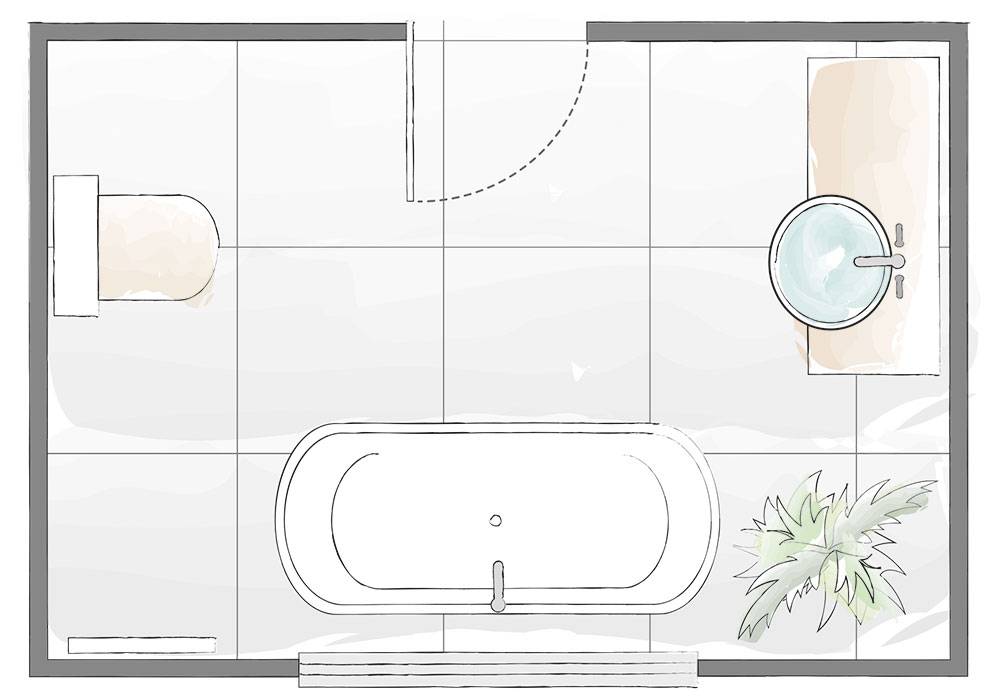
Best master bath layout
23 Master Bathroom Layouts - Master Bath Floor Plans
There are lots of factors to bear in mind when designing your master bathroom. With a room you’ll be using every day, you’ll want to get it right! So before you get to the stage of picking colors, make sure you’ve got a layout that will work perfectly.
We’ve collected together 25 master bathroom layouts to help you do just that. However big your space, and however much you want to fit in, we have a plan to help!
So read on to be inspired …
23 Master Bathroom Layouts – Master Bath Floor Plans
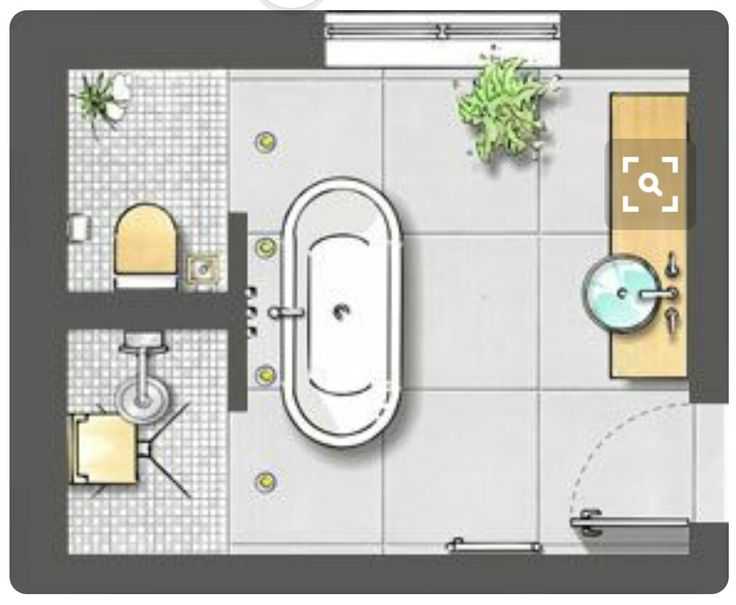
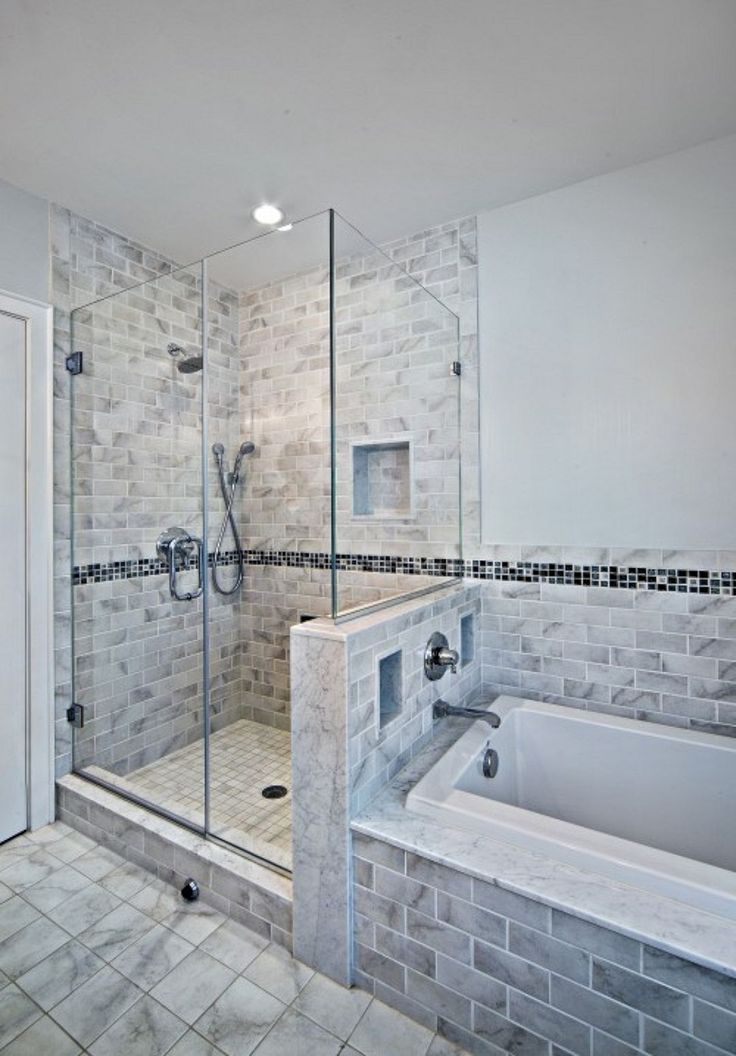
1. Spacious luxury
In this bathroom, dividing the room into a series of screened zones creates a feeling of spacious luxury.
Showering and bathing take place at the far end. A wall around the bath area creates a spa-like feel in which to relax and unwind. Adding a bench between the bath and shower cubicle provides a convenient place to disrobe.
The WC sits behind a door for privacy. That also allows it to be used when others are bathing or washing their hands.
2. Doubling up
The layout of this bathroom is perfect for allowing it to be used by two people at once.
The WC is set in its own private cubicle, well away from the main door. Double sinks sit opposite the bath and standalone shower. And we love the double vanity unit that’s been fitted into the side wall, giving both partners room to sit.
The open area in the middle of the bathroom makes it feel beautifully spacious.
3. Statement bathing
With this layout a freestanding bath acts as a focal point for the whole room. You could even elevate it on a plinth to create a real feeling of grandeur.
The side walls feature separate basins and vanity units. Positioning them opposite one another avoids any risk of two people jostling for space! The WC is tucked into a corner, opposite the shower. A pocket door is a space saving option to provide privacy.
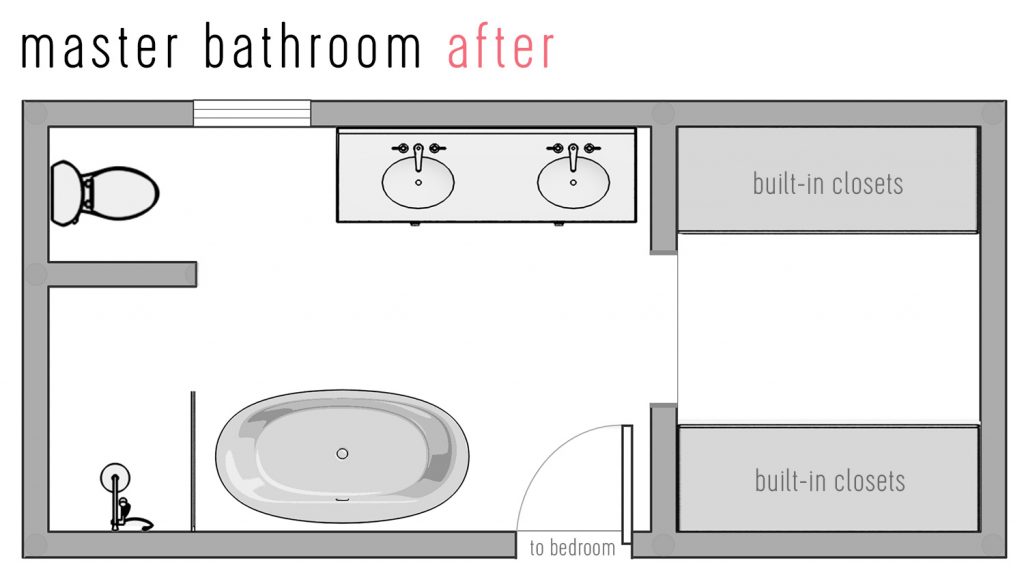
4. Extra storage
This plan shows a master bathroom adjoining a bedroom at the top, and a walk-in wardrobe at the bottom. The clever design provides plenty of space for storage. A tall linen closet has been included next to the basins. And further cabinets could be added below them if needed.
Here, a generous walk-in shower is given even more space than the bath. But the freestanding tub is there for when there’s time for a more leisurely bathing experience.
5. All about the shower
Not everyone enjoys soaking in the bathtub. In this bathroom, the owners could have chosen a tub with a shower above. Or even squeezed in a small shower cubicle and slipper tub. Instead, they’ve chosen to stick with a luxurious shower, measuring a full 4 foot by 8 foot.
That gives them all the room they need to create a jaw-dropping feature. With a shower this size, multiple jets and statement lighting are a must.
6. Covering the angles
In this bathroom, a corner bath adds a touch of luxury. You could also replace this with a freestanding tub installed at an angle.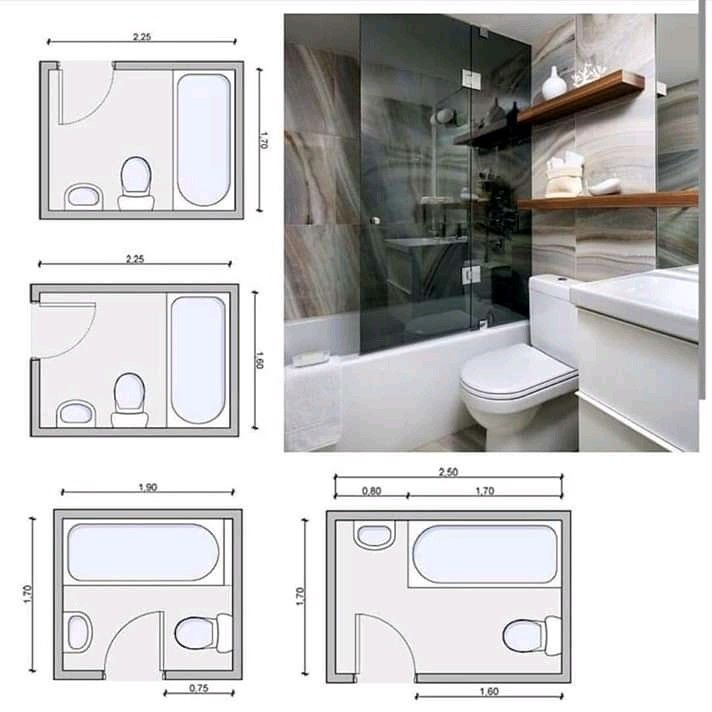 The design allows room for a separate shower, WC and double sink unit. And there’s also a full-height linen closet to provide storage for towels and other bathroom necessities.
This layout shows you don’t need acres of space to fit in all these fixtures. The room measures 8 feet by 12 feet. But in this case, there’s no screening between the commode and the rest of the room. That means you won’t be able to use it if someone is in the bath or shower.
7. Quirky yet practical
By dividing up the space using interesting angles, this design creates an unusual and striking bathroom.
A freestanding tub sits diagonally opposite a smart corner shower. The WC is tucked into its own separate cubicle, together with a generous linen closet. But note that you’ll need to walk past the tub to get to it. Anyone sharing the space will need to be pretty comfortable with each other!
Completing the design is a large vanity with double sinks facing a door to a walk-in wardrobe. If you have the space for it, this is a beautiful and creative layout.
8. Sunken floor
Another way to add interest to your home is to play with different levels. Here, two steps take you down from the main floor to the bathroom. The difference is only 16 inches, but the effect is to create a cosy, secluded space.
The walk-in shower is half hidden at the rear corner. Building an extra wall allows one side of the cubicle to support the WC. There’s a linen closet for handy extra storage. And a freestanding bathtub beneath a picture window allows you to enjoy the view as you bathe.
In this bathroom, the battle of the sexes has a clear winner. The “guy sink” has one basin, while the “girl sink” opposite has two!
9. Separate shower
This layout takes a different approach to the problem of privacy. Here, the WC sits together with the shower, separated from the rest of the bathroom in its own small cubicle. It means anyone wanting to use the sinks can do so while someone is in the loo.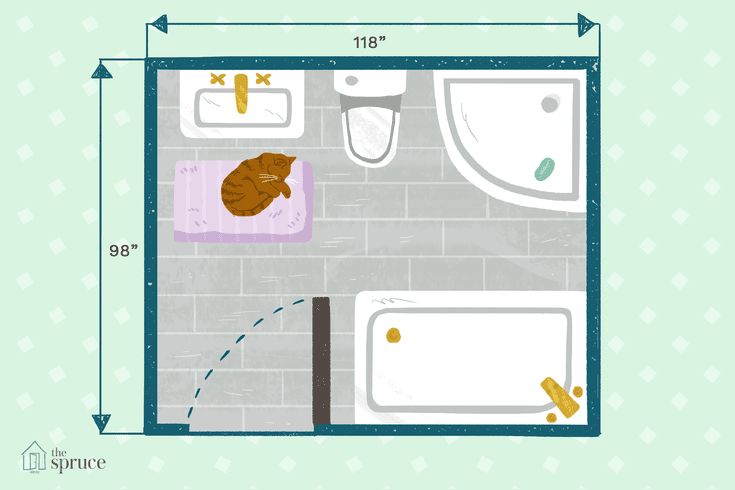
But again, you’ll need to walk past the bath to get to the WC. So it won’t solve the problem of barging in while someone’s in the bath.
On the plus side, those who like a long soak will be able to enjoy a spacious room. And they won’t be looking at the commode whilst they’re in the tub!
10. Corner closet
In this design, about a quarter of the 14 by 14 foot floorplan is given over to a generous walk-in closet. But the economical layout still leaves room for a separate WC, bathtub, shower and vanity with double basins.
Sliding doors to the shower cubicle mean there’s nothing to get in the way of the entrance to the WC. And the door to the WC is hinged to open inwards.
11. Discreet screening
Sometimes the design you want might be made challenging by your plumbing. Changing the location of pipework can be an expensive business. But there are other workarounds.
In this bathroom, the easiest position for the WC in terms of the plumbing is opposite the door.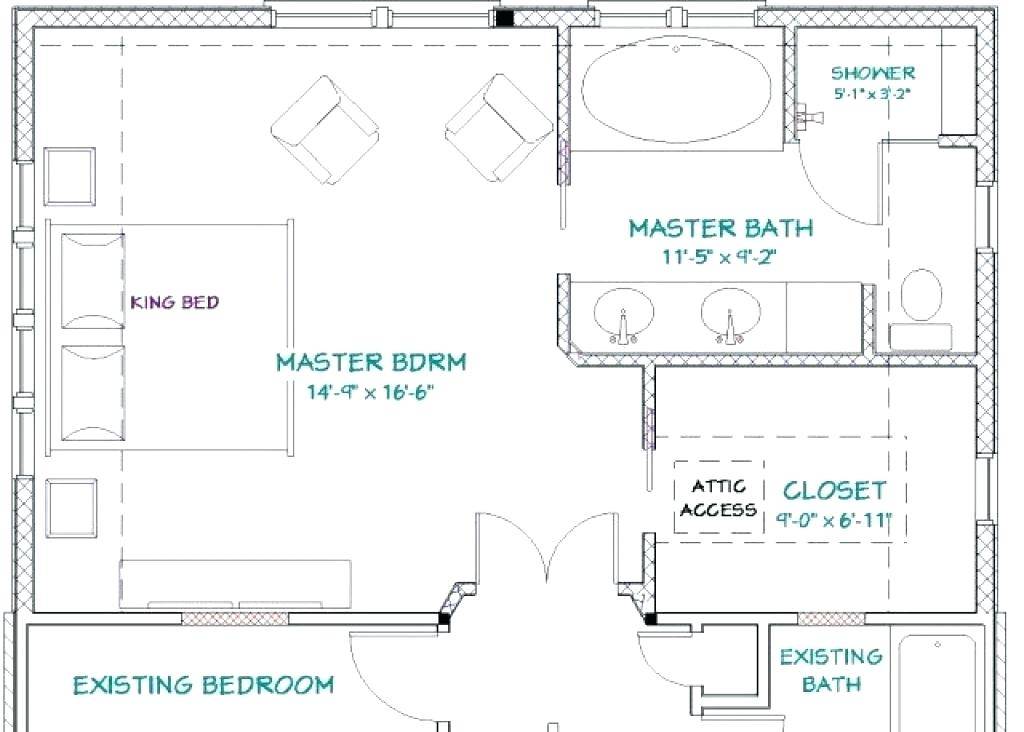 The problem of someone getting an eyeful if they barge in is solved by creating an enclosed cubicle. Even if the user doesn’t shut the door, no-one else will see them on the throne.
12. Diagonal bathtub
if you find a wall isn’t long enough to fit the fixtures you want, consider installing them at an angle. Here, the freestanding bath is placed on the diagonal, allowing a walk-in shower to sit next to it.
The only negative is that the large vanity unit makes it feel rather hemmed in. If the storage is vital, a better alternative would be open shelves. These would let through the light and create a greater sense of space.
13. Architectural flourishes
If you’re lucky enough to have a bathroom with distinctive architectural features, make the most of them with your layout.
In this bathroom, the dramatic window provides a ready-made focal point. Positioning the bathtub directly underneath it is a no-brainer. It’s the first thing you see when you step inside, and creates a stunning focal point.
The effect is accentuated by the magnificent chandelier and, more subtly, by the strip of mosaic on the floor. Everything leads your eye to the end of the room.
14. Hidden spaces
There’s no door to this master bathroom, so the layout is essential in maintaining privacy.
The space reveals itself a little at a time. The first thing you see is the double vanity, with a wall behind it. Step inside and you find the WC tucked away in a corner, out of sight of the entrance. A wall separates it from the bathtub. And the shower cubicle is hidden away behind the vanity.
15. Small but perfectly formed
This layout shows that you can fit everything a master bathroom needs in a compact space. It measures just 9 foot by 7 foot, but includes a walk-in shower, separate bathtub, WC and double sinks. And the simple design ensures that nothing feels crammed in.
The bath sits opposite the vanity unit. Hanging a large mirror above the sinks would help create the illusion of more space.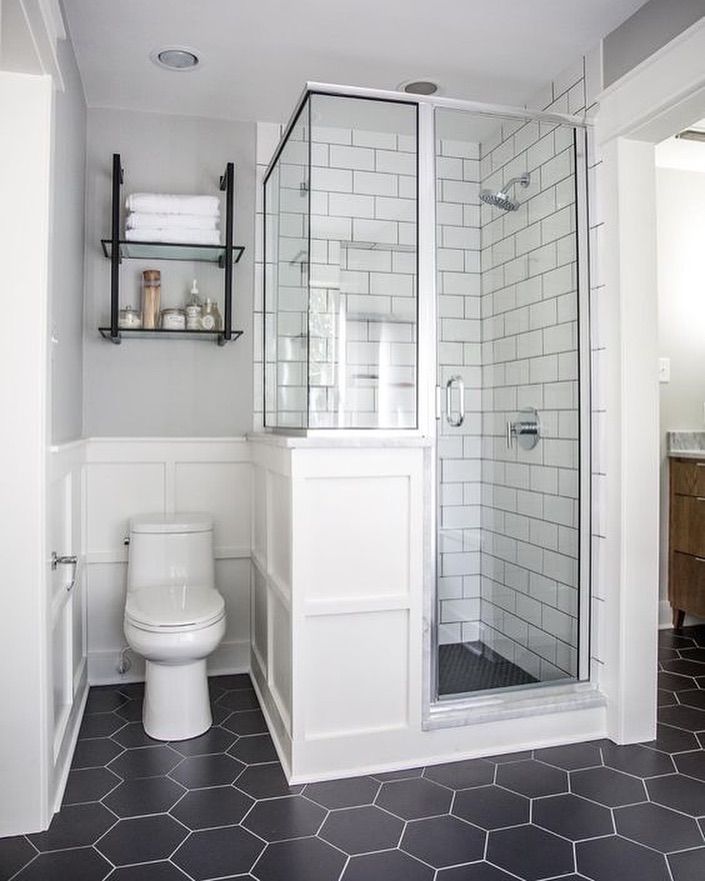 Next to it, the shower is opposite the commode, which is positioned as far as possible from the entrance.
16. Balancing a longer space
In this bathroom the design makes a virtue out of the long thin space. Positioning the bathroom and shower at opposite ends of the room provides balance. And by reducing the difference between the visible width and length, the space no longer seems narrow.
The double vanity provides an attractive focal point on entering the room. A statement mirror above the basins would add immediate impact.
17. Room to relax
This layout capitalizes on a larger space with an unusual and attractive design. A central wall provides a backdrop to a freestanding bath and creates separate spaces for the shower and WC. And a free corner leaves space for a chair to settle in while waiting for your bath to fill.
The same design could work even better by swapping the position of the shower and WC. That would avoid the commode being the first thing you see when you enter the bathroom.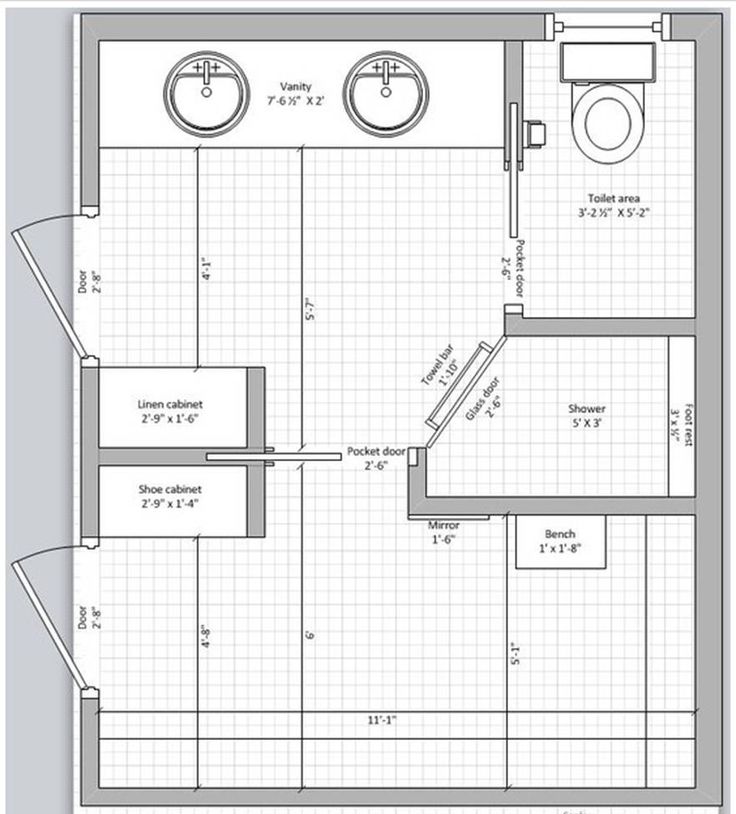
18. Double the comfort
This bathroom solves the problem of both partners being caught short by incorporating two WCs. Both have their own separate cubicles at either end of the room.
The shared space is dominated by a freestanding bathtub, big enough for two. By positioning it end on, enough wall space is freed up to allow for two separate entrances. The room between the WCs is used for a generous walk-in shower.
19. Bonus bathtub
If you and your partner both love long baths, this layout could be the stuff of dreams. It incorporates not one but two separate bathtubs!
Perhaps it’s not as romantic as sharing a larger bath. But you won’t have to worry about your partner splashing the pages of your current read! The space is separated by a wall from the commode. And there’s also a walk-in shower for faster bathing.
20. Space at the sink
If you want two basins with their own private space, this layout could be the answer.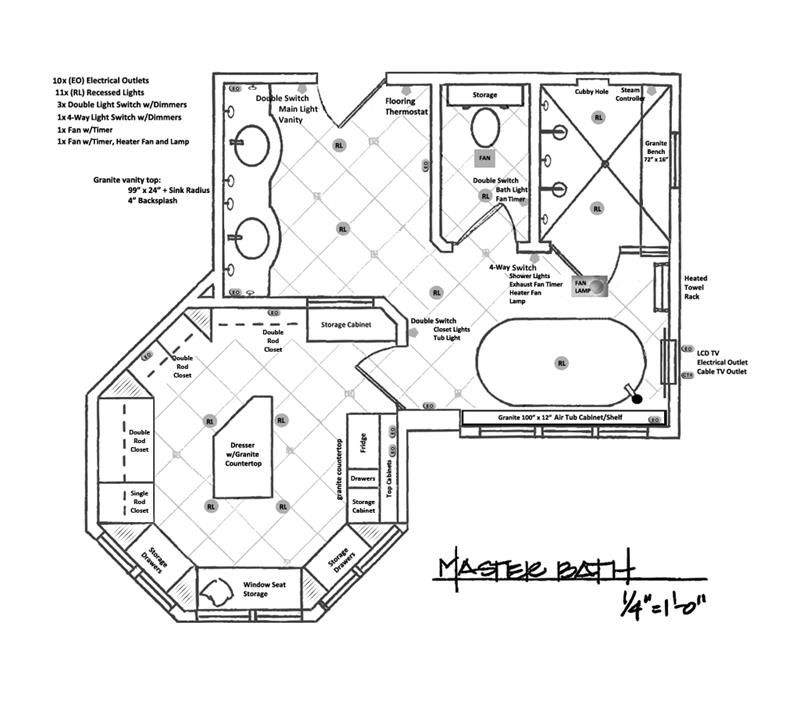 Here each basin has its own separate zone at either end of the bathroom.
Although at first sight the space looks symmetrical, the space on the left of the bathtub is actually slightly narrower. Flipping the vanity there through 90 degrees allows it to fit in alongside a walk-in shower.
21. Half-height screening
The problem with hiding a commode in its own cubicle is that it makes the space in the main bathroom smaller. This layout solves the problem with the use of half-height walls.
The grey tiling used throughout ties every part of the design together. You almost don’t see the commode tucked behind the wall. And that wall means you won’t be staring at it from the bathtub!
22. Simple comforts
This simple layout incorporates a bathtub, walk-in shower, commode and vanity unit with double basins. There’s also a separate linen closet to provide handy storage.
The commode is positioned at the end of the room furthest from the entrance. A half-height wall will spare any blushes if someone forgets to lock the door! The freestanding tub is positioned opposite. It’s a compromise, but the benefit is allowing the bath to sit directly beneath the window.
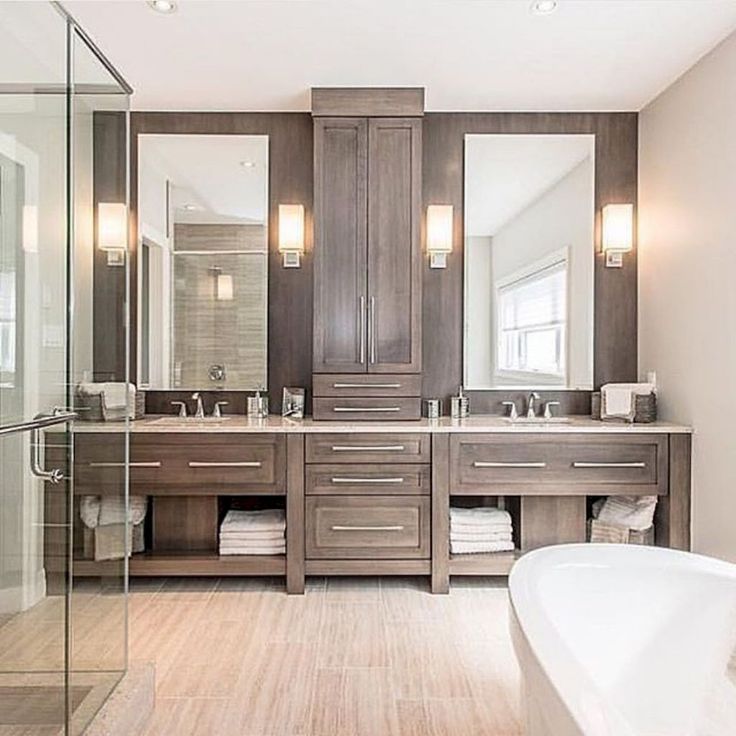
23. Vanity focal point
This bathroom shows just how effective a vanity unit can be as a focal point in a bathroom.
The bathtub and shower here are both beautifully designed. But to take advantage of the window, the tub has to be positioned on the side wall. That leaves the vanity to take center stage.
The strong lines of the unit and oversized mirrors create a dramatic vista. And when it gets dark, two spotlights will add to the staging.
Ready to design your master bathroom layout?
That brings us to the end of our low-down of 23 fabulous master bathroom layouts. We hope they’ve given you plenty of ideas for your project.
No matter how large or small your room, good design will give you a practical as well as a beautiful space.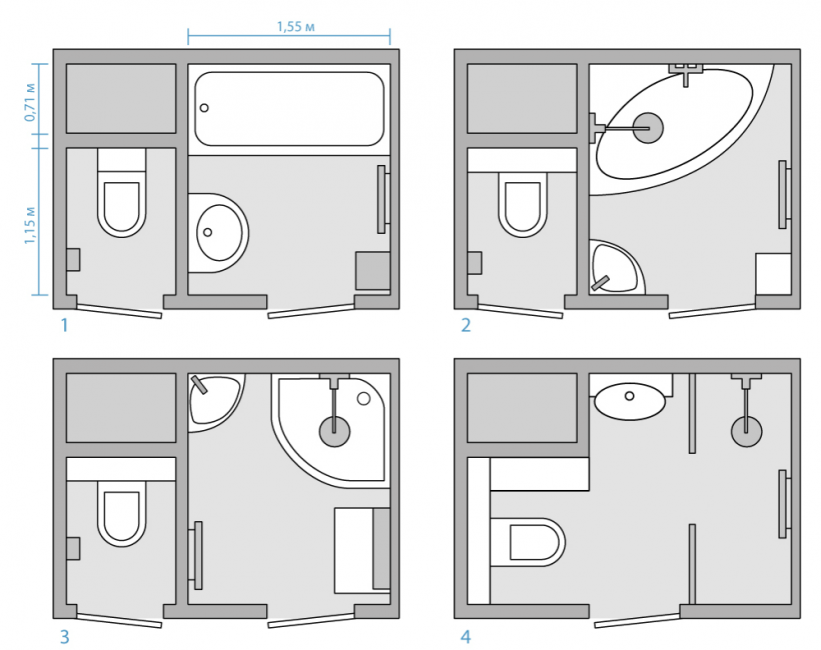 Drawing out a few different options will help you narrow down the best approach for your needs.
Good luck in creating a stunning master bathroom!
Resources:
- https://www.houseplanshelper.com
- https://cedreo.com
- https://nimvo.com
- https://www.crddesignbuild.com
- http://jrid.com
7 Designer-Approved Bathroom Layout Ideas that Never Fail
Mindy Gayer
The first step to tackling any bathroom renovation is to decide on the layout. You probably spend way more time in your bathroom than you realize, so getting your layout right can take a stuffy, boring bathroom and create a serene space you enjoy being in.
Though your layout may be somewhat limited by the space you have to work with, there are many ways to arrange a bathroom to make the most out of any quantity of square footage. Whether you're lucky enough to have a huge room to work with or you have tight space you want to maximize, we asked a few designers for their favorite bathroom layouts.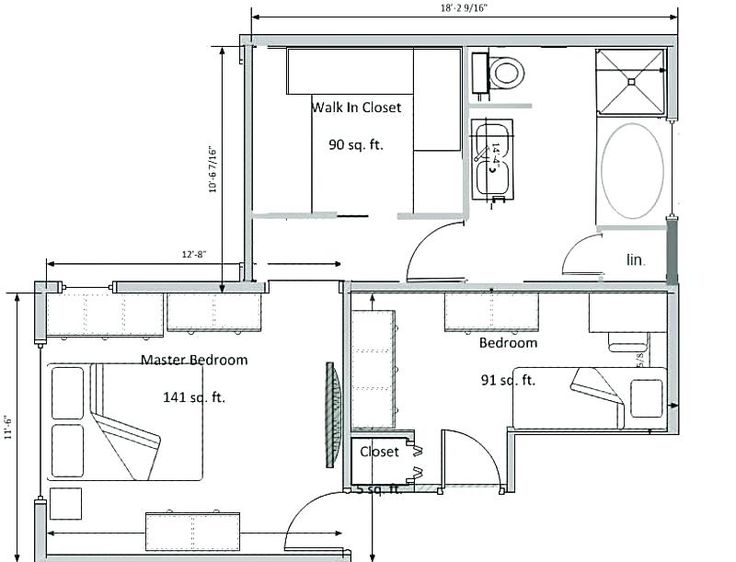
From small to oversized, read on for our designers' tips on creating the best layout for your space.
01 of 07
MyDomaine/Ellen Lindner
Tiffany White, Principal Designer of Mid City Interior Design went with this layout in a recent renovation after running into a cost issue and needing to save money on plumbing.
The Layout: A bathroom with the shower and sinks lined up on the same wall.
The Shower: Here, the shower and the vanity share the same wall, opposite the door. Not only does this save on plumbing costs, but it also allows you to ensure that the first thing you see when you walk into your bathroom isn't the toilet.
The Extras: According to White, "We have found that women prefer this layout because the vanity is opposite the shower and next to a window. This eliminates 'fizzy hair' or an oily makeup application."
Mid City Interiors
02 of 07
MyDomaine/Ellen Lindner
"This house was designed for a mid-to-upper age couple," says White.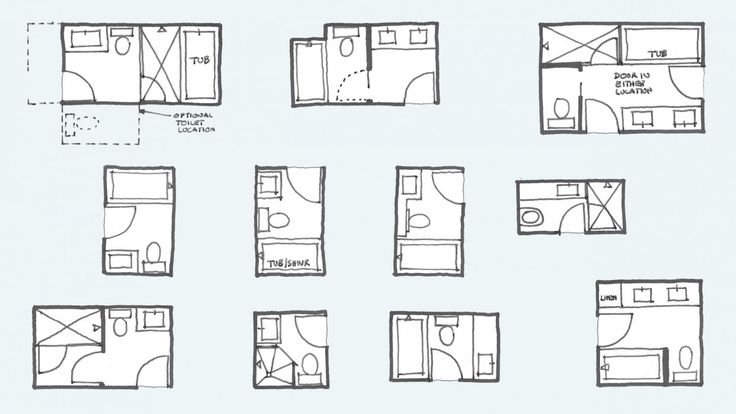 "While they still love soaking after a stressful day or tough workout, the walk-in shower, with a built-in bench, will soon become a necessity."
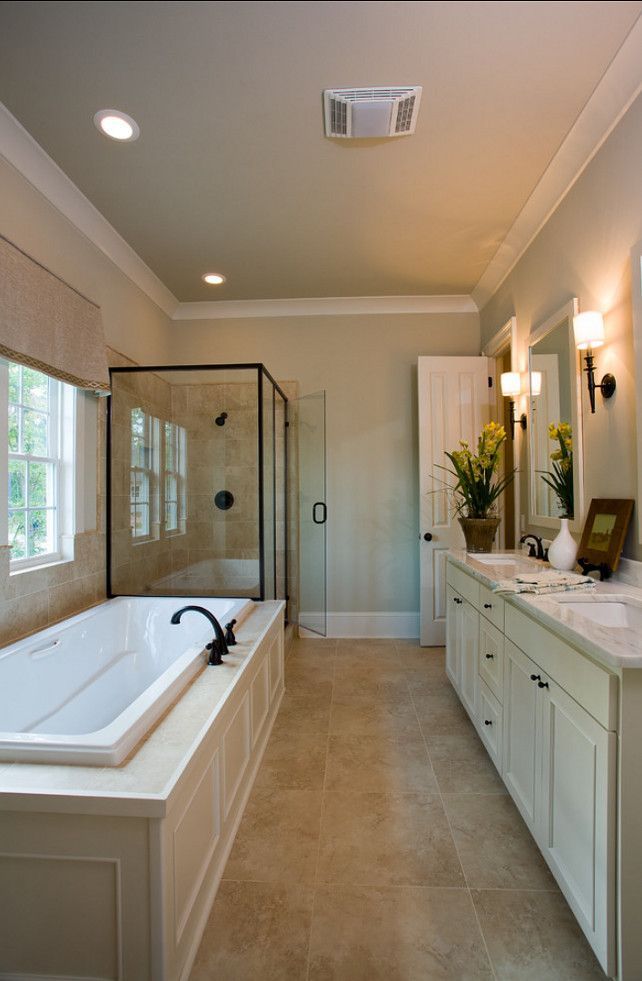
The Layout: An expansive bathroom layout with a separate shower and bathtub, perfect for a forever home.
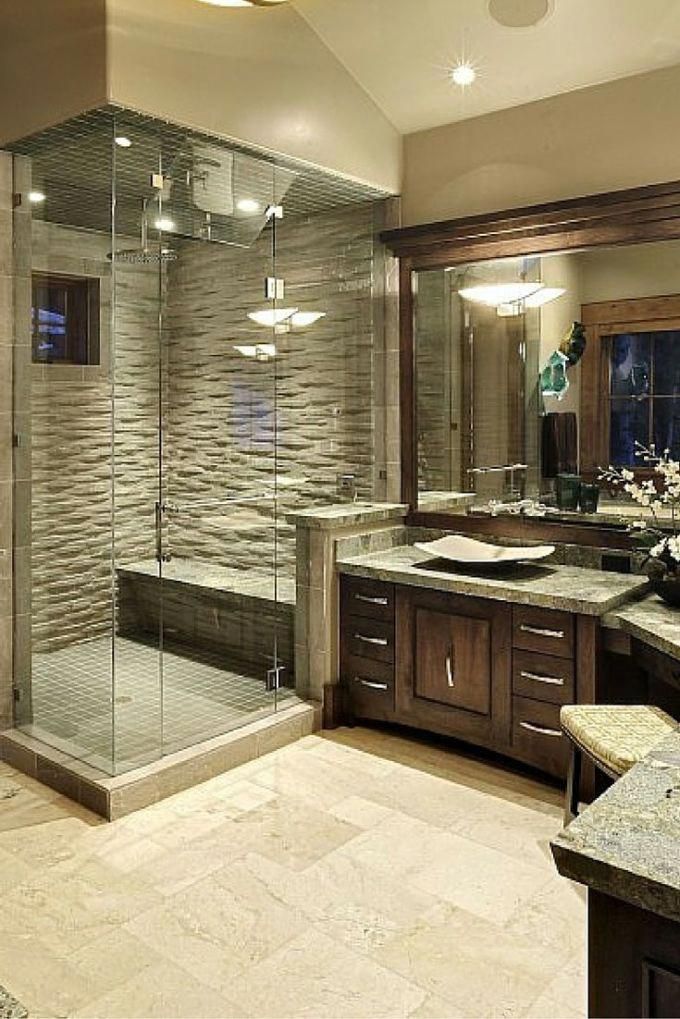
The Shower: This bathroom is large enough to house both a shower and a standalone tub. In the center of the bathroom, a massive soaking tub acts as a centerpiece and lends the space an air of luxury.
The Extras: If you have enough space, a built-in bench is a great way to add a permanent perch for getting ready in the morning. This is a great idea if your bathroom is attached to the master closet and you need a place to rest while getting ready every morning.
Mid City Interior Design
03 of 07
MyDomaine/Ellen Lindner
This design from Mindy Gayer is perfect for a long, narrow bathroom space.
The Layout: A long, horizontal layout with the shower and the bathtub on opposite ends of the room.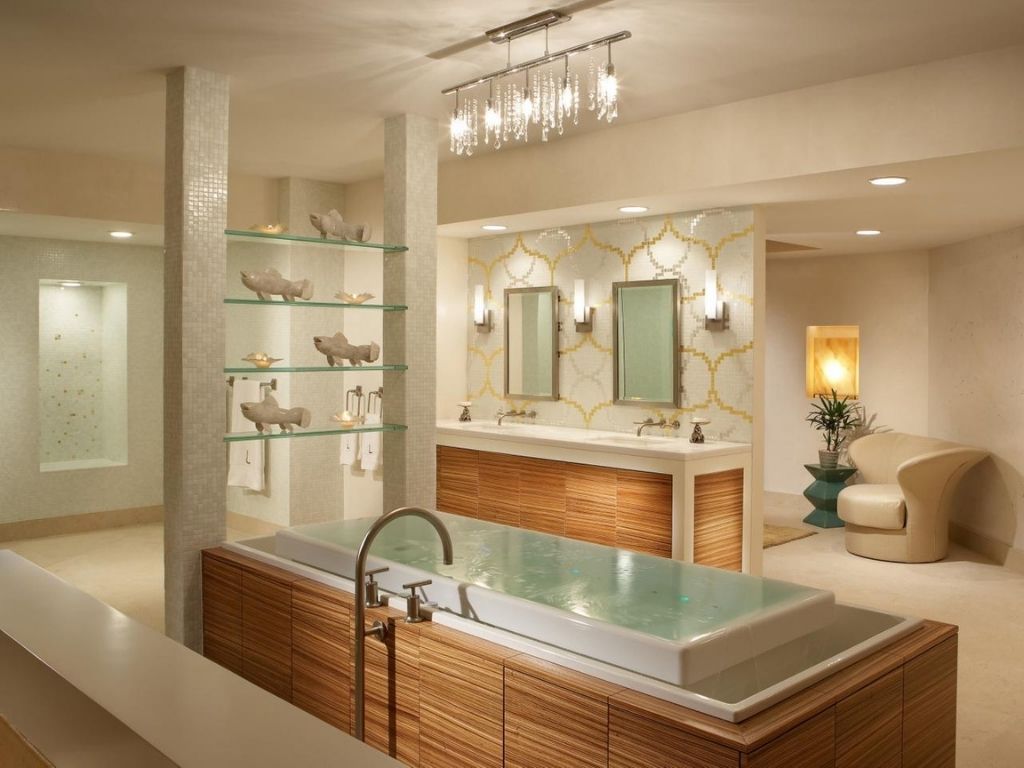
The Shower: Here, a shower sits on the same wall as the vanity, separated by a pony wall. "That allowed us to integrate the vanity and shower spaces nicely and in a way that felt intentionally designed," says Gayer. On the other end of the bathroom is a freestanding soaking tub.
The Extras: If you have a large enough bathroom, consider splurging for a freestanding tub. According to Gayer, "freestanding tubs are great because they can help visually anchor a focal point in a bathroom." This layout is both beautiful and functional, with a window above the soaking tub to add a lot of natural light.
Mindy Gayer
04 of 07
MyDomaine/Ellen Lindner
The hardest part of planning for a renovation is predicting when your needs will change. Here's a great option for those who know they will want something different in the future.
The Layout: A mid-sized bathroom with just a soaking tub that can be easily converted to a shower when the time comes.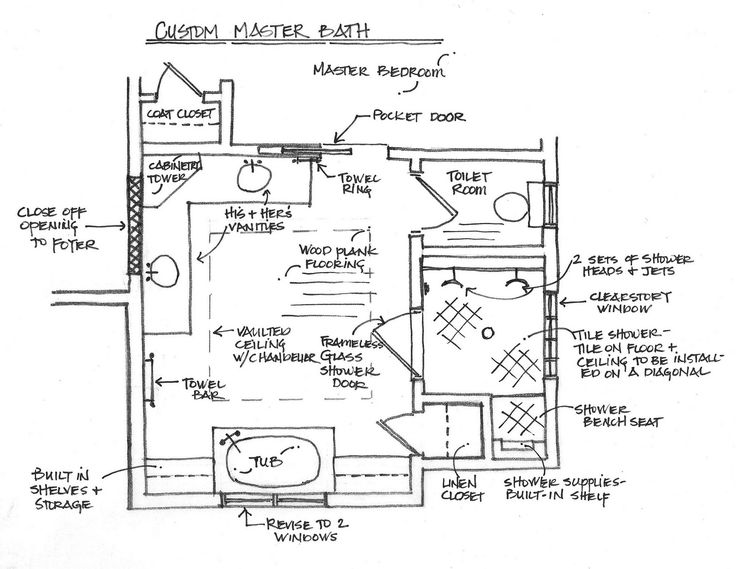
The Shower: "We designed the kids' bathroom to have a freestanding tub that could later be converted to a shower," says Gayer. "We installed an overhead rain shower, so that in two to three years as our clients' kids got older, they could add a wall-mounted rod with a shower curtain so the tub could double as a shower."
The Extras: If you don't have room for both a shower and a standing tub, a layout like this proves you don't have to sacrifice those long soaks. Instead, install an overhead rain shower and tile the space behind your tubs so it can have a dual purpose.
Mindy Gayer
05 of 07
MyDomaine/Ellen Lindner
If you have a small bathroom space to work with, this layout from Christina Kim Interior Design is perfect.
The Layout: In this layout, a stacked sink vanity and makeup vanity rest opposite the shower with the toilet in between the two.
The Shower: Though this layout does not offer enough space for a standalone tub and a shower, you can opt for a dual shower-tub or go for just a walk-in shower with eye-catching tiles to act as a focal point.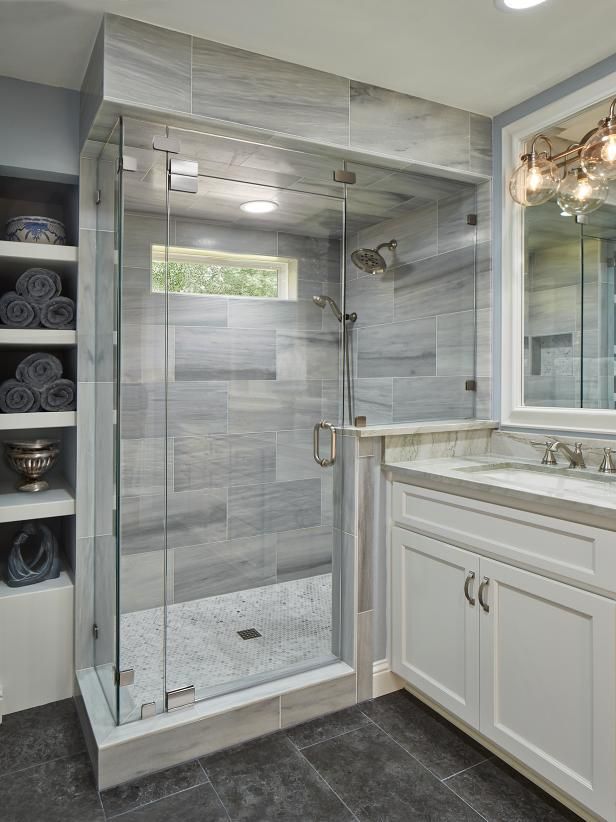 Think about your personal habits and which makes more sense for you.
The Extras: By placing the toilet parallel to the shower, you keep it out of the direct view. "In a typical small bathroom floor plan, the toilet would be situated where the makeup vanity is, which would keep it in direct view", says Kim.
Borden Interiors
06 of 07
MyDomaine/Ellen Lindner
This layout from Pure Salt Interiors is great if you want two separate vanities in your master bath.
The Layout: Focused on designing a spa-like bathroom, Leigh Lincoln of Pure Sat Interiors created enough room for two standalone vanities opposite a shower and a soaking tub.
The Shower: Because this space has room for both a shower and a standalone tub, the tub becomes the focal point in the center of the room. On one side is a water closet with the toilet while the other side has the walk-in shower.
The Extras: "Utilizing one wall for a bank of cabinets allows for the addition of a vanity, offering lots of storage and counter space," says Lincoln.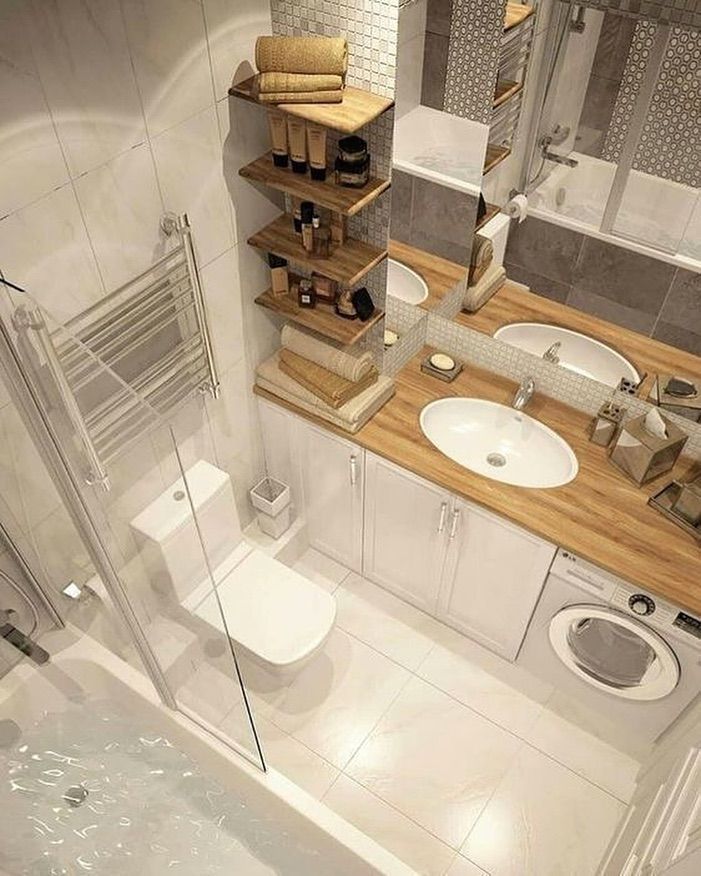 If storage and vanity space is key to your bathroom, consider two separate vanities over a single double-vanity.
Pure Salt Interiors
07 of 07
MyDomaine/Ellen Lindner
Last but not least, the perfect layout for a cozy powder room from Aly Morford of Pure Salt Interiors.
The Layout: In this small guest powder room, a vanity and a toilet sit on the same wall with enough room for a large statement lighting piece above the vanity.
The Shower: This small powder room does not have a shower, but if you had more space or you wanted to utilize this layout for a full bath, consider putting the shower to the left of the vanity or opposite the toilet.
The Extras: Powder rooms are often focused just on the necessities, but Morford says they wanted to try to make this space feel larger than its footprint. "Adding art to the walls, choosing statement lighting above the vanity, placing pops of green, and opting for wall treatments, like wallpaper or millwork, make for a more dynamic and interesting space," she says.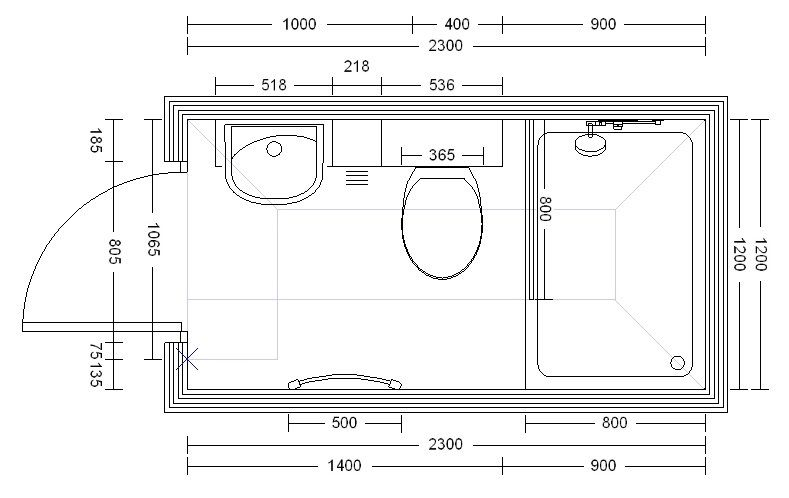
Pure Salt Interiors
Sauna layout: options, how to choose, photo
To use the sauna comfortably and safely, it is necessary to carefully consider its layout. We figure out how to do it right
Photo: shutterstock
When planning a bath, it is important to pay attention not only to the location of the rooms inside the building, but also to the correct placement of it on the site. The bath must meet construction standards, fire safety and ergonomic requirements for use. We learned from experts what factors should be considered when building a bath.
- Regulations
- Main premises
- Layouts
- How to choose a layout
- Expert comments
Experts in the article:
- Vyacheslav Smirnov , specialist of the online service for finding specialists "Profi";
- Evgeniy Spiryakov , Operational Director of TECHNONICOL Polymeric Membranes and PIR;
- Mikhail Baynov , product manager of Knauf.
www.adv.rbc.ru
Layout of the bathhouse on the site
Most of the bathhouses do not belong to capital construction projects (that is, they do not exceed the height of the second floor). Most often, these are outbuildings that do not need to be registered. A bathhouse can be built on the plots of IZHS, SNT and LPH. However, the placement of an object must comply with certain rules. The standards for the construction of any objects are regulated by SP 53.13330.2011 [1]. Here are some things to consider:
- in areas adjacent to neighbors, the distance from the bathhouse to the fence must be at least 1 m;
- the bath should be set up so that when it rains, the runoff of water along the slope does not fall into the neighboring area;
- The structure must be located 8 m from any structure, including a latrine. Moreover, this requirement does not have a restriction on the site, therefore, it is necessary to ensure that the cottage is installed at the same distance from neighboring houses;
- the same distance must be observed in relation to the well and compost.
There are also a few recommendations on how to place the building to make it comfortable to use:
- the door to the south side will help to avoid blockage of a snowdrift in winter - the snow melts faster there;
- west-facing windows provide plenty of natural sunlight;
- if you place a bath near a natural reservoir, you can save on the construction of a pool.
Rooms in the sauna
When planning a sauna, it is necessary to properly position all the basic rooms.
Steam room
This is the heart of the sauna. The stove is located here, and the temperature reaches the highest levels. The task for the builder is to design it in such a way that heat is retained for as long as possible, and there is enough space for basic bath procedures. Here are some recommendations for planning a steam room:
- The room should be located farthest from the front door.
 Windows are not needed here at all;
 - the door is best made narrow and low so that as little steam as possible comes out;
- in the steam room, benches and enough space are needed to accommodate several people in order to eliminate the danger of getting burned on the elements of the stove or coals;
- the distance from the stove to the wooden elements must be at least 20 cm;
- it is in this room that they bathe with brooms and rinse from basins. It is necessary to provide a place for storing inventory;
- when planning this room, you should take into account in advance how many people will be in it at the same time. You need to calculate from the consideration of 2 square meters. m per person.
Washing room
A relatively modern invention and completely optional if a small bath is planned. However, if you wish, you can run water here and organize a full-fledged shower.
Dressing room
When entering the main room, a buffer is required to retain heat. Usually this is a dressing room in which you can leave outerwear, shoes, inventory, firewood.
Recreation or dining area
This is an optional, but useful room in case you plan to combine a bath with tea drinking. Here you can place a large table, and dishes, and a comfortable sofa. If there is such a room, the building can even be used for living.
Swimming pool or hot tub
It's nice to have a swim after the steam room or take a dip in the icy water. These elements can be installed both in a washing room or a steam room, or allocate a separate room for a pool.
Thus, the minimum in the bath should be a vestibule and a steam room, and the maximum layout is limited only by imagination and possibilities.
Types of sauna layout
When choosing the size of the sauna, it is important to consider the thickness of the walls and insulation. The main rule is that the doors in the bath should always open outwards. This is necessary for security reasons - so that in an emergency, a person can knock out the door and get out of the room.
Sauna 3×4
The layout of 3×4 m will fit a sauna of the minimum configuration: a steam room, a washing room and a small relaxation room
This is the minimum comfortable size for a bath, on such an area you can organize a small steam room for one or two people and a dressing room. If desired, you can even organize a small washing or compact recreation area.
Sauna 6×4
The farther the steam room is from the exit, the better the heat will be retained. This room should be placed on the opposite wall from the entrance, fencing off a small washing room. There will be room for both the vestibule and the recreation area.
Sauna 6×6
In large saunas, the stove can be placed next to other rooms so that it heats the entire building.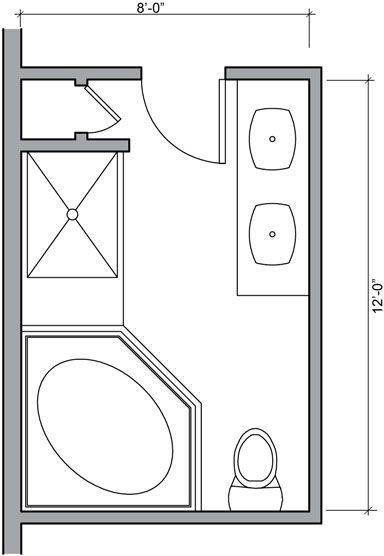 If the stove is located in the central part of the building, then it will gradually warm all adjacent rooms, giving the main heat to the steam room. This is convenient if you plan to use the sauna in winter or spend the night in it. For summer use, it is worth considering a terrace where you can go out and cool off.
Sauna with a swimming pool
Swimming pool is best placed in a separate room
When designing a swimming pool in a sauna, several important points must be taken into account:
- a solid foundation. Even the smallest pool bowl gives a serious load on the soil - you will have to use monolithic reinforced concrete;
- sewer communications. One boiler and drain will no longer be enough, you need to build a complete system;
- the pool can be bought ready;
- dimensions. If we are talking about a full-fledged swimming bowl, then its size should be at least 3 × 4 m, so that you can at least turn around and make a few movements in the water.
 A depth of 140 cm is enough for adults if you do not want to dive. For baths with a pool, a size of 8 m on each side is suitable to accommodate all the necessary premises;
 - in terms of layout, it is better to place the pool in a separate room. The fact is that most often it keeps a low temperature due to tiling and cool water. If you place this room through the door from the steam room, there is a risk that the heat from this room will evaporate faster. Otherwise, there are no restrictions on the location - the pool can even be installed on the terrace.
Sauna with hot tub
Hot tub can be installed in a steam room or washing room
Hot tub is a stagnant water tank that can hold one or more people in full height. Most often, especially in Russian-style baths, the font looks like a wooden barrel. Since it is used to plunge into the cold water after the steam room, the size of the bowl can be small, but the depth should be sufficient so that a person can fit with his head.
A good option is a font on the veranda. You can enjoy the view of nature, and in winter the water in the font is cooled to the maximum possible state
Most often, the font is placed in the steam room. This is the easiest and cheapest way, because you do not have to bring communications to other rooms, all drainage will remain in one place. It can also be erected in the washing room, if such a room is provided. Street options are also popular, which can be installed on the terrace or directly on the street next to the bath.
Sauna with a terrace
The recreation room can be moved to the terrace
A terrace is a good way to save on building materials. In fact, part of the functionality can always be taken out to this extension, and the steam room and vestibule can be left directly in the bathhouse. Despite the fact that places for storing things and firewood can be easily arranged outside, it is still not recommended to refuse a dressing room. It is he who helps to keep warm in the steam room, retaining cold air from the street. But the rest room can be safely transferred to the terrace, setting sofas and a table there. If you still want to do without a dressing room, you will have to install a heater on the terrace. Also outside you can place a pool or font. But this will require additional work on drainage.
Photo: shutterstock
How to choose the layout of the sauna
To determine the size and layout, you need to take into account a few fundamental points: , recreation area and swimming pool. Based on this, it is possible to determine the capacity, number and purpose of rooms;
 A dry sauna needs a small room - the temperature is extremely high and the humidity is low, people are sitting. In the Russian bath, it is customary to bathe with brooms, which means that you need a more spacious room with sufficient ceiling height to fan each other;
 Expert comments:
Vyacheslav Smirnov, specialist of the online service for finding specialists "Profi":
— If the budget is limited, I recommend making the walls, benches and ceiling of the sauna from linden and purchasing an inexpensive electric stove.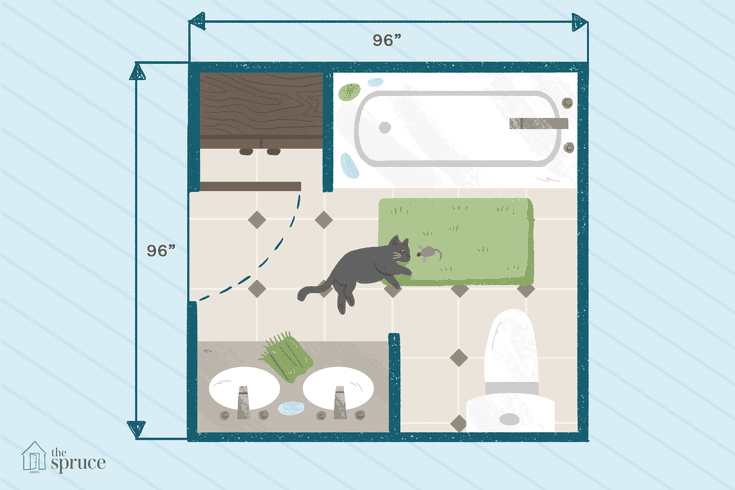 Materials affect the smell inside the steam room and long-term operation - someone likes cedar, and someone likes alder.
In order to be safe in the sauna, you need to place the stove at a distance from walls and benches.
To heat a sauna with a dressing room, a steam room and a washing room, you will need a wood-burning stove. First you need to heat the entire building so that the temperature is the same everywhere, and only then close the steam room and increase the temperature there.
Sauna can be made without a dressing room, but with a terrace. In this case, you need to heat from the terrace - first set a certain temperature, and only then enjoy the steam.
Mikhail Baynov, Knauf Product Manager:
— It is recommended to use moisture-resistant materials, such as aquapanel, when building a sauna. This is a cement base for further finishing with tiles, plaster or paint. Due to its composition, it is not afraid of moisture and withstands high temperatures up to 80 ° C. There are aquapanels for wall cladding (internal aquapanel and universal aquapanel) and ceilings (skylight aquapanel).
It is not necessary to sew up the entire bath area with aquapanel. If you want to leave the wooden base, then the aquapanel can be used only in the wet area if desired. This material is also useful if you want to sheathe the room with tiles that do not attach well to wood. The use of aquapanel as an intermediate layer between the wooden base and further finishing avoids the risk of damage to materials.
Aquapanel is used in all types of baths (Russian bath, sauna, hammam). Hammams, as a rule, have curves and rounded shapes in their layout. Aquapanel is dry-bent and allows you to create curved surfaces with a bend radius of up to 1 m and domed shapes.
Evgeniy Spiryakov, Operational Director of the Polymeric Membranes and PIR division of TECHNONICOL:
— Wooden saunas are the most widespread in Russia, this is a traditional material. But now more and more people have begun to consider brick - it helps to create a stylish, modern-looking structure, while increasing the level of fire safety. This is especially important in dense buildings, as is the case in most cottage settlements and SNT.
When choosing any material, thermal insulation is of particular importance. It is she who is responsible for how the steam room holds steam, and affects fire safety. A wide range of thermal insulation is now presented in Russia, but some types are not suitable for warming a bath. It is important to choose non-flammable materials that do not spread flames. Also, the insulation should not release harmful substances into the air under the influence of high temperatures, it should be resistant to moisture, mold and fungi.
In addition, it is desirable that it has a low thermal conductivity. It is this characteristic that is responsible for the thermal insulation properties. The lower the thermal conductivity, the smaller the layer of insulation will be enough for the efficient operation of the steam room. These requirements are met by thermal insulation based on polyisocyanurate foam - PIR, the material has been tested at the Institute of Chemistry of Solutions of the Russian Academy of Sciences. The safety of the material is also confirmed by one of the most stringent European certificates for the emission of harmful substances M1. In addition, the PIR board is coated on both sides with 40 micron thick foil. It performs not only the role of a vapor barrier, but also has a pronounced reflective effect.
The layout of the sauna on the site and inside: the dimensions of the steam room, washing room
Many people visit the desire to have their own sauna on the site: it provides a unique opportunity to improve their health, relax and unwind after a hard day. And if the bathhouse is near the house or cottage, and you don’t need to go anywhere, this way of relaxing is generally priceless. But at the same time, there are a lot of questions: where to put it, how to deploy it, how many and what kind of premises should be, what size and what foundation to make, and a thousand more.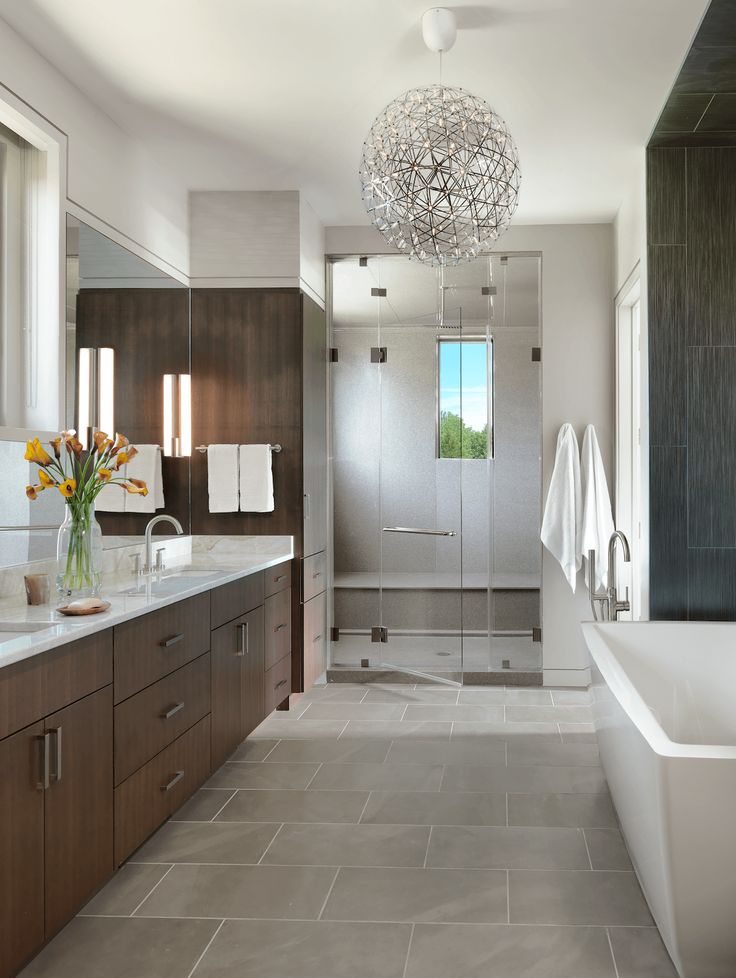 For now, let's talk about the layout of the bath on the site and inside.
Contents of the article
- 1 Layout on the plot
- 2 Layout of the sauna inside
- 2.1 What rooms are needed in the bath
- 2.1.1 Vestibule
- 2.1.2 Washing and steam room: separately or together?
- 2.1.3 Dresser
- 2.1 What rooms are needed in the bath
- 3 The size of the premises in the bath
- 3.1 Layout of the steam room
- 3.2 Sizes of washing
- 3.3 Disient dimensions
- 4 from the point of view of security
Site planning
You need to start by choosing a place for the construction of a bathhouse. In this case, you need to rely on the data of the geological survey of the site: choose the best soils and the lowest location of groundwater. Then the foundation can be made inexpensive, and the bath will stand well. Without such a survey of the site, you have to choose "maybe".
Minimum distances from various objects on the site to the bathhouse In this case, it is desirable to immediately exclude places where groundwater comes close.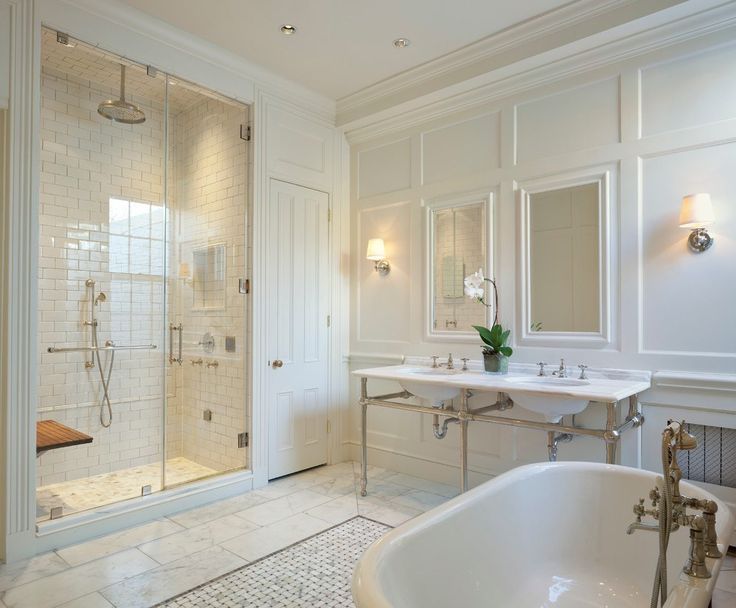 They can be seen at sunset. In the evening, inspect the site. If there are places where a small midge curls in a column in one place, water is close at the bottom. It’s good to dig a well here, but you can’t put a house or a bathhouse.
After excluding all wet places, you can try to fit the planned building on dry areas. Here, too, there are some restrictions:
- there should not be a distance of less than 5 meters to the well;
- the distance to the nearest residential building is at least 8 meters;
- The toilet and compost pit should be located as far away as possible.
If your site overlooks the banks of a river or lake, it makes sense to put a sauna nearby: you can take a dip and not fool around with building a pool. It will also be possible to organize the supply of water from the reservoir, but with the diversion, in this case it will be necessary to fool your head - so that the drains do not get there. So the optimal location of the bath on the site is an individual matter.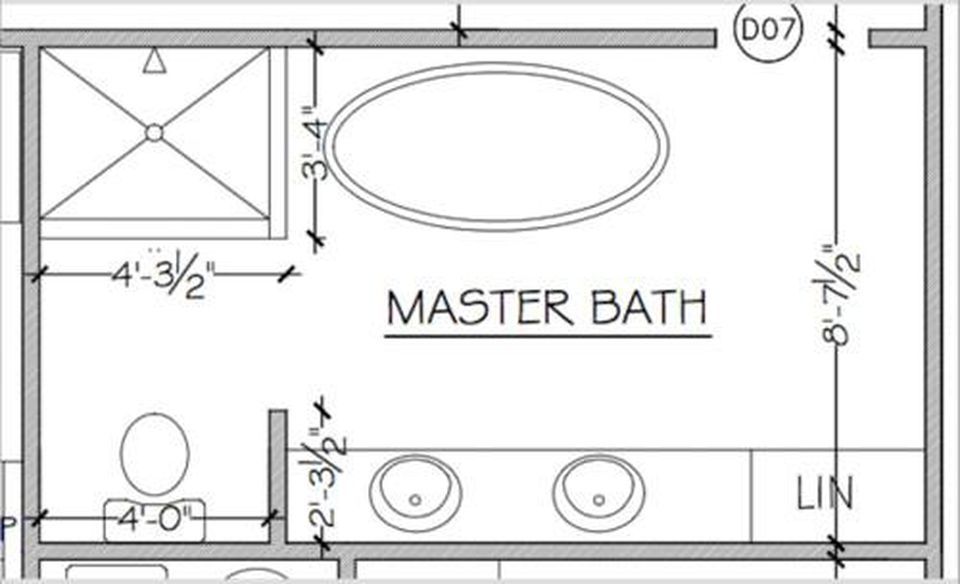
But this is only the most common layout and nothing more. You can arrange both the entrance and the windows as you see fit: maybe you have an amazingly beautiful landscape in the east, and all that is visible to the west is the wall of the neighbor's barn. No one will stop you from doing what you want.
What rooms are needed in the sauna
Constant battles are going on around how to take a steam bath in the bath. They also apply to the number and volume of premises. There are several approaches to this issue. Choose the one that is closer to you.
Vestibule
This sauna layout has a small vestibule. It will not allow cold air to break into the room.
The first postulate is that in case of all-season use of the bath (and in winter too), there must be a vestibule at the entrance to the bath. Otherwise, the rest room will quickly dry out: with each opening of the door, a portion of cold air will burst into it. There are no disputes here. There are only a few options for organizing a vestibule: it is enclosed inside or attached outside.
If you bathe only during the warm season, there is no need for a vestibule. In summer, they often relax after a steam room in the air: on the terrace or porch.
Washing and steam room: separately or together?
But there is a dispute about the composition of the premises that are needed in the bath. Most are of the opinion that the steam room and sink should be separate. But since the size of the baths is usually small, these two rooms are small. For dry-air saunas, this is good: small volumes warm up quickly. And in this case, a sink separated from the steam room is a necessity: it should be dry in the sauna. No more than 10% humidity. A large amount of steam at a temperature of 100 ° C and above will burn the nasopharynx and bronchi. Therefore, if the bath is dry-air, then the sink must be separate.
Some advocates of moderate temperatures and high humidity - a regime that is typical for the Russian bath - believe that the washing and steam rooms can and should be combined. There are several reasons for this:
- The first is that in a small steam room, when water is applied to the stones, the temperature and humidity conditions change dramatically. There's nothing you can do about it: a small volume, and the steam literally hits everyone who is in it. If it is possible to make the steam room larger, the question is not so acute.
- The second reason is physiological. In the steam room, the pores open. If the washroom is much cooler during the time they have been in it, they close again. The next time you enter the steam room, you have to steam them again.
 If the “washing room” is a trestle bed located in the opposite corner from the shelves, then no “cooling” occurs.
In principle, the second problem can be solved: it is also necessary to maintain a rather high temperature in the washing room, 35-40°C, and there is enough humidity there anyway. You will get an almost “hammam” atmosphere in it. Under such conditions, you can rest. To do this, trestle beds are made in the washing department, on which they rest in a warm, humid atmosphere after the steam room. Then the washing area should be large. And they go to the rest room only when they are no longer going to go into the steam room.
You can combine a steam room and a washing room in a Russian bath The second approach to soaring is different: after the body has warmed up, it must be cooled down. Contrasting procedures are used for this - a cool or cold shower, dousing, rubbing with snow, etc. That's when a separate washing with a cool atmosphere is needed. And here they put fonts with cold or cool water.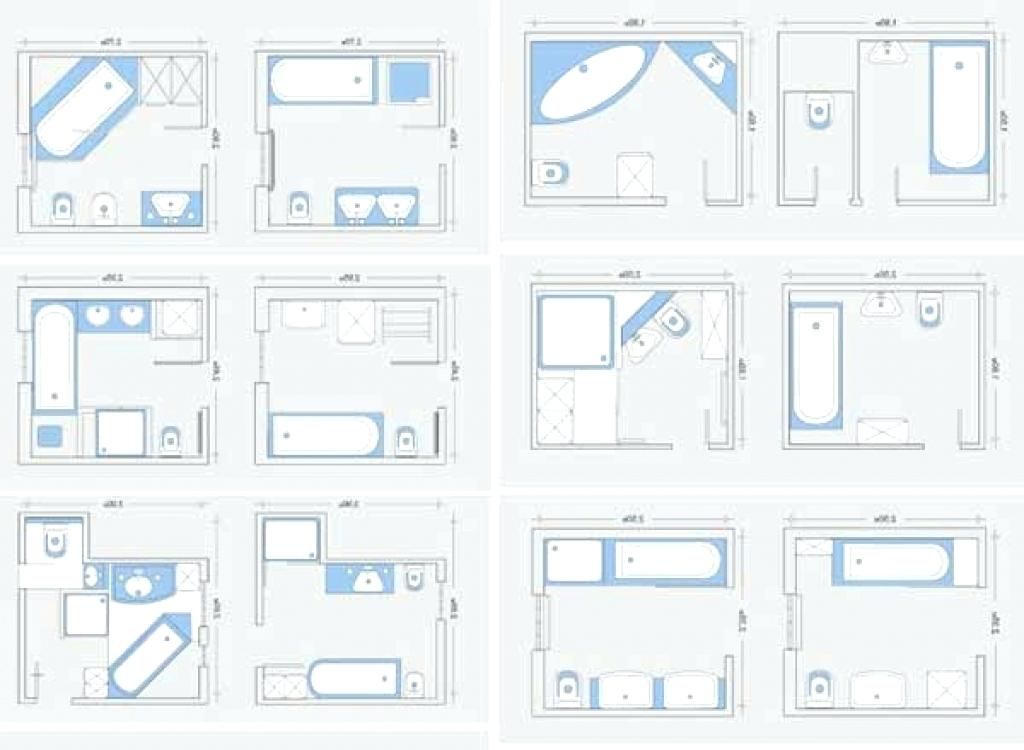 With this approach, they stay in the steam room for quite a long time - for 10-15 minutes, because again you need to warm up.
Ideally, you need to visit both types of baths to decide which suits you best. In which of them you will be better, that one is worth building.
Now let's summarize. The bath can have two or three rooms. There may be a rest room, and separate rooms for a steam room and a washing room. In another option, there is a rest room, and the steam room and washing room are combined in one room.
Dressing room
This room is optional but desirable. It is much more convenient if all things are collected in one place. But even here questions and disagreements arise: where should the doors go. There are usually two options: in the rest room and in the washing room. Both options are not ideal.
If the entrance to the dressing room is made from the rest room, then undressing, you will have to walk through this room. If there is no one else in the bath, this is one thing, but if a campaign has gathered, and someone is already resting, this is a completely different calico.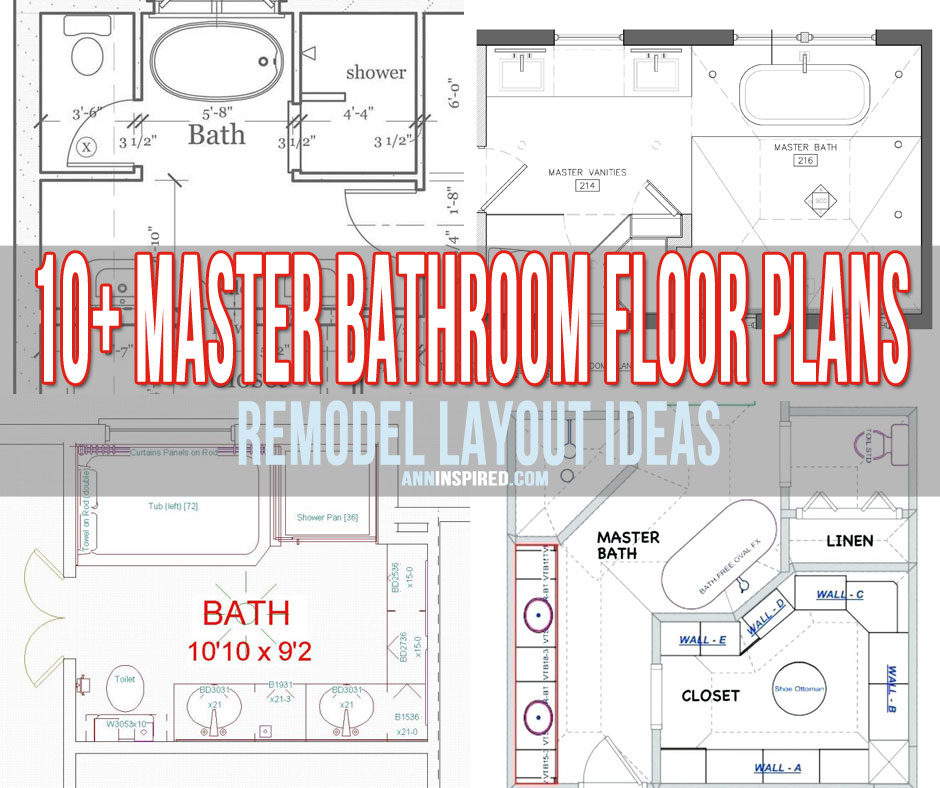
The second option is preferable from this point of view: from the locker room you immediately get to the sink, and from there to the steam room. But then the damp air from the sink will inevitably be in the locker room. Damp air = wet clothes. That's still a pleasure. So you usually have to choose: to walk in a negligee through the rest room or put on wet clothes after the bath.
Sizes of rooms in the sauna
In addition to the composition of the rooms, it is necessary to determine the dimensions. Since most often they still do three rooms - the sink and the steam room are separate, then we will describe approaches to choosing sizes for all three rooms.
Layout of the steam room
The main thing when planning a bath is to determine the optimal size of the steam room. It is clear that you want to save on construction and firewood for heating. But too small a room is completely uncomfortable: the bath overheats quickly and you feel like in a cage.
It is most reasonable to proceed from how many people should fit in the steam room at one time. Moreover, the dimensions also depend on the type of steam room. In the dry air, no one really moves. Everyone sits decorously on the shelves: at such a temperature you can’t move. Therefore, one meter is enough to “sit” for one person. To lie down, already 2.2. So. Determine how many people can sit with you, and how many can lie down. Then you count the area of the shelves, add space for the stove and a little for the passage to the shelves. You get the minimum dimensions of a steam room for a sauna.
Even the same size of a bath can be divided in a dozen different waysIn a Russian bath, they mostly lie on the shelves. And also, the attendant is waving brooms. Therefore, the dimensions here should be larger.
For a wet Russian steam room, the width and length are chosen so that two or three people can comfortably lie down, depending on how many people will be steaming at the same time. We calculate the area of the required shelves (for one 80-100 cm wide, from 2.2 to 2.5 m long), add the area for placing the stove, the screen around it, approaches and gaps, and we get the minimum volume of the steam room for a Russian bath. If the dimensions do not allow, they leave one “lying” place, be sure to place where the attendant stands, and, if possible, at least a small shelf for “sit”.
In general, it is more rational to use the area in the steam room if it is not square, but rectangular in shape. Moreover, the oven is usually located on the long side. And keep in mind that from the stove, even closed with a brick screen (for Russian baths, it must be closed with a screen), there should be a distance of about 20-30 cm from the shelves, but more is better.
These are the approximate dimensions of shelves and steps that can be pushed under them For choosing the height of ceilings and doors, see article " The height of the ceiling and shelves in the bath and sauna ".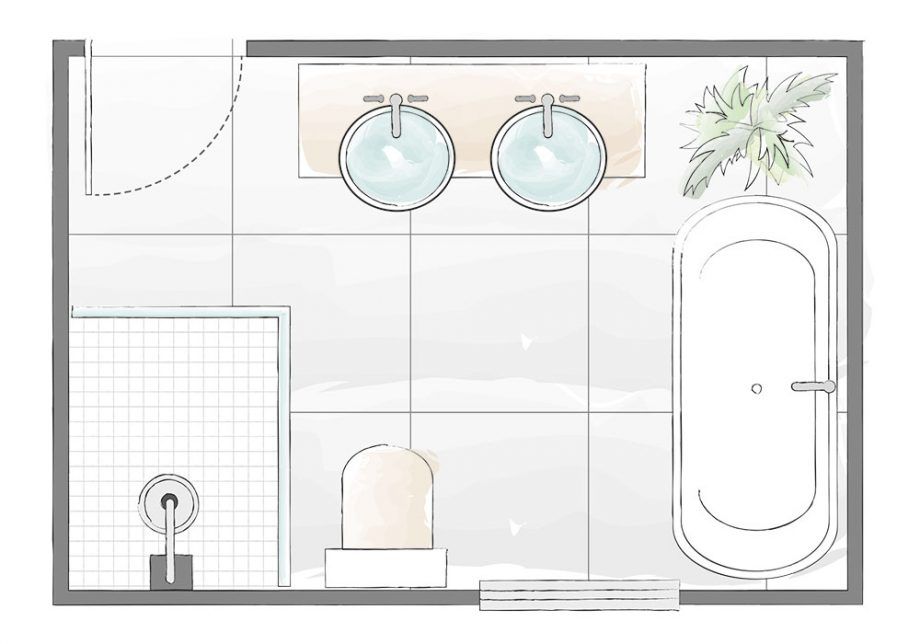 Briefly, we can say the following: for a conditioned steam room (steam is mixed evenly throughout) the final ceiling is not lower than 2.10 m, and for a pie one (steam is collected under the ceiling) not lower than 2.4 m. Shelves are another stumbling block when designing a steam room. In general, each parameter is selected individually. If you customize the steam room “for yourself”, then the height of the shelf should be up to the knuckles of the lowered hand. Stand on the floor (on a grate or stool, if any), lower your hand down. Where your knuckles are, that's where the shelf surface should be.
If several tiers of shelves are planned, then the top one should not be closer to the ceiling than 115 cm. hotter").
You need to draw everything in size and all this should be placed in the steam room in a "clean" form, taking into account the walls and the insulation pie But not everyone who will bathe is the same height. That's why they make side steps. You can have several pieces of different heights for people of different heights: they rely on such a step when it is necessary to climb the shelves. The bath attendant uses the same steps: people have different waist circumferences, and sometimes even in a steam room fitted “for themselves”, you have to stand on a step to make it more comfortable.
One little tip: make the steps wide. Firstly, if necessary, it will be possible to sit on them, and secondly, wide and low ones are more stable.
Dimensions of the sink
Here again, there are two approaches: either try to get by with a minimum - this is if the dimensions of the bath are limited, or plan it in a way that is convenient, and lay the resulting dimensions into the project. If we talk about the minimum, then you can get by with a small shower, over which you can still attach a shower device. In this case, a size of 1.5 * 1.5 meters will suffice. Cramped, but not too tight.
Having fenced off a small gap from the rest room, we get a vestibule at the entrance and a locker room or storage room. Then, probably, you need to fence off a separate shower stall - this is 1. 2 * 1.2 m (or more, if you want). And enter one or two trestle beds (depending on the number of steamers in one run). Trestle beds in size can be similar to the shelves in the steam room, or slightly different. Here the dimensions are not critical. The main thing is to be comfortable.
 Some people put fonts in the washing room. Here you can’t get by with small dimensions, and the sizes of the font can be different - from one and a half meters in diameter and more.
Dimensions of the relaxation room
And again, two layout options, even in saunas of the same size. Some try to fence off as much area as possible for the rest room, leaving a minimum for the steam room and washing room. This option is suitable if the bath is something like a club. Then the main action is just gatherings in the rest room. And the room stands out, respectively, spacious.
But there are people who enjoy the processes taking place in the steam room. And then the situation changes dramatically: the necessary minimum is allocated for the rest room: a hanger, a table, several benches / armchairs / chairs. All. But all other areas are allocated for a steam room.
Having decided on the size of all rooms and their location, do not be too lazy to draw everything to scale. This can be done on a computer using programs or in the old fashioned way on paper in a box. Just draw large, and with the preservation of proportions, taking into account the thickness of the walls and walls, insulation and finishes. Then calculate the real areas that remained in a "pure" form. Absolutely: you are in for a surprise. And unpleasant. A lot of space is taken away by all the piers and walls. And in the remaining space it will be necessary to “enter” all the items. Especially a lot of difficulties arise with the steam room. So be especially careful here. Most likely, the ready-made bath plan will have to be redrawn, and more than once.
Just moved the doors to another wall, immediately there were problems with the location Pay attention to the location of the doors. It is desirable that they are located as close as possible. Especially in passage rooms. It's all about the same utility: it's impossible to use all the passages. So they eat up a decent amount of space.
From the point of view of safety
It is also necessary to consider the layout of the premises in the bath from the point of view of safety. Therefore, it is desirable to make the path from the steam room to the street as simple and short as possible, without labyrinths. This is necessary in case someone becomes ill. The sooner a person can get out into the fresh air, the better. Therefore, some projects provide for two doors in the steam room: one of the washing rooms is for regular use, the second is to the vestibule - for emergency situations.
In order to be able to evacuate as quickly as possible, the washing room should have a window of decent size - no less than 50 * 50 cm. And it should open inwards (again, safety precautions). And it is better not to save on dimensions: small dimensions will not provide the amount of fresh air required for ventilation.