Backsplash for behind kitchen stove
33 Ideas for Memorable Backsplash Behind Stove
Instagram FacebookSearch
Kitchen
Written by
Zakhar (aka Zee)
September 3, 2022
If you have ever felt like your kitchen is missing something; it’s probably a memorable backsplash behind stove. Backsplash is one of those things you don’t realize makes a world of difference until your eyes are open to the possibilities. The stove is such a precious tool in our kitchen it deserves a companion worthy of the location.
Imagine creating a breathtaking mosaic behind your stove or installing that herringbone tile you have been patiently waiting to try, these are just some of the designs you can incorporate. Don’t settle just yet, we haven’t even discussed a dressed-up subway tile or brick backsplash. With so many options you will want to turn your whole kitchen into a tiled paradise. Don’t be ashamed to tell everyone that you won’t be cooking tonight, backsplash behind stove has stolen your attention! Take a look below at some examples you are sure to adore.
01 of White Herringbone Stove Backsplash with Pot Filler
PHOTO:
- the.old.barn
White herringbone stove backsplash with pot filler covers the wall above two stainless steel ranges. Large white hood is installed upon a kitchen wall between cabinets. Neutral countertop displays a collection of decorative and kitchen items.
02 of Gold Accents and White Stove Backsplash
PHOTO:
- homeonharbor
Subway tile backsplash behind stove hosts floating wood shelves decorated with a variety of items. Black range with gold accents matches gold hardware installed upon white kitchen cabinets. A wood range hood completes this space.
03 of Black and White Kitchen with Tile
PHOTO:
- happily.ever.nashville
Black kitchen island hosts black stools and a white countertop illuminated by glass pendant lighting. White cabinets are separated from black countertops by a tile backsplash.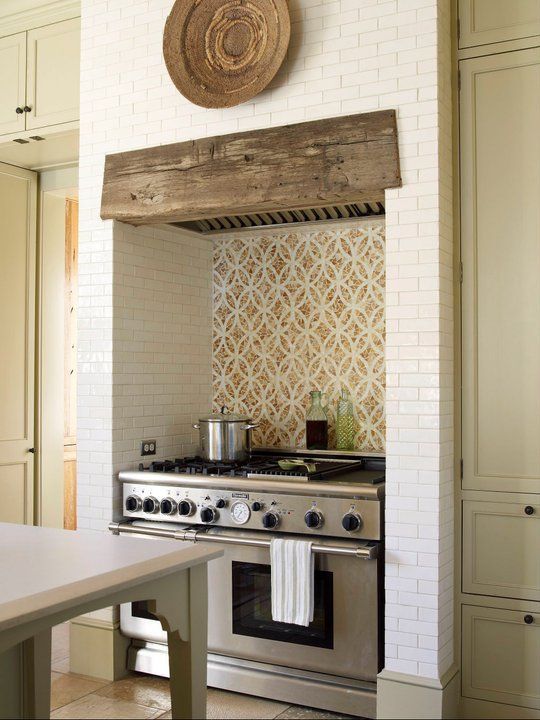 Checkered Kitchen items are placed around a cooktop stove.
04 of Brick Backsplash Behind Stove and Lantern Pendants
PHOTO:
- ourfergusonfarmhouse
Lantern pendant lighting hangs above a wood island with a white countertop. Wood kitchen hood and white cabinets are complimented by a brick backsplash behind stove. A cooktop stove sits upon a white countertop.
05 of Mosaic Tile Kitchen Niche Over Stove
PHOTO:
- simple_and_lovely
Mosaic tile kitchen niche sits above a cooktop stove within a square tile backsplash. White cabinets are complimented by shiplap walls and wood shelves displaying kitchenware. White hood with wood accents showcases a subtle flower wreath.
06 of Arched Alcove with White and Gold Range
PHOTO:
- lindsay_hill_interiors
White kitchen range with gold accents sits beneath square tile backsplash with a black sconce affixed upon it.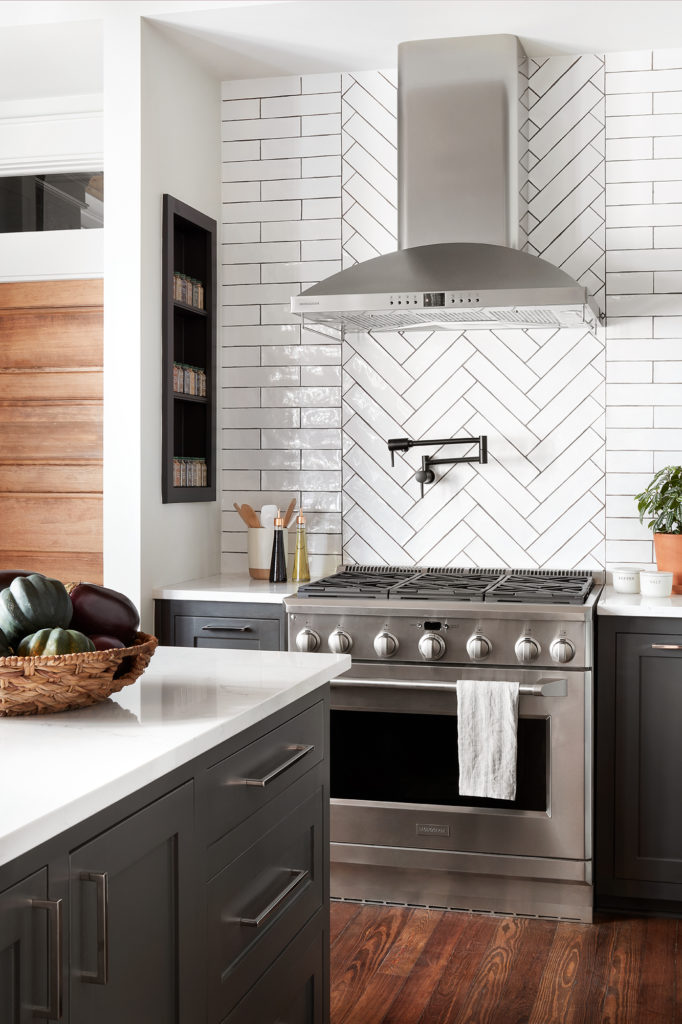 White cabinets with glass inserts sit on either side of an arched alcove. Light gray cabinets with wood countertops complete the space.
07 of Patterned Tile Backsplash Under Range Hood
PHOTO:
- sweet_southern_homestead
Patterned tile backsplash behind stove provides color to white kitchen walls and cabinets. White range hood with wood header fits between cabinets with glass inserts. Bronze bridge faucet sits on a kitchen island in front of a stainless steel range.
08 of Shared Herringbone and Subway Tile Wall
PHOTO:
- nest.out.west
This kitchen features a shared wall of black herringbone and white subway tile backsplash. Board and batten hood is installed next to wood floating shelves. White cabinets host a farmhouse sink and stainless steel appliances.
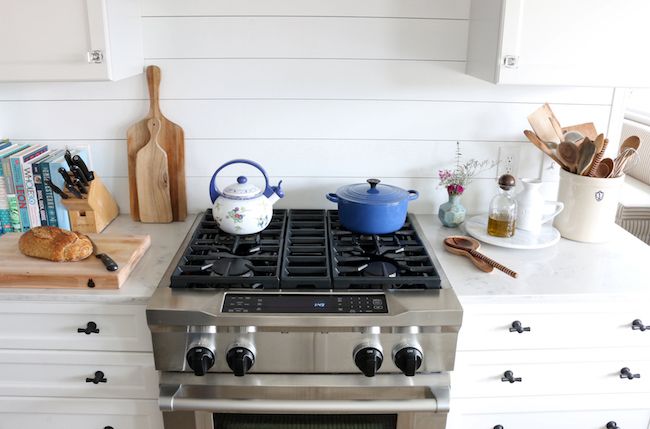
09 of White Hex Tile Behind Cooktop Stove
PHOTO:
- archerhillcottageaz
Hex tile backsplash is installed behind a cooktop stove with a charming vintage sign resting on the tile.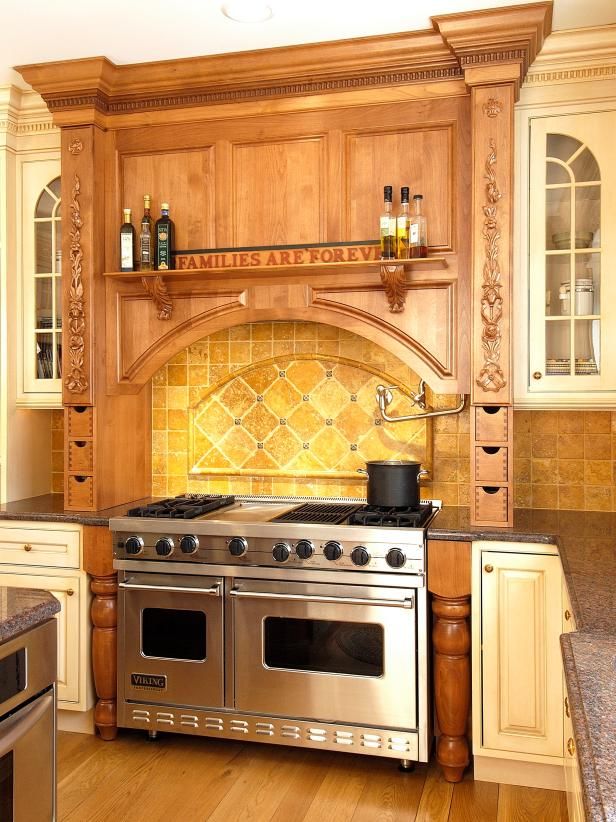 White shutters allow light into this kitchen with small potted plants on the countertop. Wood cutting boards accentuate this space.
10 of Herringbone and Subway Tile Kitchen Backsplash
PHOTO:
- hickorylanehome
Herringbone tile kitchen backsplash with pot filler shares the space with white subway tile. White hood is installed above a stainless steel stove among white cabinets. Kitchen island countertop displays seasonal ornaments.
11 of White Kitchen with Brick Wall Behind Stove
PHOTO:
- farmhouseonchapel
White cabinets and countertops host a cooktop stove under a wood hood. Black pot filler is affixed to a brick backsplash surrounded by small pine tree decorations. A drawer opens up to reveal a collection of spices.
12 of Minimalist Kitchen With Marble Slab Backsplash
PHOTO:
- rocking_the_cotswolds
This minimalist kitchen features a gray marble backsplash behind stove only with black sconces on either side. Light gray drawers host matching countertops and a variety of kitchen appliances. A green wreath sits upon the stove.
13 of White Brick Wall Between Kitchen Cabinets
PHOTO:
- raising3foodies
Vintage brass pendant lighting hangs above a wood kitchen island with white countertop. White brick wall sits between white cabinets and stainless steel appliances. A framed picture is secured to a glass panel above stove.
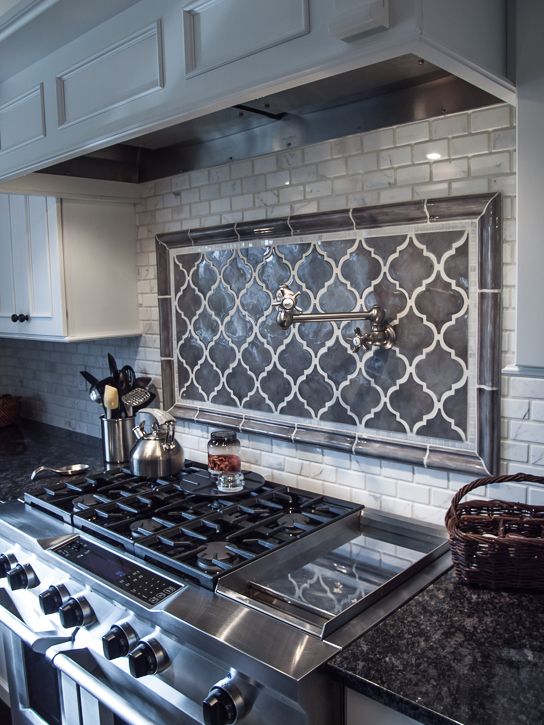
14 of Herringbone Tile Backsplash Behind Stove Only
PHOTO:
- homebydesign.nc
Subway tile wall is paired with a herringbone picture frame backsplash behind stove. Wood accents are displayed in front of the herringbone for an extra decorative touch. Stainless steel range is fit between white cabinets.
15 of Fall Decorations Displayed in White Kitchen
PHOTO:
- bloom_jennybrooks
Kitchen subway tile backsplash behind stove is paired with a chevron picture frame backsplash creating an interesting design. Stainless steel stove sits within white countertops. Fall decorations are displayed upon a white and black hood.
16 of Accessorized Countertops and Herringbone Tile Wall
PHOTO:
- themodernclassichome
Herringbone tile backsplash covers the wall behind stainless steel stove. An embellished dome sits atop a white cake stand over stove. White countertops are accessorized by patterned bottles and glass candlesticks.
17 of Herringbone Tile Surrounded by White Cabinets
PHOTO:
- our_rustic_farmhouse
Herringbone tile backsplash is installed above a cooktop stove in this kitchen. White cabinets surround a dark wood hood above stove. Countertop displays a variety of copper canisters and small kitchen items.
18 of Patterned Backsplash and Wall Mounted Shelves
PHOTO:
- simplyminedesigns
Shiplap hood with wood header is accompanied by wood wall mounted shelves. Stainless steel range sits between white countertops and cabinets. Black and white patterned backsplash is affixed to the wall above stove.
19 of Black and Gold Range Under White Hood
PHOTO:
- kelseyleighdesignco
Black range with gold accents is contrasted by square tile backsplash in varying tones of gray. White hood is paired with floating shelves and brass sconce. Wood kitchen island is joined by a collection of wood accents throughout the kitchen.
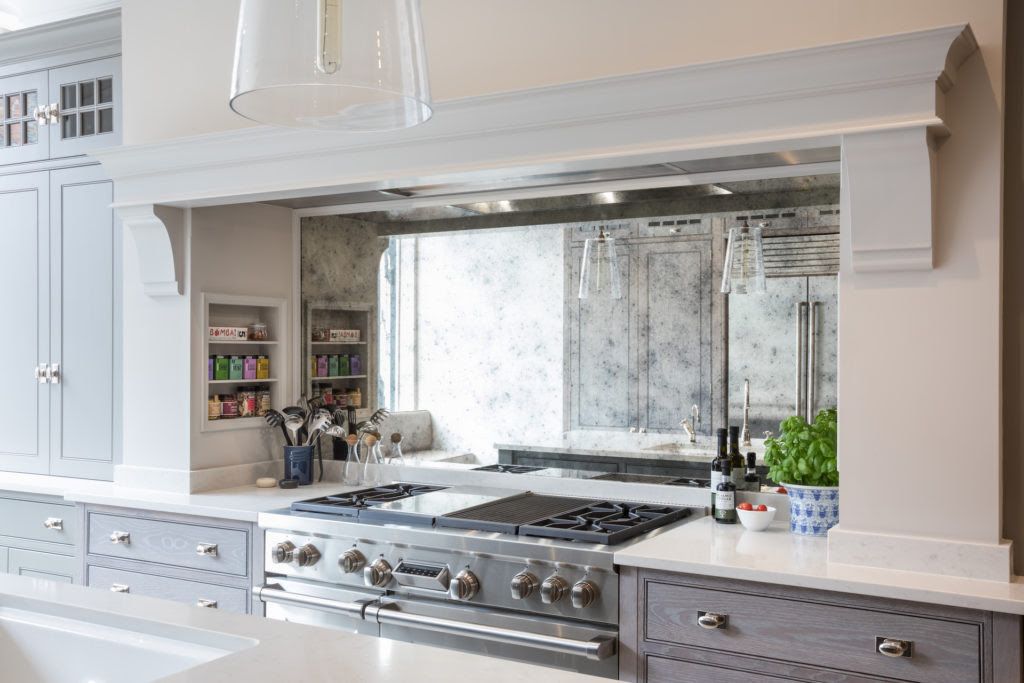
20 of Neutral Marbled Kitchen Backsplash Behind Stove
PHOTO:
- kelseyleighdesignco
This neutral kitchen features wood and glass display cases surrounding a stainless steel stove. Neutral marbled backsplash fills the space between the hood and stove joined by a pot filler. Pendant lighting hangs above a black island countertop.
21 of Cooktop Stove on Gray Kitchen Countertop
PHOTO:
- bootsandgrace
Herringbone tile behind the stove hosts a bronze pot filler. Cooktop stove sits beneath a wood kitchen hood atop a light gray countertop with small decorative items placed upon it. White kitchen cabinets include brass hardware.
22 of Shaded Chandelier in White Cabinet Kitchen
PHOTO:
- jennifersusanstyle
Tile backsplash is covered with brick wallpaper to create a unique look. White kitchen cabinets with black hardware are paired with a white hood above stove. A woven shaded chandelier hangs above the kitchen island.
23 of Neutral Kitchen with Subway Tile Behind Stove
PHOTO:
- thetedescofarm
White cabinets surround a subway tile wall behind the stove. A green wreath is placed on the hood above the stove offering a decorative touch to this kitchen. A coffee station displayed on a tray sits atop neutral countertops.
24 of Light Gray Island and Stainless Steel Appliances
PHOTO:
- therustedroost
Light gray kitchen island hosts a black rack showcasing an array of decorative kitchen items.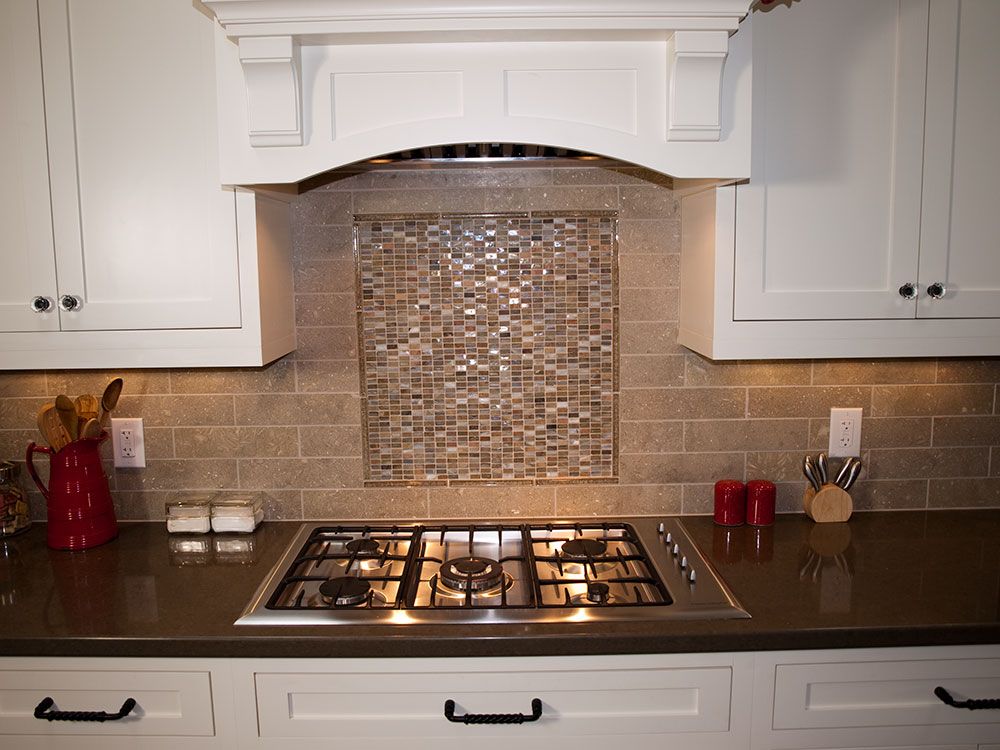 Stainless steel appliances are set between cabinets while a patterned backsplash behind stove only is attached to the wall.
25 of Modern Farmhouse Kitchen with White Tile Backsplash
PHOTO:
- kimk.styledwithlace
Vintage style pendant lighting hangs from the ceiling in this modern farmhouse kitchen. White tile backsplash covers the wall between cabinets. Black countertop provides contrast to white kitchen island and cabinets.
26 of White Subway Tile Backsplash Behind Stove
PHOTO:
- our.pretzer.home
Subway tile backsplash behind stove is complimented by vintage wood cutting boards and a stainless steel stove. A wreath of greenery is displayed on the white hood above stove. White drawers with black hardware sit beneath kitchen windows.
27 of Black and White Patterned Backsplash Behind Stove
PHOTO:
- theclassiccottage
Patterned black and white backsplash is placed behind the stove separating white tiles.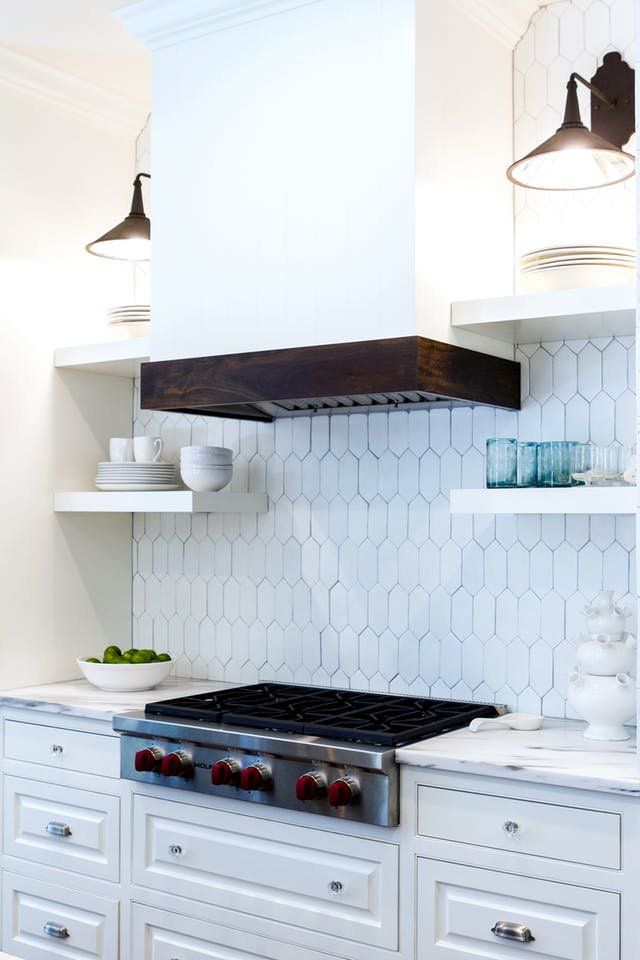 Black countertops cover white cabinets and showcase a collection of wood cutting boards and utensils. Shelves are affixed to the wall beside the cabinets.
28 of Pristine White Kitchen with Herringbone Backsplash
PHOTO:
- decorformycalamity
Stainless steel appliances sit among white cabinets in this kitchen. White herringbone backsplash behind stove offers a pristine appearance to this space. A cooktop stove sits upon a white countertop.
29 of Green Kitchen Cabinets and Herringbone Backsplash
PHOTO:
- 1920farmhousereno
White herringbone tile backsplash is equipped with hangers for kitchen utensils and a vintage sign. Stainless steel range sits between light green cabinets with white countertops. A wood range hood with wreath completes the space.
30 of Brick Backsplash Behind White Vintage Stove
PHOTO:
- marieshomeandgarden
Farmhouse kitchen features a brick backsplash behind a white vintage stove.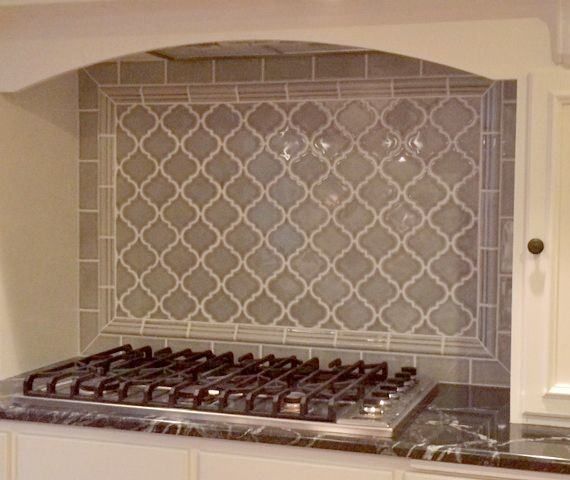 Retractable shelf folds out from the stove to display a mug holder and other small items. White shelving unit stands beside the stove with a variety of kitchen items.
31 of Neutral Stone Behind Stove Backsplash Ideas
PHOTO:
- stagerroz
This alcove kitchen space provides some interesting behind stove backsplash ideas. Arched stone surrounds a cooktop stove on a black countertop. Neutral checkered tiles and a mosaic stone backsplash are accentuated by wood accents.
32 of Cooktop Stove with Varying Gray Backsplash
PHOTO:
- austincreekfarmhouse
Picture frame backsplash behind stove only creates a unique separation from the rest of this kitchen tile. Vintage wood cutting boards stand behind a cooktop stove upon a white countertop. White cabinets surround the stove.
33 of Tile Backsplash Behind Stainless Steel Stove
PHOTO:
- rootedinlove.design
Stainless steel appliances are fit between white cabinets and a shiplap hood in this contrasting kitchen.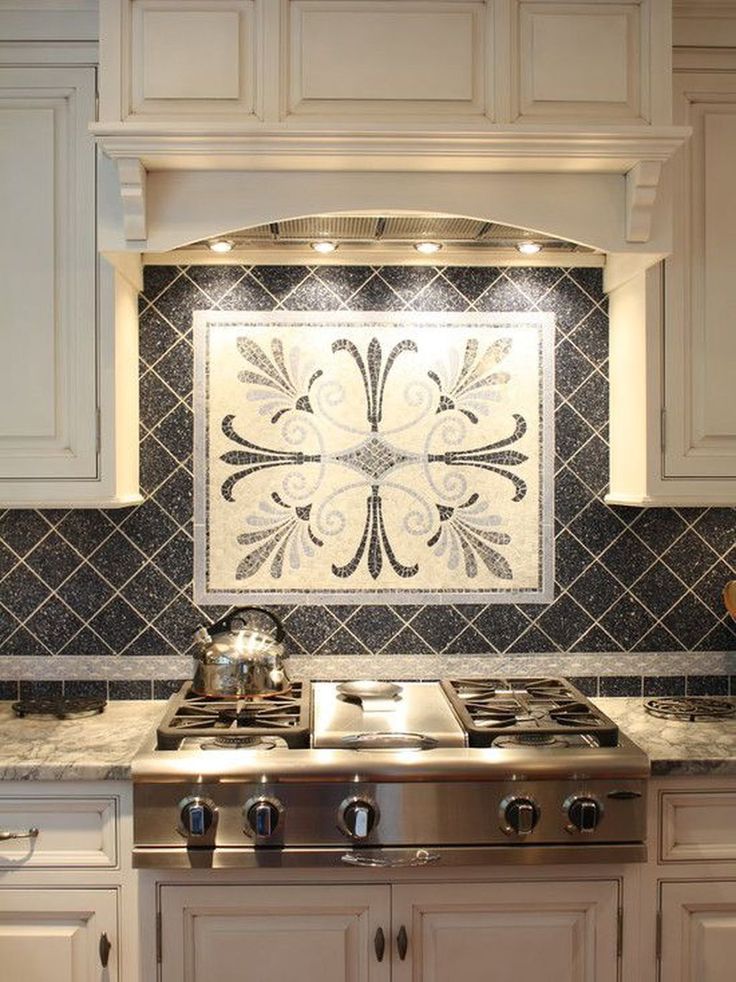 White tile backsplash covers the wall behind the stove accompanied by wood cutting boards and black countertops.
Stove Backsplash - Etsy.de
Etsy is no longer supporting older versions of your web browser in order to ensure that user data remains secure. Please update to the latest version.
Take full advantage of our site features by enabling JavaScript.
Find something memorable, join a community doing good.
(899 relevant results)
What is the best way to make an apron in the kitchen and from what: expert advice and feedback
Finishing the working area in the kitchen requires a number of conditions.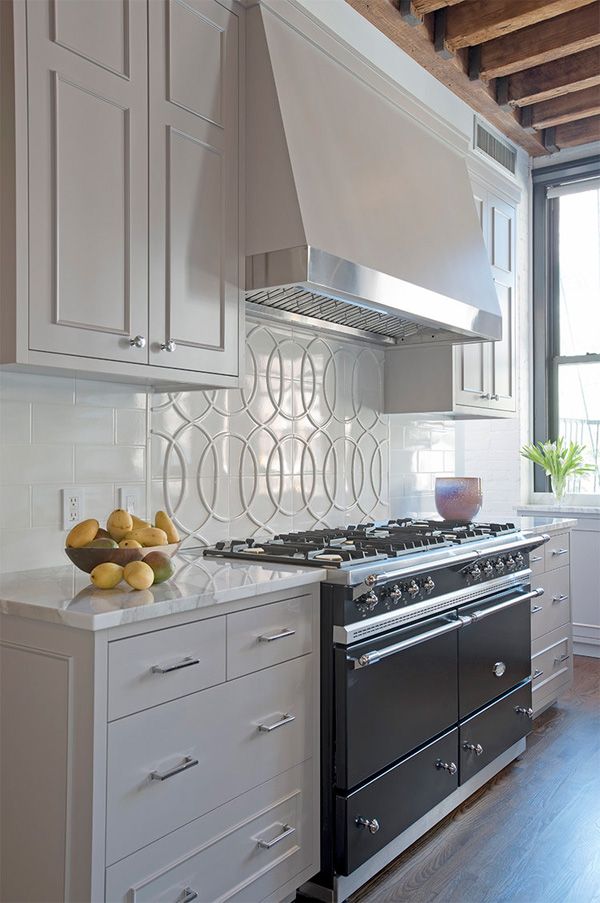 Culinary processing is a process that has a diverse and very strong effect: there is steam, and cold water, and splashes of hot fat, and dyes.
So not every material is suitable for a kitchen apron.
Kitchen backsplash requirements
Finishing must meet very high practical and aesthetic requirements at the same time. The hostess spends a lot of time in the kitchen, and if the person preparing lunch and dinner is surrounded by ugly worn-out items, the furniture is inconveniently located, and it is impossible to wash stains of grease and soot from the wall near the stove, you can forget about delicious dishes. nine0003
Ceramic tile for finishing the work area
This option can safely be called the most traditional and most popular. The “fault” for this is an extremely successful combination of user qualities, exceptional diversity and quite affordable cost. The main feature of the material is its low porosity. And since there are no pores, moisture will not be absorbed and bacteria will multiply.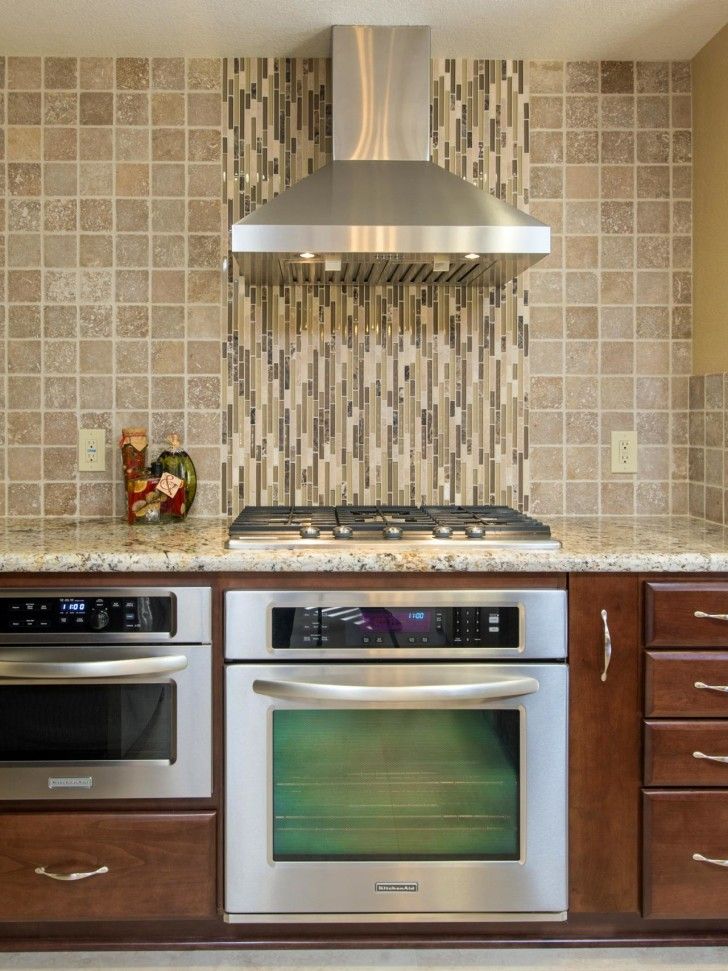
This option has a lot of advantages, so this lining is being made and will be made for a long time to come. nine0018
The disadvantages of a ceramic tile backsplash include the complexity of installation. The tile is not flexible, so the surface for ceramics must be perfectly flat. Yes, and styling is best done by professionals, there are a lot of subtleties in this matter.
Mosaic - a stylish option
Quite often, for lining a small kitchen, they suggest choosing a mosaic: a panel or ordinary masonry of small elements - 5 * 5, 7 * 7 cm. As a rule, ceramic tiles act as the basis, although you can use glass, a mirror or metal. Which option is better depends, rather, on the design of the kitchen. However, ceramic mosaic retains all the excellent properties of tiles, but with some reservations. nine0003
The decorativeness of the variant is undeniable: it is much easier to lay out a mosaic in the form of a complex ornament. And mosaic images will definitely not seem boring or trivial.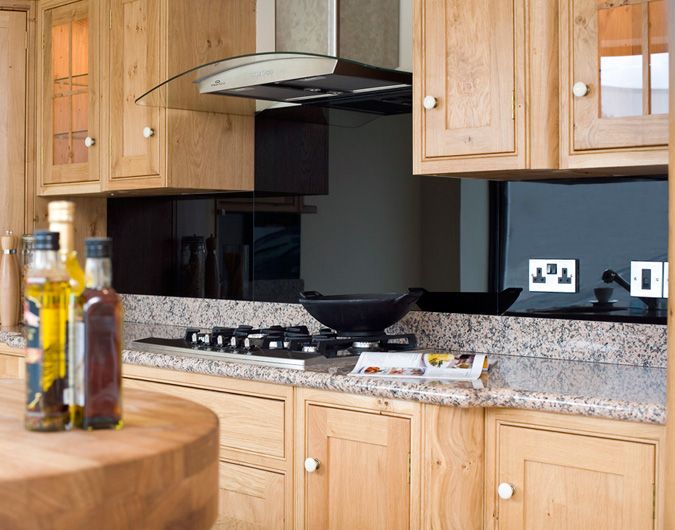 In addition, unlike tiles, perfect alignment can not be achieved here: the elements are small and easily hide small defects.
The weak point is the seams between the tiles. Grout, unlike ceramics, does not differ in hygiene and accumulates more dirt. But when laying large tiles, this disadvantage is minimized, but when laying mosaics, you will have to do additional processing of the seams, at least with a sealant. Moreover, expert reviews indicate that the grout loses its moisture-resistant qualities over time, so it must be periodically removed and the seams re-sealed, which, of course, I would not want to do. nine0003
Natural and artificial stone
This name hides a lot of materials, and not all of them are suitable for the kitchen. The fundamental difference is the number of pores and the ability to absorb water. Material with minimum values is allowed. Which one is better is determined by the distinguishing features.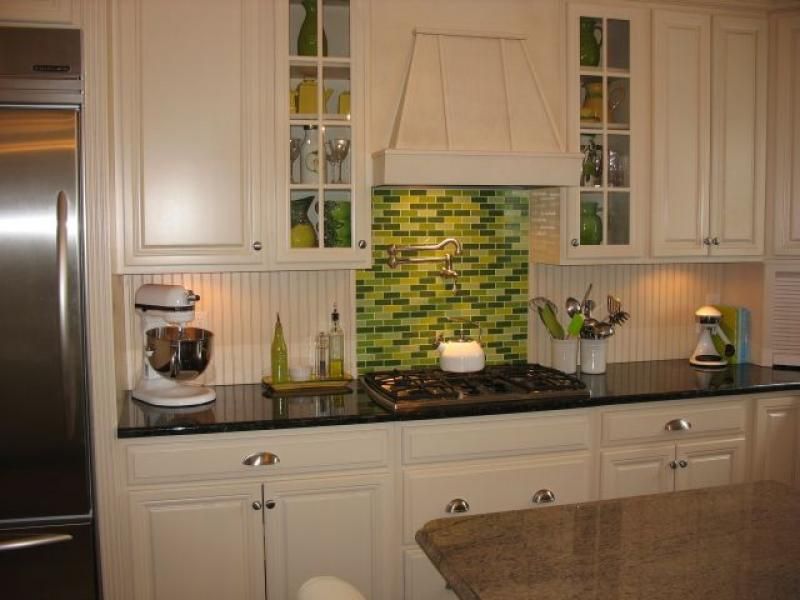
But marble, no matter how impressive it looks, is not suitable for lining a kitchen backsplash: the material is porous and absorbs dirt. Polishing reduces this effect, but in itself such a surface is short-lived. nine0003
- Granite and basalt - much more practical, but require washing with special products: the stone absorbs coloring pigments. Facing is better to choose a greater thickness than the same porcelain stoneware, since the strength of natural granite, oddly enough, is lower.
The main disadvantage of this option is not even the cost, but low maintainability. If the panel is damaged, it will have to be replaced. The installation of stone is also not an easy task: the material is very heavy, requires special glue, and size adjustment is almost impossible, with the exception of clinker tiles. nine0003
Aprons made of steel
This is an option for a modern kitchen in the style of techno, minimalism, high-tech, where the utility of the material is considered its best advantage.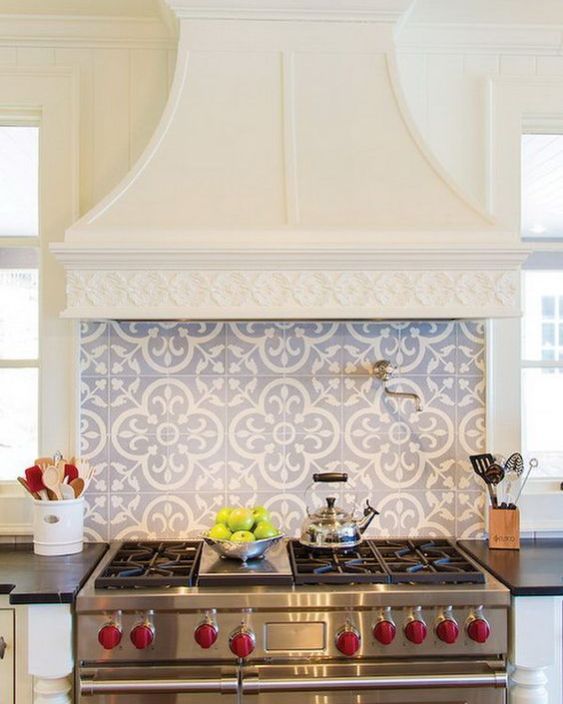 The custom finishes are excellent, although the decorative ones are noticeably lower.
- Solid stainless steel sheets or tiles, and sometimes even mosaics, are used for cladding. The last 2 options are much more interesting, since the surface of the steel can be made shiny, matte, embossed, which makes the apron much more attractive. In the photo - an example of a metal apron. nine0002
- Steel finish is better in terms of strength: there is little that can affect this material. Temperature, water, steam, splashes of grease and so on have no effect. Of the chemicals, only strong acids are dangerous.
- Since steel does not contain any pores, it does not absorb dirt or water and, accordingly, does not contribute to the growth of bacteria.
As the reviews indicate, it is still possible to scratch the surface, and even abrasive products destroy the glossy finish. But if you choose a matte and embossed steel tile and make an apron out of it, this feature loses its meaning.
nine0003
Glass aprons
Only impact-resistant or tempered glass can be used for this option, as ordinary glass is too fragile. The material is extremely popular, because it is not only decorative in itself, but also provides a lot of other design options. Glass can serve as a protective screen for any finish - from silk wallpaper to wine corks or solid wood, as in the next photo.
- It is difficult to overestimate the possibilities of glass itself: colored, frosted, transparent, with photo printing, with a pattern, relief pattern, painting, in the form of tiles and so on. What cannot be done with glass is to combine it with tiles. nine0047
- Impact-resistant glass withstands very high loads, although it is quite possible to scratch it. Do not use abrasives for cleaning. But glass is completely insensitive to the effects of temperature or humidity. The material does not absorb dirt and is quite hygienic.
- Glass apron - an option for modern styles: modern, hi-tech, eco.
 Its effectiveness is difficult to overestimate. In the next photo - a glass apron with photo printing.
The disadvantage of the solution is the complexity of installation and cost. To make the work area completely safe, the apron is mounted from a single piece of glass. And with a fair weight of this material and size, its installation is very difficult. Only specialists can install a glass kitchen apron. The cost is also determined by the material: the procedure for tempering glass, and even more so triplex, is an expensive process. nine0003
Plastic aprons
Plastic is an extremely versatile material, so several options can be included in this category.
- Plastic panels are the most common option for kitchen cladding. However, in the working area, it does not show its best side, as evidenced by the reviews: PVC is sensitive to temperature, and near the stove it deforms rather quickly. The same thing happens with the finish near the sink, because there is too much dampness, and the plastic changes in volume under the action of water.
 As a result, the entire skin goes in waves and changes color. nine0047
Panels are quite suitable for finishing other walls, as they tolerate the general temperature in the kitchen. But at the same time, another factor should be taken into account: plastic, even self-extinguishing, belongs to combustible materials, and at a heating temperature above + 80–110 degrees Celsius, it is irreversibly deformed.
According to expert reviews, such cladding is allowed in a kitchen with an electric or induction stove, where the heat is still less.
Finishing with MDF panels
No less dubious option than plastic cladding. MDF is a chipboard, and has almost all the disadvantages of wood. The properties of the panels somewhat depend on the nature of the top finishing layer: it is difficult to say which one is better, since they are all quite sensitive to temperature.
In the photo - MDF with acrylic coating. MDF boards are more resistant to water and steam than wood and retain their geometric dimensions.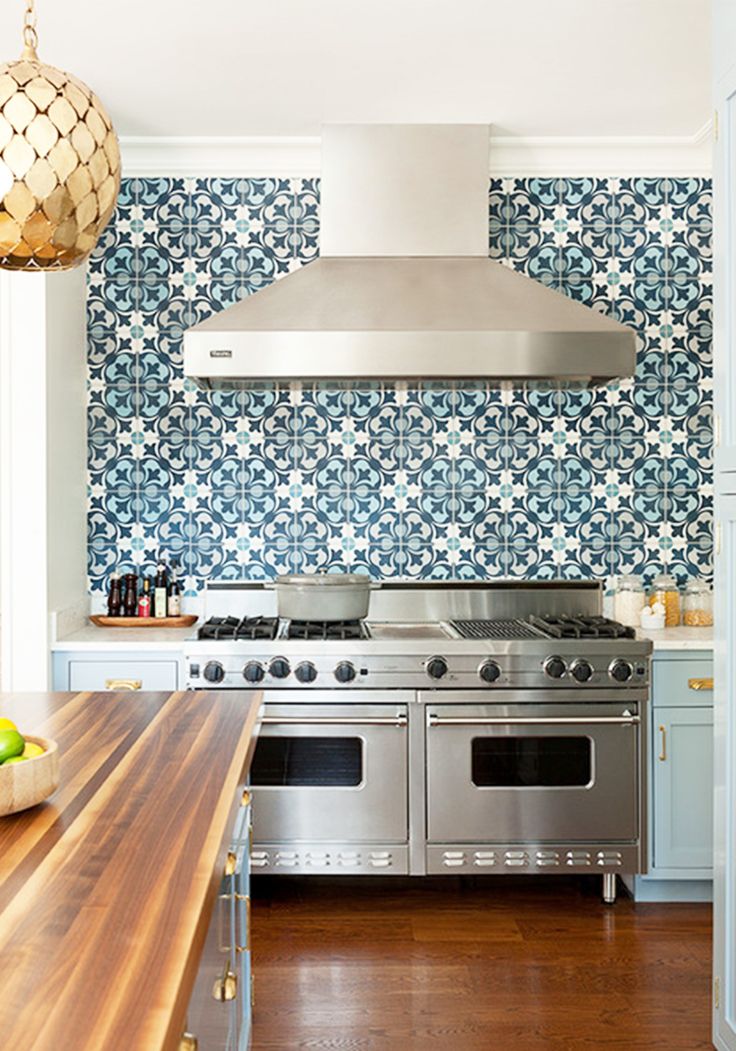 However, the material wears out faster. The finish is mounted much easier: the plates are light, the fasteners need the simplest. nine0003
However, the mechanical strength for the kitchen is clearly insufficient: an accidental impact is enough to hopelessly ruin the panel. You can not discount the high fire hazard: the material burns perfectly, so near the source of open fire - a gas stove, its use is prohibited.
Apron trim available in many materials. And if they do not suit you for some reason, you can always find an alternative or use a glass screen as protection.
the best ideas for decorating the wall near the gas stove + safety rules
Having started a renovation in the kitchen, we often think about how to sheathe the gas stove so that the coating lasts for many years and does not lose its appearance after the first cleaning.
Agree, finishing the working wall in the kitchen is not an easy task and requires compliance with a number of conditions.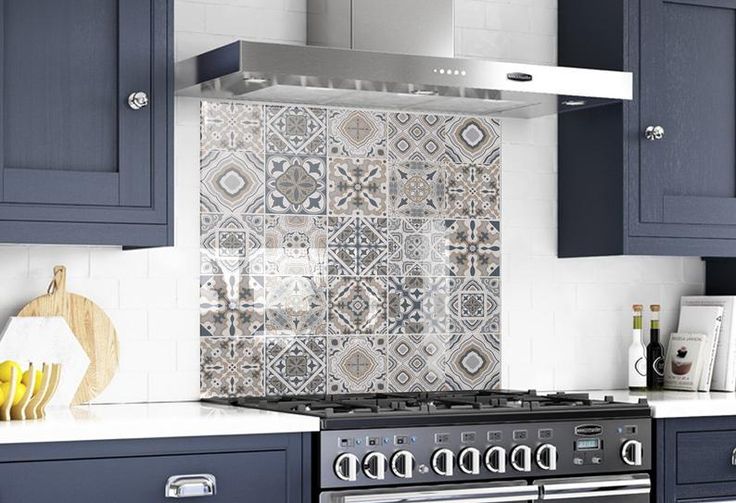 After all, cooking is a process that has a strong impact on the exterior of the kitchen: there are splashes of fat, and water, and steam. Over time, all this may not have the best effect on the outer lining. nine0003
Below we will tell you what materials can be used to cover the wall behind the gas stove. And we will understand the intricacies of their installation. Here are step-by-step instructions, provided with visual photos and useful videos.
Contents of the article:
- Materials for decorating an apron
- Instruction on wall finishing
- Option #1 - installation of ceramic tiles
- Option #2 - decorating the wall with a glass screen
- Safety rules when choosing a material
- Conclusions and useful video on the topic
Materials for designing an apron
Quite high requirements are put forward for materials for lining kitchen walls. After all, housewives spend a lot of time in the kitchen preparing food.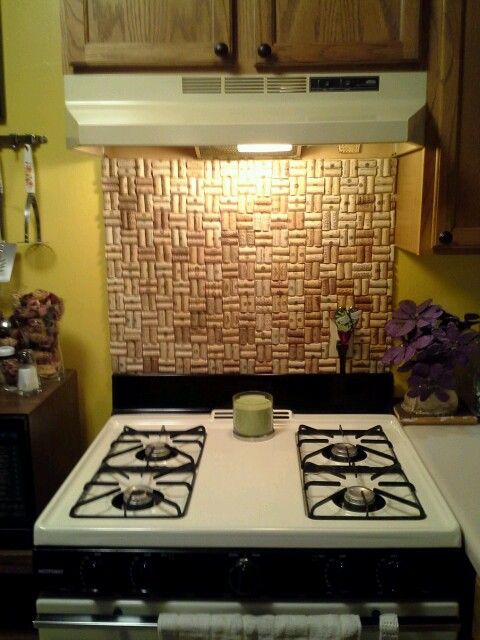 Therefore, it is very important that the environment is not only pleasing to the eye, but also practical.
So, materials for protecting walls from a gas stove must have the following characteristics:
- Moisture resistance . Everyone knows that the humidity in the kitchen is always at an elevated level - steam during cooking, splashes of hot and cold water. All this can adversely affect finishing materials with low moisture resistance.
- Heat resistance . Near the gas stove, the walls always heat up, and quite strongly. Therefore, constant exposure to high temperatures can adversely affect the wall covering.
- Hygiene . In conditions of high humidity, bacteria multiply at an incredible rate. Therefore, for the cooking zone, you need to choose a coating that will not absorb anything into itself. nine0047
- Mechanical strength . This is one of the main requirements put forward for finishing materials for the kitchen.
 The work area (apron) will be cleaned regularly. And it is very important to choose a material that will allow you to remove contaminants without much effort.
 - Aesthetics . In addition to all the above requirements, the material for kitchen walls should look organic in the interior, because the kitchen is a place where every housewife spends a lot of time. Also, you should immediately take care of. nine0047
Having dealt with the requirements that are put forward for materials for finishing the working area of the kitchen, we will talk about the materials themselves that are used for this purpose.
Finding the right material for the walls in the kitchen is easy. There is a huge variety of finishing materials on the market. In addition, you can order a finish according to your own taste, although it will cost a little more
0017 ceramic tiles . This material is famous for its aesthetic qualities and affordable price.
The tile does not absorb grease and other dirt, so cleaning it is not difficult.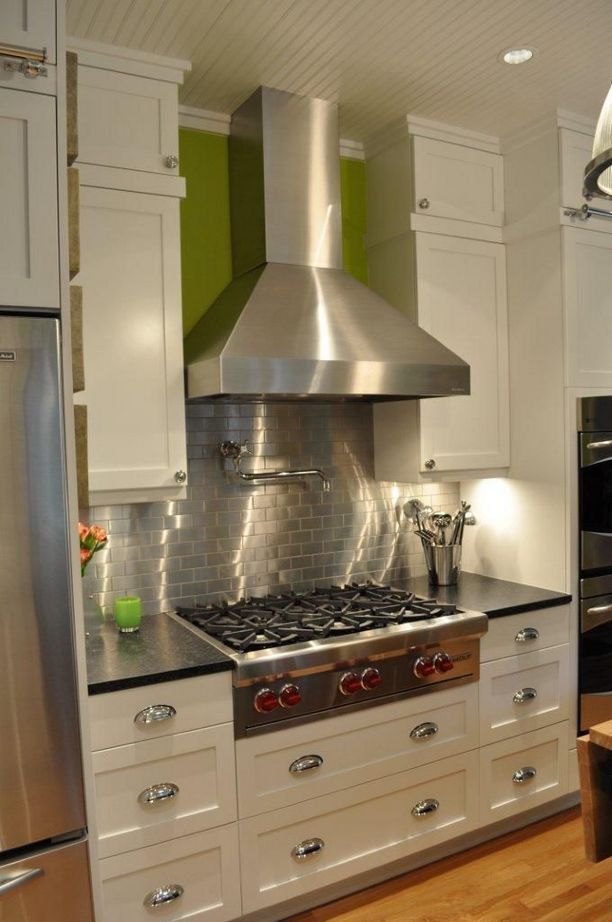 In addition, the material has a high resistance to temperature extremes and is not afraid of household chemicals. A variety of shades and textures allows you to create the perfect design of your dreams.
Ceramic tiles are perhaps the most common material for wall decoration near a gas stove. It is not whimsical in care, and a large color palette allows you to choose a material suitable for any interior
The only disadvantage of ceramic tiles is the complexity of their installation, but we will talk about this a little later.
PVC film . It can also be used for wall cladding behind a gas stove. This is a fairly cheap type of PVC coating. The film can be textured and glossy, with or without a pattern. And you can buy it in almost any hardware store.
But, in fact, this is a one-time coating option. After all, this material has extremely low wear resistance. It's more of a temporary solution. For example, when you need to close a more expensive finish.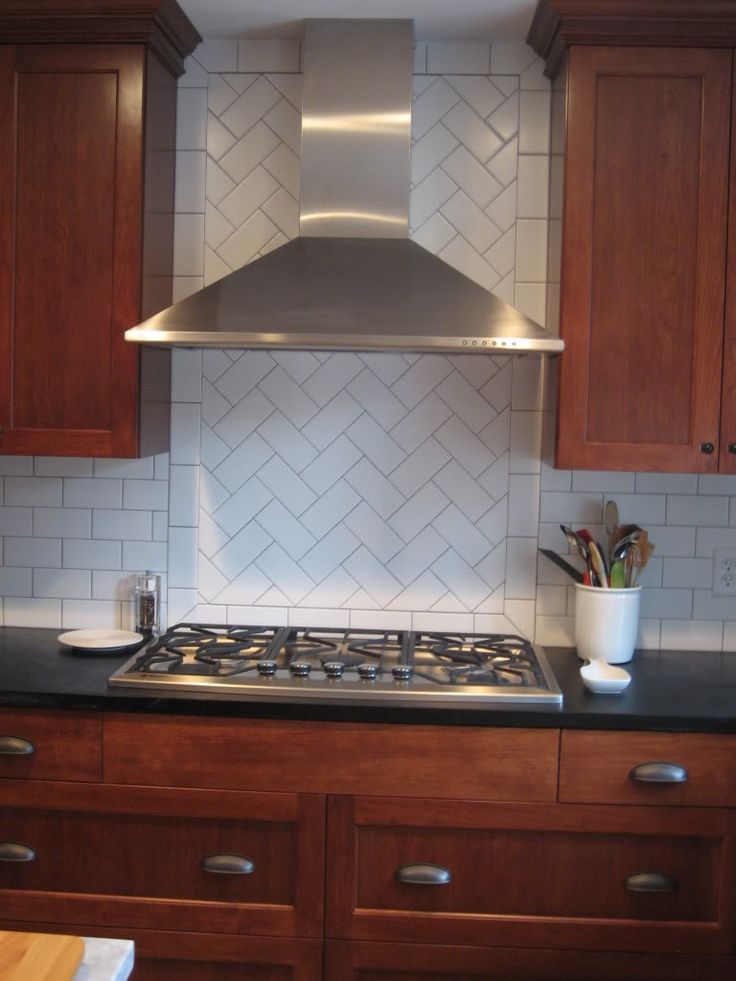 nine0003
We have reviewed the best ideas for wall decoration in this photo collection.
Image gallery
Photo from
A variety of colors, textures, ease of maintenance - all this makes ceramic tiles the most popular option for wall cladding behind a gas stove
Mosaic can be made of various materials: glass, mirror, metal. But the best option would be a mosaic of ceramic tiles. She is not as demanding in care as other vari
Plastic panels are often used to finish the walls in the kitchen, including behind the gas stove. But, choosing this option for your kitchen, you should not forget that plastic is very sensitive to temperature changes, so behind a gas stove it will quickly become unusable
Recently, tempered glass aprons have gained wide popularity. A variety of images can be applied to this material, which allows the glass to be used in any kitchen interior
The use of natural or artificial stone for wall cladding behind a gas stove is not a very popular option.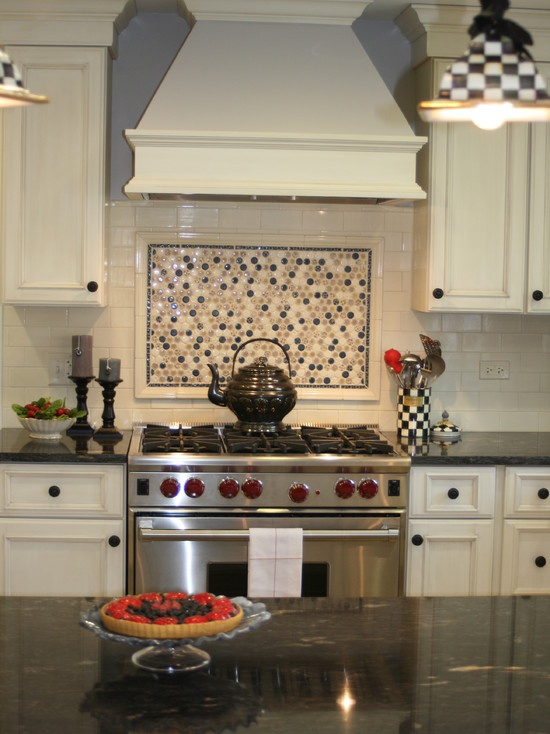 Of course, this solution looks very expensive and stylish, but in terms of practicality, the stone is very much inferior to other materials
Stainless steel can be used to decorate the apron behind the gas stove. This material is not afraid of exposure to high temperatures, it is resistant to a humid environment, easy to maintain and does not lose its original appearance for a long time
Another popular type of cladding for walls behind a gas stove. A mirror apron can be made both in one piece and from fragments. And if desired, the material can be tinted to match the color of the interior
Allows you to choose an option for every taste. But, the film is the most impractical material of all listed
Ceramic tiles - an affordable and practical option
Mosaic - a stylish finishing material
Plastic panels - a stylish but impractical option
Glass - bright and practical
Natural and artificial stone - expensive and stylish
Metal - the most durable material
Mirror - stylish and unusual
PVC film - beautiful, but not practical
Mirror 9001 looks behind the gas stove8 bright and unusual.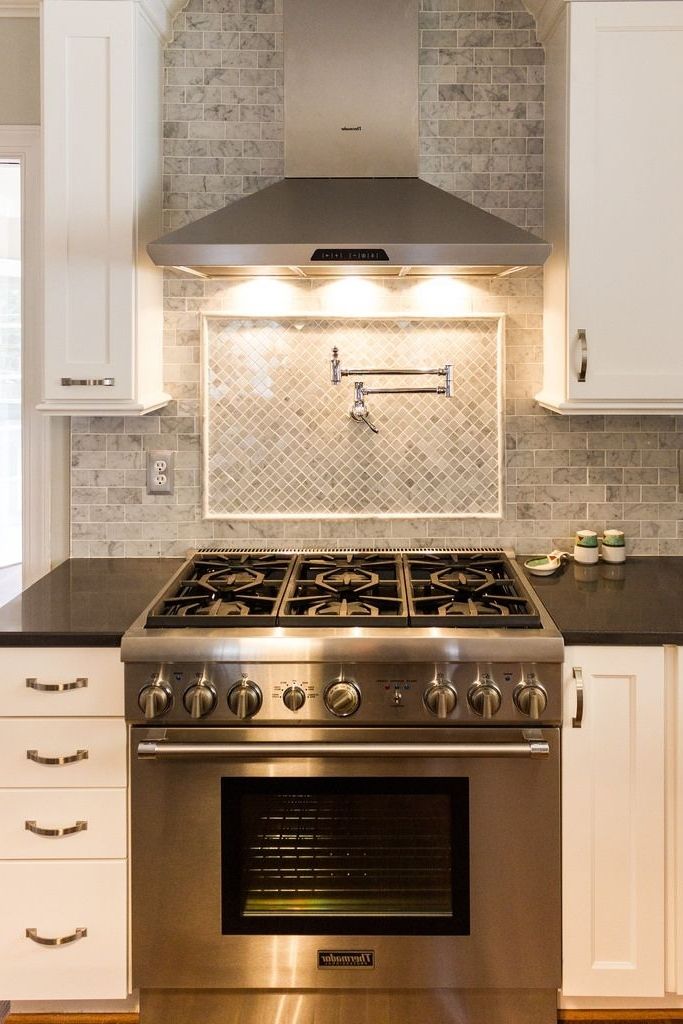 The mirror panel is easy to clean from dirt, it has good resistance to moisture and high temperatures. Such a solution will fit into the interior of almost any kitchen.
The mirror coating also has disadvantages. Chief among them is the complexity of installation. In addition, in order for the mirror coating to look stylish and aesthetically pleasing, it is necessary to constantly keep its appearance clean. Therefore, be prepared for the fact that after each cooking, the mirror apron will have to be wiped clean of dirt.
Stainless steel , as a finishing material, is also popular. Its surface can be matte, glossy or patterned. Steel has strength, durability, resistance to moisture and temperature extremes. nine0003
This material is quite expensive, therefore, in order not to spoil the coating during the first cleaning, it is worth considering that it should be cleaned only with the use of special, non-abrasive cleaning agents.
Wood looks stylish and noble behind a gas stove.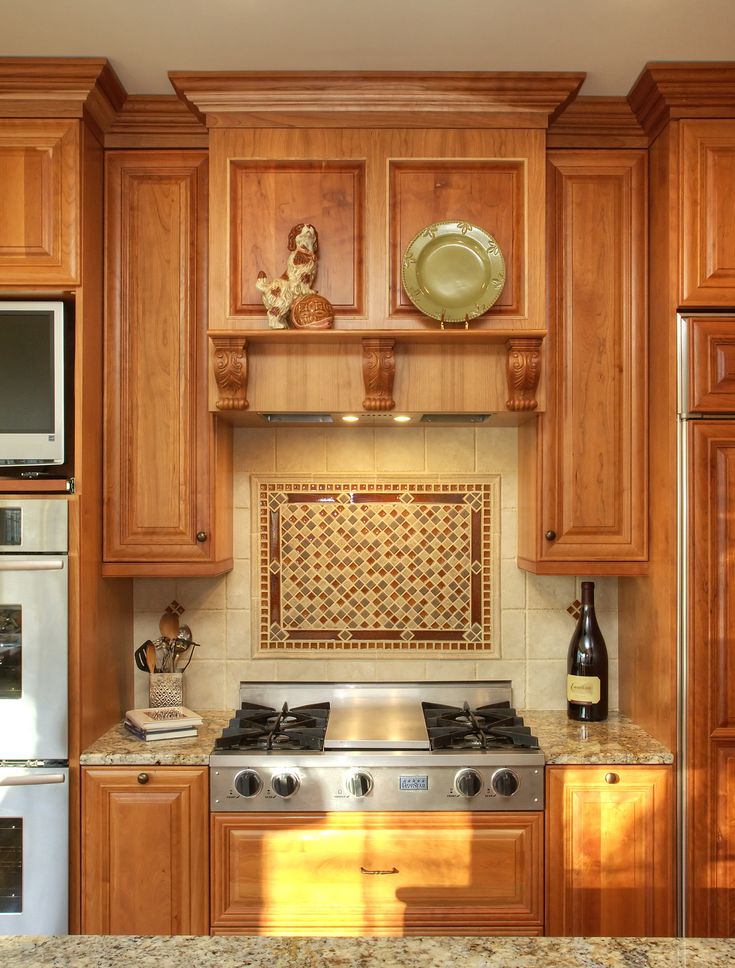 This is perhaps one of the most environmentally friendly materials for wall decoration. But, before you stop your choice on this option, it is worth considering that such a finish will be very expensive. In addition, for proper installation, one cannot do without the involvement of specialists, and this will also cost a tidy sum. nine0003
Wooden apron is a stylish and environmentally friendly solution, but in order for the coating to last for many years, you need to take care of its proper installation and maintenance
Natural and artificial stone - this group includes many materials and not all of them can be used for wall decoration behind the kitchen stove. Among the materials suitable for this purpose, it is worth noting clinker tiles, granite, basalt and porcelain stoneware.
When choosing such materials for finishing a kitchen backsplash, it is worth considering the high cost of the coating itself and its installation, as well as the fact that if the lining is damaged, it will have to be completely changed, since it cannot be repaired.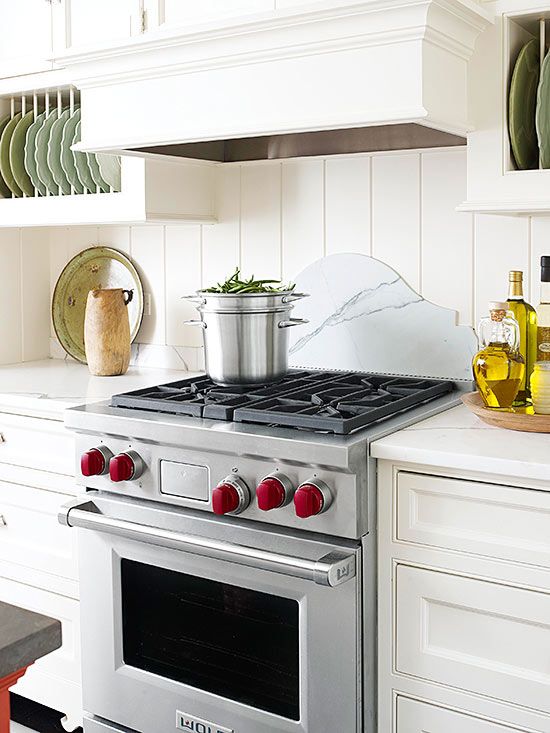 nine0003
The above are the traditional ways to finish the wall behind the slab, but there are also alternatives that you can do yourself. More on this in the next photo gallery.
Image Gallery
Photo of
Using wine corks to create a backsplash is a stylish and original idea. Corks can be laid lengthwise, across, cut into pieces. But, this option is not durable, so you should take care of its additional protection, for example, by covering it with a layer of glass
Don't rush to throw away your old discs - they can make a great backsplash for a work wall in the kitchen. You can create a panel, both from whole disks and from their parts - it will look equally attractive
temperature differences
If desired, you can create a practical and original apron for the kitchen area from fragments of ceramic dishes and tiles. But do not forget that such a non-standard solution is not suitable for every interior
Wine cork apron
Old CDs for work wall
Sea pebbles for wall apron
Ceramic kitchen apron
As you can see, there are a lot of options for decorating walls behind gas stoves.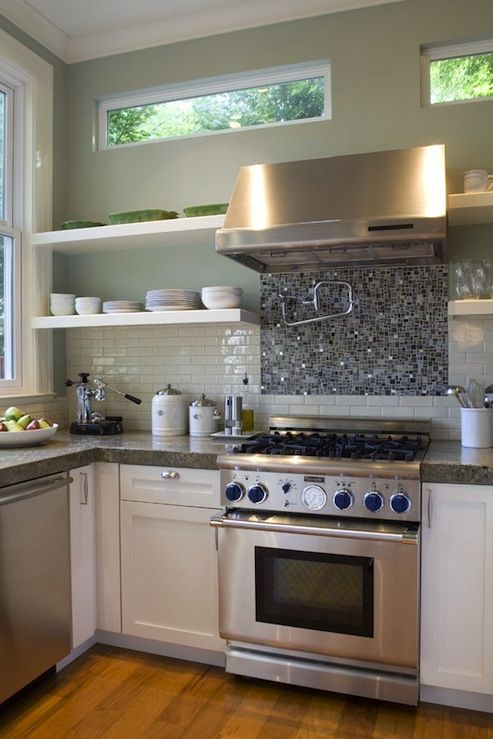 You can choose a classic performance, or you can create a masterpiece from improvised materials with your own hands. The decision should be made based on your preferences and financial capabilities.
Wall finishing instruction
Next, we will analyze a few simple ways how you can independently sheathe a wall behind a gas stove. What materials and tools will be required for this.
Option No. 1 - installation of ceramic tiles
Decorating a working wall in the kitchen with ceramic tiles is one of the most popular and common options. Of course, this work can be entrusted to professionals, or you can try to do everything yourself.
But, before proceeding with the decoration of the walls near the gas stove, we recommend that you familiarize yourself with the progress of the upcoming work. nine0003
Usually the height of the backsplash above the countertop is 50-75 cm. It should be taken into account that the tile must necessarily go beyond the countertop so that moisture and dirt do not accumulate in the joint.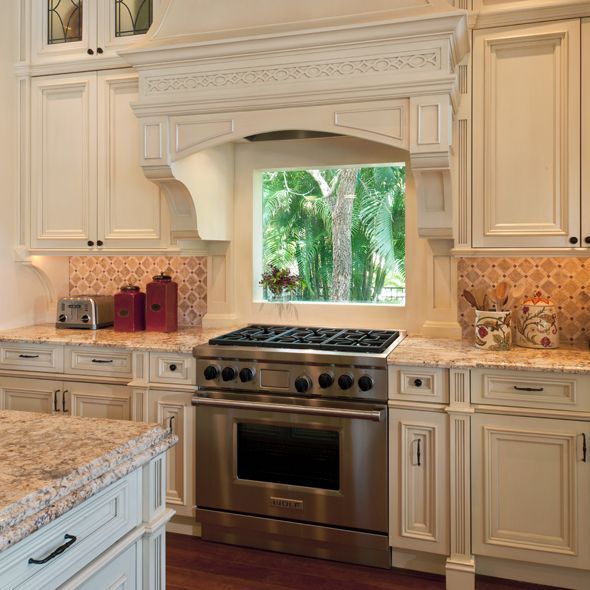
To do this, you need to measure the height and width of the apron itself, not forgetting to take into account the dimensions above the gas stove.
The number of tiles will depend on their size and installation method. Given the possible errors in the calculations and the possibility of spoiling the material, it is better to play it safe and take tiles 10% more than the calculated amount. nine0003
The most economical is the traditional way, in which the tiles are stacked on top of each other without offsets, but laying diagonally will require much more skill
Having purchased the required number of tiles, you can begin to prepare tools for work.
For wall preparation and cladding you will need:
- Hammer drill . It may be needed if there is an old coating on the walls.
- Screwdriver . For mixing adhesive. Only in advance you need to take care of a special nozzle.
- Bucket .
 It is better to take a capacious plastic bucket with a volume of at least 10 liters.
 - Spatulas . To work, you need a narrow, jagged edge and rubber.
- Building level . With its help, the correct laying of the tiles will be controlled.
- Tile cutter . For trimming the edges of tiles if necessary. nine0047
In addition, the following may come in handy: cord, ruler and pencil, rubber mallet, crosses for mounting tiles, grout and, directly, the adhesive itself.
Having prepared all the necessary tools and materials, you can start finishing work.
Image Gallery
Picture of
Step 1 - Preparing the Work Wall
Step 2 - Estimating the Tiles
Step 3 - Applying the Adhesive
Step 4 - Laying the Tiles on the Wall
After all the tiles have been laid, it remains to wait until the adhesive has dried, then remove the crosses and grout the joints with a rubber spatula.
As you can see, the process itself is not as complicated as it might seem at first glance.
Option No. 2 - decorating the wall with a glass screen
A worthy alternative to a protective screen made of ceramic tiles is the use of special tempered glass. This material will reliably protect the walls near the slab from dirt, it is not exposed to moisture and high temperatures, and also has good wear resistance. nine0003
That is why many housewives opt for a glass screen. Yes, and it looks very stylish.
Before starting work, it is necessary to measure the area of the wall on which the glass apron will be attached. It is better to double-check the accuracy of measurements several times in order to avoid installation problems later if the product turns out to be a little larger / smaller than necessary.
To save money, you can order an apron made of transparent glass, and paste your favorite photo wallpaper or a film with a suitable image under it.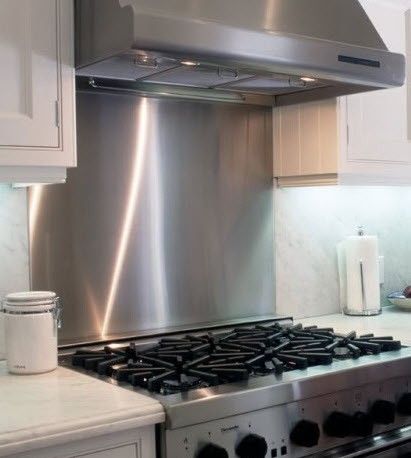 And you can order a product with a printed pattern, but it will cost a little more
When ordering the production of glass for an apron, you should immediately specify the making of holes for fasteners. They must be at least 5 cm from the corners of the product.
The panels are quite large, so the wall to which they are to be attached must be perfectly flat so that the product adheres to it tightly over the entire area.
The protective glass screen is easy to match with the most diverse kitchen interior solutions. And the ability to apply any images you like greatly simplifies the choice
Before starting installation, attach the finished apron to the wall and mark the location of the fasteners with a pencil. Next, using a puncher and with a nozzle of the appropriate size, make holes for the fasteners, insert dowels and anchors into them.
The next step is to position the glass panel on the anchors and fix it with the caps.
As you can see, even a novice home craftsman can handle the installation of a glass apron.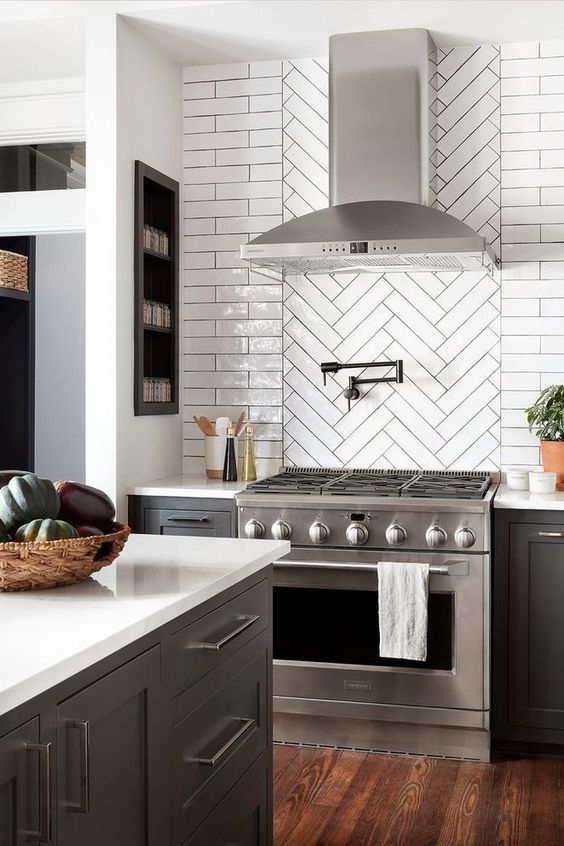 The main thing here is the accuracy of measurements and smooth walls. nine0003
Material selection safety rules
The most important thing in the design of the kitchen space is the right choice of material for finishing the wall behind the stove, especially if the kitchen has gas appliances. In addition to splashes from cooking, this wall will be exposed to high temperatures.
It is therefore important that there is a heat-resistant material behind the hob. In this regard, ceramic tiles, glass, metal have proven themselves well.
If the choice fell, for example, on MDF or PVC panels, then you should know that flammable materials cannot be mounted in the immediate vicinity of gas burners so that such a solution does not turn around. nine0003
Styrofoam, cork, chipboard, drywall and many others can be used as thermal insulation material. The choice will depend on your financial capabilities
Also, do not forget that it is highly undesirable to place a refrigerator next to a gas stove.