Wooden porch ceiling
Porch Ceiling Ideas - make your porch inviting by adding design above
Your patio ceiling is a blank canvas just waiting to be styled. Consider your porch as an extension of your living space. You want it to be as warm and inviting as your indoor living spaces. We think of our covered porches as just shade or protectors from the elements but they also gives us the feeling of our interiors without walls. It’s true that most concentrate on the decor elements like furnishings, don’t forget to look up and consider what you can create on the ceiling of your porch! Haven’t gotten to your porch ceiling yet? No worries, we’ve got tons of porch ceiling ideas in this post.
You can easily add some interest and personality to this all too often forgotten space with one of these porch ceiling ideas. Adding some visual interest to your porch ceiling design is an afternoon project that will have you and your guests wow-ing at your effort. Depending on your porch design, you can select from a variety of materials as well as paint colors so you’re sure to find the perfect combination for your patio. Shiplap, wood planks, reclaimed barn wood, plywood, tin, and bead board are all popular choices for patio ceilings. Additionally, there are numerous design elements including lighting that you can choose from to give your patio a truly personal look. Let’s take a look at some ways you can style your patio ceiling.
Table Of Contents
- Beadboard Porch Ceiling
- Wood Planks/ Tongue and Groove Planks Porch Ceiling
- Painted Wood Plank Patio Ceiling
- Haint Blue Patio Ceiling Color
- Stained Wood Plank Porch Ceiling
- Shiplap Porch Ceiling Ideas
- Vinyl Patio Ceiling
- Reclaimed Barn Wood Porch Ceiling Ideas
- Tin Patio Ceiling
- Pergola Porch Ceiling
- Wood Paneling Porch Ceiling
- Porch Ceiling Ideas – Lighting
- Patio Ceiling Fan
- Patio Pendant Lights
- Flush Mounted Patio Lighting
- String Lights and Cafe Lights
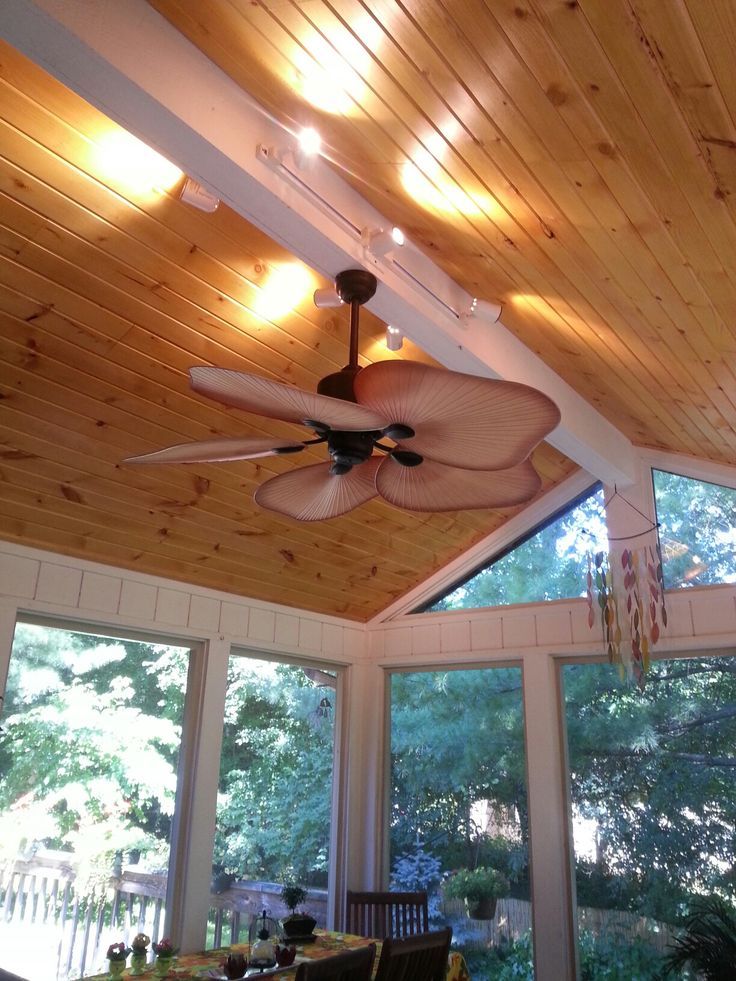
Beadboard Porch Ceiling
via Southern HospitalityBy far the most popular choice for the front porch and back porch alike, beadboard is a great way to customize your exterior space.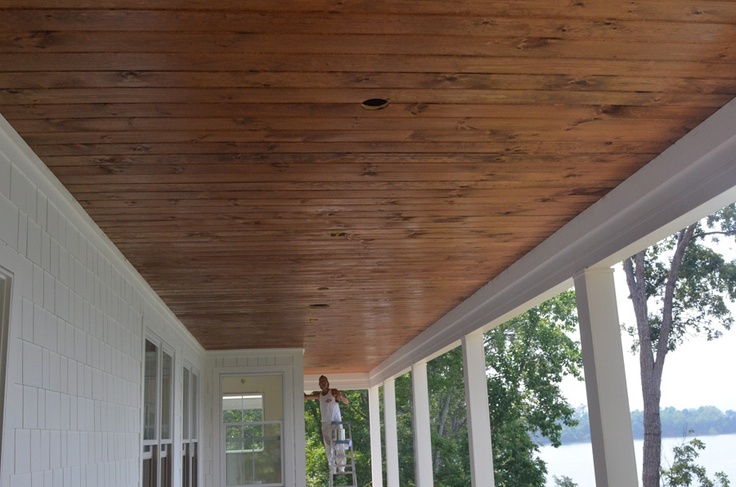 Beadboard is a popular choice for porch ceilings because it’s an inexpensive material and easy to install. It makes for a great weekend DIY project. Beadboard is a type of wood paneling that has vertical grooves or “beads” running along its surface. It usually comes in sheets 38-inch or 44-inch long. You can also purchase it pre-primed or natural wood to suit your painting or staining needs. You also have an option of purchasing vinyl beadboard if you want a more durable product. You can paint it any color you’d like, or even stain it for a more natural look. Beadboard ceilings are classic and very popular in coastal and southern homes. It’s a simple way to add charm and character to your patio.
One important thing to keep in mind, if you decide to paint your beadboard, it is typically much easier to paint beadboard paneling prior to installation.
Wood Planks/ Tongue and Groove Planks Porch Ceiling
via Plank & PillowAnother great feature to add to a porch ceiling is wood planks also known as tongue and groove planks. It’s another popular choice for porch ceilings. They provide a warm and natural look that is perfect for any patio. You can choose from many different kinds of wood, that are great for exterior spaces, such as cedar, pine, or redwood. You can also opt for composite wood planks that are made from recycled materials.
Painted Wood Plank Patio Ceiling
An alternative to a natural wood ceiling would be a painted wood plant ceiling. Paint is always a fun way to inject color into an outdoor space. You can use any color you like, or even give it a pattern or design. Blue is a popular paint color for porch ceilings. Some other colors to check out as possible options for your patio ceiling are: Sea Salt, Top Sail, and Whisper White.
Haint Blue Patio Ceiling Color
via My Life From HomeWe cannot discuss outdoor patio ceiling ideas without talking about haint blue porch ceiling. Haint blue is the single most popular color for porch ceilings. Ironically, “haint blue” isn’t an actual paint color at all. “Haints” also known as ghosts, or the southern variation of them, are said to not be able to cross water. To keep malevolent spirits away from their homes, southerners painted their porch ceilings a haint blue color in order to scare away these bad spirits.
Even if you don’t believe in ghosts or the tale of haint color porch ceilings. A blue ceiling adds plenty of benefits from a design perspective. It adds loads to the curb appeal of your home. Some blues to consider if you are interested in a haint blue patio ceiling are Sherwin Williams Rain, Sherwin Williams Sea Salt, and Benjamin Moore Palladian Blue.
Stained Wood Plank Porch Ceiling
Staining your wood plank patio ceiling is a great way to add some depth and dimension to your space. Staining the wood planks will highlight the natural grain of the wood, giving it a beautiful look. There are still loads of customizable options when staining a porch ceiling. Here are some popular stain options on pine.
Shiplap Porch Ceiling Ideas
via Kyle and KateShiplap is a type of wood siding that has been around for centuries but has gained renewed popularity with the farmhouse trend.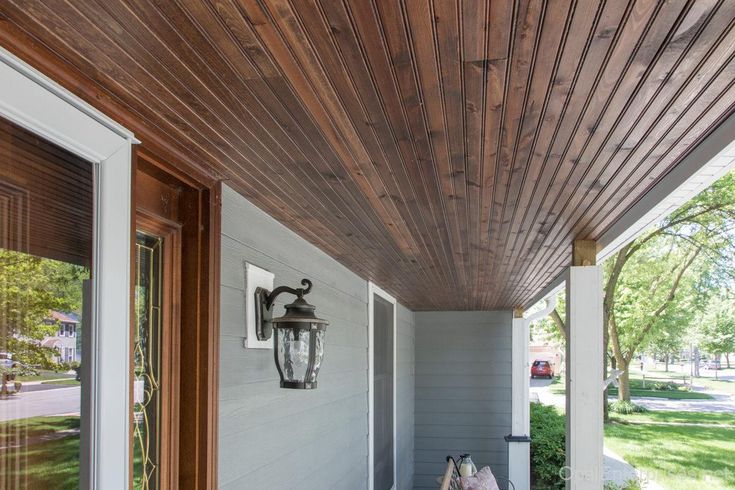 It’s characterized by its overlapping boards that create a tight seal against the elements. Shiplap is a popular choice for patio ceilings because it’s durable and easy to install. Plus, it gives your patio an instant classic and rustic look.
As with beadboard and wood planks you can leave a patio ceiling’s shiplap natural wood or paint it.
Vinyl Patio Ceiling
via Jen RizzoUsing vinyl as a porch ceiling material has many advantages. It comes in a variety of styles (including beadboard) and it is easy to install and the maintenance is a breeze (no scaping and re-painting) just powerwashing! Plus, it’s one of the more inexpensive patio ceiling options.
Reclaimed Barn Wood Porch Ceiling Ideas
via Life with Neal and SuzIf you’re looking for a truly unique patio ceiling, why not use reclaimed barn wood? This material adds plenty of character and charm to your patio. Plus, it’s eco-friendly since you’re using recycled materials. Reclaimed barn wood is also very durable, so you won’t have to worry about replacing it anytime soon.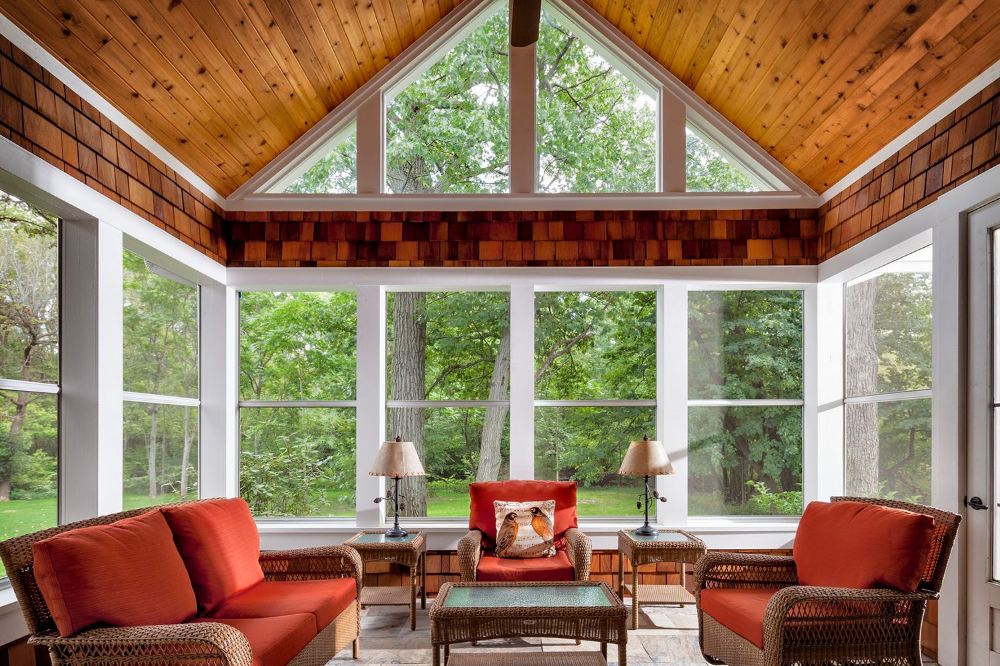 You can also get really creative with the design using exposed beams. You can choose to cover the entire ceiling or just install a few wooden beams of reclaimed barn wood.
Tin Patio Ceiling
via Old Brand NewTin patio ceilings are a popular choice for homes in warm weather climates because they help keep your covered porch cool. Tin is also a very durable material that can withstand the elements. Plus, it’s easy to install and comes in a variety of colors and patterns. Using tin for your patio ceiling has an additional bonus in that you get to enjoy the relaxing sound of “rain on a tin roof.”
Pergola Porch Ceiling
Via J. Montgomery DesignsA pergola is an outdoor structure that typically consists of a wood or metal frame and has vertical slats on top. It can be used to provide shade and support climbing vines and plants, while also serving as a decorative element in your front or backyard. Some pergolas have a roof or canopy to provide additional protection from the sun or rain, this usually consists of tin, canvas or plastic sheeting.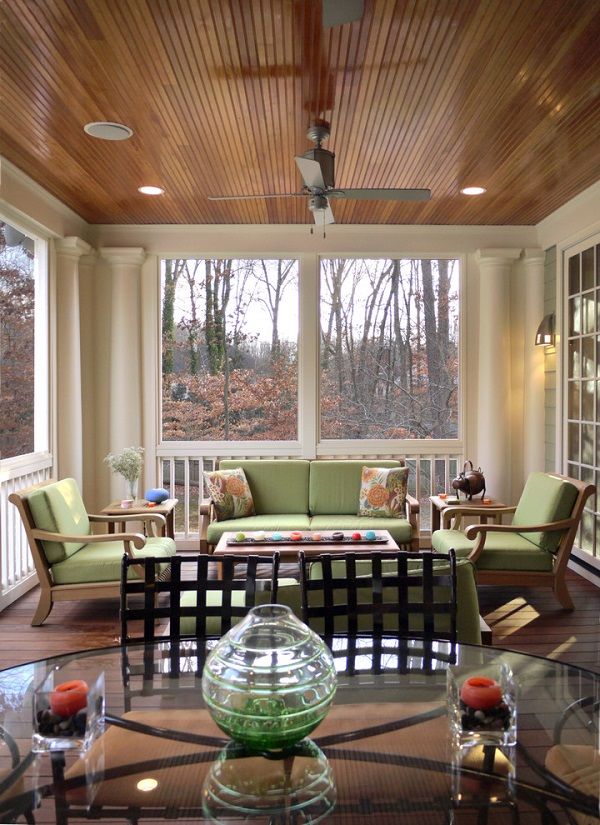 My favorite pergolas are ones that have climbing plants rising up the frame.
Wood Paneling Porch Ceiling
Via Ross Built Custom HomesIf you are looking for a clean and beautiful porch ceiling this might be the idea for you. The wood paneling on this porch ceiling goes great with the coastal vibe of this home. To add a spin to this porch ceiling idea you could easily paint the top wood boards a different and contrasting color to make the wood paneling stand out even more.
Porch Ceiling Ideas – Lighting
Now that we’ve discussed the many porch ceiling ideas, it’s time to think about another thing that will add to your home’s curb appeal and that’s your porch lighting! To create the most comfortable outdoor living space you’ll want to need to add lighting to your porch. You can (and should) install lighting in your outdoor ceiling. Consider light fixtures such as a patio ceiling fan, pendant lights, and even flush mount lights to make your patio more comfortable.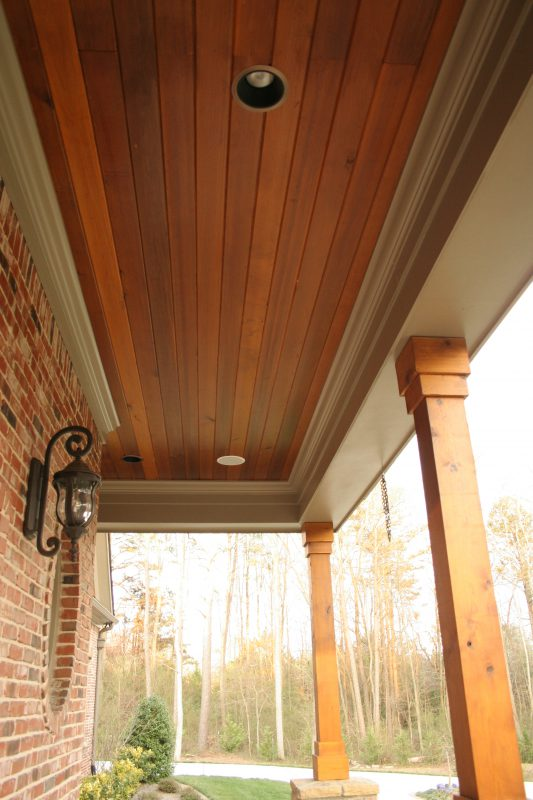
Patio Ceiling Fan
Via Samyn D’Elia ArchitectsIf you live in a hot climate, a patio ceiling fan can be a lifesaver. A patio ceiling fan helps circulate air and to keep your patio nice and cool on those hot summer days. Additionally, it helps to keep insects away in those warmer months.
Patio Pendant Lights
Simple StylingsPendant lights are a type of patio ceiling lighting that hangs down from the ceiling. They come in a variety of styles so you can be sure to find something that suits your home.
Flush Mounted Patio Lighting
Flush mount patio lights are another type of patio ceiling lighting. As the name suggests, these fixtures are flush with the ceiling. They’re a good choice if you have a lower porch ceiling or a screened porch ceiling.
String Lights and Cafe Lights
via Thrifty Decor ChickAnother completely optional but so fun fixture is the installation of string lights or cafe lights. They’re perfect for creating a warm and inviting atmosphere on your patio.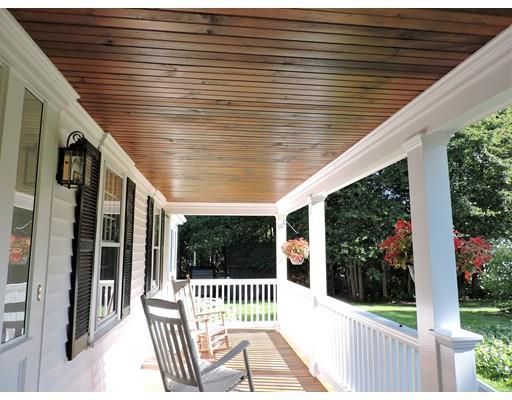 Imagine sitting around with friends on summer evenings under a string of twinkling lights. It’s such a simple way to create some magic. String lights are also very versatile and can be hung in a variety of ways. You could wrap them around columns or railing, or hang them from your patio ceiling.
Wrapping Up
To wrap up, there are many inexpensive porch ceiling ideas to choose from. Beadboard, shiplap, wood planks, tin tiles, or even barn wood. You can create a gorgeous ceiling design that will bring warmth and coziness to your outdoor space. Take the opportunity to bring the indoors out by sprucing up your patio. No matter what material, design, or haint blue paint color you choose, don’t forget the patio ceiling lights! They’ll help create the perfect ambiance for your outdoor living space and do wonders for your home’s curb appeal!
How to Install a Beadboard Porch Ceiling
Project details
Skill
3 out of 5 Moderate Standing on a step-ladder with your head cocked sideways and working overhead will leave you sore the next morning, but technically, this is of moderate difficulty.
Cost
$5.50 to $6.50 per square foot
Estimated Time
Two 6-hour days
Tools & Materials
-
Tape measure
-
Miter saw
-
Jigsaw
-
Pneumatic finish nailer
-
combination square
-
Pneumatic brad nailer
Picture a warm spring afternoon - you, on the front porch glider, lemonade in hand, gently swaying back and forth. This is the life, right? Until, that is, your gaze drifts upward and there it is: builder's grade plywood.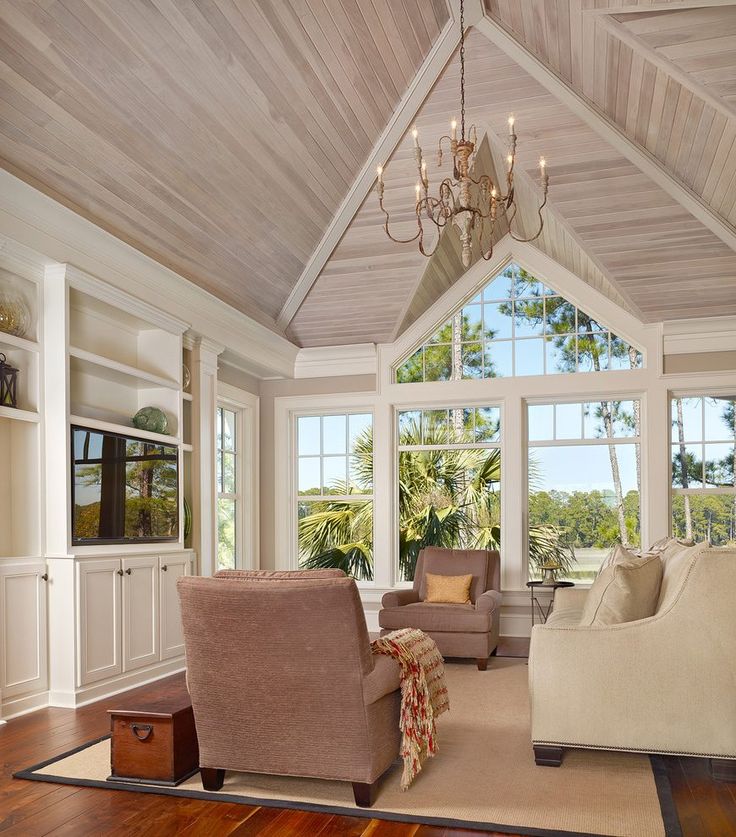
Visions of lazy afternoons lounging in your own shaded haven have now been overtaken by how to avoid looking at the dreary underside of the porch roof. Rather than averting your eyes, grab your tool belt and start planning your next project: a new beadboard ceiling.
Paneling the underside of your porch roof with wood is strictly an aesthetic endeavor, of course. But with a little know-how and a lot of patience, it's a way to add a touch of tradition and charm to a covered entryway - or to a bathroom, kitchen, or mudroom, for that matter. And it makes for a much nicer view when you wake from that rocking-chair slumber.
Tip: To calculate the number of strips you'll need, measure in inches the longest span of the porch, divide by the width of the beadboard you plan to use to get the total number of boards, then add 10 percent to cover mistakes and offcuts.
Step 1
Beadboard Ceiling Overview
Photo by Gregory NemecMost porch ceilings are covered, at the least, with plywood—which is the perfect substrate for a high-grade finish like beadboard.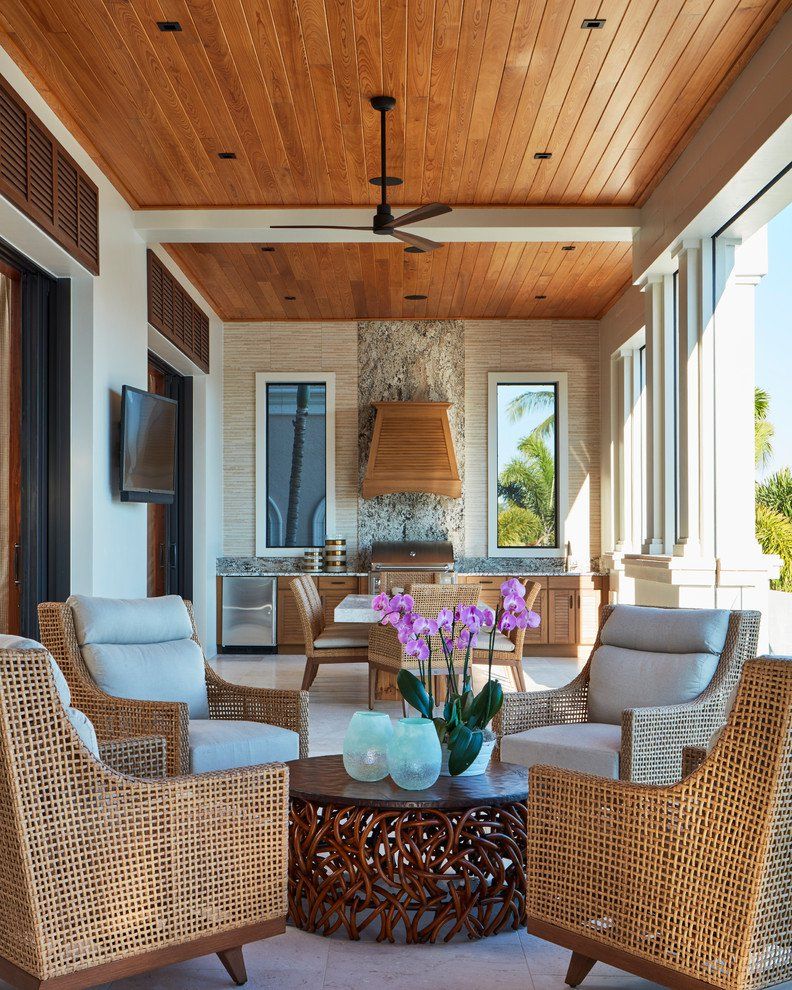 However, if for some reason the joists of your porch roof are exposed, don't fret; you can either put up sheets of plywood first or, if your joists run parallel to the house, tack the beadboard right to them.
Here, carpenter John Fitzpatrick of Stone Ridge, New York, shows how to install the beadboard simply and quickly. The process doesn't require a lot of complicated engineering, but you do want to be very careful with your measurements so the boards look neat and even.
One thing you'll really want to consider is renting a couple of nail guns and a compressor, if you don't already have them. Sure, you can stand there all day hammering tiny little finish nails over your head. But you'll thank yourself many times over if you spring for the pneumatic guns—fasteners will go in quickly, straight, and without splitting the wood. And you won't be left with hammer dents and a bunch of nailheads that need setting and filling before you can paint the ceiling.
Using preprimed beadboard will also limit your labor on this project.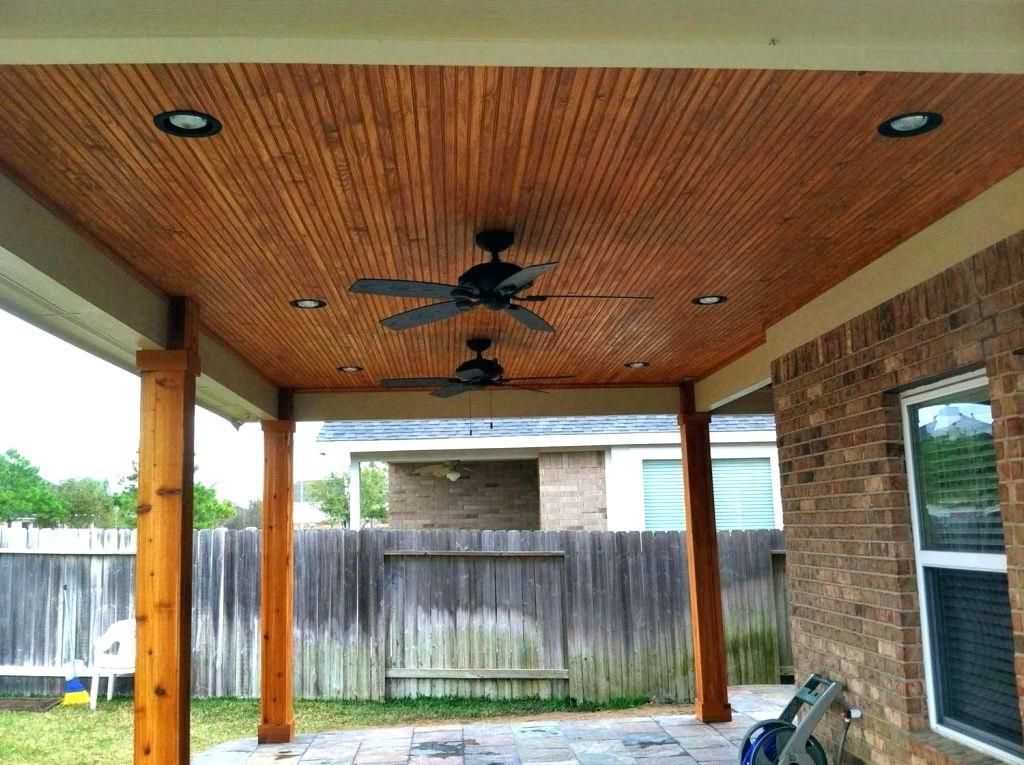 If you want to be extra vigilant, you can take a page out of This Old House master carpenter Norm Abram's book and also prime the ends of the boards after you cut them. This seals the wood against warp and rot—a good idea in an exterior application. Then, once your ceiling is nailed up and finished, put a fresh coat of paint on everything—for the Victorian-era look, make it sky blue—and your classic porch is done.
Step 2
Cut the beadboard to length
Photo by Kolin SmithMeasure the depth of the porch front to back at the end where you will start installing the beadboard. Subtract ½- inch from this measurement to account for the ¼-inch gap you want to leave around the perimeter of the ceiling to allow the wood to expand. Using a miter saw, cut a piece of beadboard to this measurement.
Step 3
Trim the first board
Photo by Kolin SmithBefore you put up the first piece, calculate how many boards it will take to cover the ceiling.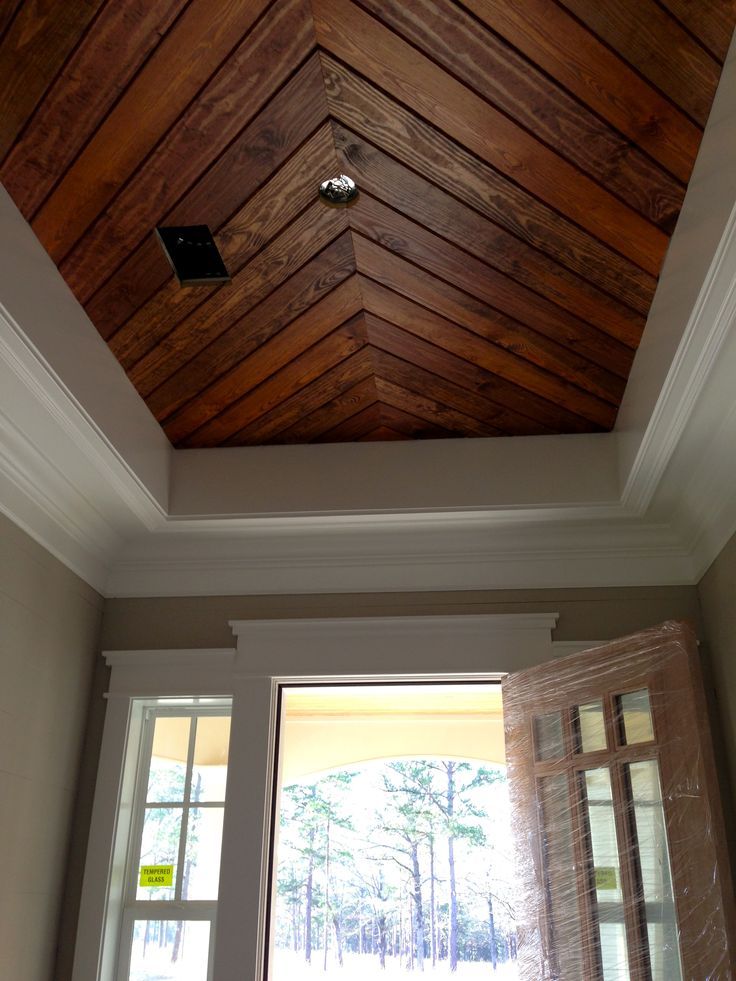 Measure the actual width of several pieces of beadboard and average these out to get the true width of the wood after shrinkage. Divide the width of the porch ceiling by the true width of the beadboard to get the number of whole boards that will cover the ceiling.
If the last board will end up being less than 2 inches, then you will need to trim down both the first and last board to make the ceiling look evenly spaced. To do that, add the width of the last board to the width of a full board. Subtract ½ inch to account for the expansion gap. Then divide by two. This final figure is the width of each end board. Using a jigsaw, trim the first board to this width.
Step 4
Saw off the grooved edge
Photo by Kolin SmithWhen trimming the first board to width, be sure to cut off groove side of the board. That will leave the tongue edge for nailing.
If your calculations from Step 3 show that the last board will end up wider than 2 inches, start with a full board.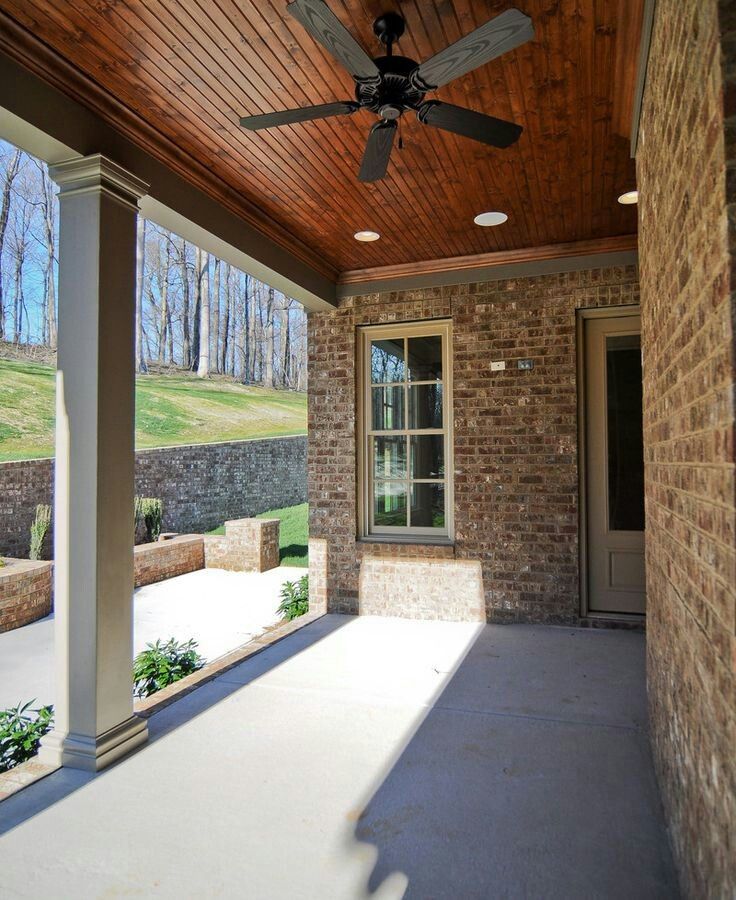
Tip: When using a jigsaw, you can prevent chipping on the face of the board by first scoring your cut lines with a utility knife or by cutting on the back side.
Step 5
Face nail the first board
Photo by Kolin SmithPosition the first board on the ceiling, groove side (or the side you cut) against the wall, ¼ inch away from it. Using a pneumatic gun and 2-inch finish nails, face nail the board to the plywood underlayment every 12 to 16 inches. Position the nails ½ inch to ¾ inch from the outer edge of the beadboard so they can be covered later by the lattice trim.
Tip: To keep the beadboard looking smooth across the ceiling, don't put nails too close together or the wood will contour to dips in the plywood. Instead, keep nails at least a foot apart to let the weight of the board pull it down level.
Step 6
Toenail the rest of the boards
Photo by Kolin SmithAll the boards, including the first one, should be nailed every 12 to 16 inches through the tongue for the most secure assembly.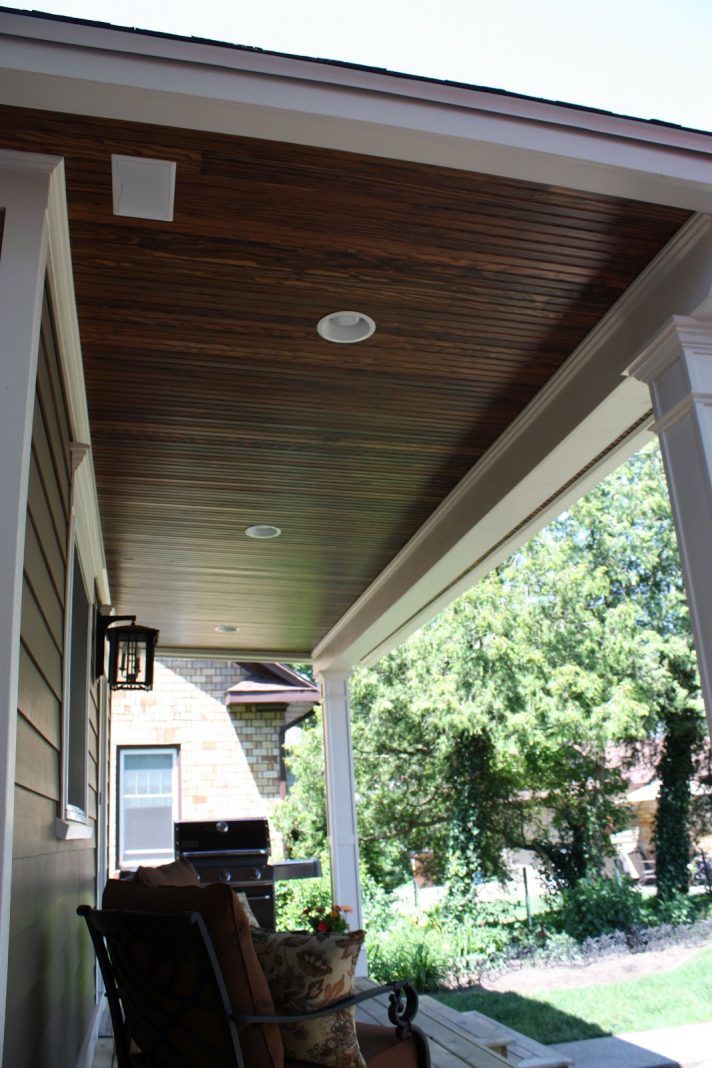 Position the pneumatic gun at the back edge of the board's tongue, then angle it away from the tongue and to one side. This will keep the nail from pulling out and from blocking the tongue when you fit the groove of the next board over it.
Measure for and cut the next board. Slide its groove over the tongue of the previous board. If necessary, tap it tightly in place with a hammer on a woodblock. Nail it through the tongue as detailed above. Continue installing beadboard in this manner.
Tip: Use a scrap of beadboard as your woodblock so you can fit the groove over the tongue and keep the tongue from mushrooming when you hammer it.
Step 7
Trim beadboard around openings
Photo by Kolin SmithIf you come to a light fixture or speaker, you'll need to cut an opening in the beadboard. For a square opening, measure the distance from the edge of the last board (not including the tongue) to the edge of the opening. Then dry fit a piece of beadboard in place, letting it overlap the hole. Mark the beadboard where it meets the opening's sides.
Step 8
7. Mark cut lines on the boards
Photo by Kolin SmithAfter marking the beadboard at the sides of the opening, mark the distance between the last board and the edge of the hole onto the face of the board. Take the board down and use a square to extend your marks to meet each other. Notch the board with a jigsaw. If the opening is big enough, install cut boards butted against the sides of the hole, then finish with another notched board.
For a circular opening, dry fit each piece individually and reach into the hole with a marker and trace the shape of the opening on the back of the board.
Step 9
Tack up the trim
Photo by Kolin SmithFinish installing beadboard to cover the ceiling. Trim the final board, if necessary, from the tongue side. Install lattice trim around the perimeter of the ceiling, tight against the siding to cover the expansion gap. Cut the pieces of lattice with a miter saw.
Using a brad nailer, tack the lattice to the beadboard. Again, nail the trim every 12 to 16 inches, and make sure to only nail into the beadboard, not the wall, so that the trim will expand and contract with the rest of the wood.
Once all the trim is in place, paint the whole ceiling. Because brad nails are so small, the paint will cover their holes in the lattice.
Step 10
BUYING GUIDE: Beadboard
Photo by Todd HuffmanBeadboard is sold as 1-inch-thick tongue-and-groove boards, offered with different widths between the beads. Which one you choose is a matter of personal taste; you can even mix them together to make a pattern. You can also get less expensive plywood beadboard, which comes in 4-by-8-foot sheets and can be nailed right to the joists, or faux beadboard made from cellular PVC, which is more stable than wood in an outdoor setting.
White pine 3 ¼-inch beadboard, 37 cents per ft. ; hemlock 2 ½-inch beadboard, 63 cents per ft.; and aspen 1 ½-inch beadboard, 64 cents per ft.; all from Reliance Specialty Building Products. PVC beadboard, $1.55 per ft., from AZEK Trimboards. Plywood beadboard, $37 per sheet, from The Home Depot.
Step 11
BUYING GUIDE: Solid Flooring
Photo by Todd HuffmanFor a plainer profile, install tongue-and-groove flooring on your porch ceiling, then paint or stain it. Or choose a flooring made from a wood that stands up to the weather, such as teak or cedar, and either get it prefinished or leave it unfinished for a more rustic look. Because the flooring won't be walked on, you can get away with boards as thin as 3/8 inch. Try to order long pieces to avoid seams.
Red oak flooring, about $77 a bundle (19 sq. ft.), from The Home Depot. Prefinished ⅜-inch Bellawood Santos mahogany, $5 per sq. ft., from Lumber Liquidators. Vertical grain cedar, $1.39 per lineal ft. (to find a distributor go to realcedar. org). Unfinished ⅜-inch Bellawood Brazilian teak, $2.45 per sq. ft., from Lumber Liquidators.
Step 12
BUYING GUIDE: Engineered Flooring
Photo by Todd HuffmanFor an exotic-wood ceiling without the cost or weight of solid boards, use engineered flooring, which combines a finished veneer of wood over a base of plywood. You may, however, be stuck with seams on your ceiling, as engineered flooring is often sold in bundles of varying lengths. Because some companies don't guarantee their products for outdoor use, they're best used on an enclosed porch.
Island Chestnut, $10 per sq. ft., Horizontal Bamboo in caramel, $8 per sq. ft.; and Heritage Hickory in topaz, $14 per sq. ft.; all from Mannington Mills.
what to make, how to hem and line the ceiling on an open veranda on the street
To make a country house truly cozy, you can make an open veranda. Its design must be approached as deliberately as the decoration of other rooms.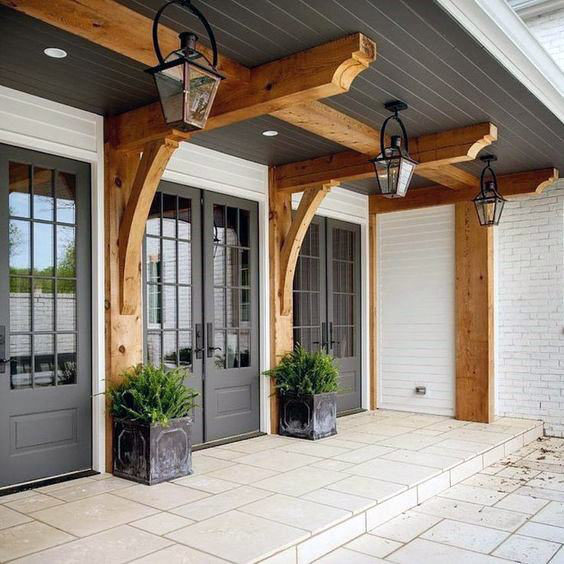 The ceiling of the extension should "breathe", fit into the overall interior and be beautiful. To finish the veranda, modern manufacturers offer a wide range of materials that differ in price and performance.
Veranda ceiling: what to make?
The first step is to pay attention to the most common materials. Today, for cladding and decorating an open ceiling on a terrace, you can use:
- wood;
- PVC;
- glass;
- paint;
- wallpaper;
- flexible rods;
- metal.
Some will last a long time, others will have to be changed in three or four years. The main thing here is to find the perfect option that suits the owners of the house.
Many people think that only wood is suitable for the ceiling in the country house, but this is a stereotype. If you look at photos of modern design projects, you can see that both PVC panels and wicker ceilings fit perfectly into the interior of a rural house.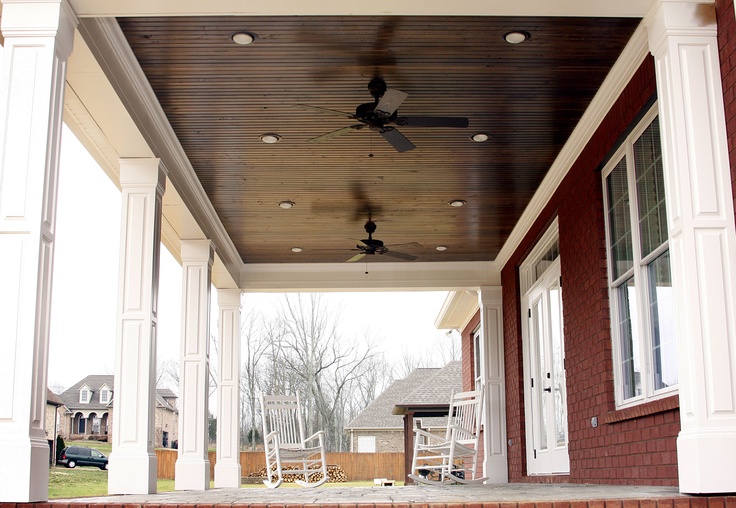 The most affordable option is still wallpaper and paint. But such finishing methods are more suitable for a closed terrace. On the street, with a constant draft and bright sun, the wallpaper will please the owners for only one season, and the paint will last no more than three years.
Wooden ceilings on the veranda
If you don't know how to hem the ceiling on the veranda outside, stop at the tree. A more practical, high-quality and environmentally friendly material has not yet been invented. Wooden boards fit perfectly into the classic interior of the house. They harmonize well with rattan furniture and pillows in checkered pillowcases.
Wooden ceiling - ideal for a country house veranda. The tree breathes, serves for a long time and makes any interior cozy.
It is desirable that the windows and lining on the walls and ceiling be made of wood of the same texture and color.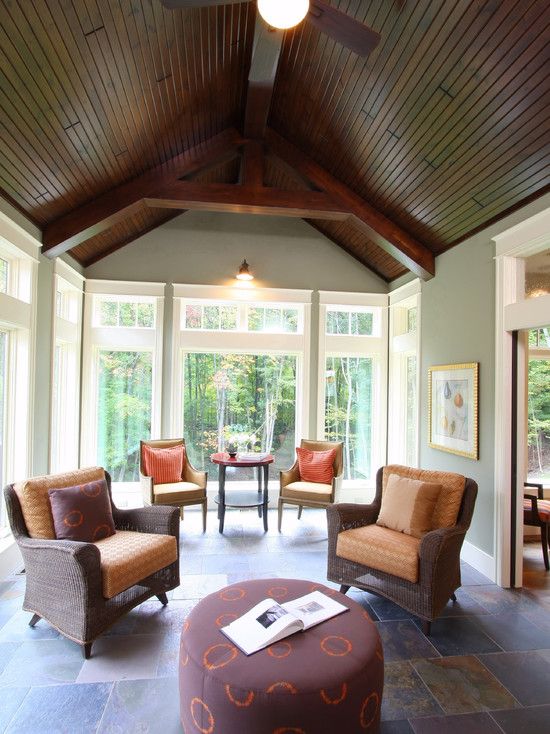 But making a ceiling from this material is not so simple. The roof slope must be reliable and strong, because it will have to mount a frame for a wooden ceiling from the inside. Ceiling beams should not be rotten or old.
Wood is often not covered with paint, but only with stain or special protective compounds so that the natural pattern is noticeable.
If used correctly, the material can last a long time. But he is afraid of water, and in a humid climate, even the best wood can warp. The suspended ceiling from the lining must be treated with compounds that will protect it from parasites and pests. Only specialists can mount a tree. Therefore, this option for finishing the ceiling on the veranda is not suitable for everyone.
PVC ceiling – fast and reliable
On the veranda it is possible to make a ceiling from PVC panels. They are cheaper than wood, serve for a long time, and are not afraid of moisture and temperature changes. But this finishing material also has disadvantages. PVC is a synthetic material, so it does not “breathe” and is considered non-environmental (compared to wood). Plastic is highly flammable and may warp when exposed to direct sunlight.
The room will appear larger and the ceiling higher if light plastic panels are used for its decoration.
PVC ceiling lining is not suitable for all interior styles. But such panels weigh several times less than wooden boards. For this reason, they can be attached to old floors and ceiling beams. The main advantages of plastic panels are low price and easy installation.
Glass ceiling on the veranda
Recently, glass ceilings have become very popular. Without the help of good craftsmen, such a project cannot be implemented, since the load on the material must be calculated as accurately as possible. Services for the installation of such ceilings are provided by specialists who deal with windows.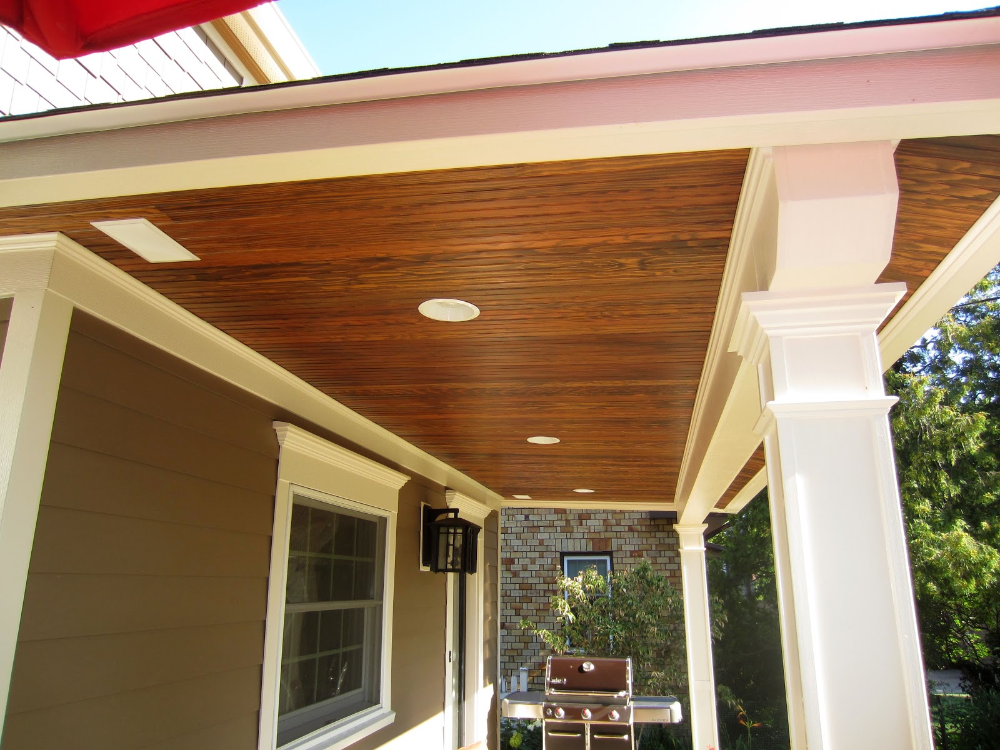
The glass ceiling is a special chic. Its installation is expensive. But you can pay a lot of money to have breakfast in the open air every day.
The glass ceiling will fit into almost any interior. But it will look especially good in loft or high-tech houses. In this case, you need to install a powerful ceiling structure, as well as the use of impact-resistant glass. Such a ceiling will cost more than wood or plastic. But it looks very impressive - this is its main advantage.
Paint and wallpaper - a budget option for the ceiling
If the ceiling is even and without flaws, it can be painted. For this, oil or acrylic paint is suitable. It is better to choose light colors. With them, the ceiling will appear higher, and visually the boundaries of the veranda will move apart. For classic interiors, it is better to use paint of the same color. Fans of experiments can divide the ceiling with different shades and thus zone the space.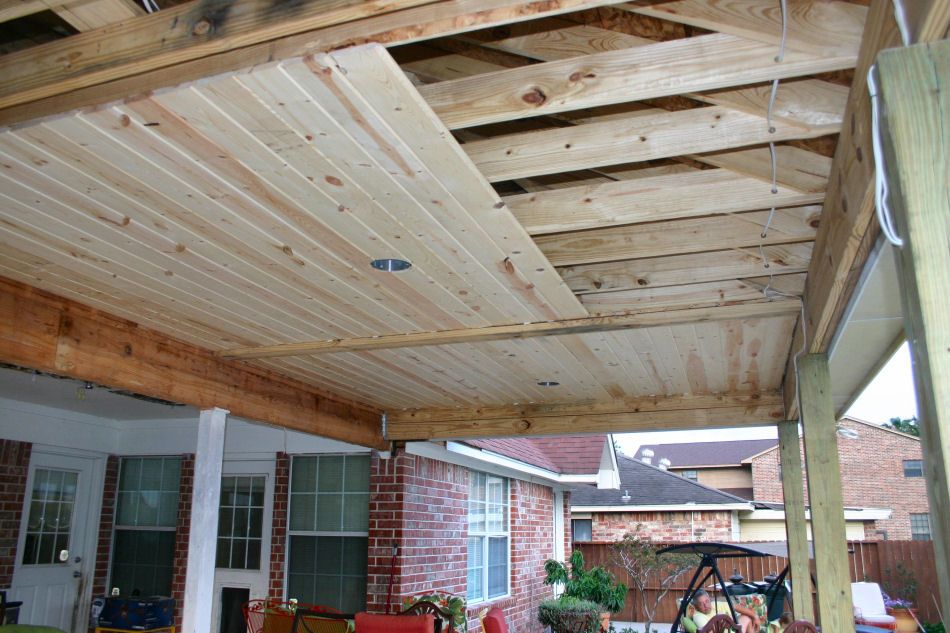 Even a person who has no experience in carrying out repairs can paint the surface. One or two days is enough to complete the work.
Wallpaper is not the best option for decorating the ceiling on the veranda. They are easy to stick, but do not last long. In the fresh air, the material begins to peel off, the paper will fade and swell. Non-woven or vinyl-based wallpaper may be suitable for the veranda, but they are also very short-lived.
Wicker ceilings - an original solution for a veranda
In this case, not lining or plastic panels should be hemmed onto the finished wooden frame, but sheets woven from willow, bamboo, rattan, etc.
You can cut plywood with your own hands and twist it crosswise. Despite the fact that the material is inexpensive, such a filing will look spectacular. To order, tiles are made from any flexible tree.
This ceiling has an impressive weight. It is driven to the ceiling with long nails. And this must be done not only in the corners, but also in the center of the structure.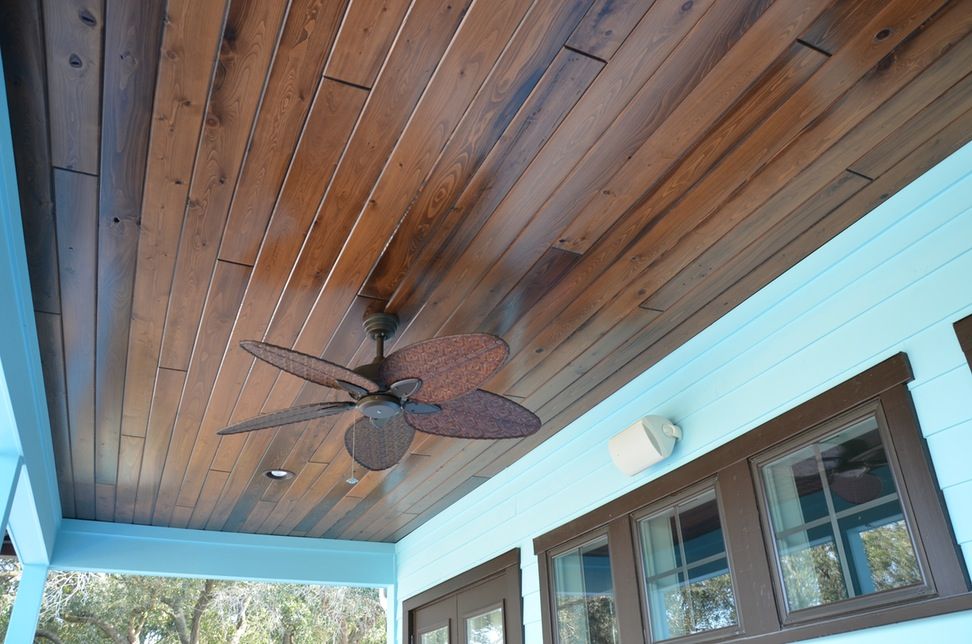 Wicker ceilings breathe, and wooden lining successfully hides any surface irregularities, wires and pipes. The manufacture and installation of such a ceiling will take a lot of time, but it will look spectacular.
Metal ceiling on the veranda
Metal profiles can be used to cover the ceiling on the veranda. In this case, a frame is attached around the perimeter of the room, and metal cassettes are inserted into it. Remotely, it resembles plastic or wooden panels, but it still looks different.
This ceiling is suitable for Scandinavian-style rooms, loft or high-tech. Such a design may not fit into the interior of a classic country house. Metal, unlike other materials, will last a long time. It does not deform and is not afraid of temperature changes. Its main enemy is moisture. Therefore, the cassettes must be treated with a special primer and paint. The metal structure is heavy. Therefore, you need to install it only on a reliable ceiling. Rotten beams frame and metal cassettes will not stand.
We decorate the ceiling of the veranda with our own hands
Before decorating, the veranda must be repaired. If all the work is done correctly, then you will get additional living space. It can be used as a dining or recreation area.
Whether it will be cozy and warm on the veranda also depends on the correct ceiling finish. If the budget is limited, and there is no extra money to call the masters, you can finish the ceiling with your own hands. Now there are enough articles and videos on the Internet that tell you how to do this work yourself.
Before heading to the hardware store, decide what kind of ceiling you will have. If the beams are reliable, then you can make it out of metal or wood. If they can't handle the heavy structure, opt for a ceiling covered in plastic, wallpaper, or paint. Only professionals can make a glass surface, so you should not try to build it yourself.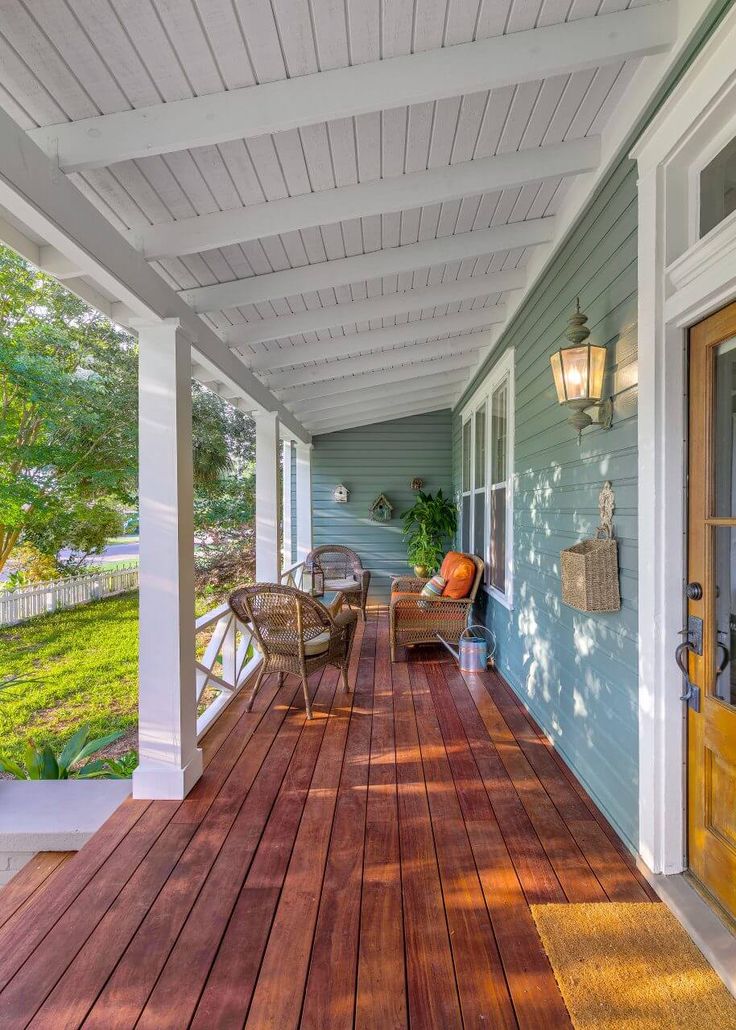
Ceiling frame assembly
All types of ceilings are mounted on a solid frame. It can be made from a wooden beam or a metal profile. It must be mounted not only around the perimeter, but also in the center of the ceiling, otherwise the structure will not withstand the load and collapse.
To fasten metal cassettes, wall paneling or plastic panels, you need to make a powerful frame made of wood or metal.
Be sure to leave a small distance between the frame and the ceiling (20-30 cm). It is all filled with a special insulation - on a cold veranda it is impossible without it.
The frame is needed in order to hide the pipes and make the lighting wiring. If you do it yourself, be sure to insulate the wires, as a fire may start if it comes into contact with the insulation fiber.
Many people think that after installing the frame, the ceiling will become lower. This problem can be solved with the help of finishing materials.
They should not be dark, and then the frame ceiling will not “press” on the head and reduce space.
Ceiling insulation
To keep the room warm, it is necessary to insulate not only the walls and floor, but also the ceiling. The following materials can be used for this:
- mineral wool;
- foam;
- polyurethane foam;
- penofol;
- tow and moss.
Use several different materials to insulate the ceiling. If you combine them correctly, it will always be warm on the veranda.
Wool suitable for frame structures. It does not burn and keeps heat well, but over time it becomes caked and begins to let cold air through. Styrofoam weighs little and is inexpensive, but it is highly flammable, leaks steam, and can deform. Mice and rats often gnaw on such material, which is why it has to be changed. Polyurethane foam is expensive, deforms under heavy loads, does not "breathe" and changes under the influence of bright sun.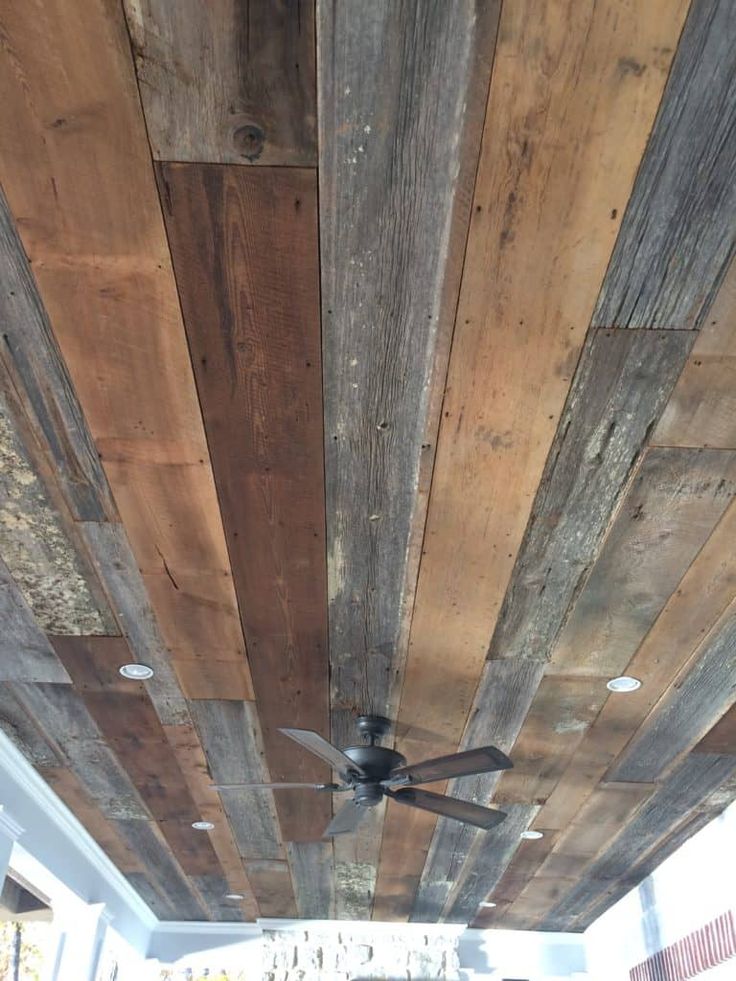 But it is light weight, easy to install and long lasting.
Penofol is considered one of the best heaters. It is a frozen foam covered with foil. It is easy to install, non-flammable and environmentally friendly material. For a cold veranda, this is an ideal option for insulation. It can be combined with tow and moss or other materials.
Finishing the ceiling
When the frame is assembled, the finishing can begin. Lining and plastic panels are attached to the frame and snapped together with locks according to the "groove-comb" principle. This task is not so difficult to deal with. The main thing is that the panels are fixed not only at the walls, but also in the center of the room.
Wood panels can be sanded and varnished or painted with acrylic. This finish is suitable even for small spaces. The main thing is that the paint is white, beige, creamy or any other light shade. If there is no opportunity and time to make a wooden or plastic ceiling, it can be leveled and covered with wallpaper.