What to put in bottom of raised beds
What Do I Put on the Bottom of a Raised Garden Bed? 4 Things
Florida Yards is reader-supported. When you buy via our links, we may earn a commission at no cost to you. Learn more
Weeds are one of the challenges of gardening. They take up too much space and remove sunlight, water, and nutrients from your plants. They also invite insects that can do more damage to your crop.
Gardening in a raised garden bed is a great option to prevent weeds. It also allows easier control in improving the soil, better drainage, and lesser work for your back.
Now, you might ask, “what do I put on the bottom of a raised garden bed”?
The most used materials for a raised garden bed liner are cardboard, mulch, concrete, fabric, and plastic. They serve as a barrier between your garden soil and the ground to stop the weeds from coming through and keep out toxins and other pests in the ground.
Table of Contents
- What to Put at the Bottom of Elevated Garden Bed
- 1.
Cardboard
- 2. Hardware fabric
- 3. Plastic
- 4. Mulch
- 1.
- What Is the Recommended Soil Mix for Raised Garden Beds
- Conclusion
Cardboard is everywhere, and if you are on a budget, this is the best option for you. Putting cardboard under raised bed is very easy too.
Just spread the board across the bottom, fill it with soil, and you’re done!
However, the cardboard will decompose in 4-6 months. So, it is better to use several sheets of cardboard under raised garden beds to form a thick layer for best results.
Just make sure not to include cardboard with glossy print, for it may release toxins that will harm your plants.
2. Hardware fabricIf you are building your raised garden on concrete, hardware fabric works best as a raised garden bottom liner.
Choose galvanized hardware fabric to avoid sagging and rust over time.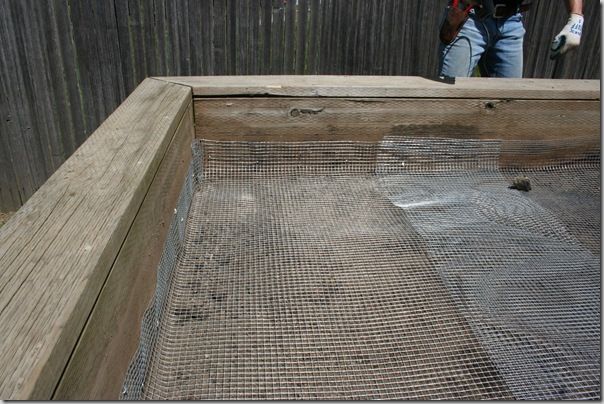 On top of it lay a landscape fabric to make a strong and long-lasting garden bed bottom.
How to put a hardware fabric basket under your raised bed:
- Get the measurements of the inside part of your garden bed. Add a few extra inches of slack and cut it using metal snips.
- Form the basket by imitating the shape of the bed with the extra slack bending up. Try to make the sides as even as possible.
- Push the basket to the bottom. You might need to step onto the wire inside the bed to be able to install it properly.
- Attach it into place using wide-head screws.
- You may add a layer of landscape fabric to keep the soil in place. Then, add the soil and place your plants in there.
Using a hardwire fabric on your raised garden bed with bottom provides good drainage and, at the same time, protects your plants from pests such as gophers that can eat all your crops.
3. PlasticOne variation of a raised garden bed is the one with legs.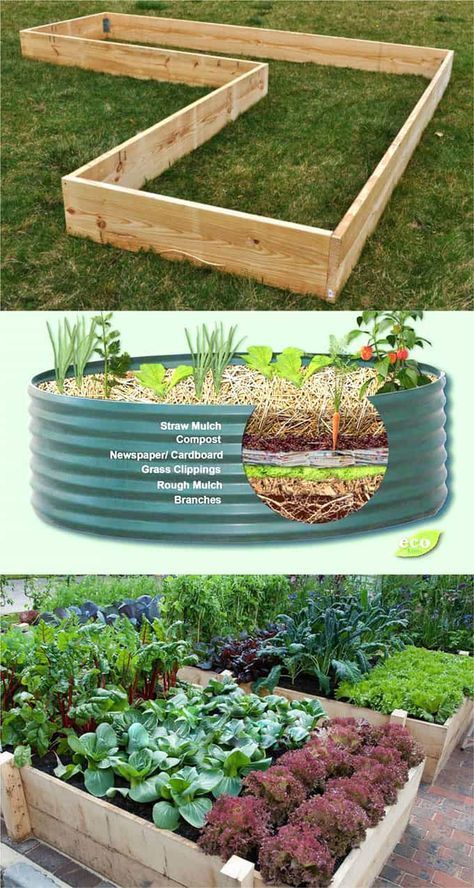 It is easier to reach and is most beneficial if you have back problems. It is ideal to use a light-weight plastic as a liner of a raised garden bed with legs.
How to use plastic as a garden bed liner:
- Get an old pool cover or plastic tarp. If they are not available, you may use a polypropylene garden bed liner from a store.
- Measure the bottom of your raised bed and cut the plastic based on it.
- Cut drainage holes on the plastic before spreading it under your raised bed to allow the water to drain.
Lining plastic as a base for raised garden bed will protect your plants from toxins that might be present in the frame of your raised garden bed.
Additionally, it is the best material to use if your soil is too dry and you need to keep it moist.
Otherwise, there are other options, including water-permeable material and plastic made of polypropylene fabric that allow better drainage.
4. MulchMulch bottom of raised bed is another excellent option.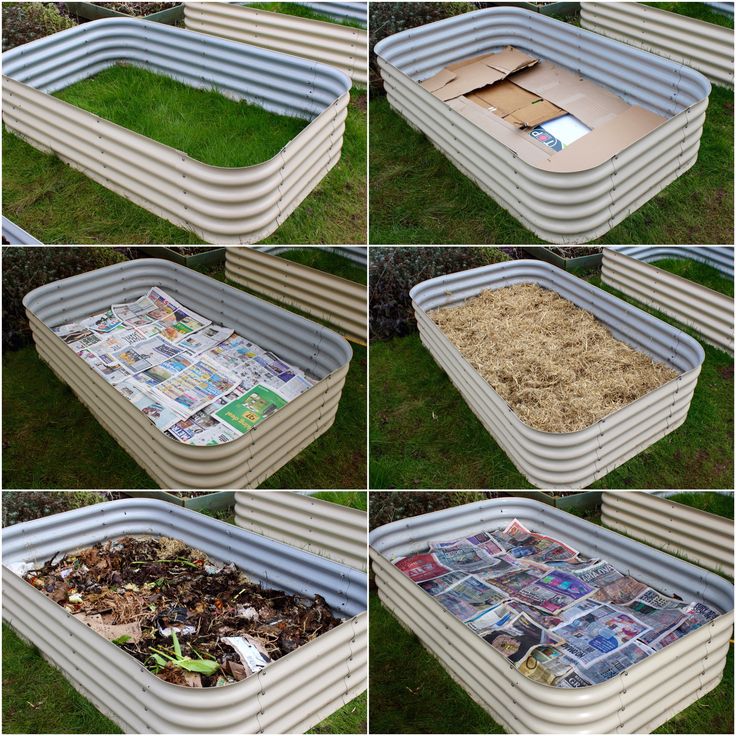
- It can be either organic, composed of materials such as chopped parts of plants and compost.
- Or you can use inorganic mulch, which include rocks, gravel, plastic, or rubber.
Both types of mulch work to prevent the weeds from growing and retain the moisture for your plants. However, organic mulch contains nutrients that are beneficial to your plants in the long run.
For example, mulching with straw in bottom of raised beds is effective in keeping the weeds out and maintaining moisture.
How to add mulch to your raised bed:
- Prepare enough mulch to cover the bottom of your raised beds and remove the weed from the soil you will add to the garden bed.
- Place a 2–4-inch layer of mulch using a shovel or your hands. Do not put more than what is needed because too much mulch may suffocate your plants. Also, make sure to place them around 3 inches away from the plant bases.
- After spreading your mulch evenly, you can add the soil layers in your planter box.
According to Iowa State University Extension and Outreach, light, well-drained soils should be used in raised beds with closed bottom.
You can make a great soil mix of your own by preparing an equal part of topsoil, organic material (leaves, ground bark, composted manure), and coars sand and mixing them all.
Important notes:
- Check if the compost is mature enough.
- If you are getting soil from another place, check thoroughly for pathogens or toxins harmful to plants.
- Make sure that the compost is of good quality. It should be moist but not sticky or greasy. It should not smell of ammonia and should have a pH level of 7.2-7.8.
A raised garden bed has many benefits. It gives you more control over the soil, protects your plants from weeds and other pests underground, and requires less maintenance. Many materials can be used on a raised garden bed bottom, including cardboards, mulch, hardware fabric, and plastic.
So, what do I put on the bottom of a raised garden bed? It may depend on your budget, the availability of the material near you, and their advantages and disadvantages. We hope we can help you choose based on the information from our post.
Related articles about garden bed:
- Recommended depth of raised garden bed
- Raised garden beds vs in ground beds (detailed comparison)
- Quick steps to edge a garden bed
Happy gardening!
Categories Organization & RepairA Few Words From the Author
Hi, I am William – Floridayards’ digital content creator. My job is to find answers to all your concerns with thorough research and our team’s expert advice. I will also bring you honest reviews on the best products and equipment for raising your beautiful garden.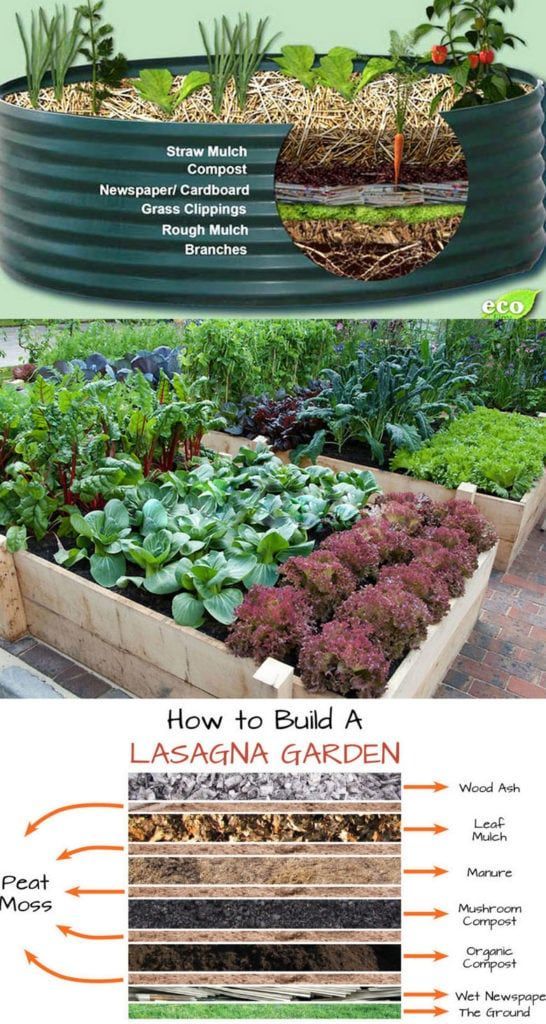 Please look forward to our work!
– William Golder
What Should You Put On The Bottom Of Your Raised Garden Bed?
3 shares
So, you have just built your raised garden bed and now you are ready to fill it and start growing. But what should you put on the bottom? Your raised bed can be part of your garden for years to come, so it is important to start off on the right foot.
The ideal bottom layer should suppress weeds, which help with drainage, improve your soil, keep rodents from burrowing in, and protect your soil from potential contaminants.
Some great materials to put at the bottom of your raised garden bed are cardboard, newspaper, straw, woody material, leaves, grass clippings, rocks, burlap, wool, and hardware cloth.
Each material has its unique benefits for your raised bed and they can be combined to get your garden off to a great start.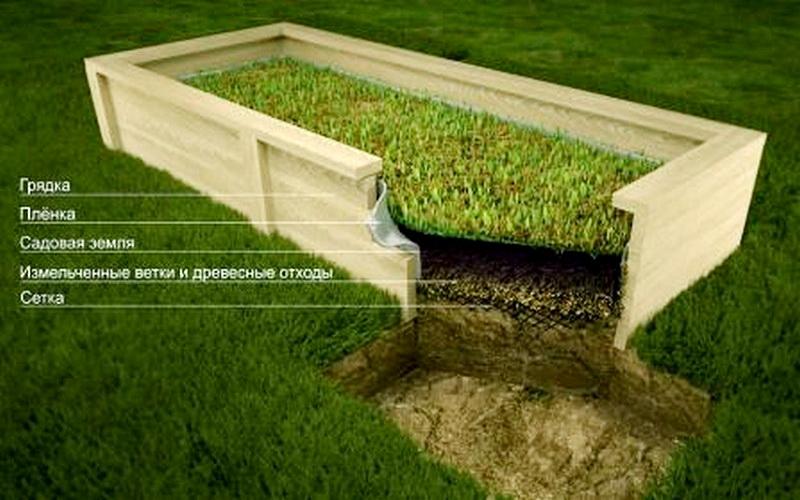
Let’s look at the pros and cons of each material so you can decide what will work best to line the bottom of your raised garden beds with.
Should I Line The Bottom Of My Raised Bed?
Of course, you can simply put your raised bed right on the ground to fill it and start growing, and while this is the cheapest and fastest way to get going it might not be the the best option. Wether or not you put something on the bottom of your raised bed depends on your situation, and you should ask yourself questions like:
- What is under your raise bed? Is it dirt, sod, or annual weeds? If it is dirt, you might not need anything on the bottom, but sod will require something to smother the grass.
- What kind of vegetables are you growing? Some vegetables have deep roots that might be inhibitied by certain bottoms while others will benefit from a bottom layer.
- What materials do you have on hand to line the bed? Do you want to buy anything or just get started right away?
- What kind of soil are your filling your raised bed with? Will it profit from a bottom layer or not?
- Below are the benefits of lining a raised bed so you can make the best decision for your garden.
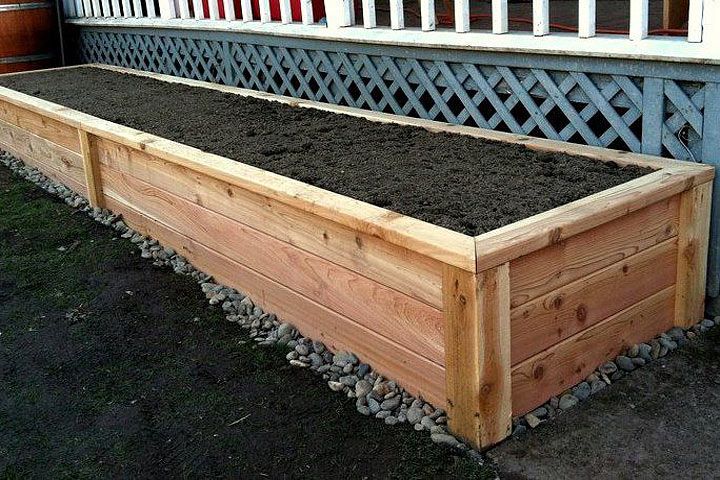
Building a raised garden bed is a long-term investment that takes a lot of work, so you want to make sure the project is a success. Lining the bottom of the raised beds has several advantages that might be worth the extra time and effort.
Here are some of the benefits of lining your raised bed:
- Weed Prevention: The main reason to line your raised bed is to prevent weeds and grass from growing up from underneath. Cardboard and newspaper are particularly effective at weed prevention, but many other organic mulches will work as well. A thick layer on the bottom of your raised bed will choke out the weeds and grass under the bed. This is particularly important if you are buying sterilized soil because you don’t want to spend all that money on weed-free soil just to have it invaded by more weeds and grass. By the time the bottom layer has decomposed, most of the weeds or sod will have been killed off and your raised bed will be (relatively) weed-free.
- Improve Drainage: Raised garden beds tend to dry out quicker than the surrounding soil. Lining the bottom of the bed can help retain moisture that would otherwise wash away. Alternatively, thick heavy soils under your beds can keep them from draining properly, and a suitable layer can keep the soil from becoming waterlogged.
- Build The Soil: As the material at the bottom of your raised bed decomposes, it will add valuable nutrients and humus to your soil and your plants will grow all the better.
- Rodent Prevention: Some areas are plagued by burrowing rodents who can wreak havoc on the buffet we so generously provide for them. Some materials, such as hardware cloth or rocks work great at keeping out pesky critters.
- Soil Contamination: Soil can become contaminated in many ways. Garbage, construction sites, roadways, and previous exposure to pesticides or other chemicals can all cause soil to be unfit for growing.
 If you live in an area where the soil has the risk of being contaminated, putting as many layers between that soil and the soil in a garden bed can help keep the toxins from leaching in.
Should You Line My Raised Garden With Landscape Plastic?
There are several reasons that landscape fabric should NOT be used under raised beds.
1: Landscape fabric is not biodegradableLandscape fabric is thought to be a great option because does not decompose. However, the reason it does not decompose is that it is made of plastic. There is a lot of concern about using plastic in the garden, especially to grow vegetables. If in doubt, it is better to err on the side of caution.
2: It is impermeable to beneficial insectsEarthworms and other beneficial soil-dwelling creatures do not easily pass through landscape fabric. Not only can they become trapped underneath, but they will not be able to travel upwards and your raised bed will not reap the benefits of their assistance.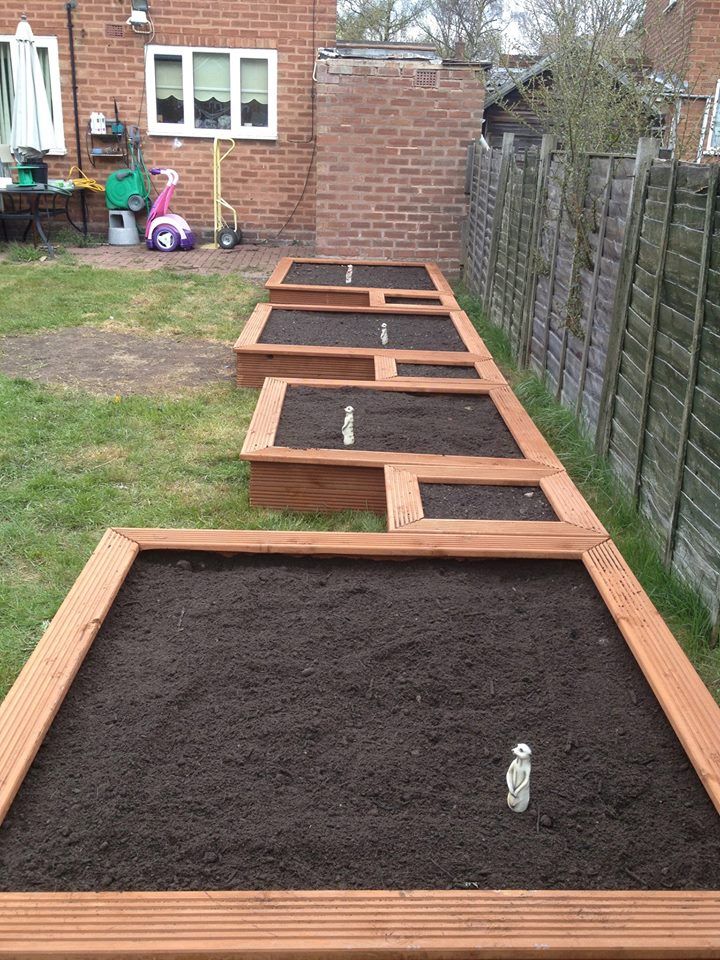
While landscape fabric can be very beneficial as a ground cover, it does not when it is buried underground. Any soil on top of the fabric will sprout weeds, and you will end up with a bunch of weeds growing on top of the fabric.
Also, once weeds start growing through the fabric, they are almost impossible to pull out and you will have to remove all the fabric and start over.
If you want to use landscape fabric with your raised beds, consider covering the top of the soil to prevent weeds rather than the bottom.
10 Great Materials To Put Under A Raised Garden Bed
Before your start filling your raised bed with soil, take special consideration about what you put at the bottom. Here are 10 great materials to use to line the bottom of your raised garden bed:
Helpful Tip: If you are using cardboard, newspaper, straw, or other organic matter, have it extended outside the bin by at least 6 inches.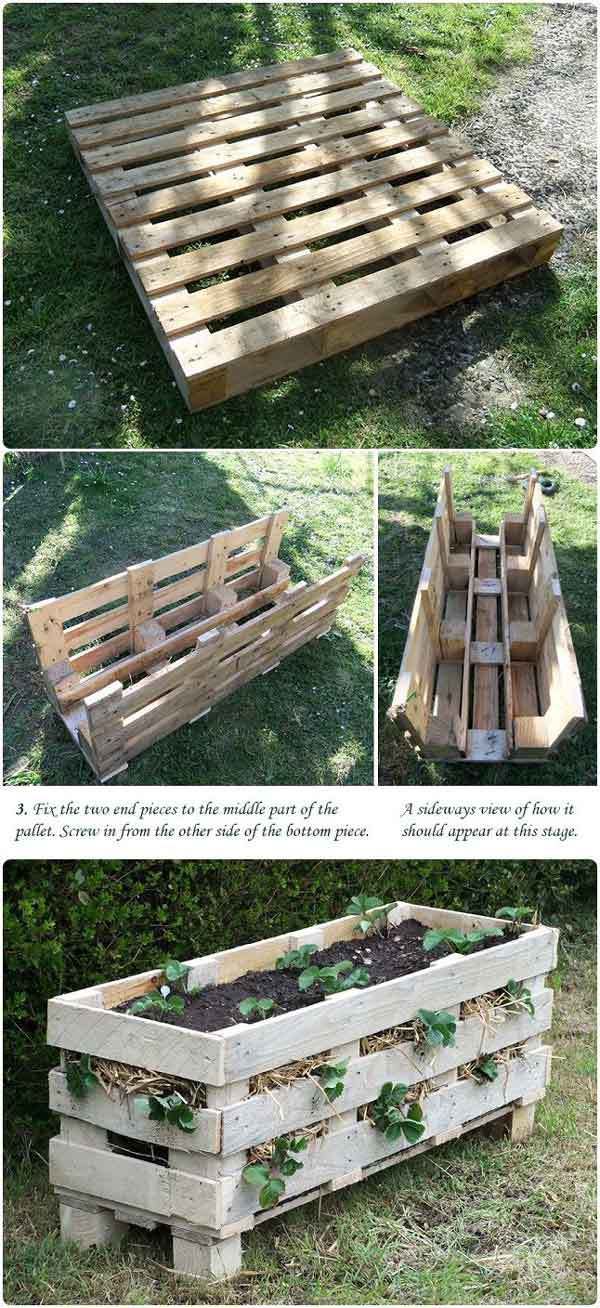 This will keep weeds from growing under the edge of the bed and into your soil.
1: Cardboard
Cardboard is the ultimate mulching material for anywhere in the garden, including under a raised bed. It chokes out weeds, keeps moisture in the soil, encourages earthworms, and adds organic matter as it decomposes. Carboard will take about 8 to 10 months to decompose, at which time most of the weeds underneath will be dead.
Cardboard also successfully chokes out tough weeds such as quack grass when a thick enough layer is applied and it is topped with a layer of organic matter such as straw.
Cardboard is free and easy to come by. Try asking your local grocery store, and they will often gladly give you more than you can use.
To use cardboard under your raised bed, remove and staples and tape from the cardboard. Lay down at least two layers of cardboard over the bottom of your raised bed (don’t forget to extend it outside the box), and make sure the edges are overlapped by a few inches so the weeds can’t slip in between.
No matter what other material you put on the bottom of your raised bed, it can always be paired with a bottom layer of cardboard.
2: Newspaper
Newspaper has similar benefits as carboard and makes a great bottom layer for your raised bed. It will smother weeds, is excellent at holding moisture, earthworms love it, and it decomposes into nice compost.
While it will break down a little faster than cardboard, it will still last for most of the season.
One caution of newspaper is some of the ink can contain undesirable chemicals.
Thankfully, most newspaper and printing services are switching to soy-based ink which is safe even for the vegetable garden. Check with your local printing or recycling facility to be sure.
To use newspaper on the bottom of your raised bed, lay down at least 10 sheets with the edge overlapping.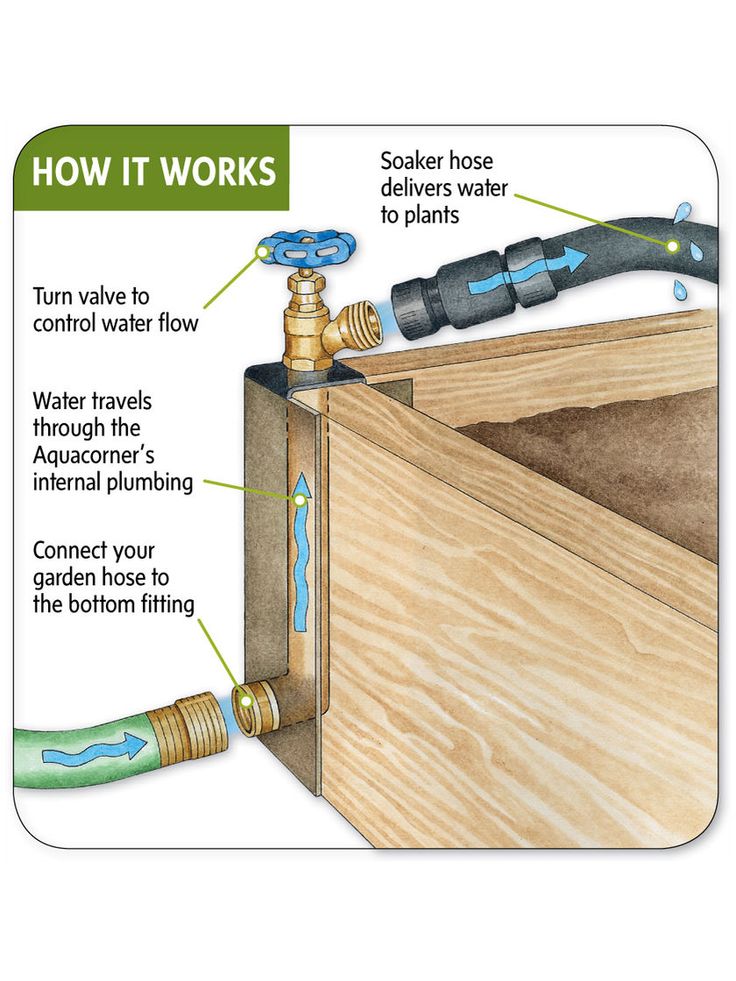
As with cardboard, newspaper can be combined with any other material to form a good bottom to your raised bed.
3: Straw
Straw is a great way to keep moisture in your raised beds while adding organic matter at the same time. While straw will smother weeds on its own, it is better when applied on top of cardboard or newspaper.
Straw adds carbon-rich matter to your raised bed, and the humus that forms as the straw decomposes under the soil will do wonders in the long run.
For best results, add 10cm to 15 cm (4-6 inches) of straw on the bottom of your raised bed.
Be aware that the straw will shrink as it decomposes, so you might have to add a bit more soil to the top of your bed next year.
There are a few considerations when purchasing straw for use in your garden. First, make sure you know your source as a lot of straw comes infested with weeds seeds.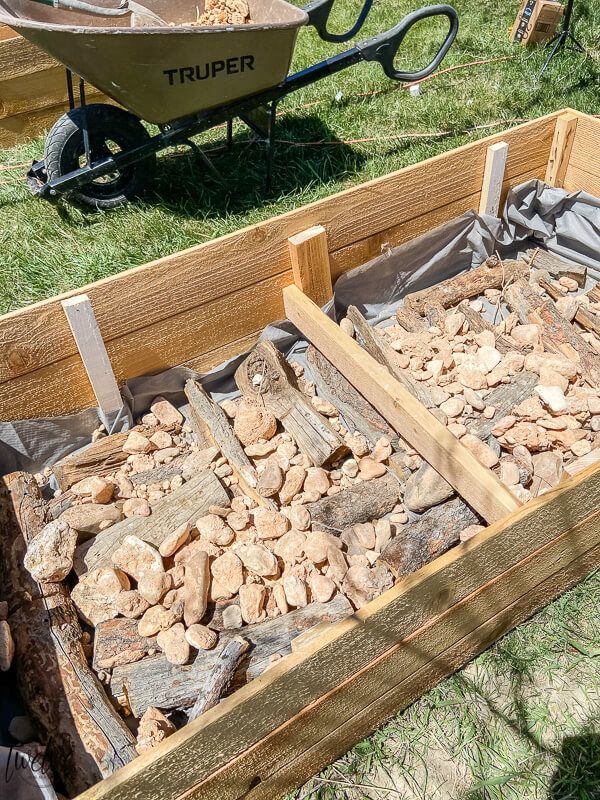
We have noticed in the last few years that anywhere we have used straw from certain farms will sprout thousands of Canadian thistles in subsequent years.
Second, try and source organic straw as this will be free from the harmful fertilizers and pesticides that are used on conventional fields (and no, organic straw does NOT have more weed seeds than conventional farming).
4: Wood, Woodchips, And Other Woody Material
If you really want to choke out the sod below your raised bed, consider lining it with wood planks or old boards.
This creates a more solid weed barrier that will still decompose over time and feed the soil. Avoid using pressure-treated lumber, or glued material such as plywood or OSB as these can leach chemicals into the soil.
Decomposing lumber makes an excellent home for beneficial soil-dwelling bacteria.
You can also put a layer of wood chips on top of cardboard or newspaper. A layer of wood chips that is a few inches thick is excellent at choking out weeds and will retain lots of moisture.
However, too many woodchips can limit nitrogen in the soil and make the soil more acidic, so monitor your soil if you decide to use wood chips.
Adding a layer of wood material, such as branches, twigs, and small logs will also benefit your raised beds. While this will not suppress weeds, the decomposing wood will benefit the soil similar to hügelkultur practices.
5: Leaves
Leaf mould (or decomposing leaves) will really benefit your soil by creating lots of beneficial humus at the bottom of your raised bed. The thick mat of leaves works great at smother weeds that might try to sneak through.
Add 5 to 10 cm (2-4 inches) of leaves to the bottom of your bed (preferably on top of cardboard or newspaper).
You can use leaves from most trees, but avoid using leaves from black walnut and eucalyptus trees as these will inhibit plant growth.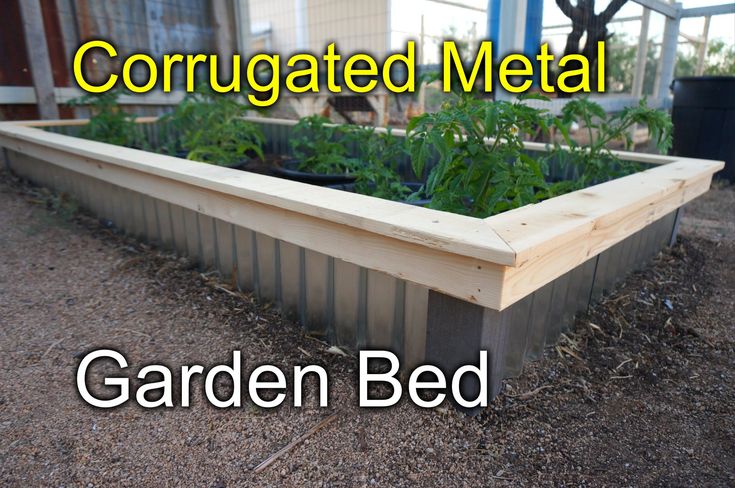
The leaf mat will shrink as it decomposes so you might need to add soil in the following years.
6: Grass Clippings
Grass clippings will form a thick mat at the bottom of your raised bed that will decompose into wonderful humus while choking weeds at the same time.
Apply a layer that is about 5 to 10 cm (2-4 inches) of grass clippings to the bottom of your raised bed.
Make sure that the grass did not go to seed before cutting or you will be fighting grass in your raised bed for years.
Also, a lot of grass that is mechanically clipped can have an oily-gassy smell from the mower, and you might prefer to avoid adding potential toxins to your garden.
7: Rocks
Rocks can be beneficial to your raised bed in certain circumstances but they should be used with caution. When used properly, rocks can improve drainage but they can also cause the ground to become saturated.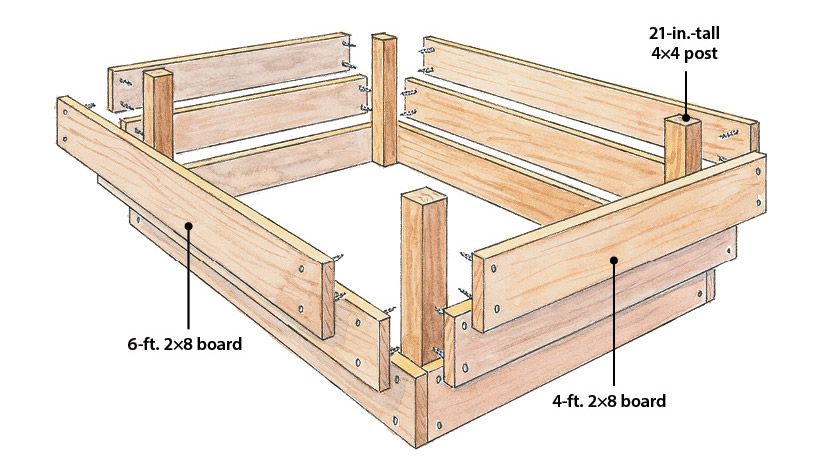
If you have very heavy clay soil beneath your raised bed, a layer of rocks in the bottom of the bed can help. The water can settle in the rocks until it filters through the clay keeping the soil in the bed from becoming waterlogged.
However, too many rocks, or if the layer of rocks is too dense, can actually trap water on top of the rocks (similar to a river bed) and the soil will not drain and become saturated.
8: Carpet
Carpet can be used at the bottom of your raised bed, but be careful which kind of carpet you use. Most carpets are made from plastic and will never decompose, potentially leach chemicals, inhibit drainage, and interfere with the roots of your plants.
However, natural carpets made from organic materials (such as hemp, jute, or cotton) can be an excellent bottom layer. These carpets will successfully choke weeds and still be permeable for water and deep roots to pass through.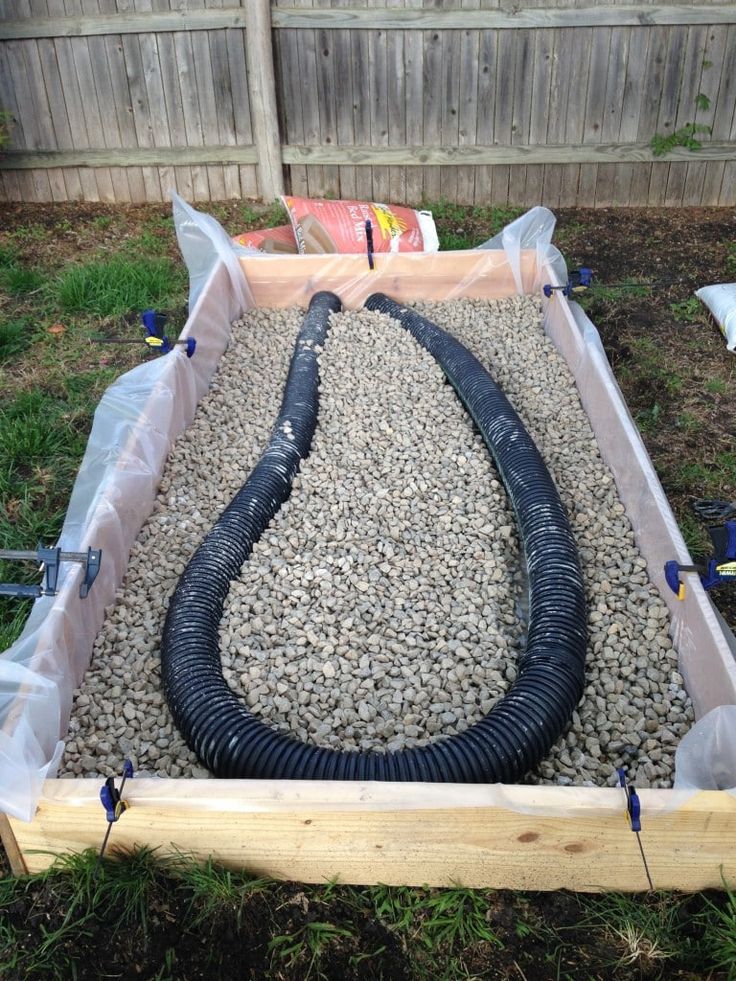 They will generally take a few years to decompose.
You can staple the carpet to the sides of the raised bed to form a solid base, or stick the carpet out past the edges of the bed to keep weeds from slipping in the sides.
9: Wool
There is not much information about using raw sheep’s wool as a bottom layer of your raised bed, but some gardeners have been using wool in their raised beds for years.
There are many benefits to using sheep wool as a mulch and a layer that is 15cm (6 inches) thick will successfully smother weeds.
It is also natural, contributes to healthy soil, and retains moisture while still allowing good drainage. Wool works great on top of cardboard to keep the weeds down.
10: Hardware cloth
If burrowing critters are a plague in your garden, then hardware cloth is the product for you. Hardware cloth is a strong wire mesh used in construction.
It will corrode and break over time, but it will give you at least 10 years of protection from hungry critters digging under your raised beds.
Lay hardware cloth over the bottom of your raised bed and staple it to the sides.
Hardware cloth comes in a variety of different sizes and thicknesses, so check your local hardware store for availability.
Conclusion
Building raised garden beds is not an easy task, so it is important to get it right the first time. I hope this article has given you some ideas on how to line the bottom of your raised bed so you will have a successful and plentiful harvest for years to come.
Cameron Jenkins
Cameron Jenkins moved from the city to a small farm where he lives with his wife and daughters. The farm is divided between the garden, pastures, hayfields, the start of an orchard, and 13 times as many pets as people. Their farm vision is to grow produce and raise animals in unison with nature. When Cameron is not farming (or writing about it) he spends his time playing with his children, reading, cooking, and napping with his pet pig.
What can and cannot be placed in high beds: instructions in pictures
The interest of gardeners in smart beds is getting higher, the degree of discussions and disputes is getting hotter. We decided to bring a little clarity and figure out what must be used to fill the high beds, what is desirable, and what should never be put in it. Join now!
First, let's remember what high beds are and why they are good.
High (and also warm, or smart) is a bed in a box filled with organic waste, plant residues and fallen leaves, which, in the process of decomposition, release heat and warm the earth. Thanks to the correct filling, garden crops in such a bed more easily tolerate temperature changes, develop better and give a higher yield. nine0003
The organic matter that fills the garden bed not only warms the soil for plants, but also turns into a valuable nutrient vermicompost over time.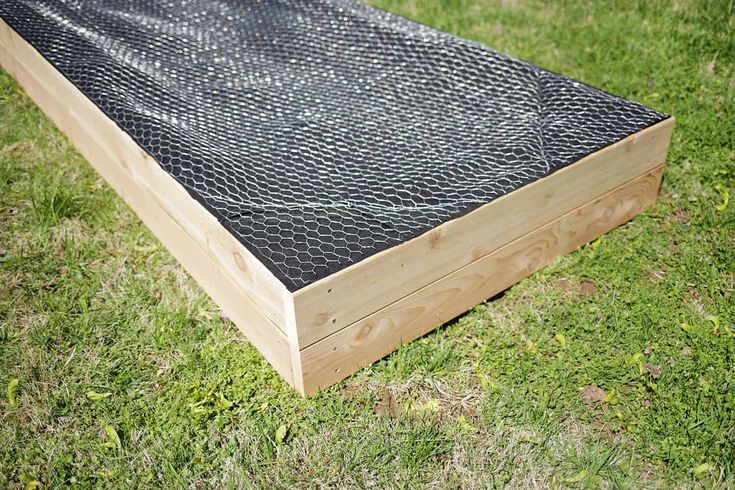 So, it makes smart beds even more efficient.
Benefits of high beds
Let's list the main advantages of high beds, thanks to which they won the hearts of fans of country experiments.
- The temperature inside the raised bed is about 5-8°C higher than in the open ground. This allows you to start the gardening season earlier and extend it by 4-6 weeks, collecting two crops instead of one during this time. nine0018
- Proper arrangement of the bed provides good drainage, which helps to avoid stagnant moisture and the diseases provoked by it.
- Raised beds are easier to care for than conventional ones: the right height avoids unnecessary physical stress, and mulching eliminates the appearance of weeds.
- For each crop, you can choose the ideal soil mixture, which means that you can accelerate the development of plants and increase productivity. nine0018
- It is convenient to put arcs on high beds for the construction of a greenhouse.
 Young seedlings and seedlings in such warm beds feel much better than in ordinary ones. And when the plants get stronger and the need for shelter disappears, the arcs can be used as supports for tying.
 - Raised beds can become an element of landscape design in combination with decorative paths or a lawn.
High bed quick guide
- Seat selection . Any well-lit place on the site will do. You can place high beds next to a building or fence, but you need to make sure that they are not in the shade. It is recommended to place the bed with the long side to the south - then the lighting of the plantings will be uniform throughout the day.
- Trench . Strictly speaking, a trench is not a mandatory element - a high bed can be made right on the lawn. But not to use fertile soil, if it is on the site, would be at least strange. Therefore, deepening the frame of the bed by 20-30 cm looks like a logical decision - and the structure will eventually turn out to be not too high, and fertile soil will come in handy.
 nine0018
 - Frame construction . A box for a high bed can be built from improvised materials or you can buy a ready-made metal or plastic structure. If you are making a wooden case, protect it from the inside with a film or impregnation to prevent the wood from rotting. The length of the bed can be any, the parameters of 100-120 cm are considered the optimal width (for the convenience of processing the middle), the height depends on the growth of the gardener and can be from 30 to 80 cm.
- Laying layers . The lower layer of the high bed performs the function of drainage, so chopped branches of shrubs and trees, stems of large garden plants are placed in it. The next layer is laid wet fallen leaves, sawdust, turf, tops, unformatted vegetables and fruits, organic waste from the kitchen. Next is a line of green plant residues, which are preferably covered with ready-made compost from above. All valuable organics are sprinkled with fertile soil - and you're done!
- Planting or sowing horticultural crops .
 On high beds, especially in the first year, heat-loving plants that need a lot of nitrogen will feel great: cucumbers, zucchini, pumpkin. In the following seasons, you can plant strawberries, tomatoes, cabbage, carrots, beets, beans and peppers. And at the end of efficiency (about the 4th year), the time will come for unpretentious greenery.
Laying layers of a high bed - what is important to remember
Let's talk in more detail about the fourth point of our algorithm - the correct laying of layers. Let's consider what to put in a high bed in order to get that very double harvest promised to us by "bed building" enthusiasts. nine0003
A fine-mesh metal mesh should be laid at the very bottom of the trench or box - it will protect the plantings from the encroachments of moles and mice, which will surely come to visit. For reliability, it is worth attaching the grid with a construction gun to the bed frame.
Next is the drainage layer. It is needed in order to prevent stagnant moisture and ensure sufficient air exchange in the roots of plants. For this layer, you can use chopped branches and branches of trees and shrubs, brushwood, corn or sunflower stalks. Here you can also add straw and sprinkle everything with wood ash. Drainage height - about 30 cm.
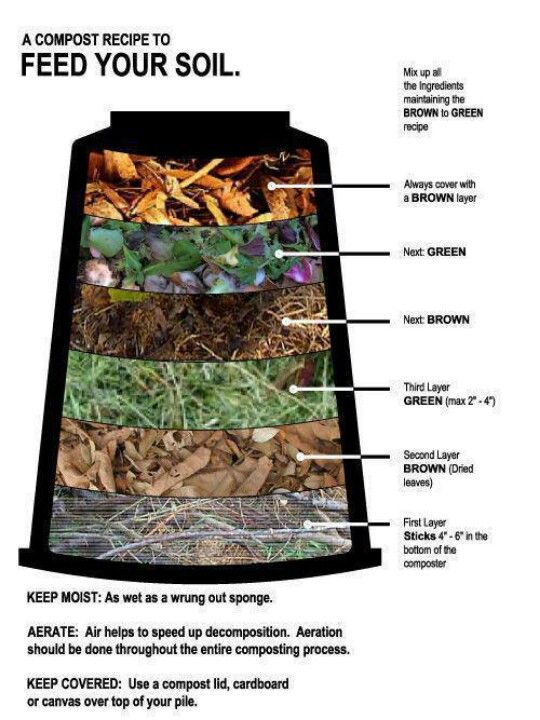
The next layer is not always recommended, but it is worth doing if your soil is light, porous, quickly permeable to water (sand or peat). In this case, after coarse organics, you can lay out wood and paper waste: cardboard, old newspapers, burlap, shavings. Sometimes a layer of sawdust is poured, spilling it with a solution of potassium permanganate. These materials absorb water and gradually release it into the substrate, helping to maintain optimal humidity inside the garden. In addition, thick cardboard prevents the germination of weeds from the soil under the bed. nine0003
How else can you use cardboard and old newspapers for the benefit of the garden? It is recommended to make it about 30-50 cm thick. Plant residues from this year's crop, weeds, turf, fallen leaves, dry grass, kitchen waste and everything that we usually store in a compost heap will go here. The only difference is that this pile will be immediately inside the garden. That is, the process of compost maturation will also go on inside, while releasing heat and providing future plantings with the necessary nutrition. The illustration below shows the possible options for filling the organic layer. nine0003
In order to ensure the ripening of the organic mass by spring, the compost layer is shed with EM preparations that speed up the process.
This is again an optional but desirable layer. If you already have last year's compost at your disposal, lay it in the garden. This will further accelerate the maturation of the lower fresh layer and enrich the composition of the soil. Straw manure or humus can be used for the same purposes.
The logical completion of the "construction" is the backfilling of the upper fertile layer of garden or garden soil 15-20 cm thick. If you prepared a trench to create a warm bed, then simply return the garden soil "to its place". If the soil on your site is unsuitable for growing plants, use a purchased substrate or prepare a potting mix for seedlings yourself according to one of our recipes. nine0003
Raised beds are usually made at the end of the season, and there are at least two reasons for this. Firstly, after harvesting, the summer resident has a lot of organic waste at his disposal, which are great for laying in the garden. Secondly, organic matter must mature to become a nutrient fertilizer, and the winter period is just enough time for this process. The green mass planted in the garden in autumn will turn into high-quality compost by spring and will provide good nutrition to young seedlings and seedlings. nine0003
What not to put in raised beds
Since a raised bed is essentially a well-ordered and organized compost heap covered with earth, the "forbidden ingredients" in both cases will be similar. That is, you can’t put in a high bed what you wouldn’t put in a compost bin: organic matter of animal origin, the remains of raw fish, fruit bones and walnut shells, weeds with seeds, cat litter and non-degradable materials. nine0003
Also, do not put leaves and tops of disease-infected plants in high beds - this will lead to the spread of pathogens to your future plantings. To prevent such a scenario, some gardeners use fungicides: they spill the "dangerous" layer with a solution of Fitosporin, HOM or SCOR and hope for the best. But is such a risky game worth the candle - you decide!
If you have long wanted to experiment with beds in your country garden, now is the time! Use our tips and you can get a high yield with less effort and without harm to health. nine0003
how to make, from boards, metal, slate, plastic
Many summer residents suffer from the fact that the subsoil waters are too high on the site. Excessive soil moisture is not suitable for all plants, many develop poorly or die altogether. You can solve the problem by making high beds. With such an organization of landings, it is possible to control the degree of humidity. And a nice bonus to such a decision will be an earlier ripening period and a much larger yield. nineOl000
- 6.1 From planks
- 6.2 From logs
- 6.3 From slate
Advantages and disadvantages that the sun warms the walls. This is also facilitated by the decomposition processes occurring in plant waste, which make up a significant part of the backfill. Therefore, such beds are also called warm. If you put arcs on such a bed and cover it with spunbond or other similar material, then the crop can be harvested even earlier. nine0003
The device is more problematic in regions with a hot climate. The task in this case is not better to heat the earth, but to keep it from overheating. But this can also be solved: use materials with poor thermal conductivity, for example, wood, to fence high beds. For the best effect, you can make double walls, between which you can fill up, for example, sawdust, lay foam, or you can leave an air gap - the best thermal insulation.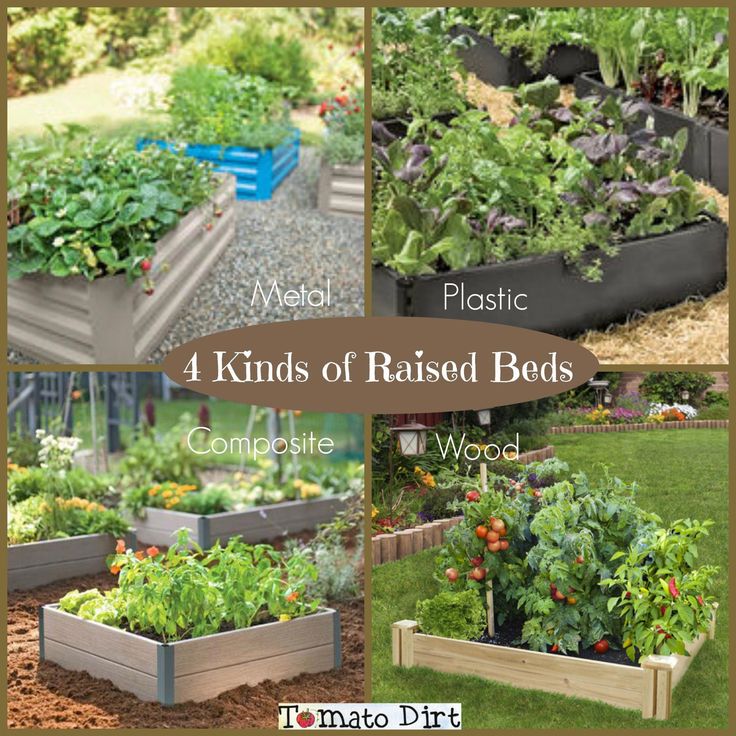 It is better to paint the outer wall in a hot climate with white paint or whitewash. It is known that light surfaces heat up less. In this case, it will be possible to save the root system from overheating: in the south, the earth sometimes warms up very much and the higher the plant is, the cooler it will be. And over the beds you can stretch the same covering material. It not only retains heat, but also protects against overheating. nine0003 Beet harvest in a high bed
High beds can also be a good yield on infertile lands. It is more convenient to lay out the imported soil in the beds, and not distribute it throughout the site. Maintaining fertility contributes to the compost layer, which is located under the layer of earth.
The problem of arid regions is also being solved. In this case, the fence for a high bed is coated with bituminous mastic from the inside or covered with a film, a rolled waterproofing material is laid on the bottom (on the grid) (the roofing material will quickly rot, so something from modern types of waterproofing is better). Complete waterproofing cannot be achieved, but to keep moisture inside in sufficient quantities - yes. nine0003 Carrots - one to one. The best on a high bed, although the same variety
was planted on a regular one. As you can see, with a balanced approach, almost any problem can be solved. There are few shortcomings in high beds, but they were not without them:
- In most cases, you have to make a fence, and these are costs.
- The complexity of the process. Again, making fences takes time and also moves a lot of earth and plant debris, which is hard work. nine0018
- Medvedka and other similar living creatures feel great in rotting leaves, branches, bark. You have to fight them.
- Fertility has to be maintained by updating or completely replacing the "stuffing".
That's all the shortcomings. If you decide on the arrangement of high beds, be prepared for a considerable amount of work. But the harvest will be many times greater. For testing, you can make one or two beds. Then decide if you need them or not.
Size
There are no strict recommendations in this regard, and there cannot be: very different conditions in the country, and people too. There are sizes that many consider optimal.
In one area there are very high beds and not very ...So, the dimensions of the high beds:
- Height - from 20 cm to 50-60 cm. Here you can see what a difficult task is. The higher the bed is raised, the easier it is to process it - to bend less. But the earth and the rest of the "stuffing" will need more. Another point: if a small bed in height can be under the snow and will be covered from severe frosts, then the high one will freeze through: the sides are also open. For those ridges where annuals are sown, this does not play any role, but for perennial strawberries, say, this is a problem. Therefore, the height is chosen based on these considerations. According to the experience of many summer residents for strawberries, the optimal height is 20 cm.
 Then we can hope that it will not freeze out. nine0018
 - Width - from 60 cm to 1.2 m. Choose a distance that makes it convenient for you to process the bed. A distance of 60-70 cm is chosen if the approach to the garden is only on one side. If you can get to it from both sides, you can make a meter or more. It is important that the middle is processed without much stress.
- Length. Here everyone chooses based on the configuration of the site or their desire. There are no recommendations at all.
So that the bed is not too high, part of it can be deepened: dig in 20-30 cm, and already put walls on top. The removed soil will go to backfill (there is often simply not enough land), and the substrate from the lower rough layers can be made thicker. And to minimize the cost of maintaining such a bed, you can do drip irrigation. nine0003
How to fence high beds
You can use anything that can hold the soil. The most durable curbs are made from brick, stone and concrete.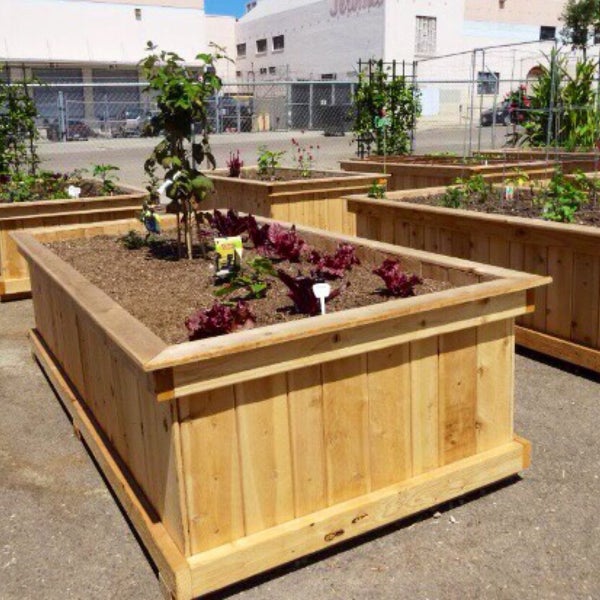
But a brick costs a lot, it takes a long time to fiddle with concrete. A concrete fence is made according to all the rules: first, a formwork into which reinforcement is laid, then it is poured with concrete and they wait until it sets. But the service life is impressive - decades.
Concrete garden fences are the most durable and will never “float”The brick and stone fence is also folded according to all the rules: on the mortar with dressing. To reduce the consumption of bricks, the walls are placed in half a brick. And so that the earth does not move it, the rows are reinforced with a mesh.
Half-brick brickwork alone cannot hold soil. Support poles required But even with this option, support poles will need to be installed one meter apart. If your soil is viscous, heavy, often waterlogged, such walls can be squeezed out. Therefore, put wooden or metal supports that will fix the long walls or make small beds, as for an ornamental garden. nine0003 Brick raised beds for ornamental gardens
Fences made of expanded clay blocks have proven themselves well. Even the voids in them can be covered with soil and plants with a small root system can also be planted there: for example, some types of greens and salads.
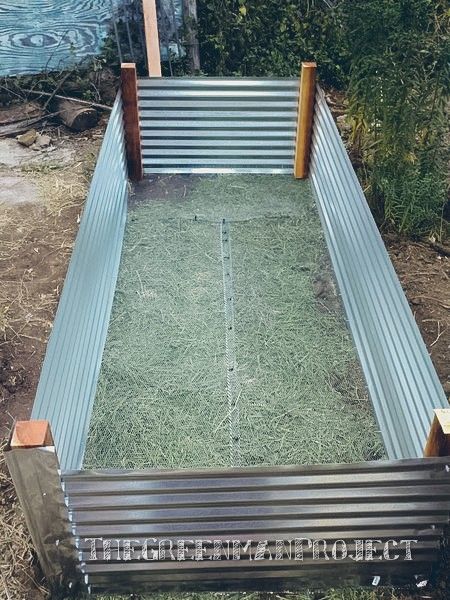
Fencing for high beds made of expanded clay concrete blocksThey also make fences for high beds from galvanized metal and slate. Slate can be used second-hand, you can buy a new one, wave or smooth - it doesn't matter. Cut the sheets into strips of the required width. There is no need to fear that it is harmful. In slate, asbestos is contained in a bound state, and it does not dissolve in water. It is harmful when it is sawed: the dust rises and enters the body through the respiratory tract. To reduce exposure, wear a respirator and wet the incisions. nine0003 High slate beds
They make plastic garden fences. Changed siding? Use it. There are old plastic panels - they are in business. But for plastic, a rigid base is needed.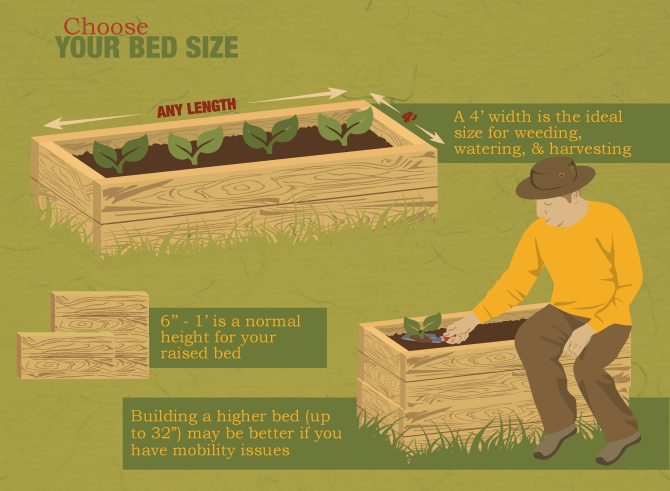 They make it from a metal mesh of thick wire.
Nets can form the basis for pebbles or pellets. Only in this case, a double frame will be needed, inside which stones or some other material are poured. This technique is called "gabion" and not only fences for beds and flower beds are made from it, but also fences. But so that water does not seep through the walls from the gabion beds, the inside of the box is lined with a dense film. nine0003 Filled stone fence for high beds
The most popular fence is made of wood. You can use boards, timber, logs. Wood is good for everyone, except that it rots.
Really high bedsAnd since all the conditions for activating this process are created in the high beds, destruction occurs rather quickly. You can slow down the process somewhat by painting the boards or by impregnating them with a bioprotective composition. But there is still no guarantee against destruction.
Board cuttings can also be used for high bed borders But the material can be used cheap, and sometimes even junk: the remains after construction, slabs, old logs, pallets, etc.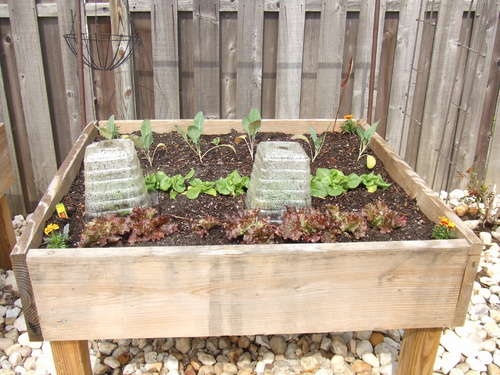 If desired, you can even make a fence out of branches. Only the bark is desirable to remove: it is under it that there are many larvae and woodworms. Although...they will also process the wood residue that you lay on the bottom of the backfill. But too many of them are also not needed, so, probably, it is still better to remove the bark.
From the same branches, only freshly cut, you can make a wicker fence. And it will also need to be lined from the inside with a film: to keep water and earth inside.
Read how to make wattle here.
Bed framing can be woven from fresh branches or laid out of stonesEven straw can be used. It is tied into small bundles, which are interconnected with a wire. It simply cannot be cheaper, but it keeps water and temperature well. The only disadvantage of this option is that such a fence will last a maximum of two seasons, but rather one. But it can then be used as one of the layers. nine0003 Fencing of beds made of straw
Bulk beds
There are high beds without a fence: the so-called bulk beds.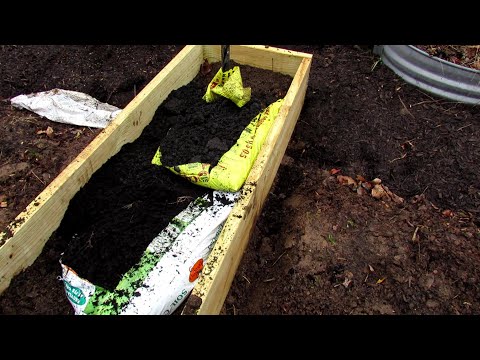 The soil in them is poured in the form of hills.
To improve drainage, branches are laid inside such a bed. To reduce the height of the bed (for example, under tomatoes), it is slightly deepened, throwing the soil to the side. After laying the branches, it is covered from above, often there is a need for additionally imported soil. If you can’t choose the row spacing deeply. nine0003 Internal arrangement of bulk beds
The disadvantage of this kind of vegetable garden: when watering and during rains, the topsoil is washed away. Therefore, they began to make boxes - to avoid washing out the soil.
Raised Bed Layers
Framing is only a small part of the job. You still need to fill the received box. It must be said right away that the thickness of the layers depends on the height of the bed that you have chosen, so if any values \u200b\u200bare given, then only approximately. In addition to the size of the bed, the thickness of the layer, for example, the fertile one, is influenced by the choice of plants: 5 cm is enough for someone, and much more is needed for someone.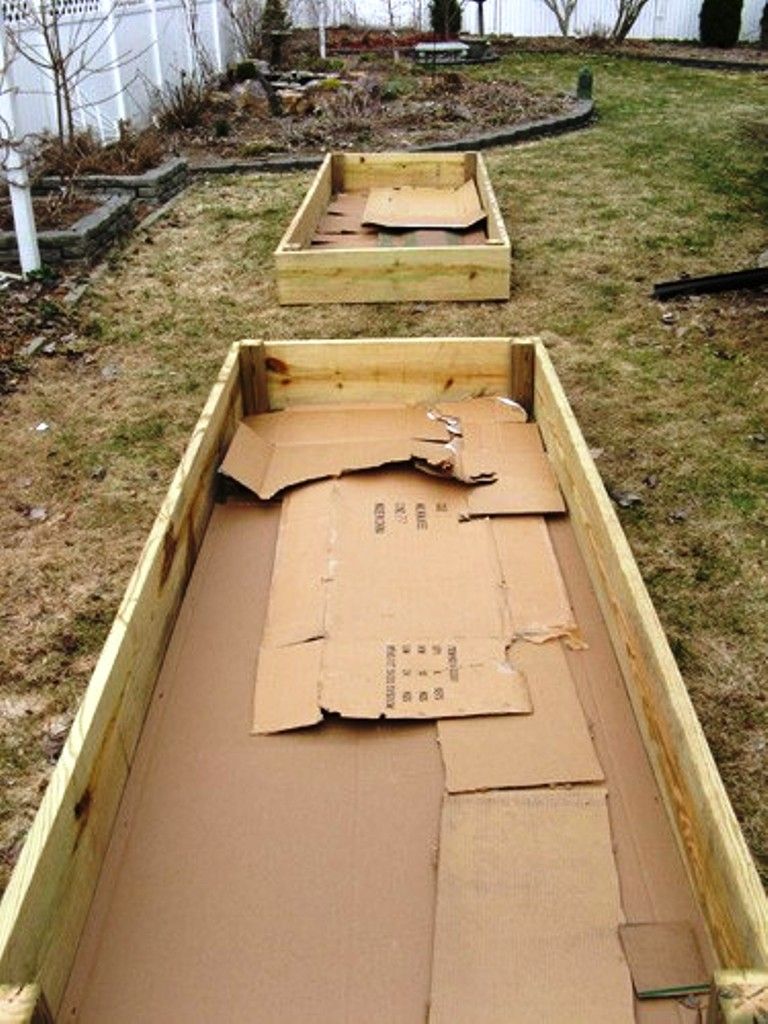 nine0003 Approximate layers for a high bed
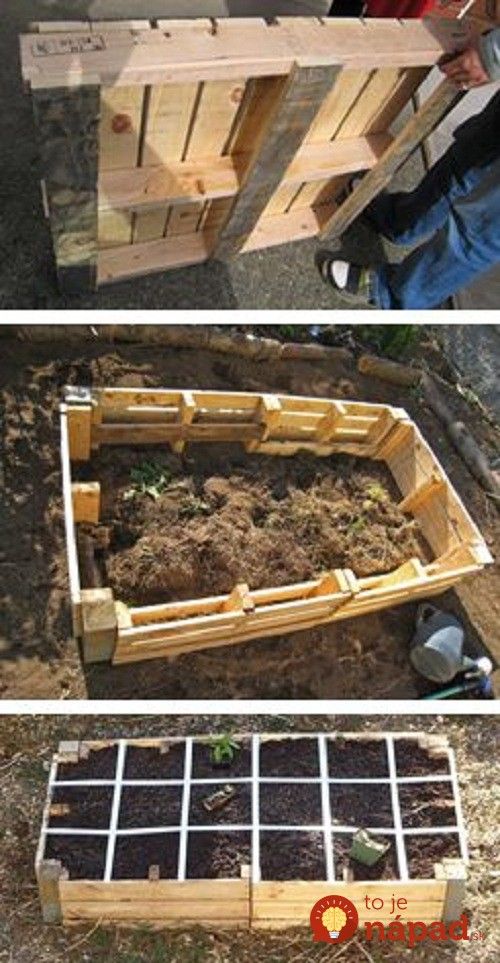
So, what to pour into a high bed - layers from bottom to top:
- A metal mesh with a small cell or a layer of geotextile is laid on the bottom. You can put cardboard. Mesh and geotextile - protection against rodents and moles. Cardboard plays about the same role, but it is less effective.
- Large wood residues: thick branches, branches, even chocks and bars. This layer serves, firstly, for drainage, and secondly, moisture accumulates in the wood. The more arid the climate in your area, the more wood you need. Moreover, the following wood layers too. nine0018
- Shredded small branches, bark. Other coarse plant residues will do: corn stalks, straw. Their mission is also twofold. They store water, and when decomposed, they release heat and nutrients. But when using corn trunks and straw, keep in mind that the bed will soon sink: these remains quickly rot, but the yield will be high, and fertile land can be sprinkled on top.
- Paper, thin cardboard. It is usually lined with a thin layer. They use packing cardboard more often, because glossy paper is not suitable, just like newspapers: the lead base of the paint is not at all what plants need to be fertilized with. If there is an old unnecessary burlap (natural), you can lay it. nine0018
- Layer of plant residues: leaves, grass, semi-decomposed sawdust. Be careful with sawdust: they strongly acidify the soil. So sprinkle them under plants that love acidic soil, or neutralize the acidity by sprinkling them with a good layer of ash.
- Fertile land.
In the last two layers, you can add a good portion of matured compost, as well as sprinkle deeper layers with it. This will speed up the “readiness” of the high bed for planting.
Read about how to make a pond in the country with your own hands here, and this article says how to turn it into a fountain. nine0003
When is the best time to plant and what to plant
It is better to fill the high bed in autumn.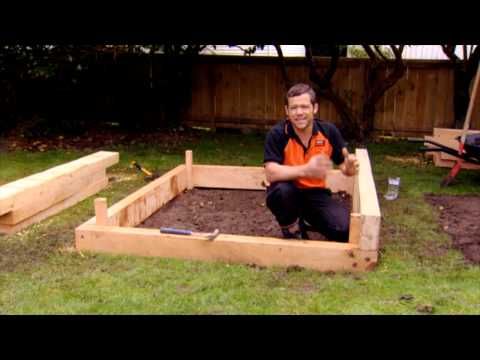 During this period, there will be enough “material” and during the winter the processes inside will gain momentum. In this case, you can plant plants in the spring and hope for a high yield. It can be done in the spring, but there are unlikely to be any significant differences in yield: the processes have just begun and will not be able to have a noticeable effect on the fertility of the backfill. Although you will definitely feel the difference in the amount of water for irrigation: much less water is required. nine0003 One of the high bed options: metal mesh and reinforced polyethylene film
Plant rotation
In the year of the high bed, plants requiring high fertility can be planted on it: cucumbers, zucchini, zucchini, pumpkin, any kind of cabbage, eggplant, tomatoes, sweet peppers . The next year, you can plant greens - spicy-aromatic and leafy. Root crops feel good in the second year.
After the second harvest, fertility must be restored. If the contents of the bed sagged, in the fall they fill up with good earth mixed with mature compost.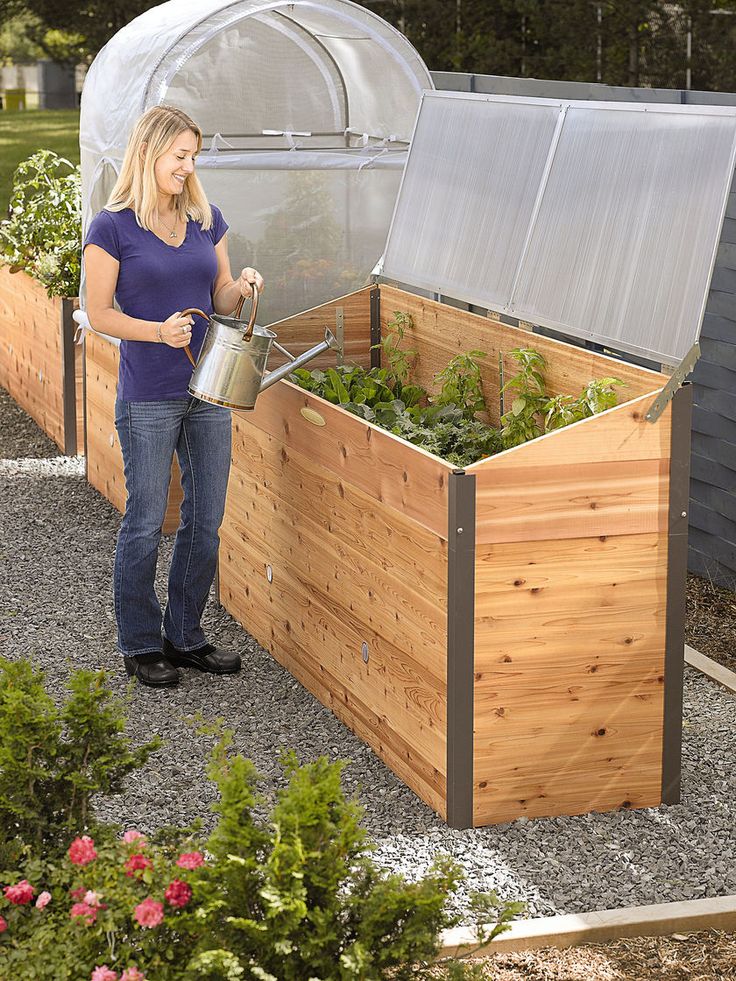 If there is nowhere to fill up, remove part of the top layer (on a compost heap or in another box as part of the backfill) and replace it with fresh earth with fertilizers. nine0003
High bed for strawberries
It differs only in that a covering material is spread over the finished “pie”. Holes are made in it, in which plants are planted. This option leads to the fact that moisture evaporates in minimal quantities, and weeds do not grow in the aisle. The second option - mulching the ground also works well, but evaporation is more intense.
Strawberries feel goodStrawberries are peculiar in that their roots are located mainly on the surface. Therefore, the fertile layer can be small. But this same feature leads to the fact that in severe frosts it can die. Although there is a decomposition process inside the high bed, warming up the soil, if the bed is without snow and not covered for the winter, the root system may freeze. nine0003
Cucumber and tomato high bed
It is no different in its structure.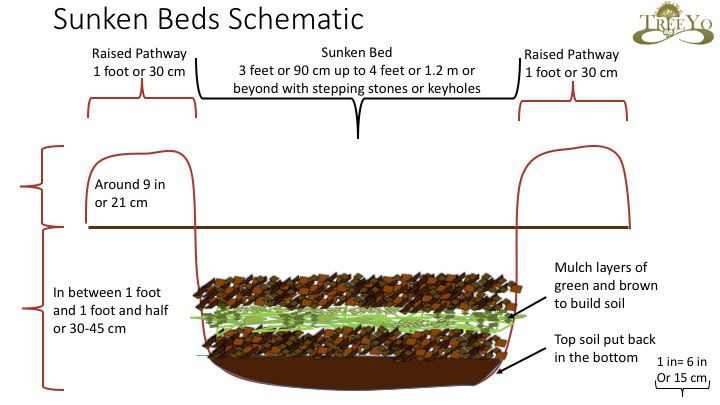 Is it only because they need poles and crossbars or stretched wire around the edges in order to be able to tie up bushes of tomatoes or lashes of cucumbers.
You can read about the organization of automatic watering of the garden or plot here.
Do-it-yourself high beds
Most often, questions arise not when laying layers in high beds, but when making a box. Since women often do a lot of gardening, right up to making fences for garden beds, many points may not be clear to them. To clarify the most difficult ones, we present photo reports of making a box from boards and slate - the most common fences. nine0003
From planks
Several options for how to make high beds from boards were in the photo above. The main snag is usually in the connection at the corners. The easiest way is to overlap them: just put one to the other at 90 ° and knock it down with nails. But there are aesthetes who all strive to do the right thing.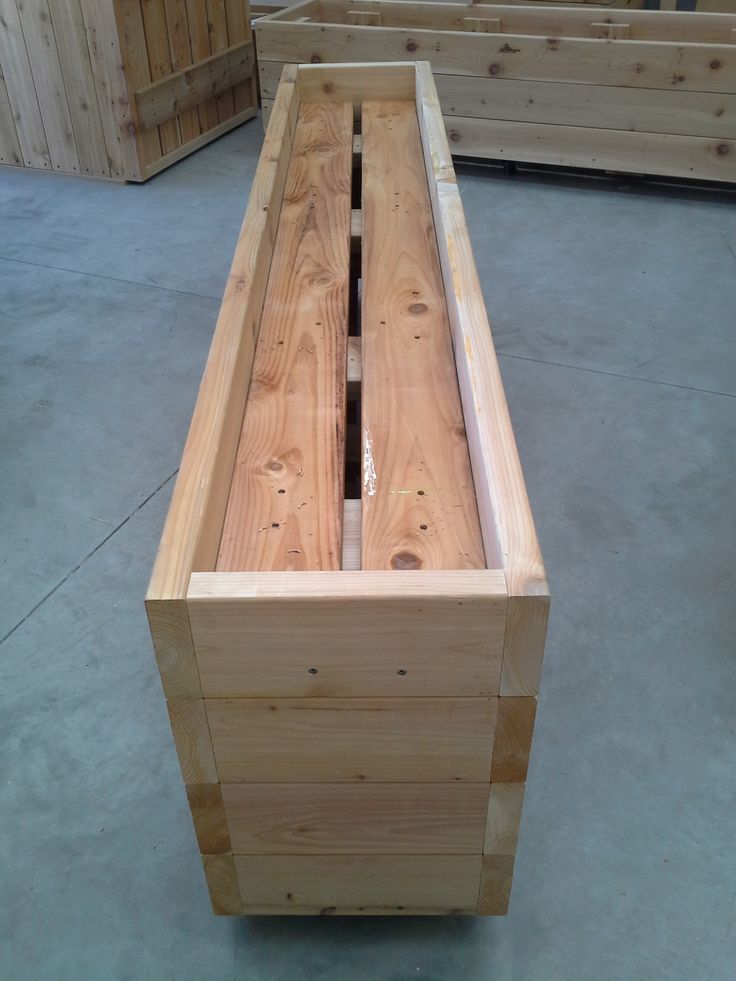 And that's right - cut down two boards at an angle of 45 ° and connect them like that. It is this option that will be shown in the photo.
To make it convenient to fix the fence on the ground, vertical bars or pieces of board are nailed in increments of 1.2-1.5 m, the length of which is approximately 20 cm more than the selected bed height.
We nail vertical bars so that the box is strong and can be dug in.The lower end of the bar or board needs to be sharpened - this will make it easier to drive the fence into the ground. Then we take a miter box or a circular saw, and cut off the edges at an angle of 45 °. Putting two boards together creates a perfect 90° angle.
Correctly made cornerFor a strong connection on the inside of the corner, we install a bar, to which we nail the boards.
That's what happened. Only he lies "burdens" up. They are hammered into the ground Fencing for high beds made of wood does not take long, but even easier, connect the boards end-to-end, and nail metal corners for strength (pictured below).
From logs
It is not difficult to make a similar box from hewn logs. For example, this option: two long sides from logs, and short ones from pieces of boards. nine0003 The advantage of logs is that they are heavy, and due to their weight they will hold the soil well.
Whitewash the finished fence: both pest protection and a more attractive look.
Getting StartedFrom Slate
When making beds from flat or wave slate, questions also arise about how to fix it. The easiest way is to dig in. But this is uneconomical: you will have to make the stripes wider by at least 10 cm and still there is no guarantee that the slate will not “float” in the spring. In the muddy earth, it will simply be squeezed out with a mass. You can fix it, but it's too much time and effort. nine0003
Therefore, most often corners or pipes are driven in from one or both sides of the sheet, which clamp the slate and prevent it from deviating strongly. In the photo, the corners are driven in only from the outside: from the inside, the mass of layers of the high bed will press, so that the fence will not fall inside.