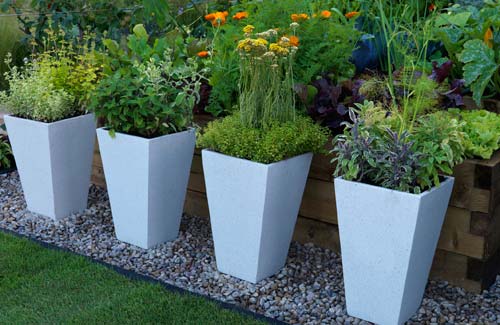
Toe kick vs base molding
Toe kicks versus plinths – why your choice can make or break your kitchen design
(Image credit: Life Kitchens)
To toe-kick or not to toe-kick – that’s the question to ask when you’re planning a new kitchen. In kitchen design, a toe-kick is a recessed plinth at the base of your cabinets that gives them a ‘floating’ look. The alternative is a plinth skirting that creates a solid base at floor level.
Toe kicks versus plinths is a recurring debate, and one that's come to the fore on Instagram recently.
See: Country kitchen ideas – get the rustic look with our ultimate inspiration gallery
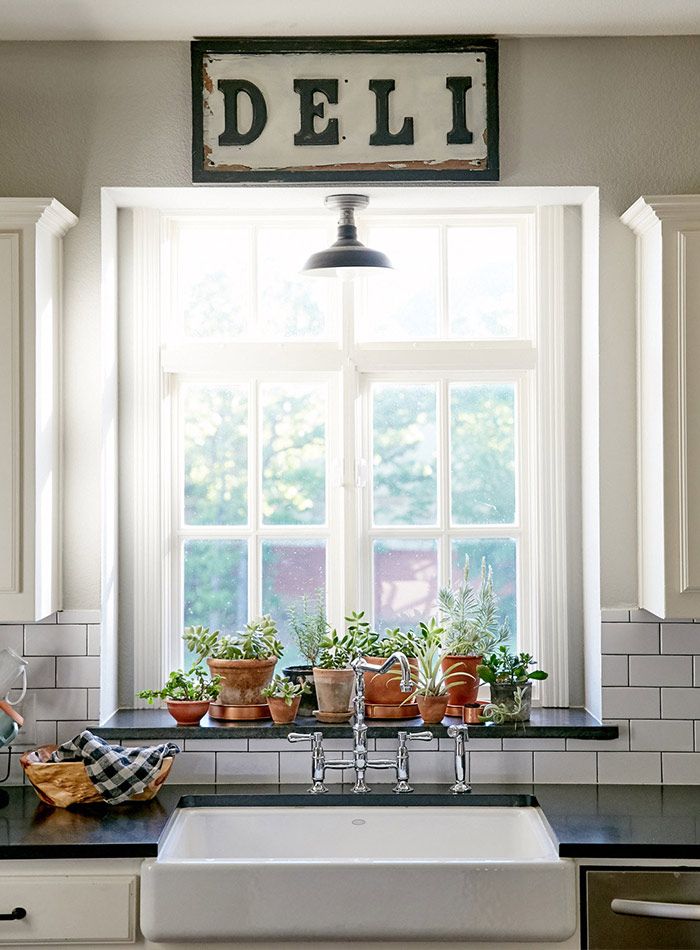
This Real Shaker Kitchen features a skirting along the base cabinets
(Image credit: deVOL)
‘Toe-kicks tend to be more common in the US, where kitchens often have a freestanding look,' says Collette Black from deVOL . 'In the UK, many of our customers choose skirting for a more fitted appearance that suits an English-style kitchen, but it’s really down to personal preference. '
That personal choice could be down to the size of your feet… ‘The toe-kick stops anybody who is quite tall or has big feet from having to stand away from the counter and potentially strain their back while washing at the sink,' says interior designer Dee Gibson, founder of Velvet Orange . 'This seemingly unimportant detail can have a big impact on the usability of your kitchen, and it’s something I always discuss with clients.'
‘While countertops need to be at the right height for you to keep your posture, the toe-kick will also help you stand closer to your work surface without angling yourself forward because your feet can’t get close enough.’
- More inspiration: Cottage kitchen ideas – design inspiration for homely spaces
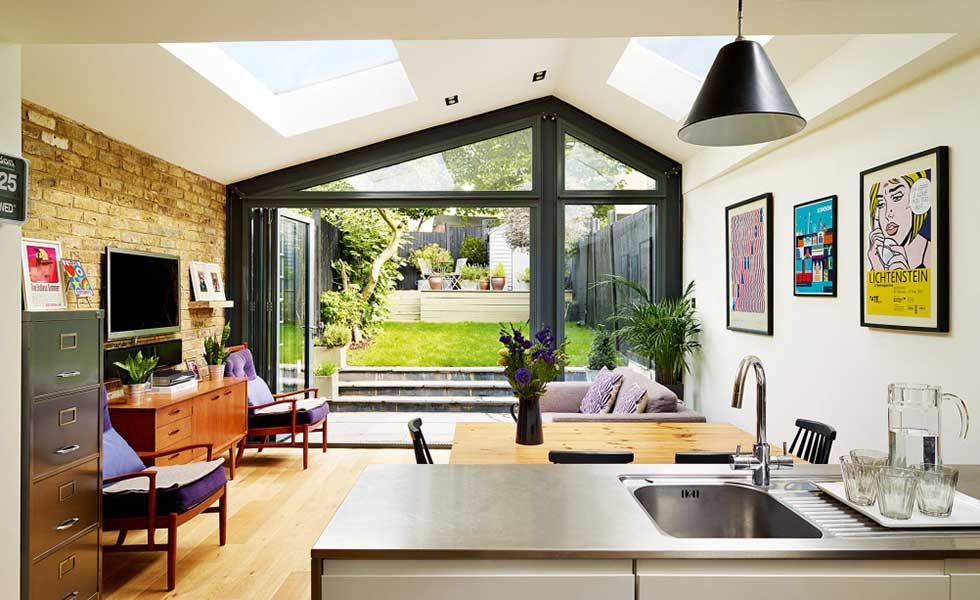
The recessed plinth, or toe-kick, allows you to get up close o the counter
(Image credit: deVOL)
But whatever your shoe size, a toe-kick may not be the best option for you.
A modern kitchen works well with a toe-kick, but a traditional country-style or Skaker kitchen tends to look better with a proper skirting board around the base.
The trend for open-plan living also means that we are designing kitchens that need to work within a single living-cooking-entertaining-relaxing space. Which means we want cabinets that look more like furniture pieces.
‘A skirted kitchen creates continuity with wall details and styling,’ explains Gibson. ‘If your kitchen is bespoke or the supplier has a range of different options, you can choose how deep your skirting. And if you like chunky furniture, this will give your kitchen a very solid and expensive look.’
A toe-kick can be incorporated into a kitchen island
(Image credit: Polly Eltes/Future)
Gibson’s pro tip is to make sure that any skirting is finished in durable paint to withstand scuffs and chips from working in and cleaning your kitchen.
The final verdict on toe-kicks versus skirting: factor in how deep the skirting is in the rest of the room, how much time you spend in the kitchen and, finally, how big your feet are…
Andrea has been immersed in the world of homes, interiors and lifestyle since her first job in journalism, on Ideal Home. She went from women's magazine Options to Frank. From there it was on to the launch of Red magazine, where she stayed for 10 years and became Assistant Editor. She then shifted into freelancing, and spent 14 years writing for everyone from The Telegraph to The Sunday Times, Livingetc, Stylist and Woman & Home. She was then offered the job as Editor on Country Homes & Interiors, and now combines that role with writing for sister title homesandgardens.com.
Cabinet Toe Kicks - Dimensions, Options & Installation
What is a cabinet toe kick? Why do you need them? What dimensions should they be? I'll answer all these questions and more!
At the bottom of every base cabinet in your kitchen or bathroom, you'll notice a recessed area between the bottom of the door and the floor. This area is called a toe kick, and it's an ergonomic feature to make it more comfortable to work at the countertop or sink.
It gives you a spot to slide your toes under the cabinets without bumping into the front, so you can get up closer to your work. Without a toe kick, you'd have to bend forward and strain your back.
This post contains affiliate links for your convenience. Purchases made through these links may earn me a small commission at no additional cost to you. Please visit my disclosures page for more information.
Cabinet toe kick dimensions
The toe kick is usually set back 3-4" from the front of the cabinet and 3-4" from the bottom. It needs to be deep enough for your feet to fit, but not so tall that it wastes space that could have been used inside the cabinet.
The standard depth of a toe kick is 3", which is what you'll find on most commercially available cabinets. You can go deeper if you have big feet that need extra space, but you shouldn't go less than that.
The standard height of a toe kick is 3 ½", although you can go up to 4" without losing much space in the cabinet above. I built our base cabinets with 4" tall toe kicks simply because our Roomba tends to get stuck under anything shorter!
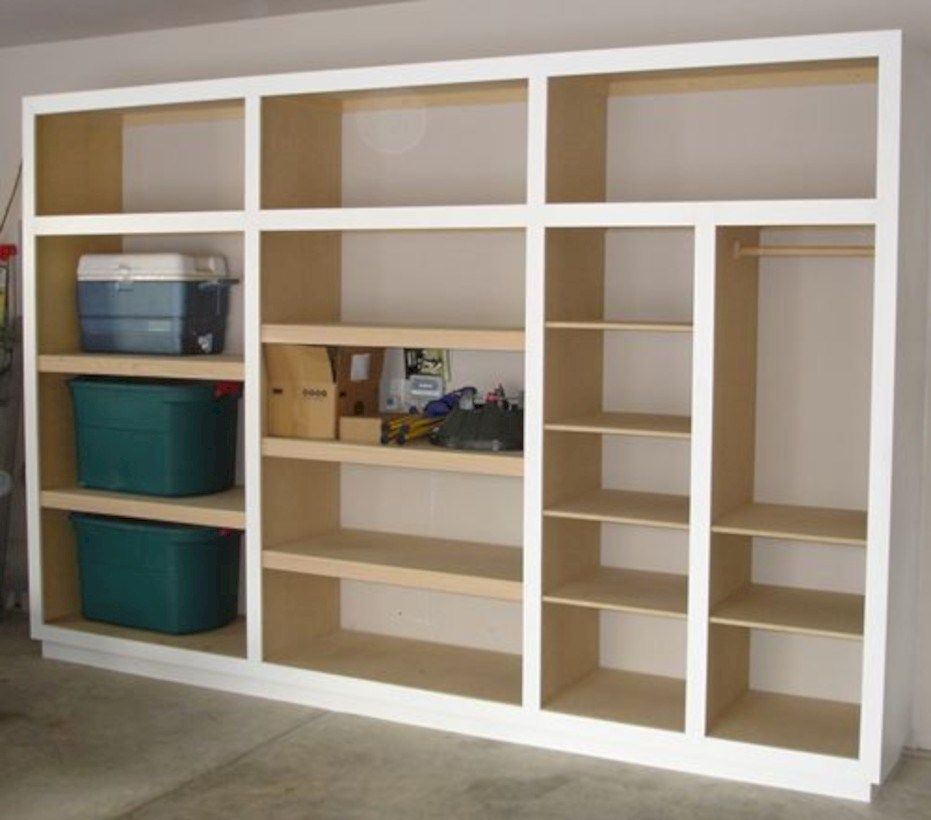
Cabinets without toe kick
Some people prefer the look of base cabinets without a toe kick, or an open bottom with legs. While this is fine for storage cabinets like the one below, it isn't recommended for a kitchen or bathroom.
Not only will a cabinet without a toe kick be uncomfortable to work at, but it will quickly get damaged. Even if you think you won't need it, you might find yourself scuffing the front with shoes or the vacuum cleaner more often than you might expect.
If you're thinking of making your cabinets look more like furniture by adding feet instead, consider the additional cleaning that you'll need to do underneath. Crumbs and pet fur can end up deep under your cabinets, and no one wants to clean under there! A toe kick seals off this area and makes cleaning the floors much easier.
Also keep in mind that the next owner of your home will expect a functional kitchen, and they might not appreciate your aesthetic choice to skip the toe kicks.
What is toe kick molding?
Toe kick molding is a piece of trim that matches your cabinets, and is used to hide the seams and gaps between the cabinets and the floor.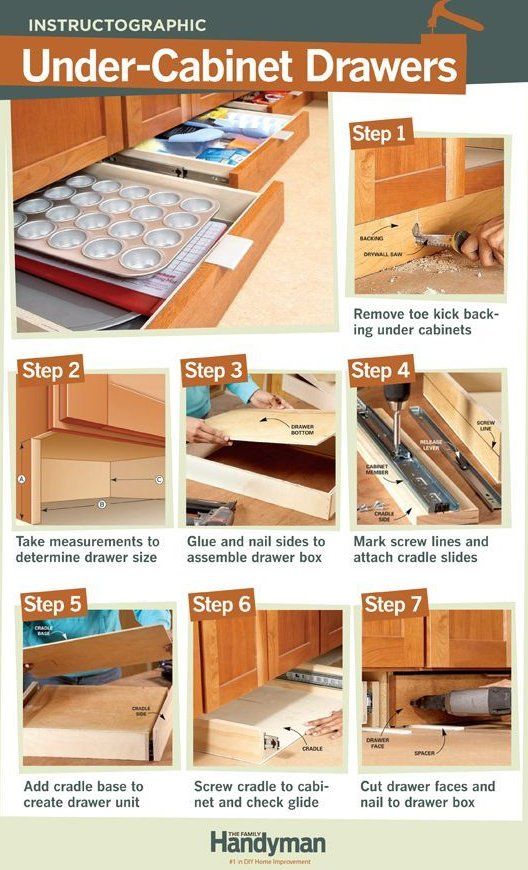
When you're installing base cabinets, shims are inserted to bring all the boxes level and plumb. Walls and floors are rarely perfectly straight, and the shims hold the cabinet boxes at the correct angle so the countertop is flat.
However, these shims can create unsightly gaps between the toe kick and the floor. My base cabinets span across both tile and hardwood, and there was more than a ¼" difference from one end to the other! It took quite a bit of shimming to get the countertop level.
I'll be using a thin piece of trim painted to match the cabinet doors to cover up these gaps. A scribe tool will help to transfer the irregular lines to the molding to create a perfect fit! Once it's installed, the height difference from one end of the cabinets to the other won't be noticeable.
How to install IKEA cabinet toe kicks
IKEA cabinets use feet under the cabinet box, which are easy to adjust to accommodate uneven floors. The feet come with little clips to attach the toe kick once you've cut it to size.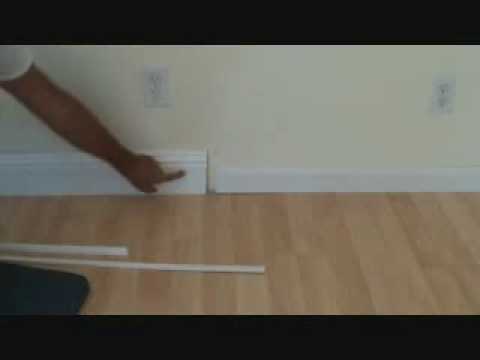 The video below shows you exactly how to install it!
https://youtu.be/cLqXSjr6wGcVideo can't be loaded because JavaScript is disabled: IKEA Toe Kick Installation / SEKTION Cabinets (https://youtu.be/cLqXSjr6wGc)
How to make a cabinet toe kick
There are two ways to create the cabinet toe kick. You can build a separate platform for the cabinet to rest on, or you can integrate it into the side pieces and cut out a notch at the bottom.
For my DIY kitchen cabinets, I'm building a separate toe kick platform instead of integrating it into the side pieces. This saves on materials, since I'm able to get most of two cabinets out of a single sheet of plywood and use scraps for the toe kick box. Plus, it's easier to level a small platform rather than a huge cabinet when it's time for installation.
For integrated toe kicks, you'll need to add 3 ½" - 4" to the height of the side pieces. Then cut a notch in the lower front corner to create the recessed area. The video below shows you how to use a jigsaw to complete this step.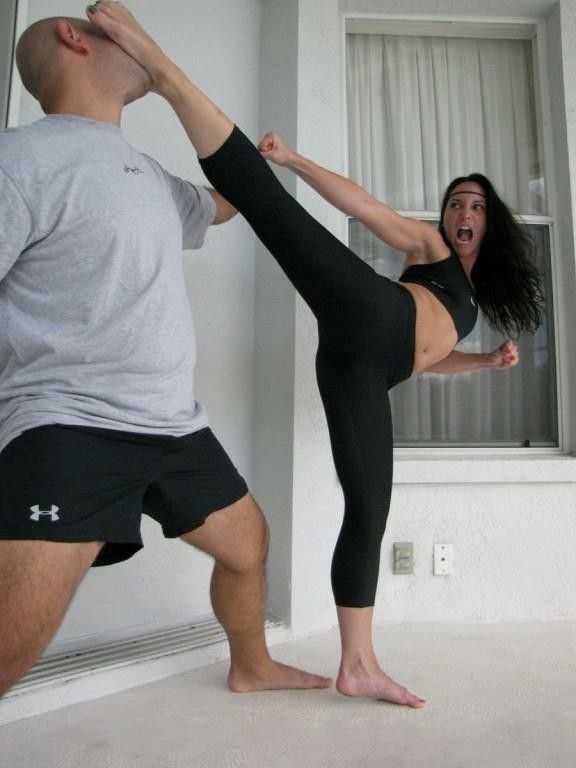
https://youtu.be/t1xcySmyJaEVideo can't be loaded because JavaScript is disabled: How to Build a Cabinet Lesson 40: Cutting Out Toe Kicks (https://youtu.be/t1xcySmyJaE)
The separate toe kick box can be made from 2x4s or any ¾" material. You can make one long platform for multiple cabinets, or individual platforms for each cabinet box. Just make sure to stick to one height throughout the entire kitchen!
For cabinets that are 24" wide or more, you may want to consider adding a support down the center of the toe kick box to prevent the bottom from sagging. I assembled mine with pocket holes, since the inside of the platform won't be visible once the cabinet is installed.
If the outside corner will be visible (like on a kitchen island), you may need to cut both ends at a 45 degree angle to hide the board ends. You can learn more about how to make a mitered cut here.
Once the platform is level in all directions, it can be screwed into the wall through the back piece to hold it in place. Make sure to use a stud finder to locate the studs and mark them all the way up to countertop height. Once the cabinet is set on top, you'll need to attach it to the wall the same way, and it'll be easier to see the markings.
Kitchen cabinet toe kick ideas
Even though it's only a few inches high, you can put that space under your cabinets to good use! There are a lot of interesting features for toe kicks that will make your kitchen more functional.
Toe kick heaters and vents
Your kitchen needs heat just like the rest of the house, but you may find the vent blocked by the cabinets. Typically, a hole is cut into the toe kick to allow the heat to escape into the room. A short register plate covers up the hole and prevents debris from getting inside.
The problem with this method is that it heats up the entire underside of the cabinet, instead of directing it out into the room. A short duct that connects the heating vent to the register funnels the hot air out where you need it!
Toe Ductor Toe Kick Duct KitToe kick drawers
If you have a small kitchen, every square inch of space is valuable.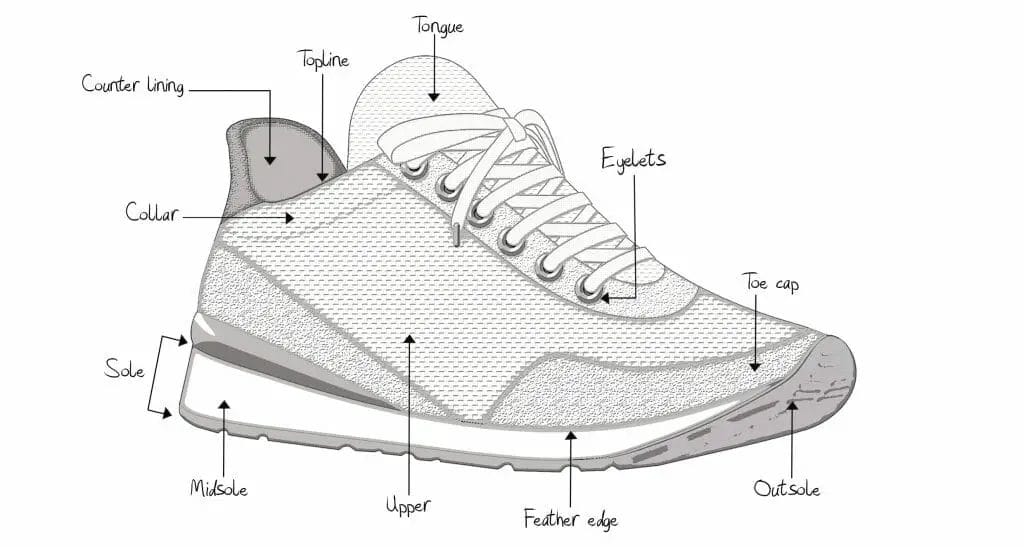 Toe kick drawers are perfect for cookie sheets, cooling racks and other flat items, as long as you remember they're down there!
These small drawers are easier to install when you're putting together a new kitchen. Kraftmaid offers this feature on some of their cabinets, or you can build your own like the one in the video below. You can also retrofit existing cabinets with a few modifications.
https://youtu.be/ideCiArksxw?t=396Video can't be loaded because JavaScript is disabled: Toe-kick Drawer for hidden storage [Part 2: Home Bar] (https://youtu.be/ideCiArksxw?t=396)
Usually these drawers operate with push-to-open drawer slides. Keep in mind that using your shoe to press on the drawer front will quickly lead to scuff marks, and bending all the way down to the floor to retrieve items isn't great for your back. If you have pets, you may also discover that their fur finds its way into these drawers (ewww!)
Toe kick lighting
If your kitchen feels too dark, toe kick lighting is an easy way to brighten it up! Motion activated sensors can turn on the lights automatically when you walk into the room, so you can sneak to the fridge for a midnight snack.
Toe kick lighting can be as simple as an adhesive LED light strip that sticks to the underside of the base cabinets and plugs into the wall. You can also hire an electrician to hard wire the lights to each cabinet for a more custom look.
Toe kick vacuum
This is a great feature that I added to my pantry cabinet! I removed the bottom and the toe kick, and installed a motion-activated vacuum on the floor inside. Now we just sweep crumbs to the pantry and they're automatically sucked up without having to open the door!
There are also kits that incorporate the vacuum directly into the toe kick. This one may be easier to install when you're renovating an entire kitchen, so you can easily cut out the hole and wire it up.
Hopefully this article helped answer all your questions about cabinet toe kicks! If you're interested in learning more about building your own kitchen cabinets, check out the articles below!
Automatic pouring systems
Ladles designed to operate with an overhead crane or monorail system cannot always handle the demands of high speed lines to move large volumes, unless several ladles are used at the same time. This can lead to difficulties in operation, creating a bottleneck in the line and limiting production.
Over a full shift, operator fatigue can also be a significant factor in slowing down production and changing casting quality.
A fully automated casting system, such as a pressure casting device, will overcome these limitations, but it may be expensive and not provide the necessary flexibility, especially if different types or grades of metal are poured in the shop, such as gray cast iron and ductile iron. Acetarc can offer economical, cool semi-automatic casting systems that consistently deliver high casting speeds, reducing operator fatigue and providing flexibility in pour metal changes. Acetarc cold casting systems are based on tip or bottom axis casting processes, whichever method best suits the production requirements. All of our cold semi-automatic casting systems are designed to meet specific production requirements. Below is the main technical description of the Acetarc semi-automatic pouring system for liquid metal.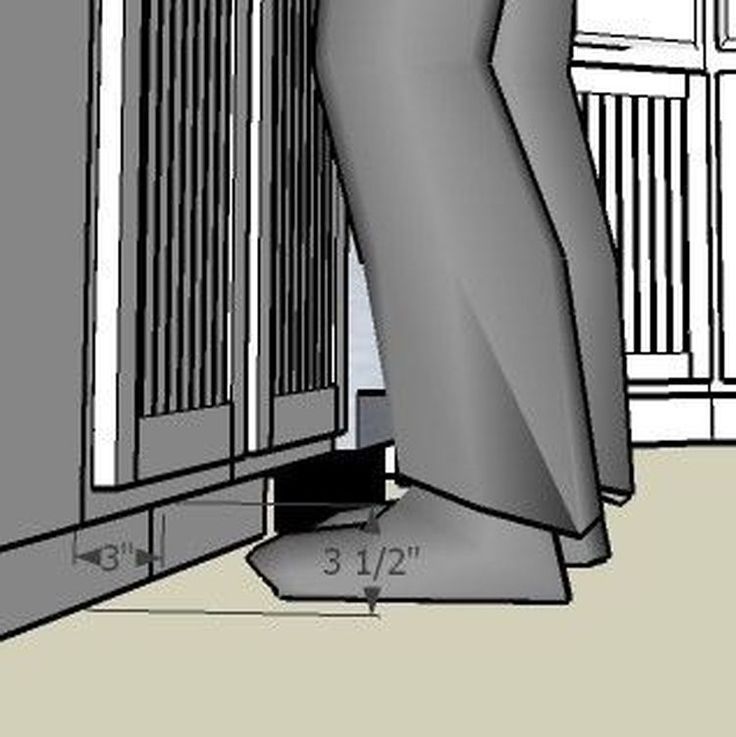
buckets and spills A CETARC with an axis by the toe
We present to your attention a brief guide to the buckets and spilling installations with an axis of the sock, made by the sock, made by Actarc Ennngering. Please note that this equipment is designed and manufactured to suit each specific application. Therefore, the information below is offered as a general guide only and should not be taken as an exhaustive list of what we can offer.
Below is a detailed explanation of what these ladles are, how they differ from other tundish systems, and the advantages of the nose axle system when pouring metal.
Spout pouring and spout pouring ladles
Ladles are usually distinguished by the method of pouring, the standard methods being spout pouring, siphon or kettle pouring, and others. A ladle with an axis at the toe is a type of ladle with pouring through the toe. It got its name from the location of the axis of rotation at the toe of the pouring chute, which is discussed in more detail below.
Spout Ladles
The standard spout pour ladle has a pour spout on the ladle rim and the pivot is located approximately in the center of the ladle body.
| Nose ladles Small bucket without gear and large transfer bucket with swing drive and wireless remote control. When working with a small bucket, filling accuracy depends on the experience of the operator, while in the case of a large transfer bucket, a large operating space is required for pouring manoeuvres. |
Therefore, when a standard spout ladle is rotated, the spout follows an arc whose radius is equal to the distance from the ladle pivot to the tip of the spout. If the bucket has an elongated toe, then the arc of movement will naturally be larger.
In many molten metal pouring applications this is not a problem and may even be advantageous as it allows the experienced ladle operator to have a significant pour range in which to fill molds, especially in the case of a long nose ladle.
However, this requires raising and lowering the bucket at various stages of pouring to accommodate the changing nose position as the bucket turns. It also requires operator experience to ensure fast and accurate pouring.
But even with experienced operators, there is a limit to how quickly the flask can be filled, especially in the case of large castings. Therefore, usually on automatic molding lines producing small castings, two or more spout ladles can be used at the same time, while on molding lines producing larger castings, some kind of automatic filling system may be used to ensure the required filling rate.
Pouring with nose axis
In a nose-axle ladle or nose-axle pouring plant, the ladle pivot is offset close enough to the tip of the nose.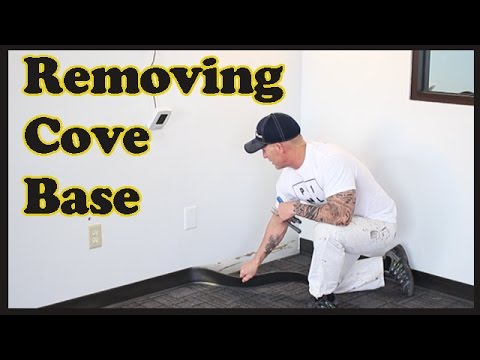 Therefore, when turning the ladle, the position of the pouring nose changes slightly and can be considered as fixed.
| Pouring with nose axis 1 ton aluminum transport ladle pours into a small furnace feed chute |
This allows for more accurate pouring than conventional ladle through-toe pouring, allowing faster pouring speeds while the operator does not need to have the same skill level as a conventional ladle operator to ensure high quality and uniform casting.
Mechanized
| The position of the pivot point relative to the center of gravity of the nose-axis ladle requires the use of a power tilt drive and does not allow manual rotation gearboxes to be dispensed with as on standard nose-pouring ladles. As a result, the use of a power tilt drive, coupled with high casting accuracy, allows the operator to pour faster and more uniform quality on high-speed molding lines, with less effort and less stringent skill requirements. |
Small buckets with tip-toe tilt can use electric lifts or linear drives, while larger units typically use hydraulic cylinders due to high load.
Lip-axis ladle and lip-axis pourers
The term “lip-axis” refers to the axis about which the molten metal container rotates. Toe-axle tanks usually refer to either toe-axle ladles or toe-axle bottling plants. The pouring process is the same in both cases, but at Acetarc Engineering we usually define them as follows:0002 The toe ladle is generally used in the same way as a normal toe ladle, namely, the toe ladle is filled at the furnace and then transported to the molding line where casting is carried out.
When the tip-pin bucket is emptied, it returns to the furnace for refilling. Typically, a toe-axle bucket is suspended from an overhead monorail or crane. If a monorail is used, then several buckets with an axis at the toe can be used simultaneously.
The usual capacity of 250 kg toe buckets is 600 kg, although we have also produced larger buckets.
Tilt speed is either constant or switchable between standard and reduced speed.
The tip-pin bucket is usually height adjustable to accommodate different filling and pouring heights.
Power is supplied to the device via the ceiling monorail or the busbar system of the crane.
| Basic pouring ladles with an axis at the nose of a small capacity. Used with Ceiling Monorail System. Each bucket with simple push-button control. Ladles move between oven and mold line. Each bucket has its own operator. These ladles will be used as a direct replacement for standard spout ladles and will provide higher pouring accuracy |
Toe axle pouring machine
Generally the term applies to larger capacity pouring ladles that can be suspended from a ceiling monorail or floor mounted on rails. They are also used in systems with more complex controls and/or additional features such as PLC (Programmable Logic Controller) position control, variable tilt speed, etc.
Therefore, the nose-axis pouring system can be offered with a variety of features, and each system is designed and manufactured to meet the requirements of a specific foundry.
The pouring ladle is usually placed on a frame that provides rotation around the axis at the toe. This allows the bucket to be removed from the frame. The pouring ladle is sent to the filling furnace, while the tilting frame remains on the molding line.
This type of system typically uses two buckets at the same time so that when an empty bucket is sent for refilling, a second filled bucket can be mounted on the frame, avoiding downtime.
Alternatively, the pouring ladle remains on the pivot frame at the nose and a transfer ladle is used to fill the pouring ladle. The ladle in this case can be removed from the frame for maintenance, or when the metal in the ladle cannot be used for casting and must be poured into ingots.
Placement of the
Whilst some
can be used as stationary machines in a fixed position relative to the molding line, most machines are offered with the ability to move along the section of the molding line. Casting machines with a fixed location can only pour into a mold placed immediately before the installation. Thus, the filling speed is limited by the speed of replacing forms.
Movement along the molding line (X-X movement or longitudinal movement)
Pouring machines moving parallel to the molding line (X-X movement) can not only be used to pour into the mold directly in front of them, in a fixed position, but also move along the molding lines, producing filling in additional forms relative to the advance of the molding line.
The X-X movement capability also allows the use of the toe-axis filling machine on a constantly moving molding line, where the toe-axis machine adjusts to the speed of the molding line so that the pouring is done in synchronization with the molding line and the toe-axis machine, so that the machine and the molding line is stationary relative to each other.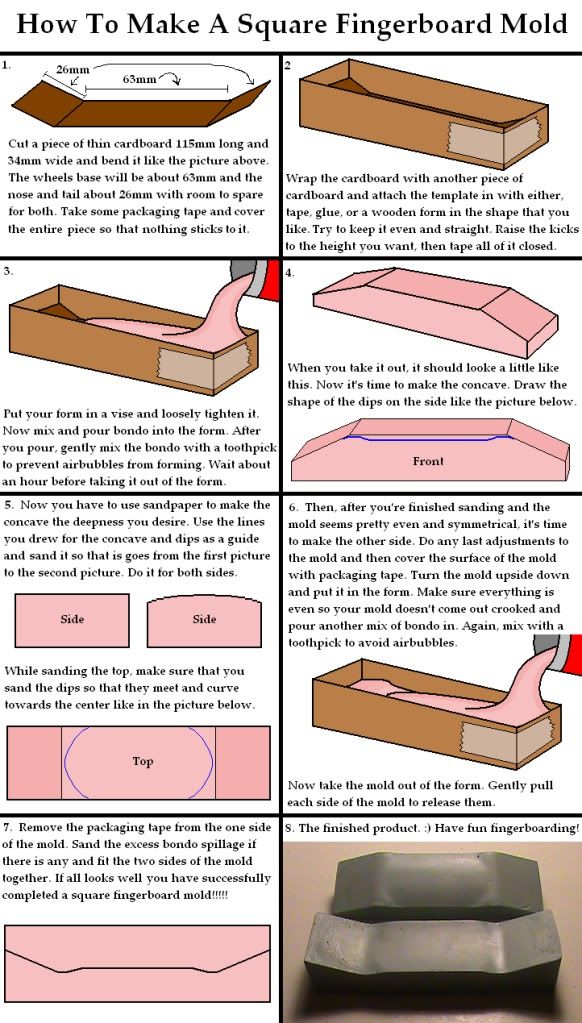
The overfilled molds create a buffer so that when the toe-axis machine stops pouring for refilling, this can be done without skipping the molds.
Pouring molds at a speed faster than the speed of their approach to a fixed casting point also means that the speed of passage of the spread metal, which is less time in the ladle, is increased. This can be very important when casting nodular cast iron (high strength).
Two ways to achieve X-X movement:
- Suspension of the bottling plant with an axis at the toe on the ceiling monorail.
- Placement of a bottling plant with an axis at the toe on a trolley moving along rails installed on the floor.
Ceiling Monorail / Beam Travel
Toe Axis Pouring Units can be mounted on a ceiling monorail system or on a gantry for movement along the molding line.
| Typically, the monorail is an overhead guide parallel to the mold line and may include a service outlet to take the toe-axle plant out of service when needed. A monorail can be used to move the ladle/toe-axle tundish from the mold line to the furnace, but typically in toe-axle tundish the monorail line is dedicated to service the mold line and the toe-axis tundish remains in place at all times. |
The transfer of metal from the furnace to the y-axis plant is done either with the ladle shroud remaining on the frame and filling with the transfer ladle, or by removing the ladle shroud from the frame using an additional system to move the ladle shroud between the furnace and the y-axis tundish sock.
Ceiling mounting units can be powered by a busbar system mounted on a beam or monorail. It is a convenient and reliable power supply solution.
Floor-Mounted Toe-Axis Machine
lines. This version is available for all unit sizes, but is especially suitable for units with higher capacity and weight.
Having contact with the rails at 4 points, the floor mounting unit has great stability. Typically, the transfer cart includes all equipment required for tilting, including hydraulic power if hydraulic cylinders are used for tilting.
Floor-standing units can be supplied with power in several ways. Typically, power is supplied through a ceiling-mounted cable tray system, a floor-mounted cable reel, or a cable chain. Obviously, a ceiling system has the advantage of not interfering with operation, but this is the customer's choice and, depending on the circumstances, there may be reasons why a ceiling power supply system would be inconvenient in a particular case.
Floor Mounted Toe-Axis Unit can also include Y-Y movement in addition to x-x movement, and even vertical movement.
Y-Y movement
As explained above, the standard nose-axis machine can move along the forming line (X-X movement). The pouring position remains fixed relative to the molding line. This is sufficient if the mold funnel on each mold remains in the same place and does not change when the model is changed.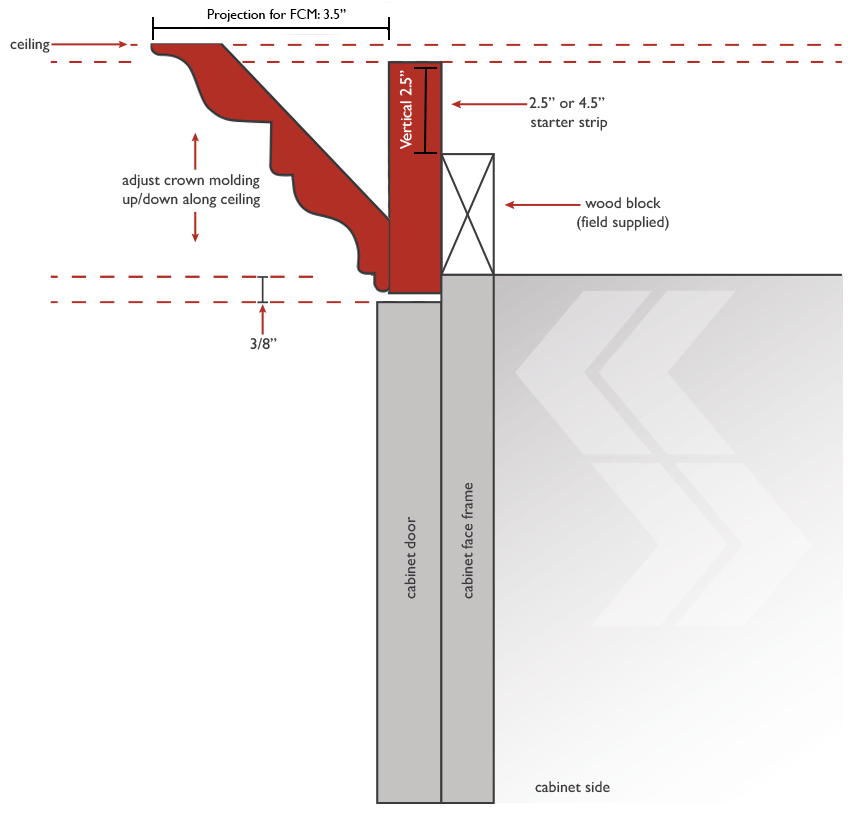
If the funnel position changes as the model changes, it may be necessary to design a tundish with a nose axis that can be moved in and out of the molding line so that the position of the pour remains constant relative to the funnel. This is called Y-Y movement.
Y-Y floor mounted filling machines are much easier to handle than monorail machines and this can be a significant factor in choosing a floor mounted system over a monorail system.
Pouring machine with nose axis with movement in all axes.
The plant also has a late retrofit jet feeder.
X-X movement is limited to 1000 mm, which corresponds to the positions on the automatic molding line.
Jet late modification device automatically pours additives directly into the molten metal stream during pouring.
Z-Z movement (vertical movement)
For small ladles moved between the mold line and the furnace, it is necessary to be able to raise and lower to the optimum height for filling and pouring.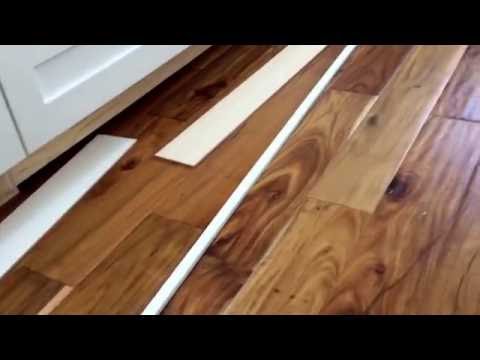
Toe-axis filling machines, for the reasons described above, do not need height adjustment to adjust to fill and pour levels.
However, we know from experience that a small amount of vertical movement of the nose-axis potting machine can greatly improve service quality and potting uniformity, especially for a kettle ladle. This is caused by a change in pressure when the ladle is tilted and molten metal is poured. The flow of metal from the nose of the ladle varies slightly depending on the amount of rotation of the ladle and the amount of metal in the ladle.
The ability to raise the unit allows the operator to compensate for this small change in metal flow.
Vertical movement can also be useful if the height of the forms changes for some reason. For example, if the molding system uses flaskless molding when the molds are made in layers, or the injection process requires the use of increased profit inserts.
Controls
Tip-Axis Buckets are usually supplied with basic controls, usually pendant push buttons for one and two speed tilt and raise/lower.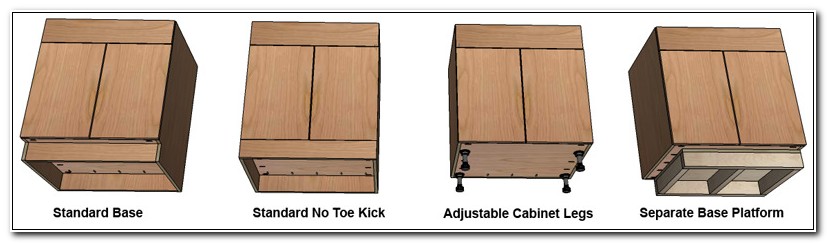 If a toe-axle bucket is used on a monorail system, the dolly can either be manually pushed or powered. For power driven carts, there are usually 2 speeds: standard and reduced.
| Pouring machine with nose axis in operation. Pouring accuracy shown | ||
| Automatic casting ladle filled on site | Filled with an axis at the toe. Foundry start-up |
Loading stations
In yoke-axle pouring systems, where the ladle is removed from the yoke-frame and transported to the furnace for filling before returning to the frame, two ladles are usually used at the same time.
| This toe-axle ladle shroud is filled in the furnace and then transported to the toe-axle tundish using a ceiling-mounted monorail. At the end of the movement, a special wheel frame is used to move from the monorail to the bottling plant with the axle at the nose |

One ladle moves from the toe-axle to the furnace, while the second ladle is in the toe-axle tilt frame. Thus, when the bucket in the frame is emptied, the full bucket is ready to be loaded onto the frame. This keeps downtime during pouring to a minimum.
The moment of removing the empty bucket from the frame and placing the full bucket on the frame can become the bottleneck of the cycle. Therefore, a transfer station is usually provided that allows the replacement of an empty bucket with a full one quickly and efficiently with minimal hassle and delay.
Y-axle ladle shrouds
If the same ladle is used to transport the metal from the furnace to the y-pipe casting system and the pouring operation, different ladle options can be offered.
Bucket can be supplied without gear and with fork recesses. This is the simplest option, but requires a forklift and space to operate it safely.
The bucket can also be supplied with a removable lifting eye. It may be convenient to transport the ladle from the device to the furnace and back with an overhead crane when using two ladles at the same time.
Toe-Axis Filler: Why do you need such a system.
The nose-axis filler can be used as a pouring system for mold lines where manual ladles cannot handle the number of molds and switching to a fully automatic filler is uneconomical.
The nose-axis pourer can also be used as an auxiliary pouring system for an existing automatic filling system, when an emergency pouring system or casting of various metals is required, which the existing automatic system cannot cope with.
Therefore, the main advantages can be considered as follows:
Pouring system with an axis at the nose ensures fast, precise and uniform pouring.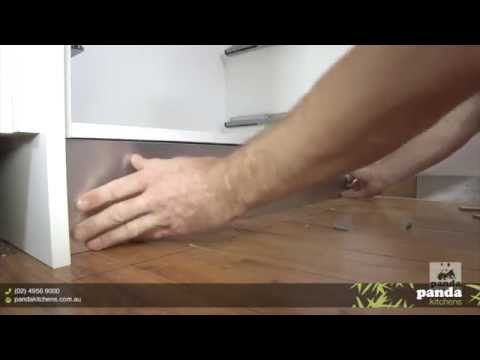
With tilt and travel control, it doesn't require as much operator skill to produce the same casting quality as conventional trough-toe ladles.
Since no manual effort is required to tilt the bucket, the operator does not get tired.
Toe mount can also be used with various metals
As a standard option, the tip axle tundish can be fitted with quick release bucket liners. This greatly simplifies maintenance operations and also allows the toe-axis system to be used with different metals without the risk of contaminating one alloy with another. If during operation it is required to replace one alloy with another, then replacing the bucket liner is quite simple.
Questionnaire
In order to provide you with a more accurate quote for yoke ladles and yoke tundish, we need to know as much as possible about the intended use of the equipment and the location of the equipment.
Answering some or all of the questions below will help us come up with the most accurate offer. In any case, a layout diagram of the equipment location with a cross-sectional view of the molding line will be very useful.
Nose Bucket
- What bucket capacity do you need?
- How many nose buckets do you need?
- What metal or metals will you cast?
- If ductile iron is being poured, is there a time limit for pouring?
- What are the maximum and minimum casting weights?
- What is the bucket usage pattern (approximate number of hours of use per day/per week)?
- What is the height of the molding line?
- Can you send me a sketch of the dimensions of the flask?
- What is the distance from the edge of the flask to the center of the funnel?
- What is the filling height of the oven?
- How does the nose-axle bucket move between the mold line and the oven?
- Do you require any special features of the remote control?
- If the toe-axle bucket is to be used on an overhead monorail, is the monorail already available or does it have to come with the bucket?
- How much free ceiling space is there?
- If an existing monorail is to be used, what is the height, size and safe working load of the rail?
- If there is already a monorail, what kind of power system is used?
- What is the voltage of the current power system?
- Will the tip-pin bucket be moved manually or is a power drive required?
Toe Axis Filler
- How many molds are poured on a molding line per hour?
- Does the mold line change forms (start-stop movement) or does it move continuously?
- If there is a change of forms, what is the duration of the cycles? (line stationary state time, line movement time).

- What is the displacement of the changing line? (distance traveled per cycle).
- If the molding line moves continuously, what should be the speed of movement and can it be changed?
- What is the distance from the edge of the mold to the center of the funnel?
- Can you send me a sketch of the flask exchanges?
- Will the funnel position change?
- Will the height of the form change?
- What bucket capacity do you need?
- What metal or metals will you cast?
- If ductile iron is being poured, is there a time limit for pouring?
- What is the typical casting weight?
- What are the maximum and minimum casting weights?
- What is the bucket usage pattern (approximate number of hours of use per day/per week)?
- What is the height of the molding line?
- Do you prefer monorail mounting or floor mounting on rails and trolley?
- How will the toe-axis machine be filled with metal? Will the ladle move between the forming line and the oven or will a transfer ladle be used to fill the plant?
- Do you require any special control functions?
- How much free ceiling space is there?
- Are there space restrictions on the site?
Any information you can send us will be helpful in making an offer. Any information sent to Acetarc or its representatives is kept confidential and is used only for the purposes for which it was provided.
Please note that the above text and accompanying photographs and drawings are provided for general information only and may not be suitable for your intended use.
All systems are designed and manufactured according to the requirements of each customer and can be modified accordingly.
place an order for the spilling complex - order
Need another type of equipment - transition
9000
| Newsletter subscription |
|
| |
home
Search
| You can find the information you are interested in Oops, there is no such page ( Go back |
Beauty Backstage is an online beauty magazine created by insiders for all those who are not indifferent to the beauty industry.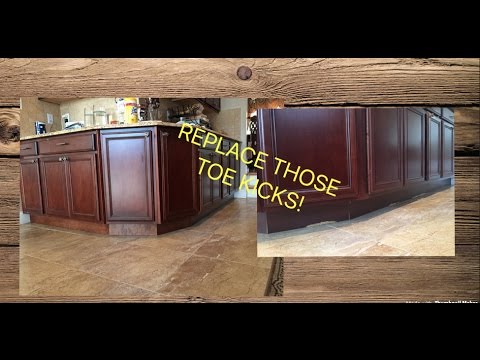 If you always want to be aware of the hottest trends, be the first to know about new products, get acquainted with world-class beauty gurus, understand the compositions and features of cosmetics and perfumes, then this resource is for you! In order not to miss the most interesting, subscribe to our newsletter.
The beautybackstage.ru website may contain references, screenshots and links to Facebook and Instagram owned by Meta, whose activities are prohibited in the Russian Federation. All information and links to Facebook and Instagram were posted before Meta was banned in Russia. There are no prohibited materials and/or links to such materials on the site beautybackstage.ru.
| © 2021 BeautyBackStage.ru. Internet portal about beauty. 
|