Planning house extension
How to extend a house – a guide to planning your extension
When you purchase through links on our site, we may earn an affiliate commission. Here’s how it works.
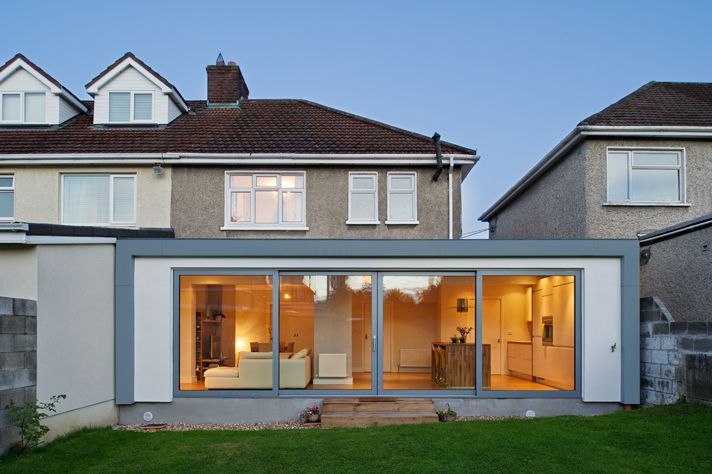
(Image credit: William Eckersley/Ar'Chic)
Join our newsletter
Thank you for signing up to Realhomes. You will receive a verification email shortly.
There was a problem. Please refresh the page and try again.
By submitting your information you agree to the Terms & Conditions and Privacy Policy and are aged 16 or over.If you're planning, and wondering how to extend a house, then you are in the right place. Extending your home will let you enjoy more family space, and it can even up the value of your property to make moving easier down the line. As one of the most life changing home improvement projects you could take on – requiring extra care when planning – we have put this expert guide together to help you every step of the way.
From designing your home, to permitted development rights and building regulations, you'll find everything you need to know about extending a house right here, including how to add value to your home via an extension.
Keep reading to get your building project off the ground and for information on the cost of an extension you can look to our feature.
How to extend a house: planning
Planning how to extend a house – from getting the required paperwork in place to agreeing the contract with your chosen builder – is vital, to ensure that your extension schedule runs smoothly and to keep you on budget. This is what to consider.
Applying for planning permission when extending a house
Gaining planning permission is an important stage in the process of planning an extension, but can be tricky to navigate if you're not in the know. Use our expert guide to planning permission to find out more, and make sure you have gone through your plans thoroughly with an architect or builder who is familiar with the local planning authority and their preferences.
As a general guide, when building a more ambitious extension you will need planning permission if:
- Your extension covers half the area of land surrounding your home;
- If you are extending towards a road;
- You are increasing the overall height of the building;
- You are extending more than six metres from the rear of a semi-detached house;*
- You are extending more than eight metres from the rear of a detached house;*
- Your single storey extension is taller than four metres;
- Your single storey extension is to the side of the property and more than half the width of your house;
- You are using materials that differ from the original style of the house;
- You plan on building a balcony or raised veranda;
- Your house is listed.
Other planning considerations for house extensions
What else might affect your planning application that you hadn't considered? Here are just a few things to bear in mind when you're planning a house extension.
Overlooking neighbours
Features such as upper-floor balconies can be contentious if they overlook the neighbours. For windows, you can use obscure frosted glass, install them at a high level, or fit skylights.
Overshadowing neighbours
Building a two-storey, or higher, extension too far out from the back of the house into your garden may overshadow the neighbours, which will limit the permissible size.
Highways and your extension
If your proposed extension could interfere with visibility for motorists, it will also limit how far out you can build.
‘Another factor to bear in mind when building within three metres (or in some cases, six metres) of neighbouring buildings is the Party Wall Act, which requires you to formally notify the adjoining owners two months in advance of the proposed project,’ says Ian Rock. (See planningportal.gov.uk .)
Discover how to apply for planning permission in our guide.
(Image credit: IQ Glass)
Considering access issues when extending a house
Organising the access to your extension is an important early step to consider when planning a house extension because it could limit your design options. So, if access to the rear of your home is restricted, perhaps because you live in a terraced house, you will need to talk to your builders and neighbours early on in the process to ensure you won't be causing issues for later on in the build. Having materials craned over a house is possible, but it's extremely expensive and you need to get the agreement of the council to close the road temporarily.
What to do if your extension's planning application is rejected
If you're planning to extend a house and your application is refused here's what will happen: your planning refusal notice will outline whether or not you can appeal and specify a time period in which an appeal must be submitted. An independent planning inspector, who will take into account national and local policy, as well as the impact of the proposal, will then consider the appeal.
Sometimes changes to an extension's design are unavoidable and any that are slight should be given the okay with few issues. However, any significant changes made to your extension's design after the planning application has been approved will require a retrospective amendment, or a new application all together. Find out more in our planning permission guide.
(Image credit: Korniche)
Planning an extension under permitted development rights
‘Homeowners are sometimes surprised at how much can be built on to a house under permitted development rights,’ says Alan Cronshaw of Acronym Architecture & Design.
Side return extensions are a good example. In many cases, two-storey side extensions may not even be a problem, but it’s a good idea to discuss your proposals with the planners before spending money on drawing up detailed plans.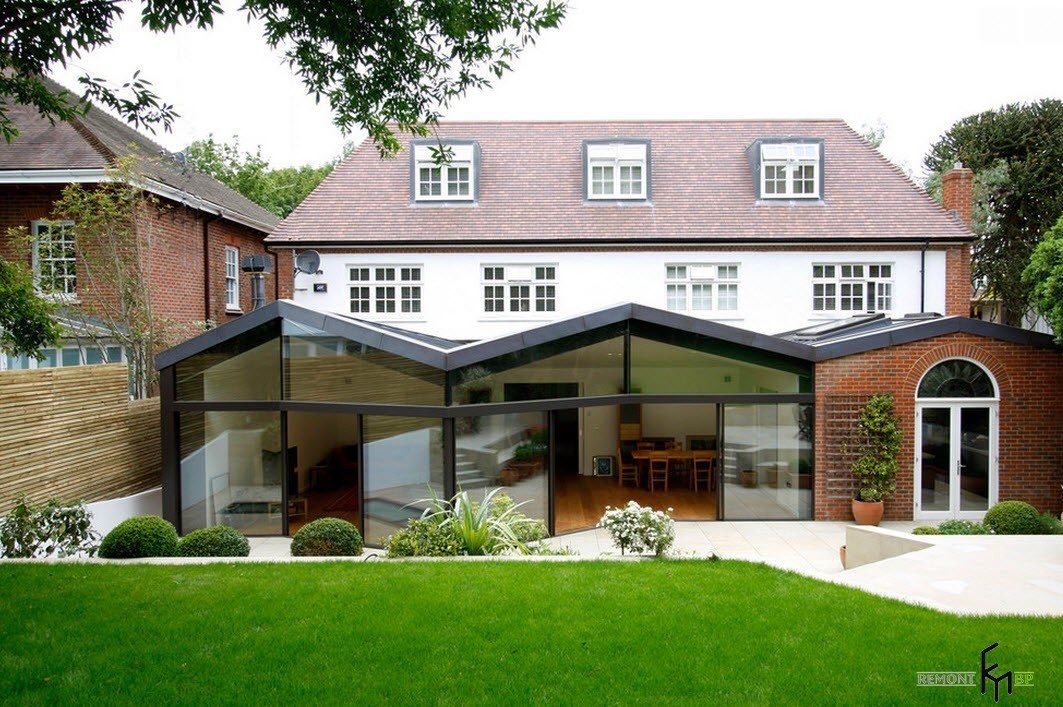 Even in conservation areas you can build rear extensions as long as they meet the size criteria and are in matching materials.
Building regulations for extending a house
This is important to factor into your extension planning routine.
All home extensions need to comply with the building regulations. Most obviously, this relates to structural stability – including foundations, window and door openings, lintels, beams and roof structures. Therefore, your design will normally need to incorporate a structural engineer’s calculations, submitted together with drawings as part of your building regulations application.
When it comes to submitting your application, you can either do this via local authority building control, or an independent firm of approved inspectors. Either way, there are two ways of making an application – either full plans, or the short-cut method known as a building notice.
For a major project such as an extension, it makes sense to get your design approved with the former before you start work, otherwise you could run into trouble if your project doesn’t comply with the regulations.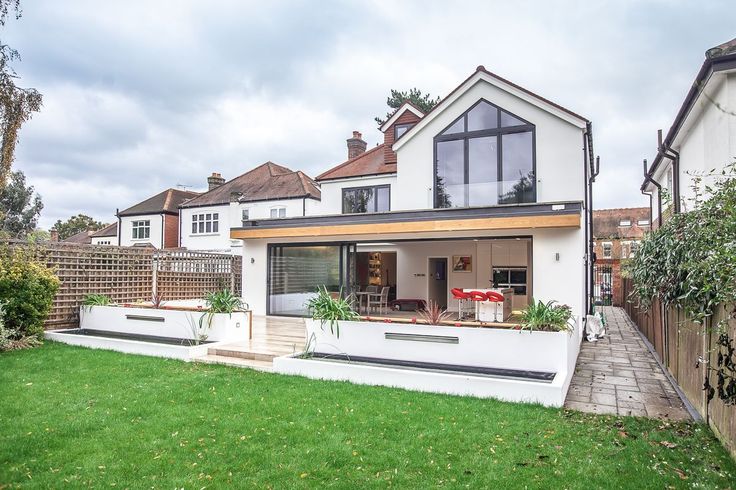
‘When work is due to start, it is essential to liaise regularly with building control, as they will need to carry out site inspections at key stages, commencing with start on site and excavation of foundations. Finally, once your new extension is built, don’t forget to obtain proof of compliance in the form of a completion certificate – this is a key document when you come to sell.’
What to submit to make sure you comply with building regulations:
- Completed application form;
- Estimate of costs;
- The appropriate fee;
- Two copies of detailed drawings at a scale of 1:100 minimum;*
- Two copies of a site plan showing the proposal, site boundaries and sewer positions;*
- Two copies of any plans and specification to accompany drawings including structural design and calculations;*
- Four copies of plans for buildings covered by fire safety legislation, showing fire resistance, fire detection, alarms, emergency lighting, means of escape and signage.
 *
*
*If online applications are accepted, only a single copy of each plan is required.
Planning an extension? Comply with fire regulations
Most extensions should naturally comply with fire regulations thanks to the inert qualities of building materials such as plasterboard, bricks and concrete blocks, which can normally resist the spread of fire for at least 30 minutes.
However, where you have any exposed major structural components such as timber posts and steel beams, they will normally need to be protected, for example with skimmed plasterboard lining. Also, where holes are cut in ceilings for recessed lighting, they may need to be fitted with fire hoods. Extensions built with modern timber-frame wall panels are lined internally with inert plasterboard and also incorporate integral cavity barriers to slow the passage of smoke and fire.
If your design includes an integral garage, then the walls and ceilings need to resist fire – which most materials should manage, although special pink-coloured plasterboard (fireboard) is the ideal cladding for ceilings and stud walls. Ceilings to integral garages must be plastered, and any doors from the house must be fire doors with a suitable step down into the garage (normally 10cm).
Requirements become a lot more demanding for extensions of three storeys or more. Considered as part of the newly enlarged house, this might involve fitting special fire doors to all new and existing rooms as well as ensuring there is a safe escape corridor (usually via the landing and stairs) down to a main exit door, with the stairs protected with a fireproof lining.
If your extension is two storeys or higher, it is best to assume that you need to fit a mains-operated smoke alarm to the upstairs landing(s) in the newly extended house.
(Image credit: Brent Darby)
It's always best to pick a designer with a style or track record of projects that match up to what you're trying to achieve. Ideally, a local firm is a better choice than one that's distant, since they will be more familiar with the local vernacular and the local council's foibles.
‘Organisations such as the Federation of Master Builders, Home Improvements Guarantee, Which? Local and Checkatrade offer builders who have been assessed in some way,’ says Kate Faulkner. ‘Make sure they have insurance and a warranty service that survives something happening to them or their business, and check they are happy to sign a contract.’
'It is good to have a brief for your designer, but this can be loose,’ says Alan Cronshaw of Acronym Architecture & Design. ‘If you want an open-plan layout, a better relationship between house and garden or simply more space, your designer will advise you on how to achieve this, perhaps with options. If you want expensive items, such as a certain brand of kitchen, or bi-fold or large sliding doors, let the designer know so the added cost can be factored into your budget.’
Bear in mind that some designers will charge for an initial visit. Check their fee structures and flexibility before you appoint, too.
You can find architectural technologists on ciat.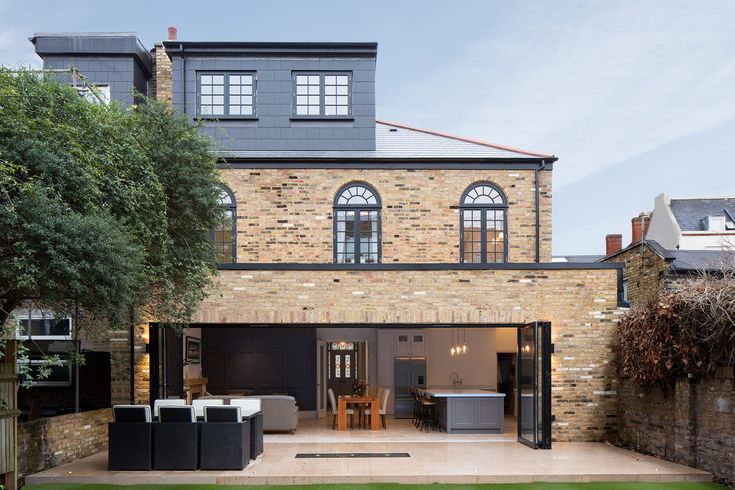 org.uk and architects via architects-register.org.uk or RIBA . Find out more in our guide to working with architects.
Planning an extension: find the best builder
We all know that recommendations from friends or neighbours locally, as well as via trade bodies such as the Federation of Master Builders, is the best way to find a good builder if you're planning for how to extend a house. Questions to ask when looking for referrals include: Was the project completed to schedule and as expected? Was it finished on budget? Were there any unforeseen problems and how were they dealt with?
Ask to see examples of previous work and talk to past clients as well. Compare at least three written quotations and ask for clarification on any detail so you’re comparing like for like. Finally, make sure you’re comfortable – you’ll be working closely for months.
‘Decide if you want to use a larger, faster but more expensive firm that may be more flexible, or a smaller firm that will be less expensive,’ says Marta de Sousa of property developers Lux Reality.
‘Make sure that any contractors you use have warranties in place, such as Masterbond. Draw up a watertight contract using a template, such as a JCT homeowner contract, and make sure to state in it that payments be made following the completion of specific parts of work and not at different stages, as it is usually very hard to define when you are halfway or a quarter of the way through an extension project.’
Use our guide to find a builder and reliable contractors for your extension project.
Hiring a project manager when you extend a house
A project manager, often the architect or lead builder, will oversee the project to ensure it runs smoothly, on budget and to schedule. Or, you may wish to save money by running the extension project yourself. Use our guide to how to project manage an extension to find out what you need to know about the process. And, either way, checking our week-by-week extension planner will give you an understanding of the extension process and help yours be built to schedule.
- To source materials, try BRE
- If you're looking for planning advice, try The Planning Portal
Designing an extension doesn't just cover how the extension's interior will look when completed; it also encompasses details such as the roof's structure and height; the exterior materials used; door and window construction; and the extension's footprint. Here, we cover everything you need to know about the practicalities – and, the fun bit, the extension's aesthetics and interior.
It's important to ensure that your extension's design suits your needs during the planning process, as it can be costly to make changes further down the line. There are many options to consider, including:
Defining its footprint
When it comes to how to extend a house, knowing the footprint you want to cover is vital. There are few limits on the size of your extension’s floor area unless it’s likely to cover more than half the garden (including any existing extensions and outbuildings). However, bear in mind that any extension that does swallow up a significant proportion of usable garden space may affect your home's future saleability.
(Image credit: Chris Snook)
Deciding on your extension's height
You’re not normally allowed to build higher than the existing house. However, side-extension roofs and walls often need to be set back slightly from it (perhaps by 10cm to 15cm). Ensure that your extension's roof design flatters that of the original house – whether through matching materials, echoed roof lines or even through contrast. This part of your extension's design will be looked at closely by planners.
(Image credit: IQ Glass Solutions)
Don't think about your extension in terms of adding the maximum size you can fit in – or are permitted to. Instead, consider exactly what you need for your extension and how you want it to feel. Often, over-sized extensions lead to over-sized rooms – usually kitchen diners – that feel unwelcoming and overly spacious.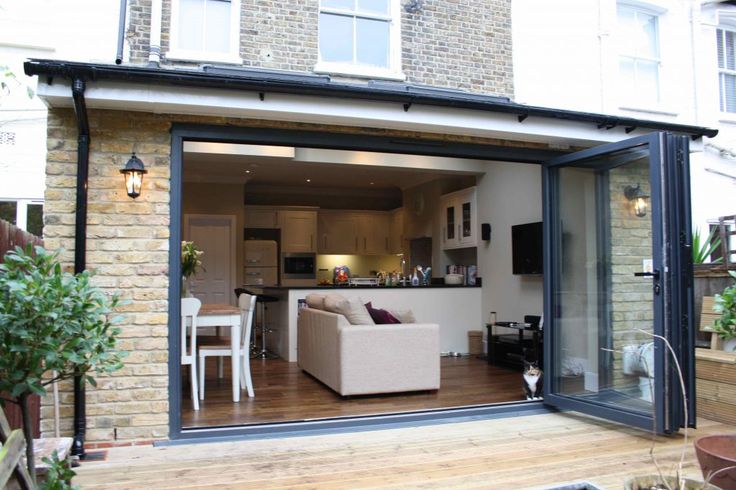 It's better to get the perfect floor plan laid out, then work backwards to ensure the extension's footprint is the right size for both your needs and the plot.
Exterior materials for your extension should be chosen to either match those of the original house – think reclaimed bricks to make your extension look like it’s always been there – or picked to contrast with the original house, such as cladding and render or even glass.
‘There are no hard-and-fast rules on what materials will be accepted by the planning office. It depends on the building, the area, local planning policy, and you – the homeowner,’ says Hugo Tugman.
‘It used to be that planners generally wanted extensions to be in keeping with the original building, which led to a rash of pastiche additions to older buildings, but these days there is more and more of a prevailing view that allowing an original building to be itself.
‘Contrast does not have to mean shiny modern or hi-tech. It is generally a good idea when extending an old building for the extension to play a quieter role to that of the original building, and it is quite possible to produce a relatively contemporary design that is modest and calm in its expression.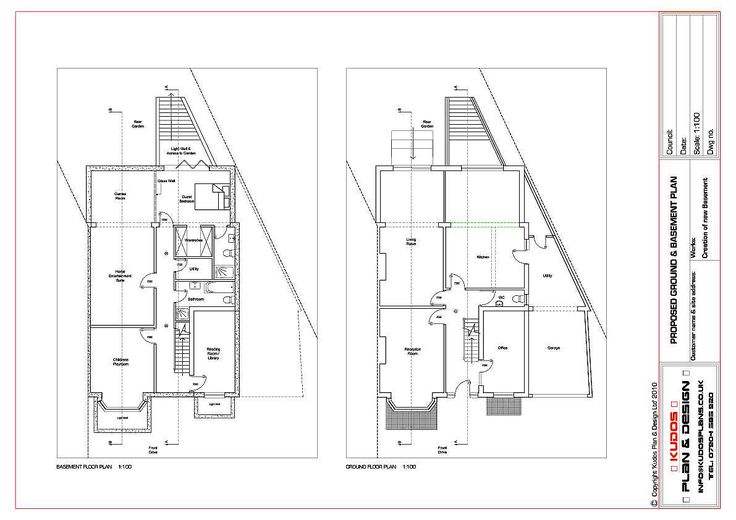 ’
’
Inside, try to think of your furniture choices for the interior and exterior together. ‘Choosing matching finishes, colours and textures for outdoor and indoor furniture is a great way to keep a coherent look that flows from within the home and out into the garden or patio, for example,’ says John Sims Hilditch, co-founder of Neptune .
(Image credit: Chris Snook)
Choosing contrasting materials for extensions is sometimes more acceptable to planning departments and an architect can help with this, but make sure the contrast is complementary and not grating visually. This is one of the most important, but often forgotten parts of learning how to extend a house.
When Up Architects designed an extension for a South London home (below), providing a young family with a large open-plan living space, they incorporated twin-hipped roofs to break up the bulk of the building and clad the walls and roofs with Kebony . Developed in Norway, Kebony starts out as sustainably-sourced softwood, which is then modified to make it stable and highly durable. It costs £60 per sq m.
(Image credit: Adam Scott)
Adding bespoke elements to an extension
(Image credit: William Eckersley/Ar'Chic)
Adding bespoke elements when you extend a house doesn’t come cheap. Because they’re produced individually rather than available off the shelf, they’re more expensive to manufacture, or might involve the skills of an individual artisan. Thus they can be subject to delays, holding up your building project. However, it’s worth paying the premium since they can add massive appeal to an extension, both practically and visually.
Expect to pay more for bespoke solutions such as the outstanding metal-framed curve of glazing on this extension by Ar’Chic (above and below), which also includes circular rooflights, a green meadow on the roof and bespoke kitchen joinery. A similar project would cost around £190,000.
(Image credit: William Eckersley/Ar'Chic)
Ensuring the extension feels like part of the original house – or like a wonderful addition – rather than something that's awkwardly bolted on is vital, and this will be most noticeable from inside. Renovations expert Michael Holmes suggests the following expert tips so you can get this right:
Maximise the opening between the existing space and new
The wider and taller the opening that links the two spaces, the more they will feel like a single room.
All new openings will need to be spanned by joists, usually steel, to support the walls and floor above. The joist size and its supports should be calculated by a structural engineer (you can find one via the Institute of Structural Engineers at istructe.org ). The smaller and less visible these elements, the more seamless the flow between old and new. In most instances it is possible to conceal the joist within the ceiling void, especially if you’re removing only a non-load-bearing partition wall.
Create a continuous ceiling level
The ceiling height between old and new spaces should, ideally, be the same. If they’re different, however, the higher ceiling can often be brought down by adding new battens and plasterboarding over the top.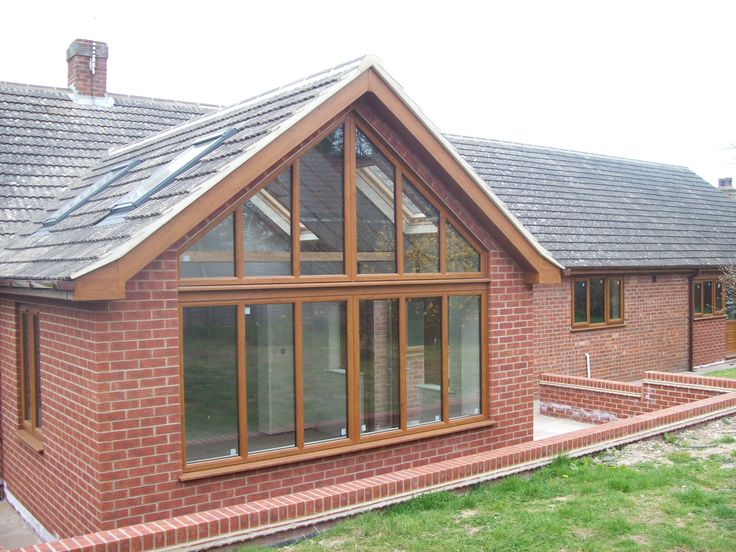
There is no minimum ceiling height under the Building Regulations, other than above staircases, but 2.3-2.4m is standard. If this is not a practical solution, then it is best to have a smaller opening with a boxed bulkhead to conceal the step-in ceiling levels.
(Image credit: Katie Lee)
Make sure the flooring is laid at the same elevation
When setting out floor levels for an extension, it is important to work backwards from the finished floor level in the existing property to ensure they will be identical once they’re linked.
When you’re remodelling, rather than extending, any differences in floor level can be overcome by building up – often using a quick-setting silicone floor screed. If the same level can’t be easily achieved, it is best to create a full step, (H)19-22cm, rather than a small difference that could end up being a trip hazard for children.
Use matching finishes in existing and new spaces
Old and new spaces can be linked seamlessly by using the same flooring material throughout. This principle also applies to the same architectural detailing such as windows, doors, skirting, architraves and coving; and the same décor, including colour schemes, flooring, curtains and furniture.
Try to think of your furniture choices for the interior and exterior together. ‘Choosing matching finishes, colours and textures for outdoor and indoor furniture is a great way to keep a coherent look that flows from within the home and out into the garden or patio,’ says John Sims Hilditch, co-founder of Neptune .
How to create an open plan living space
If you're designing an extension for a contemporary home, it's likely that you'll be designing an open plan space.
‘Open plan or, more frequently, semi-open plan living, is very popular, as it suits most people’s modern lifestyle and enhances the sense and use of space within the home,’ says Hugo Tugman. ‘I do generally encourage people to go this way; however, there are a number of things to bear in mind when working out how best to use the space.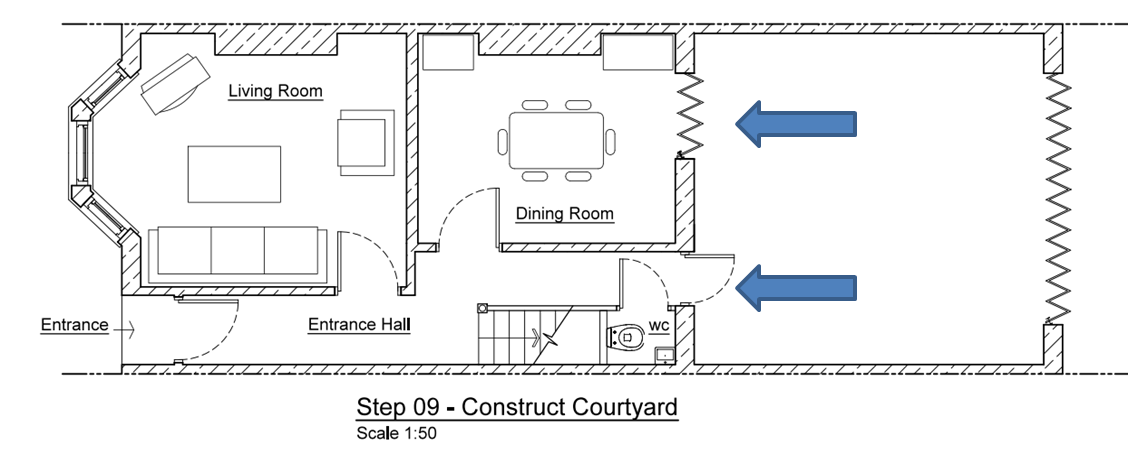
‘It’s usually a good idea to identify different zones within your layout – such as the kitchen, dining and living areas. The look and feel of your space can be fine-tuned by the extent to which the boundaries of these are defined or blurred, and there are lots of devices, such as continuing through or changing the floor finish, for example, which can control this degree of separation.
‘While walls can block up an open space, they can be helpful when it comes to positioning furniture, storage and radiators, for example. One of the reasons that underfloor heating works so well in an open-plan space is because often there are not enough suitable walls on which to position radiators.’
Use our guide to creating an open plan living space for more tips and inspiration.
Choosing doors and windows for extensions
Doors and windows for your new extension will affect its appearance both inside and out. Getting their positions, sizes and shapes, framing materials and sightlines just right will make the new extension blend with the original house, and can affect how much daylight reaches the room.
It's important to ensure both the windows' and doors' style and framing complements not just your interior fittings – such as your kitchen design – but also the style and framing of your home's existing windows. Something as simple as having the exterior frames in the same paint shade as existing window frames can help the new extension blend with the original house.
Opt for the widest panel possible when you’re choosing bi-fold or sliding doors for uninterrupted outlooks to your garden space. ‘The maximum panel width for this door style is 1.2 metres, providing a large expanse of glass and maximising the view outside,’ explains Neil Ginger, chief executive officer at Origin .
‘There are a range of different options available for bi-fold doors in a two storey conversion, from two-door models through to large eight-door configurations, set-ups for bays and 90-degree corner sections,’ continues Neil Ginger. ‘The price of doors varies but, as a guide, a bespoke, aluminium design would cost from £1,500 per door leaf.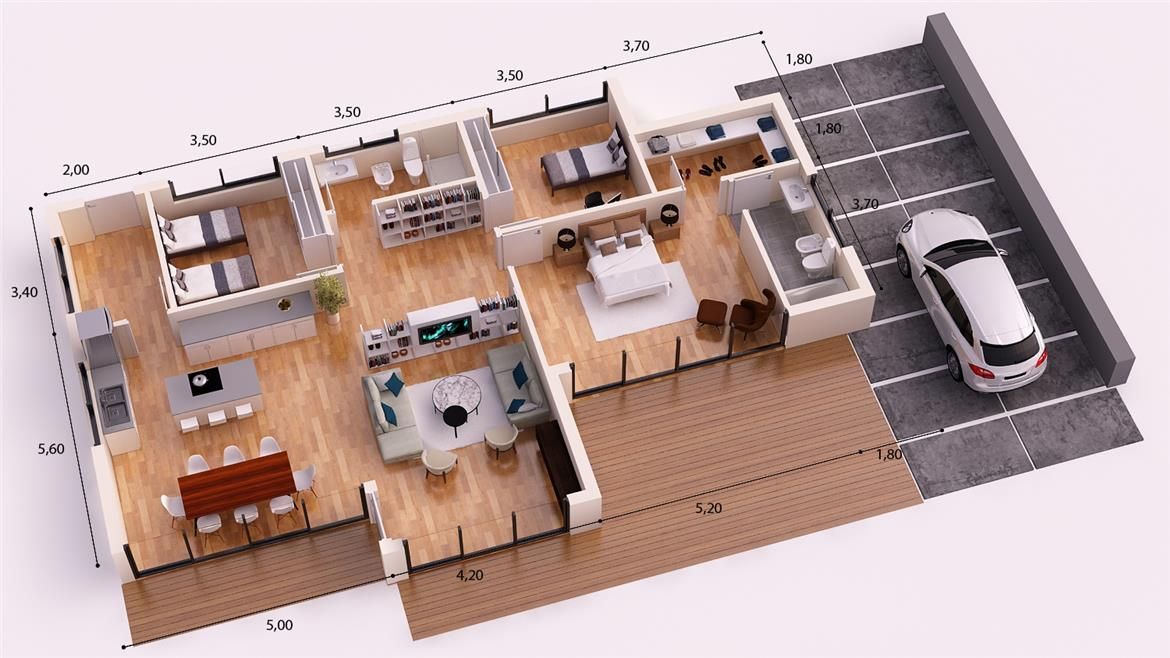
‘The space allowance for the doors to open outside depends entirely on their width, which can be as narrow as 40cm, protruding less than half a metre outwards. You will need to allow just over a metre of space for doors with a width of 1.2 metres.'
Read our guide to choosing windows sympathetic to period homes or go contemporary with metal-framed windows.
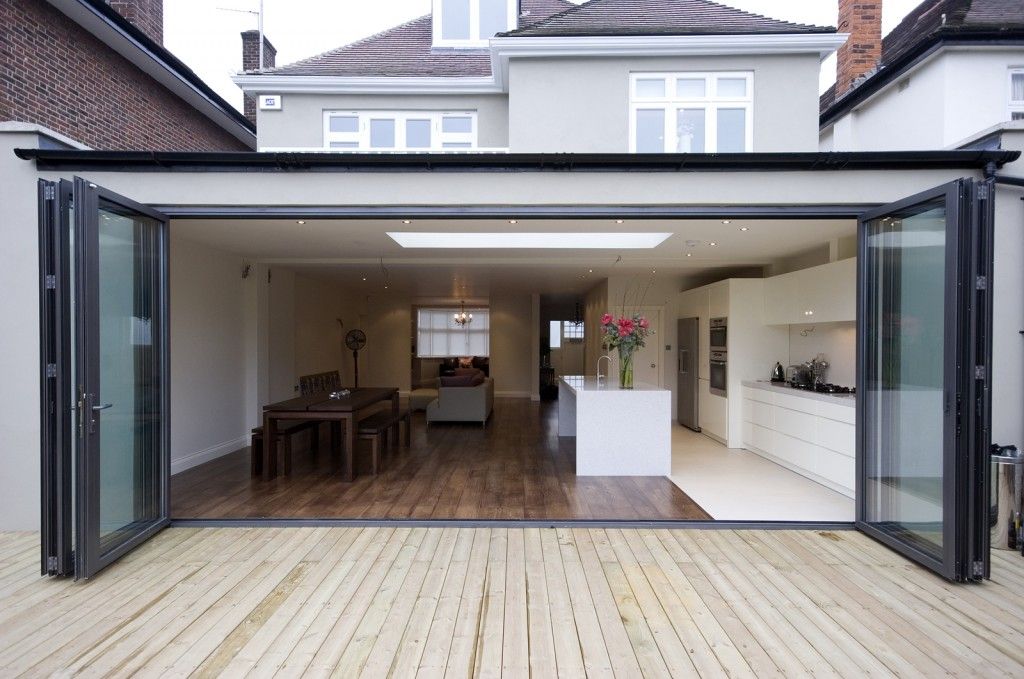
Choosing bi-fold and sliding doors for an extension
When you're designing an extension, much of the focus of the new room will be on the doors that open out on to the garden.
‘There are a range of different options available for bi-fold doors, from two-door models through to large eight-door configurations, set-ups for bay arrangements and entire 90-degree corner sections,’ explains Neil Ginger. ‘The price of bi-fold doors varies but, as a guide, a bespoke, aluminium design would cost from £1,200 per door leaf.
‘The space allowance for the doors to open outside depends entirely on their width.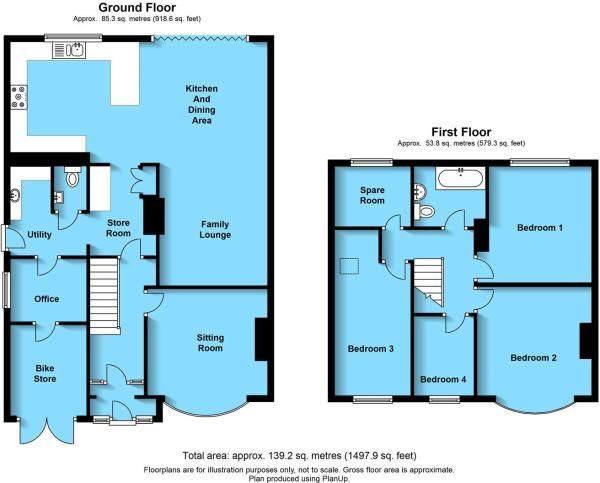 Bi-fold doors can be as narrow as 40cm, protruding less than half a metre outwards, while you will need to allow just over a metre of space for doors with a width of 1.2 metres.
‘Doors that open inwards are ideal for projects where space outside is limited — on a balcony, for example. In the majority of cases, it is recommended that outward-opening doors are chosen to prevent any rainwater from coming into the home when the doors are opened after it’s been raining.’
Bi-fold doors can also be installed internally, as the low threshold of the design can create a seamless transition from one room to another.’
Ways to add space without having to extend out
If you decide an extension is not for you, or that now you know how to extend a house, it's not for you, there are still other ways to add the space you need:
- From remodelling the layout to loft conversion, we show you how to add value to your home by working with what you've got.
- If a joined extension is out of the question, you might want to add a detached extension in the form of an annexe or a garden outbuilding.
- Maybe you already have the space in an unused garage? A garage conversion can bring you lots of new living space at a fraction of the cost of a single storey extension.
- House extensions for every budget
- House renovation: an essential guide
- Loft conversion costs: a breakdown
Sarah is a freelance journalist and editor writing for websites, national newspapers, and magazines. She’s spent most of her journalistic career specialising in homes – long enough to see fridges become smart, decorating fashions embrace both minimalism and maximalism, and interiors that blur the indoor/outdoor link become a must-have. She loves testing the latest home appliances, revealing the trends in furnishings and fittings for every room, and investigating the benefits, costs and practicalities of home improvement. It's no big surprise that she likes to put what she writes about into practice, and is a serial house revamper. For Realhomes.com, Sarah reviews coffee machines and vacuum cleaners, taking them through their paces at home to give us an honest, real life review and comparison of every model.
Building an Extension: How to Budget and Manage Your Project
(Image credit: c/o KeDesign)Building an extension isn't a one size fits all affair. Your build journey will be unique to you and your home so it's important to plan and manage it well for it to be successful.
Each extension will have its own criterion, whether you opt for a wrap around extension, a glazed single or two-storey extension, but there are some key details to get right, whatever your project.
If you've not built an extension before how do you go from sketching your ideas down to seeing it come to fruition? Who do you talk to first? How should you budget? What do all would-be extenders need to know?
Our beginner’s guide breaks down all the areas you need to think about, from answering questions on planning permission and how much an extension costs, that will help kickstart your extension project.
Before You Start Building an Extension...
VISIT THE HOMEBUILDING & RENOVATING SHOW
(Image credit: Future)Need more advice or inspiration for your project? Get two free tickets to the Homebuilding & Renovating Show
Before building an extension make sure you're aware of construction news locally and nationally that might affect your project - from materials to trades and changes in planning.
One area that's hitting the headlines is the construction material shortages and price hikes, and lack of HGV drivers that are having an impact on the build sector. Dwindling supplies of key building materials such as roof tiles, cement and a timber shortage are impacting the construction industry nationwide and prices have soared across several materials.
The shortage is expected to continue so this will have a knock on effect with the trades you want to employ (who are battling with backlogs from Covid, increase in demand and the material shortfalls) and with your budget, as inflated prices hit trades, who then have to pass that increase onto you, the client.
(Image credit: Matthew Smith)Factor in Extended Timescales
“With the material and labour markets still so volatile, clients just need to be prepared for delays,” says quantity surveyor Tim Phillips. “Lead times for quotes are only a little longer than normal due to the surge in demand,” says master builder Andy Stevens. “But start dates are way longer now. If you can get a good, experienced builder to start in under a year you’re doing well. You may be lucky if anything is cancelled due to planning issues, and so on, but I would aim for a year (obviously depending on where you are geographically).”
And as far as build time goes? “Depending on build cost and complexity, I would allow five to six months as a minimum build time for small extensions, due to the current challenges in the industry,” says Darren Bray. “Most tender prices are coming back way over budget, so allow time to look at cost savings.”
Many extension projects – big or small – are now choosing to use a quantity surveyor (QS) because of this to help keep a handle on costs as Tim Phillips explains: “More clients are aware of the nationwide price hikes, so projects where a client may have sought quotations from individual trades and project managed the build themselves are now seeking reassurance and advice from quantity surveyors. ” So this might be something to bear in mind.
Be Realistic About Your Budget
It’s easy to daydream and get carried away with design ideas but one of the first steps to take is to be realistic about money. “Before taking the plunge it’s a good idea to work out roughly what size extension you can afford,” suggests Ian Rock MRICS, author of the Haynes Home Extension Manual and director of rightsurvey.co.uk . Most extension projects cost around £1,500- £2,000/m2 of new space and Ian agrees: “A ‘sticky note’ calculation of at least £2,000/m2 should give you a rough guide for build costs.”
And it's not just build costs to account for. “Making design decisions up front can help you keep in control of your budget so you know how much you’ll be spending on flooring, tiling, kitchen units etc,” says Jo Dyson Dyson, a partner at Mae House Design .
Your extension will almost always cost more than you expected it to, so it’s important to have a contingency fund you can fall back on. “Allow a contingency of about 20%. There will always be unforeseen costs no matter how much you plan ahead in advance, especially with old buildings where there are a lot of unknowns,” says Jo.
How Much Does Building an Extension Cost?
Extension Cost Calculator
Try out our Extension Cost Calculator for an accurate estimate for your build project.
How much does an extension cost? The million dollar question for any extender!
Price hikes for materials, caused by the construction material shortage, and labour are occurring across the UK and will affect most bottom lines. Size, shape and glazing will also impact the cost of building an extension.
If you're carrying out a fairly standard single storey extension project, managed on your behalf by a builder, you should be looking to allow £1,800-£2,300/m2 for the finished scheme, with a two storey extension costing slightly less (on account of more cheaper space) at around £1,500-£2,000.
In certain parts of the South and high value areas of the UK - affected by labour shortages - this you could easily be paying £3,000/m2, particularly on smaller schemes. That makes an 8x4m kitchen extension a £50-£70,000 project; a two storey extension on the same footprint around £100,000. But, these figures are there to be broken depending on the chosen specification and the build route.
Who Will Project Manage the Extension Build?
There isn’t a one size fits all when it comes to who will act as project manager. You can choose a build route that suits you, your budget and the type of extension you want to build.
Hire an architect
The first option is to have an architect or professional designer draw up plans for your scheme who can take you through the process until work gets underway on site. “Generally, if an architect is appointed for a full design service, we’ll assist the client in appointing and then co-ordinating the other specialists and consultants up to a start on site,” says Nimi Attanayake, founder and director at nimtim Architects .
This would encompass the co-ordination of the various consultants required before the project begins, including designers, structural engineers, party wall surveyors, the Building Control Officer plus any other specialists. Your architect will also see you through the planning permission process.
Once construction begins, project management responsibilities could then be passed onto the main contractor. “This role would encompass appointing, co-ordinating and managing the separate construction packages and contractors, such as foundations, structure and finishes,” says Nimi. “The architect’s role during construction would then be one of contract administrator – facilitating the contract between the client (you) and the builder. We’d inspect the site regularly to ensure the project is being built according to our information.”
Employ a Design and Build company
If you’d prefer to keep everything under one roof, there are design and build companies with in-house professionals who’ll be able to take you through from the start of the design process right up until completion.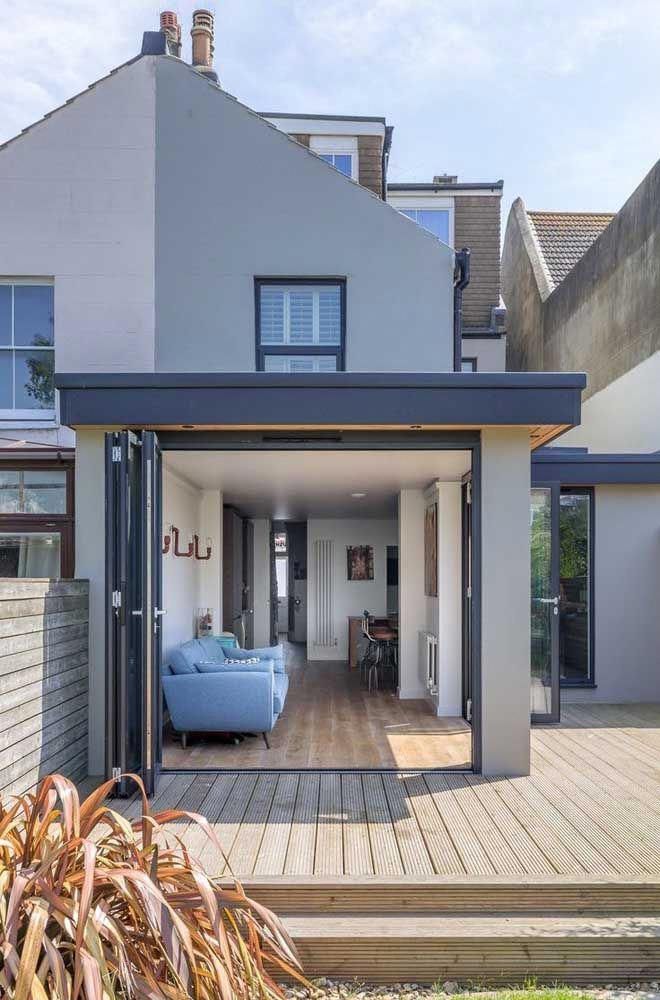 Or, for larger and more complex schemes, you might consider employing a professional project manager to oversee everything. Going down this route could save you time and potentially stress. Plus, using a professional PM brings the benefit of experience. They will be well-versed in managing the challenges that arise throughout the build because they’ll have done it plenty of times before.
Project manage the scheme yourself
If you’re working to a tight budget, project managing the scheme yourself can be one area to save some pennies. As well as giving you a greater degree of control over the budget and construction, it could be an enormously satisfying experience. “Project managing a construction scheme is always challenging and difficult, but it comes with its own rewards and satisfactions,” says Nimi. “Providing you are comfortable enough to undertake it, the feeling of satisfaction and reward may be an advantage in itself.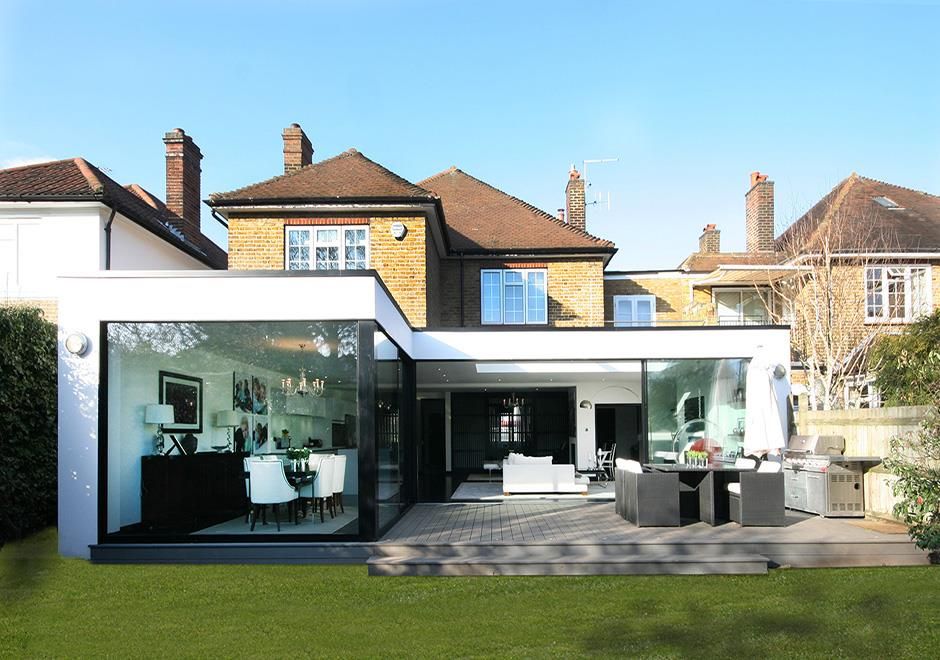 ”
”
Split the project management
It may be that you can split the responsibilities between yourself and your contractor. For instance, the building company could manage construction until the extension reaches watertight stage, at which point, you take over the role and project manage the rest of the sub-contractors (plumbers, electricians, plasterers etc.) yourself. Every project is different, so the key to managing your extension effectively is to come up with a strategy that maximises your skills, the expertise of the professionals you employ, and your budget.
Factor in How Build Route Will Affect Costs
Which build route you choose will impact costs. Typical build costs based on routes are likely to be:
- DIY: £300-£700/m2
- Self-managed: £600-£1,400/m2
- Main contractor: £1,000-£1,700/m2
- Design and build: £1,200-£2,000/m2
 The Monrovia Kitchen featured, from Wood Works Brighton , starts from £35,000. (Image credit: Wood Works Brighton)
Talk to a Builder Early on
An informal chat with a couple of local builders could be a wise first move as, at this stage, you’re trying to get a sense of the feasibility of extending from an engineering and construction perspective.
“A good local builder will likely have so much experience, extending all sorts of houses, that they have invaluable advice to impart, so use it to your advantage before getting plans drawn up,” recommends master builder Andy Stevens of Eclipse Property Solutions .
“If you engage with a builder before plans are drawn up then you can discuss structural details, groundworks and so on first. Then you can take this information to your architect and plans can be drawn up accordingly.”
If your home is in a sensitive location, for example, it might be worth getting a site appraisal by a planning consultant, too, who can advise on potential development with a site survey and feasibility studies.
Here's what you need to know on how to find a builder.
Keep Costs Down: Can I Build an Extension Cheaply?
One way to keep costs down is choosing a more budget-friendly construction system. Concrete blockwork is readily available and most builders know how to work with the material, too. However, some modern methods of construction, such as structural insulated panels, may cost more to begin with, but may save in labour on site, especially when it comes to insulating your extension.
Keeping the design and shape of your extension build simple — either square or rectangular shaped with a flat roof — will be less expensive than angled designs with more complicated roof structures and lots of glass.
It is possible to design and build extensions for every budget, so putting in work at this stage can pay off later in the project.
(Image credit: Simon Maxwell)Building an Existing DIY
If you're asking 'can I build an extension myself?' the answer is to an extent. While chipping in and doing some of the work yourself can keep costs within budget, some jobs need to be left to the professionals (namely electrics).
As chartered surveyor Ian Rock says, "Anyone with an aptitude for construction may relish the prospect of learning new skills, taking genuine pride in their achievements. But as a general rule it’s best to leave anything seriously time-critical to the professionals, along with all the heavy duty structural work. If your extension needs to be completed sooner rather than later it makes sense to stick to tackling jobs near the end of the project, such as landscaping."
The type of work you choose to undertake when building an extension will depend on how happy and handy you are with the tools. Pick parts of the build to work on where there’s less risk of causing delays.
Here are some DIY jobs that are most suited to DIY input…
(Image credit: Flooring Superstore)Internal joinery
Timber stud partition walls are typically non-structural and should be a realistic project for the average DIYer to get to grips with. However, there’s usually time pressure to get them built so the electricians can start running first fix cabling. Installing door liners in the interior walls can also be worth doing, although these normally need to be in place before plasterboarding and plastering walls. Cutting and fixing skirting boards and architraves is reasonably straightforward, and can be left until the later stages, along with hanging interior doors and boxing in pipework.
Flooring
The most widely undertaken DIY flooring project is laying floor coverings. Types of flooring such as tiles, vinyl planks, or thin strips of interlocking laminate or engineered timber are relatively simple to install. However, installing structural timber flooring to the joists upstairs, such as traditional softwood floorboards or chipboard panels, should also be a feasible DIY project. To provide a temporary work platform for the builders, large sheets of oriented strand board (OSB) or plywood can be put in place to use as a deck.
This allows you to postpone fitting the floor towards the end of the project, relieving time pressure and reducing the risk of pristine new floors getting damaged by building work or splashed with plaster. When it comes to the construction of ground floors however, these are not generally DIY-friendly because the insulation and floor screed work tends to be very time-critical and needs to be coordinated with other trades.
(Image credit: COAT)Decoration
Good quality decoration is key to achieving a professional finish, often ingeniously compensating for the less-than-perfect surfaces other trades leave in their wake. Nonetheless, deploying paintbrushes and rollers with a basic degree of competency is well within most people’s abilities, if you make sure you know how to paint a room before you start. Taking on the role of the decorator is also appealing from a DIY perspective because it isn’t usually too time critical, coming towards the tail end of the project.
Tiling
Wall and floor tiling are popular DIY projects that require dexterity combined with a logical mindset. Using good quality cutting tools is key to a successful outcome (specialist machines can be hired). It also greatly helps if you work to a clear plan and allow yourself plenty of time. As with all finishing trades you are to some extent at the mercy of those who have gone before; tiling onto perfectly true and level surfaces makes the job considerably easier!
(Image credit: Thames Valley Window Company)Use Modern Materials to Build an Extension
There are a handful of modern methods that self builders have been using that could well be adopted by extenders to potentially make the job of building an extension that bit quicker and easier.
Beam & block floor
Also known as ‘suspended concrete’, this floor structure has the advantage of being much less prone to structural problems caused by ground movement.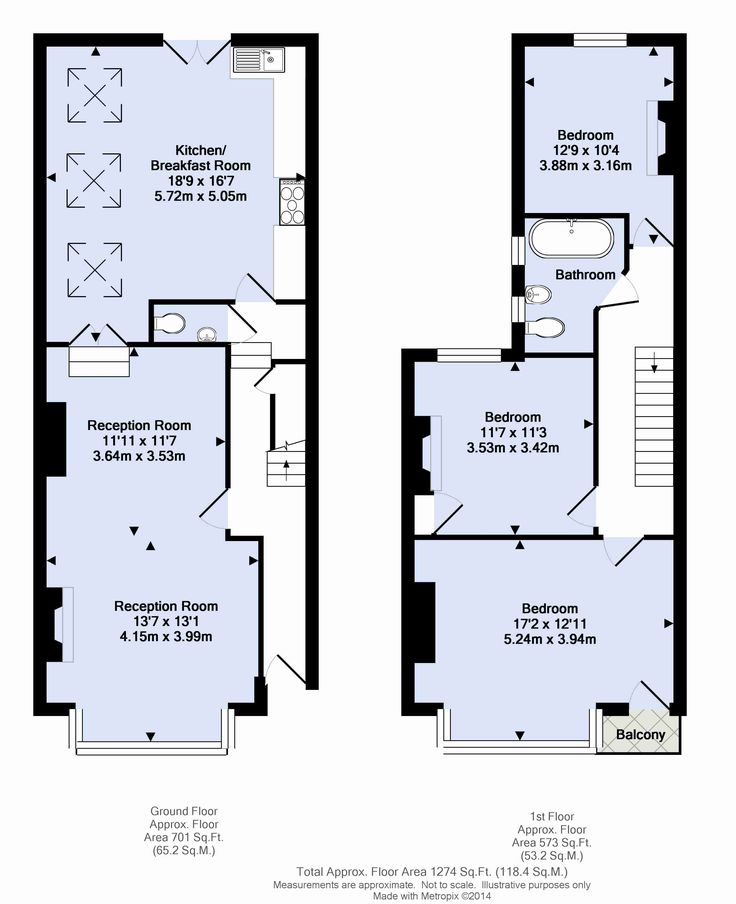 Beam & block floors are more suited to large extensions where the existing house has a suspended timber floor that needs continuity of ventilation.
Liquid Screed
Liquid floor screeds are much quicker to install by a specialist than conventional sand and cement screeds, but aren’t cost-effective for a small extension. If you’re adding UFH, then liquid screeds pair well.
I-joists
The cross-section gives them their name, but also means they can carry far heavier loads than a conventional timber joist of equivalent weight.
Monocouche render
Monocouche house rendering can be sprayed or pumped onto exterior walls, which reduces the need for scaffolding and site costs. It’s low maintenance, durable and available in a variety of earthy colours.
Prefabricated Roof trusses
Where extensions need to marry with existing roofs and walls, the need for customisation favours the traditional ‘cut timber’ route (cutting timber to size on site). However, if you’re building a large rectangular extension then prefabricated roof trusses (manufactured off site) can offer labour-saving advantages on site.
Will Building an Extension Add Value to My Home?
It’s all about balance. If you're likely to sell on eventually then you don't want to price yourself out of not recouping any of the money you spend on building an extension.
Building a small house extension while adding value in terms of space it’ll create might not be that cost effective in how much it’ll add to the value of your house if you come to sell it.
Adding a larger extension should increase the end value of your home but it’ll cost more to build so be mindful not to spend more than you’ll make back on it. Plus, there’s generally a ceiling price that you’ll want to keep within so make sure the numbers add up.
Talking to local estate agents can help paint a picture of the local market and what extended homes similar to your own are selling for.
What Size Extension Can I Build Without Planning Permission?
Join The Planning Hub
(Image credit: Future)The Planning Hub is a new online resource that will help you understand how to get to grips with complex planning rules. Join today for access to easy-to-read guides which will provide you with key information to help you navigate the planning system.
You might find that you'll be able to build an extension under Permitted Development (PD), which means you won't have to go down the formal planning route.
Do bear in mind that if your house is in a Conservation Area or a National Park, the amount of work under Permitted Development is usually reduced.
Under PD rights certain works can be carried out providing you meet certain criteria, such as:
- You can extend a detached property by 8m to the rear if it’s a single-storey extension (6m for a semi or terraced house), or by 3m if it’s double
- A single-storey extension can’t be higher than 4m on the ridge and the eaves, and ridge heights of any extension can’t be higher than the existing property
- Two-storey extensions must not be closer than 7m to the rear boundary
- Side extensions can only be single storey with a maximum height of 4m and a width no more than half of the original building
- Any new extension must be built in the same or similar material to the existing dwelling
- Extensions must not go forward of the building line of the original dwelling
- In designated areas (such as areas of outstanding natural beauty, conservation areas, etc), side extensions require planning permission and all rear extensions must be single storey
- An extension must not result in more than half the garden being covered
From 31st August 2020, the rules changed so that two-storey extensions on detached, semi-detached and terraced houses will be fast-tracked as long as they get prior approval. This means the local authority have to be notified of the details before the project starts and it’s a much more involved process with the Local Authority.
There are some restrictions an extension has to adhere to:
- Once works have been completed, the building must not be more than 18m high (excluding plants)
- The floor-to-ceiling height of any additional storey must not be more than 3m in height or higher than the floor-to-ceiling height of any of the existing storeys
- The overall height of the extension, including the roof, must not be more than 7m high.
If you’re planning on building a large extension then it will, more than likely, need planning permission and you will need to submit an application.
It's wise to engage with your local authority early on and research local planning policies to know what’s likely to get approved before you submit an application.
You can submit an application via the Planning Portal. An application in England for an extension currently costs £206.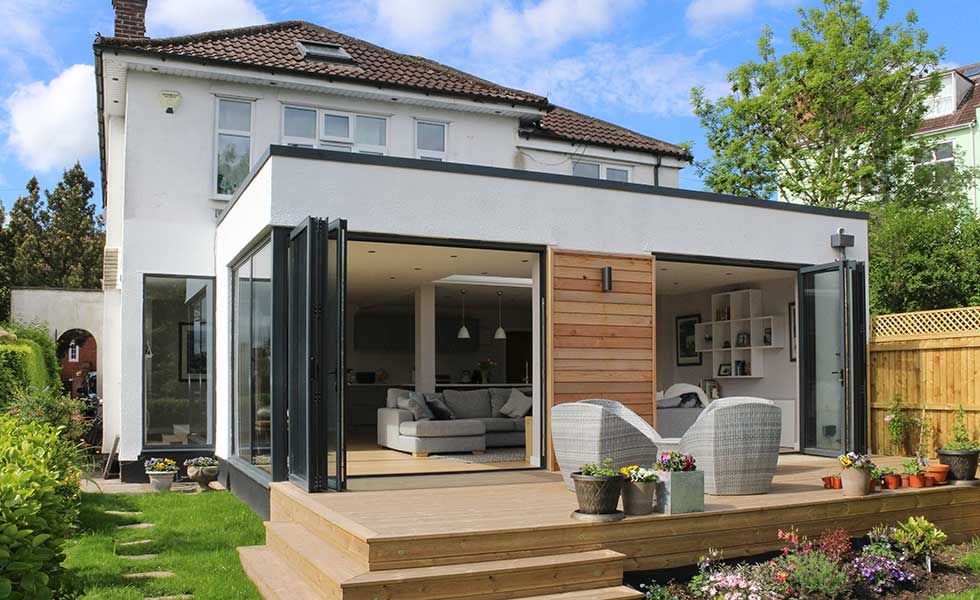
Do I Need a Lawful Development Certificate?
Even if your extension project can be done under PD rights, it’s worth applying for a Lawful Development Certificate (LDC) from your local authority to confirm that the work was lawful and met PD requirements and didn’t need planning permission. This is well worth doing if you plan to move, too.
It costs £103, half the normal planning fee.
How Close to a Boundary Wall Can I Build an Extension?
If building your extension involves digging or building foundations within 3m of the boundary, party wall or party wall structure, or digging foundations within 6m of a boundary, the work will require you to comply with the Party Wall Act (see more below).
The homeowners of this detached home wanted a better and more seamless connection between house and garden so built a contemporary side extension garden room. The glazing system was supplied by Thames Valley Window Company . (Image credit: Thames Valley Window Company)Does the Party Wall Act Apply When Building an Extension?
Good to know
You don’t need to have planning approval to serve a Party Wall notice. They are separate.
There are instances when the Party Wall Act applies to building an extension. Chartered surveyor, Ian Rock explains:
“For aspiring extension builders the part of the Act that’s often most relevant is where it applies to the excavation of foundations close to neighbouring buildings or garden boundary walls. In order to trigger this legal minefield, excavation normally needs to be within a critical distance of three metres from the adjoining property where your new trench is deeper than their existing foundations. Because older properties tend to have relatively shallow footings in most cases it’s a ‘given’ that the new ones supporting the extension will be considerably deeper.
"Where there is any doubt, it might be worth consulting any records of foundation depths or seeking an expert opinion, for example from a Building Control surveyor (since the neighbours may not relish the prospect of trial holes being dug next to their home to confirm actual foundation depths).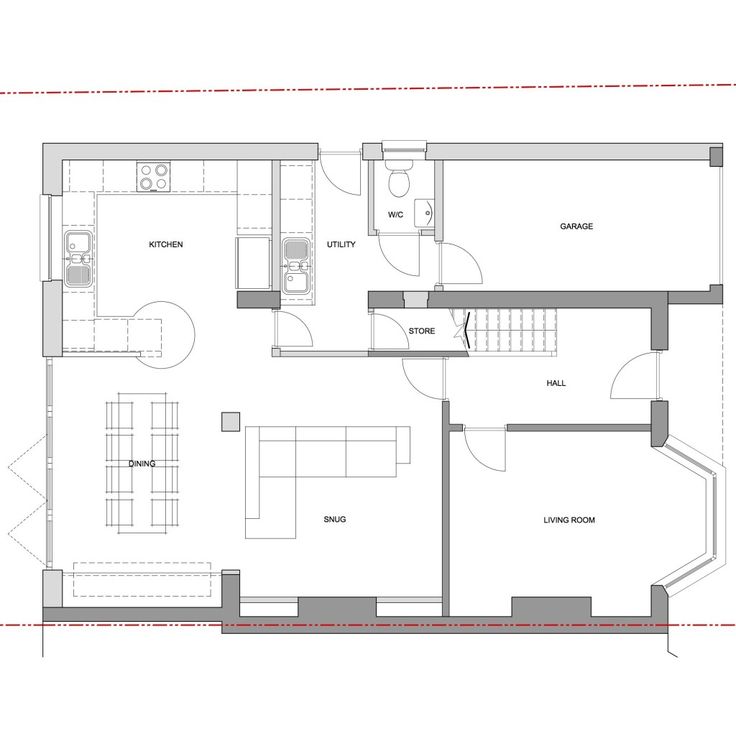
"Be warned, however, that in some cases excavating within six metres of an adjoining property can also be covered by the Act. But this only applies where the new foundations are so deep that drawing an imaginary line downwards at a 45° angle from the bottom of the next door’s foundations would hit them, for example on a steeply sloping site or where you’re incorporating a basement.
"There are two other situations where the Party Wall Act often applies. It’s not unusual for new extensions to be designed to maximise floor area by building right up to, or ‘astride’ the garden boundary between two properties. The second situation would be in cases where you physically cut or alter a party wall, such as where you want to build onto your neighbour’s existing wall so it becomes your new extension’s party wall.
"Happily, minor works like fixing screws or plastering onto party walls are not significant enough to be covered by the Act, but resting a new beam within the wall, as you might for a loft conversion, definitely would be. ”
”
Learn How to Plan the Build
What to Consider Before Drawing up Plans
There are some important aspects to consider before you get to the stage of getting your plans drawn like:
- soil type on the site
- services
- surrounding trees
- any history of flooding
- site access
- rights of way.
Importantly, notify your insurer of the work. Some may not provide cover during the works, but others offer dedicated extension insurance products.
This London townhouse had both a loft and rear extension, designed by The Gentleman Architect , to transform how the house functioned as a home. (Image credit: The Gentleman Architect)Should I Employ an Architect when Building an Extension?
Useful Contacts
Most of these bodies require full members to have relevant academic and technical qualifications. Whichever designer you choose, ensure that they carry sufficient professional indemnity insurance.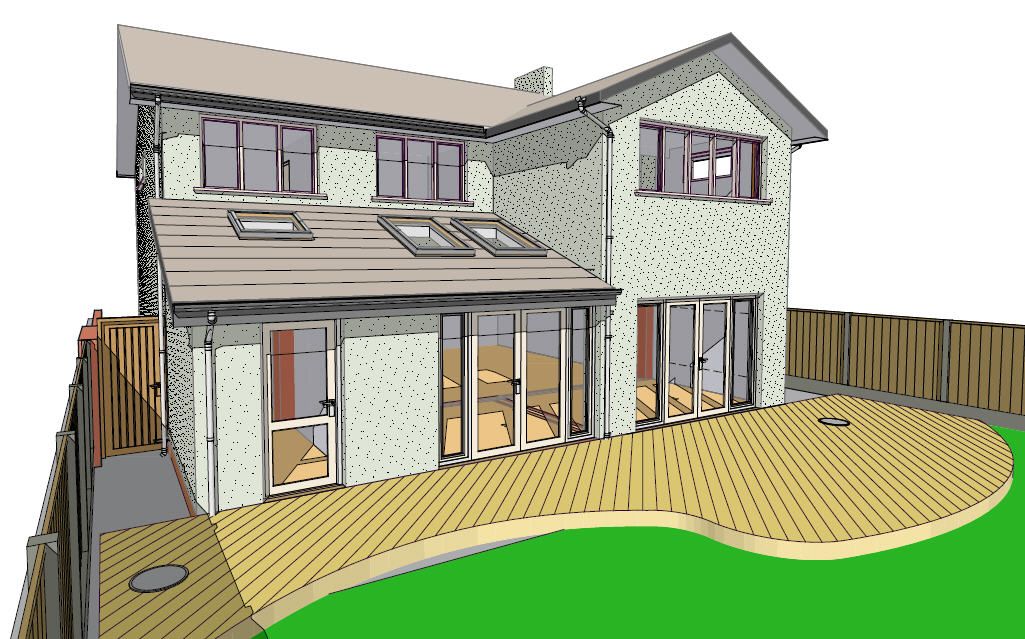
You've got house extension ideas in mind but now you need someone to turn that sketchy line drawing into a plan.
You can opt for a build and design company, or you can choose an architect or architectural technologist. However, don’t just approach the biggest or most well-known architectural practices in your area.
Look around and “choose an architect who you feel really gets your lifestyle and family life, as well as what you want, and don’t want, from an extension,” suggests architect Darren Bray of Studio Bad .
If you're competent with CAD then you can draw up plans yourself, although more complicated designs will benefit from a more expert eye due to the complexities.
Bear in mind, if you’ve designed the extension yourself you may need the aid of a designer or draftsperson to draw up your plans to submit them for planning approval (if required) and a structural engineer to produce drawings and calculations for Building Regs’ purposes. These will also form part of the tender documents when hiring builders.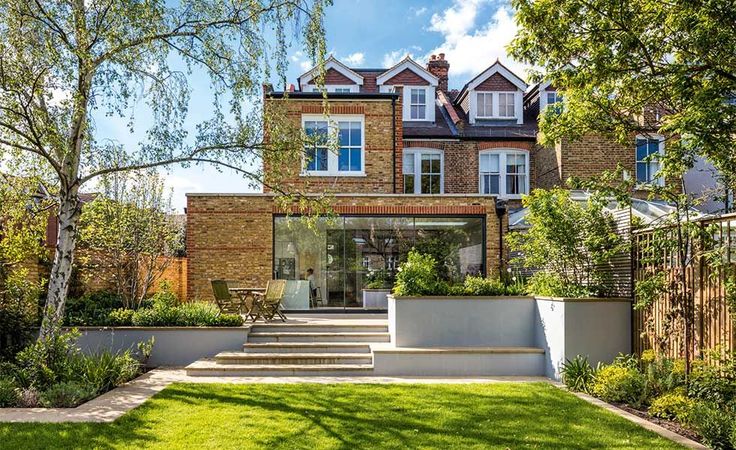
“Whether your first meeting with an architect or designer is a formal design consultation, where the first sketch design proposals are drawn up or it’s just an initial chat, it’s best to write up a short design brief detailing how your home works or doesn’t work for you,” advises Laura Jane Clark, founder of Lamp Architects . “It will then help form the basis of the first discussions you have with an architect.” Plus include any prior knowledge you have gleaned from builders or surveyors about the site.
Be clear, too, about your budget as this will help a designer create a design brief that’s achievable and desirable for you. “This will signal to your architect that you are serious about getting project work done, and it encourages them to address this key item at the beginning of the process,” advises founder of Gbolade Design Studio , Tara Gbolade.
Do I Need to Comply with Building Regulations When Building an Extension?
Whether you require planning consent or not, you will need to make sure you comply with Building Regulations. To meet the Regs, you can either submit a Full Plan Submission or a Building Notice.
- Full Plan Submission: send plans to your local authority building control or approved inspector prior to the build for approval. The building inspector visits your site at different stages and inspects the work as it progresses
- Building Notice: a statement which lets the local authority know that you will be complying with the regulations in building your extension and gives the building control department 48-hours notice of your intention to start the work. Building inspectors will inspect the work at various stages and will advise you of any problems
A Building Notice is the riskier of the two as you may only find out you have a compliance issue once building work has started, which then needs to be paid to be put right.
All alterations to listed buildings, including internal ones, require consent and it is a criminal offence to alter a listed building without it.
With a listed building the planners will always regard the existing property as more important than what you are proposing to add to it. Any extension will therefore have to respect the flavour, appearance and historic material used in the construction of the original house.
Getting a warranty for your extension is advisable as it will cover you for things such as structural defects or faulty workmanship. Should the worst happen, the builders who did the work will need to return to put right what has gone wrong.
(Image credit: Trend Interiors)How to Finance an Extension Project
There are several options when it comes to borrowing money to finance your extension.
In an ideal world, we would all finance our projects using our savings, but if you need to borrow the money, your best options are:
Credit card: If you need to borrow thousands rather than tens of thousands for your work, an interest-free credit card is a good choice. Shop around — the best deals offer up to 27 months of zero-rated spending
Loan: Personal loans of up to around £25,000 are suited to smaller projects. The loan may be enough to cover the building work and if you are fitting kitchens or bathrooms in your extension you can often buy these on finance from larger stores. Just keep an eye on repayments as they can quickly add up when you borrow from several sources
Remortgage or secured loan: If you are borrowing more than £25,000 you may need to remortgage or take our a secured loan against your home. Many building societies offer a Home Improvement Loan of up to £200,000.
This stunning kitchen extension, designed by The Gentleman Architect , embraces the original house leaving brickwork exposed and highlights the new with the striking geometric-style rooflights that stitch the buildings together. (Image credit: The Gentleman Architect)Your builder will generally stage payments for each phase of the project. Try not to make any payments upfront.
If it is necessary to purchase an expensive item perhaps a bathroom suite some months in advance of its installation, you should make sure it is in your name and not that of the builder, just in case they should go out of business.
Your designer will charge fees according to the work involved, so an accurate quotation of the fee would be a very useful thing to have before you give the go-ahead for plans to be prepared.
It is wise to check what any quote includes and who will pay any local authority application fees. Also, ask if any provision has been made should structural calculations be required.
Can I Reclaim VAT When Building an Extension?
VAT is zero-rated on new build in domestic properties including self builds, but this does not include extensions.
If you are renovating or extending a property that you can prove has been empty for 2 years or more, it will be treated as a conversion and therefore be charged at the reduced rate of 5%. The VAT concessions are only available via a VAT-registered contractor.
How to Prepare Tender Documents
“The aim of going out to tender for works is to obtain a fair and competitive price from the market to achieve the project you are proposing,” says project manager and chartered surveyor Bob Branscombe.
Approaching how to prepare tender documents can be tricky. “First, approach at least four (ideally six) builders informally, to brief them about your scheme and to gauge interest. Then whittle the list down — you’ll probably have three to four companies who have agreed to tender. These will form your list, and will all be sent a pack of documentation."
The pack must contain a framework to cost the job, a timescale to price the work and a copy of the legislative framework, plus key documents such as drawings, specifications, planning permission compliance, and so on. Give them a timescale to get back to you by, but be realistic - give them at least four weeks - there’s a lot for them to go through.
When you get the bids back, go through them thoroughly (your QS, if you have one, can look over the cost breakdown too), and ask questions. Don’t be afraid to push back and query items you’re not sure about. Once you’re happy with your chosen builder, you’re ready to start your build!
Chartered surveyor Ian Rock MRICS is a director is Rightsurvey.co.uk and the author of eight popular Haynes House Manuals, including the Home Extension Manual, the Self Build Manual and Period Property Manual.
Ian is also the founder of Zennor Consultants. In addition to providing house surveys, Zennor Consultants provide professional guidance on property refurbishment and maintenance as well as advising on the design and construction of home extensions and loft conversions, including planning and Building Regulations compliance.
Ian has recently added a 100m2 extension to his home; he designed and project managed the build and completed much of the interior fit-out on a DIY basis.
Projects of extensions to the house in plain language
Many owners of country houses and cottages from time to time carry out redevelopment of plots with their own hands. But sometimes you have to touch the house. If it needs to be expanded, then an extension is an ideal option to increase the usable area. At the same time, it can perform completely different functions and be located not only at the main entrance. Projects of extensions are developed taking into account the peculiarities of their operation.
Building types
Content of Article
- 1 Types of buildings
- 2 Types of residential extensions
- 3 Design of the new premises
- 4 Design of the base
- 5 Design of the roof
- 6.1 similar Articles
before, before, before, before, before, before, before, before, before, before, before, before, before, before, before, before, before, before, before, before, before, before, before, before, before, before, before, before, before, before, before, before, before, before, how to choose an extension project with your own hands, you should decide on its functional purpose. Usually the following types of buildings are attached to the house:
- Veranda is a summer room that will allow the owner of the house to spend time in nature, but at the same time with comfort. Such extensions are used mainly in the warm season. But at the request of the owner, the building can be insulated, equipped with windows and used in winter. Verandas are built from any material, including brick, foam blocks and wood.
- Boiler room. If the cottage was originally planned as a summer building, then it may not provide a place for a boiler or column. In this case, it is necessary to complete the room and install heating equipment there. Fire safety standards impose increased requirements on such buildings. For example, the material for them must be used exclusively non-hot, such as bricks or blocks.
- Bathroom. Such an extension is mainly used in villages and cottages that are not equipped with a bathroom and toilet. In this case, the room has to be attached in order to increase comfort.
 Depending on the material of the main building, the extension can be made of timber, brick or blocks.
 - Living quarters are being completed in order to increase the area of the house and are used as an additional room. Sometimes the dimensions of such an extension may exceed the dimensions of the main building. Often they are used in the restoration of very old buildings with a small usable area. The building material for such a room is mainly brick or blocks, less often a wooden beam.
- The garage is attached to the house, either to save the budget due to a common wall, or to heat the room for the car from the heating system in the house. For the construction of a garage, blocks and bricks are most often used.
- Bath. Such a building is usually attached to a wooden country house or cottage. In this case, one wall is common, and the other three are also built of wood. The most commonly used logs. The bath can be used as a vestibule at the entrance to the house.

For each type of extension, it is necessary to calculate the amount of materials and draw up a plan.
Types of construction of residential extensions
There are several basic options for do-it-yourself extensions to the house:
The first option is considered not only the easiest from a technical point of view, but also the most budgetary. He assumes that the roof of the main building remains in place, only slightly lengthening by the size of the extension to the house. The main building is completed on one side or two. Then a passage is punched between them so that the total area of \u200b\u200bthe building increases by the size of the new building.
An attic-type room will be more expensive, as it is supposed to carry out an add-on.
The third do-it-yourself extension to the house involves its own roof. The rest of the structure resembles a side structure. A separate roof increases the consumption of material, so the extension will cost more and will be built a little longer.
The extension of the second floor is carried out only if the foundation of the house allows it. If initially the building was not planned to be multi-storey, then there may be problems with its completion. The foundation may simply not withstand the additional load. In some cases, it can be strengthened.
Designing a new building
According to the law, any functional room is considered to be an addition to the house. A balcony, a loggia, a winter garden or an additional bedroom - all this will be considered an extension. Mandatory elements of its design are:
- foundation;
- walls.
Unlike the main building, there may not be any ceilings here. Do-it-yourself constructive solutions for the roof of the extension are as follows:
- Adjacency to the slopes of the roof of the house. In this case, new nodes are added to the existing truss scheme.
- Gable connection is the most economical option.
- Shared with the main building.
 The truss system of the house is dismantled from the edge adjacent to the extension, some elements are changed and everything is covered with a single piece of roofing material.
 - Detached structure - at
An extension of the canopy is desirable when building a house
increasing the number of storeys of the building, the roof is joined to the wall, relying on its own load-bearing structures.
The foundation of the building is recommended to be erected separately, since the structures are operated under different loads.
At the design stage, it is very important to take into account the compatibility of the new building with the old one. An extension with your own hands should not create obstacles to communications that pass through the site. If you plan to make multi-level buildings, then you need to consider that this will delay the snow masses. Therefore, they should be further strengthened to avoid subsidence of the foundation.
Foundation design
When increasing the useful area of an existing building in the horizontal direction, it is unprofitable to build a slab or strip buried foundation. The most cost-effective foundation designs are:
- Shallow-buried belt, which allows you to save the construction budget twice.
- Pile foundation.
- Do-it-yourself extension to the house on screw piles.
- Pillar base suitable for non-foaming compact ground.
If preference is given to a pile or column foundation, then it is necessary to perform additional protection of the lower part of the structure from freezing. For this purpose, you can use basement siding with an inner layer of insulation in the form of basalt wool or expanded polystyrene.
Wall design
When drawing up an extension project, you should decide in advance on the material for the walls. For frame or panel construction, a sandwich is used:
- OSB sheets with EPS or stone wool core;
- inner vapor barrier membrane;
- outer foil for waterproofing.
The laying of lightweight blocks - aerated concrete or foam blocks - will cost a little more.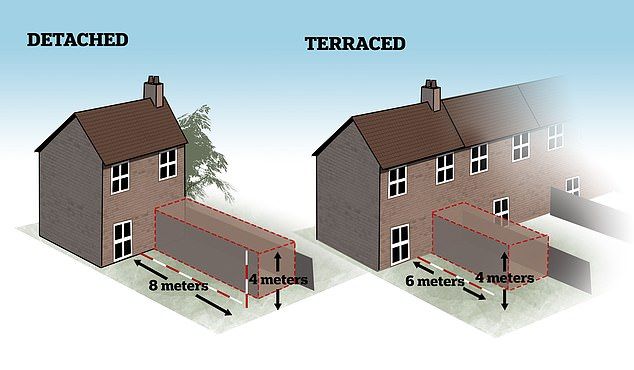 If preference is given to the latter, then it should be taken into account that even walls made of the highest quality foam concrete are often covered with a network of cracks. Therefore, the facade will need to be plastered over the reinforcing mesh with a special composition.
Designing a roof
When designing an extension to a house with your own hands, you need to calculate the reliability of the elements of the truss system, their configuration and choose a step for their placement. If the height of the walls is the same, then the supports can be based on the existing load-bearing structures. The rafters of the lower extension to the two-story building should rest on the columns located near the walls of the main building.
Most often, the slope of the roof of the house closest to the extension is dismantled. The elements of the truss system are replaced by new ones that have a greater length.
Alternatively, the roofing pie can be dismantled, but the rafters cannot be dismantled.![]() For a new building, a shed roof is being erected. You can strengthen the truss system with racks.
For a new building, a shed roof is being erected. You can strengthen the truss system with racks.
This is how the project of a house with an extension looks like
For an extension to the house with your own hands, it is recommended to choose a roofing material identical to that used for the main building. Then it will look the most harmonious.
Similar articles
100 photo ideas for building and decorating with your own hands
Many people dream of having their own dacha, but those who already have it try to improve it, make it comfortable, convenient and practical. It is not so often that the construction and arrangement of a dacha economy starts from scratch, so to speak - in an open field. As a rule, we acquire a plot with buildings already built and equipped to some extent.
However, it would seem that the obvious advantage - there is no need to waste time and money, has its "minuses", namely, the new owner has to redo everything based on his needs and his ideas of comfort and practicality. For example, the usual situation is when the area of \u200b\u200bthe cottage is insufficient.
Of course, you can demolish everything and rebuild, but this is fraught with such difficulties and costs of effort, time, material resources that this option is not suitable in any way, in this case, there is only one thing left - to make an extension and increase the total area due to it .
Looking at the pages of sites ready-made options, or rather a photo of an extension to a house in a summer cottage, you can see: with the right approach to solving this problem, the result is quite acceptable, and given the lower costs in comparison with the option of new construction, it becomes the only correct one.
So, let's figure out how to make an extension with your own hands, what is needed for this, what "pitfalls" can await us along the way and reveal some non-obvious aspects.
Summary of the article:
Thinking and planning
As in any other business: before you start sawing, laying bricks and in general - creating a fuss of construction work, you will need to think carefully, plan everything. Otherwise, the result of the work, all the invested funds, the time spent may not meet your expectations, or nothing will come of it at all, but a sad experience, you see, is not what we expect and what we need.
At first glance, it may seem that what you have planned will require special skills or knowledge from you, however, there is nothing complicated and impossible, it all depends on your desire to work and study a little. As a rule, specialists are contacted when carrying out work on the supply of communications or during calculations during planning.
Let's decide what we need, what is required, and for this we need to know what species exist and what are their distinguishing features. So, as an additional room can be:
Conventional canopy
This is the simplest option, it does not require a foundation: special support pillars act as a base for the main element - and this will be the roof of the extension. In this case, the walls are not erected at all, or some kind of screens act as them, for example, you can make a living curtain from specially planted climbing plants, which are guided along pre-strengthened threads.
In principle, the canopy still cannot be called an extension in the full sense of the word, it is rather an additional structural element of the main building.
Summer room
It can be a veranda or a terrace. The summer room does not require the use of insulation, the roof is made of lightweight material, and since the structure itself is lightweight, the foundation is made simple and cheap.
The disadvantage is also obvious - in this room you can relax or work only in the warm season, in winter the room is not used. The main "advantages" include the simplicity of design, low material costs, and the speed of construction.
Full-fledged housing for year-round use
In this case, we are dealing with a full-fledged capital construction. The convenience and comfort of the room will depend on how carefully everything will be designed, on the right choice of materials, on the quality of installation and finishing work.
It will require the construction of a full-fledged foundation, roof, main walls. Some infrastructure is needed: heating, electricity, ventilation, etc.
Kitchen
When choosing this type, remember that the kitchen will require you to sum up the entire list of communications, that is, during its construction, not only the room itself, but also the entire infrastructure is carefully designed.
In general, the kitchen will require additional financial investments from you, and for this reason it is rarely used as an additional room, with the exception of a simple, summer option.
A popular view among summer residents - garage
The room itself will require you to build a full-fledged foundation, solid walls made of stone or reinforced concrete structures, and a roof. Inside, it is required to provide an inspection pit and think over a waterproofing system, otherwise the pit will be filled with water in the spring and during heavy rains.
Please note that the garage may be heated, in which case it will be necessary to prepare an appropriate plan and supply heating.
Sanitary room
Another type of outbuildings - bathrooms, showers or sanitary rooms. This option requires the entire complex of engineering communications: sewerage, water supply, etc., and if it is not an outdoor shower, a heating and ventilation system;
Sauna
This is one of the most difficult options, and due to the specifics and technical features, it is better to build a sauna separately.
So, after the type is selected, we create the project itself, it is important to provide for all the moments and stages of work in it. Treat the design with due attention, the final result of all your work and costs largely depends on the quality and information content.
Construction technology
The most popular today are frame extensions, they are simple, require a minimum of material costs, and are quickly erected. There are the following frame technologies:
Frame-panel technology: panels with openings are made separately, and then, on the spot, they are assembled into a single structure. This method is great for extensions to a stone house; as a rule, it is not used for wooden buildings:
Frame-and-frame technology: suitable when an extension of a terrace or a small room is needed. As a rule, this method is used for summer rooms. The main advantage is the simplicity of design, as well as the fact that the master has a wide choice of methods, materials and options.
Frame technology is optimal when it is necessary to add verandas, summer rooms and other unheated and simple buildings. For a capital, all-weather premises or a garage, this method is rarely used, since in order to give the structure strength, it is necessary to significantly complicate it, and this is not always advisable.
For capital premises, stone or timber structures are more suitable. They have a margin of safety and other required qualities.
Regardless of which technology you use, the right extension to your home has one important design feature, namely, it will need to be attached to the main building. In view of the importance of this point, let us dwell on it in more detail.
Interfacing with the main building
Correct connection of an additional room will require careful calculations and research. It is necessary to take into account many factors and nuances, and therefore it is better to entrust planning to specialists.
During independent design and installation, special attention is paid to the foundation, its interface with the main one. It is important to correctly attach the walls, roof, take into account the mutual influence and seasonal changes.
The most commonly used method in practice is the use of reinforcement technology, and iron bars act as reinforcement.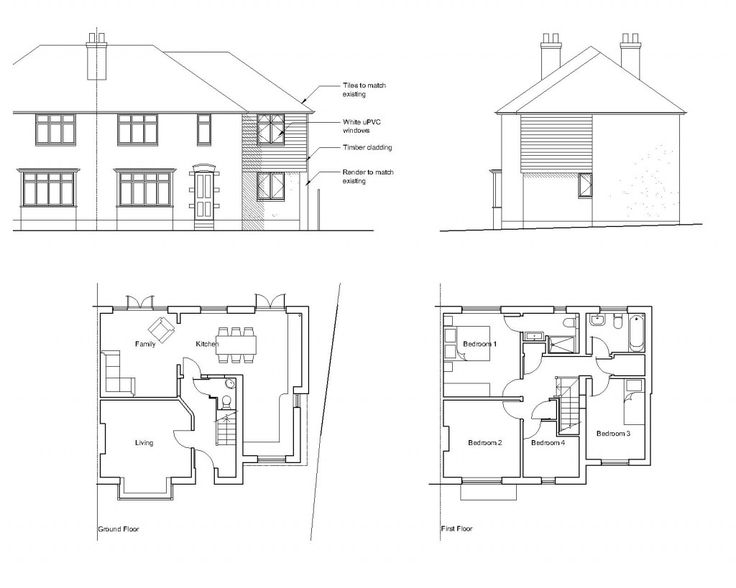 Widely used various mounting structures.
It is important to properly install the roof, to think over and provide for the flow of water from the higher roof, if the design is incorrect, walls and ceilings may get wet.
Some legal points
If you decide to build an extension on your summer cottage, it is important for you to remember that it is important to arrange any additional building structures in compliance with the relevant legislative acts. In addition, for the implementation of any construction work, first obtain a permit for their implementation.
To obtain permission and complete all required paperwork, you will be required to provide a properly executed project.
Getting to work
So, the project, which provides for a beautiful design of the extension, is ready, the necessary permits have been obtained, the necessary tools and all building materials are available, you can proceed directly to work.
In this case, the technology will not differ much in consistency or in some features. These are the usual works on erecting walls on a pre-prepared foundation, installing a roof, roofing, installing floors, summing up the necessary engineering communications, installing electrical wiring, finishing work outside and inside.
As you can see, the extension does not differ much from an ordinary building, in many ways it is, with the exception of erection in contact with the main building. That is why it makes little sense to describe the installation work, and if necessary, you will find the information you are interested in on your own .
Photo of extension to the house