Tips for kitchen storage
40+ Brilliant Kitchen Organization Ideas to Maximize Your Space
These brilliant kitchen organization ideas will help maximize your storage space and keep it neat and tidy!
Organizing the kitchen can be a bit of a bear. There are usually lots and lots of items we want to store and not much room to do it. Or even if we have the space, it quickly gets unruly and feels like a cluttered mess.
Since we need to eat, we often spend a decent amount of time in our kitchens, and that time feels much more pleasant when everything is tidy and organized. So I thought I’d round up all of my most favorite kitchen organization ideas in hopes that some of them will be helpful for organizing your kitchen space!
Grab our free organizing guide,
7 Simple Starting Points!This quick guide gives you 7 simple, practical ways to begin to tackle an overwhelming organizing project. (And once you get started, the momentum will help you keep going until it’s complete!)
SIGN ME UP!
Kitchen Organization Ideas to Maximize Your Space
This post contains affiliate links. For more information, see my disclosures here.
I’ve lived with kitchens of all shapes and sizes. From a very, very small galley-style kitchen in my first one bedroom apartment to our fairly small townhouse kitchen…
…to our current kitchen that is on the bigger side, each space has had its own unique challenges when it comes to organization.
The “ideal” kitchen organization setup will vary based on your space, your routines, your preferences, and the needs of the people in your household. Things that have worked perfectly for me may not work at all for you (and vice versa), and that’s okay!
But hopefully the ideas that I share below will act as a spark of inspiration that you can take and tweak to fit your own space as you see fit.
General Kitchen Organization
Before I get into nitty gritty kitchen organization ideas, there are two strategies that I would recommend for every single kitchen if at all possible. (And every single space in the house, for that matter!)
1.
 Declutter like crazy.
It does us no good to just rearrange all sorts of stuff that we’ll never ever use. If the clutter is still there– even if it is hiding in cute bins and baskets– it will still take over eventually and derail our other organizing efforts.
So before I buy one bin or even decide on the permanent placement of one item, I like to go through and get rid of as much stuff as possible. I typically grab three garbage bags or cardboard boxes and label them “trash,” “donate,” and “sell.” Then I go through my entire space and put anything I no longer love or use often into the appropriate bag.
While I am decluttering, I also look for any items that should be relocated. For example, if I am going through my kitchen cabinets and come across some action figures that my boys have stashed in there, I am going to move them back to their playroom and out of the way.
After I get rid of anything that I don’t love or use often, I then…
2. Put like items together.
By storing like items together, it becomes easier to find what I need when I need it. It is also more obvious to other members of my household where things go so they can put items back in their designated spots too.
This photo is from when I was decluttering our townhouse kitchen and putting like items together. Who knew that such a small kitchen could hold so much stuff?!
Taking the time to put like items together also shows us exactly what we’re working with and how much space we’ll need so we can make educated decisions about where to put everything.
Kitchen Cabinet Organization
Kitchen cabinets can be some of the hardest areas to organize in the kitchen. Let’s look at some ideas for how to maximize space in them.
3. Nest or stack pots and pans.
After trying a bunch of different methods for storing pots and pans and their lids, I always seem to come back to nesting them inside one another with the lids on top. I like the idea of other methods like filing them or hanging lids on backs of doors, but in practice (at least for me), this is one instance where the simplest solution was the best solution. It also takes up the least amount of space.
We have a few pans that we wanted to make sure didn’t get scratched, so for those we purchased an organizer like this one. It makes the most of the vertical space while still keeping the pans from scraping against one another.
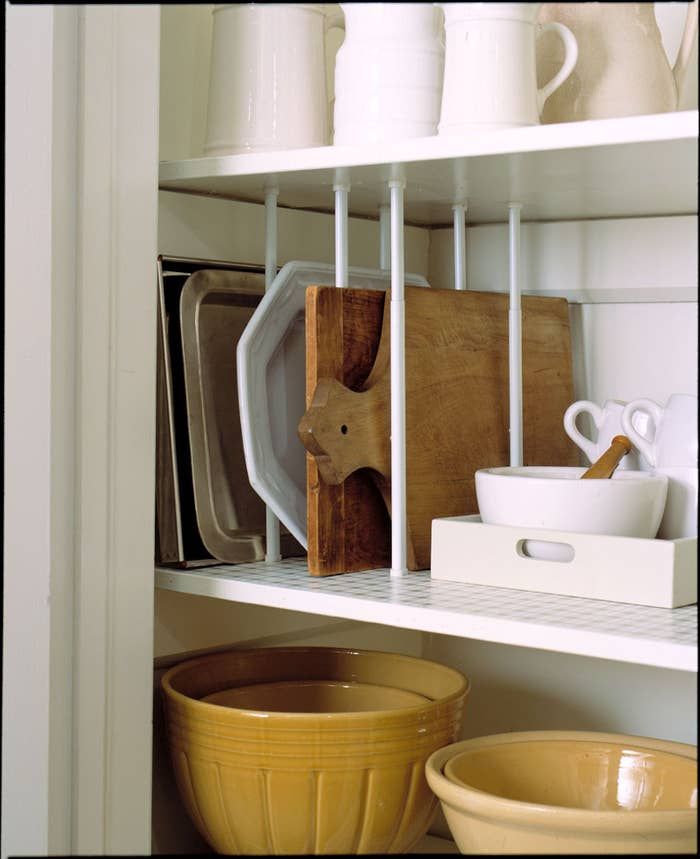
4. File pans and cutting boards.
If I have a choice between “filing” things upright or stacking them flat, I will almost always choose filing.
It allows me to be able to see all of the items at once. And I’m not always unstacking and re-stacking to get to the item I need. To give my pans and cutting boards a little extra support when filing them, I use an organizer like this one.
Most of us have the issue of not having enough cabinet space, so we need to make the most of every inch! I will often use riser shelves to add another layer in a cabinet so I can store more items neatly and efficiently.
I used a wire riser shelf in this cabinet, but I actually like these solid ones better.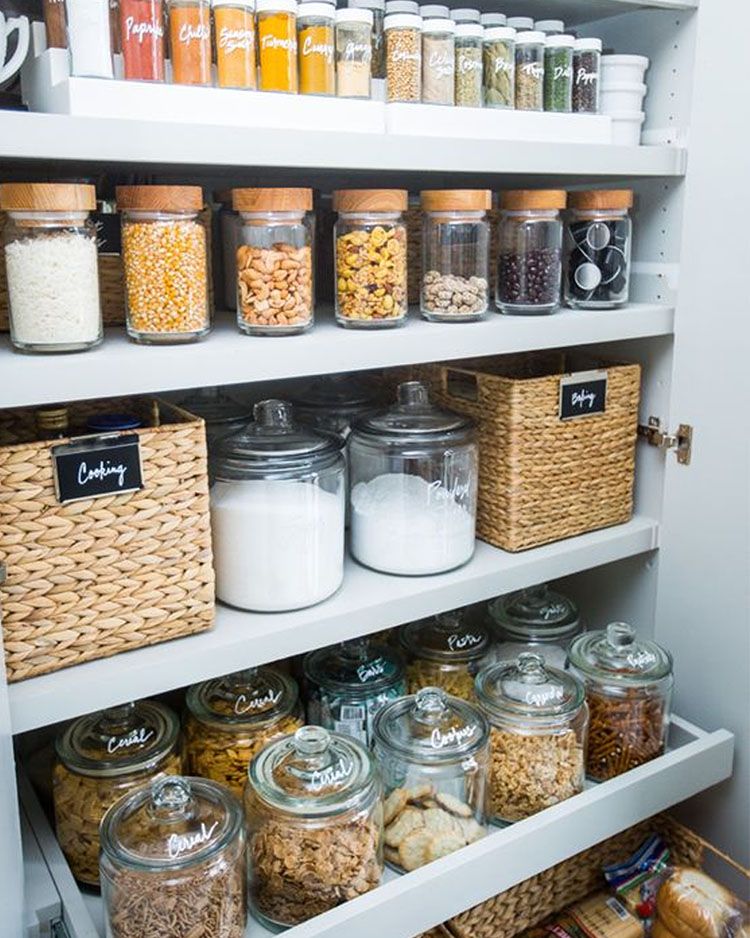
6. Use bins to corral small items on shelves.
Sometimes we have a lot of little items that we need to store together in our cabinets. Rather than having a bunch of small stuff floating around making a mess, I like to put like items together in a bin to keep them tidy.
Bins are especially useful on higher shelves. Rather than having to awkwardly try to root around in the very back to try to find what we need, we can simply pull the entire bin down, grab what we came for, and put the bin back.
7. Use all the same type of food storage containers so they nest neatly.
This is one of my kitchen pet peeves, so if you don’t feel as strongly about this one as I do, feel free to ignore me. 😉 But I absolutely need all of my tupperware / food storage containers to be a matching set so that they nest neatly inside one another. (I currently have double of this set.)
When I have mismatched sets, they don’t always fit together well and the tupperware cabinet becomes a mess.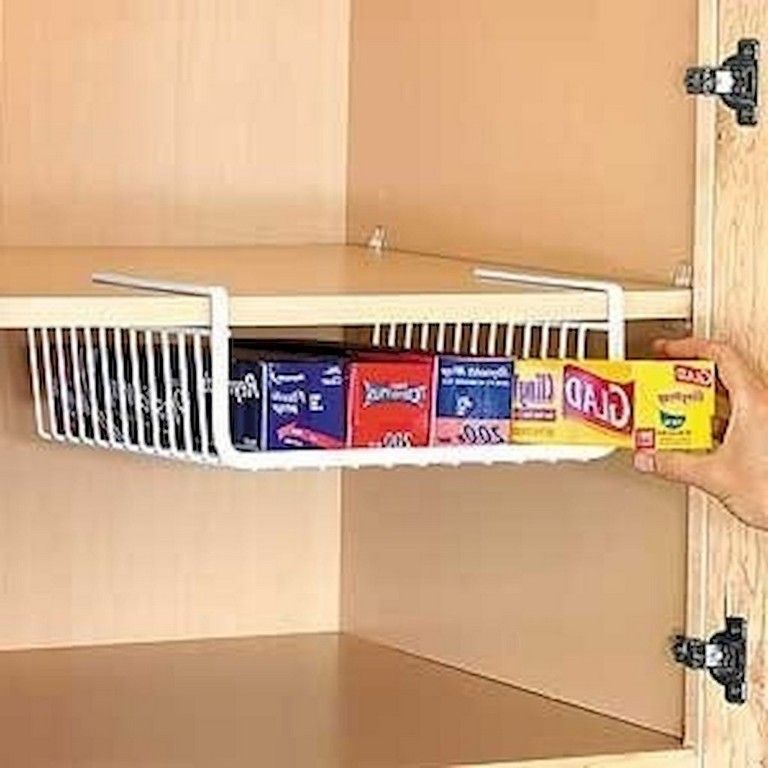 It’s also harder to keep track of the lids, which drives me nuts. And speaking of lids…
8. File food storage container lids in a bin.
Again, I try to use the least amount of space possible while keeping everything organized, so filing the tupperware lids upright in a bin has worked best for me. Tons of lids. Teeny bit of space. Everybody wins.
Now this may be an unpopular organizing opinion, but I do not typically love using the back of the door for storing things. It often feels really clunky and can mess up other items in the cabinet that it hits.
However, I realize that sometimes in small spaces, we really need the back of the doors to work hard for us. So in some cases, when we have enough space to use the back of the door without disrupting the other items in the cabinet, it can be a good solution.
This is a picture from my mom’s kitchen where she uses a magazine file to hold items on the back of one of her cabinet doors. This works perfectly because she has her cleaning supplies in a bin that sits far back enough that the magazine file will not disturb the cleaning supplies when the door is closed.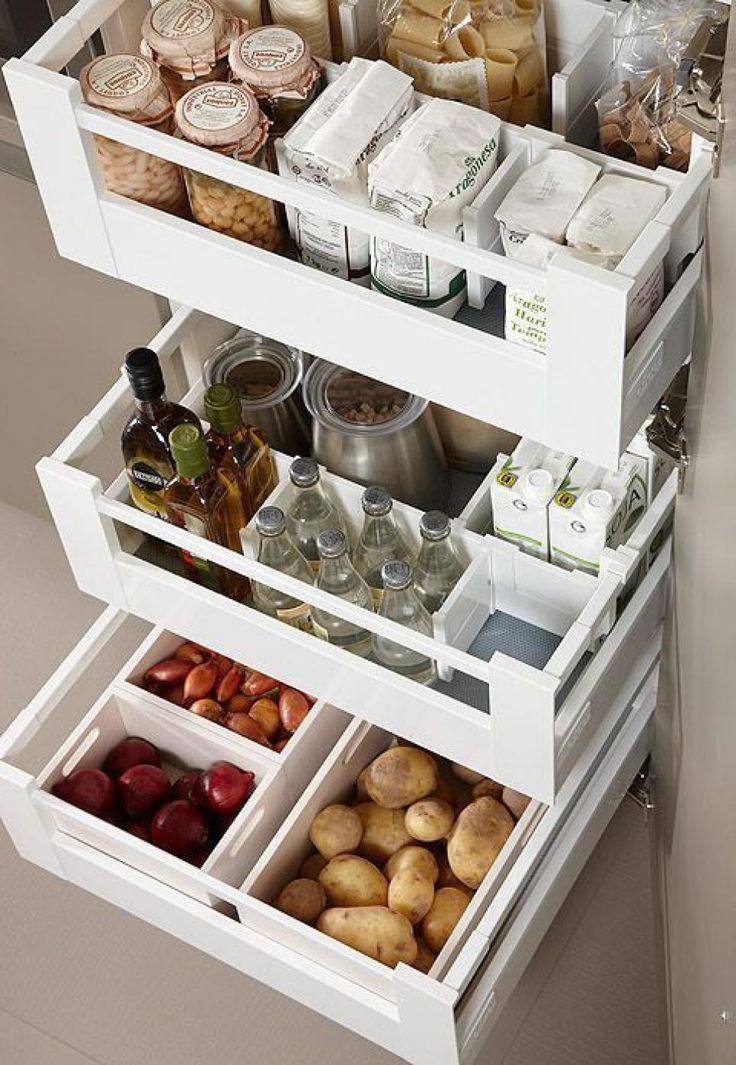
10. File fold kitchen towels to keep them tidy.
Here is another example of my “file when possible” mantra! I feel like I can fit more towels/washcloths in a space. AND I can see all that I have more easily when they are file folded rather than stacked.
This photo is from our IKEA kitchen in the townhouse, and I love their option of having a clear drawer divider to separate the space.
11. Corral kids’ dishes in a bin to give boundaries.
Kids’ stuff is always tricky to keep organized. It’s definitely a balance between wanting to give them independence and wanting their gear to stay tidy!
When possible, I like to keep the kids’ dishes down low so they can reach them on their own. (It wasn’t possible in our townhouse kitchen, and that was fine too! But since we have the space in our current kitchen, I put the kids’ stuff within their reach.)
I have found that the boys will keep their items a lot tidier if there are more boundaries. So for example, if I put their plates, cups and bowls straight on this slide-out shelf, they would probably not be neatly stacked. They would be sliding around everywhere and falling off the sides. And they would be a general hot mess.
But by simply adding a little basket, there is now only room to stack the stuff neatly, it doesn’t fall out, and it is clear exactly where everything goes.
12. Use stacking bins to make the most of shelf space.
Another way to maximize space in the cabinets is to utilize stacking bins. I don’t love lidded stacking bins because it can be a pain to get to the ones on the bottom. But I do really like stacking bins with an open front that you don’t have to un-stack and re-stack to get to what you need.
At one point, we used stacking bins to hold pods in our coffee station, and they worked really well for us.
13. Grab a caddy for cleaning products.
I love to organize. I don’t love to clean. But cleaning gets just a tiny bit better if I have a cute caddy for my supplies!
I love the caddy option because I can easily take all of my supplies with me throughout the house, wherever I may need to clean.
14. Maximize space under the sink with stacking drawers.
The under-the-sink cabinet is typically tall and deep, so utilizing vertical space is of the utmost importance! These clear stacking drawers are some of my favorites for holding small items. We’ve had ours for years, and they’ve held up beautifully.
15. Use stacking containers to utilize under-the-sink vertical space.
And speaking of maximizing vertical space under the sink, stacking containers can help with that too! I have these ones. These ones are similar but are a less expensive option!
SHOP CABINET IDEAS
Turn on your JavaScript to view content
Organizing the Kitchen Drawers
Drawer space can be at a premium in the kitchen, so we might as well make the most of what we’ve got! Here are my best tips for keeping the drawers neat and tidy:
16. Add drawer liners to protect the insides of the drawer.
This is obviously optional, but I like to use drawer liners because they’re easy to wipe down and can quickly be replaced if there’s a huge mess or they get worn out. (Whereas it would be much more difficult to replace the actual bottom of the drawer or the entire drawer itself.)
I also love the cute pop of pattern that peeks out! This is my favorite drawer liner that I use all around our house.
17. Use organizers to corral Ziplock bags, foil, plastic wrap, wax paper, and more.
Our drawers were too shallow to accommodate the boxes that the ziplock bags, foil, plastic wrap, wax paper, and parchment paper came in.
I didn’t have a great system in place for them until I found some bamboo organizers made specifically for that purpose! I use these for the Ziplock bags, this for the 2 gallon Ziplocks, and this organizer for the foil and other rolls.
18. Utilize drawer organizers for silverware and utensils.
Whenever I’m organizing smaller items especially, I try to make sure I divide up the space so everything has a dedicated spot. I found these particular drawer dividers years ago, so I don’t think the teal-bottomed version is available anymore, but these are similar.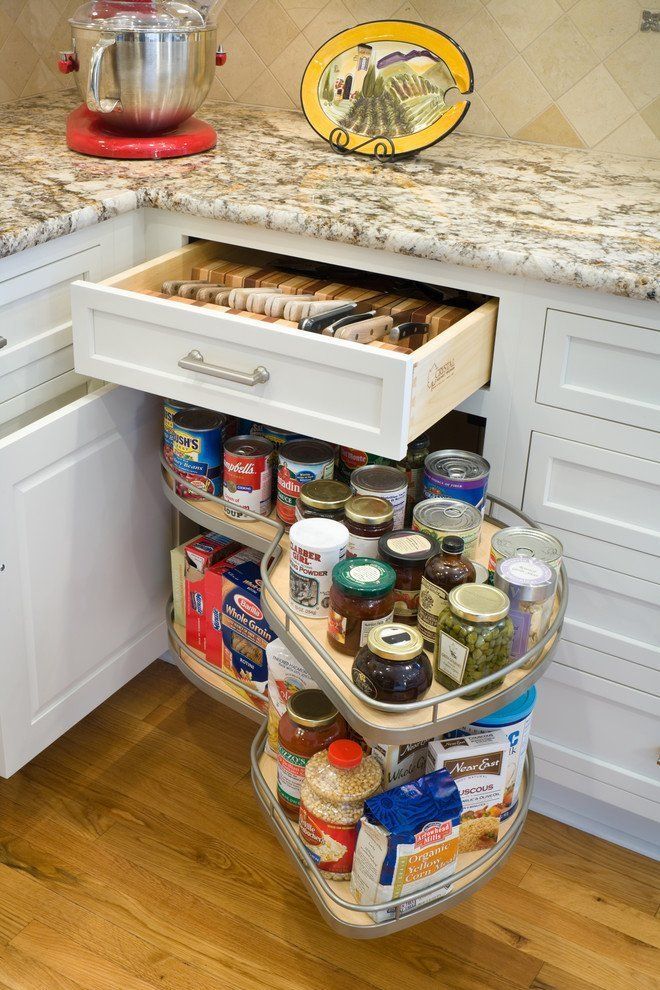
Some people have looked at my kitchen gadget drawer (above) and have said, “That’s all you have?! Where are the rest of them?!”
That’s not all I have. But the only little gadgets I keep in the drawer are the ones I use often. (And I’m not a huge cook, so there aren’t many.) For gadgets that I still need to keep around for occasional use, I keep a basket higher up in one of my kitchen cabinets to store them.
That way, I still have the gadgets when I need them, but my drawer stays tidy and uncluttered and can open and close easily.
(I realize this is in the cabinet, but it’s related to the utensils in the drawer, so I figured I’d put it in this section! 😉 )
20. Choose an in-the-drawer knife rack.
I used to keep a knife block on the counter, but when I went on a mission to clear the counters as much as possible, I found this in-the-drawer knife rack and love it. (I have two of these in the drawer pictured.)
The blades are tucked away so no one accidentally gets cut, and I can store a bunch of kitchen knives in not much space at all.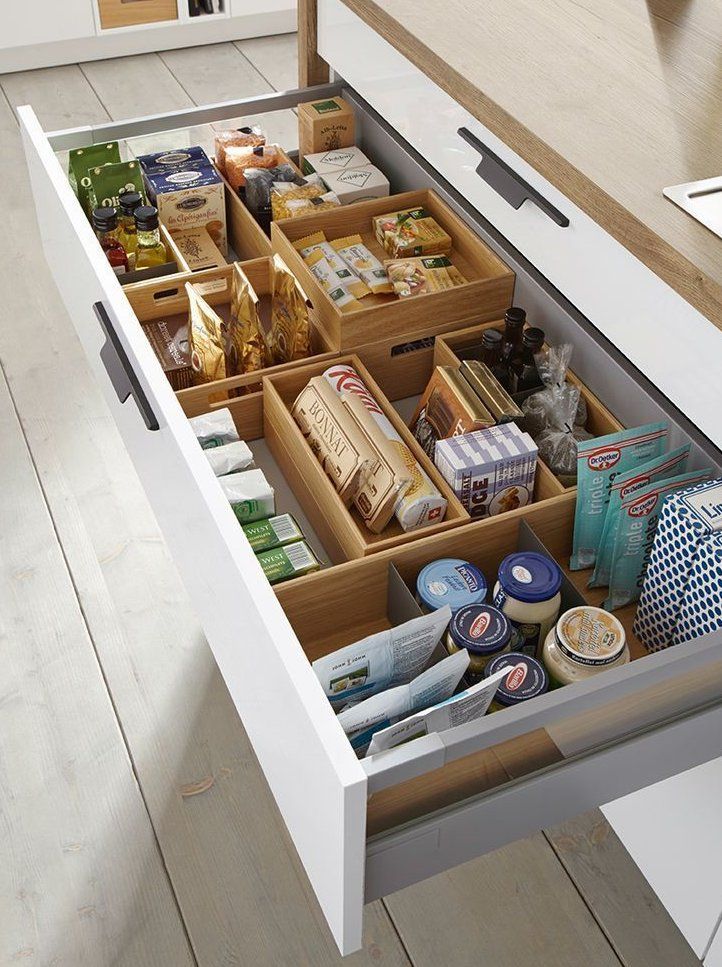
21. Tidy up the junk drawer.
Whether it’s right in the kitchen or somewhere close by, most of us have a “junk drawer” where we keep office supplies and other necessities that we reach for often. But even though it’s a junk drawer, it doesn’t have to be a cluttered mess!
I added some dividers to our junk drawer and labeled the bottoms of them so everyone could see what goes where, and they stay neat and organized!
SHOP DRAWER IDEAS
Turn on your JavaScript to view content
Keeping the Kitchen Countertops Tidy
Surfaces are magnets for clutter, so it’s easy for our kitchen counters to quickly become overrun with stuff. Here’s a few ways I try to keep them as uncluttered as possible…
22. Use a cake stand to keep the sink area uncluttered.
As I did with my kids’ dishes, the cake stand limits the area available to hold items. We keep the absolute necessities on it but know that once we’re out of room, anything else has to be tucked away out of sight.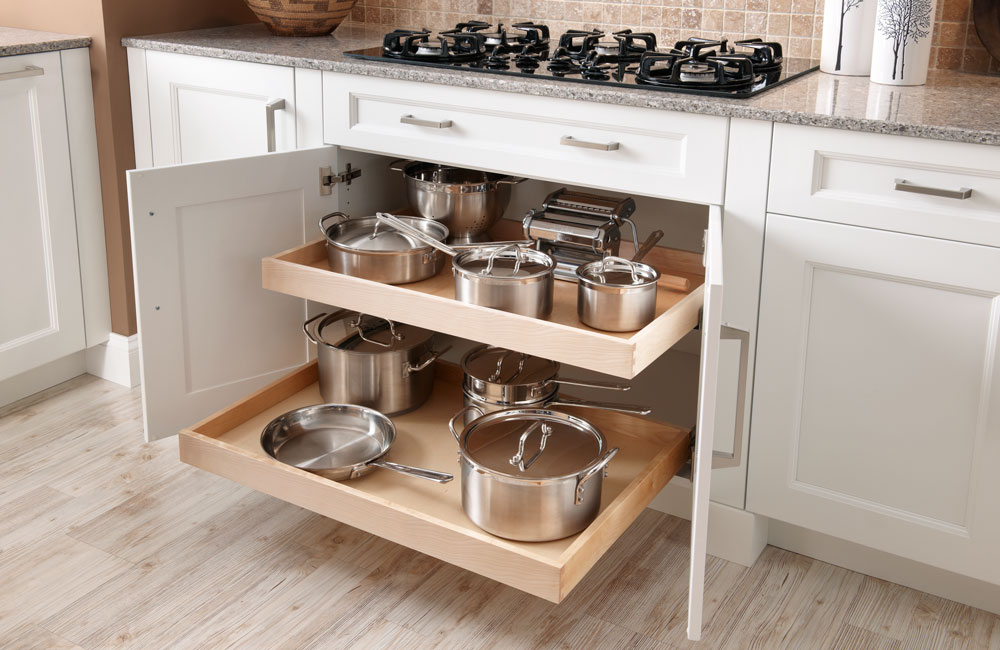 Plus, cake stands are so pretty too!
23. Utilize a tray to corral small appliances on the counter.
I may not love the look of my appliances on the counter, but for the ones I use daily, it’s too much of a pain to take them out and put them away all the time. I keep ours on a tray that sits out on the counter. But if we are having company over or I need more counter space, it’s easy to just pick up the whole tray and tuck it away somewhere.
24. Corral utensils in pitchers or crocks.
Another way I keep my gadget/utensil drawers from becoming overstuffed is to corral our utensils in some sort of container on the counter. This makes them easy to reach while we’re cooking, and they double as cute decor too!
I have used these pitchers to hold our utensils…
Or little crocks like these ones can work well too…
25. Use a divided lazy Susan for smaller items.
I am always looking for ways to use lazy Susans because I think they are awesome! Even though I don’t drink coffee, I got very excited when Donnie got his Nespresso machine because I wanted to organize all of the different pods! 🙂 The lazy Susan worked beautifully for this.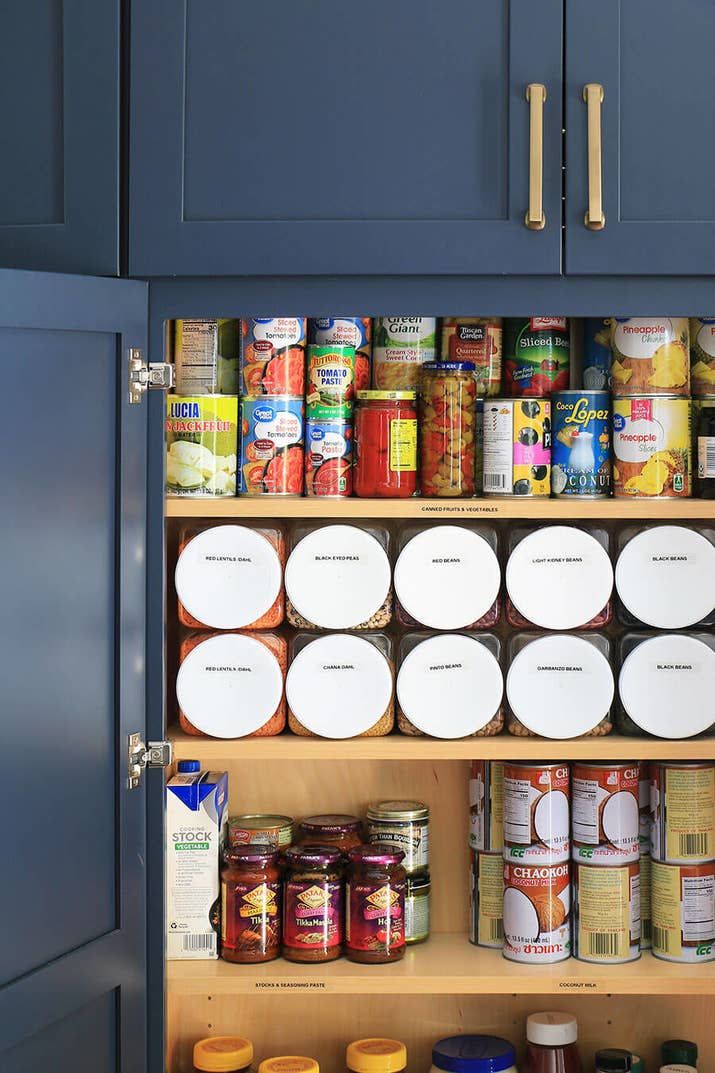
A divided lazy Susan could also be a good option for making a little snack station. Kiddos can easily find what they need and grab it themselves. I show it on the counter here, but it could also work well in the pantry.
SHOP COUNTER IDEAS
Turn on your JavaScript to view content
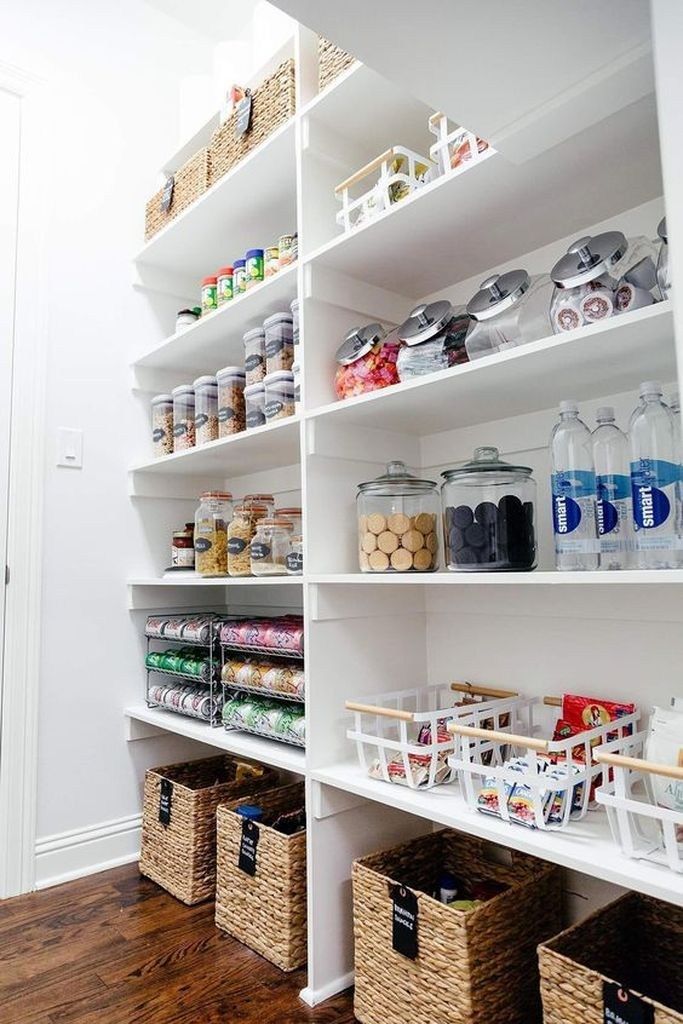
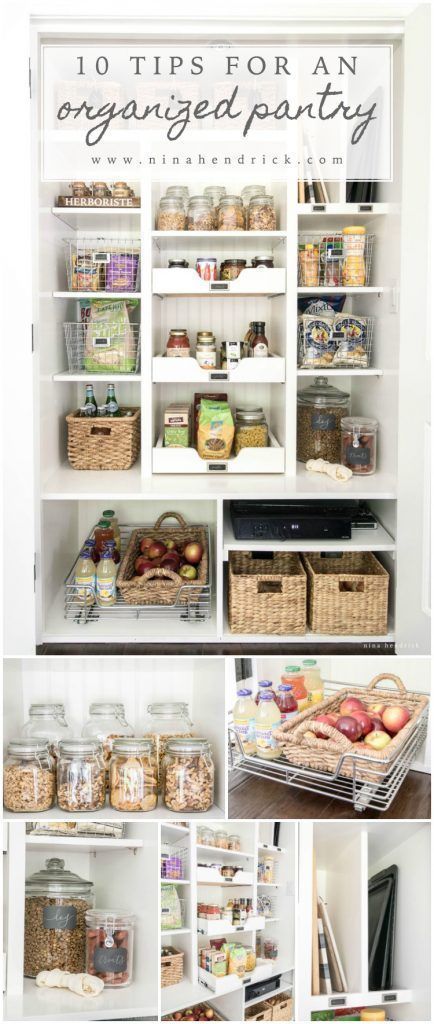
Kitchen Pantry Organization Ideas
I love, love, love an organized kitchen pantry because I feel like when the pantry is organized, the rest of the kitchen stays a lot tidier too!
Here are some of my favorite ways to organize the pantry:
26. Use risers to organize spices and/or cans.
Many pantries have deep-ish shelves where items can easily get lost in the back and become unorganized. One way to combat this is to use risers like these so that items in the back can be seen more easily and don’t get forgotten about in the black hole!
27. Group like items in bins.
Here we’re back to grouping like items again! In the pantry where there are often multiple shelves, it’s easier to keep everything tidy when like items are grouped together. I like to keep smaller items together in bins so that they don’t get unruly and float around all over the pantry, making a mess.
The bins shown here hold my boys’ school snacks (our school prefers that they bring individually packaged items so there is a label for identifying allergens), some miscellaneous items like flavor packets for drinks, and a bin for seasonings.
28. Decant dry goods for a streamlined look.
Decanting— or taking items out of their original packages and putting them in uniform containers instead– is largely a personal preference thing, but I am a fan! I love the streamlined look of it. I love that I can get rid of a lot of excess packaging. And I really love that I can see exactly how much of everything I have so I know when I need to pick up more at the store.
I personally decant pasta and dry goods like flour and sugar. I do not decant snack foods like chips and cookies or cereal because I don’t feel like they stick around long enough to make it worth it.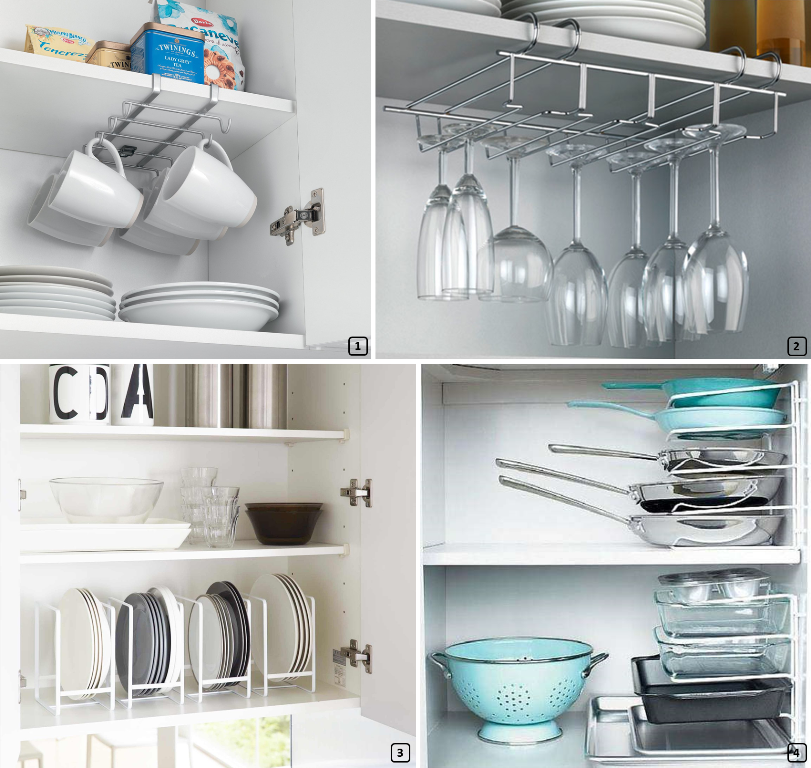 But again– this is totally a personal preference thing!
I currently use these containers (pictured above) for decanting. I labeled them myself using my Cricut Explore cutting machine and adhesive vinyl.
29. Use clear adhesive business card holders to store instructions and expiration dates.
When we decide to decant some of our pantry items, we also have to figure out how we will keep track of information from the original packaging, like instructions and expiration dates.
The way I’m doing that currently is by using clear adhesive business card holders on the back of my containers to hold any pertinent information.
The instructions stay clean and tidy, and I don’t have to reach into the food to retrieve the directions/expiration info.
30. Keep a clipboard and wet erase marker close by to document expiration dates.
Another way I’ve solved this problem is by creating a printable to keep track of the dates. I laminated mine and use a wet erase marker to keep it updated so that I don’t need to print a new one every time something changes.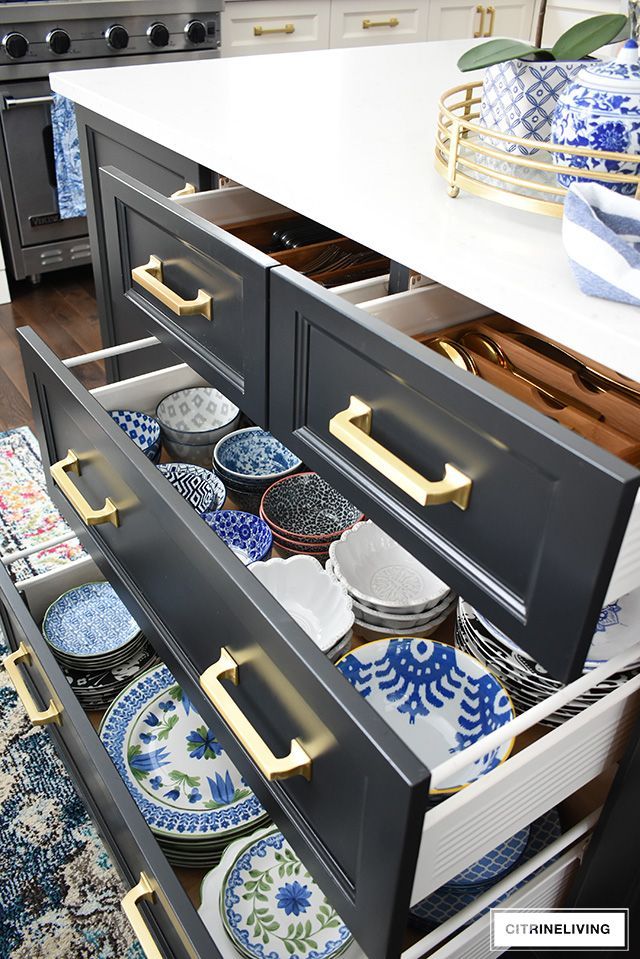
31. Choose built-in scoops.
One of my favorite features of the OXO pantry containers is their ability to hold a half cup scoop on the bottom of the lid!
The scoop attaches to a small circular disk on the lid and is readily available anytime I need to measure out whatever I’m storing in the bin.
32. Use a wine rack to corral water bottles.
Water bottles used to drive me insane! It seemed like no matter what I tried, they were always falling over and making a mess. A few years ago, I saw the idea to use a wine rack to store them on their sides, and I’ve been hooked ever since.
This system also keeps us from accumulating water bottles in excess. We only keep what we have room to store.
33. Take advantage of vertical space with a tiered lazy Susan.
Before we switched some things around in our townhouse, we only had an itty bitty pantry that was about 9″ deep. Yikes. You’d better bet I did everything I possibly could to utilize every inch of that little space, including using these nifty tiered lazy Susans.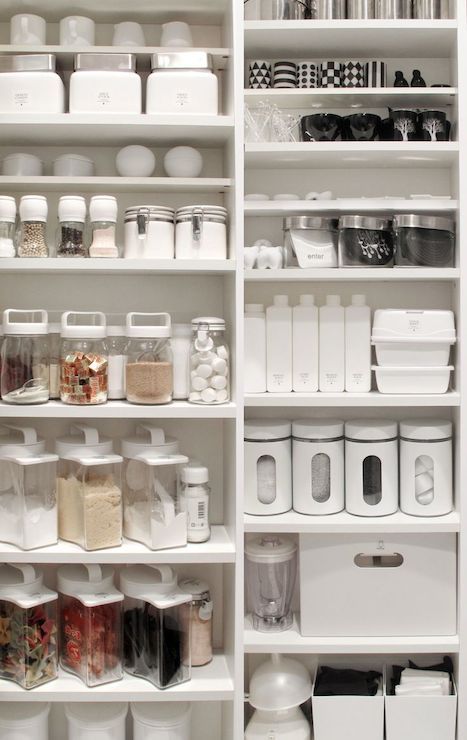
By using the lazy Susans to hold our cans and spices, I was able to eliminate a lot of the dead space I would have had if I had only been storing one layer of items on the shelf.
34. Keep bigger bins on the floor of the pantry to corral bags and overflow.
Another problem people come across when decanting is that their container isn’t big enough to hold an entire package of something, so they end up with some excess that they’re not sure what to do with.
I solve this problem by keeping two deep bins at the bottom of our pantry. If I open a new package of flour, for example, and not all of it will fit in my container, I close up the rest of the bag and put it in one of these bottom bins. Then I use it first the next time I make a recipe that calls for flour, and it is typically gone pretty quickly.
I also use these bins to hold larger items (like cereal boxes) and things that would sit awkwardly on the shelves (like bags of chips and popcorn).
35. Add labels!
Labels are always optional, but I am a fan! They make items easier to find, can help give a space a streamlined look, and they just look plain cute!
In the image above, I used clip-on labels for the bins.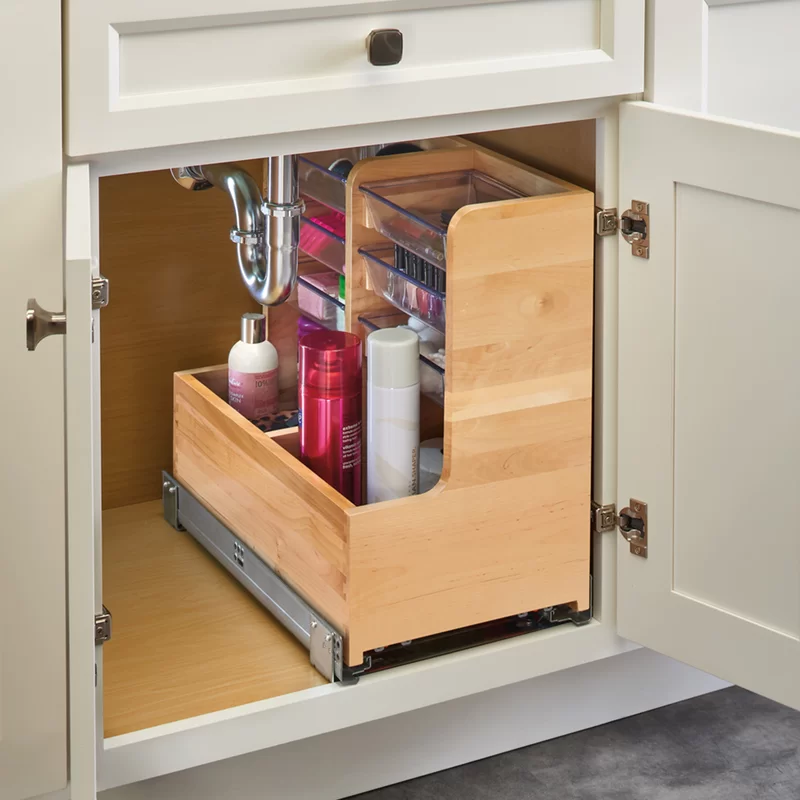 I then used my Cricut Explore + adhesive vinyl to label the containers and spice jars.
Sometimes people can feel like adding labels causes visual clutter. (I actually don’t love labels in my refrigerator for that reason, so I don’t use them.) If this is you, feel free to use labels very sparingly or not at all!
No pantry? Get ideas for organizing baking supplies in a kitchen cabinet.
36. Maximize space in the pantry with a closet system.
Now this one requires a bit of a budget, but it can also make a huge impact.
I have typically found that most pantries are not set up for maximum efficiency. As such, in both homes I have owned, we have ripped out the existing system and put in a new closet system to make the absolute most of the space. And it has been a total game changer!
(In this closet we used IKEA’s ALGOT system. They recently discontinued ALGOT and replaced it with the BOAXEL system, which is very similar.)
The “pantry” shown above was actually the coat closet in our townhouse, but we used the closet system to rework it into a full pantry and relocated our jackets.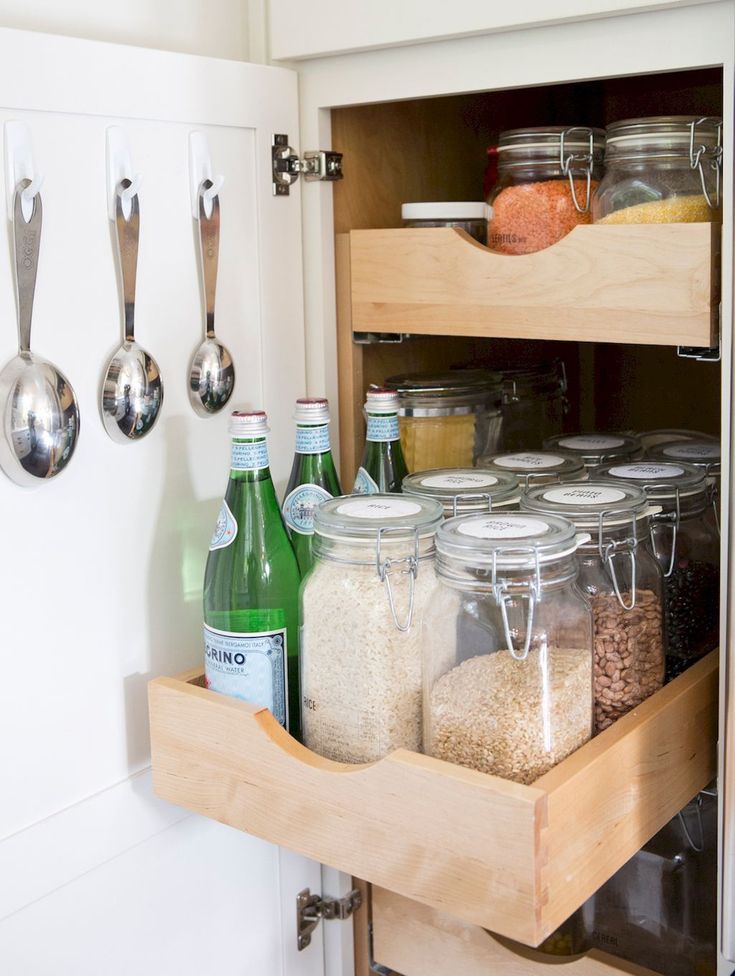 Don’t be afraid to get creative with your space if the space you have isn’t working!
SHOP PANTRY IDEAS
Turn on your JavaScript to view content
Organizing the Refrigerator
The refrigerator is another one of those areas where I may go against popular organizing opinions. I know that there are tons of beautiful refrigerators on Instagram and Pinterest with tons of bins and organizers and color coded food and all sorts of stuff.
I have found, however, that in real life, I don’t actually like to use a lot of bins in the fridge at all. Because I don’t buy the same exact items every time I go to the store, the bins take away a lot of needed flexibility and just end up getting in the way for me.
(If you like them and found some that work well for you, by all means keep using them! It’s all about finding the system that works well in your individual space!)
There are two little exceptions to my “less is more” bin policy in the fridge, and they are…
37.
 Divide up the deli drawer.
Our fridge has this shallow drawer that spans the whole width of the refrigerator. It was driving me crazy because every time I would go to grab meats and cheeses, I would have to search through a bunch of stuff I didn’t need before I found what I was looking for.
I was thrilled, then, when I came across these organizers and two of them just happened to fit perfectly together in our deli drawer.
This allowed me to divide up the space, keeping like items together, so we could more quickly and easily find what we needed.
38. Divide up freezer space with containers if needed.
I applaud the people who designed our current freezer, because it has a bunch of nifty dividers and sections built in that make it easy to keep everything tidy. Our townhouse freezer, however, did not have that.
To help keep it a little neater, I added a bin to corral bags of frozen veggies and fruits. This allowed them to stand upright, keeping them in a neat row rather than being piled up haphazardly.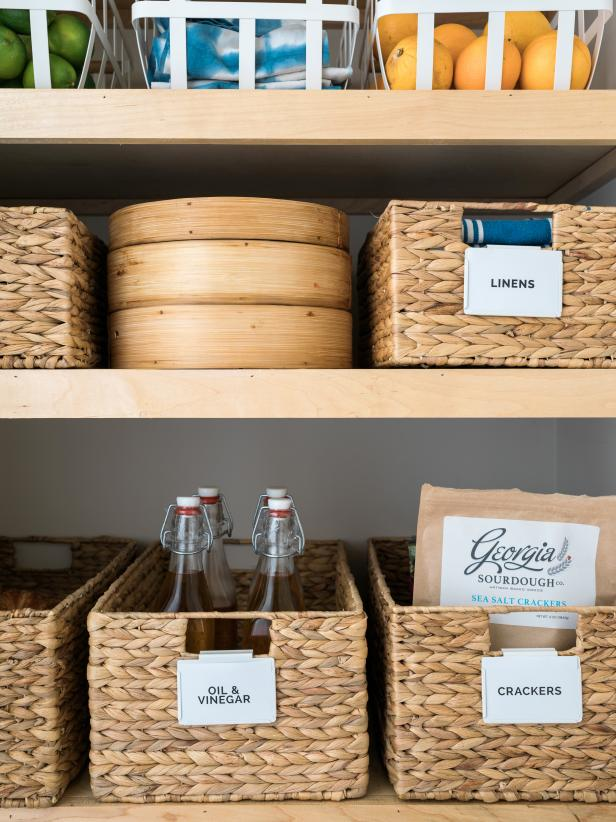
As a general rule of thumb, pay attention to the things that are driving you nuts when you go to get something out of your fridge or freezer. If there’s something that is a pain every time, that’s when it may be a good time to come up with another system for it or try adding some type of organizer.
If it’s not driving you nuts, it may be better to preserve the flexibility of your fridge space and go with less organizers rather than more.
SHOP FRIDGE IDEAS
Turn on your JavaScript to view content
Ways to Bring in Extra Kitchen Storage
Sometimes no matter how much we try to organize and how often we move things around, the kitchen we have is simply not big enough to accommodate all of the items we need to store there. When that is the case, it’s time to get creative and use other storage solutions to help us stay organized.
If this is the case in your home, here are some things you could try…
If there’s open wall space in the kitchen, floating shelves could be a great solution.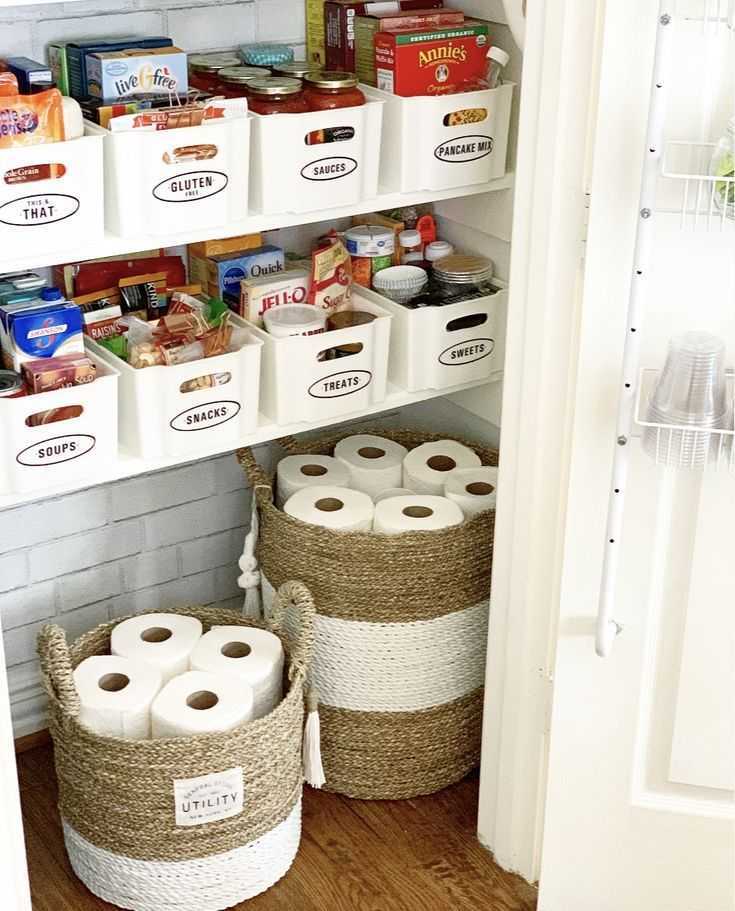 They could hold pantry items or dishes or coffee and coffee mugs– so many options!
If you’re worried about items on the shelves looking messy, consider corralling them in a cute basket. They’ll still be right at your fingertips while still looking tidy.
40. Hang pots and pans from a pegboard to free up space in the cabinets.
Another way to make the most of wall space would be to hang a pegboard or two. (I like these ones.) Hooks can hold everything from pots and pans to kitchen utensils to racks for spices and more.
41. Choose a light fixture with added storage.
My mom lives in a beautiful older house with tons of character, but it has almost no large lower cabinet storage in the kitchen. To store her pots and pans, she chose a light fixture that was also a pot rack, and her kitchen supplies now double as cute decor as well!
42. Create a backup pantry in a nearby space.
If kitchen cabinet space is minimal, consider creating a “backup pantry.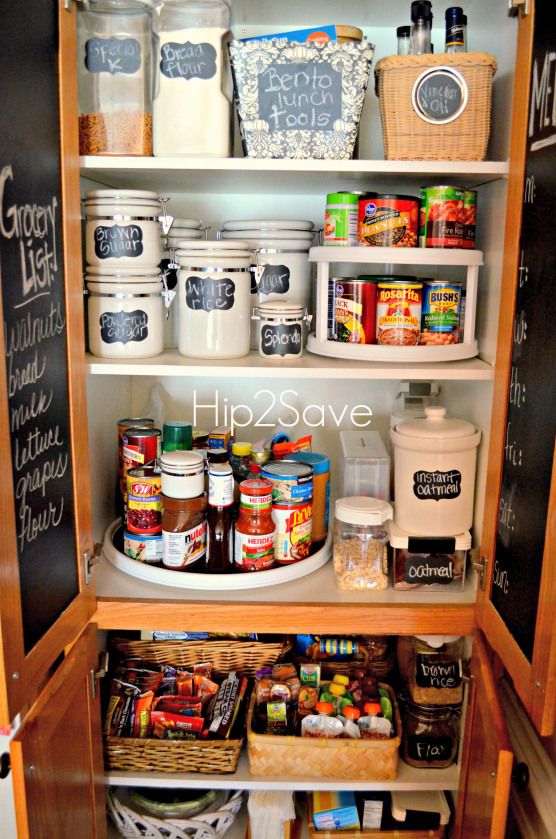 ” Before we created a bigger pantry using the closet at our townhouse, I had a backup pantry area in the basement that held items that I used occasionally but didn’t need access to all the time.
My sister did something similar using a bookshelf in a mudroom area near her kitchen.
Using the backup pantry strategy is great because it helps the kitchen cabinets from being overstuffed, which makes it easier to keep them tidy.
43. Build a cabinet to hide the trash can.
Sometimes the trash can can eat up valuable cabinet space, so instead of taking up an existing cabinet, consider DIY-ing a cabinet specifically for the trash can to free up some space in the kitchen.
We built this trash cabinet to match the kitchen in our townhouse. You can see the tutorial here.
44. Bring in a sideboard or rolling cart for additional storage.
Can you bring in a piece of furniture for some added storage? In our townhouse kitchen, the window wall was kind of a waste storage-wise because there was no way to add cabinets to it.
One day I was moving stuff around and happened to push our entry desk in front of the window to get it out of the way, and I realized that it was a perfect fit! I ended up using it as a kitchen sideboard, giving me some extra drawers and more surface area as well.
Another piece to consider bringing in is a rolling cart or island on wheels. These are especially great for small spaces because they can easily be pushed out of the way when needed. AND they also add some much-needed storage.
45. Use hooks on a rail to keep utensils nearby.
I love this little rail at the end of our island because it is functional and beautiful at the same time. There are many different types of accessories that can hang from it as well.
If you don’t have an end cabinet or island, these rails can also be used to add storage in the backsplash area, particularly if it isn’t tiled.
SHOP STORAGE IDEAS
your shortcode here
Turn on your JavaScript to view content
Whew! That was a lot of kitchen organization ideas in one post! I hope you found some inspiration to use in your own space.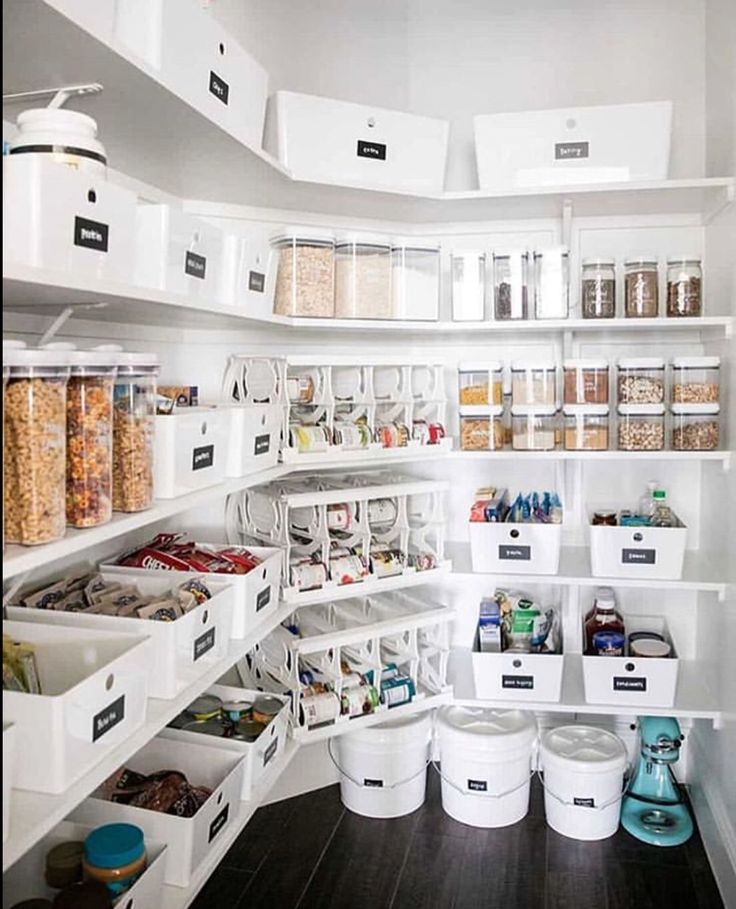
Kitchen Organization Ideas: Frequently Asked Questions
I also know that this post was nowhere near exhaustive, so please let me know your favorite kitchen organization ideas in the comments below!
Thank you so much for following along! Have a great day!
This post contains affiliate links. For more information, see my disclosures here.
51 Best Kitchen Organization Ideas
Aaron Colussi / Thomas Loof for Country Living
When you're the chef of the house, the kitchen can become cluttered and overwhelming, especially if you have a small space. If you're looking for smart and efficient ways to store your essentials, browse through our roundup of unique kitchen organization ideas. We're sharing clever ways to make use of your cooking area, including a few DIYs and useful installations.
From finding the best racks to store your spices and ingredients to the best drawers and countertop ideas to corral utensils, our list will help you tackle everyday cooking items and appliances you can never find a place for.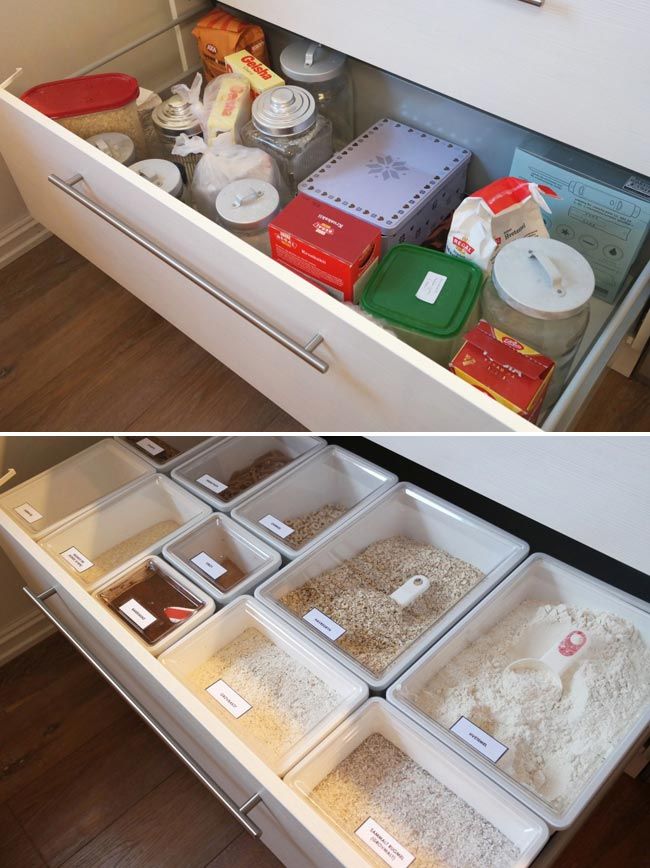 And as an organization tip, Nicole Papantoniou, Director of Good Housekeeping's Kitchen Appliances & Culinary Innovation Lab, suggests grouping items together to make them easier to find and store. "The most accessible things should be the things you use most often," she says. "Use high cabinets and hard-to-reach places for things you rarely use." For instance, if you're not a huge baker, keep those baking essentials above your fridge.
Ready to get organized? Say goodbye to the messy drawers and pantries (check out our best kitchen cabinet drawer organizers and clever pantry organizing tips for more ideas) and say hello to the clean, sleek and glamorous kitchen you designed when your family first moved in.
Watchtower Interiors
1 of 51
Ditch Countertop Produce Bowls
Pack a deep drawer full of removable bins (like in this custom cabinet from Watchtower Interiors). If you use them to sort produce that doesn't need to be refrigerated, you'll never lose precious counter space to a fruit or veggie bowl again.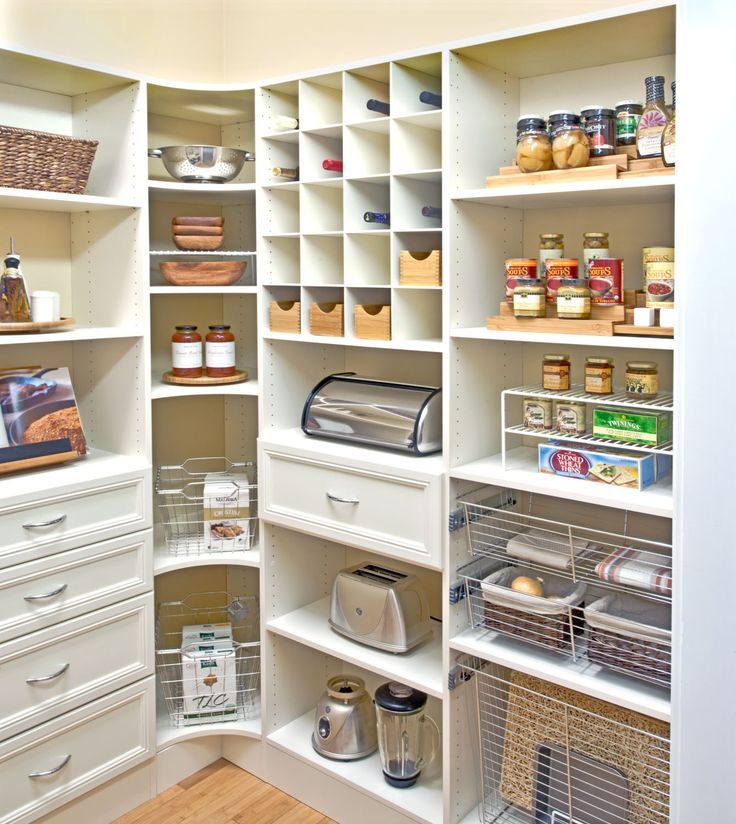
Settled
2 of 51
Add Bins to Your Bottom Drawers
Reserve your bottom kitchen drawers for jars and cans. Use 16"-deep bins to keep them organized and label each bin so you know where to find what you need quickly.
SHOP DRAWER BINS
Bakes & Kropp Photography
3 of 51
Store Pots and Pans in Sliding Shelves
If you can't fit your pots and pans into your square cabinet, consider installing a corner pullout cabinet system. It'll easily open and close, while making those pots accessible.
Bakes & Kropp Photography
4 of 51
Install a Pullout Pantry
Pullout cabinets are sneaky ways to keep your kitchen organized. They allow you to grab items from both sides, plus it gives you easy access to what's hidden in the back.
Diamond Cabinets
5 of 51
Or Try a Tall Pull-Out Pantry Drawer
Keep unsightly — but frequently used — cans, bottles, and other staples within reach with this sleek pull-out pantry setup from Diamond Cabinets.
Eric Piasecki
6 of 51
Design a Bar Area
If you're a wine lover, add slide-in trays to your cabinets to store your drinks. You can also use drawer dividers.
SHOP DRAWER DIVIDERS
Art Streiber
7 of 51
Add Pot Racks to Your Walls or Inside Your Pantry
Pot racks are great for hanging pots and pans that can't fit in your drawers or oven. Use racks to hang them in an empty space on your wall or inside your pantry, where they'll be hidden yet secure for grabbing.
Lauren Pressey
8 of 51
Add Corner Shelves in a Small Kitchen
Fill that empty corner with functional accents. Designer Kate Lester upgraded this kitchen with reclaimed barn wood shelves — perfect for a farmhouse flair.
SHOP CORNER SHELVES
Jason Hartog
9 of 51
Utilize Your Island's Storage
Your kitchen island can be a great place to store most essentials — at least the heavier ones. Purchase an island with hidden cabinets on both sides to place your pots, pans, linens and single-use items.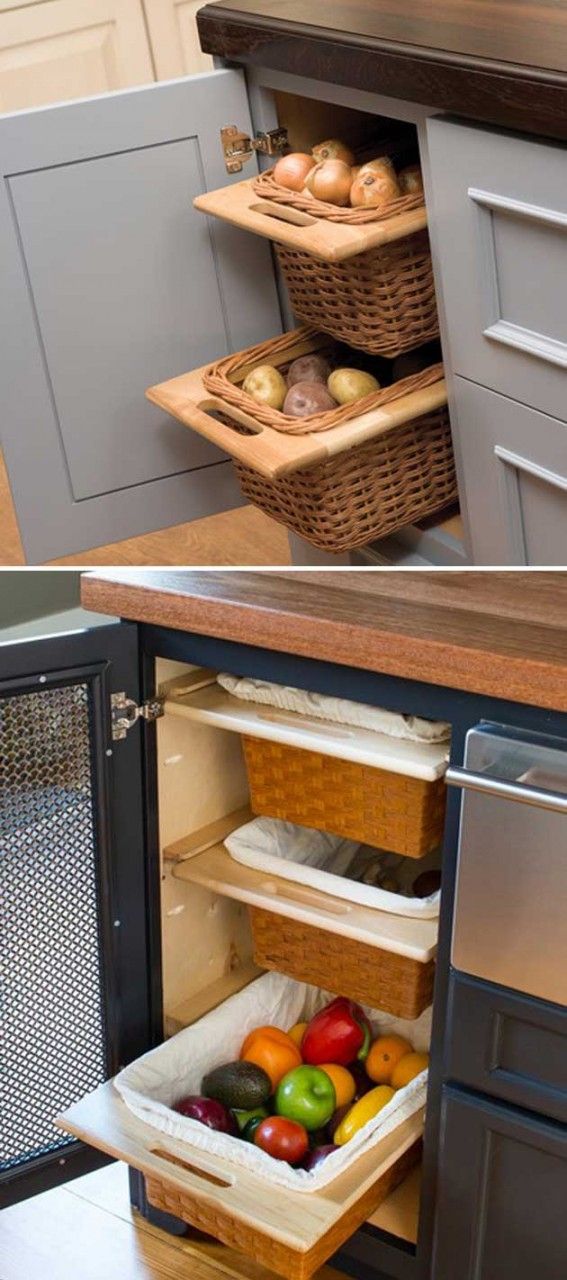
Amy Bartlam. Design: Jenn Feldman Designs
10 of 51
Create a Slide-Out Prep Station
Here's a clever solution for a kitchen short on counter space: Build a butcher block board into a drawer like designer Jenn Feldman did here. With a hole right over the trash can, it's easy to dump peels and pits as you go, using a scrapper-chopper.
Diamond Cabinets
11 of 51
Add a Paper Towel Cabinet Inside Your Trash Bin Drawer
What makes this trash and recycling bin drawer from Diamond Cabinets stand out from all the rest: the built-in paper towel rod above it. Cleaning up kitchen messes has never been easier.
Margaret Rajic
12 of 51
Design a Beverage Nook
Similar to this look by designer Kate Marker, you can upgrade your kitchen with a pantry cabinet that's functional and eye-catching. This one includes a beautiful counter workspace that's brilliant for prepping your morning coffee and storing your mugs and cups.
Decora Cabinetry
13 of 51
Put a K-Cup Organizer in Your Drawer
Searching through the cabinet for your favorite coffee before you're caffeinated can feel, well .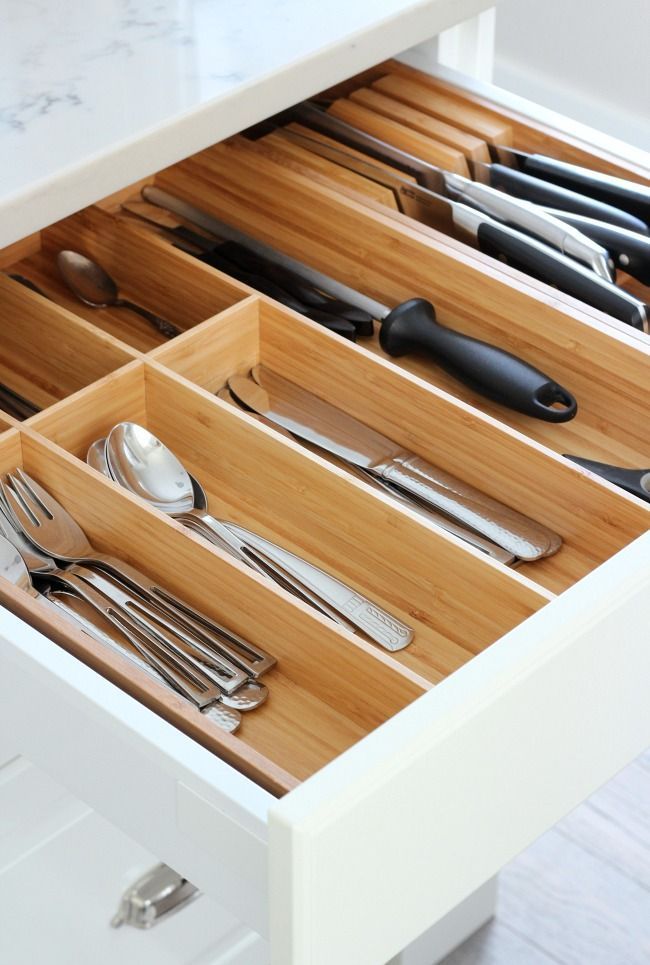 .. exhausting. This custom K-Cup drawer from Decora Cabinetry lets you store all of your options (up to 40 at any given time, in fact) face-up for easy early-morning locating.
Rev-A-Shelf
14 of 51
Install a Charging Drawer
This sleek drawer idea is the secret to banishing unsightly cord clutter. Planning a reno? Talk to your contractor. You could also DIY it by installing a surge protector in an existing drawer or pick up this fully loaded version from Rev-A-Shelf.
SHOP CHARGING DRAWERS
ShelfGenie
15 of 51
Try a Tray Organizing Drawer
Serving trays, baking sheets, and other large tins can be a pain to store in often-unaccommodating cabinets. Swap your usual stack of pans for this tray-friendly drawer from ShelfGenie to keep them upright and easy to locate.
Eric Lawler
16 of 51
Design a Wine and Drinks Section
An ordinary closet in your kitchen can become the ultimate drinks station, where you store your favorites and separate them by type.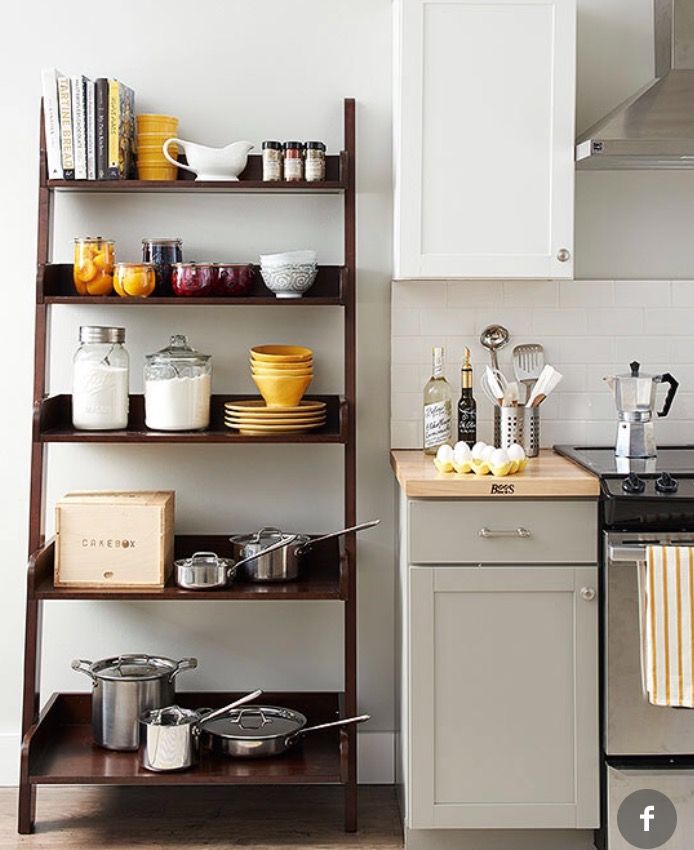 Installing motion-sensor lights is another great addition.
Rev-a-Shelf
17 of 51
Add a Food Storage Container Drawer Organizer
Fact: The Tupperware cabinet is the hardest part of a kitchen to keep orderly. But that's where this genius drawer organizer comes in — it has a spot for every last one of your food storage containers and their matching lids.
SHOP DRAWER ORGANIZERS
Mike Garten
18 of 51
Designate a Drawer for Dishes
Keep your dishes protected and in place with adjustable plate holders, perfect for deeper drawers. Opt for holders with carrying handles, so you can lift them out of the drawer when it's time to set the table.
SHOP DISH HOLDERS
Victoria Pearson
19 of 51
Or Try a Peg Drawer Organizer
Or you can try a built-in quick-to-assemble peg system allows you to move your plates from high-up cabinets to deep, down-low drawers. (The best part: They'll be easier to pull out and put away.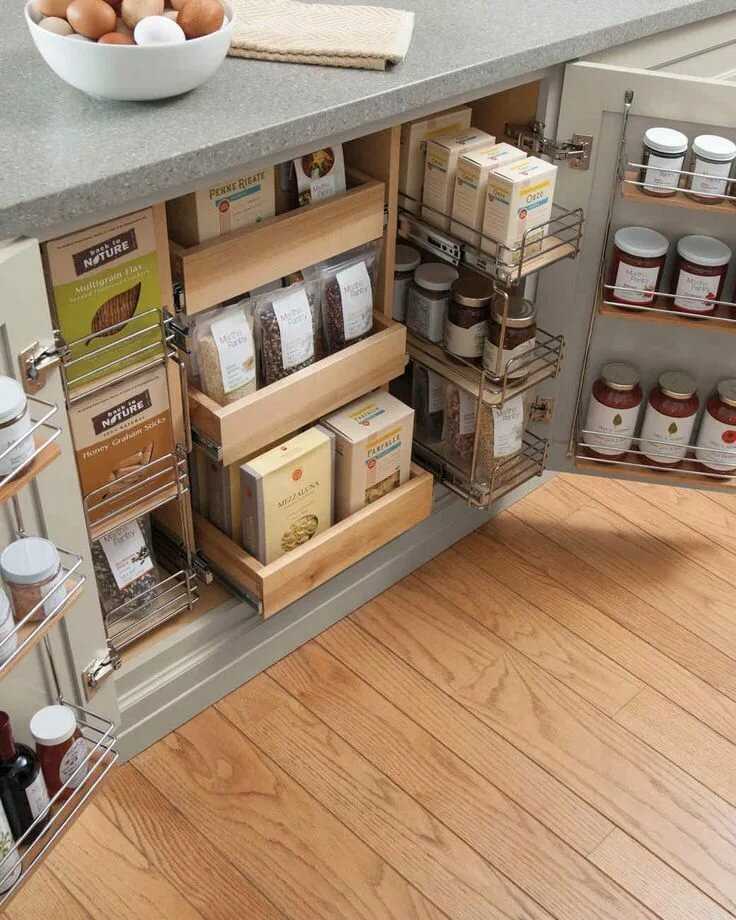 )
)
SHOP PEG SYSTEMS
Danielle Occhiogrosso
20 of 51
Attach a Spice Rack to Your Walls
Keep your condiments away from your counter space with a spice rack. Attach the rack to one part of your kitchen wall or use a hanging rack on your pantry's door.
SHOP SPICE RACK
ShelfGenie
21 of 51
Or Add a Spice Drawer Organizer
Tired of digging around the back of your spice cabinet until you finally find the cumin? This genius drawer from ShelfGenie puts your full collection on display.
Mike Garten
22 of 51
Install Bracketed Shelves
If there's an open space you haven't yet designed, install bracketed shelves for a practical look. They're not as bulky as cabinets and they'll make great storage for your colorful and cute glassware.
Dr. Organizer
23 of 51
Install a Pull-Out Pots and Pans Drawer Organizer
If you've ever tried to pull a pan out of a big, heavy pile just to be met with a cookware avalanche, you're not alone. Avoid the crashing and clattering with this pull-out organizer, where you can hang up to 100 pounds worth of pots and pans on adjustable hooks.
SHOP PULL-OUT ORGANIZER
Erika LaPresto
24 of 51
Create a Command Station
Stick chalkboard contact paper and adhesive pockets to the inside of one of your cabinets, so that everyone in your household knows where to look to find the grocery list, coupons, recipes and WiFi password. Add a plastic pouch to store coupons and receipts!
SHOP CHALKBOARD CONTACT PAPER
Smart Design
25 of 51
Add a Refrigerator Egg Drawer
Easily organize fresh eggs with this refrigerator-ready drawer. (Worth noting: This organizer comes fully assembled, so all you have to do is clip it on to one of your fridge's shelves.)
SHOP EGG DRAWER
Lucy Call
26 of 51
Mount a Double-Duty Shelf
Here, one shelf gives you two smart ways to store your kitchen essentials: Stick seasonal platters and pretty dishes on the top shelf for all to see, and hang cutting boards and oven mitts on the lower hooks.
Aaron Colussi
27 of 51
Arrange Baskets High and Low
Trevor Tondro
28 of 51
Make the Most of Your Drawers
Find ways to make your drawers work for you. Carve out spaces to hold your most-used utensils, baking supplies and spices. In this case, an ice cream-obsessed family dedicated an entire drawer to their sundae-making essentials.
Thomas Loof for Country Living
29 of 51
Fill up Clear Canisters
When done right, your pantry staples can make an eye-catching display. Transfer all of your nuts, cereals, pastas and baking ingredients into glass jars, marking each and every one with a custom chalkboard label.
Mike Garten
30 of 51
Add a Built-in Storage Block
Build a knife block into a narrow drawer to keep your knives sharp and secure — and your hands safe.
Kitchen storage: 15 life hacks
The kitchen is a place where many things are stored, from food to dishes and household items.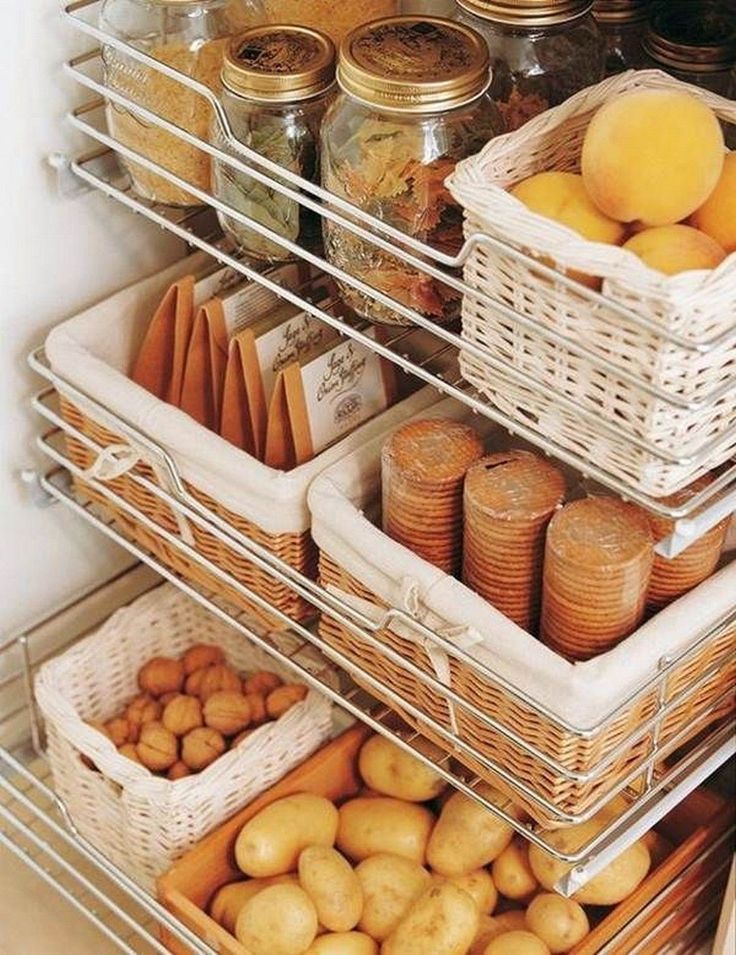 Therefore, the order and functionality of this space play an important role, regardless of its size. We tell you how to make the kitchen cozy and comfortable
Photo: Shutterstock
You open the kitchen cabinet, and a colander and baking bags fall out from there, looking for spices for frying - you find vanillin, and again there is nowhere to put a ladle and pot lids. Familiar? To minimize stress during the cooking process, the kitchen space must be organized so that it is pleasant and comfortable to be in it. nine0003
- 15 kitchen storage tips
- Spice storage
- Vegetable storage
- Storing pans and pots
First of all, you need to identify areas that require revision: overflowing spice racks, cluttered drawers and cabinets, a clogged refrigerator, etc.
adv.rbc.ru
Photo: Pexels
Then it is worth identifying the areas that require the most prompt intervention - usually these are places to store essentials (pots and pans, a dish dryer, bulk products, etc.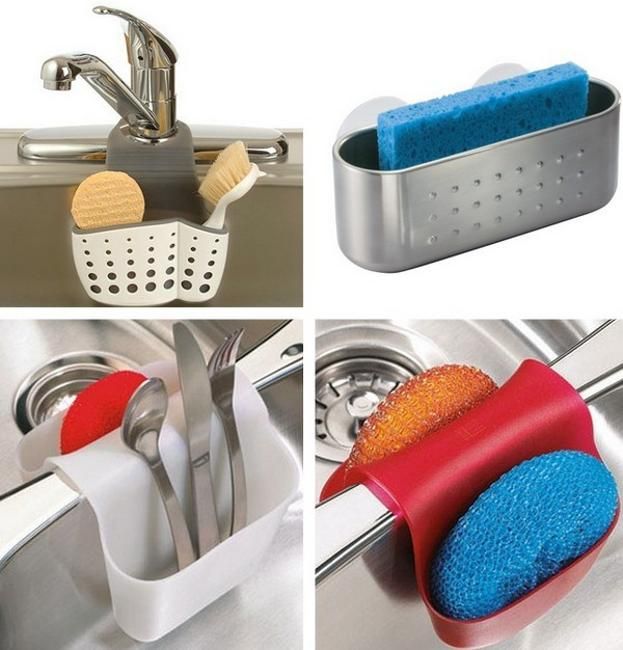 ). Thanks to small steps and a clear understanding of what you want to see in the end, you can save time and effort. After each new decision, it is worth stopping and evaluating - perhaps the bar for kitchen comfort has already been reached and you can just enjoy the cozy and comfortable space or add finishing touches. nine0003
7 tips for organizing a small kitchen
Storage, cooking and social gatherings are often not enough. Alas, not every apartment has the opportunity to re-equip the kitchen, expand the space or organize a separate pantry for food. But even with these inputs, there are ways to deal with kitchen chaos.
15 kitchen storage tips
1. Organize your work area
All items that are used daily for cooking and table setting should be placed within easy reach so as not to waste time looking for them. Then it is worth evaluating the workplace, ideally it should be between the stove and the sink, so it is more convenient to quickly remove dirty dishes from the working area and quickly add ingredients to dishes cooked on the stove.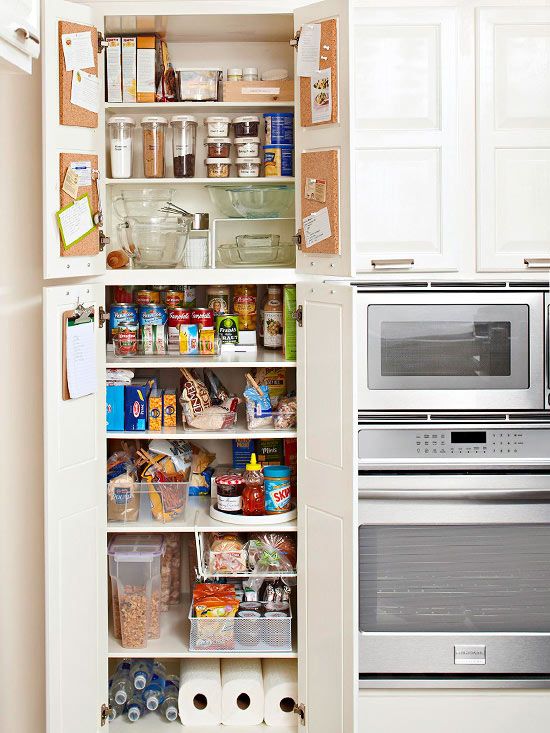 nine0003
Photo: Pixabay
The optimal length of the countertop is 80–90 cm. It is also better to place the refrigerator nearby so that you do not have to move around the kitchen while cooking and waste time.
2. Use the space under the ceiling
If the space between the ceiling and the kitchen cabinet is empty, it can be used for storage. It is better to place rarely used or decorative items there.
Photo: Pixabay
These can be, for example, serving plates that only come to the table on holidays, bottles of alcohol that do not require refrigeration, a supply of oven mitts or other cooking utensils. If you want visual uniformity, you can buy wicker storage baskets that are the right size. nine0003
3. Install rails
Rails can be used to save space. This accessory is great for storing a variety of items - from spices in special jars to ladles, potholders, mugs, pans.
Photo: Pixabay
4.
 Place shelves with hooks
 When choosing new furniture for the kitchen, you should pay attention to its functionality. For example, on a horizontal surface of a shelf with hooks, you can put frequently used dishes so that they are always at hand. You can also use this surface for decorative purposes: to place bright dishes, vases, etc. The hooks under it are suitable for cutting boards, potholders, ladles, kitchen scissors. nine0003
Photo: Shutterstock
5. Hang Magnetic Knife Holder
Countertop space is an important part of a comfortable cooking experience and should be as free as possible. One way to tidy up is to hang a magnetic holder for knives, kitchen scissors, and other cutlery above your countertop.
Photo: Shutterstock
6. Buy containers
Plastic containers are a great way to store both food and kitchen utensils. They can be placed in the refrigerator and signed to know exactly where everything is, as well as placed in kitchen drawers and cabinets and store spices, rarely used utensils, bulk products, and household items there.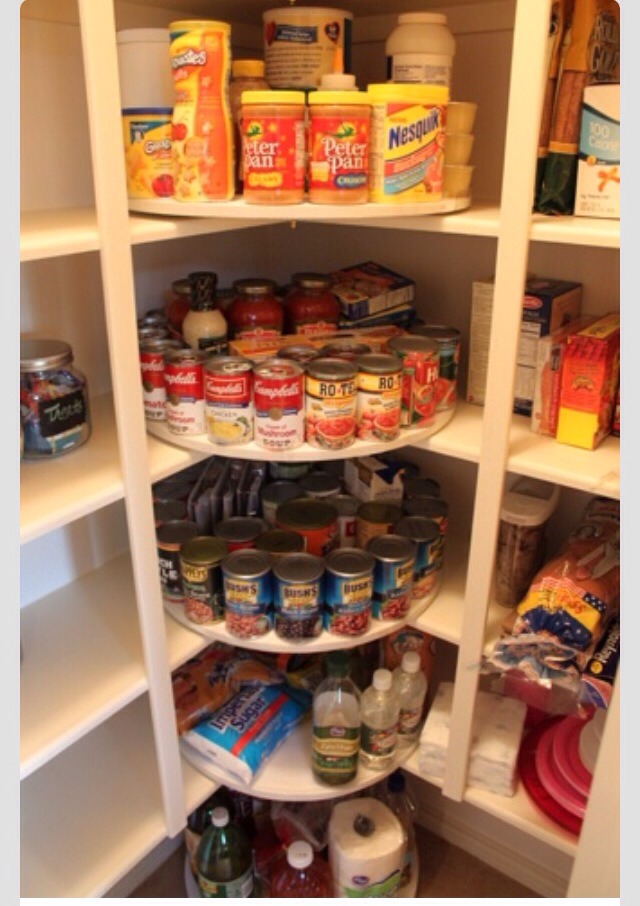 nine0003
Photo: Unsplash
7. Use the space under the sink
The space under the sink can be used for more than just a trash can. There is a small bookcase for storing household items: sponges, gloves, garbage bags. You can even hang hooks for towels and oven mitts or small hanging shelves for detergents on the cabinet door. Another option is vertical drawers.
Photo: Shutterstock
8. Use organizer
Organizers are a convenient storage solution for things that are always needed at hand. Transparent drawers, with which it is easy to organize space in the refrigerator, will save space, and rubber holders can be hung on the sink, placing a dish sponge and detergent in them.
9. Store bulk food in containers
Grains, pasta, breakfast cereals and other bulk products are best stored in containers of the same type with labels on the contents. Such jars / boxes can be used not only as a place of storage, but also as an element of decor.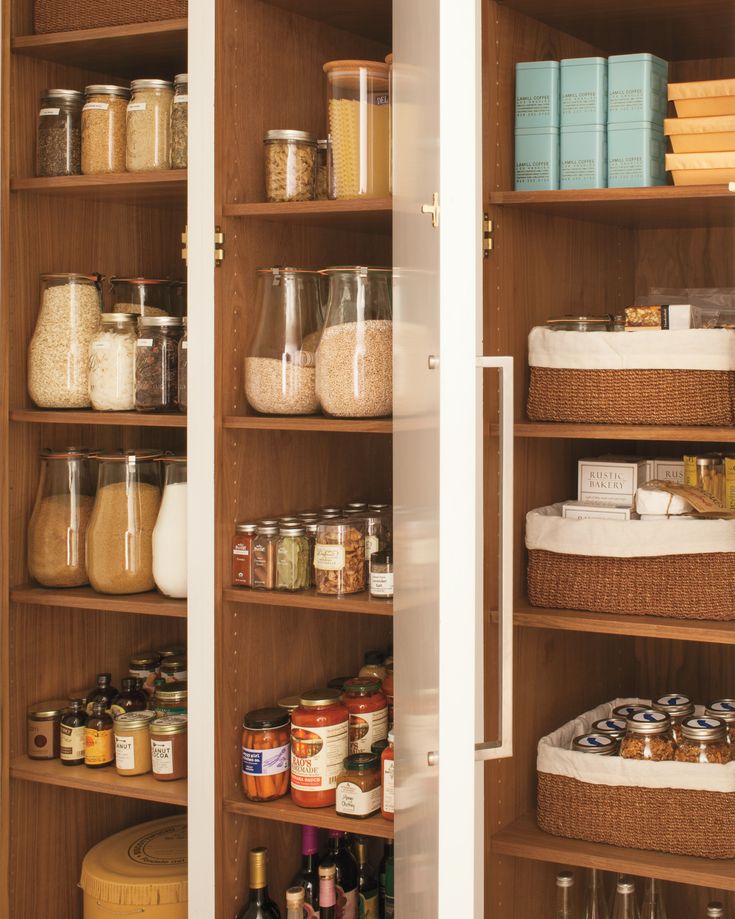 nine0003
Photo: Pexels
10. Hang a shelf above the table
This way you can solve the problem with items that clutter up the table, but are only needed at meals - napkins, spices, a sugar bowl. Cups can be hung on hooks under the shelf so that they can be reached without getting up from the table.
Photo: Unsplash
11. Use the side walls of hanging furniture
On the sides of kitchen cabinets, it makes sense to place small shelves for spices, sauces and dressings that do not require storage in the refrigerator. On such shelves you can store textiles, potholders and other kitchen utensils. nine0003
12. Use drawers
Instead of a decorative panel, a drawer can be built into the bottom of kitchen cabinets. This is a convenient way to store pans, baking sheets, cutting boards, or other items that fit.
Photo: Shutterstock
13. Install Insert Shelves
Kitchen cabinets can be fitted with custom built-in shelves to help you make the most of space, organize items by type, and save time looking for what you need.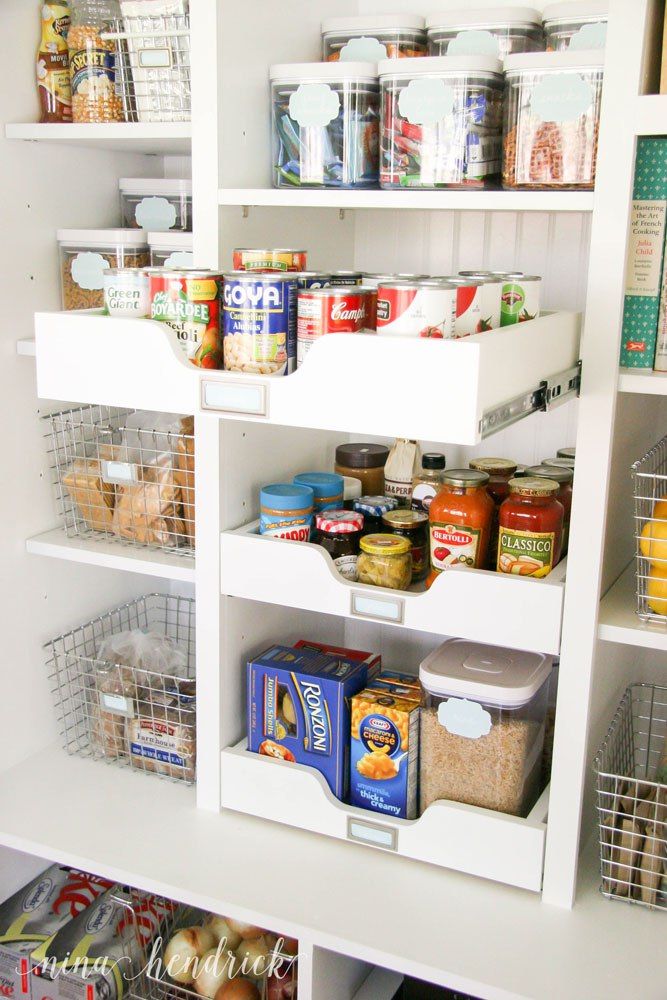 nine0003
14. Don't Forget the Top of the Refrigerator
If the ceiling and height of the refrigerator allow, the top surface can be used to store refills, rarely used crockery, kitchen utensils, canned food and other non-perishable foods.
Photo: Pexels
15. Buy a cutting board basket
A low-sided, moisture-resistant basket is perfect for cutting boards. So they will be in one place, they will not interfere during cooking and fall into the sink. nine0003
10 unusual gadgets for the kitchen
Storage of spices
Spices are best stored in a cool dry place: they lose their properties from humidity and high temperature. It is worth considering a place to store them away from the stove and heating, but not next to the sink.
Photo: Shutterstock
If the spices are stored in retail packaging, all of them can be placed in a container and placed in a kitchen cabinet.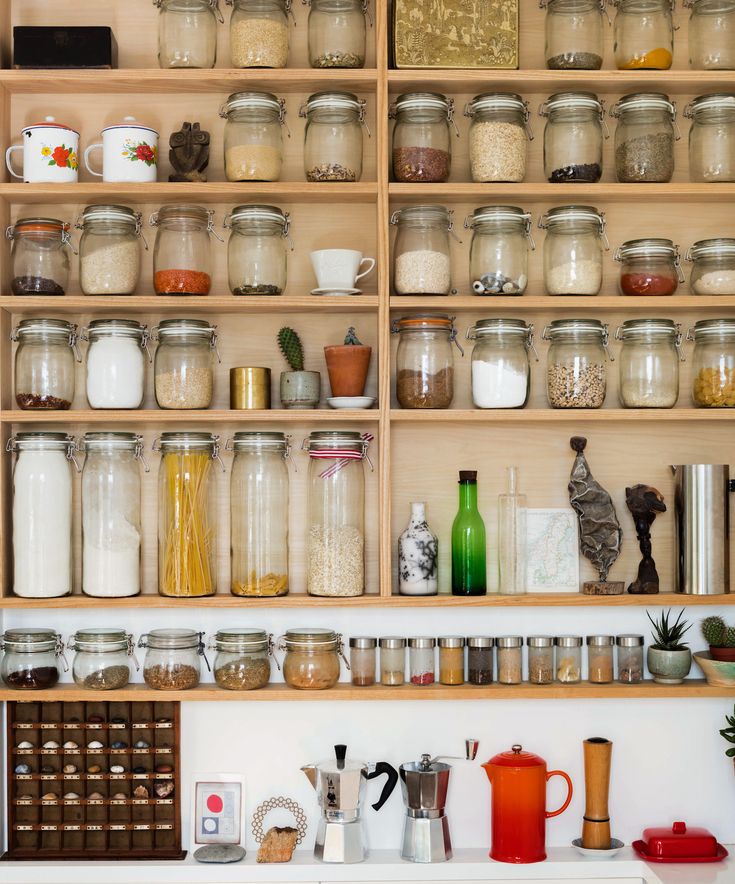 It is convenient to rank them according to the frequency of use and put those that are not needed all the time on the top shelves. nine0003
Jars of spices can be placed on hanging shelves on cupboard doors, hung on rails or placed in drawers.
Storing vegetables
The place where vegetables should be stored depends on their type. Potatoes, onions, garlic, avocados, tomatoes do not like the cold. Therefore, they can be placed in wicker baskets, drawers, plastic or metal containers. Such containers can also be used as kitchen decor if they are matched to the overall color scheme. nine0003
Photo: Pexels
Vegetables that require refrigeration can be placed in special compartments. There are also separate refrigerators for storing vegetables with a large number of drawers.
12 Foods You Shouldn't Really Keep in the Refrigerator
Storing Pans and Pots
Pans and pots can be placed on special hanging structures.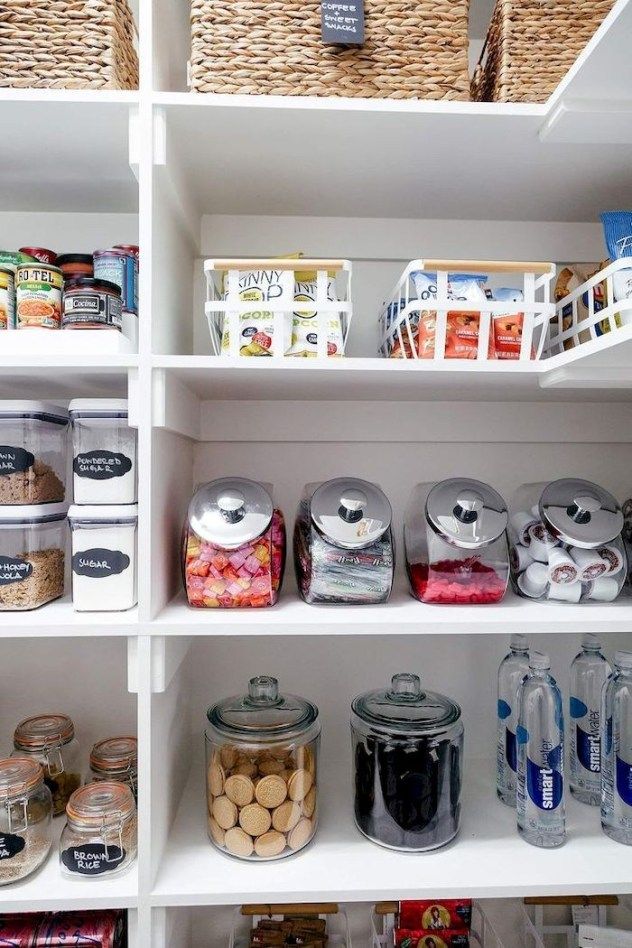 Such a solution will not only become a bright accent in the interior, but will also significantly reduce the time it takes to find the necessary things. You can also use open shelves or rails for small pans. nine0003
Photo: Pexels
If you don't want to focus on dishes, you can use cabinets or an oven for storage. For flat frying pans and small pots, pull-out side and plinth drawers are suitable. To save space in kitchen cabinets, special organizers for pans and pots will help.
11 Fresh Ideas - INMYROOM
Tips
To keep your kitchen neat and functional, you need to use all available space wisely. Today we talk about new solutions for organizing storage
In the kitchen there are always a lot of little things, accessories and kitchen utensils that are sometimes difficult to organize. We tell you how to organize storage systems and simplify life with the help of simple tricks.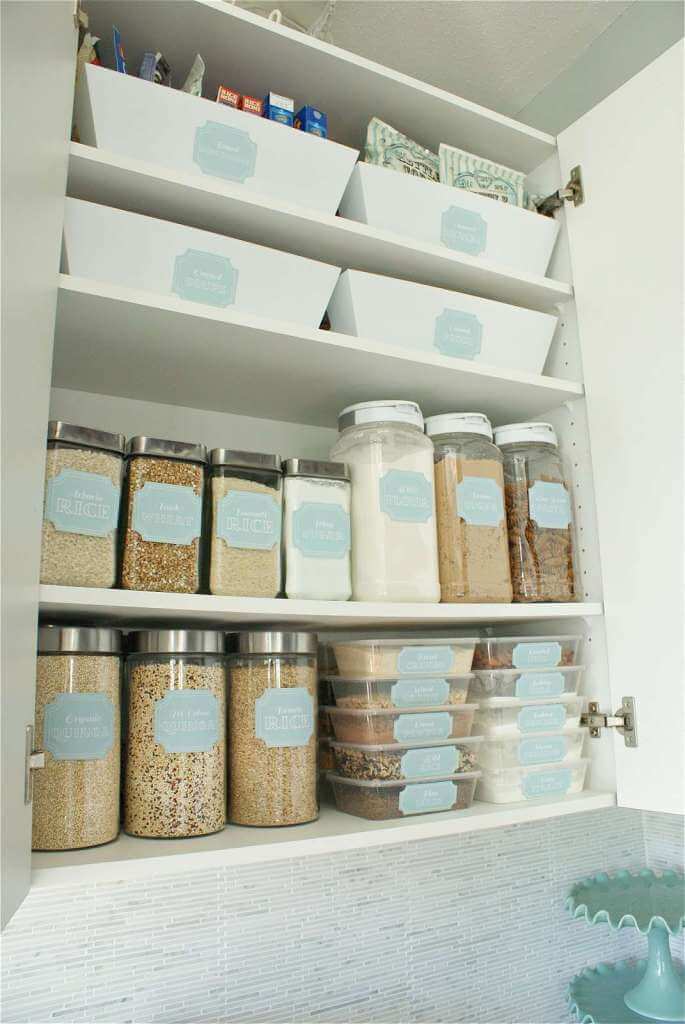
Roof rails for smaller items
The functionality of your kitchen can easily be extended with railings. For them, manufacturers produce many modules, hooks, special jars for spices and much more. If you want something more original - instead of metal planks, fix a branch on the wall. nine0003
Corner cabinets - special shelves
If you have a corner kitchen, then you probably already realized that the space in the corner itself is quite difficult to use. Special retractable racks and corner boxes of a special design will help to solve this problem.
Dividers are indispensable
Drawers can be made more convenient if you create perfect order in them and systematize all kitchen utensils. Use separators and special inserts. nine0003
The hidden potential of bottlenecks
Even the tiniest space between walls or cabinets can be put to good use by installing a narrow rack with dividers and shelves.
Shelves - not necessarily wide
Narrow shelves are ideal for storing spices and oil bottles. To prevent items on the shelves from creating visual noise and clutter, use the same containers. One of the best options is glass jars and bottles of the same size. nine0003
Need interior fittings
Add hanging baskets, glass racks and other functional items you can find at a kitchen supply store or IKEA for extra cabinet space.
Fronts - for extra storage
Hooks and fasteners on cabinet doors, containers and mini-poles - remember that every inch of space can be put to good use. Not only to increase storage space, but also to have convenient access to the right things. nine0003
Storage can be decorative
Dishes can be stored not only in closed cupboards, but also on narrow open shelves. In addition to the practical side, it is also beautiful.
Magnets - for spice storage
Due to the lightness of spice jars, magnetic surfaces can be used to store them. For example, they can be hung on the wall of the refrigerator or a special board inside the cabinet.