Raised garden beds layers
How To Fill Raised Garden Beds With Soil And Save Money – Vego Garden
Once you have assembled your Vego organic gardening raised beds, the next task is filling the raised garden beds before planting. One of the most common questions we get from new gardeners is how to fill a new raised bed and still save money. There are many different methods out there that work well! From our experience, the Hugelkultur method is the easiest and most cost-efficient method to use.
SummaryHugelkultur is the process of layering organic garden waste inside the raised garden bed, before adding soil to save on costs, in addition to attracting and preserving moisture. Of German origin, hugelkultur translates to “mound or hill culture.” It is especially applicable in areas where soil retention and drainage are poor, which is typical of soils found in urban areas.
The materials used include large rotting logs, sticks and other debris that are layered with grass clippings, coffee grounds, compost, and other organic matter. As the material breaks down, it creates a flourishing environment for beneficial fungi and microbes that mimics the natural landscape of a forest. There are many advantages to the Hugelkultur method, including soil quality improvement, minimal maintenance, and water retention.
To create a bountiful garden bed, organic matter such as rotted hay, plant waste, and compost is added to the soil. Wood debris decomposes slowly, making it a stable source of organic matter. The optimal kind of wood used is one that is starting to rot, which can be obtained from branches cut from a dead tree or logs from an abandoned wood pile. This organic matter will decompose over time, and plant roots will travel deeper into the raised garden bed soil to obtain the nutrition. It will also work as a big sponge, retaining water to maintain an ideal moisture level.
In the Hugelkultur method, for filling a raised garden bed, the large pieces are laid at the bottom as they will take the longest time to decompose.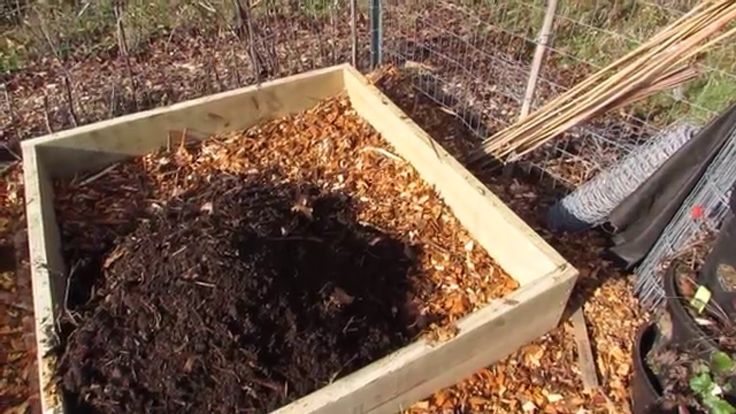 In the picture above, the piling logs may take up to 5 years before the base sponge breaks down into rich, wonderful raised garden bed soil. The smaller pieces are placed on top of the larger pieces to fill space, such as branches and sticks, and then grass clippings, leaves and kitchen scraps. Compost and topsoil are on the top two layers for your raised garden bed so you can start planting as the organic matter beneath decomposes.
Some Considerations While Filling a Raised Garden Bed Using Hugelkultur Method
- Pests: Something to be aware of are termites, especially if you live in a wooded area with a high termite distribution, which can be attracted to the large amount of buried wood. However, most termites tend to live in dead trees that are still standing, rather than buried logs found in hugel beds. Garlic can be grown for pest control. Make sure to be vigilant against pests such as slugs, snails, and pill bugs. You can use organic pest control such as beer traps if slugs become a problem.
- Various Hugelkultur Methods: The classic method requires you to dig a deep trench around 2 meters and fill it with large logs, adding progressively more logs until it becomes mound-shaped. Most gardeners dig a shallower trench that is about 1 meter. Vego raised garden beds provide a convenient alternative that only requires you to fill the container on the ground with the appropriate contents. They provide structural integrity through an enclosed terrain that is easy to manage and will last for many years, making it the perfect framework. That way, you don’t have to spend time digging a trench or placing a fence around it, which can be burdensome and labor intensive. Additionally, it is more aesthetically pleasing than just a mound on the ground, which is unsightly to some.
- Wood Type: The right type of wood is important to consider. Hardwoods are recommended as they break down more slowly and hold water longer. However, softwoods are also acceptable.
 The woods that work best include birch, alder, maple, cottonwood, willow and oak. Avoid allelopathic trees like black walnut, red oak, and sycamore, as they contain chemicals that inhibit plant growth, as well as rot resistant trees like black cherry and black locust.
 - Preparation: Be sure to add a fresh layer of compost on top prior to planting. The combined layers of organic material above the wood should be as deep as the wood base. This means a 30" bed can have up to 15" wood in it, while a 15" bed will have 6" wood to allow enough space for the growing medium.
- Moisture Levels: Maintaining moisture is an important aspect of hugel garden beds, as dryness is a commonly reported issue. Therefore, it is important to shift the soil into crevices to eliminate any dry pockets. One way to accomplish this is to continuously water the bed during construction to make sure there are no gaps. You should also use a good quality organic mix soil, which improves water retention.

Using the Hugelkultur method for filling raised garden beds has many advantages and has been proven to work. If you are seeking to cut down on costs, or looking for a sustainable gardening technique, then this method is for you. The vertical nature of the mound helps maximize surface area, which is useful in compacted, urban areas. Therefore, it is a method that is suitable for farmers, gardeners, and homeowners.
- Cost Efficient: Buying bags of soil from a store is quite costly, which can amount to over a hundred dollars for large garden beds. The Hugelkultur method turns garden and kitchen waste into useful material for filling raised garden beds, allowing you to save a substantial amount of money. You can also repurpose fallen tree branches or dead branches cut from trees instead of carting them away or burning them. The organic waste will decompose over the years, enriching the soil and providing steady nutrition for plants to use.
- Environmentally Friendly: When branches are burned, gasses and nutrients are released into the atmosphere, which contributes to global warming. By retaining them in the ground, they undergo carbon sequestration, a process that reverses CO2 pollution and mitigates climate change.
- Water Retention: Hugelkultur tends to hold water very well since the garden waste works as a sponge to hold moisture, releasing rainwater into the soil during dry seasons. This allows gardeners to save on water costs by reducing the frequency of watering. In addition, you don’t have to worry about overwatering your plants to the point they become waterlogged, which is detrimental to root growth and can choke out oxygen.
- Soil Temperature: While compost is decomposed by bacteria, hugel beds are primarily decomposed by fungi. As the organic matters decompose, they will heat up and create a microclimate under the plants, and warm the raised garden bed soil, which can be very helpful in colder climates.
- Soil Improvement: Hugelkultur also creates a mini biosphere consisting of microorganisms, fungi, and insects, emulating the natural landscape of a forest, with its spongy, nutrient rich soil teeming with microorganisms. Because the soil is naturally aerated, it employs a gardening technique known as no-till gardening. Plants grown in this manner are more resilient to disease, pests, and environmental stressors. They are also more flavorful due to the abundant nutrients.
- Minimal Maintenance: Although the initial setup takes some effort and preparation, there is not a lot of maintenance involved in these garden beds once they have been constructed. You only need to minimally maintain the garden bed by occasionally adding a couple inches of compost and fertilizers to the top to replenish it. They also require minimal weeding compared to conventional beds.
Below is diagram for Hugelkultur in our Extra Tall 32" Raised Garden beds. You can use the same concept to fill your 17" tall garden beds or any other beds.
You can build the garden in a sunny or shady location. Hugel beds are very versatile and can support many types of plants, including vegetables, herbs, and fruits. Make sure to match the plant to the appropriate growing conditions. Vegetables grow best when exposed to full sun. Greens like lettuce and spinach and root crops like carrots and beets will tolerate partial shade. You should try to plant a wide variety of crops, including both perennial and annual plants, as diversity offers more opportunities to harvest and results in a more plentiful yield.
It is important to note that root vegetables such as carrots may have difficulty growing in Hugelkultur beds due to the depth requirement of at least a foot of soil. Tubers like potatoes can also disrupt the structure. For more detailed information, consult plant tags and garden catalogues for the climate requirements of other plants you plan to grow in your Hugelkultur garden.
About Vego
At Vego Garden, our goal is to redefine Raised Garden Beds. The company was founded with the goal of launching a modular metal garden bed system with a 20+ year life expectancy, utilizing eco- friendly metal materials instead of cutting down trees. We emphasize innovative design and high quality with our products. The name vego carries the spirit of DIY modular raised beds suitable for growing vegetables.
Read More >>
Featured Posts
12 Gardening Resolutions to Stick To in 2023
December 31, 2022
Lessons We've Learned in 2022
December 26, 2022
Get A $15 OFF + Free Shipping*
Be the first to know about our discounts, and get $15 off your next order of $199 + free shipping
Please enable JavaScript to view the comments powered by Disqus.About Vego
At Vego Garden, our goal is to redefine Raised Garden Beds. The company was founded with the goal of launching a modular metal garden bed system with a 20+ year life expectancy, utilizing eco- friendly metal materials instead of cutting down trees.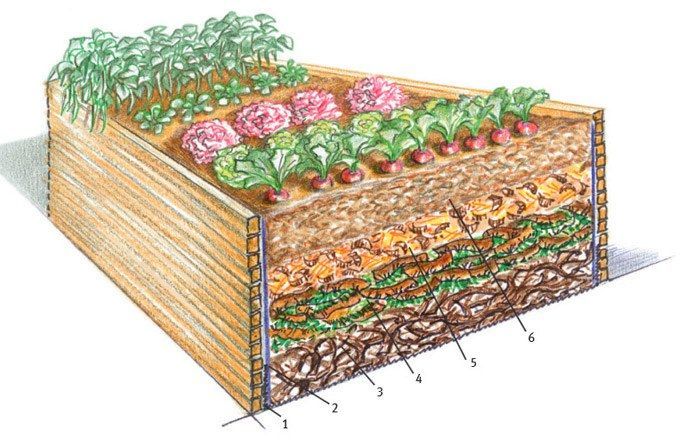 We emphasize innovative design and high quality with our products. The name vego carries the spirit of DIY modular raised beds suitable for growing vegetables.
Read More >>
Featured Posts
12 Gardening Resolutions to Stick To in 2023
December 31, 2022
Lessons We've Learned in 2022
December 26, 2022
Get A $15 OFF + Free Shipping*
Be the first to know about our discounts, and get $15 off your next order of $199 + free shipping
Back to Academy BlogsHow Deep Should A Raised Garden Bed Be? – Vego Garden
When deciding on a raised garden bed, one of the major factors is the depth requirements of the raised garden bed. If you’re placing your raised bed on a patio or a terrain where the soil underneath is not conducive to growth, then it is important to grow your plants within the parameters of the bed itself. A raised bed should be able to blend in well with its surroundings as well as adequately support the roots of your plants. The required soil depth depends on the types of plants grown, the soil conditions, and desired aesthetic. Other important considerations include the shape, size, and material chosen for the raised garden bed. Since there are a dazzling array of designs available worldwide, choosing one can be a tough decision to make.
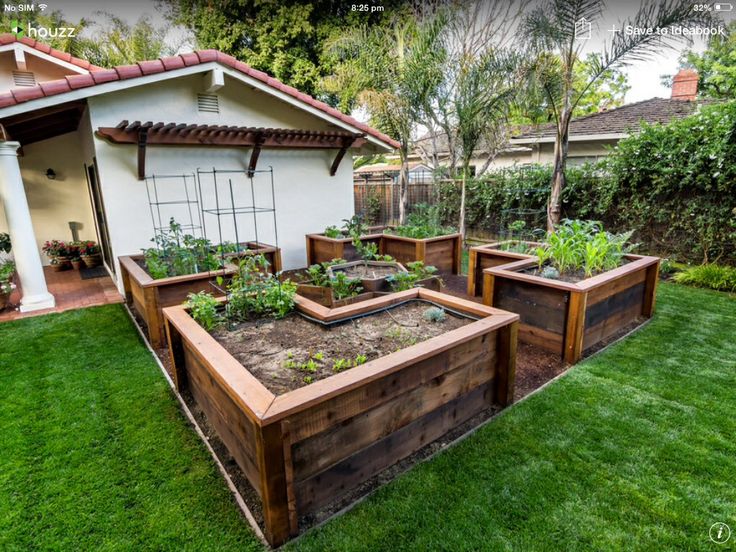
However, the large variety of patterns available guarantees that there is a match for every type of landscape, budget and style. A raised bed can either be informal or formal, depending on your preference and garden situation. We recommend displaying vegetable gardens in modern, industrial metal beds, which can prove to be an attractive focal point of your garden, and significantly brighten up dull spaces or outdoor dining areas. It is important to keep in mind that the size of the bed should be proportional to the space around it. If you have limited space, it is best to buy modular raised garden kits, which will allow you to customize your beds based on your available space.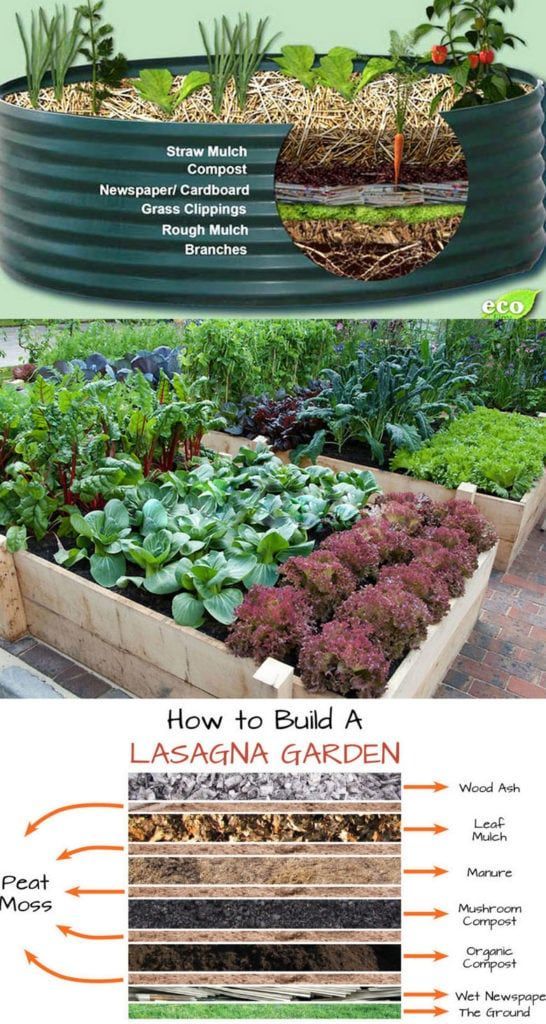 This article examines the soil depth requirements for various types of yards and plants.
Drainage: Whether it be an irregularly-shaped perennial border garden that sits behind a dry-stone wall, or a metal raised bed in a vegetable garden, one should always consider the depth of the raised bed carefully. A raised bed does not always require a significant depth for it to be effective. They should have at least 8 inches of soil depth to accommodate the root systems of plants, because the majority of plant roots require 6 – 8 inches of soil for healthy root growth. A depth of 8 – 12 inches will suffice for most gardening situations.
Because of the excellent drainage properties of raised beds, it is possible to grow an abundance of vegetables in a limited amount of space. In cases where drainage is an issue, or if the plants that you are planning to grow prefer an environment with drier soil, then the depth of your raised garden bed can be taller, which can then be filled up with a porous growing medium.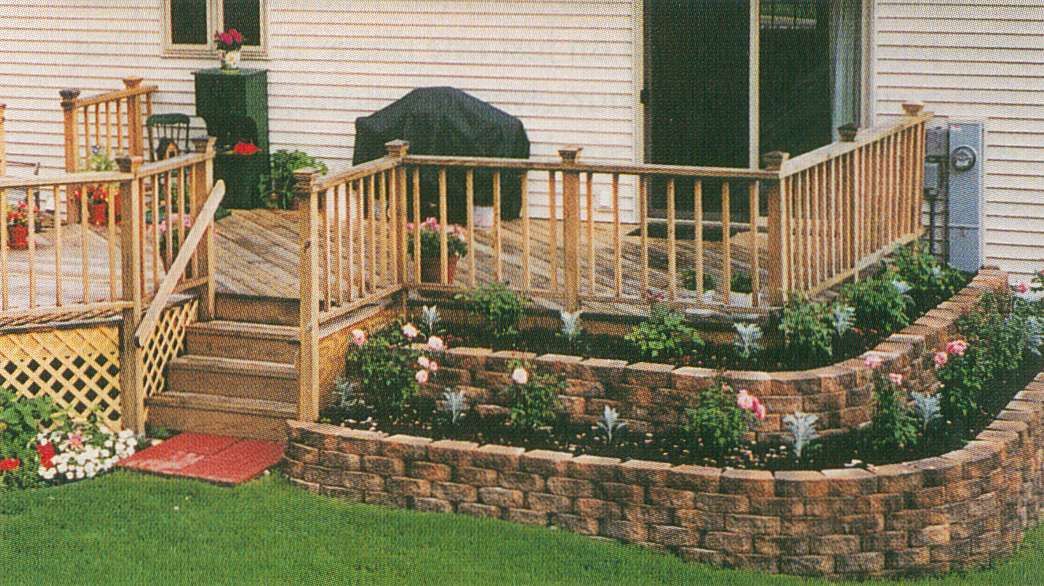
Material: The material you use for a particular raised bed should be durable, attractive and stable. It is important to consider the material of your garden bed, which determines how well it blends in with the landscape. The sides of the bed lend structural support to the and help contain the soil in a particular space. The sides of raised garden beds can be metal panels, wood, or brick and stone. While it is important to consider the depth of your raised garden beds when browsing for raised garden bed designs, it is also important to consider the material of your garden bed.
Traditional metal panels, while easy to install, can rust over time, diminishing its attractiveness and usefulness. Wood will rot in as little as one season. Stone and concrete blocks can be expensive to install. Also, many gardeners do not want the hassle of buying raw material and assembling them for a DIY raised garden bed project. We recommend Vego Garden beds for an easy solution. Vego raised garden beds are made of a specialized rust and corrosion resistant metal and lend a clean, modern aesthetic to your garden.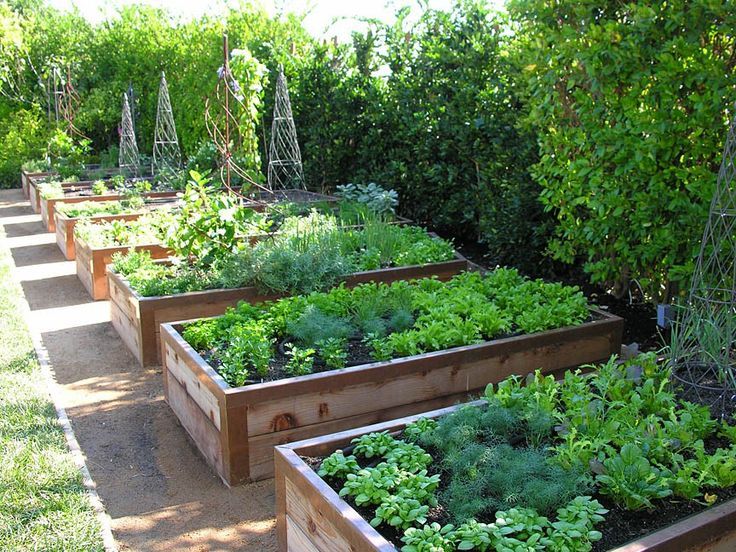 Our kits are easy to assemble, and complete with heavy duty rubber edging along the top to ensure a safe and fun experience.
Double Digging: Some gardeners choose to dig below the ground using their shovel to create more space for their roots, especially if they have a crowded or shallow garden bed. This process, known as double digging, can be time consuming and arduous. Vego Garden beds are tall enough that you don’t have to dig into the ground. You can simply place your raised bed anywhere in your yard after clearing the ground of debris.
Gardeners should slightly overfill their gardening beds, because the soil will compact over time with watering. As a tip, you should add an extra 2 inches of soil over your garden bed, and water the soil to see how much it compresses.
Vegetable Beds: On the other hand, when it comes to vegetable beds, the bed must be approximately 12 to 18 inches deep to ensure adequate depth for the roots of your plants. This is especially important if your raised bed is placed on cement or the patio, which will inhibit roots from growing deeper into the ground.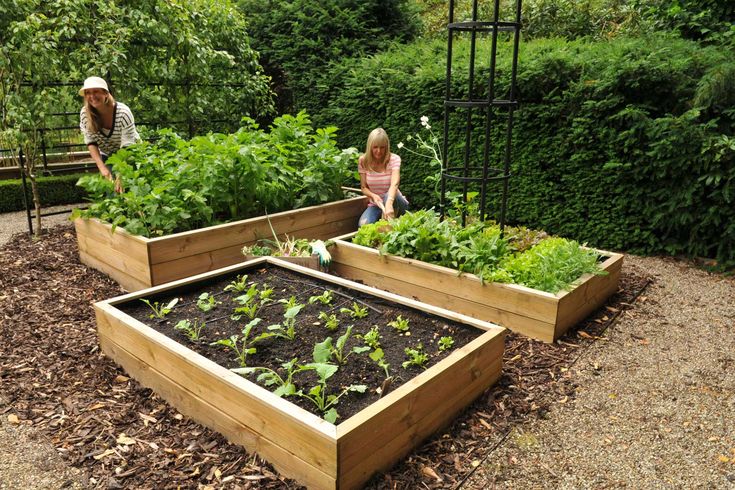 Below are the root depth requirements of a few common garden plants. Since our garden beds are 17″ and 32″ deep, they are deep enough to cultivate a medley of vegetables, including those with deep root systems. A deeper bed also allows for more moisture retention, leading to less watering and chance of drying out.
The following plants have 12 - 18″ roots
- Garlic, onions, chives
- Lettuce, brussels sprouts, spinach
- Corn, cabbage, radishes
- Strawberries
The following plants have 18 - 24″ roots
- Beans, peas
- Cantaloupes, squash, eggplants
- Carrots, turnips, beets
- Potatoes
Below are plants with deeper systems of 24 - 36″ roots
- Artichokes, asparagus
- Parsnips, rhubarb
- Sweet potatoes, pumpkins
- Watermelons
When planning out the components of your raised garden bed, it is important to orient your crops so that taller plants don’t block shorter plants from receiving sunlight.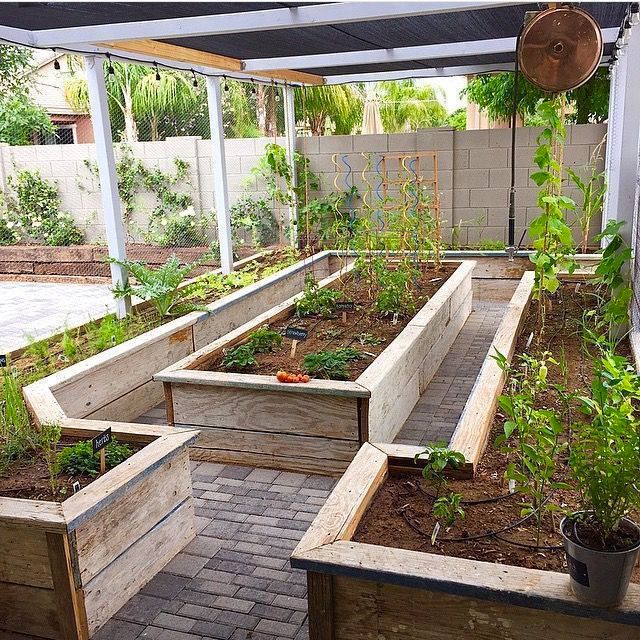 Beds should face South horizontally, which optimizes sun exposure across the bed and prevents neighboring plants from shading each other as the sun moves from East to West. If you are growing a variety of plants, you can orient your bed vertically (North to South), positioning the taller plants in the back to prevent them from shading shorter plants. Do not situate your garden bed in windy locations or near wet and marshy areas.
It is important to know the height of each crop at maturity in order to plan out your planting arrangements. To illustrate, shorter plants such as lettuce and radishes should be planted on the south side, while the tallest plants should be planted on the northern side of the area. If you have a trellis, it is important to keep it near the rear wall, as those plants can block out a large amount of light. Below are the heights of some popular vegetables at maturity:
| Vegetable | Size at Maturity | Vegetable | Size at Maturity |
| Artichokes | 4' - 5' | Leeks | 12" – 24" |
| Arugula | 8" - 10" | Lettuce | 6" – 12" |
| Garlic | 12" – 24" | Onions | 8" – 24" |
| Corn | 4' – 8' | Peas | 2' – 6' |
| Beans (lima) | 24" – 36" | Watermelon | 12" – 36" |
| Beans (pole) | 8' – 12' | Parsnips | 6" – 18" |
| Tomatoes | 2' – 8' | Potatoes | 12" – 30" |
| Cabbage | 12" – 18" | Turnips | 6" – 12" |
If you experience mobility issues, back strain, or simply dislike bending over, a taller raised garden bed will improve your gardening experience. Our extra tall 32″ garden bed kits significantly reduce back strain when you are tending or harvesting your garden. Whether you are a more experienced gardener or a beginner, we definitely recommend you invest in a raised garden bed to reduce the toll that straining your back can have on your health.
32" Extra Tall 9 In 1 Modular Metal Raised Garden Bed Kit
$369.95 $319.95
Our extra tall 32" height eliminates bending and strain on your back when you tend to your garden, as well as creates plenty of space for healthy roots. …
About Vego
At Vego Garden, our goal is to redefine Raised Garden Beds. The company was founded with the goal of launching a modular metal garden bed system with a 20+ year life expectancy, utilizing eco- friendly metal materials instead of cutting down trees. We emphasize innovative design and high quality with our products. The name vego carries the spirit of DIY modular raised beds suitable for growing vegetables.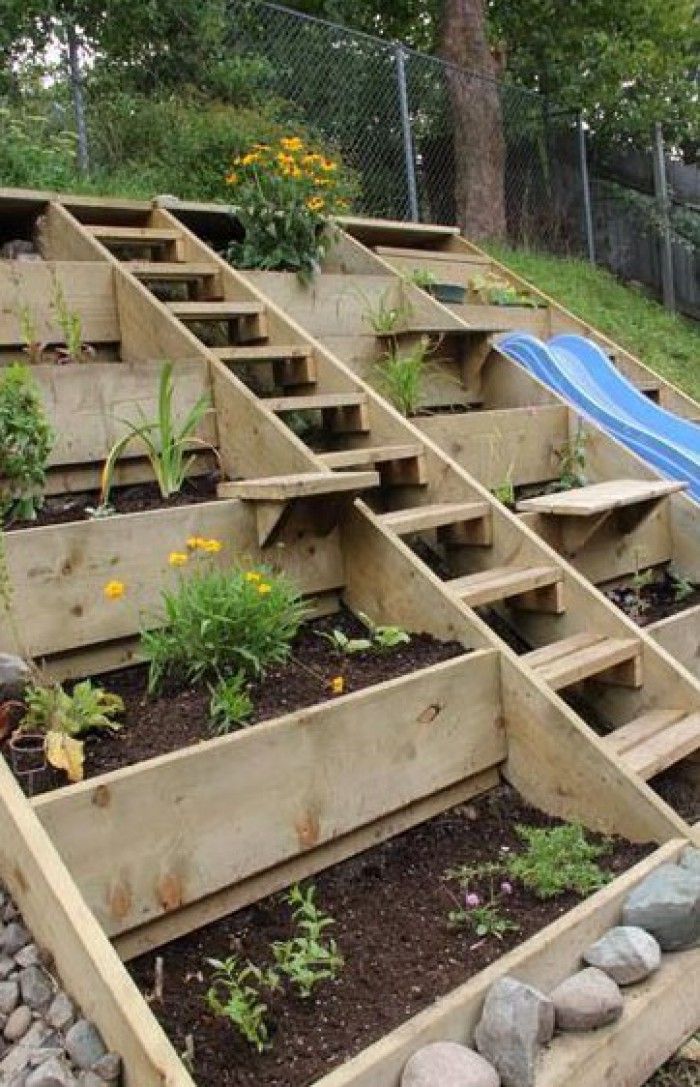
Read More >>
Featured Posts
12 Gardening Resolutions to Stick To in 2023
December 31, 2022
Lessons We've Learned in 2022
December 26, 2022
Get A $15 OFF + Free Shipping*
Be the first to know about our discounts, and get $15 off your next order of $199 + free shipping
Pros and cons of raised beds -
In any modern garden whose owners are focused on recreation, and not on the food program, you can find a parking lot, barbecue area and recreation area instead of the traditional potato fields or greenhouses with tomatoes and cucumbers. However, few people are ready to completely abandon the beds and the opportunity to grow at least something of their own “by the tooth”. In the wishes of customers for the garden, the description “small” and “decorative” is often heard, which leads the designer to the idea of using raised beds in the layout of the plot.
Raised beds provide a neat ornamental garden Raised beds are containers that protrude above ground level, the sides of which are made of a wide variety of materials: boards, timber, saw cuts, vines, metal, concrete, stone or plastic and hold the earth inside the bed.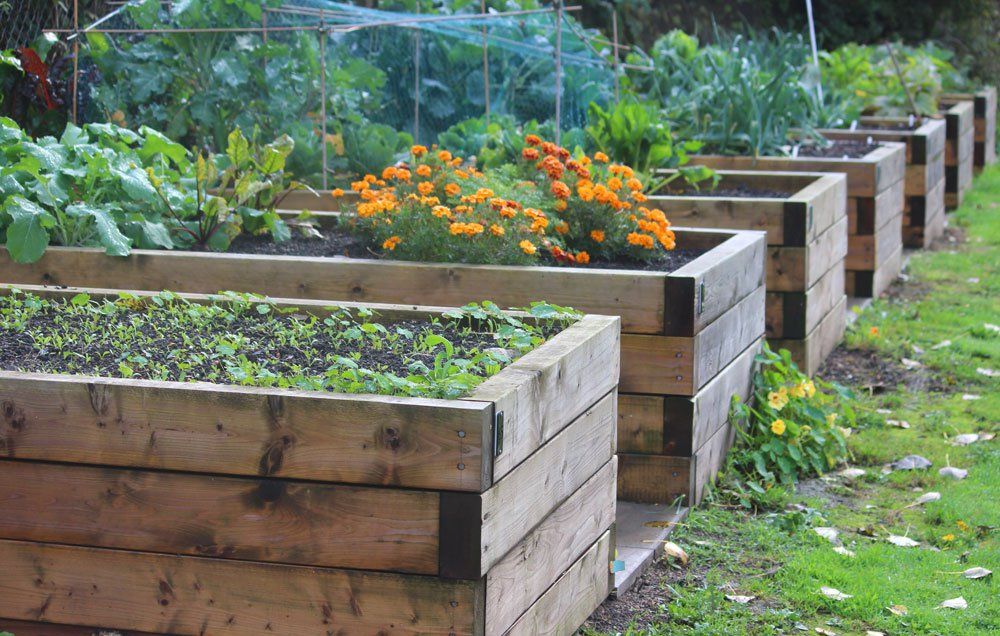
Are such structures suitable for harvesting or is their beauty opposed to usefulness? Let's look at the pros and cons of high beds together.
+ tidy garden appearance
Raised bed edging keeps soil from collapsing and washing out during watering, maintaining a tidy overall garden appearance. Turfing with a lawn or paving between the ridges will protect the paths not only from dirt, but also from weeds.
Paving the paths will make it easy to protect them from dirt and weeds+ support for the general chosen style of the design layout of the site
The material and color of the raised beds of the ornamental garden open for viewing to support the overall style should overlap with the material and color of the walls of the house, fence, retaining walls or vertical accents.
+ interesting design
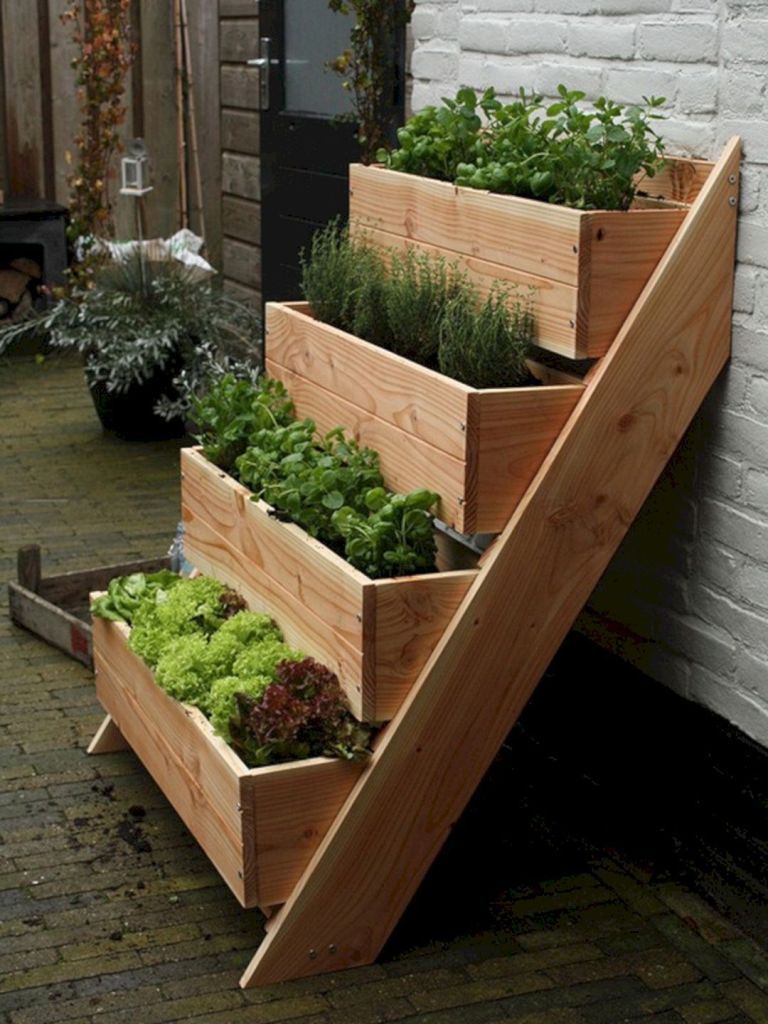
Selected shapes of containers can be the same as twins or different and placed parallel to each other or folded into an intricate geometric pattern.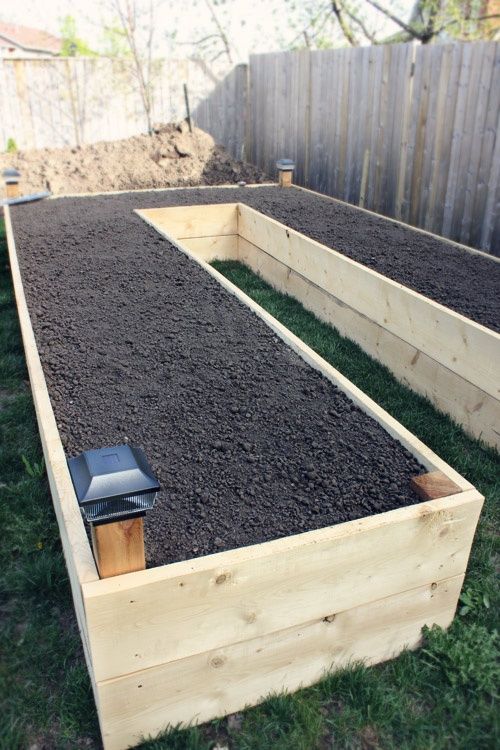 Alternating beds of a similar shape but different heights gives a spectacular three-dimensional result and is suitable even for decorating a patio or roof garden.
+ weeding comfort
Bordering the beds reduces the total area of open land, reducing the amount of weeding, and the right height for the height of the garden owner will make it easier to work, allowing less bending. A height convenient for caring for plants will be at least 40 cm, but not higher than 80 cm (minimum knee-deep, maximum thigh-deep), otherwise you will have to lie down on the garden bed, thinning carrots, or put up a stepladder, picking cucumbers. The wrong height or shape of the container, too wide or sharp-angled, instead of facilitating maintenance work, will make it difficult.
The sharp-angled shape of high beds is not practical: plants dry out faster, and the gardener is injured when caring for them+ improved lighting and drainage
Western region, allowing earlier sowing of seeds and planting more heat-loving crops.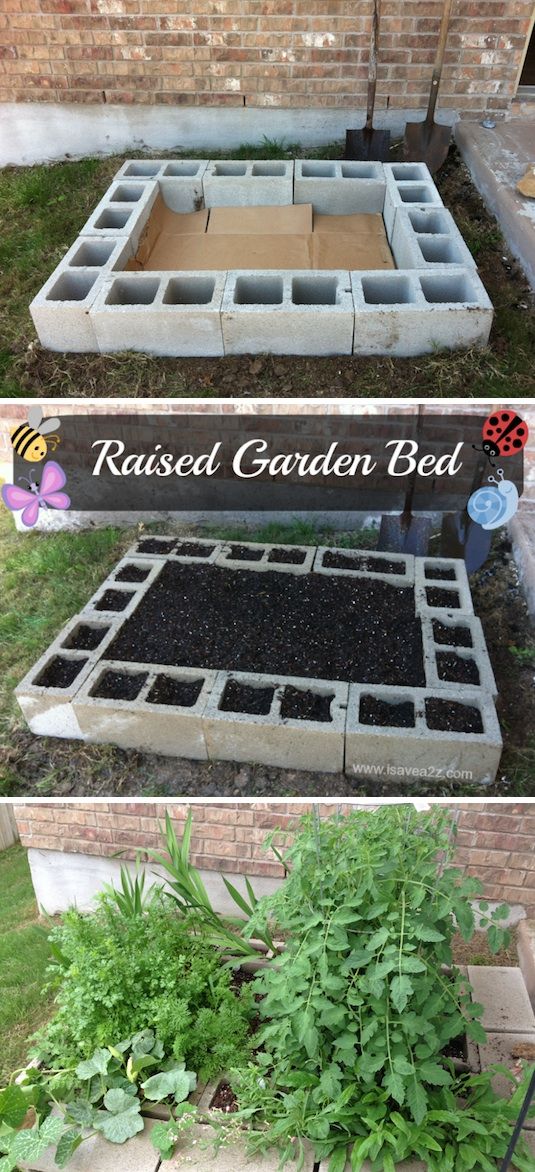
+ possibility to combine raised beds with warm beds
For those who like to build warm beds for the winter with a drainage-compost layer of sawdust, chopped branches, foliage and other organic matter at the bottom, a frame is needed to create compost right at the place where vegetables are grown, and raised beds do an excellent job with this task.
A warm bed goes well with a decorative raised bed+ creation of special conditions for plants with special requirements
The use of separate containers will allow you to grow lingonberries and cranberries in addition to the usual vegetables and herbs - the main thing is to lay in each bed the substrate necessary for the selected plant and provide each species with its own watering frequency.
+ growing vegetables and herbs even in previously unsuitable for farming areas
Stony poor soil, heavy clay, lowland, swamp or area flooded during high water, a paved courtyard or even a roof - containers with fertile soil can be placed anywhere and grow your own vegetables, flowers or herbs.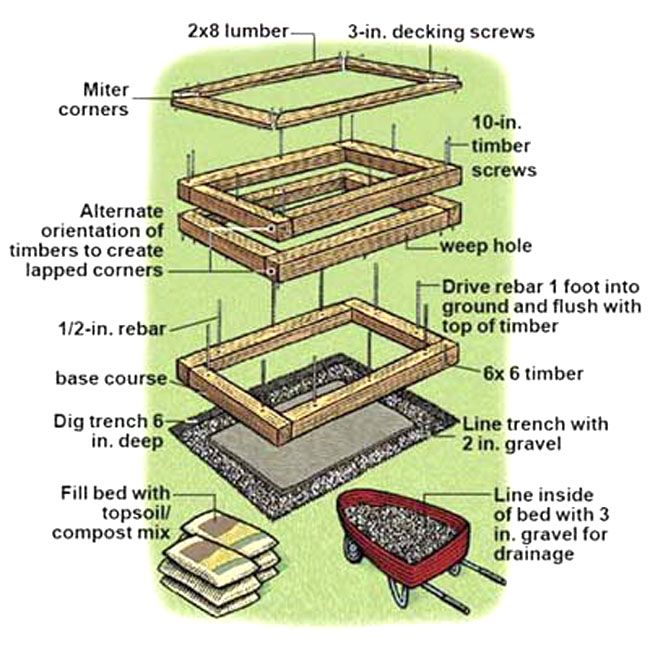
With so many advantages, anyone would ditch traditional furrows in favor of raised beds, but they also have disadvantages.
- high price for sidewalls and bulk soil
The construction of raised beds will require physical strength, skill and financial investment. In addition to the cost of materials for the sides, you will have to purchase fertile soil. In the non-chernozem regions, the soils themselves are not fertile enough for farming, and the existing fertile layer of 10 cm will not allow growing most vegetables by simply digging up the ground, so the owners of the garden in the North-West in any case will have to purchase soil or improve the existing one by adding compost and other organics. If you choose short-lived material for the sides (boards or vines) or if you do not observe crop rotation when growing vegetables and herbs, the costs of re-purchasing materials and soil will have to be repeated regularly.
- beds drying out
Rapid runoff of moisture causes accelerated drying and even drying of the earth in raised structures, more frequent and plentiful watering will be required.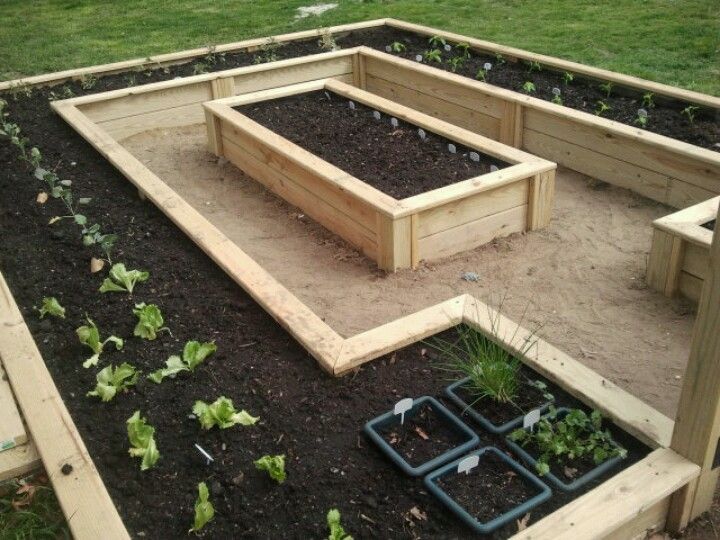 This consequence makes high beds an extremely unfortunate solution for arid and hot regions and areas with a lack of water, but in the Northwest, to solve this problem, it is enough to mulch the soil and slightly change the design, raising the beds only 30 cm above the paths, and deepening the subsequent layers of fertile ground below their level.
- loss of useful area of the plot to wide paths between beds
For comfortable and safe movement between high beds, wide, from 70 to 100 cm, inter-bed paths will be required, otherwise a garden wheelbarrow will get stuck between the sides of the beds and the owner of the garden will move sideways and that's it bruising as well.
Narrow paths between high beds will make it difficult to care for them As you can see, raised beds have many advantages, especially in a small area and suffering from spring waterlogging in the garden of the Non-Black Earth Region, where several of these containers can be originally arranged and placed in a place previously unsuitable for a vegetable garden.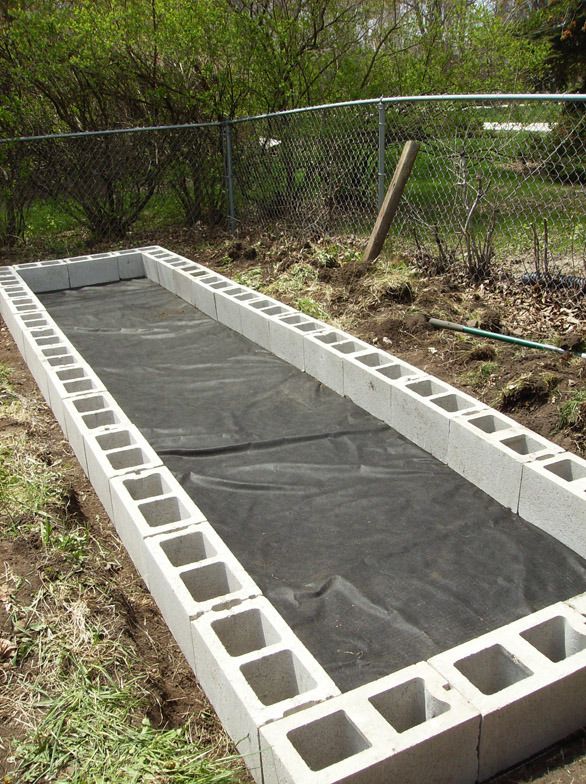 But for plots with large vegetable gardens, especially in sunny regions with arid climates, this solution will bring more problems than good. The choice is yours.
how to make, from boards, metal, slate, plastic
Many summer residents suffer from the fact that the subsoil waters are too high on the site. Excessive soil moisture is not suitable for all plants, many develop poorly or die altogether. You can solve the problem by making high beds. With such an organization of landings, it is possible to control the degree of humidity. And a nice bonus to such a decision will be an earlier ripening period and a much larger yield.
Content of Article
- 1 DPCs
- 2 Dimensions
- 3 than you can enclose high beds
- 3.1 Empitations
- 4 layers of high beds
- 5 when it is better to do and what to do
- 5.1 of plants.
- 5.2 High bed for strawberries
- 5.3 High bed for cucumbers and tomatoes
- 6 DIY high beds
- 6.
 1 From planks
 - 6.2 From logs
- 6.3 From slate
- 6.
Advantages and disadvantages that the sun warms the walls. This is also facilitated by the decomposition processes occurring in plant waste, which make up a significant part of the backfill. Therefore, such beds are also called warm. If you put arcs on such a bed and cover it with spunbond or other similar material, then the crop can be harvested even earlier.
The device is more problematic in regions with a hot climate. The task in this case is not better to heat the earth, but to keep it from overheating. But this can also be solved: use materials with poor thermal conductivity, for example, wood, to fence high beds. For the best effect, you can make double walls, between which you can fill up, for example, sawdust, lay foam, or you can leave an air gap - the best thermal insulation. It is better to paint the outer wall in a hot climate with white paint or whitewash. It is known that light surfaces heat up less.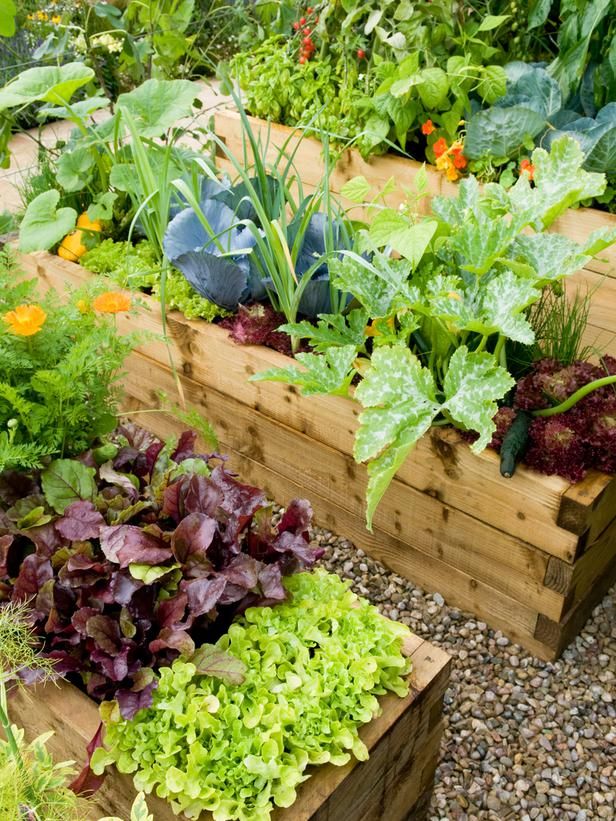 In this case, it will be possible to save the root system from overheating: in the south, the earth sometimes warms up very much and the higher the plant is, the cooler it will be. And over the beds you can stretch the same covering material. It not only retains heat, but also protects against overheating.
High beds can also be a good yield on infertile lands. It is more convenient to lay out the imported soil in the beds, and not distribute it throughout the site. Maintaining fertility contributes to the compost layer, which is located under the layer of earth.
The problem of arid regions is also being solved. In this case, the fence for a high bed is coated with bituminous mastic from the inside or covered with a film, a rolled waterproofing material is laid on the bottom (on the grid) (the roofing material will quickly rot, so something from modern types of waterproofing is better). Complete waterproofing cannot be achieved, but to keep moisture inside in sufficient quantities - yes.
was planted on a regular one. As you can see, with a balanced approach, almost any problem can be solved. There are few shortcomings in high beds, but they were not without them:
- In most cases, you have to make a fence, and these are costs.
- The complexity of the process. Again, making fences takes time and also moves a lot of earth and plant debris, which is hard work.
- Medvedka and other similar living creatures feel great in rotting leaves, branches, bark. You have to fight them.
- Fertility has to be maintained by updating or completely replacing the "stuffing".
That's all the shortcomings. If you decide on the arrangement of high beds, be prepared for a considerable amount of work. But the harvest will be many times greater. For testing, you can make one or two beds. Then decide if you need them or not.
Size
There are no strict recommendations in this regard, and there cannot be: very different conditions in the country, and people too.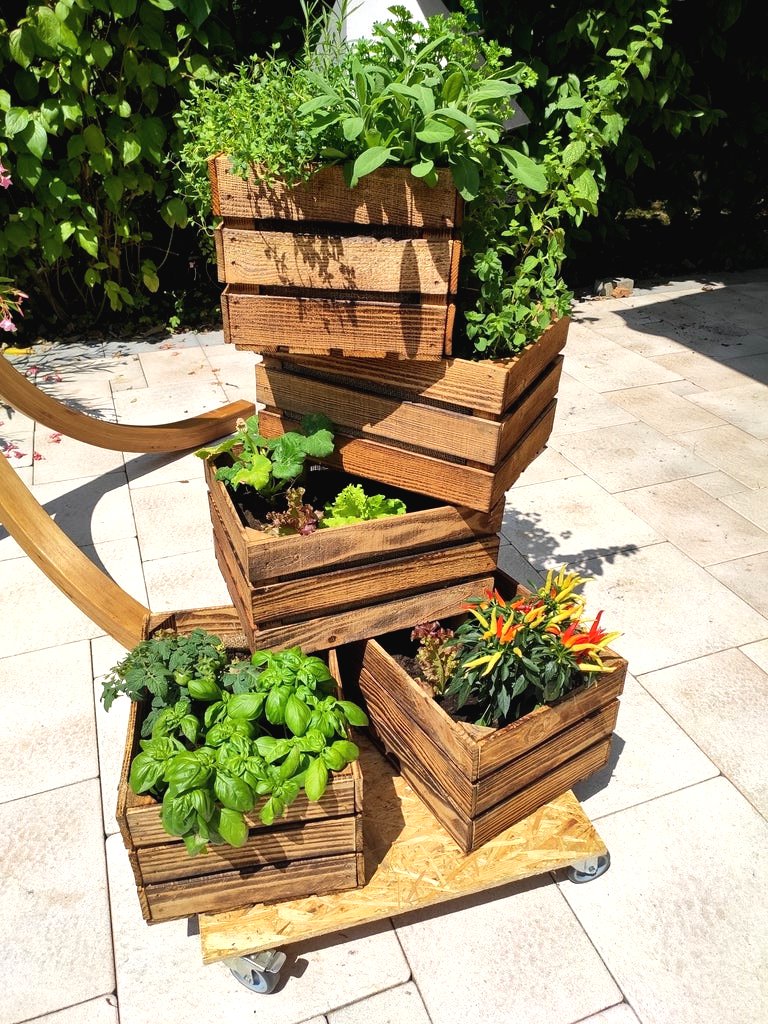 There are sizes that many consider optimal.
So, the dimensions of the high beds:
- Height - from 20 cm to 50-60 cm. Here you can see what a difficult task is. The higher the bed is raised, the easier it is to process it - to bend less. But the earth and the rest of the "stuffing" will need more. Another point: if a small bed in height can be under the snow and will be covered from severe frosts, then the high one will freeze through: the sides are also open. For those ridges where annuals are sown, this does not play any role, but for perennial strawberries, say, this is a problem. Therefore, the height is chosen based on these considerations. According to the experience of many summer residents for strawberries, the optimal height is 20 cm. Then we can hope that it will not freeze out.
- Width - from 60 cm to 1.2 m. Choose a distance that makes it convenient for you to process the bed. A distance of 60-70 cm is chosen if the approach to the garden is only on one side.
 If you can get to it from both sides, you can make a meter or more. It is important that the middle is processed without much stress.
 - Length. Here everyone chooses based on the configuration of the site or their desire. There are no recommendations at all.
So that the bed is not too high, part of it can be deepened: dig in 20-30 cm, and already put walls on top. The removed soil will go to backfill (there is often simply not enough land), and the substrate from the lower rough layers can be made thicker. And to minimize the cost of maintaining such a bed, you can do drip irrigation.
How to fence high beds
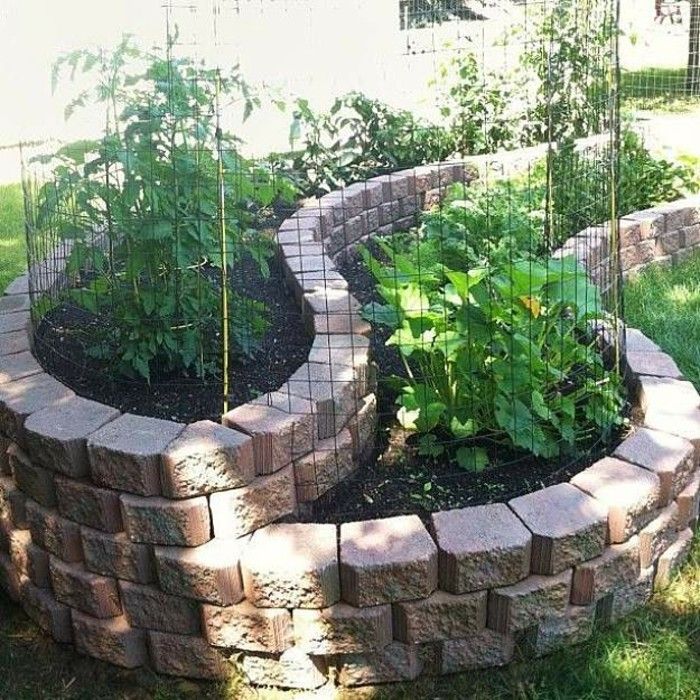
You can use anything that can hold the soil. The most durable curbs are made from brick, stone and concrete.
Beds made of concrete and stone can be made like this But a brick costs a lot, it takes a long time to fiddle with concrete. A concrete fence is made according to all the rules: first, a formwork into which reinforcement is laid, then it is poured with concrete and they wait until it sets. But the service life is impressive - decades.
The brick and stone fence is also folded according to all the rules: on the mortar with dressing. To reduce the consumption of bricks, the walls are placed in half a brick. And so that the earth does not move it, the rows are reinforced with a mesh.
Half-brick brickwork alone cannot hold soil. Support poles requiredBut even with this option, support poles will need to be installed one meter apart. If your soil is viscous, heavy, often waterlogged, such walls can be squeezed out. Therefore, put wooden or metal supports that will fix the long walls or make small beds, as for an ornamental garden.
Brick raised beds for ornamental gardens Fences made of expanded clay blocks have proven themselves well. Even the voids in them can be covered with soil and plants with a small root system can also be planted there: for example, some types of greens and salads.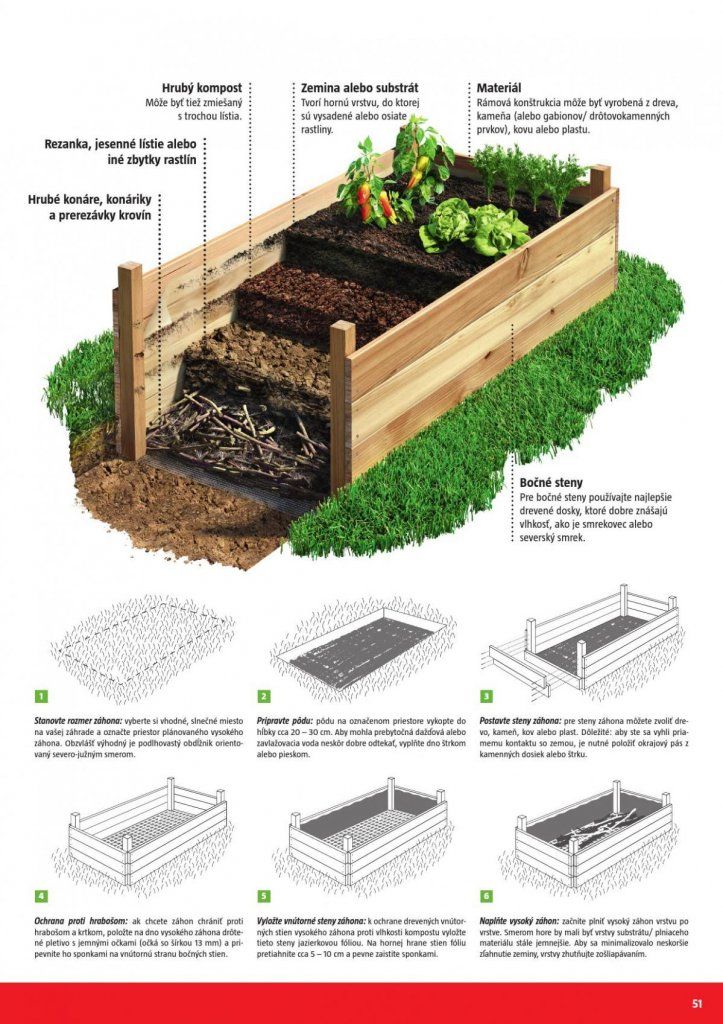
They also make fences for high beds from galvanized metal and slate. Slate can be used second-hand, you can buy a new one, wave or smooth - it doesn't matter. Cut the sheets into strips of the required width. There is no need to fear that it is harmful. In slate, asbestos is contained in a bound state, and it does not dissolve in water. It is harmful when it is sawed: the dust rises and enters the body through the respiratory tract. To reduce exposure, wear a respirator and wet the incisions.
High slate bedsThey make plastic garden fences. Changed siding? Use it. There are old plastic panels - they are in business. But for plastic, a rigid base is needed. They make it from a metal mesh of thick wire.
Raised beds in wire baskets Nets can form the basis for pebbles or pellets. Only in this case, a double frame will be needed, inside which stones or some other material are poured. This technique is called "gabion" and not only fences for beds and flower beds are made from it, but also fences.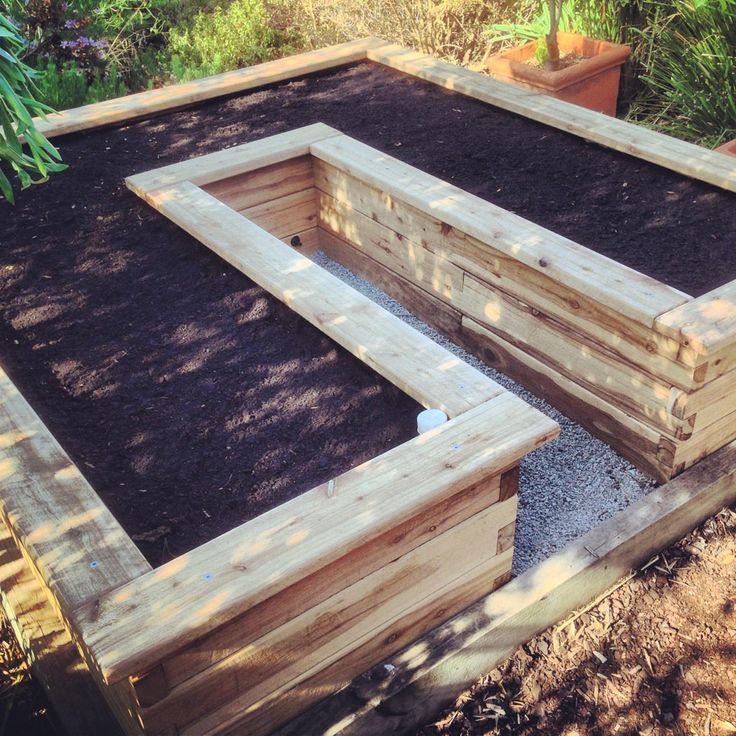 But so that water does not seep through the walls from the gabion beds, the inside of the box is lined with a dense film.
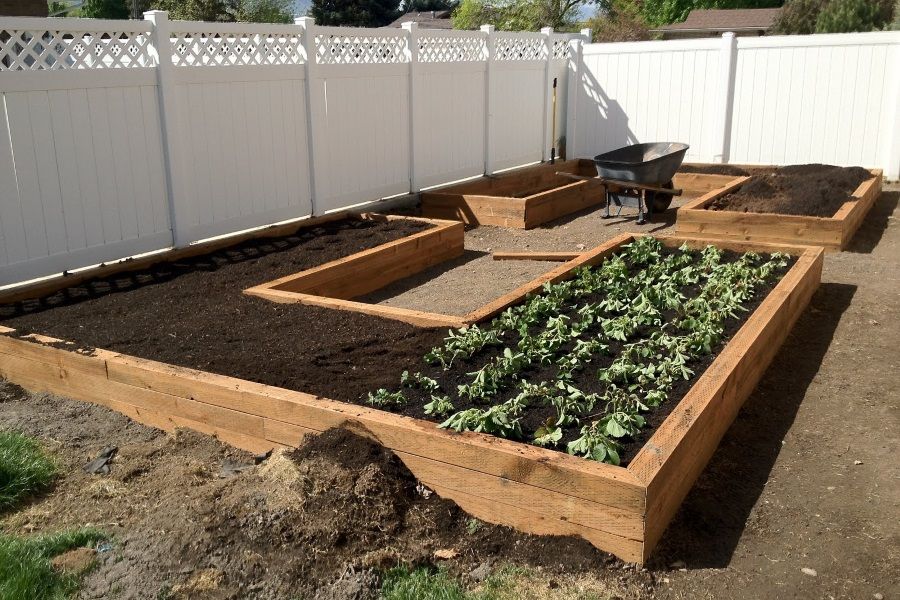
The most popular fence is made of wood. You can use boards, timber, logs. Wood is good for everyone, except that it rots.
Really high bedsAnd since all the conditions for activating this process are created in the high beds, destruction occurs rather quickly. You can slow down the process somewhat by painting the boards or by impregnating them with a bioprotective compound. But there is still no guarantee against destruction.
Board cuttings can also be used for high bed borders But the material can be used cheap, and sometimes even junk: the remains after construction, slabs, old logs, pallets, etc. If desired, you can even make a fence out of branches. Only the bark is desirable to remove: it is under it that there are many larvae and woodworms. Although...they will also process the wood residue that you lay on the bottom of the backfill.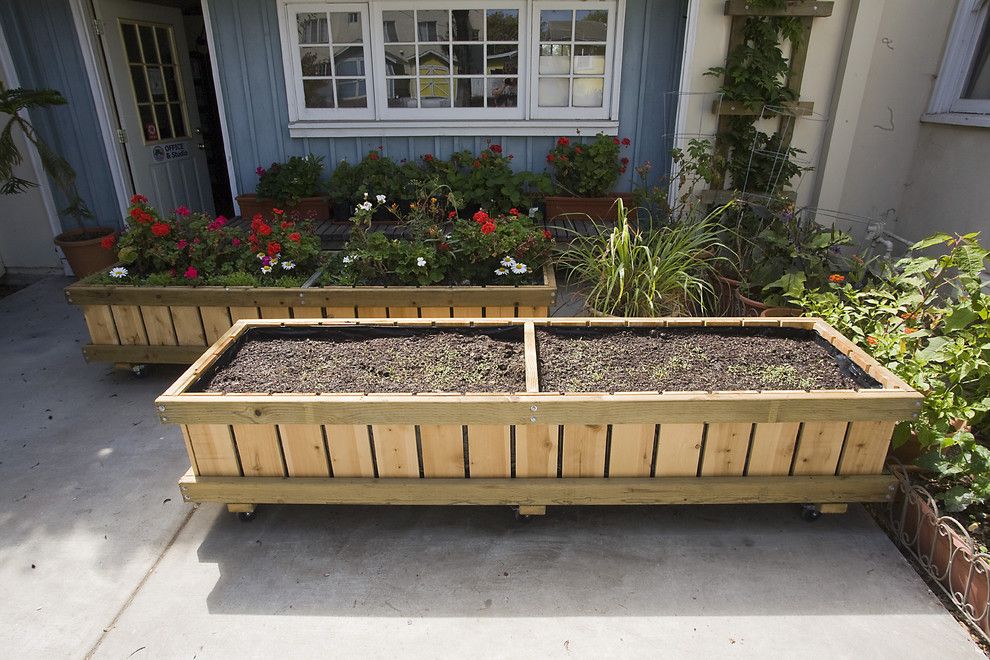 But too many of them are also not needed, so, probably, it is still better to remove the bark.
From the same branches, only freshly cut, you can make a wicker fence. And it will also need to be lined from the inside with a film: to keep water and earth inside.
Read how to make wattle here.
Bed framing can be woven from fresh branches or laid out of stonesEven straw can be used. It is tied into small bundles, which are interconnected with a wire. It simply cannot be cheaper, but it keeps water and temperature well. The only disadvantage of this option is that such a fence will last a maximum of two seasons, but rather one. But it can then be used as one of the layers.
Fencing of beds made of strawBulk beds
There are high beds without a fence: the so-called bulk beds. The soil in them is poured in the form of hills.
Raised beds To improve drainage, branches are laid inside such a bed. To reduce the height of the bed (for example, under tomatoes), it is slightly deepened, throwing the soil to the side.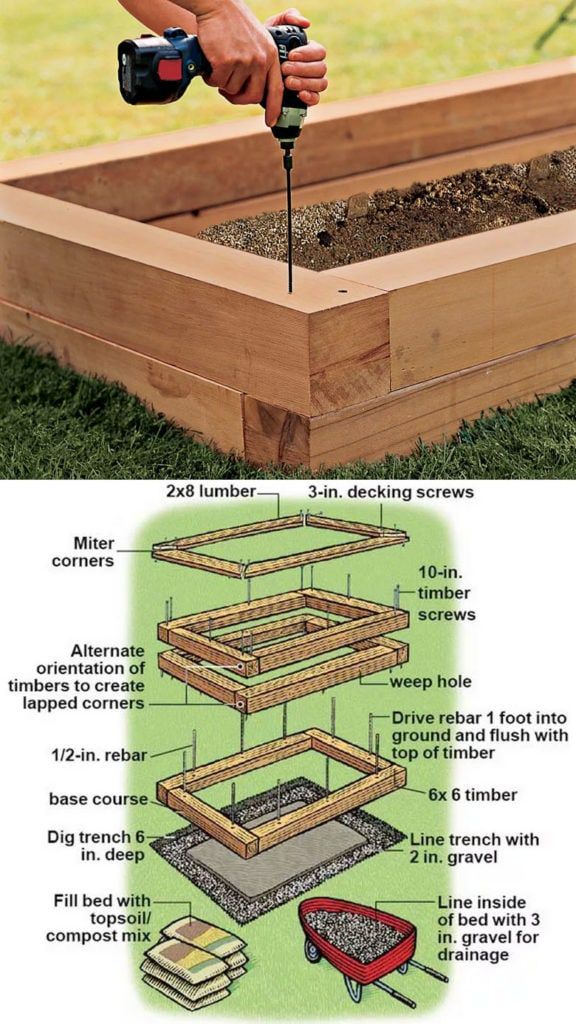 After laying the branches, it is covered from above, often there is a need for additionally imported soil. If you can’t choose the row spacing deeply.
The disadvantage of this kind of vegetable garden: when watering and during rains, the topsoil is washed away. Therefore, they began to make boxes - to avoid washing out the soil.
Raised Bed Layers
Framing is only a small part of the job. You still need to fill the received box. It must be said right away that the thickness of the layers depends on the height of the bed that you have chosen, so if any values \u200b\u200bare given, then only approximately. In addition to the size of the bed, the thickness of the layer, for example, the fertile one, is influenced by the choice of plants: 5 cm is enough for someone, and much more is needed for someone.
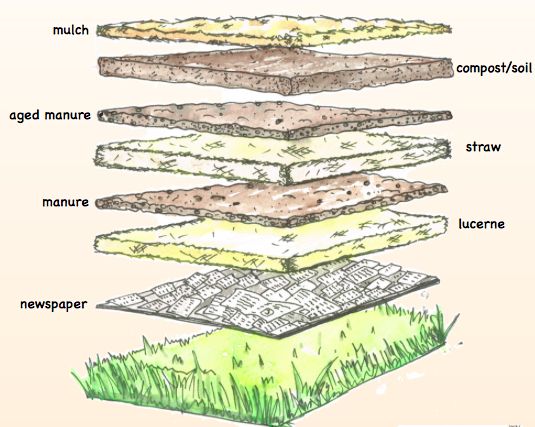
Approximate layers for a high bedSo, what to pour into a high bed - layers from bottom to top:
- A metal mesh with a small cell or a layer of geotextile is laid on the bottom.
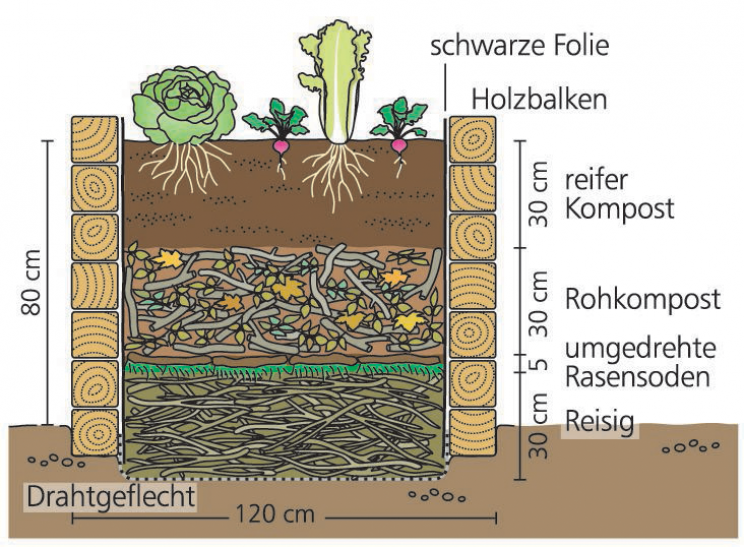 You can put cardboard. Mesh and geotextile - protection against rodents and moles. Cardboard plays about the same role, but it is less effective.
 - Large wood residues: thick branches, branches, even chocks and bars. This layer serves, firstly, for drainage, and secondly, moisture accumulates in the wood. The more arid the climate in your area, the more wood you need. Moreover, the following wood layers too.
- Shredded small branches, bark. Other coarse plant residues will do: corn stalks, straw. Their mission is also twofold. They store water, and when decomposed, they release heat and nutrients. But when using corn trunks and straw, keep in mind that the bed will soon sink: these remains quickly rot, but the yield will be high, and fertile land can be sprinkled on top.
- Paper, thin board. It is usually lined with a thin layer. They use packing cardboard more often, because glossy paper is not suitable, just like newspapers: the lead base of the paint is not at all what plants need to be fertilized with.
 If there is an old unnecessary burlap (natural), you can lay it.
 - Layer of plant residues: leaves, grass, semi-decomposed sawdust. Be careful with sawdust: they strongly acidify the soil. So sprinkle them under plants that love acidic soil, or neutralize the acidity by sprinkling them with a good layer of ash.
- Fertile land.
In the last two layers, you can add a good portion of matured compost, as well as sprinkle deeper layers with it. This will speed up the “readiness” of the high bed for planting.
Read about how to make a pond in the country with your own hands here, and this article says how to turn it into a fountain.
When is the best time to plant and what to plant
It is better to fill the high bed in autumn. During this period, there will be enough “material” and during the winter the processes inside will gain momentum. In this case, you can plant plants in the spring and hope for a high yield. It can be done in the spring, but there are unlikely to be any significant differences in yield: the processes have just begun and will not be able to have a noticeable effect on the fertility of the backfill. Although you will definitely feel the difference in the amount of water for irrigation: much less water is required.
Plant rotation
In the year of a high bed, plants requiring high fertility can be planted on it: cucumbers, zucchini, zucchini, pumpkin, any kind of cabbage, eggplant, tomatoes, sweet peppers . The next year, you can plant greens - spicy-aromatic and leafy. Root crops feel good in the second year.
After the second harvest, fertility must be restored. If the contents of the bed sagged, in the fall they fill up with good earth mixed with mature compost. If there is nowhere to fill up, remove part of the top layer (on a compost heap or in another box as part of the backfill) and replace it with fresh earth with fertilizers.
High bed for strawberries
It differs only in that a covering material is spread over the finished “pie”. Holes are made in it, in which plants are planted. This option leads to the fact that moisture evaporates in minimal quantities, and weeds do not grow in the aisle. The second option - mulching the ground also works well, but evaporation is more intense.
Strawberries are peculiar in that their roots are located mainly on the surface. Therefore, the fertile layer can be small. But this same feature leads to the fact that in severe frosts it can die. Although there is a decomposition process inside the high bed, warming up the soil, if the bed is without snow and not covered for the winter, the root system may freeze.
Cucumber and tomato high bed
It is no different in its structure. Is it only because they need poles and crossbars or stretched wire around the edges in order to be able to tie up bushes of tomatoes or lashes of cucumbers.
For cucumbers and tomatoes, you need to take care of the garter You can read about the organization of automatic watering of the garden or plot here.
Do-it-yourself high beds
Most often, questions arise not when laying layers in high beds, but when making a box. Since women often do a lot of gardening, right up to making fences for garden beds, many points may not be clear to them. To clarify the most difficult ones, we present photo reports of making a box from boards and slate - the most common fences.
From planks
Several options for how to make high beds from boards were in the photo above. The main snag is usually in the connection at the corners. The easiest way is to overlap them: just put one to the other at 90 ° and knock it down with nails. But there are aesthetes who all strive to do the right thing. And that's right - cut down two boards at an angle of 45 ° and connect them like that. It is this option that will be shown in the photo.
Planed boards treated with impregnation to slow decay To make it convenient to fix the fence on the ground, vertical bars or pieces of board are nailed in increments of 1. 2-1.5 m, the length of which is approximately 20 cm more than the selected bed height.
The lower end of the bar or board needs to be sharpened - this will make it easier to drive the fence into the ground. Then we take a miter box or a circular saw, and cut off the edges at an angle of 45 °. Putting two boards together creates a perfect 90° angle.
Correctly made cornerFor a strong connection on the inside of the corner, we install a bar, to which we nail the boards.
That's what happened. Only he lies "burdens" up. They are hammered into the groundFencing for high beds made of wood does not take long, but even easier, connect the boards end-to-end, and nail metal corners for strength (pictured below).
The easiest optionFrom logs
It is not more difficult to make a similar box from hewn logs. For example, this option: two long sides from logs, and short ones from pieces of boards.
Whitewash the finished fence: both pest protection and a more attractive look.
Getting StartedFrom Slate
When making beds from flat or wave slate, questions also arise about how to fix it. The easiest way is to dig in. But this is uneconomical: you will have to make the stripes wider by at least 10 cm and still there is no guarantee that the slate will not “float” in the spring. In the muddy earth, it will simply be squeezed out with a mass. You can fix it, but it's too much time and effort.
Therefore, most often corners or pipes are driven in from one or both sides of the sheet, which clamp the slate and prevent it from deviating strongly. In the photo, the corners are driven in only from the outside: from the inside, the mass of layers of the high bed will press, so that the fence will not fall inside.
Fencing beds with slate The joints of two sheets are secured with a special welded plate.