Raised bed vegetable gardens beginners
Raised Bed Vegetable Gardening For Beginners
Can you guess what is the most frequently asked question on all Facebook gardening groups each Spring? There are actually two: ‘How do I start growing vegetables at home’? and ‘How do I set up a raised garden bed’? I will answer the second question here by explaining the basics of raised bed vegetable gardening for beginners.
See how they did it!
I will walk you through the step-by-step process of setting up a raised bed garden at one of my client’s home and explain the points to consider at each step. My clients, Mr. and Mrs. Dave live in a townhome with a small space in the backyard for gardening. They both are beginner vegetable gardeners and wanted help in setting up their first raised garden bed.
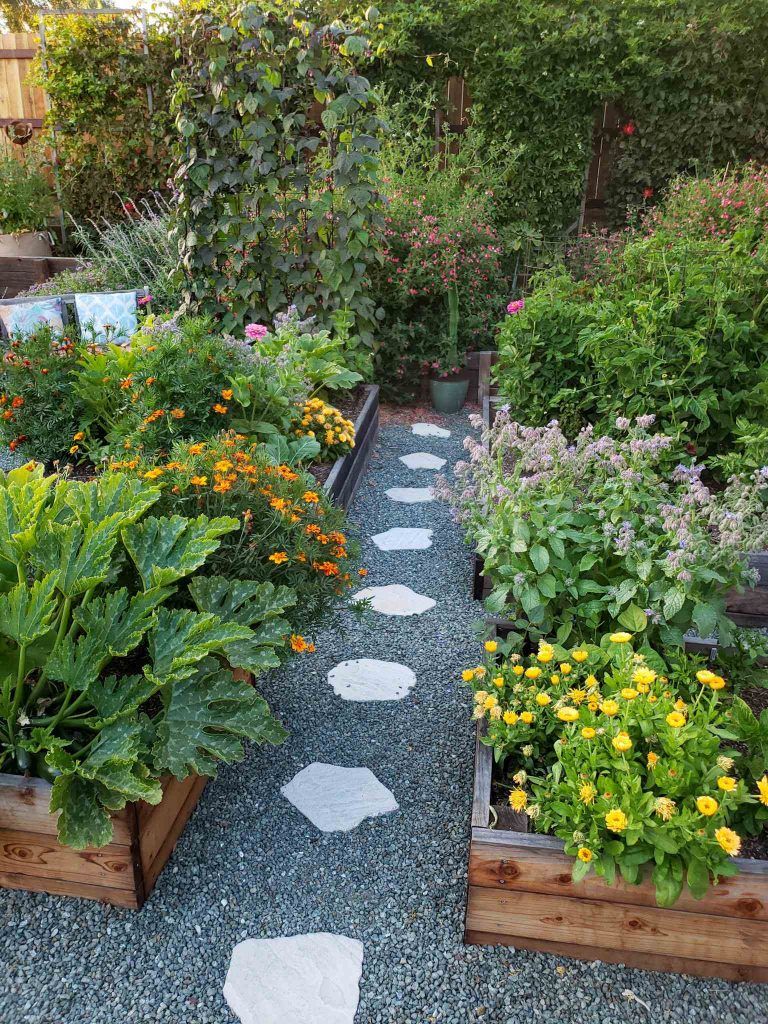
A raised garden bed for vegetable gardening enables you to grow fresh produce organically anywhere in your backyard. Save money on your grocery bill and eat healthy organic vegetables by investing a little time and effort into creating a raised garden bed. It’s a great way to spend time outdoors with kids and get some exercise while the kids learn practical lessons on how to grow food. Kids enjoy watching the plants grow and the vegetables ripen on the plants.
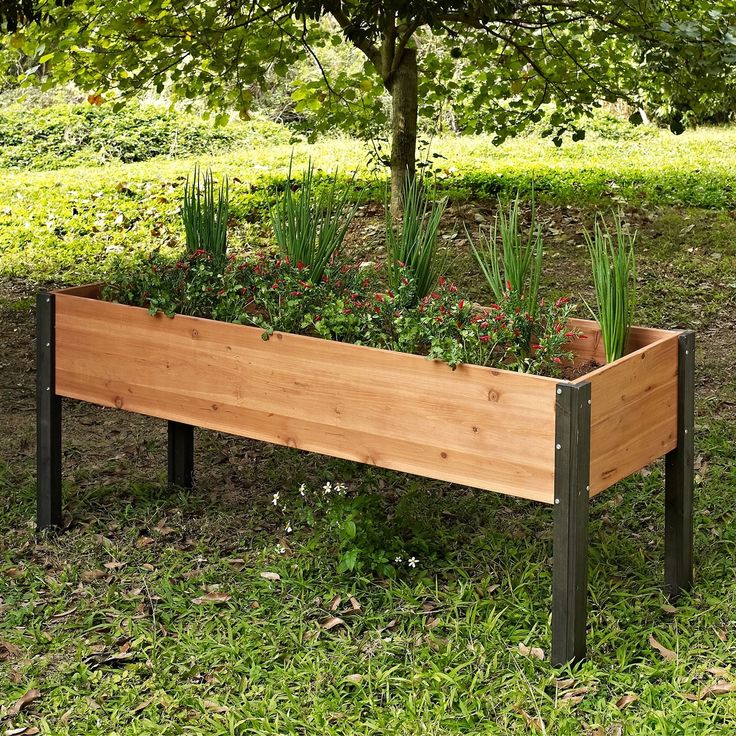
Raised garden beds don’t have to be laid on ground. Gardening enthusiasts with physical limitations can enjoy growing vegetables and flowers in an elevated raised garden bed (raised bed with legs).
The process of assembling a raised garden bed largely depends upon the material used for the raised bed. Let’s see what the most popular options are for building a raised garden bed.
Selecting Material For A Raised Garden Bed
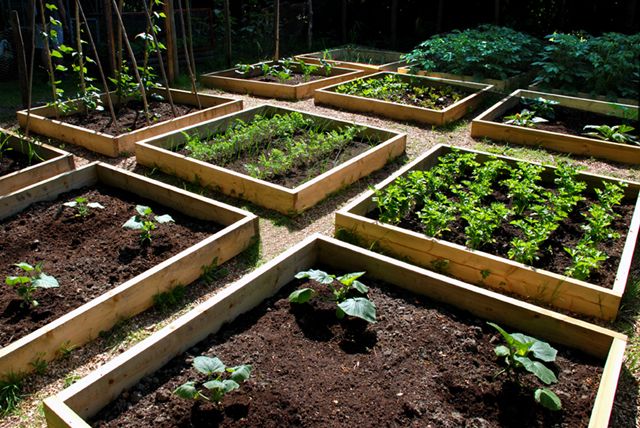
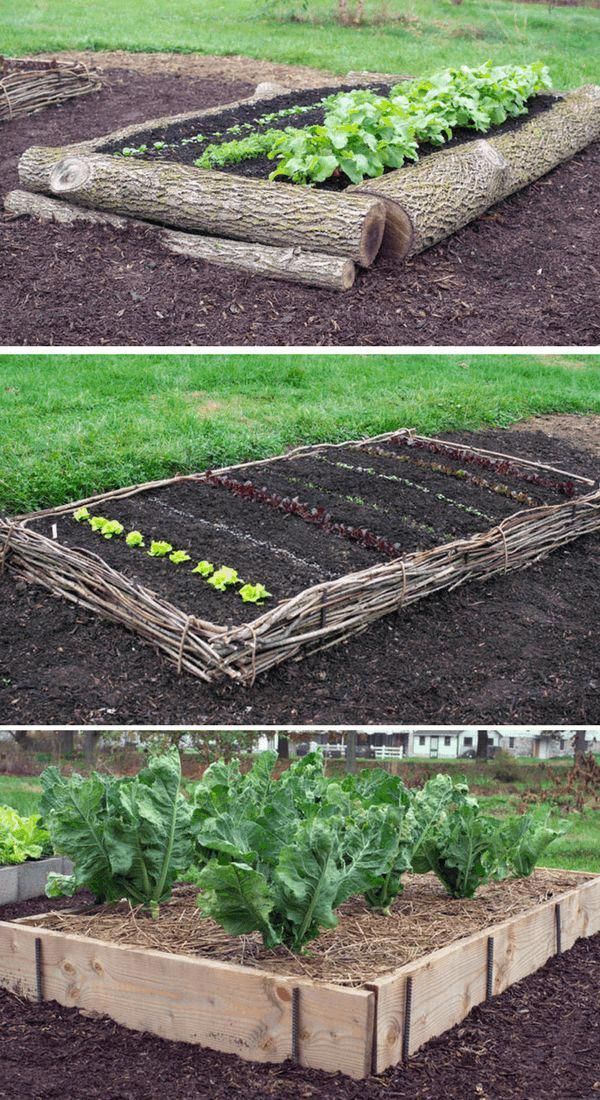
There is no right or wrong material for building a raised garden bed frame. The job of the bed frame is to hold the soil in place. The structure can be created from any material you have on hand from previous building projects and can include wood, vinyl, metal, concrete, or synthetic materials.
Wood or Lumber:
Lumber is the most popular choice for building the raised bed frame (most raised beds do not have a bottom).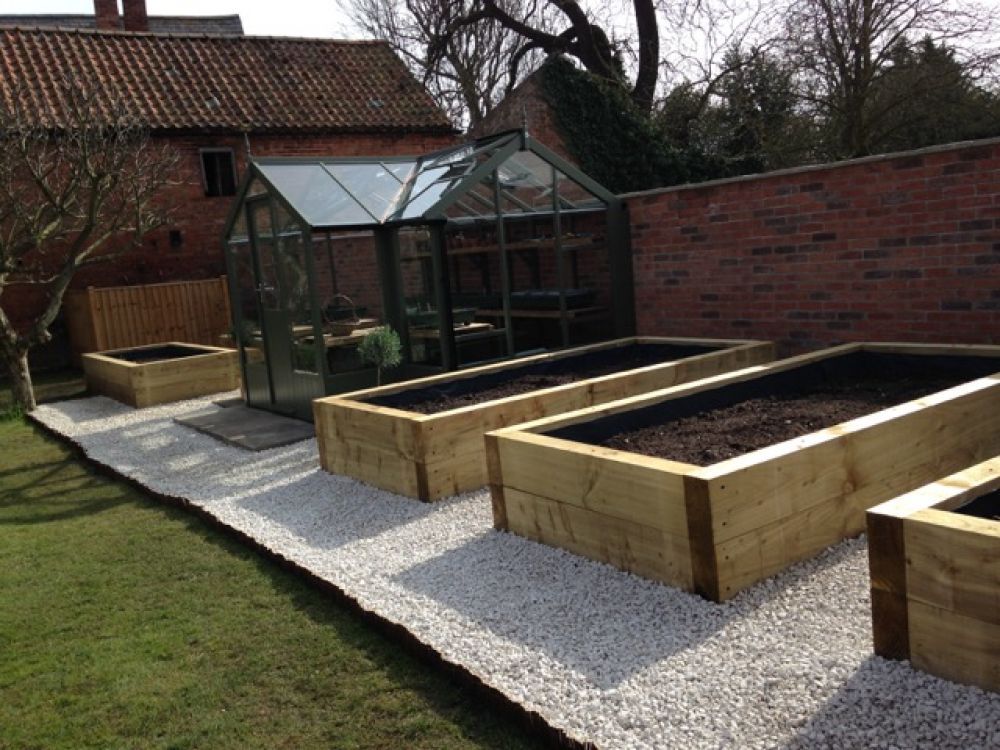 The lumber can be new, recycled, leftover bits and pieces, or a felled tree trunk. Any thickness or type of wood will work fine except for treated wood. Landscape timber, railroad crossties, and other treated lumber contain toxins that will leach out into the garden soil and harm plants. Use untreated lumber and paint the outside of the raised bed with non-toxic, eco-friendly paint, if desired. A coat of paint will make raw lumber look better and stand up better to the elements.
There are many Wood Raised Garden Bed Kits available in big box stores and online. The most reputed wood raised garden bed brands are:
Greenes Fence Original Pine Raised Garden Bed
Giantex Raised Garden Bed Planter
YAHEETECH Raised Garden Bed
Vinyl:
Vinyl boards, siding, or other types of vinyl building/remodeling material can be used to create the garden bed frame. Vinyl is lightweight and inexpensive.
Personally, I have been using these Vinyl Raised garden bed kits in my garden for years:
Vita Gardens Garden Bed
NuVue Products Raised Garden Box Kit
Metal:
Metal roofing, galvanized steel, sheet metal, siding, building frames, animal feeding troughs, or anything else made from metal can be used to create a raised bed for growing vegetables.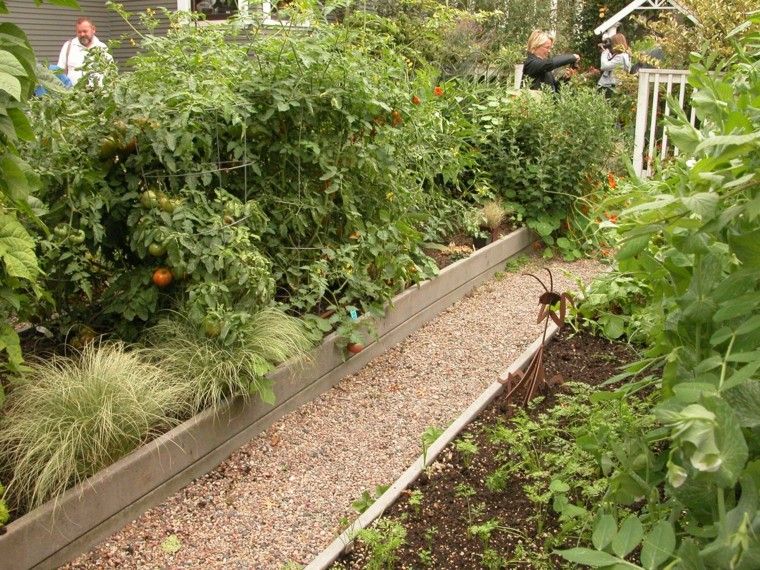 Metal or steel will last indefinitely and develop an attractive patina over the years that will enhance your landscape’s appearance.
If I ever have to update my raised garden beds, I am going to use one of these metal raised beds:
Best Choice Products Outdoor Metal Raised Garden Bed
zizin Galvanized Raised Garden Beds
Quictent Extra-Thick Galvanized Steel Raised Garden Bed
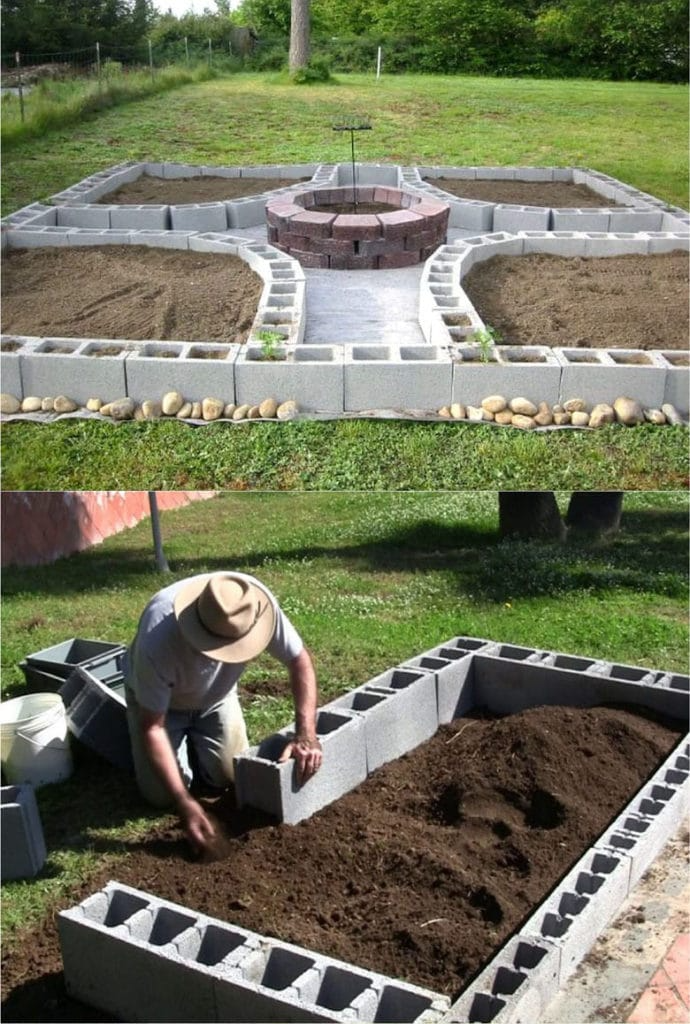
Concrete/Brick/Stone:
Concrete blocks, stone pavers, landscape stones, or recycled bricks make sturdy material for fabricating the garden bed’s exterior frame. Concrete and stone are virtually indestructible, and the smaller sizes make creating odd-shaped garden beds easier.
Composite Material:
The synthetic or composite material is lightweight, inexpensive, easy to work with, and will last forever. Synthetic material will not require maintenance and will look good for many years.
Most popular options are:
Greenland Gardener Raised Bed Garden Kit
The Lakeside Collection Raised Garden Bed Set
Fabric:
With the popularity of Fabric pots in recent years, Fabric raised beds are popping up in more garden stores and nurseries. Fabric raised beds are easy to assemble, somewhat movable, and most importantly, it allows the soil to breathe. Air can move through the roots and encourage ‘air-pruning’ of roots, which helps develop more fibrous roots.
Most popular options are:
Smart Pots Big Bag Bed Fabric Raised Bed
Victory 8 Garden Fabric Pots Raised Bed
Apipi 2 Pack Raised Garden Planter Fabric Bed
Since the raised bed garden will be a part of your landscape, use materials to build the frame that complements your outdoor landscape’s appearance and usage. For example:
• The garden bed frame can be flat on the top and double as outdoor seating.
• Steps can be incorporated into the design to accommodate sloping landscaping.
• Solar lights are easy to place in the garden to illuminate an outdoor walkway.
Once you have all the things needed to build a raised bed garden, let’s start building it!
There are 5 simple steps in setting up a raised garden bed:
Step 1: Select A Site For The Raised Bed
Selecting the right site for the raised bed is essential for healthy plant growth. There are a few things to consider when choosing a location for the raised garden bed.
Sun
Look for a location in the landscape the remains in full sun most of the day. The majority of the food-producing plants that will be grown in your garden will require at least 6-hours of direct sun each day, and more hours of sun will be even better.
Observe a potential site throughout the day. Notice how the sun shines on it in the morning, afternoon, and again in the early evening. Note if there are any nearby structures, trees, or tall shrubs that could cast a shadow on the potential garden spot.
Alternatively, you can use a sun meter to measure the sun exposure of a site in your garden.
Also, consider the time of year you observe the possible location for the raised bed garden. The sun could shine on the site differently in the winter when there are no leaves on the trees than in the summer when the trees are fully leafed out.
In the northern hemisphere, the south side of the house is the best place to locate your raised vegetable garden. Similarly, if you are in residing below the equator line, the north side of the house is the best place to set up your raised garden bed.
Terrain
Consider the topography of the potential raised bed location. A flat location for setting up a raised bed garden is ideal, but a slight slope can be accommodated and will work out too. Just make the sloping end of the frame a little higher so it will be level on top.
A steep incline is not the right choice for a raised garden bed, but it can be made to work with a lot of excavating and soil manipulation. Instead of doing all that hard work, look for a more agreeable flat surface for setting up a raised garden bed. Consider a concrete patio, driveway, or walkway as a viable option.
Water
Keep in mind when selecting the location that the plants will need to be watered regularly. Setting up the raised garden bed near a water source will make plant maintenance easier. Placing it near the outdoor shed, garage, or wherever you keep garden tools and plant food will also help.
Avoid low-lying areas that remain soggy. Even though there will be several inches (or feet) of a growing medium in the raised bed, excess water needs to be drained away quickly. If the water cannot drain through the soil, the vegetable plants will be in danger of drowning and decaying.
Wind
If you are growing tomatoes and peppers in the raised bed, they can be easily damaged by windy conditions. In a windy location, the raised bed dries out faster than the raised bed in a protected area. Consider selecting a site with a windbreaker like a line of trees, a fence, or a structure that can protect your raised garden bed from the damaging wind.
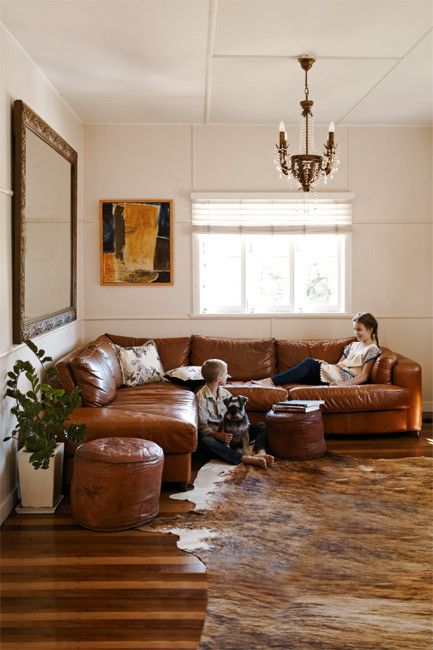
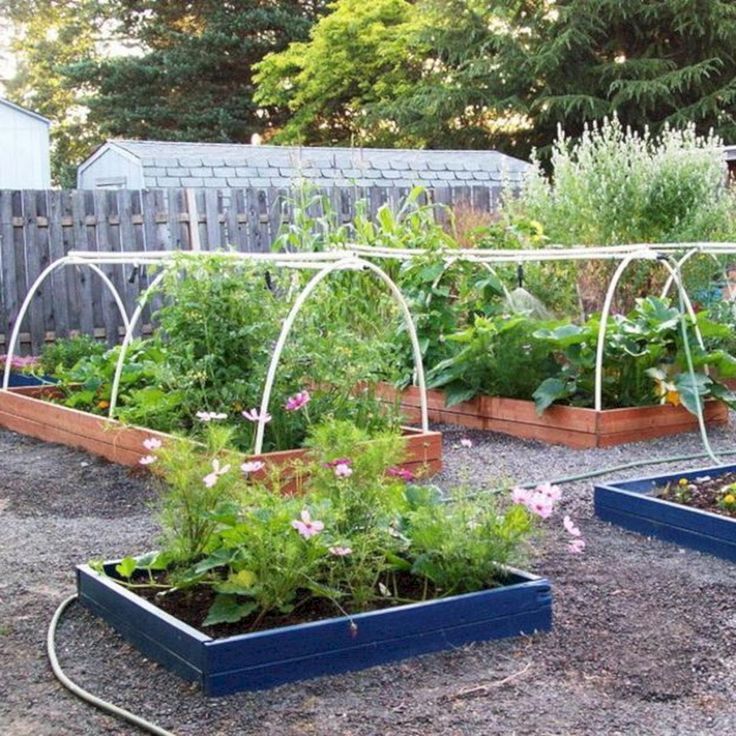
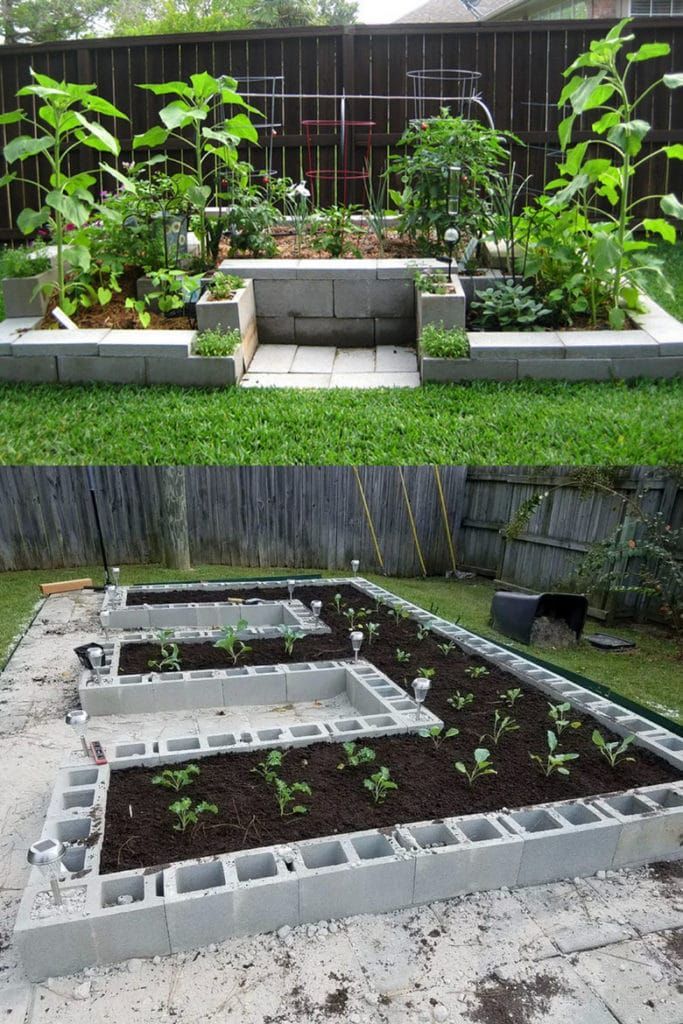
For selecting an ideal site for Dave’s raised garden bed, we took a step back to look at all the elements. Dave’s house is north facing, so naturally, the backyard would get 8+ hours of direct sunlight, which is ideal. The yard is flat with a slight slope. Their property is marked by two privacy fences on the east and west sides, which can act as windbreakers.
The raised bed could be located on the left or right of the yard. We picked the location on the left because the water housing is located nearby. This site is also tucked away from the direct view from inside, which is great because no matter how much you care, a garden is not always pretty to look at (Wait till fall, you’ll see!)
Step 2: Prepare The Site For The Raised Bed
Now it’s time to prepare the selected site.
First, ensure there are no underground utilities directly under the selected site. While you will not be digging down into the soil when preparing the site or tending to the garden plants, if there should ever be a problem with the buried utility lines, your raised bed garden may have to be removed.
Next, use a spray paint to mark off the boundary similar to the raised garden bed’s size by spraying the ground.
Now, mow the grass, remove any shrubs, tree roots, and large rocks. Use a shovel to loosen the native soil down to the depth of 6-inches. This will improve the drainage in the raised bed and enable plants to grow deeper roots. Root vegetables like carrots, turnips, and potatoes will grow better when you take time to break up the native soil in the garden bed.
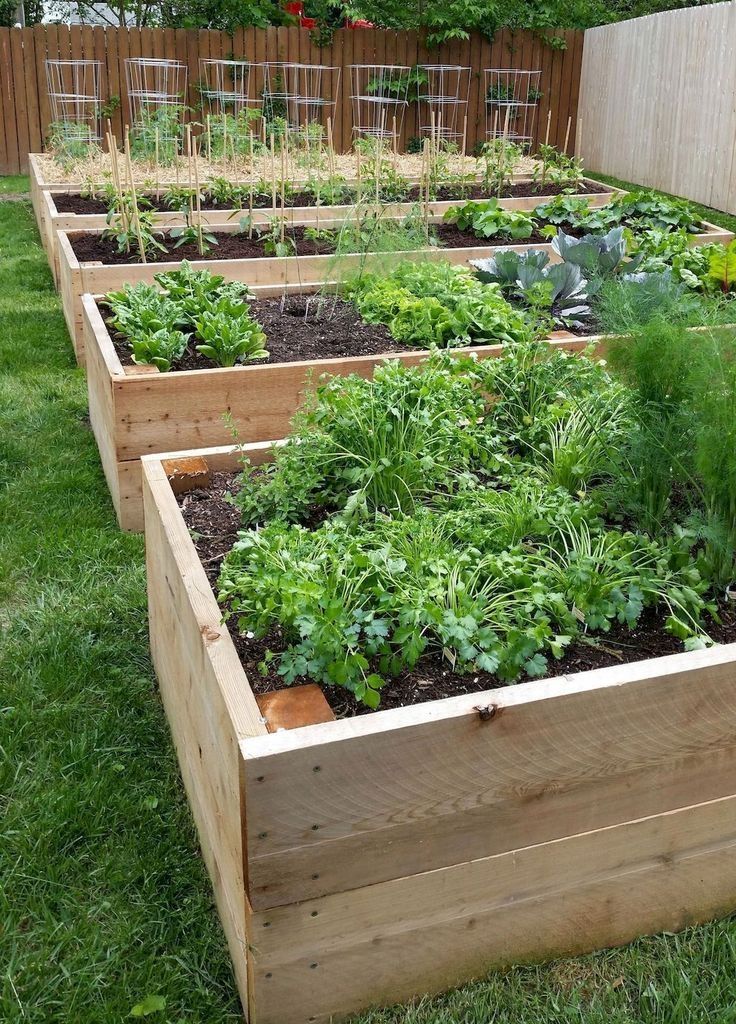
In Dave’s backyard, a new utility cable was not buried yet. So, we just moved the cable aside. Since Dave family is new to gardening, we did not have the gardening tools needed to remove the sod or dig under the raised bed. Fortunately, the raised bed they were setting up was 11” tall. That’s plenty of depth for growing vegetables, even for growing carrots and radishes. We bypassed removing the sod or digging the ground and got started on assembling the raised garden bed.
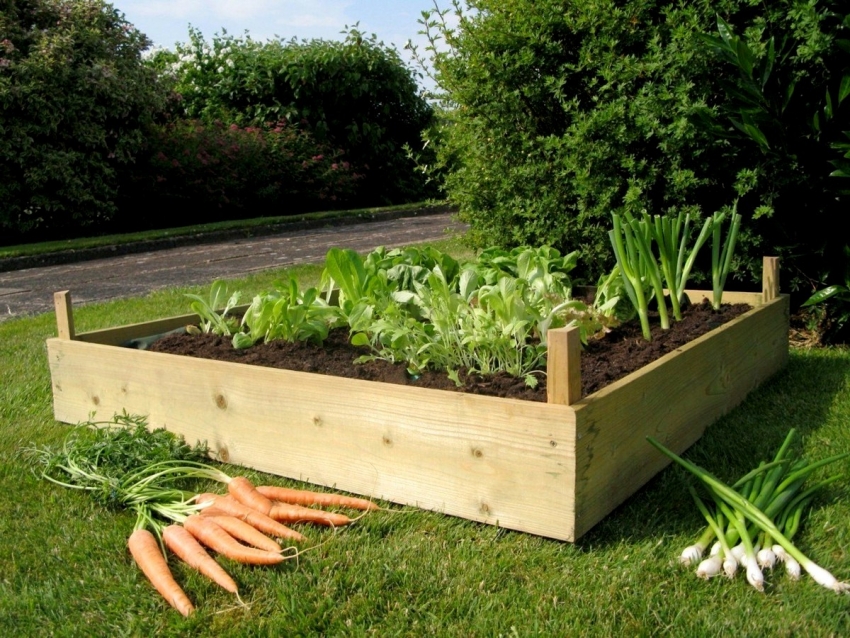
Step 3: Set Up The Raised Garden Bed
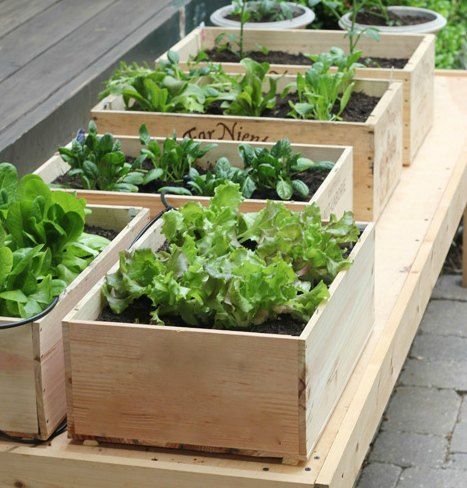
Before assembling a raised bed, first, consider the dimensions of the raised bed. The raised garden bed should be at least 6-inches high to provide enough soil space for plant roots to develop. The width should be no more than 4-feet, so it’s easy to reach across from either side.
The most recommended size of a raised garden bed for the beginner gardener is 4’ x 4’. Other popular configurations are 3’x6’, 4’x8’, and 4’x12’.
The length and actual height are up to your personal preference and available space.
Follow the instruction on the Raised bed kit to assemble the raised bed.
The Dave family was using a hand-me-down vinyl raised bed that was gifted by a friend. Even though the raised bed was used for years in their friend’s garden, it was sturdy and completely intact.
Like most of the raised bed kits available in the market, this raised bed was made up of 4 side panels and 4 corners. To assemble the raised bed, all we needed to do was slide corners and panels to create a square. Building a raised garden bed cannot be easier than this!
We started with one corner, slid one of the panels in the corner. Next, slide another corner on the panel. Before moving on to the next side, we made sure the first side is parallel to the fence behind the raised bed. Then, we repeated the steps to create a perfect 4’x4’ square.
Step 4: Line The Bottom Of The Raised Garden Bed
The bottom of the raised bed needs to be lined with material that blocks weed growth through the raised bed. This will prevent weed seeds from germinating so vegetable plants will not have to compete with weeds for nutrition and moisture. No weeds in the garden also mean less work for you.
You can use landscape fabric, recycled cardboard, or cloth fabric from recycled clothing. You should avoid lining the bottom with plastic or other non-porous material because it will prevent easy water drainage and hinder the development of a healthy worm colony in the soil.
Line the bottom of the raised bed with the selected material.
Next, if you are using landscaping fabric or recycled cloth, it is a good idea to add 2-4 inches of dry leaves, grass clippings, or other organic matter. This will help fill up the planting bed and slowly decompose and increase the soil’s fertility.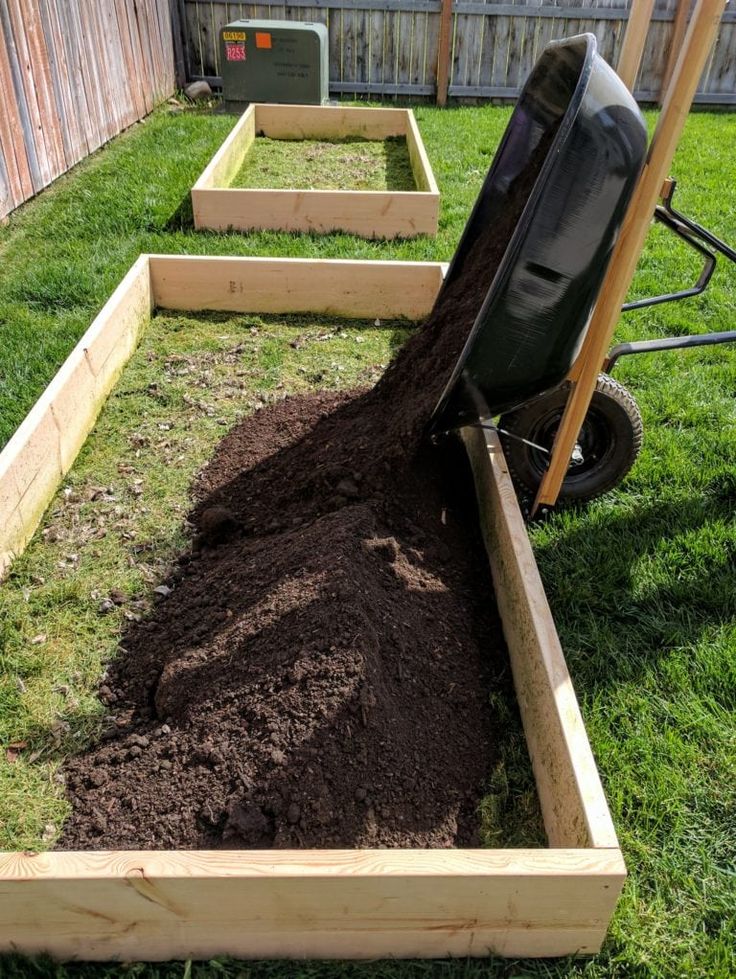 The organic matter will also help smother any weed seeds that can pass through the bottom liner and germinate.
We used empty Amazon packaging boxes and pizza boxes to line the bottom of the raised bed. Over time, the cardboard will decompose and add organic matter to the soil.
Step 5: Prepare Soil For The Raised Garden Bed
Good soil is the most critical ingredient for a productive vegetable garden. You can fill a raised garden bed with any blend of soil you want to make it far superior to the native soil in your garden.
A soil blend that’s loose, nutrient-rich, and contains plenty of organic matter allows the plant roots to easily penetrate the soil. Hence, the roots have easy access to water and vital nutrients. Adding Perlite to the soil mix will help promote good drainage and air circulation.
Special Soil blends mixed for use in raised bed gardening can be purchased at any garden supply center. These pre-blended soil mixes will take the guess-work out of this step, but it will cost more than creating the soil mix yourself, and the ingredients might not be in the proportions you want.
Custom Raised bed Soil Recipe:
Create a soil blend that is 50-percent potting soil or topsoil, 30-percent compost, and 20-percent Perlite. Depending on the type of vegetable you plan to grow, you may need to add a little sand to the soil blend.
Mel Mix Soil Recipe:
The most post popular soil mix recipe is to mix each of the below ingredients in an equal amount:
• One-third of Peat moss
• One-third of vermiculite (or Perlite)
• One-third of Compost (A blend of multiple types of compost works the best)
Add the soil blend on top of the bed liner and organic matter until it is 2-inches below the top rim on the bed frame. Gently level the soil, water it thoroughly, and allow it to sit overnight before planting.
Enhance the soil with additives:
In my top 10 tips for vegetable gardening, one of the most critical is ‘Invest in the soil’. In addition to using the custom or Mel Mix recipes above, add soil enhancers to improve the raised bed garden’s productivity.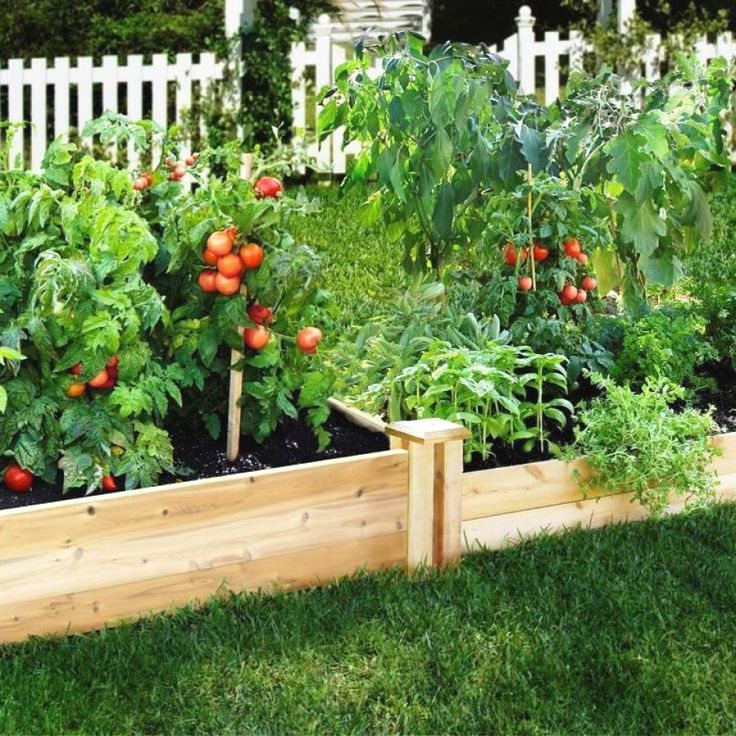
The two most essential soil enhancers are:
– Worm Castings: Also known as ‘vermicompost’, these earthworm droppings are the best soil additives for any indoor or outdoor garden. Mix 1 cup of worm castings per 4 sq ft. of raised bed soil.
– Rock dust: This is a fine powder of minerals that contains many trace elements. Rock dust enhances the soil’s productivity and provides nutrients to the vegetable plants to make the produce sweeter and better tasting.
In Dave’s raised bed, we chose the Mel’s mix recipe above. We mixed Peatmoss, Perlite, and a blend of Mushroom compost and Cow manure. Using a large shovel, we mixed the ingredients thoroughly, ensuring there are no large lumps or pockets of unmixed soil.
We filled the raised bed up to the top of the raised bed because we knew this soil mix will settle down a little once wet. Mr. Dave leveled the soil before drenching it with water.
This entire process took about 1.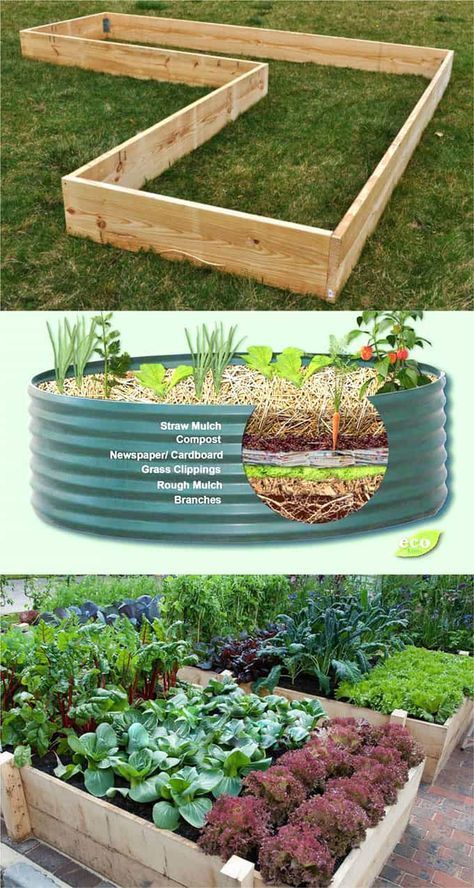 5 hours for us from start to finish. Most of the time was spent mixing the soil components.
The result was a light and fluffy soil mix that is ideal for growing vegetables. The raised garden bed was ready for planting!
What’s next?
Now your raised garden bed is ready for vegetable planting. But what do you plant in the raised bed? How many vegetables? How far apart? I will address all those questions in the next article about What and How to plant in a raised vegetable garden bed.
Check out this article to learn how to prepare the raised bed for spring planting.
Conclusion
Even if you do not have a lot of space or time for gardening, you can still have a productive vegetable garden using the raised bed gardening method. A raised garden bed allows you to grow vegetables almost anywhere and in any soil condition. Plus, you can produce a lot more food in a raised bed than in a traditional in-ground garden. Setting up a raised bed for vegetable gardening the most challenging and critical part, but with the right location, material, and soil, you too can start growing amazing veggies in your own backyard.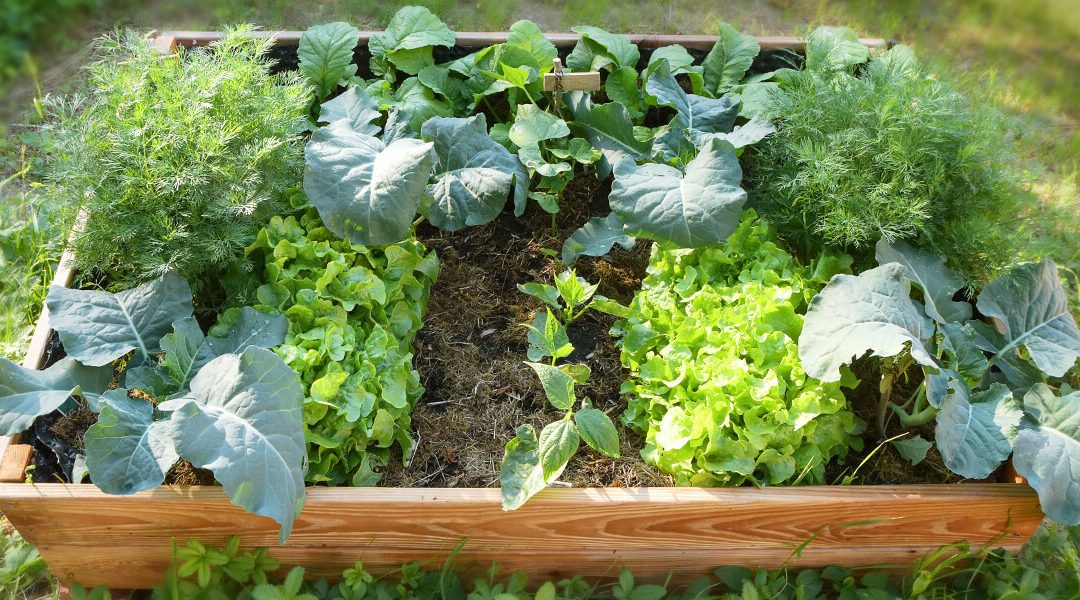
Did you find this information helpful? Share the link to this article on your Facebook page or gardening group. Your fellow gardeners will thank you for it!
Questions? Comments? Want to help?
If you have a question or like to share your thoughts on this article, please leave a comment below. I will respond as soon as I can.
Would you like to refer to this article frequently? Just pin this image to one of your Pinterest gardening boards so that you can easily find it later when you need it.
7 Common Mistakes in Raised Bed Gardening
Updated November 8, 2022
Many beginning gardeners plan to grow their vegetables in raised beds — and for good reason! Those of us who have been raised bed gardening for years testify to how much we enjoy it! What’s so great about gardening in raised beds?
- Better harvests
- Less weeding
- Sharp aesthetics
- Better Control Over Soil Fertility
- Uses Less Water & Mulch
- Easier to work in
- Less compaction = more airspace in soil = healthier plants
What’s not to love?
But as in any venture, mistakes are common. The problem with making mistakes in a raised bed garden is they aren’t easily corrected. I know this first-hand!
Had I known as a beginning gardener what I know now a decade later, I would have done many things differently. But thankfully, I’ve been able to correct many of my own raised bed mistakes. Others I’ve learned to live with, but now I know!
From both my own experience and from hearing the experiences of others, I’ve compiled these mistakes raised bed gardeners commonly make. (Number four is the biggest one, in my opinion.)
If you’re planning a raised bed garden for the first time or adding to your existing beds, this article will help you avoid many of the mistakes I and others have made.
And if you’re already gardening in raised beds but are seeing lackluster results, you may find some reasons why here.
*some links below are affiliate links, which means if you click through and make a purchase, I receive a small commission.
1.
 Raised Beds are too wide.
One of the biggest benefits of raised bed gardening is avoiding soil compaction. You want to be able to work in your garden beds without stepping on them.
Most beginners don’t realize this, but healthy soil needs air as much as it needs water! But when soil is trampled upon by either machines or foot traffic (or both!), the air between the soil particles is pushed out.
To avoid this problem, we want to make every effort NOT to step on our garden beds. This promotes a better soil structure and ultimately healthier plants.
But if the width of your raised beds prevents you from working all sides within your reach, you will find yourself stepping inside the bed, defeating this major benefit of a raised bed.
For this reason, raised beds should never be more than four feet wide.Most people can comfortably reach into the center of a four-foot-wide raised bed without any problem. But as I’ve experimented with different sizes, I’ve found a three-foot-wide span is even more comfortable for me.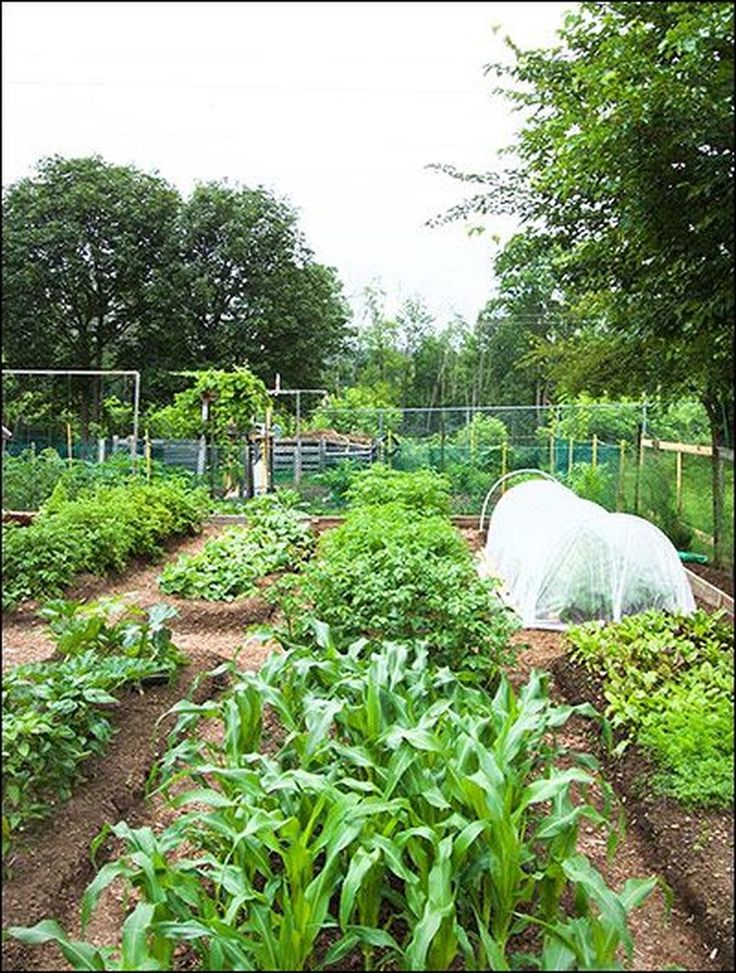
When choosing the width of your raised beds, you also must consider the placement of the bed. I made the mistake of putting two 4′ by 12′ raised beds up against a fence. Not only did weeds and grass grow between the beds and the fence, but I could not reach into the back of my bed to easily plant, weed, or harvest.
See how close the electric fence is behind these raised beds? Big mistake.This was such a pain we ended up moving the fence.
Learn from my mistake here: if you situate your raised beds next to a fence, I recommend the width not exceed thirty inches. This way, you can work your bed from one side only with ease.
This bed is 2.5 feet wide, which makes it easy to work from one side if necessary.2. You don’t plan for irrigation.
Unless you want to hand-water your raised beds with a watering can (and that will get old quick), you need to plan ahead of time how you will irrigate the beds.
First, I recommend placing raised beds near a water source.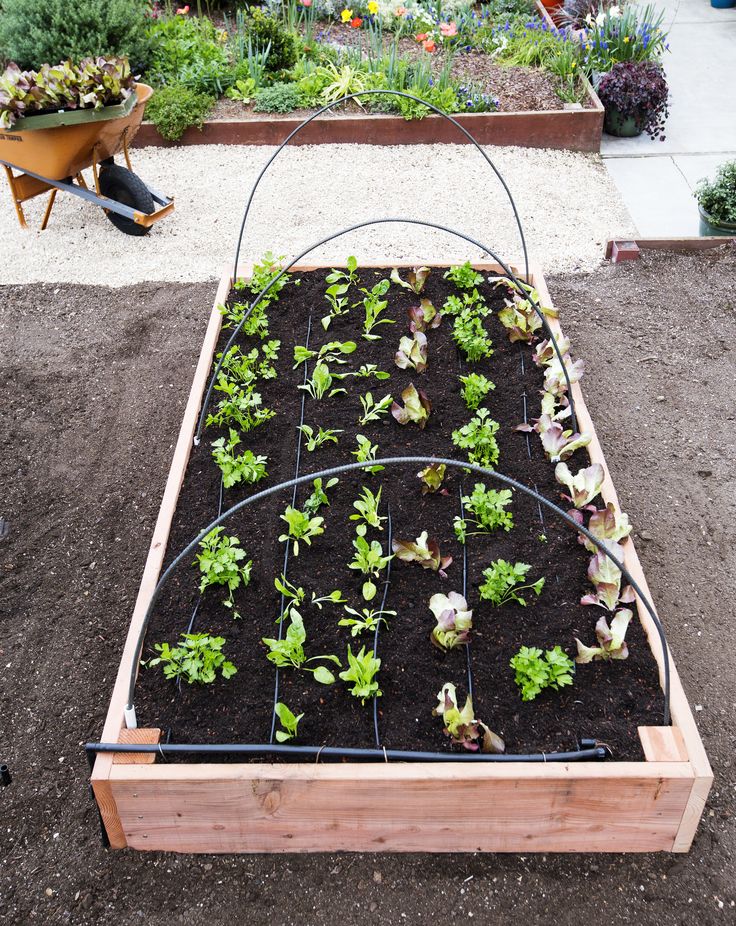 Whether you plant to hand-water your beds or use a more efficient system of soaker hoses or drip lines, having water easily accessible will save you much time and headache.
In my early years of gardening, I placed a lawn sprinkler near my raised beds to overhead water my garden. But this proved entirely inefficient. Not only did overhead watering waste water, but it also exacerbated many of the fungal diseases common in my area like early blight and powdery mildew.
Over the years, I’ve tested a variety of raised bed irrigation options — soaker hoses, drip lines, drip tape, and even an all-in-one solution called the Garden in Minutes Garden Grid. You can read about my experiences with each one, including pros and cons of each one, in this article: Irrigation Options for Raised Beds.
Most gardeners start out with an inexpensive soaker hose or a drip irrigation starter kit. But if you want an easy, all-in-one setup, I highly recommend the Garden in Minutes Garden Grid. (If you decide this is right for you, you can use my affiliate code JILL10 to get $10 off your purchase of $100 or more. )
)
The bottom line, however, is this: decide on which irrigation method you’ll try. This is best done sooner than later. Trust me when I tell you, adding any kind of irrigation after your plants are growing is a pain. It’s best to have the irrigation in place before you plant anything.
3. Wood (or other material) is Unsafe.
Though you will find a myriad of speculation about the safety of certain pressure-treated wood for use in raised beds, most experts agree on this: do not use pressure-treated wood manufactured prior to 2003.
Pressure-treated wood manufactured prior to 2003 contains chromated copper arsenate, and you don’t want that near your food garden.
What kind of wood should you use for your raised bed?
If you want to build your raised beds out of wood, these are the three most common options:
- Pressure-treated pine
- Untreated pine (or similar)
- Rot resistant wood (like cedar)
Pressure-Treated Wood
First, let’s talk about pressure-treated pine. Full disclosure, this is what I use. Modern methods of pressure-treated wood use safer practices than those used prior to 2003.
After researching this topic at length, I believe any risk in using pressure-treated wood for raised bed gardens is minimal. Copper is the main substance used in modern pressure-treated wood, and copper is actually a nutrient plants need in small amounts.
Therefore, in my opinion, if enough copper leached into the soil to pose a health hazard, we would see it first in the health of the plants. The plants themselves would suffer. In my decade of gardening in raised beds using pressure-treated wood, I’ve never seen a plant suffer in this way.
But what about leaching that does occur? The studies that have been done (and admittedly, there are few) on pressure-treated wood in raised gardens have shown a larger amount of copper leached near the wood itself than is present in the rest of the soil. Though it’s a minimal amount, I plant my crops several inches from the side of the bed.
Using pressure-treated wood in raised beds is definitely a personal choice. Personally, I choose it because I can build more raised beds and grow more food with the same amount that I would pay for a more expensive rot-resistant option (more on that below).
But, not everyone will come to the same decision. If that’s you, what are your other options?
Untreated Pine
Some gardeners choose to purchased untreated pine, mainly because it’s less expensive than other untreated wood.
Though I’ve never used this, from what I understand, the life of untreated pine is very short — perhaps a few seasons. This likely depends on the amount of rainfall your location receives, as rainfall will contribute to the breakdown of the wood.
This may be an option for you if you plan for your beds to be temporary and you want to save money.
Rot-Resistant Wood
Many people choose to use rot-resistant and chemical-free woods such as cedar or redwood. These beds are truly gorgeous, and they can last many years.
The problem? All good things come at a price. When I prepared to build my elevated raised bed, I compared the price of pressure-treated wood to cedar, and the cedar would have cost me (at the time) two to three times as much.
For one small bed, the difference in price may be worth it, especially if you still have concerns about pressure-treated wood. For me, though, and the size of the bed I was building, the difference in price was in the hundreds of dollars, if not nearing the thousands.
One thing to note — the price and available of rot-resistant woods depends on your location. You may have a ready source of rot-resistant wood nearby, so it’s worth looking into and pricing yourself.
Cheap Raised Bed Option
If you’re looking for cheap raised garden beds, you might want to repurpose wood that was used in a different capacity. Perhaps you have an old fence you are taking down, for example. To be safe, just make sure it wasn’t manufactured prior to 2003.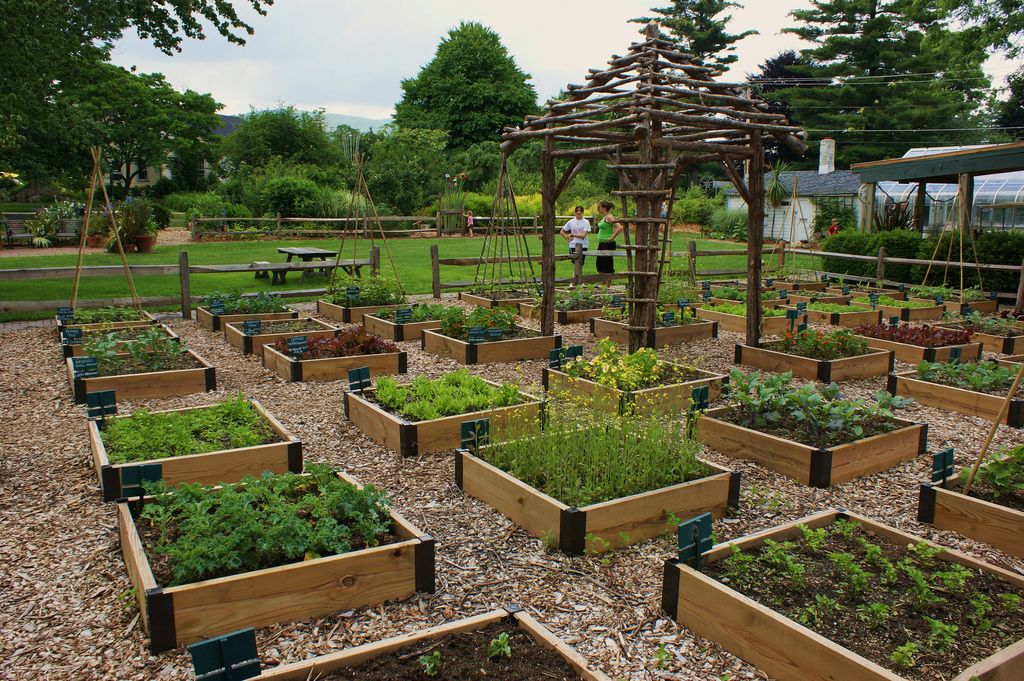
My brother-in-law called me when he took down his old fence and asked me if I wanted the wood. Before I took it, I confirmed the fence was only 10 years old. Then, I repurposed that old fence into three new raised beds. You can see my process of building these raised beds from that old garden fence here.
Other Materials for Raised Beds
These days gardeners are getting innovative and are using a variety of materials to grow their vegetable gardens. While you always want to stay away from old tires or railroad ties, here are safe options to consider:
- Raised Beds constructed from steel panels (like Jill Winger’s raised beds here).
- Metal raised beds (like Birdies raised beds – get 5% off with code JOURNEYWITHJILL)
- Rocks (like Elliott Homestead uses here)
- BPA-free polyethylene pre-built raised beds (from Good Ideas, Inc. – get 10% off with code JILL10)
 Explore this option and get 10% off with my referral/affiliate code JILL10 here.
These are just a few options, but as you can imagine, the options for how to frame your raised bed are virtually endless. Just be sure to do your research and choose a material you’re comfortable with.
4. Raised Bed Garden Soil Lacks Nutrients ⬅Insufficient nutrients in raised bed soil is probably the most common mistake I see. But when you get it right, the vegetables in your raised beds will thrive.
Many soil combinations will work well with raised beds, but some do not. Potting soil, for example, drains too quickly. Unless your raised bed sits on concrete or rocks (and thus acts more like a container), skip the potting soil. You need more substance than what potting soil can provide.
Potting soil also often lacks nutrients to sustain a raised bed garden all season. Raised beds aren’t containers that need constant fertilization; instead, raised beds function best when filled with organic, nutrient-rich soil from the beginning.
Another caution: When I conducted a raised bed soil test, I found that plants grown in a raised bed filled only with bagged soil grew much slower than those beds with some amount of organic material mixed in.
What is the best soil for raised beds?
Personally, I’ve found the best success in my raised beds by using a combination of native soil (or topsoil) and organic material like compost, but depending on what you have available and your budget, you have many options to choose from.
The possible combinations of raised bed soil can get overwhelming, especially if you’re on a budget. That’s why I put together a free guide to help any gardener — on any budget — discover the ideal soil combination for them. Download the free guide by clicking below.
5. Raised beds are placed too close together.
Working in raised beds can be the joy of any gardener. That’s why you want to create the most comfortable working area as possible.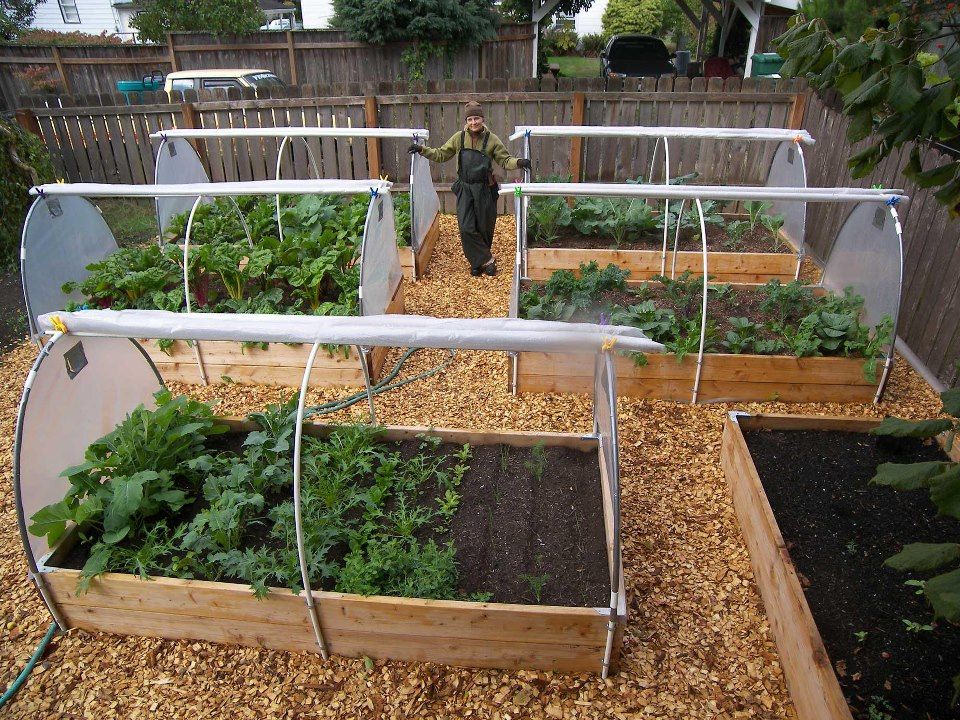
To do this, you want enough room to be able to work between the beds comfortably — two to three feet at least. I made this mistake by only allowing about a foot between my raised beds, and it’s always a challenge weeding, planting, and harvesting from those edges.
One thing we all forget is that not all of our plants will stay in the lines of our raised beds. Many plants spill over the edges (like squash and pumpkins), and others just grow so wide they reach over the walkways.
With all that in mind, then, when you place your raised beds on the ground, ensure you can get your garden cart or wheelbarrow in between them. When you have enough space to do that, you can sit a stool beside the beds for a comfortable working area.
The garden stool above can be found on Amazon here.6. Pathways grow up with weeds and grass.
There are few things more frustrating than going out to my garden, planning to enjoy some time working in my raised beds, and discovering the grass has grown up beside them.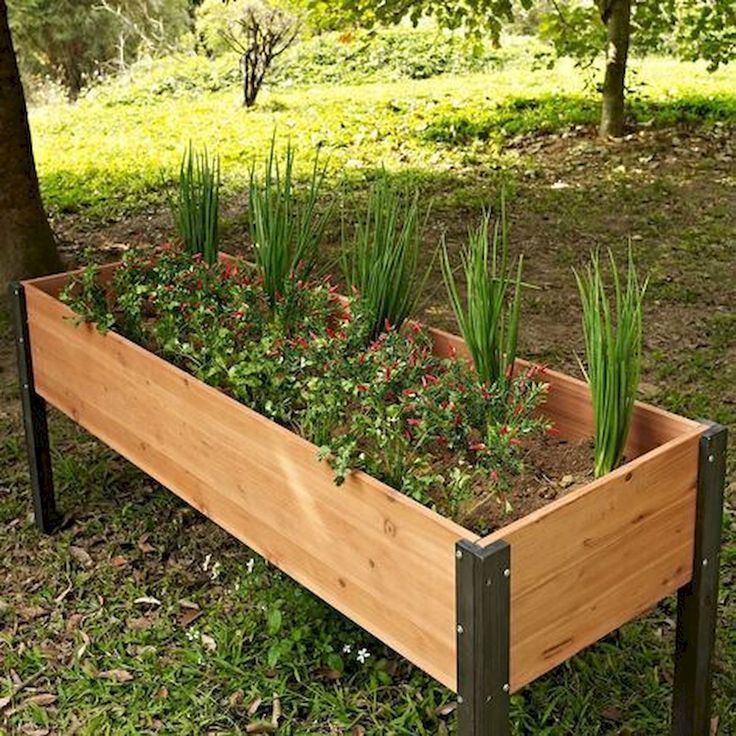
Weed and grass overgrowth always has the potential to harbor snakes, and overgrown grass causes my legs to itch. My husband and I both try to keep the area trimmed with a weed eater, but with three acres to maintain, sometimes we can’t always keep it tidy.
If you don’t want to keep mowing or weed eating the grass and weeds around your raised beds, place a barrier down before the weeds and grass emerge for the season.
Options for the Paths Around Raised Beds
To keep the area around your raised beds tidy and easy to work, you have several good options. Here are just a few:
- cardboard boxes
- sawdust
- pine needles
- gravel
Cardboard boxes
Broken down cardboard boxes with a light layer of mulch on top works great! But an even easier method I’ve begun to use is rolling brown kraft paper between beside my beds and covering with mulch.
Sawdust
My husband is also a hobby woodworker, so I spread sawdust between my beds. I don’t recommend sawdust as mulch because it can retard plant growth. But that makes it a great barrier where I don’t want nuisance grass and weeds to grow. The key is to lay it on thick — 4-6″ is ideal.
Pine Needles
Another option is pine needles if you happen to have pine trees nearby. Pine needles are my favorite for pathways because they break down more slowly than other materials. Like other organic mulches, lay it on thick, and a layer of cardboard or kraft paper underneath helps as well.
Gravel
Though expensive, a layer of gravel is an option many gardeners choose, especially when their entire raised bed space is in one area. Like the other options, I recommend putting down a barrier first. Without it, grass and weeds will grow between the gravel, and you don’t want to have to pluck weeds out of gravel (trust me).
What about landscape fabric?
I know we’ve all been tempted to use landscape fabric to line our pathways (even as a layer underneath some of the options above), but I don’t recommend it.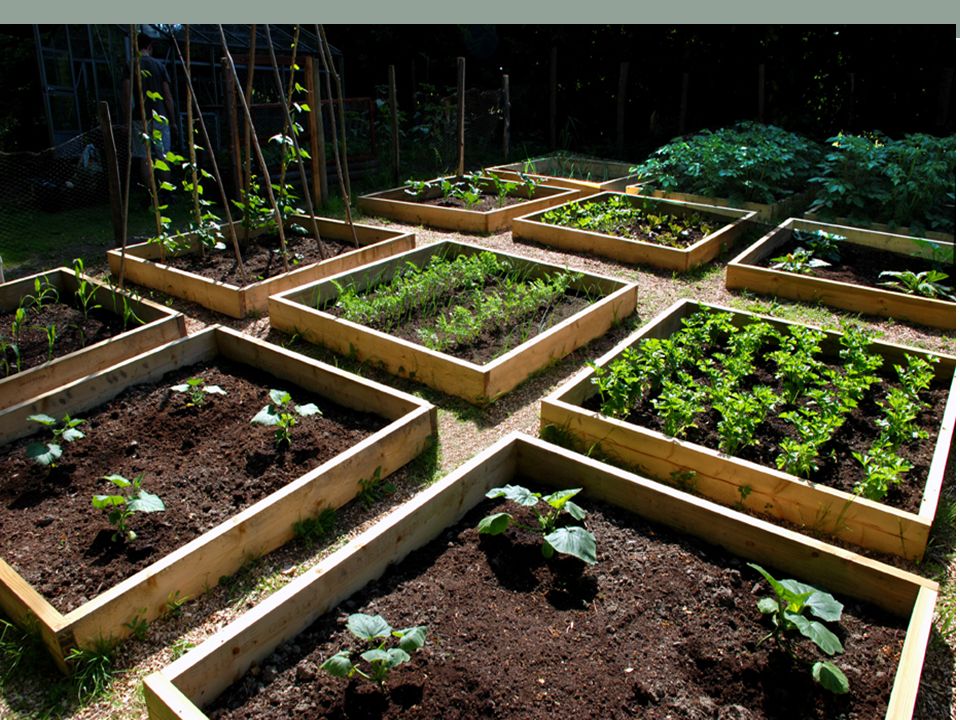 In my experience, weeds will eventually get through anyway. If you do choose a more permanent barrier, I recommend a greenhouse-grade plastic sheeting instead of permeable landscape fabric.
7. Neglecting to Mulch Raised Beds
Mulching your raised beds is just an important as mulching in a ground garden bed, and perhaps even more so.
Though weed pressure is usually less in raised beds, it isn’t non-existent. Weed seeds from native soil find light and sprout. Seeds floating in the wind and deposited from birds love the rich soil of raised beds. For these reasons, mulch will dramatically reduce your weeding time.
But more importantly, mulch regulates the soil temperature and retains moisture — both critical needs of raised beds in the hot summer.
One huge advantage of raised beds is how the soil heats up quicker in the spring, allowing for faster planting. But it also heats up as the season goes on. Mulch helps regulate that temperature more than bare soil would.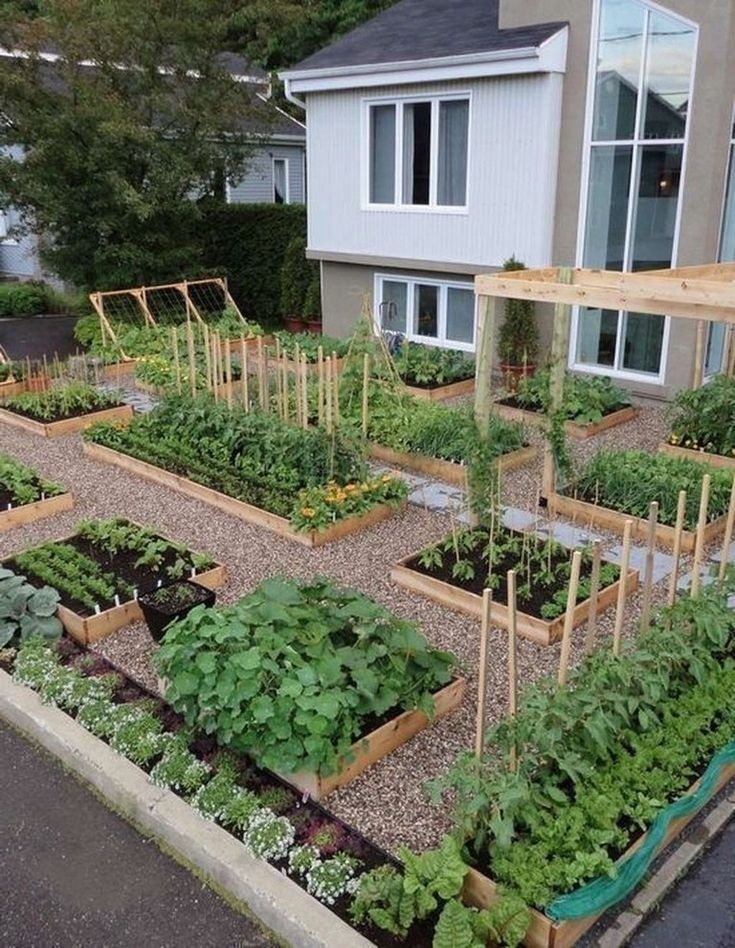
Mulch also regulates moisture. In wet seasons, it acts like a sponge, absorbing excess rainfall. In dry times, it keeps moisture from evaporating in the heat of the summer. You will find your mulched raised beds much healthier than those without it.
I prefer to mulch with wood chips, and in this post, I talk about the pros and cons of four common types of mulch — all of which I have tried in my raised bed gardens.
Update: here are 9 organic mulch options you can consider as well.
Hopefully, by avoiding these 7 mistakes, you will be on your way to an enjoyable raised bed gardening experience with abundant harvests!
Do you have anything to add to my list?
More Raised Bed Gardening Resources
How to Troubleshoot and Revive a Raised Garden Bed
If you’ve had problems with your raised bed soil, this post explains what the problem might be and how to fix it: Problems with Raised Bed Soil
3 Raised Bed Soil Mixes Tested
What is the best soil blend to fill your raised beds with? I put three common raised bed soil mixes to the test, and the results may surprise you.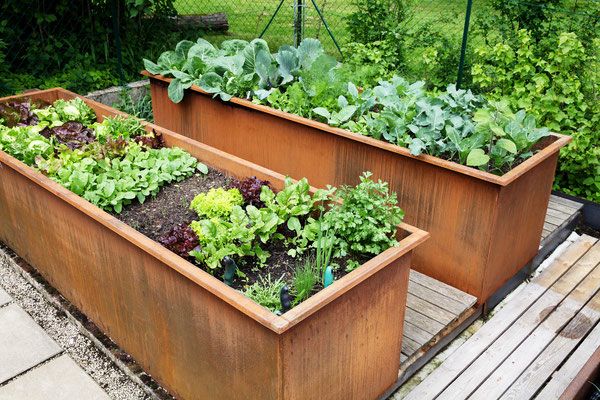
What do I Put on the Bottom of Raised Beds?
When you’re building your raised bed, should you line it with anything? How can you fill it in the least expensive way and still provide fertile soil? This post gives your options: What do I put on the bottom of raised beds?
Raised Bed Garden vs. In Ground Garden
Jill Winger of the Prairie Homestead talks with me about why she changed from an in-ground garden to a raised bed garden to help others decide if it’s right for them in this post.
FAQs of Raised Bed Vegetable Gardening
I’ve received many follow-up questions to this post, and I addressed the most common ones here: Raised Bed Gardening FAQs: 9 Common Questions
Raised Bed Soil Options Free Download
Don’t forget to download my free Raised Bed Soil Options for any budget guide below:
Podcast
I discuss each of these seven mistakes in even more detail in this episode of the Beginner’s Garden Podcast. Listen here or on your favorite podcasting app.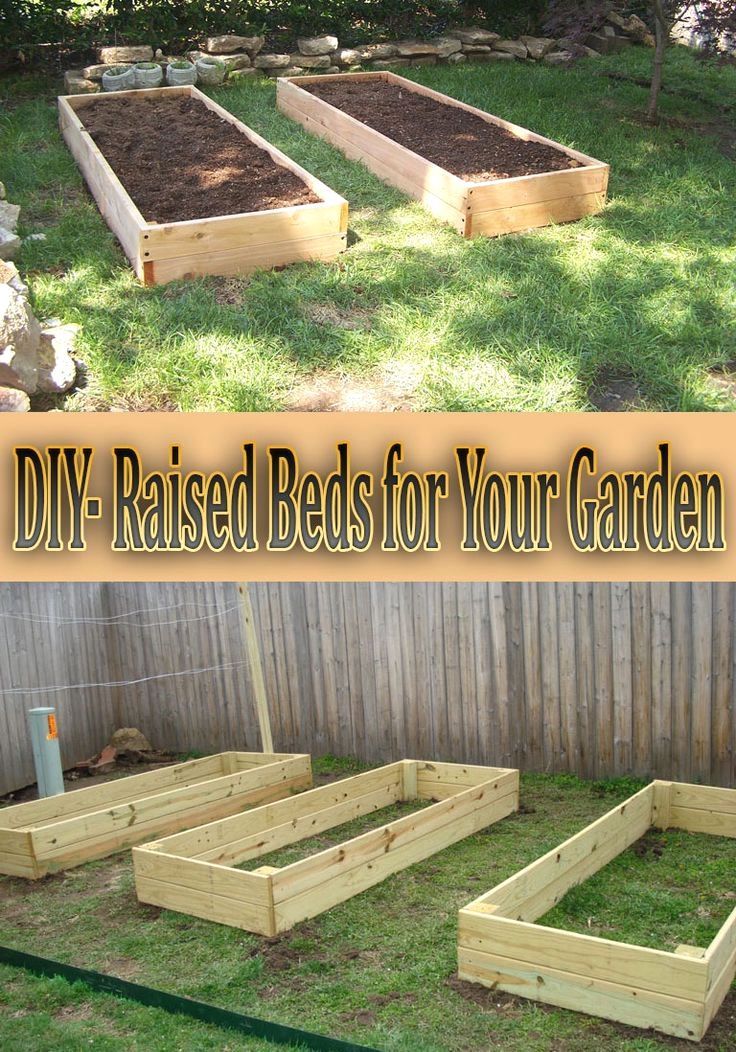
Content
- 1 Warm beds
- 2 High beds
- 3 Raised beds
- 4 other types how to make beds. Indeed, in fact, there are several types of ridges: warm, high, multi-level, ridge-box or pit. What type of beds to choose for a particular culture, how to properly organize the structure and what are its advantages? We will try to give answers to all these questions in the proposed article.
Warm beds
Warm beds are built by gardeners who want to get the first spring crop of vegetables as early as possible. In a sense, they are an alternative to greenhouses and greenhouses. The principle of operation of such ridges is to use the heat obtained from the decomposition of organic matter.
The warm bed can be laid in a trench or box. The height of the sides of the structure should be approximately 50 cm. The width of the ridges can be varied. So, you can create narrow ridges 40-60 cm wide, or wide 100-120 cm.
 Each gardener chooses the length of the ridges independently. The sides of a warm bed can be made from slate, boards, timber. A metal mesh should be placed at the bottom of the structure, which will become a barrier to the penetration of rodents.
 After the warm bed box has been created, it must be filled in layers in the following sequence:
- Sawdust is placed on the bottom of the box. Before use, they are scalded with boiling water and spilled with a manganese solution. The thickness of the sawdust layer should be at least 15 cm. The sawdust in the process of using the ridges will retain moisture and nourish the plants with it. It is worth noting that when constructing warm ridges on clay soil, the bottom layer should be drainage, consisting of large wood residues.
- The second layer is organic debris, such as leaves or turf mixed with manure or bird droppings. After laying, the layer is rammed, subsequently it will heat up the upper layers of the soil.
 Its thickness should not be less than 15 cm.
 - The third layer should consist of rapidly decaying organic matter, such as grass or ready-made compost. Its thickness should not be less than 10 cm.
- The fourth layer is a fertile filler. It should be made by mixing 6 buckets of garden soil (peat) and one bucket each of treated sawdust and sand. It is also necessary to add superphosphate, wood ash in the amount of 1 tablespoon, as well as urea, zinc sulfate, potassium sulfate in the amount of 1 teaspoon to the resulting substrate. The thickness of this fertile layer of earth must be at least 20 cm.
Important! All layers of a warm bed are covered with a thin layer of sand.
You can make beds in the garden in autumn or spring. Autumn ridges overheat in winter in a natural way, but you can speed up the process of decay in beds created in spring with the help of special preparations, for example, Baikal-M or Radiance. They contain a large number of beneficial bacteria, the vital activity of which contributes to the accelerated decay of organic matter.
It should be noted that warm beds can be equipped not only in open areas of soil, but also in greenhouses, greenhouses. Information on how to do this is shown in the video:
Warm beds can be used for 4 years, after which they should be dismantled. Over time, the microelement composition and intensity of heating of the soil in the box changes. That is why farmers recommend growing the following crops on them:
- In the first year of decay, organic matter releases a lot of heat and contains an increased amount of nitrogen. Such conditions are great for growing cucumbers, watermelons, pumpkins, zucchini and squash. Root crops cannot be grown under such conditions.
- In the second year of operation, it is recommended to plant cucumbers, tomatoes, eggplant, cabbage, peppers on warm beds.
- In the third year of use, warm beds are suitable for growing all types of crops, including root crops, tomatoes, cucumbers, peppers, eggplants
- In the last fourth year, the nutrient content in the soil is significantly reduced, which means that the ridges are unsuitable for growing heat-loving crops, however, root crops, legumes, onions and greens will feel great in such conditions.

Warm beds can be planted with heat-loving crops in early spring. Additionally, you can protect them from the cold with the help of a film shelter on the arcs.
High beds
Another popular type of garden beds is high beds. They are designed for growing vegetables in areas located in marshy areas and in rainy regions, as they provide good drainage.
Ridges with a height of 30 to 80 cm are called high. When creating high ridges, it is necessary to build a box. The material for this can serve as a wood board, brick, plastic, metal. The process of erecting high ridges consists of the following steps:
- At the bottom of the box, a metal mesh is placed as an obstacle to rodents and geotextile, which will not allow weeds to germinate.
- A drainage layer consisting of crushed stone, expanded clay, pebbles or brick fragments must be laid over the protective materials. The height of this layer must be at least 10 cm.
- Fill the box of a high ridge with a homogeneous, fertile soil, free of weeds and larvae of harmful insects.
 So, for filling it is better to use purchased soil or clean the fertile soil on your own by sifting and spilling with a solution of potassium permanganate. A layer of soil should fill the entire bed, to a depth below 3-4 cm of the upper edge of the side.
Making high beds with your own hands is not at all difficult. At the same time, any kind of plants can be grown on them. You can see an example of an originally made high bed in the photo:
High beds are guaranteed to provide good soil drainage, facilitate weeding and plant care, and are highly decorative. This type of beds allows you to grow heat-loving plants in regions with an unfavorable climate.
Raised beds
This type of beds is the classic and most common. To create such ridges, special facilities are not needed. It is not at all difficult to make such beds in the country with your own hands. For this, only a shovel is needed.
Raised beds are considered to be 10-20 cm high, without a special box.
 Depending on the preferences of the gardener, their width can be narrow 50 cm or wide 100 cm. Trenches between the beds are made with a shovel, digging recesses at least 30 cm wide. The edges of such a bulk ridge are compacted with pops of the same shovel.
 These raised beds are perfect for growing any crop. They are easy to water, but not very convenient to weed. When arranging the beds, one should take into account the features of different parts of the world. So, heat-loving crops must be placed in the south, where daylight is maximum.
Important! Raised beds are the best option for lazy gardeners.
It is worth noting that with the help of raised beds it is easy to create beautiful, original forms that can become a real decoration of the site.
Other species
In addition to the above species, there are other, more "exotic" beds. The most famous of them are:
- boxes, which differ from the usual raised ridges by the presence of a frame made of wooden boards, stones, slate;
- pits are designed for growing moisture-loving, tall crops;
- multi-tiered beds are used mainly for growing crops with an underdeveloped root system for decorative purposes.

An example of how an unusual garden bed can decorate a summer cottage is shown in the photo below.
Basic principles of arrangement
Having determined the required type of bed, the farmer must also familiarize himself with the basic principles of its placement in the garden: in the south, in the northern shade, dill, basil and other greens will feel good.
- To place the ridges, you should choose the most even piece of land where water flows will not wash away the crops, but will be evenly absorbed into the soil.
- Plant beds in high, hilly areas receive maximum light;
- Using fertile soil when creating ridges, you can count on the maximum yield of vegetables;
- The aisles between the beds should be wide enough so that the movement of a person is not difficult, and in the neighborhood growing crops do not obscure each other.
- Beds with a frame are more reliably protected from the penetration of weeds;
- In low terrain, when creating beds, it is necessary to provide for the presence of drainage, in arid regions, on the contrary, it is recommended to place the beds in recesses.
When creating beds in your backyard or cottage, be sure to take into account the above principles. They will facilitate the care of plants and allow you to get the maximum yield of vegetables.
It is impossible to unequivocally answer the question of how to properly make beds in the garden, because there is a huge variety of different types of structures for growing vegetables. All of them can be used in specific conditions. So, you can get an early spring harvest, without a greenhouse and a greenhouse, with the help of warm beds, but high or multi-level beds will allow you to create a real architectural masterpiece for decorating a garden. The choice of one or another design always remains with the gardener.
photos and recommendations for gardening
SHARE
IN SOCIAL NETWORKS
This article discusses beds for the lazy: photos of the easiest structures to manufacture for those who want to get a neat garden with a minimum of effort, the most common materials and technologies for creating structures based on them. The reader will learn how to combine vegetable crops in one garden and prepare the soil for planting cucumbers. The article contains practical recommendations for beginner gardeners.
Proper organization of beds in the garden will help save time and effort when planting and harvesting
Contents
- 1 Beds for the lazy: photos and basic information for beginner gardeners
- 1.1 Varieties of beds in the garden: how to properly prepare for construction
- 1.2 Making beds with your own hands from improvised materials: photos of high structures
- 1.3 How to arrange the beds in the garden: photos and recommendations for choosing a place
- 1.4 How to make the best beds in the garden: choosing the optimal design
- 2 How to make your own beds from boards: useful tips
- 2.1 Making practical beds from boards: how to make the right choice of material for your own
- 2.2 Making beds from boards hands: photo, dimensions of structures
- 3 Creation of mixed plantings of vegetables in the garden: photo examples and optimal schemes
- 3.
 1 Proper neighborhood of vegetables in the beds: compatibility table
 - 3.2 Examples of mixed planting of vegetables in the garden: popular schemes
- 3.3 Table of crop rotation of vegetables in the beds by crop groups
- 3.
- 4.2 How to make cucumber beds in the garden with laying
- 4.3 Warm surface cucumber beds in the open field
- 4.4 Raised beds for cucumbers in the open field
- 4.5 How to make beds in the garden: a video review of technology
Beds for the lazy: photos and basic information for beginner gardeners
- protection against erosion of the soil in the garden when a large amount of precipitation falls or when the plants are watered. The bed borders will keep the nutrient soil in place, preventing it from washing out onto the paths. In addition, the passages between the structures themselves will remain clean, no dirty puddles and streaks;
Neat garden beds will make the garden more attractive and organized
- the possibility of forming the basis for the creation of a temporary greenhouse for the spring.
 By installing high sides as fences, inside the structure you can organize a multi-layered garden bed, which can be used as a greenhouse. To do this, it is enough to install special arcs and stretch the film. The result is a neat greenhouse house;
 - improving the appearance of the vegetable garden through orderly and even plantings with beautiful framing;
- creating boundaries to prevent the spread of weeds.
By planting the plants correctly, you can avoid the growth of weeds on the beds and paths
Making your own beds from boards and other materials allows you to clearly limit the planting area, so weeds and harmful plants do not have the opportunity to spread widely. If the fence of the garden is dug in to a great depth, the level of protection increases and perennial weeds that are unable to overcome this barrier can no longer penetrate into the garden.
Please note! With the help of beds with well-buried fences, the spread of plants such as reeds and couch grass is effectively blocked.
Their root system is capable of covering large distances underground if left unchecked.
High warm beds made of quality materials can serve the owners for many years
Varieties of beds in the garden: how to properly prepare for construction
Several types of beds are used for gardening:
- standard;
- high;
- narrow.
Wide paths and the optimal size of the beds will allow you not to step on the ground when working with plants
Standard beds are on the same level with the garden, they do not go deep into the ground and do not protrude above it. At the same time, the owner of the territory can independently choose the width, length and nature of the location of the beds in the summer cottage, photos of interesting design options can be seen in this article. As a rule, plantings are placed at a distance of no more than 0.5 m from each other, so that it is easier to care for the plants. To mark the territory, it is recommended to use a rope stretched between the pegs.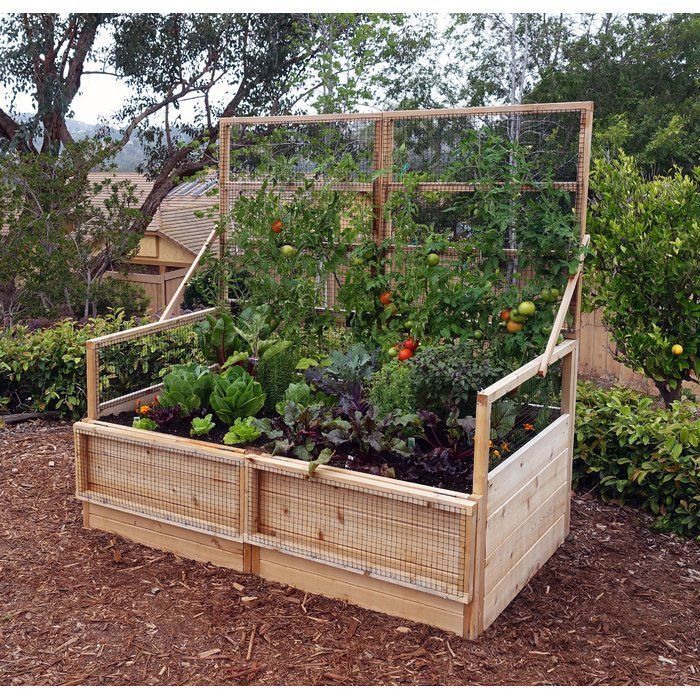 The use of a special garden marker is allowed.
Paths can be planted with lawn grass, but care must be taken to ensure that the beds are well defined.
Before making a bed with a narrow design, make sure that the building area has a level surface and sufficient lighting. This type of product is characterized by increased row spacing. This parameter can sometimes reach 1 m. At the same time, the beds themselves do not exceed 0.45 m in width. The designs of narrow beds slightly rise above the soil level. The difference between the height of the garden and the surface of the plot is 0.2 m.
Many gardeners find it convenient to work with narrow beds
In the area where the beds are planned, the soil should be dug up and fertilized. At the same time, you should not spend nutritional supplements on aisles, you only need to process the planting site. Dolomite flour or a special complex consisting of minerals can be used as fertilizers.
Interesting fact! Narrow structures are also called Mittlider beds (after the man who invented their technology).
According to the agronomist, the garden will bring a good harvest if the plants are regularly watered and nutrient mixtures of industrial production are applied. And he, on the contrary, did not recommend using compost and manure.
Narrow beds according to the Mittlider method, due to the large amount of light received, give a good harvest
Making beds with your own hands from improvised materials: photos of high structures
then proceeds to further planning and construction, since the technology of their creation depends on the physical and operational indicators of the material. Regardless of his choice, the mechanism for manufacturing structures is almost always the same. Construction begins with the installation of the frame. The standard size of such structures is 0.9m (width) and 1.2 m (length). After that, the product is filled with fertile soil.
Beds made from quality wood are more environmentally friendly than concrete or asbestos-cement
Designs of hand-made beds from improvised materials can be created on the basis of:
- Stone or brick - products from these materials look aesthetically pleasing, while they characterized by a long service life.
 The disadvantages of stone or brick frames include their cost. In addition, the assembly procedure requires a lot of time, the dismantling of a stationary structure can be difficult.
 - Vines are the most accessible material found in nature. Due to the flexibility, the beds can be given any shape, however, the service life of such a design is limited to a short period of time. In addition, you will need to carefully study the weaving technique and acquire a special tool for cutting branches.
- Metal - the material allows you to create lightweight portable structures that can be painted in any color. However, the cost of such a frame is high, and the operation may require a welding machine and skills in handling it. Products also need anti-corrosion protection.
- Slate is a relatively inexpensive material that provides easy assembly of the structure, but requires extreme care due to its fragility.
Gabion can also be used to organize a warm bed
How to arrange the beds in the garden: photos and recommendations for choosing a place
Of no small importance in obtaining a rich harvest is the right choice of a place for the construction of beds and their placement. It is desirable that the area chosen for organizing the garden is flat and receives maximum sun exposure throughout the day.
Please note! Most plants need a lot of sunlight. In the afternoon, a slight blackout will be useful.
To make the right choice of a place for organizing a garden, it is recommended to spend some time on the site and observe the distribution of light throughout the day. In addition, special attention should be paid to the placement of trees, both on your site and on the territory of your neighbors. This is necessary in order to determine what size the shadow is and where it falls. It should be borne in mind that a site flooded with sun in winter may be shaded in summer, since dense foliage appears on bushes and trees in the warm season.
Related article:
Do-it-yourself beautiful garden beds: photo examples and unusual solutions
Photos of interesting designs of beds, recommendations for their creation.
Tips for designing unusual landscape design on the site.
The best place is the area where the sun is present throughout the day. It is allowed to install beds where the shadow is present in the morning or in the afternoon. If the proposed construction zone is dark throughout the day, you should not use this place for arranging a garden.
How best to make beds in the garden: choosing the optimal design
Choosing the design of the beds is carried out at an early stage of planning, when the place for the garden has already been selected.
Each type of bed has its own advantages:
- Raised or high beds are the most efficient designs and best suited for growing vegetable crops. Building materials for their creation are not expensive, while the soil does not need to be dug up. The width and height of the structures determine how much effort and time it will take to build them. Most often, summer residents prefer wooden beds made of planks.
 On the network you can find photos of bulk beds with your own hands, such structures do not have a fence. They are also categorized as elevated structures;
Container beds are very convenient because they can be moved to another convenient location if desired.
- Container beds are beneficial when space is limited For organizing such beds, pots of small, large and medium sizes are suitable. Garlic, peppers, lettuce and greens feel especially good in containers. Mobility is another advantage of container beds, which, if desired, can be rearranged to any place;
- open field beds are the oldest way to grow crops that are planted directly in the ground. In such conditions, it is more difficult to get a good harvest, so the technology of joint planting vegetables in the garden is often used.
Annual plants can be grown in large plastic bottles and placed in a convenient location for the plot
Helpful Hint! If it is planned to plant crops in open ground, it is recommended to determine the quality of the soil, fertilize it and check the compatibility of vegetables in the garden against the table.
How to make your own plank beds: useful tips
Raised beds are most often made of wood. This material in comparison with others is considered the most practical and environmentally friendly. Similar designs look very aesthetically pleasing in the photo. Do-it-yourself plank beds have other advantages:
- simple maintenance system for easy weeding, harvesting and watering plants;
- the possibility of growing vegetable crops even where the soil is completely unsuitable for these purposes. On the basis of the boards, a frame is made, which is subsequently filled with fertile soil bought in a store, so there is no connection to the quality of the earth and its composition. Thanks to this, plants can be grown even in areas with a rocky surface;
Sturdy wooden beds can be made by yourself or purchased at the garden center
- box constructions help keep the soil inside the beds. In addition, the presence of sides simplifies the process of mounting arcs to form a greenhouse.
 It is much easier to fix these elements on the fence than to dig them into the soil;
 - without even knowing how to properly make beds in the garden, any summer resident will cope with the manufacture of wooden structures-boxes. The boards are easy to process, and the construction and assembly of the frame does not require an expensive tool;
- there is no chance that plants planted near the sides will get burned in the summer heat. Wood, unlike metal, is not prone to overheating.
In order to avoid washing out of soil from high beds, it is necessary to pay special attention to the joints when assembling the box
Please note! The environmental friendliness of the material allows you not to worry that harmful substances will get into the soil. Wood is much safer than asbestos-cement sheets (slate). The exception is boards treated with chemicals designed to double the life of the material.
Making practical beds from boards: how to make the right choice of material
Summer residents most often create wooden structures based on blanks that they find on the farm. For the manufacture of beds, timber, round timber, slab, lining can be used.
When it comes to purchasing boards in the store, you should pay special attention to the type of wood from which they are made:
- a board made of ash or oak will last a very long time. Although the cost of such products is quite high;
- pine board remains the most favorable in terms of price and processing. But this type of wood is highly susceptible to decay while in the ground, so its service life is short. Due to impregnations and antiseptic agents, the life of a pine tree can be extended for a couple of years;
- cedar and larch boards are considered the most suitable material for making boxes. Larch has a natural impregnation with resin, thanks to which the product will retain its novelty for many years without the use of additional impregnations. Cedar wood is characterized by a lower resin content, but it is not inferior to larch in terms of durability and at the same time has an affordable price;
To ensure that water does not stagnate in the boxes, it is necessary to think over the drainage system before planting the plants. It is worth noting that this type of wood is durable and has a solid structure, so the process of processing it will be more difficult. To work with acacia, you need a powerful electric tool.
Good advice! It is not recommended to save on the quality of the material. Boards made of bad wood are prone to rapid decay. After a few years, holes will appear on the fences of the beds, through which fertile soil will be washed out during rains and watering plants.
Wooden beds can also be used for planting bushes and small fruit trees
Making beds from boards with your own hands: photo, dimensions of constructions
Box-beds have a rectangular shape and are made of boards. The simplest design does not require special knowledge and skills, so any novice summer resident can handle it. The main thing at the same time is to correctly calculate the dimensions of the boxes.
When planting plants, it is necessary to take into account the optimal amount of light and heat for certain crops, since the higher the bed, the faster it heats up
Recommended bed sizes:
- height - many summer residents strive to create the highest possible sides.
 However, this approach is erroneous if it is not planned to build a warm bed for cucumbers or other types of crops, where a fence height of up to 0.7 m is welcome. The manufacturing technology of such structures requires the laying of a multilayer insulation. For ordinary beds, such high fences are not required, it is enough to limit yourself to 0.15-0.2 m. In addition, wood is susceptible to deformation changes under the influence of moisture, so there is a risk that over time, high fences will swell and lose their attractive shape;
Long beds made of wood should be strengthened in several places to avoid their deformation. Most often, this parameter is in the range of 0.9-1.2 m, because in the process of work, a person should be able to reach the middle of the structure from the side of the side rail;

Good advice! When choosing dimensional parameters for wooden beds, it should be taken into account that between them it is necessary to organize passages 0.4-0.6 m wide. Only after that is the layout of structures on the site considered.
Creating mixed plantings of vegetables in the garden: photo examples and optimal schemes
The method of combining crops in practice is very effective if the companion plants are chosen well. Therefore, site owners calculate according to a special table of the neighborhood of vegetables in the beds before planting. Some types of vegetables have a depressing effect on each other, others can improve the growth and development of neighbors, provide them with protection from pests.
When planning the beds, it is worth considering that companion plants give more yield if they are planted side by side
The correct neighborhood of vegetables in the beds: compatibility table
significantly reduced the number of the Colorado potato beetle. Marigolds effectively protect cabbage from white butterflies. Despite this, a certain balance must be maintained. After all, an excessive amount of marigolds in the garden can drown out the growth of cabbage.
Table of neighboring vegetables in the garden, creating a successful tandem:
| Vegetable crop name | Plants for successful combination |
| strawberry | beans, spinach, marigolds, garlic, lettuce |
| kohlrabi | cucumber, lettuce, onion, beetroot |
| peas | carrot, corn, cucumber, calendula, eggplant |
| bow | tomato, celery, beetroot, savory, carrot |
| beans | potato, cucumber, tomato, strawberry, eggplant |
| cucumber | radishes, peppers, peas, cabbage, beans |
| carrots | lettuce, onion, sage, tomato, peas |
| lettuce | strawberry, cucumber, carrot, radish |
| pepper | lettuce, cucumber, beans |
| tomato | calendula, basil, beans, nasturtium, parsley |
The following pairs of plants are characterized by poor compatibility of planting vegetables in the garden:
- cabbage and strawberry;
- onions and beans;
- carrots and celery, dill, parsley;
- cucumbers and potatoes.

Even in a small area, you can get a high yield by using the plant-neighbor correspondence table when planting
Useful advice! In the garden, in addition to the main crops, it is recommended to plant spices and ornamental herbs pointwise. Thus, the garden will be not only beautiful, but also useful.
Examples of mixed planting vegetables in the garden: popular schemes
A good example of the compatibility of vegetables in the garden is the combination of onions and carrots. As an independent crop, onions are able to produce about 2.5 kg of yield from 1 m² of beds. Carrots on the same area gives about 6 kg of crop. With the joint cultivation of these crops with 1 m², you can get 9kg of vegetables. These plants create protective barriers for each other against pests, so the efficiency of the used area increases.
Onions and carrots are excellent neighbors, so they are usually planted side by side.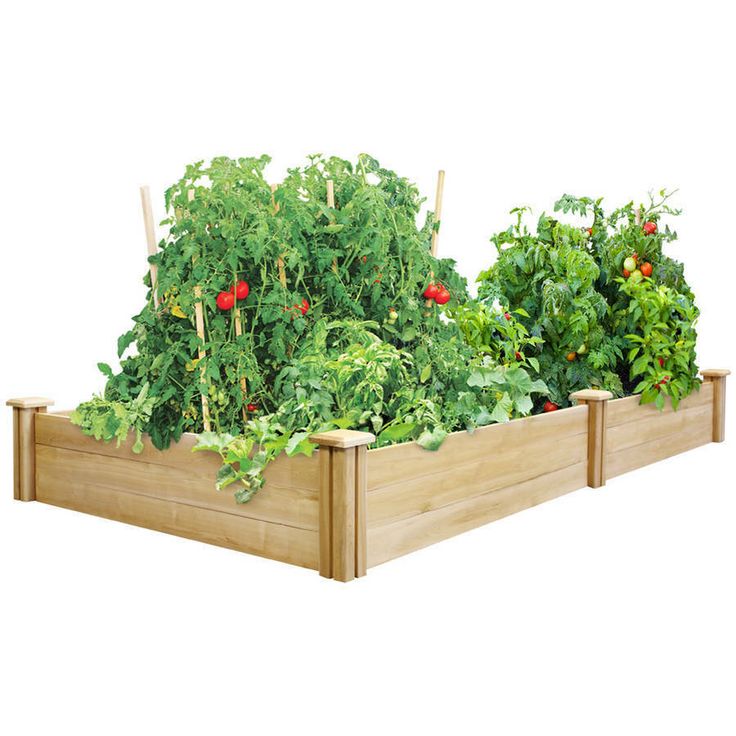
Of course, when planning a joint cultivation of crops in a garden, you need to group the plants according to their height so that none of them blocks the light for the other. This is necessary because vegetables can not only have different heights, but also grow at different rates. It is desirable that compactors that are planted additionally be lower in height than the main vegetables. The principle of a multi-tiered neighborhood of vegetables in the beds allows you to create favorable conditions for the root system of crops, and also contributes to the rational use of solar energy.
High yields are gathered from the beds where beets and late cabbage are planted. To do this, beets (9 plants) and cabbage (4 bushes) should be planted on an area of \u200b\u200b0.8x0.8 m, while not forgetting to fertilize the holes with a glass of compost and a handful of eggshells (pre-grind).
By planting marigolds near the beds, you can avoid some pests in the garden
To get an excellent result when planting beans and tomatoes, it is recommended to place the plants in a row with a step of 0.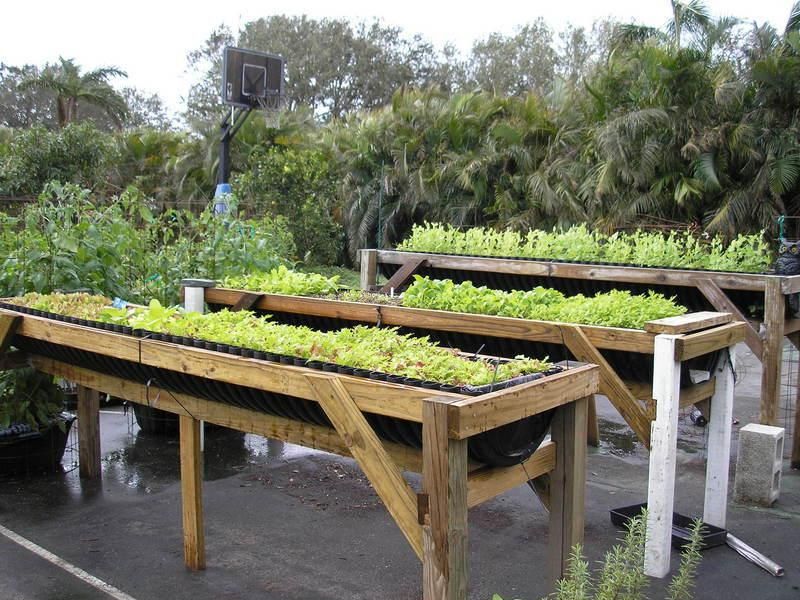 3 m. A drip irrigation system is installed along the row with bush beans so that each plant was on the drip. Tomatoes are planted in the central part of the garden. As a result, bean and tomato bushes should be staggered.
Good advice! Tomato stalks are best cut for the winter, and as low as possible. And the beans, on the contrary, are recommended to be left untouched.
Proper planting of vegetable crops is the key to a rich harvest
Table of vegetable rotation in beds by crop groups
Plant rotation can also affect the yield of beds. If the annual change of crops grown in the same garden is carried out in the correct order, the garden will produce good yields.
Benefits of proper crop rotation:
- eliminates the possibility of soil fatigue on the site, since the same vegetable every year absorbs the same set of nutrients from the soil and does it from the same depth;
- the spread of diseases and pests that infect plants of the same family is prevented;
- it becomes possible to rationally use fertilizers.
Green manure and crop rotation should be used to increase the yield and restore the soil
The most primitive way of organizing crop rotation in the garden involves planting plants from different families on the same area every year. The easiest way is to break the crops into four groups:
- Leaf crops - these include various types of cabbage, green onions, leafy lettuces, and spinach.
- Fruit vegetables - cucumbers, tomatoes, eggplants, peppers, pumpkin.
- Legumes - beans, chickpeas, peas.
- Root vegetables - potatoes, beets, radishes, carrots.
Table of the simplest crop rotation in the garden:
| Planting order by years | Recommended crops for planting | |||
| 1st bed | 2nd bed | 3rd bed | 4th bed | |
| 1 year | fruit | roots | legumes | sheet |
| 2 year | roots | legumes | sheet | fruit |
| 3 year | legumes | sheet | fruit | roots |
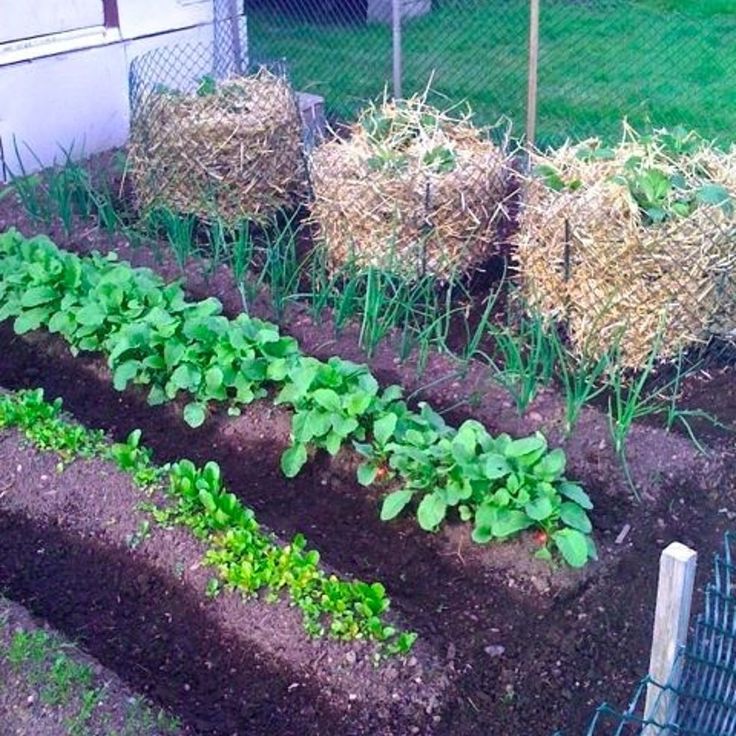
Outdoor cucumber beds: photos and tips
Outdoor cucumber beds are usually prepared in autumn.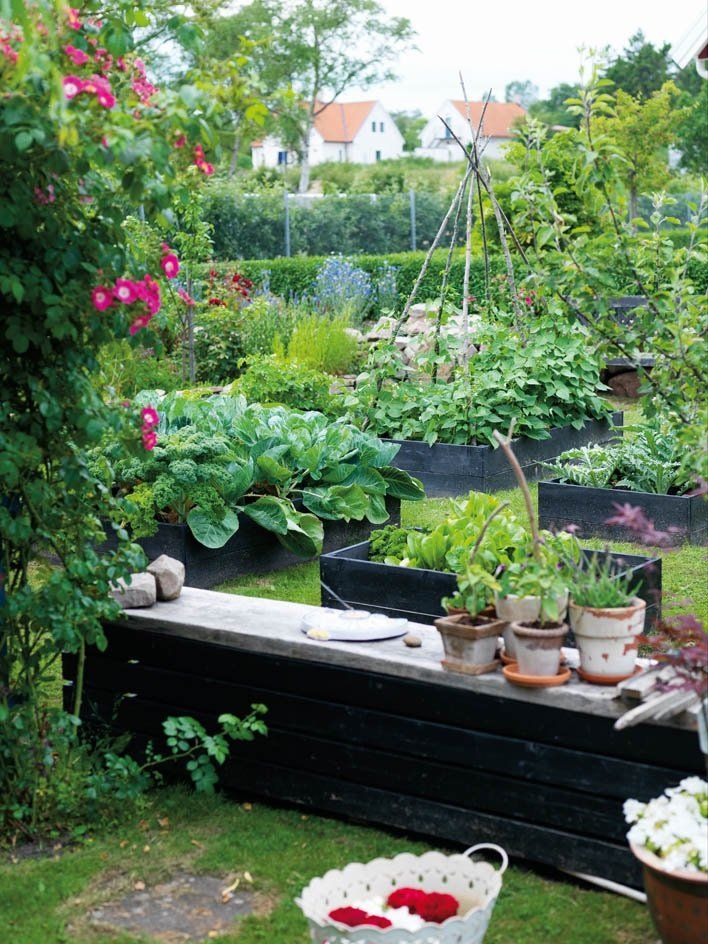 This should be done before the onset of rain and temperature drops. The planting area must be carefully dug up and saturated with organic fertilizers. Cucumbers like fertile, light soil that has a good level of air and water permeability. If the soil in the area is heavy, sawdust, peat or sand can be added to the ground to facilitate loosening.
To get a rich harvest of cucumbers, the soil for the beds must be prepared in autumn
Useful advice! To get a rich harvest, it is recommended to add a tablespoon of superphosphate and a glass of ash per 1 m² of area. Instead of ash, you can use dolomite flour.
The process of preparing a bed for cucumbers in the spring includes a soil disinfection procedure. For this, the place of the future garden is spilled with potassium permanganate. The solution should be hot and strong. In addition, soil fertility can be increased by introducing chicken manure or manure.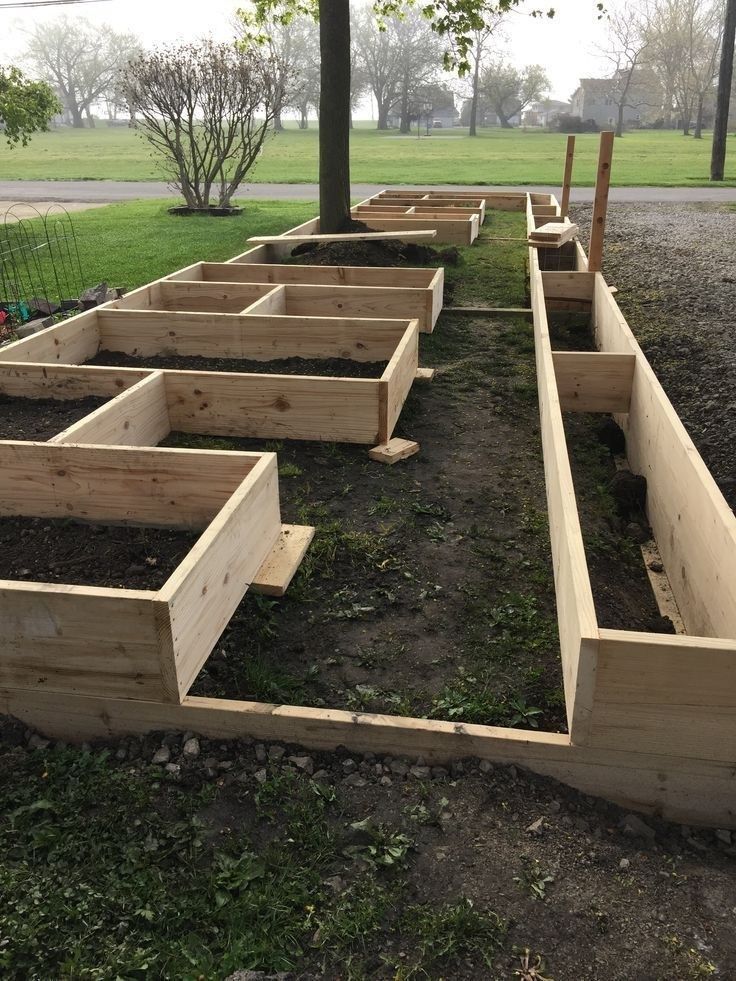 This procedure is carried out locally, that is, the fertilizer is placed directly in the trench or hole. After that, the bed is covered with a small layer of soil, where the seeds are then planted.
How to make a cucumber bed: agrotechnical secrets
To get a rich crop of cucumbers from the garden, you must follow the basic rules:
- Near the beds should not be irrigation canals, streams and flowing reservoirs.
- If the planting area is not protected, the vegetable garden is best placed in a quiet, draft-free area.
- Procedures such as watering and loosening the soil should be carried out on a regular basis. Otherwise, a hard crust will form on the surface, and the bed will dry out a lot.
- Cucumbers grown outdoors need to be fed much more frequently than plantings grown in covered beds.
- During harvesting, it is not recommended to change the position of the vines of the plant or turn them over.
- Plants in open beds should be weeded more frequently than indoors.
- It is recommended to cover the entire surface of the bed with black film.
In order to collect clean cucumbers without soil, you need to think about what you can tie long shoots to
Cucumbers need a rich biological composition of the soil. Therefore, it is recommended to fertilize the land with organic matter, for example, grass, humus, branches, rotted manure, food waste. In the process of their decomposition, not only the fertility of the soil increases, but also heat is released, warming the soil. So that the high temperature does not damage the root system of cucumbers, experienced gardeners advise to carry out abundant watering.
Interesting fact! Sometimes the decomposition of organic fertilizers is so active that the soil in the garden warms up to 80 ° C. Under the influence of such a high temperature, many pests, viruses and pathogenic fungi contained in the soil die. The result is a natural sterilization of the soil.
The soil where cucumbers are grown must be fertilized after harvest
There are several ways to grow cucumbers outdoors. For these purposes, you can form a long ridge bed, a hole, dig a ditch, or build a high structure.
How to make a garden bed for cucumbers with a bookmark
To form a bed with a bookmark, you will need to dig a trench. The depth of the ditch should be equal to two shovels. Then branches are laid out across and sawdust is poured. The next layer consists of straw and garden waste. You can add autumn leaves, cardboard or newspapers, compost. The thickness of the fertilizer layer should be within 5-7 cm. The bookmark is filled with warm water and covered with a mixture consisting of compost and earth.
A planted bed can effectively serve for 5 years. In the second year of operation, it will not be necessary to add compost to the top layer, because during the decomposition of organic components, the bed itself will produce nutrients.
Planted Cucumber Bed
Benefits of Planted Cucumber Bed:
- Convenient watering system;
- water stagnation is excluded;
- in the spring it is not necessary to dig up the soil, it is enough to loosen the soil.
Plants can be planted on this nutrient base much earlier than is customary to do in conventional beds. It is not recommended to use beds with a bookmark in low-lying areas and areas where water stagnates.
Cucumbers can only be watered from below, making sure that moisture does not stagnate at the roots. This technology will be the best option for areas that are located in the lowlands. In order to enhance the heating process, the bed is covered with a film. As a result, a greenhouse effect is formed, which has a positive effect on the growth of cucumbers and their yield.
Surface beds also include structures in the form of boxes made of brick, slate or boards. The bottom of these containers is covered with sand, then with wood waste. Next comes a layer of organic waste and straw. After laying each component, the contents are carefully compacted and filled with liquid manure. Finally, the bed is covered with a mixture of compost and soil.
When making warm beds for cucumbers, it is worth following clear instructions so as not to oversaturate the soil with fertilizers
Good advice! Vegetable and fruit skins, fallen leaves, egg shells (powdered) can be used as organic waste.
Cucumbers are planted in two rows. Plants are placed along the edges of the bed-box, which ensures a sufficient level of illumination. If it is planned to plant cucumbers in early spring, the structures can be converted into greenhouses. To do this, you will need to install plastic arcs and stretch a plastic film over them. Thus, heating is enhanced and it becomes possible to get an early harvest. Moreover, the result is completely independent of weather conditions.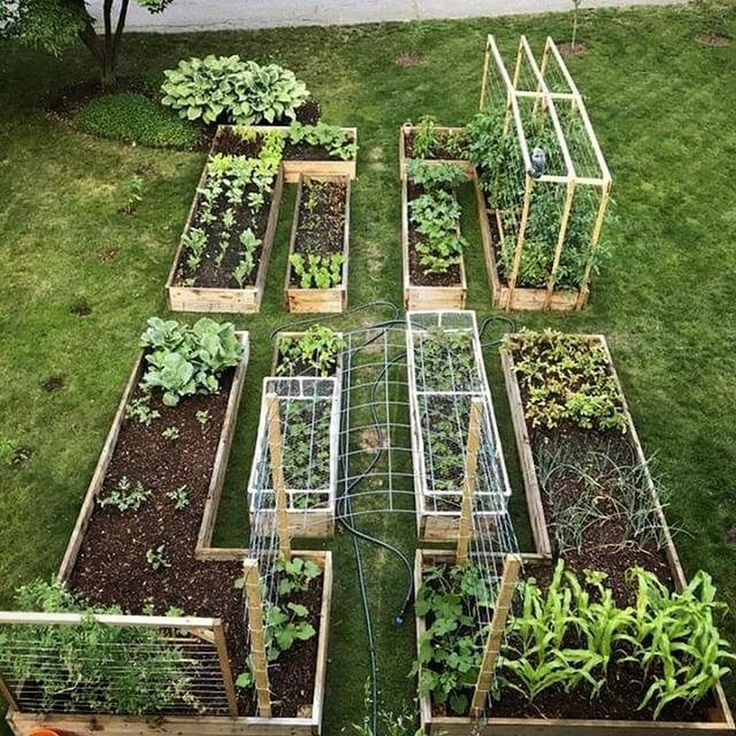
Insulated beds can be planted with cucumbers earlier than outdoors
Raised beds for cucumbers outdoors
Warm raised beds are used when the site is located in a region with a cold and humid climate. Due to this, there is a full warming up of the soil, which allows to achieve a harvest in the early stages. If groundwater comes too close to the garden, the bed rises high, due to which the plantings do not get wet on soil oversaturated with moisture. Stone trees, whose roots are severely affected by groundwater, are planted in a similar way.
Various materials are used as borders for these structures. The most popular of them are slate and wood. In rare cases, metal is used. This type of beds can be installed even in the middle of the lawn. If you make a frame in the form of paving stones or tiles, a raised garden with cucumbers will become a worthy decoration of your summer cottage.
Ordinary high beds can be used to build mini-greenhouses that help preserve crops during frosts.