Pot organization ideas
16 Creative Ways to Organize Pots and Pans in Any Kitchen
By
Grace Gallagher
Grace Gallagher
Grace Gallagher is a lifestyle expert and writer with five years of experience covering home furnishings, storage, and organization. She has also written for Greatist, Veracity Selfcare, Brit + Co, and others. Grace also taught creative writing workshops in Portland, Oregon.
Learn more about The Spruce's Editorial Process
Published on 08/03/22
@nycneat_louisa
Pots and pans are an essential part of every kitchen, but they're notoriously hard to store. Most pots and pans are too large for an average kitchen drawer, and you may not be excited about the idea of devoting precious counter space to pots (which aren't always the prettiest). Because pots and pans come in so many shapes and sizes, and you'll probably want them at least somewhat close to the stove, it can feel like a puzzle trying to get them all stored away in a way that makes sense. These pots and pans storage ideas will get your kitchen more organized and leave it uncluttered.
-
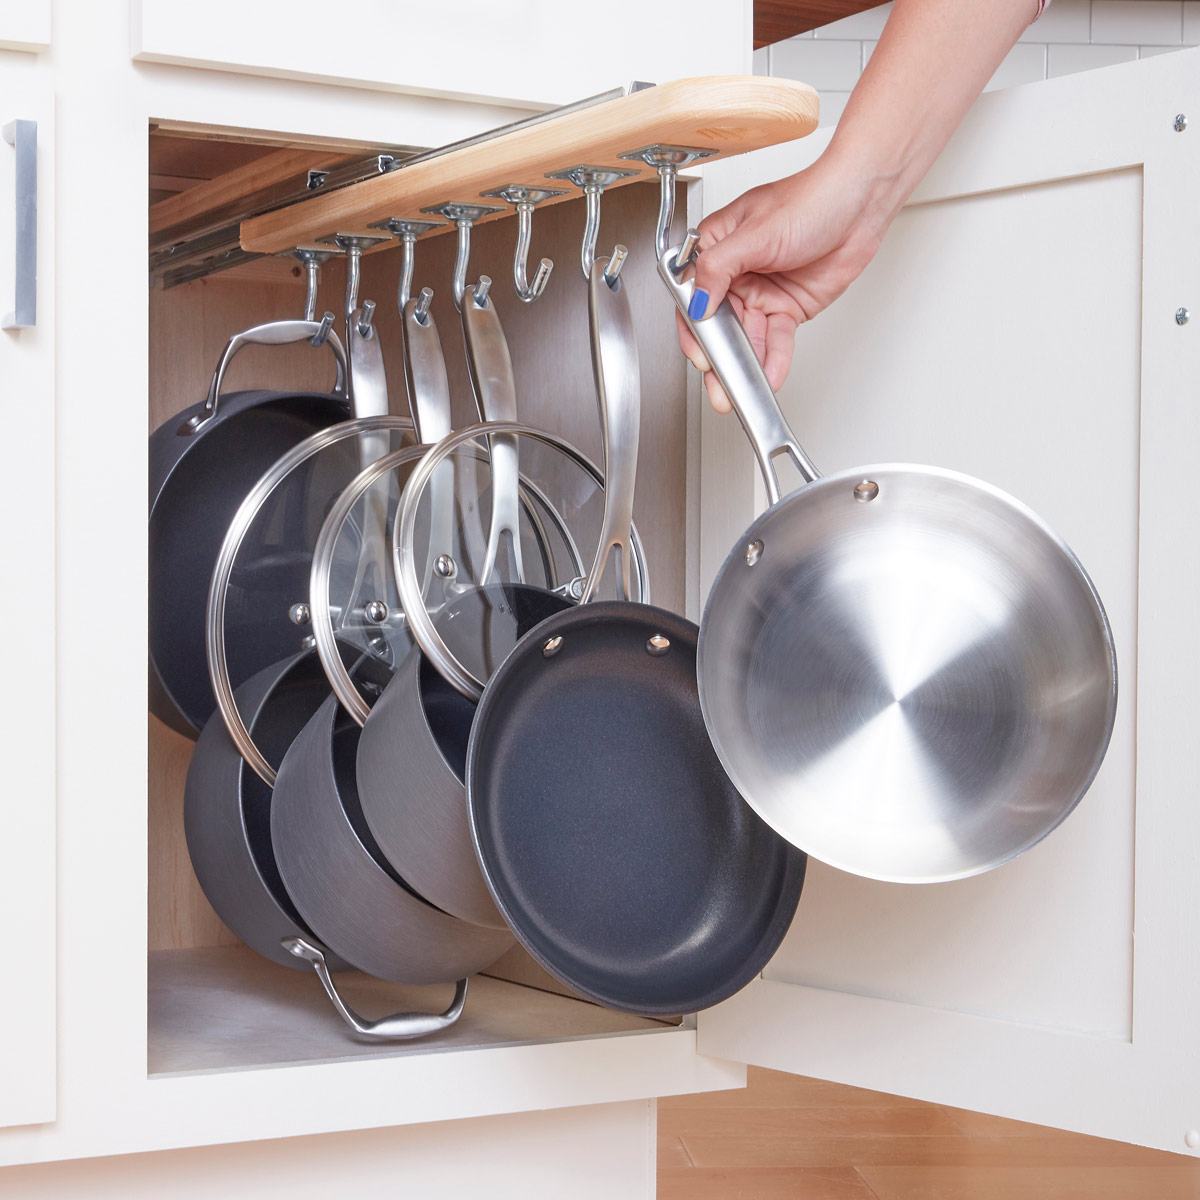
01 of 16
Store in a Designated Cabinet
@theneatsquad
If you're going to use a cabinet for pots and pans, the organization is key for making sure you can see everything and no smaller pot gets lost in the back. Here pots are stacked in size order and a cookware rack acts as a divider to keep pans organized without scratching each other.
-
02 of 16
Install a Hanging Rack
@bbdesigncontractors
These pans are collectibles rather than everyday staples, so they get a moment to shine in the dining room area. An oval pot rack can showcase a lot of pots since the ceiling-mounted solution is strong and sturdy.
 However, be sure to always check the weight limit and make sure your ceilings can handle the weight. If your ceilings are particularly high, you may want to lengthen the chain on the rack so you can reach them more easily.
 -
03 of 16
Use a Tiered System
@themollybeffect
A simple tiered holder is perfect for storing pans vertically. They won't get scratched this way, and you'll use space that would otherwise be empty. You can find storage racks like this online or at most organizations or home goods stores.
-
04 of 16
Bring in Some Greenery
@lana_rose_interiors_stafford
A pot rack is a gorgeous and efficient solution, especially in smaller kitchens. It frees up a cabinet and makes for a lovely focal point in the room if decorated. The greenery strung on the rack adds interest and warmth, making the rack a part of the decor.
-
05 of 16
Utilize Pantry Space for Large Pots
@afreshspace
It usually makes sense to keep your favorite pots and pans near the range.
 However, larger soup pots and other more special-occasion items can be stored neatly in a pantry (if you're lucky enough to have one this big) alongside other more specialty appliances that you don't use regularly. It'll also be easily accessible if you have a walk-in pantry closet like the one shown above.
 -
06 of 16
Hang Pots and Pans Right Above the Stove
@nycneat_louisa
Here, a gorgeous brushed pot rack hangs above a range. You can find a hanging rack to match your hardware and style of your kitchen. This way, the pots and pans become part of the decor. Hanging racks are also great for storing spatulas and other kitchen tools you'll want just an arm's length away.
-
07 of 16
Create a Wall
Laura Cattano
For a chic industrial kitchen look that's super practical, install hanging pot racks against a bare wall. The vertical space would otherwise go unused, and this keeps pots and pans in sight but out of the way.
 A great trick is to tuck the lids behind the bars.
 -
08 of 16
Save the Deep Drawers for Pots
@nycneat_louisa
Deep drawers are a godsend when it comes to storing pots. These drawers are deep enough that the pans can be stored with their lids on. If you're renovating a kitchen, installing some bigger drawers is always a good idea, and a more narrow one works well for pans.
-
09 of 16
Divide by Shelves
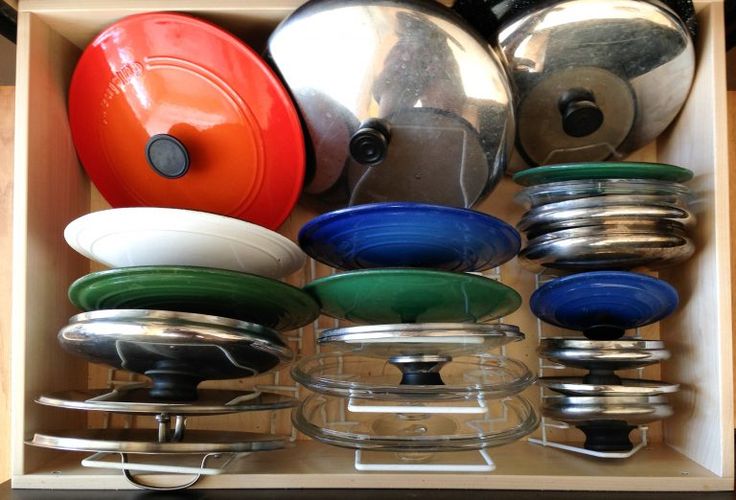
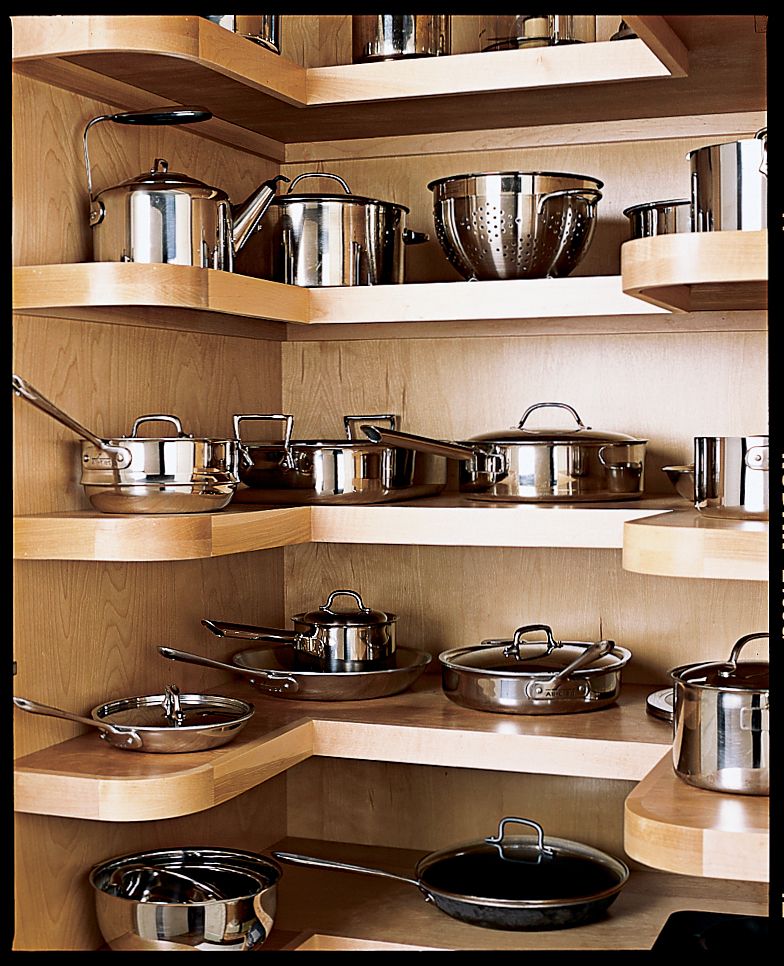
@nycneat_louisa
If you're struggling to find a place to store your pots and pans, the first thing you may want to do is edit your collection and pare it down to just the favorites. Here Le Creuset pots get their own stage (er, shelf), stainless steel pots are stacked in size order, and a pan divider keeps pans separate.
-
10 of 16
Place Cabinet Dividers
@afreshspace
A divided kitchen cabinet is so helpful for storing awkwardly shaped items that have a tendency to get lost (like baking sheets and smaller pans).
 You can always add dividers into your drawer, but if your kitchen has dividers built-in, or you're designing a kitchen from scratch, built-ins are a great way to go.
 -
11 of 16
Store Large Pots in the Pantry
@afreshspace
It's nearly impossible to find a good place to store a stock pot... unless you have pantry space to spare. It's hard not to love a stocked and organized pantry, especially when it has room for pots and other appliances you bought with best intentions but may not use all that much in reality.
-
12 of 16
Separate Lids
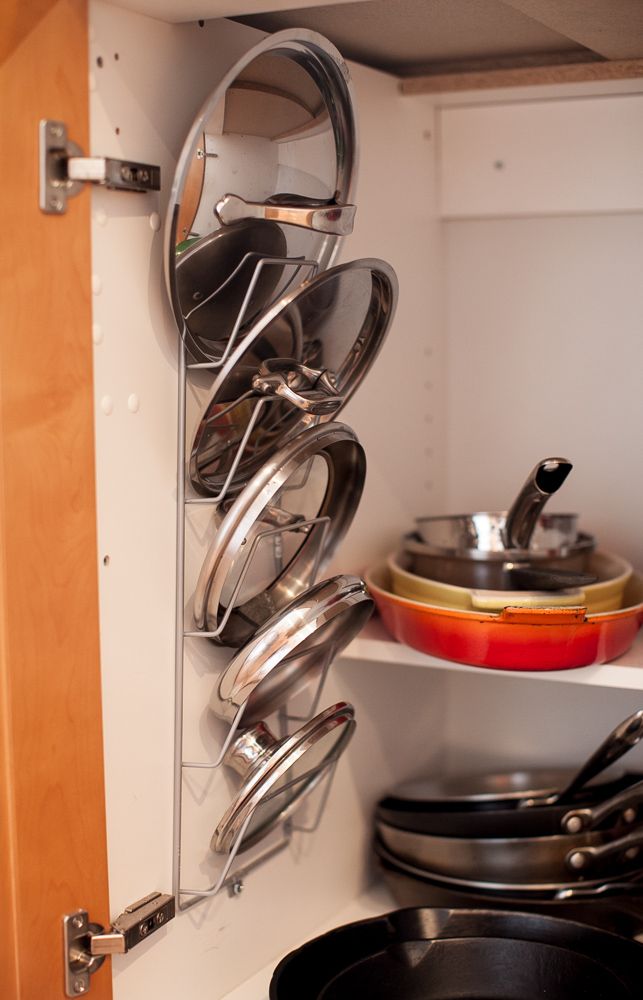
@neatbymeg
This storage solution is somewhere between a pantry and a cabinet. The wire tiers add additional layers and space for pans while the dividers for pot lids assure you'll never have to go searching for the one lid you need. What makes this extra creative are the Command hooks behind the door that are used for storing pot holders and oven mitts.
-
13 of 16
Install Built-in's
@kimhalfkept
Built-in drawer dividers are great for storing pots and pans, just make sure you have enough depth that the handle can fit and the drawer still closes.
 Lids, steamer baskets, and other kitchen accessories also fit. If your drawers don't already have installed built-in's, DIY your own.
 -
14 of 16
Consider Open Shelving
@iknownothingaboutinteriors
Open floating shelves are great for storing anything from dry goods to pot lids when they're this organized. A hanging rack for smaller pots looks like a seamless extension of the shelves; it frees up space and also gives the kitchen a farmhouse feel.
-
15 of 16
Double the Pot Racks
Sheffield Sustainable Kitchens
Double wire racks keep the area directly overhead clear while cooking (so tall people don't bump into any pots). Even the top of the pot rack is used for storing lids and other non-essentials (you just may need a kitchen stool to get them down).
-
16 of 16
Make It a Part of the Theme
@burcharddesignco
A vintage-looking pot rack completes a farmhouse-style kitchen.
 Whether you use it for storing the pots and pans you use regularly, or it's for showing pans you collect, this simple style wooden dowel with hooks could be bought or recreated with a DIY.
Regardless of your thoughts on cooking, every kitchen needs pots and pans; it can just be less than palatable thinking of ways to store them all. These pot and pan storage ideas will inspire you to find clever ways of organizing your pots and pans, so you can find what you're looking for.
11 Genius Ways To Organize Pots & Pans
Home / Organizing / 11 Genius Ways To Organize Pots & Pans
Organizing
This Post May Contain Affiliate Links. We earn a commission if you click this link and make a purchase at no additional cost to you.
Organizing Pots and Pans can be a real headache if you don’t have the right tools. Stacking them isn’t always the best option because they are hard to get in and out, and makes for a very unorganized cabinet.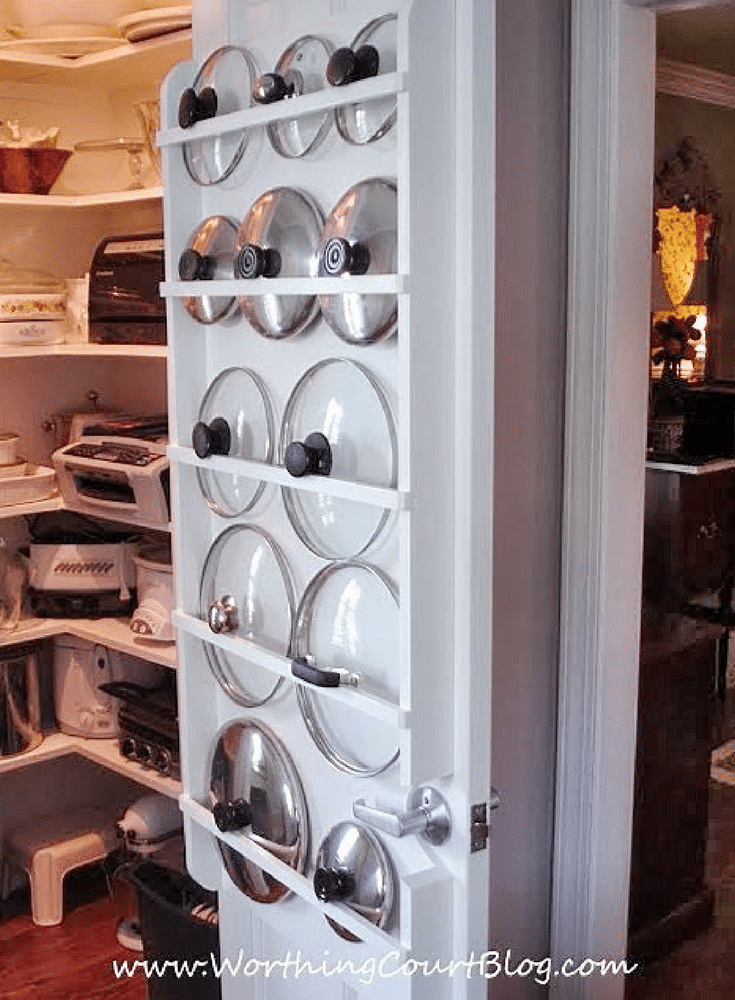 So today we have rounded up 11 Genius Ways To Organize Pots and Pans.
These ideas will help you get your pots and pans organized and stay organized!
11 Genius Ways To Organize Pots and Pans
This is my own pots and pans cabinet and I must say that it is my favorite cabinet in our kitchen! I love it. It stays organized pretty much all of the time and it is so easy to get pots and pans in and out of. I only keep pots and pans in my cabinet that we regularly use to cut down on clutter and then I organize them with a pot organizer and lid organizer!
Read The Full Post Here!
Use Pan Organizers
Need to organize your pots, pans, and baking dishes in one cabinet? Use wire pot organizers to stack all of your cooking ware. This is a great idea when you don’t have a lot of cookware or space to work with!
Image Credit: The Kitchen
Use Tension Rods
This idea from Better Homes and Gardens is a cheap and brilliant hack. Stand up your pots, pans, or cookie sheets and separate them with small tension rods. This will keep your pans from toppling over and keep you organized! Plus its a super cheap way to stay organized!
Image Credit: Good House Keeping
DIY Drawer Dividers
Have a deep drawer in your kitchen? Store you pots and pans in it with these DIY Drawer dividers! See exactly how to make them here!
Image Credit: Seeded At The Table
Use A Towel Rod
This is a brilliant way to organize pots and lids if you don’t have the cabinet space. These people used an industrial towel bar and S hooks to hang their pots and pans and hold their pot lids!
Image Credit: Pinterest
Use an Adjustable Pots & Pans Organizer
When you want to organize your pots and pans on the same rack, you need an adjustable pots and pans organizer! These are so handy to keep all of your pots and pans together and you only have to use one organizer! Grab this one for less than $25.
Image Credit: Organizing Home Life
Use A Spare Pantry
Emily from Simple Life Of A Fire Wife is lucky enough to have two pantries to organize her pots and pans! (I’m so jealous) So if you have two pantries, you could organize your pots and pans just like Emily! I love how she used a pot organizer and lid organizer as well!
Image Credit: Simple Life Of A Fire Wife
Hang Pots and Pans
Hanging your pots and pans is a great way to keep them organized and save space! You can easily hang your pots and pans by attaching hooks to the top of a cabinet.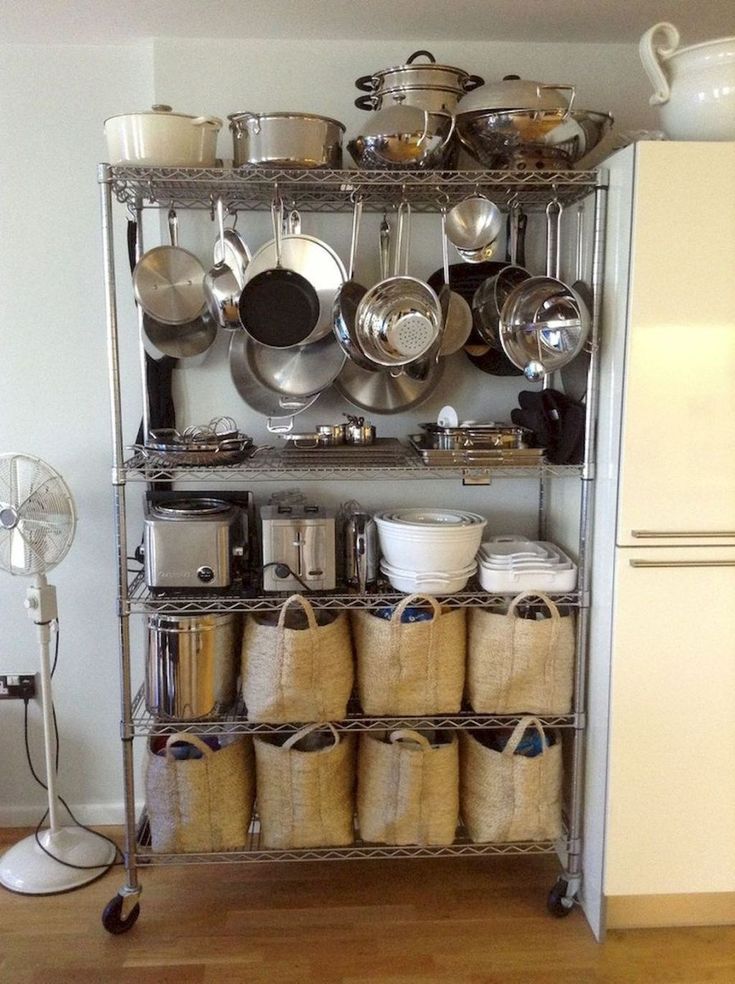 I love this idea because then you still have the base of your cabinet to store your lids or more pots and pans!
Image Credit: Tara Dennis
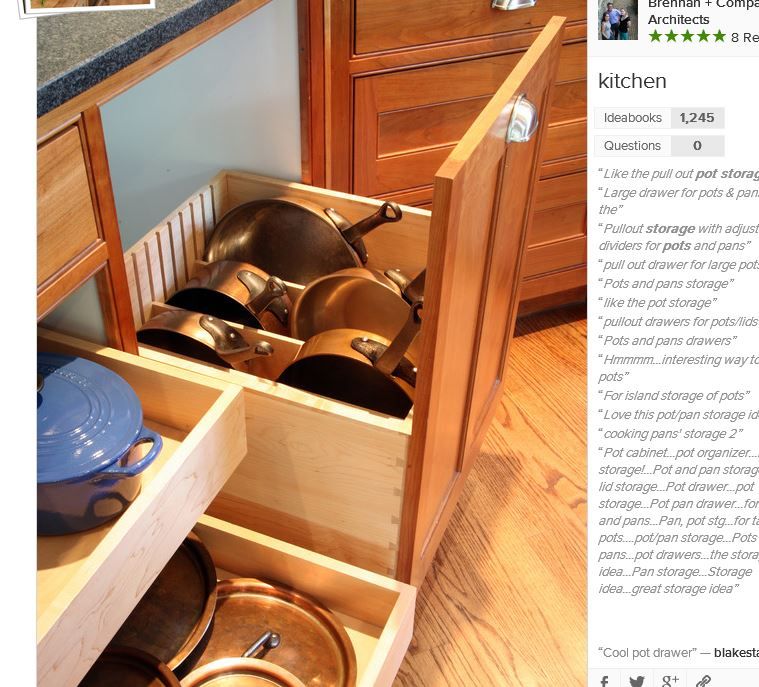
Pull Out Organizer
Bending over to pull out pots and pans can be difficult for some. If you have trouble accessing your pots and pans, this pull out cabinet organizer for pots and pans is exactly what you need! It takes up very little space and makes it super easy to access all of your pots and pans! Grab yours here!
Pots and Pans Cabinet Organizer
This pots and pans organizer is what dream kitchens are made of! This organizer installs directly into your kitchen cabinet and makes it so easy to keep all your pots and pans organized. It’s a little pricey but if you are in the market for the perfect way to organize pots and pans, this is it! Check it out here!
Need more ways to organize your pots and pans? We love these!
· Leave a Comment
Reader Interactions
15 simple ideas to transform a flower pot
Editor (redaktor)
Flowers are always beautiful.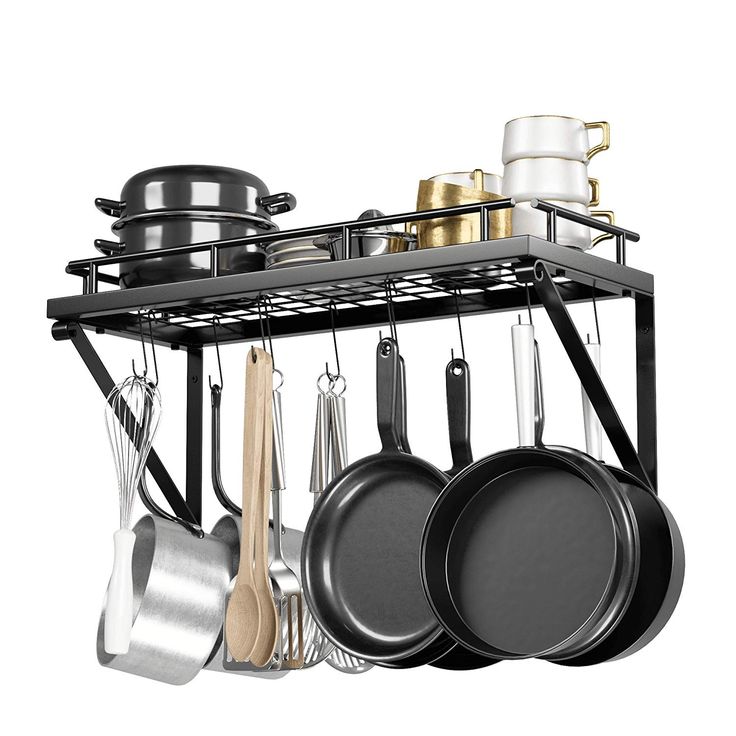 And when they grow in original pots, the aesthetic pleasure is enhanced! Meanwhile, a flower pot is not just a container for plants. It can become a bright accent in the interior, a springboard for creative experiments and, of course, a thing that invariably cheers you up.
We've rounded up 15 affordable ways to give your favorite flowers a beautiful, personalized home.
1. The pot can be painted in an interesting way, creating a degraded effect. To do this, the paint is added to the water, then the pot is immersed in it several times for a different amount of time.
Many people color eggs this way for Easter.
2. It's not difficult to make a flower pot in the form of a strawberry, the main thing is to find the base of a suitable shape. And in the work you can do with two colors of paint.
3. If finding the right shape is difficult, you can create your own with the help of hardening clay. Like, for example, if you were inspired by a pineapple. With such a pot, plants like aloe look best.
The stripes are drawn with a white permanent marker, but black can also be used.
4. Marbling is also a great way to create a unique psychedelic pattern.
You will need a bowl of water, various shades of nail polish, a stick and the pot itself.
It is important that the water temperature is slightly above room temperature. Pour varnish into water. Lightly mix the colors with a stick to form whimsical patterns. Now lower the pot there and, as it were, “wrap” paint on it. If desired, repeat the procedure until you get the desired result.
5. Beautiful ceramic shards can also be used! Use them to decorate a pot in the mosaic technique.
6. Natalia and Yulia showed in their master class how to decorate a flower pot with twine and a few buttons.
7. If you love knitting, making a cute potty dress is easy for you. In this case, textured yarn will look especially original, as in the lesson of Kati Ju.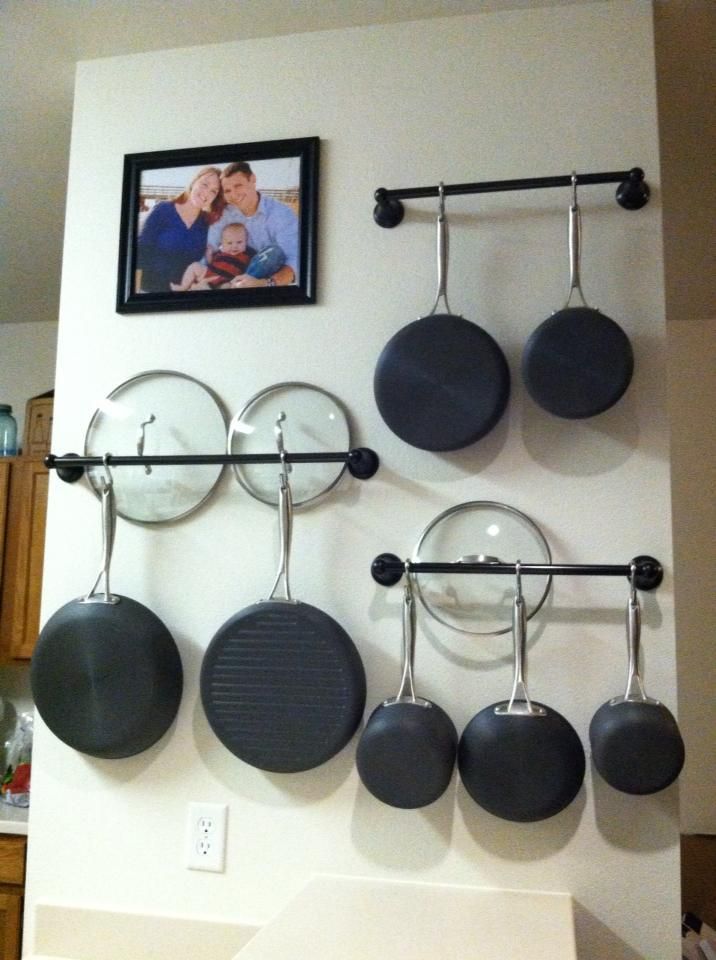
8. Even a simple pattern (perfect for those who can't draw) can transform an ordinary pot. This is a great way to best fit it into your interior.
In this example, chalk paint is used - its matte finish looks very stylish.
9. Simple geometric patterns look no less stylish, especially when they are done in black and white.
10. Let the paint create its pattern by turning the pot over and applying the paint generously. Rotate and tilt the pot to achieve beautiful smudges.
Tip: don't dry the pots on paper or cardboard - they will stick. Better to use foil.
11. And if you paint the pot with slate paint, you can leave nice messages on them, reminders or write the names of plants :)
12. Pots covered with fabric look incredibly cozy. To implement this idea, use decoupage glue. And, of course, you will need skill to make everything even.
13. Fans of eco-style will like the decor option with the help of wooden twigs, which are fastened together with twine.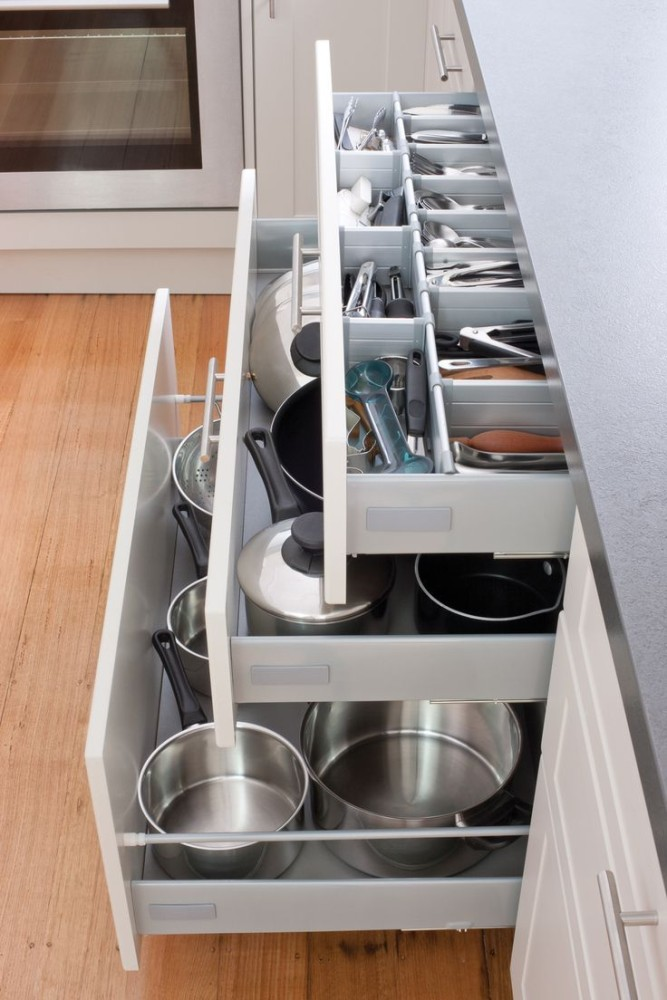
14. Add some glamor and sparkle with rhinestones. Literally one strip of stones will transform a flower pot. If you are afraid of pretentiousness - rhinestones can be covered with paint.
15. Emotions never get in the way! Just a few touches and the flower pot smiles at you :)
Rating
★
★
★
★
★
5.0 (2 votes)
Editor (redaktor)
Russia, Moscow
Store
Blog (363)
Follow the work of the master
Related publications
Keywords
- Keywords
- flower pot
- pot decor
- pots
- do it yourself
- Flora
Headings of publications
Ideas and inspiration
All about sales
Fashion, style, trends
Handmade as a business
Materials and tools
Workshop organization
Handicraft history
Interesting stories
Interview
Tips and tricks / Lifehack
How to make candy out of a flower pot! Decor ideas
June 10, 2020
Flower lovers often find themselves in a difficult situation - beautiful pots are expensive, and day after day there is not the slightest desire to “admire” artless plastic, simple terracotta also gets bored over time.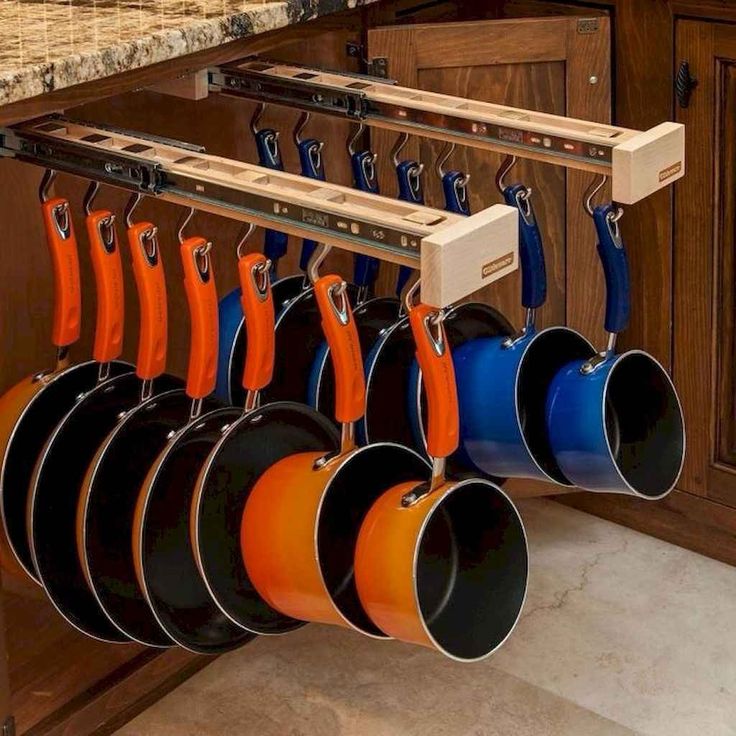 I see two ways out - either pay a tidy sum for the containers you like, or take simple budget flower pots and turn them into exclusive ones! Don't believe it's possible? And I will try to dissuade you.
Any pot can be transformed
Video of the day
Master class
And immediately into battle! Consider two ways to decorate pots with paint and stencils. The first is a little more complicated: it involves layering the pattern, which results in a more interesting and voluminous pattern. The second is the easy-to-perform classic application of paint through a stencil. You will need
Plastic or ceramic pot
Masking tape
Paints (I have leftover Vixen cans from a previous workshop)
Tanks for paint
Thin synthetic brush
Washing sponge
thick paper
Scissors
Pencil
Glories
We will need
, Note before the start of work: a sponge for washing dishes can be used old.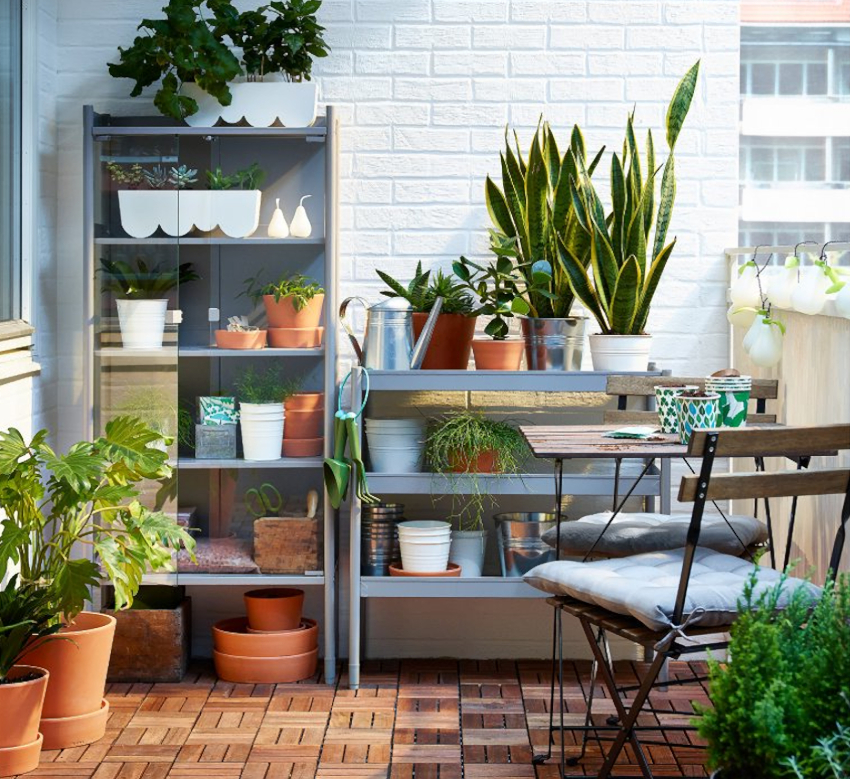 Cut it into several pieces. It is better to paint with gloves, but to cut leaves from adhesive tape - definitely without them. Due to prolonged heavy rains, I had to conduct a master class on the balcony and cover all surfaces so that nothing extra was painted or dirty. I advise you to paint pots on the street.
The first method of painting the pot
Spray white paint onto a clean pot prepared for painting. I have this universal Vixen enamel. I like its ease of application (the brush usually leaves characteristic stains) and the fact that the painted surface does not fade or fade over time, which is ideal for my very sunny south-facing balcony. In order for the paint to always lie well and evenly, shake the can before spraying: 1-2 minutes - and you can spray. I made one light layer of white paint on purpose, as I wanted a translucent effect as planned. You can apply enamel in two or three layers, then the color will be even and dense. Leave the painted pot to dry completely.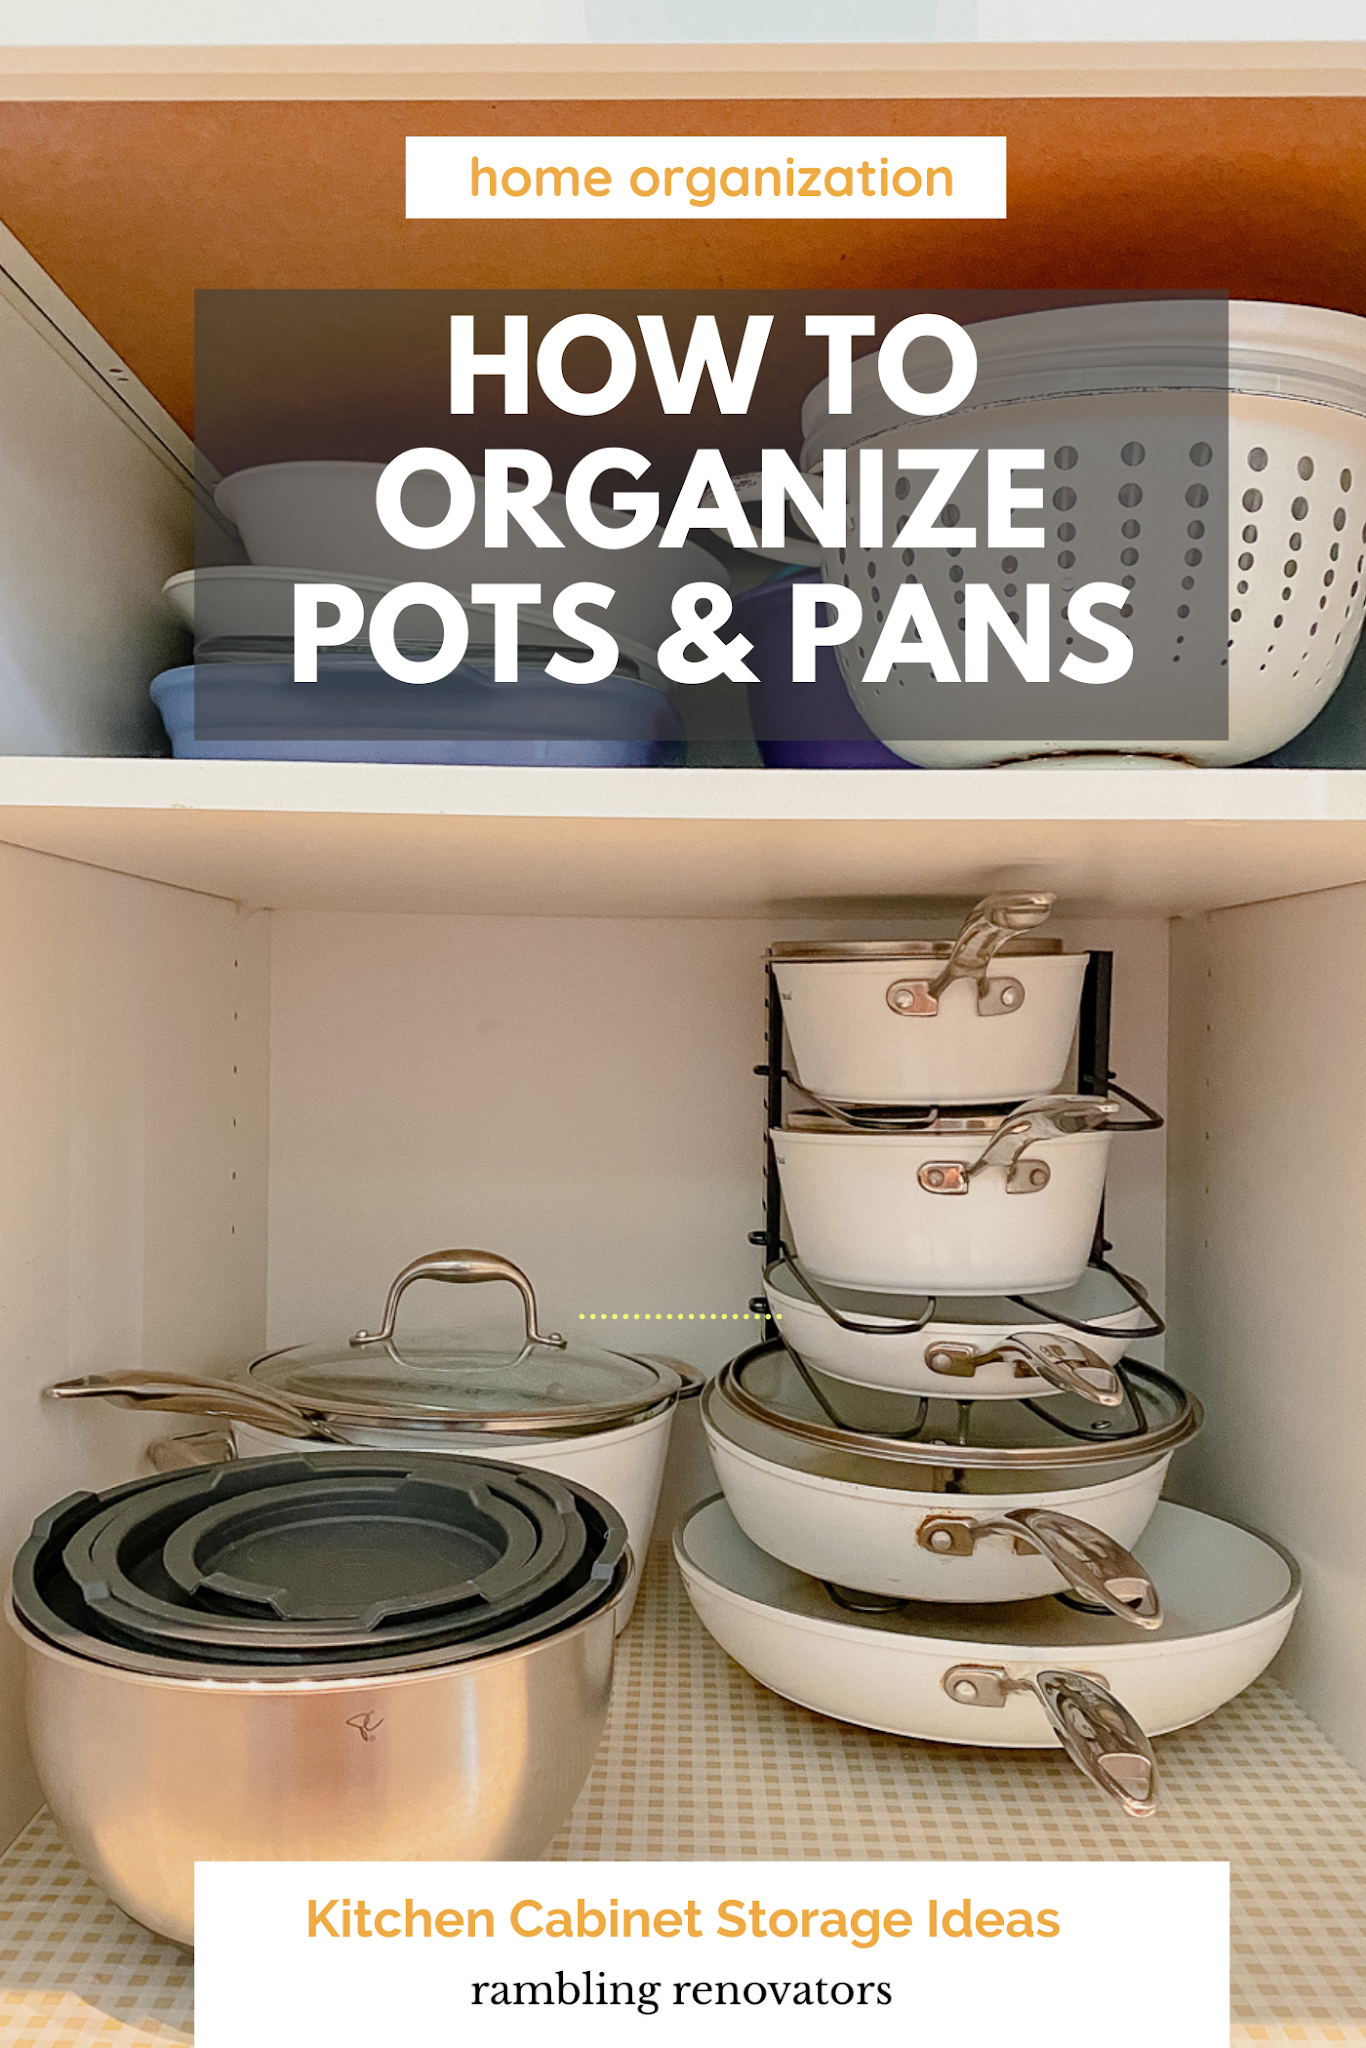 Tip: To color the pot evenly, flip the stool over and slide it over one of the legs. So you can easily turn the pot without risking smearing the paint. The stool, of course, will also be painted, so use an old, unnecessary one that you don’t feel sorry for. This makes the job very easy!
We apply the first coat of paint, it will be white, translucent
Now we need masking tape. With scissors (more convenient - manicure) we cut out small leaves from it - they can be of different shapes and sizes. And we stick them on the surface of the pot, pressing well so that the tape lies evenly and securely. Remember that you will have another layer of leaves, so you don't need to glue them too thick. Let them “float” on the surface of the pot freely.
Apply masking tape
Directly on top of the leaves on the entire outer surface of the pot, apply the following color. In this case, it is not one, there are two of them - green and orange. I painted the top and bottom of the pot from a spray can, and walked along the central part with a sponge so that the colors layered on top of each other.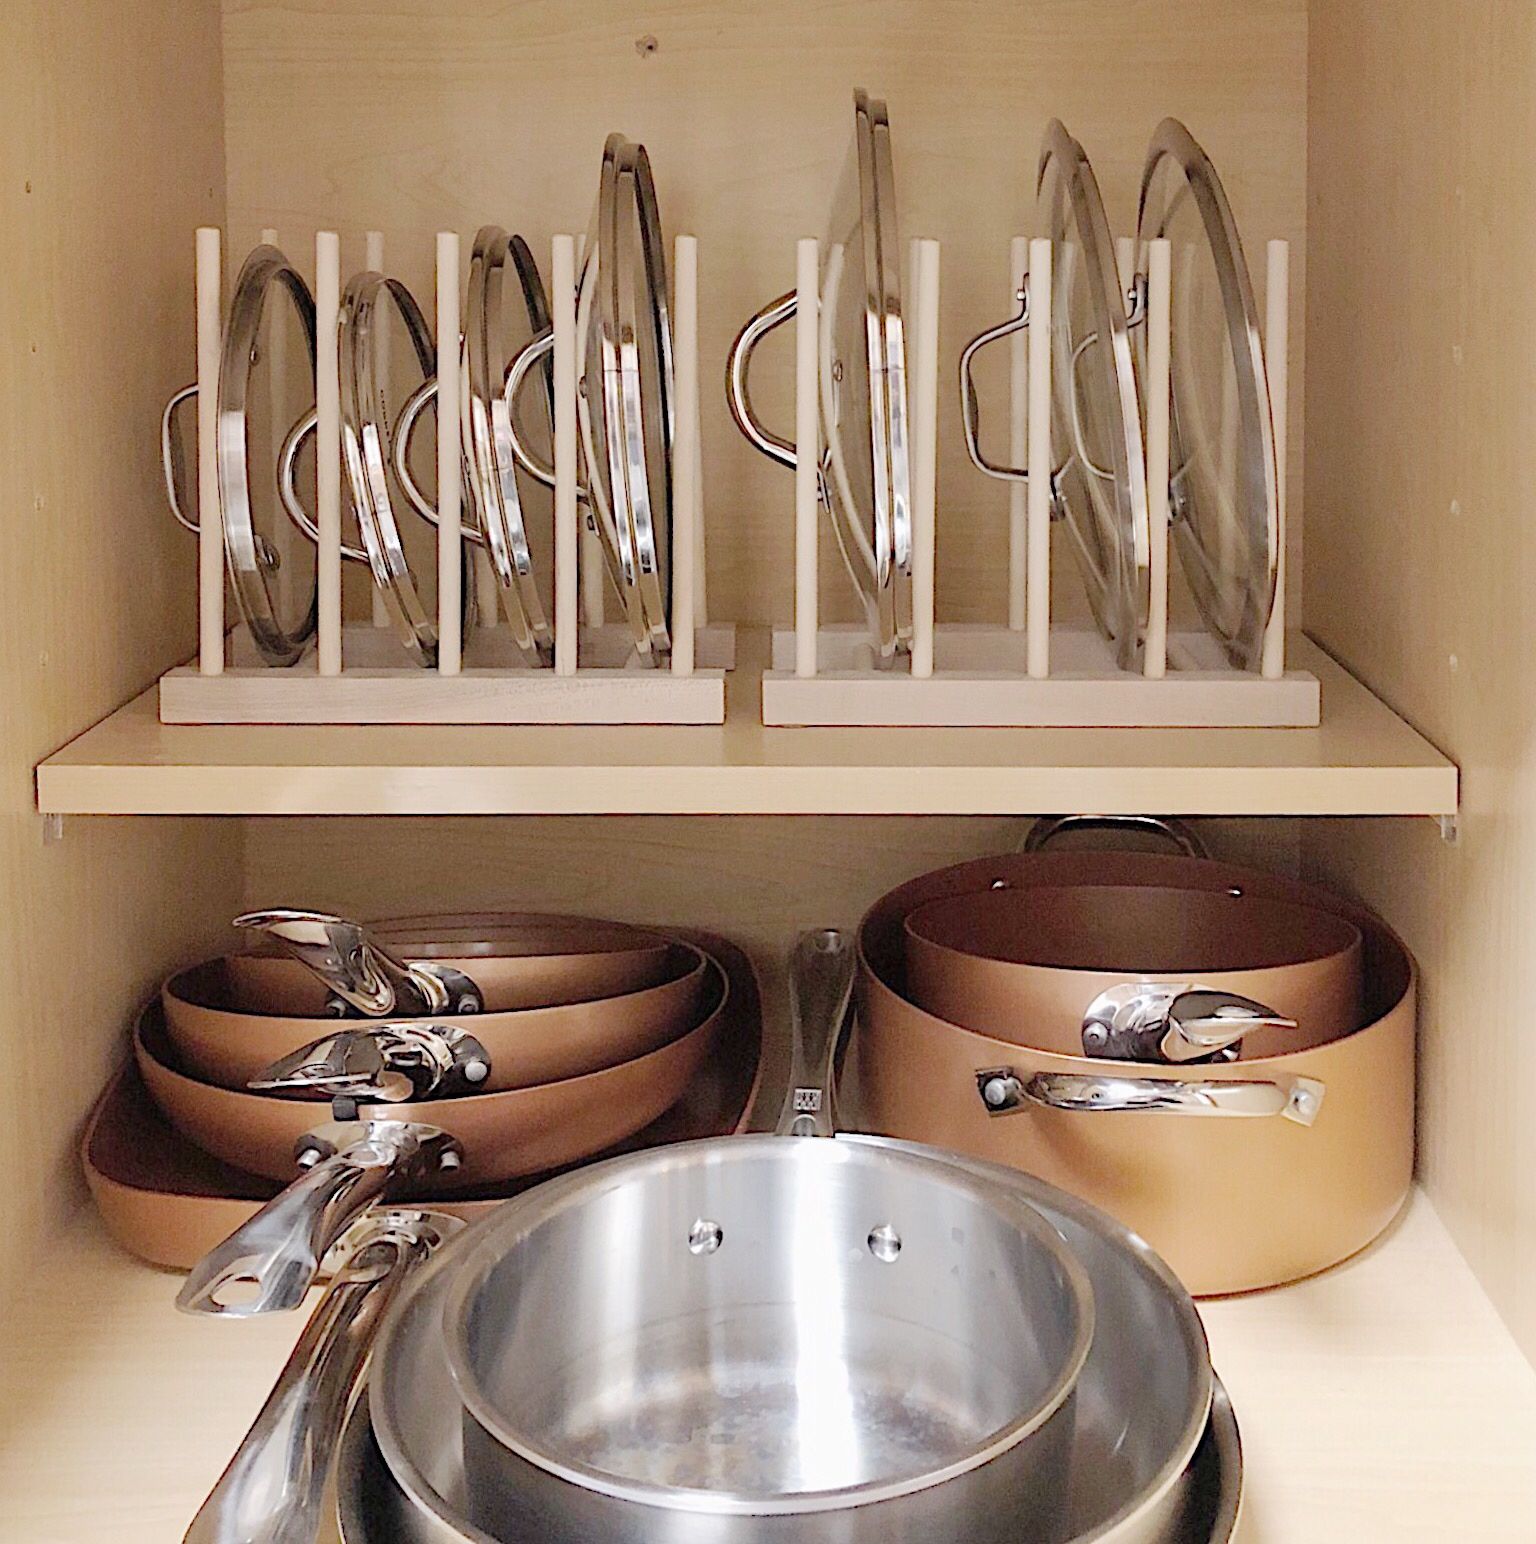 It turned out a beautiful gradient - the transition from green to orange.
Gradient effect is obtained
After complete drying of this layer of paint, glue new leaves. Now you can make a pattern, that is, stick the leaves not singly, but next to those that are already on the pot. As a result, groups of different colors will be obtained. We try to glue the leaves over the entire surface (bottom, top, middle), so that later the pure orange outlines of the leaves, and green, and gradient ones are visible. The final color of the pot is yellow. The paint should be of high quality and completely cover the lower colors - I had no problems with this, two layers of enamel lay well and easily blocked the orange-green frenzy that I applied before. Now leave the pot until the paint is completely dry. It's time for the most pleasant thing - to see the result of your work. With scissors, carefully pry off the corners of the adhesive tape and remove the leaves from the pot. If you glued the leaves well, then the pattern will be clear, without smudges.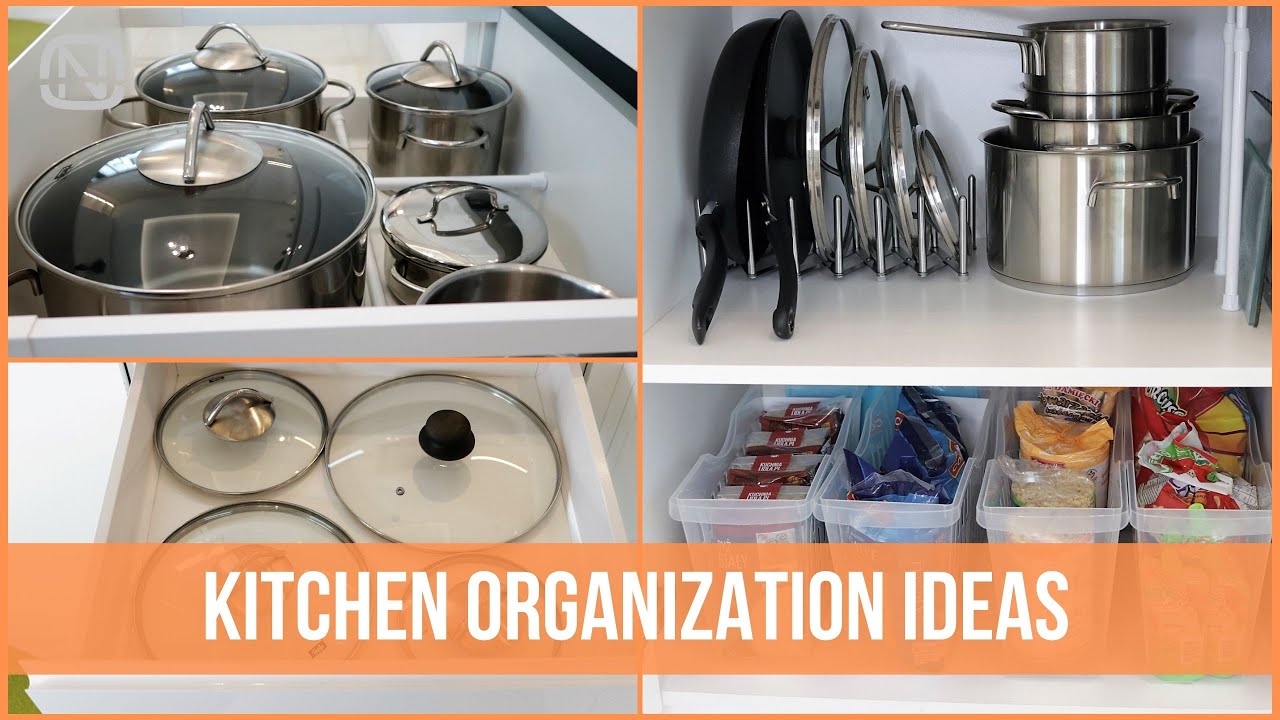 But in any case, I recommend taking a thin brush and correcting the edges of the leaves, making them more expressive.
The second way to paint the pot
Since the pots on my balcony will be a pair, in both cases I chose yellow as the main color. As planned, the second pot should have cute white peas and multi-colored hearts. Spray yellow Vixen universal enamel from a can and let it dry well. You should get a solid base color.
Applying the paint
Applying the paint While the paint is drying, make the stencils (use them if you have them). Take thick paper (I have craft paper, left over from parcels from Ozone). Draw a heart shape on one piece of paper with a pencil, and a small circle (pea) on the other. Ideally, the paper should be both thick and flexible enough. Cut out the center piece in the heart and pea. Stencils are ready. Now estimate the approximate location of the pattern on the pot and secure the stencil with masking tape. Take some paint on a sponge and blot the drawing. The sponge needs to be saturated with paint quite a bit, you can even blot the excess first so that the applied pattern does not drip. For the hearts, I used two colors (green and orange) to match the leaves on the other pot. It was decided to make the peas white.
We make hearts according to a stencil
We make hearts according to a stencil We apply the drawings one by one, letting them dry so as not to smear them during the work. And now the very last heart has dried up - you can enjoy the result. Now my balcony is decorated with such a bright couple, which cheers up and pleases with its sunny color.
It is impossible to stop at the decor of only two pots, so I present to your attention a selection of various ideas for implementation and just inspiration.
Paint works wonders!
You've already figured out that painting is the easiest way (by technique, but not by result!) to give flower pots a new look. Therefore, we continue the parade of multi-colored dwellings for indoor flowers.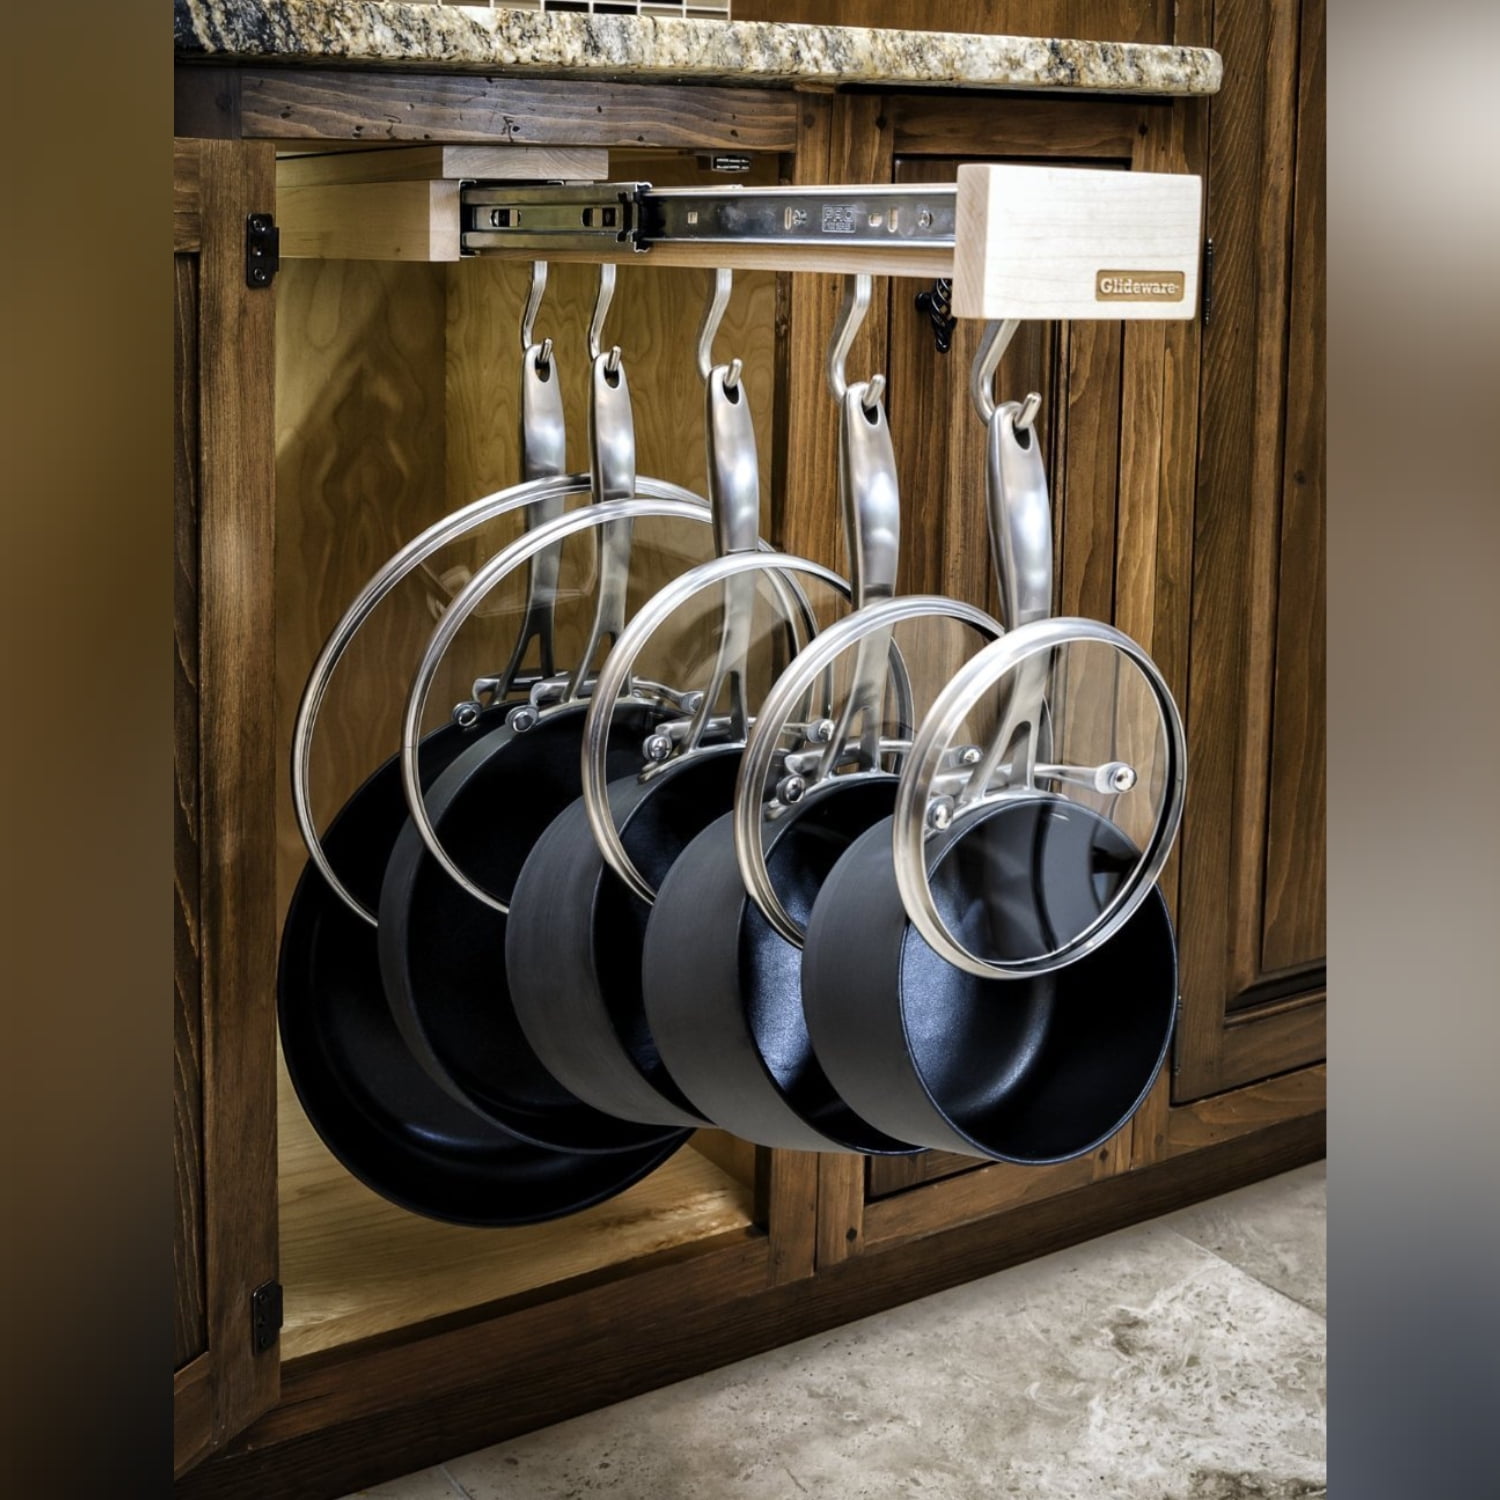
Rich colors
Streaks and streaks are not a marriage, but a design idea. That's how it should be!
Each pot will be unique
Sometimes a minimum of consumables leads to great results. Look how stylish these planters look, and it took just a little paint: a little white and a little black.
Black and white - classic
Here are some more amazing ornaments that, despite their simplicity, give the pots a spectacular look. It is not necessary to depict a monogram, but if you like the idea, but you don’t have the skill, don’t be too lazy to make a stencil.
How do you like these ideas?
The following painting method is ideal for beginners, but experienced masters do not refuse it. Just try! The process is so easy and exciting that you probably won’t be limited to the decor of one pot.
Bitmaps will never go out of style
Exceptionally bright colors available? Amazing! Cover the surface with the main color, and when it dries, draw fruits, berries or flowers.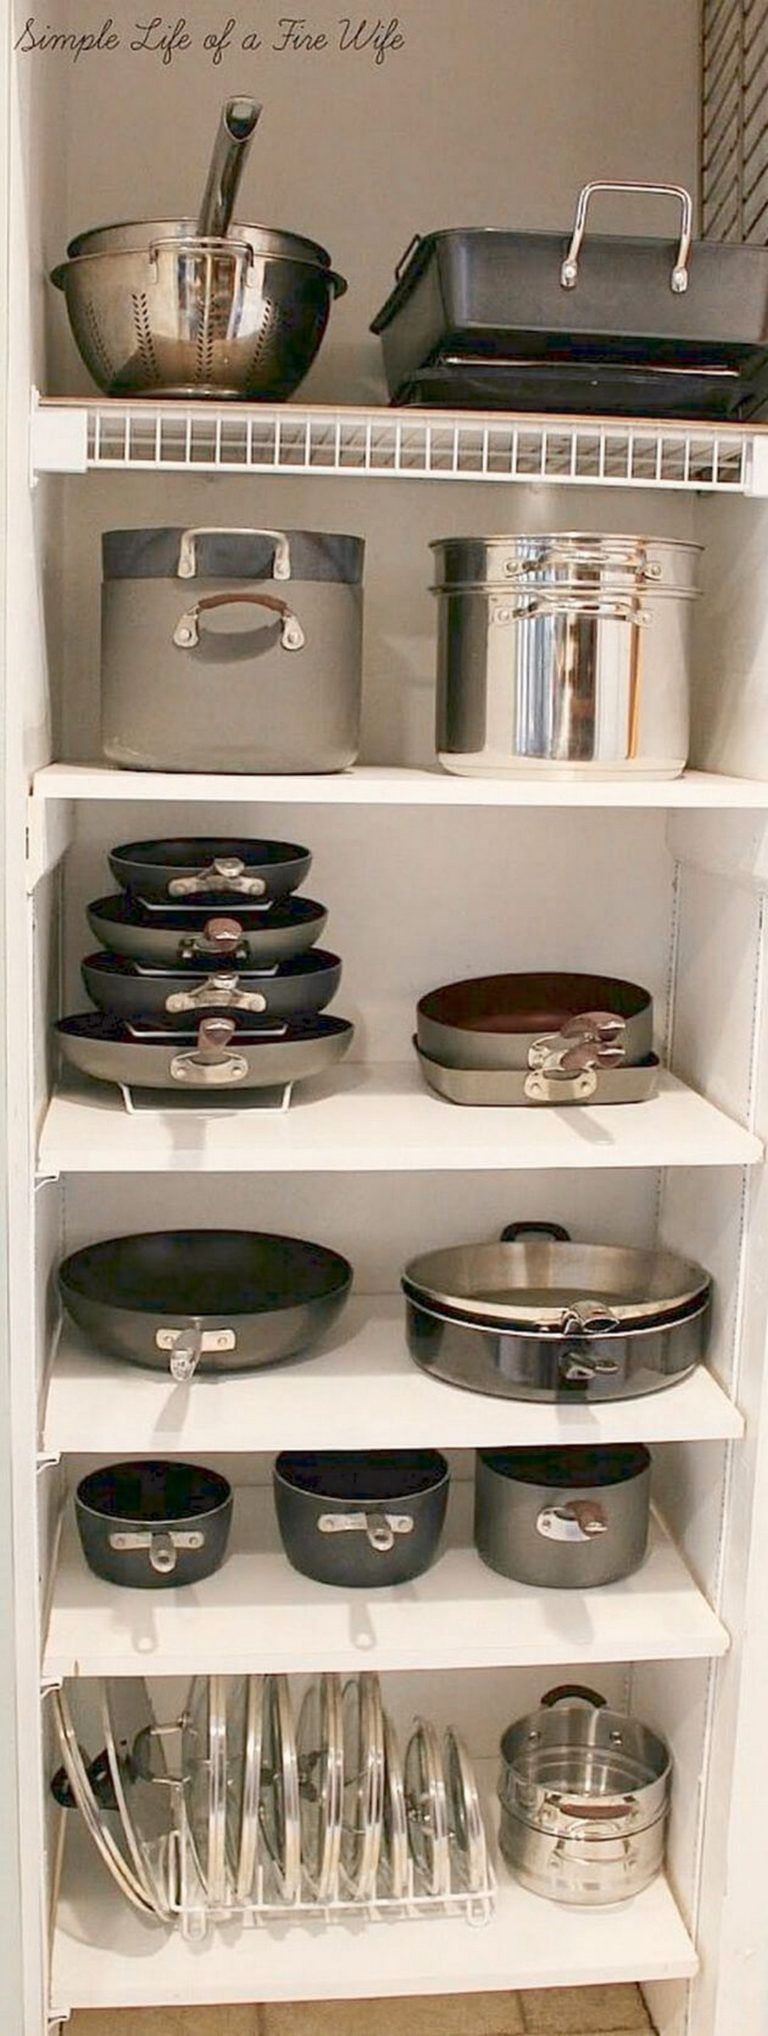
The drawing is simple, but looks very nice.
Bright floral fantasies look very nice on a light background. You can reduce the number of shades, for example, depict a clearing in blue-blue or pink-burgundy tones.
Flower theme is always in demand
Another modern print - representatives of the fauna, and the most diverse from butterflies and bugs to birds and elephants. I would probably refuse a pot with a picture of a snake or a spider, preferring fish or elephants that are more attractive to me.
Animal world - why not?
Everything in a nursery should be special, including flower pots. For example, these are cute and funny.
Fun Ideas for Nursery
If you like to draw intricate patterns with lots of small details, check out these delightful ideas. If you want to significantly reduce the time of work on decorating the pot, use ready-made stencils. They will also come in handy if you decide to decorate several planters in the same style.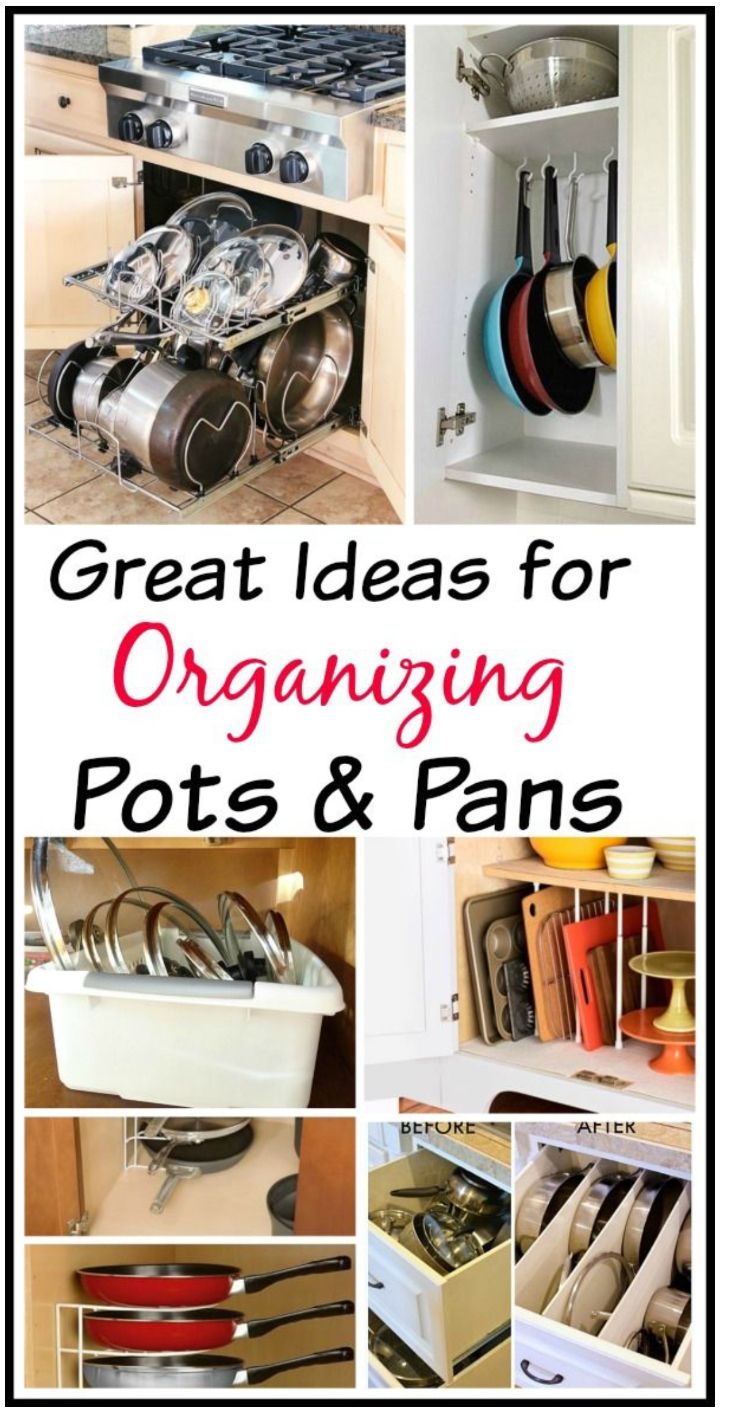
A stencil will help you get the job done.
An easy way to add some chic to your interior is to paint pots with glitter pigments. You can limit yourself to a part of the planter and decorate it completely - as you like.
Let's add some sparkles
Now it's not a problem to find the most unusual paint, so don't be afraid to experiment - the result can exceed the wildest expectations! Well, if you definitely don’t like the new look of the pot, just repaint it.
Literally brilliant ideas
It is impossible to show all the colorful variety: cute, unusual and surprising ideas are countless. And most of the work is done by no means professionals.
Decor options are countless!
So leave your doubts and try!
Decoupage mood
I don't know who invented this technique, but it was definitely a man of genius. Judge for yourself: thanks to simple manipulations with paper and glue, ordinary things turn into non-trivial products.
It is almost impossible to recognize plastic stamping in a chic planter
According to craftswomen who have mastered this technique, decoupage is a chance to give a second life to your favorite things. And indeed it is! And you can use not only napkins, but also fabric.
Paper will hide the flaws of old pots
Don't be afraid to take the first step. As practice shows, this decoration technique is easy to master. But there is also a "side effect" - after the first successful experience, there is an irresistible desire to transform everything and everything!
You can decorate both ceramics and plastics
It's hard to resist the temptation when so many great ideas haven't been tried yet. Perhaps, such pots will ideally fit into the interior of the living room...
And these are stunningly beautiful!
When your creation is ready, don't forget to cover it with varnish so that the pattern is not afraid of water, dirt and sun.
Pretty floral print
You can also try making a retro pot.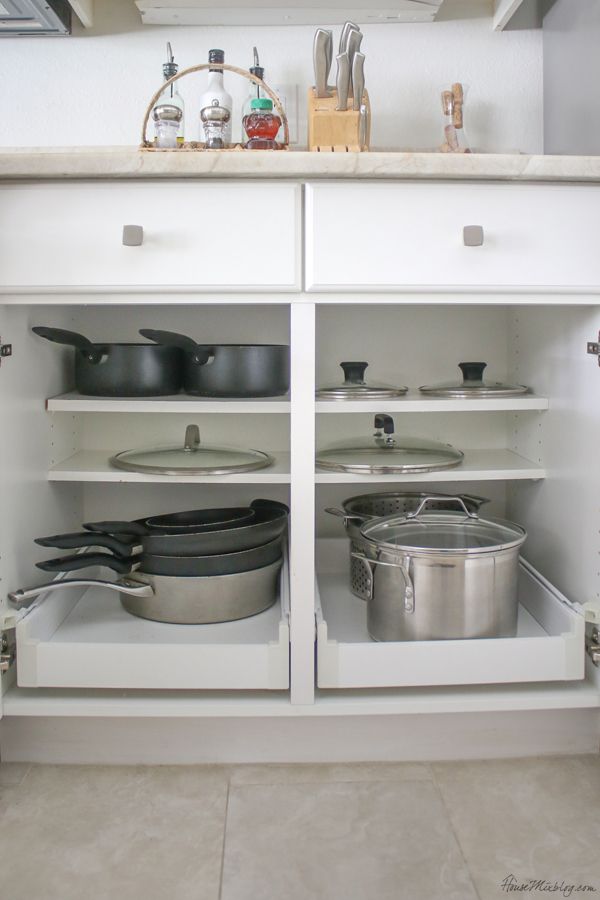 On flower pots stylized as antique ones, there must be some minor flaws - rust stains, scuffs, scratches, cracks and other traces allegedly left by time. It turns out that such an original decor is easy to make. Interested, are you ready to try? Then the theory will come in handy: the technique for making crackle is described in detail in the material Renovating old furniture. The charm of cracks.
The charm of cracks
An interesting trend in decoupage of pots is the use of photographs. You can, of course, insert pictures into a frame and hang them beautifully on the wall. But on a cache-pot - much more original!
Original!
Romantic mood
How to quickly and inexpensively give the interior a touch of romance? Yes, it’s simple - it’s beautiful to decorate flower pots! Graceful fabrics, lace, braid - everything will come in handy.
That's where the ribbon trim comes in handy!
Are you familiar with the macrame technique? Then it will not be difficult for you to repeat one of these charming ideas.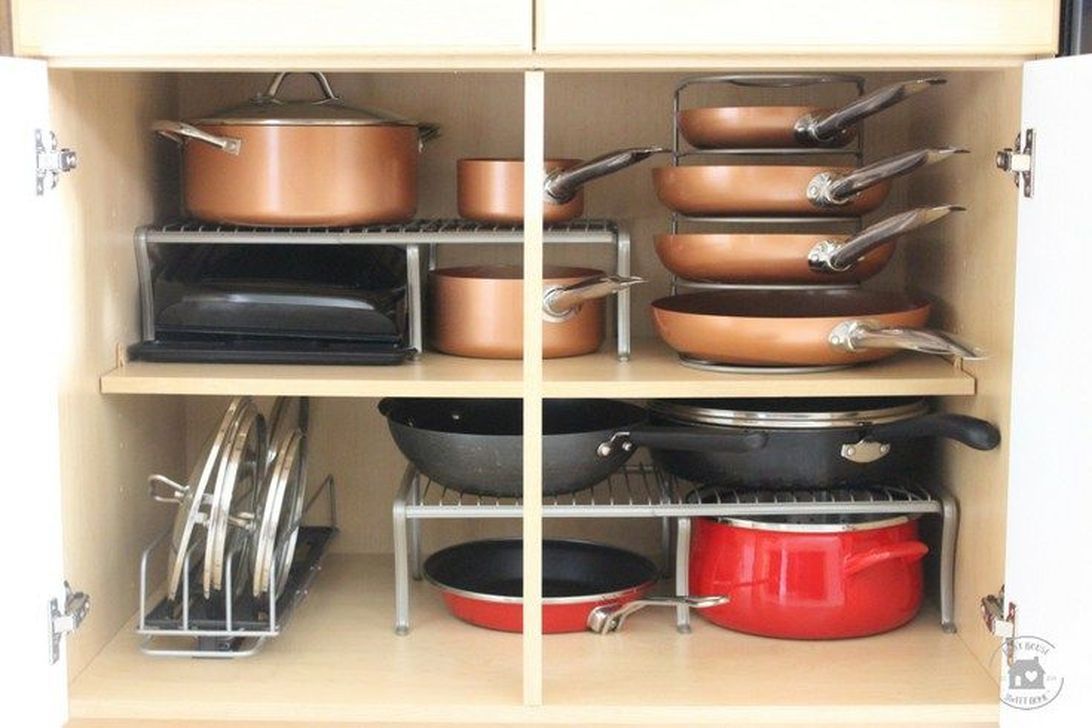
Macrame fringed braid looks luxurious
The succulents collection will finally look decent. Finding decent pots for these babies is almost impossible!
Isn't it romantic?
You can make a temporary decor - just stick ribbon lace on the pot. If, in addition, cover it with varnish or paint, dust and water will be nothing to him.
Outdoor planters will also like to dress up
I managed to find ideas exclusively in soft pastel colors, but if bright colors suit your interior more, why not experiment? Perhaps an ammarine or ruby lace pot will look much cooler than a snow-white one.
Charming pastel
Perhaps, for the first time, it is better to take a cylindrical planter. It won't be hard to wrap it up.
Nothing complicated, right?
With a little practice, you can move on to more complex shapes. By the way, almost any fabric is suitable for decoration - matting, knitwear, chintz and others.
Any fabric can be used for decoration
Twine laces
A wonderful way to transform flower pots! You will need a cord, glue and quite a bit of time.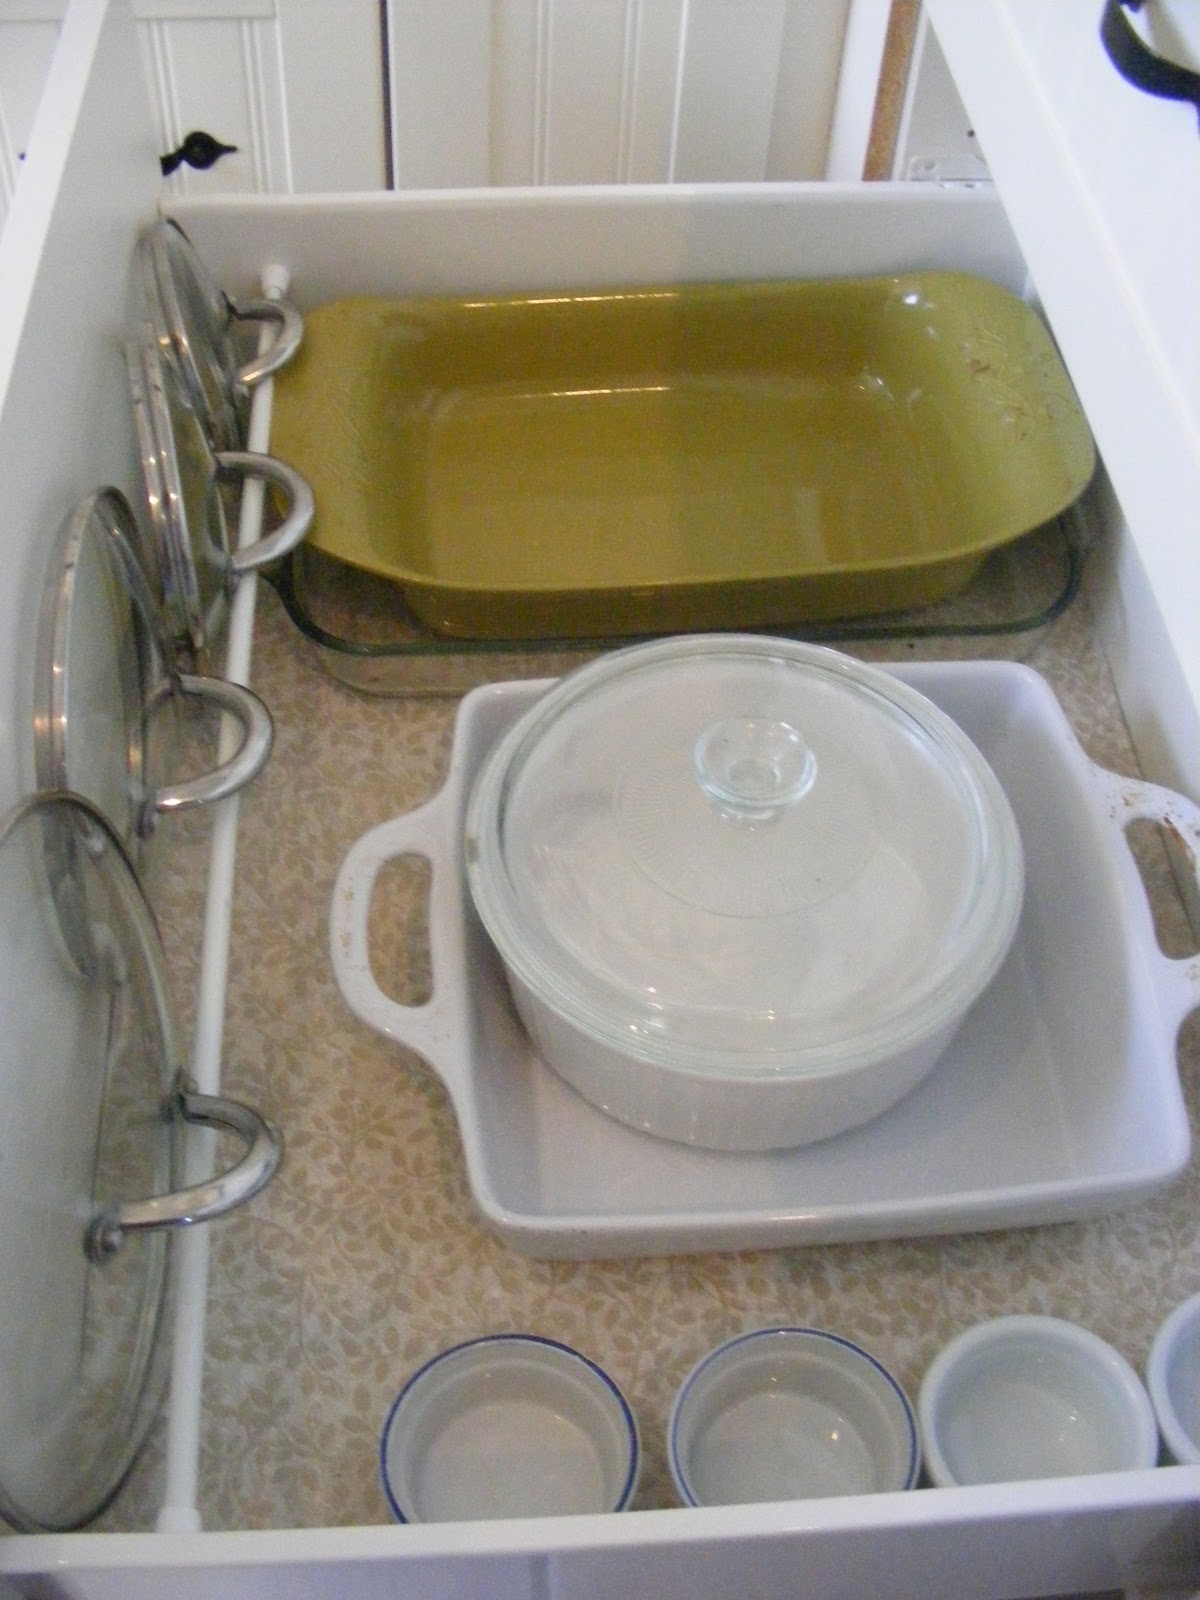
Twine is suitable not only for tying tomatoes
If desired, you can decorate the planter with a pigtail or symbolic handles.
It's even more interesting
Or - sea shells (oh, how nice it was to collect them to the sound of the surf!).
Marine motifs
Here are some more cute options for every taste. Yes, and you probably already have your imagination working, tossing one idea better than another.
So cute too!
These ideas are a bit more difficult to implement, but not hard enough to make them go away. In my opinion, the order of work is clear and without description.
These will take longer to work on
The twine made of natural fibers certainly looks very impressive. But if it is not there, you can always find a worthy replacement!
Cord can be replaced with improvised analogues
Almost a jeweler's work - a mosaic
How good are mosaic planters! Words can not convey - better show.
Unfortunately, I'm with a mosaic on "you"
I studied the theory thoroughly, since there is a wonderful publication on the site on this topic: What can be done from tiles that remained after construction.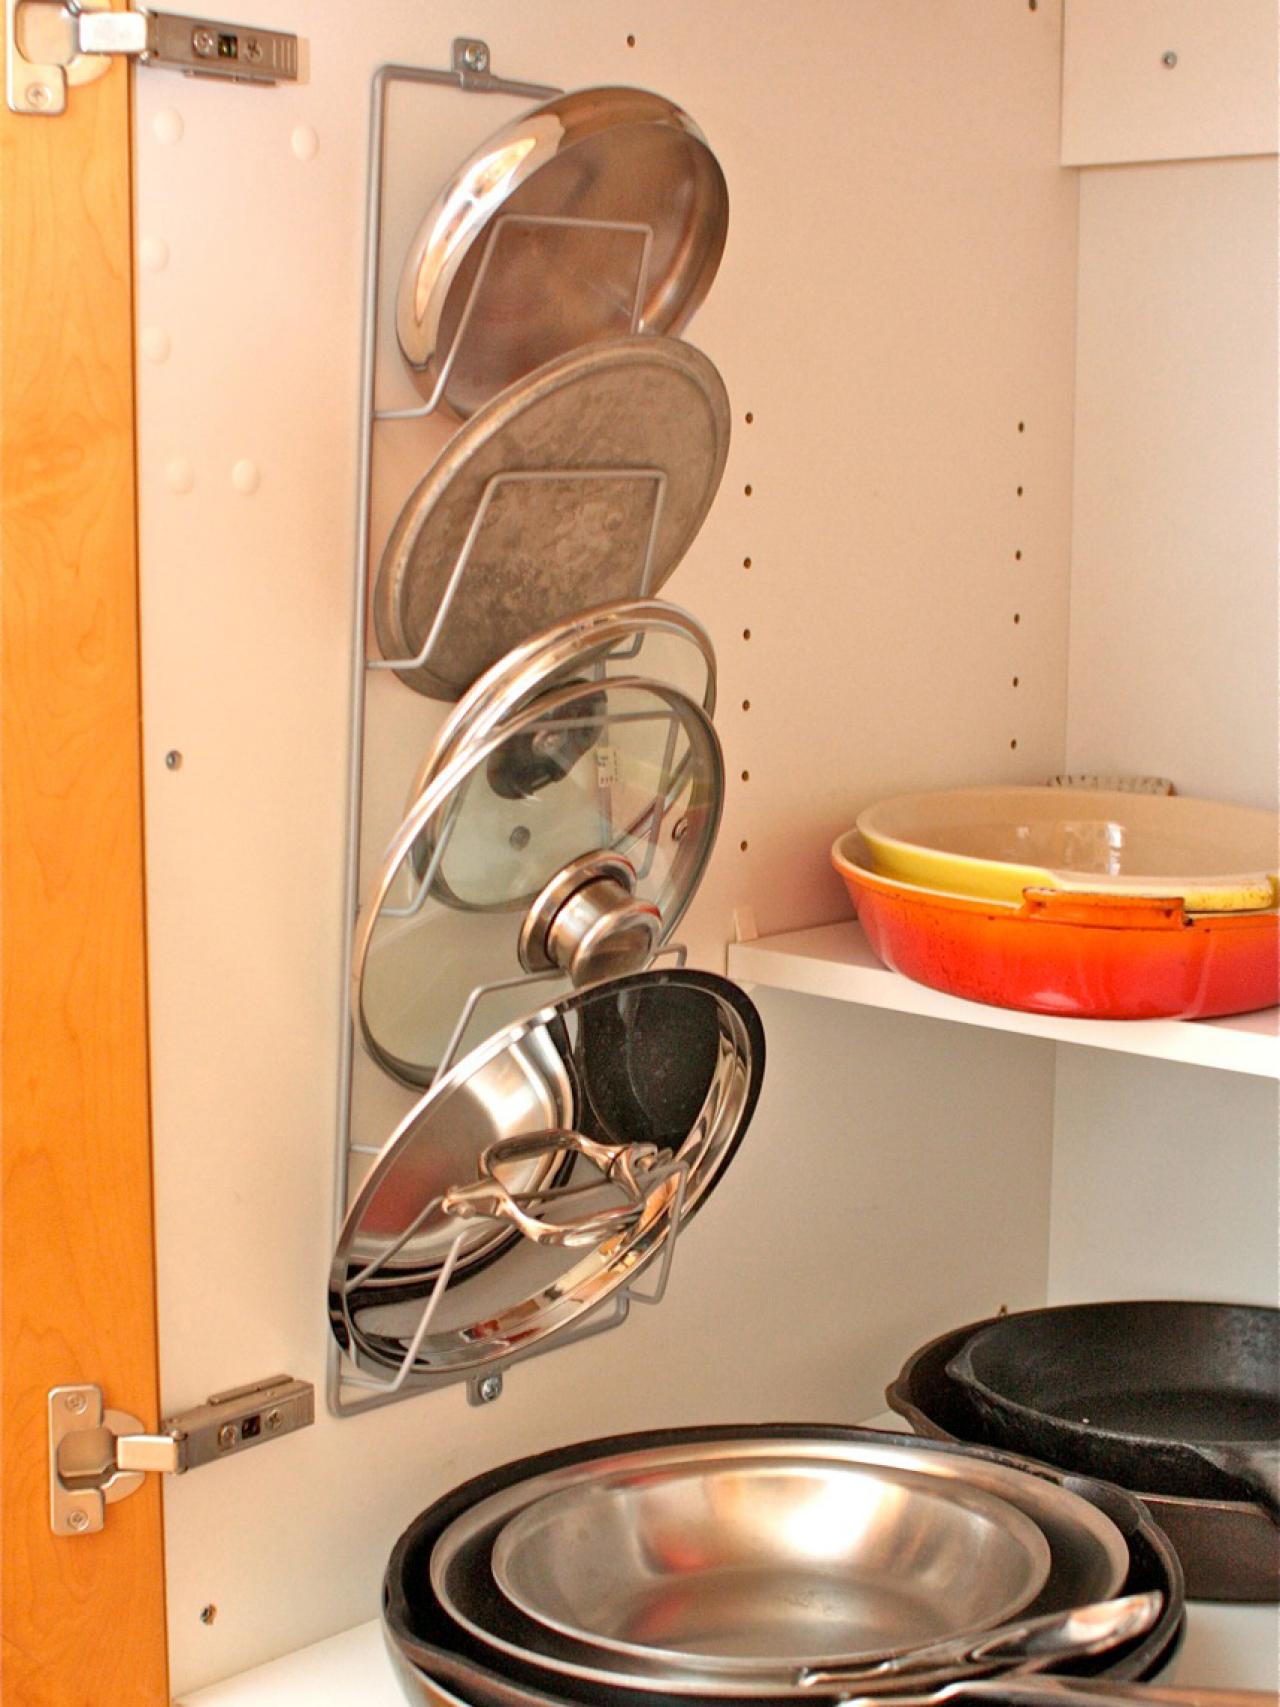 But it has not yet come to practice, I only dream of beautiful garden planters.
They will magically transform the garden
I will hardly ever be able to do something like this... However, I will not put an end to my dreams ahead of time, it would be better to admire the creations of real masters together with you.
Works of art
Two of the most delicate romantic planters completely fascinated me. And it does not matter that they are made either by novice masters, or deliberately simple. Looking at them, I seriously thought that it was time to punish numerous relatives to bring me broken cups and plates. What's with the dishes? Take a look at the article Do not throw away broken cups, or Mosaic from nothing - you will find out both the answer and a lot of interesting and useful information on the topic.
The very tenderness
Mosaic is a versatile material, anything can be depicted.
Birds again
Quite often pieces of tiles are complemented with decorative stones.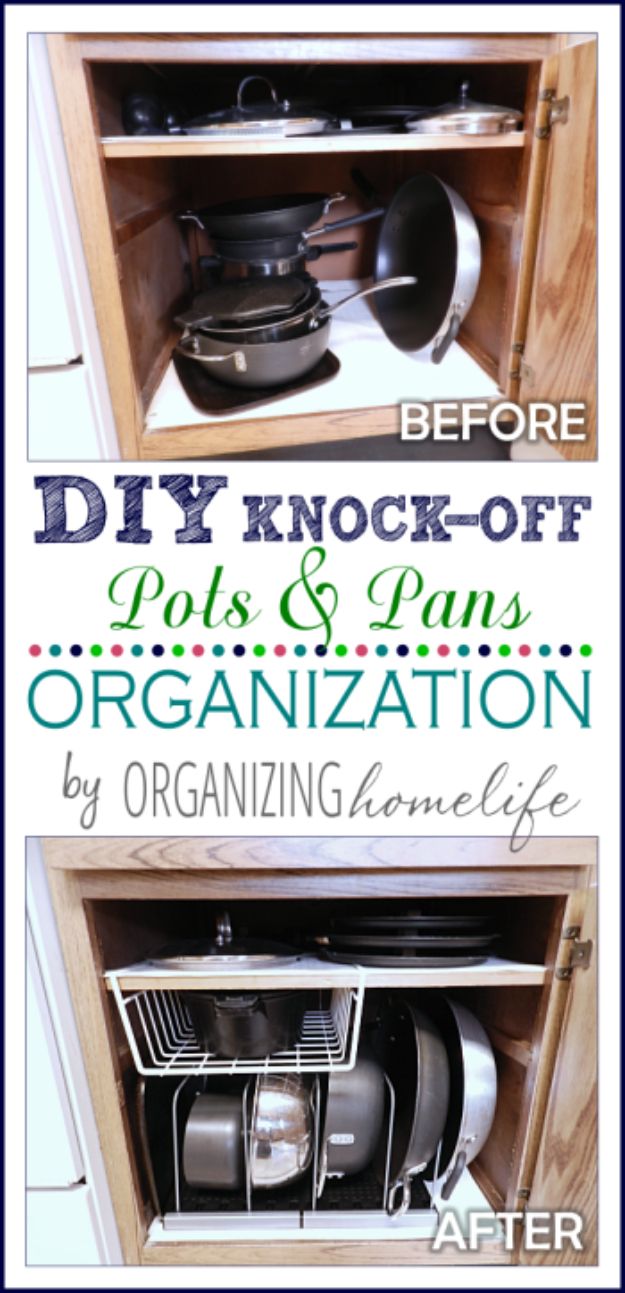 Or even use them as the main material.
With decorative stones
The mirror mosaic looks very impressive.
From pieces of mirror tiles
Stone Age
In principle, tiles can be replaced with pebbles - it will turn out no worse! The pot, of course, will become heavier, but much more stable.
Pebble masterpieces
Small pebbles are also suitable for decoration.
Small stones are also good
Sea gifts
Judging by the number of different ideas, sea shells are very popular as a finishing material.
Marine motifs again
Sometimes they are complemented with imitation pearls. No beads - paint small shells with mother-of-pearl paint or at least nail polish.
Pearl shine would be nice
Experienced craftsmen make unusually interesting compositions.
The imagination of the masters is truly limitless!
Shells are the ideal material for decorating outdoor planters, as they are not afraid of either sun or rain.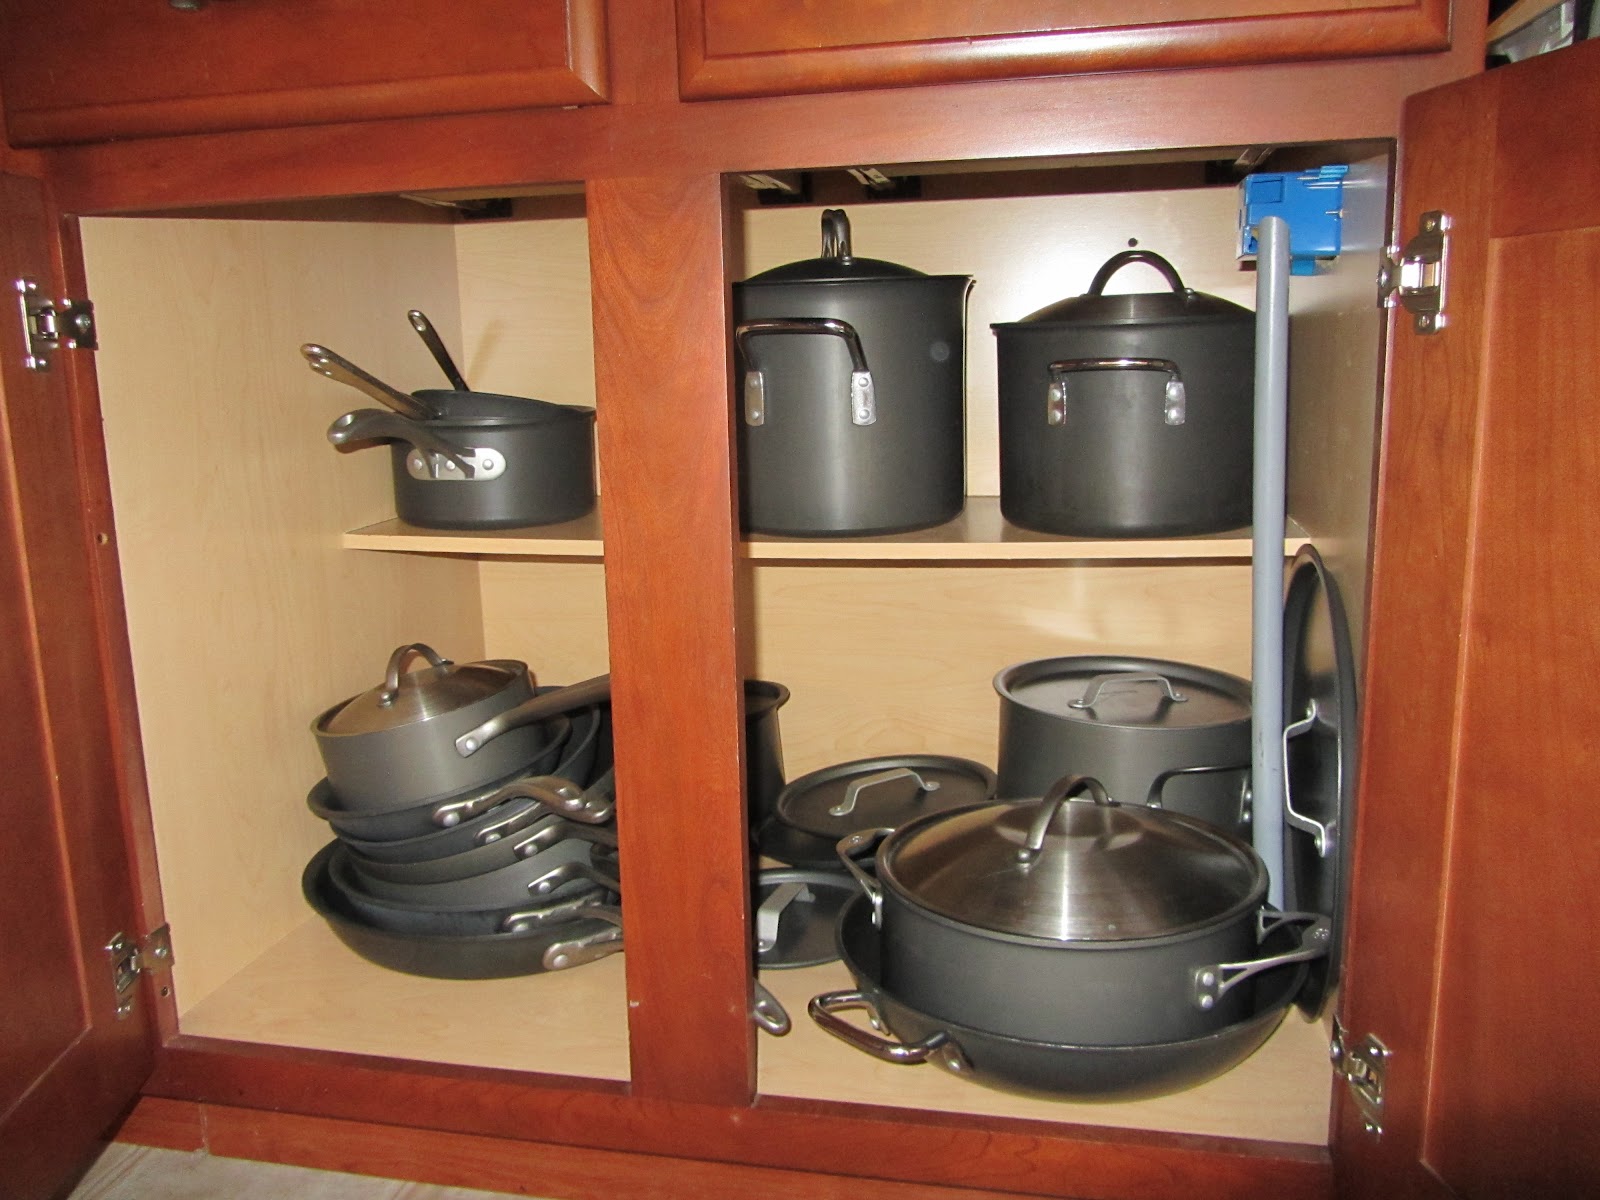
Shells on outdoor flowerpots - beautiful and practical
Coloring of the finished product will give an interesting result. And if there are enough pieces of glass polished by sea waves in stock, why not use them too?
How do you like these options?
Collectible saltwort
Fairy houses on flower pots - a fantastic idea for the garden and for the children's room.
Pots - Fairy Houses
The choice of decor materials is almost limitless. Sea sand or plant seeds - what do you think of these ideas?
An interesting solution
A button planter decorated with beads looks very nice: elegant. And all sorts of things - at least original!
Ideas for every taste
There are many beautiful planters in the stores. But there are no such that we can make with our own hands and never will be. The conclusion is obvious: you need a beautiful pot - start decorating it! In preparing the publication, photos from the site pinterest.