Pantry shelving depth
The Ideal Measurements for Your Pantry Shelves
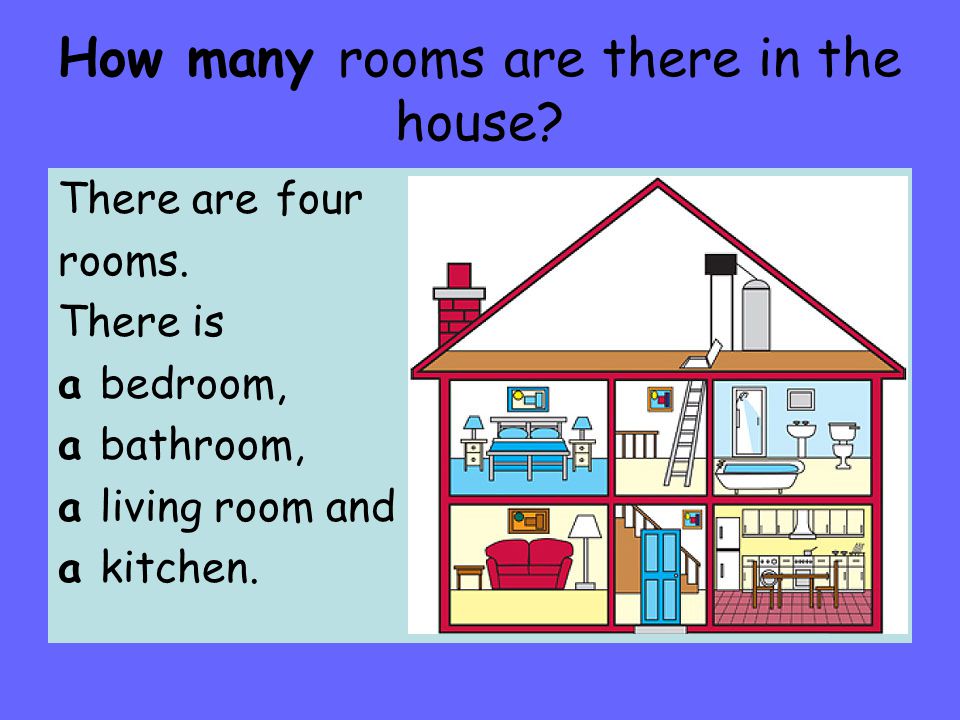
Kitchen
Expert Interview
pantry
Tips & Techniques
Ayn-Monique Klahre
updated Aug 21, 2022
We independently select these products—if you buy from one of our links, we may earn a commission. All prices were accurate at the time of publishing.
Even if you’re lucky enough to have a pantry, you still might not feel like all of your food-storage prayers have been answered. Sure, it’s nice to have some extra shelves beyond your cabinets, but why can’t you ever find what you’re looking for?
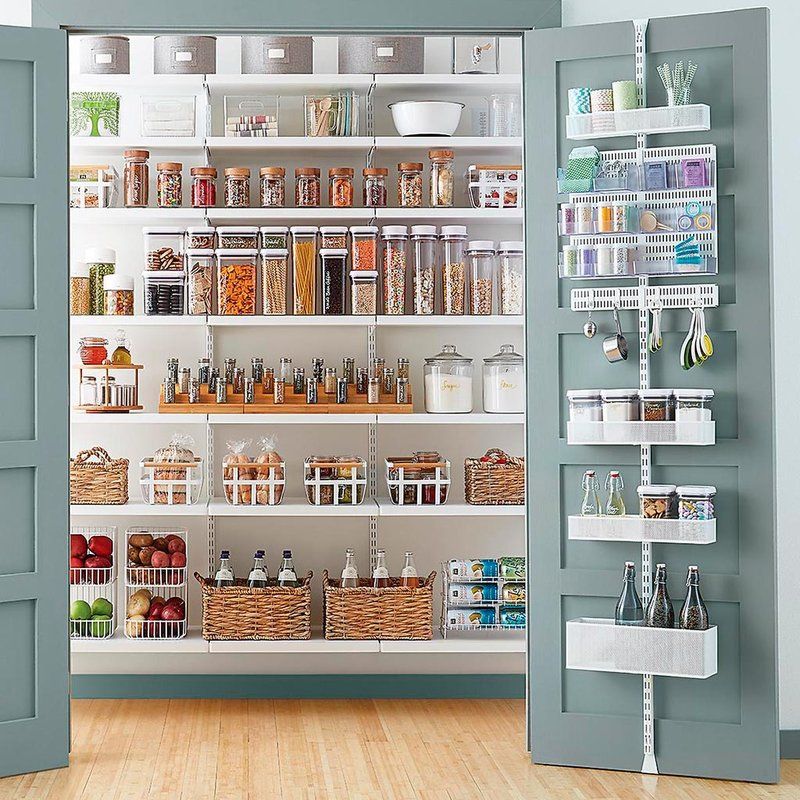
We talk a lot about using bins, organizers, and plenty of labels to keep order in a pantry. And while those are great helpers, you also might need to take a look at the shelves themselves — specifically the depth, placement, and measurement of each pantry shelf. So says Scott Davis, vice president of product development and marketing at Closetmaid, a storage system manufacturer.
Because Closetmaid designs pantries both for consumers and for builders, we thought Davis would be the perfect person to share the ideal measurements for pantry shelves. Here’s what he says you need to know.
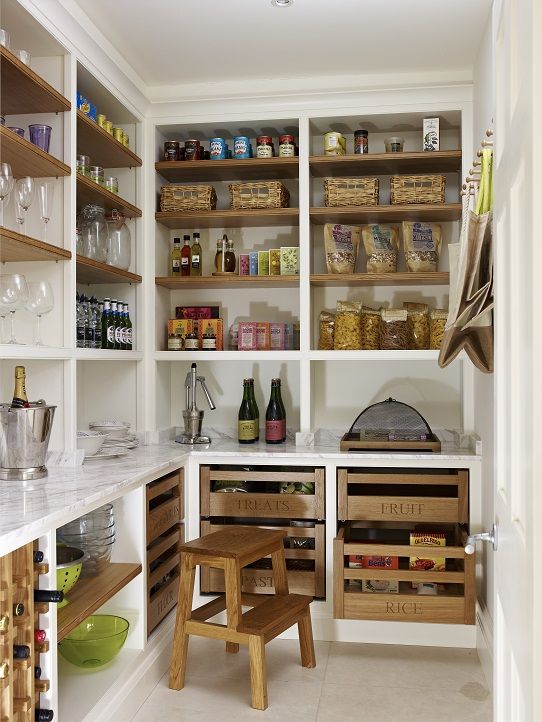
1. The shelves shouldn’t be too deep.
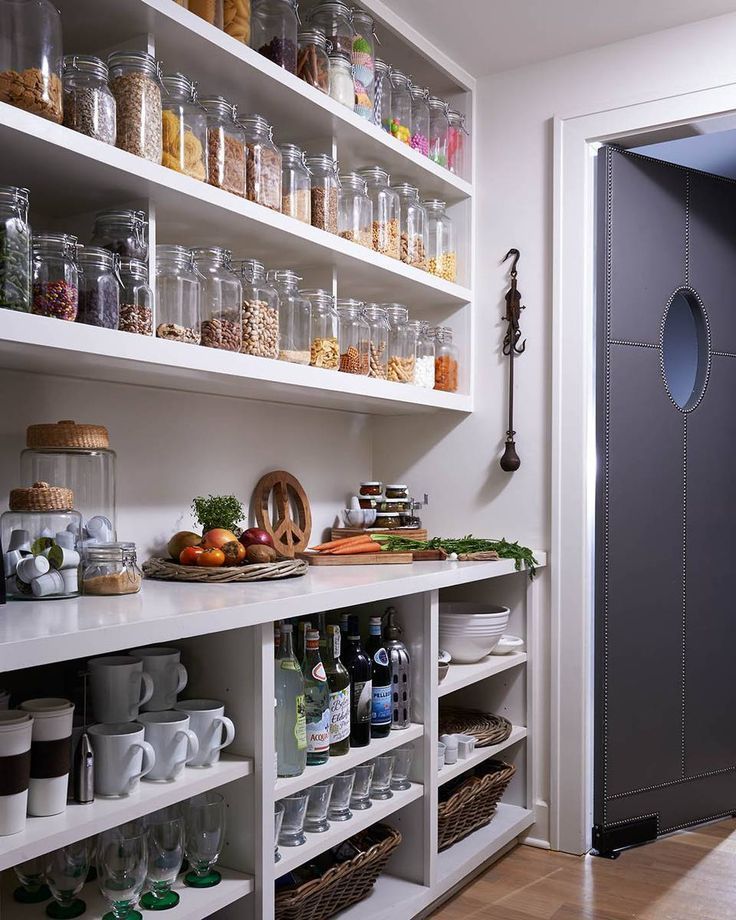
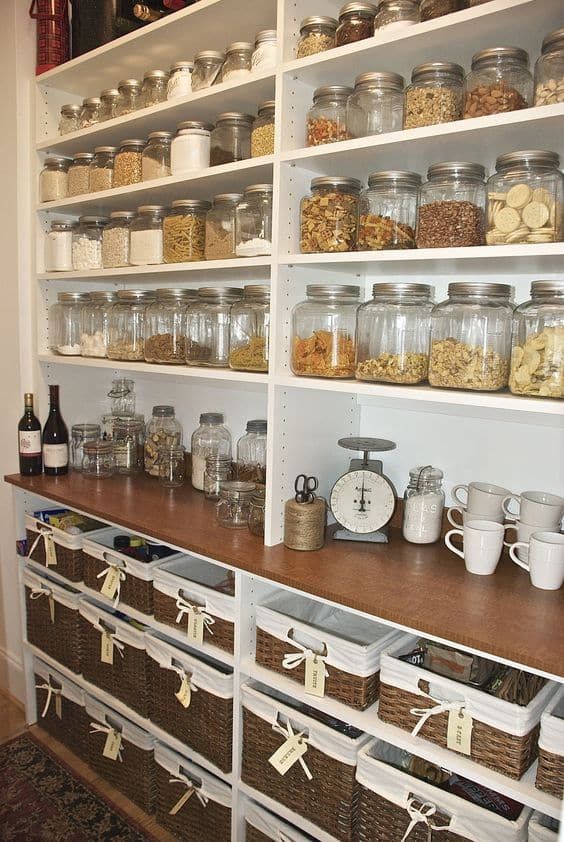
The standard depth of most shelves is 16 to 20 inches deep. The highest shelf should be shallower, like 12 inches deep, to make those items easier to access. If you find that stuff seems to get pushed to the back and forgotten about, you should consider even shallower shelves.
2. You need floor space.
The bottom-most shelf is typically 20 to 24 inches from the floor. If you need to raise it even higher, do it. This will give you room to store bulk items like pet food, paper towels, or even crates on wheels (which essentially become rolling drawers).
3. There are magic numbers to figuring out shelf heights.
Depending on what you store on each one, raise or lower the shelves accordingly.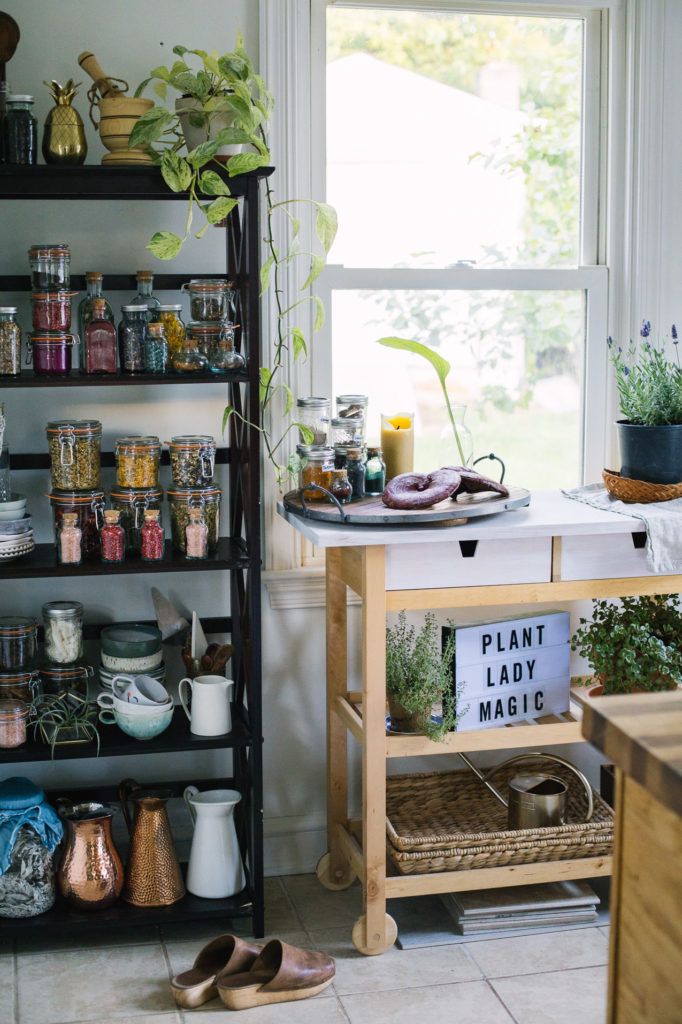 Plan at least two inches of clearance above the tallest item on the shelf. This will make each item easy to access and help cut back on wasted space. Here are some general rules.
- Allow 6.5 to 7 inches for a shelf of canned goods.
- Allow 14 to 16 inches for cereal boxes.
- Allow 18 to 20 inches for large items, like bins of potatoes.
4. Pay extra attention to a few key shelves.
The shelves between waist and eye level are easiest to access, so put your most frequently used items there. If you’re only going to use a few bins or organizers, these are the shelves to use them on. This way, people will put things back in the same place they found them — versus just placing them toward the front of the shelf.
5. Don’t be afraid to rearrange.
Once you get your system in place, you’ll want to revisit it periodically. “My wife and I are amazed at how much our pantry has evolved over the years,” Davis says. If you have kids, for example, you may (or may not!) want to place snacks someplace they can reach.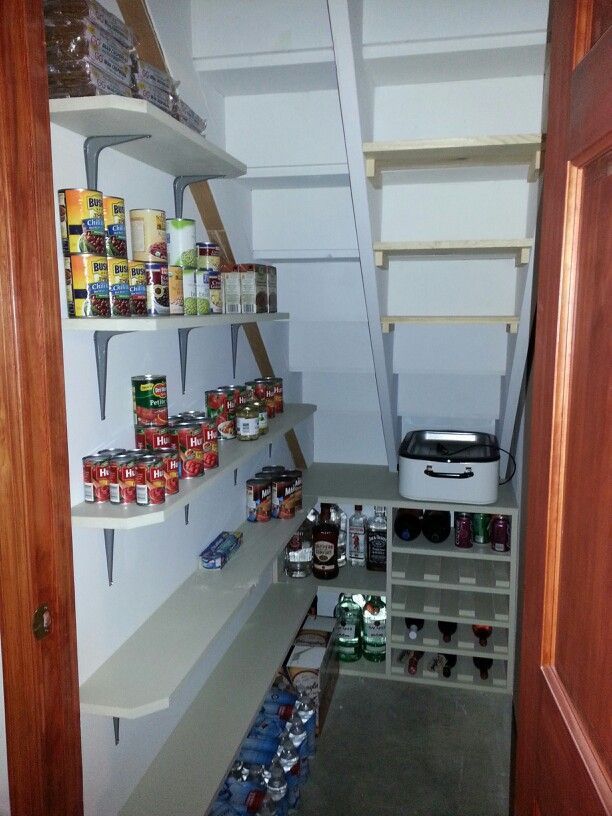 And if the snack shelf now has eight inches of clearance space, you’re wasting valuable real estate. Once in a while, it’s worth taking a step back to reevaluate.
Perfect Pantry Shelf Depth and Height – Every Thing Pantry
by Anders Nielsen
Good day, pantry enthusiasts! Are you evaluating your food storage space right now, trying to make space decisions? Let’s see if we can help. Below are the shelving averages to keep in mind when working with pantry shelving spacing.
- standard pantry shelves come in depths of 12″ and 16″ deep
- an average spacing of shelves for most food items is 7″-10″ and 12″-14″
To lay out pantry shelves, plan on a mix of 12″ and 16″ deep shelves. Heavy and bulkier items gravitate to the lower shelves of the pantry. Place frequently used items at eye level and lighter objects like baskets on top shelves.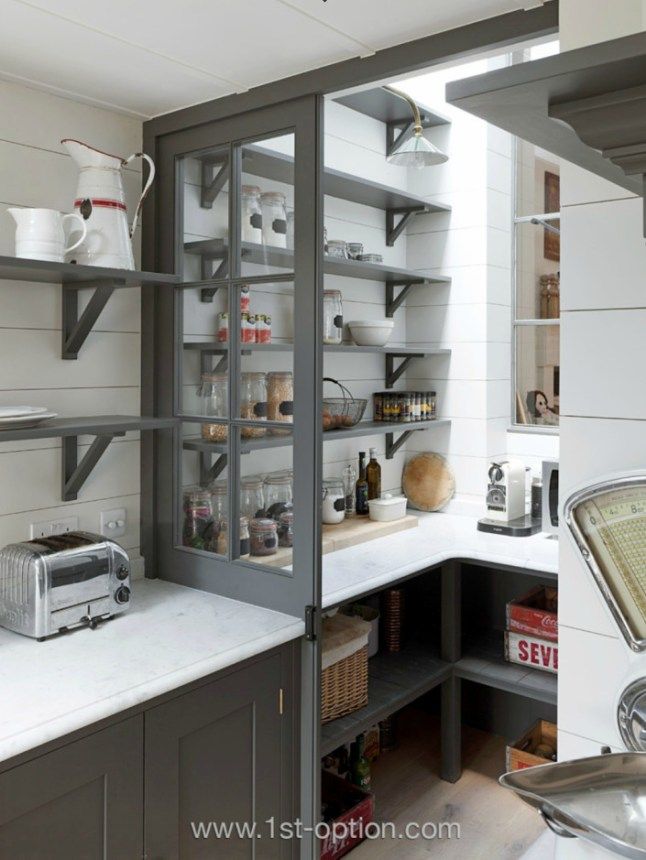 Most food boxes are not more than 10″ deep; standard cans are within 3″-4″ wide and can be stacked 3-4 deep on a shelf.
are
For comprehensive charts of pantry shelf depths and spacing, read on.
RELATED ARTICLES
- Tips for Buying Pantry Shelves
- Plan a Pantry Shelf: Food Size Charts
Table of Contents
Where to start your pantry shelving spacing adventure
If you need shelves, and have chosen a closet kit, you don’t have too many decisions to make. When choosing a package, the measurements have been decided for you. The depth of the shelves will likely be the standard 12″ depth with some 16″ depths thrown in for bigger items.
If you are at the point of doing this all from scratch, there are a lot of decisions to make. If you want some easy information right now, head over to find out about my “Pantry Shelf Planning Bundle” that helps make shelf decision making easier. if you want Customization is a beautiful thing, but it can be a double-edged sword, bringing more choices than you ever imagined.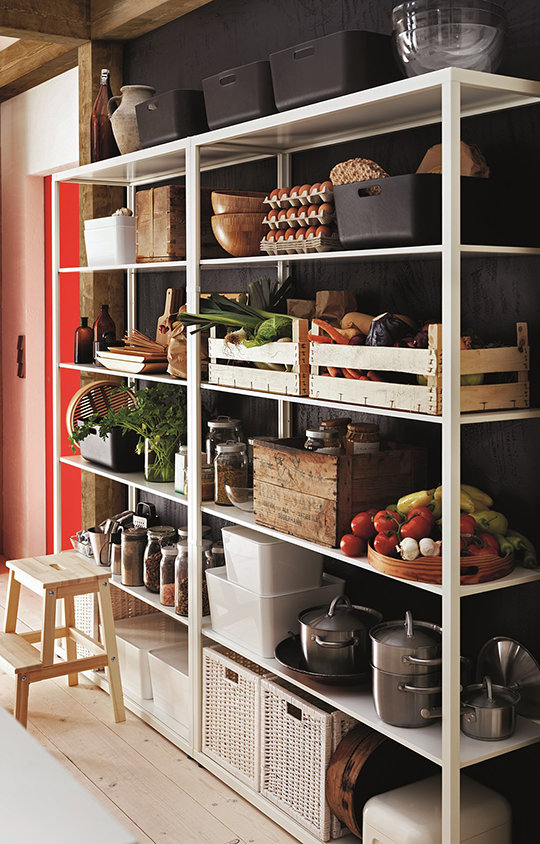
One of our Iowa pantry tours “A Visit to a Modern, Old-fashioned Pantry” demonstrates this. The pantry is a fine example of custom pantry shelving of different depths that transition beautifully. Great care and thought were taken and it shows.
This article focuses on ideal pantry shelving spacing from a practical viewpoint (I will leave the fancy carpentry work to the experts!) The reality is, the food in our pantry comes in all shapes and sizes. The best we can do is find the averages and keep making adjustments until we find what works for our own situation.
The reality of food item size management in pantries.Exploring shallow wall pantry ideas
I love shallow shelves. They can be tucked in almost anywhere – behind a door, on a special wall, or a featured custom shelf. Finding anything back is an enjoyable experience – no hidden or forgotten items. Here is the low-down on narrow pantry shelving:
- a shelf of 4 inches wide, and not more than 7″ will conveniently hold small bottles such as spices, flavoring extracts, baking powder, gelatin and pudding boxes, etc.
- shelves the depth of just one can – 3 1/2″ to 5″ – will still be useful; a depth of 6-8″ allows for one or two rows depending on can depth.
In one of my houses, leftover door trim was used for shallow shelves. The “one row shelf rule” is an admirable goal, but may not always be possible. The idea of one row shelving is to aim for shelf depths narrow enough for one row of cans for visibility and easy retrieval.
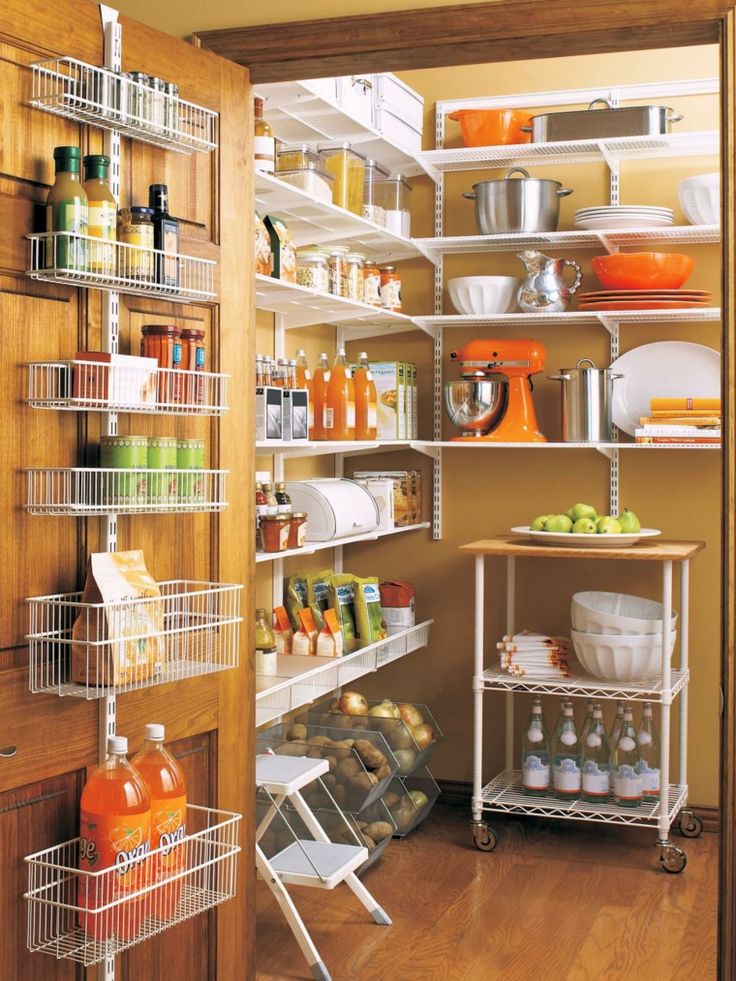
For maximum storage, most houses opt for at least 12″ deep shelves – they are the standard. This won’t stop you from adding over-the-door storage, installing narrow shelves on empty walls (especially where the door opens) or tucking spice shelf racks in where opportunity calls.
Single item storage on narrow pantry shelf/racks.Standard pantry shelving lengths
Across closet shelf companies, wire shelf lengths are very standardized. Pantry wire shelving comes in standard widths of 18″, 24″, 36″ 48″, 60″ and 72″.
The length of wood shelving boards can vary, especially the decorative offerings. If you favor a certain finish, it may only be available in minimum choices. You will not always be able to find 8′ boards for a project, but more common would be 2′, 3′ and 4′ board lengths.
Both wire and wood can be cut to fit. Pantry shelving kits, especially for wire, provide a good base to start a pantry closet with.
Standard pantry shelving widths
If you’re building a custom pantry, you have control over pantry shelf depth. I will still recommend staying to somewhat common shelf depths because they have been proven to fit most anything.
If you’re buying stock pantry shelves from the store, you will get stock sizes and won’t have much of a choice. As mentioned above, typical pantry wire shelf depths come in 12″, 16″ and 20″ deep depths.
How deep should pantry shelves be?
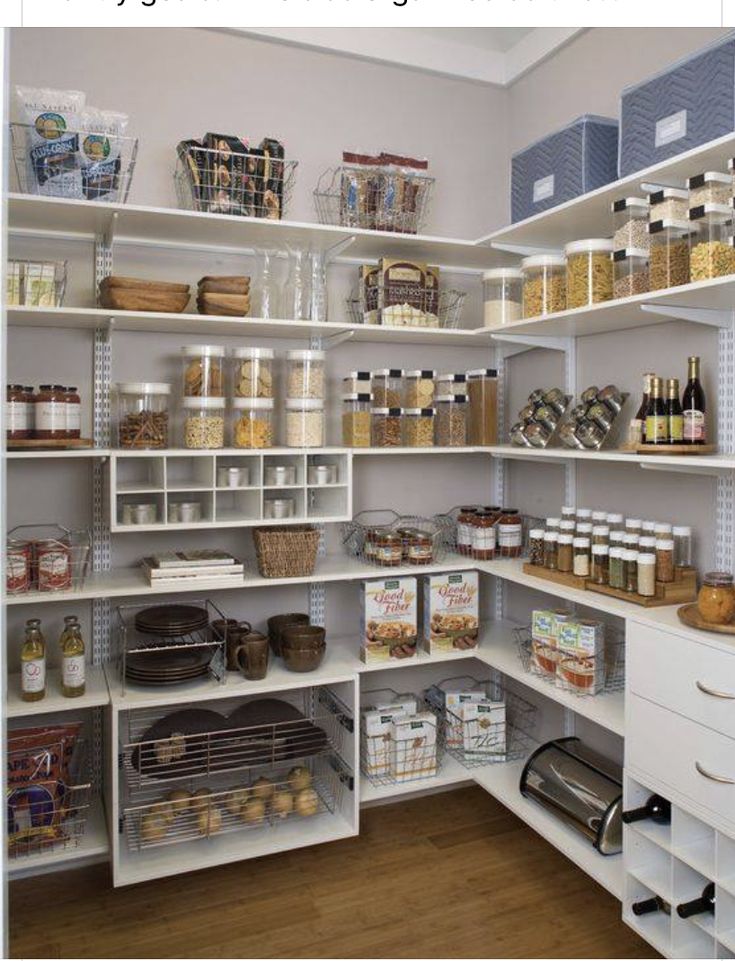
Twelve inches deep is the best pantry shelf depth for canned goods, boxed food, and pantry organizers and provides the easiest access. Sixteen inches can accommodate the occasional large bins and small appliances. Most pantry owners agree that 20″ deep shelves are too deep and hard to access.
I will point out that some decorative wood for shelving at home improvement centers does come in the 7 3/4″ depths. This isn’t intended for pantries, but decorative interior use such as display shelves.
Shelves are shelves and anything is up for grabs when it comes to pantry shelving. If you find it works for your space, go for it. Of course, any carpenter can “rip” a wood board in half, making a more narrow pantry shelf. A 20″ board would produce nicely sized 10″ depth pantry shelves.
Very few food items are more than ten inches across. Start by looking over your food items and take a quick “poll” – measure a few cans, jars, and boxes to quickly discover width and height averages. This provides the information you need to plan on best shelf dimensions.
Below are suggested shelf depths for certain food items. Shelves, spacing, and diagrams are all found in my “Pantry Shelf Planning Bundle” that helps make shelf decision making easier.
Some of these are not standard shelf depths to buy in a store, this is if you are customizing a pantry and cutting boards to fit. It is still helpful to everyone, nonetheless. If you are curious about space between shelves, jump to Golden rules of pantry shelf spacing.
SHELF DEPTHS
4 inches
Spices, gelatin boxes, small bottles, cans 1-deep
Location: empty wall behind door, storage on door, “rack”
Most single cans are about 3.5″ wide. Achieves ONE ROW SHELF RULE. For best results, design shelves only wide enough to hold comfortably one row of supplies.
6-8 inches
Canned goods, 2-deep
Large jars, bottles, or cake mix 1 deep with room to spare
Assorted mixed condiment bottles, 2 deep
Cracker boxes.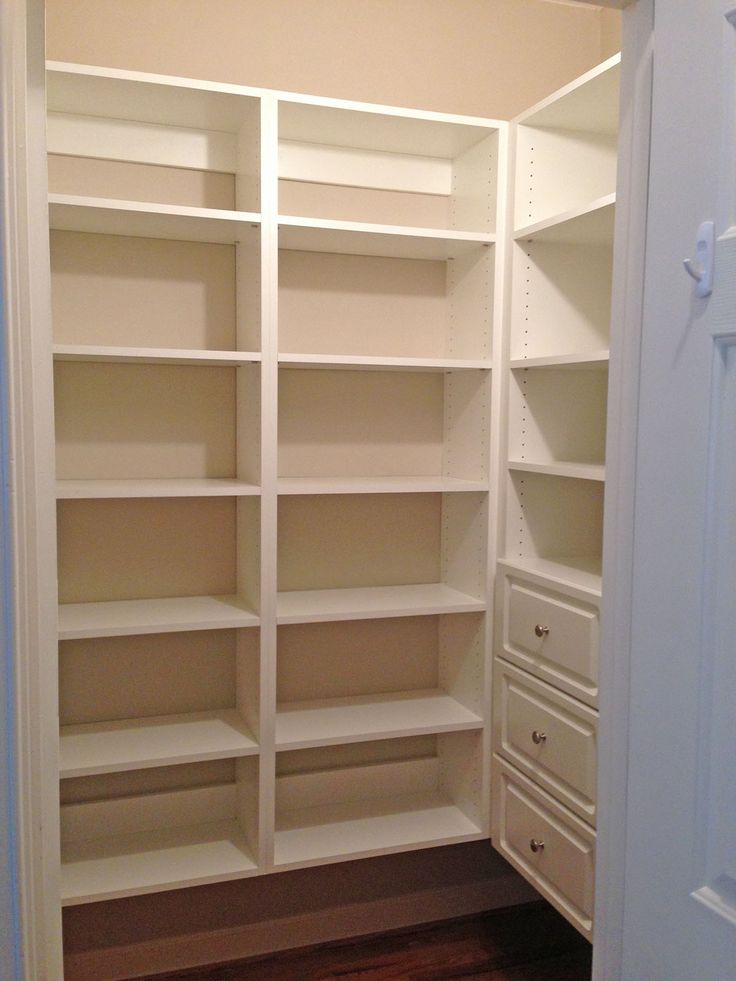
Location: eye level or higher
10 inches
Canned goods, 3-deep
Large peanut butter or mayonnaise jar, 2 deep
Assorted mixed condiment bottles, 3 deep
Medium-size cereal boxes
Location: eye level or higher
Very few food items are more that 10″ deep, but 12″ deep shelving is the standard.
12 inches
Canned goods, 4-deep
Jumbo-size cereal boxes, flour, bins
Large peanut butter or mayonnaise jar, 2 deep
Assorted mixed condiment bottles, 4 deep
Location: eye level or higher
MOST COMMON DEPTH. Accommodates a wide range of food items.
WARNING!Shelves start entering the
“DEEP ZONE”
14-16 inches
Plates, platters, pots and pans, pantry organizers such as can organizers, turntables and bins of produce, small appliances.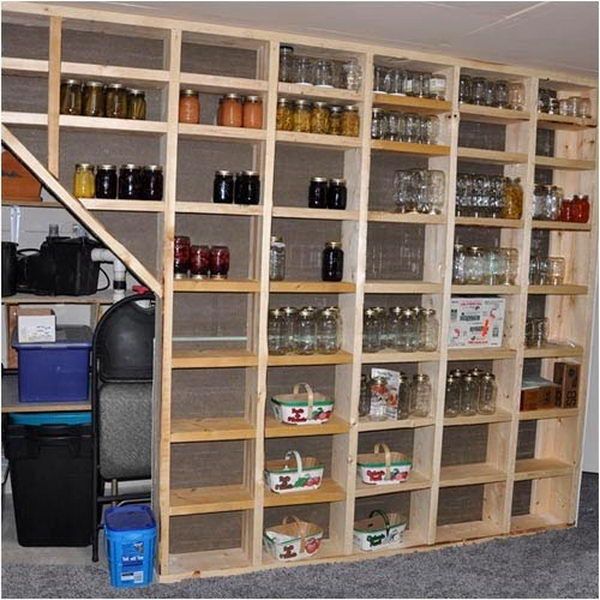
Location: eye level or lower
18-20 inches
Medium-size small appliances and bulky items like crock pot, roaster, etc.
Location: bottom shelf
20+ inches
Bulk food, jumbo bins or use “layering” techniques for mixed items.
Location: bottom shelf
Golden rules of pantry shelving spacing
- The area of comfortable reach is between one and six feet from the floor.
- Narrow shelves should be at eye-level.
- Install medium width shelves above eye level and below waist level.
- Deeper shelves should be at waist level (especially if the shelf doubles as counter space).
- Store heavier items lower and lighter items higher.
- Graduate shelf depth from deepest on the bottom, to more narrow on top.
- Consider 12″ deep shelves placed above 16″-20″ deep shelves for easier access of the 12″ shelf.
- If you find that stuff seems to get pushed to the back and forgotten about, you should consider more shallow shelves or buy organizers for deep pantry shelves.
| PANTRY SHELF SPACING HEIGHT | FOOD ITEM EXAMPLES |
|---|---|
| 6″ | General height of cans and spice jars is about 4 inches; allow 2 inch space for comfortable access. |
| 6. | Most canned foods. |
| 7″-10″ | A safe average distance for spacing. |
| 9″-12 1/2″ | Mason jars (6.6″). Most baskets are 8″ tall. Marinade bottles are 8.5 and large ketchup bottles are 9”. |
| 14″-16″ | Cereal boxes average 12″ in height (frequently accessed, so keep nearer to eye level). |
| 18″ | Height of shelves above countertops in pantry. Allows for space of KitchenAid mixer, coffee maker, or other appliances. |
| 18″-24″ | Large bins of food and big items that just don’t fit well elsewhere and bulky appliances (this corresponds with deeper shelf depth, such as 16″-18″). |
| FLOOR TO BOTTOM SHELF (minimal) | Plan on 16″-18″ from floor to bottom of first shelf for bulk storage, pet food, heavier food like potatoes, small appliances. |
| FLOOR TO BOTTOM SHELF (generous) | Big objects such as paper towels, pet food, jumbo bins, crates, bottled water, trash cans. |
 5″-7″
5″-7″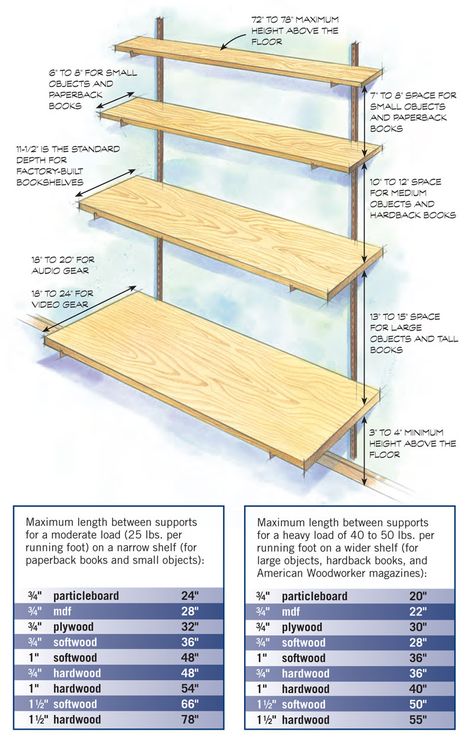 Ideal for flour and sugar storage. Wine bottles, oil jugs, bulk containers are 10″-12″ tall. Bulky items.
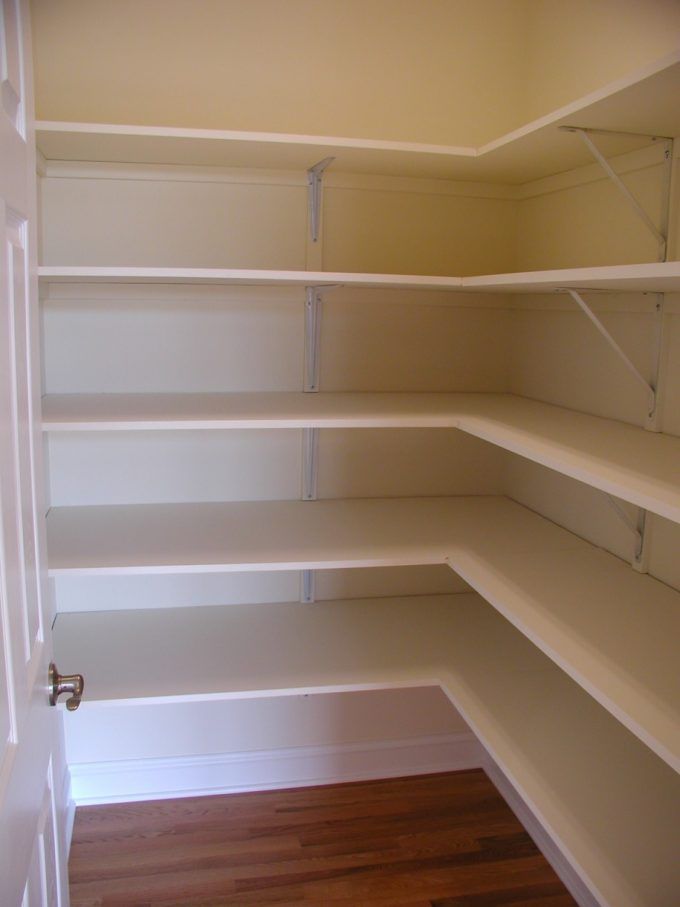
Smart pantry owners do this
Use these smart pantry shelf strategies to reach food easier, organize shelves, and find things back.
- The shelves between waist and eye level are easiest to access, so put your most frequently used items there.
- Go with adjustable shelving for the most flexibility and spacing options.
- Use an interchangeable labeling system that can easily be changed as items are moved around.
- Allow for a 2-inch clearance above the tallest object on the shelf for easy removal and handling.
- Save even more space by decanting food into modular food storage containers.
Needs of family change over time
Just when you thought you had the perfect pantry shelf system, your life changes. Kids grow up, go off to college, and get married. A changing family follows a changing pantry. Adjustable shelving can adapt with different food requirements over time.
Reasons why storage needs change over time:
- growing family, more buying in bulk
- larger cereal boxes for growing family
- “hiding” food or goodies from young children, placing on higher shelves or behind
- less family, cooking for 1-2 people, buying more pre-packaged convenience food
- packaging changes (Ritz crackers changed their box design to be more “pantry friendly”)
In conclusion
Speaking for myself, finding the ideal pantry shelf settings is is very satisfying. Adjustable shelving helps a great deal in making everything fit.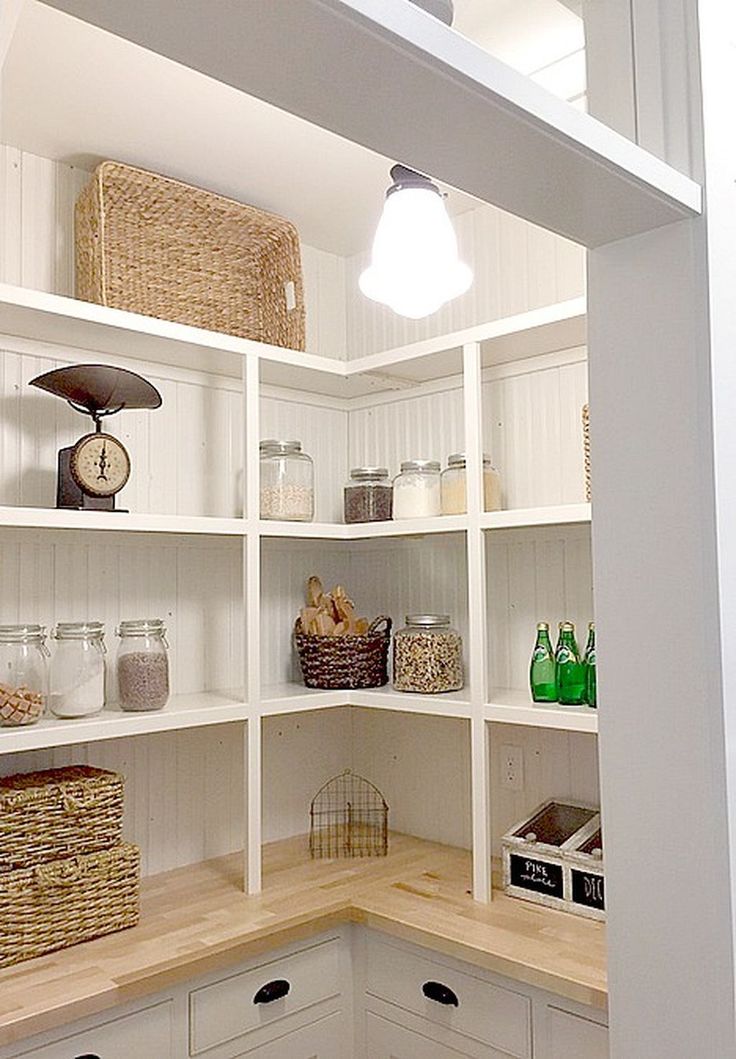 If you are still struggling, give food storage containers a try. Never fear, you will triumph over your pantry shelving (and I will add, victory is sweet!).
Storage room in an apartment and house - 35 photos and 5 answers
A storage room or simply a pantry is a small room that serves to store all kinds of things. Such a kind of "warehouse" can be made in any room of a house or apartment, depending on the availability of empty space, wishes and needs. In any case, this is a very rational use of space.
For example, in the pantry:
-
Corridor - place outerwear, shoes, bags, sports equipment, sleds, bicycles, accessories for fishing, picnic and other outdoor recreation.
-
Kitchens - store jars of cereals, boxes of fruits and vegetables, preserves, kitchen utensils and even small household appliances (mixer, blender, slow cooker, toaster, bread machine).
-
nine0005 Bathroom - store towels, bathrobes, household chemicals, toilet paper and various care products (shampoos, lotions, creams).
-
Nursery - lay out toys, books, stationery, clothes, shoes, bedding, pillows, blankets and other personal belongings of the child.
-
Bedrooms - accommodate bedding, travel bags, wardrobe items, ironing board, iron, hobbies, printed matter. nine0003
-
Living room - save the artificial Christmas tree, a box with Christmas toys and garlands, candles, board / active games for the whole family and guests, literature, a fan.
-
Balcony - place tools, building materials, garden tools, equipment packaging under warranty.
With the right layout, even the smallest storage room can accommodate a huge number of different household items. Let us consider in more detail: where to do it, how to equip it, how to fill it, what design to choose and other nuances of building a pantry. Details below - read on! nine0003
Where can I make a storage room in the apartment / house?
Despite the fact that the storage system does not require large areas and can be placed in a very tiny area, it still needs space. Under the pantry room you can take:
-
Niche is an ideal option where you don't even need to invent anything. You just have to think over the design of the storage room and bring it to life. nine0003
-
Part of the corridor - suitable for apartments and houses with a long corridor, at the end of which there is a dead end. In this case, you just need to isolate the "warehouse" from the hallway and equip it with storage places.
-
Corner - the principle is the same as in the case of creating a storage system in the corridor, that is, it is necessary to put up a partition and make an inside.
nine0009 -
Balcony end is a place that is especially popular among owners of small apartments (that is, when every centimeter counts in living rooms and there is absolutely no free space for a pantry).
nine0014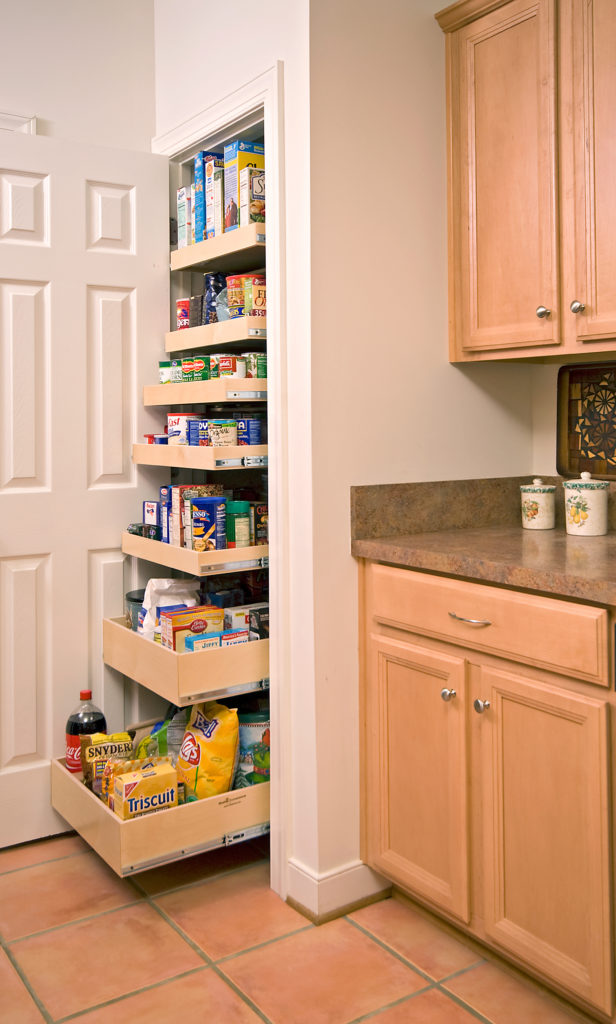
-
Wall - is an option for those who do not already have recesses or dead ends for building a storage system. Here you will have to build a structural box or at least install side walls.
Place under the stairs - great for creating a pantry. In this case, an absolutely unused area becomes a useful and functional area.
In addition to living quarters (nursery, bathroom, living room, kitchen, bedroom), in private houses storage rooms are made in the basement, attic, veranda and attic.
What types of storage rooms are distinguished? nine0058
The type of pantry directly depends on its internal content, namely, how the shelves, drawers and other components of the system are located. The option of arranging storage places, first of all, determines the area of the allocated premises, and then the personal preferences of the owners.
Storage room can be:
-
U-shaped - shelves are placed beech "P" and a free area remains in the center. A very convenient option, but designed more for spacious rooms.
 nine0003
 -
Parallel - boxes, hooks, shelves and other structural elements are installed opposite each other. Suitable for rooms where it is not possible to occupy all 3 walls (on one, for example, there is a window).
-
L-shaped - all storage places are fixed along two walls (short and long). Such a pantry requires less square footage than the previous ones, but at the same time it can hold fewer items. Ideal for narrow spaces. nine0003
-
Linear - the most compact version, which can either have a small area for movement, or be a simple recess with shelves, baskets and drawers (such a pantry can hardly be called a room, because it looks more like a regular built-in closet).
The choice of the type of pantry is also influenced by its purpose, that is, what it is planned to be used for (storage of things, household items, household appliances, food, printed materials, etc. ). nine0003
See photos of different types of pantries placed in different rooms of the apartment / house and filled with different things:
How to furnish the inside of a pantry?
In order to make the storage room as useful, convenient and reliable as possible, it is important to think over its layout in detail, calculate the dimensions and take into account a number of nuances. Everything matters here: from the materials used to the distance between the sections. Let us consider in more detail each stage of the equipment of the internal space of the storage room. nine0003
-
Drafting . First, decide what you are going to store there, draw a future design and “lay out” things on the shelves in the picture. Consider which items are best placed on shelves, which in closed drawers, and which in baskets. It may be best for some to make hooks (for example, for a bicycle) or buy special organizers.
 Decided, painted and proceed to the next step. *** We advise you to make the depth of the shelves 40-90 cm, height - from 35 cm. Height of drawers - 40 cm, width - 40-70 cm (leave min 50 cm for extension). The passage between the racks must be at least 60 cm.
*** Depth of shelves is recommended to be 40-90 cm, height - from 35 cm. Height of drawers - 40 cm, width - 40-70 cm (leave min 50 cm for extension). The passage between the shelves must be at least 60 cm.
-
Material selection . Shelves and drawers for the pantry are traditionally made of: metal, wood or boards (MDF, chipboard, chipboard). For small items, durable plastic is also used. In rare cases - glass. Each option has its pros and cons: the tree is reliable, but expensive; the metal is strong, but prone to corrosion; plastic is cheap and light, but not designed for heavy loads. The most suitable, in our opinion, materials for arranging a pantry are MDF and chipboard (affordable and not very capricious).
 nine0003
 -
Mounting method - shelves, drawers, baskets can be fixed directly to the wall or mounted on special frames made of wood or metal. The second method, in comparison with the first, is more convenient and mobile, since at any time it allows you to change the distance between the compartments, add or remove unnecessary elements.
-
Interior trim . The walls of the storage room can be sheathed with wall panels, wallpapered or simply painted. Lay linoleum on the floor, install ceramic tiles, laminate or parquet. Ceiling - whitewash, wallpaper, paint or make a suspended / tension structure. In order for the pantry to perfectly harmonize with the interior of the room, use the same finish as in the room where it is located (in this case, repairs should be done in both at once). nine0003
-
Lighting . Even if the room receives natural light or is made in the style of a "closet", lighting fixtures should be installed.
 The ideal option is to use small and not very protruding lamps or LED strips (so as not to take up space in the closet and not to cling to them).
 -
Ventilation . Whatever items you plan to store in the pantry, they need to be protected from mold, mildew, and musty smells. Good air exchange, supported by fans or vents, greatly reduces the chance of harmful formations and an unpleasant "smell" of dampness inside. nine0003
By the way, to collect excess moisture, you can put bags with an absorbent substance in the pantry (they can’t cope with high humidity, but still dry the air a little). A more efficient option is to use a household dehumidifier.
Which door design should I choose for a storage room?
The pantry is an integral part of the room, so it naturally affects the interior of the entire room. It depends on how correctly the doors in the “vault” are chosen, whether the design will stand out or, conversely, stylishly complement the overall design.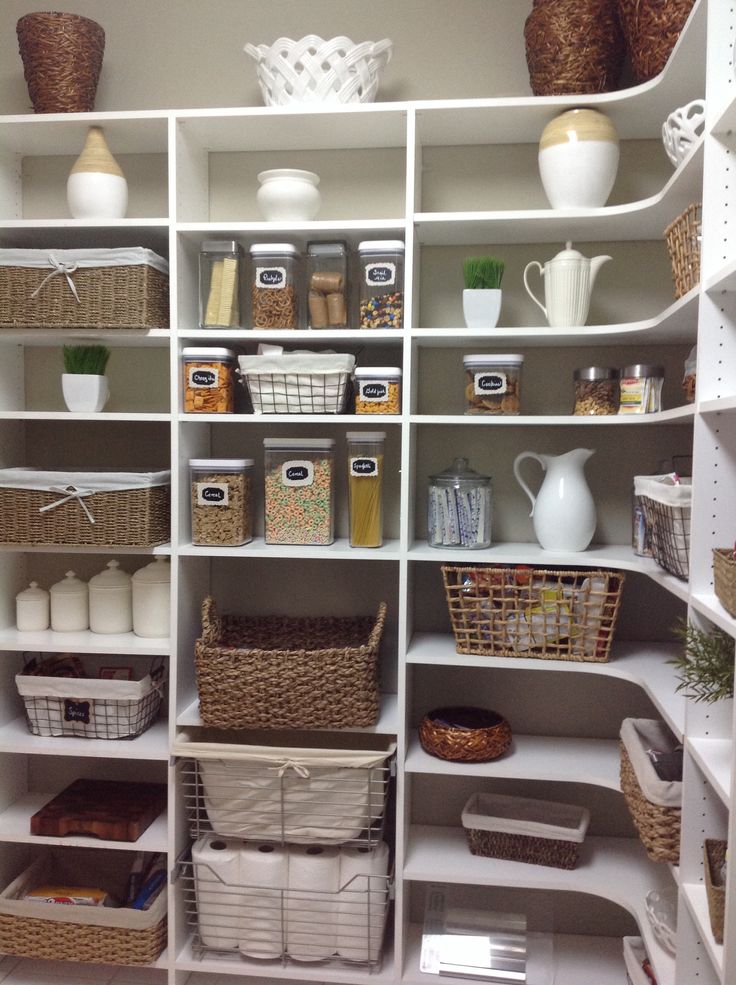 nine0003
Depending on the location, the style direction of the interior of the room and your preferences, you can choose the doors for the pantry of the following designs:
-
Deaf - doors made of laminated chipboard, MDF, chipboard or natural solid wood (decor in the form of carvings is possible).
-
Transparent plastic or glass fronts (opaque, transparent, colored, tinted). nine0003
-
Reflective Doors with mirror or gloss foil finish (in any colour).
-
Combined - facade, the filling of which consists of different materials (for example, MDF + plastic).
-
Decorated - doors decorated with sandblasting, fine engraving or photo printing. nine0003
-
"Blinds" is a comfortable model that looks rustic charming and provides ventilation.
-
Mobile - that is, partitions and screens that are not attached to the walls of the room, but simply placed at the entrance.
-
Fabric is the simplest, most affordable and quickest replacement option for pantry doors. nine0003
As for the method of opening the doors, the choice lies between two options: hinged (reliable, but require space to open) and sliding (convenient, simple, durable and do not need additional space).
If you don't want to put doors, leave the storage system open. In this case, you will have to constantly monitor the order inside the room, but use it as conveniently and simply as possible.
nine0143 See photos of different storage room designs, with and without doors:
How else can you use a storage room in your house/apartment?
A pantry can serve as more than just a place to store things. With the right approach, it can be turned into a full-fledged functional room. For example, the pantry is being converted into:
-
Office - gives you the opportunity to retire in order to calmly finish the work taken at home.
 nine0003
 -
Workshop is a place where you can practice your favorite hobby on your own or in the company of other family members.
-
Library is the perfect place to enjoy reading a book, writing poetry or contemplating yourself.
-
Dressing room is a room where everything you need to create an image is at hand. nine0003
-
Laundry room - with good heating and ventilation, allows you to wash, dry and iron things in one place.
We offer photos of options for using storage rooms - look and be inspired:
You can order shelves, drawers, rods, racks, furniture and doors of any design, as well as the creation of a pantry room on a turnkey basis with us, at the Mebelino furniture company. All details by phone - call: +7 (495) 215-27-97 .
How to make shelves in the pantry with your own hands? 40+ photos and videos
Features of planning storage systems
The most important thing when arranging a pantry in an apartment or private house is to decide what things it will be intended for and correlate the load with the dimensions of the room.
- For a small closet, several rows of shelves placed one above the other are suitable. At the bottom it is better to leave room for boxes and boxes: this way the area will be used optimally. nine0014
- The dimensions of the compartments must be made in accordance with the dimensions of the items that will be removed in the pantry.
- If the room has a high ceiling, it is worth providing a place for a stool or stepladder: it will be more convenient to get things from the upper shelves.
- Some pantries have enough free space to make deep shelves. This is not always convenient, and besides, you should leave a distance for the passage and bringing in objects.
Preparation
Before installing storage systems, the pantry needs to be repaired: clean the space, carry out dry and wet cleaning, remove old wallpaper and flooring. If necessary, the walls of the pantry or attic are leveled and also put in order: painted or pasted over.
It is recommended to use a primer containing antifungal impregnations.
Laminate, parquet or linoleum is laid on the floor. It is also worth equipping the pantry with ventilation and lighting, which will greatly facilitate the use of the room. nine0003
Which material can be used?
One of the most affordable and durable materials for creating shelves in the pantry is wood. Boards made of natural wood (pine, larch), as well as chipboard, are fixed to metal fasteners. The heavier the items that will be stored in the pantry, the thicker the boards should be. For conservation, large equipment, construction tools and other heavy things, it is worth providing an additional stiffener.
If you make shelves in the pantry with your own hands, you can use what is at hand - wooden pallets, old unnecessary furniture, plastic fruit boxes. Plywood is considered a budget option, but thin sheets are not suitable for heavy items. Lightweight but durable plastic is suitable for storing books, clothes and bulk products. It is easy to care for it, besides, the material is not afraid of moisture. nine0003
Shelves made of metal are considered the most durable and do not require additional reinforcement. Modern products have a collapsible design, they are easy to rearrange and transport, in addition, the material easily withstands temperature changes. When buying, you should pay attention to the coating - it must be protected from corrosion with a special composition.
Shown are shelving, drawers and wall shelves for a spacious pantry.
How best to arrange the shelves in the closet?
The size of the utility room primarily affects the placement of shelves.
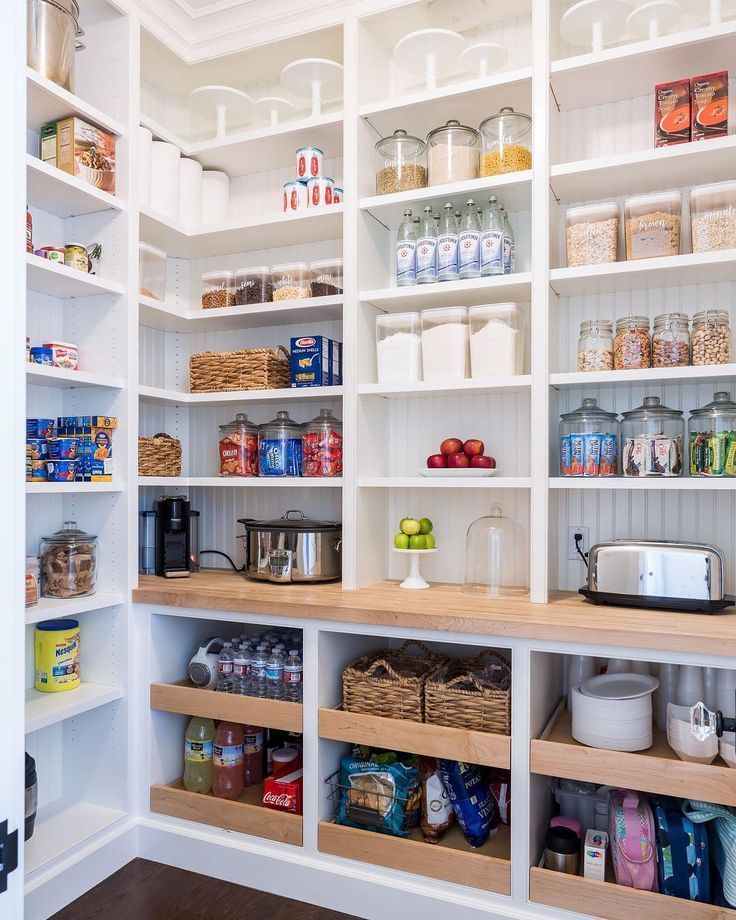
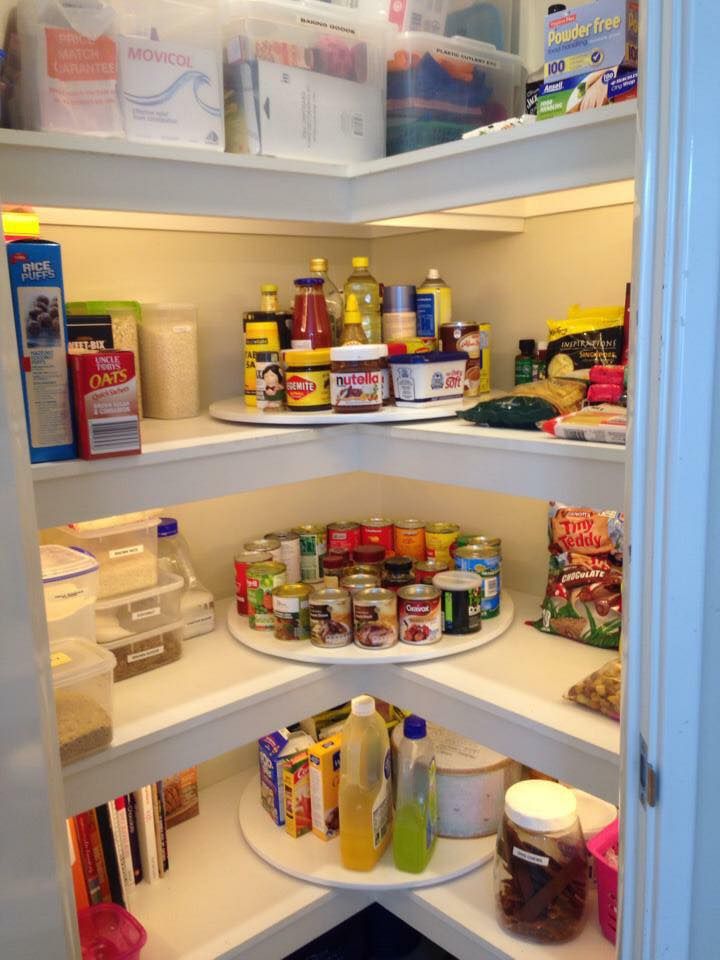
- A small closet (about 2 meters) allows you to install shelves in only one row - linearly, along one wall. Sometimes designs are made rounded - this shape allows you to win a few centimeters and use three walls.
- The corner arrangement in the form of the letter "G" is considered much more practical, but the area of \u200b\u200bthe pantry should exceed 2 meters.
For maneuvers, you need to leave a small passage, especially if the room is elongated and narrow. nine0014
- In a large utility room, it is best to place shelves in the shape of the letter "U". In this case, it is necessary to calculate the depth of the structures so that there is room for movement in the middle.
The photo shows a pantry in which the racks are functionally arranged in the shape of the letter "P".
Deciding on the dimensions
The most popular and practical shelf shape is straight. The length of the shelf is usually equal to the length of the wall. If the distance between opposite walls is 2 meters or less, then the shelf does not need additional support. Otherwise, the structure should be strengthened, especially if it is planned to store rolls and tools. nine0003
The thicker the wooden shelf, the more fasteners it requires. Also, its strength is determined by the distance between the support posts: the more massive the structure, the smaller the gaps.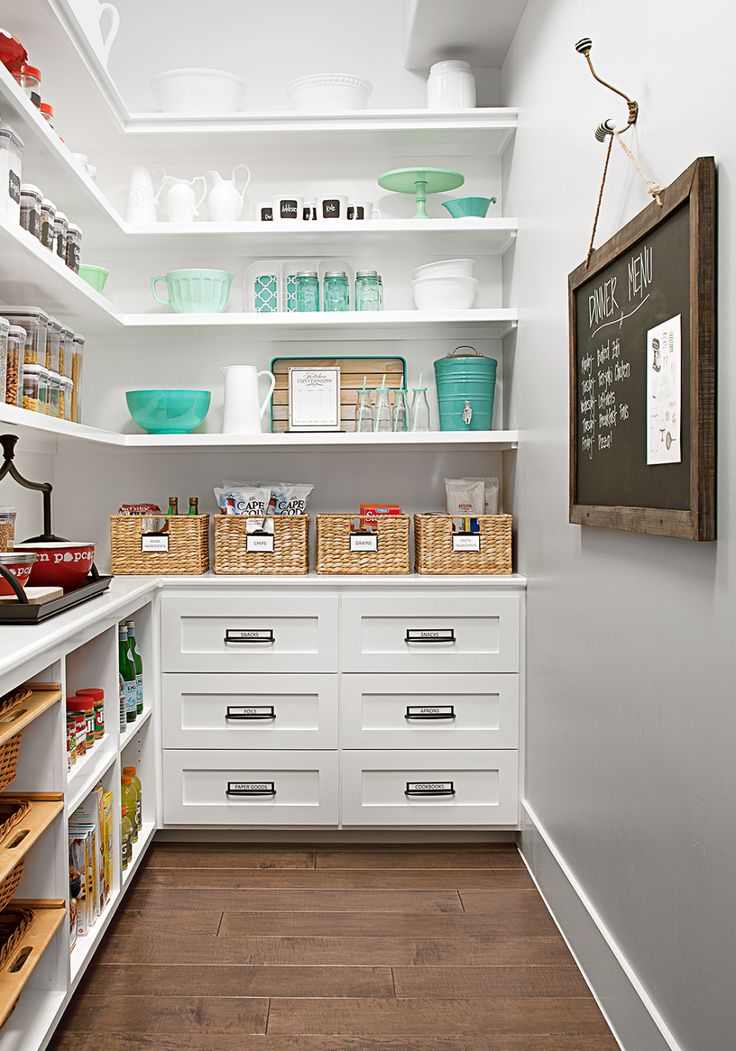
In order to use the shelves comfortably and safely, the heaviest items must be stowed down. The width of the protrusions should decrease from bottom to top. The standard shelf width for cans with preservation is 30 cm. The height depends on the dimensions of things.
Pictured is a pantry with a wide aisle between wooden shelving.
Do-it-yourself shelf options: step-by-step instructions
You can save the family budget with the help of home-made shelves in the pantry and detailed master classes, which are given below.
How to make a wooden shelving unit for a pantry?
Before starting work, it is necessary to measure the walls of the pantry and create a drawing of the desired structure. Next, prepare in advance the consumables necessary for the manufacture of functional shelves. nine0003
The photo shows a linear self-made shelving made of wood, occupying the entire wall of the pantry.
Tools and materials
For work you will need:
- Planed block for a vertical post (8 pcs, about 2 m).
- Block for horizontal supports (12 pieces, approx. 50 cm, depending on the depth of the rack).
- Boards or lining for shelves (the number depends on the depth of the shelves, the length depends on the length of the wall).
- 16 metal corner fasteners (corners). nine0014
- 45 screws (3.5x25).
- About 70 thin studs.
- Wood impregnation and brush.
- Building level.
- Roulette.
- Hammer.
- Electric jigsaw.
- Screwdriver.
Step-by-step instructions
- First you need to prepare the material. Using a hacksaw or electric jigsaw, we cut the bars and lining in accordance with the dimensions of the future pantry rack. nine0002
- We apply impregnation, carefully processing every detail. You need to dry for as long as indicated in the instructions on the bank.
- We fix the corners with screws at the level where the shelves will be located:
- We fix the horizontal bars as follows (4 such structures should be obtained):
- Install the lining horizontally, nail it with thin nails:
nine0002 - We make the second shelf in the same way: we fasten the corners, fix the horizontal bars, attach the lining.
- We lay the upper horizontal bars, fasten them.
-
The shelves in the pantry are ready. In this way, you can make a rack of any height, depth and shape.
You can learn more about how to make shelves in the pantry from this video:
DIY wall shelves
The following is the easiest and most economical way to make hanging shelves in a small pantry. The amount of material for the shelves depends on the size of the room and the number of floors.
In the photo there are pantries in small-sized apartments such as Khrushchev or Leningradka, equipped with shelves that are simple in execution.
Tools and materials
To make shelves in the pantry with your own hands, you will need:
- Planed bars. nine0014
- Plywood, chipboard, boards or remnants of old furniture.
- Self-tapping screws for fastening.
- Screwdriver.
- Fine nails.
- Hammer.
- Level.
- Jigsaw or hacksaw.
Step-by-step instructions
- Sawing timber and plywood according to the area of \u200b\u200bthe pantry. If desired, they can be painted or varnished. For the frame of one shelf, you will need 1 long and 2 short bars, for the base - a plywood sheet or boards of the required size and thickness. We make markings on the walls and securely fasten the bars. nine0002
- Making markings for the next shelf.
- We mount the shelf in the pantry.
- We fix it with nails.
And this video shows how to install a wall shelf in the pantry in two ways: on the brackets for chipboard and on the standard brackets.
Shelves in the pantry from the profile
Solid U-shaped shelving for a spacious pantry is obtained from metal profiles. Having understood the principle of operation, you can make shelves of any configuration, replace plywood with wood, cover the metal profile with paint and create a loft-style rack. nine0003
In the photo there are two types of shelves for the pantry, made by hand from metal profiles and wood.
Tools and materials
- Guide profiles 50x40.
- Guide profiles 50x50.
- Plywood or wooden boards.
- Roulette.
- Building level.
- Metal shears.
- Electric jigsaw.
- Screwdriver.
- Dowel-nails.
- Self-tapping screws.
- Ladder. nine0014
Step-by-step instructions
- We make a drawing and calculate the amount of materials. We cut the profile into components in accordance with the dimensions.
- Marking out horizontal lines. We fasten guide profiles 50x40 to the walls using dowel-nails.
- We make the frame of the first shelf, put it on temporary supports from the profile.
Learn more