Painted wood finishes
How to Get a Smooth Professional Paint Finish on Furniture
Learn how to get a smooth paint finish to give your DIY projects a professional look.
Building a new piece of furniture is just one part of the process. You also have to finish your piece. For painted furniture, follow these steps to get a smooth paint finish on your project.
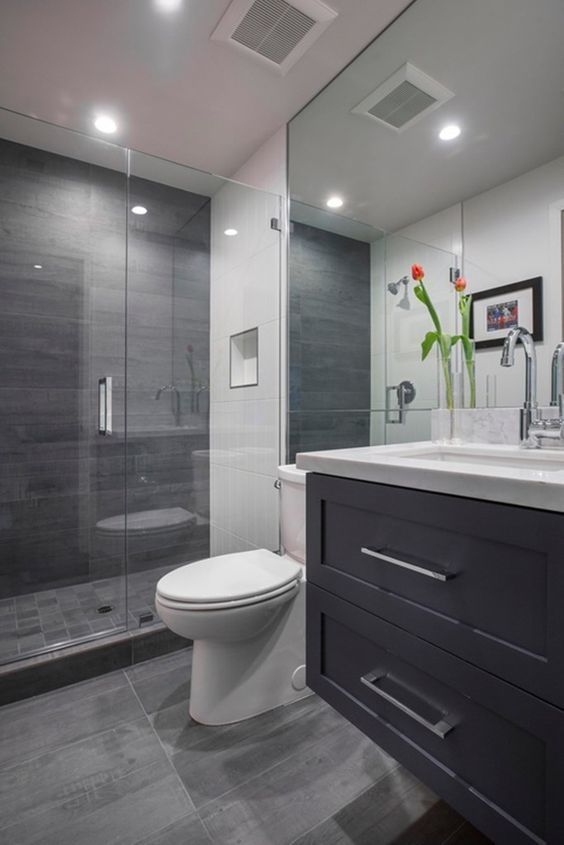
I used these furniture painting steps on the DIY double vanity in our master bathroom. The paint finish turned out amazing! It took the project from DIY to professional.
We have had the vanity in our master bathroom for a couple weeks now, and everyone that comes to visit must go check it out. It has been really awesome to see their reactions. I have heard “You really built this?” and “It looks professional not homemade.”
As much as I want to believe the comments are all about my skills with power tools, I know that the finish on the vanity is what is making people really impressed.
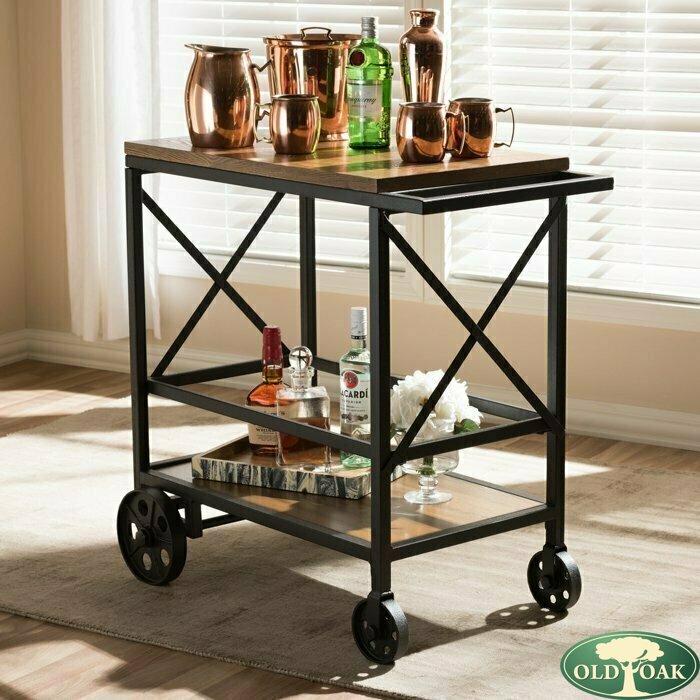
I hate to admit that some of my early building projects didn’t turn out as high-end looking as the bathroom vanity. Even my coffee bar table (which I still absolutely adore) is not as professional as the vanity.
But I have been learning a lot by trial and error over the last few years and I want to share this knowledge with you so you know how to get a smooth professional paint finish on furniture you build too.
Pick the Best Materials for Your Project
Before we get into how to paint the furniture for a smooth finish, I want to take a minute to talk about things that need to be done in the building process to make the painting step much easier!
I hate sanding and I hate painting! But I do it because no one will do it for me and I want to actually be able to use the pieces I build.
So I always take a little extra time in the building to cut down on time spent finishing a piece, starting with the wood I choose. I know it is tempting to make pieces of furniture out of cheap 1x2s and 1x4s, and they definitely have a place in my wood shop.
In the beginning, I used them frequently so it didn’t cost a lot when I messed up.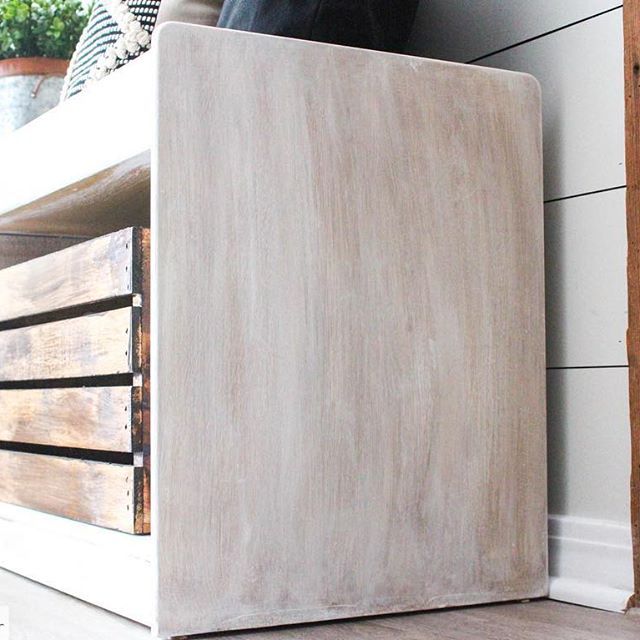 I built a toddler bed for less than $25 and this nautical picnic table for less than $50 because I used these inexpensive building materials.
But these woods are soft and will not hold up over time. So when I build with them I know that they will be pieces that are used for just a few years.
However, using a harder wood will give you a more solid piece that will last for many, many year and the hardwood is much easier to achieve a smooth professional finish on.
Budget Friendly Hardwoods to Build With
Using hardwood can get expensive, but there are more budget friendly options like knotty alder and poplar.
Alder and Knotty Alder
I used knotty alder to make these rustic railings, this dining room hutch, and the double bathroom vanity (and all the supplies for our 8′ double vanity cost less than $350).
It is really easy to work with, but be warned, there are quite a few knots in it. I personally love the knots because my house is full of rustic charm.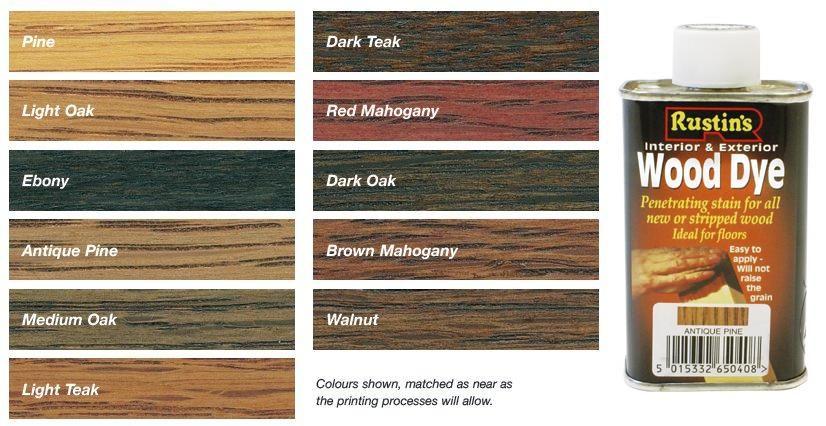
If you do not want the knots, use regular alder (which is a bit more expensive but not as expensive as other hardwoods). Or you can fill the knots with epoxy or wood filler before painting.
Poplar
Poplar is a great option for painted furniture. It can have some uneven or greenish tones so if you are not painting, make sure to carefully pick out your boards to match.
I used poplar for all the cabinet doors and face frames in our kitchen remodel and for this mudroom storage locker. I also for this stained TV stand.
Poplar is easy to work with and has no knots.
Select Pine
Another option for a great painted wood on a budget is select pine. It is more expensive than construction lumber or whitewood, but not as expensive as hardwood.
The pine lumber is easy to work with and takes paint beautifully. I used it to for these small console table build plans.
The finish on this console was made to look chippy by adding petroleum jelly to the edges before applying the paint.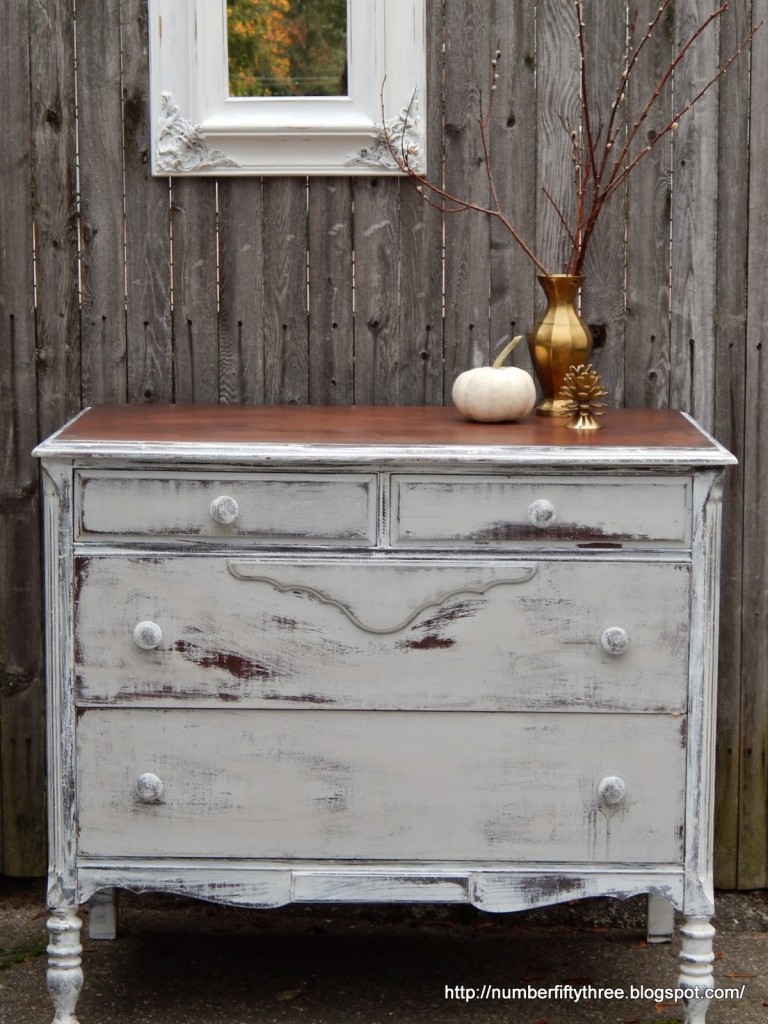 After the paint dried, the paint wiped off the areas with the jelly to create a farmhouse effect.
Next time you go the hardware store, feel the difference between the hardwoods and inexpensive lumber. You will notice how much smoother the surface is. And the boards also tend to be much straighter.
All these things will ensure a high-end finish in your building project.
Now on to the painting and finishing!
How to Get a Smooth Paint Finish on Wood
Supplies:
- Sandpaper, multiple grits from medium to ultra fine
- Paint
- I don’t believe there is one paint that is the end-all-be-all for the best results. Use what you love. I use the Behr Interior Paint & Primer in One most often and am very happy with the results. For the bathroom vanity I used the Behr Pot of Cream in Eggshell.
- I have used the newer water based Cabinet Enamel paints for painted cabinets recently. They offer a hard, enamel-like coating for durability.
 Use the same process as below to get a smooth finish with it.
- Paint sprayer
- A paint sprayer will give you the smoothest finish. I like the budget friendly HomeRight Finish Max sprayer.
- You can still achieve a great paint finish without a paint sprayer. Make sure to use a high quality paint brush and do not over brush the paint.
- Vacuum
- Tack cloth
- Fine grit sanding sponges
- Polyacrylic or Sealing wax protective finish
1- Prepare for Paint
Proper preparation is the key step to getting a smooth professional paint finish on anything!
Start by sanding your piece very well. All the paint in the world cannot cover up rough wood. This is one of the main reasons I love using quality lumber, it makes sanding so much easier.
If you are starting with rougher lumber, start with a lower grit sandpaper (like 60 or 80 grit). Then step down to a medium grit (100), then a fine grit (150-180) and always end with an extra fine grit (220 grit).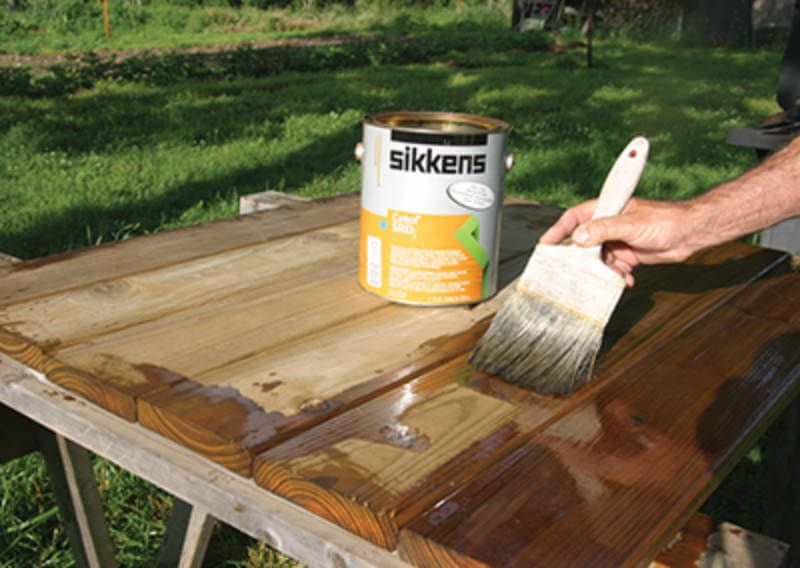
Always sand in the direction of the grain. Pay extra attention to the places where boards connect.
Once the entire piece is sanded down, vacuum it to remove dust, debris, and sawdust. Before I had a shop vacuum I use my household vacuum. If you have a dusting attachment, use it to help loosen anything on the surface of the wood.
After the surface of the wood is vacuumed and appears clean. Use a tack cloth to pick up the fine dust particles from the wood.
This is the first time I used a tack cloth and it is a game changer. It’s super easy to rub all over the furniture piece and it’s amazing how much dust you will get off what looked like a clean surface.
This also helps you see if there are any spots that need additional sanding because the tack cloth will snag on a rough spot.
2- Paint the First Coat
Now you are finally ready to apply paint. I used the HomeRight FinishMax sprayer. Painting the vanity with the sprayer took a fraction of the time it would have taken with a paint brush. Also, it dried quickly so I could complete the project faster.
To use this paint sprayer you need to thin the paint (their new Super FinishMax sprayer does not require it). You can determine if your paints needs to be thinned by using a very simple drip test. The paint must pass through the specific container in 25-40 seconds to be ready to use in the sprayer.
For my first coat, since it would ultimately be my primer (my paint had primer included in it), I only thinned it to 40 seconds so it was the thickest it could be for more solid coverage.
If you are using a water based paint, you can thin it with just water (yay!). If you are using an oil based paint you will need to use an oil-based medium that is recommended by the paint you are using.
Completely cover the entire surface of your piece in paint. Be aware that it will be spotty/streaky as the paint will soak into the wood a bit. Do not apply a thicker coat for the first layer to try to achieve a smooth finish or you may get drips.
Multiple coats are necessary and will result in a better final finish.
When to Paint Furniture
It’s worth noting that I painted my vanity in the summer, and it was HOT and DRY! We had temperatures in the 90s that week.
Typically, it is not recommended that you paint in extreme hot or cold temperatures. The paint will dry extremely fast in these high temperatures.
If you are using a paint brush to paint in the heat, it will leave brush strokes and the paint will dry in your brush making a mess of the brush and leaving clumps of paint or brush strokes on your furniture. This will not result in the smooth professional paint finish you are hoping for.
The paint sprayer did not have any issues in the heat though. And it was dry almost immediately after painting so that was an added bonus.
3- Sanding Between Coats of Paint
After the first coat has dried, use a fine grit sandpaper and sand the entire surface by hand.
I use the sanding sponges for this step and love them. They make it easier to get into corners because the sanding surface is on 4 sides of the sponge.
Give it a good sanding to remove any bumps or texture in the paint. Be careful around edges because it is easy to sand them too much and end up with a worn look (or go heavy on the edges if you want the worn look).
To make sure the piece is sanded enough, I run the palm of my hand over it to see if it feels smooth to the touch.
Once everything is sanded, pull out the vacuum again. Vacuum the entire piece of furniture as you did above. Then grab the tack cloth and remove any additional dust from the surface.
4- Paint the Remaining Coats
Now it is time for a second coat of paint.
For the second (and third) coats of paint, I thinned the paint to a thinner consistency. For the drip test, it only took 25 seconds for my paint to pass through the container.
The thinner paint made for a smoother coverage from the paint sprayer. Coat the entire piece of furniture with a second coat of paint. There should be very little to no streaks/spottiness when you finish this coat.
After the second coat has dried, continue sanding between coats of paint, vacuuming and cleaning with tack cloth before adding the next coats.
Now it is time for a third coat. Thin the paint the same as you did for the second coat and cover the entire piece. After this coat the surface should look smooth and uniform.
I stopped at 3 coats for my bathroom vanity, but sometimes a forth coat is needed or desired. Paint, paint color, and wood can all affect if you need more coats.
Add more coats as necessary. Make sure to sand between each coat of paint. Then vacuum and tack cloth the surface before adding paint.
5- Add the Protective Finish
Once you are happy with your paint. Give it a very light hand sanding with the ultra fine sanding sponge. Then it is time to protect it.
This step is optional, but will create a protective finish on your piece of furniture.
If using a water-based paint, you want to use a water-based polyacrylic finish. If using an oil-based paint, use and oil-based finish.
Polyurethane finished will yellow over time and are not recommended for use on painted finishes.
A wax finish will add a matte or low-sheen finish to the paint.
Typically the higher the gloss to a finish, the easier it will be to clean. I usually use a satin/semigloss finish for walls and furniture in the kitchen and bath.
If you are using a sealing wax, buff it on the surface with a brush or rag. Then buff off the extra. Repeat if needed, but typically 1 coat is sufficient for waxes.
If you are using a poly coating, using a high quality paint brush or paint sprayer to apply a coat to the entire piece of furniture. Let it dry.
If a second coat is needed (and I usually advise at least 2 coats for normal furniture and 3 coats for high traffic or areas around water), you will need to sand between coats, then vacuum and tack cloth the piece before adding the polyacrylic.
This will ensure a super smooth finish. However, you do not want to sand the final coat or you will end up with a cloudy finish.
Now you can stand back and admire your beautifully painted piece of furniture that no one will be able to tell was homemade!
A proper paint finish will make all your pieces stand the test of time, and isn’t that what you want from a piece you spend the time to build yourself? I know I do. Maybe I’ll even be able to pass them down as family heirlooms someday.
It may seem like a lot of work for a perfect paint job, but it really is mostly waiting for things to dry. And if you want to take the time to build something you will want to finish it properly too.
Materials
- Sandpaper (multiple grits from medium to ultra fine)
- Paint (use a Paint & Primer in one to eliminate an additional primer step)
- Tack cloth
- Ultra fine sanding sponge
- Polyacrylic or Sealing wax protective finish
Tools
- Sander
- Paint sprayer
- Vacuum
Instructions
- Sand your furniture piece smooth.
 Start with a lower grit if needed. Step down your grits and finish with an ultra-fine grit. Sand with the grain of the wood.
 - Vacuum all the dust from the furniture piece. Use a bristled attachment to help loosen the dust as you vacuum.
- Wipe off any remaining dust with a tack cloth.
- Fill your paint sprayer with paint. Thin the paint if needed.
- Spray the first coat on your furniture. Use a light coat to avoid drips. You may have some spottiness after the first coat.
- After the first coat is dry, lightly sand the entire surface with an ultra fine grit sanding block.
- Vacuum the dust off and clean the surface with a tack cloth.
- Paint the second coat of paint on the piece the same as the first.
- Repeat by sanding between coats of paint. Then vacuum and tack cloth before applying the paint.
- Paint a third coat, then fourth coat if needed.
- Sand, vacuum and clean the piece again.
- Apply a protective finish of polyacrylic or wax.
- If using wax, no need to sand between coats if you want a second coat.
- If using a poly finish, sand, vacuum, and tack cloth between coats. Apply 2-3 coats as desired.
Now I’m off to cross something else off my crazy long to-do list.
How to paint wood furniture: an expert guide |
(Image credit: Polly Wreford/Sally Denning / Jon Day / Annie Sloan )
Knowing how to paint wooden furniture is a useful skill that can help to breathe new life into old furniture. Whether you want to refresh a family heirloom, change your home's scheme for less, or want to reinvigorate a second-hand piece, painting wooden furniture is easy.
Painted furniture ideas are endless, however, the process is a lot different from painting wood trims around your home. Preparation is key to ensuring a lasting, flawless finish so patience and a steady hand are required when tackling a furniture project. If the process is rushed, you risk marring the piece – something you will hope you avoid.
Here, we have spoken to experts to learn their top tips for painting wooden furniture, from picking the right piece through to finishing a project, so that you can achieve the best finish every time.
How to paint wood furniture
(Image credit: Getty Images)
Gone are the days of hastily assembled flatpack and cookie-cutter interiors. Today, interior design is all about personality and character. Antique and vintage stores are a treasure trove of beautiful pieces of furniture that you won't find anywhere else. However, these vintage gems often need a little TLC to bring them up to scratch or sometimes need a change of color to suit your look.
'Colorful furniture has made a huge resurgence over the last few years, but it has been hard to find exciting colored cabinetry outside of the bespoke sector,' says Claire Hornby, head of creative at Barker and Stonehouse . Learning how to paint wood furniture gives you the opportunity to create a piece full of color and character that perfectly complements your interior scheme.
That’s where the painted furniture revolution comes to the fore. Learning how to paint wood furniture can transform a boring brown dresser that's otherwise destined for landfill into the hero of your sustainable kitchen ideas.
In addition to creating characterful pieces for your home, learning how to paint wooden furniture will also save you money as lots of these antiques sell for a song, and also know that you’re doing your bit for the planet, repurposing rather than buying new.
1. Prepare your space
As with any painting project such as how to paint a wall or how to paint a door, you need to ensure you ventilate the area. For painted furniture projects this is easier, as the piece can often be moved outside into the open air or into a shed or garage. If the furniture cannot be moved outside, open up windows and internal doors to allow for a through-draft to help clear the air in your home.
When painting wooden furniture, make sure you lay out a dust sheet to catch any dripping paint.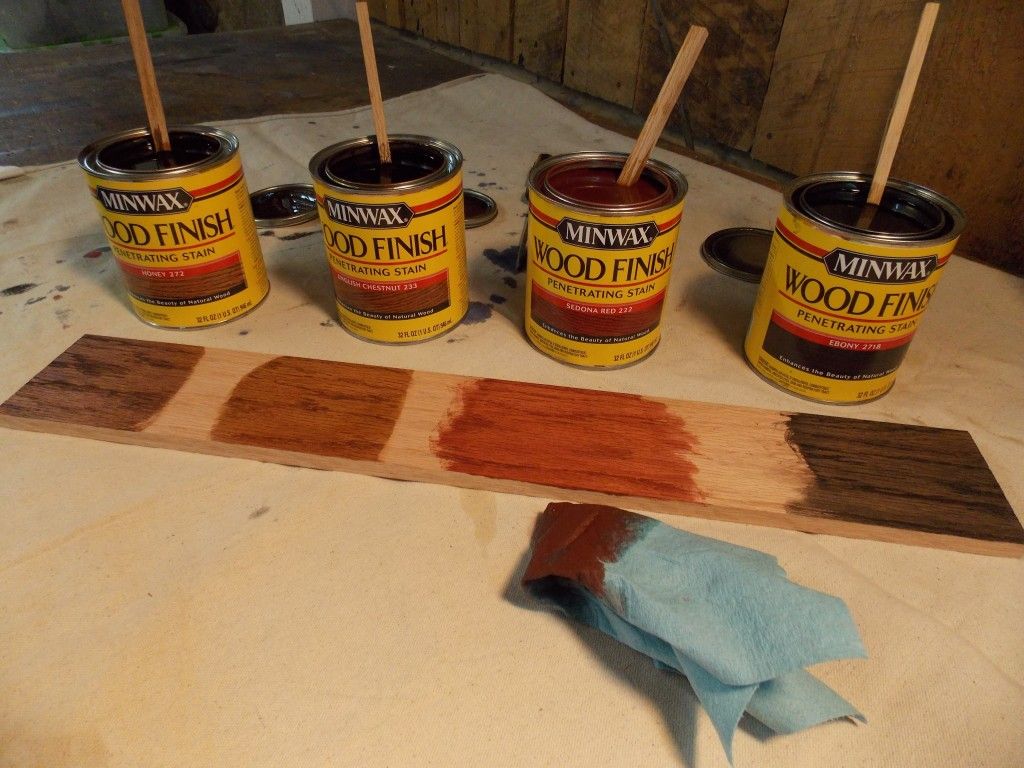 This is especially important if you are painting inside or on outside deck ideas.
2. Prepare your furniture
Remove any hardware, doors, and drawers and dismantle any sections of the furniture that is easily removable to allow for even coverage across the entire piece.
Sanding is key before any repainting project. ‘It is always important to prepare the surface as outlined on the tin, even if previously painted,’ adds Hanna Ellis. If a piece has previously been painted, sand with coarse sandpaper to remove the previous color and leave an even surface, and vacuum or wipe away any dust. Wash unpainted furniture with sugar soap (available on Amazon) and then lightly sand. Wipe with methylated spirits to remove any dust or grease.
If you are looking to repaint a painted or glossed piece of furniture, it is important to remove this layer first. To achieve this sand the surfaces with coarse sandpaper, (between 60 and 80 grit). If your piece has intricate carving and detailing, treat it with a stripper to remove paint and gloss. If you're unsure of where to start then be sure to find out how to strip paint from wood.
For an unpainted piece, 'start with a good scrub with sugar soap to remove dirt, grease, old polish/wax or nicotine, rinse thoroughly and allow to dry,’ says Hanna Ellis of Frenchic Paints . Then follow by sanding with a light sandpaper (between 180 and 220 grit) to create a key to help the paint to adhere. Once having sanded your piece, wiped the surface with methylated spirits to remove any grease or dust. Then leave to dry for a few moments before painting.
3. Prime wooden furniture
Knowing how to open a paint can is also essential – yes, there is a right way to do it. While you often only have to prime certain surfaces, adding a coat or two of suitable prime to any project will allow for a more even layer of paint. Prime your furniture and allow it to dry for the recommended time as stipulated in the tin. Drying time is key to ensuring that your finished piece isn't streaky or patchy.
4. Start painting
Once your primer has dried or if your paint includes a primer then you can start painting. Opt for a round brush and apply your first coat of paint, ensuring all details are painted thoroughly. You may need to change to a smaller, finer brush if your furniture as particularly intricate details that a larger brush cannot reach. Then allow to dry for the recommended time.
5. Apply a second coat
When this is dry then apply your second coat. If using milk paint, brush along the direction of the grain, while chalk and mineral paint looks best if painted in different directions.
6. Finish the piece
Finishes are key if you don’t want all your hard work to go to waste. Some paints, especially milk paints, are self-sealing meaning that after a few days of curing it will be incredibly durable. However, other paints such as chalk paints will need a wax or lacquer to prevent them from being marked or scuffed.
'Water could damage chalk paint if left unprotected. Opt for a specific chalk paint wax to protect your furniture while also giving a beautiful mellow sheen,' says Annie Sloan. 'Alternatively, you can use matt or gloss chalk paint lacquer. Matt will give a slightly clouded finish whereas gloss chalk paint lacquer will give a high-end sheen.'
Finding wood furniture to paint
(Image credit: Jon Day Photography)
The secret to finding a good piece of wood furniture to paint is to look for good bones. Look past ironmongery, colors and any scratches and instead look at the piece's silhouette. Ensure that it is well made, look for solid wood and dovetail joints. Check all mechanisms are working well and that the piece stands strongly and doesn’t rock or wobble.
'I hate the thought of well-built, carefully crafted furniture going to landfill. And while from an aesthetic point of view they might have seen better days, there is still plenty of life left in these old pieces,' says Claire Manton, founder of Claire's CraftHouse . 'With the interiors market looking to become more sustainable, upcycling is a great way to reuse pre-loved pieces, while unleashing your own creativity.'
Choosing the right brush for painting wood furniture
(Image credit: Cornish Milk Mineral Paint)
An often overlooked element, the right brush can make or break your project. When starting to research how to paint wood furniture, brushes are a key consideration.
‘There are different schools of thought on brushes, and it really depends on the type of paint you are using. For milk paint, which is water based and quite thin, synthetic bristles or a blend is better as they absorb less water meaning more paint ends up on the surface being painted, and stops the paint drying out too much on the brush. A slanted synthetic brush will give a great finish with milk paint or any thin water based paint,' says Carolyn Moore, owner of Old Fashioned Milk Paint .
'However, some of the thicker mineral/chalk paints will work better with a thicker natural bristle brush, even a round brush often used for waxing, as they hold more paint, meaning fewer dips in the paint and therefore fewer brush marks. If you are planning a lot of painting, look for a good quality brush – the best you can afford, to avoid annoying bristle shedding and ensure they stay in shape following repeated uses.'
The best paint to use on wood furniture
(Image credit: Annie Sloan)
There are lots of different paint finishes to choose from when finding out how to paint wood furniture. Your choice will predominately depend on the look you want to achieve, though it will also be guided by whether you are happy to use a primer and sealant or are looking for an all-in-one product. Also consider selecting eco-friendly paints to keep your project kind to the planet.
- Chalk paint is the most common choice of paint for wooden furniture and gets its name from the luxurious chalky finish it creates. ‘It’s a multi-purpose paint that applies to just about any surface, without the need for priming or sanding,’ says Annie Sloan, founder of Annie Sloan Paints .
- Mineral paint is crafted from mineral pigments combined with a binder, typically acrylic resin.
 'Unlike milk and chalk paint, which need to be sealed with a wax or varnish to prevent absorption of grease or moisture, mineral paint is waterproof and washable rather like an eggshell or satin paint,' says Carolyn.
 - Milk paint is quickly becoming a favorite for furniture restoration. 'Traditional powdered milk paints achieve a finish that is flat back to the grain and produces no brushstrokes,’ explains Joe and Reece Daden-Tapp of Cornish Milk Mineral Paint .
- 'It is perfectly possible to use a normal eggshell, satin or spray paint on furniture too, if you want a contemporary, sleek, full cover paint finish, as long as you prepare it well!' adds Carolyn.
How to avoid streaks when painting wooden furniture
(Image credit: Annie Sloan)
Avoiding streaks when painting wooden furniture, all comes down to your paint finish and your direction. ‘With milk paint it’s always best to brush along the direction of the grain, but there’s no need to worry too much about brush marks, (especially on raw wood as it sinks in like a stain), milk paint is very forgiving – it dries really fast, but with a light sanding using a super fine sanding sponge after each coat, it leaves a rich, buttery smooth finish and no brush marks. However with chalk and mineral paint, it is recommended to paint in different directions to avoid brush marks, and fat round brushes work better,’ explains Carolyn.
‘When applying the paint, try not to overload your brush as this can lead to overworking the paint which tends to cause dragging marks and unwanted texture. The other tip is to make sure you leave the correct amount of hours between coats,’ adds Hanna Ellis.
Do you need to prime wood furniture before painting?
You don't necessarily need to prime wood furniture before painting. This slightly differs from how to paint a wall where priming is vital to achieving a high-end finish.
Lots of chalk and mineral paints feature an integrated primer meaning that after a light sanding and a wipe down, you can apply the paint and still achieve a flawless finish. Some furniture paints will require a primer before use, be sure to check the tin before starting your project.
However, even if you do not need to use a primer, it is essential that you prepare the wood before you start painting.
Should I paint the interior of wooden furniture?
Whether you decide to paint the interior of your wood furniture is utterly up to you. 'Sometimes a thorough clean and some hemp oil or wax is sufficient to tidy them up,' says Claire Manton. 'It’s worth remembering that if an old piece has a musty smell to it, painting the interior can sometimes help by sealing odours into the wood, thereby reducing any unpleasant smells. Scented furniture waxes and salves are also a good way to freshen things up.'
Why does paint peel off wood?
Paint can peel off of wood for a number of reasons, however incorrect preparation such as the lack of cleaning, a primer, or the correct paint is often one of the main causes of peeling paint on painted wood furniture.
To prevent paint from peeling from wooden furniture make sure you follow through with the correct prep work and do not rush the process. While it may be tempting to rush through to complete the project, patience is needed to ensure the best finish. What's more, consider adding a protective finishing coat or wax to seal the paint in and prevent it from peeling due to every day use. This may be especially important on pieces you touch or move every day such as drawers, cabinets, or chairs.
How do you create a vintage finish on wood?
The easiest way to make a vintage finish on wood is to use an antique-style glaze. There are myriad crackled glazes from which to use. Simply apply between coats of paint to create the distressed effect. 'If you are applying a crackle glaze, always choose a period style paint such as milk paint, which will result in a rich, matt finish as would find on older pieces,' recommends Carolyn.
However, for a traditional distressed look, then hand-distressing is the way to go. This is achieved by painting a piece of furniture a solid color and then buffing the corners and edges with a fine sandpaper to reveal the wood beneath. 'Begin by painting a piece of furniture one color and then, once it’s dry, paint over it with a completely different second color. Sand back through to the first color and in some areas go back as far as the original wood. With the right color combination, it looks beautiful,' says Annie Sloan.
'You can make the process easier with any type of paint by applying wax to the corners/edges before painting, so the paint flakes in those areas,' recommends Carolyn. 'Any distressing works best when the wood beneath is darker – bright new pine showing through doesn’t look aged, so in that case it is a good idea to stain the wood before painting/distressing. You can even layer paint colors by using a darker color first and a lighter color on top, then distressing back to let the darker color show through – this creates a wonderful effect.'
What happens if you don't sand before painting?
If you don't sand before painting wooden furniture you will not achieve a smooth painted finish as paint will gather in any scratches or scrapes. It will also highlight any other natural flaws in the wood grain. Furthermore, if you don't sand before painting, your paint may not stick to the surface resulting in it peeling off once dry.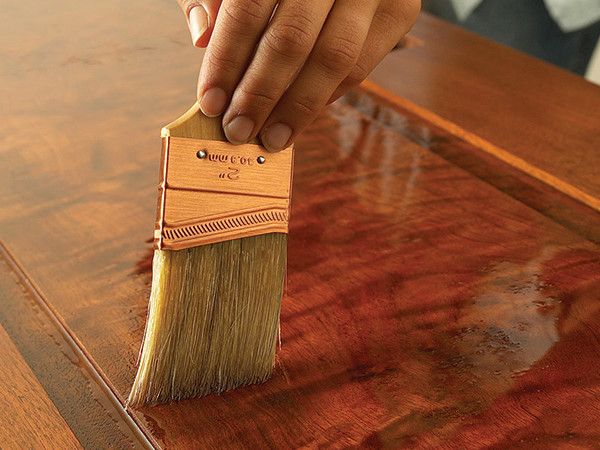 This is because even a light sand provides a key onto which the paint can adhere.
Having graduated with a first class degree in English Literature, Holly started her career as a features writer and sub-editor at Period Living magazine, Homes & Gardens' sister title. Working on Period Living brought with it insight into the complexities of owning and caring for period homes, from interior decorating through to choosing the right windows and the challenges of extending. This has led to a passion for traditional interiors, particularly the country-look. Writing for the Homes & Gardens website as a content editor, alongside regular features for Period Living and Country Homes & Interiors magazines, has enabled her to broaden her writing to incorporate her interests in gardening, wildlife and nature.
7 popular solutions for different budgets
Wood, along with stone and clay, is one of the first finishing materials of mankind. Initially, wood wall decoration was of a utilitarian nature, allowing you to warm cold stone houses, today it is more valued for its aesthetic and tactile properties, while it can still be regarded as additional heat and sound insulation of the room, and also as an opportunity to hide wall irregularities and defects. We talk about the seven most popular ways of wood wall decoration for different budgets. nine0003
Lining
Once, clapboard was sheathed on freight cars, then it penetrated the interiors of country houses, and its lacquered version became an integral attribute of the “Russian dacha” style. Today lining is an affordable and interesting solution for total sheathing or accent wall decoration both in a country house and in an apartment.
Bedroom walls: 5 decorating tips
If bedroom walls could talk, what would they say? Maybe "We hear the neighbor's TV at 2am" or "This paint shade in the morning light doesn't look like the manufacturer's sample"? We talk about finishing solutions that will definitely appeal to the walls in your bedroom. nine0004
Light unvarnished lining is one of the favorite "tools" of modern designers for creating minimalist interiors with a Scandinavian flavor. It looks completely different after staining or staining.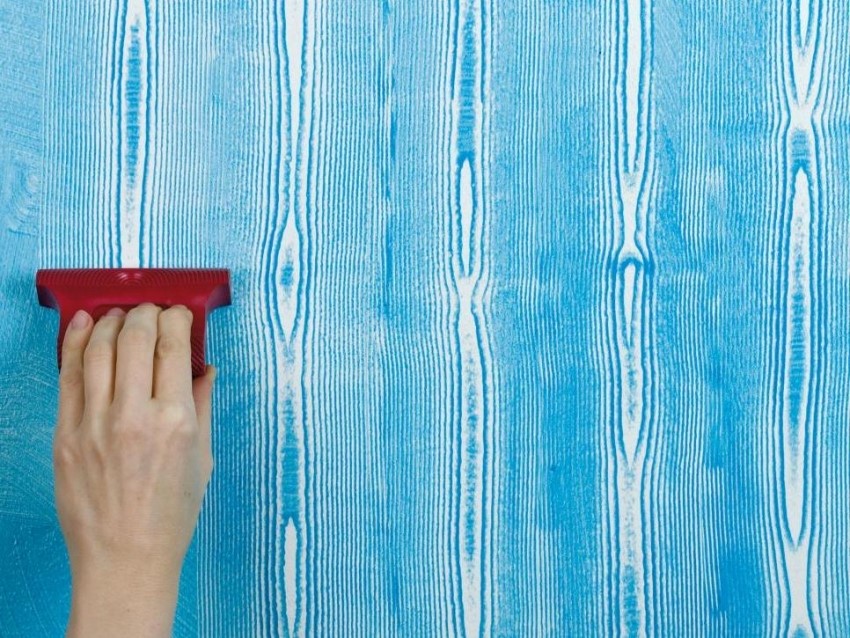
To avoid the "country" effect, use a non-standard wide shape of the boards.
If the drying technology of the material has not been violated, the lining can last up to 20 years. nine0004
Edged board
For decorative wall decoration in interiors with a rural flavor, edged boards with a natural rough texture are often used. This is the name of a solid piece of logs, processed along the edge. It is a material with great decorative potential, offering different ways of installation and finishing. Boards can be laid diagonally, herringbone, randomly, stained, painted and combined in different colors. In interiors that gravitate towards Provence, rustic or country style, brushing, deliberate aging and scuffs are welcome. nine0004
You can also find polished boards, they will take root well in contemporary interiors.
OSB
Perhaps the most non-trivial option for decorating walls with wood is oriented strand board.
This material, based on resin-bonded wood shavings, was initially considered exclusively rough, but its interesting texture did not go unnoticed by designers.
Today, OSB is used in decoration more often than commercial, less often residential premises, it looks fresh and experimental, it is inexpensive, but not suitable for allergy sufferers. nine0004
In residential interiors, only OSB 2 category boards are used, which contain the least amount of harmful resins. They are also covered with a special protective top to reduce the throughput of the material and reduce the percentage of emissions.
Strip parquet
The classic solution for the floor is also a good find for the walls. Block parquet is small slats made of precious wood, it is rarely used as a total finish, more often for decorating an accent wall behind a headboard or in a TV area. nine0004
A controversial but effective solution is to lay out a kitchen apron with parquet. Near the hob, a tempered glass screen will come to the aid of a capricious parquet that is not ready for temperature changes.
The material is distinguished by high wear resistance and maintainability, it ages beautifully and looks status. There are many options for decorative styling, but the most popular, of course, is the “French herringbone”.
Solid, parquet and engineered board
A massive board has different dimensions, it is wider, longer and you can’t lay out a “Christmas tree” from it. A solid board may look different, depending on the cutting of the tree trunk and the final processing of the coating. The material can provide decent heat and sound insulation of walls, lives on the floor for half a century, and on the walls even longer, is durable and hypoallergenic, but loves attention and care. With this finish, you should try to maintain a certain level of humidity in the room in order to avoid deformation of the wood. nine0004
Another option for wooden wall decoration is parquet board.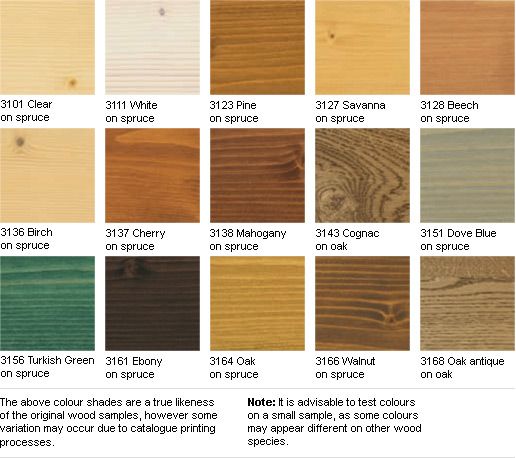 It is cheaper than piece parquet and solid wood, due to the fact that it consists of three layers of wood, and only the upper one is valuable, the two lower ones are budgetary.
If the board consists of two layers, and the lower one is multilayer plywood, then it is no longer parquet, but an engineered board - an even more affordable, and at the same time more durable material that, in terms of reliability and stability, can compete even with solid wood finishes . nine0016Laminate
The basis of the laminate is a fibreboard, and its decorative layer may contain natural veneer, but calling the laminate wood wall decoration is a bit of an exaggeration. But, as with the floor, laminate on the walls is an affordable and popular replacement for parquet.
It is easy to mount it, it lives for a long time, is not afraid of cat claws, and generally endures a lot.
For walls in the kitchen, you can choose a moisture- and heat-resistant laminate.
nine0004
Wall panels
Geometric veneer panels are a fashion hit of the 21st century. Only the top layer of a two-layer panel is made of valuable species veneer, the base is made of chipboard or MDF. Such panels are usually made to order, which means they can look completely different. They have one significant advantage: unlike parquet and solid wood, thin veneer is not afraid of humidity and temperature changes.
The most classic version of interior wooden wall decoration is Wainscot. So called decorative wall panels come from England. They were invented in order to insulate cold British houses, but then they also revealed the decorative potential of such a finish. nine0016Often, only the lower part of the wall was sheathed with wood to protect it from mechanical damage that furniture could cause.
In its minimalistic interpretation without carvings or decorations, the Weinsko became an integral part of the American colonial style, so that such panels are sometimes erroneously called American.
And in France, a similar wall cladding is known as byazeri. Unlike vayscott, boiserie was more often made in the entire wall, with openwork patterns and in pastel colors. nine0004
Traditionally, such panels were made from solid oak, today Weinskot is even made from MDF or imitated using boards and moldings. So the slatted version of the Wyscott is essentially a lining with a horizontal railing.
What is the best primer for walls to be painted?
In order for the paint to adhere perfectly to the surface, it is recommended to prime the wall with a special compound before application. Some craftsmen neglect this, citing the uselessness of extra spending on building materials. However, the benefits become visible already when applying the paint - we will talk about this in our article, as well as which primer is better to choose for walls for painting. nine0003
Total or accent wall decoration with wood is the leading trend of the last few years and at the same time is a solution that exists outside of fashion and time.
Properly choose the finishing material that meets the needs of your interior, will help in the salons of the shopping mall "Lanskoy".
#Overview #Wood
Modern wall decoration with wood - 30 photos of beautiful interiors
Wood is a versatile material for building and decorating your home. Wherever you apply it, it instantly adds warmth and comfort, relaxes, pacifies and simply pleases the eye. Wall decoration with wood will perfectly fit into any style of interior, allowing you to realize elegant and non-standard solutions. What's more, wood paneling is becoming a popular trend these days, giving you the opportunity to look at room design in a whole new way. In this article, you will see 30 photos of interiors with chic wood wall decoration. nine0004
Wall decoration with wood: choosing the material
When choosing wood for decorative wall decoration, special attention should be paid to the quality and effectiveness of the selected material in the interior.
The advantages of natural wooden walls in the interior are:
- Environmental friendliness of the coating;
- Practical and durable;
- Good heat and sound insulation;
- Ability to blend perfectly with modern materials;
- Large selection of beautiful shades and textures. nine0091
As with outdoor work, interior wall decoration with wood can be done using wax or oil impregnation, various stains, varnishes and paints, which give a sophisticated look to the simplest board, and significantly increase its service life.
Below we will look at and compare the features of the use of wood and wood panels in the interior of houses and apartments, as well as give 30 inspiring photos.
Beautiful wooden walls in the interior (lining, boards, etc.)
As a rule, interior wall decoration with wood is made from expensive species: solid maple, cedar, oak, alder, cherry, pear, beech or other trees. They are not as afraid of moisture and temperature changes as the more traditional pine, but due to the high cost, it is sometimes easier to use it, only with the addition of a protective coating.

Clapboard is increasingly used in country houses, while in modern apartments and private houses it has become fashionable to use boards and laminate. Wooden walls made using:
- Antique wood look;
- Use of bleached wood technology;
- Saw cut, which allows you to feel the natural originality in the interior.
Note that wood wall decoration can completely cover the walls or be used as a decorative element. With the latter option, it is installed behind a sofa, headboard, TV or fireplace, as well as in combination with stone, brick and painted walls. nine0004
Also read: Brick walls and other features of the loft style
We offer you to enjoy 12 more stunning photos of wood wall decoration in the interior. Notice how the texture and color of the wood determines the style of each space.
Also read: Wooden private houses - types of facades and photos
Decorative wall decoration with wooden panels - 10 photos in the interior
Wooden panels for interior wall decoration are made from cheaper raw materials: spruce, pine, larch, fir or birch .
Learn more