Paint of house inside
Interior House Painting Cost 2023 – Forbes Home
Getty ImagesTable of Contents
- Cost to Paint the Interior of a House
- DIY Interior House Painting Costs
- Factors That Affect the Cost of Interior Painting
- Additional Costs and Considerations
- Frequently Asked Questions (FAQs)
{{ tocState.toggleTocShowMore ? 'Show more' : 'Show less' }}
Nothing livens up a home quite like a fresh coat of paint. So if you’re looking to revamp your home with a few coats of paint, you’re in the right place. How much does a home improvement project like this cost, though? The average cost to paint a house interior is $1,900, ranging from as low as $950 up to $2,900.
Advertisement
THIS IS AN ADVERTISEMENT AND NOT EDITORIAL CONTENT. Please note that we do receive compensation for any products you buy or sign up to via this advertisement, and that compensation impacts the ranking and placement of any offers listed herein. We do not present information about every offer available. The information and savings numbers depicted above are for demonstration purposes only, and your results may vary.
Tired Of Looking At Dull, Faded Surfaces?
Book painting services and compare quotes form highly rated painters near you. Find local pros on Angi that offers both residential & commercial painting services.
Explore Options
This cost fluctuates depending on the size of your home, the materials used and several other factors. If you paint the interior of your home yourself, you will save money on labor, but it might not look as good as a professional paint job.
| Average Cost | $1,900 |
| Highest Cost | $2,900 |
| Lowest Cost | $950 |
Cost to Paint the Interior of a House
To determine interior painting expenses for your particular home, here’s how to figure out the total cost by the type of room being painted or by the square footage of the space.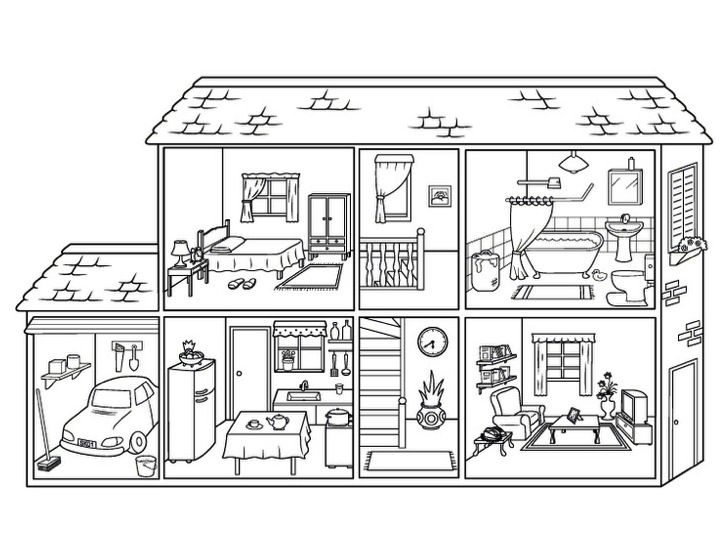
By Room
The cost to paint a house’s interior depends on the type of room and the obstacles that need to be painted around, like appliances and fixtures. Expect to pay anywhere from $900 to $2,000 to paint an average-sized living room. Painting a kitchen will cost about the same as a bedroom, between $300 and $750. For an average-sized bathroom, you can expect to pay between $150 to $300.
By Square Foot
If you know the square footage of your home, you can easily estimate the price to paint the interior as it costs from $2 to $6 per square foot, including all labor and materials. With an average cost of $3.50 per square foot, painting the interior of a 1,000 square foot home would cost $3,500, a 2,000 square foot home would cost $7,000 and a 3,000 square foot home would cost $10,500.
Advertisement
THIS IS AN ADVERTISEMENT AND NOT EDITORIAL CONTENT. Please note that we do receive compensation for any products you buy or sign up to via this advertisement, and that compensation impacts the ranking and placement of any offers listed herein. We do not present information about every offer available. The information and savings numbers depicted above are for demonstration purposes only, and your results may vary.
Start By Getting The Right Paint Supplies For The Job
DIY Interior House Painting Costs
If you want to save money on your interior painting project, you might consider taking on the task yourself. Budget around $200 to $300 for all of the materials, including paint and equipment. Painting your home’s interior can take anywhere from a few hours to a few days, depending on the size of the job and your expertise. If you have never painted a large space before, there will be a bit of a learning curve.
While hiring a professional painting company will cost more than DIY, there are benefits to doing so. Professional painters will ensure the paint is applied perfectly at the edges and corners and that the overall finish is clean and smooth. They will also likely get the job done quicker, reducing the project’s impact on your day-to-day life. On average, expect to pay professional painters between $20 to $50 per hour.
Factors That Affect the Cost of Interior Painting
The conditions inside a home vary drastically from house to house, so be sure to consider these factors that may affect the cost of painting your home.
- House Size: While it might seem obvious that the larger a home, the more expensive it is to paint, there are other factors related to house size to consider. If you need more than one level of your home painted, additional labor fees will be included in your pricing to account for transporting materials from floor to floor.

- Type of Paint: There are dozens of paints available for you to choose from, some cheaper than others. Glossy paints cost a bit more than matte or satin paints. Basic paints made with synthetic coloring will run from $20 to $30 per gallon, while designer, high-end paints made with natural coloring can cost as much as $100 per gallon.
- Materials Needed: Besides equipment like ladders and sprayers, most of the supplies needed to paint your home need to be purchased new for each job. The cost of paint brushes, drop cloths, paint pans, rollers, tape, and more will be included in the quote. If you think you can get these supplies at a cheaper cost, ask your painter if you can purchase them separately.
- Labor: While painting companies don’t usually disclose their actual per hour rate and instead provide a total project cost, you can expect a painter to cost between $20 and $50 per hour.
 Painters most often charge by the wall or floor square footage.
 - Moving Furniture: Moving your furniture out of or to the center of the room yourself is a great way to save money. Otherwise, the painters will move it for you, resulting in additional labor costs.
- Wall Repairs: If your walls have seen better days, your painter might recommend wall repairs to fix any dents, scratches, water stains, or other damage. While this will be an add-on cost, there is no better time to get these repairs taken care of than before a fresh coat of paint is applied.
Advertisement
THIS IS AN ADVERTISEMENT AND NOT EDITORIAL CONTENT. Please note that we do receive compensation for any products you buy or sign up to via this advertisement, and that compensation impacts the ranking and placement of any offers listed herein. We do not present information about every offer available. The information and savings numbers depicted above are for demonstration purposes only, and your results may vary.
Compare Quotes From Top-rated Local Painters
Free, No-commitment Estimates
Find a Painter
Additional Costs and Considerations
The factors above apply to almost every interior painting application. In some cases, you should also think about the following costs and considerations:
- Drywall Texture: If your home has textured walls, whether “orange peel,” popcorn or swirled patterns, they will cost more to paint—up to 50% more. A gallon of paint does not go as far on a textured wall as on a smooth wall. For example, if a gallon of paint covers 400 square feet of a smooth wall, it might only cover 250 square feet of a textured wall.
- Accent Walls: If you dream of including accent walls in your interior paint job, make sure you also budget for them. An accent wall will cost 20% to 30% more than the rest of your walls due to the extra materials and labor needed.
- Ceiling Height: The average ceiling height is nine feet tall.
 If you are estimating the cost to paint the interior of your home with cost-per-square-foot pricing, be sure to consider your ceiling height. Walls much higher than nine feet, especially those with vaulted ceilings, will be more costly to paint.
Your Home. Your Decisions. Our Support.
Get expert advice on your home, design tips, how much to pay for pros and hiring experts, delivered to you daily.
{{ newsletterState.emailErrorMsg }}
Thanks & Welcome to the Forbes Home Improvement Community!
{{ newsletterState.emailErrorMsg }}
I agree to receive the Forbes Home newsletter via e-mail. Please see our Privacy Policy for more information and details on how to opt out.
Frequently Asked Questions (FAQs)
How much does it cost to paint the interior of a 2,500 sq. ft. house?
To paint the interior of a 2,500-square-foot house, it will cost from $5,000 to $15,000. The total amount is based on a range of $2 to $6 per square foot.
How do you bid an interior paint job?
To bid an interior paint job, a contractor will use one of the following methods:
- Use an average rate based on the total square footage
- Use a multiple of four to six times the total cost of the paint
- Estimate the total hours the project will take to complete and add the cost of materials
Is it better to paint yourself or hire a professional?
It is often better to hire a professional than paint your home yourself. A professional painting company will know the right materials to use, how to apply the products correctly, and they can give you the highest quality paint job. While some handy homeowners might be able to take on painting tasks themselves, the quality is usually not comparable to the professionals.
DIY Interior Wall Painting Tips & Techniques (With Pictures)
Use these tips for how to paint interior walls to make your painting projects go faster and smoother.
1 / 10
JGI/Tom Grill/Getty Images
To Avoid Lap Marks, Roll the Full Height of the Wall and Keep a Wet Edge
Lap marks are those ugly stripes caused by uneven layers of paint buildup. They occur when you roll over paint that’s already partly dry. (In warm, dry conditions, latex paint can begin to stiffen in less than a minute!) With these tips learn how to paint interior walls.
The key to avoiding lap marks when learning how to paint interior walls is to maintain a “wet edge,” so each stroke of your roller overlaps the previous stroke before the paint can begin to dry. Here are some painting tips:
- To maintain a wet edge, start near a corner and run the roller up and down the full height of the wall, moving over slightly with each stroke.
- Move backward where necessary to even out thick spots or runs.
- Don’t let the roller become nearly dry; reload it often so that it’s always at least half loaded.

- Keep the open side of the roller frame facing the area that’s already painted. That puts less pressure on the open side of the roller, so you’re less likely to leave paint ridges in your stylish wall painting ideas.
2 / 10
Family Handyman
Mix Several Cans of Paint in a Large Bucket for a Consistent Color Throughout the Room
Paint color may vary slightly from one can to the next. If you have to open a new can in the middle of a wall, the difference may be noticeable. Mixing the paints together eliminates the problem. It’s best to estimate the amount of paint you’ll need and mix it in a 5-gallon bucket (a process called “boxing”).
Here are some good painting tips:
- When coverage is difficult to estimate, add more rather than less when learning how to paint interior walls. You can always pour the leftover back into cans.
- For large jobs, use the bucket and a roller screen rather than a roller tray.
 It’s much faster to load your roller with the screen than to use a roller pan.
 - Simply dunk the roller into the paint bucket, then roll it along with the screen until it stops dripping.
3 / 10
Family Handyman
Let the Paint Dry, Then Cut the Tape Loose for a Perfect Edge
Once the paint is dry, you can’t just pull the tape off the trim. Paint forms a film between the wall and the tape and removing the tape tears pieces of dried paint off the wall. So before pulling off the tape, cut it loose.
Wait for the paint to completely dry, at least 24 hours, then use a sharp utility knife or box cutter knife to slice through the film. Start in an inconspicuous area to make sure the paint is hard enough to slice cleanly.
If you cut the paint while it’s still gummy, you’ll make a mess. As you cut the paint, pull up the tape at a 45-degree angle.
4 / 10
Family Handyman
Painting Techniques: Paint the Trim First, Then the Ceiling and Walls
Pros usually follow a certain order when learning how to paint interior walls. They paint the trim first, then the ceiling, then the walls. That’s because it’s easier (and faster) to tape off the trim than to tape off the walls. And you certainly don’t want to tape them both off.
When painting the trim, you don’t have to be neat. Just concentrate on getting a smooth finish on the wood. Don’t worry if the trim paint gets onto the walls. You’ll cover it later when painting the walls.
Once the trim is completely painted and dry (at least 24 hours), tape it off (using an “easy release” painter’s tape), then paint the ceiling, then the walls.
5 / 10
Family Handyman
Prime and Texture Wall Patches To Avoid a Blotchy Finish
Freshly painted walls often look blotchy. The color is uniform, but the sheen isn’t consistent. This usually occurs over the holes and cracks you patched with a filler or drywall compound. The porous fillers absorb the paint, dulling the surface (a problem called “flashing”).
When light hits these dull spots, they stick out like a sore thumb. The smooth patch also stands out in contrast to the slightly bumpy texture of the rest of the wall. A quick coat of primer is all it takes to eliminate flashing and texture differences.
Primer seals the patch so paint won’t sink in and look dull. To match texture, prime with a roller, feathering out the edges. Choose a nap thickness to match the surrounding wall texture (a 3/8-in. nap roller for smooth walls; 1/2-in. for textured).
6 / 10
Family Handyman
Clean Dirty Surfaces So the Paint Can Form a Strong Bond
If you paint over dirty, oily surfaces, the paint will easily chip or peel off. So to prepare before painting, clean grimy areas with a deglosser or heavy-duty cleaner intended for prepaint cleaning.
They work well to clean painted, varnished or enameled surfaces to improve the adhesion of the new paint. They’re ideal for cleaning greasy or oily areas like kitchen and bathroom walls and removing hand marks around light switches and doorknobs.
Wipe on the cleaner in a circular motion using a lint-free cloth or abrasive pad. Start at the bottom and work up. After the surface is clean, fill in any nicks and holes, then sand them smooth before painting. Be sure to wear rubber gloves and eye protection.
7 / 10
Family Handyman
Roll Paint Along the Edges for Consistent Texture
Corners and areas next to trim that are painted only with a brush have a noticeably different texture than the surrounding paint. To ensure the finished texture will be consistent in these areas, brush on the paint, then immediately roll it out before the paint dries.
Use a 3-in. roller with a nap that’s the same thickness as the roller used for the rest of the wall. Roll as close as you can without bumping the opposite wall or slopping paint onto the trim. Finish brushing on the paint and rolling it out in one area before moving on to the next section.
8 / 10
Family Handyman
Use Cotton Drop Cloths Rather Than Plastic
Spills and spatters happen, regardless of how careful you are. It’s a lot easier to prepare for them than to wipe them out of your carpeting or off your wood floor later. All it takes is canvas drop cloths in your work area.
The thick canvas stays in place, so you don’t need to tape it, and you can use it to cover any surface. Plastic drop cloths are slippery to walk on or set a ladder on and don’t stay in place. Even worse, paint spills on plastic stay wet, and they can end up on your shoes and get tracked through the house. Canvas is slippery on hard floors, so rosin paper is better over vinyl, tile and hardwood. Tape the sheets together and to the floor to provide a nonslip surface.
But even with canvas or rosin-paper drop cloths, large spills still need to get wiped up right away or they’ll seep through. Clean spills with paper towels or cloth rags. Likewise, if you splatter paint on any other surface, wipe it up immediately.
9 / 10
Family Handyman
Feather Out Paint Where You Can’t Keep a Wet Edge
You can’t cover large areas like ceilings, extra-tall walls or stairwells in single, continuous strokes, so the best way to minimize lap marks on these areas is to feather out the paint along the edges that you can’t keep wet. The thinner, feathered coat of paint will avoid the buildup that causes the lap mark.
To paint a large section without leaving lap marks, roll the nearly dry roller in different directions along the dry edge, feathering out the paint as you go. After completing the entire length of the wall or ceiling, move to the next section and paint over the feathered edges.
For the second coat, apply the paint in the opposite direction. This crisscrossing paint application sharply reduces (if not eliminates) lap marks.
10 / 10
Family Handyman
Sand Trim Between Coats for an Ultra-Smooth Finish
One coat of paint usually won’t hide the underlying color and sheen on trim. And if you don’t sand the surface smooth between coats, the finish may have a grainy texture. For a smooth finish, sand the trim before applying each coat of paint.
Sand the trim with a fine-grit sanding sponge. Sponges get into crevices where sandpaper can’t go and let you apply even pressure.
Then apply the first coat of paint, let it dry at least 24 hours, lightly sand it again for a completely smooth surface, and apply the second coat. After each sanding, vacuum the trim, then wipe it down with a tack cloth to remove the dust.
Originally Published: February 09, 2021
How to paint a wooden house inside
Painting options
- Environmentally friendly
- Painting walls and ceilings with acrylic varnishes
- Acrylic lacquers with glazing primer
- Wood waxing
- Painting with interior acrylic paint
How to paint?
After building and painting the wooden house outside, the next question is the choice of materials for painting the wooden house inside. What to choose: water-based acrylic lacquer, acrylic interior wood paint or wood wax? nine0019
Environmental safety
One of the main requirements for interior painting materials is high environmental safety for people living in the house. All TEKNOS materials for painting walls and ceilings inside a wooden house are water-borne, odorless, solvent-free, and comply with the highest M1 environmental safety class.
We offer you to get acquainted with the possible options for painting a wooden house inside with acrylic varnishes, acrylic paints and TEKNOS wood wax (TEKNOS). nine0019
OPTION 1. Painting walls and ceilings with acrylic varnishes for interior use.
This type of interior painting of a wooden house is the most traditional. Acrylic semi-gloss varnish PANELILAKKA can serve as a budget option for painting walls and ceilings. If you wish to obtain a lacquer finish with varying degrees of surface gloss, you can use NATURA 15 acrylic matt lacquer or NATURA 40 acrylic semi-gloss lacquer. Acrylic lacquer can be applied by brush or spray. nine0019
A colorless acrylic lacquer is applied to preserve the natural color of the wood. Tinted colored acrylic varnish is applied for glazing color painting of walls and ceilings. The disadvantage of tinted lacquer when painting a wooden house inside is some “turbidity” of the lacquer coating and the difficulty of uniformly applying tinted lacquer when painting walls and ceilings, which causes the effect of “camouflage” or uneven tone of the painted surface.
OPTION 2. Painting walls and ceilings with acrylic lacquers for interior use using glazing primer (mordant). nine0003
In order to ensure the highest possible quality of painting a wooden house inside with acrylic lacquers, it is recommended to pre-apply tinted water glazing primer (water stain for wood) AQUA PRIMER 2920-02. After the AQUA PRIMER 2920-02 glazing primer has dried, two layers of colorless acrylic lacquer are applied over it: PANELILAKKA or NATURA 15 and NATURA 40. If necessary, a light sanding is performed between the first and second lacquer layer. This variant of lacquer painting provides high transparency and uniformity of glazing painting of wall and ceiling surfaces. Color map for glazing primer AQUA PRIMER 2900-02 includes more than 120 colors.
OPTION 3. Painting walls and ceilings with wood wax.
For high-quality and beautiful painting of a wooden house inside, it is recommended to apply 2 layers of colorless or tinted wood interior wax. Tinted wax gives the most beautiful glazing effect to the interior surfaces of a wooden house. Wax does not form a continuous film, and as indicated in the data sheet for SATU WAHA (Satu Sauna Waha) wood wax, the treated wood retains its breathability. Wood wax is recommended to be applied with a synthetic brush or by spraying if you have professional experience. nine0051 The following wood waxes are offered by TEKNOS for painting a wooden house: SATU WAHA, HIRSIVAHA and TEKNOVAX 1160-00.
Waxes (oil-wax) for wood have gained the greatest demand for the glazing coloring of a wooden house inside. The popularity of wax is due to many factors and, above all, the pleasant appearance of the treated surfaces. is the best choice for painting a wooden house inside. SATU WAHA wood wax contains natural wax, belongs to the highest class of environmental safety M1, does not emit harmful substances and does not cause allergic reactions, it is safe for direct contact with the human body. Wax for wood SATU VAHA has high performance properties, perfectly withstands the effects of water and high temperatures, cleaning with detergents. nine0019
SATU WAHA wood wax is ideal for painting the inside of log cabins, solid wood houses, profiled and glued timber, as well as for painting lining boards or timber imitators. SATU WAHA wood wax has an economical consumption, which makes this option for painting a wooden house inside economically attractive. Samples of wood wax tinting are presented in the trading floors of the TEKNOS branded stores of the TEKNOVIKS company.
Helpful advice. Antiseptic for interior work
Before painting walls and ceilings inside a wooden house with acrylic lacquers or wood wax, the wood can be pre-treated with a water-based antiseptic WOODEX AQUA BASE. The use of WOODEX AQUA BASE is optional. However, according to Finnish experts and feedback from our customers, priming reduces the risk of biological damage to wood, and more importantly, the application of acrylic varnishes for interior work and wood wax on wood treated with WOODEX AQUA BASE provides a more beautiful and uniform glazing painting of walls and ceilings. nine0070
OPTION 4. Painting walls and ceilings with interior acrylic paint.
To paint the walls and ceilings of a wooden house inside, water-based interior acrylic paints can be used, which form a colored opaque coating. Interior acrylic paints for interior work are traditionally used for drywall, plastered surfaces and for painting wallpaper. Interior paints TEKNOS (TEKNOS) are odorless, do not contain solvents, have the property of hypoallergenicity, that is, they do not cause allergic reactions. BIORA acrylic paints are used for painting dry residential premises, and acrylic waterproof paints of the TIMANTTI series are used for interior painting of premises with high humidity. nine0019
The most popular materials for interior work are: TIMANTTI 7 matt paint and BIORA BALANCE deep matt paint.
On the recommendation of Finnish specialists, TIMANTTI acrylic paints can be used for painting wooden surfaces of walls and ceilings inside the house. Teknos interior acrylic paints are computer tinted according to various color charts and have thousands of possible options, which can be found in any of our Teknos brand stores. nine0019
How to repaint varnish. Wood restoration
Covering paint is the optimal restoration material, it does not require complete cleaning of the wood. Unlike glazing compositions, which mainly require fresh, unpainted wood for painting, covering paint will require a maximum of local sanding.
Types, options, paints and colors of wall design- Overview + Video
Interior finishing is one of the final stages of construction. A wide range of materials, colors and textures puts the developer in front of a rather difficult choice. nine0019
When decorating a room, one should take into account its purpose, as well as the type of material from which the internal surfaces of the walls of the house are built.
Wooden surfaces can be coated with a layer of paint, since the choice of such coatings today is quite large.
[contents]
However, starting to finish, it should be remembered that although painting a wooden house is, first of all, the finishing touch in interior design, however, surface painting also performs a protective function. nine0019
When starting to paint a wooden house, you should carefully consider the choice of coating and color shade, as well as the technology of applying different types of paints, since these factors will determine the result that you get in the end.
Contents:
- 1 Why paint the house inside
- 2 Paint the house with paint: choosing a finish
- 3 Antiseptics, bleaches and waxes for timber
- 3.1 Painting the house inside: surface preparation
- 3.2 Coating wooden surfaces with varnish
- 3.3 Painting with paint
What is the purpose of painting the house inside? . Painted wood will become a real highlight in the interior and will help to put an end to the embodiment of design ideas.
Wood is becoming more and more popular and is often used in private individual construction. Developers love it for its environmental safety, excellent transmittance (the most "breathable" material), the ability to maintain an optimally comfortable indoor climate.
Painting the walls inside the house with paint makes it possible to keep all the above advantages of wooden materials at the proper level . In our article, we will consider the main types of paint and varnish products, help you decide on the type of coating and discuss the technology of applying paint to wooden surfaces. nine0019
Painting a house with paint: choosing a finish
Varnishing gives shine and durability to your home Paints and varnishes for interior work can be natural (impregnations) and synthetic (paints).
Natural varnishes and paints are made from natural oils or water. At the same time, natural wood impregnations can be transparent and tinted.
For home interior painting, it is better to use natural-based paints that do not contain harmful substances. nine0019
The flooring should be selected according to its purpose in the room. For the walls of living rooms, water-based paint is well suited, but for the floor it is better to use more wear-resistant compositions.
In damp rooms, such as the bathroom or even the kitchen, it is better to choose a paint that is resistant to moisture.
Pokarska in light colorsMany manufacturers also include substances in their coatings that can protect the coated surfaces from the formation of mold fungus, this is worth paying attention to. nine0069
Color scheme is a purely individual matter. House painting options can be very different. From the point of view of the structure, the shade of the coating can be:
- matt,
- semi-gloss,
- glossy,
- semi-gloss.
Everyone chooses the colors for painting houses according to their taste. Here we will only replace that all shades of color are divided into cold and warm, matte and glossy.
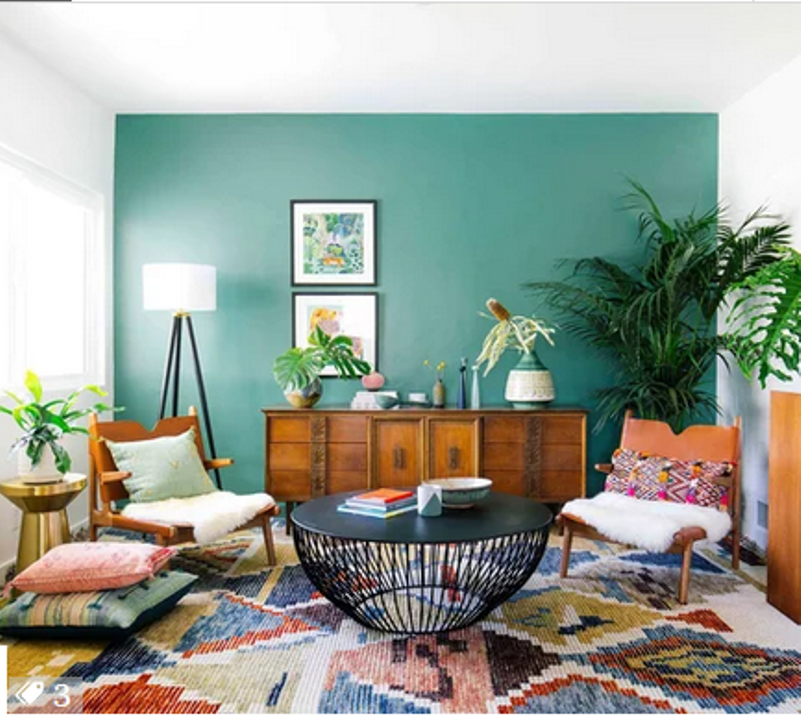
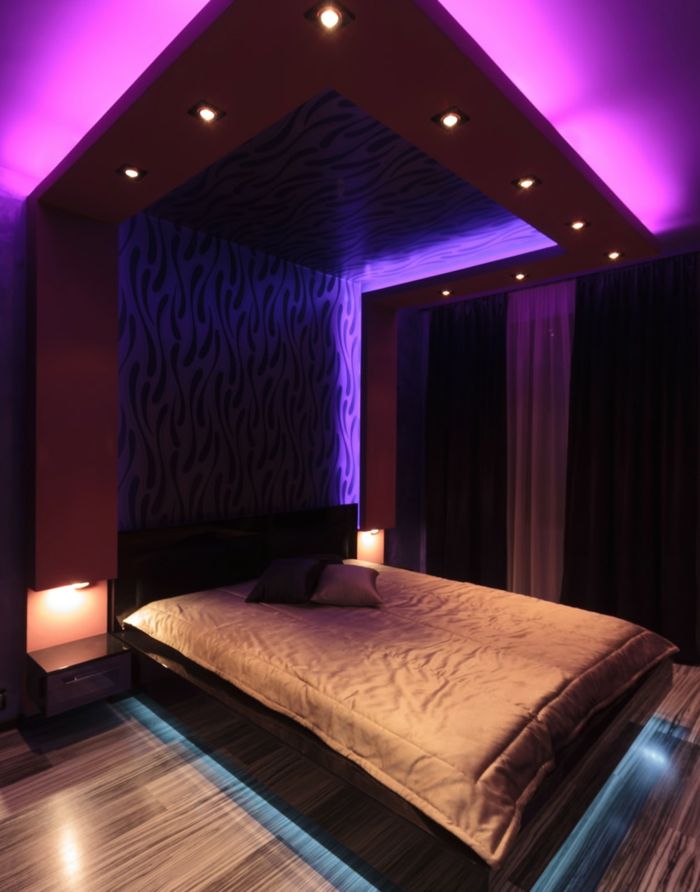
Glossy painted surfaces are brighter and bolder. Such paints are best used in active rooms - living room, kitchen, etc. Matte shades give a softer color cast on a painted surface and are great for a bedroom or children's room. nine0019
Antiseptics, bleaches and waxes for timber
Painting a timber house requires some surface preparation. To protect against mold and other fungus, as well as against wood damage by insects, solid wood surfaces are covered with special antiseptics. Penetrating deep into the wood, the antiseptic protects it from moisture and decay.
Antiseptics are available in transparent. These are suitable for further coating surfaces with clear or translucent lacquer. Surfaces that are supposed to be coated with paint are best treated with a primer antiseptic composition. nine0019
According to the composition of antiseptics there are:
- on an organic basis,
- is chemical based.
Organic-based compounds are recommended for interior timber house painting, they are more environmentally friendly, but also have less protective properties.
White always looks at homeIt is better to cover wooden walls with protective compositions immediately after construction is completed, because wood can darken and lose its aesthetic appeal under the influence of ultraviolet radiation. nine0068 Sanding will help restore wooden surfaces to their original appearance.
In addition, dark areas can be bleached with special wood bleaches.
To avoid unpredictable reactions, it is better to use coatings (antiseptics, paints or varnishes) from the same manufacturer.
If for some reason you are not satisfied with the painting of a frame house or a house made of timber, you can treat the wooden surfaces inside the house with a special wax or stain. Such a coating is quite durable, protects wood well, and also looks visually very attractive. nine0068 This kind of wood processing is not cheap, but it looks accordingly.
Interior painting of the house: preparation of surfaces
Frame house wallsPainting of wooden surfaces, including lining inside the house, requires some preparation of these very surfaces. The final result will depend on how carefully and competently the wooden surfaces are prepared for painting.
Preparation of wooden walls for painting includes several steps:
- Cleaning surfaces with a stiff brush. At this stage, dust, dirt, oil and tar stains are removed from the wooden surface. If necessary, dirt can be cleaned with sandpaper.
- Puttying of large holes, cracks, depressions.
- Coating wood with a clear or primer preservative.
- Sanding surfaces for better adhesion of the paint to the wood. For grinding, you can use a grinder or sandpaper.
Using a grinder significantly reduces time and labor costs. nine0006
- Painting a house with paint or varnish.
Lacquering wooden surfaces
Lacquering allows you to preserve the natural color, original pattern and natural appearance of wooden surfaces.
Wood varnish can be completely transparent or tinted. For interior work, it is better to give preference to varnish coatings without a strong artificial smell of solvents.
Most often, alcohol-based or water-based varnishes, as well as waterless polyurethane, alkyd and acrylic varnishes are used for painting surfaces inside the house. nine0019
When applying coatings, follow the procedure and follow the instructions on the packaging.
Painting with paint
The main requirements that apply to top coats used for interior walls in a house are their safety for health, absence of a strong odor and fast drying.