Kitchen counter bar extension
How to Build a Breakfast Bar
Every kitchen needs a little perch where you can sip your morning cuppa and scan the headlines before heading out the door each morning—or where the kids can munch on cookies after school or do their homework while a parent prepares supper. If you crave that extra space in your kitchen, here are a few DIY breakfast bar styles for you to choose from.
Measurements and Choosing Your Bar TopBefore you start constructing anything, consider a few details.
Breakfast Bar HeightThe average bar height is 42 inches tall. You want to keep your bar between 36-42 inches or else your barstools won’t fit under comfortably.
Whether you want your bar built extending out from a wall, to create a division between spaces—or along an empty wall as a shelf—you need to leave an adequate passageway. Forty-two inches is the magic number, here, too. Remember, even if you have enough room to walk, you may need to fit appliances, furniture, or even a wheelchair through the space at one point or another.
Before deciding where to build your bar, find the studs in the wall. You want to mount the bar on at least two studs, which are spaced 16 inches apart behind the drywall. Use a stud finder to locate them, then measure out where the bar will go.
How Deep Should a Bar Top Be?Pretty much any solid surface, at least 24 inches deep, could make a beautiful bar top. Consider a solid piece of hardwood, cut straight or with its natural live edge. Or, purchase a solid surface countertop like Corian, use ¾-inch plywood, or something salvaged like an old door. Once you choose your top, cut it to size and finish as desired before making the base.
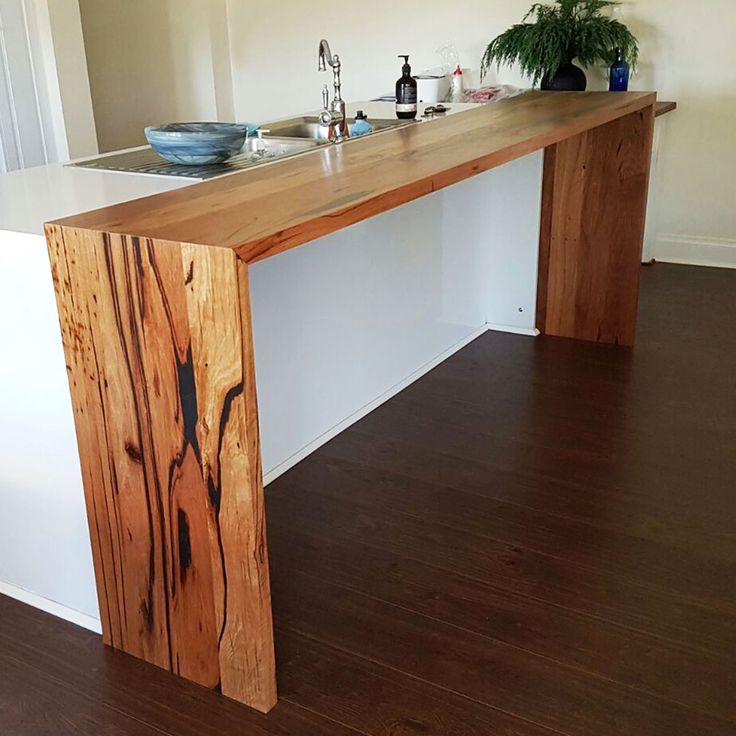
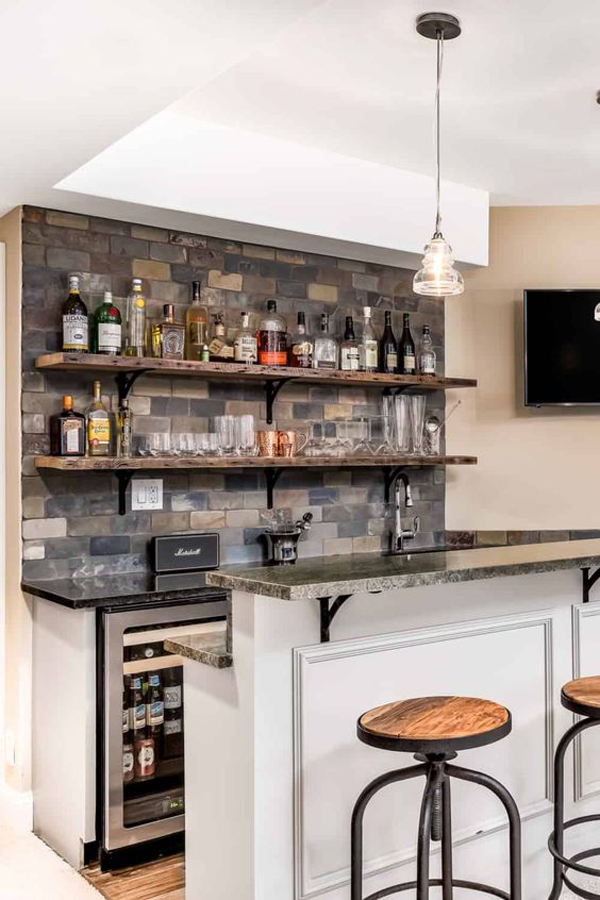
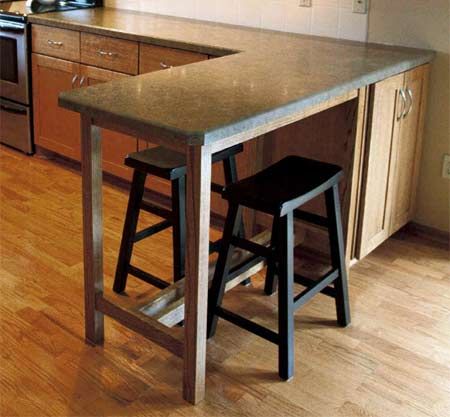
How to Build an Extension BarThis style extends out from a wall, supported by a pedestal at the other end. Homeowners often choose this style to provide a division between the kitchen and family room. For the pedestal, you can purchase a 5-by-5-inch pre-made wooden beam, or use a salvaged porch pillar or an old barn beam.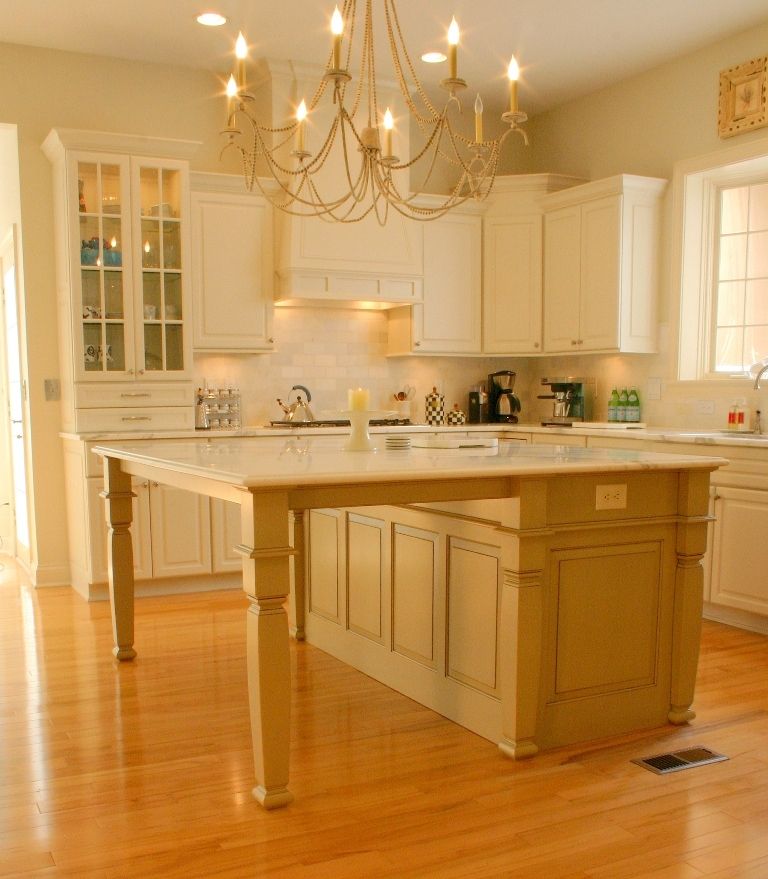
- First, create a support system using the 2x6 pieces by screwing them together to form an I shape. You’ll mount one end of the I to the wall and secure the other end to the pedestal. Paint, stain, or finish to match the top.
- Once you have the base support finished, mark a small line 42 inches from the floor at each stud you chose in your supporting wall. Use your level to make sure they’re even. Also, make a center mark on the side of the pedestal that will face the wall.
- With someone assisting you to hold the base in place, use your drill to secure one end to the wall with two screws, one above the other, on each side of the central piece.
- Next, screw the other end of the base to your pedestal, lining up the center mark you made with the center board.
- Run a bead of construction adhesive along the top edge of your base. Lay the bar top in place, centered.
- Once it’s where you want it, screw in place from the underside.
If you don’t have the room for a bar to extend out into the room, a shelf along the wall makes a nice place to eat your morning toast.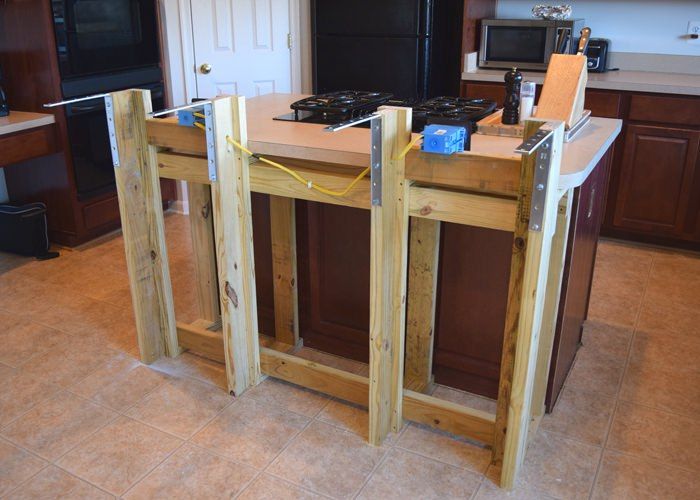 For this style, you only need the bar top of your choice and a few shelf brackets or architectural corbels. If your bar is over 4 feet long, use more than two.
- Find the studs in your wall using a stud finder and mark lines 42 inches up from the floor. Use your level to make sure they’re even.
- Screw your shelf brackets or corbels to the wall at those marks.
- Lay the bar top, centering it over the brackets, and screw in place.
If you already have a kitchen island, adding a breakfast bar is easier than you think. Simply buy and install a new countertop for the island that is a few feet larger on one side to create an overhang. If you can’t match the old counter you’re removing, never fear. Just opt for another color or material that coordinates equally well with the room
Other Breakfast Bar OptionsIf you’re not the handy type, or you want something temporary, consider purchasing a ready-made island on wheels.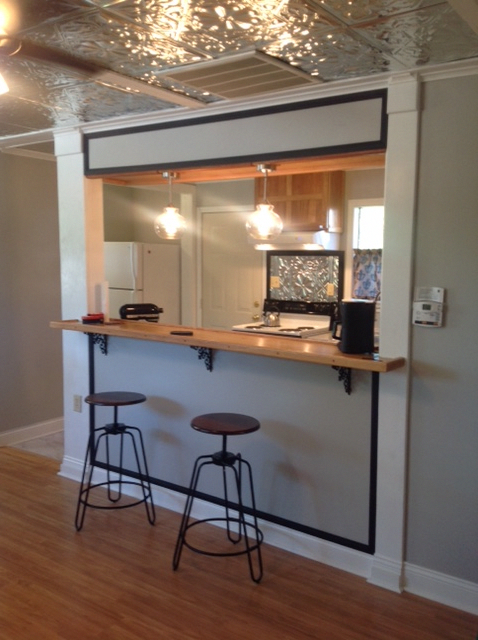 Here are some ideas to whet your appetite: a kitchen center and breakfast bar, and a breakfast bar on wheels.
Once you have your breakfast bar in place, pop some cookies in the oven so you have something to savor while trying it out.
Recommended Tools:
Tools & Materials
-
Saw
-
Drill
-
Pencil
-
Tape
-
Level
How to Extend a Kitchen Island | Top 10 Options
Love it? Share it!
156 shares
Do you have a kitchen island that isn’t quite large enough? Learn how to extend a kitchen island with several options! Plus, see how my kitchen island extension turned out with our recent mini kitchen remodel.
Post may contain affiliate links for your convenience.
Mini Kitchen Remodel Update
When we did our kitchen remodel in 2019, I didn’t think ahead to accommodate for our growing family. That left us with a super tight eating space in the kitchen, where we like to eat breakfast and lunch together.
Even though I designed the original island to be 43″x84″, it was elbow to elbow when all four of us were sitting at the countertop. I had thought that kitchen island size was enough for four stools.
BEFOREWhile they did fit, it wasn’t comfortable and left no space for additional seating.
When we decided to replace the laminate flooring on the main level, it was the perfect time to also extend the kitchen island!
We also decided to darken the island to match the new flooring.
In the process, I discovered many ways to extend a kitchen island. Learn how to extend a kitchen island and choose which option might be best for you!
Kitchen remodel regrets
If you’re interested in all of my kitchen remodel loves and regrets, make sure to check out this YouTube video! Hit the subscribe button while you’re there!
how to extend a kitchen island
There are multiple ways to extend a kitchen island so you have more seating and/or counter space, depending on your needs.
All of these options include how to lengthen a kitchen island that is already installed.
Island Extension + keep existing countertops
- Add another level to an existing kitchen island
- Incorporate a stand alone island extension
- Butt a new work surface to your existing countertop
- Add a table to your existing kitchen island
- Add butcher block to one end
Island extension with new countertops
- Extend a kitchen island with legs
- Add a cantilever countertop
- Install an open waterfall countertop
- Install additional base cabinetry with a new island top
- DIY an end cap with shelving (Can also be done with existing countertops by using butcher block or another top for this addition.
 )
)
The majority of these are self explanatory. However, I wanted to dive into my favorite options in more detail!
how to extend a kitchen island with legs
Our kitchen island extension was done by reusing our original kitchen island cabinetry and adding legs.
This included lengthening the skirting to 10 feet long to support the additional countertop overhang.
We now have about two and a half feet of open space on one side of the kitchen island. This is excellent for additional seating if we ever need more stools.
By choosing to extend the kitchen island with legs, we were able to save money by reusing the existing base cabinets.
While we did pay to have the cabinets refinished to this beautiful charcoal color, the majority of the cost was in the island legs and a new island countertop.
How Much Does It Cost To Extend a Kitchen Island?
The cost to extend a kitchen island can vary greatly.
Each kitchen island extension is going to cost a different amount, depending on:
- The materials you choose
- How much of an extension you create
- If you need to replace the countertop
- Labor and installation costs for your area
- The type of extension you decide on
You can find a stand alone island extension that is several hundred dollars, or you can install a custom extension that can cost several thousand.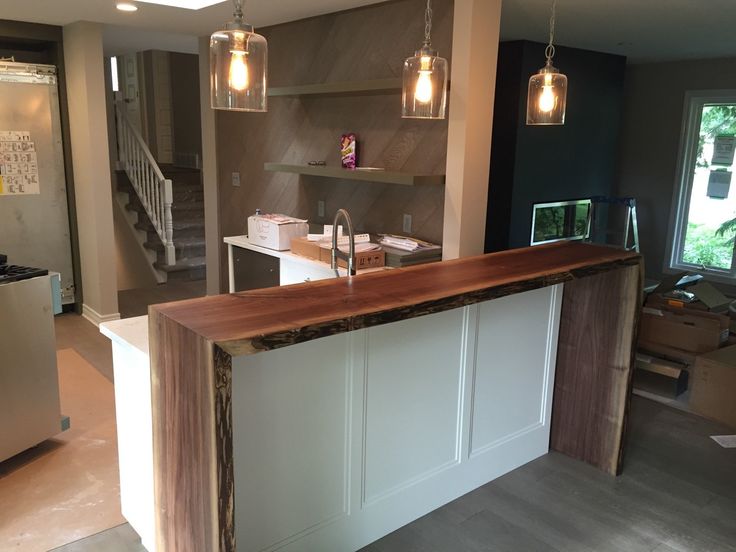
Shop My Kitchen
Turn on your JavaScript to view content
Incorporate a stand alone island extension
If you are looking for a very budget friendly option, I would highly recommend adding a stand alone island extension.
This can be done by either purchasing one pre-made, or crafting your own to the dimensions you need.
Island extensions come in a variety of sizes. However, the majority of them are for additional counter space, rather than additional seating.
You can add surface space with shelving like this extremely affordable option that also offers storage.
However, if you’re looking to add seating, try an option that has an open area for leg room like this extension. While it can serve as a stand alone island in small kitchens, it can also serve as an extension if it fits your island’s dimensions.
Turn on your JavaScript to view content
Most of the time, it will make the most sense to build an extension like this from scratch to work with your existing kitchen island. Most carpenters or handy DIYers can build this type of structure easily for an affordable option.
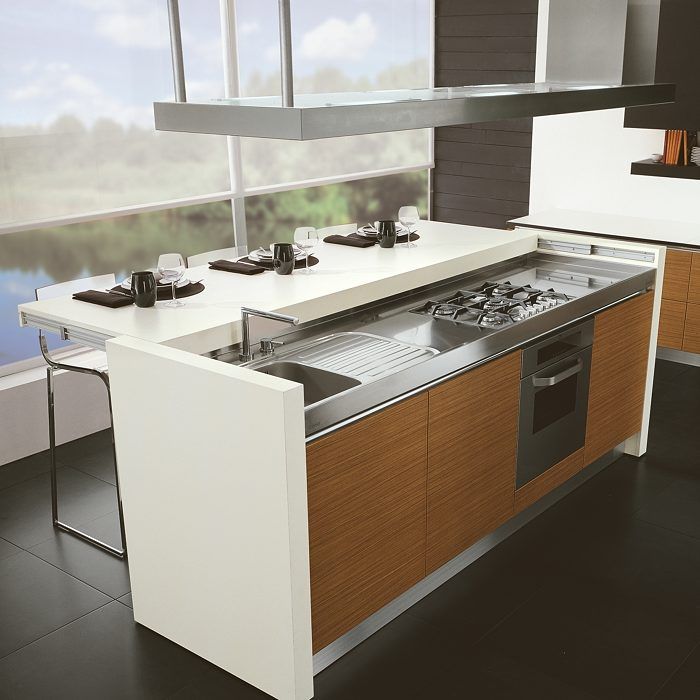
Add a cantilever countertop
On the flip side, you can extend your kitchen island by adding a larger countertop. While I chose to do this by adding legs for support, you can also accomplish the same goal with a cantilever countertop.
Cantilever countertops either extend out one end, or extend over both sides like a balanced table top. Either option gives you more seating and more surface area.
However, you will need to assess how much over hang is stable for the countertop you choose. Working with your local countertop expert is the best way to go about this as it will vary based on material.
You can get a better idea of some cantilever island options in this article.
Butt a New Work Surface to Existing Island
Let me quickly discuss one item that might have been confusing from the list.
Adding a new work surface to one end of an existing island is a viable option to extend your island.
You can do this by building an extension of any kind, and then adding a contrasting material for the top.
Butcher block is often a great material to use to accomplish this.
Design: Studio McGeeAs you can see in this beautiful kitchen designed by Studio McGee, butcher block ties in well with white countertops.
The trick to this method is ensuring that whatever extension you create, your two countertop materials hit at the same height for a seamless transition.
kitchen island dimensions
One of my most asked questions from our previous kitchen remodel was, “What are your kitchen island dimensions?”
kitchen island size for 4 stools
As I stated above, our first kitchen remodel had an island measuring 43″x84″.
This fit four stools. However, it was tight.
If you have a small kitchen and have no wiggle room, this is the shortest length you should go to be able to fit four stools.
On the other hand, you should aim for 10 feet in length to comfortably fit four counter stools at a kitchen island.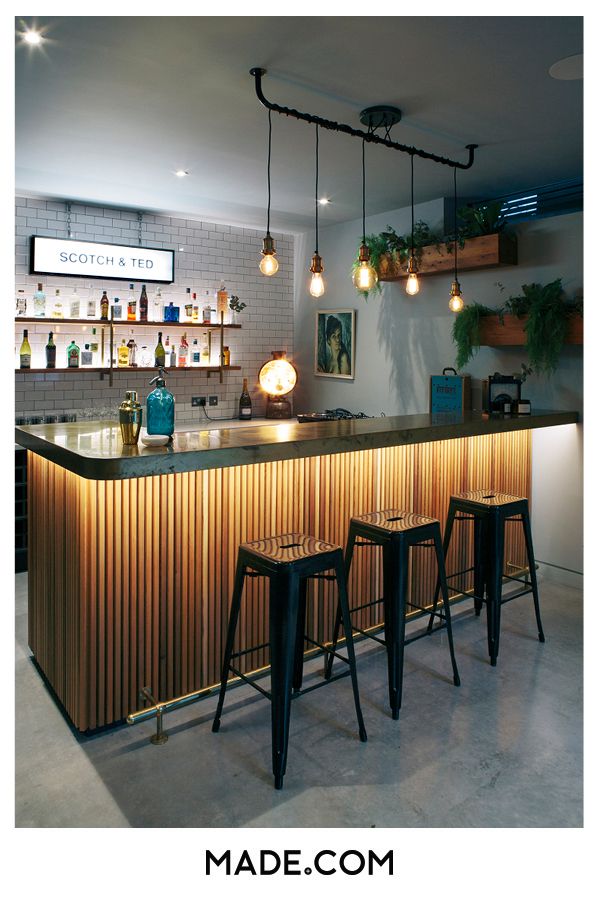
Our new kitchen island measurements are 43″x116″. This is just a few inches shy of 10 feet.
We love the new size! And I’m also loving the dark kitchen island stain I chose.
Our previous wood tone accents in the kitchen were more orange toned. With the replacement of our main level flooring, it no longer matched well.
So I updated all the wood accents in the kitchen to a charcoal stain over maple wood.
I love the high contrast design it creates!
Plus, there are now less wood tones to compete throughout the entire house.
You Might Also Enjoy…
I hope that this article on how to extend a kitchen island 10 different ways has been helpful to you as you plan your own kitchen makeover!
If you’re looking for more kitchen design inspiration, make sure to check out these articles next.
- How to Design a Custom Kitchen
- 10 Best Kitchen Styling Tips
- Kitchen Design: Corner Cabinet Ideas
- 15 Pros and Cons of Open Shelving
- How to Make Your Own DIY Floating Shelves
And if you want to learn more about the countertops in our kitchen, check these out!
- Our Island Countertop: 10 Best Granites That Look Like Soapstone
- Our Perimeter Countertop: 15 Quartz Countertops that Look Like Marble
Thanks so much for stopping by Grace In My Space today! Make sure to subscribe to access all my free guides. Plus, you can follow along with me daily on Instagram and weekly on YouTube!
~Sarah
How to arrange a bar counter in the kitchen? - advice from MK "Victoria"
- Design
- What to make a bar area from
- Original design solutions
- Errors in the preparation of the project
- Accessories Bar stools for the kitchen counter
Before installing a bar counter in the kitchen, you need to weigh the pros and cons of a trendy solution. A useful detail needed at catering points is not always appropriate in the household. In a small room, it is more advisable to buy a kitchen set for installation along the wall, complementing functional cabinets and cabinets with a traditional table with chairs, which can be rearranged if necessary to temporarily free up space.
However, in modern design, bar counters often replace the dining area. The new design style is especially popular in studio interiors. The narrow design with high chairs successfully copes with the functions of the table. When decorating studios, designers practically do not use classic kitchen sets, limiting themselves to racks. The original version of the free-plan space zoning helps to save space.
If there is no shortage of space, the bar counter in the kitchen can be combined with the installation of a wide dining table. In a spacious room, an additional work surface will only come in handy. A narrow tabletop can separate the work unit from the dining area. A stationary structure blocking a large kitchen can be both a purely functional and a decorative element of a modern interior.
In fact, there are many more technical solutions. If desired, the rack can be placed even in a cramped room. Bar furniture should be abandoned only if there are kids and elderly people in the family who are uncomfortable and even dangerous to use high chairs. Not the best idea would be the reception of numerous guests. A narrow surface will not be enough for a comfortable location in a bar of a large company.
Design
- Multilevel furniture. The classic bar is completed with base cabinets, rows of shelves, high side shelving, hanging cabinets, accessory holders and spectacular lighting.
- Island construction. Classic Western design suitable for spacious rooms. The island is a free-standing structure that is usually installed parallel to the working wall.
- Wall extension. If the kitchen space is partially separated from the living room, it is easy to attach a countertop on a support to the partition, leaving a free passage of sufficient width between the rooms.
- Baffle replacement. Extending the kitchen with a glazed balcony is not uncommon in urban design. In the process of redevelopment, it is worth saving part of the dismantled wall for bar equipment.
- Window top. Modern compact kitchens are easy to style.
 A spectacular bar can be equipped by expanding the window sill. For a successful redevelopment, a minimum of space is required.
 - Wall bar. Bracketed high shelf is an easy project to implement. Narrow chairs are easy to slide under the bar, if necessary, freeing up maximum space in the room.
- Niche design. If there is a niche, the depth of which is not enough to install a table, the functions of dining furniture can be taken over by a narrow but long counter with compact bar stools.
- Integrated rack. Bar furniture often serves as an extension of the work surface. A perpendicular tabletop can be flush with the headset, be higher or lower.
- Withdrawable transformer. The tightness of the kitchen is not an obstacle to comfortable home furnishing. There are many options for built-in structures that are put forward immediately before use.
- Folding shelf. The wall table is mounted on the principle of compartment equipment in trains.
 A folding high shelf is another solution for decorating a cramped kitchen according to the standards of modern comfort.
 - High table. The mobile solution will help to do without installing a bar counter in the kitchen. A tall, but narrow table is simply installed in an empty space. Mobile furniture does not need fasteners.
What to make a bar area
The choice of materials depends on the structural features and design. For the manufacture of light products with an open bottom, it is enough to find a countertop of the desired size and a support of the desired height. The base can be a thick steel pipe. One end is securely attached to the wall with brackets. On the other side, the tabletop is supported by a leg. A completely inexpensive and easy-to-install design will transform the kitchen.
To save space, a washing machine is often located below. It is permissible to use wood, artificial stone or MDF with a film coating as a countertop. If in a small kitchen there is absolutely no place where to put a bar counter, you can make a folding or retractable design from the same materials by choosing the recommended fasteners. For large rooms, the choice of options is expanding.
Drywall is a universal material for self-improvement of a residential interior. The lightness of products is an advantage for a city apartment. Plasterboard furniture is easy to make even without carpentry skills. The frame is quickly assembled from wood or aluminum profiles. The base can be “sewn up” with drywall at your discretion, leaving the bottom of the rack partially open or making it deaf.
An unusual design is easier to create in a country cottage or country house, where there are no load restrictions. Interesting options are obtained when making do-it-yourself racks based on solid wood, brick or natural stone. If the design idea is sustained, monolithic structures look great in a residential interior. In such a countertop, you can build a hob, sink and other fixtures.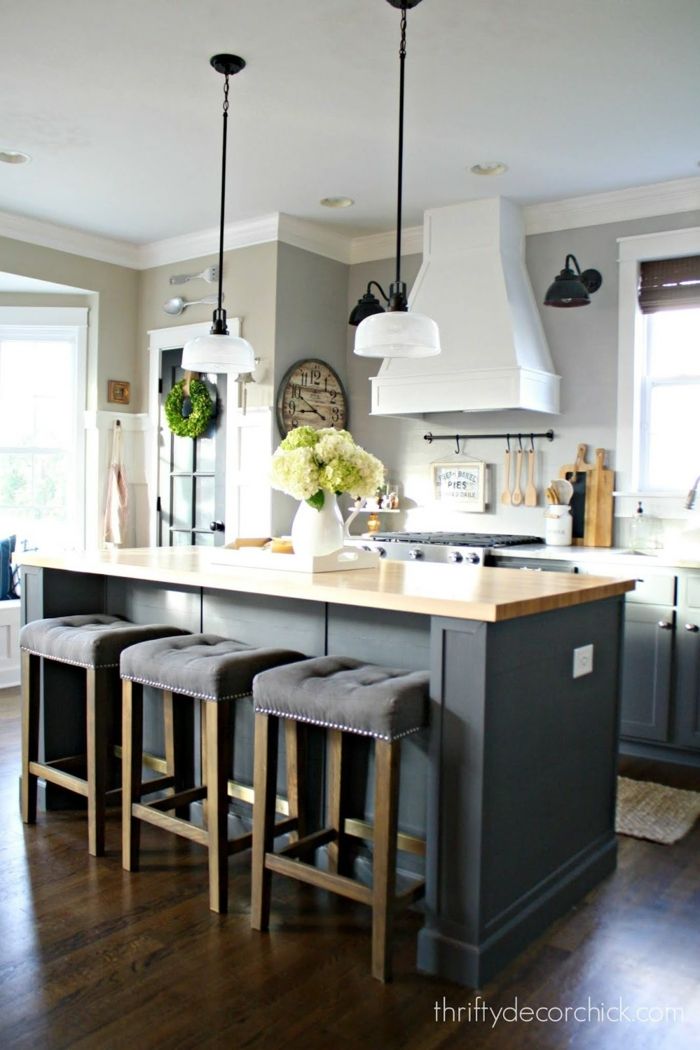
Original design solutions
- Figure tables that effectively separate the working area of the kitchen from the dining area.
- Combined furniture with functional add-ons for kitchen accessories.
- Two-level structures combining a standard height kitchen table and bar counter.
- Clear, frosted, colored and textured tempered glass or lightweight acrylic equivalent.
- Equipped with a built-in aquarium with live aquatic life or "dry" imitation.
- Art objects with mosaic decoration or artistic painting in a general style for the kitchen.
- Narrow shelves suspended from the ceiling beams in a fixed position.
Mistakes in project preparation
When deciding how to equip a bar counter in your home kitchen, you need to pay attention not only to design, but also to comfort in operation. It is necessary to arrange a new interior detail in such a way as to leave convenient access to all parts of the room.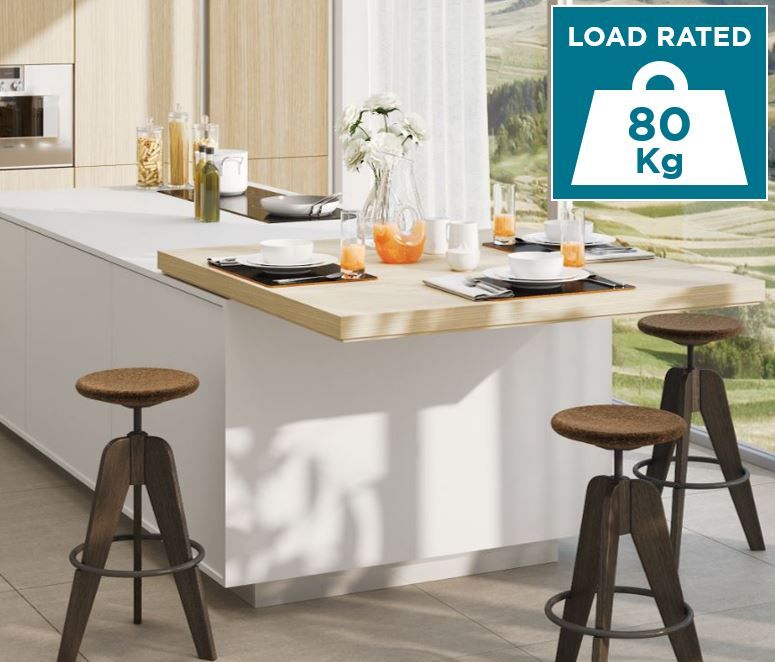 High furniture is not recommended to be installed near the entrance, refrigerator and other household appliances. When designing, it is desirable to avoid protruding elements that interfere with movement.
Overloading with details also affects the design. An overly complex shape of the tabletop and an abundance of decorative elements will not benefit the interior, especially if the appearance of the bar does not fit with the overall concept. Conciseness is a symbol of modern aesthetics and comfort. When drawing up a project, you must remember that under the table top you need to leave enough space to sit comfortably.
Kitchen counter chairs
When choosing kitchen furniture, it is enough to be guided by three criteria: safety, comfort, design. If a stand, if desired, can simply be made at home, chairs are in any case more convenient to buy or order in a workshop. The seat can be located at a height of 58-91 cm. When calculating the dimensions, the dimensions of the rack must be taken into account. Chairs that are too low will be uncomfortable to sit on. Too high are unsafe to operate.
Bar stools - a small kitchen equipment option. Seats without a back will go under the table top entirely and will not clutter up a narrow passage. But the chairs are still comfortable. Height-matched models with backs, armrests and soft seats allow you to comfortably sit in a home bar with family and friends. The modern assortment reflects all popular interior styles from classic and modern to hi-tech and loft.
Bar accessories
In order to design a bar counter for its intended use, you will have to choose useful accessories for furniture and arrange them correctly. The obligatory set includes holders for glasses for drinks, which can be mounted on a bar or an additional console for dishes can be installed above the table top. It is necessary to provide a place for a bottle holder, an ice bucket, a fruit bowl and other utensils.
A full-fledged bar cannot be equipped without household appliances that make it easier to prepare cocktails. In a well-equipped kitchen, a blender, shaker, juicer are required. Bar strainers, geysers for pouring alcohol in a thin stream, rimmers for decorating the edge of a glass according to the rules, muddlers for rubbing ingredients and other useful devices that are easy to find on sale will come in handy.
Height, length, width and other dimensions of the bar counter in the kitchen
Recently popular bar counters appeared in the homes of our fellow citizens relatively recently. The fashionable Western trend has become widespread, respect for functionality, the ability to save space, freshness, originality of the design idea. A similar model of space organization has taken root not only in spacious country houses, but also in small-sized city apartments.
Contents:
- Benefits of a custom solution
- Main varieties
- How to decide on the size?
- Height
- length
- Width
- The height of the bar chairs
- Compliance with the dimensions of the premises
- Conclusion
- Video: We expand the space of the kitchen due to the bar of
The bar standing in residential premises was significantly modified. Now this is not a harsh stone slab, hiding from drunken brawls, but a stylish interior detail that replaces a dining table, a dividing wall, and significantly complements the functionality of the room. Along with the "domestication" of the subject, there was a change in the "technical" characteristics, appearance.
The height of the bar in the kitchen, its dimensions depend on the purpose of the item, the area of the room, the interior. Choosing the right model is not always easy, given the variety of options.
At the moment, there are several dozen different variations that are suitable for any room
Advantages of a non-standard solution
When the bar counter only migrated to the homes of ordinary citizens, it performed only the main function - providing a venue for entertainment events. The owner of the "bar" deftly wielded bottles and glasses. The guests, sitting on a dais, enjoyed drinks, easy communication, a cheerful atmosphere of a drinking establishment in a homely atmosphere.
A little later, the owners of "fun corners" in the rhythm of everyday life noticed how convenient it is to use the stands for a quick breakfast, snack. The children rejoiced at the possibility of an unusual meal. The hostesses rejoiced at the absence of the need for tedious table setting.
The standard dimensions of the bar counter make it easy to replace a classic kitchen table. At the same time, the functionality is extensive. The item serves as a cooking surface, a place for eating, gatherings alone or as part of a friendly company, expands the storage system.
Configurations allow the creation of non-standard interiors. The item allows you to expand the functionality of the room. Different sizes of the bar counter in the kitchen contribute to solving most of the problems that are typical for this room.
Making a non-standard rack will diversify and make the interior of the kitchen unique
Main varieties
Depending on the functionality, the location of the rack is distinguished:
- wall-mounted;
- adjacent to kitchen furniture;
- freestanding.
Wall mounting is typical for small spaces. In this situation, the size of the countertop is often reduced. The narrow edge is fixed to the wall, the long one is placed in such a way that the approach to the object is not limited.
A similar option is often used to divide a room into zones. Application in the interior of the kitchen-living room is most typical. The use of a bar counter for zoning involves the combination of most possible functions in a single object.
Options adjacent to kitchen furniture often continue the main worktop. One narrow edge is attached to the headset, the second is supported by a support. Models are often equipped with a functional cornice containing lighting, accessories for dishes, and decorative elements. In this case, the height at the rack is insignificant. Items complement each other, form a single group.
Free-standing models are typical for large spaces. It is possible to use for the kitchen, combined with the living room. The rack can act as an island. Similar models significantly expand the functionality of the room.
Free-standing option - the most convenient placement format
How to decide on the size?
Getting an individual item to order or making it yourself is not difficult. Therefore, the bar counter can be absolutely any size that fits well into a particular interior. In any case, compliance with the standards will help to avoid problems with ergonomics, selection of chairs.
Standard dimensions
The classic model, which is the most common, corresponds to the dimensions of 120x55x105 cm (length-width-height). The parameters meet the minimum allowable standards, allow the item to successfully fit into most rooms.
For models combined with a set, the parameters are 86x88x91 cm. This is due to the standard dimensions of kitchen furniture. This option is typical of small kitchens, rooms that already contain a standard set of furniture.
The dimensions of a stand-alone model most often correspond to the values: 110x120x130 cm. Such a modification is suitable for large rooms. Sizes are ideal for ease of use, but not universal.
Calculation features
When choosing individual parameters, one should be guided by the characteristics of the premises, family members. The standard height of the bar counter in the kitchen is not always convenient for the undersized, the length for the obese.
When preparing a project, carefully consider the required functionality and take into account the needs of all family members who will be frequent users of the headset
Height
functions. The lower tabletop is more suitable for various uses: as an additional work surface, as a standard table. This model is preferable for families with young, elderly family members.
When the counter is part of the main work surface, it is worth knowing how high the headset is, because the dimensions will be equal.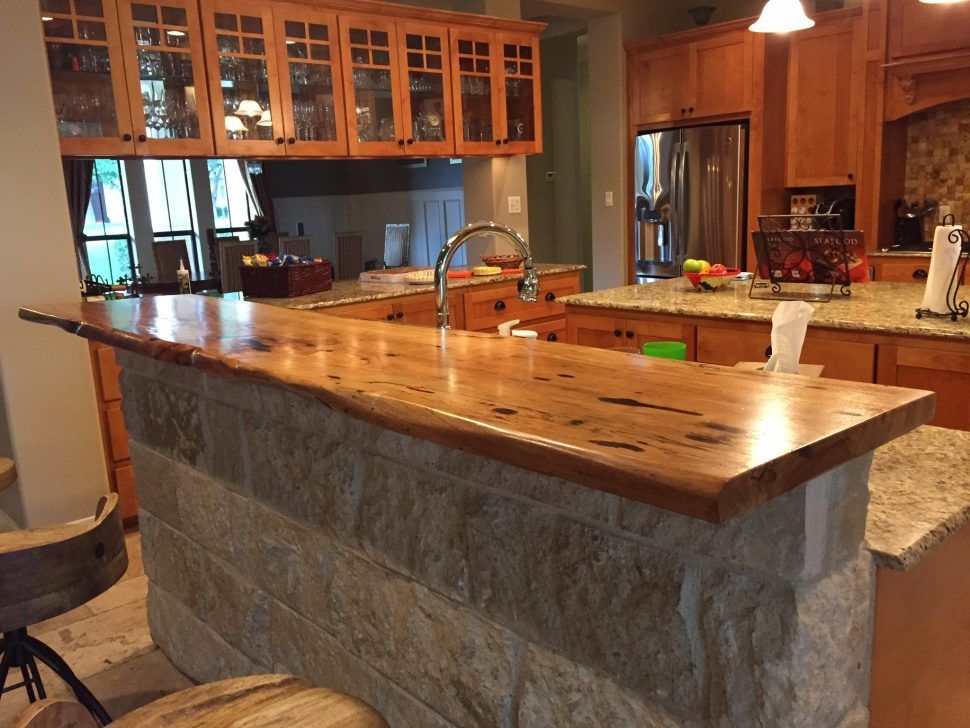 Usually the parameter is in the range of 86–90 cm. The option is optimal, suitable in most cases. In a kitchen with a similar variety, it is easier to make a coordinated interior.
The standard height of the bar counter in the kitchen connected to the living room is slightly higher due to the fact that it has to act as a partition. The value is rarely below 100 cm. An object that acts as a space separator is often performed at different levels. The side facing the kitchen repeats the parameters of the furniture set.
The other part, looking into the living room, reaches 130 cm. In this case, it is advisable to add high bar stools from the side of the room.
Height is one of the important factors that you need to pay attention to when designing a headset
Length
Absolutely any length of the product is allowed. The main thing is that the object fits in the room, does not create obstacles, harmoniously fits into the interior.
When calculating this parameter, do not forget that the norm for 1 person is 60 cm. The dimensions of family members should be taken into account. It is difficult for obese people to comfortably accommodate in a cramped space, so the standard should be adapted to a specific situation.
When choosing the length, it is necessary to take into account how many people gather at the table at the same time. Here, the width of the product becomes an important aspect. Therefore, the final choice depends on the totality of quantities.
Width
The width of the bar in the kitchen depends on the functions performed by the object. If it is supposed to receive only a replacement for the dining table, then 55 cm is enough.
When using the rack as a work surface, it is desirable to increase the parameter. For the arrangement of small-sized kitchens, a width of 30 cm is acceptable. The value is sufficient for minimal convenience. To reduce even more is impractical.
When choosing a width, remember that a standard table setting will not work. Replacing a full-fledged dining group with a bar counter, you need to have adapted ideas about eating.
When calculating the required dimensions of length and width, it is necessary to take into account what the maximum number of people will spend time at the table at the same time. They should be stable, and the seats should be comfortable to sit on. The difference between the height of the tabletop and the chair is within 30 cm. The most popular models on sale are 75–85 cm.
To save space, standard bar stools are often abandoned. In return, they get high stools that can fit in the space under the countertop. At the same time, stable plastic models are considered the most successful.
The height of the bar stools is "adjusted" to the main parameters of the project set
Compliance with the dimensions of the room
When choosing furniture for a spacious room, there is no need to save space. It is required to be guided by the features of the created interior, personal preferences. Here, the item is not a replacement for the standard dining group, but only complements the existing environment.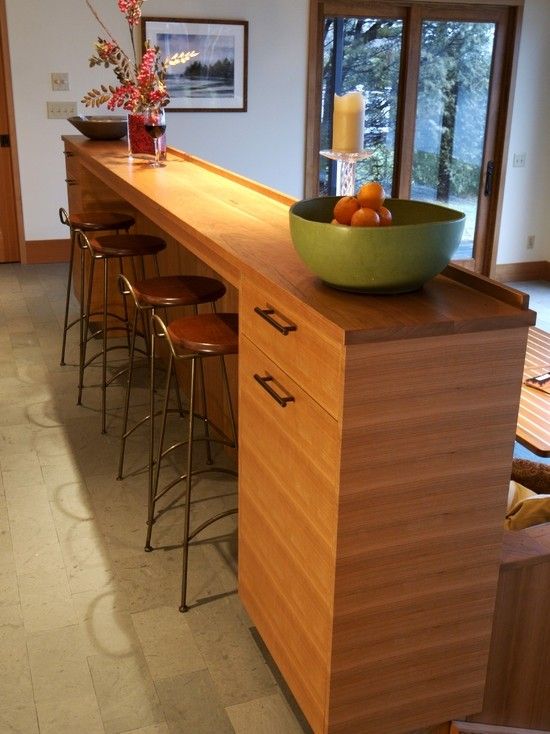
The choice of parameters depends on the frequency, features of using the "table". If a rack is required for infrequent snacks, accommodation of single guests, then a large-sized model will become redundant.
For a dynamic family gathering a large number of guests in the kitchen-living room, a massive object is suitable that can maintain the holiday atmosphere and accommodate those who want to take a break.
The modest dimensions of the room dictate a different approach. Here it is important to use every corner of the free space to good use. The item often replaces a full table. Thinking about the location of furniture, do not forget about ergonomics. The working triangle (sink, stove, refrigerator) should not overlap.
Tip
A good choice would be a consolidated version (connected to a headset). Universal dimensions are convenient for use, location in space. The rack will not block other items. Significantly increase the functionality of the room.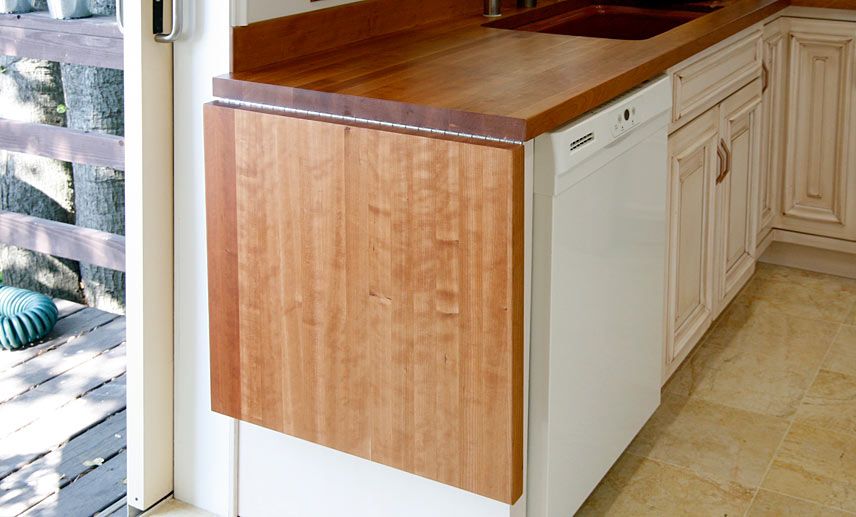
For extremely limited spaces, it is worth considering the possibility of placing a post connected to the window sill. This option will be the perfect choice to expand the possibilities of the kitchen. The width of the surface due to the area of \u200b\u200bthe window sill increases significantly. The counter does not take up useful space in the main part of the kitchen.
By choosing stools that slide completely under the table top, it will be possible to unload the space even more.
When furnishing a small kitchen, special attention should be paid to the design of the furniture. Objects are allowed lightweight, made of materials that contribute to the visual expansion of space. For the rack, it is desirable to select "weightless" chrome supports. Do not overload the upper part with storage systems. Bar stools are desirable transparent.
It is also important how the counter will fit into the interior and will correspond to the general concept.
Conclusion
If you are going to equip your kitchen with a bar counter, you should consider in detail the possible ways of placing this item.