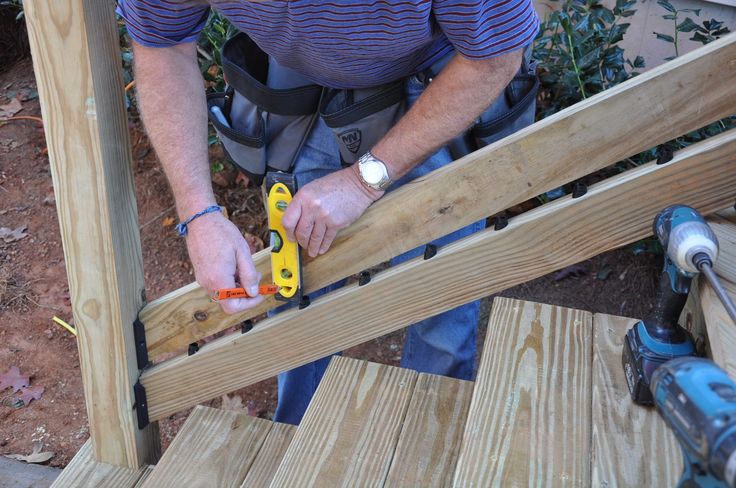
Installing deck railing
DIY Guide: How To Build a Deck Railing
How Do I Build a Railing?
From first-time homeowners spending the weekend DIY building a new deck, to experienced deck builders updating a worn-down deck, knowing how to build a railing setup for your deck, porch, or balcony can protect your family and enhance your outdoor space. Protecting guests, children, and pets from dangerous trips and falls off the structure, a solid metal or wood deck railing system also increases the curb appeal of your home's outdoor living area.
Here are some straightforward and easy step by step DIY installation instructions and learn how to make a railing Be sure to wear protective eye gear, work gloves, and solid footwear to keep your DIY deck rail install smooth and injury-free.
What to Know Before Staring DIY Deck Railing Installation:- Each state and region have their own unique set of deck building regulations. Be sure to check with your local building office before beginning your deck railing build.
- The majority of states throughout America require a minimum deck railing height of 36 inches from the deck board surface to the top edge of the top deck rail.
- States such as California and Washington generally require a minimum deck railing height of 42 inches from the deck board surface to the top edge of the top rail.
- Railing systems installed on a third-story area or higher typically require a minimum deck railing height of 42 inches, and can often increase up to 48 inches.
How to Build and Install a Deck or Porch Railing
Your outdoor living space needs a strong, solid deck frame before any railing build can go on. Learn more about deck framing and how to install deck support posts in the Decks 101: How to Frame a Deck guide.
1. Measure Your Deck Space and Determine How Many Railing Posts You'll Need
Use a tape measure to find the distance of each straight outside edge of your deck. Then you can begin determining the number of deck railing posts you will need and the post spacing.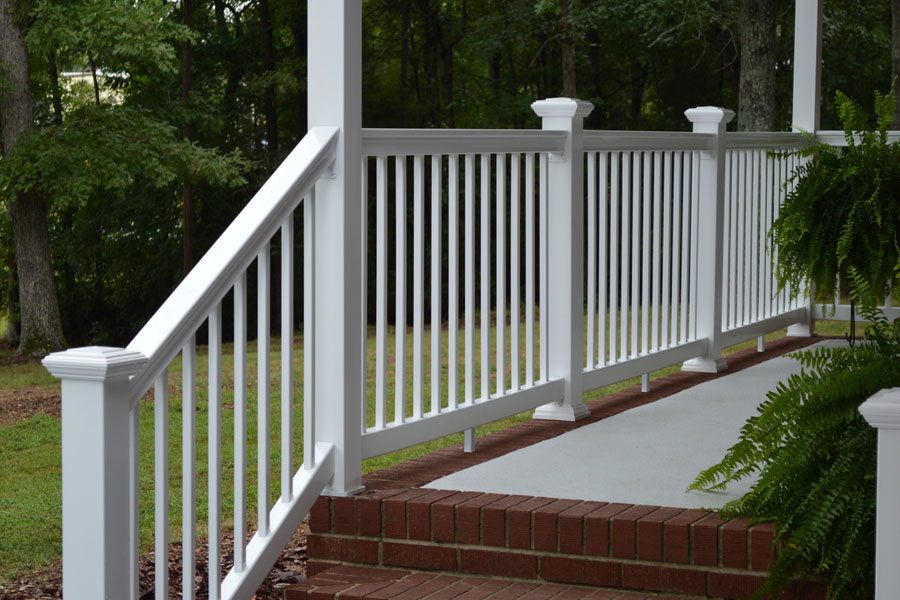 Plan on mounting deck posts in the two spots closest the house, as well as having posts at outer corners of the space.
If you have outdoor stairs on your deck area, plan on mounting deck posts at the top corners of the exterior stairway.
Deck railing posts are generally spaced 6 feet apart on-center, however, they should not exceed 8 feet apart on-center. Make sure your posts are evenly spaced. If a deck railing posts end up positioned directly above a deck joist, reposition it slightly.
2. Mounting the Railing Posts
Mark with a pencil the mounting locations of the deck railing posts on the deck board surface. Then, check underneath the pressure-treated or composite decking into the deck frame. The area below the post will require at least 4 inches of blocking for the deck post anchor fasteners to drive and anchor into. If there is not this substructure beneath, attach some yourself between the deck joists.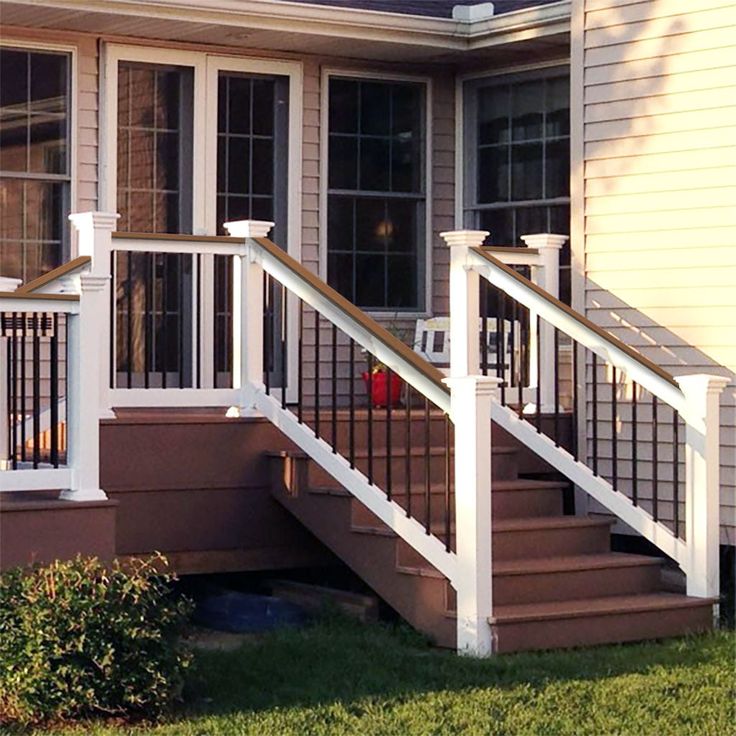
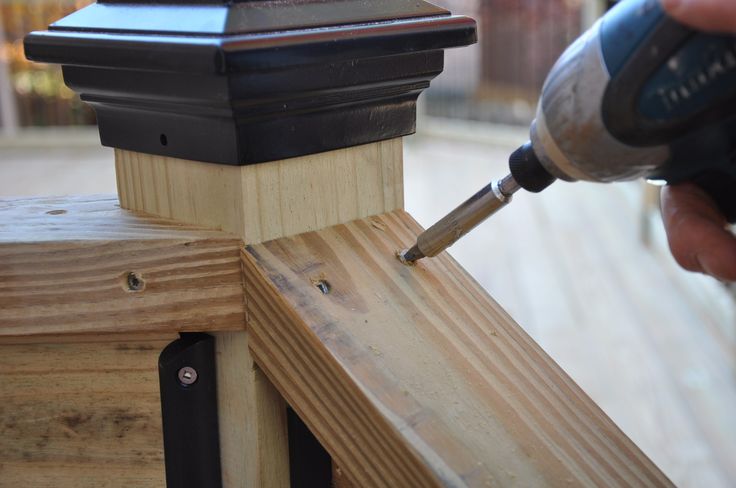
To mount your 4x4 deck post or 6x6 deck post, use a Post Base Anchor or Post Base Kit to firmly and securely attach the post to the deck and substructure. Watch these two quick videos to see how to attach deck posts to the deck surface in minutes.
3. Measure and cut deck rails to fit railing sections
Stretch the tape measure tightly between the center of one railing post, to the other, and note down the distance. With these measurements in hand, mark and trim your 2x4 or 4x4 railing lumber to size. Set the coordinating top and bottom rails side-by-side.
4. Attach deck baluster connectors to the top and bottom rails
Mark the center of the top and bottom rails, and then mark every 4-1/2 inches moving outward from the center of the deck rails. This is the standard spacing for deck balusters throughout the United States as there cannot be an opening of 4 inches anywhere within a railing section.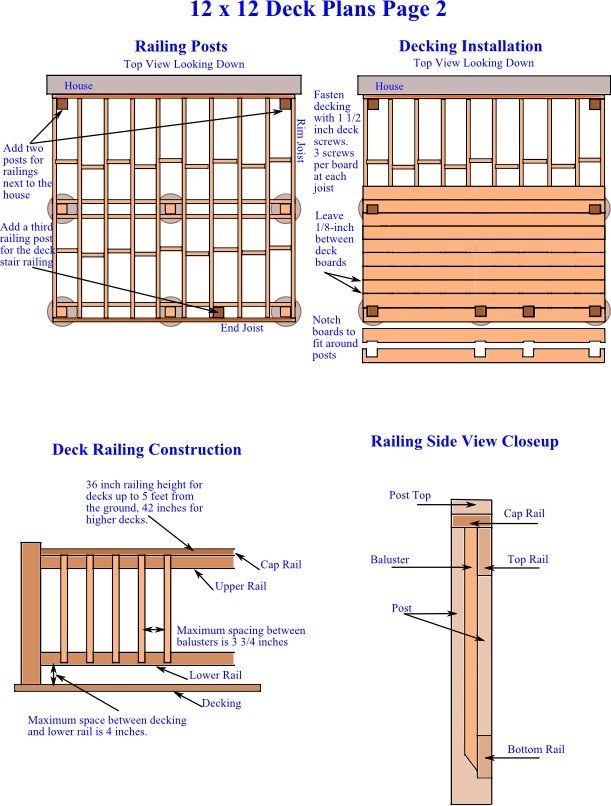
Continue this method for all top and bottom rail sections for your deck.
On these marks, use a drill to attach baluster connectors securely to the deck railing material.
If you would like a more specific deck baluster spacing to work with your deck's exact measurements, check out our helpful "How to Find Your Baluster Count and Spacing" video below.
5.Attach the bottom rail between deck posts with a deck rail connector
Secure the bottom rail to the posts using a deck rail bracket or a level rail connector. Use two spare pieces of wood to support the bottom rail up to the height you want it to be while attaching.
6. Slide deck balusters over the bottom rail baluster connectors
Push down each baluster to ensure it is seated fully on each connector.
7. Place and attach top deck rail
Starting from one end, feed each deck baluster over its coordinating baluster connector.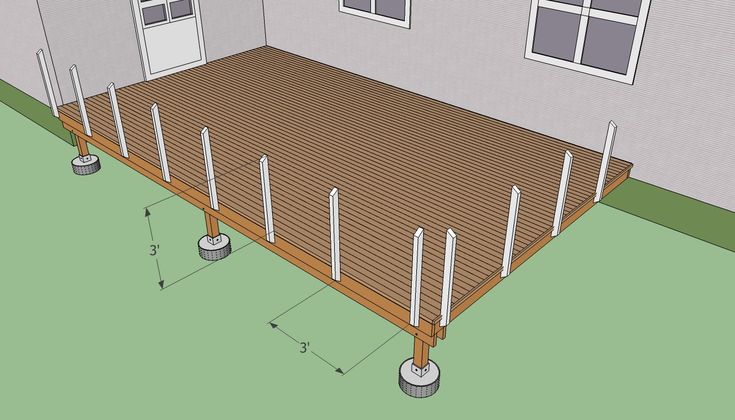 When finished, lightly tap the top rail down in place via your fist or a rubber mallet.
Inspect the finished railing and secure top rail with two deck rail brackets. For additional support and decor, add a cap rail on top for a finished look.
For more in-depth deck framing and building information, read our Decks 101: Deck Framing Guide to become a true deck construction pro and wow your family, friends and guests these spring and summer seasons ahead!
Or skip the hassle and worry of DIY deck railing installation and look into a new metal or composite deck railing system! Whether you're looking at a brand new start or a fresh end-of-season deck renovation, give our deck designers a call at 1-888-824-5316 or send us an email at [email protected]. Our deck experts will help you get the information, products, and tools you need for a gorgeous deck that you created and designed!
How To Install 4x4 Deck Railing Posts
510shares
- Share
- Pin
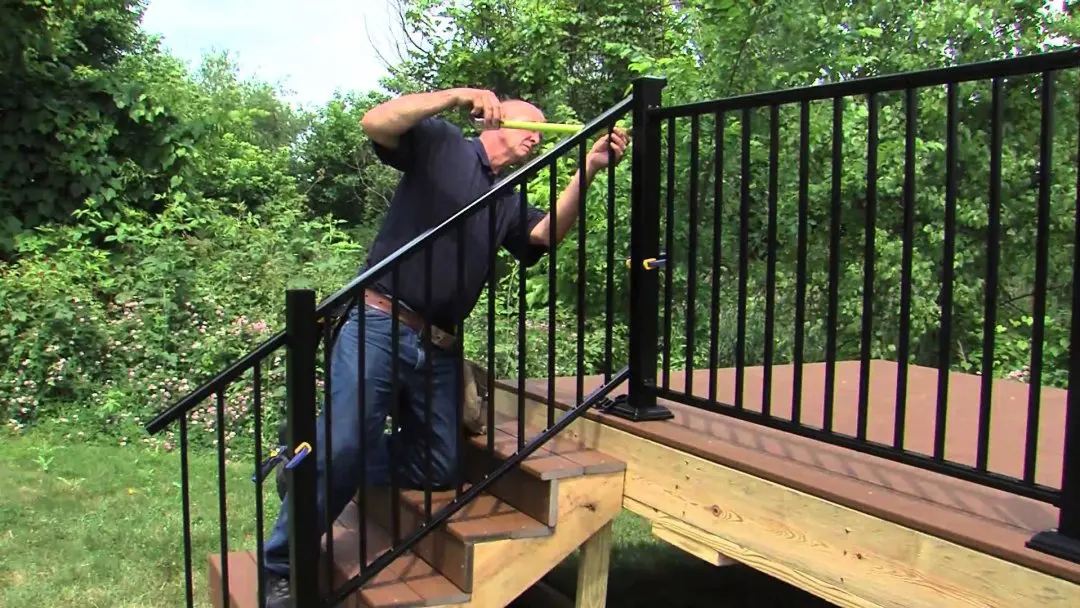
The installation of railing posts is often the lead up to completing a deck project.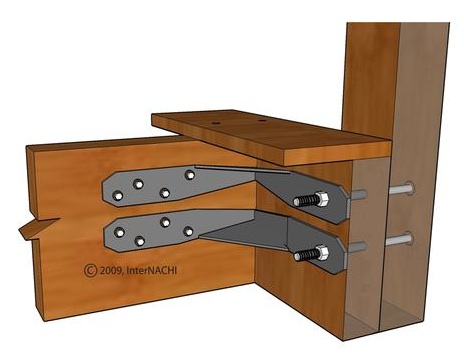 The posts must meet Code requirements for height, spacing, strength, and even fasteners. It is important to understand how to install deck railing posts, so your deck is safe for all who use it.
Deck railing posts are spaced to meet Code and design. They are secured to the framework with approved hardware and blocking or to the decking with surface-mounted post bases. Railing posts must withstand a minimum of 200-pounds of pressure applied to the top of the post or railing.
In this guide, we’ll take a look at Building Code requirements, different ways to install railing posts, look at a selection of fasteners, and explain the common installation methods. Our hope is that by the end of the read, you’ll have a better understanding of how railing posts should be installed and which method is best for you.
Quick Navigation
- Deck Railing Code Requirements
- Deck Post Installation Options
- Notching
- Anchors
- Bolts with Blocking
- Surface Mounted Post Anchors
- How to Install Deck Railing Posts
- Planning
- Deck Layout
- Planning Post Placement
- Decide on Post Spacing and Posts Height
- Tools and Materials
- How to Install Deck Railing Posts Inside of the Deck Frame
- Installing Deck Railing Posts on Outside of Deck
- Installing Deck Railing Posts Corners
- How to Install Deck Stair Railing Posts
- How to Install Deck Railing Posts on Top of the Existing Deck
- Conclusion
Deck Railing Code Requirements
Deck railings come in hundreds of different styles and finishes, but all must meet code requirements for safety.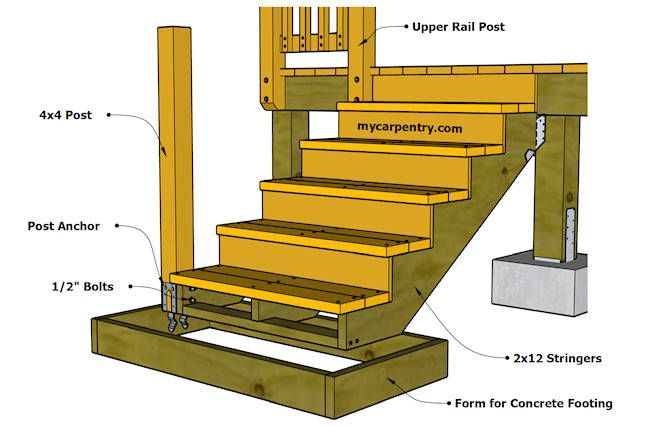 The International Residential Building Code (IRC) provides minimum guidelines for most construction projects and is the basis for many national and local Codes.
For example, in the USA, railing heights must be 36” above the decking if the deck is 30” above grade. In Canada, the railing must be 36” high if the deck is 23-5/8” to 71” above grade, and 42” if it’s higher than 71” off the ground.
It should be noted, however, that there are different areas within each country that may have more stringent requirements, so it is important to check with your local building department. California is a case in point; it requires the minimum deck railing height to be 42” above the deck surface if the deck is 30” above grade.
Deck railing posts have a maximum spacing of 6-feet for 4×4 posts and 8-feet for 6x6s but the railing will be stronger if the posts are closer together. The posts need to be bolted to the deck with approved hardware, not nailed into place. Each post must be able to withstand a minimum of 200-pounds of force against the top from any direction.
There is currently a discussion in some localities, though, that posts need to meet a safety factor of 500-pounds of force. Notched 4×4 railing posts fastened to the deck rim may not support that weight and could be unacceptable in your area even though it may have been in the past, so check before you build.
Deck Post Installation Options
There are many deck configurations that affect how railing posts can be installed. Posts are commonly notched and fastened to the rim and end joists, bolted to joists and blocking, secured with anchors, or attached to the deck surface.
Notching
Cutting a notch in the base of the railing post allows it to rest on the decking and fasten directly to the rim or end joist. This will minimize the intrusion of the railing into the deck and allows the railing to be added after the decking is done. Notching 4x4s is not acceptable in some areas, however, as it weakens the post – notching 6x6s may be permitted, though.
Anchors
Fastening posts to the rim joist may require the use of extra hardware to transfer forces against the post to other parts of the deck structure. Rim joists are a weak point since they attach to the end grain of other joists with nails or screws. Forces applied against the top of the railing post act as a lever and can rip the rim out of the joist ends; hence, this practice may have additional requirements.
The use of engineered anchors transfers forces against the post to the joists making for a stronger, more secure railing. Anchors add to the cost and must be installed correctly which also adds to structural requirements for posts fastened to end joists. They can be installed after the decking is down, but it is easier to do beforehand. Corner posts may also require two anchors to ensure they are secure against all possible forces.
Bolts with Blocking
Using 4×4 blocks and approved bolts to secure posts makes for a more secure railing. The blocks are bolted to both the joist and the post, providing a more rigid connection. However, additional 2x full-depth blocking may need to be installed to facilitate the block and bolts. The connection is very strong, improving the strength of the railing connection and its safety. It does require more blocking and bolts, adding to the cost and time, and must be done before the decking is down
Surface Mounted Post Anchors
Surface mount anchors are fastened to the finished deck. There are numerous products available and must be installed following the manufacturer’s instructions with approved hardware. The anchors fasten to the finished surface of the deck and often through it into joists and blocking.
The railing posts are attached to the anchors either prior to or after the anchors are secured. Surface-mounted anchors are costly but provide a reinforced base for the post and connect in such a way that they meet or exceed Code requirements. They are easier and quicker to install than other methods, attach to any surface, last longer, and provide a greater range of flexibility for design.
How to Install Deck Railing Posts
Installing deck railing posts often begins before the deck is begun. Determining the type of materials and the finished look helps to identify the way posts will secure to the deck structure, and where. That way necessary reinforcing is built in place and doesn’t need to be added as an afterthought.
Planning
The planning stage is the best time to determine the type, style, and look of the railing desired for a deck. The dimensions of the deck and height off the ground, privacy barriers, and the location of stairs or access points are important considerations as they affect the placement of the railing posts. This is also the time to check out building code requirements and any homeowner association regulations for your area.
Deck Layout
The frame of the deck, including posts, beams, joists, blocking, and any other structural members are part of the deck layout. Whether computer-assisted or paper and pencil designed, layout the deck. Identify perimeter dimensions and locate where access points will be. Privacy barriers and shelters on the deck that are part of the perimeter may be an extension of the railing structure layout too.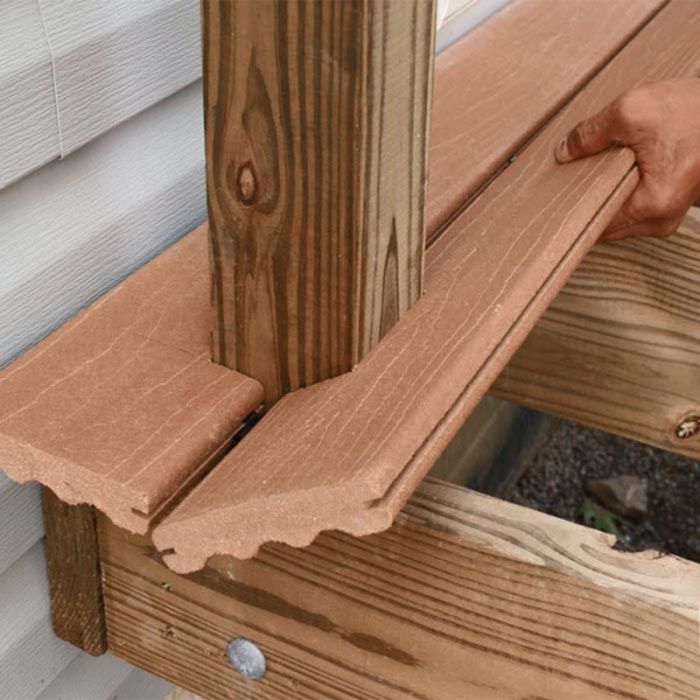
Planning Post Placement
With the layout developed, identify where railing posts need to go – 4x4s max at 6ft spacing and 6x6s at 8ft. Locate where openings for stairs will be and mark those post placements. Measure the perimeter of the deck and divide the space into even parts to determine the post location.
Determine if the posts will mount to the perimeter or be set in 2” to 4” or more. Decide if the posts next to the building will attach to the structure or if there will be 2” gap for a paintbrush.
Decide on Post Spacing and Posts Height
The railing posts may all be evenly spaced, or the design may call for different gaps between some. Decide on the look and identify where posts need to be. Identifying railing post spacing is helpful in projecting material costs for posts and additional hardware or timber.
Set the height of the railing to meet Code minimums, and then determine if the railing height obstructs views from a seated height. Raising the railing height 6” may make all the difference. If the post will support privacy barriers or other structures, decide on their heights too.
Tools and Materials
As with any project, identify and gather the tools and materials needed for the task beforehand. It will prevent time-wasting runs to the hardware or lumber store, and much frustration. It’s all part of planning and preparation. Tools commonly include:
- Pencil (or three)
- Tape Measure
- 48-Inch Level
- Circular Saw or Miter Saw
- Drill and Impact Driver Combo Kit
- Long bit sized for fasteners, driver bits, clamps, hammer, wrench, and maybe a chisel.
Some anchors may require other specialized tools that may need to be purchased.
The materials will depend on the type of posts being installed. Cedar or pressure-treated 4x4s or 6x6s, square or round metal tubing, anchors, bolts, nuts, washers, structural screws, and dimensional lumber for blocking or reinforcing. There may be other materials needed depending on the type of posts and installation method.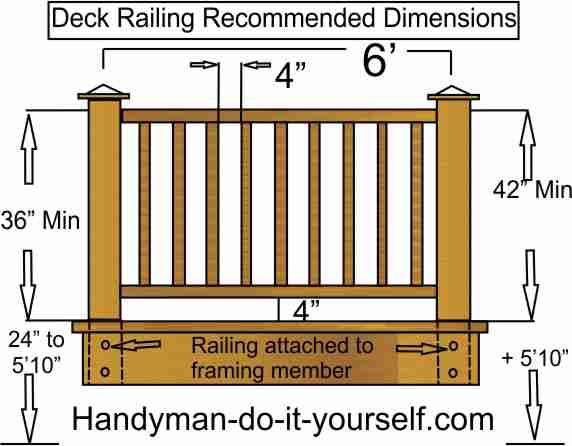
How to Install Deck Railing Posts Inside of the Deck Frame
There are several ways to install railing posts inside the rim and end joist frame. The most common utilize carriage bolts and blocking or engineered holdown brackets and blocking with carriage bolts.
With Deck Post Holdown
Simpson Strong-Tie and a few other manufacturers make galvanized or treated deck post holdown connectors engineered to counter the forces applied to posts and meet Code requirements. The connectors fasten to ½” diameter bolts or threaded rods run through the framing and post. It also attaches to structural members or blocking with eight 1/4”x1-1/2” treated screws.
The aim is to transfer the load from the rim or end joist and share it with other structural members. Thus preventing force applied to the post from levering the rim joist away from the deck and causing an accident.
The connector commonly attaches to the top bolt or threaded rod driven through the rim or end joist and post, while the lower bolt receives a washer and nut. The top bolt is usually 2” below the top of the board. On a rim joist connection, the connector attaches to the side of a joist. With the end joist, blocking is needed to connect the end joist with the one parallel to it.
An additional connector is used to solidify the connection between joists. Additional blocking may also be required if posts don’t line up with joists at the rim. The use of holdowns minimizes the amount of fastening hardware visible on the deck perimeter.
With Carriage Bolts
Sandwiching the railing post between the rim joist and full-depth 2X blocking is another way to transfer and reinforce a railing. The three members are connected with two 1/2″ diameter galvanized carriage bolts. To meet Code in most localities, the rim joist and blocking must be fastened to the joists with 1/2″ lag screws or structural screws like LedgerLoks.
This method works whether the post is beside a joist or between two. Posts on the end joist will require more blocking to frame the post properly.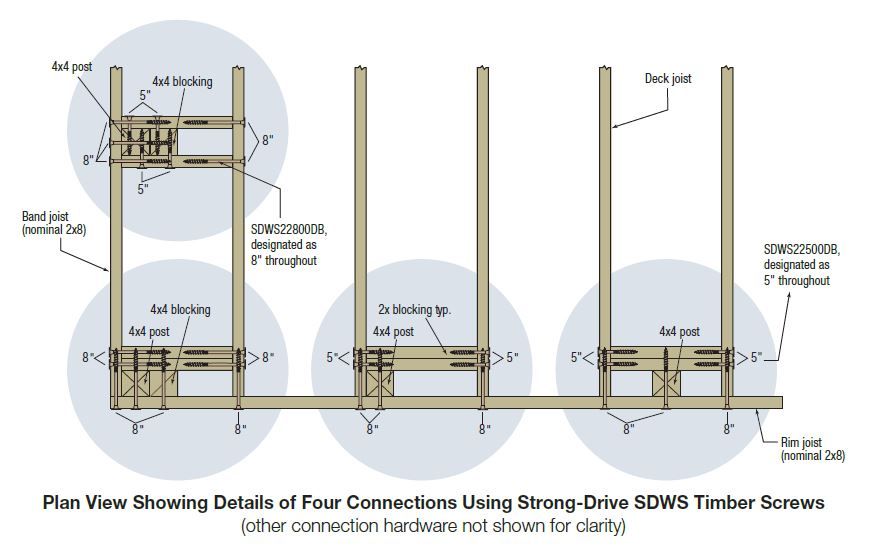
Installing Deck Railing Posts on Outside of Deck
Fastening posts to the outside of the rim or end joist requires additional blocking and Deck Post Holdowns to counter stress forces. Where the post is near a joist end, the holdown fastens to the joist, and to the top 1/2″ bolt run through the post and rim joist.
Additional blocking is required if the post falls between two joists. Attaching posts to the end joist requires blocking to connect the next parallel joist and two holdowns to secure the connection.
Installing Deck Railing Posts Corners
Corner railing posts may be mounted inside or outside the rim and end joists, it’s all a matter of blocking, brackets, and structural fasteners. Whether installing one post on the inside where the rim and end joist meet, or two posts to frame the corner, the posts must meet multi-directional force requirements.
An inside corner post needs to be blocked and bolted in both directions. One method is to run blocking parallel to the rim joist that sandwiches the post base and uses two holdowns – one fastens to the blocking with a bolt through the end joist and post, and the other to the end joist on a bolt run through the rim joist, post, and blocking. Bolts and brackets will also need to be offset about 1/2 an inch.
Outside corner posts need additional blocking to reinforce the inside corner. Bolts through the post, rim or end joist and blocking fasten to a holdown which is secured to the rim or end joist. This method also works if two posts are attached at the corner, one to the rim and one to the end joist. Offset the bolts to avoid them conflicting with each other.
How to Install Deck Stair Railing Posts
Placement and installation of the stair railing post on the deck is similar to securing other posts. Fastening the bottom stair railing post also requires it to be secured to the base. The bottom of the stair often rests on a concrete pad, sidewalk, or pilings. A common practice is to use two 1/2″ bolts to fasten the bottom railing post to the end of the stair stringer or the bottom riser board, or add two bolts and fasten it to both.
Another method is to anchor the base of the post into the concrete and fasten it with two 1/2″ bolts to the stringer.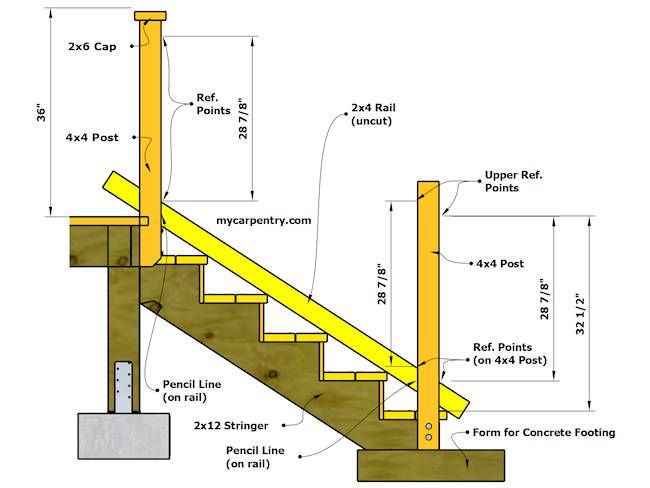 The galvanized steel anchor may be set in the concrete at the time of the pour, or installed after it cures. Simpson Strong-Tie has an adjustable post base that works well for both methods.
Made of heavy, 16-gauge galvanized steel it raises the 4×4 post 1” off the concrete to prevent moisture damage. The bracket attaches to the concrete with a 1/2″ diameter bolt, and to the post with six 10d hex-head drive galvanized screws to provide a solid, secure base for the post.
How to Install Deck Railing Posts on Top of the Existing Deck
Installing railing posts to the top of the deck boards is done using surface mounted post anchors. Different manufacturers offer bases for railing posts that attach to the deck boards or through the boards to blocking or joists under the decking.
The railing posts must still meet Code requirements for the pressure applied to the top of the railing, so make sure to follow the manufacturer’s instructions.
Post bases are commonly made of powder-coated or enameled galvanized steel or paintable high-strength nylon or plastic. They are available for 4×4, 6×6, and even 8×8 posts; however, some have restrictions on the height of the post it can support.
The base mounts to the decking using lag screws, bolts, tap-cons, or engineered screws.
Most bases also raise the post off the surface, helping to protect it from moisture. Some anchor bases are adjustable for slight deviations in post dimensions, while others require posts to be trimmed or sanded to fit.
Conclusion
Installing deck railing posts to meet Code safety requirements is important to prevent injury. Posts can be fastened during deck construction to transfer and share forces applied to the railing and post for a more secure attachment.
Alternatively, railing posts may be mounted to the decking using manufactured post bases. Whichever method you use, follow the manufacturer’s instructions, and use the appropriate hardware and fasteners.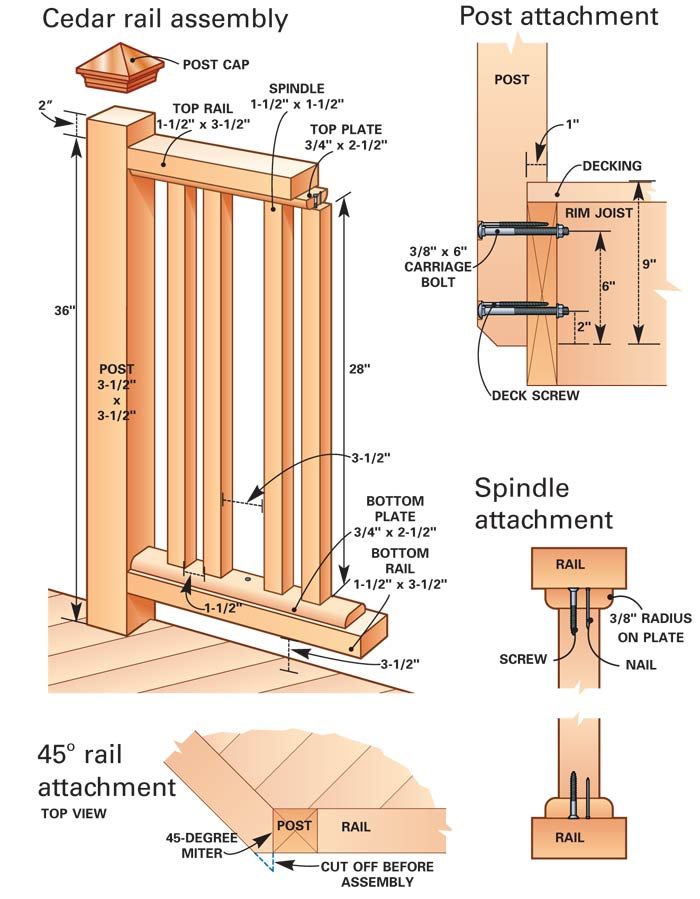
I hope you have a better understanding of how to attach railing posts, so they are secure and safe. If you found this guide helpful, please share it with others. As always, your comments and suggestions are appreciated.
Eugene Sokol
Eugene has been a DIY enthusiast for most of his life and loves being creative while inspiring creativity in others. He is passionately interested in home improvement, renovation and woodworking.
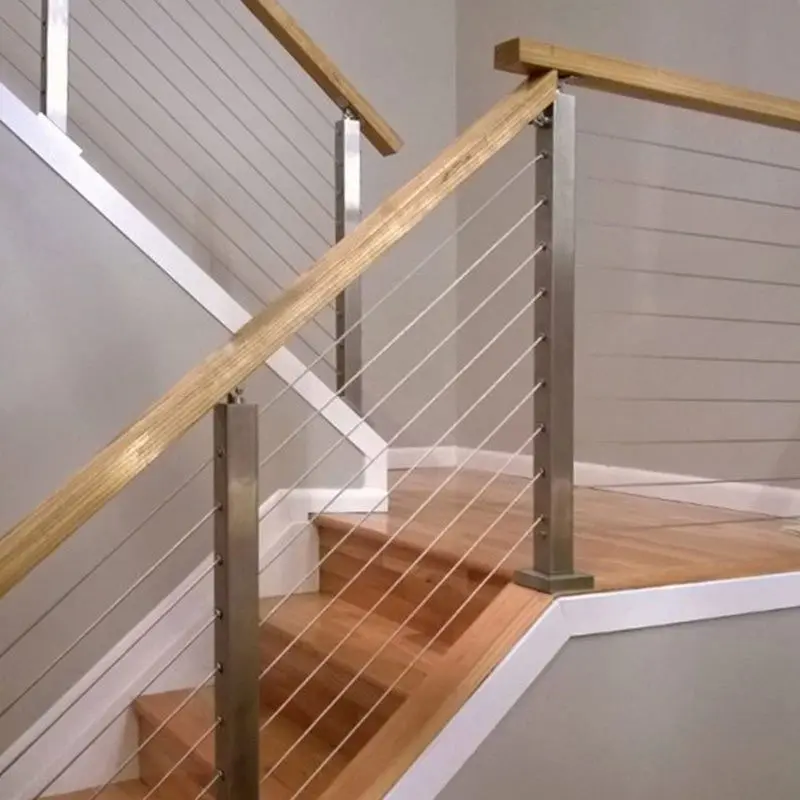
Terrace railings, options and basic nuances - sdelayzabor.ru
admin 0 comments
Contents
- 1 Purpose of the terrace railing
- 2 What is the building envelope?
- 3 Requirements for the manufacture of deck railings
- 4 Selection of materials for timber construction
- 4.1 Soft woods
- 4.2 Hardwoods
- 5 Do-it-yourself installation of wooden railings
- 6 Installation of metal railings on the terrace
Terraces in a country house are designed primarily for comfortable pastime. Such an extension is not only an additional resting place, but also decorates the exterior of the house with its appearance. For safety, the terraces are fenced with railings. A special charm is created if such a railing is made of wood. Below we will consider how to make a terrace fence with your own hands, what materials are better to use, what nuances need to be taken into account in the process of performing work.
Purpose of the terrace railing
Several purposes of the railing can be listed:
- Decoration of the building and the entire area. The railing for the terrace made of wood looks especially impressive.
- Ensuring the safety of people. The railing will not allow a person to fall if he suddenly loses his balance. If there are children in the house, then the relevance of this approach will be even higher.
- Increasing the level of comfort and coziness. Agree that being on a fenced area is much more pleasant.
- The fence complements the house, makes a single composition with it.
- The sturdy railing can act as a backrest if you lean on it while relaxing.
- Such a platform can be a place for placing flower arrangements or any other elements of the interior of the estate.
What is a building envelope?
The railing on the veranda or on the terrace is a combination of several elements:
- Bearing posts. Usually they, like all other elements, are made of wood. Pillars can have a different section, thickness, shape. The height of the pillars can also be different. If there is a canopy above the terrace, then the pillars are the supports for this canopy. It is on the pillars that the primary attention is drawn when looking at the fence.
- Handrails made of wood or other material. These are the upper parts of the railing, located in a horizontal plane. They can be made narrow or wide. In the latter case, it will be possible to place flowers or any other objects on the handrails.
- Vertical protection sections or individual balusters. Their shape can be completely different.
- Additional planks connecting vertical balusters.
Requirements for the manufacture of terrace railings
There are several mandatory standards to ensure the safety of people on structures such as terraces and open verandas:
- The railing on the terrace must withstand a load of at least 100 kg. This is necessary so that even a person of solid build can freely rely on them. All load-bearing elements must be securely fastened to the floor.
- Handrails must be free of burrs. They must be polished to perfection.
- The height of the railing must be at least 50 cm. It is better if the railing is 1 m high.
- The distance between adjacent balusters should not exceed 15 cm. This is all the more important if small children live or visit the house.
Choice of materials for wood construction
Handrails are most often made of wood.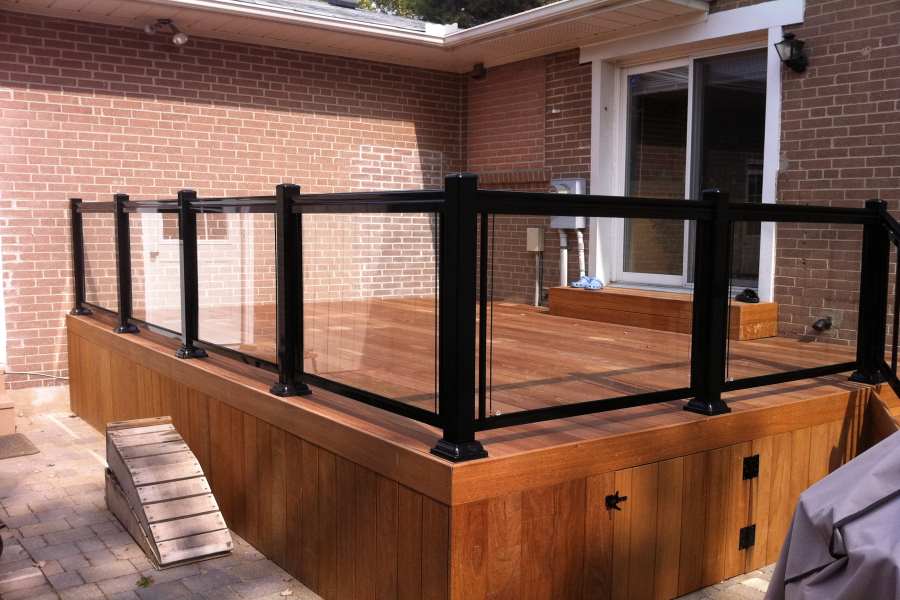 However, cases of using forged elements and wood-polymer composite material are not uncommon.
When choosing wood for a railing, you should be guided by your financial capabilities and the availability of one or another type of wood. Usually both soft and hard woods are used. Soft types are easy to process, have a low cost. Hard rocks resist moisture well, are considered more durable. We list the most popular of them:
Softwood
- Pine. Inexpensive material, well processed. Requires moisture protection.
- Spruce. Before its use, heat treatment of wood is carried out. Otherwise, the material will not last long.
- Larch. Its structure contains natural antiseptics, so it does not need additional impregnations.
Hardwood
- Oak. Durable and weather resistant.
- White fir. It is well processed, unlike oak, but it is practically not inferior in strength.
- Ash. Over time, the air loses its density due to moisture and ultraviolet radiation.
But birch, linden, alder and maple are undesirable for creating open fences. High humidity affects their structure, which is why they can quickly warp.
Do-it-yourself wooden railing installation nuances
Usually, all fencing elements are made on woodworking machines or purchased ready-made. Before installation, they are treated with impregnations. If you need to make the wood darker or give it some shade, use stain. The order of work will be as follows:
1. Preparation of project documentation. A detailed drawing, which will indicate all the elements of the future design with dimensions, can significantly facilitate and speed up the construction process.
2. Floor preparation. It can be made from boards, parquet boards or other materials. In some cases, wooden flooring is laid on a concrete base. Or only a stone or concrete floor is used.
3. Marking for the installation of support poles is being made.
4. Drill holes of the required diameter for the anchor bolts.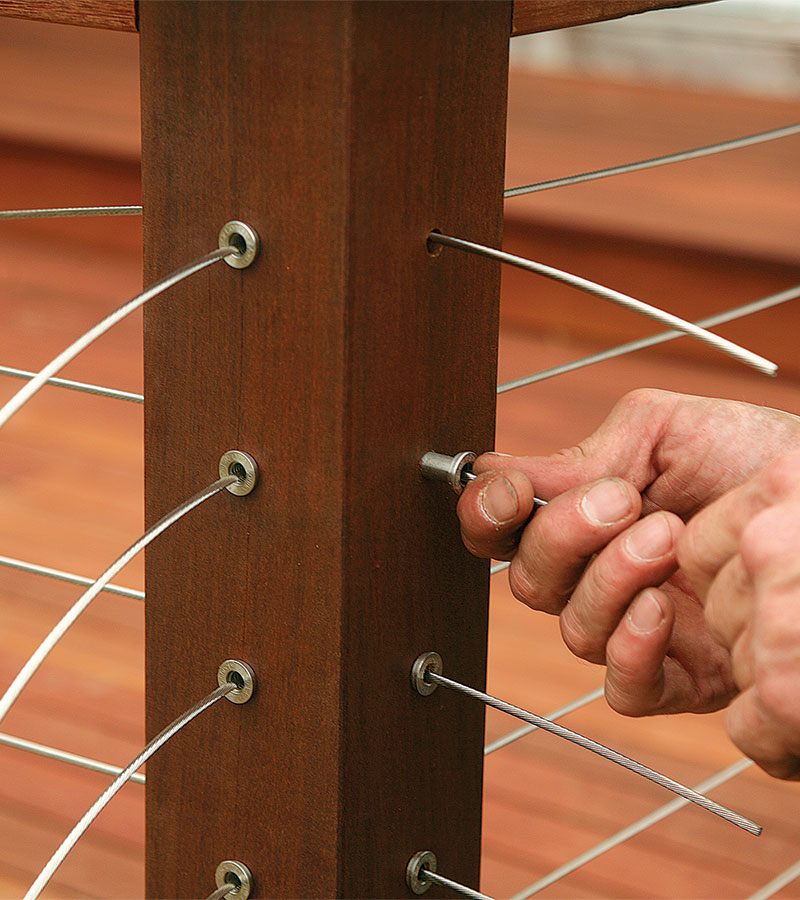
5. Support posts are mounted on the floor using anchors with threaded studs. First, corner supports are installed, and only then - internal pillars. The distance between the posts is 1.5 m.
6. A railing is installed over the supporting posts. They are attached to the poles with self-tapping screws, bolts or strong glue. It is better to use several types of fasteners at once to ensure the safety of the structure. At the same time, fasteners should not be conspicuous or create any difficulties.
7. Barrier sections or balusters are being installed. In some cases, additional horizontal slats are used to improve the aesthetics of the fence.
8. If there are gaps in the structure, they are filled with mounting foam. After hardening, dry foam is cut off, and these areas are covered with decorative strips.
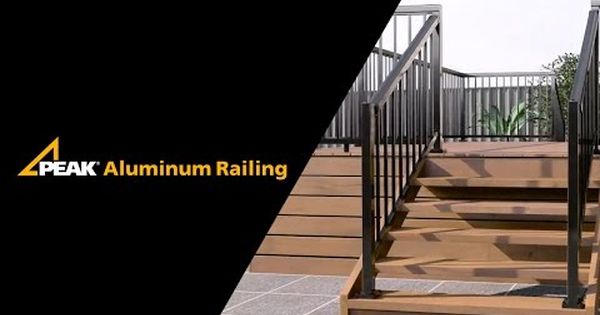
Installation of metal railings on the terrace
Often your house is decorated with a terrace with wrought iron railings. They emphasize the style of the building and site, are not afraid of precipitation and temperature changes, are more durable and strong. Such fences can be made from different materials:
- Aluminum structures. They are distinguished by their low weight, resistance to any influences, lack of care.
- Wrought iron railings attract with a variety of designs, unusual shapes, and their luxury. They are famous for their durability and originality.
- Stainless steel railings attract with their unsurpassed appearance. Resistant to all types of influences, durable.
The installation of metal fences consists of several stages:
- Marking the floor of the terrace with the designation of the places for the installation of metal supports.
- Installation of supporting posts. Metal poles are attached to the floor with bolts or anchors. The welding method is also sometimes used if metal embedded elements are prepared on the floor.
- When all supports are fixed to the floor, the handrails are attached.
- Installing the metal sections between the supports.
- Additional processing of the finished fence is carried out, if necessary.
The choice of material for the construction of the terrace railing depends on your preferences and possibilities. Wooden railings will provide maximum naturalness and environmental friendliness of the design. Polymer composite will add durability to the fence. Metal railings will decorate your terrace in a peculiar way, being the embodiment of reliability and constancy.
Share this post
Random entries
Popular entries
© Copyright 2020 sdelayzabor.ru · everything about fences and other types of fencing in one place. All rights to the content of materials published on the site sdelayzbor.ru are protected in accordance with Russian and international copyright and related rights laws. The use of site materials is allowed only if a direct backlink is provided. 12+
Do-it-yourself terrace railing
This article will look at various types of terrace railing materials, give practical advice on planning and construction. We will also consider the most convenient and effective methods for caring for a terrace railing and make wooden railings with our own hands.
Do you need a railing on the terrace?
The terrace itself is an open area, located next to the house or separately from it. Fences on it perform both aesthetic and protective functions. Not on every terrace they will be justified - for them there are a number of requirements that it is desirable to comply with.
- First of all, the need for a fence on a veranda or terrace is affected by height. A careless fall from a building with a height of more than 500 mm can lead to serious injuries that adversely affect the future health of a person.
 If the terrace is below 400mm, then you can do without fences.
Separately, we can say about the fence on cliffs and strong slopes - in this case, it is necessary for safety reasons and their planning should be carried out during the initial planning of the terrace.
- In addition, the size of the terrace is an important factor. On a small building less than 4 sq.m. railings will rather interfere - they will cut an already small area, making use inconvenient.
- Another factor is the stability of the foundation. If the construction is planned on a light foundation, then it will be impossible to erect brick or stone railings on it without additional strengthening - they have a large mass and the foundation may not withstand.
In general, the question of whether a terrace fence is needed is best answered on your own - it depends on aesthetic preferences, size and height of the structure. When planning, it is better to develop several terrace projects for the house with your own hands - a photo of which option is best.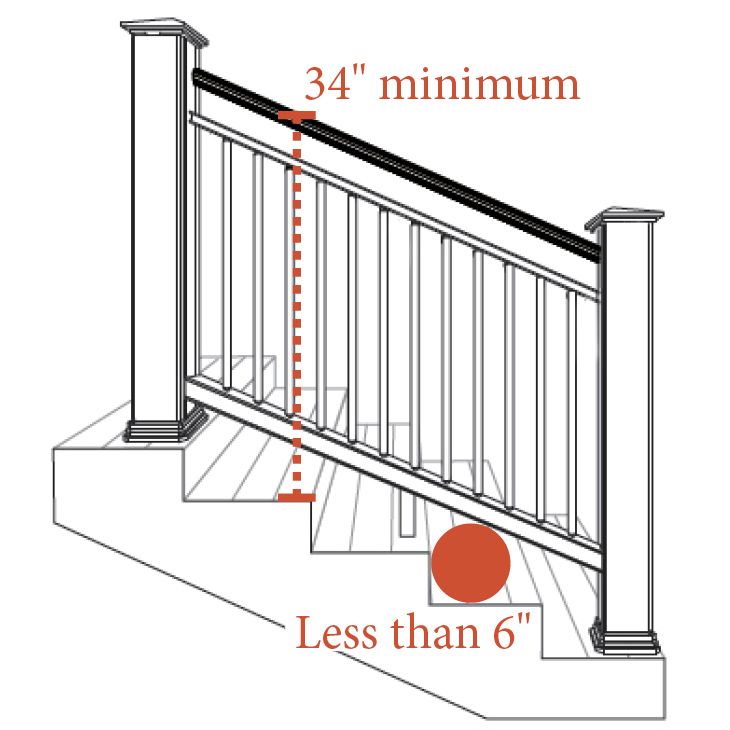
How high should the railing on the terrace be?
If you still decide to make a fence for the terrace, then you need to decide on its height. When choosing the height of the railing, it is necessary to build on:
- average person;
- terrace height.
The average human height is 1.7m. The fence should perform a restrictive and protective function, therefore, it is most logical to make it of such a height that it would be difficult for a person to simply fall through it. The most optimal height of the railing on the terrace will be 1-1.2 m, but for low structures this figure can be reduced due to their low traumatic risk.
Fences that are too low can be a big hazard - it will be easy to stumble over them, so it is best to follow the lower logical threshold of 0.8 m for the terrace fence height.
The height affects the security requirements - the higher it is, the more strength and height of the fence will be required.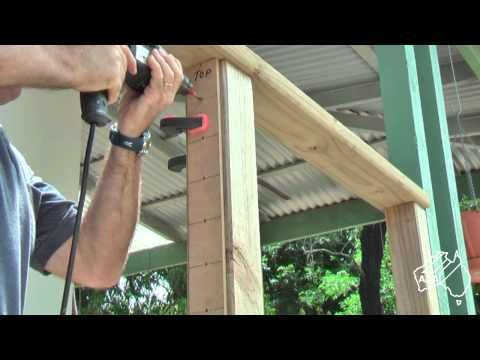 For example, if your building is located at a height of 4-5 m from the ground, it is worth making a railing for the terrace at least 1.2 m, since a fall can end extremely tragically.
Terrace railing options
Railings are currently made from a wide variety of materials. This article will consider options for fencing a terrace from the most practical materials that will not fail and will not require additional investments. These include:
- wood and WPC;
- metal;
- PVC.
wooden terrace railings
wooden terrace railings are one of the most common and easy to build. Since today “wood” is a very broad concept, for the construction of railings, we can distinguish:
- wood-polymer composite;
- solid wood.
You can also use curtains on the terrace in the country house as a fence.
Wood-polymer composite is the most modern type of wood-based materials. WPC terrace fences are made from a mixture of polymer fibers with the addition of wood dust or granules. The result is a material that is extremely similar to wood, which has water-repellent and, at the same time, breathable properties.
A large number of different WPC materials with different textures and sizes can be found on sale. WPC finds its greatest use in the creation of flooring, but it is also great for railings - it does not need to be painted and does not require maintenance from you.
Beams and boards made of solid wood are the most ancient material for the manufacture of various buildings. Since wooden terrace fences are not exposed to a lot of dirt and moisture, they retain their appearance for quite a long time and do not require special care.
Terrace stair railingWooden terrace railings can be used with any wood, from pine to oak, everything depends on the price and appearance. Maple should be avoided - under the influence of the sun and moisture, it can deform, ruining the railing.
Metal railing
Metal is great for railings. Today on the market you can buy both individual pipes and profiles, and purchase ready-made metal railings for the terrace. The second option is the most popular, because it provides a ready-to-use solution.
From materials, preference can be given to both a tetrahedral metal profile and metal pipes. Unfortunately, both options require a welding machine and the ability to use it, but allow you to go beyond creative solutions.
Wrought iron railings for the terrace are also available. Such a product is quite expensive, however, is a real work of art. Forged railings are made to order according to the developed drawings and sketches, and are sold ready-made, in the form of standard solutions.
If there is no welding machine and it is not possible to purchase it, you can use the options with fixing with corners using self-tapping screws or a nut connection, however, it has much less strength and security.
When choosing a material, chrome-plated versions or stainless steel profiles and pipes should be preferred.
Otherwise, fences for a metal terrace must be constantly tinted to avoid the development of corrosion.
Metal railings allow you to combine different materials without much difficulty - for example, you can insert glass sheets into the railing, which will create a progressive terrace style.
PVC railing
Plastic terrace railing is the cheapest, but not always unsightly material. There are many varieties of plastic on the market, but the most common is polyvinyl chloride.
Plastic deck railingsPlastic railings sold:
- ready to install railings;
- separate materials.
The main advantage of ready-made solutions is ease of installation, but they do not require a special variety of fences and are often standard designs. Ordering railings according to individual projects can be considered another option, but their cost increases significantly.
It is not always easy to assemble the railing from individual PVC plates and poles - you will need a special soldering iron that will solder the parts firmly.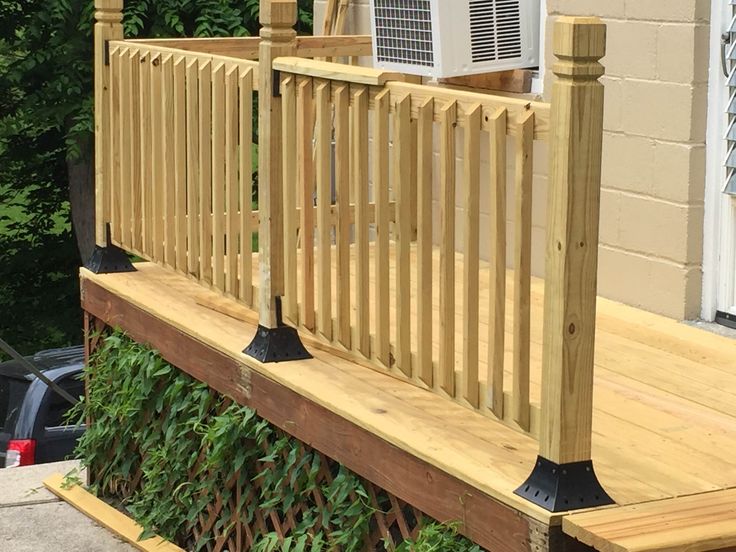 The material itself is easily sawn and cut with an ordinary knife, but for strong fences it is sometimes necessary to assemble a frame from metal rods.
Types of balusters
Balusters are low posts that support a railing. The materials of manufacture for them are the most diverse - from wood to plastic, and the forms allow you to create any design of the terrace.
The most common types of balusters are:
- straight;
- round;
- carved.
Straight and round are ordinary segments, usually bars of various materials, on which the fences are located. They are made from the same material as the railing. Carved ones are prepared separately - with the help of various tools they are shaped, as a rule, the same along the entire perimeter of the fence.
Railings can also be made without balusters – gaps between individual posts are covered with polycarbonate, glass or plywood. It is also common to cover the outer side of the fence with clapboard and other weather-resistant finishing materials.
DIY Wooden Terrace Railing
This chapter will look at an example of how to make a wooden terrace railing with your own hands using timber and boards.
Timber and boards must be sanded and polished. Of the tools you need a miter saw or a hacksaw, as well as a screwdriver.
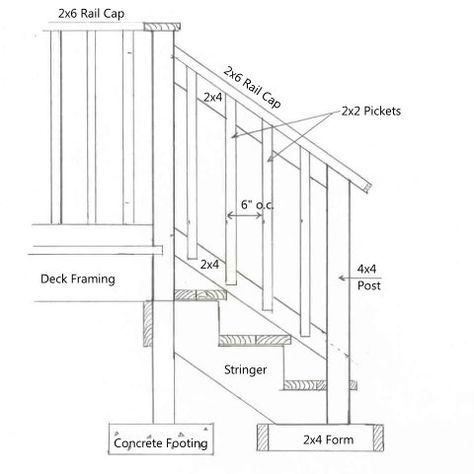
Planning
The basis of the railing will be posts made of timber, on which a board 40x100mm will be screwed on top. One span of this fence will be equal to 1680mm (excluding stobbles), height - 1200mm. Poles - 200 mm wide. In the spans there will be wooden balusters for the terrace 80x20mm, at a distance of 80mm from each other and from the supports.
In the planning process, all dimensions must be taken into account - otherwise there is a risk of missing the mark and getting either a shortage of material or large costs on the surplus.
The process of preparing and assembling the railing for the terrace
- Beforehand, all the materials for the fence on the terrace are cut by hand to the required dimensions.
 For 1 span - a board 40x100x2080mm (including pillars), beams for pillars 200x100x1200mm, balusters 80x20x1200mm (10 pcs). When sawing, it is important to observe the dimensions - the saw blade takes about 1 mm from the total length.
 - After complete sawing, it is necessary to process all the resulting material - cover it with impregnation or stain, since the joints cannot be processed after assembly.
- Assembly begins with fixing the bars. The location can be arbitrary - both along the edge of the terrace, and indented.
- The beams are fixed with self-tapping screws 100-120mm long. They are screwed at an angle of 45 degrees, through the beam into the floor. It is desirable to fix it on at least two sides, aligning it with the future crossbar.
- After fixing all the posts, you need to place the crossbar. It is simply screwed on top of the pillars by 3-4 self-tapping screws through the board. For accuracy, it is desirable to drill holes in advance. So there will be less risk of passing by the post, damaging the surface.

- The terrace balusters are then fixed. The most convenient way to do this is with the help of squares and self-tapping screws 10 mm long. When thickening baluster boards, you can also rotate the screws at an angle of 45 degrees, as is done with poles.
Handrail Care
Maintenance varies by material. The best solution would be to choose materials that are more resistant to decay and destruction, for example, plastic or iron, but this does not always correspond to design decisions and requirements.
Solid wood is best treated with antiseptics and varnished or stained. The stain will retain the natural texture and features of the look of the wood, while the varnish is much more durable and needs to be updated much less often. Wood deck paint is also good. If desired, the tree can be painted with ordinary paint.
It is better to cover metal with various paints for metal, for example, enamels or nitro paints. Additional protection will be the use of corrosion-resistant metals, such as stainless steel.