How to tell the ph of soil
Soil Testing: How to Test Your Garden Soil
Success in the garden starts with healthy soil. Soil—as much as water and sunlight—determines whether plants thrive or die. Getting a soil test is the best way to find out your soil pH and soil health. Learn more about how to get a soil test—plus, learn three DIY soil tests.
Why Get a Soil Test?
Your soil needs to be able to provide nutrients to plants. Otherwise, your plants just won’t grow well. Having the right soil pH (level of acidity) means your plants can take up the necessary nutrients in the soil. If your pH is too high, many nutrients such as phosphorus and iron may become less available; if your soil pH is too low, it can be toxic to plants. Without healthy soil, it is very difficult to have a successful garden.
Another reason we test the soil is because we won’t need to rely on fertilizing the soil too much. If you start with healthy soil, you won’t need so much “fixing.” Before you start dumping on the lime and fertilizers, your first step should be taking a soil sample to send off for testing.
What Will a Soil Test Measure?
A good soil test will evaluate the basic texture of your soil—sand, silt, or clay—and determine its acidity—the pH level. The available amounts of nutrients, including magnesium, calcium, phosphorus, and potassium, will be calculated and recommendations will be made for raising each to the correct levels for optimum plant growth. Armed with this knowledge, you can make the proper improvements. Too much of a good thing can be just as harmful as too little so let your soil test be your guide.
How Often Do You Do a Soil Test?
For optimum plant growth, it is recommended to test your soil pH and nutrient status every 3 to 5 years. You can take soil samples at any time of the year, with fall being preferable. That way, you can get your results and make any fixes in time for spring.
Where to Get a Soil Test
Home test kits are available at gardening centers; they are not as accurate or thorough as professional testing through your local county extension office.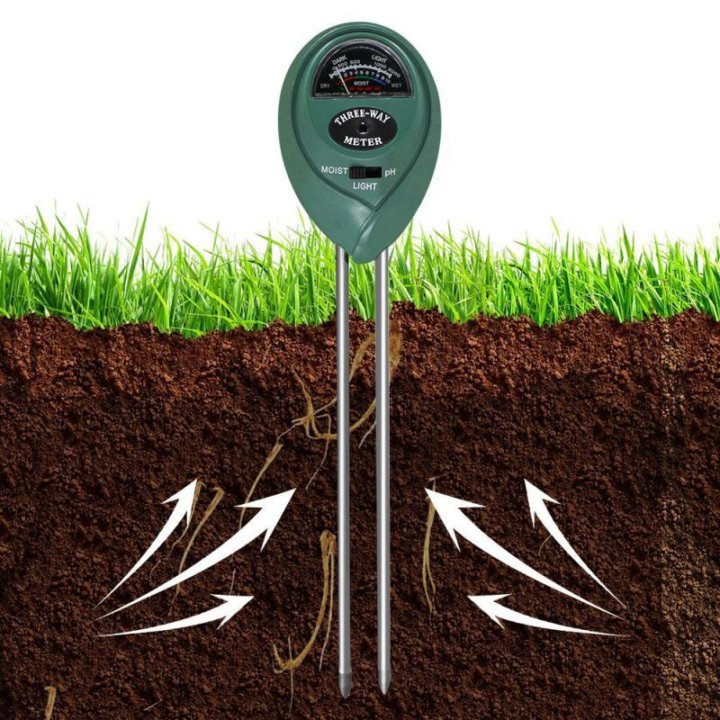 And the good news is that your county extension soil test is usually free or low cost. Here’s a list of cooperative extension services by state.
How To Take a Soil Test
- To take a representative sample, scrape away any surface litter, plant residues, leaves, etc.
- Avoid sampling in a spot where ashes have been dumped, manure or compost stored, or brush burned.
- Cut straight into the soil with a shovel or trowel 6 to 8 inches deep making a V-shaped hole.
- Cut a 1 inch wide slice of soil the length of the hole from one side. Take a 1 inch strip from the center of this slice to use in your sample.
- Repeat sampling randomly around the garden and mix the samples together in a clean glass jar or bucket. Since we use raised beds we take a slice from each bed and mix them all together.
- Measure out a cupful of soil, dry it indoors for a few days, and seal in a plastic bag with your information on it.
- Send it in with the proper forms and fees, then wait for your results!
Reading Test Results
When you get your test results, the fertilizer recommendations will be quite specific, and speak to three elements: nitrogen, phosphorus, and potassium.
- Nitrogen: N stands for nitrogen, which helps plants make leafy growth. For nitrogen, they will tell you how much manure or compost to use. If you are using fresh manure, spread it on in the fall so it can break down over the winter and be safe for spring planting. If you prefer, dried blood, alfalfa, soybean, or cottonseed meals can be substituted. Nitrogen is released quickly from them, so it is best to wait until spring to add it to your soil. Ten pounds of blood meal supplies the same amount of nitrogen as 10-20 bushels of manure, but without the added benefit of all the organic matter that manure contains.
- Phosphorus: P stands for phosphorus, which is necessary for germination, strong root growth, flowers, and fruit. It helps plants absorb minerals, grow strong stems, and withstand disease. Rock phosphate provides phosphorus, magnesium, and trace minerals. Rock powders are wonderful soil enhancements. They are slow acting but long lasting, so they need to be applied only every 3 to 4 years.
 Bone meal and bone char are more readily available sources of phosphorus.
 - Potassium: K stands for potassium or potash. It regulates the flow of water in plant cells and is necessary for flowering, fruiting, and disease resistance. A lack of potassium will cause plants to have weak stems and stunted growth. For added potassium you can use granite dust or greensand which is made from glauconite, an ocean mineral high in potassium and iron. Wood ashes are also high in potash.
→ See more about NPK Ratios and what this means.
3 DIY Soil Tests
To learn more about your soil and its health, here are three DIY soil tests covering 1) your soil’s texture, 2) soil pH, and 3) soil health.
Soil Texture: The Peanut Butter Jar Test
Find out what kind of soil you have! Healthy soil typically consists of 20 percent clay, 40 percent silt, and 40 percent sand. This should take about 1 hour to set up and a full day to conclude. Find an empty straight-sided jar, such as a peanut butter or mason jar, with a lid, and have a ruler handy.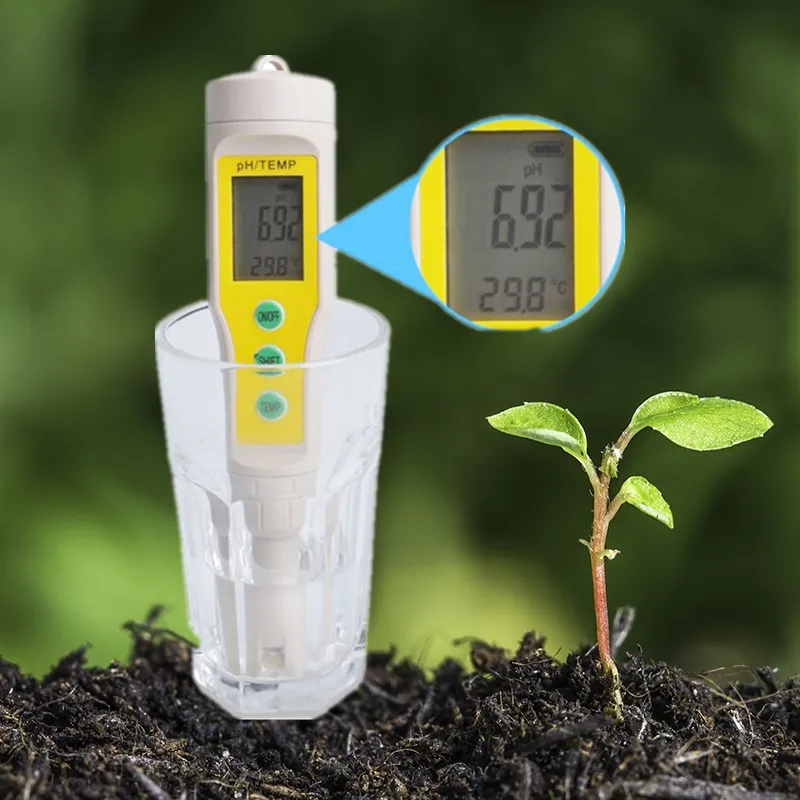 Dig down to root level—about 6 inches—in the area that you want to test and remove enough soil to fill the the jar to between one-third and one-half full. Next, fill the jar to the shoulder with water, then set the jar aside to let the soil soak up the water. Put the lid on the jar and shake it hard for about 3 minutes.
- Set the jar down and look at your watch. In 1 minute, measure (with the ruler) the amount of sediment that has collected at the bottom. This is the sand in your soil.
- Wait 4 minutes more. Measure the sediment again: The difference between the two numbers will be the amount of silt in your soil.
- Take a third measurement in 24 hours. The difference between the second and third number will be the amount of clay in your soil.
Calculate the percentages of sand, silt, and clay, which should add up to 100 percent. Nice, loamy soil will be 20 percent clay, 40 percent silt, and 40 percent sand. This simple test can help you to decide what to grow: If your soil is high in sand, it will be well-draining.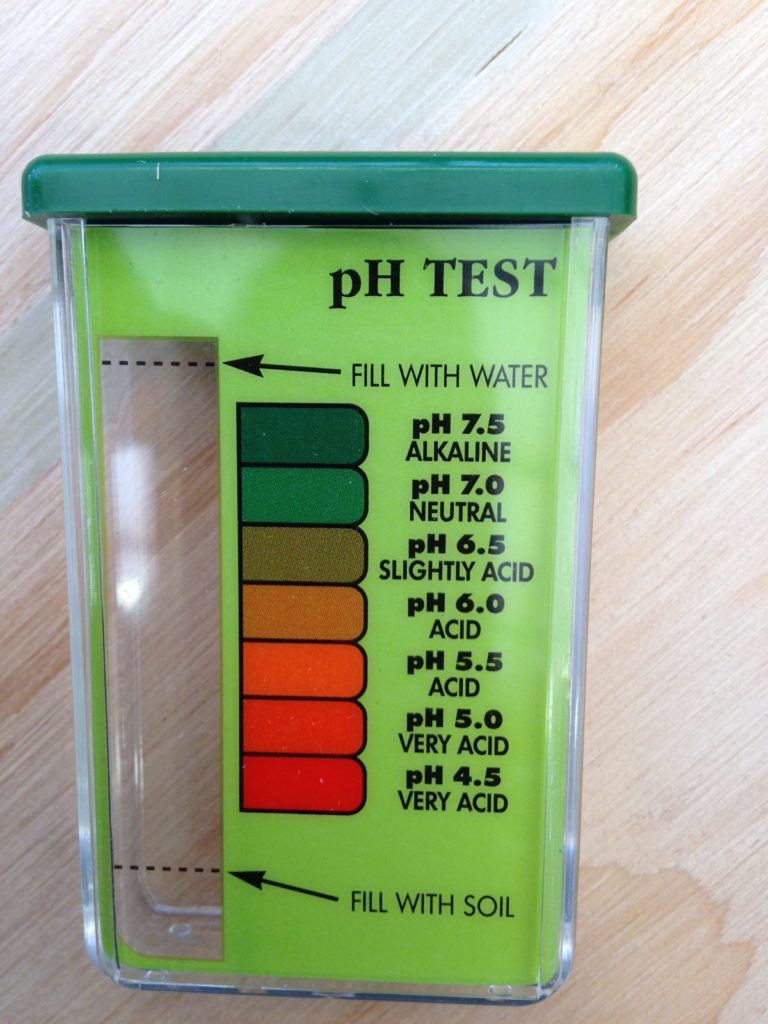 Silt and clay are hard to get wet, but they stay wet; plants that like “wet feet” would be happy here. Choose your plants accordingly and/or amend the soil:
- If you have sandy soil, add humus or aged manure, peat moss, or sawdust with some extra nitrogen. Heavy, clay-rich soil can also be added to improve the soil.
- If you have silty soil, add coarse sand (not beach sand) or gravel and compost, or well-rotted horse manure mixed with fresh straw.
- If you have clay soil, add coarse sand (not beach sand), compost, and peat moss.
→ Learn more about soil amendments and preparing the soil for planting.
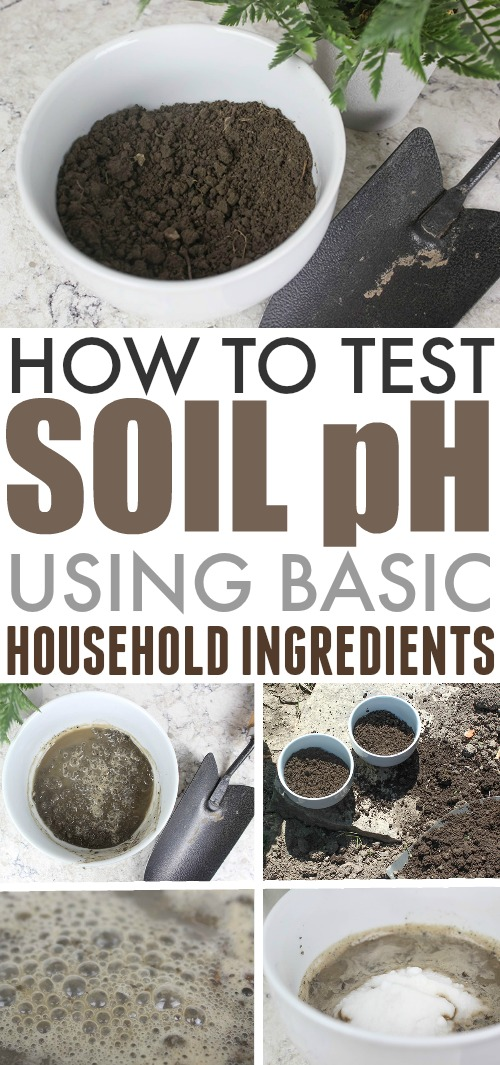
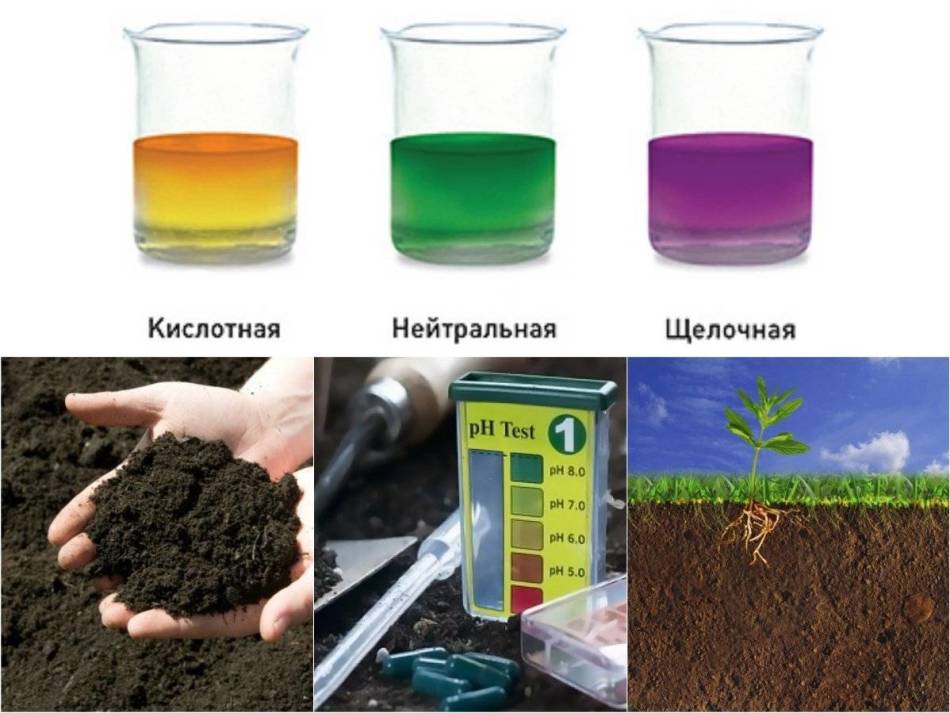
Soil Acidity or Alkalinity: The Pantry Soil pH Test
- Place 2 tablespoons of soil in a bowl and add ½ cup vinegar. If the mixture fizzes, you have alkaline soil.
- Place 2 tablespoons of soil in a bowl and moisten it with distilled water. Add ½ cup baking soda. If the mixture fizzes, you have acidic soil.
- If it does not react to either test, the soil has a neutral pH.

- A very high or very low soil pH may result in plant nutrient deficiency or toxicity.
- A pH value of 7 is neutral; microbial activity is greatest and plant roots absorb/access nutrients best when the pH is in the 5.5 to 7 range.
Once you figure out your soil pH, you can change or adjust it. Acidic (sour) soil is counteracted by applying finely ground limestone, and alkaline (sweet) soil is treated with ground sulfur.
→ See a list of Soil pH levels for different plants.
Soil Health: The Earthworm Test
The best time to check for earthworms is in the spring when the soil’s temperature has reached 50°F and its surface is moist. Use a shovel to dig up about 1 cubic foot of soil. Put the soil on a piece of cardboard, break it apart, and look for earthworms.
If your soil is healthy, you should find at least 10 earthworms! If your soil has fewer than 10 worms, add more organic matter—compost, aged manure, leaf mold. Organic matter improves structure, slowly releases nutrients, and increases beneficial microbial activity.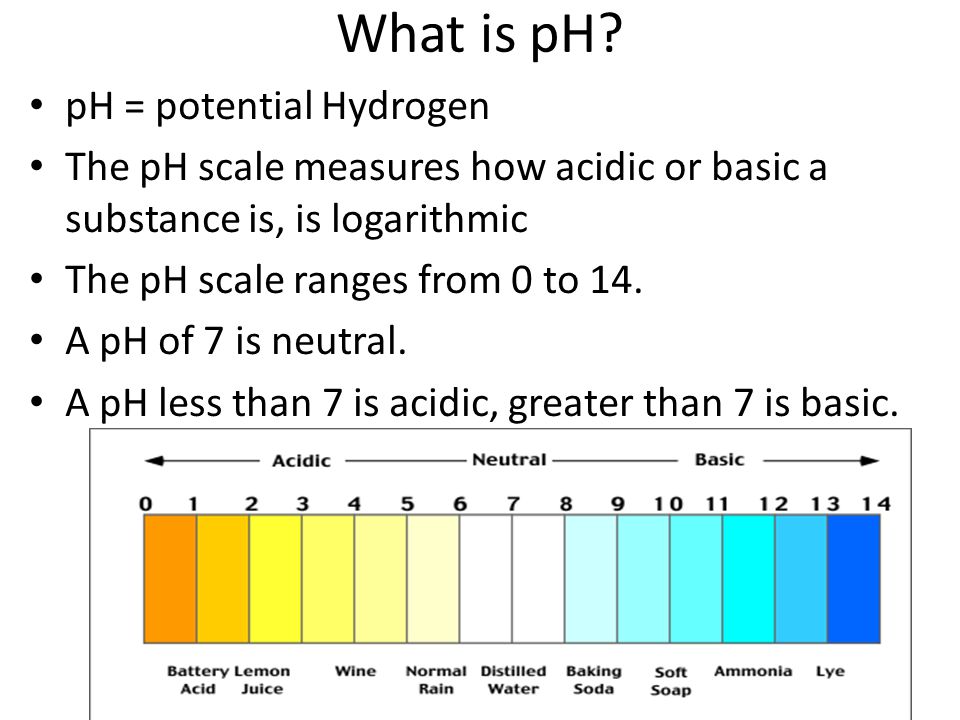
→ Learn more about the wonderful world of earthworms.
Use these DIY tests to gauge the overall health of your soil, but for more granular information, be sure to order a proper soil test as described above!
How to Conduct a Soil pH Test
By
Marie Iannotti
Marie Iannotti
Marie Iannotti is a life-long gardener and a veteran Master Gardener with nearly three decades of experience. She's also an author of three gardening books, a plant photographer, public speaker, and a former Cornell Cooperative Extension Horticulture Educator. Marie's garden writing has been featured in newspapers and magazines nationwide and she has been interviewed for Martha Stewart Radio, National Public Radio, and numerous articles.
Learn more about The Spruce's Editorial Process
Updated on 04/24/22
Reviewed by
Debra LaGattuta
Reviewed by Debra LaGattuta
Debra LaGattuta is a gardening expert with three decades of experience in perennial and flowering plants, container gardening, and raised bed vegetable gardening.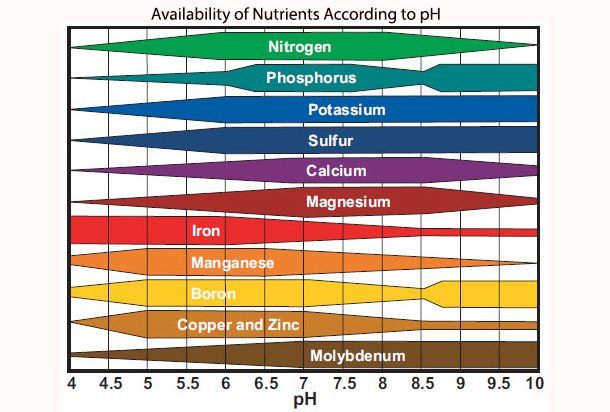 She is a Master Gardener and lead gardener in a Plant-A-Row, which is a program that offers thousands of pounds of organically-grown vegetables to local food banks. Debra is a member of The Spruce Gardening and Plant Care Review Board.
Learn more about The Spruce's Review Board
The Spruce/Claire Cohen
In This Article
-
When to Conduct a Soil pH Test
-
Testing pH Using Kitchen Supplies
-
Testing pH Using Soil Strips
-
Soil pH Testing Tips
Project Overview
As a home gardener, it's important to test soil pH because certain plants have specific pH requirements and won't thrive unless the soil pH falls within a particular range. pH measures the level of acidity in the soil and it affects a plant’s ability to absorb nutrients. If the soil pH level falls outside of a plant's recommended range, all the plant food and fertilizer in the world won’t help -- the plants can’t absorb nutrients.
Technically speaking, a soil pH test measures how many hydrogen ions are in the soil. On a scale of 1 to 14, a pH less than 7.0 is acidic, 7.0 is neutral, and anything higher than 7.0 is alkaline. Acidic or alkaline soil isn't necessarily bad; it all depends on the plants you're growing. Most plants can adapt to soil pH ranges from 6 to 7.5, but some plants have distinct requirements. For instance, blueberries require acidic soil in the range of 4.5 to 5.5 to produce berries while lavender tends to do best in alkaline soil about 8.0.
Identifying and Fixing Plant Nutrient Deficiencies
When to Conduct a Soil pH Test
Testing your soil's pH should be an item to include on your fall garden task checklist. Testing pH in the fall enables you to take steps to correct the pH before the next spring planting season. And, fall is a good time to note any weeds that have grown throughout the summer, which can also give you clues about your soil pH. For instance, dandelions, wild strawberries, and plantain proliferate in acidic soil while chickweed, Queen Anne's lace, and chicory favor alkaline soil.
Performing a soil pH test in the fall gives you plenty of time to plant a nitrogen-fixing cover crop (for mild winter climates) or to revise next year's planting plan to suit the pH reading. In the case of alkaline soil, you can lower the pH by adding organic materials, such as peat moss. Acidic soil can be neutralized by adding lime. The type and quantity of soil amendments depend on how much the pH needs to be raised or lowered.
Learn How to Conduct a Soil pH Test
Equipment / Tools
- Hand trowel
- Clean glassware
- Liquid measuring cup
Materials
- Distilled water
- Coffee filter
- pH testing kit
- Vinegar
- Baking soda
Testing pH Using Kitchen Supplies
An acidic solution generally reacts when it's added to something basic. You can use vinegar (acidic) and baking soda (basic) for a do-it-yourself quick pH reading of your soil. This do-it-yourself test will reveal whether the soil is relatively acidic or alkaline and is recommended for those who have healthy gardens that might benefit from a little more targeted care.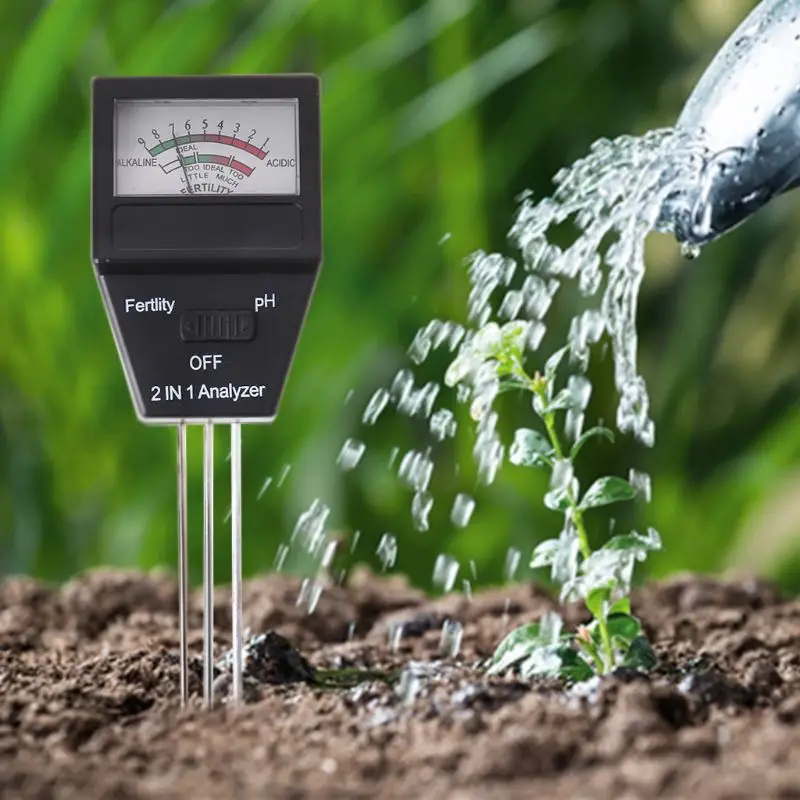
Note
Soil testing labs provide more complete and accurate results than do-it-yourself home methods. Soil testing labs provide a complete analysis of soil composition including percent of organic matter and major and minor nutrients as well as pH level.
-
Dig for a Soil Sample
Using a hand trowel, dig four to six inches below the soil surface to obtain a soil sample. Dig in several locations in your garden bed to obtain an average soil sample representative of the area.
-
Clean the Soil
Remove stones, sticks, and other debris from the soil. Be sure to break up any large clumps.
-
Add Soil and Water Together
Place approximately one cup of soil into a clean glass container, and add enough distilled water to turn the soil to mud.
-
Add the Vinegar
Add 1/2 cup of vinegar and stir the mixture. If the soil fizzes, foams, or bubbles, your soil is alkaline.
-
Repeat the Process if No Bubbling Occurs
Take a soil sample, clean it of debris, place it into a clean container, and use distilled water to turn it into mud.
-
Add the Baking Soda
Add 1/2 cup of baking soda and stir. If the soil fizzes, foams, or bubbles, your soil is acidic.
Testing pH Using Soil Strips
Testing with vinegar and baking soda can indicate which end of the pH scale your soil is leaning. But for an exact measurement, a soil pH testing kit provides more definitive results. You can purchase testing kits at most garden centers and through local cooperative extension offices.
-
Dig for a Sample
Using a hand trowel, dig four to six inches below the soil surface to obtain a soil sample.
The Spruce / Almar Creative
-
Collect the Soil
Place one to three teaspoons of soil in a clean glass. Remove sticks, stones, and other debris.
The Spruce / Jayme Burrows
-
Pour in Distilled Water
Fill the glass with distilled water to the same level as the soil sample.
The Spruce / Jayme Burrows
-
Agitate the Soil
Vigorously stir or swirl the mixture. Let the solution rest for 30 minutes.
The Spruce / Jayme Burrows
-
Drain the Sample
Pour the soil sample through a coffee filter and into another clean glass. Make sure that you are capturing the solids and allowing the liquid to pass through.
The Spruce / Jayme Burrows
-
Use the pH Test Strip
Dip the test strip into the liquid. Pay close attention to the instructions on how long to leave the strip in the liquid. When the strip turns color, compare the color to the chart on the manufacturer's packaging to determine the pH.
The Spruce / Jayme Burrows
-
Repeat the Process
Repeat the process several times with samples from different parts of your garden to determine an average pH.

The Spruce / Jayme Burrows
Soil pH Testing Tips
If you test your soil using vinegar and baking soda and neither test produces much of an effect, your soil is probably in the neutral range. No further testing is needed.
You can mix soil from several different samples of a small garden for the vinegar-baking soda test. However, if you have a large garden, it is better to test several samples separately.
If it's difficult to successfully grow anything in your garden beds or your lawn is not thriving, it's best to send a soil sample to a professional soil testing lab to obtain a complete soil analysis. Based on the test results, the experts will make specific recommendations for soil amendments.
How to Improve Garden Soil With Amendments
Article Sources
The Spruce uses only high-quality sources, including peer-reviewed studies, to support the facts within our articles. Read our editorial process to learn more about how we fact-check and keep our content accurate, reliable, and trustworthy.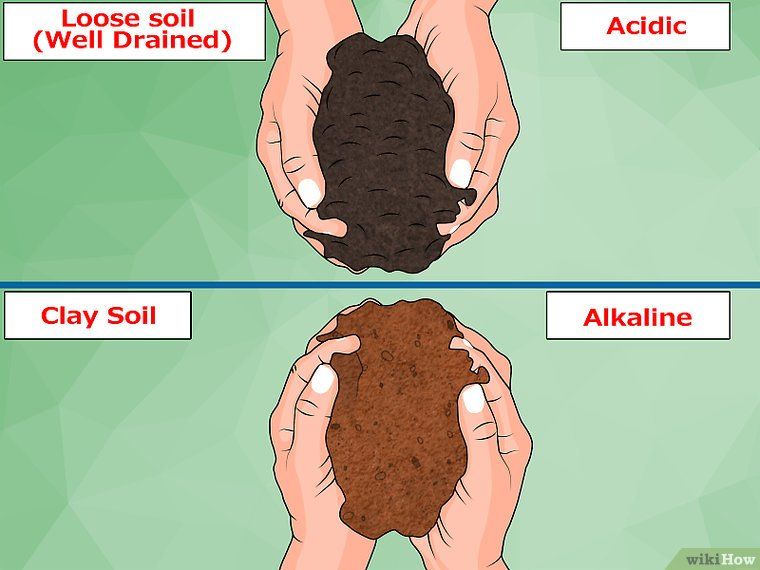
Soil Testing. University of Maryland Extension Website
Soil testing and soil testing labs. Umd.Edu.
Reducing Soil PH. Wisconsin Horticulture.
“Soil Sampling Instructions.” Rutgers.Edu, https://njaes.rutgers.edu/soil-testing-lab/pdfs/home/Home_and_Landscape_-_Soil_Sampling_Instructions.pdf
Soil Testing Laboratory. Rutgers.Edu.
How to check soil pH?
June 22 2020
Soil pH for Optimum Plant Growth
The desired soil pH range for optimal crop growth varies for different crops. A soil pH of 6.0-7.5 is generally acceptable for most plants, as most nutrients become available in this pH range.
Soil pH can be determined by mixing a soil sample with water and then analyzing the resulting aqueous solution.
Soil pH is a measure of acidity or alkalinity. On the pH scale, a soil with a pH of 7.0 is neutral. Below 7. 0 the soil is acidic and above 7.0 it is alkaline. Soil pH strongly influences the uptake of available nutrients for plant growth. In highly acidic soils, toxic aluminum and manganese become more available, while calcium, phosphorus, and magnesium are less available for plant uptake. In highly alkaline soil, phosphorus and most trace elements become less available.
A pH meter will help you determine if the soil is suitable for growing plants successfully.
When designing a garden or landscaping, it is useful to check soil pH, as different plants thrive in different soil pH ranges. Determining pH can tell if a given soil is suitable for successful plant growth or if it needs to be adjusted to ensure optimal plant growth.
Soil pH can be quickly and easily measured using the HORIBA LAQUAtwin 9 pH meters0019 - pH 11 , pH 22 and pH 33 . These compact pH meters can be multi-point (2 to 5) calibrated using both NIST and USA pH buffers.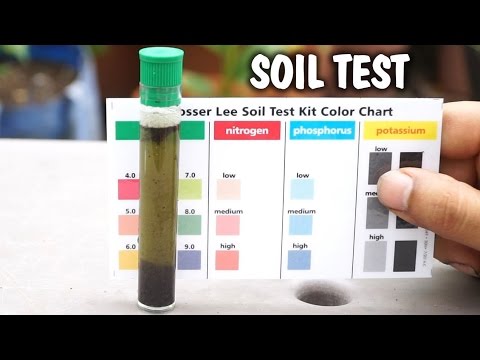
Among the above models, HORIBA LAQUAtwin pH-33 High Accuracy Handheld pH Meter has a built-in temperature sensor that measures and displays temperature values and performs automatic temperature compensation (ATC), as well as automatically calibrates to the exact pH value of the buffer solution at the measured temperature.
Effect of soil pH on plant growth
| soil pH | Plant growth |
| > 8.3 | Soil too alkaline for most plants |
| 7.5 | Iron availability becomes problematic in alkaline soils |
| 7.2 |
6.8 to 7.2 - almost neutral 6.0 to 7.5 - acceptable for most plants |
| 7. | |
| 6.8 | |
| 6.0 | |
| 5.5 | reduction of soil microbial activity |
| < 4.6 | too acidic for most plants |
 0
0 (Source: Colorado State University - CMGGarden Notes #222)
LAQUAtwin pH meters are calibrated according to the manufacturer's instructions using at least 2 buffer solutions whose pH is close to the expected pH of the sample to be measured.
How to measure soil acidity with the LAQUAtwin pH meter?
The method described below is based on US EPA Method 9045D. This method is also applicable to pH measurement of wastes and samples, which may be solids, sediments or non-aqueous liquids. If water is present, it must be less than 20% of the total volume of the sample.
1. In a beaker or container, add 20 ml of pure water to a sample weighing approximately 20 g. Stir for 5 minutes, then cover.
2. Let the potting mix sit for 1 hour. Separate the liquid phase using a filter or centrifuge.
3. Measure the pH of the liquid phase. Record the pH value and temperature.
To obtain accurate results, buffer standards and samples must be measured at the same temperature. If the electrode is coated with oily material from the sample, clean it with detergent and warm water.
The desired soil pH range for optimal plant growth varies for different crops. In general, a soil pH of 6.0–7.5 is acceptable for most plants, as most of the nutrients become available there.
Desired soil pH range for optimum plant growth
| pH 4.0–6.0 | pH 5.0–6.5 | pH 6.0–7.5 | pH 5.0–7.5 | pH 6.0–8. |
| potatoes | pineapple peanuts watermelon basil pomegranate melon blackberry cranberry gooseberry mango olive rice rosemary sweet potato soy dill chicory sage apple | apricot quince artichoke bob broccoli Brussels sprouts vine cherry peas mustard grapefruit mushroom cabbage Chinese cabbage hazelnut lemon bow feather bow mint nectarine nephelium peach millet radish lettuce beets celery plum mulberry spinach | banana strawberry raspberry carrots mint cucumber pepper parsley tomato rhubarb turnip sweet corn thyme pumpkin cauliflower garlic lentils shallot | avocado ginger leeks mint paprika asparagus
|
 0
0 How soil pH affects plant nutrient availability
Nitrogen, phosphorus and potassium are the main nutrients needed in large quantities. Calcium, magnesium and sulfur are secondary nutrients and are needed in smaller amounts. Zinc and manganese are trace elements and are needed in soil in very small amounts. Micronutrients and secondary nutrients are most easily adjusted to maintain optimum soil pH.
Soil pH also affects the activity of microorganisms in the soil. Bacteria that contribute to the decomposition of organic matter are depleted and hampered in acidic soils, leading to the accumulation of organic matter and associated nutrients, in particular nitrogen.
Buy pH meters HORIBA LAQUAtwin pH 11, pH 22 and pH 33 in the SIMVOLT Meter Market.
SIMVOLT measuring instrument market is the official distributor of Horiba LAQUA products in Ukraine. SIMVOLT carries out sales, warranty and post-warranty service of Horiba LAQUA devices on the basis of its own service center.
Share
Share
Share
New comment
Sign in with
Submit
How to determine the acidity of the soil at home?
June 3 2020
Plants need a certain soil acidity.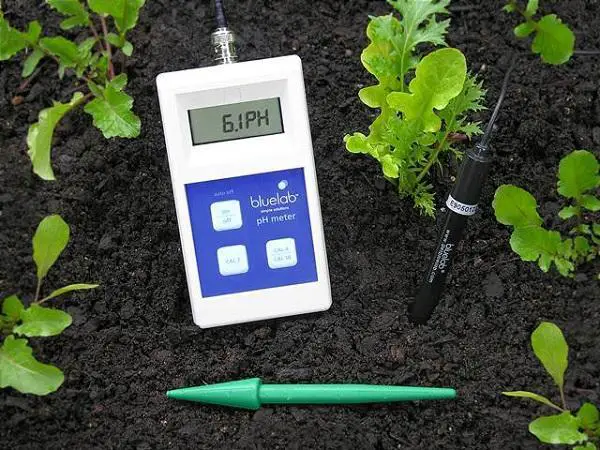 Some crops are suitable for slightly acidic soil, others grow better in a neutral one, and still others prefer a slightly alkaline environment. For example, blueberries, lingonberries, cranberries grow exclusively on acidic soil, hawthorn will give birth well on alkaline soils.
If you want to have a good crop of cucumbers, prepare the soil with a pH that is close to neutral.
Why measure soil acidity?
If the acidity of the soil does not meet certain requirements, the normal process of absorption of nutrients in plants is disrupted, vegetative development slows down and disease resistance decreases.
Determination of soil acidity will show if your soil is within optimal limits or if you need to take cultural measures to regulate the pH level. To improve acidic soils, lime or dolomite is usually used. Lime contains mainly calcium carbonate, while dolomite contains calcium carbonate and magnesium carbonate. An increase in soil acidity is a rather rare occurrence, but if such a need arises, it is easier to introduce acidic swampy peat into the soil.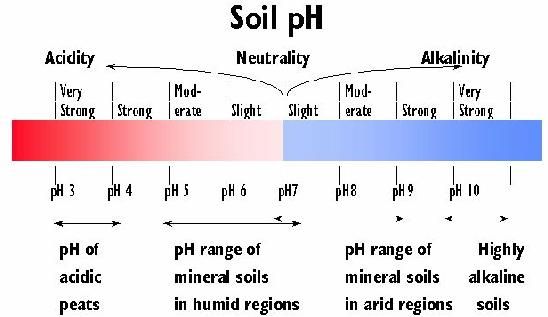
Acidity is an unstable parameter, it can change after applying a certain type of fertilizer, after acid rains, and also depends on the pH of the water you water. Therefore, it is important to choose a method convenient for you and determine how and with what to measure the acidity of the soil.
How to determine the acidity of the soil in the garden?
Soil acidity is determined by pH.
The pH scale is from 0.0 to 14.0. The indicator of the most acidic environment is 0.0, the most alkaline is 14.0, and the neutral is 7.0. For example, lemon juice - 2.4 pH (acid), water 7.0 (neutral), soap solution - 9.3 (alkaline). The optimal acidity indicator for cultivated plants is the pH range from 5.5 to 7.5.
Usually, special devices called pH meters are used to determine the acidity of the soil, or soil samples are sent to the laboratory for analysis. It is advisable to purchase such measuring instruments if you are a farmer or intend to carry out analyzes on order.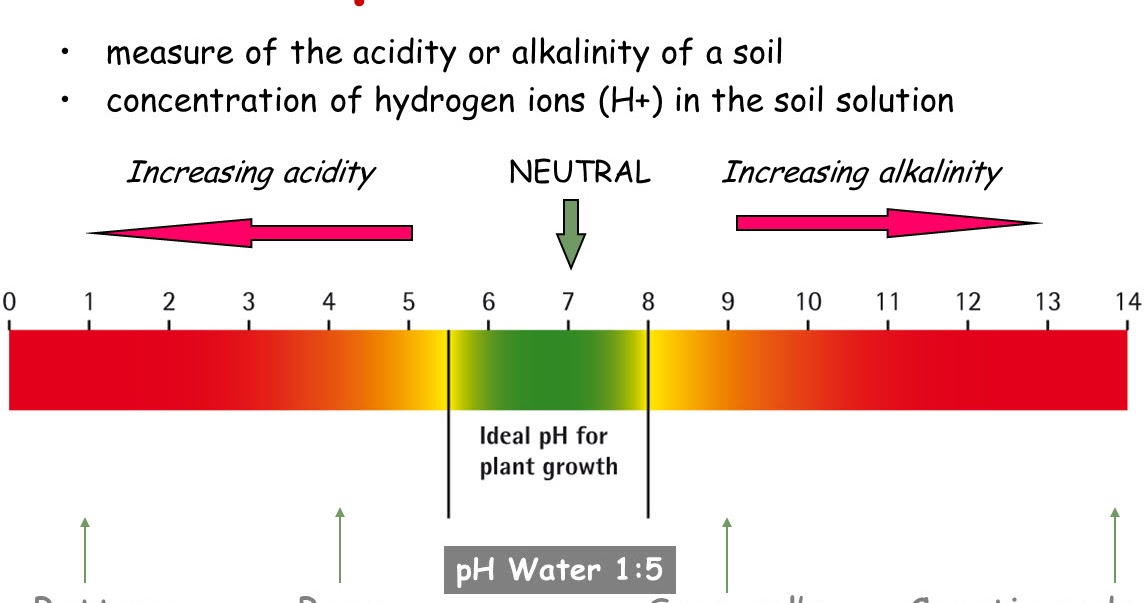 A good pH meter that will accurately measure the pH value is expensive. If you send soil samples to a specialized laboratory, then the analysis requires a certain time and such studies cost money.
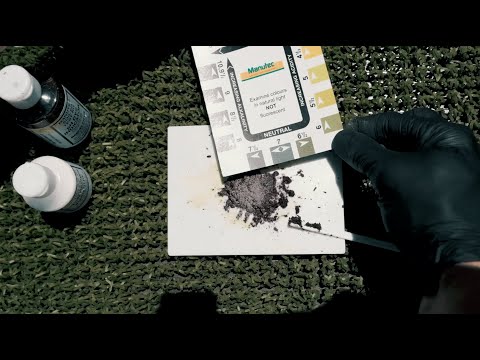
There is a budgetary and simple method of soil analysis for pH . You can determine the acidity of the soil using litmus paper .
Of course, not all test papers are suitable for determining soil acidity. Try to use pH test strips from reputable manufacturers. Chinese test strips should be treated with caution, as they often have low-quality dye that "floats" when measured, and this harms the accuracy of the results. Also, if possible, buy acidity test strips with a narrow measurement range, such as 4 to 8 pH. Due to the narrowed range, they have high accuracy (pH determination step 0.3–0.5, in contrast to the standard 1.0).
Which pH test strips from the assortment of the Nanomarket online store are more suitable for determining soil acidity?
These are pH test strips from the renowned UK manufacturer Johnson Test Papers.
pH Indicator Strips 4.0–7.5 JTP pH Indicator Strips
Test strips have a range of pH 4.0 to 7.5, which fully covers the range of soil acidity, from strongly acidic (for example, for growing blueberries) to slightly acidic (chernozem). ) and neutral.
These test strips are in 0.3 pH increments, which in principle allows you to get pretty decent results when measuring.
Pack of 100 pieces.
We definitely recommend this product as the best value for money.
High resolution pH 4.0-8.0 test strips JTP Comparator Paper pH
These strips have a slightly wider range (up to 8 pH), but, accordingly, a narrow step (0.5 pH). The kit contains 200 test strips.
Benefits: fast pH determination, high measuring accuracy. The pH level is easy to determine thanks to the clear gradation of the colors of the scale on the comparator.
High resolution pH 4.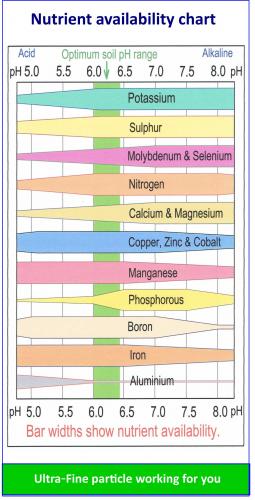 0-8.0 test strips JTP Comparator Paper (5 m roll)
These test strips are similar to the previous ones, but have a roll form factor that is convenient for continuous measurements. One set contains a roll of paper strip 5 m long.
The comparator allows you to accurately determine the color intensity of the strip using a color wheel that rotates.
Accuracy is on average 5 times higher than the conventional color scale.
Test strips for pH 4-8 (100 pcs.) UKRHIM TS-PH8-100
Test strips from the Ukrainian brand "UKRHIM" for self-determination of pH (acidity) in the range from 4 to 8 pH.
Test strips have an elongated design and are made of PVA plastic that will not soak in water. One package contains 100 strips with measuring steps of 0.5 pH.
Advantages: the strip is impregnated with a high-quality reagent, the colors are well calibrated in accordance with the measurement scale, a color scale is applied to the storage bottle for comparing measurement results and instructions for use in Ukrainian.