How to set up a small vegetable garden
How to Start a Small Vegetable Garden
Share
Whether you’re looking for ways to save money, eat more healthily or just enjoy working the land, a small vegetable garden is a great idea.
You can do quite a lot with a small amount of space, so there’s no need to have a huge backyard.
Once everything is set up, the actual work is minimal.
It definitely helps if you enjoy gardening, but you might learn to enjoy it after reaping the benefits.
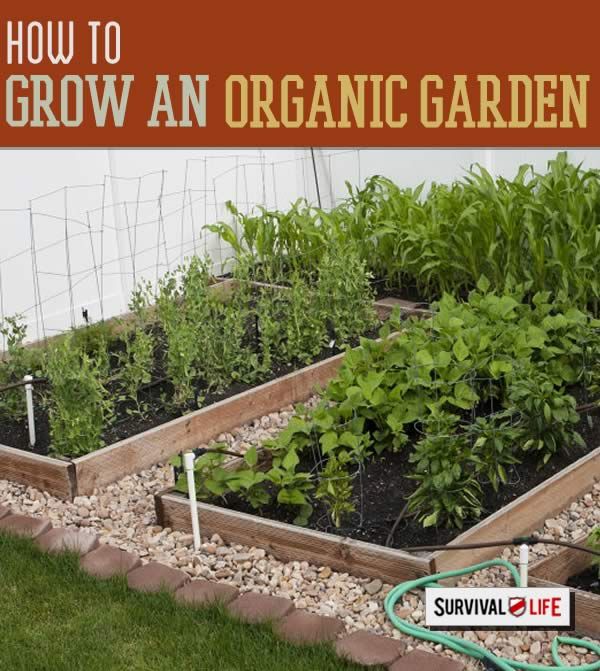
1. Choose a Sunny Spot in the YardChoose the sunniest spot in the yard for your vegetable garden.
If your entire yard is shaded, your options are going to be pretty limited.
Lettuce and spinach do fairly well in shady conditions, but most other vegetables do not.
If possible, have the trees trimmed in order to get more sun into your yard.
If the side of the house is sunnier, you might want to start your garden there.
2. Map it OutIt’s a lot easier to get the right arrangement when you make clear plans ahead of time.
You don’t have to be an artist to do this.
Just grab a sheet of paper and start with a square.
Map out different quadrants for different vegetables.
It’s smart to start small, so stick with just a few things at first.
Now is not the time to be overly ambitious.
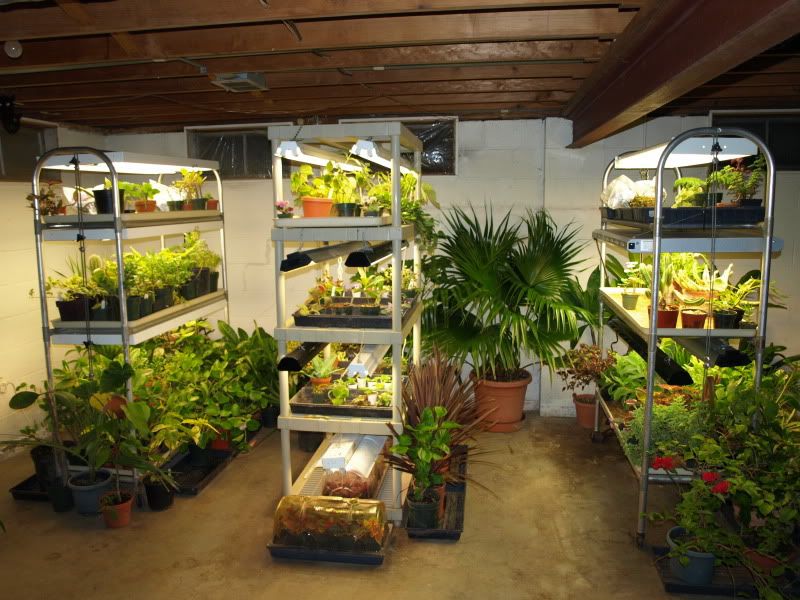
3. Start Seedlings IndoorsWaiting for seeds to sprout in a vegetable garden can be frustrating.
It will leave you wondering whether you’ve done it right or not.
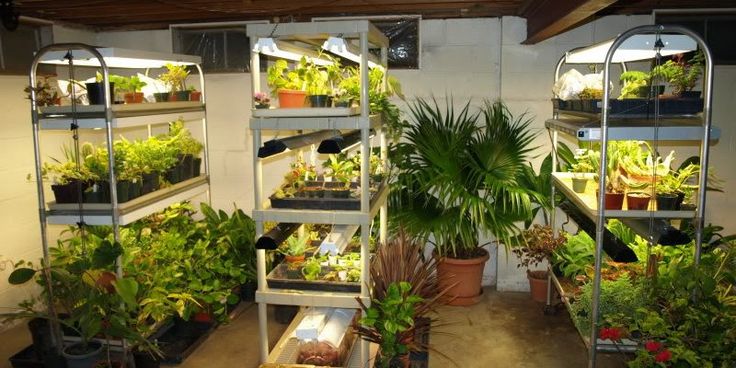
A great way to alleviate this problem is by starting seedlings indoors before warm weather is here for good.
You can monitor their progress to make sure they are growing properly.
When the time comes, just transplant them out in the garden.
4. Invest in Excellent ToolsYou may be tempted to buy the most affordable gardening tools possible, but that’s a mistake.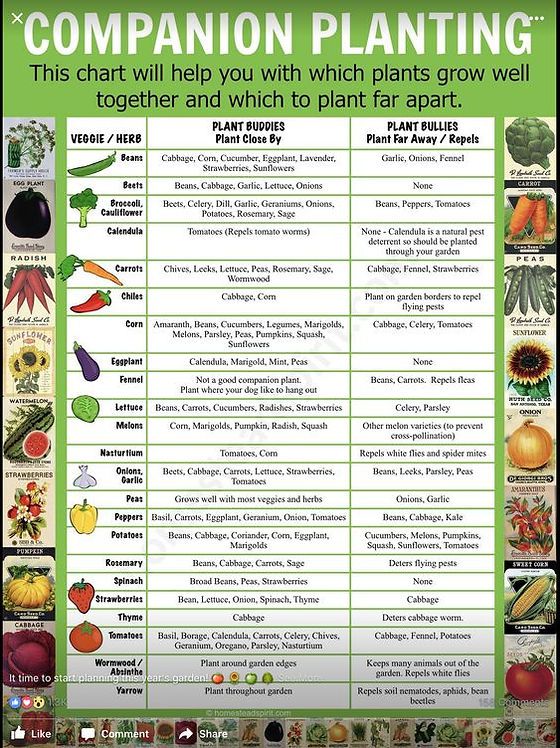
You’ll have a much easier time working in your garden when you have decent tools.
It’s well worth it to spend a little more for quality.
Begin with a basic assortment of tools.
As you work on your garden, you may need to buy additional tools.
Eventually, you’ll have everything you need and will be able to keep up with the maintenance of your garden with ease.
5. Use TrellisesPlants like cucumbers and beans are tasty, but they take up a lot of valuable space.
You can still grow them, though.
You just need to set up a few trellises.
You can find affordable trellises at the local big-box hardware store.
Make sure they are secure.
As the vegetables grow and ripen, they will put a lot of strain on the trellis and could break it.
6. Start a Compost PileOne of the best ways to have great soil for your garden ready to go is by starting a compost pile.
This also gives you a way to reuse old scraps of food and other items.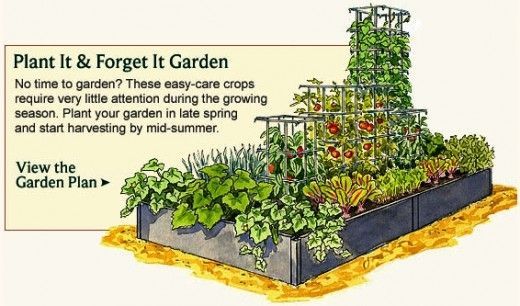
Do plenty of research before starting a compost pile.
There’s a definite science behind it.
Whether you build a bin for your compost pile or invest in a composter, you will love having ready access to great soil.
7. Devote a Section to HerbsIf you normally use dried herbs while cooking, you’re in for a real treat.
Devote a small section of your garden to herbs and start planting.
You will love how much more flavorful your dishes are when you use fresh herbs, and most of them are quite easy to grow.
Options like chives, cilantro and dill are all popular, but you can successfully grow just about anything.
8. Position Your Garden Near the KitchenIt’s not always possible, but you should try to position your garden so that it’s close to the kitchen.
Use pavers to make a nice pathway from the back door to the garden.
While you’re in the kitchen dreaming up meal ideas for the night, your garden is sure to inspire you.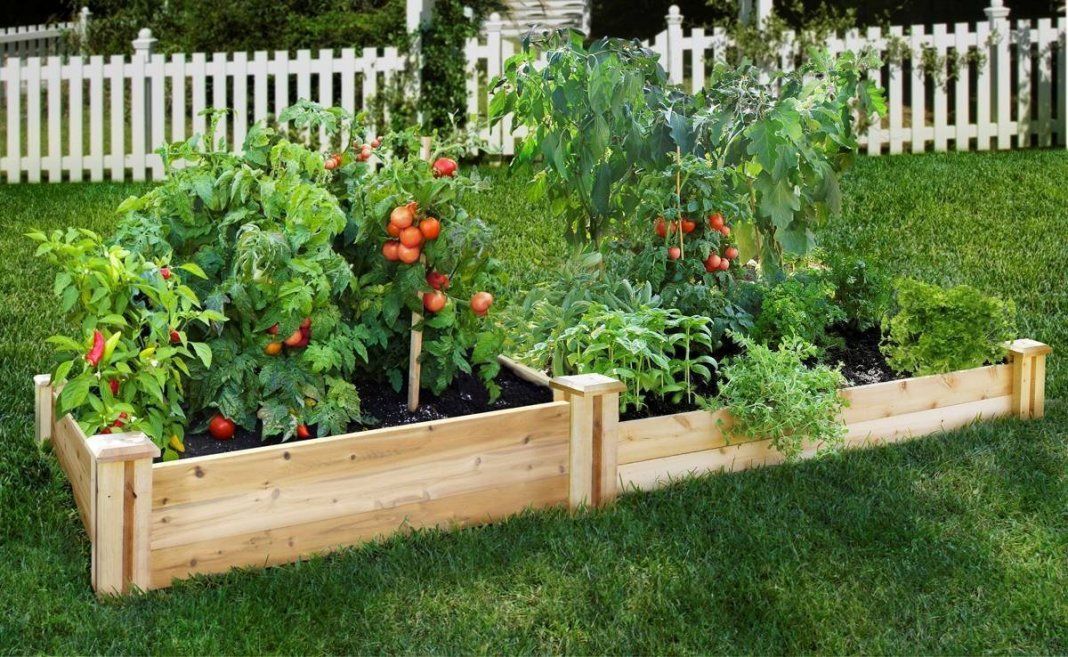
It’s nice to just dart out to the backyard for freshly grown tomatoes, carrots and other ingredients.
9. Have a Water Source NearbyMake it as easy as possible to water your garden.
Most vegetables need a lot of water to thrive.
If you have to drag a garden hose from around the side of the house every time, you’re going to dread watering your plants.
Buy an extra hose if necessary to make it as easy as possible.
You’ll thank yourself later.
10. Buy Seedlings from a NurseryThere’s no law that says you have to start all of your vegetables from seeds.
Plants like tomatoes are actually easier to grow from seedlings, and there’s nothing wrong with visiting a nursery to get what you need.
Whether you strictly plant seedlings or do a combination that includes plants grown from seeds, the point is to grow fresh vegetables in your backyard.
How they begin is inconsequential.
11. Make Sure the Soil is Vegetable Friendly
Take the time to make sure that the soil is suitable for growing vegetables.
All too often, people assume that all soil is the same, and they are crestfallen when their veggies don’t thrive.
Ideally, your soil should be well-drained, moist and mixed with plenty of organic matter.
Compost and peat should be used liberally.
You don’t have to perform a chemical analysis of the soil, but you should do what you can to make it as suitable as possible.
12. Grow Flowers around the PerimeterYour garden will look even lovelier when you plant flowers around its perimeter.
The sky’s the limit, but many people like to grow things like morning glories, which crawl up chicken wire and other fencing materials to add a lot of charm to a vegetable garden.
This is especially nice when your fence is a little on the unsightly side.
13. Soak Seeds before Planting ThemAlways check the directions that come with seeds you buy before planting them.
However, it’s usually fine to soak them for a while before planting them.
This can help speed things up a lot.
Many times, specific instructions on soaking the seeds will be included.
Some seeds need to be soaked for a few days while others just need to soak overnight.
You’ll be pleasantly surprised by how much more quickly they produce plants.
14. Choose Productive PlantsSome vegetables thrive better in some areas than in others.
Also, some plants produce more vegetables than others.
Maximize the output of your garden by selecting plants that are highly productive in your neck of the woods.
It’s usually better to have a few plants that produce vegetables throughout the year than it is to have plants that only produce edible veggies once or twice.
Speak to someone at a local nursery to get advice.
15. Grow Vines on Tepees TooIf you’re not a fan of trellises for whatever reason, a tepee is another good option.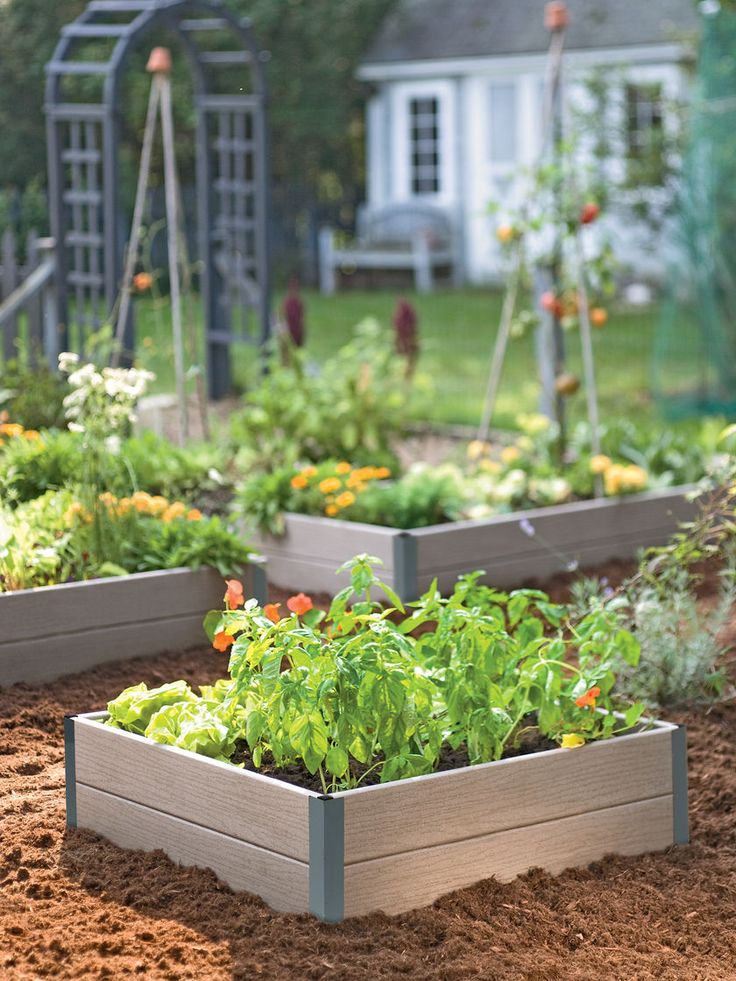
That doesn’t mean you should build a tent over your garden.
It means you should grab six to eight poles that are about 6 feet in length and position them in a tepee shape.
Plants like beans and cucumbers can then grow up them, and you can plant other things below them.
16. Study, Study, StudyIn the months leading up to planting season, do as much research as possible about vegetable gardening.
Thanks to the Internet, you don’t even need to leave the house to do so.
However, you might also want to buy at least one or two decent books on the subject.
Read them from cover to cover to learn as much as you can.
This knowledge will pay off later.
17. Rent a RototillerThere’s something to be said for working the soil with your bare hands.
It loses its charm quickly when you’re trying to set up a vegetable garden for the first time, though, so you should plan on renting a rototiller.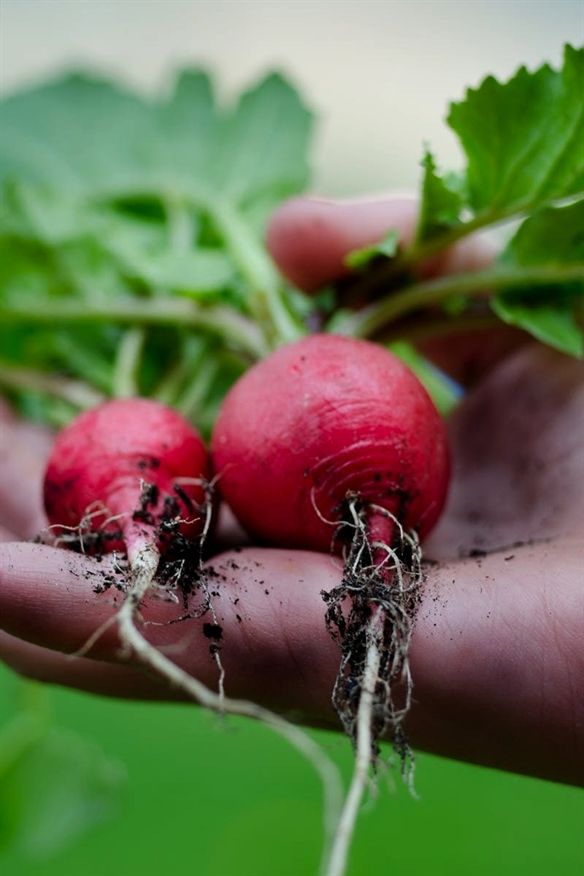
You can usually rent one by the hour, and you’ll only need it for part of the day.
This tool will quickly churn the soil to make it ready for your seedlings or seeds.
18. Use FertilizerIt’s great to want to have an organic vegetable garden, but fertilizer is crucial if you want to have a real stab of growing veggies on an ongoing basis.
Luckily, there are ways to fertilize a garden without using harsh chemicals.
This is another example of something you should research before the time comes.
When you’re ready to plant, have a few different options for fertilizing everything.
19. Share with Other GardenersYou probably know at least a few other people who have vegetable gardens.
Talk to them to see about pooling your resources.
One person might actually own a rototiller, for instance, and another might have a nice selection of spare seeds.
You can also trade seedlings with each other and turn to each other for advice and guidance.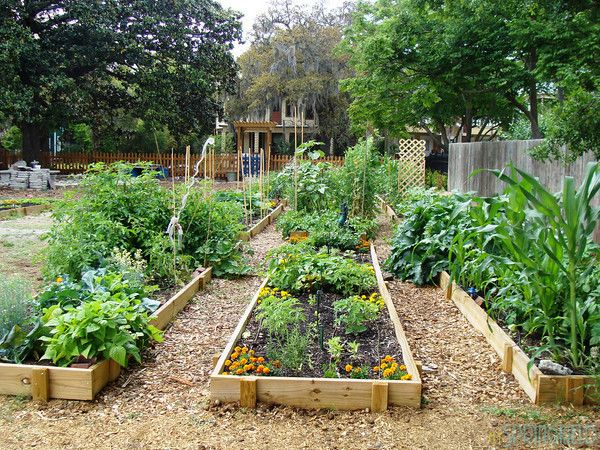
As an added bonus, you can share the bounties of your respective gardens later in the year.
20. Use Mothballs to Keep Critters at BayNothing is worse than discovering that a rabbit or other critter has gone to town on your veggies.
Bunnies dig beneath fences, so you can’t rely on them alone.
A great idea is to sprinkle mothballs below where your fence will be placed.
The scent of the mothballs will scare away many critters, and they won’t try to burrow beneath your fence.
21. Improve Drainage with Compost and Other MaterialsIt’s crucial to make sure that your soil is adequately drained.
Otherwise, your plants will become waterlogged and won’t thrive.
Test the drainage of your soil by soaking it and then digging up a piece a day later.
If it’s still soaked, you have drainage issues.
Add more peat and compost to the soil to help it drain better.
Keep testing it until it is properly drained.
Drainage is important, but you need to keep the soil moist too.
You also need to work continually to keep weeds at bay.
Shred some newspaper and lay it between the rows of your garden.
Mix in some straw too.
It may not be the prettiest thing, but it is a very effective way to help the soil retain moisture, and it will do a lot to keep weeds from growing.
23. Use Pavers and Chicken Wire to Keep Critters OutIn some areas, critters aren’t a major problem.
If you already see bunnies and other critters in your yard, you’re going to need to plan accordingly.
A simple chicken wire fence is a great starting point.
However, many critters dig beneath fences to gain access to vegetable gardens.
Take flat pavers and bury them around the perimeter of your garden too.
Bury the chicken wire fairly deep as well.
24. Harvest Your Veggies ProperlyAs exciting as it is to see fresh veggies growing in the garden, resist the urge to harvest them prematurely.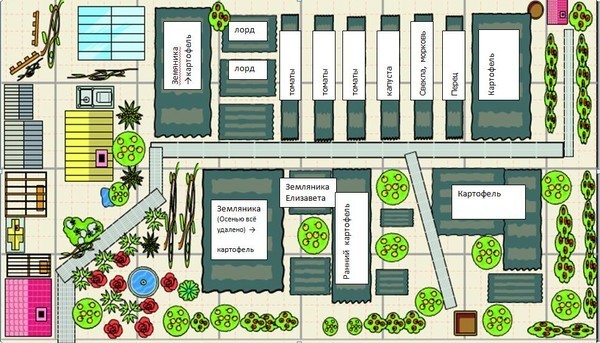
Some vegetables need to be harvested at specific times.
Before planting something, find out when and how it should be harvested.
Some plants can be harvested at different stages, so do a little experimenting too.
You’re going to want to make the most of your delicious veggies.
25. Grow Veggies that You and Your Family LikeThis may seem obvious, but many people are more concerned about choosing veggies that are easy to grow than with selecting veggies they actually like.
What’s the point of growing something if no one is going to eat it?
Even if it involves more work, it’s way better to plant a vegetable that you truly love.
Get the whole family in on the act and have each person select one veggie to grow.
Final Thoughts…At first, starting a small vegetable garden may seem like a huge chore.
By taking a methodical approach and keeping a few things in mind, though, it’s actually pretty easy.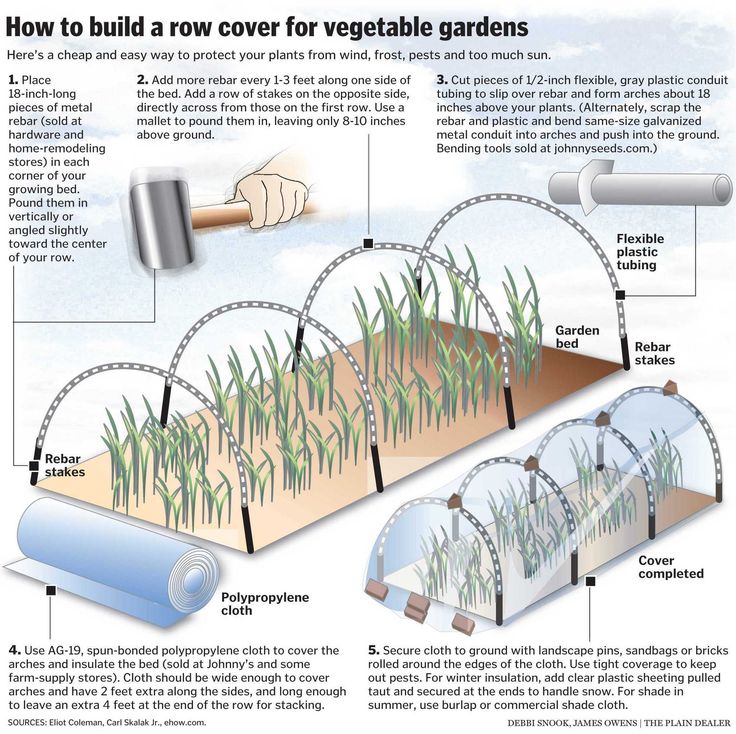
Your efforts will really pay off when your table is piled high with fresh, delicious vegetables later in the year.
Vegetable Gardening for Beginners: The Basics of Planting & Growing
In this comprehensive guide, we cover how to start a vegetable garden from scratch, which vegetables to grow, and when to plant what. We’ve also added a “starter” garden plan consisting of easy-to-grow vegetables, companion planting techniques, and some lovely flowers!
Vegetable Gardening for Beginners
Why garden, you ask? How about enjoying the best vegetables and fruit you’ve ever eaten? If you’ve never tasted garden-fresh food, you will be amazed by the sweet, juicy flavors and vibrant textures. There’s absolutely nothing quite like fresh veggies, especially if you grow them yourself—which you can!
It may seem daunting at first, but gardening is a very rewarding hobby. On this page, we’ll highlight the basics of vegetable gardening and planning: how to pick the right site for your garden, how to create the right-size garden, and how to select which vegetables to grow.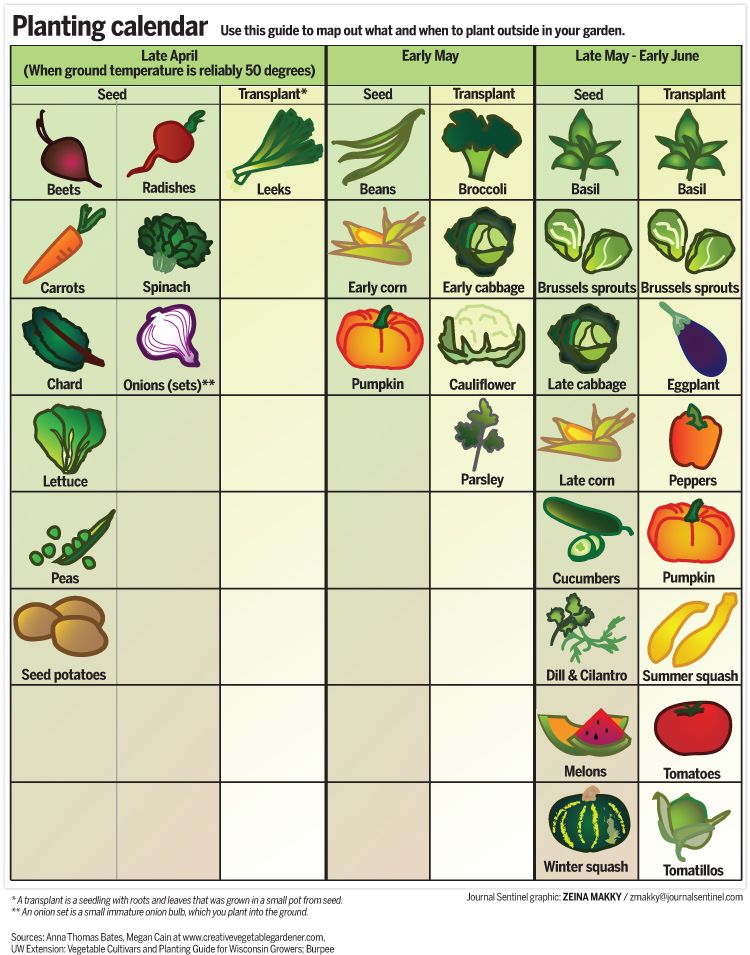
Pick the Right Location
Picking a good location for your garden is absolutely key. A subpar location can result in subpar veggies! Here are a few tips for choosing a good site:
- Sunny spot: Most vegetables need 6 to 8 hours of direct sunlight per day. There are a few veggies (mostly the leafy ones) that will tolerate some shade.
- Drains well and doesn’t stay wet: If you have poorly drained soil where water pools, plant veggies in a raised bed or raised row for improved drainage. Wet soil means wet roots, which can turn into rotted roots. If you have rocky soil, till and remove the rocks, as they will interfere with root growth and make for weaker plants.
- Stable and not windy: Avoid places that receive strong winds that could knock over your young plants or keep pollinators from doing their job. Nor do you want to plant in a location that receives too much foot traffic or floods easily. Plant in a location that would make Goldilocks smile—somewhere that’s “just right.
 ”
” - Nutrient-rich soil. You soil feeds your plants. If you have thin, nutrient-poor soil, you’ll have poor, unhealthy plants. Mix in plenty of organic matter to help your plants gro. See how to prepare you soil for vegetable plants.
Choosing a Plot Size: Start Small!
Remember: It’s better to be proud of a small garden than be frustrated by a big one!
One of the most common errors that beginners make is planting too much too soon—way more than anybody could ever eat or want! Unless you want to have zucchinis taking up residence in your attic, plan your garden with care. Start small, and only grow what you know you and your family will eat.
Size of Garden
- If planting in the ground, a 10’ x 10’ garden (100 square feet) is a managable size. Pick 3 to 5 of your favorite vegetables and buy 3 to 5 plants of each one.
- If planting in a raised bed, a 4’ x 4’ or 4’ x 8’ is a good beginner size.
 See our Raised Garden Bed Guide which covers the benefits of raised beds, how to build a raised bed, and what type of soil to fill a raised bed with.
 - If you want to go bigger, a 12’ x 24’ garden in the ground is probably the biggest a first-timer should go. For example, a garden that feeds a family of four could include: 3 hills of yellow squash; 1 mound of zucchini; 10 assorted peppers; 6 tomato plants; 12 okra plants; a 12-foot row of bush beans; 2 cucumbers on a cage; 2 eggplant; 6 basil; 1 rosemary, and a few low-growing herbs such as oregano, thyme, and marjoram.
- Whatever the size of your garden: Every four feet or so, make sure that you have paths that allow you to access your plants to weed and harvest. Just make sure that you can reach the center of the row or bed easily without stepping on the soil.
Choosing Vegetables
As a beginner, start by choosing easy vegetables that are also productive. We’ve listed ten easy vegetable below.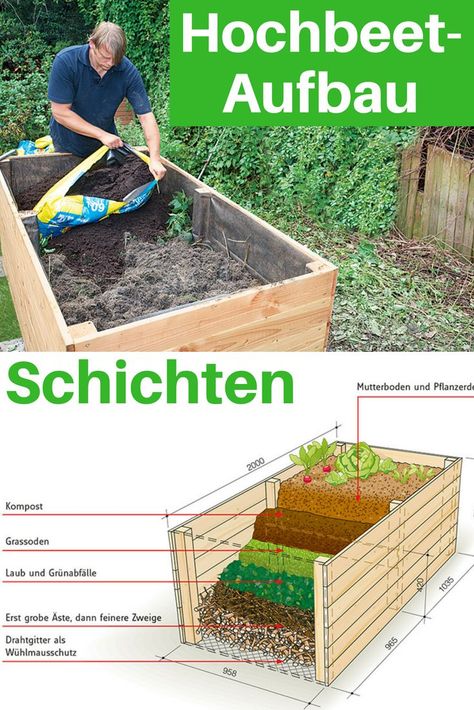 However, it would also be wise to contact your state’s Cooperative Extension Service to find out what plants grow best in your area. For example, if you live in an area with extremely hot weather, vegetables that prefer cooler temps may struggle.
Top 10 Easy Vegetables to Grow at Home
(Tip: Click on a veggie’s name to see its detailed Growing Guide.)
- Lettuce
- Green beans
- Radishes
- Tomatoes (bush variety or cherry are easiest)
- Zucchini
- Peppers
- Beets
- Carrots
- Chard, Spinach, or Kale
- Peas
Mix in flowers such as marigolds—which discourage pests, attracts pollinators, and adds some color!
Five tips for choosing vegetables:
- Choose what you (and your family) like to eat.
 If no one likes brussels sprouts, don’t bother planting them! But if your kids love green beans, put more effort towards growing a big crop of beans.
 - Be realistic about how many vegetables your family will eat. Be careful not to overplant, as you will only stretch yourself thin by trying to take care of tons of plants! (Of course, you could always give excess veggies away to friends, family, or the local soup kitchen.)
- Consider the availability of veggies at your grocery store. Maybe you want to grow tomatillos, instead of cabbage or carrots, which are readily available. Also, certain veggies are so far superior when homegrown, it’s almost a shame not to consider them (we’re thinking of garden lettuce and tomatoes). Also, homegrown herbs are far less expensive than grocery store herbs.
- Be prepared to take care of your plants throughout the growing season. Going on a summer vacation? Remember that tomatoes and zucchinis are growing strongest in the middle of summer.
 If you’re gone part of the summer, you need someone to look after the crops or they will suffer. Or, you could just grow cool-season crops such as lettuce, kale, peas, and root veggies during the cooler months of late spring and early fall.
 - Use high-quality seeds. Seed packets are less expensive than individual plants, but if seeds don’t germinate, your money—and time—are wasted. A few extra cents spent in spring for that year’s seeds will pay off in higher yields at harvesttime.
Where and When to Plant
If you are simply growing two or three tomato plants, this process is easy. But if you plan to grow a full garden, you need to consider:
- Where will each plant go?
- When will each vegetable need to be planted?
Here are a few guidelines for arranging your vegetables:
- Not all vegetables are planted at the same time. “Cool-season” vegetables such as lettuce and brocoil and peas grow in cooler weather of early spring (and fall).
 “Warm-season” such as tomatoes and peppers and cucumbers aren’t planted until the soil warms up in late spring and summer.
 - Plant tall veggies (such as pole beans on a trellis or sweet corn) on the north side of the garden so they don’t shade shorter plants. If you do get shade in a part of your garden, save that area for small, cool-season veggies. If shade is unavoidable in parts of your garden, save those areas for cool-season vegetables which appreciate shade as the weather heats up.
- Most veggies are annuals (planted each year). If you’re planning on growing “perennial” crops such as asparagus, rhubarb, and some herbs, provide permanent locations or beds.
- Consider that some crops mature quickly and have a very short harvest period (radishes, bush beans). Other plants, such as tomatoes, take longer to produce, but also produce for longer. These “days to maturity” are typically listed on the seed packet.
- Stagger plantings. You don’t want to plant all your lettuce seeds at the same time, or all that lettuce will need to be harvested at around the same time! Stagger plantings by a few weeks to keep ‘em coming!
When to Plant What
Every region has a different planting time based mainly on their weather, and every vegetable has its temperature preferences, too. See the Almanac’s Best Planting Dates—a gardening calendar customized to your local frost dates. Just enter your zip code (or postal code in Canada)!
For specific planting information, see our individual Grow Guides for over 100 popular vegetables, herbs, and fruit. For each crop, we provide specific information about how to plant, grow, and harvest, including watering and fertilizing and pest control!
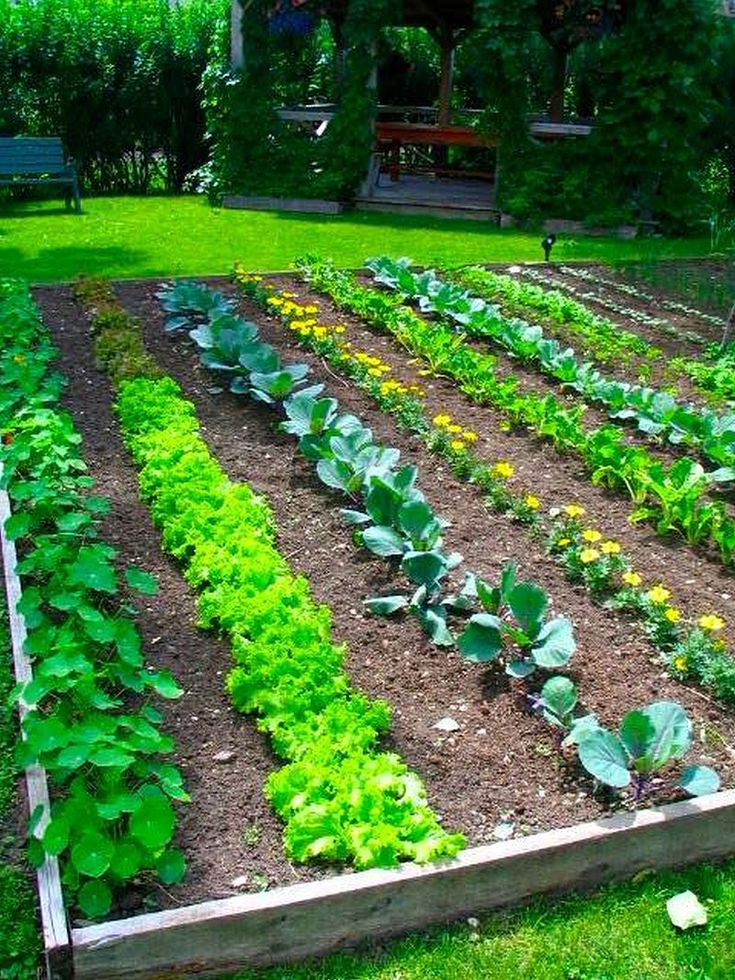
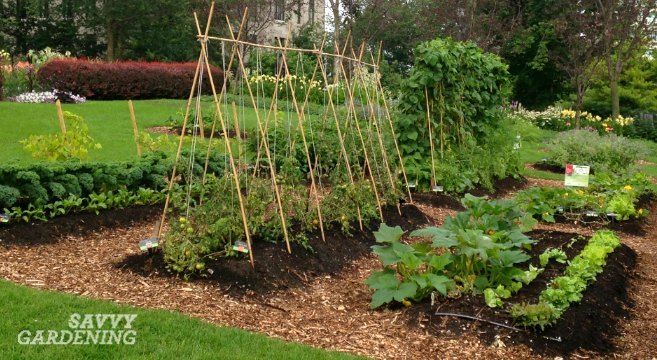
A Starter Beginner Garden Plan
To help out beginners, we thought that it may be useful to see a garden design. Here is an example of a starter family garden using mainly of the common easy-to-grow vegetables listed above. It also features companion planting (the practice of placing plants that thrive together next to each other).
You’ll see that we have given the garden decent-sized paths and mixed in a few herbs and flowers, too. Frankly, if we had grown this garden in our very first year, we would be thrilled! In planning the garden this way, we have made it so much easier for you to succeed with it.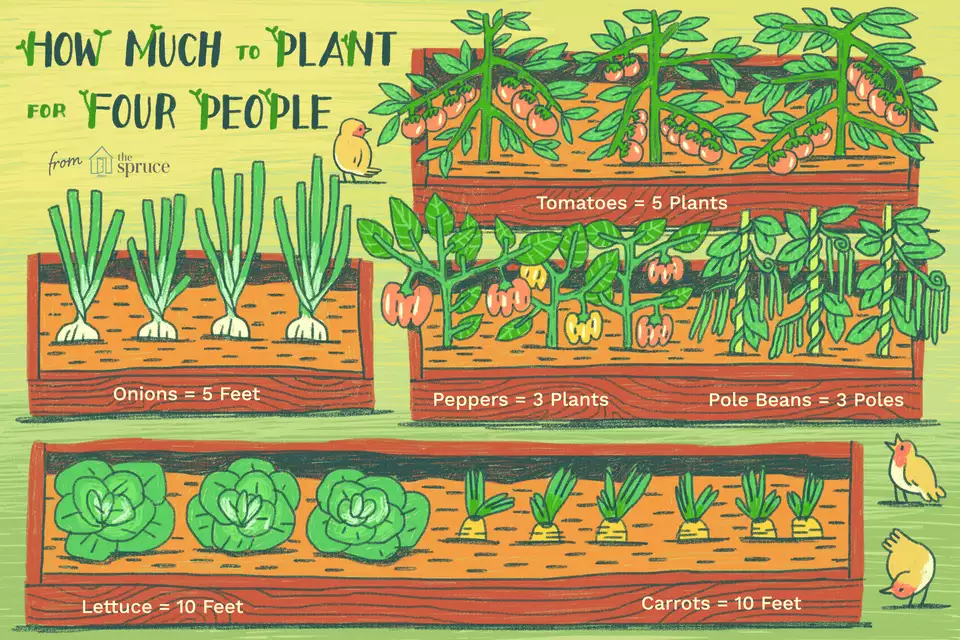
Click here to see the full plant list, number of plants, spacing, and spacing in rows.
Garden Planning Tool
The Old Farmer’s Almanac offers an excellent online garden planning tool which makes your garden planning fun and easy. With this tool, draw your garden plan on the computer and drop in your preferred vegetables, and it automatically calculates the proper spacing for each type of crop! This way, you don’t waste seed or crowd your plants. The Garden Planner automatically pulls in the frost dates for your specific location, identifies easy vegetables, and even identifies companion plants. Then you can print out your plan and the tool reminds you of your seeding and harvesting dates for every vegetable!
Plus, you’ll see many free garden plans for inspiration! Over time, you’ll see that this tool also provides “crop rotation” so that if you plan a second season, you can properly reposition your plants to avoid pests and disease.
With new gardeners in mind, we offer a FREE week to try the Garden Planner—ample time to plan your first garden.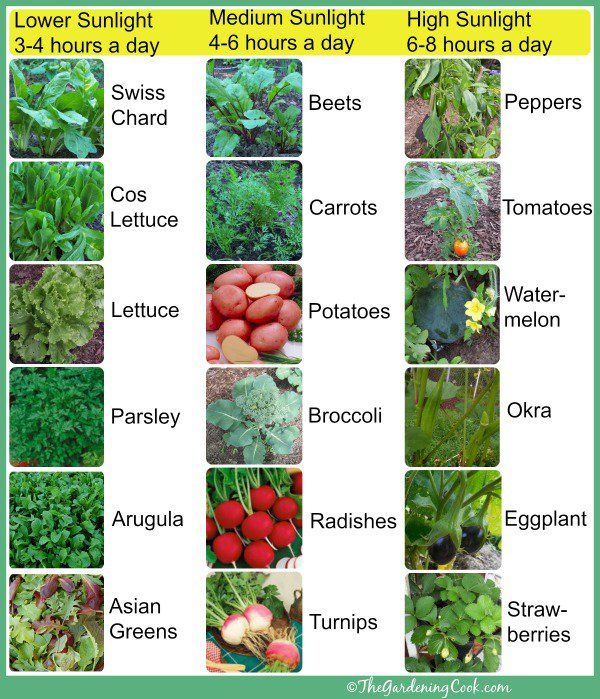 Check it out here: http://gardenplanner.almanac.com/
Photo: Almanac Garden Planner. Earth’s most popular tool for planning your garden. Try it free for 7 days.
Any questions or advice about starting your garden? Check out some of the comments below. Many of your questions may have been answered already by our Almanac community or you are welcome to add your own comment. Happy gardening!
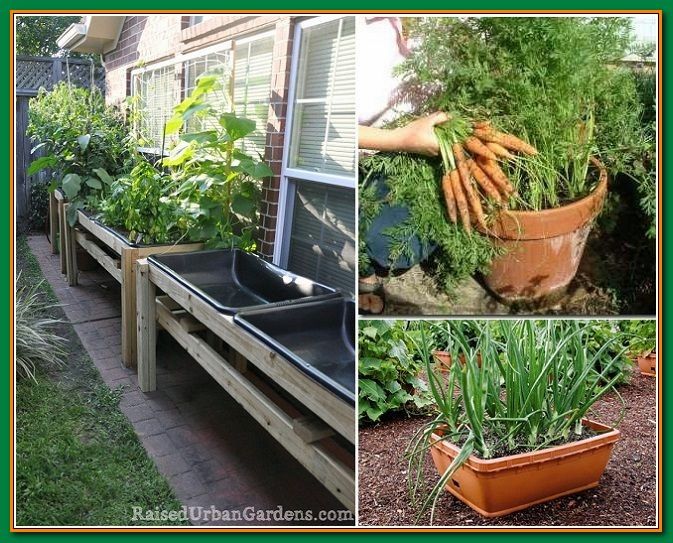
How to plan a garden on a small plot
If you cannot boast of a large summer cottage, but really want to set up a full-fledged garden, our article will come in handy for you.
Any owner of a country house wants to have a garden bed with fresh herbs and vegetables at hand, even if the plot is very modest in size. Fortunately, thanks to some tricks, it is possible to set up a garden that will bring a good harvest even in the most cramped conditions - there would be a desire. We tell you how! nine0003
Experiment with the shape of the beds
It is not at all necessary to set aside half of the summer cottage for a traditional garden when you can resort to non-standard agrotechnical methods.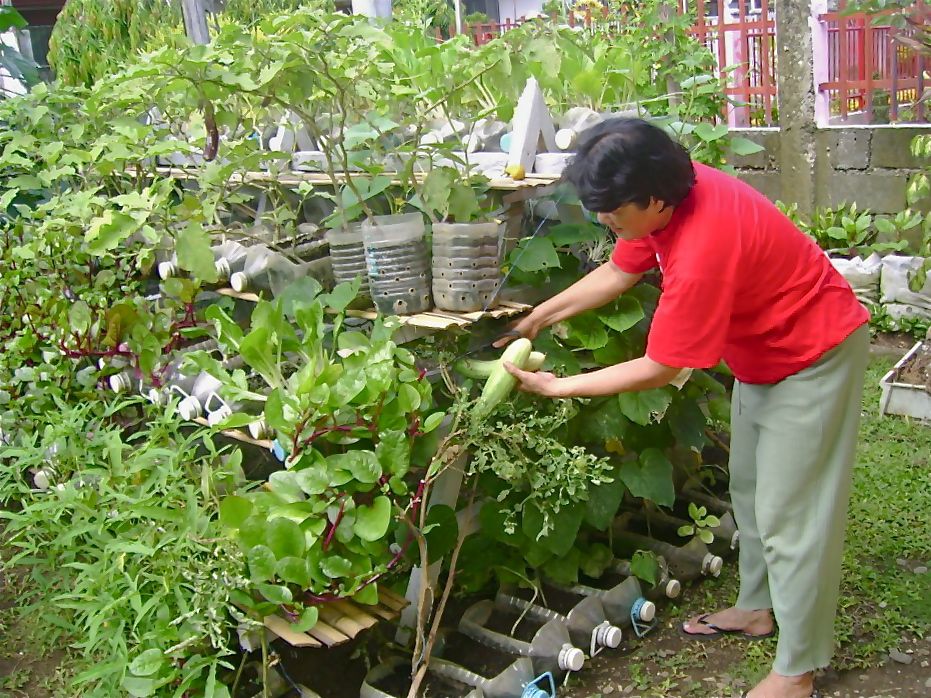 For example, vertical beds take up much less space, and their yields are often higher.
We have already written about the African garden in bags, which allows you to get a good harvest even on poor soil, because it is much easier to buy quality soil to fill several bags than to completely replace the fertile soil layer on the site. nine0003
In addition, many plants can easily be grown in containers. All this will allow placing an impressive number of vegetable crops on 4 acres.
Combine a vegetable garden with a garden
Even on the smallest plot, you want not only to grow onions, cucumbers and potatoes, but also to set aside a corner for a flower garden and berry bushes. A good compromise is an ornamental garden that combines a garden, a vegetable garden, and a flower garden. nine0003
Fortunately, many vegetable crops and herbs look very beautiful and fit well into landscape design. For example, why not include a bed of greens or cauliflower in your flower garden?
The main requirement of an ornamental garden is a beautiful design of the beds.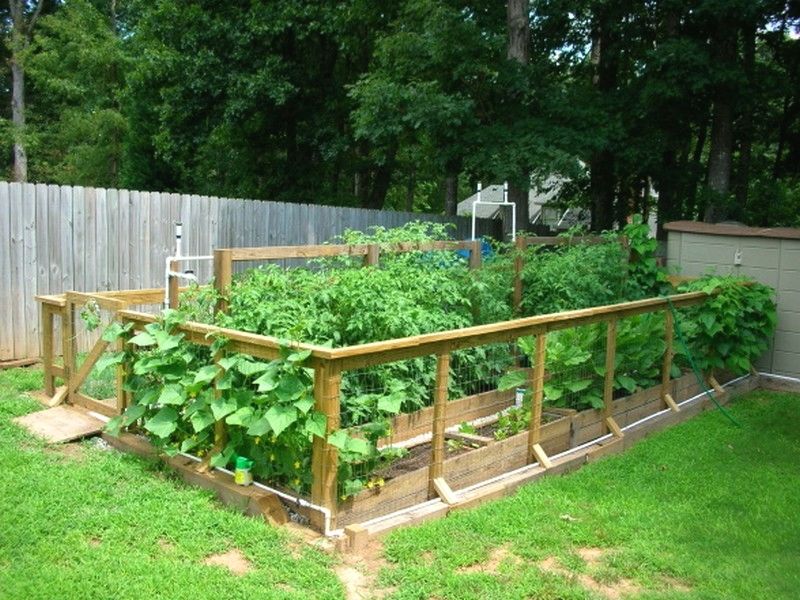 For example, fences can be made from colored glass bottles, and the beds themselves can be made in the form of a mandala. There are a lot of ideas for creative design of the garden.
Choose compact crops
Naturally, if you want to grow tall peppers and tomatoes, a tiny bed is a must. But what prevents you from planting undersized varieties of these same crops on your site? They take up much less space.
Prefer early-ripening varieties
Another trick that will help you make more efficient use of space in a small garden is to grow early-ripening vegetables in multiple batches. By the time you harvest your first crop in the first half of summer, you should already have seedlings ready for a new batch. Depending on the climate and weather conditions, two or three crops can be harvested from one garden per season. nine0003
Plant compacted
Crops like tomatoes and potatoes take up a lot of space in the garden, but only at the end of the growing season.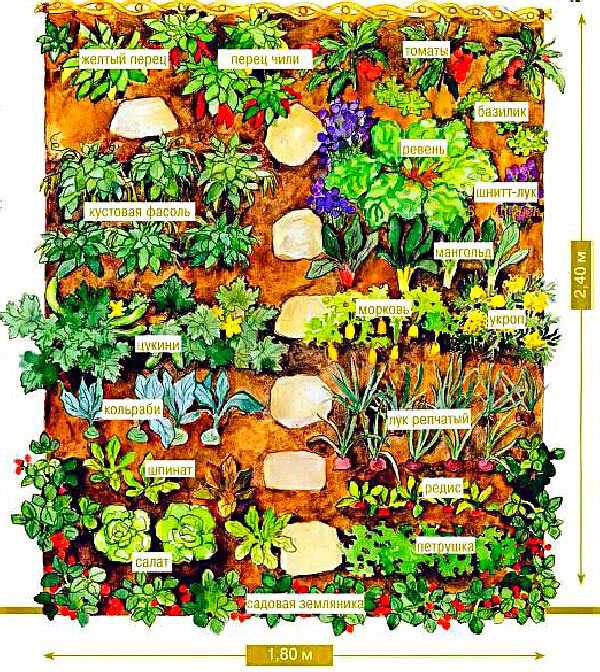 In the meantime, young seedlings have not yet had time to turn into sprawling bushes, lettuce, dill and other "early" greens can be grown between rows without any problems.
Fall in love with hanging and climbing crops
All plants that develop vertically - creep up or hang down - are your best friends, because they do not take up much space in the garden! For example, green peas can be planted near the fence, and hanging tomatoes can be hung on the porch. nine0003
What tricks do you use to save space in your garden? Share your secrets in the comments!
How to properly plan a garden plot
Increasingly, a dacha is no longer just a place to solve food problems, but also a place to relax. And not the whole area is allotted for the garden. How to plan a garden so that there is not only a harvest, but also that it is beautiful? And I also want to leave a place for garden "beauty". Everything is possible, you just need to find the right approach. nineOl000 2.3 Cultivation method and width of beds and spacing
- 5.1 Vertical beds
- 5.2 Garden along the fence
- 6.1 from small areas to maximum: Seal
- 6.2 Pre -eating
- 8.1 Application rules
- 8.2 Types of green manure plants and their choice
Choosing a place for a garden
Most plants love sunlight. Then they grow and bear fruit normally. It is necessary to choose a place for a vegetable garden taking into account this fact. It is especially important to allocate a well-lit area for a garden for the middle lane and northern regions.
It will be beautiful and convenient if everything is done according to the rules Before planning, take a closer look at how the shade is distributed on your site during the day.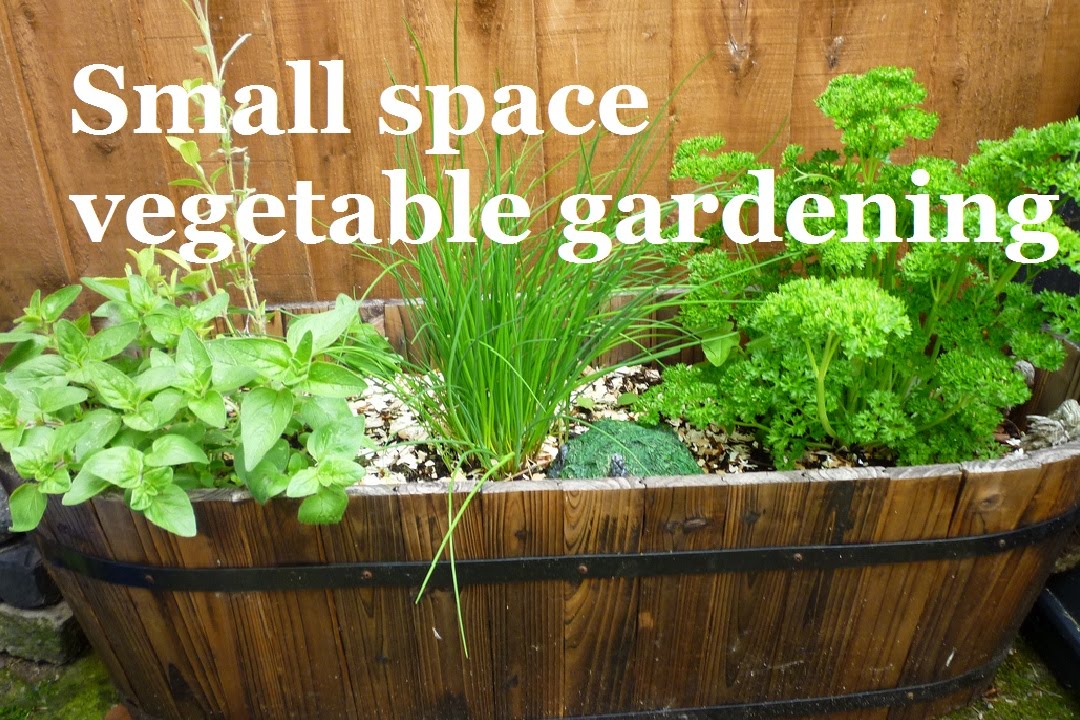 It is not only buildings that are discarded. Another shadow gives a solid fence, trees and shrubs. According to the results of observations, divide the area into three groups: illuminated all daylight hours, until noon and all day in the shade. nine0003 Choose a place for a garden, taking into account the amount of sunlight on the site
For regions with a cool climate, the best place for a garden is where the sun shines throughout the day. In the south, choose other areas - in partial shade. For the southern regions, it is ideal if the sun is only in the morning, and in the afternoon the plot is covered with shade. Where there is shade throughout the day, only shade-loving plants can be planted. There are few of them in the garden, but there are enough flowers or ornamental plants. So you can make a flower bed. nine0003
How many beds do you need
To plan a garden, you need to know how much space you need to allocate for each type of plant. When you decide on the area, it will be possible, already in the planning process, to choose the size of the beds and their shape.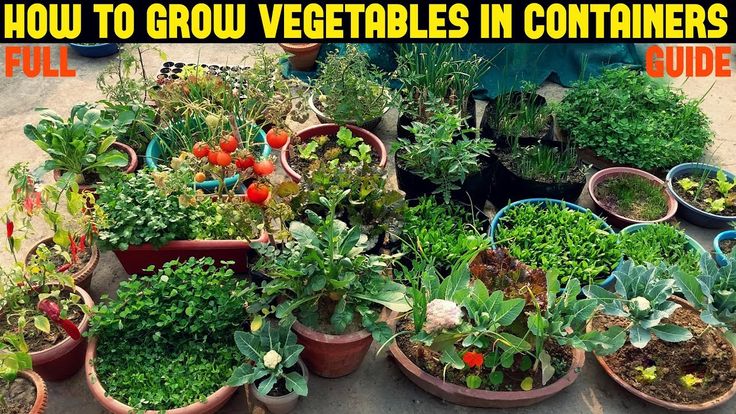 So, how many beds do you need? First of all, you must decide what you want to grow in your garden and how many kilograms you would like to have each of the crops. The easiest way to do this is in the form of a table.
| Vegetables | Yield in kg per hectare |
|---|---|
| Potatoes | 250-300 kg |
| Carrot | 230-270 kg |
| Cabbage | 500-600 kg |
| Beets | 300-370 kg |
| Bow | 100-120 kg |
| Tomatoes | 60-70 kg |
| Cucumbers | 350-420 kg |
| Eggplant | 200-350 kg |
| Sweet pepper | 150-200 kg |
Next, you need to find yield data per hundred square meters in your area. Data is needed for each type of plant that you want to grow. The table shows the average yield in Russia. We counted them into kilograms per hundred square meters. By region, they will differ, and significantly. But for the first estimate, you can take these numbers. After the first harvest, adjustments can be made. You can also try to find out from your neighbors how many vegetables they grow and focus on local indicators. nine0003
Calculate crop area
All you have to do to calculate the area to plant is divide the amount you plan to harvest by the crop yield. Get how many acres you need to allocate for this vegetable. Then, when planning a garden, decide on the length and width of the beds, then you can finally understand how much space is required.
Two gardens. And there, and there, there is everything you need. It all depends on preferences and on the required volumes of grown productsLet's look at an example. For example, we want to grow 250 kg of potatoes, 50 kg of onions, 50 kg of tomatoes and 50 kg of cucumbers. We consider:
- The yield of potatoes is 250-300 kg per hundred square meters.
 We want the same 250 kg. That is, we will allocate 1 hundred square meters for potatoes.
 - Luca want 50 kg. Productivity - 100-120 kg. We consider: 50/100 = 0.5 weave.
- Tomato need 50 kg. Productivity is 60-70 kg. Calculation: 50/60 = 0.8 weave.
- Ogurtsov plan to get 50 kg. The yield is 400 kg, we get 50/400 = 0.125 weave. nine0070
In the same way, we count for all plants that we want to grow in the garden. We add up the obtained numbers and compare the result with the area that we can allocate for the garden, make adjustments.
This is if done "according to science". If a garden is more of a pleasure for you, then take a plot plan on a scale, make patterns of beds of different shapes and sizes on the same scale. Move the beds around the site until you get a picture that you like. Then just distribute the vegetables in the beds. But, even in this case, it is necessary to take into account the illumination. nine0003 There is no gain in the area, but it looks interesting and the illumination can be better
The location of the beds
If we talk about orientation to the cardinal points, then the most optimal placement of the beds is from north to south.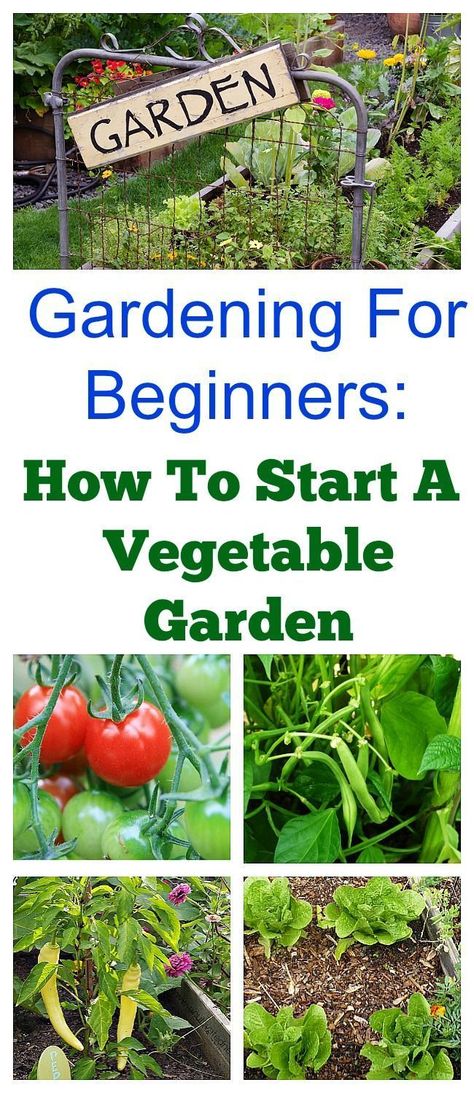 In this case, the landing will be illuminated all day, the shading will be minimal. But this is true for regions with cool summers. In the southern regions, the problem is different. Not how to achieve better lighting, but how to prevent the sun from burning plants. The task is the opposite, but it is by no means easier. Here the plus is that the orientation of the beds is not so important. nine0003 You can plant plants both along the long side of the bed and along the short side
Northern regions
The choice of a place for vegetable crops is also influenced by the location of the region, the presence / depth of groundwater. Recommendations for the northern regions:
- Arrange the beds from north to south.
- Guessing that the shadow of the house or trees on the garden falls the least.
- When the water level is high, we try to take the highest places under the garden or make ditches around the perimeter to drain water. nine0070
- We arrange high or raised beds.
These are general principles and rules. See for yourself what suits you and what doesn't. As for the high beds, it is worth saying that they require more time and money for the device. But they justify themselves. Firstly, they warm up earlier, and secondly, soil waters and substances dissolved in them have a minimal effect on plants. Thirdly, the garden season can be extended, since it is easy to make something like a greenhouse by making arcs on which to stretch the covering material. This will also protect the crop from sudden frosts. nine0003
Garden in the south
For the southern regions, the layout of the garden is subject to other principles. It is necessary to protect the plants from the scorching sun and ensure normal watering. Here's what you can do:
High beds in the south are also applicable, but really high and with light walls (whitewashed). Reasons are different. In the southern regions with dark soil, it heats up so that it is impossible to walk barefoot - it feels like in a frying pan.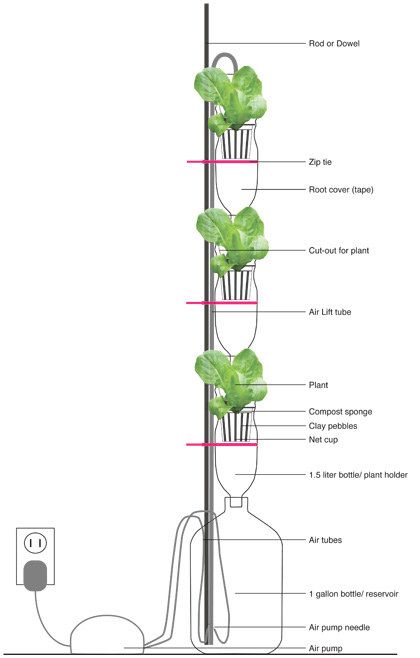 With high beds, lift the plants above the hot ground. Well, a limited amount of soil is easier to shed. In addition, you can also put up arches and pull on a covering material or shading net to protect from the scorching sun. nine0003
Growing method and width of beds and row spacing
Not all gardeners divide their plots into beds. Many simply plant plants in rows, not even always separating one crop from another. Sometimes the separation is a wider "pedestrian" aisle. In principle, this is possible, but dividing into beds makes it easier to care for, makes the garden more attractive. When properly processed, it increases yield.
Who said that it should only be straight?How to plan a garden for beds
There are several systems for dividing into beds. They determine the width, the length of the landing, and some also the row spacing.
- Narrow beds . The width of the beds is 45 cm, the distance between them is 90 cm. Why is that? In a regular bed, the edge plants are usually taller and stronger because they get more light.
For this reason, they make a bed 45 cm wide, planting only two rows of plants. Thus, high yields can be achieved, even sun-loving varieties ripen in the middle lane. But there is also a significant minus: wide aisles reduce the “working” area, and they are also overgrown with grass that you have to fight with. nine0002 The famous gardener Igor Lyadov grows a splendid harvest on narrow beds
- Regular beds or regular width - from 50 cm to 90 cm or even up to 1 meter. Row spacing - from 40 cm to 60 cm. They can be level with the ground or raised. Raised - this is without walls, but the seedbed is higher than the level of row spacing. The height difference is formed due to the brought soil or the site added from other places.
- Raised beds . Walls are made from boards, slate or other similar material, humus, a layer of earth are poured inside the box. Such beds are not flooded by floods or rains, they warm up better. They are more comfortable - easier to handle, no need to bend too low.
 But the cost and time for the device require more.
 Increasingly, beds occupy only part of the garden. The rest of the plot is allocated for a recreation area, garden, rock garden and other similar garden "excesses"
- Warm beds . Differ from high "stuffing". Inside the box of boards or slate, branches, foliage, humus, a layer of soil are laid in layers, in which plants are already planted. Width - up to 1 meter. The good thing is that rotting foliage warms up the soil, which allows you to plant plants earlier. This is important for the northern regions, for the southern regions it is not so important, but it is also practical due to the higher results that the prepared soil gives.
You can use any of the methods for growing plants in garden beds. You can also choose any width of the beds. Optimally - no more than one meter. Maybe less. We select it individually: it is important that you can easily reach the middle without much difficulty.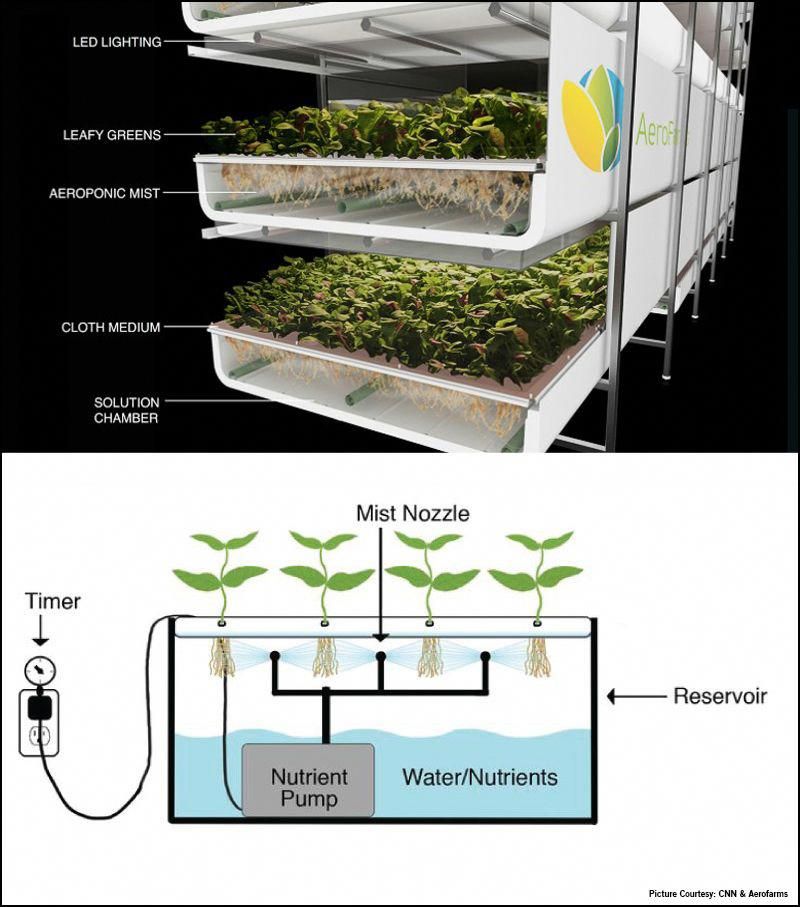 And not only to reach - you will have to handle the middle of the landing, while it should not be too uncomfortable. nine0003
Bed shapes
The traditional shape of the beds is a rectangle. Its width, as you understand, is from 45 cm to 100 cm and depends only on your desire and the chosen method of growing. The length of the beds - again, it depends on your desire or on the layout of the site. Why choose a rectangle more often? Because this is the most rational use of the garden area.
Forms of beds can be any. As in this case, they can emphasize the shape of a flower bedIn general, there can be beds of any shape: square, triangle, polygon, circle, oval and more complex shapes. These forms may look more aesthetically pleasing, but more space "walks". So choose the shape of the beds at your discretion. It affects the yield slightly, but the appearance of the garden is very different. nine0003
Garden beds on a sloping plot
Planning a vegetable garden on a sloping plot is more difficult.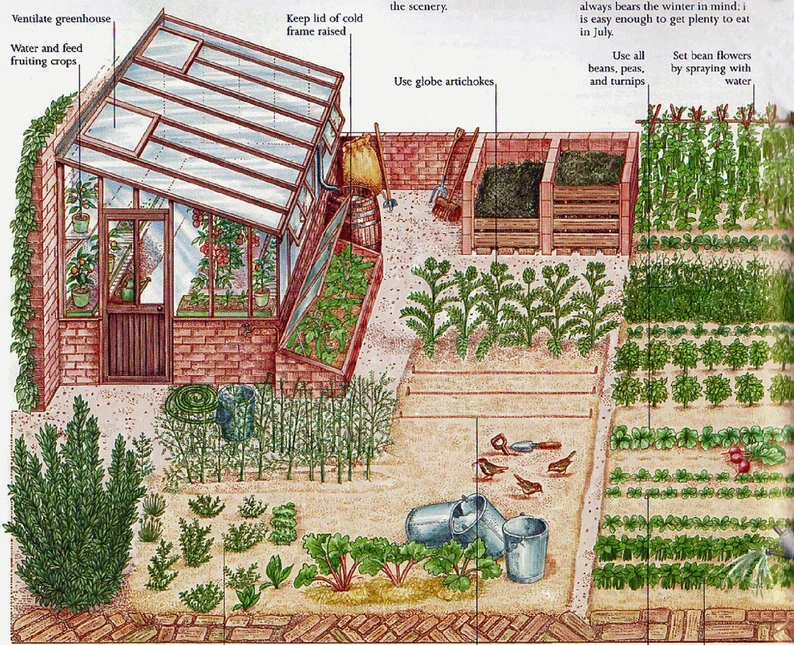 Here, the retaining walls set the direction of the beds and it is too difficult and expensive to change something. You have to use what you have to the maximum. Everything is fine on the southern slope - the illumination is ideal, and the retaining walls additionally heat the plantings - they accumulate heat, then warming up the air. Therefore, we make the paths closer to the edge of the leveled area - so that the heat from the walls gets to the plants. nine0003 Where to make paths on a site with a slope
On the northern slope, the retaining wall provides shade. Near the wall, she lies almost all day, while the edge receives more sun. Therefore, we make paths near the wall itself, pushing the beds to the edge of the site. In this case, it is more convenient to process landing one level higher. That way you don't have to bend over at all.
How to lay out beds on the east or west slope? Observe which part is illuminated more, which receives less light. Make paths where there is less light.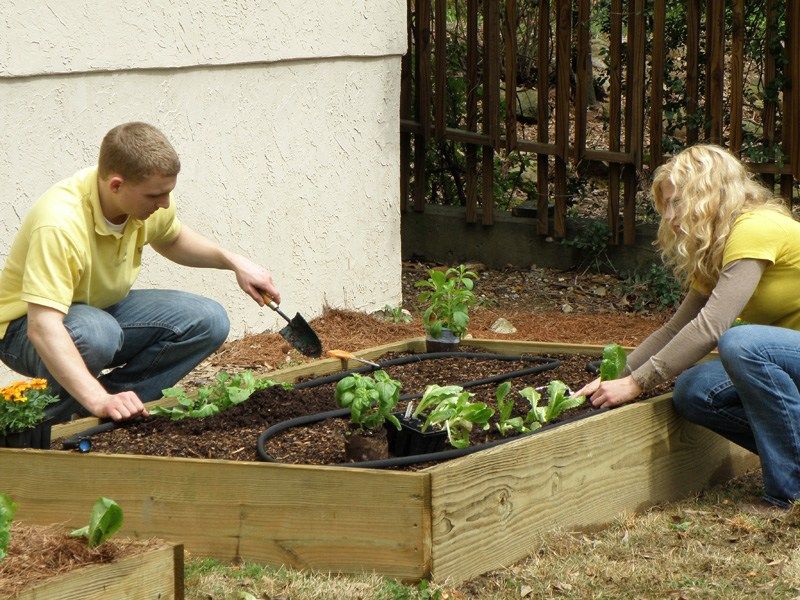 nine0003
You can also make small beds on a slope that is not leveled with supporting walls (example in the photo below). Install two wide boards in parallel (or knock together a couple of boards narrower). The distance between the boards is the width of your garden. Optimal - 70-90 cm.
Beds can be made on the slopes themselvesLay the boards on the slope "on edge". You can dig a little, deepening the bottom edge into the ground. On both sides of the board, hammer in the pins that will hold it in this position. From short lengths of boards, make mini-retaining walls, fill the voids with soil. Now you can plant plants. nine0003
It is convenient to grow herbs and aromatic crops on such beds. Suitable for strawberries, you can plant tomatoes or bush beans. In principle, the selection of crops depends on the illumination. And one more thing: weaving or giving a lot of volume plants are not very good on such a slope. And keep in mind that the walls will hardly accumulate heat, except perhaps in the spring.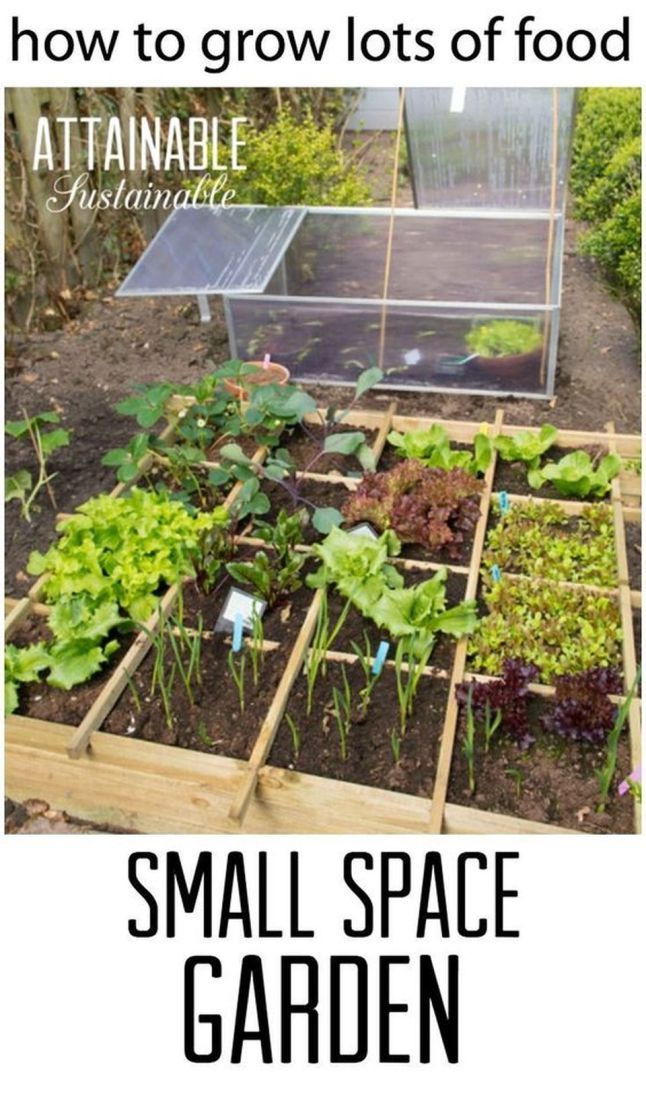 Later they will be covered with greenery.
How to organize a garden in a small area
Not everyone wants to have a big garden. More and more summer residents prefer to relax in the country, and not to cultivate plantings. Nevertheless, going to the country with a full range of products is “too much” for many. Therefore, they make a couple of beds, where they plant greens and a couple of bushes of various vegetables. In principle, this is a global trend, so there are more than enough ideas for organizing beds in a small space. nine0003 Mini-garden can even be organized on the terrace
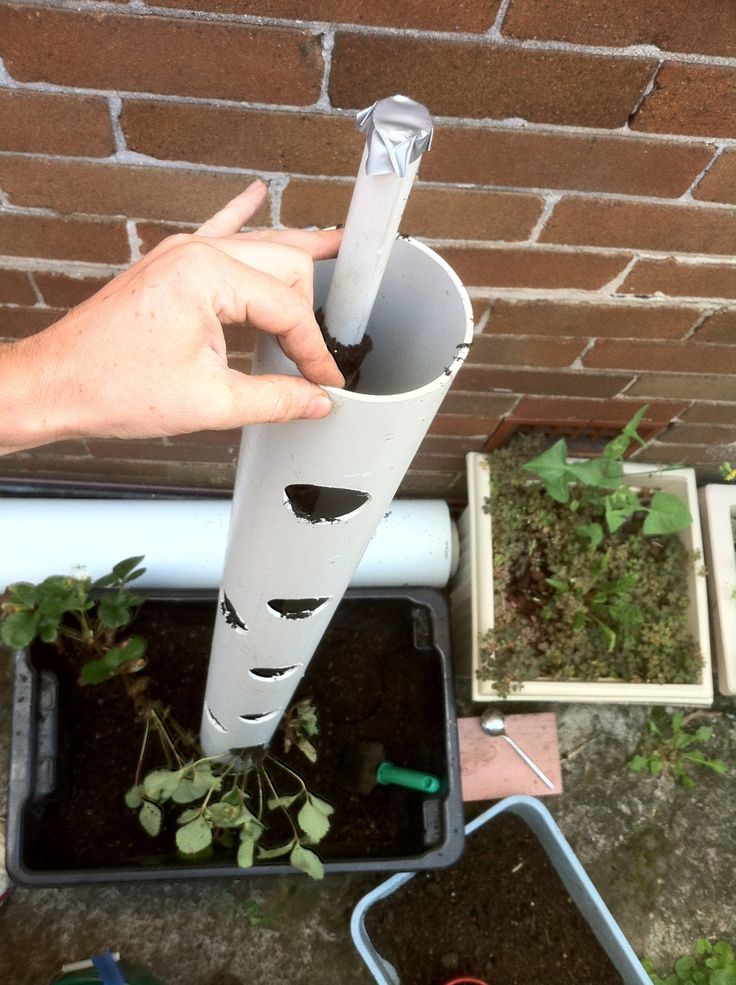
Vertical beds
An interesting idea is to grow plants on vertical beds. This name hides a lot of different ways. The only thing that unites them is that plantings / crops are located one above the other. They can be offset or exactly one under the other, but they all tend upward and occupy a minimum area.
Vertical plantings do not require a lot of space Option one - a wall for a vegetable garden.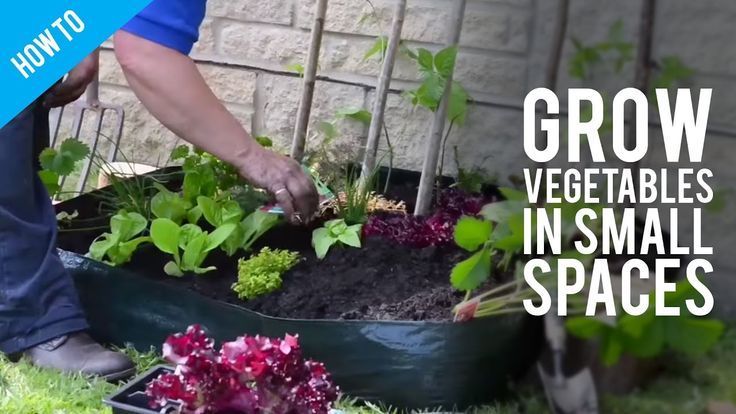 Trays, boxes with earth are hung on an existing or specially built wall or fence, in which plants are planted / sown. This is how green crops and various herbs are grown. If you want, you can plant curly or weaving. But it makes sense to land them together, giving support in the form of a grid, a wooden lattice. nine0003
Hanging planters on the wall is not for everyone. Still, you will have to water, so the wall may get wet or the finish will be damaged. In this case, you make a rack on which you place the containers. And this stand may not be near a wall or fence. She can, for example, separate the garden from the garden. Or cover some areas or buildings (in front of the toilet, shed, compost pit).
The most popular variety of boxes and boxesYou can even use large diameter vertically or horizontally fixed plastic pipes in which to cut "windows" for planting. Strawberries feel best in such plantings, but greens and aromatic plants will not be offended. nine0003
Garden along the fence
Not everyone has a fence along the perimeter of the entire plot.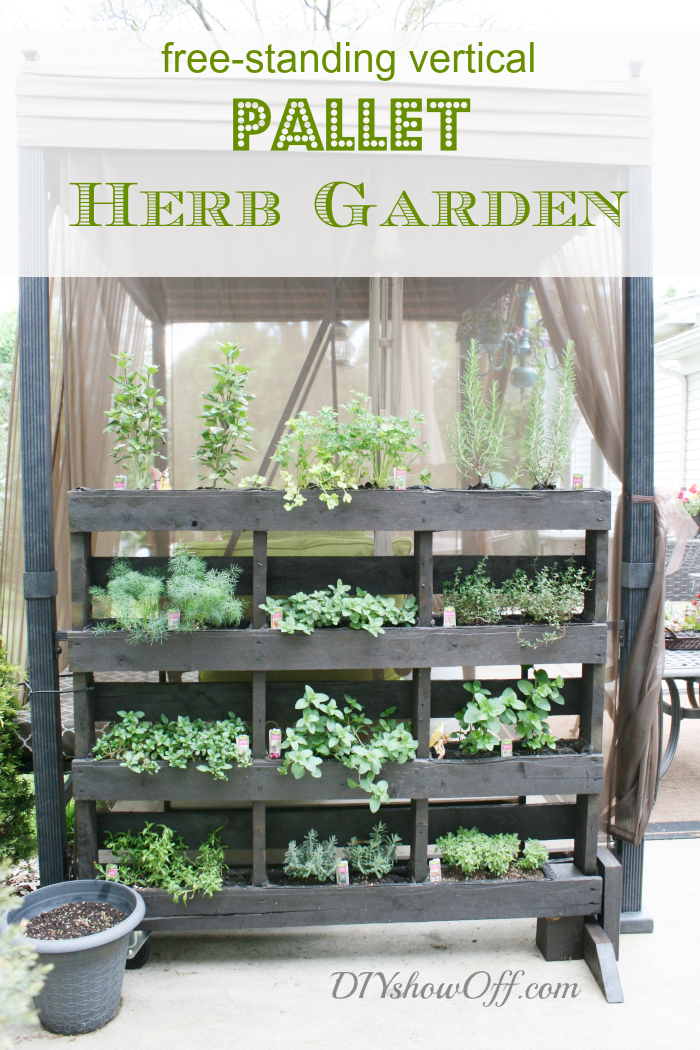 But if it does exist, beds can be made under it. An exception is corrugated fencing in warm regions. The metal heats up so that everything just burns out. In the northern ones, this is not a hindrance - it will additionally heat the plants.
The arrangement of beds under the fence depends on the groundwater level, soil type and rainfall. If the soil is good, the water is not standing even after heavy rain, you can simply separate the part for planting. You dig up a bed 50-60 cm wide, put a border. nine0003 Height and material for the border - your choice
If the soil is "not very good", there is a lot of water or you just want a more well-groomed appearance, we make high beds. Add partitions and get space for greens, cucumbers / tomatoes. If you do not want to "spoil" the fence, you can make a full-fledged box. In any case, it is tightened from the inside with geotextiles. To protect against moles, you can lay a fine-mesh metal mesh on the bottom.
As mentioned above, the width of such a bed is 50-60 cm.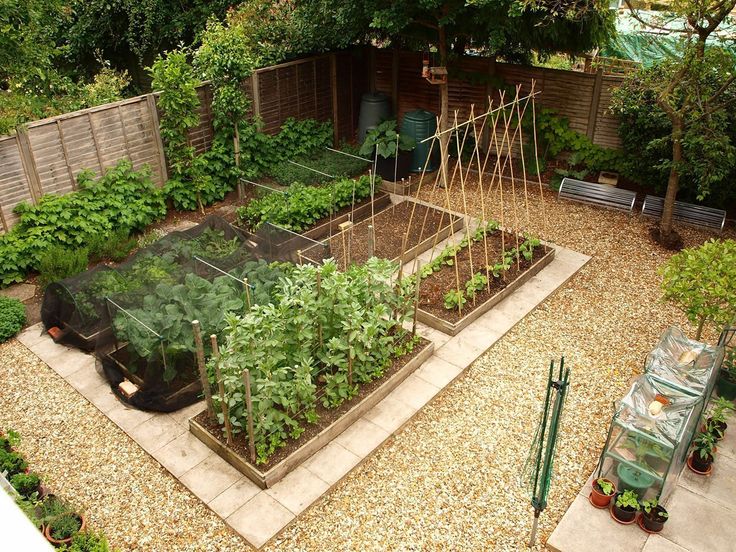 You need to reach the far edge without much effort. And stand in this position for a while - plant, weed, water. Height is entirely up to you. As well as the material of the walls. nine0003 Even a narrow passage to a house or garden can be attractive
A couple of ideas for small garden areas
If you have a small garden and want to achieve maximum results, give preference to those plants that grow well in your area and guarantee a yield . It is possible to occupy squares for exotics, which probably will not survive, but if the area is large. The same goes for time. If you can allocate a minimum of time to care for the garden, you should not plant plants with complex agricultural technology. They take a lot of time, and a positive result is not guaranteed. nine0003
From small areas to the maximum: compaction
Use the principles of dense planting - this is when another plant is planted between plants of one species. Actual for narrow beds or for small gardens. The rules for selecting plants are as follows:
- so that they are not affected by the same diseases,
- to take food from different depths,
- "seals" ripen earlier than "basic".
The landing site must also be taken into account. For example, lettuces and cabbage are best planted in the aisle. The remaining cultures are in the same row as the main species. List of what can be compacted:
- beets - dill, lettuce;
- potatoes - garlic, beans, radishes;
- cabbage - lettuce, dill, spinach;
- carrot-spinach, radish;
- zucchini, squash - beans, beans, dill, corn on the cob (remove young).
These are the most common co-growing schemes. As you can see, dill, radishes and salads do not need to be allocated a separate place at all. They are perfectly combined with various garden crops. Just don't plant them all at once. Optimally - with an interval of a week or 10 days, otherwise everything will reach maturity at the same time, you will not know where to put it. nine0003
Pre-seeding and post-seeding
Another way to optimize your garden is to use pre-seeding or post-seeding.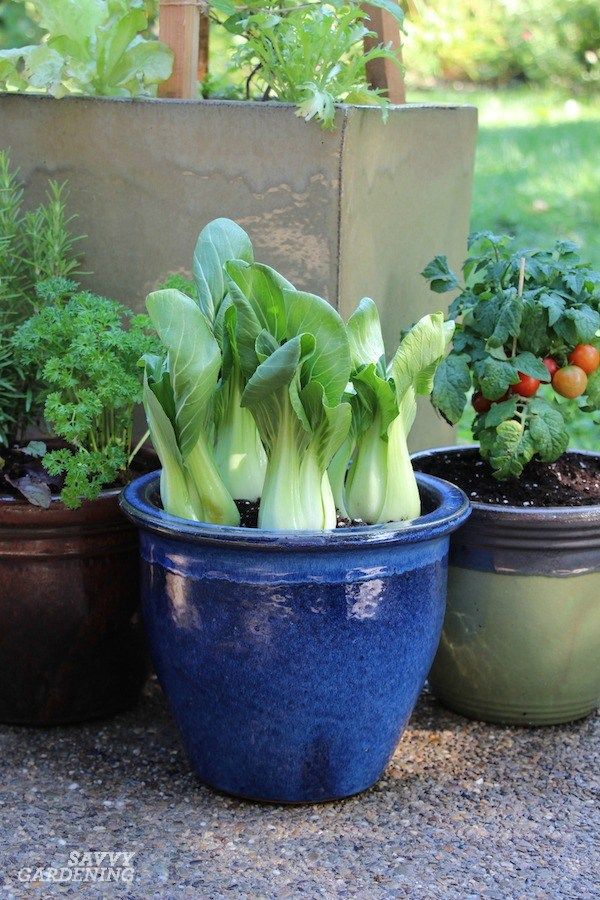 Post-sowing is when new plants are planted in place of mature plants. If late-planted species are sown in early spring with fast-maturing species, this is called pre-sowing (pre-sowing). Radishes, lettuce, greens, onions on a feather, watercress are suitable for previous or subsequent sowing.
Principles of crop rotation
To have a harvest every year, change the area under planting plants of the same species. For example, don't plant tomatoes in the same place every year. Pests and diseases of a particular type accumulate in the soil. By changing plants, planting disinfectant plants, you destroy pests. nine0003
Tomatoes, eggplants, potatoes are all nightshade and have the same pests.
So when choosing plants, you should also look at the classification of species. To make it easier to navigate, we present a table of order / compatibility of cultures.
| Crops for planting | Good predecessors | Acceptable predecessors | Bad predecessors |
|---|---|---|---|
| Medium and late cabbage | Peas, beans, beans, cucumber, carrots, early potatoes | Beets, cabbage | |
| Early varieties of cabbage, cauliflower | Onions, cucumbers, beans, peas, beans, green grass. | Carrots, tomatoes. | Root vegetables, cabbage |
| Beets | Potatoes, cucumbers, herbs, green manure. | Tomatoes, onions, carrots, cauliflowers and early cabbages | Beets, late and mid-ripening cabbages |
| Cucumbers, squash, squash, zucchini | All legumes, onions, garlic, cabbage, except late. | Potatoes, beets, greens | Tomatoes, carrots, late cabbage. |
| Tomatoes | Cucumbers, turnips, cauliflower, greens, green manure. | Onion, beetroot, medium and late cabbage. | Tomatoes, potatoes |
| Onion, garlic | Legumes, potatoes, cucumbers, cauliflower and early cabbage | Beets, tomatoes, late cabbage | Greens, carrots |
| Potatoes | Legumes, green manure, cucumbers, cauliflower and early cabbage | Beets, carrots, medium and late cabbage, greens | Tomatoes, potatoes |
| Greens | Legumes, onions, cauliflower, early cabbage, cucumbers, green manure | Potatoes, beets, herbs, tomatoes | Carrots, late cabbage |
| Legumes | Potatoes, onions, garlic, whole cabbages, cucumbers | Root vegetables, green manure, herbs, tomatoes | Legumes |
How to "change" vegetables in the beds
If you change the places for planting plants according to the table above, it is most convenient to divide the garden into 4 parts. For the first time, plant plants that have the same requirements for soils, fertilizers in a certain area. For example:
- Reacting to the introduction of organics: pumpkin, cucumbers, squash, cabbage.
- Less demanding soils: tomatoes, peppers, eggplants. nine0070
- Root crops (carrots, beets, turnips, turnips, rutabaga).
- Potato.
Next year we are moving everything. Since autumn, we add humus to the area where the potatoes were. We plant plants of the first group there. Plants from the second group move to 1 plot, etc. Schematically, the first crop rotation option for the garden is shown in the left figure below.
Proper crop rotation in the garden - what to plant then Sometimes potatoes and tomatoes occupy half the area. In this case, we divide the second half into three sections, where we place the plants of the remaining groups. Every year potatoes / tomatoes move from one half to another, and vegetables in the second half also alternate with each other.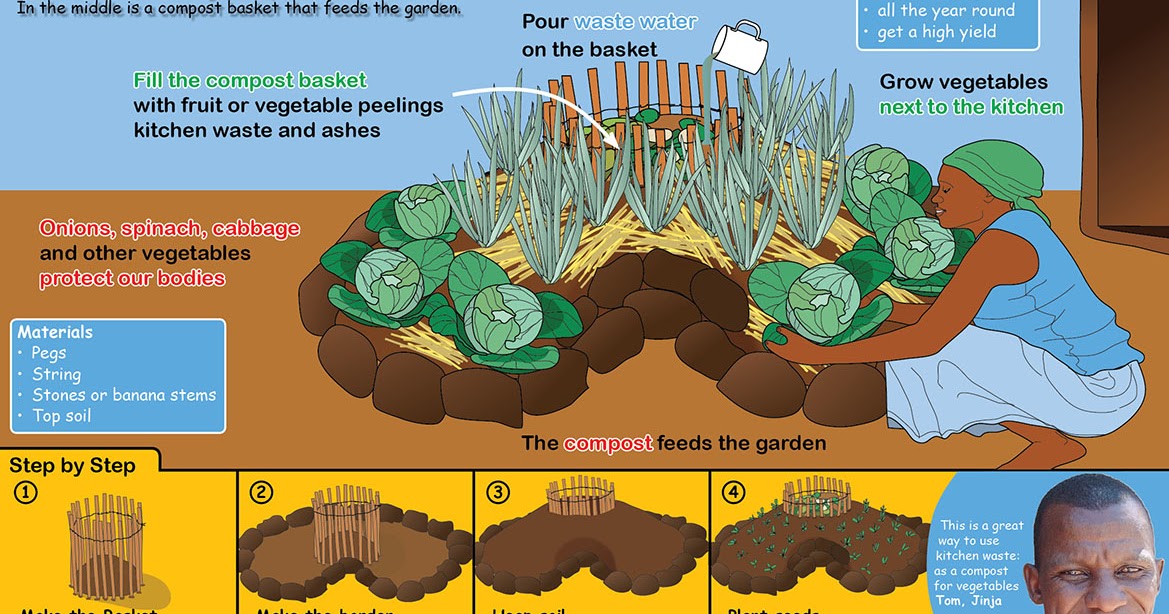 Schematically, such a crop rotation is shown in the right figure. nine0003
Green manure
The gardener has two global tasks: to maintain or improve soil fertility and to fight weeds. There is one method that will solve both problems at once - the use of green manure. These are plants that grow quickly, form dense greenery that suppresses the development of weeds. They are sown after or before the main sowing / planting, then the greens are cut off, leaving the roots to rot in the ground. Rotting, they enrich the soil, and also make it looser. And some of the green manure also kill diseases. So this agricultural technique is really very important. nine0003 It's not stupid. This is an agricultural technique for improving soil fertility
Rules of application
A few basic methods for using green manure. They are sown immediately after harvesting with a solid carpet (lupine, rapeseed, phacelia). Or in early spring before planting the main crops. Scatter the seeds over the surface, then close up with a rake.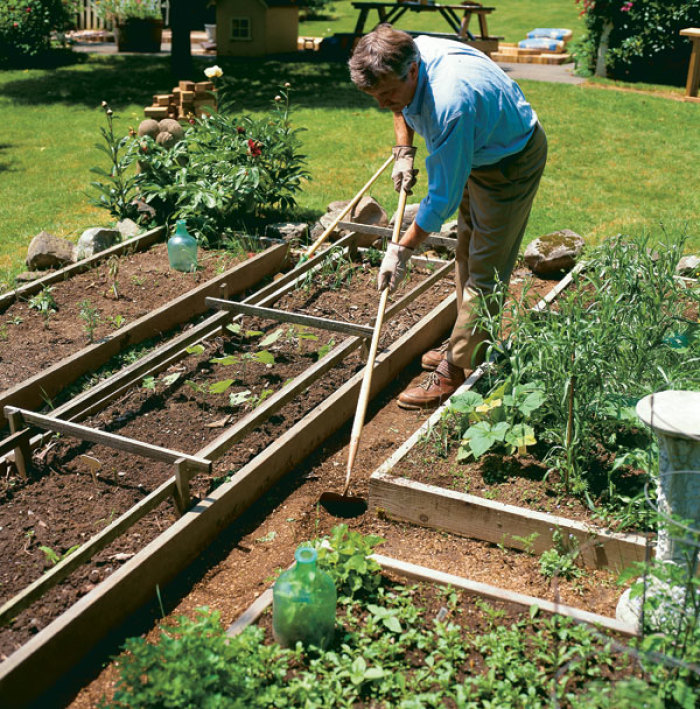 Green manure is mowed two to three weeks before planting the main plants. Greens can be used for mulching. You need to cut it before the seeds appear, otherwise you will get a new type of weed. nine0003 Growing seedlings on green manure
When planting seedlings, green manure may not be mowed. We just make the hole bigger, plant the seedlings, and mulch the soil. If green manure covers the sun, they can be cut, but in general, they even out temperature fluctuations. When the seedlings have taken root, you can cut off the green manure, mulch the soil with foliage.
Types of green manure plants and their choice
Many plants are suitable for soil improvement. When choosing a green manure, take into account what you will plant after it. nine0003
- Enriched with nitrogen almost like manure application: alfalfa, clover, sweet clover, chink, lentils, peas, beans, etc. They also kill the nematode.
- General improvement of topsoil and nematode control: winter rye and wheat, spring oats and barley, Sudan grass, millet, fescue.
 Dense greens don't rot very well, but make an excellent mulch. Suitable for all types of soil, including acidic ones.
- Soil enrichment (not suitable for acid soils): rapeseed, mustard, colza, radish. The greenery is soft, rots well, but it is necessary to mow it to the pasture of the "arrows". After green manure of this group, you can not plant cruciferous - cabbage, radish, radish, spinach, arugula.
- Phacelia, mallow, amaranth, flax, calendula, tagetes (marigolds) are also good for improving soil fertility. It is necessary to mow before the appearance of buds.
To suppress weeds, green manure can be sown not only in spring or autumn, row spacings can also be sown in summer. Just remember to mow on time. Greens will go to the mulch. For regions with a hot climate, green manure can be planted after the main plants have taken root. In this case, dense greenery will keep the soil from overheating.