How to prepare okra seed for planting
How to Grow Okra | Southern States Co-op
Gardeners in the southern United States usually reserve a spot to grow okra, because it's a staple in southern cooking. Northerners have come to know and enjoy its subtle taste, too. Similar in taste to eggplant, okra is used in shellfish, corn, onion and tomato dishes. It is also known as "gumbo". When cooked, okra's liquid commonly is gumbo's thickening agent.
The annual, warm weather vegetable is related to hibiscus, hollyhock and rose of Sharon. Native to Africa, it is easy to grow this unique vegetable.
Growing okra
Prior to planting, soak the okra seeds in water for 12 to 18 hours to soften its hard seed coat. Soaking aids moisture absorption and germination.
Plant okra in the spring or early summer once the threat of frost has passed. To prevent the seeds from rotting, the soil should have warmed to at least 65 degrees. Gardeners in cool regions may want to start okra seeds indoors in peat pots four to six weeks before the area's final frost date.
If buying okra plants, purchase those that are started in containers such as peat pots that can go into the ground. Disturbing okra's roots hampers growth.
Okra can grow from three to six feet tall. Choose a garden spot where its shade will not harm other sun loving plants. Sow the seeds one inch deep in rows that are three feet apart. The seeds generally germinate in two to 12 days. Okra will grow in many soil types, so mulch and fertilize as needed.
Once the plants start to grow, thin them so they are spaced 12 to 18 inches apart.
Okra thrives in the full, hot sun. Regular watering is needed and is particularly critical during flowering and pod development. During extended dry spells, a weekly deep soaking is beneficial.
Crop rotation and good soil management help control diseases. Okra is susceptible to wilt, root knot nematode and Southern stem blight. It is not unusual for okra to attract various beetles and worms. Watch regularly for infestations and treat appropriately.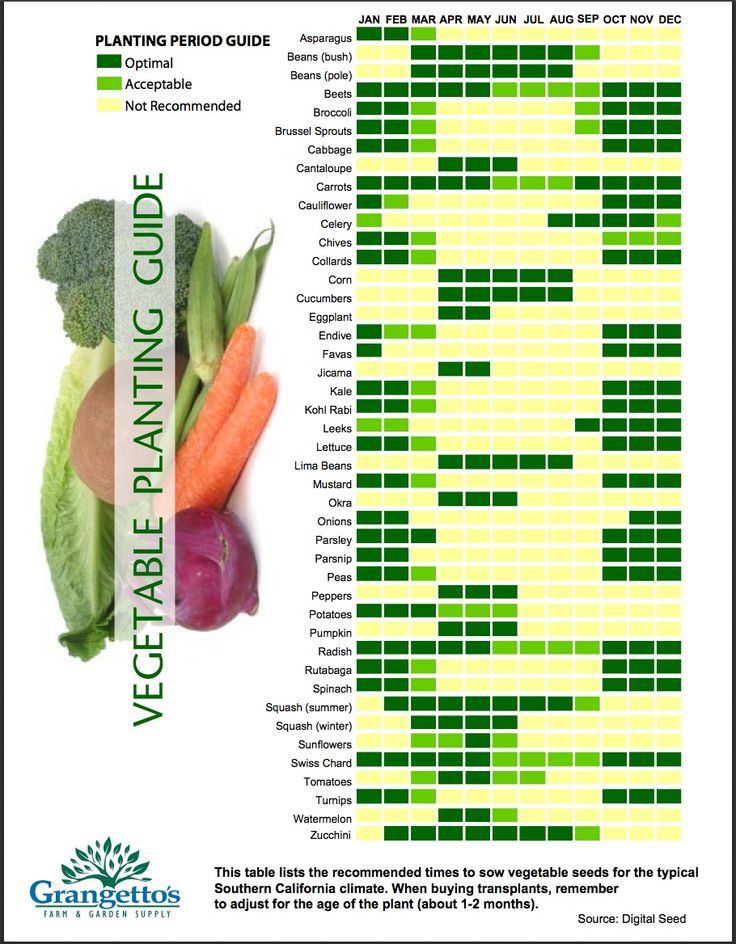
Harvesting okra
Okra reaches maturity in 50 to 65 days. The plants can produce for ten to 12 weeks. It grows and bears seed pods until frost, which quickly turns them black and kills them.
Start harvesting a few days after the okra blooms fade. At that point the seed pods should be soft and two to three inches long. Pick the pods at least every other day, as they quickly turn from tender to tough the bigger they grow. Handle okra gently. The pods bruise easily.
Remove old seed pods so they do not inhibit new pods from developing. For maximum yield, prune older limbs beneath the already harvested pods.
All okra varieties have spines, so wear gloves when picking the pods. The spineless varieties have fewer spines on the pods themselves, but spines on other parts of the plant make wearing gloves and long sleeves a good idea.
Storing and using okra
Do not wash okra. Wet pods become slimy and mold quickly. Refrigerate dry okra in perforated plastic bags. Use within a few days before the pods' ridges and tips start to turn dark.
Because of the long growing season and hearty production, four or five plants usually produce enough okra for most families. More plants may be needed, though, to can or freeze okra for use during the winter.
While old seed pods cannot be eaten, they are perfect for dried flower arrangements.
How to Save Okra Seeds for Planting
Okra is super easy to grow, and delivers abundant produce from just a few plants.
The vegetable with botanical name Abelmoschus esculentus is just as generous when it produces seeds home gardeners can save for next year’s planting.
Just a few pods will yield dozens, and they can be viable for two or three years in proper storage.
We link to vendors to help you find relevant products. If you buy from one of our links, we may earn a commission.
Want to try your hand at saving your own okra seed? In this guide, I’ll share tips that will take you from pre-planning through collecting and on to storage.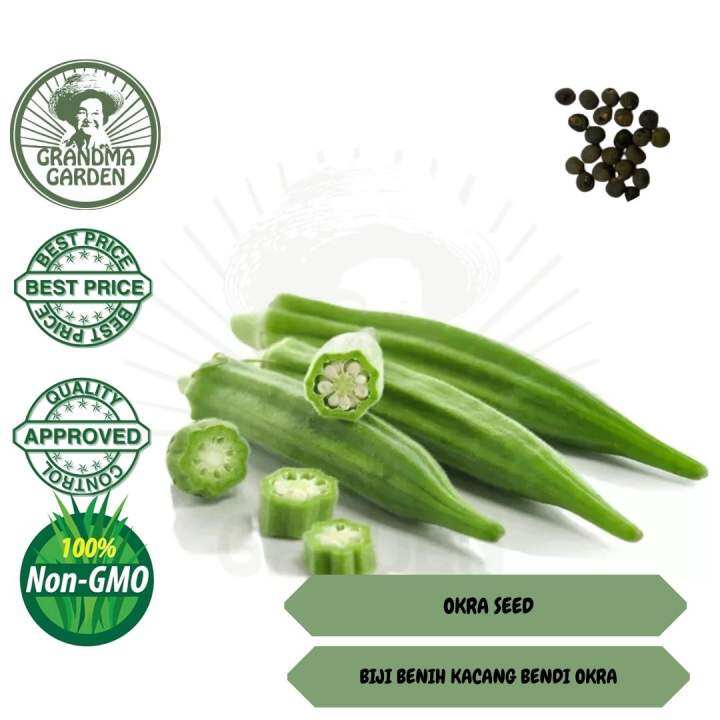
Here’s what to expect:
What You’ll Learn
- Benefits of Saving Okra Seeds
- Pre-Planning
- Collecting and Drying
- Storage
Benefits of Saving Okra Seeds
Along with maintaining a ready supply and not having to pay for fresh seeds next season, there are a few extra benefits to this sustainable gardening project.
For one thing, you’ll know precisely how old these seeds are and for how many more seasons you might be able to plant them, which isn’t always true when you buy from independent online sellers or local retailers.
Photo by Rose Kennedy.You might also be able to give disadvantaged gardeners a boost. Even if a couple bucks for a packet doesn’t seem like a big deal, those on a fixed income may not have the money or alternative ways to obtain such high-quality materials for growing their own food.
If you successfully collect and process even a handful of dried pods, you’ll have plenty to share with community groups or individuals.
Dry a few more for extras to give family and neighbors. Just make sure to ask them first if they’d like a share, since not everyone intends to grow these tasty, tender pods! (Their loss, I say.)
Probably the biggest add-on benefit comes from being able to choose varieties of okra to grow again based on firsthand knowledge.
Saving seeds from pods grown in your garden allows you to regrow the type that tasted best, was a size that worked with your space or harvest needs, or had a color or shape you grew and liked.
More step-by-step instructions for this beneficial process start now.
Pre-Planning
Like most, this vegetable gardening project goes more smoothly when you plan ahead.
One absolute must is growing an open-pollinated variety of okra. It need not be an heirloom, but hybrids won’t work since the second generation will not usually produce seedlings that are true to the parent plant.
Lots of fun hybrids, like ‘Okra Dokra’ and ‘Jambalaya,’ offer great taste and disease resistance, but they’re not suitable for next year’s supply.
You should also select a type that matures fast enough that you’ll have time to let some pods mature beyond the edible stage.
Okra needs warm weather, and typically 50 to 60 days before it produces a harvest. Letting the fruits get extra big can take just a few days, or maybe another week or more.
When you live where the summers are short, some varieties won’t have enough time to form seeds to harvest.
So be sure to read packets and online catalog descriptions ahead of ordering and select one you can start picking in 50 to 55 days. Also consider starting transplants indoors if you’re going to be pressed for time.
Plan to grow just one variety, or give plants of different cultivars plenty of distance so they don’t cross-pollinate.
Serious seed savers who are trying to preserve rare species will grow different types of okra no less than 500 to 1,600 feet apart.
But you should be fine planting each 20 or 30 yards apart, or growing one type in the front yard and a second one in the back.
If you don’t have that kind of room, consider isolating one variety by planting a couple in containers you can move a safe distance away once they begin to flower.
Collecting and Drying
Before you start collecting, determine which plants had fruits that tasted best at their edible stage.
Don’t opt for a plant just because you’ve already accidentally allowed all of its pods to get too big, because you won’t know for sure how the edible pods it produced tasted or if they warrant growing again.
Just one plant from each variety of okra that you’re growing can usually deliver an ample supply.
Let several fruits on it mature beyond the tender edible stage. The exteriors will get so tough you can’t even bend the pod or bite into it when the pods are big enough to start harvesting for next year’s seed.
Photo by Rose Kennedy.Look for the bigger pods lower down on the plant.
Here, you have two options.
If you’re done with that plant for the season, you can allow the pod to stay on the stem and clip it off with scissors only after it gets brittle and brown.
But if you still want to harvest the smaller, more tender fruits from the top of the plant, you can clip each overly-large pod while it’s still green (or orange, lemon yellow, or burgundy, depending on the variety).
Either place the extra-mature fruits in a mesh bag and hang them to dry in a cool, dry place, or place them on screens or mesh baskets laid over sheets of parchment to dry on a counter.
Photo by Rose Kennedy.Let them cure until the skins are crackly and somewhat light brown or white. Then don garden gloves to break the pods open, and tip or lightly scrape the seeds out with your fingers.
Some okra varieties grow so large you may need pruners to lop the dried pods in two.
Separate out all of the dry membranes and skins that remain, otherwise known as the chaff. This debris can go in the compost, if you like.
Storage
The process of storing okra seeds to grow again next year is the same whether you’re working with your own bounty or extras left over from pre-purchased varieties.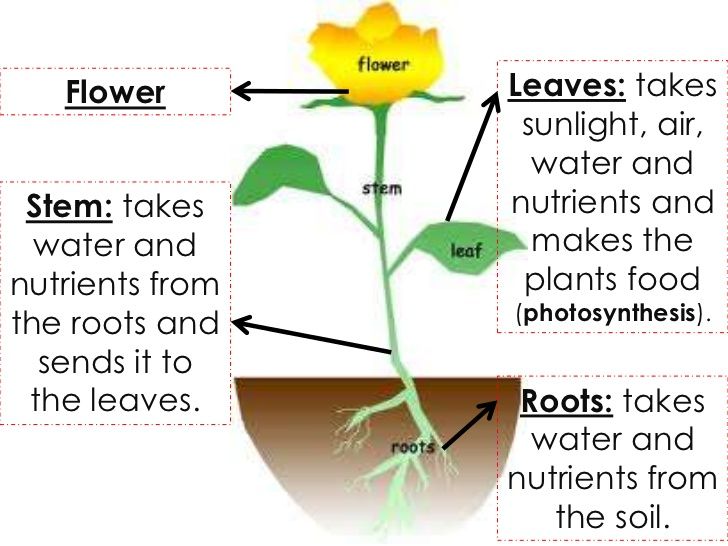
Place them in a clean, sealed envelope or an airtight container with a lid, and store them somewhere cool and dark. Make sure it’s somewhere rodents, possums, and the like aren’t able to get to them.
They may stay viable for two or three years, meaning that’s how long they’ll be able to both germinate and produce vigorous seedlings.
But you can only truly rely on them to produce healthy plants if you use them the very next season.
If you wait longer than that, attempt to start some indoors about a month before you intend to plant out, as proof that the seeds will germinate.
Okra Seeds for Everyone!
This is easily one of the simplest vegetable seed-saving processes you’ll ever encounter.
The seeds are large and easy to see, and the plants produce so many pods to work with that you can easily start over if one of the steps doesn’t work out.
Have you already had success with this rewarding project? If you have, it would be nice if you’d add any helpful tips in the comments section below.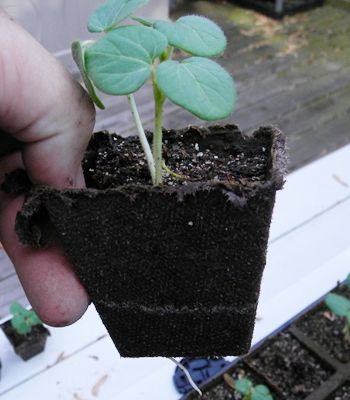 That’s also the place for any questions you might still have.
And if you found this information helpful, check out these okra guides next:
- How to Grow and Care for Okra
- Harvesting Okra: When and How to Pluck Those Prickly Pods
- 13 of the Best Okra Varieties for Your Vegetable Patch
Okra - growing from seeds in the middle lane and Moscow region
This amazing plant is known and loved in many countries. Its ovaries are very tasty and nutritious, all kinds of dishes are prepared from them. And at the time of flowering, okra is very decorative and can decorate any flower bed or front garden.
Okra is also called differently: " okra ", " gombo ". Its relatives are decorative and fodder mallow, Chinese rose, or decorative hibiscus. At home, in Africa, this plant is cultivated as a perennial, while in our country okra is grown through seedlings as an annual plant. nine0003
Okra, like eggplant, is heat demanding. Therefore, it is cultivated only in the southern regions. But lovers can afford to grow it in the middle lane. So, at the dawn of the 20th century, it was successfully grown in the Moscow region by Anton Pavlovich Chekhov.
Sowing okra seeds
Okra is usually sown in early April. It is better to sow seeds for seedlings in separate cups of 1-2 pieces, because. the root of okra is slightly branched, taproot. The plant does not tolerate transplanting well. Before sowing, it is better to soak the seeds for a day in warm water. nine0003
They germinate well at 20-22°C. In the middle lane they are usually sown in March. Shoots appear in 10-15 days.
Planting seedlings
Seedlings are planted in the ground at the end of May, when the soil warms up well (approximately 45-50 days after sowing). Plants are placed in one row at a distance of 30 cm from each other.
Okra grows best on light, fertile soils, cucumber plantings can be predecessors.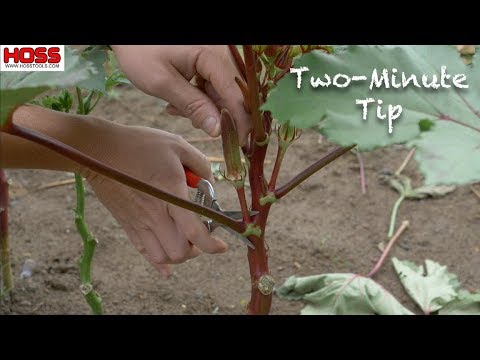 It is not bad at the same time to additionally add humus in a mixture with mineral fertilizers. nine0003
Care of okra
Plants need a temperature of at least 20°C to grow and bear fruit. In dry weather, one should not forget about watering, especially during the harvest period. With a lack of moisture, the fruits of okra quickly coarsen.
Okra needs warmth and timely watering
Under film covers, moisture in the soil lasts longer, but the air humidity is higher there. Therefore, you often have to ventilate by lifting the film from the leeward side. The air temperature under the film must not be allowed to rise above 30°C. nine0003
In dry and hot weather, plants can be attacked by aphids, therefore, with the appearance of the first pests, it must be urgently treated with special preparations.
Feed okra with a combined mineral fertilizer, such as Nitrofoska (2 tablespoons per 10 liters of water). And during the fruiting period - potassium nitrate (in the same proportion).
Already two months after germination, early maturing varieties of okra bloom, and after another five days you can start picking fruits.
Collection of okra ovaries
Edible 3-5 day old fruit ovaries, which are not yet covered with hard hairs, like the rest of the plant. By the way, you need to be careful when harvesting: the plants are covered with dense, fine pubescence, and when in contact with them, itching may appear on the skin.
The young ovary is cut with a knife or scissors. Harvested fruit should be used immediately. They can be stored in the refrigerator for no more than 2-3 days.
Okra fruits are not stored for a long time
In the south, the ovaries are harvested every other day, in the middle lane - every 3-5 days. nine0003
Remember: fruits not picked in time become inedible!
Fruiting lasts until frost. An adult plant withstands frosts down to -2 ° C, but with the onset of cold weather, fruit growth slows down sharply.
On plants left for seeds, the first two ovaries are allowed to eat, the next ones are left until the seeds fully ripen inside the fruit-box. When these boxes are completely dry, the seeds are selected and threshed, cleaned of impurities and stored in paper bags or cloth bags in a dry, ventilated area. nine0003
Try growing okra in your garden. You will surely like the fruits of this unusual plant.
Okra - growing from seeds - My Agro
Contents:
- Okra: what is this exotic plant?
- Okra growing techniques
- How to grow Okra seedlings?
- When to plant Okra seedlings in the ground
- Basic requirements for caring for Okra
Today it is difficult to imagine, for example, Caucasian dishes without the presence of Okra fruits in them. They are stewed with various vegetables, pickled, added to salads, made into healing oil, and the ripened seeds of this plant can replace coffee.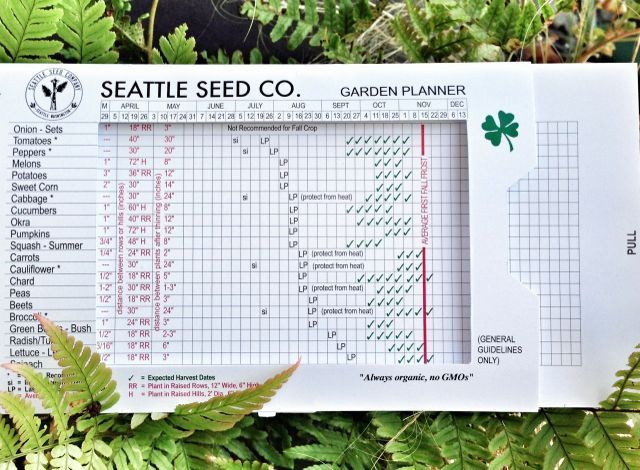 Okra decoctions are recommended for sore throat, severe cough, bronchitis. At the same time, in addition to gastronomic and medicinal properties, Okra is an original ornamental plant that, during its flowering, will decorate any garden plot, and therefore Okra becomes one of the most popular plants among gardeners. nine0003
Okra: what is this exotic plant?
Okra is a plant belonging to the Malvaceae family. It is also called Okra, Gombo, Ladyfingers, Bhindi, Adelmosh edible. Okra comes from sultry Africa. This is an annual tall, up to 2 meters in height, herbaceous plant, however, thanks to the efforts of breeders, Okra varieties have been grown that reach a maximum of 50 cm and a minimum of 10 cm in height.
Recommended related entries:
Heliotrope - a description of how to grow seedlings
Ramson - agrotechnics of growing from seeds, diseases and pests
Okra has a thick stem, which at its base can have up to 7 branches. Flowers are large, creamy yellow. The leaves of the plant are also large, dark green in color. The okra fruit is similar in appearance to a bean pod or green pepper, but covered with hairs. It is thanks to this form of the fruit that Okra was popularly called the Lady's finger. nine0003
When harvesting, remember that the hairs covering the fruit can cause allergies, and therefore it is better to work with gloves.
Okra cultivation techniques
Okra is a heat-loving plant and even a slight cold snap can harm it. In open ground, it is best grown in the southern regions. As for the middle zone, it is necessary to create favorable conditions for its full growth and development.
The first step is to make sure that the soil is fertile, loose, rich in organic fertilizers, necessarily drained. The bed for growing Okra should be located in the sunniest place of the garden plot, but at the same time it must be protected from drafts, which Okra is so afraid of. nine0003
In order for the plant to develop well, it is better to plant it on a site where legumes or plants from the Cucurbitaceae family were previously grown, but if Malvaceae grew on this bed earlier, Okra should not be planted in this place.
The garden bed for growing Okra must be prepared in advance, preferably in autumn. It will need to be carefully dug up, unwanted weeds removed, in the spring, mineral phosphorus-containing fertilizers are applied to the site, after which the bed is loosened and leveled. nine0003
In case of frost, the bed with seedlings should be covered with foil.
How to grow Okra seedlings?
When starting to grow Okra seedlings, it is necessary to take into account the fact that after it is transferred to the garden, the seedlings can get sick for a long time, and the yield will be noticeably lower. However, in regions with a temperate climate, it is not possible to grow Okra in any other way. Planting Okra from seeds at home
It is necessary to sow Okra seeds for seedlings at the end of February or early March. Sowing is best done in peat pots filled with fertile soil. 3-4 seeds are placed in each pot. The seeds are quite large, so sowing will not cause difficulties. Sprinkle the seeds on top with soil, water, then put the pots on a pallet, and cover with a film or glass on top, thereby creating greenhouse conditions. nine0003
The most favorable air temperature for seed germination is +19-21°C. During this period, it is necessary to ensure that condensation does not form on the glass (film). To do this, it is necessary to remove the glass from the pots daily for a short time, remove the condensate.
After about 15 days, the first shoots will appear. After that, shelter for seedlings is no longer necessary. It is recommended that the seedlings be provided with a cool, approximately +13°C temperature for the first few days, and then gradually increase it to the previous level. When the seedlings have 2 leaves, it will be necessary to thin them out. nine0003
The healthiest sprout is left in the pot, and the weaker ones are removed.