How to plan a flower garden layout
Flower Bed Design - How to Design a Garden Bed
Gardens should always be considered highly personal works of art. As in any kind of art, taste will vary greatly with every person having a different opinion of what constitutes beauty. I think understanding basic design principles, is important for two reasons. First, if you know the rules you can break them in an intelligent way. Second, it helps give you a comfort level that what you design won't be a complete disaster. However, in the end the only thing that really matters is that you love your garden - your opinion is the most important one.
There are two basic types of garden beds; island beds and borders and two basic styles of gardens; formal and informal. We will start by covering the two types of beds and then move onto the two styles.
A border is anchored by a backdrop and I think these beds are easier to visualize than island beds, at least for me, since the background will help define the size of your new bed. The backdrop might be a house, a hedge row, a fence, or anything else that gives you a fairly solid background. Borders are viewed from only one side.
A flower border is generally, but not always, long and narrow. How deep your bed needs to be will partially depend on how long the bed is. The proportions of the bed are important. A short bed doesn't need to be as deep, a 3 foot by 8 foot bed will look right at home. A longer bed will need more depth, if possible. A 12 foot by 100 foot bed will look proportional.
Most home gardens are more likely to have beds that fall between 5 and 50 feet long. In this case depth should range between 3 and 6 to 8 feet deep. Any bed that is deeper than 4 feet (you can only reach so far) will need to have access to the interior of the bed for weeding and other maintenance purposes. Paths or stepping stones are common ways to provide access. Here are some examples of borders:
The photo on the left shows a narrow border at the Missouri Botanic Garden, in the center is a border along my front porch, and on the right is a great orange-toned border.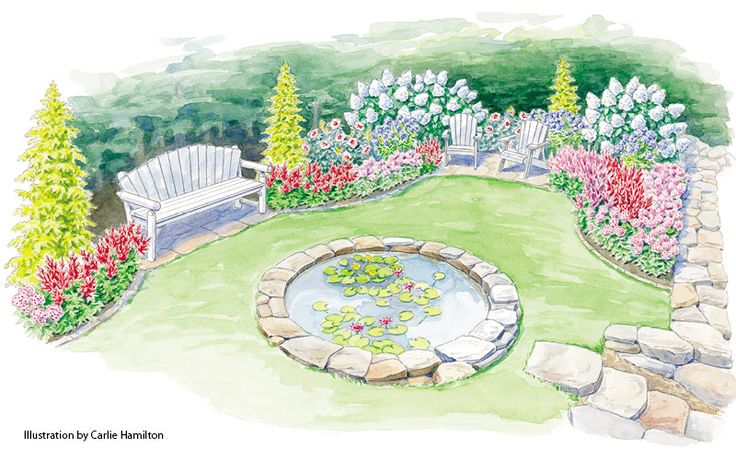
Island beds, on the other hand, are not anchored by a backdrop and can be viewed from all sides. They often have a center anchor. This anchor isn't necessarily right in the middle. It can be offset to one side for an asymmetrical look. Center anchors can be anything from a tree, shrub or large perennial to a piece of statuary or a large container, even a bench or trellis/arbor can work as a center anchor.
Island beds tend to be more round, square, rectangular or amorphous. They are rarely long and skinny. As with borders, their length and width needs to be somewhat proportional, so longer beds need to also be wider. Island beds can be small, a mailbox planting for instance, but are more often large. Since island beds can be reached from all sides; only beds larger than 6 to 8 feet across will need access for maintenance. Here are some examples of island beds:
The photo on the left shows an island bed with a tree as the anchor, the structure on the right is open so you can see this bed from all sides. The photo was taken at the Boerner Botanic Garden in Hales Corner, Wisconsin; a great garden if you get a chance to visit. In the center is a butterfly wing shaped bed taken at the Michigan State Children's Garden. The photo on the right shows a series of small island beds that use mailboxes as their anchor. The photo was taken at the Missouri Botanic Garden.
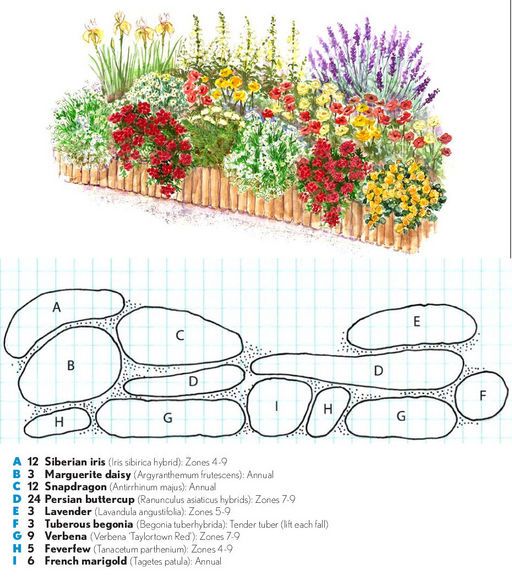
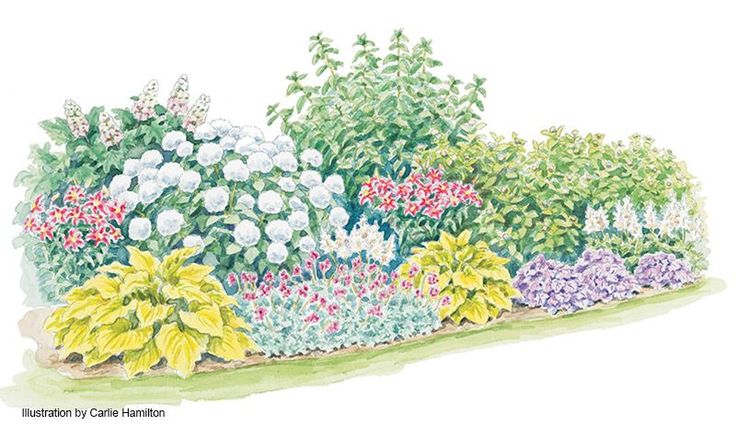
In general, plants in borders are arranged with tall plants (taller than 2 to 3 feet) placed in the back, mid-size plants (10 inches to 2 to 3 feet tall) in the middle, and short plants (less than 10 inches) in the front of the bed. It is best to use groupings or drifts of plants for a natural feel. Look at the border planting plan below. Tall plants are in brown, medium-tall plants are in blue, medium-short plants are in teal, and short plants are in dark green. Note that the plants are grouped rather than in rows.
*
The other thing to consider when planning your plant placement is that it is often best to use groupings of at least 3 of the same plant together. One plant alone often does not have enough impact, where a grouping of 3, 5, 7 or more will have good impact. Odd numbers tend to look better than even numbers. This is especially true of smaller plants where groups are necessary to have impact. Short plants can be used in long narrow plantings to create borders on the edge of a bed.
There is an exception to the plant 3 or more plants rule. In general, if a plant is large enough, think shrubs or large perennials, it can hold it's own without being grouped with other plants. Usually, only back of the border plants can stand alone. Scroll back up to see photos of borders.
Island beds work on the same principles as borders, but rather than having the taller plants in the back. The taller plants are in the middle of the bed or centered on the anchor plant. In the design below, the bright blue dot is the anchor, the brown are the tall plants, the pink are the medium plants, and the dark blue are the short plants.
*
You will note that the plants are grouped in drifts with the taller plants in the middle of the bed and then getting progressively shorter as you get toward the edge. Your design doesn't need to be rigid, you can see above that some medium sized plants come to the edge of the bed and some short plants are right next to tall plants. The tall to short progression is simply a rule of thumb, not a hard and fast rule. Scroll back up to see photos of island beds.
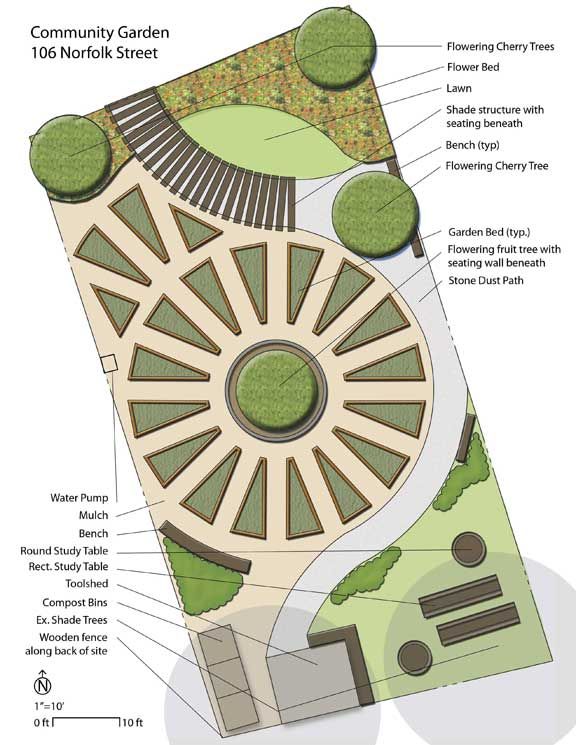
Let's talk now about the two styles of garden. Gardens generally are either formal or informal. Formal gardens tend to use distinct geometric shapes for their layout; circles, rectangles, triangles or long straight lines. Plant spacing, color, and layout are all very precise. Here are some examples of formal gardens:
On the left is a circle knot garden, in the center is a formal garden with lots of color, but very geometric shapes, and on the right is a formal garden with a clipped boxwood hedge to create the form of the beds. All of these photos were taken at the Missouri Botanic Garden.
Informal gardens tend to use curves and free flowing forms. The color combinations are more relaxed and varying plant heights will mingle together. I think most home gardens tend to be this type. Here are some examples of informal gardens:
The photo on the left is from the Ball Seed Company garden in West Chicago, Illinois and shows, more or less, a wildflower meadow. The center photo is from the Boerner Botanic Garden and shows a curving walkway bordered by colorful plantings. The photo on the right is from The Champaign County (Illinois) Master Gardener Demonstration Garden and shows a great informal garden using bright colors.
Learning the types and styles of gardens and the general principles of plant placement will help you design gardens for your own home. To learn about using color in your garden click here. Of course, once you design a bed you have to actually dig and prepare it. For more information on actually preparing your bed for planting, click here.
*Planting plans developed by the University of Missouri Cooperative Extension Master Gardener program.
Ask a Question or Give Feedback about this article.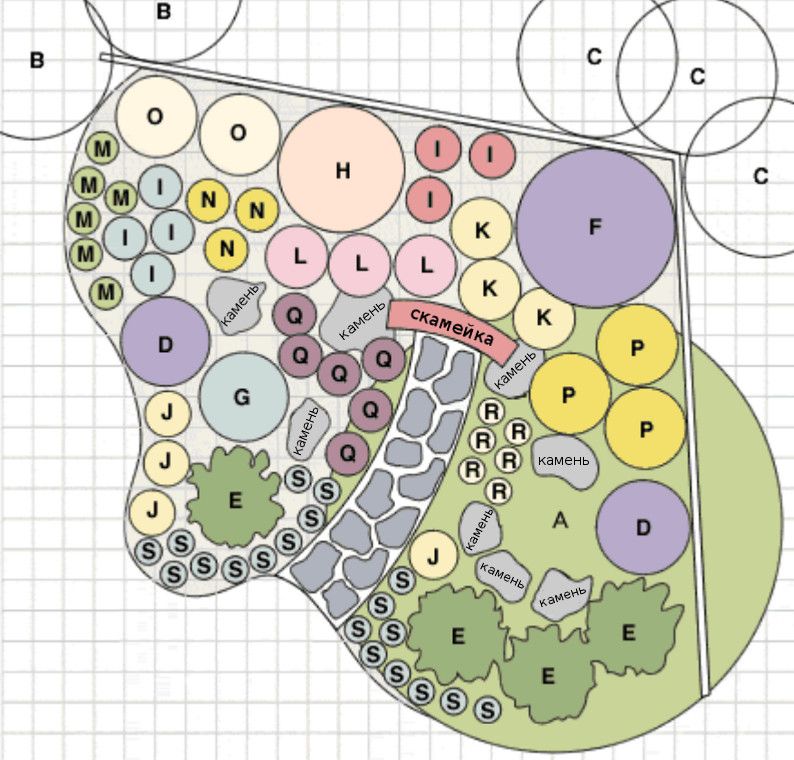
22 Layouts and Design Plans for a Perennial Flower Garden
How to choose flowers and where to plant them
Reviewed by
Kathleen Miller
Reviewed by Kathleen Miller
Kathleen Miller is a highly-regarded Master Gardener and Horticulturist who shares her knowledge of sustainable living, organic gardening, farming, and landscape design. She founded Gaia's Farm and Gardens, a working sustainable permaculture farm, and writes for Gaia Grows, a local newspaper column. She has over 30 years of experience in gardening and sustainable farming.
Learn more about The Spruce's Review Board
The Spruce / Adelyn Duchala
Some of the most luscious perennial gardens look like they just kind of happen, don't they? Lush cottage-style flower beds overflowing with color, just popping up out of nowhere all on their own, right? Well, not exactly.
Perennial gardens can definitely become very easy and low maintenance over time, but before that magical effortless look happens, there are plenty of plans and decisions to be made. Specifically, where you plant things is almost as important as what you decide to plant.
Here are 22 suggestions and ideas to help you plan the layout and design of gorgeous perennial flower garden.
How to Design a Perennial Flower Garden
There are some specific things to consider when choosing what and where to plant:
- When will this plant bloom, and for how long?
- How much growth (height, spread, bloom size) does it put out during the high point of the season?
- Do its blooms or foliage change color over time, and if so, when and what colors can you expect?
- What different colors are available in this plant's cultivars?
- Does this plant have a desirable fragrance?
- Does it have specific light or soil needs that are different from the plants near it?
- Is it vulnerable to pests, and if so, will it attract pests that might damage adjacent plants?
- Does this plant have flowers that are vulnerable to damage from wind, rain, or heat?
Keep a notebook listing plants you're considering, and then do your research. Read tags at the nursery, and ask for guidance and tips from employees or other gardeners.
The 11 Best Places to Buy Flower Bulbs Online
-
01 of 22
Get the Big Picture
@thepsychgarden / Instagram
Look at your garden from a distance and see how the plantings work together. When we work in the garden, we're often "up close and personal" with plants, but designing requires stepping back to get a more comprehensive perspective of your space. This is especially important if you have trees and large shrubs in your landscape—consider the entire impact of your design. Step back to take in the big picture and see how your plantings balance and flow into one another.
-
02 of 22
Plant Bulbs for Early Spring Color
@gardenfromscratch / Instagram
You can't beat spring bulbs for low-effort color in spring. But, they only bloom for a few weeks. By planting your spring bulbs (crocuses, daffodils, hyacinths, and tulips) by your hostas and daylilies, the bulb foliage will be dying back once the foliage from these later season plants starts to emerge. This makes for great use of space and fills in the gaps between seasons of bloom.
-
03 of 22
Arrange Plants By Height
@thepsychgarden / Instagram
Most of the time, you will want to put taller plants in the back of the bed and shorter ones in front. Exceptions can be plants with very delicate sprays of flowers, or tall slender stems with flowers at the very top, which can go in front even if their stems are taller than the plants they're in front of (like alliums, salvias, coral bells/heucheras, veronica, columbines, bluebells, or forget-me-nots).
-
04 of 22
Create Visual Patterns with Color
@thepsychgarden / Instagram
Planting to create a pattern of color to draw the eye is a well-known landscape designer's trick. See how the purple foliage of these heucheras creates a dynamic pattern that leads the eye across the garden, and connects them to the purple tones of the Japanese maples. The purple-toned foliage of these heucheras and Japanese maples creates a dynamic pattern that leads the eye.
-
05 of 22
Strive for Interesting Shape and Texture
@paintedleafhostagarden / Instagram
Plant strategically to create a lively combination of shapes and textures. Even a simple shade garden can balance the sturdy rounded or pointed leaves of hostas with the delicate textures of heuchera leaves and flowers, airy astilbes, and spiky ferns. Consider also how a plant's texture may change as the season progresses. The delicate airy texture of heuchera flowers (coral bells) is a perfect contrast to the heavier shapes and textures of hostas in this shade garden.
10 Best Varieties of Heuchera
-
06 of 22
Try Color Blocking
@thepsychgarden / Instagram
Some gardeners like to have a large variety of plants in their mixed perennial beds. But there is something to be said for the dramatic impact of a large area blooming with vibrant color, making your garden into a seasonal show-stopper. This is especially effective with long-blooming perennial flowers like columbines, echinacea, hydrangeas, dianthus, chrysanthemums, etc.
Plant other flowering plants nearby that will add color when these show-stoppers are done; try chrysanthemums or perennial snapdragons in front of your echinacea.
-
07 of 22
Design with Foliage
@gardenfromscratch / Instagram
Perennial flowers don't always have long seasons of bloom, so learning which plants have colorful or interesting foliage can help you design a garden that stays rich and interesting through the seasons.
Heucheras come in a rainbow of colors with differently-shaped leaves and do well in sun or shade.
 Hostas and daphne come in variegated varieties that add visual depth and interest. Silvery tones can come from artemisia or brunnera. The beautifully-shaped leaves of oakleaf hydrangeas and amsonia provide brilliant autumn color.
 -
08 of 22
Create Colorful Shade Beds
@thepsychgarden / Instagram
There are many perennials that will happily bloom in partial shade, so your shade beds needn't be all hostas and astilbes! Perennial geraniums weave in and out among plants in search of dappled sun, and other colorful part-shade lovers include foxgloves, alliums, irises, heucheras and primroses. See how the purple tones and lacy texture of the Japanese painted fern complement the 'Rozanne' geraniums and 'Millennium' alliums here.
-
09 of 22
Time Your Blooms Right
@thepsychgarden / Instagram
One of the biggest challenges in garden design is finding ways to have flowers blooming consistently throughout the season.
 But, consider how certain plants may have a more dramatic impact than others.
 Maybe you want your roses to take the starring role. Maybe your peonies are the pride of the neighborhood. Let those pink David Austin roses shine by keeping other early summer blooming perennials to a minimum nearby, unless you want an all-pink garden, in which case, go for it! With a bit of practice and research, you can plant strategically to showcase certain plants at the height of their bloom season.
-
10 of 22
Plant Flowering Groundcovers
@gardenfromscratch / Instagram
Ground covers can be a wonderful way to fill in empty spots and add low-growing beauty to your beds. Some bloom in spring (like sweet woodruff, epimedium, or creeping phlox), some in summer (spreading dianthus), some in fall (like creeping sedums which come in many colors, or peacock plumbago with its bright cobalt blue flowers). Depending on your climate, there are a great many to choose from.

Tip
Be careful with ground covers like vinca that grow matted roots, as these can spread and crowd out the roots of other perennials. But, planting these evergreen plants beneath a tree where not much else will grow adds year-round color. For example, the vivid blue flowers on peacock plumbago make it a gorgeous choice for ground cover.
-
11 of 22
Experiment with Contrasting Colors
@plantsplantsen / Instagram
Opposites on the color wheel create vibrant, dramatic contrasts in the garden. Pair purples and yellows, oranges and blues, or reds and greens, including variations like magenta and chartreuse for dynamic color combinations.
-
12 of 22
Balance Warm and Cool Colors
@thepsychgarden / Instagram
Many gardeners love having a garden that is all cool colors (blues, purples, pinks) while some enjoy vibrant warm colors like reds, yellows, and oranges. Having a mix of warm and cool palettes makes for maximum visual appeal.
 You can mix them together in one bed, or have one section that's cool next to one that's warm. The possibilities are endless and can include both flowers and foliage.
 -
13 of 22
Choose Easy-to-Divide Perennials
@ladylandscape / Instagram
Perennial dividing is usually a yearly task for the avid gardener. Some perennials will tend to show decreased vitality in their blooming if left undivided, as the roots or tubers may get crowded. Most types of irises need dividing every 3 years, as do daylilies and hostas; all three are very easy to divide. Some plants benefit from once yearly division, such as artemisia 'Silver Mound.' Once you divide them (mid to late autumn is the best time) you can replant the divisions immediately.
-
14 of 22
Go For Late-Season Blooms
@thepsychgarden / Instagram
Many gardeners find it challenging to keep a vibrant palette of blooms happening through three seasons. Don't neglect to plant late-blooming perennials, especially in spots where other perennials will have stopped blooming for the season.
 Anemones are a lovely sight in autumn with their delicate pinks and whites fluttering above the flower bed like fairies. The deep blues of monkshood add dramatic color too.
 -
15 of 22
Add Winter Interest
@paintedleafhostagarden / Instagram
Why stop at three seasons of beauty? Winter can be a beautiful time in the garden, even if you're looking at it from inside a warm room, standing by the window with a cup of hot chocolate. Many evergreen shrubs and trees hold up to the weight of heavy wet snow and create sculptural shapes and a bit of color in the winter landscape.
Consider leaving some plants intact for winter, like tall sedums, that create a lovely shape, then cut back in spring as new growth appears. This snowy garden has beautiful forms and textures from its evergreen and tree plantings.
-
16 of 22
Plant in Containers
@thepsychgarden / Instagram
Containers are an easy way to add height, shape, and balance to your garden and give you flexibility in terms of placement and adding plants throughout the season.
 A solid clay pot can offer an earthy feel next to airy, delicate blooms or the spreading branches of shrubs. You can also choose brightly colored pots to add to your garden's colorways.
 -
17 of 22
Incorporate Frost-Hardy Color
The Spruce / Peg Aloi
A number of perennials will keep blooming after a light frost, including late-season chrysanthemums and perennial snapdragons. Such plants can provide much-needed color and form later in the season. These football mums keep their form and color even after a light frost in November.
-
18 of 22
Add Flowering Shrubs
@thepsychgarden / Instagram
Flowering shrubs can be colorful centerpieces in your perennial beds. They bloom at different points in the season, so plant them where you want seasonal impact. Azaleas and rhododendrons in spring, weigelas and hydrangeas in summer, Rose of Sharon through fall, etc.
-
19 of 22
Plant for Autumn Color
@plantsplantsen / Instagram
Plant perennials that flower in autumn (chrysanthemums, snapdragons, sedums) but also plan for foliage shifting to rich autumn color and plant accordingly.
 There are many plants that provide bright and earthy colors in autumn: Japanese maples, ferns, amsonia, hydrangeas, heuchera, ninebark, and fothergilla are but a few.
 -
20 of 22
Don't Forget Deadheading
Barry Winiker / Getty Images
Deadheading is vital in the busy summer season. Some plants that offer thrilling blooms need frequent deadheading to stay fresh-looking. One good example is the day lily (hemerocallis): the blooms only last one day but there are always new ones about to open; plucking off the dead/drooping flowers makes the most of the blooming time.
-
21 of 22
Choose Long-Lasting Blooms
@ladylandscape / Instagram
You don't have to sacrifice planting your favorite short-blooming flowers for the sake of having a lush perennial garden. Plant the briefest blooms between long-lasting perennials like purple coneflowers (Echinacea purpurea) and catmint.
-
22 of 22
Plant Annuals that Act Like Perennials
The Spruce / Peg Aloi
Annuals like zinnias, cornflowers, and cosmos will often reseed every year, becoming a reliable "perennial" flower.
 Many of these colorful annuals are heavy with nectar and beloved of pollinators. You can collect the seeds to plant in spring (direct sow after last frost date), or just let early annuals like cornflowers reseed themselves.
 Tip
The great thing about perennials is that if they're not ideal in one spot, they can be moved to another. And when they grow larger, you can divide them and plant more! Remember to observe how plants do after they're planted: they are the best teachers and will tell you if they're content.
The 13 Best Places to Buy Seeds in 2023
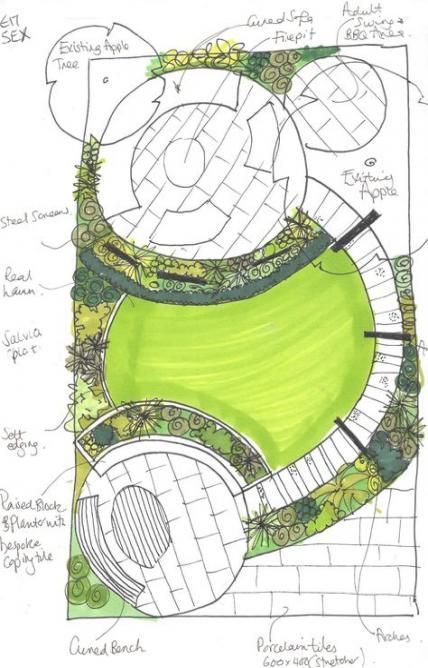
How to plan a flower bed - it's not as difficult as it seems! + Video
Necessary tools and materials
Expanded clay Artificial stone
Layout of flower beds and flower beds in the country - is it so scary?
Many of you, for sure, often doubt your own abilities, and the design of a summer cottage is no exception. Having solved complex tasks with building or repairing a house, planting or putting in order a garden / vineyard / garden, and having reached an item on the list of works called “flower bed”, along the way, having seen enough of numerous photos of chic designer flower beds, you suddenly give up.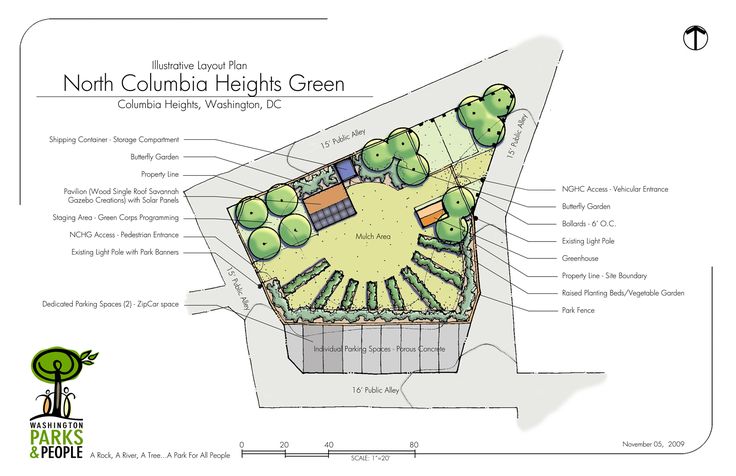
“How to plan a flower bed, who will do it at all, well, it’s definitely not going to work out for us, and therefore we’ll just plant some flowers, and sooner or later they will bloom and will delight everyone,” such thoughts appear in the head, if not every second, then every third summer resident. You may be very surprised, but there is nothing terrible and especially difficult in this. The main desire! And it, the desire to arrange a lovely flower garden, filling it with your green friends, apparently, is there.
So, the planning of a flower bed should begin with deciding on the type of flower garden that you would like to see as a result. If you decide to limit yourself for the first time to flower borders along garden paths - it's one thing, planting plants of the same type and color in the shape of a circle is another, trying to do something more complicated is a third. Having become acquainted with the types of flower beds, and there are a sufficient number of them, you can choose what you can afford.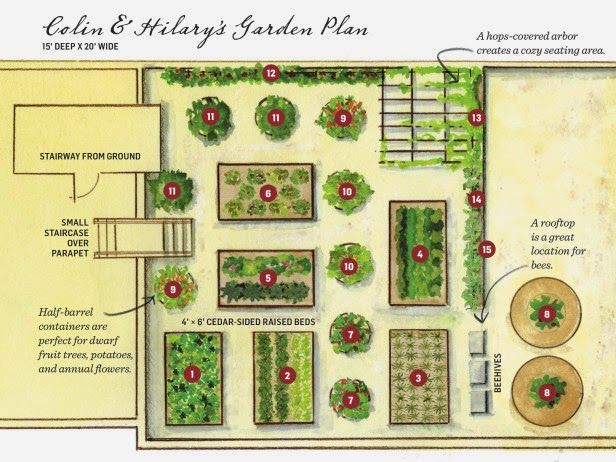
How to plan a flower bed - let's get started!
What grades did you have in drawing and drafting at school? The skills learned in these lessons will be useful to us. The fact is that we will start planning a flower bed in the country by drawing a diagram of our future flower garden. For example, you decide to break it around a small tree growing in front of your house. Such a flower bed is called near-stem, in terms of diameter it is recommended to make it so that it is convenient to take care of, that is, no more than 1.5-2 meters. Draw a circle on a piece of paper.
Which flowers do you like the most, are they annuals or perennials, what month do they bloom and how long do they bloom, which plants go best with each other? Would you like to divide the already drawn circle into sectors or draw a few more circles inside? After answering these questions for yourself, try to draw it on paper, marking your future plants with the appropriate color.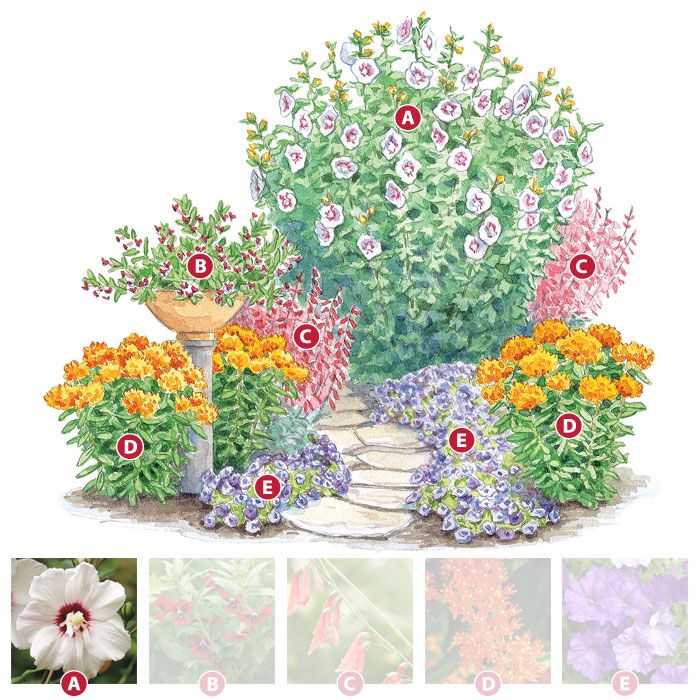 Just be careful with the abundance of bright colors and combinations of shades - it is better to alternate rich and calm.
There is a rule to consider when planning flowerbeds and flower beds: plants in the center are planted the highest, and the closer to the edge, the lower and lower. The last row may well play the role of a circular frame for your flower bed, if it is on the lawn. What else you need to think about at the stage of developing plans is the use of all kinds of decorative elements that will be used in the direct formation of a flower garden. They can be both purchased and made by hand, located on the same plane and at different levels in height.
An extremely simple, but effective and popular way of dividing a flower garden into zones are flowerbeds made from car tires. Some ideas have been used for many years, while others can be called know-how.
You have decided on the applicants for places in your flower garden, the color scheme suits you, the plan has been drawn, but some doubts remain: what if it doesn’t work out? Resolutely reject them! Firstly, this is your idea, and if the embodiment still does not suit you, you can easily change it by carefully transplanting the flowers in a different way, and secondly, you have chosen your favorite flowers, how can you not like them on you planned flowerbed?
Plan for planting flowers in a flower bed - do it yourself!
If the stage of drawing a plan and agreeing with family members is already behind you, if a place for a future flower garden is chosen, then it's time to start work. From the place where the future flower bed will be located, we will carefully remove the top layer of soil, about 15 cm. Now you need to provide drainage, for this, fill in a thin layer of fine gravel or, for example, expanded clay - everything is exactly the same as with planting home flowers.
The next step is to fill in the crushed soil, immediately fertilized, in the same place, but in such a way that there is a small hill in the center, and it disappears towards the edges. We will water the earth abundantly and let it stand for a couple of days. If both you and the plants are ready for planting, then proceed. Remember that in the center we must plant tall flowers: panicled phloxes, dahlias, gladioli, chrysanthemums , etc. , and further downward, ending with smaller ones: nasturtiums, marigolds, calendula, etc.
During the planting process, it is important that the wind does not disturb your plans for the formation of the flower bed. For example, you can solve this problem like this: put a small bottomless shape, round or rectangular, in the right place, pour the earth inside, pour seeds there, sprinkle it with earth on top and, removing the mold, calmly take on the next section. The wind is no longer a problem.
After planting the flowers, it's time to start framing the flower garden. A small decorative fence, purchased or made by hand, will look very impressive around it, the latter will certainly be much nicer to you. You can pour a 15-20 cm ribbon of colored gravel around the flower bed or lay out artificial or natural stones. Decorative figurines of fairy-tale heroes or animals, perhaps, will add mood to the flower garden. In general, do not be afraid to fantasize and believe that everything will work out for you!
- Author: Mikhail Malofeev
Rate this article:
(2 votes, average: 5 out of 5)
Share with your friends!
START PLANNING FLOWERS
Creating a beautiful garden and flower garden is not so easy. You need to have good taste, knowledge of landscape design, as well as agricultural technology for growing plants.
There is now a large amount of literature in printed and film form. A lot of gardeners and florists share their knowledge and ideas on creating chic ensembles of flowers and ornamental bushes.
In many countries and cities, flower growers' exhibitions are held, where amateurs can learn many secrets of professionals in growing rare species of flowers and ornamental shrubs.
A beautiful flower garden for real professionals and amateurs is first born in dreams and on paper. In order for the flower garden to be beautiful throughout the summer period, flowers are chosen for it that have a long flowering period, or flowers that will change each other with their flowering.
In parks, squares, flower beds are arranged in large sizes, they have the correct shape. In amateur gardens, flower beds are small, often have a variety of shapes that can go around paths and paths.
Beds can be either raised or flat. I plant flowers in flowerbeds of both the same species and various species.
Consider the main types of flower beds:
Tapeworms - single plantings of very beautiful bushes or flowers. Such flowers can have beautiful large carved leaves or buds. Tapeworms arrange on lawns or in places well viewed from afar. Roses, castor beans, amaranths, dahlia bushes look good as such plantings.
Rabatki are long and narrow strips of flowers that can stretch along paths, paths, along the fence or wall of the house. Rabatki consisting of 2, 3 types of plants look very nice, which are planted by combining the colors and height of the plants. Low-growing plants are planted in the foreground, taller ones in the background so that the plants do not obscure or obscure each other.
Borders are narrow strips that can border lawns or large flower beds. Flowers in borders are planted undersized and of the same type and color. If your main flower garden will have red-pink colors, then pick up flowers with white tones in the border. Borders consisting of alyssum, lobelia are very good, because in addition to long flowering, such flowers also have a wonderful smell.
Parterres are complex flower beds and often form whole compositions of several elements. Such compositions may include lawns, borders, curbs.
Mixborders are especially liked by summer gardeners. In such flower beds, flowers of various flowering periods and colors are used. Plants are selected and planted so that the flower bed is bright and blooming throughout the entire period from early spring to late autumn.
arrays consist of low maintenance perennials. Arrays usually occupy large areas. Flowers in arrays grow quickly and well and are planted in groups by species.
Groups - plantings having shapes of any shape, but usually having smooth shapes. Flowers of the same species and variety or several species are planted in them in the form of beautiful bright spots.
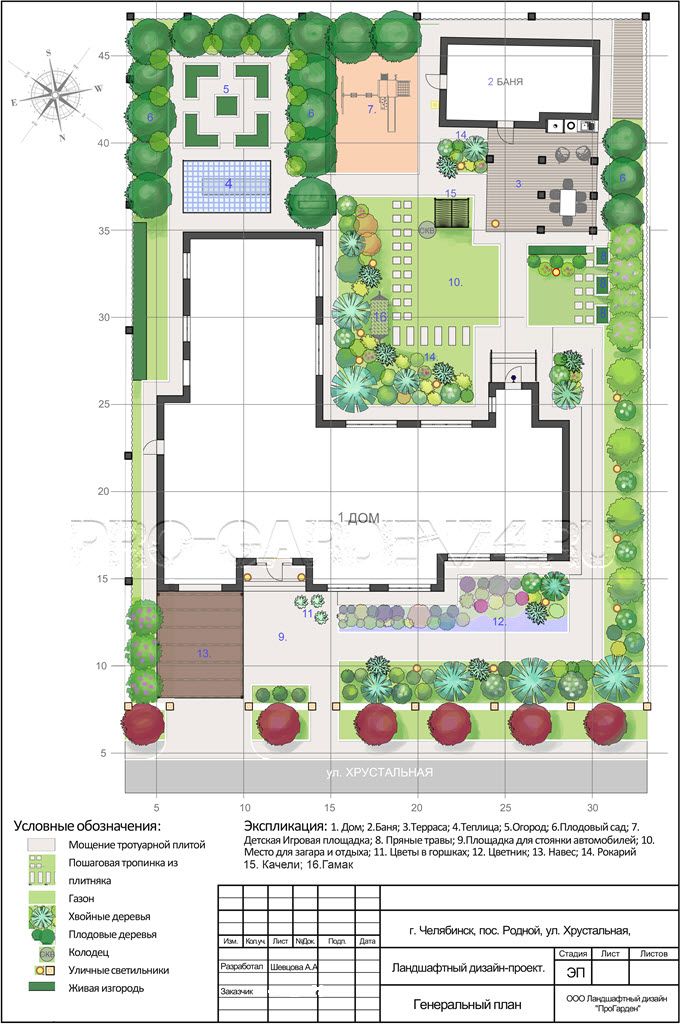
When arranging a flower garden on plots, it is necessary to take into account the natural and natural features of the landscape.
Flower beds and designer finds that take into account the natural features of this garden look most harmoniously in the garden. When we start planning flower gardens, there are many factors we need to consider:
-Composition and acidity of the soil. The assortment of flowers that will bloom well on the site will also depend on it.
- Illumination of the area where flowers are supposed to be broken. The choice of light-loving or shade-tolerant plants depends on this.
- Humidity of the site. The choice of ornamental shrubs and perennial flowers depends on how close surface waters lie.
- "Wind Rose". Many heat-loving flowers cannot stand constant cold winds and need to be planted in sheltered places.
Before you go and buy all the bags of flower seeds in a row, ask about their flowering time, in what soils these flowers will grow and develop well and what temperatures these plants like.
Then select flowers according to the color scheme you need, which would bloom at the required time for a particular flower bed.
Do not rush to immediately allocate a permanent place and put permanent borders for a flower garden in new areas. We are sure that after the first year you will reconsider your decision and want to move the flower garden to a new location. Select a place for a nursery in which you will plant seeds of annuals and perennials.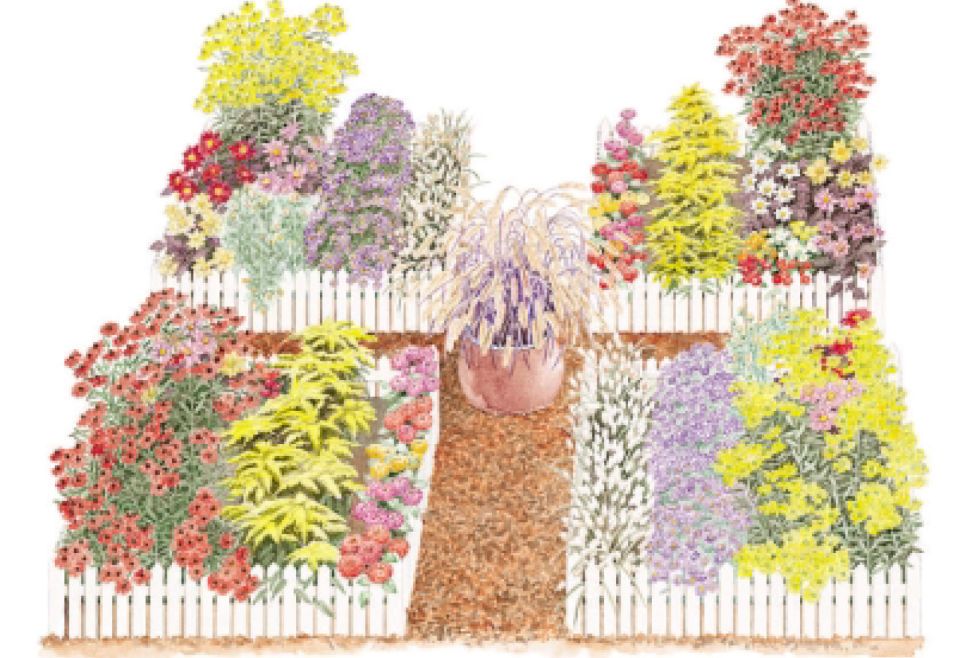 During the operation of the site, it will become clear what kind of soil is on your site and what flowers grow best on it.
Try an approximate list of colors for the arrangement of the flowerbed:
1. Helenium Autumn
2. Rubbed Disseed
3. Sunword annual
4. Small -fruited
5. Middle Kolo reservoir
6. The largest
7. Hybrid is hybrid
8. Hybridge. large
9. Garden iris (bearded group)
10. Calendula officinalis
11. Hybrid narcissus (tubular group)
12. Pyrethrum maiden (yellow-leaved form)
13. Lupine hybrid
14. Damascus nigella
15. Large nasturtium
16. Armenian Muscari
17. Italian setaria
18. Hybrid tulip (early terry group)
After the flowering of certain perennials, you will understand whether the combinations of flowers planted in your flower bed are beautiful. If the colors do not match, then transplant to your liking. Be sure to consider the distance between the flowers, otherwise they will oppress each other.