How to patch plaster ceiling hole
How To: Repair a Plaster Ceiling
An old-fashioned plaster ceiling can be a long lived and beautiful thing or it can look like a train wreck depending on how your old house has been treated over the years. The reasons to keep your plaster are numerous and may surprise you.
Over time everything needs a little maintenance and that includes plaster ceilings which take the brunt of gravity’s destructive force constantly working against them.
In this post, I’ll show you how to deal with everything from hairline cracks to sagging plaster ceilings to water damaged plaster and beyond. If you want to keep your plaster ceiling and make it look in tip top shape keep reading.
Fixing Cracks in a Plaster Ceiling
Old lime and gypsum plaster gets harder and harder as decades pass and this rigidity can cause small stress cracks. Sometimes these cracks are small, no more than a hairline crack and other times those cracks can grow quite large. You’ll deal with each type of crack a little differently.
Small Cracks
These pose you no real issue to the structural health of the plaster ceiling and can be left alone unless they bother you.
For these small cracks the easiest solution is to use a 5-in-1 tool to dig any loose plaster out of the cracks very gently and then fill them with a spackling paste or joint compound.
If you have a rough texture or sanded plaster you can add some sand to your spackle or use a sponge to match the texture as closely as possible. For smooth plaster simply fill, sand smooth, prime, and touch up the paint.
Large Cracks
If you have large cracks, the size of a quarter or larger, or converging cracks where you see several cracks running roughly parallel to each other then these are a sign of potential issues.
Parallel cracks are a sign of settling that should be address before doing any plaster repair. Perhaps the settling has occurred years ago and is now stable or maybe it’s ongoing. The latter should be addressed immediately to prevent further damage.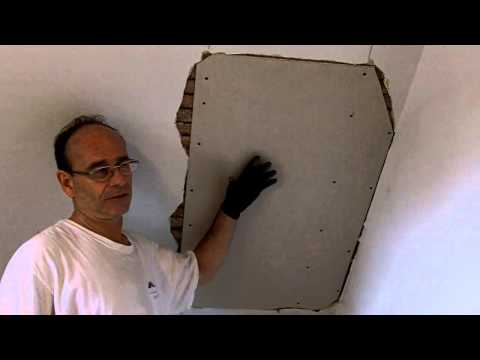
Once you’ve resolved the settling issues check along the sides of the cracks to determine if you have sagging plaster that has come loose from the supporting lath. If it’s loose then skip to the section below on sagging plaster. If the plaster ceiling feels firmly attached to the lath then you can do the same repair as for the small cracks above.
For larger cracks you may need two coats of spackle because of its tendency to shrink as it dries in large gaps so double check before priming and painting.
Fixing a Sagging Plaster Ceiling
Repairs become a bit more complicated when the plaster is sagging. This means that the plaster keys have come loose from the wood or wire lath that supports it which is a big problem for ceilings.
A plaster ceiling can support itself for a while but if enough of the keys come loose the ceiling can eventually unzip itself and come down in one tragic failure like a row of dominoes failing one after the other so this is important to resolve quickly.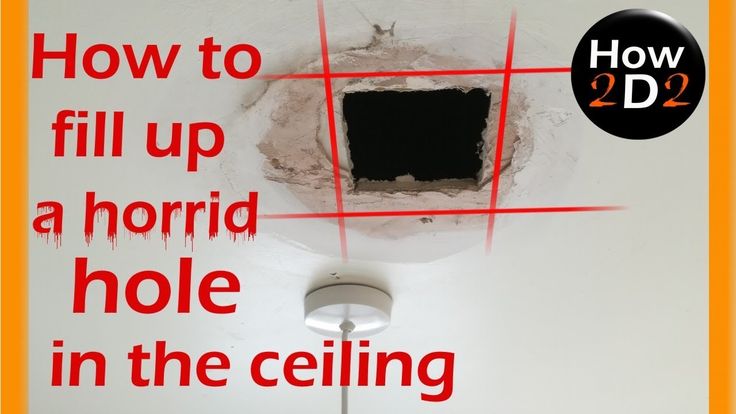
The preferred way to resolve this is not by pulling the ceiling down and replacing it with drywall, but rather to reattach the plaster ceiling to the supporting lath.
The old way of doing this was by using plaster washers which are a larger wash the is screwed through the face of the plaster into the lath to mechanically support the plaster. Then to cover the washers you would have to apply a couple coats of plaster over the ceiling building it up as much as 3/16”.
I prefer using a product called Big Wally’s Plaster Magic to reattach sagging plaster in my projects and I’ll walk you through the steps below. Using Plaster Magic prevents having to skim the entire ceiling because it uses a very effective adhesive to reattach the plaster to the lathe meaning no permanent plaster washers.
Before doing any plaster ceiling repair make sure to setup drop clothes and wear eye protection. Here’s a quick list of the tools and supplies you’ll need.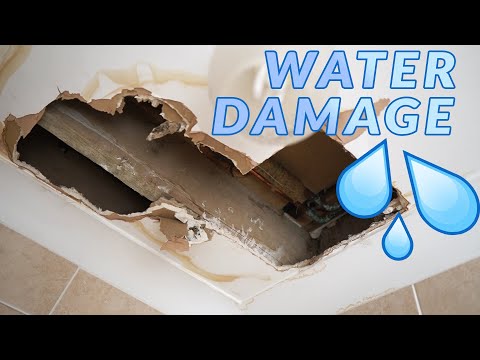
- Big Wally’s Plaster Magic Kit
- Drop Cloth
- Drill
- Impact Driver with Phillips bit
- Caulk Gun
- Rags
- Vacuum
- Pencil
Step 1 Drill Holes
Using the enclosed 3/16” masonry drill bit drill holes 1” to 2” from the crack, when you hit the lath stop (don’t drill thru the lath). Drill additional holes about 3” to 4” apart across the area that is loose or bulging.
Step 1: Drill holesMark any holes that missed the lath to note them for later. If you miss the lath simply move over about 1/2” and drill a new hole. When finished vacuum out the dust from each hole.
Step 2 Condition the Lath
Using the spray bottle of conditioner, spray 3-5 sprays into each hole to condition the lath. Keep a rag handy because the conditioner will run out of the holes.
Step 2: Spray conditioner into the holesWipe off the excess thoroughly and let the conditioner set for 10 minutes. Rinse out the spray nozzle by running water through it and spraying the water until all the conditioner is out of the unit.
Step 3 Inject Adhesive
Trim the adhesive tube nozzle to fit in the drilled holes. Using a caulk gun apply one full pull of adhesive into each hole (you can skip the holes that you circled earlier where the drill missed the lath).
Step 3: Inject AdhesiveTrigger the caulk gun slowly because the adhesive can squirt out of the holes unexpectedly. Wipe the excess off with a wet rag before it dries.
Step 4 Install Clamps
Install the temporary clamps every 8” to 12” by screwing into the lath through some of the drill holes. Bring the plaster into “soft” contact with the lath and avoid overdriving the clamps which can crush the plaster or cause all the adhesive to squeeze out of the area leaving a weaker bond.
Step 4: Install ClampsWipe away any excess adhesive that squeezes out with a wet rag and let the clamps sit for 24 to 48 hrs. Remove them by unscrewing and prying off the clamp with a putty knife.
Step 5 Fill Holes & Cracks
Once the clamps have been removed you can fill the holes and cracks like we discussed above using spackle or joint compound, sanding, and then priming and painting.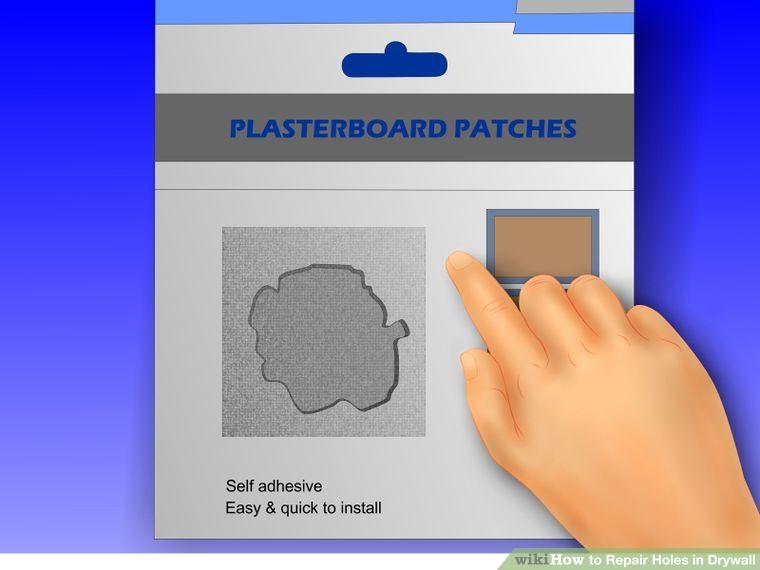
The plaster magic is a permanent fix that does not need to redone again. The adhesive will permanently rebuild the bond between the plaster and the lath.
Fixing a Water Damaged Plaster Ceiling
Plumbing leaks are fun, right? Not so much! While plaster ceiling are more resilient to water leaks compared to drywall they are not impervious to its ill effects.
Depending on whether you have lime or gypsum plaster it will respond differently to water damage. Old school lime plasters tend to crack and pull loose after repeated water damage due to the expansion and contraction of the lath which breaks the plaster keys off and usually results in a sagging plaster ceiling which we dealt with above.
Gypsum plaster is not as resistant to water damage and it has a tendency to bubble and turn to a powdery texture. You’ll see this bubbling behind the paint and it can best be dealt with by scrapping away any of the damaged gypsum and skimming the area with a couple fresh coats of joint compound, Sanding smooth, priming, and painting.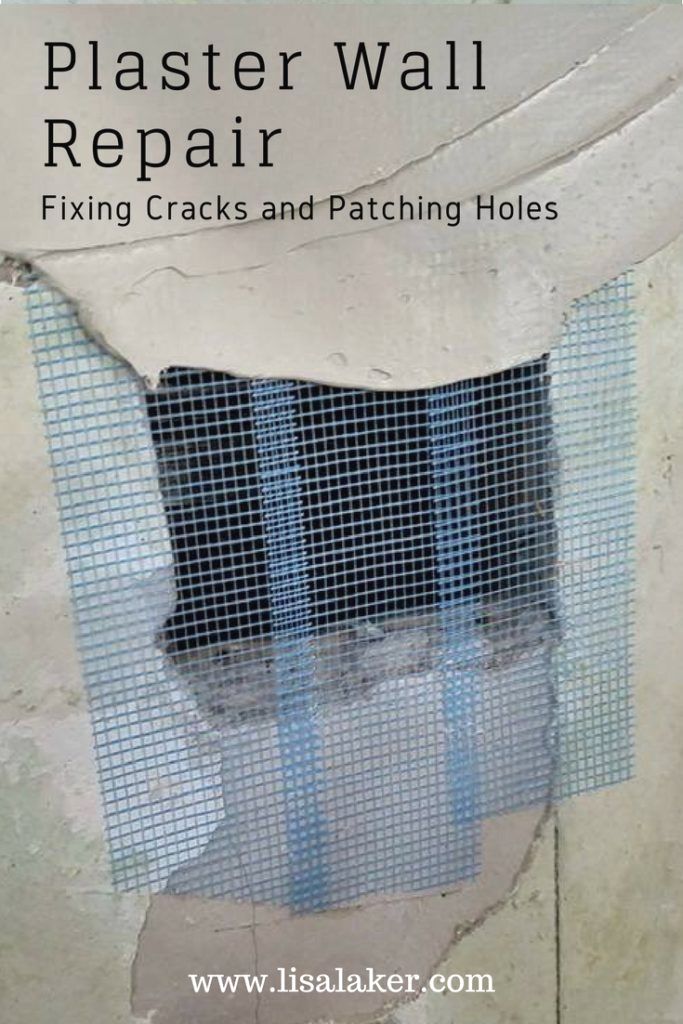
If you notice mildew or mold growth in the area it’s best to get rid of the mildew using the steps in this post before patching things to make sure it doesn’t come back.
You may also need to prime using a stain blocking primer like an oil-based interior primer or for very stubborn water stains you may need to upgrade to a shellac based primer to permanently keep the water stains at bay.
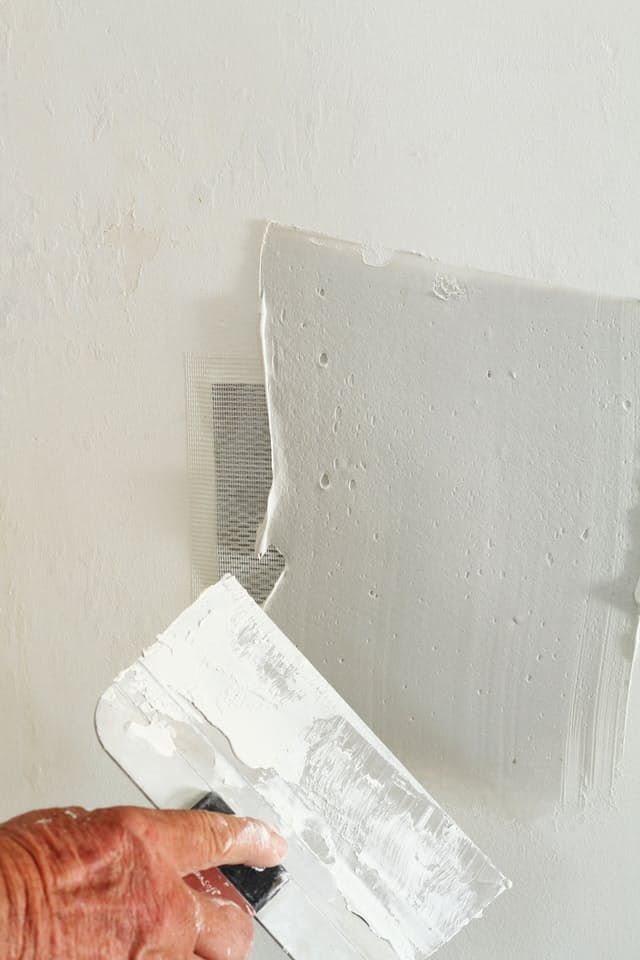
Fixing Holes in a Plaster Ceiling
Maybe a chunk of plaster fell off your ceiling or an electrician cut some unfortunate holes and other than the hole the rest of the ceiling is in good shape. If that’s the case, you need a patch.
If the lath is still intact then the patch is very simple. Using some joint compound or patching plaster you can simply fill the void with the patching material. Make sure to wet the wood lath first with a spray bottle before applying any patch to avoid it from drawing the water out of patching materials and causing premature drying.
The video below will show you how I repaired a water damaged ceiling in my own house.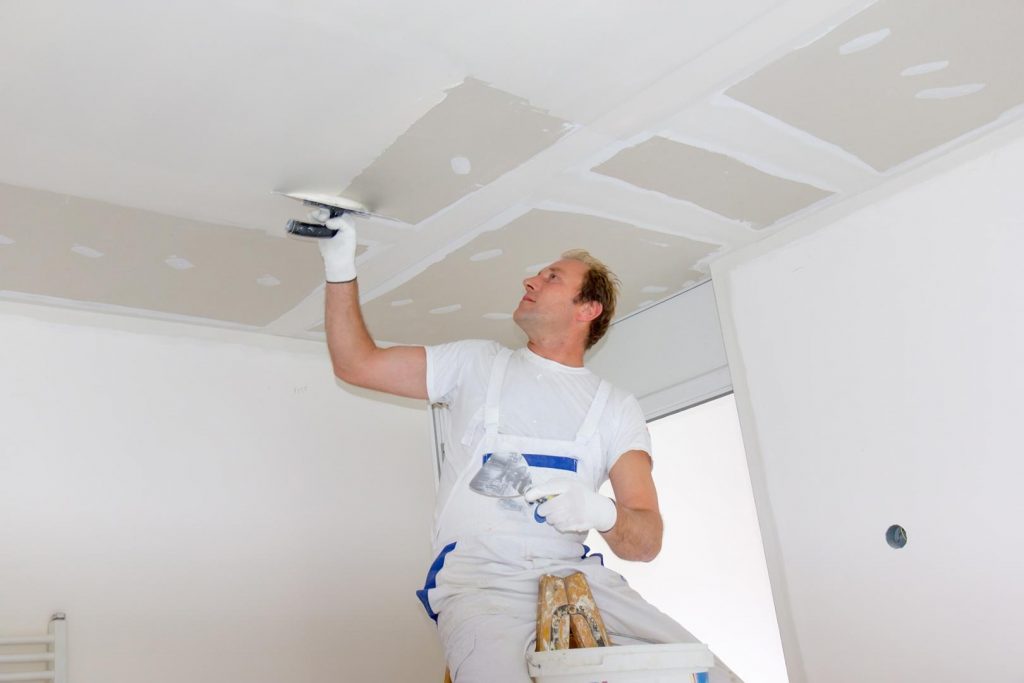
If the lath is missing the patch is bit more complicated, but still very doable for any DIYer. Here’s the short list of tools you need to patch a plaster ceiling when the lath is missing.
- Scrap wood
- Driver or drill
- Drywall screws (varying lengths)
- Drywall or plasterboard (varying thicknesses)
- Bucket
- Drywall knife or trowel
- Sponge
- Setting type joint compound or veneer plaster
- Big Wally’s Patching Plaster
Step 1 Install Supports
If you have a hole (like in the picture) the first thing you need to do is attach support pieces. These supports are just small pieces of scrap wood (1/2″ to 3/4″ thick) that you can attach the patch to.
Cut at least 2 pieces (cut more if there is a large area to patch) a few inches longer than the void you have to fill. In this case, I had a hole that was 4″ x 5″ so I cut 2 pieces of wood 7″ long.
Next, slip them into the void and lay them across the opening as you see in the picture. These will be the supports for a piece of drywall or plasterboard we’ll install shortly.
Once you have them in place, attach them with a couple screws into the existing plaster. Make sure to use screws long enough to make it all the way through the plaster and support pieces.
As you screw in, the support piece may be pushed up by the screw. Just back the screw out and try it again. It may take a few times to get the screw to pull the piece tightly to the backside of the plaster, but it will work.
Countersink the heads of the screws into the plaster and don’t leave them proud of the surface, you’ll be covering them later.
Step 2 Attach Patch
Cut a piece of drywall or plasterboard the same size and shape as your void and attach the piece using drywall screws. Screw the patch into the support pieces (or lath) every 6-12″ so that the patch is securely in place.
If you’ve got a complicated and large area to patch, you may have to be a bit of an art student to cut a patch to match, but just do your best. You can always use multiple pieces if you need to.
Depending on how thick your plaster is, you may need differing thicknesses of patching board. For thick plaster, I’ve used 2 pieces of 1/2″ plasterboard stacked on top of each other. Other times it’s a piece of 1/2″ and 1/4″ board. In this case I got away with just one piece of 5/8″ plasterboard.
It really depends on your wall, but the important thing is that the patch should be just a little shy of the thickness of the wall. You don’t want the patch to be the same thickness of thicker than the wall, otherwise it will be visible later.
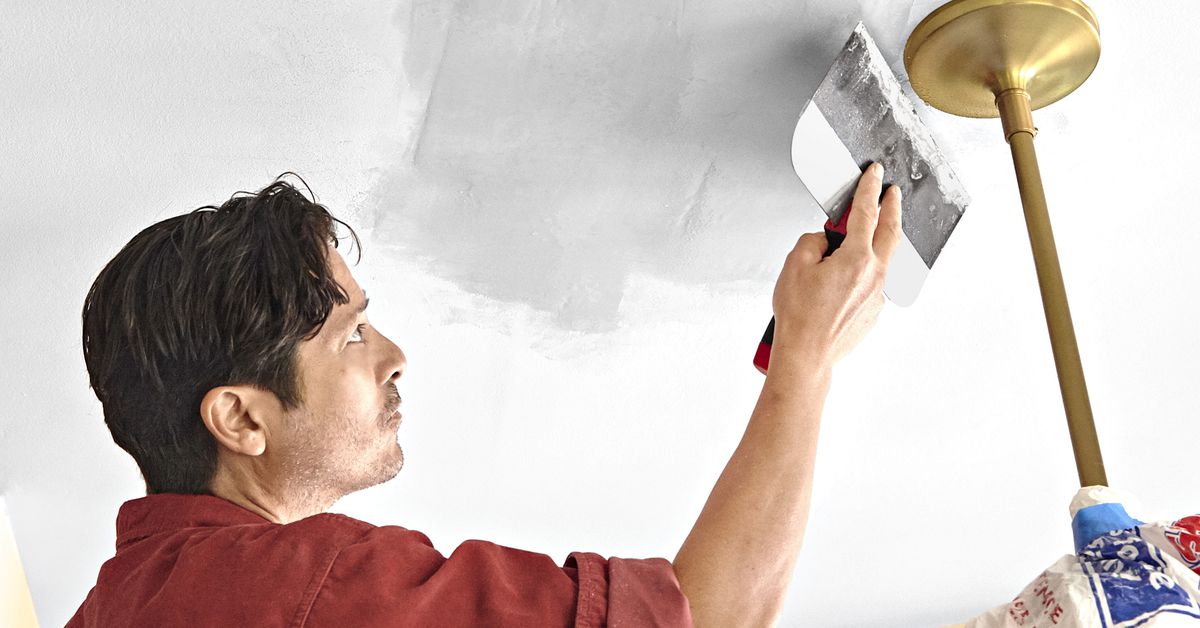
Step 4 Fill and Smooth
With this technique, you won’t have to make a big sanding mess like with other patches.
Use either veneer plaster, setting-type joint compound, or my favorite Big Wally’s Patching Plaster for the repair. Mix up a batch and cover the patch and screws so that it is just a little proud of the surface of the existing plaster.
As the compound firms up, wipe it down with a damp sponge so that the patch is now completely flush with the surrounding plaster.
Step 5 Add Texture
Depending on whether your wall is textured or not, it’s now time to add the final touch. Whether it’s an orange peel, knockdown, sanded finish or some other type of texture, you can now add that texture to the wall as best as you can to match the existing style.
Final Thoughts
Hopefully, this post has given you some encouragement that you can DIY your plaster ceiling repairs. I’ve got all the supplies you need to repair old plaster in our store and we’re always here to support you if you need some assistance.
If you’re still unsure about doing it yourself consider joining me on Patreon where I work with readers one-on-one to help them with their old house projects like plaster repair.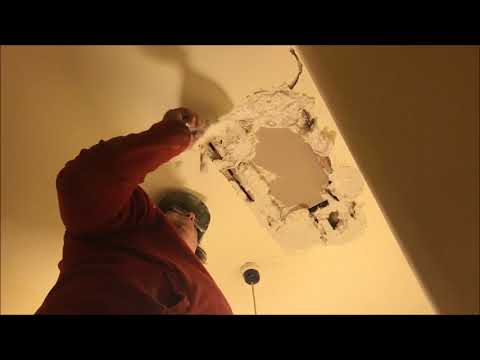 You can decide what level of support you need and let’s start the conversation!
Subscribe Now For Your FREE eBook!
Scott Sidler
Founder & Editor-in-Chief
I love old houses, working with my hands, and teaching others the excitment of doing it yourself! Everything is teachable if you only give it the chance.
restore its smooth surface |
When you purchase through links on our site, we may earn an affiliate commission. Here’s how it works.
(Image credit: Getty Images)
Wondering how to repair a plaster ceiling? There are a few different ways you can do it. Which method you use ultimately comes down to the cause of the damage and how extensive it is (and sometimes the structure of your ceiling, but more on that later), so it’s always best to start with a little investigation.
The good news is that in most cases, it’s relatively simple to restore the surface to its smooth former glory, meaning that you won't have to plaster a ceiling in its entirety.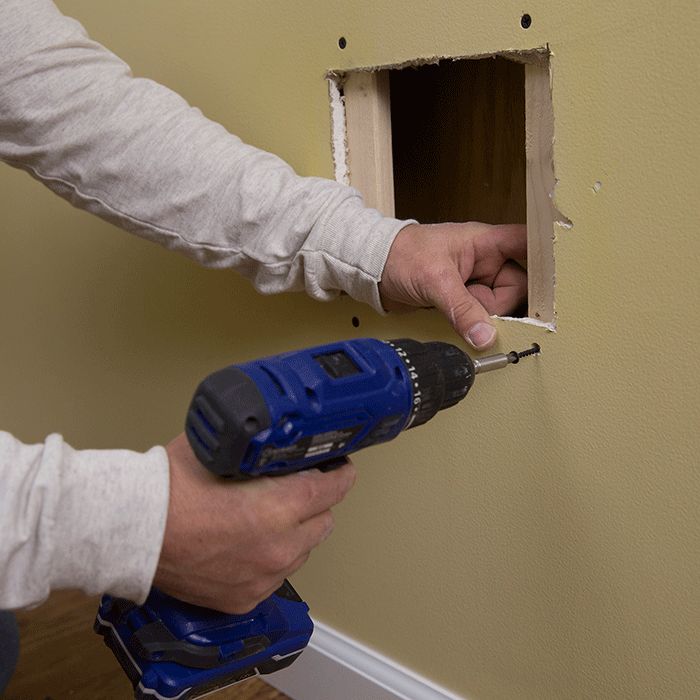
‘You can usually scrape away any cracks or holes in the plaster using a putty knife and then repaint the area. Another option is to patch up smaller areas that are damaged using drywall compound or spackle. If the damage is particularly severe, replacing the ceiling altogether might be the best route to go down’, says Luke Lee, co-founder of Ever Wallpaper .
In this case, learning how to patch a drywall ceiling or how to hang a drywall ceiling can prove useful.
How to repair a plaster ceiling
Before you start fixing, it’s worth establishing the structure of your plaster ceiling, and find out, perhaps, why your ceiling is cracking. Moisture could be the cause, in which case you’ll need to know how fix a ceiling with water damage. Modern building methods have seen traditional lath-and-plaster ceilings replaced by drywall or plasterboard that’s then skimmed with a thin layer of plaster to achieve the same smooth surface. Repair methods will vary depending on the type of plaster ceiling you have in your home.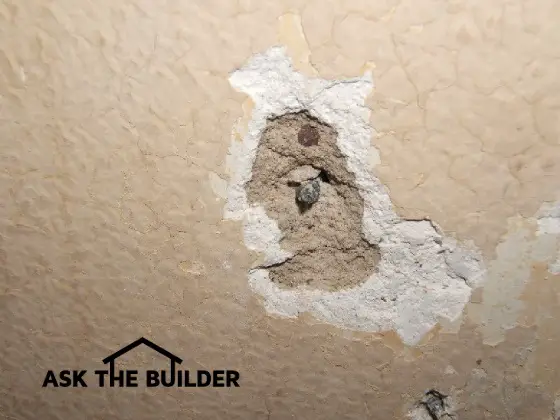
Whether the damage has come as a result of fixing a ceiling leak, shoddy DIY work, simple wear and tear or something a little more serious, we’ve put together an easy guide to help you recognize the warning signs and know how to repair a plaster ceiling accordingly.
Track down the cause of the problem
Before you start any repair work on your ceiling, you’ll need to work out what caused the damage in the first place. Sometimes it’s obvious; unsightly yellow stains are a clear sign of a moisture problem, so you’d be best off researching how to fix a ceiling with water damage for example. Other times it can be a little trickier.
The cause of a crack in a plaster ceiling is more than likely cosmetic, occurring due to changes in temperature or as a result of DIY work, for example. However, it’s better to investigate.
‘While minor cracks are usually nothing to worry about, thicker ones (anything more than 1/10 of an inch) can be a warning sign that structural problems may be afoot.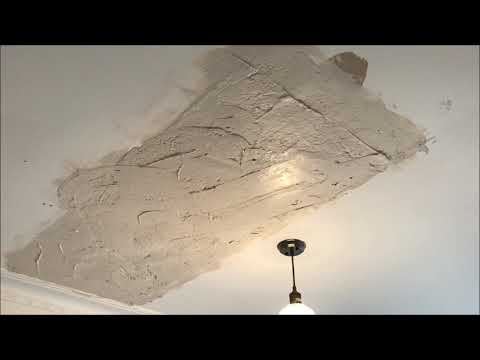 In this case, you should bring in a professional to inspect in more detail’, says Ash Reed, interiors expert at Living Cozy .
If the crack in question traverses the wall as well as the ceiling, you will want to know what causes cracks in walls to help solve the problem.
Only once you’ve established the cause – and resolved any issues – are you in a position to think about how to repair a plaster ceiling.
Protect the area
Regardless of the extent of repair work necessary, you’ll need to wear protective gear including a face mask and goggles, particularly when working with old plaster. Cover walls and furniture with plastic and lay down drop cloths so any dust and scrapings can be easily cleaned up afterwards.
How to repair cracks and holes in a plaster ceiling
Cosmetic issues such as repairing nail holes and gouges caused by DIY work and fixing ceiling cracks that are fine in a plaster ceiling are relatively easy to deal with. It may seem counterintuitive, but the best thing you can do is to make the crack slightly wider. ‘This will ensure you get enough easy sand into the crack for a substantial strong fill’, explains Nicholas Smacchia from Westchester-based company, Plastering by Nicholas .
Ensure you have brushed out any debris before applying joint compound or filler with a putty knife, scraping off the excess as you go. After applying several thin layers, let it dry and sand the area to create a flat, smooth finish. Then prime and paint to match the wall.
For wider cracks, consider applying mesh or fiberglass tape over it before spreading joint compound over the top and smoothing out. This same method works for small holes, too.
How to repair a sagging plaster ceiling
Typically found in older homes, traditional lath-and-plaster ceilings are formed by nailing strips of wood or metal mesh (referred to as laths) to the ceiling joists to form a strong base, then adding layers of plaster on top.
Over time, plaster can dry out, weaken and lose its holding strength, and the laths can start to pull away.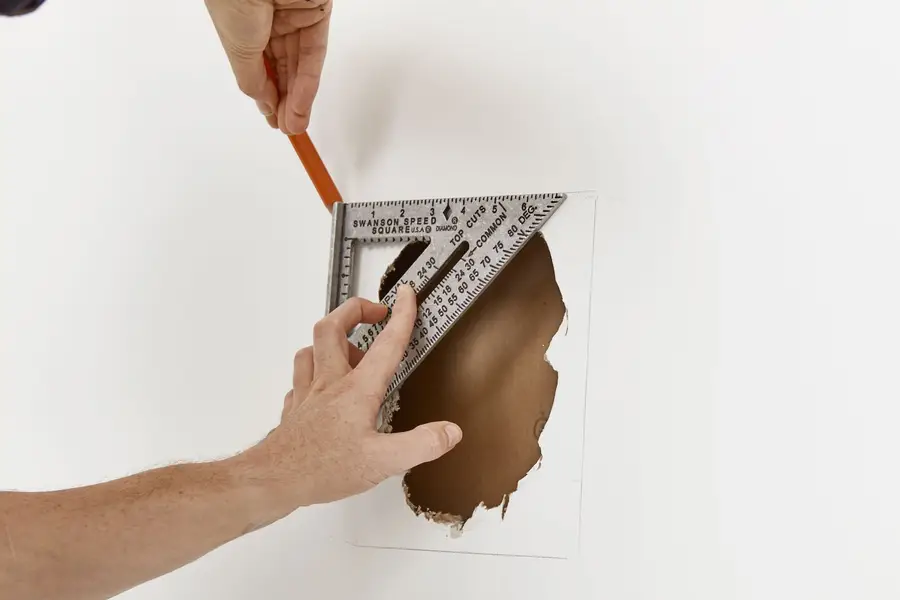 The first sign of this is sagging or bulging plaster. We’d advise calling in a professional for a job like this, however, it you want to attempt it yourself, here’s how the DIY experts at B&Q advise you do it:
‘Prop up the sagging plaster using a flat piece of chipboard or plywood nailed to a length of 38mm-square timber. This should reach from the floor to the ceiling. Lift the floorboards in the room above and vacuum between the joists over the bulge to collect up loose plaster.
'Mix fairly runny boding undercoat plaster and pour it over the damaged area to replace the broken plaster. Leave the supporting prop in place until the plaster has dried and bonded to the laths’.
You can then either remove the old plaster or leave it in place and reface the entire area with a new drywall.
Does water damaged plaster need replacing?
It depends. If modern plastering applications have been used, you’ll need to assess whether the drywall underneath has suffered extensive water damage. Indicators include large holes or sagging in the ceiling, as well as mold and discoloration.
‘In this case, the ceiling would need to be fully replaced, including structural elements such as beams’, says Adam Graham, construction analyst at Fixr .
Repairs aren’t usually that drastic, however. Assuming the water damage is surface-level and the laths are still intact, you can simply replaster over the top.
Can you repair part of the ceiling?
If only a small part of your ceiling is affected, you can make a simple repair with a plasterboard or drywall patch. Cut out the damaged area of plaster, then use drywall to patch it, securing it in place with drywall screws.
‘It’s a good idea to take off the old plaster before you buy the plasterboard to make a repair patch. Then you can choose the thickness closest to the depth of your plaster’, say the DIY experts at B&Q.
Can I fix my own ceiling?
It depends on the extent of the repair work required and the finish you’re expecting. Minor issues such as cracks and water damage are easy enough to DIY, however, larger fixes should be dealt with by professionals to ensure the ceiling is repaired to recommended safety standards.
‘Whether you decide to do the work yourself or hire an expert, it's important to address repair issues as soon as possible. Leaving them unaddressed for too long can lead to costly problems further down the line’, says Luke Lee.
For 10 years, Tara King worked as a Content Editor in the magazine industry, before leaving to become freelance, covering interior design, wellbeing, craft and homemaking. As well as writing for Ideal Home, Style at Home, Country Homes & Interiors, Tara’s keen eye for styling combined with a passion for creating a happy – and functional – family home has led to a series of organization and cleaning features for H&G.
How to fix a hole in the drywall on the ceiling?
WikiPotolok
Now it is difficult to find a material more popular for interior finishing work than drywall. It is good in almost everything except mechanical strength. Despite this drawback, structures on ceilings are often made from GKL and they look very beautiful. However, in case of damage, it is necessary to find the best option for repairing such a surface, and therefore, we will continue to talk about how to repair a hole in drywall on the ceiling - a phenomenon not as rare as it might seem.
Where to start
In order to qualitatively repair a surface that is always in sight - the ceilings are one of the most open and largest planes available to the eye, it is necessary to determine the nature of the forthcoming repair. This will determine how exactly the hole in the drywall on the ceiling is to be repaired - using simple puttying or using a more radical method.
- Small holes, up to half a centimeter in diameter, can simply be puttied.
- If the hole is through and has a diameter of more than a centimeter, but less than three, you need to prepare a small piece of a special mesh and putty with preliminary gluing it to the damaged area.
- When the hole is already large enough, you will have to find something to fill it with, and then repeat the operation with putty on the grid. You can fill the holes with pieces of drywall or sealant - according to the circumstances.
- For large holes, simple filling will not be enough. Here it will be necessary to partially dismantle the section of the structure and replace it with a new one, followed by the application of putty.
The hardest part is figuring out how to fix a large enough hole in the plasterboard on the ceiling - there will be much more work here and it will be more difficult to complete them. Therefore, we will not analyze cases with minor defects - everything is quite clear there. Let's take a closer look at situations with major damage.
What needs to be done
Each case of repair is individual, but, nevertheless, the method of repair and getting rid of defects in the ceiling structure in the case of plasterboard is always the same. In general, there are a number of quite simple operations to be performed:
- Determine the size of the damaged area.
- If possible, find the places where the guides pass, on which the drywall sheet or other structural elements of the frame are held.
- Expand the hole, if necessary, to such an extent that the “patch” can be attached to the frame.
- Prepare a patch of the desired shape and size.
Tip: if you need to make a part exactly matching the shape and size of the hole, you can first cut it out, and then outline it on the surface and cut a hole of the ideal configuration according to the drawing.
- Fix it in place with self-tapping screws.
- Fill and sand the repaired area.
You can get an insert that fits perfectly under the cut opening not only by tracing it along the contour. If the hole is small, the insert can be drilled into the surface with an ordinary “crown” - a drill nozzle. A cut circle will remain inside the nozzle, and the hole itself will be round. Combining these two parts will be easy.
If it is not possible to determine where the frame parts are, then it is possible to carry out repairs without attaching a patch to it. In this case, in order to close a hole in a plasterboard ceiling, you will need two or more wooden bars or slats that are slightly larger than the hole made. They will become the basis for fixing the piece of hl installed in the hole. The principle of mounting the repair piece of the surface is very simple:
- First, the hole or hole needs to be made a little larger and give them a rectangular or square shape.
- Blocks of wood or slats must be attached along the long side of the cut hole. They should be slightly longer than the hole to be patched.
- Bars or slats are fixed with self-tapping screws through drywall along the edges of the hole.
- Next, you need to carefully try on the patch to the cutout - its shape and size should fit very well.
 It is best to cut the inner edges of the insert at an angle, which will increase the bonding area and allow you to more accurately fit the edges of the workpiece to the opening to be sealed.
- If all is well, then fix the patch by attaching it to the edges of the previously mounted bars.
- It remains only to putty everything again and sand the repaired area after the putty has dried.
In this way, it is possible to restore the integrity of both a small area of a few centimeters, and to carry out a more global surface repair on large areas. Do not forget about one more thing: it is always necessary to treat the repaired areas and the areas adjacent to them with primers. This will improve the adhesion of the materials to each other and the putty will lie down better.
WikiPotolok
How to repair holes in plasterboard on walls and ceilings: video
Today, plasterboard has become commonplace in interior decoration.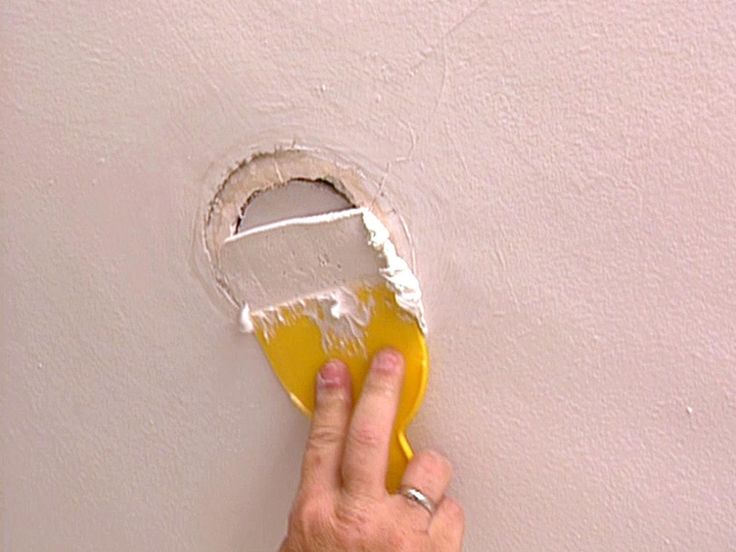 With its help, drywall walls and partitions, furniture and cabinets from drywall and other drywall design elements in the apartment are assembled. But, the material has one drawback, and it is likely that holes in the drywall may form with careless handling.
Drywall cracking example
Such damage can occur from accidental impacts during the transport of drywall, heavy objects and repairs. And also, do not exclude the wetting of a certain section of the wall, the need to gain access to communications under the skin. In any case, repairs will be required to restore the original state.
How to fix a hole in drywall without resorting to high costs, let alone changing the entire skin?
Back to index
Full content of material
- 1 What is needed for repair
- 2 How to fill a hole in a drywall on the wall
- 2.1 Preparatory work
- 2.2 Measurement and fitting of the workpiece
- 2.3 Settling of the opening
- 2.
 4 Decoration of the damaged section
Repair does not require special and highly specialized equipment or material.
There must have been pieces of drywall and plaster with reinforcing tape left in the household. It is these materials that will be needed when you need to seal holes in drywall for wall or ceiling cladding.
And you also need long self-tapping screws for drywall or wood (at least 40 mm long) and, importantly, a wooden beam or rail.
Filling a hole in drywall with wood
The wood can be sized to fit on a wall or 40mm thick for fixing to the back of a drywall sheathing.
Scheme for sealing holes in drywall
Plaster is used the same as for all wall or ceiling decoration. But, if there are no residues left, you can purchase a small amount of universal putty.
The tool kit is also very simple. You definitely need a drywall or stationery knife, or a piece of hacksaw blade for metal. They will cut drywall and fit it.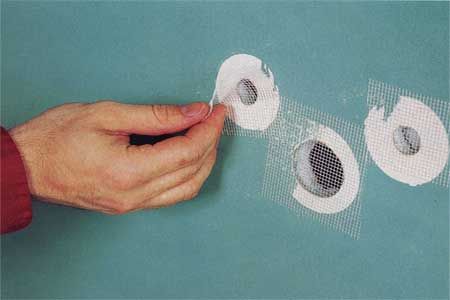
Self-tapping screws can be screwed in with either a screwdriver or a conventional Phillips screwdriver.
For finishing, you will need plastering trowels or a straight trowel to work with putty and level all surfaces.
Back to index
How to repair a hole in drywall on a wall
When everything is ready, work begins on the restoration of damage. Watch the video on how to fix a hole in drywall.
Preparatory work
Removing even a fairly large hole is not so difficult. Moreover, you do not need to incur large expenses in terms of financial expenditure. In such a situation, one of the features of drywall plays into the hands, its easy and simple workability without special equipment and tools. To prepare the restoration of a damaged surface, you only need a regular clerical or construction knife.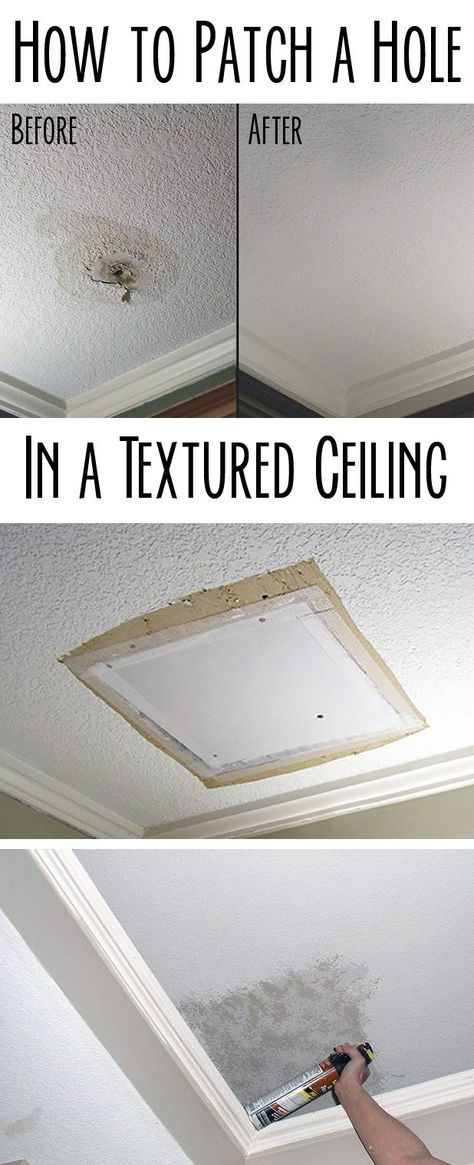 It is necessary to cut the material at a distance of 40-50 millimeters from the hole.
Step-by-step process for patching a hole in drywall
This is done to remove drywall that is of poor quality in structure, as it becomes brittle due to getting wet or hit.
The cut is made in several passes, after which the resulting edges are inspected and, if necessary, the hole is expanded to a solid material. Do it as follows:
- Draw a rectangle around the resulting damage with the specified parameters.
- Using a knife (you can also use a hacksaw blade), make cuts and remove the damaged part.
- After that, you need to remove and trim all the irregularities on the resulting edges, slightly trimming the edges with a blade.
At this preparatory work can be considered completed.
Measuring and Fitting the Workpiece
All repairing the hole comes down to installing a precisely sized plasterboard patch in place of the cut, which simply covers the damaged area.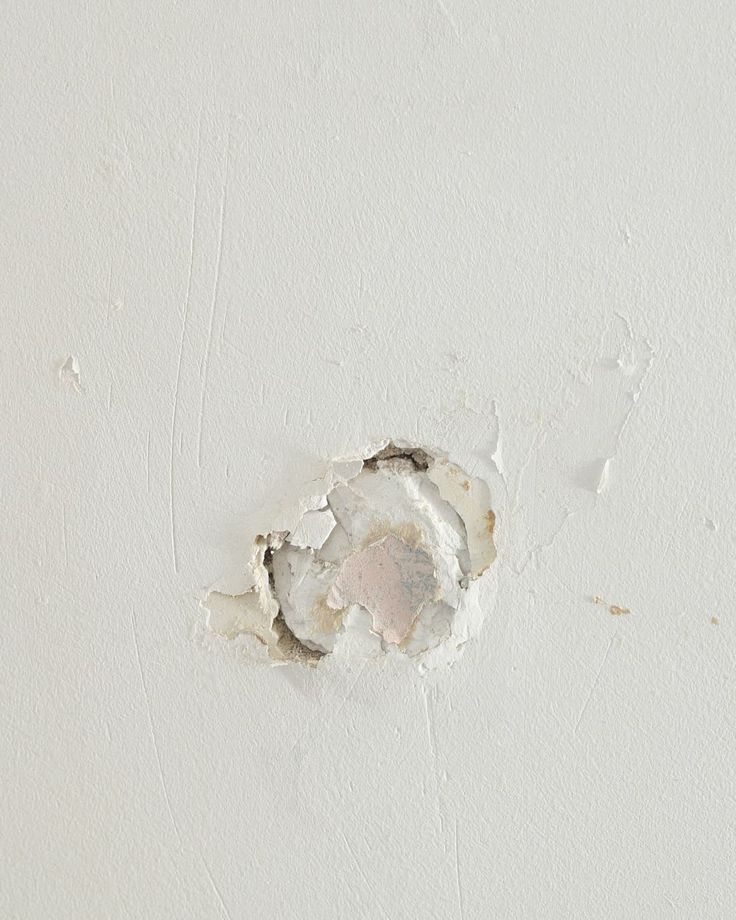 It is desirable that the slot has even and uniform edges, then it will be much easier to fit the workpiece.
Step-by-step instructions for patching a hole in a drywall sheet
The dimensions of the sides are taken with a tape measure or ruler and transferred to a piece of gypsum board used as a donor.
For a more precise fit, the cut-out patch can be applied to the hole and circled with a pencil around the excess edges, which, having hemmed, can most accurately fit the resulting opening without gaps.
When the workpiece is ready, proceed to its direct fastening, closing up the hole.
Closing the opening
First, a final check is made by comparing the prepared piece with the cut hole, after which the fixing material must be prepared.
The next step is to prepare a piece of wood or batten that will serve as a base for fixing the patch in the opening. It is best that the section corresponds to the distance of the rear edge of the sheathing sheet from the wall.
The timber must be slightly larger than the size of the holes itself, exceeding its dimensions by 50 mm on each side. And also you need to apply at least some kind of paint and varnish coating on the wood so that it does not swell from moisture and does not squeeze out the patch.
Stages of sealing the opening in drywall
The lath is inserted with its ends under the drywall sheathing and fixed with long self-tapping screws directly through the sheet. Even if the rail does not reach the wall, it can be tightly “pulled” with screws to the exterior finish.
If the gap in the gypsum board is too large, then 2-3 strips or even more can be used to seal it, the main thing is to create sufficient support so that the patch is securely held in the cut opening.
Example of using a strip to seal an opening in drywall
After preparing the support base, the cut opening must be closed with a previously prepared patch, everything must be checked using the building level.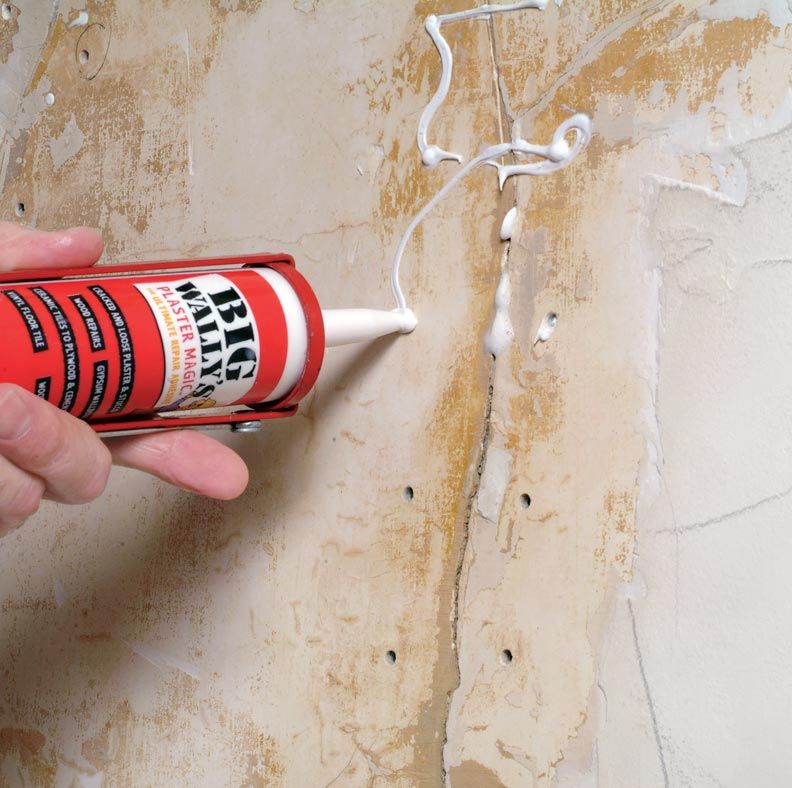 If the location is quite satisfactory, then you can fix the workpiece using self-tapping screws of the appropriate length.
When everything is ready, you need to move on to finishing and plaster all joints of drywall.
Finishing the damaged area
To remove all kinds of gaps, universal gypsum putty, reinforcing sickle tape and plastering spatulas are used. The perimeter, along which the patch is joined to the plasterboard sheathing, is carefully covered with putty and a sickle is glued on top. From above, all surfaces are covered with another layer of plaster on the GKL, carefully leveling the mixture over drywall.
The process of mounting sickle on a patch
The process of grouting a puttied patch
When the putty dries, (when it dries completely, it acquires a snow-white color) it is rubbed with sandpaper with fine grain (120-160) on a grater.