Decorating painted furniture
15 painted furniture designs to try |
(Image credit: Future)
It's at this time of year that painted furniture ideas really come into their own. Many of us are looking for quick and easy ways to transform our homes, to freshen them up for the year ahead.
And with inventive paint ideas, you can achieve quite dramatic results with ease and, at the same time, create a cohesive scheme, link different rooms and even continue the theme, pattern or color scheme of the painted furniture ideas through to other pieces, fixtures and fittings.
Painted furniture ideas
Painted furniture ideas might be limited in our minds to upcycling old pieces of furniture to give them a new life. But they are so much more than that – encompassing everything from single, freestanding items, to built-in units, to painted kitchen cabinet ideas.
1. Be adventurous with chalk painted furniture ideas
(Image credit: Annie Sloan)
You can create an extraordinarily unique look with painted furniture ideas. Need inspiration for standout hallway paint ideas? Look to color and paint expert Annie Sloan , who uses chalk painted furniture ideas as a defining feature of her work.
'This room was painted entirely in Chalk Paint® to suggest the iconic English living museum of art and design which is Charleston Farmhouse ,' she says. 'Around Charleston, you’ll notice repeat graphic shapes, botanical motifs, and lots and lots of color.
'The artists living there liked to emphasize the character of the furniture and the rooms they were working with; here you’ll notice the Burgundy outlining on the beautiful crenellations of the table, and the thick borders on the wall panelling which are both effective, easy design quirks you can easily use in your home. For best results, use the shape of the brush to dictate the design of the pattern.'
2. Give antique furniture a contemporary lift
(Image credit: Annie Sloan)
Painting antique furniture can feel like committing a sin, but they payback can be well worth taking the plunge.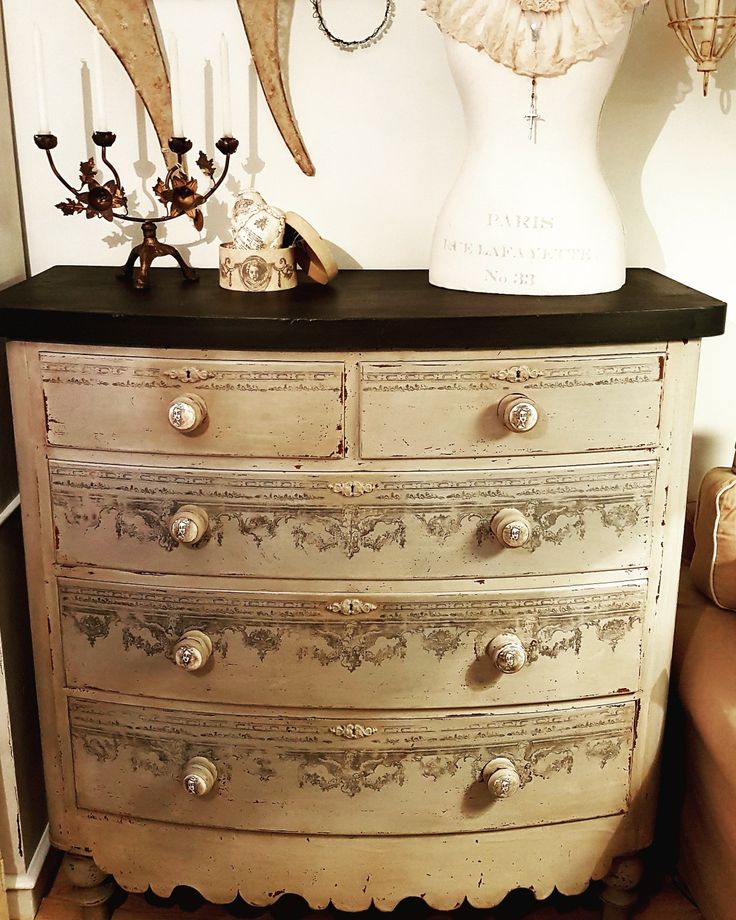 Here, a period console has been given a bold new lease of life by Annie Sloan with a modern finish reminiscent of antique Chinese furniture.
'My Chalk Paint™ is one paint that can be used in so many different ways. You can create washes of color, thick and textured paint, layered colors, or a smooth modern finish. There are so many different looks and techniques – you can really achieve anything you like! I created my paint to be flexible and to do all the things I liked about other paints,' says Annie Sloan.
3. Paint furniture to bring character to utility spaces
(Image credit: Future/Carolyn Barber)
Choosing a bold, toning color scheme for painting furniture in spaces seldom seen by guests – mudrooms and laundry rooms, for example – can make these utility areas feel elevated, and more part of the main house, rather than separate spaces.
'A mudroom should include practical storage solutions, such as shelves and coat hooks,' says Emma Sims Hilditch of design agency Sims Hilditch .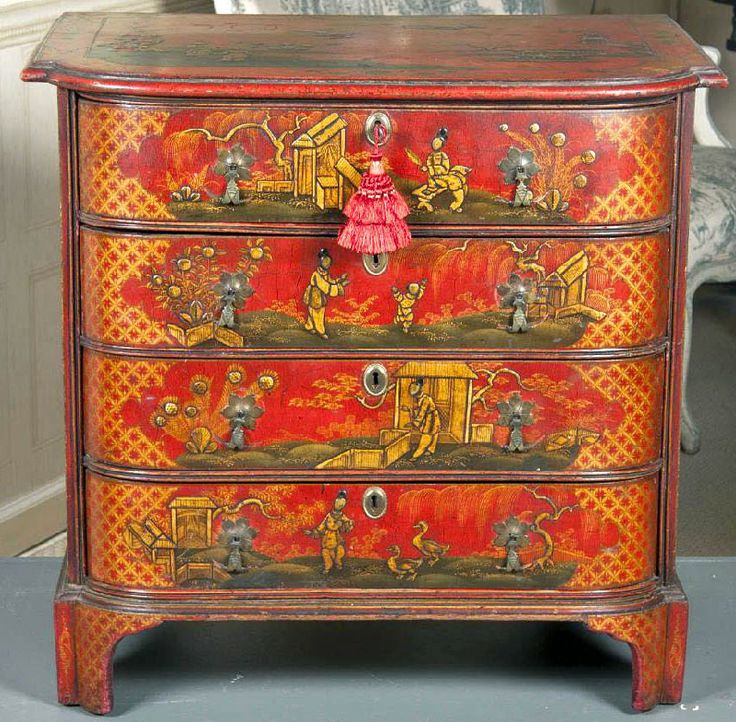 'But that does mean that the walls, where we might normally hang art, are taken up, leaving little space to give the room character.'
This can be remedied by painting both fitted and freestanding furniture in a characterful color that will not just hide dirt and scuffs more easily than white would, but that might also create a visual link to the room it's adjoining, likely the kitchen.
4. Paint vintage furniture for a cohesive look
(Image credit: Devol)
If you are looking to create a rustic kitchen ideas that are created from freestanding furniture from disparate sources and even periods, you can conjure up a cohesive, more uniform look with the clever use of paint. Here, freestanding kitchen cabinets and a plate rack have simply but cleverly been visually linked with kitchen colour ideas to match.
'You needn't pick exactly the same color for different pieces of painted furniture,' says Homes & Gardens' Editor in Chief Lucy Searle. 'Simply choosing differing tones of the same color can create a more layered look.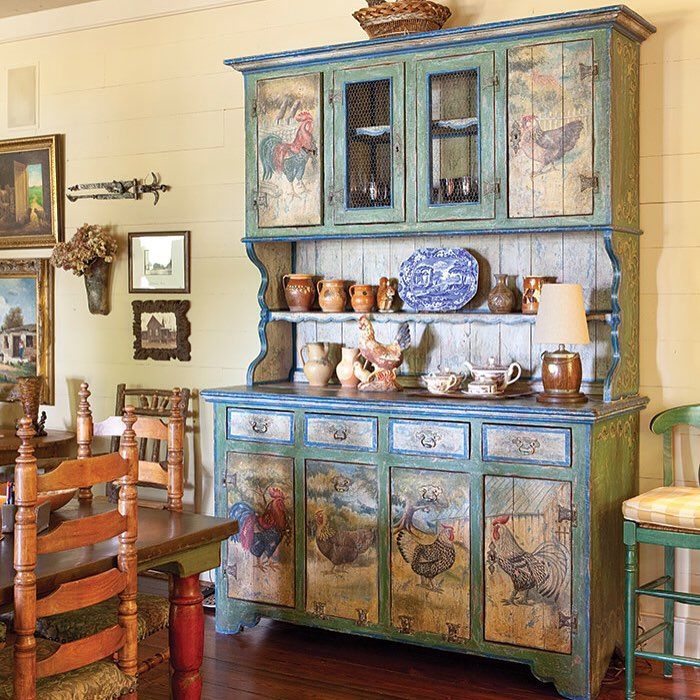 If you are applying this technique to a kitchen, it is always more space-enhancing to put the darker tone on the base units, and the lighter shade on the wall cabinets.'
5. Use painted furniture to cheat a freestanding look
(Image credit: Neptune)
If you love the idea of a freestanding painted kitchen – perhaps you've been browsing Shaker kitchen ideas – but want to make the most of every inch of space in a really practical way, there is a great compromise that can be achieved, in part with paint.
Fitted kitchens that have freestanding-look fronts like this one can be given even more of a freestanding look by differing the choice of paint colors on the different pieces of furniture – as in the kitchen above. Just as we advised above about base cabinetry being painted a darker tone than wall cabinetry, so the rule applies that a kitchen island looks better in a slightly more stand-out tone than the boundary cabinetry. It's not a hard-and-fast rule, but it does work brilliantly.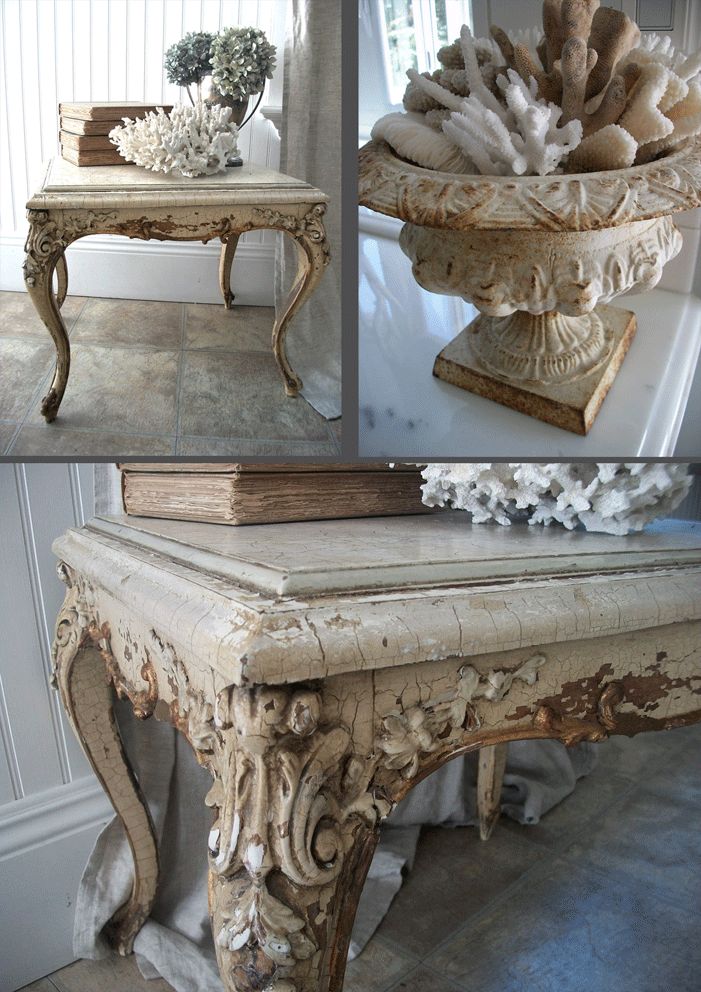
Knowing how to paint kitchen cabinets like a professional is key to a smart finish, with an expert always giving you the best results.
6. Part-paint furniture to show off displays of accessories
(Image credit: Future/Jon Day)
'Simply painting the interior of a display cabinet in a color that works to showcase the display of objets, favorite finds or even just everyday china, can have a transformative effect,' says Homes & Gardens' Editorial Director Sarah Spiteri.
'Here, the blue chosen tones with the most dominant of the accent colors in this space, but there's no reason not to pick a second accent color to add more interest to the scheme.'
7. Upcycle pre-loved furniture with paint
(Image credit: Neptune)
If there's a color you really want to introduce to your scheme, one way to do so is via painted furniture. And while you might look to buy a new piece, it's far more environmentally-friendly to upcycle a piece you already own, or which someone else is happily parting with.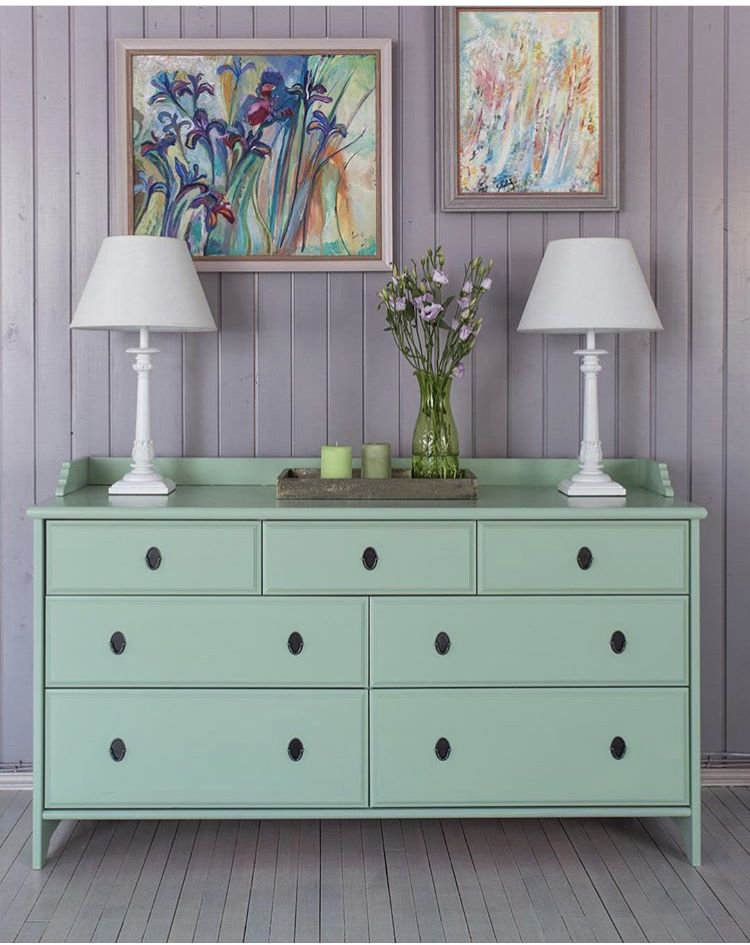
And because you're using paint, you can be more experimental. Don't love that deep purple you've chosen for that chest of drawers? Let the paint dry and start over.
8. Create contrast with painted furniture ideas
(Image credit: Future/Jon Day)
If you are considering really stand-out dining room color schemes, you can introduce contrast with painted furniture.
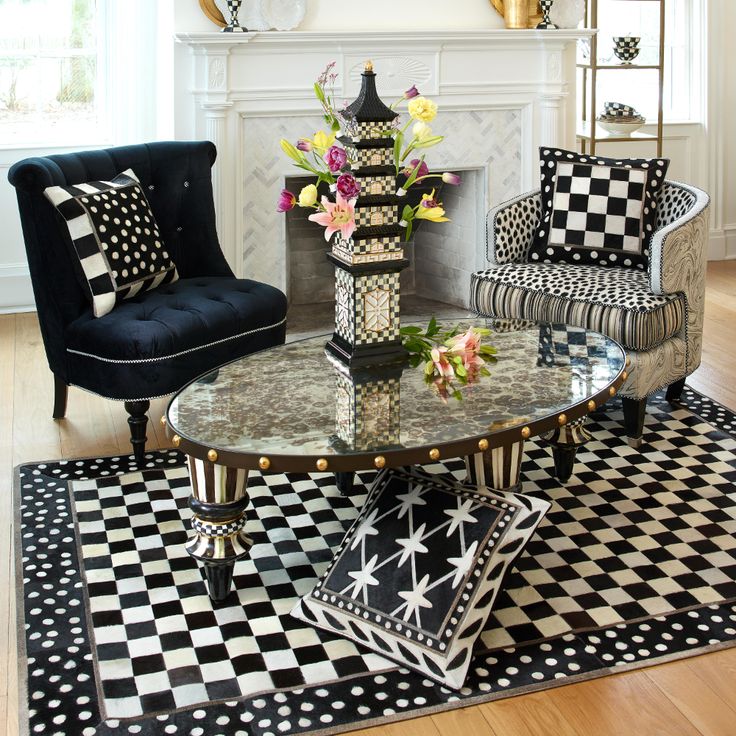
'We chose this extraordinary hand-painted wallcovering design by Fromental for one of our decorating shoots and wanted to add an element of surprise to the dining room set with an unexpected accent color,' says Emma Thomas, Homes & Gardens' Decorating Editor. 'We felt this pale blue on the table pedestal and dining chair, plus the salmon pink were perfect opposites for the deeper, bolder colors on the wall. This same effect could be achieved with painted furniture ideas.'
9. Paint wall-to-wall, floor-to-ceiling furniture
(Image credit: Future/Paul Massey)
In a room that has wall-to-wall, floor-to-ceiling furniture, it's worth giving it a painted treatment with real impact.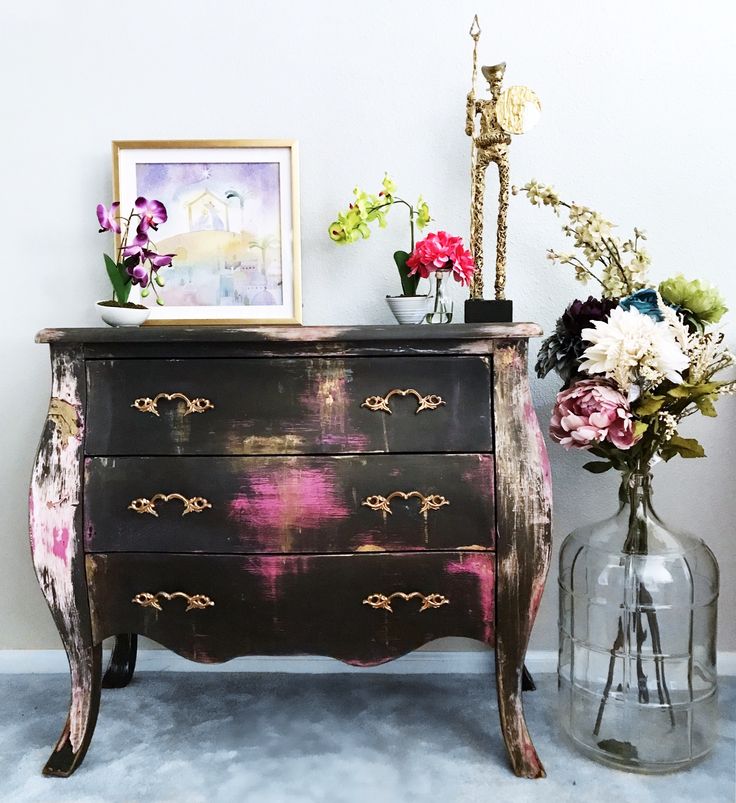 Here, a home library has fitted shelves painted in a red gloss, with walls adjacent painted in the same high-sheen finish.
'This brings real contemporary style to an otherwise traditionally styled room, but ensure any walls you paint with a high-shine finish are perfectly flat, otherwise lumps and bumps will show,' says Homes & Gardens' Digital Editor Jennifer Ebert.
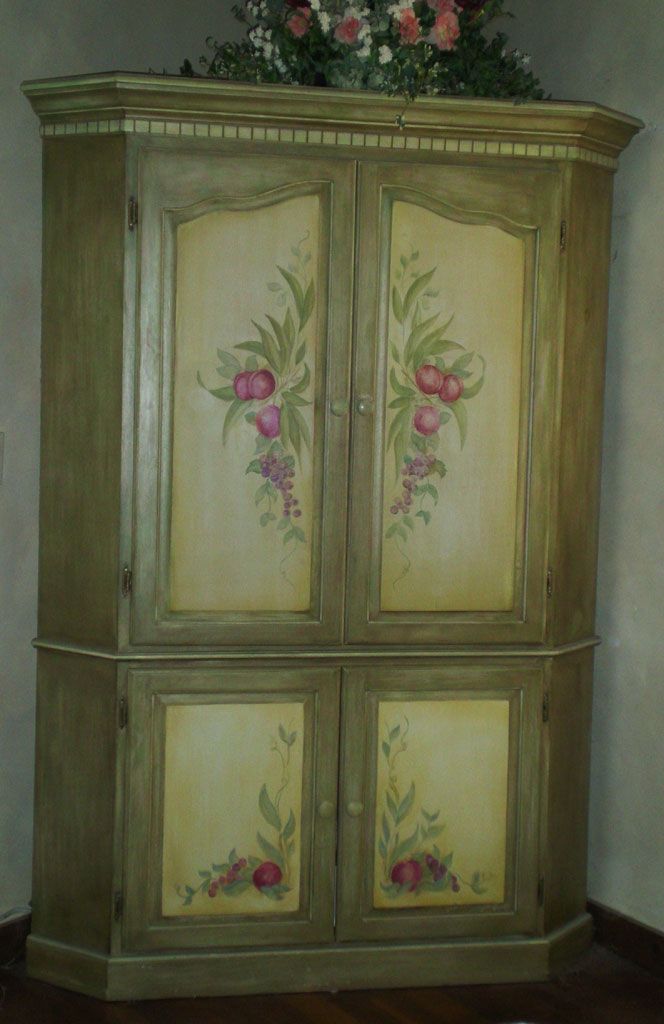
10. Mimic the look of folk-art painted furniture
(Image credit: Sarah Hollister Jessick at Surrey Lane Home)
Folk art has come back into our consciousnesses thanks, in part, to the pandemic and a craving for the 'good old days'. And it's a look that can be easily mimicked.
This piece was painted by Sara Hollister-Jessick from Surrey Lane Home with a base of Annie Sloan Chalk Paint in Old Violet, and a dry brush of Provence in the center, with Pure around the edges. A top coat of Oxford Navy was applied, then Sara distressed the piece to reveal the layers beneath and give a rustic feel.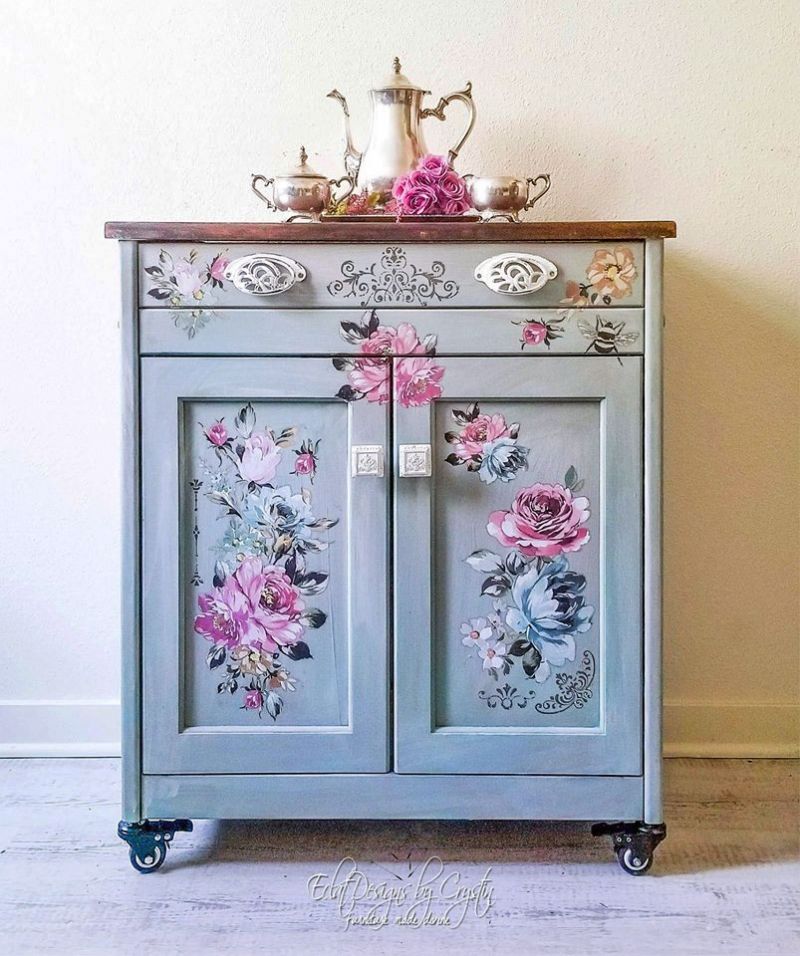
'I would encourage everybody to look to their local charity shops or online marketplaces with an open and creative eye, rather than purchasing brand new,' says Annie Sloan. 'There’s a much greater sense of satisfaction in making your house a home in this way.'
11. Let painted furniture inspire a color scheme
(Image credit: Benjamin Moore)
Fitted cabinetry is a ready-made canvas for color. Start with one-coat chalk paint for an easy makeover. More confident? Try satin or matte.
'Paint cabinetry a bold color and style your room around it,' Helen Shaw, director at Benjamin Moore. Earthy colors inspired by nature create a warm look all year around – the perfect living room paint ideas for spaces small or large, north- or south-facing.
12. Paint a bed to add depth to a bedroom scheme
(Image credit: Polly Wreford/Sally Denning)
So often we choose neutral-colored or natural materials for beds, when they are a wonderful opportunity for adding an extra splash of interest with adventurous bedroom color ideas.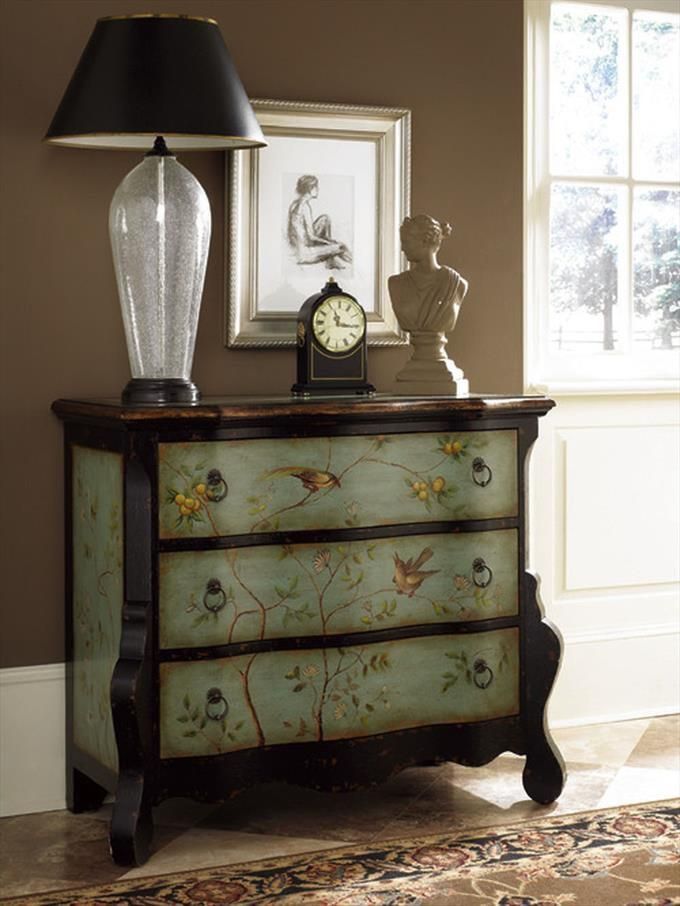
'Here, a contemporary four-poster bed in a gentle pea green by Shaker of Malvern is lifted by the ochre tones of the canopy, quilt, cushions and lampshade,' says Homes & Gardens' Decorating Editor of this bedroom created for us by stylist Sally Denning .
13. Take paint beyond furniture for a cohesive look
(Image credit: Annie Sloan)
Paint is the perfect medium to bring unique character, add personality and even introduce an element of humor to a home. Painted furniture ideas can inspire the look of the rest of the room, too, as in this bedroom where the colors on the chest have found their way on to the wall, bed frame and even lampshade.
'A gentle, muted palette evokes a sense of calm and restfulness,' says Ruth Mottershead, Creative Director, Little Greene .
14. Update children's rooms with painted furniture ideas
(Image credit: Annie Sloan)
Children's rooms tend to take on a new look more often than adult bedrooms purely because they – and their tastes – change so quickly and intensely over a short period of time.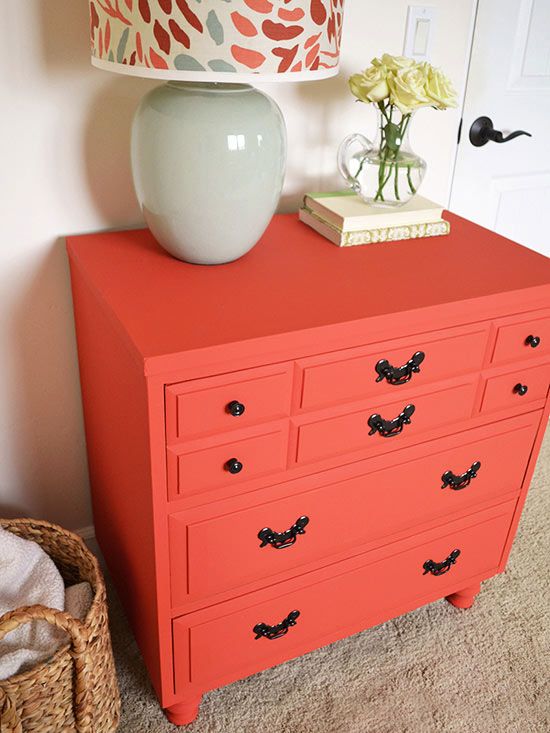
'This is where kids' room paint ideas can really come into their own,' says Homes & Gardens' Editor in Chief Lucy Searle. 'Of course, you can repaint or wallpaper the walls, but choosing a white backdrop and repainting the furniture again (and again) can make for an easier approach. Plus, of course, you can have more fun with designs on smaller areas, such as wardrobes, while creating enormous impact.
In this project, Annie Sloan painter in residence Beau Ford took a characterless old wooden wardrobe and transformed it in to a fun, colourful statement piece using Barcelona Orange and Pure Chalk Paints, creating a peachy-orange colour.
'One thing I love to do is to put a bold color on the inside of a piece that is painted in quite a neutral color on the outside. It’s a good way of introducing color if you’re not confident with it,' says Annie. 'I love creating patterns with my stencils – you can layer up a design with a few different stencil designs or create a pattern with one.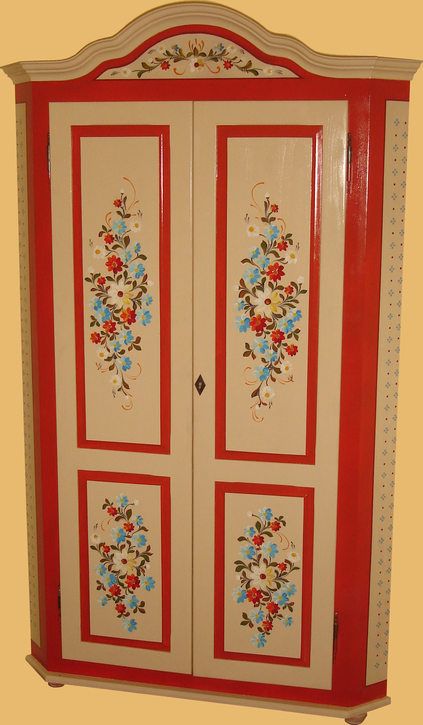 '
'
15. Update plain bathrooms by painting furniture
(Image credit: Maestri Studio/Nathan Shroder)
We often play it safe with bathroom color schemes, choosing neutrals, whites, perhaps blues, all of which look clean, practical – but unadventurous. If you have done this, perhaps bolder bathroom paint ideas can give you an update that ticks all the color boxes – but is easily reversible – are the answer?
Here, a bold green-painted vanity brings a strong dash of color into a bathroom designed by Maestri Studio . Matched with black and the retro wallpaper, it creates a characterful look that's perfect for a family bathroom, powder room or half bathroom.
What kind of paint is best for painting furniture?
The best kind of paint for painting furniture is one that is designed for the job. This means avoiding matte paint created for painting walls and instead looking for paint that is suitable for painting wood, metal and perhaps even plastic. These paints might come in different finishes – from Annie Sloan's Chalk Paint to home improvement stores' range of satin, semi- and gloss finishes. When you are planning painted furniture ideas, it's vital to consider the preparation needed – and this will really depend on the paint you use, so check the tin; many will require sanding and priming, others might suggest painting straight on to clean, dry surfaces.
How do you paint furniture to give it a professional finish?
To get a professional finish when painting furniture, begin with thorough preparation. If the top coat you are using suggests using a primer, it is best to sand the furniture to create a key, vacuum and wipe off all the sanding dust, prime the furniture, allowing it to dry and then applying the top coat. If the paint you are using does not need a top coat, a light sanding, thorough dust-removal and application of top coat will be all that's needed.
However, the key to a really professional finish is the application of the paint. Spray painting can give you the neatest finish on pieces of furniture with intricate curves; flat-surfaced furniture, such as kitchen door fronts, are best removed, laid flat and painted with a small sponge roller; if you are looking to create an antiqued look or to paint stencils or freehand designs, choose soft brushes that are designed for the job.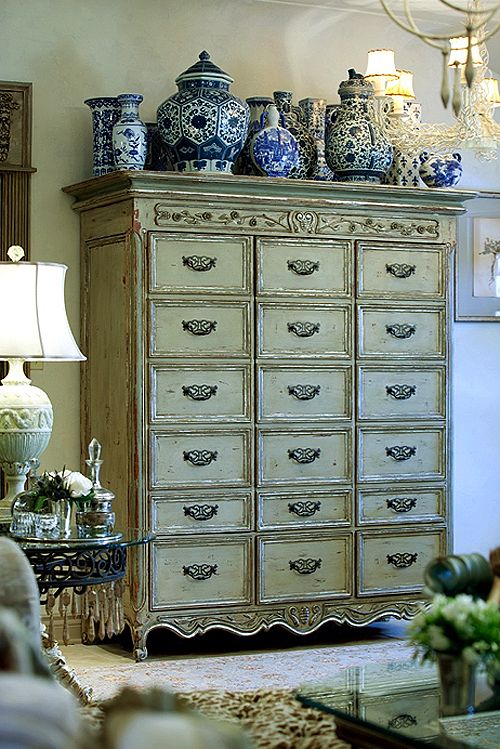
Lucy Searle has written about interiors, property and gardens since 1990, working her way around the interiors departments of women's magazines before switching to interiors-only titles in the mid-nineties. She was Associate Editor on Ideal Home, and Launch Editor of 4Homes magazine, before moving into digital in 2007, launching Channel 4's flagship website, Channel4.com/4homes. In 2018, Lucy took on the role of Global Editor in Chief for Realhomes.com, taking the site from a small magazine add-on to a global success. She was asked to repeat that success at Homes & Gardens, where she has also taken on the editorship of the magazine.
10 Ideas for Decorating with Painted Furniture
furniture
People typically fall into one of 2 categories when it comes to wooden furniture … painted or unpainted. I think it’s safe to say that I fall into the painted category. I love the look of old, worn wooden furniture but I still tend to migrate toward painted pieces. To share my passion with you, I went to Houzz to find ideas for decorating with painted furniture.
1. Pull Out Color from a Patterned Piece
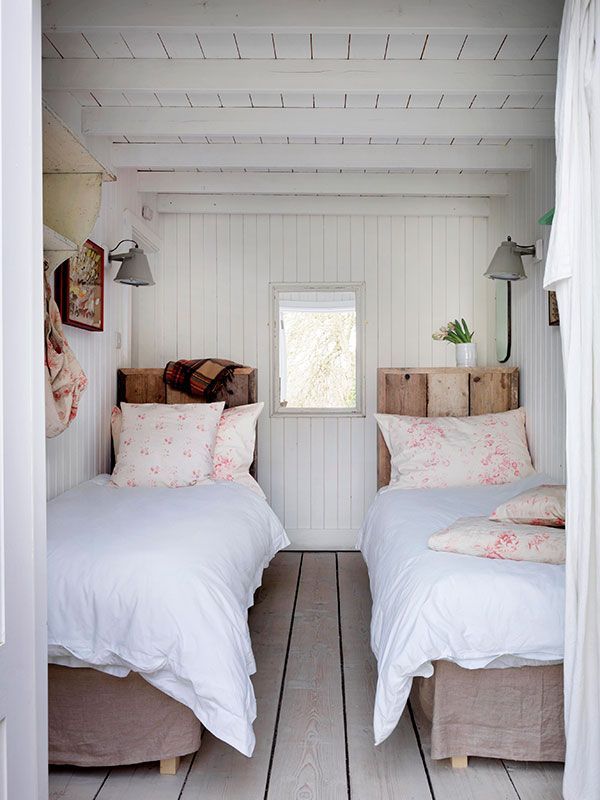
A small, dark blue dresser pulls the blue out of the comforter on the nearby bed.
The dark blue paint tones down the pink and helps to add drama to the room.
Rustic Bedroom by Bozeman Architects & Building Designers Pearson Design Group
2. Create a Monochromatic Scheme
White is a popular color for furniture these days – it goes with everything.
Here, a white painted armoire contributes to an all-white, restful bedroom.
Eclectic Bedroom by Other Metro Media & Bloggers Dreamy Whites
3. Create a Focal Point with a Bright Color
Rocking chairs painted a bright aqua create a focal point on a plain porch.
Your eye is naturally drawn to the aqua … you can accomplish this technique in any living space.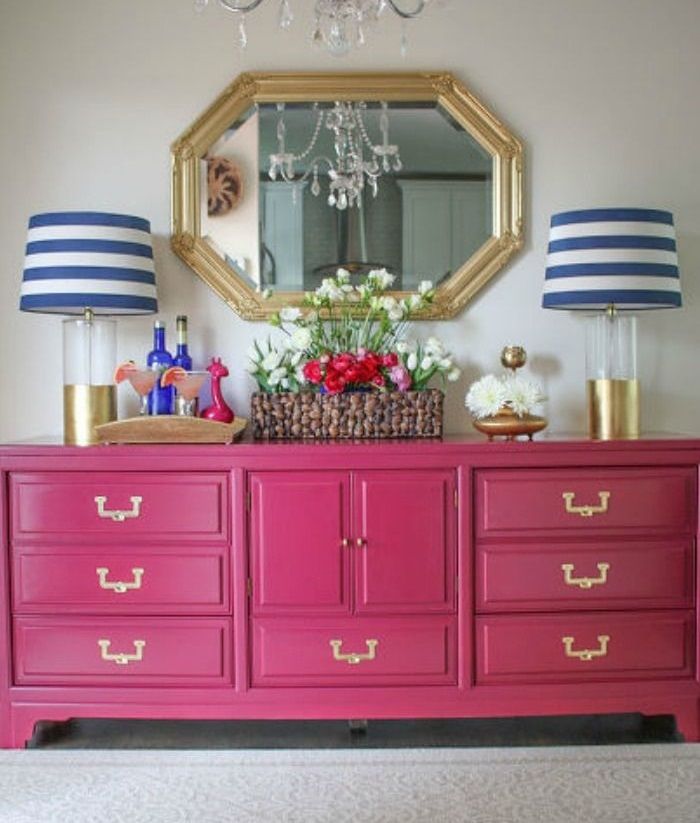
Farmhouse Porch by Norwich Architects & Building Designers Smith & Vansant Architects PC
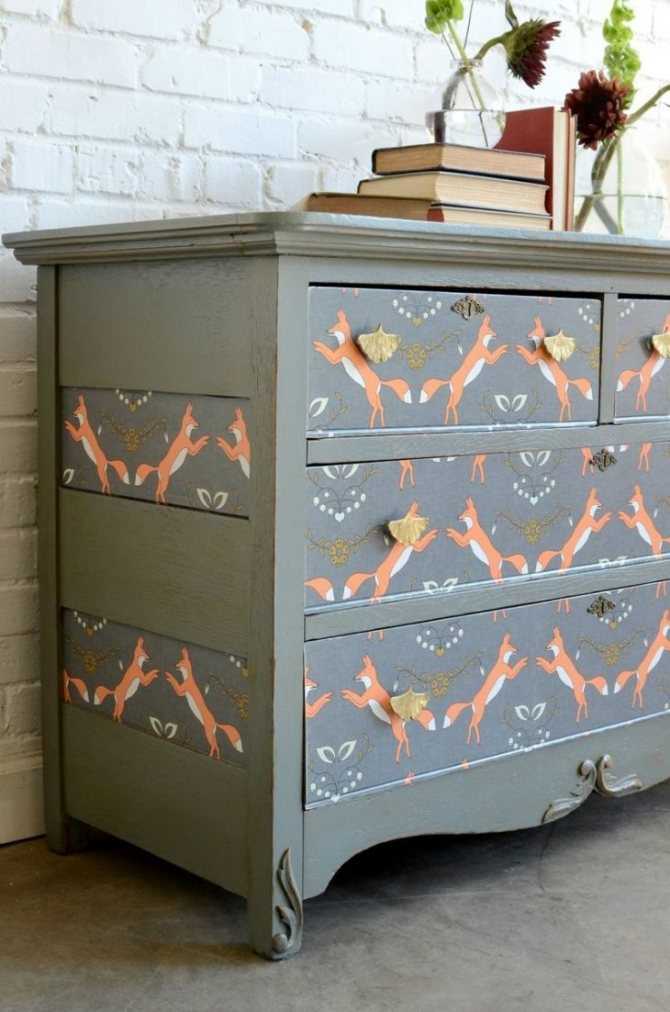
4. Use Neutral Tones to Create a Soft Palette
Gray furniture pairs well with green in this entryway since both hues are soft and don’t fight each other.
Photo by Elizabeth Home Decor & Design, Inc.
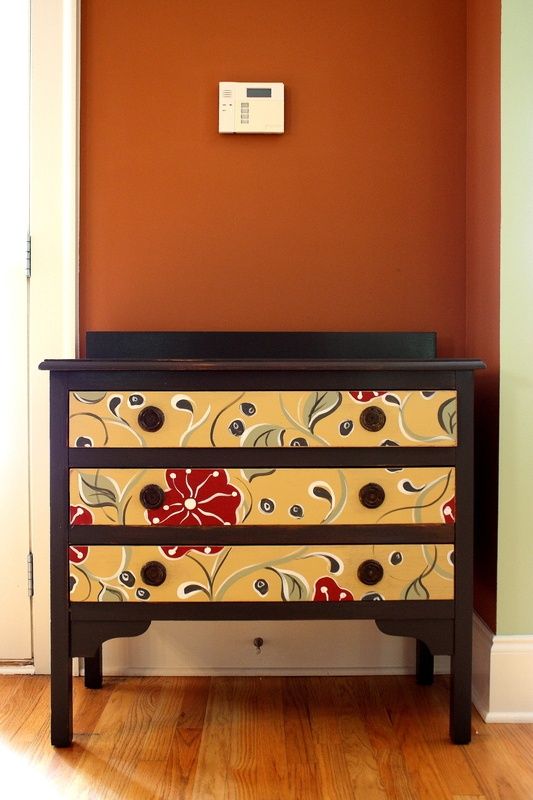
5. Treat Furniture Like a Canvas for Artwork
Give furniture a custom look by painting a mural of sorts on it. Here, the pattern on the table matches the headboard of the bed.
Photo by Linda McCalla Interiors
6. Pair Bright Color with White
If you’re afraid to use strong colors, pair one small piece with white walls.
The look is crisp, clean, and has cottage charm.
Traditional Bedroom by St. John’s General Contractors CapeRace Cultural Adventures
7. Paint Furniture Red to Energize a Room
The color red adds instant energy to any room!
White dishes look classic in a big, country red hutch.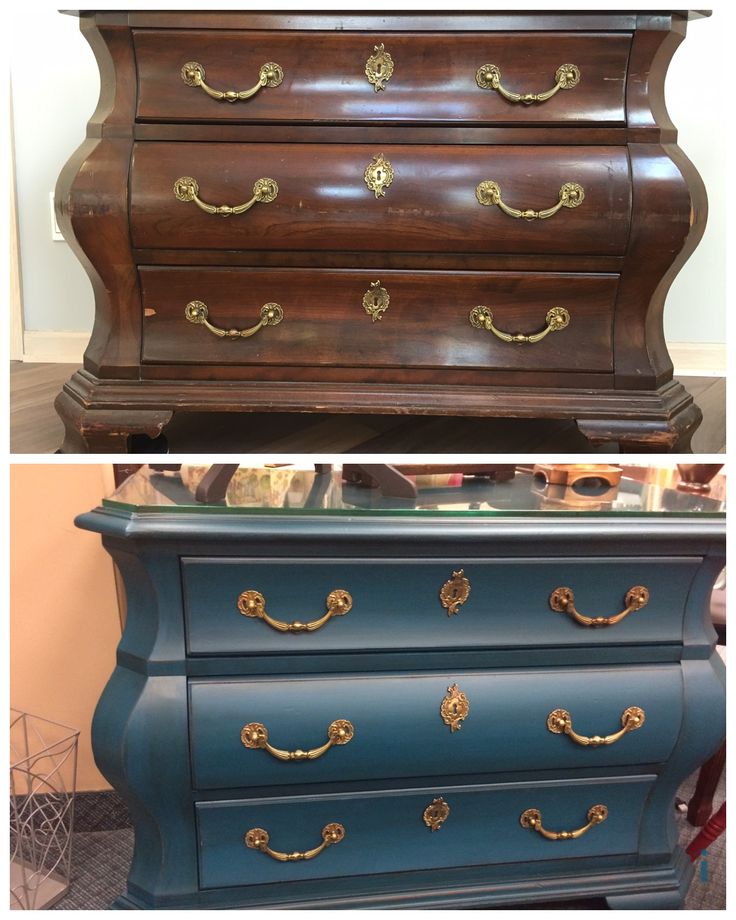
Traditional Dining Room by Annapolis Furniture & Accessories Maine Cottage
8. Paint One Small Piece of Furniture in Your Favorite Color
Afraid to paint an entire room in your favorite color?
Consider painting a single chair so you can enjoy your favorite shade without being overwhelmed.
Traditional Spaces by Annapolis Furniture & Accessories Maine Cottage
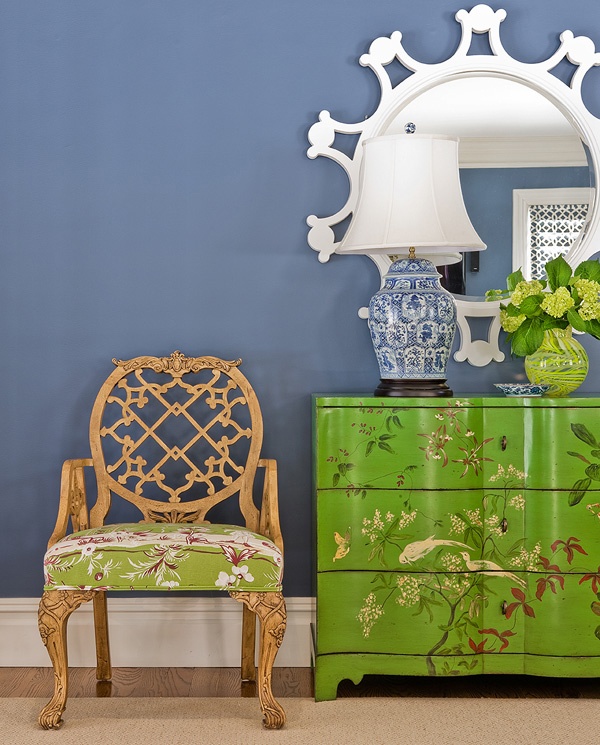
9. Pair Two Painted Pieces Together
Blue and green are analogous, meaning they’re next to each other on the color wheel.
The dresser and mirror are a perfect example of using this approach with painted furniture.
Traditional Hall by Greenfield Media & Bloggers Thrifty Decor Chick
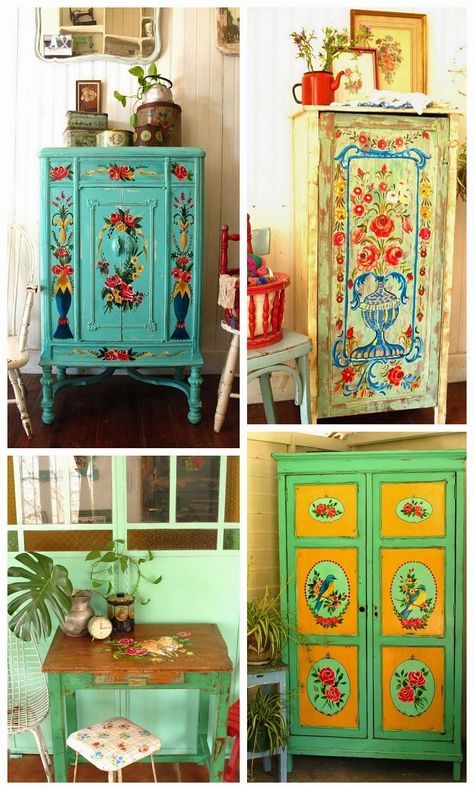
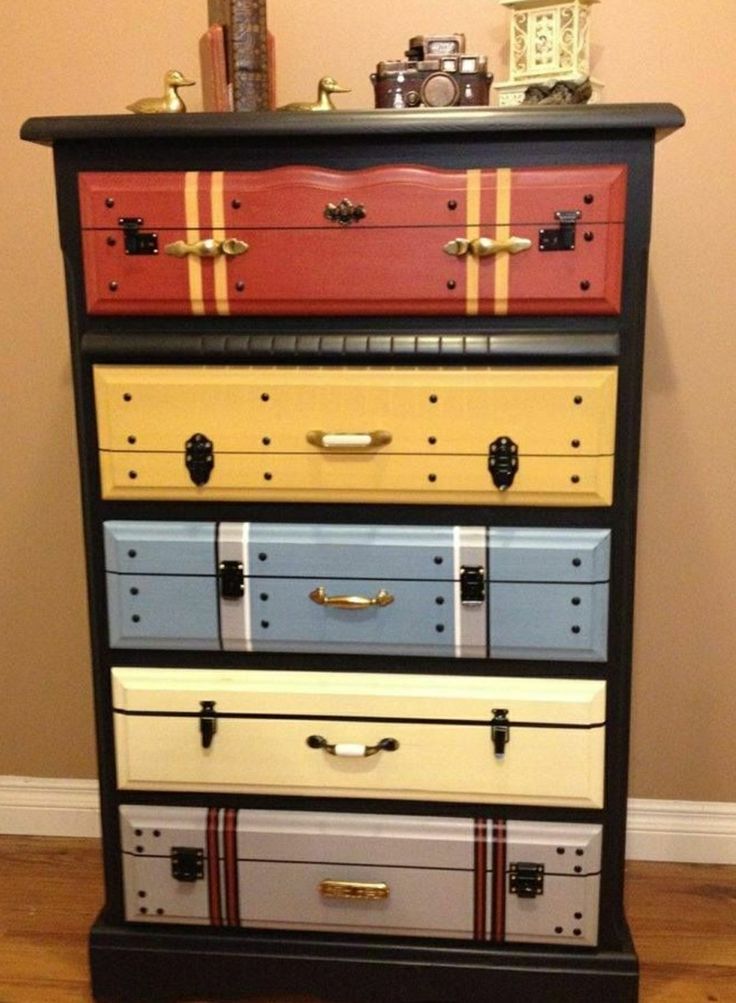
10. Use More than One Color on Painted Furniture
Be brave and use more than one color on a piece of furniture! Use the natural lines of the piece to determine where to place colors.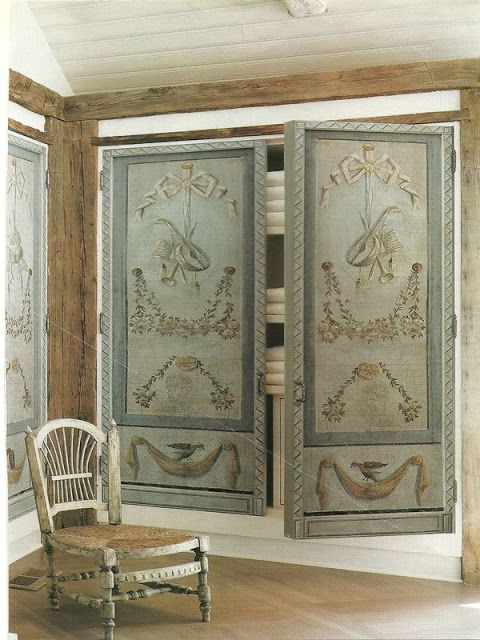 If you don’t like it, you can always repaint it!
Eclectic Living Room by Ames Furniture & Accessories American Country
I hope these 10 tips have inspired you to try something new or different with painted furniture in your home.
You might be amazed what you can do with a worn-out piece. See how I transformed the game table below.
What’s a favorite painted trash-to-treasure piece in your home?
furniture | home decor
The Return of Rattan Furniture
Fashion and decorating trends always seem to repeat themselves – just like history. Lately I’ve noticed a lot more rattan furniture in my Instagram feed so I think it’s safe to say this decorating staple of the seventies is making a big comeback! Photo by Baer’s Furniture The return of rattan furniture isn’t relegated to…
Read More The Return of Rattan FurnitureContinue
plaster, mosaic, bas-relief — INMYROOM
Interior decor
Decorators Marat Ka complete the series of articles on furniture with a description of the most original techniques
you can transform your furniture.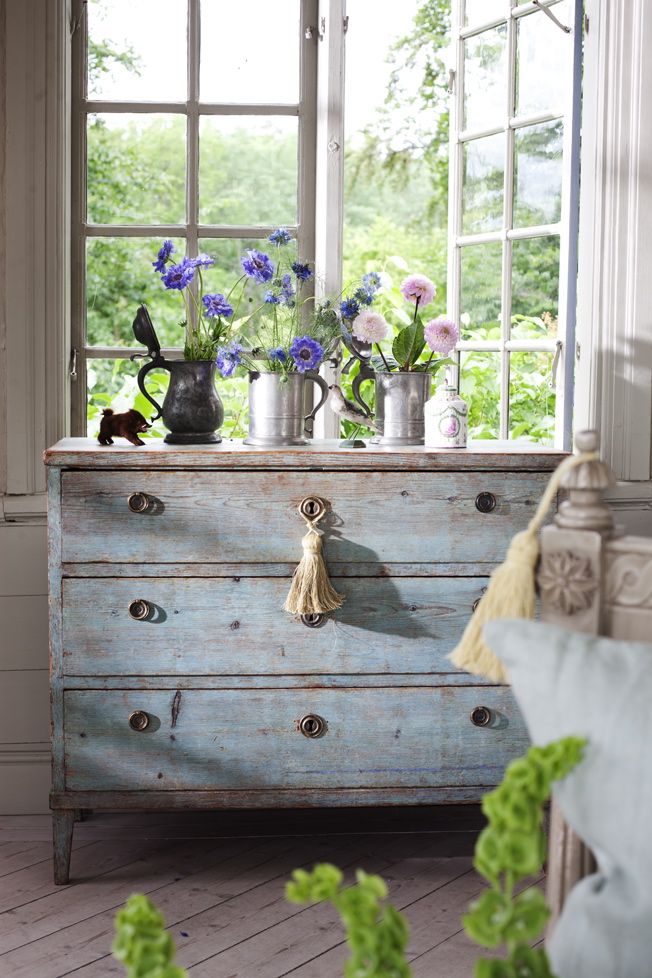
At the end of our conversation about wooden furniture, we invite you to try decorative plaster, mosaics and bas-relief coatings.
Decorative plaster
A material that knows no boundaries! Walls, ceilings, facades of buildings, interior items, and finally furniture - decorative plaster is suitable for any surface.
For wooden furniture, you can apply decorative plaster on both previously painted and clean surfaces.
We remind you: clean wood must be dedusted and primed, then painted with one layer of paint to match the plaster (make a colored substrate). Painted or varnished wood must be sanded, primed and repainted to ensure the plaster adheres to the surface.
There are many techniques for applying decorative plaster.
Basic decorative plaster techniques
Venetian
Venetian is a decorative plaster that is smooth and shiny like silk. It is applied with a spatula in circular motions in 2 layers and then polished. We recommend using decorative wax for protection and extra shine.
Texture Techniques
Here the decorative effects depend on the selected tool.
Brush is useful for creating textile and leather textures. By making long vertical broaches, you will get a texture reminiscent of velveteen. If you apply nubuck, nappa or alcantara plaster with chaotic movements, you will get an imitation of the corresponding types of suede.
Flat spatula creates a texture with "craters" that can be left or filled with pearl micas. With due experience and skill, try to make a "crocodile" texture: overlap strokes from left to right (or right to left).
When applied vertically or horizontally, the comb creates a texture similar to velveteen or papyrus. When applying strokes perpendicularly (horizontally-vertically, horizontally-vertically), a “braid” texture is obtained. Using this technique, you can make a wicker chair out of an ordinary chair!
Stencil Techniques
You can decide whether the pattern or the background will be three-dimensional and apply the plaster on the appropriate part of the stencil.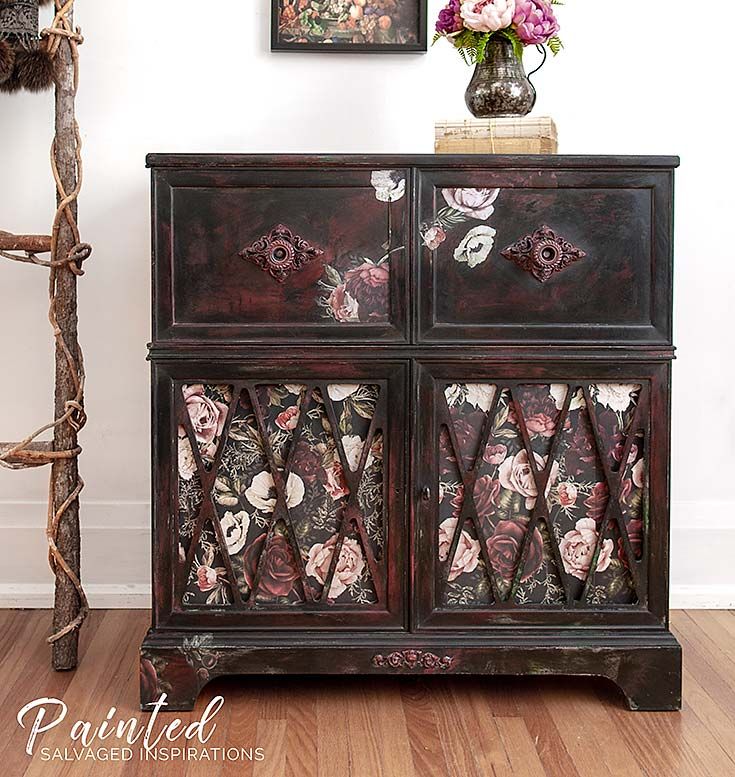
Mosaic
Glass mosaic will effectively emphasize the geometric shape of your furniture. Mosaic can be gold, platinum, silver or any other color (painted on the back). Also, in addition to glass, marble and ceramic mosaics are used for decoration. With the help of mosaics, you can lay out entire ornamental compositions on furniture, combining different colors.
The mosaic is applied with a normal two-component adhesive and grouted with micro-cement or tile grout.
Bas-relief coverings
Volumetric ornaments - bas-reliefs - can be mounted not only on walls, but also on furniture. In order to make this process more accessible, decorator Marat Ka came up with a special material "Altocca", which is plates that are connected like a puzzle. You can also mount linkrust on furniture or order a plaster execution of the ornament.
As for "Altocchi", the technology of its application is extremely simple.
Altocca bas-relief decoration
1) Level the surface and cover it with structural primer (we use primer opaque + flocaustico intotonacco).
2) Mix Altocchi's adhesive with a cement mortar (cementino).
3) Use a spatula to spread the adhesive over the surface of the furniture and on the back of the Altocchi plates.
4) Connect the plates like a puzzle, immediately remove excess adhesive from the seams.
5) Leave to dry for 24 hours.
6) Prime the finished surface of "Altocchi" with an ordinary acrylic primer and start decorating. There are no restrictions in decorative materials!
In a series of articles on decorating wooden furniture, we tried to share with you as many ways as possible and inspire you with our experience.
DIY wooden furniture decor
Content of the article:
- DIY wooden furniture decor
- Furniture Decor: Decoupage, Speaking, Swing
- Classic
- December
- December
- furniture
- New tightening furniture
- Using stencils
- Video: Restoration and decorating old furniture
- Furniture Decor: DIY decoration for creating an exceptionally beautiful house (120 photos)
- Transfiguration
- Film
- Decoupage
- Conclusions
- How to restore old furniture yourself: simple accessible methods and tips from FORUMHOUSE masters
- Do-it-yourself old furniture restoration
- Cleaning the old surface
- Priming and puttying
- Painting
- Applying varnish
- How to create "cracks"
- Do-it-yourself furniture decoupage - a new life for old things
- What is decoupage?
- Subtleties of craftsmanship
- Video: DIY decoupage of old furniture
- How to choose the right style for decoupage?
- Renovation of old furniture
- Decorating furniture with your own hands: a master class for beginners.
 Description of techniques and decor options (160 photos + video)
 - Varieties of modern decor for furniture
- Self-adhesive film
- Painting with acrylic compositions
Furniture decor: decoupage, aging, painting, replacement of upholstery
Often there is a desire to give a second life to old furniture, to make a new one special. It is not necessary to use the services of specialists for this. You can decorate furniture with your own hands using quite affordable materials and tools. There are many original ways to do this, which are very simple to implement.
The storyteller can be painted and sticking the drawings of flowers
Method of creating a soft journal table
A metal shelter can be painted and glued on it with flowers
Decoupage
Decoupage - this is a fair excellent result way to decorate. The possibilities for designing this method are limited only by the imagination of the master. There are several varieties of decoupage with their own characteristics. To decorate furniture with any of them, you will need the following tools:
- Special napkins, glossy cut-outs, printed interesting pictures, lace, photographs. You do not need to prepare all of these elements at once, you need to choose the most suitable for the implementation of the intended decor.
- Decoupage glue or ordinary PVA.
- Scissors.
- Small sponge or paint roller for smoothing the surface.
- Cloth or sponge to remove excess adhesive while working.
- Lacquer finish.
- Brushes.
- Primer.
- Acrylic paints.
Now it is worth considering in more detail the ways of decoupage.
This pattern can be applied to the table
Dresser decoration in a modern style
Classic
It consists of gluing a picture on the furniture surface and varnishing. Similarly, you can decorate stools, tables, bedside tables, chests of drawers, cabinets.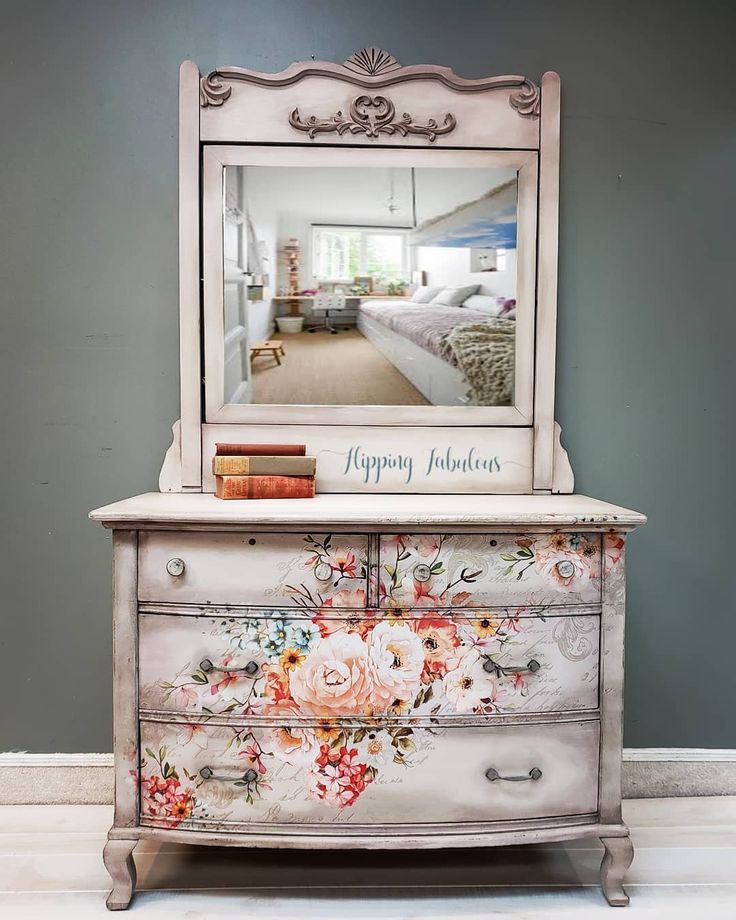 The work includes several stages, which are described in the table.
| Actions | Tools |
| Removing old paint from furniture surfaces | Spatula, sandpaper |
| Staining | Acrylic paint, primer |
| Image preparation (cutting out the desired pattern and peeling off the top layer) | Scissors, napkins |
| Image bonding | Adhesive |
| Flattening | Roller or soft brush |
| Adhesive Removal | Cloth or sponge |
After following the above steps, the product must be dried and varnished. You may need to add smoothness with fine sandpaper.
Furniture can be decorated in different ways
Chest of drawers decorating option
Drawings of flowers can be glued on the chest of drawers
Reverse decoupage
This method is great for transforming transparent furniture.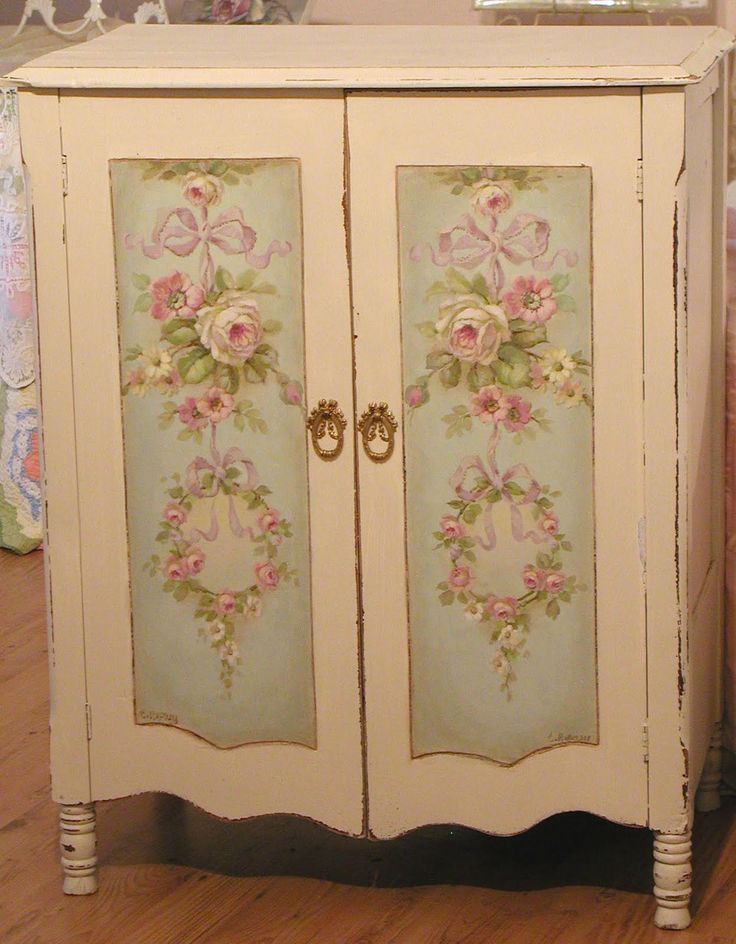 These can be cabinet doors with inserts or glass tables. The pattern will be fixed on the reverse side. To decorate furniture according to this method, you must perform the following work:
| Actions | Tools |
| Image Preparation (soak) | Better to use bright magazine clippings or printed pictures |
| Surface cleaning | Spatula, cleaners, degreaser |
| Glue on the front side of the pictures | PVA |
| Bonding and smoothing patterns | Roller or soft brush |
| Fastening | Clear varnish |
Decopatch
A more time-consuming method, it is not as easy to implement as the previous ones, but the result is worth it. It consists in collecting a composition from different elements glued end-to-end.
Wardrobe can be painted, a new color will update its condition
Glass can be placed on the table
This method is well suited for transforming chests of drawers and nightstands. It includes the following steps:
| Actions | Tools |
| Cleaning a piece of old furniture | Sandpaper, spatulas |
| Surface treatment | Primer |
| Preparing pictures | Selected images |
| Coating the machined surface with adhesive | PVA |
| Sticking pieces | Soft brush |
| PVA removal | Cloth or sponge |
After drying, apply two coats of varnish.
Decoupage allows you not only to update old furniture, hide its imperfections, but also make new interior items unique.
Furniture can be aged,
In the interior it will look unusually
Restore chairs very simple, it is enough to paint them and decorate
Comodes can be decorated with
Storywriting
sometimes to maintain a certain idea in the interior is required aging some items. You can make the specified furniture decor with your own hands. For work, you need to prepare the following materials and tools:
- water based paints;
- craquelure varnish;
- stain;
- sandpaper;
- bronze or copper acrylic paints;
- brushes.
Flowers can be glued on the table
Aging makes furniture look more sophisticated
There are several ways to decorate interior items to give them an aged look. In any case, at the initial stage, it is necessary to carry out surface treatment. Consider the techniques in more detail:
- Use of stain. This technique is more suitable for light objects. It is applied in an even layer on the prepared surface, paying special attention to the edges, bends, cracks. And then, with a sponge dipped in water, the coating in the center is removed. After drying, antique wax can be rubbed in. Such decor will look unusual.
- Craquelure.
 With the help of this type of varnish, the product is given a cracked look. First you need two acrylic paints of the same color combination, but different tones: darker and lighter. The first layer is applied with a saturated shade, and the second (after complete drying) is light. Furniture is best left outdoors until completely dry. And after it, clean small areas with sandpaper until the first layer appears. Then you can apply craquelure.
 - Gold color. Furniture modified in this way looks chic in any interior. Decorating is easy enough. You will need to paint the object with the desired color, and after drying, quickly apply gold paint with a sponge (unevenly) and varnish.
TV cabinet restoration
Whatnot can be painted and used as a flower stand
Such a chest of drawers in the room will look unusual
New furniture upholstery
Do not throw away a good sofa or armchair because the upholstery is worn or not washed from stains.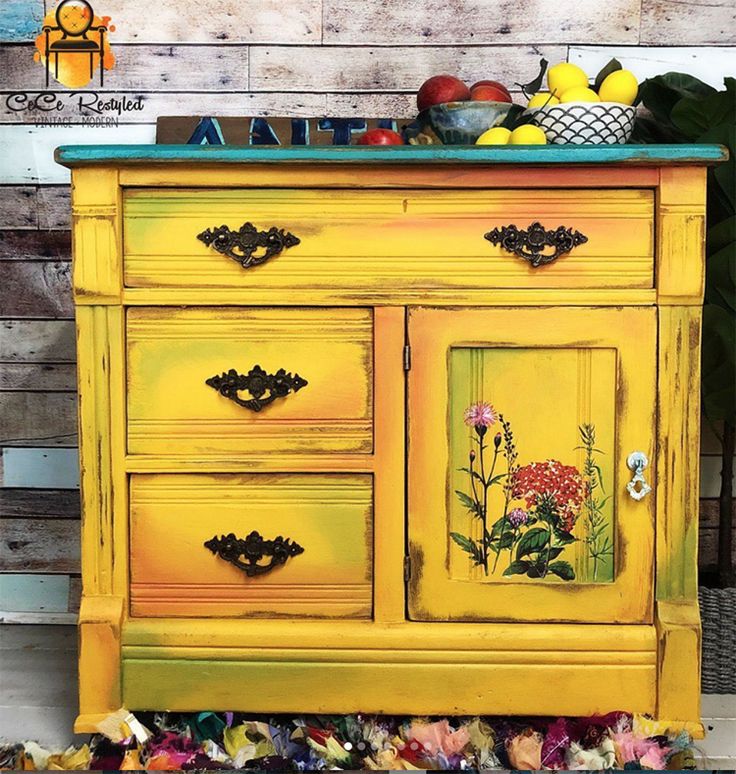 They can be updated by covering them with a brand new fabric with your own hands. At the same time, you can add the originality of upholstered furniture by creating drapery.
Work will require the following:
- New thick fabric.
- Construction stapler.
- Hammer and small nails.
- Knife.
- Pliers.
- Large needle.
- Nylon threads.
- Chalk or fabric pencil (dried soap residue can also be used).
- Screwdriver.
- Strong adhesive. Very convenient view with a thermal gun.
- Drill.
- Nail puller.
The box can be painted with flowers
Furniture can be aged, it will look beautiful
The first step is to remove the old fabric and only then proceed to update. Each detail must be accurately measured, cut out, attached to the furniture and ensure the accuracy of the dimensions.
You can update the look and a little easier: sew new covers for upholstered furniture. In this case, you do not need to remove the old fabric.
Chest of drawers decoration option
Drawings of flowers can be glued on the chest of drawers
Such a mosaic on the table will look very unusual
Using stencils
stencils will come to the rescue, using which drawings are made. They can be bought at hardware stores or prepared with your own hands from cardboard. You will also need paint in cans. The way of transformation is simple and creatively interesting.
A small stool can be painted
Any obsolete furniture can be restored
The result will be better if the surface of the furniture is made even. Stencils are applied to the right place, for the accuracy of the drawing they can be fixed with masking tape. And then spray paint. In conclusion, it is recommended to coat the product with varnish. If several colors are required in the drawing, then acrylic paints can be used, they fit perfectly on wooden surfaces.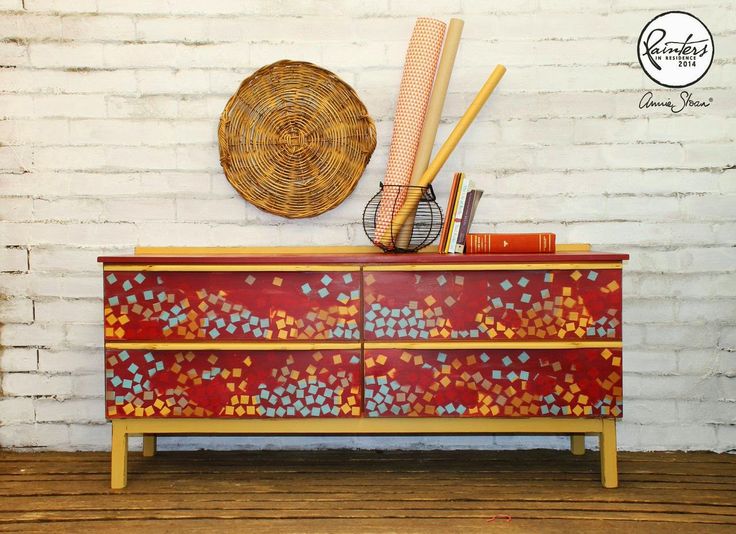
Designer things are not cheap, but you can always create them yourself. In this case, the thing will turn out exactly as it was imagined, and the creative process will bring incredible pleasure. Creating an individual furniture decor with the help of improvised means will transform any interior, make it unique.
Video: Restoration and decoration of old furniture
Decor for furniture: DIY decoration to create an exceptionally beautiful home (120 photos)
Old things are not always worth throwing away, sometimes they can be transformed in a certain way. There are a number of interesting ideas that are brought to life with their own hands. This is one of the favorite activities of designers, as well as just creative people.
No training or specific skills are needed in this business. With the help of simple tips, you can easily turn old furniture into your chosen addition to the stylistic direction.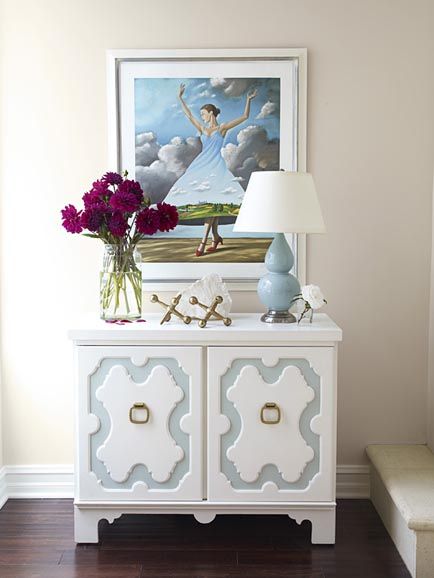
Often people like decorating furniture with their own hands so much that people turn this activity into a hobby, or a way to earn extra money.
Summary of the article:
- Transformation
- Initial stage
- Film
- Stencils
- Decoupage
- Terminals
- Furniture decor photo
Transformation
Quite common is the practice when old items are simply disposed of, or taken to the dacha, pantry. It makes sense to give furniture a second life. After all, such products that have served for a sufficiently long period of time are of better quality, compared with modern pieces of furniture. Complementing them with decorative elements for furniture, their superiority immediately increases.
Thus, it is possible to make a multifunctional and aesthetic thing out of the grandmother's chest of drawers. The procedure will not take much time, but the appearance will delight for a long time.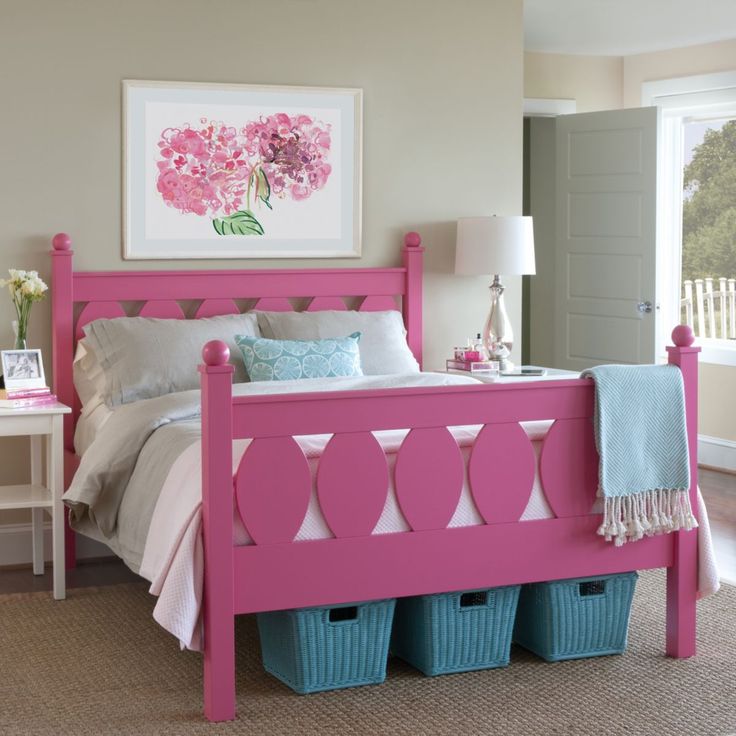
The most popular decor ideas for furniture are screen printing, or burning, decoupage. Often carving or gilding is used. These elements have been used since ancient times.
Representatives of this craft are in demand to this day. With the help of such techniques, the old thing, as seen in the photo of furniture decor, is updated, attracts with its appearance.
For men, the burning method is suitable, for women, you can also choose the most suitable option. Such a hobby is always useful.
Initial stage
It is worth preparing the material before starting work, choosing a certain technique. The most popular is the decoupage technique, carved decor for furniture, and pyrography. The method of pasting with a color film is also used.
Choose the best option for you. The techniques themselves are quite simple, do not require special skills. Suitable for creating a unique decor for furniture from improvised materials: eggshells, lace, wallpaper, colored glass mosaics.
The beginning of creative work is the preparation of furniture. It is necessary to remove a layer of old glue, process it with sandpaper. If the legs, doors are loose, then they should be tightened.
Film
With this method you can transform any cabinet or refrigerator. A variety of colors, patterns, a wide range allows you to make the kitchen room unrecognizable. Working with it is quite easy, you just need to properly prepare the surface. It should be smooth, fat-free using a special tool, such as alcohol.
Film adheres well to glossy surfaces. In addition to bedside tables, doors can be processed in this way. When choosing, pay attention to the width of the roll, prepare a washing cloth that is soft in texture.
Wipe with detergent and then alcohol before starting work. After that, you need to glue the film. The most important thing is alignment across the entire width in order to minimize the risk of bubbles.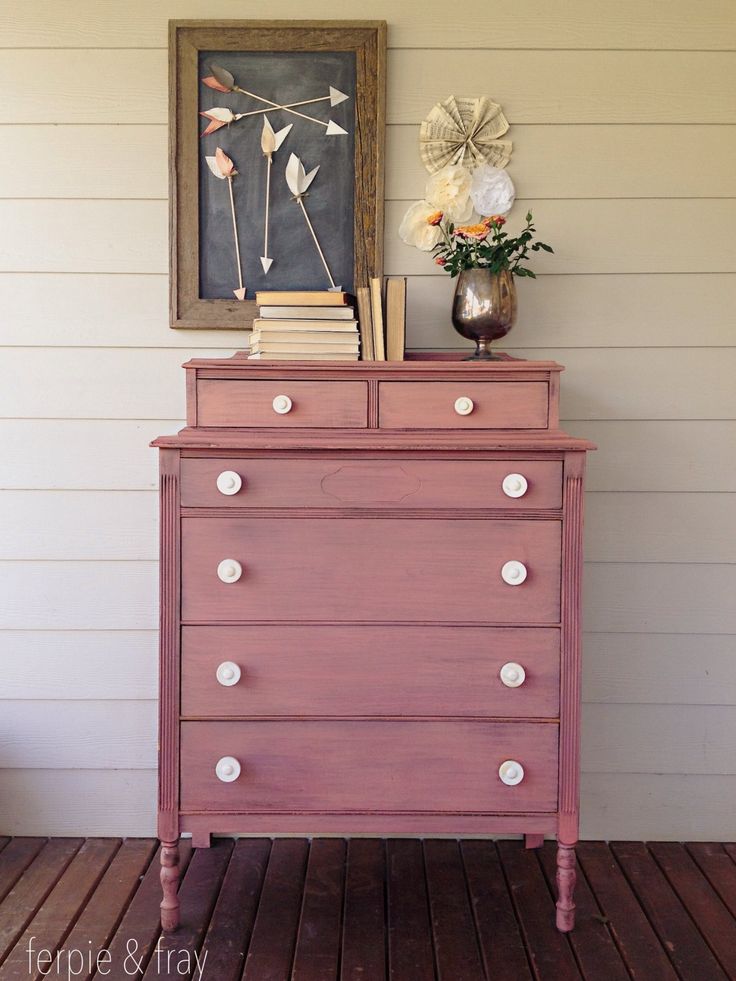 This can be avoided with a rubber spatula.
After gluing, remove excess, fasten handles and other fittings.
Stencils
This is quite an interesting and easy upgrade option. You should also choose paint.
Similar to the previous option, the furniture should be prepared. The advantage of using stencils is the ability to hide irregularities, thereby enliven, improve the interior of the room.
Determine the location, attach the stencil and spray paint. After that, it is necessary to apply several layers of varnish, so that the surface you make out will become more uniform.
Pay attention! If you are decorating wooden furniture, then acrylic paint is the best choice for you. For beginners, automotive or spray paint is suitable.
You can make your own stencils. To do this, you need to draw a pattern, then cut out the corresponding holes. This blank is suitable for decorating any furniture.
Decoupage
This is another option for decorating furniture. The method is often used to design cabinets, chairs, batteries. To do this, prepare napkins, acrylic paints. You need to buy PVA glue, furniture varnish, as well as comfortable brushes of different sizes.
Conclusions
You don't need much effort or time to decorate old furniture. Choose the appropriate method, the materials that you need to use it and proceed.
This activity is pleasant, it can eventually turn into a hobby. And the old, at first glance, furniture will delight you and those around you with its appearance for a long time.
How to restore old furniture yourself: simple accessible methods and tips from masters FORUMHOUSE
“Imagine a picture: an elegant woman with make-up, in a tight skirt and very high heels, standing at the garbage dump in work gloves and with an ax in her hand breaks out the upper part beds,” this is how a user of our portal with the nickname ELIZA describes one of her successful hunts for old furniture.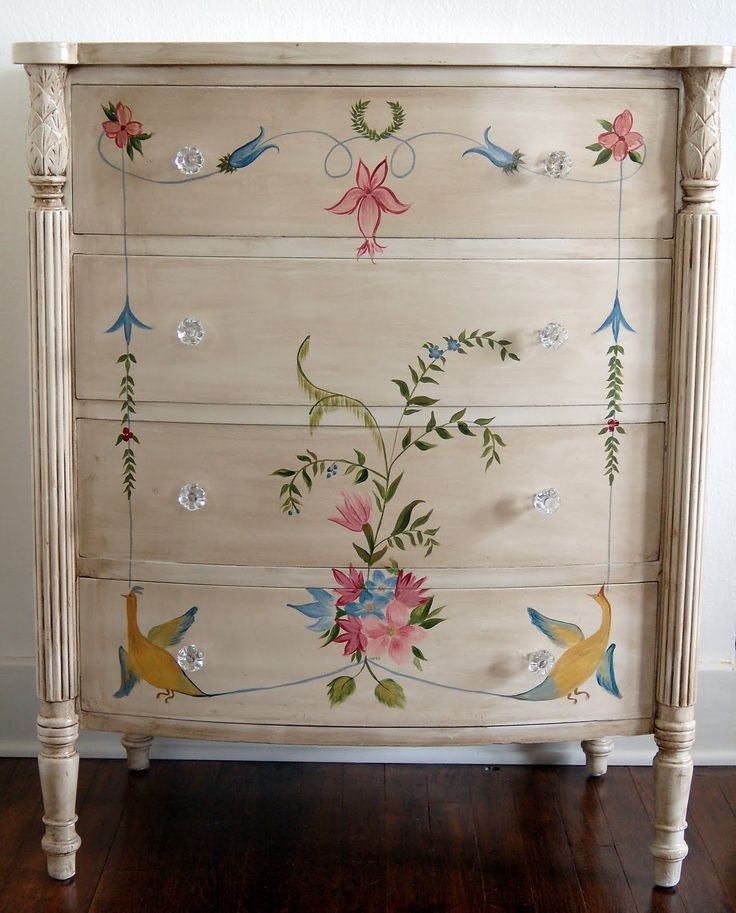 Restoring old furniture is an amazing hobby that allows you to create real masterpieces from the finds from the garbage heap and cheap furniture panels. In this article we will cover:
- Do-it-yourself restoration of old furniture
- Stages of wood furniture restoration
- Furniture restoration at home with aging effect
Do-it-yourself old furniture restoration
This is what FORUMHOUSE users get at home, where instead of a carpentry shop there is a small kitchen, and a set of tools is the most ordinary one that everyone has.
To turn an old bedside table into a furniture masterpiece, you need to:
- clean the old surface;
- prime and putty it;
- paint;
- varnish;
Cleaning old surfaces
One of the most difficult processes is removing layers of old paint or varnish from furniture.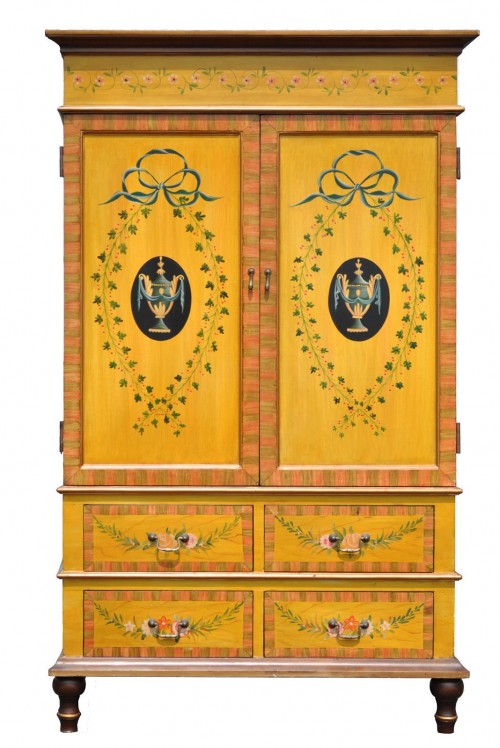
If the paint is in good condition (not chipped, not poisonous), you can paint over with fresh paint. But the ambush is that the old paint can fall off.
Old paint can be removed with special washes (available at hardware stores). The manufacturer's instructions indicate for which materials it can be used. Before applying the wash, it is recommended to break the structure of the coating - scratch it with a nail or other sharp object. Apply the wash with a wide, but thin brush. After that, the furniture should be covered with paraffin paper and kept for half an hour to two hours (if the old furniture was covered with polyester compounds). This work is carried out with gloves and a mask, in a well-ventilated area.
After keeping the furniture covered with the remover under the paper for the required amount of time, you can proceed to the removal of the peeled surface with a spatula.
The furniture should then be sanded down with a soft disc sander, or simply with sandpaper.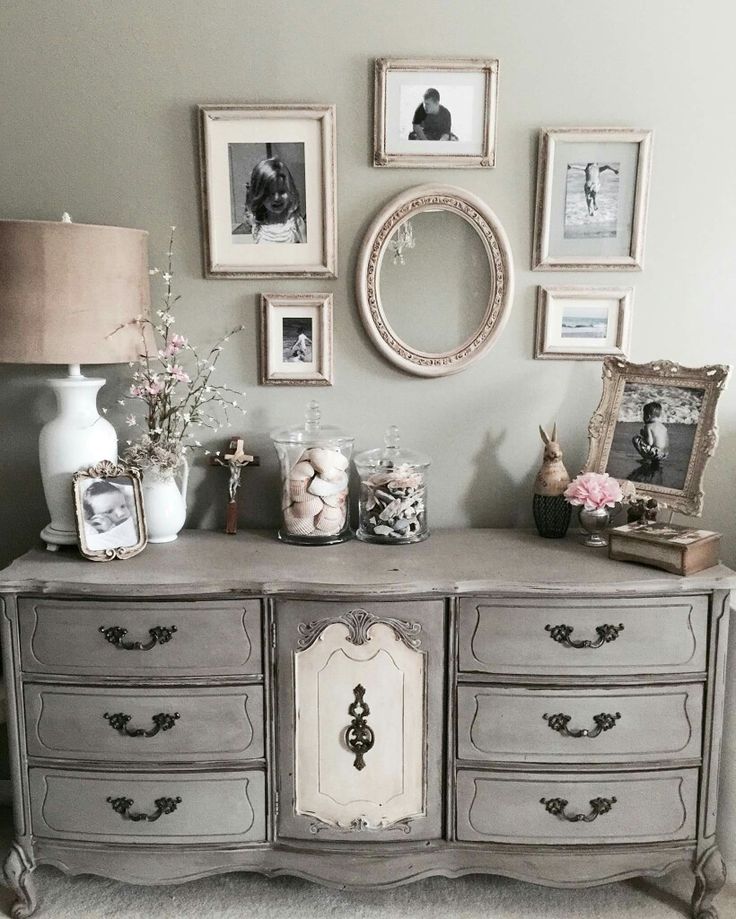 The goal is to get a clean and necessarily slightly rough surface.
Priming and puttying
Why you shouldn't skip this stage - without it, restored furniture will quickly lose its aesthetic qualities, it will get scratches, depressions, chips. So you have to:
- Degrease the item with any alcohol solution, even vodka.
- Apply the solution to a clean cloth and carefully, without gaps, treat the entire surface of the furniture.
- Prime with acrylic primer (it has good adhesion and strength). You can prime with a thin roller or a bristle brush. FORUMHOUSE restorers usually apply two coats of primer, the second after the first has dried.
- Putty is recommended to be applied with a rubber spatula. The order of work is as follows: apply - wait until it dries - process with sandpaper - apply again. And so on until a perfectly smooth surface is formed.
Painting
Before painting, it is better to apply a light layer of primer on the furniture again - this way the paint will lie better and will adhere well. It remains to wait until the primer coat dries and proceed to painting.
- Apply the first coat of paint with a handy, small brush. The most important thing is that the bristles do not climb out of it.
- Leave to dry completely, possibly overnight.
- Then sand with fine grit sandpaper.
- Apply a second coat.
Lacquer application
If all the preliminary work has been done correctly, then there will be nothing difficult in applying the varnish. The main thing is to wait until the paint layer is completely dry.
- Apply two or three coats;
- Layers must be thin;
- Apply the next coat of varnish only after the previous one has completely dried;
- It is better to apply the varnish with a sprayer, roller or a special brush.
How to create "cracks"
It's not that difficult to get the effect of antique noble furniture, for this one-step craquelure is used, which stimulates the cracking of the surface layer of paint, and through these cracks the color of the "substrate" appears.
Do-it-yourself furniture decoupage - a new life for old things
Medieval craftsmen used paper applications to imitate expensive inlay, to recreate picturesque paintings on furniture facades. Interest in an unusual decorative technique has not faded these days: creative people often do decoupage on furniture with their own hands.
What is decoupage?
Decoupage technique is a method of decorative design based on gluing cutouts of paper or other materials on the surface of an object and coating them with varnish for safety and effect.
A simple technique, accessible to everyone, allows you to create exclusive interior items on your own and without any special expenses, which are not inferior in originality to the products of fashionable furniture designers.
Paper pictures, fabrics, leather, lace, napkins, wallpapers and other materials are used for decoration. The introduction of computer innovations enriched the ancient technology: it became possible to create three-dimensional images, use drawings printed on a printer.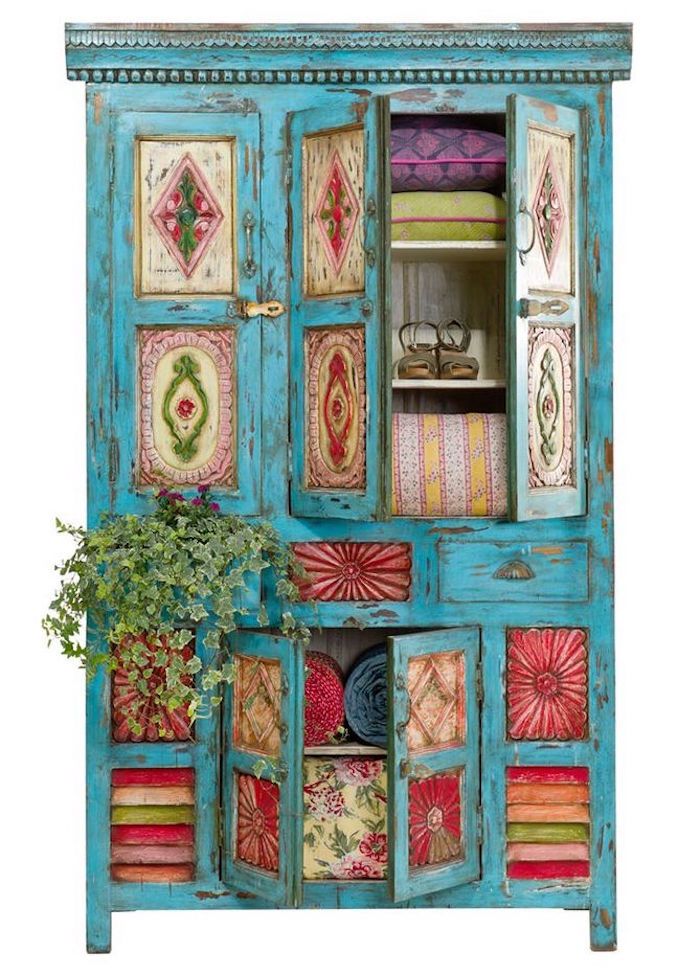
The variety of materials allows you to implement the most daring ideas, achieving a refined and unusual decorative effect.
Craftsmanship
Standard set of accessories required for the job includes:
- Paper drawing (napkins, fabric or other material chosen at will).
The choice of techniques, effects and style of decoupage depends on what additional materials and tools will be needed when working.
There are five basic decoupage techniques:
- The classic version involves attaching a picture directly to any surface in a dry, wet or hot way. A varnish layer is applied to the glued picture and polished until an absolutely smooth surface is obtained.
In some cases, the surface with the image is subjected to additional processing: it is painted, given volume, artificially aged.
3. The method of artistic decoupage involves the combination of the pasted image and the background into a single painting canvas, the recreation of a full-fledged artistic painting.
4. Decopatch is a technique in which the treated surface is not just decorated with a separate picture, but is completely filled with pieces of special paper that imitates the texture of fabric, fur and other natural materials. Separate pieces are glued closely and form a solid background.
5. Volumetric decoupage technique allows you to create paintings with a relief texture. Various techniques and materials are used to form the volume.
Image pasting is often accompanied by additional decorative effects, which allow creating the necessary surface texture in accordance with the artistic intent.
The main effects of decoupage include: Sometimes analogues of gold leaf sheets are used in the work to give the effect of precious inlay. To create wear, the surface is treated with wax before painting, and after the paint has dried, rubbed with sandpaper. The choice of furniture design style largely depends on the style of the interior and individual preferences. The piece of furniture must comply with the overall design concept and please the eye. When decorating, materials, colors, motifs are used that are in harmony with other decorative elements of the room. To decorate an object in a certain style, the actual technique and suitable effects are selected. Drawings and motifs are individual for each style. Images of angels, girls, lush bouquets are suitable for the Victorian style. Drawings for the Provencal style are distinguished by tenderness and romance. Pastoral motifs are bouquets, wreaths of wild flowers, lavender, sunflowers, bees. Decoupage will restore its former beauty to a dilapidated object, give it a second life in a new look. Creating a pattern using wallpaper cutouts is a very practical way to decorate. Repairs often leave wallpaper scraps. They can be used as appliqué material. For decoration, both whole wallpaper pieces and small fragments are used, which make up artistic compositions. The image created from the wallpaper, echoing the motifs of the wall decoration, harmoniously fits into the overall surroundings. Image three-dimensionality is achieved in various ways. Often, several printed copies are used to create a relief picture, from which those parts of the picture that they want to add volume are cut out. Prepared parts are glued to the base layer by layer. In this case, silicone glue is used, which gives the pattern a three-dimensional look. Another option involves attaching a finished stucco element to the base, followed by gluing decorative napkins on it. Dried leaves, flower buds and other natural materials are sometimes used to make the image realistic. Separate fragments of the finished application are coated with a water-based varnish. The lacquered parts of the pattern reflect the light, accentuating the three-dimensional effect. Framing a picture with a frame is an additional means to emphasize the depth of the composition. Decorating kitchen furniture with the use of original technology contributes to the renewal of the appearance, the adaptation of an object that is outdated in design to changes in the design of the room. Choosing the right pattern and decorating technique, you can give the product a romantic, classic, modern look. As a decorative material, paper clippings, wallpaper, and fabric are used. The most popular do-it-yourself decoration technique is decoupage of furniture with napkins. Only the top layer with a colorful pattern is used for work. The object to be processed must be tinted with light acrylic paint. There are two main methods of gluing: Beginners are advised to use pencil glue: if wrinkles form during sticking, the drawing can be easily washed off and replaced with a new image. A neatly pasted picture is varnished. Before decorating a wooden product, prepare the surface. Dirt, dust, grease stains are removed from lacquered or painted furniture. The peeling varnish layer is cleaned with sandpaper, polished until perfect smoothness is obtained, and cleaned with a brush from wood dust. Chips and cracks are masked with furniture wax and special putty for wood. Surely in every home there are items of old furniture paraphernalia that have lost their popularity in modern design. Do-it-yourself furniture decor helps to bring a kind of zest that fits perfectly into the interior space. Modern techniques involve the use of several textures and methods of applying coloring compositions. We present to your attention interesting ideas and instructions for decorating furniture at home. Tips from experienced designers will help to cope with the task. And here https://mebeldizajn.ru you can see new models of furniture, and options for placement and combinations in a modern interior. Article summary: To date, several techniques have been developed to give an exclusive surface to furniture paraphernalia. This method of decorating the surface of furniture is considered the easiest and most affordable for home use. This update method is suitable for the following products: The film adheres perfectly to metal, wood or durable plastic surfaces. Before starting the workflow, we present to your attention a detailed description of the furniture decor with your own hands: The decoration process is almost complete. The film should finally stick within a day. At this time, it is necessary to avoid the through movement of air masses, which can provoke peeling of the film elements. This technique has recently been in great demand among modern designers. This method of decoration is absolutely safe for the human body. The surface of furniture paraphernalia is preliminarily degreased and treated with putty. The building composition will eliminate minor flaws in the form of cracks and chips. The primer will provide a tight fixation between the coloring composition and the surface to be decorated. When the preparatory work is completed, you can proceed to the application of acrylic paint. In the process of application, it is necessary to dry each layer thoroughly. If this rule is neglected, then after a while numerous defects may appear on the decoration.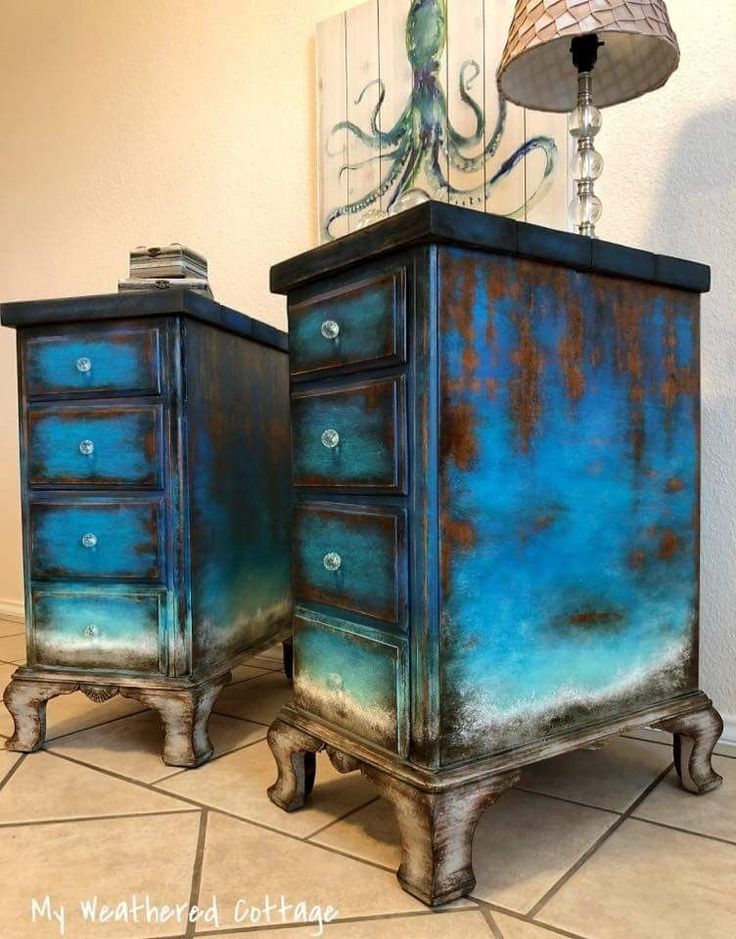
Video: DIY decoupage of old furniture
How to choose the right style for decoupage?
 You can use one technique or combine several decorating techniques in your work. Provençal and Victorian styles are very popular. Victorian-style furniture is decorated with gilded reliefs. To make items in the Provencal style, patination is used, the technique of creating artificial cracks and scuffs.
 Renovation of old furniture
 After varnishing, the napkin becomes translucent and the image may lose its brightness on a dark background.
Decorating furniture with your own hands: a master class for beginners. Description of decor techniques and options (160 photos + video)
Varieties of modern decor for furniture
 These include:
Self-adhesive film
Acrylic painting