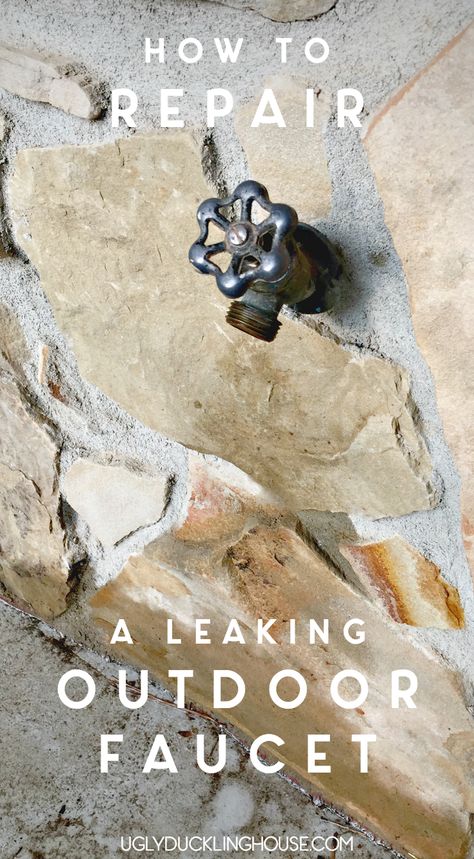
How to fix outside leaky faucet
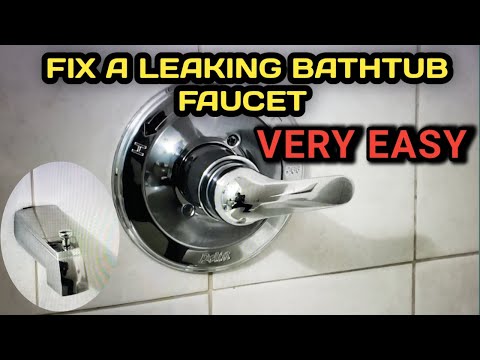
How to Fix a Leaking Frost-Proof Faucet (DIY)
Check out these fixes for common faucet problems
Introduction
A leaking frost-proof faucet can waste a lot of water, but fixes are simple, whether the problem is the faucet stem washer assembly, the vacuum breaker, or just a loose retaining nut.Tools Required
- 4-in-1 screwdriver
- Adjustable wrench
- Slip joint pliers
Materials Required
- Replacement vacuum breaker parts
- Washer assembly
Project step-by-step (5)
Sign Up For Our Newsletter
Complete DIY projects like a pro! Sign up for our newsletter!
Do It Right, Do It Yourself!
Step 5
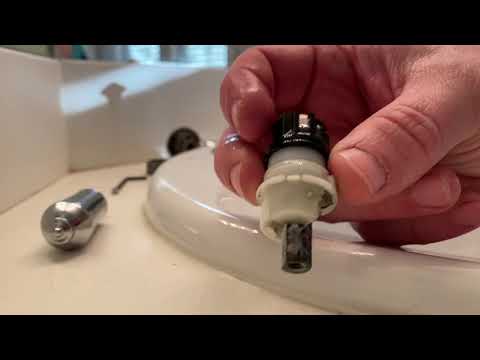
Vacuum breaker parts
Family Handyman
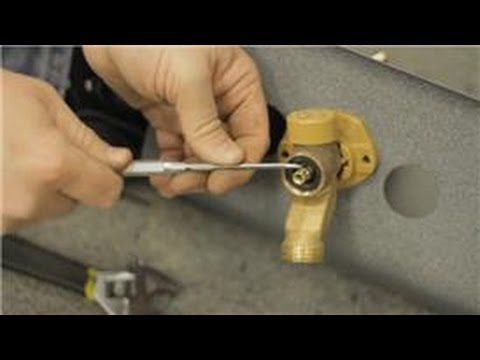
Unscrew the retainer and pull out the vacuum breaker. You may be able to fix the leak by simply cleaning the parts and reinstalling them. If this doesn’t work, take the parts to the store to find replacement parts.
Leaky, dripping exterior faucets not only waste water but also dump it next to the foundation, right where you don’t want it. Luckily, they’re easy to fix. If you have a frost-proof faucet like the one we show here, check out these fixes for the most common problems.
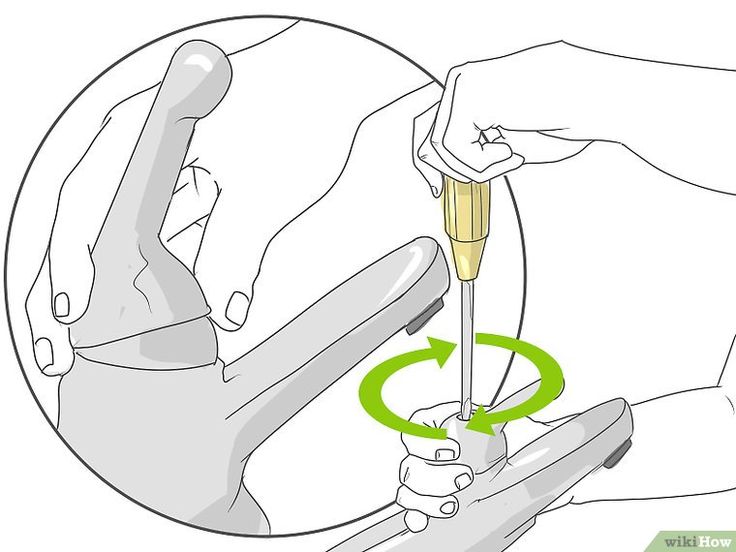
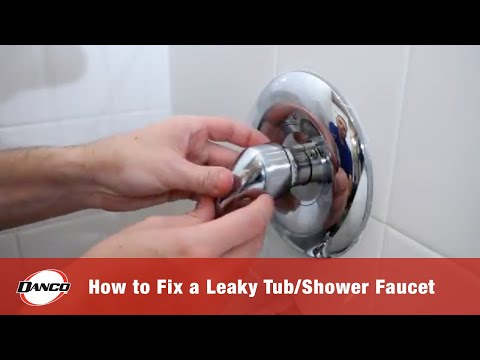
If the faucet leaks from around the handle just when the water is turned on, the stem packing may be leaking. In some cases, you can fix this by simply tightening the retaining nut that’s under the handle. Remove the screw in the center of the handle and pull the handle off. Try tightening the nut slightly (Photo 1). You’ll have to experiment to see which direction to turn the nut, since some faucets have reversed threads that tighten counterclockwise.
If simple tightening doesn’t solve the problem, you’ll have to remove the faucet stem (Photo 2) and replace the packing gasket. Turn off the water to the exterior faucet by locating the valve inside the house and closing it (or the main water valve). Buy a repair kit that matches your faucet brand and use the packing from the kit. If your faucet still leaks, the stem may be leaking and you should replace the faucet.
If your faucet leaks out of the spout when it’s turned off, the washer is bad. On frost-proof faucets, the washer is located on the end of the long faucet stem. Remove the handle and nut (Photo 1) and pull the stem from the faucet (Photo 2). You may have to turn the stem to “unscrew” it before it’ll come out. Getting the faucet apart is the hard part. After that, you simply replace the old parts with new ones. Pay close attention when you take the parts off (or snap a photo) so you can put the new ones back the same way. Snap off or unscrew the washer assembly and replace it (Photo 3). Then reassemble the faucet in the reverse order. If you find that the faucet starts leaking again after a short time, the valve seat is worn and you should replace the entire frostproof faucet. If the faucet is attached with threads, you can simply turn off the water, unscrew the faucet and replace it with one that’s the same length.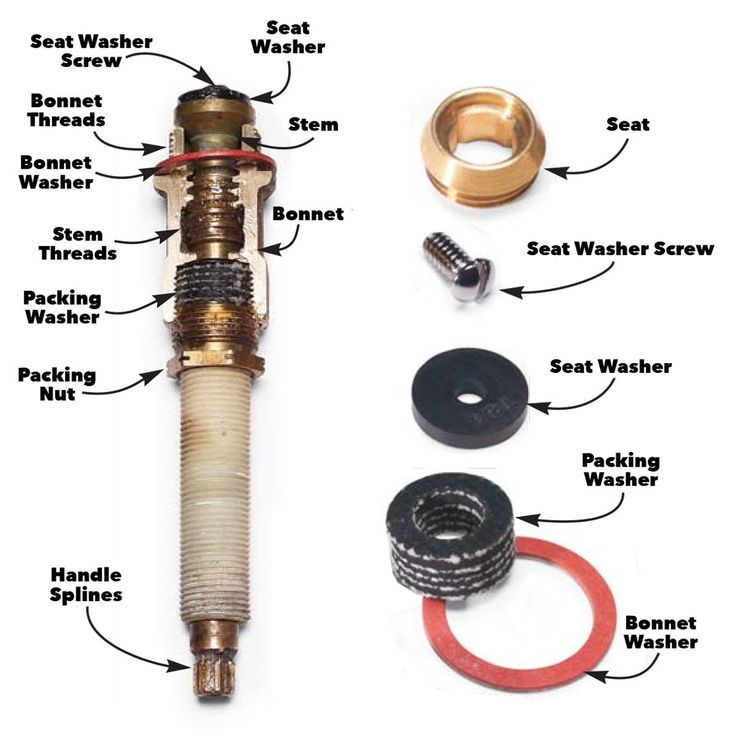 If it’s soldered on, you’ll have to break out your torch and soldering tools.
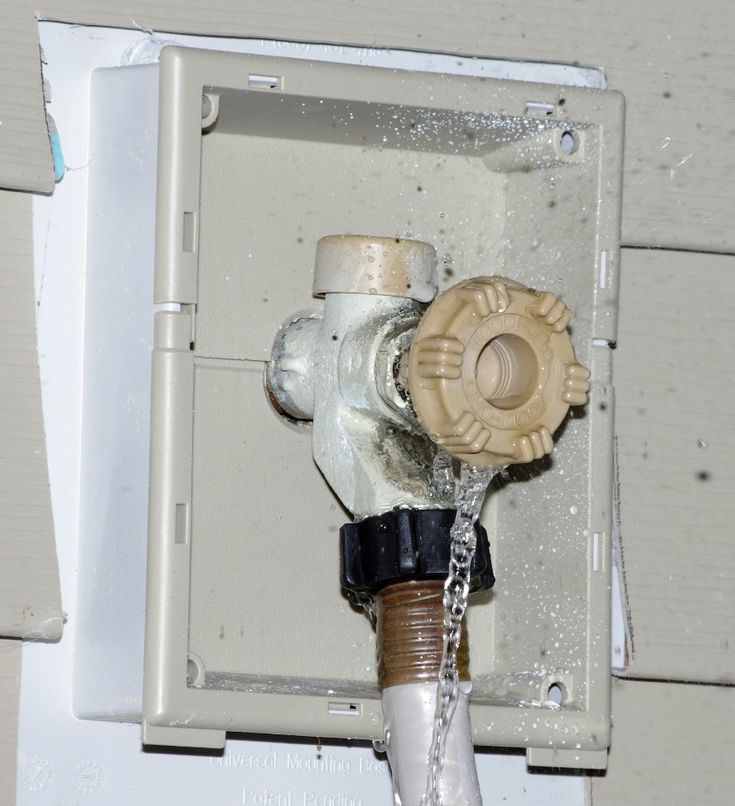
Most frost-proof faucets have a built-in vacuum breaker located on top of the faucet (Photo 4). If you see water dribbling out from under the cap when the water is running, it’s leaking. Photos 4 and 5 show how to replace a leaking vacuum breaker. Some repair kits include the parts for this. If not, you’ll have to purchase them separately.
Originally Published: November 18, 2019
Similar Projects
Popular How-To Videos
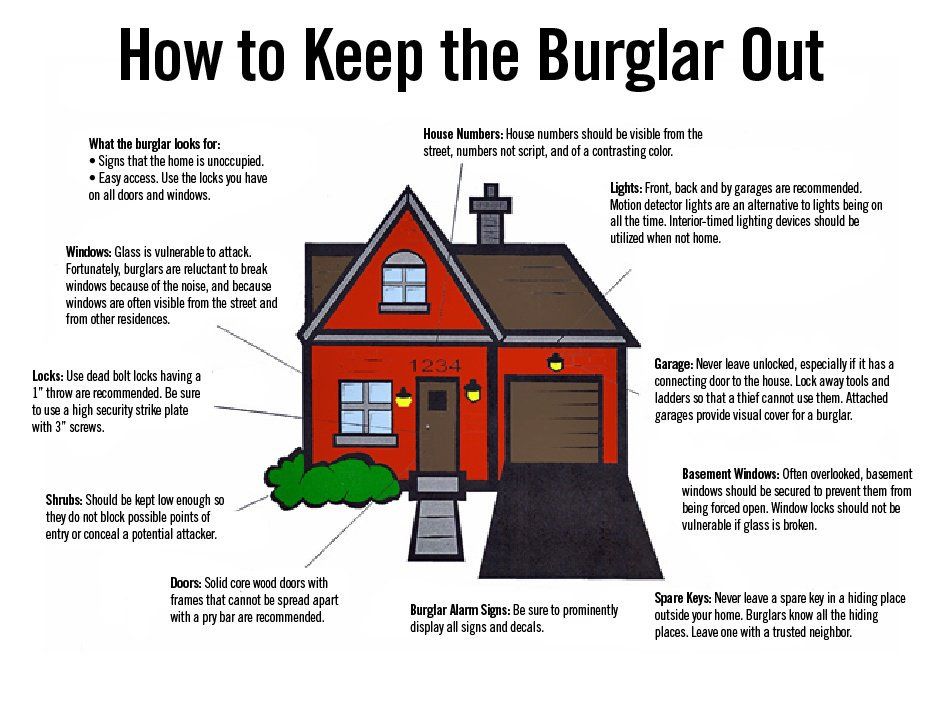
ⓘ
How to Fix a Leaky Outdoor Faucet
A common issue that any gardener or homeowner will likely run into one day is the problem of a leaky spigot. This can present as a small, insignificant issue, but if left untouched for long enough, even an outdoor faucet leaking gently can cause serious damage to your garden, your house’s foundation and your bank account. Luckily, a leaky outdoor faucet repair can be easy, quick and, most importantly, cheap.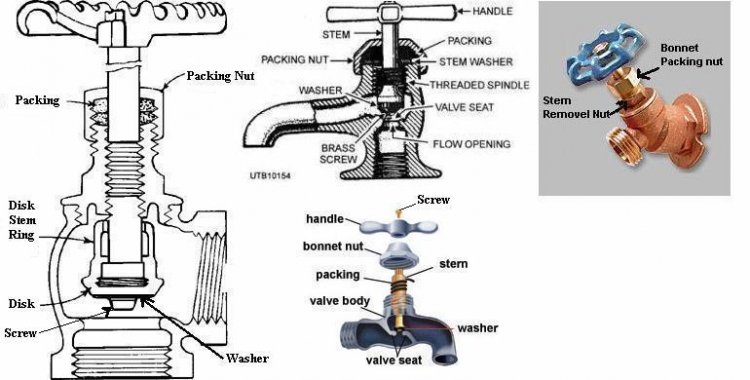 All you’ll need is a wrench, pliers, a screwdriver and a spare washer for your leaking hose bib repair. Note: If you’re working with a frost-free faucet and you see that water is leaking from the top of the bib, you might also need to replace the vacuum breaker. Skip to step 5 for more details on vacuum breaker replacement.
Step 1: Check the Packing Nut
Commonly referred to as a spigot or a hose bib, the outdoor faucet on your house has a fairly straightforward anatomy. Behind the handle, you’ll find a packing nut that keeps the water’s egress sealed off from the outside. Tightening this packing nut with ½ to ⅛ turn is the first step in any leaky outdoor faucet repair. If your handle is secured instead with a screw at its center, follow the same steps applied to the screw instead. Oftentimes, tightening this seal is all you need to get your hose bibb back to functioning the way it should be. If you find that your spigot is still leaking after this, you’ll have to move forward with removing this packing nut completely to gain access to the hose stem.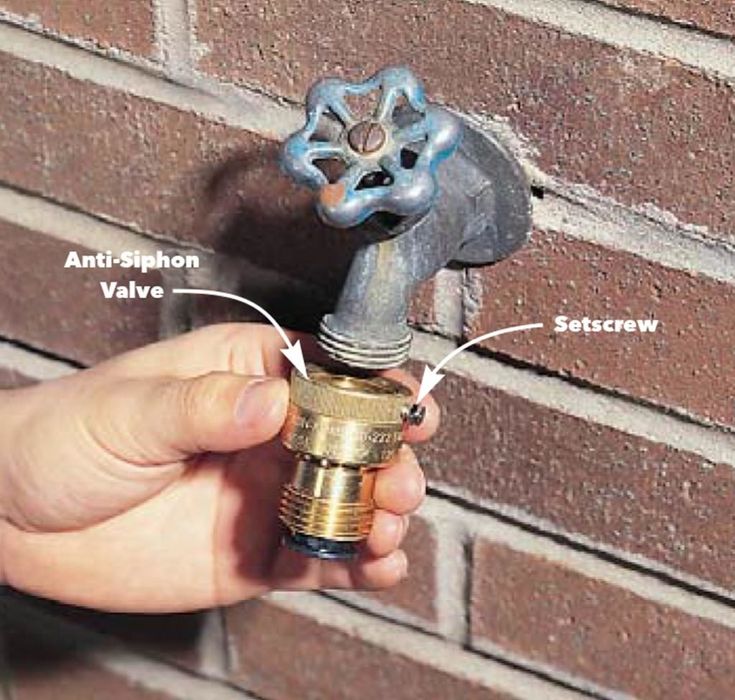 Before you do this, make sure your water supply is turned off.
Step 2: Turn Off Your Water Supply
It’s important to make sure your water supply is turned off when moving forward with a hose repair; otherwise, you will run into a world of problems when you remove the packing nut to access the faucet stem. If you aren’t sure how to do this, we recommend locating your water meter first, as you’ll typically find your water shut-off valve nearby. The location of the shut-off valve and meter vary, with indoor water meters more common for colder regions and outdoor water meters used frequently in warmer climates. If you believe your water meter is located indoors, try searching your basement, garage or crawl space. Typically, turning the water shut-off valve clockwise to horizontal will turn your water supply off. If your valve uses a knob, turn clockwise until you can no longer turn. After you’ve done this, make sure to turn your outdoor faucet to open before proceeding with the repair to get any excess water out that might be left in the pipes (and to make sure you succeeded in cutting off the water supply).
Step 3: Accessing the Washer Assembly
Once you are sure your water supply is shut off, use an adjustable wrench to loosen the packing nut that is behind the handle of the faucet. Remove the handle to gain access to the washer assembly, which will likely need to be replaced. This step differs depending on whether you are working with a regular or frost-free faucet. On a regular spigot, you’ll find the washer assembly directly behind the faucet handle. If you are using a freeze-proof faucet, you’ll find your handle is attached to a long metal rod called the faucet stem. Remove the entire stem, and you’ll find the damaged washer at the opposite end to the handle. Use a screwdriver to remove the washer assembly, gaining access to the washer. Replace the damaged washer with a new one of the same size and thickness.
Step 4: Reassemble Your Faucet
Replace the screw at the end of the faucet stem or faucet handle. Replace the handle back to its starting position and tighten the packing nut by turning it clockwise.
Step 5: Replacing the Vacuum Breaker on a Frost-Free Faucet
If you have a newer house, you might find that you are working with a frost-free faucet. While these faucets are great in that they prevent freezing and burst pipes, they have more parts to deal with and, therefore, there are more places where your leak could be coming from. The valve on the vacuum breaker has a tendency to wear down and break, letting water through when it normally wouldn’t. Replacing the vacuum breaker is easy but will likely require you to take your old part to a hardware store to make sure the replacement part is an exact fit for your particular spigot. Before heading to the store, simply unscrew (or pop off) the vacuum breaker cap on top of your faucet. Underneath, you’ll find the vacuum breaker. Each faucet is different in this department, but typically you will be able to dislodge this part by either unscrewing it to dislodge it from any threads or pulling it out using pliers. You’ll install the replacement the same way that you removed the original.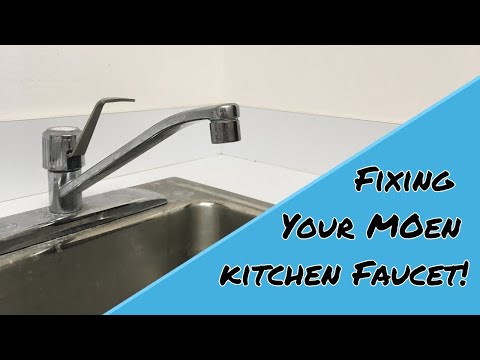
All content provided in this article is for general informational purposes only. All use of products referenced in this article should be done in accordance with the manufacturer’s instructions.
For more information on hose repair and storage, read the following articles:
Garden Hose Storage—Tips and Tricks for the Everyday Gardener
How to Mend a Garden Hose
Garden & Soaker Hose Winter Preparation: How-Tos & Tips
How to Maintain Your Hose and Extend Its Life
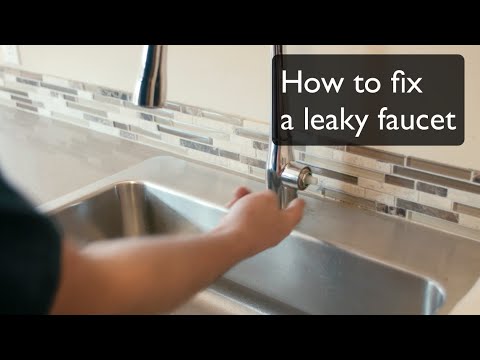
Kitchen faucet dripping: how to fix a leaking faucet
Faucets are among the most used types of household plumbing, so it's no surprise that they are constantly in need of repair. In the event of a breakdown, the user faces the problem of what to do if the faucet drips in the kitchen, how to fix the appliance.
The vast majority of budget and mid-price domestic faucets are simple and easy to repair. In order to cope with any troubleshooting in mixing appliances, it is useful to know their principle of operation and design.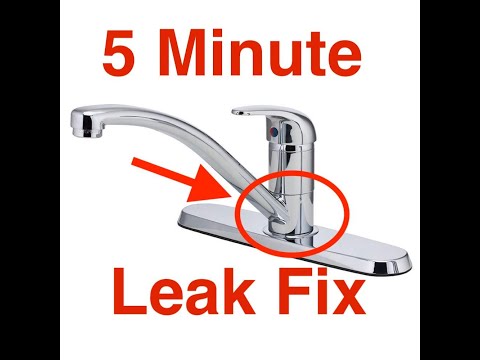 nine0003 Varieties of mixers
Content
- 1 Popular kitchen faucets and their design
- 1.1 Devices with cranes from ceramics
- 1.2 Sonal cartridge
- 2 causes for repair
- 5 How to fix a leak in a single-lever faucet and solve possible problems
- 6 How to repair a two-lever faucet
- 7 How to fix a kitchen faucet: video
Popular kitchen faucets and their design
It should be noted that a wide range of faucets with a price range that differ from each other by 1 - 3 orders of magnitude is sold in trade. This is due to the manufacturer's trademark (the highest price is for the German brands Blanco, Hansgrohe, Danish Damixa) and the design of the mixing device.
Some high-tech appliances have touch, infrared or electronic temperature controls. The design of mixers of this type is much more complicated than typical household appliances, so the taps themselves cannot be repaired by untrained users. nine0003
In contrast to modern high-tech devices, which are in increasing demand, obsolete two-hand cocks with screw bushings and rubber gaskets have lost their popularity.
Sometimes a one-handed ball valve is mentioned in various sources, in which the intensity and ratio of water flows is controlled by using an internal metal sphere with holes. In real life, such devices are almost impossible to find in the distribution network, with a high probability they are technically outdated due to unsuccessful design. nine0003
Many users in areas with poor drinking water quality purchase combination mixers, to which a reverse osmosis water filter and two flexible water pipes are connected through a water hose. Two types of taps are installed in such devices - one rotary valve for supplying filtered water and a cartridge for mixing cold and hot water flows. Depending on the design, water is supplied to the user through one spout, a double-walled gooseneck or through two different pipes. In the latter version, with two gooses, there is a rigid and flexible spout. nine0003
When a faucet leaks in a combined kitchen, it can be repaired using separately located valve and cartridge assemblies.
If we exclude from further review the considered not very common groups of mixing devices, then only two types of taps listed below will remain, which are in the highest demand among the population.
Apparatus with faucet boxesAppliances with ceramic faucet boxes
hot water. The water is mixed in the faucet body and then enters the spout. nine0003
The main element of the two-valve device is the axle box, on the end of which there are two ceramic disk plates and a sealing ring. Keramodisks have slots; when the flywheel is closed, they contact in solid areas, blocking the water flow. When the flywheel is turned, one of the disks begins to rotate with it, its slot moves onto the through hole of the other, and water flows freely through the channel passage that has appeared.
In contrast to the old worm bushings with a poppet type rubber seal, the flywheel of which has to be rotated around the axle several times. In ceramic disc devices, half a turn is enough for full opening. nine0003 Design of cartridge faucets
Single-lever cartridge faucets
Cartridge faucets are the most used appliances, having no competitors among other varieties. They are produced by all widely and little-known manufacturers of household plumbing, listing which does not make sense.
The main components of the faucet are the body and ceramic cartridge, to the control stem of which the handle is screwed. Three holes are placed in the cartridge and inside the mixing body - two inlet water flows flow through, the third is designed to drain the mixed water. nine0003
The cartridge assembly itself has a closed, collapsible design. Inside it are placed two mutually adjoining ceramic disks and plastic parts to control their movement.
One of the ceramic discs has a hole, while the other has a closed channel through which the mixed water flows into the valve body and then into the gooseneck.
Rotating the handle around its own axis or moving it vertically simultaneously controls the ratio and intensity of the mixing flows. This allows, unlike two-valve devices, to regulate mixing with one lever. nine0003 Appearance and elements of ceramic bushings
Causes of leaks through the spout
To fix a dripping faucet in the kitchen, it is useful to familiarize yourself with the following main causes of this defect:
- In single lever models, any leakage through the spout is associated with a malfunction of the cartridge assembly. If a freshly purchased faucet drips, the cause may be incorrect placement of the cartridge.
- In cartridge and two-valve versions with ceramic bushings, a leak through the gooseneck can be caused by sand particles getting between the ceramic discs. As a result, the tightness of their mutual fit is broken, and water seeps between the plates. nine0012
- Also, ceramic bushings can leak as a result of wear of the ceramic discs themselves after long-term operation.

- Another reason for the leakage of the faucet box is the wear of the fluoroplastic ring, which presses the ceramic disks against each other. As a result, a gap is formed between the plates, they begin to hang out, water leaks and it drips from the spout.
A characteristic symptom of this malfunction is that if you press on the flywheel, the flow stops.
- A silicone sealing ring is located on the edge of the ceramic bushing. When it is worn, the inter-disc contact is weakened, and the plates begin to leak.
Getting ready for work
If the faucet is leaking, it should be repaired with the water turned off on the riser or in front of the flexible water supply. You should first make sure that this procedure is possible - ball valves, after a long stay in a stationary state of the locking unit, can jam from limescale. nine0003
If water drips in a one-handed faucet and you feel a slight movement of the cartridge handle without fixing in a certain position, this indicates a 100% breakdown of the assembly. For repair, you can purchase the required cartridge in advance (if you do this on the market, you should agree with the seller about the unlikely possibility of replacement) - almost all devices for standard mixers have standard sizes and seating arrangements.
For the repair of ceramic crane bushings, repair kits are sold in trade if the necessary parts are not in the kit. Here, the option of an early purchase is not so rational, since the crane boxes are not unified and differ in their design. In order not to make a mistake, it is better to remove one of them in the mixer and present it to the seller for the selection of similar parts. nine0003
If you remove the hot water faucet and turn off its supply in the central riser, it is quite possible to get by with a certain time interval of cold water until the faucet is repaired.
Repair Tools and ConsumablesWhat You Need to Repair
To repair a kitchen faucet yourself if it is leaking, you will need the following simple tools, accessories and supplies:
- Cartridge or repair kit for faucet bushings.
- Adjustable wrench for unscrewing the valves, their decorative caps and the clamping cartridge nut. nine0012
- Screwdrivers of various shapes for removing decorative trims, unscrewing flywheels.
- On many one-handed models, the handle is attached to the cartridge stem with a hex screw. To unscrew it, you need to have a hex wrench the size of the bolt head.
- Often when repairing domestic plumbing fixtures, there is a problem with the formation of limescale on the parts, which prevents the decorative trim and clamping nut from loosening in cartridge models. In this situation, you can use household chemicals or the popular WD-40 car spray, designed to dissolve rust and lime deposits, to remove sediment. nine0012
- To facilitate the subsequent assembly of valves after their repair, machine oil or any kind of lubricant can be used in addition. This will also facilitate the dismantling of mixing parts in the future, reduce friction in the nodes, and prevent the formation of lime deposits.
How to fix a leak in a single-lever faucet and solve possible problems
As noted above, repairing a single-lever kitchen faucet with drops from a gooseneck consists in changing the cartridge. The procedure includes the following operations:
- Using a kitchen knife or a slotted screwdriver, remove the decorative trim on the mixer handle and unscrew the fixing screw holding the handle on the square cartridge stem with a hexagon.
The fixing screw is usually located in a recess and its head is not visible from the outside. In this case, you can shine a cell phone or flashlight on it to correctly determine the shape.
- Next, remove the handle from the stem, lifting it up. nine0012
- Under the handle is a hemispherical decorative cap, which is attached to the internal thread of the clamping nut.
Here the user may encounter the first problem - often moisture gets on the thread and it is covered with limescale, which prevents the decorative trim from unscrewing.
Since it has a smooth, even surface and is designed for manual removal, physical effort may not be enough.
Rubber gloves may be worn to reduce friction, if efforts fail, other measures are taken. nine0003
Under the hemisphere, in the empty space between the cartridge and the clamping nut, chemicals are poured to decompose lime or an aerosol is injected, waiting for some time for the sediment to dissolve. Additionally, you can pour boiling water over the overlay, counting on its thermal expansion and, accordingly, a decrease in the density of the threaded contact.
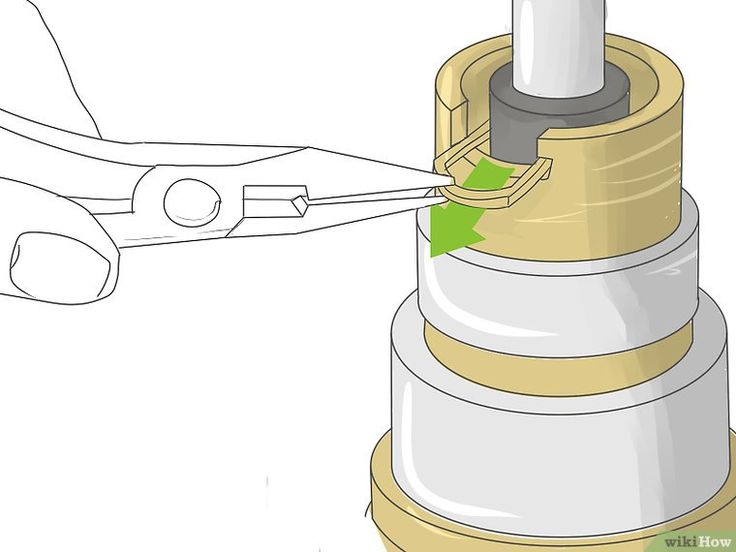
If these operations are not successful, the last resort is the use of pliers. With their help, they clamp the upper edge of the hemisphere and turn it counterclockwise, trying to unscrew it. Do not be afraid of deformation of the upper edge of the lining - it will not affect the operation of the device, and the damaged area will be closed with a handle. nine0003 Procedure for removing a defective cartridge assembly
- After removing the trim, unscrew the brass clamping nut of the cartridge.

Here, further disassembly can be prevented by lime deposits formed on the thread, which can be removed with chemicals or boiling water. If the attempts were unsuccessful, the nut is carefully cut with a grinder from above into segments and broken out with pliers.
It is worth noting that for the convenience of work, the kitchen faucet will have to be completely removed from the sink by unscrewing the mount. The cartridge rod, like the assembly itself, may break during this operation. nine0003
You can buy a similar clamping nut to replace the broken one on the market or unscrew it from an old mixer.
- After unscrewing the clamping nut, the defective cartridge is removed from the housing.
The glass-shaped body of the faucet is cleaned of dirt and lime deposits using household chemicals, a new cartridge is placed inside, tracking the alignment of the protrusions on its shell and the holes in the faucet body.
- After placing the cartridge, screw it on top with a clamping nut.
 When carrying out this operation, you should be especially careful - if the pressure is too high, the fragile plastic cartridge case may crack and you will have to buy a new part. nine0012
Therefore, the clamping nut is screwed in by hand and lightly tightened with an adjustable wrench, after which the cartridge is left alone for 10 - 20 minutes, allowing its lower sealing rings to settle over the holes. Then turn on cold, hot water and monitor its presence on the surface of the cartridge case, when drops appear, tighten the nut a little more.
- At the end, screw the decorative overlay by hand, put the handle in place and fix it with a screw on the rectangular stem, close the hole with a decorative overlay. nine0012
During the assembly process, it is useful to use machine oil or any lubricant to facilitate the possible disassembly of the valve after a few years.
Installing a new cartridgeHow to repair a two-valve faucet
To fix a leaking faucet in a kitchen with ceramic bushings, use a suitable repair kit. After removing the flywheel, unscrewing the protective lining and axle box with a wrench, the latter is disassembled and the following repair operations are carried out:
- If the disk ceramic is damaged or worn, it is replaced with similar parts from the kit. Before replacing, you should make sure that there are no sand particles between the plates; for this, the parts are washed under running water. nine0012
- If necessary, change the silicone gasket and the PTFE clamping ring. In the absence of the original last part, you can choose an analogue made of copper of the same size as it (similar washers with a through diameter of 10 mm and a thickness of 1 mm are sold on the market).
- After replacing the axle box parts with new products from the repair kit, the valve is screwed into place with an adjustable wrench. Then a protective cap and a flywheel are placed on top, the latter is fixed with a bolt and a decorative trim is put on. nine0012
How to repair a faucet in the kitchen: video
The following videos discuss the following options for repairing faucets: Do-it-yourself standard type is within the power of any user with an adjustable wrench, a new repair kit or cartridge.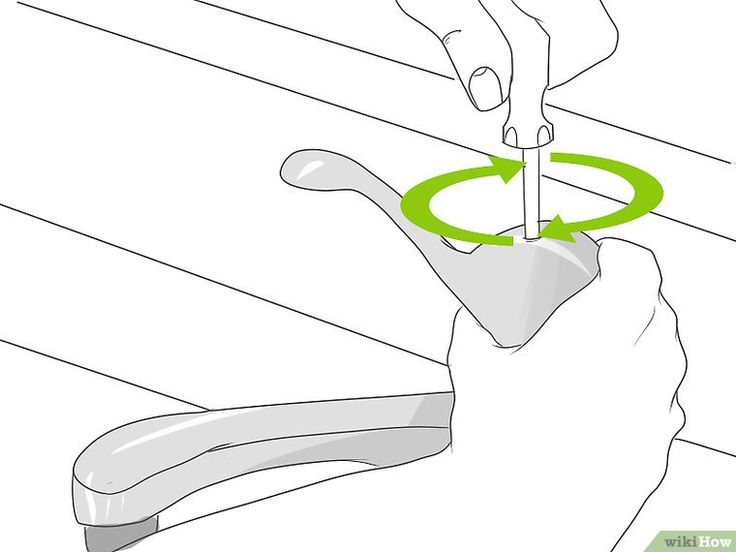 Problems can arise when lime deposits appear on threaded connections, however, knowing the methods for eliminating them outlined in this article will help you easily cope with the task. nine0003
How to fix a faucet in the bathroom, repair of a single-lever faucet
Causes and procedure for eliminating leaks in a single-lever faucet
To repair a single-lever faucet with your own hands, it is necessary to establish the causes of its failure. There can be many of them, let's consider the main ones:
- mechanical damage caused by the body breaking or cracking on it;
- gap formation on seats and ball;
- development on the gasket;
- malfunction of the aerator due to rusting of the material; nine0012
- gap on the aerator.
If the problem is due to a broken case, use a waterproof sealant or cold weld. The necessary parts are wiped with a rag, the damaged areas are carefully smeared. However, such repairs will not be enough for a long time, and soon the whole body will have to be replaced.
If the faucet is leaking, but you cannot determine the cause of the malfunction from the outside, then you need to completely disassemble the entire mechanism and look for the cause thoroughly, checking each part separately:
- First, the water supply is shut off, then the plug is removed with a screwdriver.
- Next, you need to unscrew the screw that holds the decorative cap.
- Then the cartridge is pulled out - for this, the nut is unscrewed with a wrench. All parts should be checked for defects. If none are found, move on.
- Having removed the valve completely, we look at the gasket, springs, ball and rubber seal. Worn-out parts should be replaced with new ones. The rest are wiped with a rag from accumulated precipitation and deposits. nine0012
One of the most common problems is debris getting under the ball and valve seats. In this case, you will have to change the entire cartridge as a whole.
DIY valve repair
Valve valves can be called classics of water supply. And, although they are gradually being replaced by new designs, there are still plenty of them. Their internal structure has not changed over the decades. Only the design has changed - it has become more diverse and refined. Today you can find both the most common models and very exotic ones. nine0003
Construction of valve taps
Taps of this type are still used today, because they are simple and reliable, they serve not for years, but for decades. If all the “stuffing” is of good quality, all that can fail during this time is gaskets. Replacing them is the main way to repair a faucet.
Replacing the rubber gasket
If the faucet in the kitchen or bathroom continues to drip when the valve is completely closed, the reason is most likely the gasket on the valve that has lost its elasticity (see photo in the next paragraph). She stopped snuggling tightly against the saddle, which is why the water continues to flow and sometimes the tap does not just drip, but even flows. Repair the faucet in this case - replace the gasket. To do this, you need a wrench, or better - an adjustable wrench and a set of gaskets. nine0003
Before you fix a dripping faucet, turn off the water supply (you can completely, you can only in this branch, if possible). Next, it is useful to make sure that the water is still blocked. Water does not flow - we begin repairs. You will need a wrench or adjustable wrench. They will need to unscrew the head housing (the upper part of the housing).
It works better with a wrench. In order not to damage the surface during the operation, wrap it with a soft cloth, and then apply the key. Unscrew the head, remove the valve. Now you can replace the gasket or install a new valve. You pry the old one with something sharp - you can use a screwdriver with a flat blade, you can - with an awl, etc.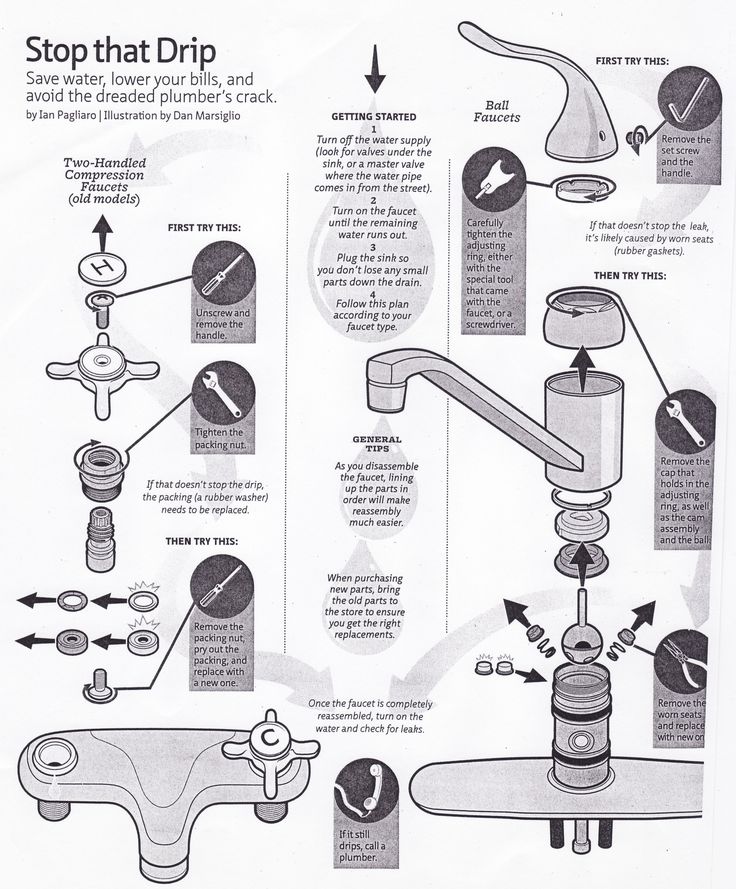 nine0003
When choosing a gasket, please note that its edges must be beveled at about 45 °, otherwise the plumbing will make noise during operation. If this is not in your arsenal, you can trim the edge with something sharp - a knife or scissors
Replacing the gasket in the faucet in the pictures
If a suitable gasket is not available, it can be cut from a sheet of dense rubber (porous is not suitable). The thickness of the rubber sheet or gasket is 3.5 mm, the inner diameter is slightly less than the stem diameter, the outer one should not protrude. Don't forget the 45° beveled edges. nine0003
After installing the gasket, put the valve in place, tighten the head. The new models do not require a winding on the thread. Moreover, winding is contraindicated - it can cause a crack in the body. If an old crane from the times of the USSR is being repaired, tow is placed on the thread, lubricated with packing paste, then twisted. After that, you can gradually turn on the water.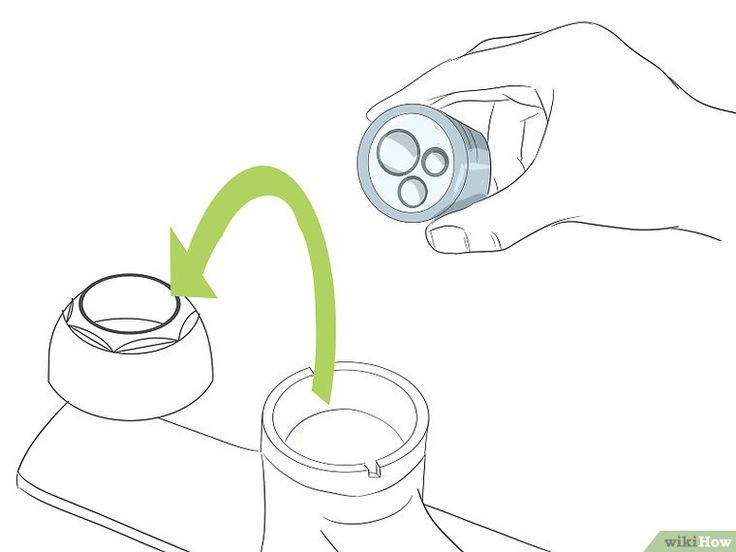
Sometimes the opposite story happens with this gasket on the valve - water does not flow or barely oozes. In this case, the gasket flew off the stem and blocked the flow of water. First, you can try to open / close the tap a couple of times, and if it doesn’t help, you need to repeat the operation described above, that is, repair the tap by replacing the gasket. Just remember to remove the old one stuck to the saddle. nine0003
Water dripping from under the stem
If water drips from under the valve, the seals are probably worn out. There are two ways to fix a faucet with a leak from under the stem. To begin with, you can try to twist the head housing more tightly. They do it again with a wrench. It is undesirable to use pliers, as traces remain after them. Tighten the head as far as possible (just don't overdo it).
Construction of the valve cock
If the thread is tightened to the maximum and water continues to ooze, the gaskets on the stuffing box must be replaced. To do this, first tighten the tap to the limit, then remove the tap head again, pry something sharp and remove both rubber rings, replacing them with new ones. nine0003
Water does not shut off
If the gasket is changed, but the water does not shut off, when the tap is rotated, the thread is stripped, it is necessary to change the stem - the thread on it has worn off. There are two options here - replace the stem itself or completely the entire valve head.
Seat may have a gully
If the threads are not worn, the gasket is new but the faucet is leaking, inspect the seat. It may have a hole in it. It is formed gradually - it is washed out by water supplied with high pressure. If the gasket is not pressed tightly in some place, a sink will form in this place. Sometimes water undermines the entire circumference, forming sharp edges, which quickly damage the gasket. The gully and sharp edge must be removed. Take a regular screwdriver and run it along the edge to dull the sharp edge.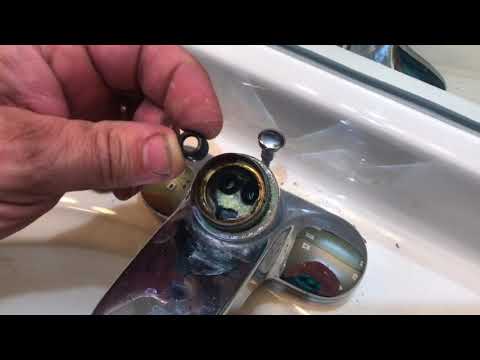 The same operation can be done with a nut file or a piece of fine-grained sandpaper. The main thing is to achieve a smooth (as far as possible) and non-sharp edge. nine0003
Currently, the following types of water taps are used in apartments:
- valve;
- single lever.
The faucet is a fairly old design, but it continues to be used in many applications. The principle of operation of such an apparatus is to use a crane box, with the help of which the water jet is supplied and blocked.
It has rubber or ceramic gaskets for these operations. At the same time, a tap is installed on each of the pipelines (for cold and hot water). nine0003
Single-lever faucets are more complex devices in which the supply and regulation of the water temperature is carried out using a single lever. Such mixers are divided into two types - ball and ceramic cartridge.
The first adjustment is made using a ball that has two inlets and one outlet. Hot and cold water is supplied to the inlets, and a liquid of the desired temperature comes out of the outlet after mixing.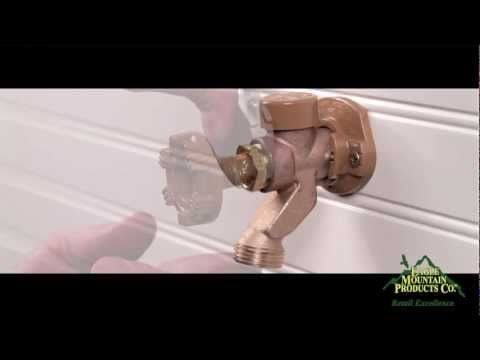 The most popular now is the mixer with a ceramic cartridge, in which the water is regulated by ceramic rings. nine0003
Two-valve faucet repair
What to do if the faucet drips in the bathroom? How to fix? First of all, you need to turn off the water. To do this, it is enough to turn the stopcock, usually it is located on the pipeline at the inlet of the water supply.
Of course, during the repair you will have to forget about access to water, but this is necessary, because if you do not repair the faucet in time, you will soon have to change it. Also, for high-quality performance of work, it is necessary to know the design of a crane with two handles. nine0003
This type of faucet includes the following elements: two handles (for hot and cold water), gooseneck, spout, body, gaskets and fittings. Most often, the problem is in the gasket, it only needs to be replaced, and the mixer will work normally again.
First unscrew the plug cap on each handle. Next, using a screwdriver, you need to unscrew the bolts, they are also on each handle. After that, both valves are carefully pulled out. Next, you will need to remove the overlay and start unscrewing the core. To do this, you need a ring wrench for polygons of a certain size. nine0003
After dismantling the valve, the cause of the leak can be determined by visually inspecting all elements
It is important that there are no salt deposits on the parts, various blockages, whether the thread is damaged, and in what condition the mixer gasket is
As already mentioned, most often it is the gasket that becomes unusable, and it is enough to replace it. By the way, you can make such a detail yourself, but it is better to do this only if there is no plumbing store nearby. The fact is that gaskets cost a penny, and self-cutting does not guarantee a quality part. nine0003
After replacing the rubber gasket, a little FUM tape should be wound in place of the thread. Other seal materials can also be used: tow, other types of tapes, HBS, etc. After winding the seal, the mixer base is installed, and all the elements are in the reverse order.
How to fix a faucet: replacing the gasket in a two-valve design
In most cases, heavy wear on the gasket in a two-valve faucet in the bathroom or in the kitchen is the main cause of water leakage. At the same time, there is a certain sequence of actions to replace it. nine0003
- The water supply is shut off and the valve body is unscrewed.
- Remove damaged or worn gasket.
- A new gasket is made from dense rubber or paronite. A worn analogue is used as a template.
- A new gasket is being installed.
- Seal is wrapped around the edge.
- The housing is installed in its place.
- Tighten the valve with a wrench.
Naturally, if there is no particular desire to make a gasket yourself, then it can be purchased at the store. Although a home-made part will fully cope with the task assigned to it. nine0003
Do-it-yourself wood brushing: how to artificially age a tree
Single-lever faucet repair
With the development of technology, the plumbing market began to fill with a new type of faucet - single-lever. They are much more convenient to use, since it is enough to turn one mixer handle to adjust the temperature of the tap water. The same goes for pressure. The device of a single-lever mixer is somewhat more complicated, but also more reliable at the same time. The role of the rubber gasket here is played by ball or disk cartridges. They need to be replaced much less often. Outwardly, it is extremely difficult to distinguish a single-lever ball mixer from a disk mixer even for experienced professionals, however, their internal structure differs significantly. nine0003
It is also worth remembering that it is not possible to replace a defective disk cartridge with a ball cartridge.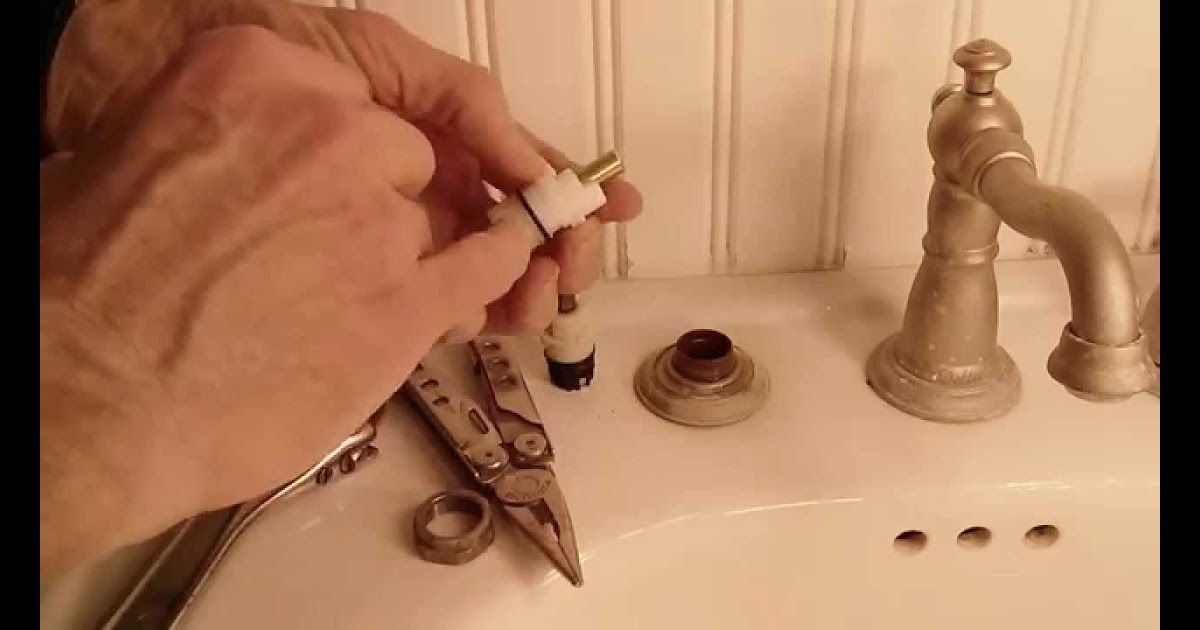 If it becomes necessary to replace the cartridge, then before buying, be sure to make sure which one is in your tap.
Let's consider how to repair a faucet with a ball cartridge with your own hands:
- First, you need to shut off hot and cold water using valves.
- Next, carefully unscrew the bolt that secures the faucet. nine0009 Remove the mixer lever. This is done carefully and slowly, with loosening movements. As soon as the resistance eases up, lift the lever up and pull it out.
- Unscrew the threaded connection.
- As soon as the dome of the crane is dismantled, a plastic part should appear in front of you.
- The next thing you'll see is the gasket. Clean it of dirt. If there are defects on it, the gasket must be replaced.
- Also inspect the ball for damage. Replace it if necessary. nine0012
- The balls are attached with seals, which must also be in good condition. If defects are found, seals are replaced.
- Reassemble the faucet in reverse order, remembering to check the tightness of each part.
How the gander works in the faucet
The goose is the curved spout of the bathroom or kitchen faucets from which water flows. Plumbers call this element a spout. Between themselves, ganders differ in length, diameter and device. When choosing one or another type, I first of all take into account the diameter of the sink, so that water gets into it, does not splash around and does not pour out past. nine0003
But still, the gander is a mixer element, which also comes in different types:
- two-valve;
- single lever;
- contactless.
Two-valve faucets consist of a body, two faucet boxes that block water and rubber seal rings. When one of the handles is turned, the faucet box turns and opens the channel: water begins to flow - hot or cold. Inside the case, the streams of liquids are mixed, which allows you to adjust the temperature.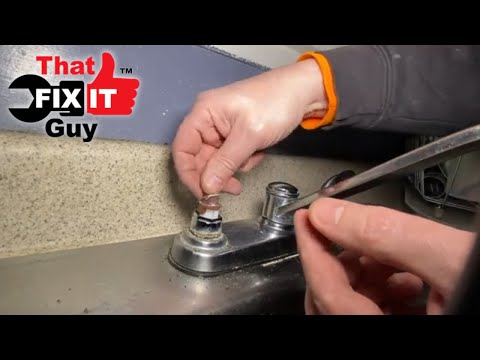 nine0003
A single-lever faucet works a little differently: turning the handle up and to the side opens the water supply channel, if you scroll the switch left and right, you can set the desired temperature.
Faucet leakage is due to the failure of one of the parts shown in the picture. It is he who is responsible for creating a mixture of hot and cold water. Over time, the part becomes clogged and ceases to perform its functions. nine0003
Contactless (sensor) faucets - controlled automatically. It is not recommended to repair such devices yourself.
The main advantage of this type is the saving of water, as it is supplied and turned off automatically
How to fix the two-valve design?
The most common problem with twin valve designs is wear on the rubber seal. It is not difficult to eliminate this cause of the leak, it is enough just to replace the damaged element with a new one. First you need to turn off the water in the bathroom, after which it will be possible to start repair work. nine0003
The process of replacing the gasket is as follows:
- It is necessary to remove the decorative plugs from the screws, under which the bolts fixing the mixer handwheels are located.
- Fixing bolts are loosened. Using an adjustable wrench, the valve body is removed.
- The old gasket is removed and a new one is installed in its place.
- After replacing the seal, the structure is reassembled.
In some cases, a leaky faucet can be caused by a loose bushing. To fix the problem, it will be enough just to tighten the locknut on the part. If the cause of the dripping faucet is a broken bushing, this element must be completely replaced. nine0003
This process includes the following steps:
- Decorative caps are removed from the faucet handles. Thus, access to the fixing elements is opened.
- Loosen fixing screws and remove valves.
- Use an adjustable wrench to unscrew the bushing.
 In order not to spoil the mixer, the movements must be slow and accurate. Removing the faucet box from an old mixer can be quite problematic, as the part is covered with scale. In this case, you can pour vinegar on the axle box, which will slightly dissolve the formed plaque and make it easier to remove the part. nine0012
 - A new one is installed in place of the old axle box. It should be exactly the same as the previous part. Otherwise, the valve will not work.
- After replacing the part, the mixer is reassembled.
Leaking shower hose repair
In addition to the kitchen, the two-valve mechanism is often used in the bathroom, and it is additionally equipped with a shower hose. Very often, the leakage problem is a strong wear of the shower hose ring gasket. Its replacement is not difficult. nine0003
- Using a wrench, the shower hose is unscrewed. Work must be carried out without excessive force so as not to damage the threaded connection.
- The old seal is removed.
- A new O-ring is inserted.
- The hose is screwed into place.
It is better to use silicone gaskets. Rubber counterparts are not as durable and therefore require regular replacement.
How to repair a bathroom faucet
If the single-lever mixer is leaking. Recently, double-lever mixers are gradually becoming a thing of the past, and they are being replaced by mixers with one lever. Their main advantage is ease of use. By turning left and right, the water temperature is regulated, and the pressure supplied up and down. The main place in their design is occupied by cartridges: ball or disk. They need to be changed less often, since the tap in such designs does not leak as often, unlike rubber gaskets. The service life will be longer. nine0003
Outwardly, ball and disc cartridges do not differ much from each other, but inside they have significant differences. They are not interchangeable, i.e., instead of a ball cartridge, it will not be possible to put a disk one. Therefore, when buying a single-lever mixer, you need to know or ask the seller which cartridge is used in this model in case of further troubleshooting.
How to repair a faucet with one lever and a ball cartridge as a filling? It's not that hard, just follow the instructions. nine0003
- Turn off hot and cold water, as the valves responsible for the flow of water into the room are located in the apartment. Then open the faucet in the bathroom and drain the water remaining in the pipes after being cut off from the water pressure.
- It is necessary to unscrew the bolt that secures the mixing handle.
- Then lift up the linkage by loosening slightly. Remove it.
- Now the screwed connection that has appeared is unscrewed (removed) clockwise.
 nine0012
 - When the faucet dome is removed, the plastic part is turned inside out.
- If contamination is found on the seal, it must be removed. If the seal itself is worn out, it should be replaced.
- The ball (ball cartridge) is then removed for a detailed inspection. If it is found that the part is out of order, or there is any defect, then the current ball cartridge must be replaced.
If there is a leak at the attachment point of the lever that switches from the faucet to the shower. Water does not always leak from the tap, sometimes drops are found in the area of \u200b\u200bswitching from the mixer to the shower. A gasket is installed between the switch lever for the shower, as in a two-valve mixer, which tends to wear out over time. This explains why water is flowing at the shower switch point. In this case, you need to change the worn seal, which can be paronite or rubber. When purchasing a new gasket, you need to know that its diameter should be ½ inch.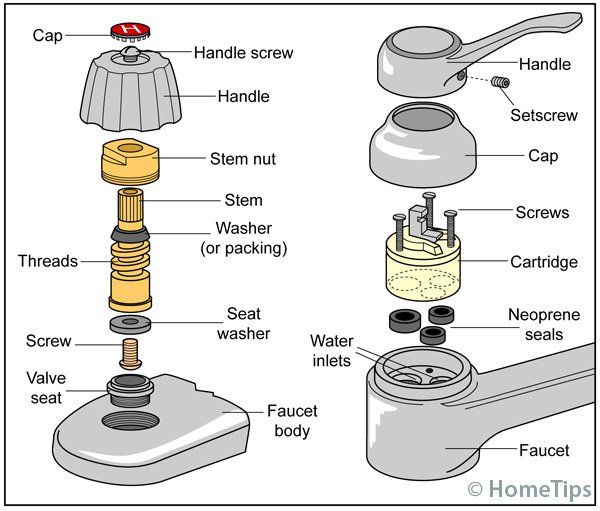 nine0003
To change the gasket between the switch lever from the faucet to the shower, it is necessary:
- Turn off the water entering the apartment by turning off the valves.
- The first step is to disconnect the lever that switches the shower.
- Unscrew the fixing bolt at the lever.
- Remove lever.
- Replace gasket.
- Where the lever is placed on the thread, any sealant must be wound, for example, FUM tape.
- A lever is put on over the thread and seal. nine0012
If the problem is that the lever simply does not attach well to the pipeline, and flows under the tap for this very reason, then you need to check the compatibility of the threads of all connected parts, disassemble and reassemble. But such cases are quite rare.
Two-valve faucet repair
What to do if the faucet drips in the bathroom? How to fix? First of all, you need to turn off the water. To do this, it is enough to turn the stopcock, usually it is located on the pipeline at the inlet of the water supply. nine0003
Of course, during the repair you will have to forget about access to water, but this is necessary, because if the faucet is not repaired in time, it will soon have to be replaced. Also, for high-quality performance of work, it is necessary to know the design of a crane with two handles.
This type of faucet includes the following elements: two handles (for hot and cold water), gooseneck, spout, body, gaskets and fittings. Most often, the problem is in the gasket, it only needs to be replaced, and the mixer will work normally again. nine0003
First unscrew the plug cap on each handle. Next, using a screwdriver, you need to unscrew the bolts, they are also on each handle. After that, both valves are carefully pulled out. Next, you will need to remove the overlay and start unscrewing the core. To do this, you need a ring wrench for polygons of a certain size.
After dismantling the valve, the cause of the leakage can be determined by visually inspecting all elements
It is important that there are no salt deposits on the parts, various blockages, whether the thread is damaged, and in what condition the mixer gasket is nine0003
As already mentioned, most often it is the gasket that becomes unusable, and it is enough to replace it.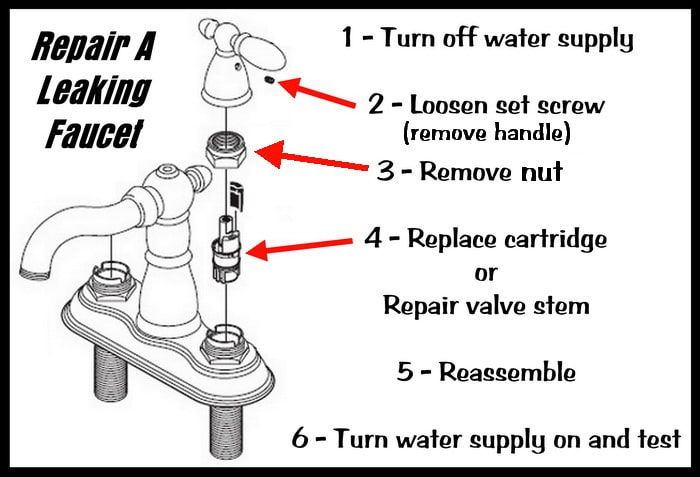 By the way, you can make such a detail yourself, but it is better to do this only if there is no plumbing store nearby. The fact is that gaskets cost a penny, and self-cutting does not guarantee a quality part.
After replacing the rubber gasket, a little FUM tape should be wound in place of the thread. Other seal materials can also be used: tow, other types of tapes, HBS, etc. After winding the seal, the mixer base is installed, and all the elements are in the reverse order. nine0003
Leakage from under the faucet lever
The cause of the leakage may be caused by a foreign particle that has entered the faucet core - cartridge. Any faucet core has two fixing rods and three openings: two for cold and hot water inlet and one for mixed outlet. The only difference is where the water will be mixed - in the cartridge itself or in the body of the mixer.
Faucet cartridge
Any single-lever mixer has a certain type of cartridge that cannot be replaced with another.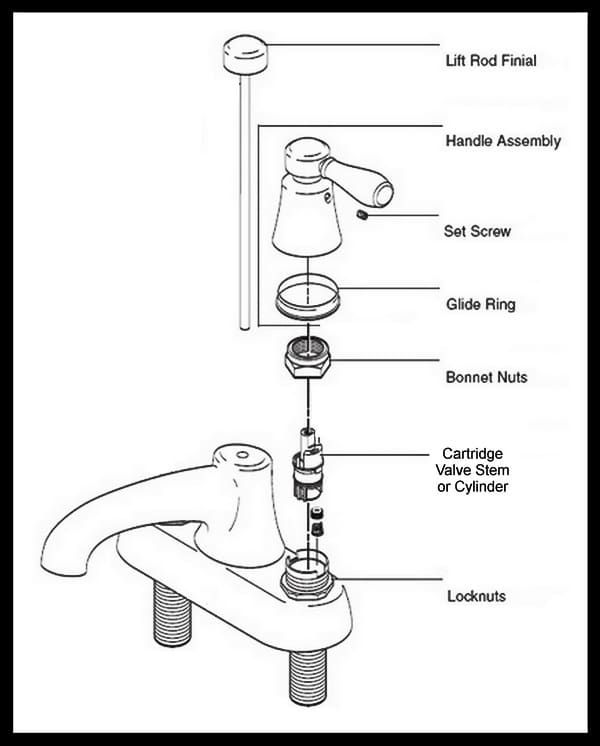 The cartridge can be ball or ceramic. Ceramic is subject to complete replacement, and ball can be repaired on your own. After dismantling, inspect the seal and other parts of the ball cartridge, remove blockages and replace unusable parts with new ones. The following signs indicate that it is time to replace the cartridge:
- no hot or cold water supply;
- water temperature changes by itself;
- lever does not open fully or does not close completely;
- lever shifts tight, with extra effort;
- the presence of a leak under the mixer lever.
Removing the single-lever cartridge mixer
To replace the cartridge, do the following:
- Remove the decorative cap - plug. nine0012
- There will be a screw under the cap that holds the lever. Unscrew the screw with a hexagon or a screwdriver.
- Unscrew the decorative trim.
- Unscrew the washer that presses the core.
- The core can now be removed for inspection.
- Install a new cartridge in reverse order.
Tip. To accurately replace the gasket or mixer cartridge, you must select the same part. Unscrew the old worn part and show it to the consultant in the store. This is the only way to ensure that the purchased spare part is suitable for your faucet. nine0003
Replacing the ceramic bushing in a two-valve mixer
When the faucet drips, we first try to tighten the locknut more tightly, if it does not help, then you will have to change the bushing. When this business is completely new for you, it is better to find a video on this topic and see how professional plumbers do the job. Usually the axle box is changed entirely, performing the work as follows:
- Remove the upper cap from the flywheel, unscrew the opened bolt, remove the valve. nine0009 We clean the threads and the flywheel from the inside.
- Unscrew the fittings of the dripping faucet using sliding pliers and placing a soft rag under them so as not to spoil the surface.
- Unscrew the axle box and remove it from the mixer.
- We clean the threads of the mixer from debris with a technical brush so that the new axle box fits snugly.
- We screw in a new bushing in place of the old one and assemble the flywheel in the reverse order.
Tip: when choosing a crane box, pay attention to the thread. It should exactly match the original size. nine0003
4 Other causes of faucet leakage
Gaskets are installed in other places of the faucet, for example, between the faucet body and the shower switch. Over time, these seals invariably wear out, and this leads to the fact that water begins to drip. In such situations, there is only one way out - replacing the seal.
First, the water selector lever is separated from the faucet. From this lever, you need to remove the fixing bolt. It should be borne in mind that in many modern models it may be absent. Then the lever itself is removed. The old sealing gasket is replaced with another one - new or self-made.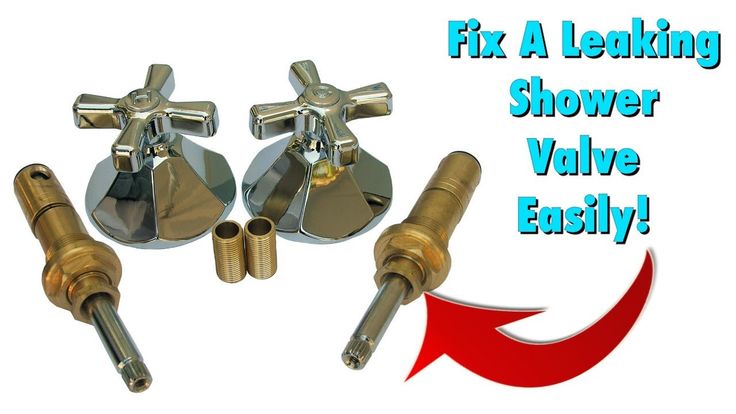 nine0003
Water dripping from the tap
FUM sealing tape is wound around the thread, after which the structure is assembled in the reverse order.
Another reason may be poor quality installation of the faucet, although such cases are quite rare. If the faucet has moved away a little at the junction, it must be removed, checked if the threads align correctly and reinstalled.
In some cases, leakage occurs even on completely new taps. Naturally, in such cases, the problem is not a worn seal. The most common reason a new faucet starts to leak is a manufacturing defect. It is not always possible to repair a defective mixer, even for specialists. In such cases, it remains only to dismantle the device, take it to the store and ask for a refund. nine0003
PVA wire: interpretation and application
How to fix a leaking faucet
What should I do if the faucet leaks in the closed position? If a two-valve mixer flows. Such a crane has been used in apartments for many decades. It's just that now it has become more modern. But the principle of the device is the same, and there are exactly the same malfunctions. The two-valve mixer is designed in such a way that one valve reacts to the supply of cold water, and the other to hot. In such a mixer, a worm gear is used. And the most common malfunction in a two-valve mixer is when water drips from a tap, i.e., the tap leaks. nine0003
In this case, the gasket in the tap fails. You can replace it yourself. The required product can be purchased at any specialized store or market. Many men know how to fix a faucet. After all, not everyone wants to call the master because of such a minor breakdown. Replacement sequence:
- First you need to turn off the hot and cold water.
- Unscrew the fixing wing bolt.
- The valve body must be turned counterclockwise using an adjustable wrench. nine0012
- Replace the old rubber seal with a new one.
- Then you should take any sealant that is available and wind it clockwise under the stop collar on the thread.
- Then screw on the housing. The valve is fixed with a screw, i.e. the assembly is carried out in the reverse order.
But it happens that a new gasket is installed, the faucet in the bathroom functions normally for a while, but after a while it turns out that the faucet is leaking again. nine0003
In this case, the cause must be sought in the so-called valve seat. After prolonged use, it can crack, chip and eat away. Then you should walk through the problem area with a cutter, align it. And the faucet will stop leaking.
Modern cranes often use a bushing containing ceramic discs instead of a worm gear. In this case, if the faucet is leaking, then you need to tighten the lock nut, which is in some models, more tightly.
If the leak cannot be eliminated, the bushing must be replaced. nine0003
Typical causes of malfunctions
Breakdowns in plumbing fixtures are largely due to poor quality products. You should not save money when shopping by purchasing cheap faucets from little-known manufacturers.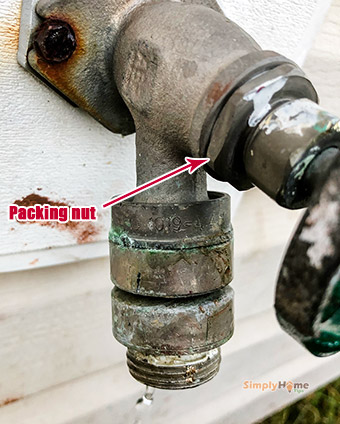 As a rule, low-quality components and consumables are used during their assembly, which quickly fail.
We can advise you to abandon the usual options for seals in favor of new analogues: instead of rubber gaskets, it is better to use modern analogues made of paronite or silicone. Their service life is much longer, besides, they are less deformed over time. nine0003
Installing a filtration system on water pipes will not only allow you to use high-quality water, but can also increase the life of plumbing products
A common cause of mixing equipment malfunctions is also water flowing in pipes. Foreign inclusions, a high content of mineral particles leads to the formation of deposits, blockages of filters, cracking of seals.
Making a bed frame
You need to get a blank for decorating. This stage of work must be performed in accordance with the size of the future bed. It makes sense to turn to specialists who will prepare the frame you need. nine0003
If you want to get an accurate result, it is advisable to call the master at home.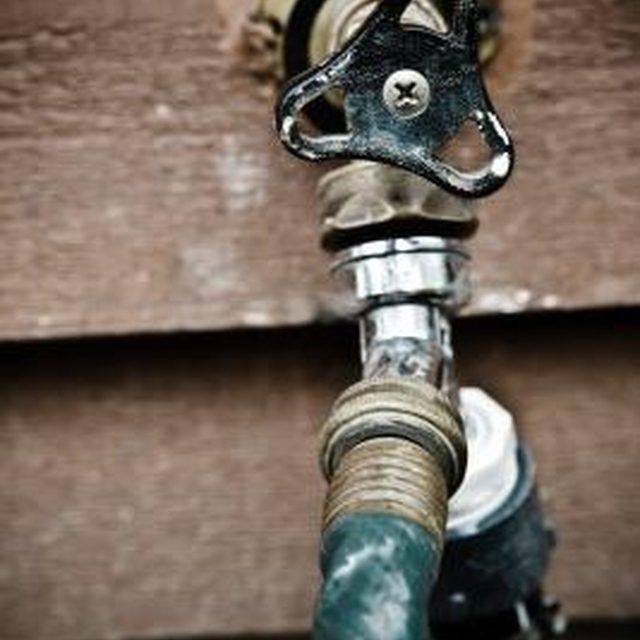 It will take measurements on its own. Accurate measurements will allow you to make a high-quality frame in a carpentry workshop.
Finished headboard frame
Machines are used for this step. Then you can independently assemble the bed frame in an apartment or house.
If it is decided to replace the gooseneck completely, then to buy a new one, you will have to measure the diameter of the part that connects to the body and the size of the clamping nut. The easiest way is to take off the old gander and go to the store with it
What to look for:
- gooseneck material: brass, stainless steel or silumin alloy. It is recommended to purchase spouts made of stainless steel or brass;
- tube length - you can pick up a gander longer than the old one or shorter;
- purpose of the spout - there are ganders for drinking and industrial water.
Sometimes in the bathroom it is enough to change plumbing for a new one and repairs are not even needed
Video instruction
Conclusions and useful video on the topic
After watching the instructional video, you will better understand the disassembly/assembly of a single lever mixer.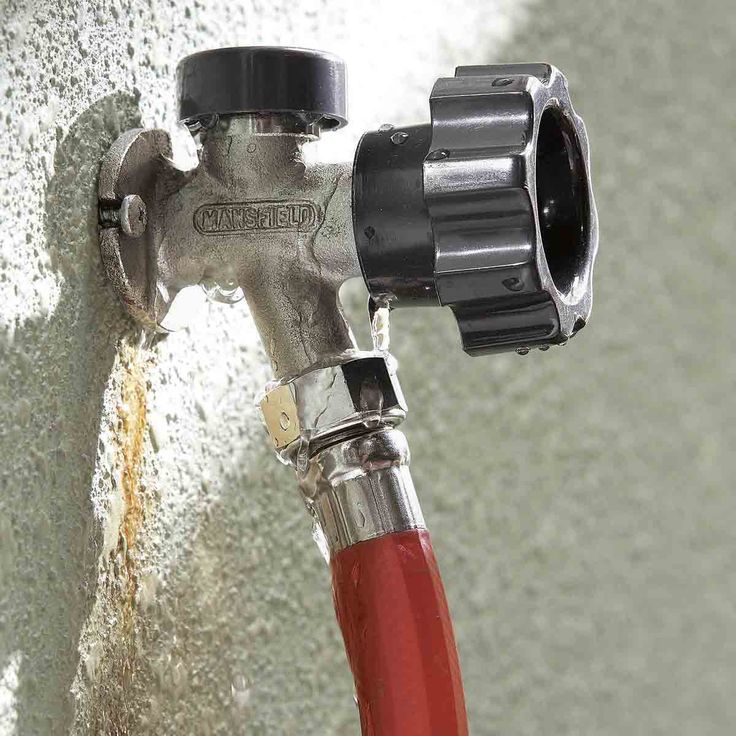
How to disassemble the appliance and replace the cartridge:
Thus, in fact, repairing a single-lever mixer is not such a difficult task as it might seem at first glance. You can solve it yourself if you have the desire and a minimum set of tools.
We hope that the material presented in this publication will help readers save a lot of money, since most people, at the very first problems with a faucet, simply buy a new one or call a plumber, and buying a quality faucet and professional services to replace it is not cheap. nine0003
Would you like to tell us how you repaired a single-lever faucet yourself? Is there any useful information for us and site visitors? Please write comments in the block below, ask questions, share the intricacies of the repair process not covered in the article, photos, tips on the topic.