How long does sweet pepper take to grow
Growing Peppers - Burpee
CAN I GROW PEPPERS?
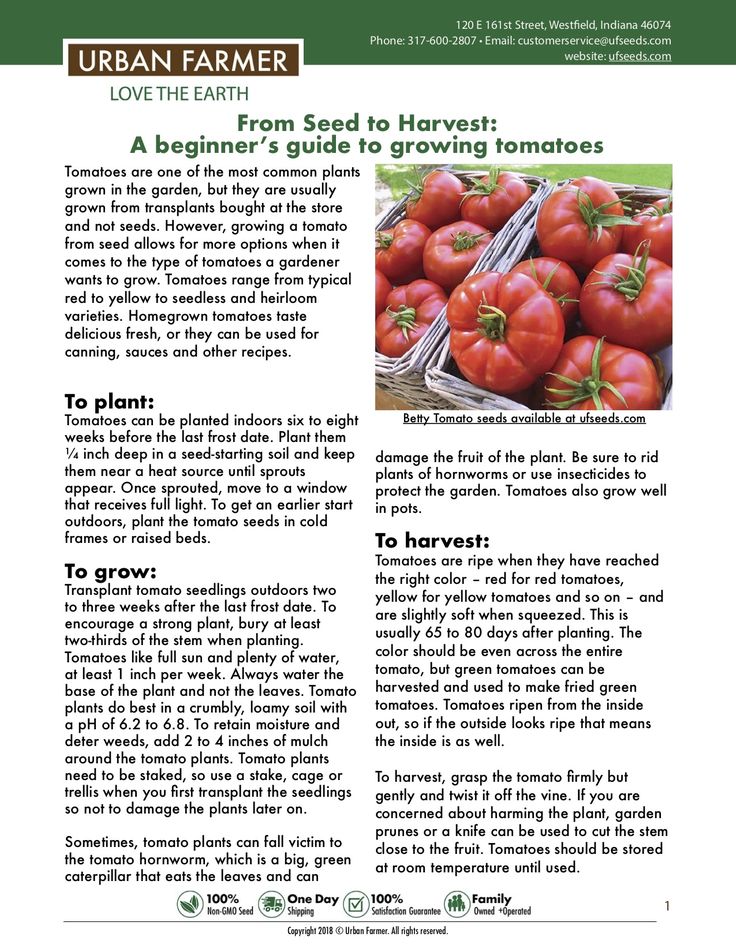
Peppers are a breeze to grow. Basically, you plant them and watch them take off! But, for maximum production, a little pampering helps. Plant peppers in a bed that receives full sun. Provide a sandy loam soil that drains well and contains plenty of organic matter. Depending on the size of the pepper varieties planted, spacing should be 12-18 inches apart. Peppers can double as ornamentals, so tuck some into flowerbeds and borders. Most sweet peppers mature in 60-90 days; hot peppers can take up to 150 days. Keep in mind, however, that the number of days to maturity stated on the seed packet refers to the days after transplanting until the plant produces a full-sized fruit. You must add 8-10 weeks for the time between sowing and transplanting which means most of us will be starting pepper plants indoors in January or February!
If you're new to growing peppers, you may want to start with one of the early varieties, like the bell pepper 'Early Crisp' or the 'False Alarm' Jalape–o variety. But, really, try any variety and you're likely to be pleased.
________________________________________
PLANT HISTORY
Peppers were grown extensively in Central and South America, Mexico, and the West Indies long before birth of Christ. But it was Columbus and other early explorers who introduced peppers to a welcoming European market. In fact, the pepper is a major New World contribution to the cuisine of the Old World. The Europeans became so fond of peppers, they carried them throughout the known world.
By the 17th century, peppers were cultivated not only in Europe, but in much of Asia and Africa.
Oddly enough, even though peppers are indigenous to the Americas, they were not introduced to North America until they arrived with the early colonists --- something of a circuitous route!
________________________________________
PEPPER SEEDS OR PLANTS?
Only gardeners who enjoy long growing seasons in the Deep South should attempt to sow pepper seed directly in the garden. Most of us must start our own plants indoors about 8-10 weeks before transplanting, which should be done 2-3 weeks after the expected last frost.
Most pepper seeds sprout in about a week at a temperature of 70-80 degrees F., but germination can be spotty depending on variety. Hot peppers can be very finicky. To speed the process, place the seeds between damp sheets of paper towel, put them in zippered plastic bag, and put the bag in a warm place (the top of the refrigerator works fine). As soon as the pepper seeds sprout, carefully plant them in individual containers such as pea pots. When the first true leaves develop, move the plants to a sunny southern window until you can transplant them into the garden. Don't set out your pepper transplants until night temperatures average around 55-60 degrees F.
If you'd rather not start seedlings, you can order plants from Burpee which will arrive shortly before transplanting time or purchase peppers at a local garden center. However, choice of varieties is generally very limited.
________________________________________
CULTIVATION
Here are two key cultivation tips to keep in mind.
Water in moderation.
Peppers are thirsty plants! They need a moderate supply of water from the moment they sprout until the end of the season. However, peppers won't tolerate a saturated soil that waterlogs their roots. The soil must drain well, yet hold enough moisture to keep the plants in production. To maintain a proper balance, before transplanting, work some organic matter into the soil to enhance moisture retention. Use mulch to prevent excessive evaporation from the soil during the dry summer months.
Don't overfertilize.
This tends to make the pepper plants develop lush foliage at the expense of fruit production. Peppers are light feeders. If you work 5-10-10 fertilizer into the soil prior to transplanting, that's probably sufficient. You can also side-dress the plants with a light sprinkling of 5-10-10 when blossoming starts, just to give them a boost if needed.
________________________________________
PEPPER GROWING TIPS
To improve overall pepper production, consider using the following techniques.
Plastic Mulch.
To get an early start with your peppers, particularly in the North, cover the prepared bed with a dark colored polyethylene mulch at least a week before transplanting. This will heat the soil beneath and provide a better growing condition for young pepper plants. The mulch will also help the soil retain moisture throughout the season as the plants grow.
Companion Planting.
If you practice this technique, try planting peppers near tomatoes, parsley, basil, and carrots. Don't plant peppers near fennel or kohlrabi.
Staking.
Peppers are easily damaged when laden with fruit. For support, tie the plants to stakes using old nylons, which have some 'give' as the stems enlarge. Don't use wire twist-ties or twine which will gradually choke off or even snap the stem.
________________________________________
INSECTS & DISEASES
Generally, peppers are problem-free. The same pests and diseases that plague other members of the Nightshade family (tomatoes, potatoes, and eggplants), however, will occasionally attack peppers. With a few precautions, you can keep your peppers "clean."
Use organic pesticides to eliminate common pests. Destructive caterpillars like cutworms, tomato hornworms, and borers are easily controlled with Bacillus thuringensis (BT or Thuricide). Rotenone and pyrethrum will readily handle pepper maggots and weevils, leaf miners, flea beetles, and aphids.
Plant disease-resistant pepper varieties, especially if anthracnose, mosaic, and bacterial spot are a problem in your area. (Ask veteran gardeners in your neighborhood or the County Extension agent.)
Avoid working in the garden after a rain. Diseases can spread rapidly among wet pepper plants.
Weed the garden. Weeds provide a refuge for garden pests and can also spread fungi and viruses to nearby healthy pepper plants.
________________________________________
PEPPER HARVEST TIPS
Like cucumbers and summer squash, peppers are usually harvested at an immature stage. The traditional bell pepper, for example, is harvested green, even though most varieties will mature red, orange, or yellow. Peppers can be harvested at any stage of growth, but their flavor doesn't fully develop until maturity. This creates a dilemma for the home gardener.
Frequent harvesting increases yields, often at the sacrifice of flavor. If you continually pick the peppers before they mature, the plants will continue to produce fruit in their quest to develop viable seed.
Allowing fruits to fully ripen enhances flavor, often at the sacrifice of yields. Plus, you will have to wait until late in the season before harvesting table-ready peppers.
To avoid this dilemma, and if you have enough garden space, plant at least two of each pepper variety you've selected. Allow one plant of each variety to fully ripen to maturity, and harvest the other throughout the season. Also, when picking peppers, refrain from tugging on the fruit, which may break off a branch or even uproot the entire plant. Use a sharp knife or garden shears to cut the tough stem.
________________________________________
RECIPES & STORAGE
For maximum flavor, eat peppers on the same day they are picked. You can also leave them on a kitchen counter for a day or two to ripen further. Do not place peppers in the crisper drawer or in plastic wrap or bags in the refrigerator. Peppers are warm-weather fruits and do not store well in cold temperatures. If you have too many peppers, consider the following storage options.
Freezing.
This is the easiest storage method, but the peppers will be soft when thawed. The flavor is retained, however, so use frozen peppers primarily for adding 'spice' to soups, stews, and sauces. If you stuff the peppers before freezing, you'll have a ready-made dinner, perfect for the microwave.
Pickling.
Peppers can also be preserved by canning them, but they're low-acid fruits and thus require canning under pressure. It's easier to pickle peppers as you would cucumbers in a crock filled with a simple brine of four cups of water, four cups of vinegar, and 1/2 cup of pickling salt. Add a clove or two of garlic and some fresh herbs for added flavor.
Drying.
This method works best with the thin-walled hot peppers, particularly the smaller varieties that can be dried whole right on the plant. The key to drying peppers is doing it slowly to retain their color and flavors.
Caution:
Be especially careful when handling the blistering hot peppers like 'Habanero' and 'Thai Dragon.' Capsaicin, the chemical that provides the 'heat' in a hot pepper, is in a volatile oil that can actually burn your fingers. The pain can sometimes last for days. When handling hot peppers use latex or plastic gloves and make sure not to touch any part of your body, particularly your eyes or mouth.
________________________________________
See all our hot peppers or sweet peppers
Beginner’s Guide on How to Grow a Bell Pepper Plant
If you’ve just started planning the perfect layout for your veggie garden, you might be looking for some ideas on what to grow. As temperatures slowly start to rise in the spring, you may be dreaming about vibrant tomato vines, mouth-watering cucumbers, or the perfect bell pepper plant.
While bell peppers might not be the easiest fruit to grow — yes, just like tomatoes, bell peppers are technically a fruit — they are certainly well worth the challenge. These warm-weather species make a great addition to refreshing salads or as a healthy afternoon snack. They’re also great eaten raw or cooked.
With that in mind, it’s time to learn the fundamentals of growing a bountiful bell pepper plant. We’ll show you the different types of peppers to consider and the basic elements needed to cultivate these delicious, versatile, and crisp veggies (er, fruit).
Peppers 101: Pepper VarietiesBefore we get into the technicalities of growing bell peppers, it’s important to understand a few basic things.
The bell pepper plant (Capsicum annum) belongs to the nightshade family, which spans more than 2,300 species, including eggplants, potatoes, and tomatoes. One of the greatest attributes of peppers is that they come in a variety of colors, shapes, and sizes, making them one of the most versatile foods used in many different cuisines worldwide.
Unlike their spicier cousins — like jalapeños and serrano peppers — bell peppers do not contain capsaicin, the compound responsible for pungency and heat in hot peppers.
Ever wondered if green bell peppers and red peppers come from different plants? Well, they’re actually the same pepper that are simply at different maturity stages. They start green, but if you leave them to mature on the plant long enough, they’ll eventually achieve their full color: a bright and deep crimson red.
Fun fact: The longer you allow your bell peppers to mature, the higher their vitamin C content. Red bell peppers that are allowed to mature fully also have a sweeter flavor!
While peppers are quite resilient to garden pests, you may want to opt for resistant varieties to ensure your pepper-growing experience goes smoothly. Some of the best species include:
- Green peppers that turn into red sweet peppers: Sweet red Marconi, Lady bell, Gypsy, Lipstick, Bellboy, Sweet California wonder
- Orange peppers: Orange sun, Milena
- Yellow peppers: Golden California wonder, Honey bell, Marengo
No matter if you decide to grow just one type of bell pepper plant or you want to put your gardening skills to the test with a pepper bundle, you’ll need to learn the basics of how to grow thriving and healthy plants.
How to Grow a Bell Pepper Plant: The BasicsThe first thing you should know about bell pepper plants is that they’re quite sensitive to cold temperatures, so it’s a good idea to start them indoors before their growing season begins (spring/summer).
Keep in mind that sweet bell peppers have a long growing season — they take between 60 to 90 days from sowing to harvesting — so the sooner you get started, the better. It’s recommended to sow your bell pepper seeds 8 to 10 weeks before your last spring frost date. You can use the Back to the Roots grow calendar to find out when that is.
Germination occurs within 10 days, and once the first set of true leaves appears, you can begin transplanting them outside if that’s your goal. (Bonus: Bell pepper plants can also be grown indoors.)
But before you move your bell pepper plant out into the open, make sure to check that the nighttime temperatures do not go below 70°F, as this may shock your young plants and contribute to their premature demise. The best way to support these plants is to wait for the last frost danger to pass.
Get Enough SunAs a true warm-weather crop, bell peppers love direct sunlight and full sun, so place them in a location where nothing is blocking the light. If you live in a climate with extreme high heat and intense sunlight, your peppers may be susceptible to sunscald, especially the younger leaves and more tender fruits. While they may look aesthetically unappealing, sunscalded bell peppers are still edible and equally tasty.
Bear in mind that to produce large and healthy fruit, pepper plants need plenty of full sun, at least 6 to 8 hours every day.
Don’t Water Too MuchFinding the right watering balance is the key factor to a thriving bell pepper plant. Since sweet bell peppers cannot tolerate extremely high temperatures, it’s essential to water them appropriately to prevent diseases. If you live in a desert climate or experience a very dry summer season, it may be necessary to hydrate your plants daily — especially in the early morning or evening to prevent water evaporation.
To avoid diseases and pests, such as anthracnose or blossom end rot, avoid overhead watering and make sure you water deeply and evenly at the base of the plant. By doing so, you encourage the development of a strong and healthy root system, which in turn will make your plant more resilient to overcome any bumps in the road.
Bell pepper plants prefer sandy to loamy soil, which is enriched with organic matter. You can either buy a potting mix with these characteristics or purchase all the elements individually and create your own. If you’re not sure what the best option is, don’t be shy — ask one of the staff members at your local Home Depot Garden Center for an opinion.
Note: Fertilizing is an important step in vegetable gardening. But don’t go crazy and over-fertilize as it usually encourages your plant to grow more foliage and produce less fruit, which is obviously not the goal.
Since water is vital for growing bell peppers, choosing the proper soil is undoubtedly the best way to ensure optimal moisture levels. These plants don’t like wet feet, so opting for sandy, loamy soil will ensure good drainage and help the soil temperature rise quicker, a key factor in the cultivation of bell peppers.
Equally important is the soil pH. Veteran gardeners claim that a slightly more acidic soil (between 6.0 and 6.8) is the optimal environment for your bell pepper plant to yield a bountiful harvest. Mixing some coffee grounds into the potting mix is a natural, eco-friendly way to balance the pH levels of the soil and support your plant’s growth.
Pro tip: To prevent blossom end rot — which is primarily a calcium nutrient deficiency — crush some eggshells and add them to the soil. It’s an easy, organic way to provide your plants with an extra nutritional boost.
To speed up the warming of the soil and help retain some moisture during hotter days, consider covering it with a dark mulch.
Choose Your ContainerIf you live in a small apartment with a tiny balcony and think you don’t have enough space to grow bell pepper plants, think again!
Bell peppers are a perfect match for container gardening and raised beds, so you can easily squeeze them into even the smallest spaces. Since these veggies (OK, fruits) require good drainage, a raised fabric bed — like this one from Back to the Roots — is a fantastic and affordable home for your bell pepper plant.
The Back to the Roots Fabric Raised Beds are made with durable felt and are double stitched, so you can easily move them around without worries. They also come with internal grow walls to prevent root tangling between different plants, which means you can plant all sorts of different veggies, herbs, and houseplants simultaneously.
Keep in mind that, like tomatoes, bell peppers benefit from some type of staking or structural support. Tomato cages are a great alternative, and they’re easy to set up. Just make sure you put them in place when the plants are still young, as it can be tricky to position them around fully mature plants.
Growing Bell Pepper Plants Is Rewarding and FunThe coolest thing about peppers is that they come in all sizes and shapes, and you can find a variety that caters to your taste.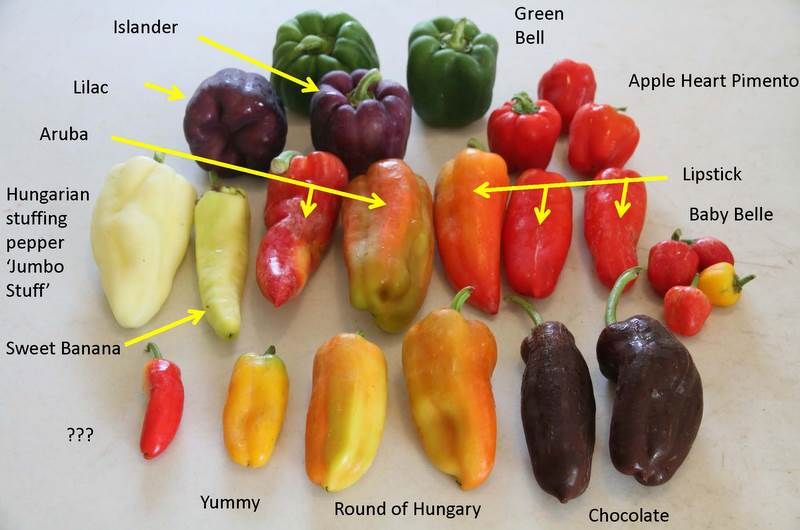 From sweet to spicy, they offer a great range of flavors that will take your cooking to the next level.
While growing and maintaining a bell pepper plant does come with its challenges, you’ll feel incredibly proud when that first tiny pepper makes its debut in the world. To learn more tips and tricks for cultivating these crunchy and delicious edibles, check out our comprehensive guide on how to grow peppers from seed to harvest.
Pepper seedlings according to the rules - basic steps at home
Pepper is a heat-loving crop that loves a lot of light. Considering that the fruit ripening period for different varieties is from 100 to 150 days from the moment the sprouts appear, it is necessary to sow pepper seeds for seedlings in late February or early March.
Hot peppers mature in about 2 months. They can be grown on the windowsill all year round and sown at any time. For home gardening, compact and shrub varieties are chosen. They do not cause trouble when grown, look amazingly beautiful on the windowsill and willingly give a generous harvest.
Sweet peppers require more attention. To obtain healthy, strong seedlings that are not susceptible to diseases typical of pepper, you need to know the intricacies of sowing, picking and growing.
Rules for obtaining strong seedlings
- Light day for pepper seedlings should be at least 12 hours. If there is little light, the seedlings begin to bend and stretch. Use phytolamps to illuminate - they increase the germination of seeds and stimulate the growth of seedlings. A more budget option is LB or LBT fluorescent lamps. Ordinary ones are not suitable - they heat up, dry the air and burn the leaves.
- It is important not to overgrow pepper seedlings. If the stems become stiff ahead of time, they will slow down the growth in thickness and begin to crack. The optimal age of seedlings ready for planting in open ground is 60-80 days.
- Unlike seedlings of other vegetables, pepper seedlings cannot be swooped down to the depth of the cotyledons - the plants will stop growing and start to get sick.
 This method of picking is used in professional greenhouses, where it is possible to keep seedlings for 7-10 days at a stable temperature of 15-17 °, followed by an increase in temperature to 23-25 °. In this case, the seedlings form a strong stem with a dense cotyledon knee, which can be deepened. At home, it is better not to take risks.
 - Pepper painfully endures a pick, reacting to the slightest damage to the roots. The best option is to sow in peat tablets, and in the phase of 2-3 leaves, carefully transplant into small pots with nutrient soil. If you choose the right size, the seedlings will quickly braid the roots with an earthen lump and the transplant will be painless. For compact varieties, prepare pots with a diameter of 3-4 cm, for large-leaved varieties - 8-10 cm.
- If you plan to prepare a lot of seedlings, take rectangular plastic containers 10-12 cm deep - they can be placed compactly on the windowsill. A 30x60 container will require one or two packages of seeds (with a planting rhythm between plants of 2-3 cm).

Pre-seeding
You will need a light, nutrient-rich soil with a neutral pH. For looseness, you can add calcined river sand (1: 5). You can reduce the acidity of the soil by adding chalk or dolomite flour (2 tablespoons per 5 kg of the mixture).
Soak the seeds in a growth stimulator before sowing. If you still have seeds from last season, check them for germination: soak them in saline (5-10 grams per glass of water) - feel free to throw away those that float. To speed up the germination of seeds, wrap them in a damp cloth, place in a plastic bag and leave in a warm place for 2-3 days to swell.
Sowing seeds
When sowing in pots or peat tablets, place no more than two seeds in each. Cover with foil. When sowing in containers, make grooves at a distance of 2 cm and carefully distribute the seeds with a rhythm of 2-3 cm. In order not to wash out the crops, moisten by spraying.
At a temperature of 23-25°, seedlings will hatch in 7-10 days; at T 25-27 ° - in 2-3 days. Remove the film. Stop watering for two days - a little stress will make seedlings stronger. If the air in the room is very dry, lightly moisten the topsoil. After the appearance of the cotyledons, water with warm water (28-30 °). Regularly highlight, protect from drafts, do not allow drying out and waterlogging.
Picking seedlings
At the age of 3-4 weeks, seedlings have two full leaves and are ready for picking. At this time, the stem is still very fragile. Grab the seedling by the petiole of the leaf, carefully remove it with a clod of earth and transfer it to a pot. While still holding the plant, water without allowing it to sag. Add earth to the root neck and lightly tamp.
Feed the seedlings after two weeks with a mineral fertilizer following the instructions on the package. After 2-3 weeks, carry out the second feeding, in the stage of 6-8 true leaves - the third. Two to three weeks before planting peppers in open ground, harden seedlings outdoors, for example, on a loggia. Many gardeners do it
already in the field, protecting seedlings from drafts and direct midday rays.
Planted in open ground
When planting large-fruited varieties, follow the pattern of 50x60 cm. Bush peppers are placed at a distance of the future crown diameter. Seedlings are planted in pre-prepared holes, fertilized with NPK-complex (nitrogen-phosphorus-potassium). The root collar is placed at ground level.
Water regularly, spray, loosen row spacings, remove weeds. Apply NPK fertilizer every 2-3 weeks. Nitrogen will contribute to the growth of green mass, phosphorus - to ensure the health of the vitality of the root system, potassium - to accelerate the formation of ovaries and weight gain of fruits.
In conclusion, we would like to remind you that pepper can be grown not only in the garden. Growing pepper on the windowsill will bring not only a vitamin harvest in winter, but also give beautiful flowering, decorating the house. In our article, we will tell you how, following simple rules, you can grow a wonderful crop of pepper on the windowsill.
Published: 21 Dec 2020
Views: 37484
(Votes: 8360, Rating: 4.8)
Share with friends:
cultivation, planting, care in the open field
Good yields of pepper in central Russia can be obtained in a greenhouse. But not everyone has it. And in order to grow this crop in open ground, it is necessary to choose the earliest varieties.
Cultivation of pepper
Pepper loves plenty of light and heat (1), so it needs the brightest place in the garden. In the shade, the pepper forms brittle shoots and does not bloom (2).
And the warmest, so it is ideal if some tall crops grow on the north side of the pepper beds. For example, corn, climbing beans on supports, cucumbers on trellises or even indeterminate tomatoes - they reach a height of 1.5 - 2 m. These plants will cover the pepper from the cold northern winds and provide it with the necessary microclimate in the garden. You can also plant pepper on the south side of the house or other building.
– A light mulch, such as sawdust, will help to ensure a comfortable existence for peppers – they reflect the sun’s rays, preventing the soil from overheating, and at the same time provide additional lighting – the reflected light hits the back of the leaves, says agronomist breeder Svetlana Mikhailova. - In addition, sawdust protects the soil from rapid drying, retain moisture in it for a long time. But in heavy rains, they, on the contrary, take over the excess and protect the plants from excess moisture.
If there is no sawdust, you can mulch the pepper with hay - it is also light and performs the same functions. In addition, hay bacillus actively reproduces in hay, which suppresses the development of pathogens - the pepper will not get sick.
Planting pepper
Since pepper is a heat-loving crop, and it matures for a long time, it is grown only through seedlings. The optimal age of pepper seedlings is 55-60 days (3). This should be taken into account when determining the sowing date. And there is one more parameter - seeds for seedlings are sown in 2 terms, depending on the ripening time:
- late varieties - late February - early March;
- mid-ripening and early varieties - in mid-March.
Before sowing, it is useful to soak pepper seeds for 20 minutes in warm water (about 40 ° C), and then dip them in cold water for a couple of minutes - this will harden future plants and help get rid of viruses.
Seeds can be sown immediately, but it is safer to germinate them by wrapping them in a damp cloth and putting them in a warm place. As soon as the roots sprout, you can sow. At the same time, you will reject non-germinating seeds.
Pepper is sown to a depth of 1 - 2 cm immediately in separate cups - he really does not like transplanting.
- There is no need to hurry with planting seedlings - for good growth, a temperature of about 20 - 25 ° C is required, - advises agronomist Svetlana Mikhailova . - If planted in the first half of May under cover with a non-woven fabric, it will protect against frost, but will not provide sufficient heat. And the pepper under it will just sit back - it will not grow. This means that the harvest will give much later, if at all in time. So let the seedlings be at home until the end of May - you can plant them on the beds after the 20th.
When planting, it is important not to bury the stem - it should remain at the same level as it was in the pot. It is necessary to replant carefully so that the clod of earth does not fall apart and the roots are not damaged - pepper does not like this very much.
Plant spacing should be 25 cm, both within and between rows. This is necessary so that the plants do not shade each other. We remember that pepper loves an abundance of light.
Outdoor Pepper Care
Pepper care involves 4 important steps: regular watering (4), top dressing, loosening and shaping.
Watering. Pepper loves to keep the soil moist all the time - ovaries fall from drought. You can water it once a week and it is better to sprinkle it with a hose with a sprayer so that water gets on the leaves. Tomatoes are categorically contraindicated, but the pepper is very respectful of such a shower! Norm - 3 - 4 liters per 1 sq. m.
Top dressing. Over the summer, peppers in the open field need 2 top dressings:
- 2 weeks after planting seedlings: 2 teaspoons of urea and double superphosphate per 10 liters of water - 1 liter per bush;
- when the ovaries are formed: 2 teaspoons of ammonium nitrate, 5 teaspoons of double superphosphate and 4 teaspoons of potassium sulfate per 10 liters of water - 1 liter per bush.

Loosening. Pepper is very fond of loose soil - when its roots breathe, the plant absorbs nutrients better and produces abundant crops. Therefore, it is necessary to loosen the beds at least once a week to a depth of 5 - 7 cm.
Formation of bushes. In peppers, unlike tomatoes, there are no problems here - they are all formed in the same way, in 3 - 4 shoots, leaving the lowest stepchildren. All other stepchildren must be removed.
It is also useful to pinch the very first flower of pepper - then flowering will be plentiful and the yield will be higher.
Harvest of peppers
Peppers have two degrees of maturity:
- technical - when the fruits have reached the size typical for the variety, but have not yet coloured;
- biological - when the fruit is fully ripe and has turned into its varietal colour.
Biological maturity usually occurs a month after technical maturity - this is a very long period during which the plant spends a lot of energy on fruit ripening.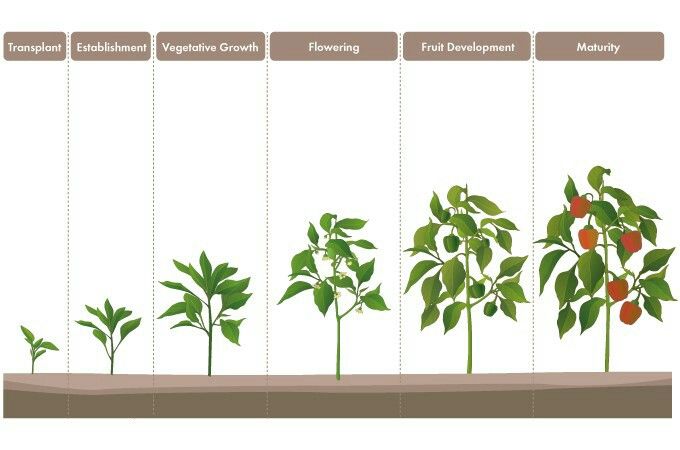
- Therefore, the fruits should be harvested in technical ripeness, - advises agronomist-breeder Svetlana Mikhailova . - Peppers, as you know, perfectly ripened at home, in the warmth, although they can be used unripe - both for food and for preparations. In this case, the plant will not have to spend energy on the ripening of the first fruits, and it will be able to produce much more of them.
Pepper storage rules
Pepper harvested in technical maturity, that is, unripe, green, is suitable for storage. At a temperature of 0 to 2 ° C, it can lie for at least 4 months, or even six months. A small crop can simply be sent to the refrigerator, and if there are a lot of fruits, then to the cellar.
In the cellar, the pepper lies well in wooden boxes with cracks between the boards so that it can breathe.
And then there are 2 options:
- wrap each pepper in thick paper;
- cover with sand - in this case, the bottom of the wall box should be lined with thick paper, pour a small layer of sand on the bottom, then lay the fruits, again a layer of sand, again fruits, and so on, but not more than three layers of pepper.

Pepper does not need to be washed before storage - if it is dirty, just wipe it with a dry cloth.
And, of course, peppers can be frozen. In this case, the fruits must be washed, dried or wiped with a cloth, inserted one into the other and sent to the freezer.
Popular Questions and Answers
We talked about growing pepper with agronomist-breeder Svetlana Mikhailova.
How to choose a variety of pepper?
Since pepper is a heat-loving crop, the choice of variety depends primarily on the region. For areas with short, cool summers, if the pepper is planned to be grown outdoors, it is better to choose early or, in extreme cases, mid-season varieties. In the south, you can grow later ones. All varieties are suitable for greenhouses.
After which crops is it better to plant peppers?
Good precursors for pepper are onion, cucumber, perennial herbs, early cabbage. But the family after vegetables from the Solanaceae family (tomatoes, peppers, eggplants, physalis) cannot be planted with peppers - they have common diseases that accumulate in the soil.