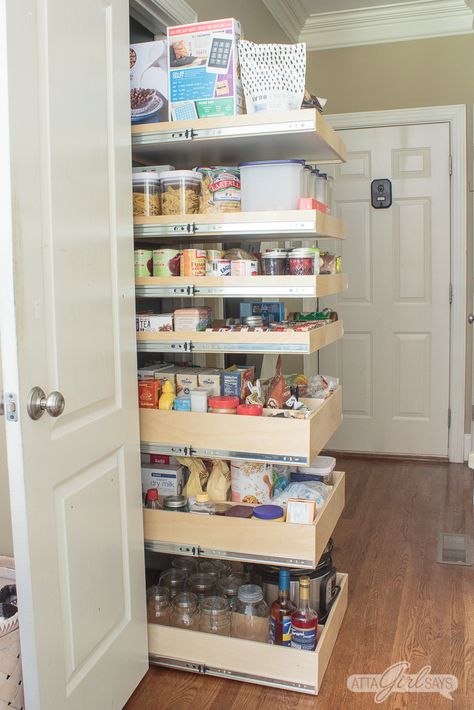
How deep should a pantry shelf be
Pantry Design Layout | Pantry Shelf Spacing, Size, Depth & Height
If you have standard shelves and drawers, you might be packing things in your pantry where they just don’t fit. Things change. So why should a pantry remain the same?
When you travel through the DC/Northern Virginia/Baltimore region, one thing you notice is how quickly things change. You go from vast and modern urban areas to hidden dales and winding forest roads in the blink of an eye. Hills and rivers roll and flow near to high-tech suburbs. Soon you realize that there is no one shape or size to the region. You’ll probably come to the same realization with your pantry.
Jars, cans, bottles, boxes, and more come in all heights and widths. You have to stack cans of beans, bags of rice, various olive oils of various heights, and much more. And if you have standard shelves and drawers, you might be packing things where they just don’t fit.
That’s why at Closet America, we are proud to create custom-designed pantries with adjustable shelves for our clients. We know that your lives aren’t designed around uniformity. You like creativity and variety. You like changing things up and we do, too.
We’ve created this guide that features the heights of common pantry items so that you can understand what you need and how to get there. We know that you’re not just buying same-size canned peas to open for dinner. Things change. So why should a pantry remain the same?
Average Heights of Common Pantry Goods
What kind of items do you store in your pantry? Do you buy things based on what you want, or what you think can fit in your existing pantry? We think your pantry should be built to store all of your wants and needs.
Here are some “Goldilocks” measurements for the most common dry pantry goods. As a rule of thumb: add two inches for accessibility.
Canned Goods: Most cans are around four inches high. So if you have a lot of chickpeas, canned fruits, or vegetables, and (especially common) dog and cat food, you’ll want a pantry shelf height that can fit six-inch goods.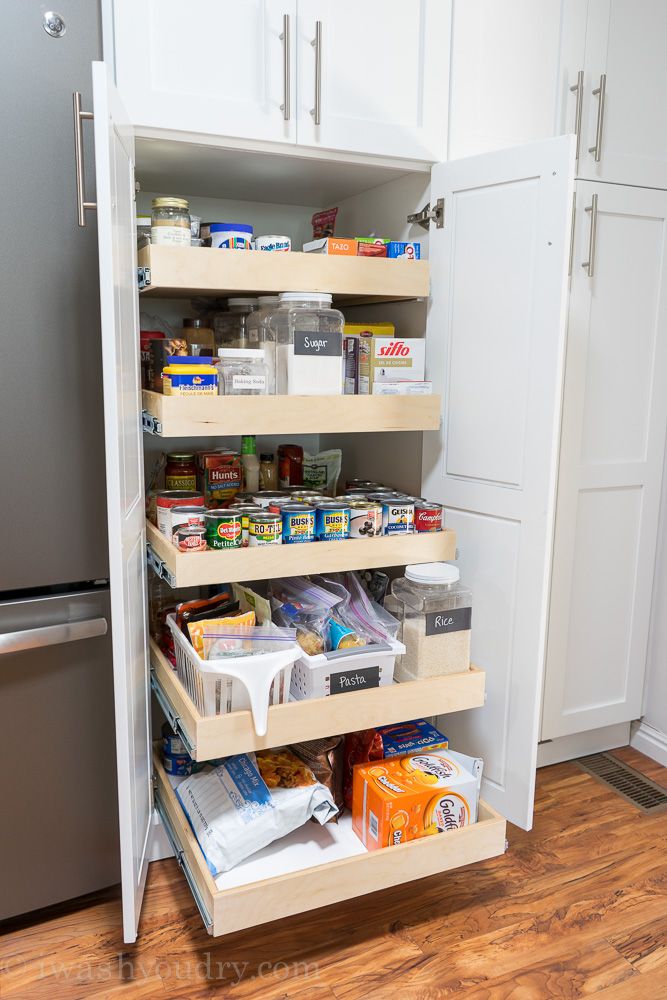
Spices: Spices can vary, but for the most part, the common spice jar is four inches tall. There are other considerations for storage, but we’ll get to those below.
Mason Jars: Mason jars are one of the most popular ways to store things, especially if you are doing a lot of pickling. That standard mason jar is 6.6 inches high, which with a little bit of adjustment can fit nicely alongside your canned goods.
Baskets: These days, baskets are a common way to store things. They are decorative and functional. They’re a great way to make the most of a space. Of course, there are a lot of basket sizes, but eight inches seems to be a common height.
Wine Bottles: The pantry is a good place to store wine bottles which are typically 12 inches tall. It’s cool; it’s dark; it’s easy to get to. And while both our walk-in and reach-in pantries have slide-out wine and bottle racks, you may need more space.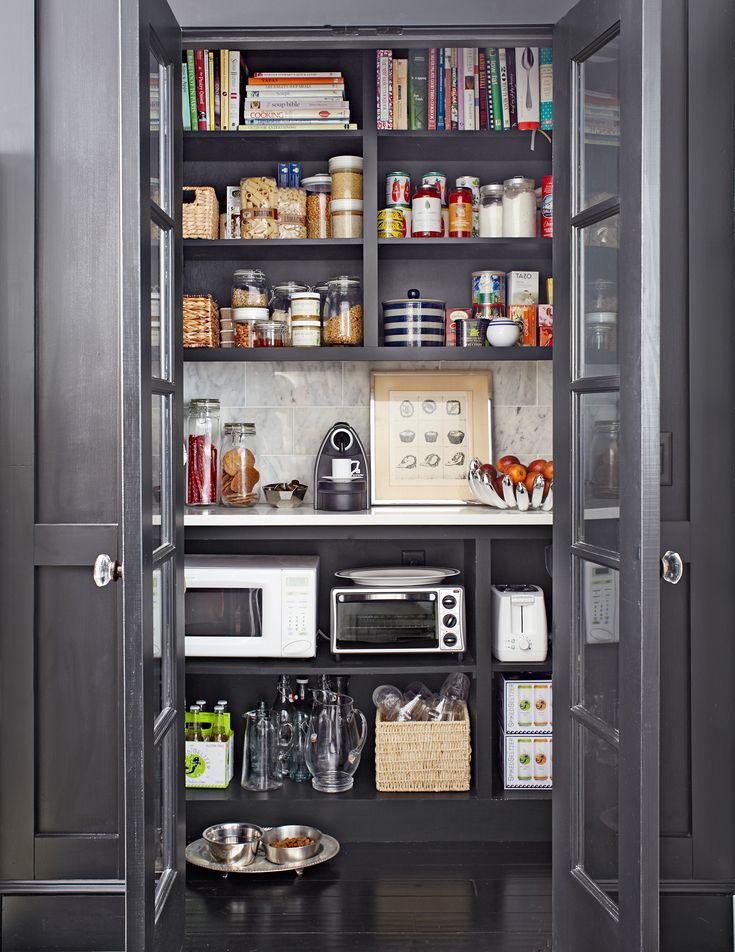
Olive Oil Bottles: Some olive oil bottles are as tall as 12 inches, while some can be much shorter. Olive oils, which have a wide variety of flavors and styles, also have a wide variety of sizes.
Cereal Boxes: The average cereal box is a little more than a foot high. So if you have cereal-loving kids (or are a cereal-loving adult) you’ll want a shelf with enough height to accommodate these and other boxed goods.
Large Goods: This may include bags of potatoes, boxes of sparkling water, and more. You’re always going to have big items that just don’t fit well elsewhere. So you’ll need at least one larger catch-all shelf. These usually go on top, though of course it is up to you.
Tips For Getting Your Shelving Just Right
If you don’t have enough height in your shelves they easily become cluttered and inaccessible. If you have too much height then there’s the chance that you may have a lot of wasted space.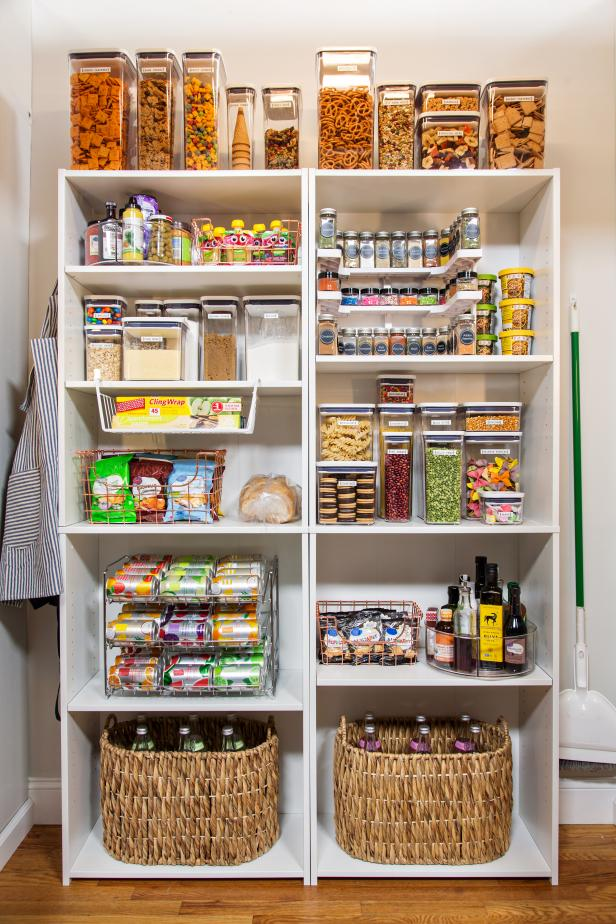
So how do you get it just right? Here are a few tips.
-
Don’t go too deep. Most experts recommend that pantry shelves be no more than 12 inches deep. Any more, and things begin to get buried. You forget you have them, you buy redundant goods, or things expire. Make sure you can see just about everything in your pantry.
-
Store like with like. We know you have a large variety of goods in your pantry. But you can start to store things of similar height together. If your system is just to hold various oils together, regardless of height, you’re probably going to end up with wasted space.
-
Take advantage of the whole pantry shelf depth. If you have storage for baskets, use it. If you have wire racks for bottles, use them. This doesn’t mean things will be cluttered. It actually means the opposite. When your pantry items go to the right place, everything starts to make sense.
-
Get adjustable shelving. Adjustable shelving means that you can create your pantry the way you want it when things change. Maybe you get a new taste in olive oils, or your pickling starts to require jumbo-sized mason jars. Don’t you want storage for that?
-
Get a custom-designed pantry. A custom-designed pantry is one that takes into account your space and your needs. When you work with Closet America, we send someone to your house to create a free 3D digital rendering using precise measurements and your requirements. We then hand-finish pieces made uniquely for you at our own local factory.
When you have a custom-designed pantry with adjustable shelves, you have something just for you. You have a walk-in or reach-in pantry created around your needs, with the knowledge that your needs can change. When they do, the pantry can change with them, adjusting to fit the new size and shape of your life. We’d love to get started on your pantry. Contact us today to start sizing things up.
The five pantry design rules only kitchen experts know
Homes & Gardens is supported by its audience. When you purchase through links on our site, we may earn an affiliate commission. Here’s why you can trust us.
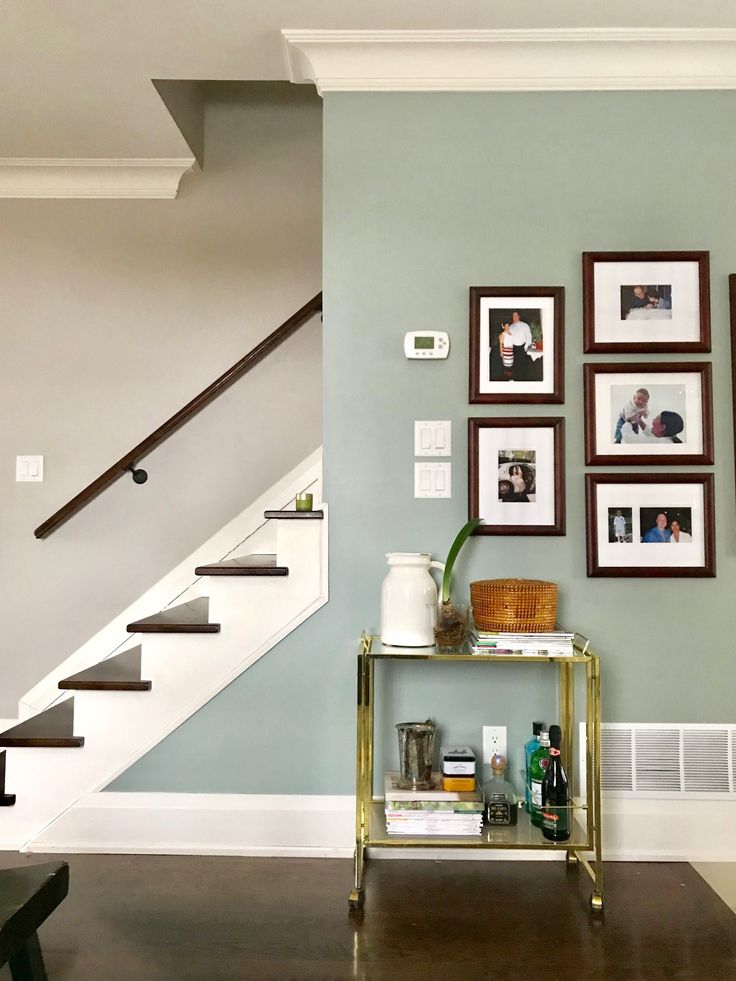
(Image credit: Heather McKean/Unsplash)
Pantry design is sometimes somewhat overlooked. Typically a functional space for storage, it can easily become overrun with spices, dry pasta, over-purchased items and other small kitchen appliances. But what if we told you that even the smallest of pantries can be efficient, user-friendly and aesthetically pleasing all at once?
From space-conscious cabinets to clever walk-in ideas, there are many fantastic pantry ideas to copy for a space that's really well designed. To get to the absolute core pantry design rules, we spoke to five interior experts who share their top tips.
(Image credit: Humphrey Munson)
Pantry design rule number one: pull-out storage is a must for easy access.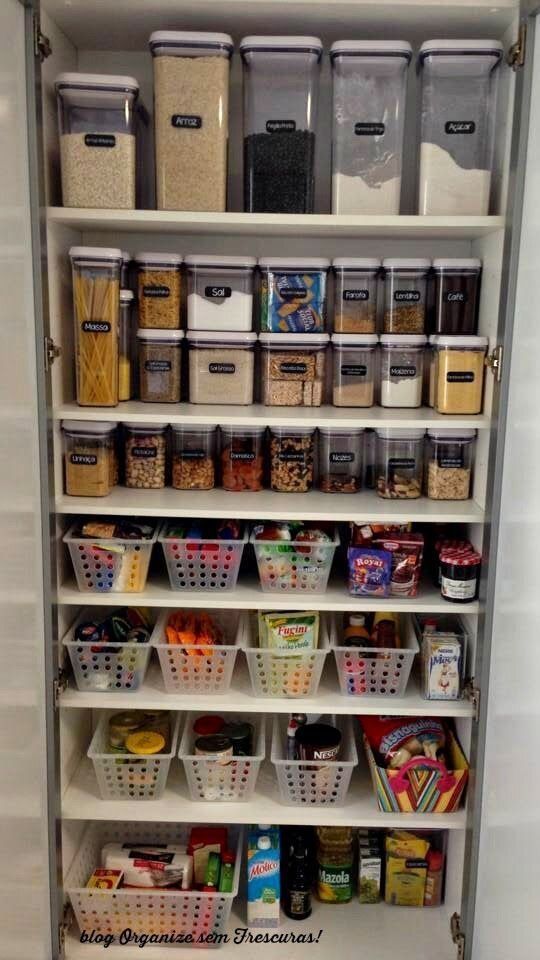 After all, pantries can get in a mess when we are looking for an item all the way at the back, or when our shelves get filled with clutter.
Enhance your available shelf space by installing pull out kitchen cabinets or installing a two-tiered Lazy Susan to allow for each access to your items. Take advantage of empty, vertical spaces by placing risers in cabinets. This will separate items that usually get bundled together.
'A successful pantry is all about optimized storage and luxury is created through a well thought out use of space. We always recommend using layered pull-out drawers that enable the use of the whole drawer depth whilst maintaining easy access to items within,' Lena Cottray, Senior Designer at Rigby&Rigby .
'This is particularly important in optimizing smaller spaces. Vertical pull-outs are also a good way of utilizing leftover spaces in a cabinetry run.
'Make sure the shelving you install is adjustable and consider the integration of an interchangeable labeling system for optimum organization,' she adds.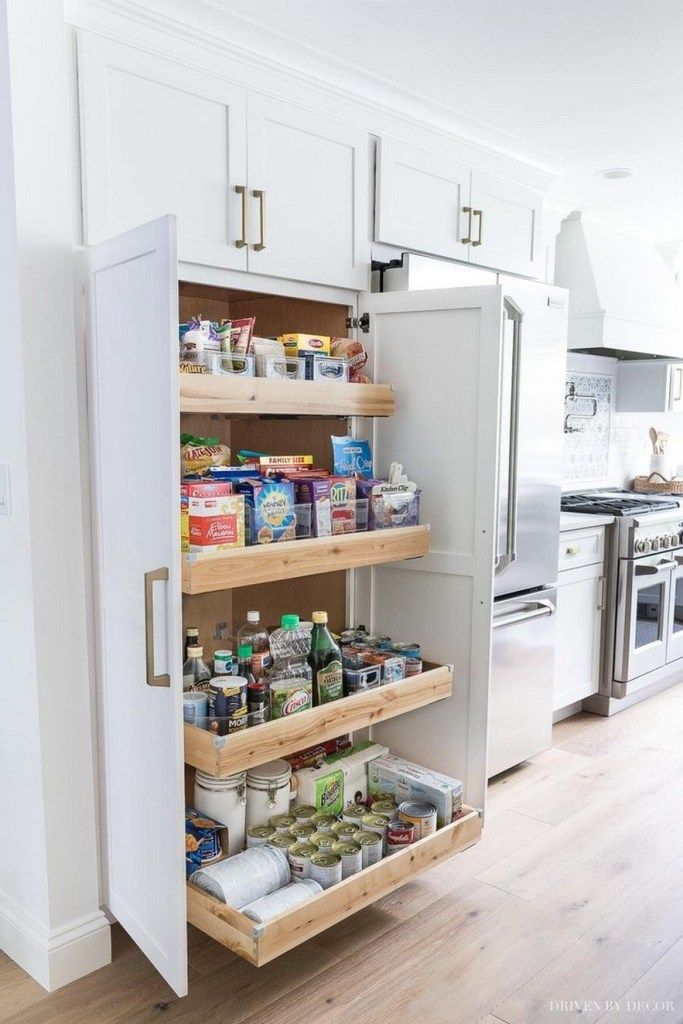
2. Ensure shelf depths are just right
(Image credit: Future/ Paul Massey)
Pantry design rule number two: pantry shelf depth. This might seem like a small detail but it is actually vital to get right if your storage is to be really useful and the items on the shelves accessible. The agreed best depth of pantry shelves is 16 inches to 20 inches deep. However, if you have a tiny pantry space, shelves the depth of just one tin – four to five inches – will still be useful. Bear in mind that shelves that are too deep will require constant restacking to ensure items don't become out of date.
The upper shelves will also benefit from being shallower, unless of course, you have space – perhaps on the back of the door – to store a foldaway step ladder to make seldom used items easier to access.
See: Pantry organization tips – our top ways to keep yours clutter-free
(Image credit: Butler Armsden)
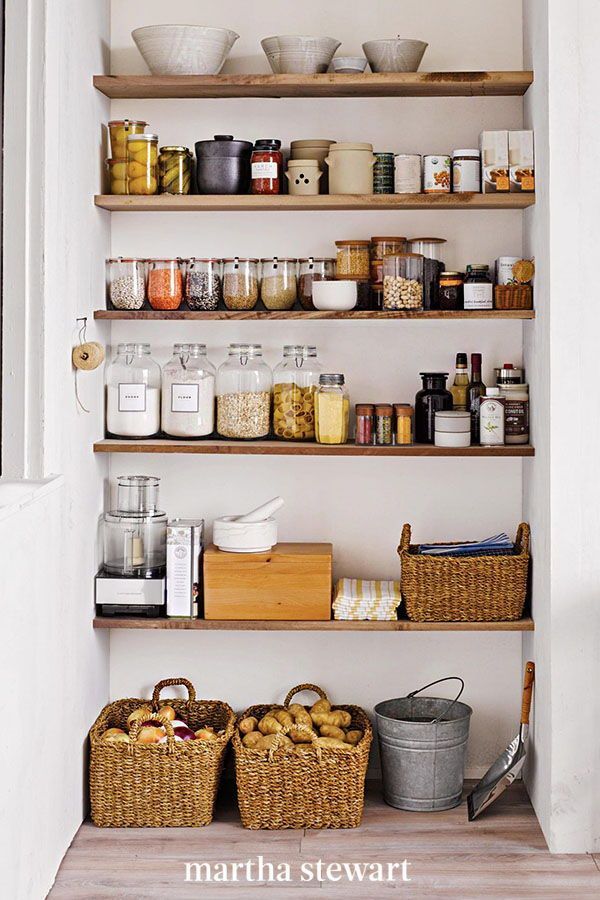
Pantry design rule number three: designate zones in the pantry at the design stage for different types of items.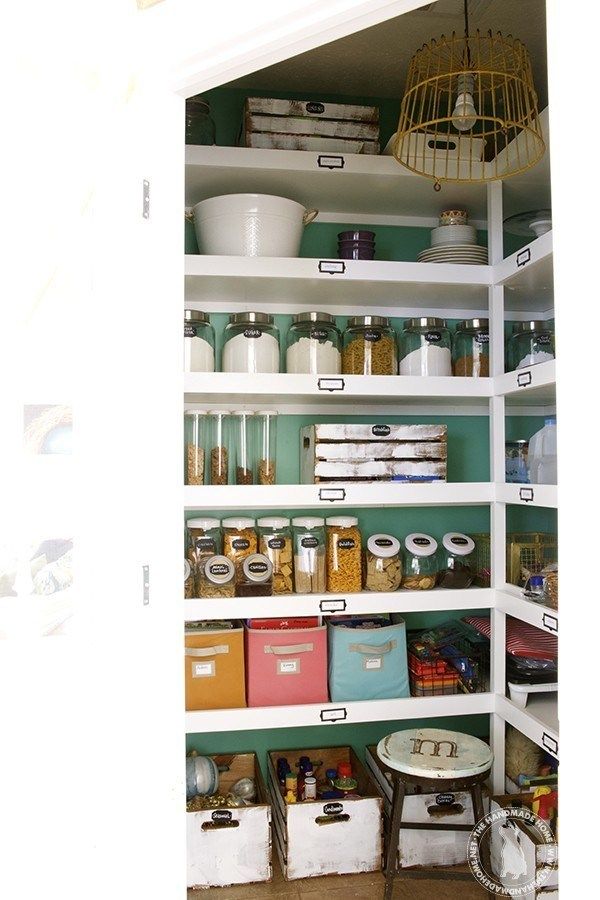
This will affect the storage and shelf depth you choose and it's a niche design detail that's really worth taking care of early on. So, you might need a deep shelf just for cereal packets, for example, or shallow, high-up shelves just for seldom-used or seasonal items, or a door-hung spice rack to free up drawer and shelf space around the walls.
Color coding these sections can make finding items quickly even easier.
'Color coordination and category coordination are the perfect way to design your pantry,' explains Ella Jade. 'Use parallel lines to stack your shelves, and organize using color, category, and also height to create the most beautifully designed pantry.'
4. Make room for counter space
(Image credit: Humphrey Munson)
Pantry design rule number four: make space for a counter – if you can.
Pantries, like laundry rooms, often serve double duty in the never-ending search for storage space. Try to install a mixture of cabinets, drawers, and counter space in your pantry, obviously, but incorporating counter space in even a small pantry will make it easier to place your shopping bags down and pack everything away into its designated spot.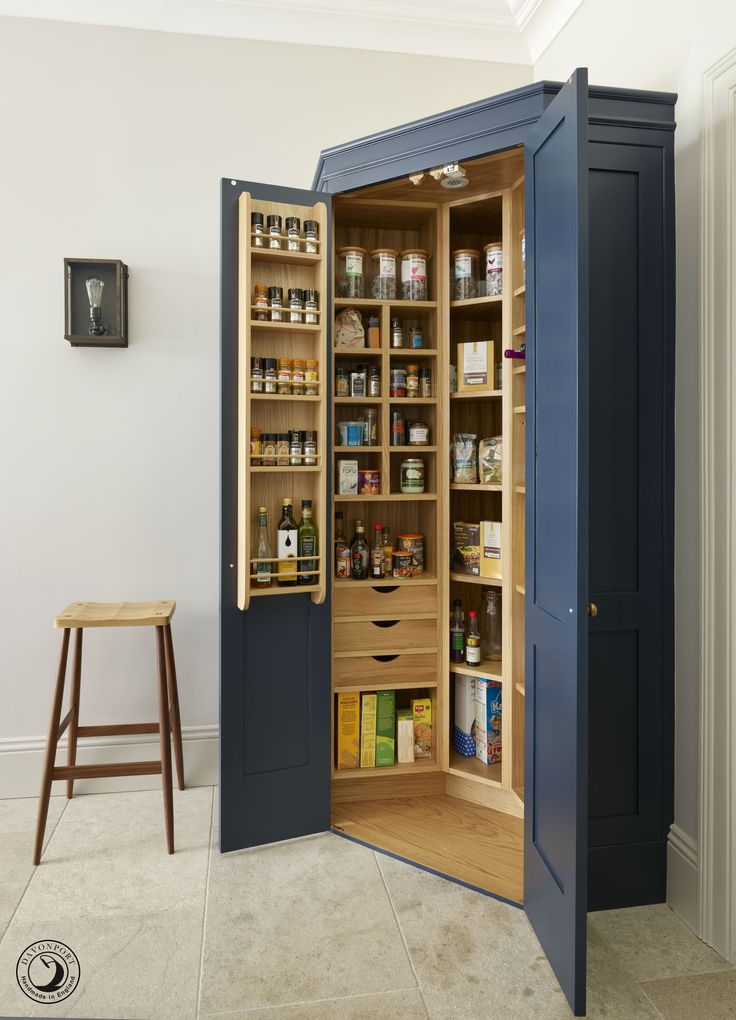
5. Use a pantry door to its full potential
(Image credit: Future)
Pantry rule number five: pantry doors should never be overlooked for useful opportunities.
If you’re unsure where to begin when designing a pantry or renovating one, start with your door. Whether you have a small or large walk-in pantry, you will want to cover up the inevitable clutter. When considering what type of pantry door to invest in, deliberate its function. Perhaps you would like to turn your doors into more storage, or for chalkboards for family members to write sweet notes or grocery lists. The only exception to the rule? When you have a small kitchen and want to install a sliding barn door to save space.
'A pantry door can serve as a visual and audible barrier for your secondary storage area, particularly if it houses your dishwasher. We have had a lot of requests from clients for glazed pantry doors in order to make space feel as though it isn’t entirely separate from the kitchen,' says Jennifer Jarvis, Senior Designer at Helen Green Design .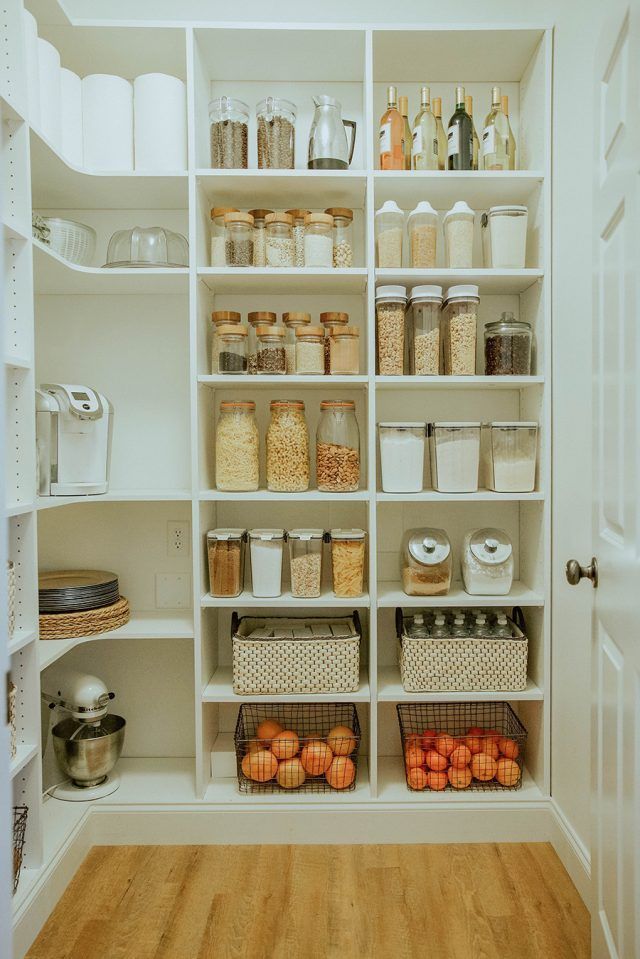
See: Under stairs pantry ideas – dream larder cupboards to sit beneath a staircase
'Steel framed doors with internal glazing are a great way to make a design statement whilst still showing off the attention to detail and design of the internal joinery of the pantry. A freestanding pantry cabinet can be great for smaller spaces. They work well as breakfast stations and you can utilize the inside of the doors as additional storage that, when opened, are easily accessible.'
As the Deputy Editor of Livingetc's print version, Busola Evans works across both the physical magazine and digital and specializes in kitchens, bathrooms and projects. She is an expert at explaining how to improve, extend and convert your home. Prior to her current role, she was Associate Editor on both Livingetc and Homes & Gardens, where she authored kitchen and bathroom articles. Busola has also written for The Guardian, The Sunday Times Magazine and Grazia, and was an interiors columnist for the London Evening Standard's ES Magazine.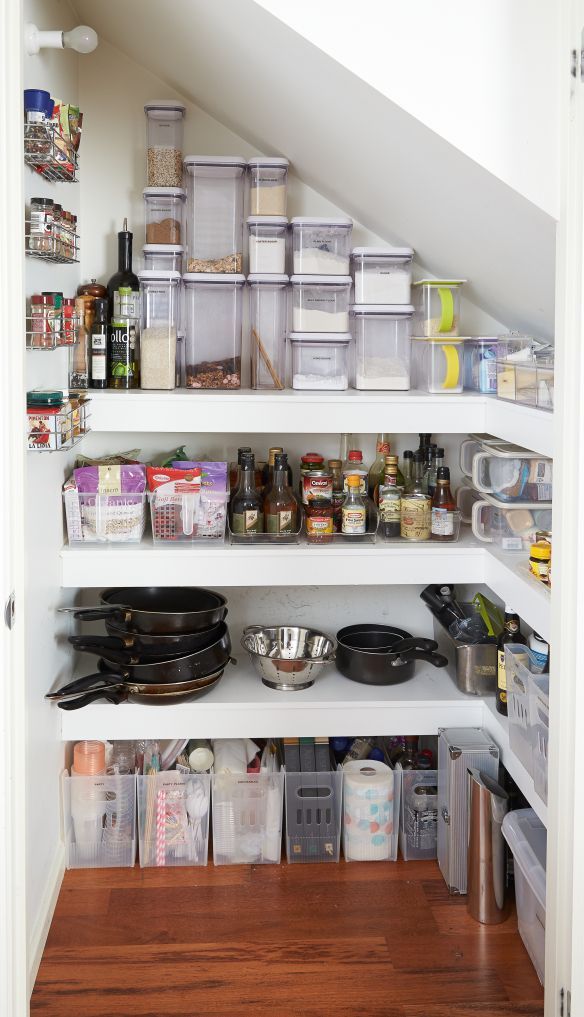
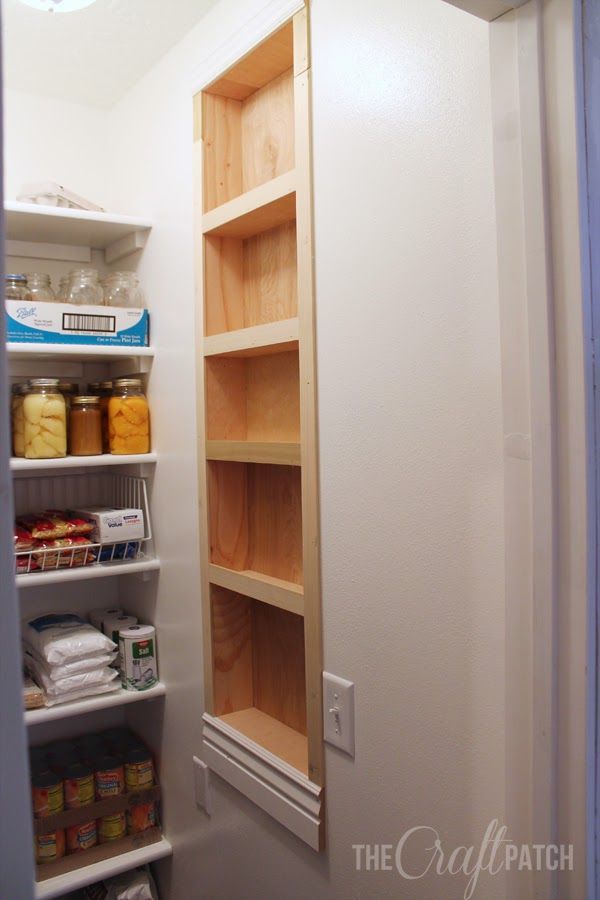
How to make shelves in the pantry with your own hands? 40+ photos and videos
Features of planning storage systems
The most important thing when arranging a pantry in an apartment or a private house is to decide what things it will be intended for and correlate the load with the dimensions of the room.
- For a small closet, several rows of shelves placed one above the other are suitable. At the bottom it is better to leave room for boxes and boxes: this way the area will be used optimally.
- The dimensions of the compartments must be made in accordance with the dimensions of the items that will be removed in the pantry.
- If the room has a high ceiling, it is worth providing a place for a stool or stepladder: it will be more convenient to get things from the upper shelves.
- Some pantries have enough free space to make deep shelves. This is not always convenient, and besides, you should leave a distance for the passage and bringing in objects.
Preparation
Before installing storage systems, the pantry needs to be repaired: clean the space, carry out dry and wet cleaning, remove old wallpaper and flooring. If necessary, the walls of the pantry or attic are leveled and also put in order: painted or pasted over.
It is recommended to use a primer containing antifungal impregnations.
Laminate, parquet or linoleum is laid on the floor. It is also worth equipping the pantry with ventilation and lighting, which will greatly facilitate the use of the room.
Which material can be used?
One of the most affordable and durable materials for creating shelves in the pantry is wood. Boards made of natural wood (pine, larch), as well as chipboard, are fixed to metal fasteners. The heavier the items that will be stored in the pantry, the thicker the boards should be. For conservation, large equipment, construction tools and other heavy things, it is worth providing an additional stiffener.
If you make shelves in the pantry with your own hands, you can use what is at hand - wooden pallets, old unnecessary furniture, plastic fruit boxes. Plywood is considered a budget option, but thin sheets are not suitable for heavy items. Lightweight but durable plastic is suitable for storing books, clothes and bulk products. It is easy to care for it, besides, the material is not afraid of moisture.
Metal racks are considered the most durable and do not require additional reinforcement. Modern products have a collapsible design, they are easy to rearrange and transport, in addition, the material easily withstands temperature changes. When buying, you should pay attention to the coating - it must be protected from corrosion with a special composition.
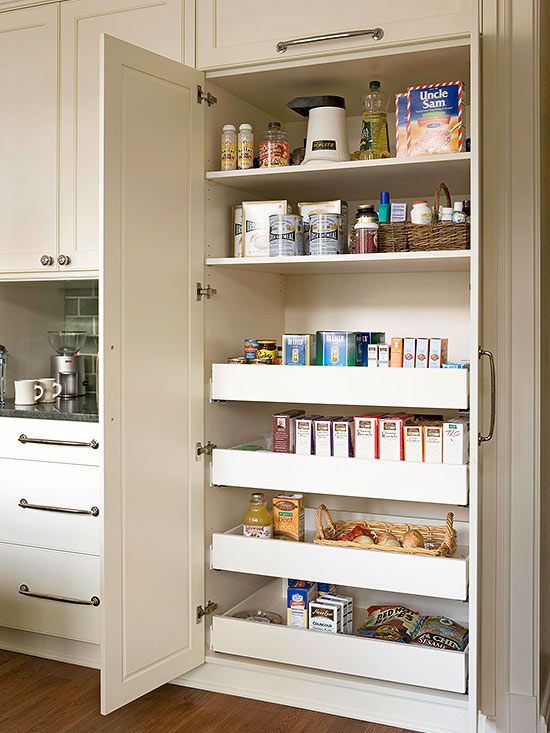
Pictured are shelving, drawers and wall shelves for a spacious pantry.
How best to arrange the shelves in the closet?
The size of the utility room primarily affects the placement of shelves.
- A small closet (about 2 meters) allows you to install shelves in only one row - linearly, along one wall. Sometimes designs are made rounded - this shape allows you to win a few centimeters and use three walls.
- The corner arrangement in the form of the letter "L" is considered much more practical, but the storage area must exceed 2 meters. For maneuvers, you need to leave a small passage, especially if the room is elongated and narrow.
- In a large utility room, it is best to place shelves in the shape of the letter "P". In this case, it is necessary to calculate the depth of the structures so that there is room for movement in the middle.
The photo shows a pantry in which the racks are functionally arranged in the shape of the letter "P".
Deciding on the dimensions
The most popular and practical form of shelves is straight. The length of the shelf is usually equal to the length of the wall.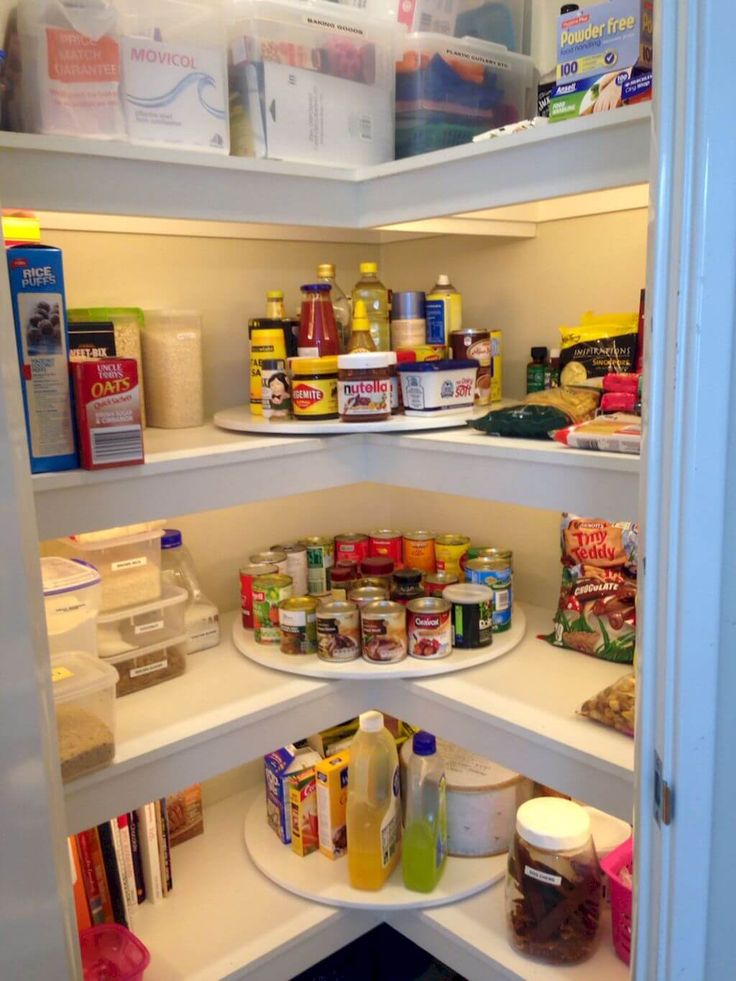 If the distance between opposite walls is 2 meters or less, then the shelf does not need additional support. Otherwise, the structure should be strengthened, especially if it is planned to store rolls and tools.
The thicker the wooden shelf, the more fasteners it requires. Also, its strength is determined by the distance between the support posts: the more massive the structure, the smaller the gaps.
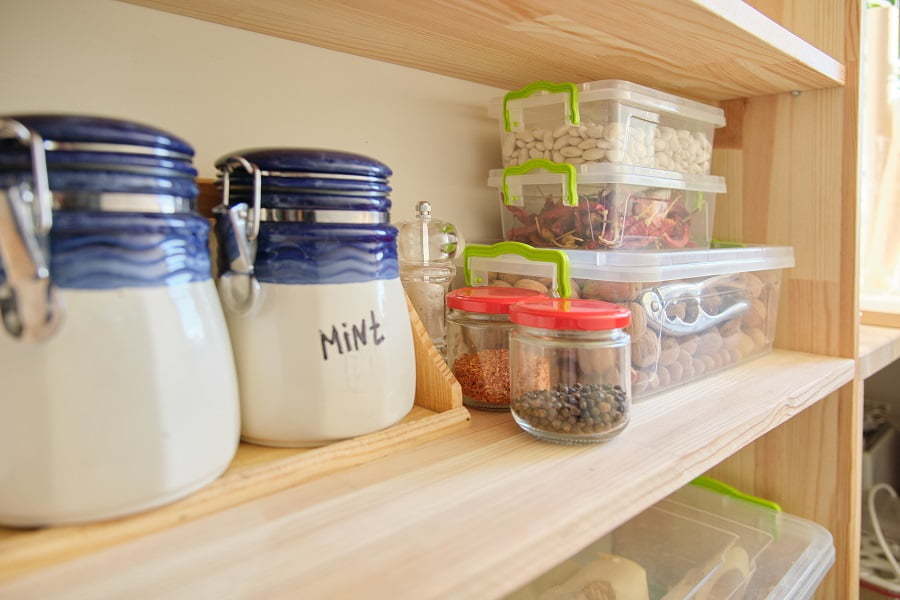
In order to use the shelves comfortably and safely, the heaviest items must be stowed down. The width of the protrusions should decrease from bottom to top. The standard shelf width for cans with preservation is 30 cm. The height depends on the dimensions of things.
Pictured is a pantry with a wide aisle between wooden shelving.
DIY Shelf Options: Step-by-Step Instructions
You can save your family budget with homemade pantry shelves and detailed tutorials below.
How to make a wooden shelving unit for a pantry?
Before starting work, it is necessary to measure the walls of the pantry and create a drawing of the desired structure.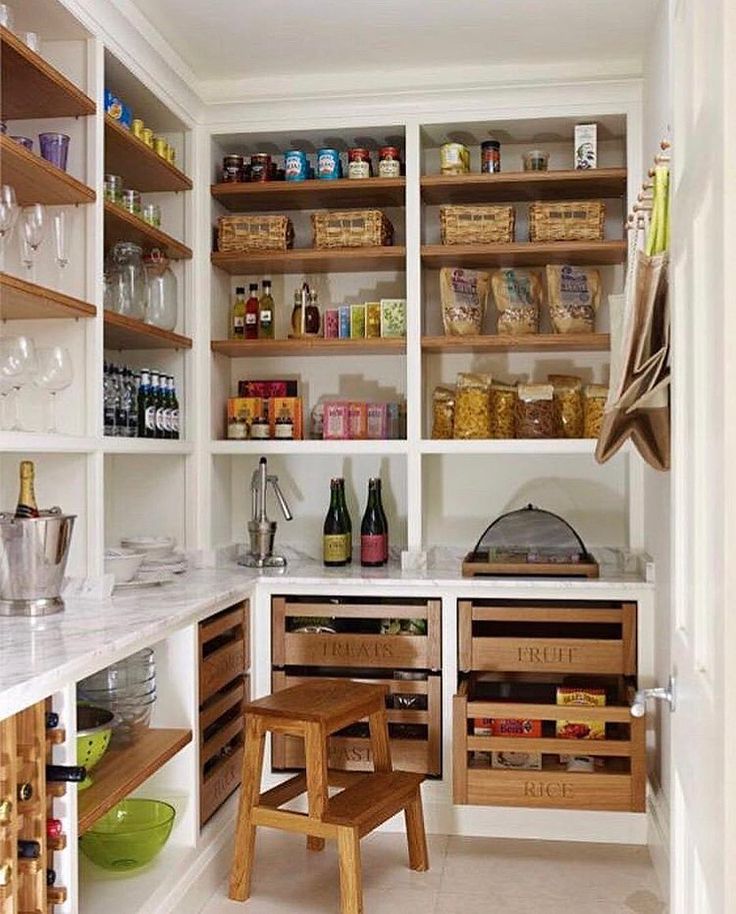 Next, prepare in advance the consumables necessary for the manufacture of functional shelves.
The photo shows a linear self-made shelving made of wood, occupying the entire wall of the closet.
Tools and materials
For work you will need:
- Planed block for a vertical post (8 pcs, about 2 m).
- Beam for horizontal supports (12 pieces, approx. 50 cm, depending on the depth of the rack).
- Boards or lining for shelves (the number depends on the depth of the shelves, the length - on the length of the wall).
- 16 metal corner fasteners (corners).
- 45 screws (3.5x25).
- About 70 thin studs.
- Wood impregnation and brush.
- Building level.
- Roulette.
- Hammer.
- Electric jigsaw.
- Screwdriver.
Step-by-step instructions
- First you need to prepare the material. Using a hacksaw or electric jigsaw, we cut the bars and lining in accordance with the dimensions of the future pantry rack.

- We apply impregnation, carefully processing every detail. You need to dry for as long as indicated in the instructions on the bank.
- We fix the corners with screws at the level where the shelves will be located:
- We fix horizontal bars as follows (4 such structures should be obtained):
- We install the lining horizontally, nail it with thin nails:
- We make the second shelf in the same way: we fasten the corners, fix the horizontal bars, attach the lining.
- We lay the upper horizontal bars, fasten them.
-
The shelves in the pantry are ready. In this way, you can make a rack of any height, depth and shape.
You can learn more about how to make shelves in the pantry from this video:
DIY wall shelves
This is the easiest and most economical way to make hanging shelves for a small closet. The amount of material for the shelves depends on the size of the room and the number of floors.
In the photo there are pantries in small apartments such as Khrushchev or Leningradka, equipped with simple shelves.
Tools and materials
To make shelves in the pantry with your own hands, you will need:
- Planed bars.
- Plywood, chipboard, boards or remnants of old furniture.
- Self-tapping screws for fastening.
- Screwdriver.
- Thin nails.
- Hammer.
- Level.
- Jigsaw or hacksaw.
Step-by-step instructions
- Sawing timber and plywood according to the size of the pantry. If desired, they can be painted or varnished. For the frame of one shelf, you will need 1 long and 2 short bars, for the base - a plywood sheet or boards of the required size and thickness. We make markings on the walls and securely fasten the bars.
- Making markings for the next shelf.

- We mount the shelf in the pantry.
- We fix it with nails.
And this video shows how to install a wall shelf in the pantry in two ways: on the brackets for chipboard and on the standard brackets.
Shelves in the pantry from the profile
Solid U-shaped shelving for a spacious pantry is obtained from metal profiles. Having understood the principle of operation, you can make shelves of any configuration, replace plywood with wood, cover the metal profile with paint and create a loft-style rack.
The photo shows two types of shelves for the pantry, made by hand from metal profiles and wood.
Tools and materials
- Guide profiles 50x40.
- Guide profiles 50x50.
- Plywood or wooden boards.
- Roulette.
- Building level.
- Metal shears.
- Electric jigsaw.
- Screwdriver.
- Dowel-nails.
- Self-tapping screws.
- Ladder.
Step-by-step instructions
- We make a drawing and calculate the amount of materials. We cut the profile into components in accordance with the dimensions.
- Marking out horizontal lines. We fasten guide profiles 50x40 to the walls using dowel-nails.
- We make the frame of the first shelf, put it on temporary supports from the profile.
- We cut a sheet of plywood with an electric jigsaw:
- We fix the finished parts with self-tapping screws.
- We replace temporary racks with rails. Shelves on the walls in the pantry are ready.
This video clearly shows how to make shelves in the pantry from the profile:
Photo gallery
You can see other options for shelves in the pantry in the photo selection below.
Recommendations for shelf length/width and load capacity
You can quickly design any shelf width in our online designer on the main page of the site https://privetmaket.ru and immediately find out its cost.
Before reading the article, try how easy it is to design in our constructor!
Often our clients design very long shelves in project designs and we have to adjust the finished designs. Therefore, we decided to collect all the useful information on this topic in this article. We also recommend that you read other frequently asked questions about furniture design
What happens if the shelf is too long?
Probably nothing to worry about. It all depends on the load. Even if you decide that you simply will not load the shelf heavily, you may not keep track of the load, forget or do not take into account how the shelf is affected by other structural elements of the cabinet.
 Over time, such a shelf will begin to sag, and at one fine moment it may crack and break. In any case, there will be no explosion)
 So, in order for your shelves not to sag under the influence of time and objects (books, dishes, flower pots), you need to take into account the recommendations of the dependence of the shelf length on its material, depth and other parameters.
Chipboard (chipboard) shelves
The main material in our constructor is chipboard. The advantages of this material are the price, a wide range of colors and applicability. Chipboard cabinets are also suitable for the office, living room, country house, etc. More about chipboard
Based on our experience and the experience of other furniture factories, we have obtained the optimal length for different material thicknesses for a construction depth of 300-400 mm:
- chipboard 16mm to 600mm;
- Chipboard 18mm up to 800mm;
- Chipboard 22mm up to 1000mm.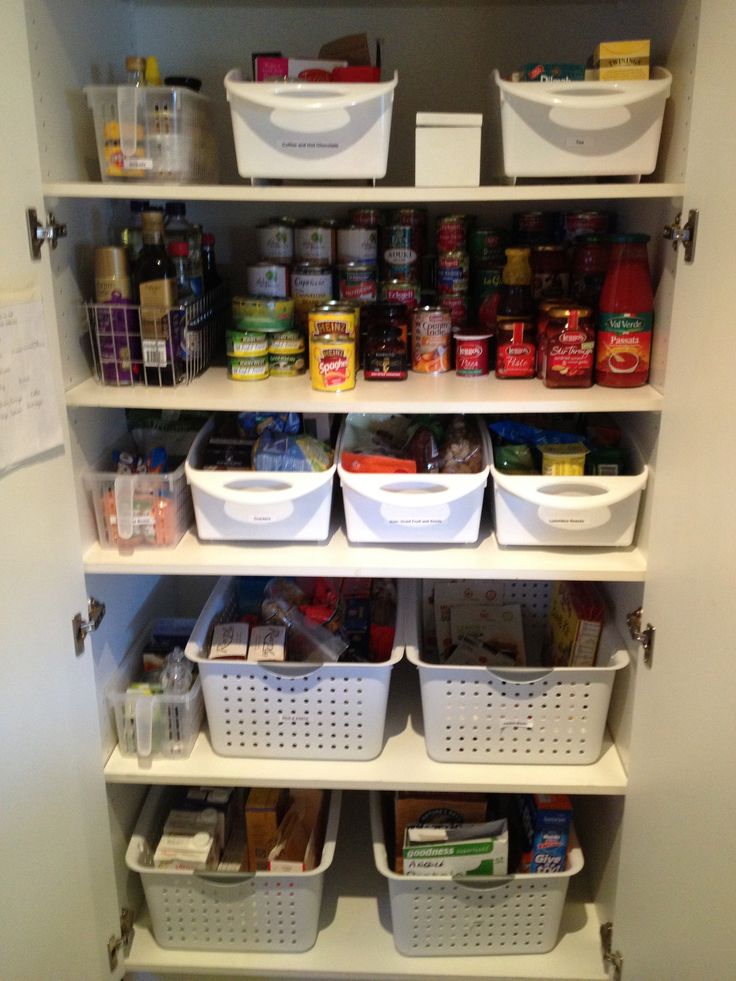
Each such shelf will be able to support up to 40 kg of distributed weight and at the same time will not look "tired" over the years. You can roughly estimate the mass of items on the shelf based on some approximate guidelines. So, for example, a medium-sized book weighs 500g, and a large book is about 1kg.
Our recommendation:
1. Make shelves no wider than 60 cm. If you want to make very long shelves, it is better to divide into narrower segments. First of all, this applies to the most popular chipboard material with a thickness of 16mm. For other materials, this value is slightly higher, but we still do not recommend overdoing it.
2. With a shelf length of 60 or more, think about a back wall that will take some of the load and protect the shelves from sagging.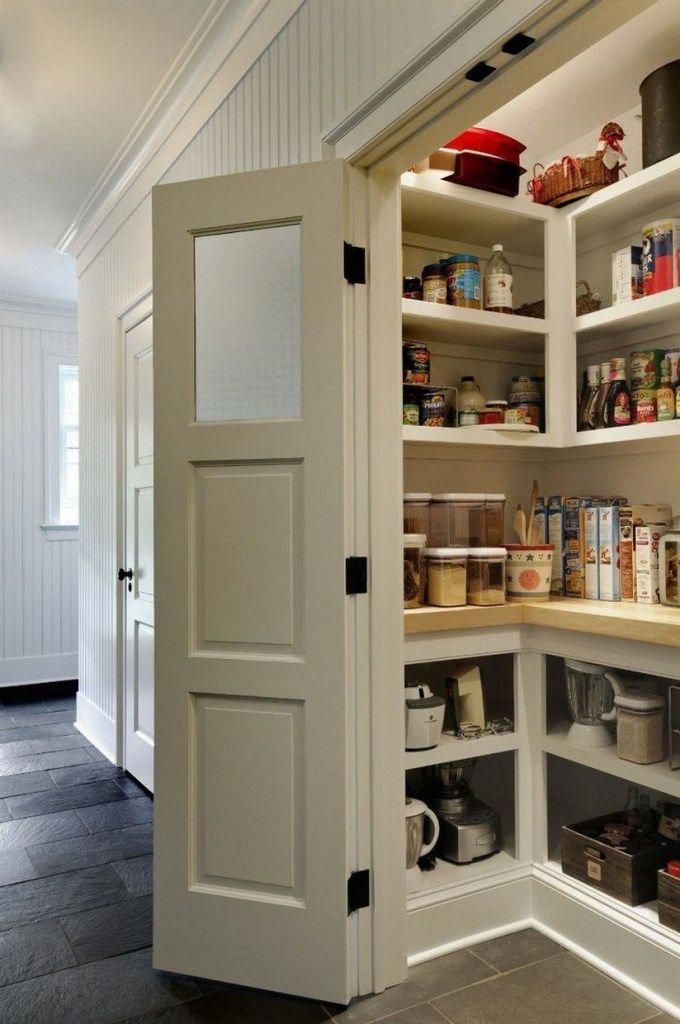 Use a cabinet with a back wall made of cabinet material or HDF - this will significantly add rigidity to the structure. We recommend following this recommendation, even if the shelves are not so long!
3. If you still need to make a long shelf, then you can provide a reinforcing bar under it or additional fastening to the wall. This can be advised to you by our manager at the stage of order approval.
4. In any case, it is important to distribute the load evenly over the entire shelf: if the weight is at one point, stability is violated. The heaviest objects should be placed at the edges of the shelf.
5. The longer the shelf, the less you can load it. Using the example of chipboard 16 mm, we can say that if you decide to make a shelf from 600 to 800 mm, then you can put up to 30 kg on it, a shelf from 800 to 1000 mm can be loaded up to 20 kg, over 1000 mm up to 10 kg. Moreover, shelves of this length can bend over time even under their own weight.
Our recommendations do not mean, of course, that we must strictly use our parameters and that we have no freedom to make our own decisions. By the way, we recommend our article How to make a wardrobe yourself
For what other parameters to choose a wardrobe, see Rules for choosing a wardrobe
Glass shelves
Also consider the option of glass shelves. The material is fragile, which means that you need to treat its load carefully. A positive point in using glass shelves is moisture resistance. Such shelves are widely used in rooms with high humidity. For example, in the bathroom or in the kitchen.
With a depth of 250-300 mm, the maximum weight distribution is the following shelf lengths:
- Glass 6 mm to 305 mm;
- Glass 10 mm up to 610 mm;
- Glass 12 mm to 914 mm.
Under no circumstances should objects be thrown onto glass shelves, the consequences may be small fragments that will be very difficult to see later.
In the image below, you can see the optimum load per shelf depending on its length and thickness:
What about the tables?
Tables are usually substantially larger than non-flexible shelves, but are often made from the same materials. If you want to make a reliable, stable table, then you need to choose a reliable frame, which differs from simple legs by the presence of rigid connections between the supports. You can find examples of such tables in our catalog
Do not forget that the stability of the shelves is not the only parameter for the stability of the cabinet. An important point is to secure the cabinet in order to protect it from folding or tipping over. Read more in our note How and why to fix the cabinet
Where to order a cabinet according to the dimensions you need?
You can specify the dimensions you need in our simple constructor and immediately find out the cost without communicating with managers.