Force bulbs indoors
How to Force Garden Bulbs Indoors
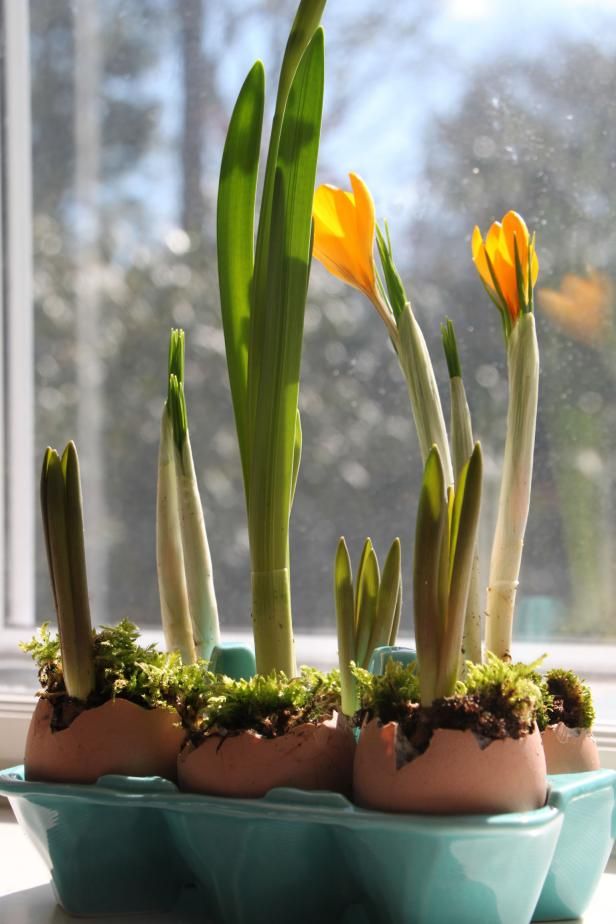
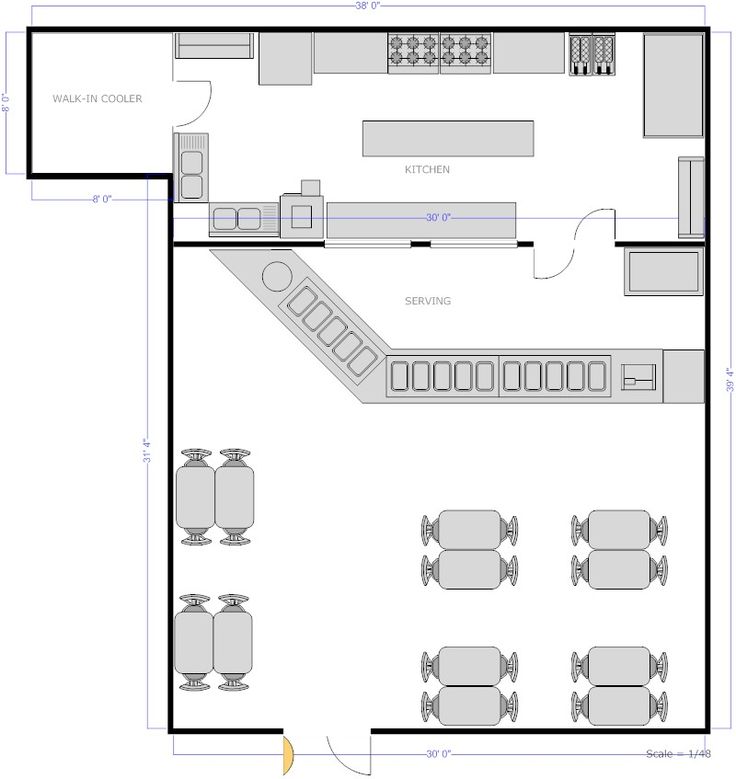
Select one of three ways to force your bulbs: Grow them over water in forcing jars, or grow in potting soil or in gravel. The container dictates the planting method. Hyacinth forcing jars, found at nursery supply stores and online, are hourglass-shaped containers that allow you to grow various bulb types. Fill the bottom part of the vase with water for the roots, and then set the bulb on top; the shape of the container prevents the bulb from falling into the water. When growing bulbs in a pot, choose a container that is twice as deep as the size of the bulb. This means using a much smaller container for crocus than amaryllis. Make sure the container has ample drainage holes.
Do you enjoy the uplifting show of spring bulbs every year? If so, get a jump on the season and "force" bulbs to light up your indoor garden this fall and winter. Forcing refers to tricking bulbs to bloom out of season indoors by providing them with favorable conditions for growing. Plant bulbs, such as paper white narcissus and amaryllis, indoors now, and you can impress your friends and family with stunning, often fragrant indoor blooms in the months ahead. If you time things right, you can even enjoy these living masterpieces during the holidays.
September and early October, when bulbs are plentiful at the nursery and via mail order, is the perfect time to select them for forcing. Follow these tips to create an indoor flower paradise this autumn and winter.
Select Bulbs Carefully
Not all bulbs bloom well indoors. Knowing the best types for forcing, and how long they take to bloom after planting, will help ensure you have a successful growing experience. Here are good indoor bulb choices, including bloom times:
Bulb Type |
Required Chilling Time (in weeks) |
Time until first bloom (in weeks) |
|---|---|---|
|
Amaryllis (Hippeastrum spp. |
None |
5-8 |
|
Bulbous iris (Iris reticulata) |
15 |
2-3 |
|
Checkered lily (Fritillaria meleagris) |
13-15 |
3-4 |
|
Daffodil (Narcissus spp.) |
12-15 |
2-3 |
|
Dutch crocus |
8-14 |
2-3 |
|
Dutch hyacinth (Hyacinthus orientalis) |
10-13 |
2-3 |
|
Grape hyacinth (Muscari armeniacum) |
8-15 |
2-3 |
|
Paper white narcissus (Narcissus tazetta) |
None |
5-6 |
|
Siberian squill (Scilla siberica) |
15 |
2-3 |
|
Snowdrop (Galanthus nivalis) |
15 |
2-3 |
|
Tulip |
10-16 |
2-3 |
 )
)Large bulbs create big blooms. So, select the largest bulbs you can find and examine each for quality prior to buying. Choose bulbs that are firm; those with soft areas are likely to rot.
If you are unable to plant bulbs immediately after buying them, store them properly until planting time. Place amaryllis and paper white bulbs in a mesh or paper bag, and then store in a cool, dry, dark location. All other bulbs should be placed in a paper bag and put in the refrigerator. Avoid storing fruit (particularly apples) in the refrigerator at the same time, as ripening fruit releases ethylene gas that can cause bulbs to deteriorate or not flower.1
Choose A Planting Method
Plant Bulbs
Place water-forced bulbs tip-end up, positioned with the bottom of the bulb 1/8 to 1/4 of an inch above the surface of the water. Roots will reach into the water.2 Hyacinth, amaryllis and narcissus respond well to this method of forcing.
For other bulb types, it is best to force using gravel or potting soil.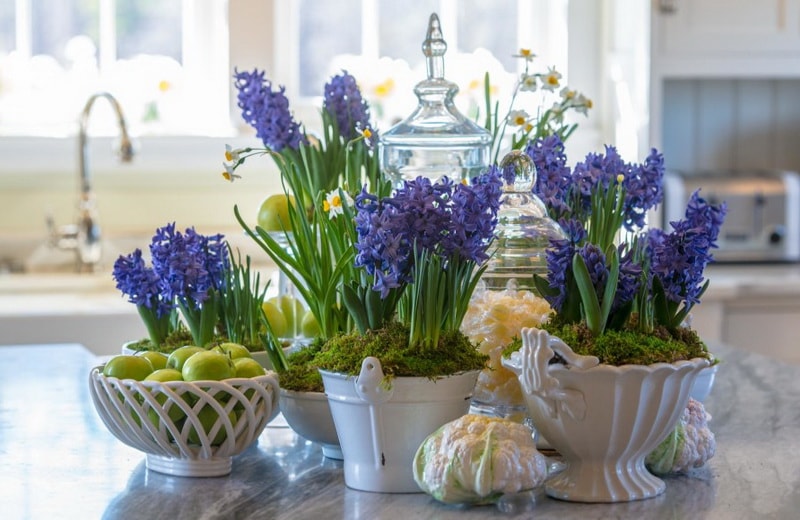 Plant bulbs about an inch apart, tip-end up, leaving 1/2 to 2/3 of the bulb exposed. If you cover the entire bulb, it may rot. After planting, water until the soil or planting medium is moist but not soggy.
Chill To Initiate Blooming
Except for amaryllis and paper white narcissus, bulbs require a period of chilling after planting in order to initiate blooming. Place the planted bulbs in a location with temperatures of 35 to 55 degrees Fahrenheit.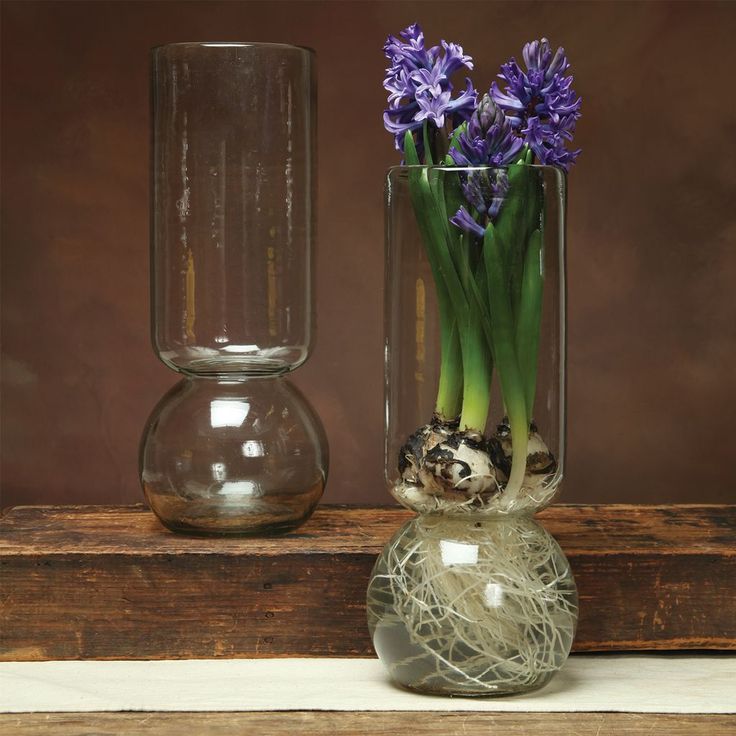 Good locations include a root cellar, unheated garage, attic, shed or, if space allows, a refrigerator.3 If temperatures are cold enough, you can also chill the bulbs outdoors. Just make sure the soil or planting medium doesn't become overly moist.
Plant roots form and stems lengthen during this cooling period, which generally ranges from 10 to 15 weeks. If the bulbs were chilled by the bulb company prior to selling (refer to the packaging), the cooling period will be shorter. Consult the chart above for chilling time periods. Subtract any pre-chilling time, including any time spent in a refrigerator prior to planting.
During the chilling period, check on the bulbs periodically, and water when the top inch of soil or gravel becomes dry or when the water level in the jar is more than 1/2 an inch below the bottom of the bulb.
Transition Bulbs To Blooming
Remove bulbs from their cooling locations when they show a thick mass of roots in the forcing jar, or when they have 2 to 4 inches of stem growth and are well rooted in the soil. Move them to a dim, warmer (about 65 degrees Fahrenheit) inside location to initiate further growth and greening. After a week, move the bulbs to a brighter area. In two to four weeks, buds should form; soon after, the plant will flower.3
Forcing Without Chilling
Paper white narcissus and amaryllis are the easiest bulbs to force because they require no chilling. They bloom quickly inside and are great for succession planting — planting at intervals so you can enjoy indoor blooms throughout the fall and winter months. Time things just right and you will see these plants flower for Thanksgiving, Christmas, New Years and Valentine's Day.
Maintenance
To prolong blooms once they appear, keep plants out of direct sunlight and away from drafts and heating vents. For potted bulbs, continue to maintain a moist but not soggy soil environment; for water-grown bulbs, replace water to just below the bottom of the bulb every three days.
To prolong blooms once they appear, keep plants out of direct sunlight and away from drafts and heating vents.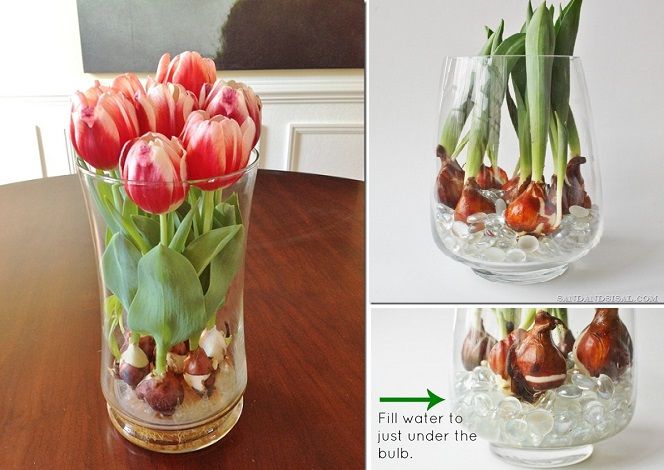 For potted bulbs, continue to maintain a moist but not soggy soil environment; for water-grown bulbs, replace water to just below the bottom of the bulb every three days.
Generally, no fertilizing is required with forced bulbs, because once the bulbs are finished blooming, they aren't likely to re-bloom the following year. It is sometimes possible to get bulbs to rebloom, however. This is easiest with those bulbs that don't require chiling, such as paperwhite narcissus and amaryllis.
If you wish to try your luck at saving the bulbs for next season, fertilize the plant after it finishes blooming and while the foliage is still green. Mix If you wish to try your luck at saving the bulbs for next season, fertilize the plant after it finishes blooming and while the foliage is still green. Mix Pennington UltraGreen All Purpose Plant Food 10-10-10 into the soil as directed. . Continue watering the plant until the foliage dies back. Once the foliage has browned, let the soil dry out, and then remove the bulb and store it in a cool, dry place until next fall when you can start the forcing process once again. into the soil as directed, and then apply a 1/4-inch layer of earthworm castings to the surface of the soil. Continue watering the plant until the foliage dies back. Once the foliage has browned, let the soil dry out, and then remove the bulb and store it in a cool, dry place until next fall when you can start the forcing process once again.
Conclusion
Forcing bulbs indoors in fall and winter is quite easy when you follow a few simple steps. By choosing healthy bulbs, chilling them when necessary, and taking proper care of the resulting plants, you'll enjoy an early spring in your indoor garden.
Lilly Miller is a registered trademark of Central Garden & Pet Company. Pennington is a registered trademark of Pennington Seed, Inc.
Resources:
1. Ann Joy and Brian Hudelson, "Forcing Bulbs," Master Gardener, University of Wisconsin—Extension, March 9, 2012.
2. B. Rosie Lerner, "Forcing Bulbs for Indoor Bloom," Purdue University Cooperative Extension Service, July 2005.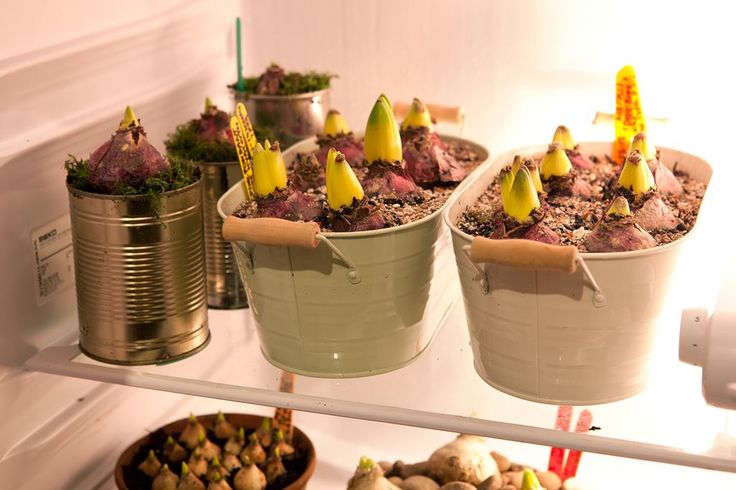
3. George Graine, "Fooling Mother Nature: Forcing Flower Bulbs for Indoor Bloom," Virginia Cooperative Extension, 2014.
How to Force Bulbs - Guide to Forcing Bulbs Indoors
Home Projects
How To
by Molly Williams
updated Jan 9, 2020
SavePin ItSee More Images
It’s finally happened: The thrills of the holidays are over and we have descended into the dark months of winter. You wake up and look out the window only to be greeted by snow or the dead-looking dormancy of January. These are the months when houseplants are especially welcome, helping to minimize the gray, gloomy view out your window. Need to up your game? Forcing bulbs indoors—including the holiday favorite paperwhites—is one of the best ways to bring colorful and cheerful winter blooms into your home.
For more content like this follow
What does it mean to force bulbs?
“Forcing” is the simple process of making a plant flower in an artificially created environment.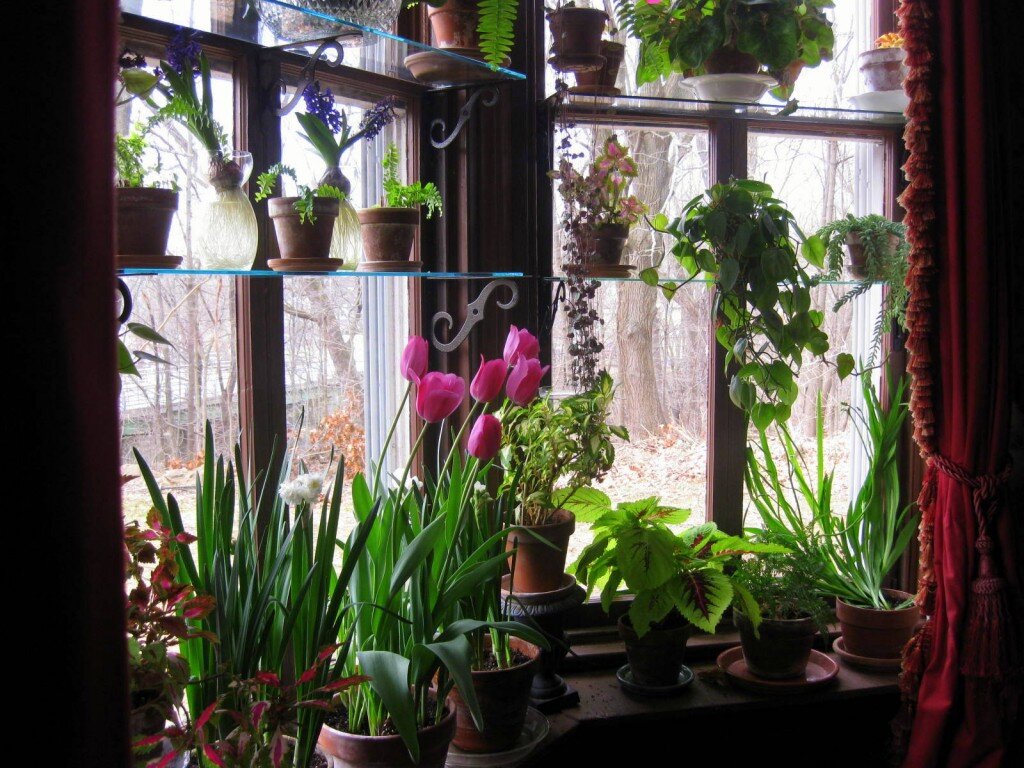 Outdoor growth bulbs are planted in the fall in order to winter over for spring blooms; you can bypass months of waiting by urging bulbs to bloom indoors within a matter of weeks. It is a fairly easy process that will have you thinking that you’ve played a fun trick on Mother Nature herself.
See More Images
What types of bulbs can you force?
There are many different types of bulbs that you can force, depending on your personal preferences. Some blooms will have a strong scent, while others will barely have one at all. It’s best to do your research beforehand if you have a sensitivity to some smells. For example, paperwhites have a very strong scent that is off putting to many people.
Commonly forced bulbs include crocus, paperwhites, amaryllis, daffodils, hyacinth, grape hyacinth, iris, and snowdrops.
SavePin ItSee More Images
Where to source your bulbs
Honestly, this is one of the hardest parts of forcing bulbs.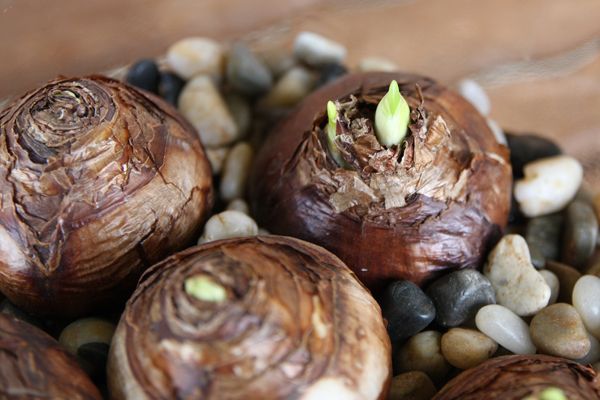 If you order online from an unreliable source, you could end up with product that hasn’t been transported or packed properly and therefore temperature-damaged. If you do decide to source your bulbs online, be sure to research multiple outlets and read reviews. Also keep an eye out for “pre-chilled” bulbs; they’ll save you even more time, as you won’t have to wait as long for blooms.
Another great option for sourcing bulbs is to stick to local plant nurseries. Most garden shops will have a wide selection of pre-chilled bulbs that are ready to force. You’ll even be able to find pre-planted bulbs that are already growing in beautiful arrangements, just waiting for you to take them home.
How to chill your bulbs
Most common bulbs that are used for forcing need a cool period—which mimics winter—in order to get ready to grow. While they’re chilling, the inside of the bulb is a flutter of growth. If you’re growing Amaryllis or Paperwhite bulbs you won’t have to worry about chilling them, as they’re naturally tropical plants and do not need a cold snap.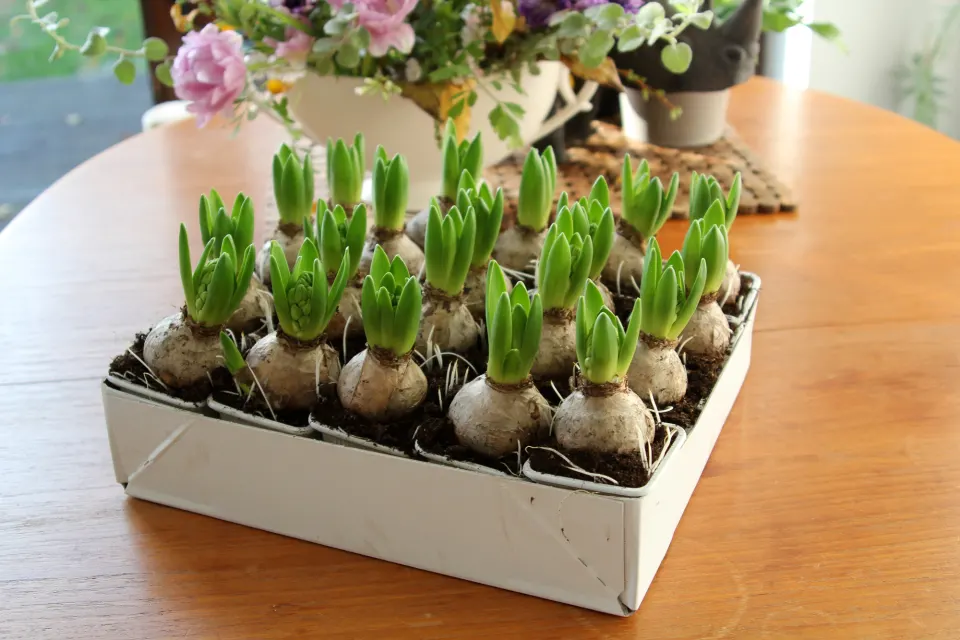 You can plant those and see blooms in 3-8 weeks (Amaryllis will take the most time to bloom). Most other bulbs you will need to source pre-chilled or chill them yourself.
You can chill the bulbs in the vegetable drawer of your refrigerator or an unheated part of your home (like the basement or garage). Keep them away from moisture unless you’re planting them in soil, which we will cover later.
The chill time is something like this:
Tulips: 10-15 weeks; blooms 2-3 weeks after planting
Snowdrops: 15 weeks; blooms 2 weeks after planting
Iris: 13-15 weeks; blooms 2-3 week after planting
Crocus: 8-15 weeks; blooms 2-3 weeks after planting
Hyacinth: 12-15 weeks; blooms 2-3 weeks after planting
Grape Hyacinth: 8-14 weeks; blooms 2-3 weeks after planting
Daffodils: 2-3 weeks; blooms 2-3 weeks after planting
Chill now for May blooms—or buy pre-chilled bulbs to get flowers even sooner. Then, this fall, follow our guide:
For January blooms, chill in September. For February blooms, chill in October. For March blooms, chill in November. For April blooms, chill in December.
SavePin ItSee More Images
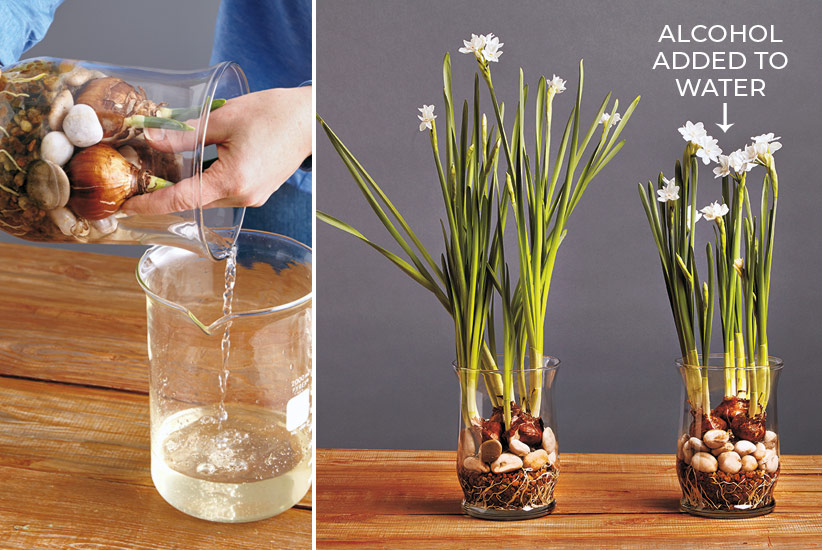
Forcing bulbs in water
If you’re looking for a mess-free way to force bulbs, this method is for you. All you’ll need is a pre-chilled bulbs, pebbles, and a vessel.
1. Pick your container. You can use a vase or favorite vintage vessel. Many people favor forcing vases because all you need to do is fill the bottom with water and then settled the bulb with in the vase. These take the guesswork out of the process and you’ll be able to clearly see if your bulb is sitting in the water (something that can cause the bulb to rot). If you choose to use a forcing vase, skip to number four in our directions. If you’re using a regular vase or vessel, read on to number two.
2. Layer a few inches of pebbles in the bottom of your vessel.
3. Nestle your pre-chilled bulb tip-up among the pebbles. Press them down gently so that the bulb is secure.
4. Pour water into the container until the water level is just under the bottom of the bulbs. Whatever you do, don’t let your bulbs sit in water. They will rot before they even get a chance to bloom. The idea is that the roots will grow down into the water.
5. Place your vessel away from direct sunlight. Leave it there until the bulbs begin to root. If you’re using an opaque container, gently pull on the bulb to see if it gives any resistance. At this point you should be at the two to three week mark. Bulbs like tulips and amaryllis will take a little longer. During this time add water when the level is at less than one inch in the vessel.
6. Once your bulbs have rooted you can move the vessel to a bright, sunny spot in your home. Still keep an eye on the water level and they will be taking in more water at this time. Once you begin to see the stem shoot up, it won’t be long (a week or two) until the bulb blooms.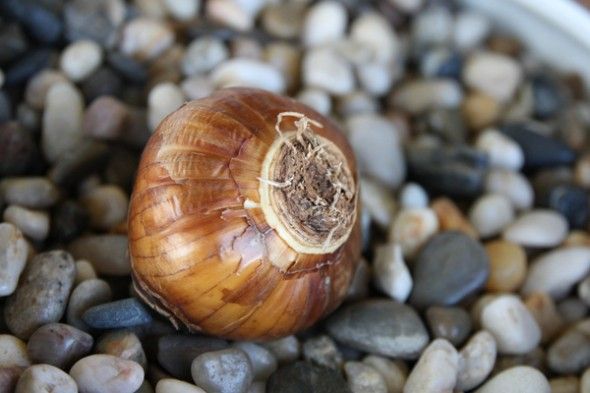
See More Images
Forcing bulbs in soil
Forcing in soil is a little more involved that forcing bulbs in just water. You’ll need a container, bulbs, potting mix and access to a place to chill the bulbs (unless you’re using pre-chilled bulbs or are planting amaryllis or paperwhites).
1. Choose a container for your bulbs.
2. Fill the container with damp potting mix until it is ½ or ¾ full, depending on your preference.
3. Place the bulbs pointy-end up on the surface of the soil. Group the bulbs close together so they are more cloistered.
4. Cover the bulbs until only the points are sticking out of the surface of the soil.
5. If you aren’t chilling your bulbs, skip this step. If you are: Place your bulbs in a cool, dark place such as a basement, unheated porch, or garage. Chill them for the required about of time. Keep the soil lightly damp during this time.
6. After the required amount of chilling time, move your bulbs into your home, out of direct sunlight. If you’ve just planted pre-chilled bulbs or bulbs that don’t require a chilling period, move them to a place that is out of the direct sunlight. Leave them there until the bulbs begin to take root. You can check by gently tugging on each bulb to see if it gives resistance. This should take two to three weeks to get to this point after chilling. Only water when the potting mix is dry to the touch. Overwatering will encourage rot.
7. Once your bulbs have rooted, move the container to a sunny spot in your home. Water when the soil becomes dry to the touch. Once the stems begin to emerge from the soil, you should see blooms in two to three weeks.
SavePin ItSee More Images
How to prolong the life of your blooms
Each type of bulb has a different bloom time, which is also dependent on the type of care they receive. You can stretch your bloom life up to roughly 20 days if you give it a solid effort. After your bulbs have begun to flower, move the container out of the direct sun to a cooler place in your home.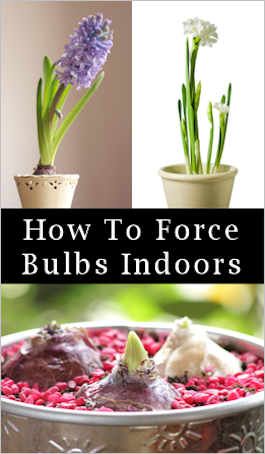 Direct sun is very hot and will cause the blooms to decay at a more rapid pace.
Don’t leave your blooms near any type of heating element, including radiators, fireplaces, space heaters or air vents. It’s also a good rule of thumb to keep bulbs away from extreme temperature change, so avoid placing them near doors that open to the outside.
Don’t be afraid to trim off dying blooms. Dead blooms pressing against newer ones will decrease the bloom time.
Only water your bulbs when the soil is dry to the touch. Overwatering will promote bulb rot, which is something you cannot see as its happening.
You might find that some of your bulbs have bloomed while others haven’t even grown. If this happens, something probably happened before the bulbs even came to you. They were either harvested or stored incorrectly, or they have some kind of rot.
Saving your bulbs
This really varies from person to person. Some people like the process of saving their bulbs and putting them into dormancy in order to start the process all over again the following year. However, it’s worth noting that this is a complicated process, and bulbs might not perform as well the second time around. They’re also a low-cost investment, so for the time, we’d recommend composting spent bulbs and buying fresh ones for your next growing season. Happy planting!
Characteristics of the color of lighting lamps as a light source.
|
|
|
|
Lighting products occupy the largest group of electrical appliances in every room. Lamps are the most important element of everyday life and in human working conditions. For general lighting in residential and non-residential premises, it is not recommended to combine different types of lamps, as this is very harmful to vision. Do not use fluorescent and incandescent lamps at the same time.
The lighting characteristics of light sources refer to the color temperature or color temperature. This is a conditional value that describes the color emitted by the lamp itself, in comparison with the color of a completely "black body", which is a constant value. This characteristic is measured in degrees Kelvin (abbreviated K). For incandescent lamps, this indicator is close to the temperature of the incandescent body. Human vision perceives the light of lamps with different color temperatures in different ways, the higher the color temperature, the colder the emitted light is perceived.
for standard incandescent lamps from 40 to 100 watts, color temperature is 2700 - 2900K,
for halogen lamps incandescent color temperature is 3100K - 2900K.
for fluorescent lamps warm white at color temperature 2700 - 3300K, neutral white at 3500 - 4500K and cool white (daylight) at 5000 - 6500K.
Gradually heated ideal emitter (black body) emits light of different colors depending on the temperature. The color temperature of the lamp is the temperature to which it is necessary to heat the black body so that the tone of the light emitted by it is approximately the same spectral composition and color as the light of a given source.
| In lamp label | Color temperature | Name of color | |||
| 827 | 2 700 K | Warm light | |||
| 830, 930, WDL, ww | Warm white white white light | Warm white white. | 3 500 K | White light | |
| 640, 840, 940, NDL, NW | 4 000 K | Cold white light (neutral) | 5 000 K | Day Light | |
| 765, 865, 965, CD | 6 500 K | Cold daylight |
What bulbs are chosen? Depends on the plinth!
Base - an element necessary for fixing the lamp in the socket and supplying electric current to it.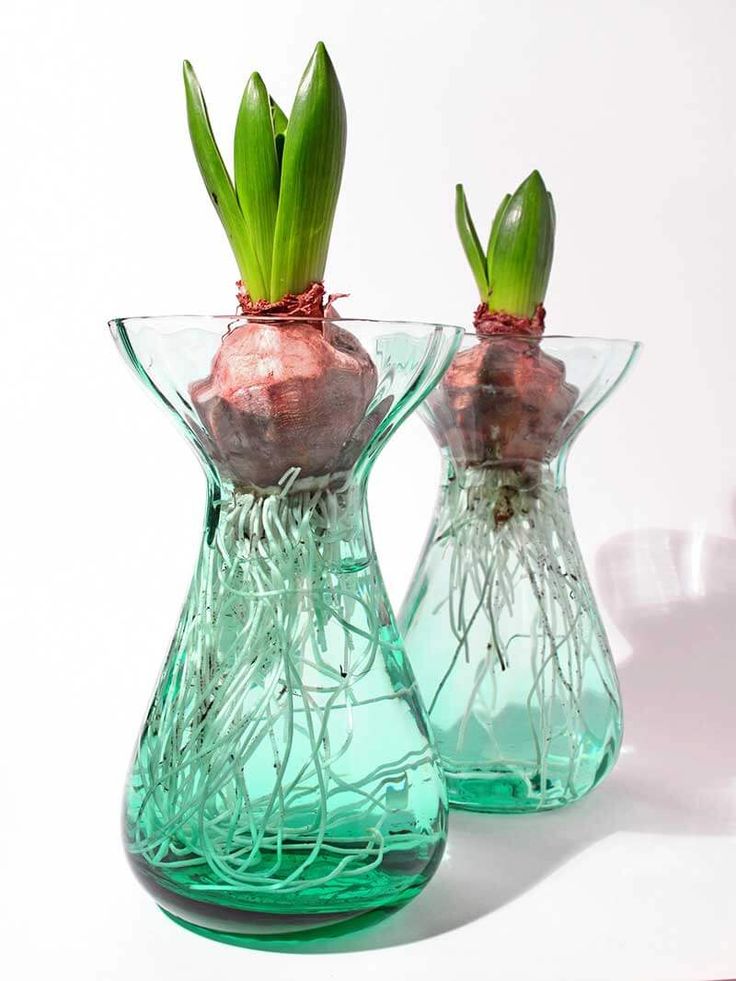 The mating part for the lamp base is called socket . To fix the light bulb in the socket, it is necessary that the base of the lamp and the socket are of the same type. The plinth is usually made of metal, but is sometimes made of plastic, ceramic/ceramic parts, or even glass.
The lamp base and socket must ensure the insulation of the conductors from each other, the mechanical strength of the connection, withstand the temperature when the lamp is on. Cartridges made from ceramic (usually electrical porcelain) can withstand much higher temperatures than carbolite cartridges or those made from other plastics. The electrical contacts in the socket must be capable of withstanding operating currents and ensure reliable electrical contact with the lamp base. If the exact position of the lamp is important (for example, in a movie projector or at the focus of a reflector), then the cartridge has structural elements that ensure positioning accuracy.
Incandescent lamp leads are often soldered to the base with soft solder, so the temperature of the socket and base during lamp operation should not exceed the melting point of the solder (i.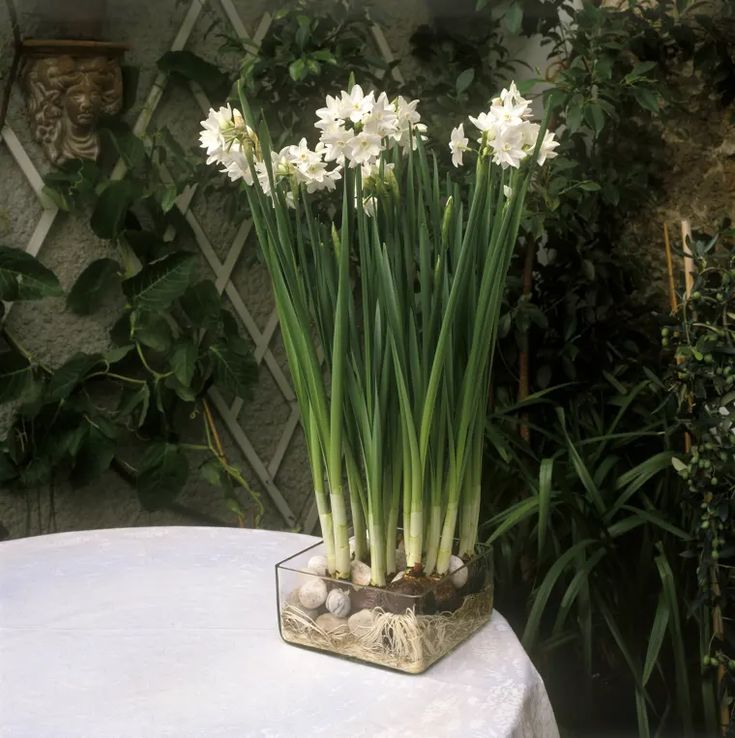 e. be below 180 °C). It is also necessary to take into account the thermal expansion of the nodes over the entire temperature range, therefore often cartridges have provided elastic elements, including spring contacts.
The most common faults in the base-chuck connection are caused by overheating of the cartridge, loss of spring properties by the contacts, oxidation of the contacts. Sometimes base in cartridge "turns sour" and an attempt to replace such a lamp ends with the fact that the base comes off the lamp bulb and remains in the cartridge. A defective cartridge causes flickering and sparking of the lamps.
By the way, there are also baseless lamps - this is a highly specialized variety designed to organize a car lighting system (bulbs H10, HB3, D1S).
DESCRIPTING THE MARKING OF THE SOCL
The first letter indicates the type of base:
E - threaded base (Edison)
G - pin base
R - base with recessed contact
B - pin base (Bayonet)
F - single pin base
a - roll pin
b - knurled pin
c - special shaped pin
S - soffit base
K - plinth with cable connections
H - socket for xenon lamps
P - focusing base
T - telephone base
W - base, in which electrical contact with the cartridge is carried out directly through the current inputs located on the glass base of the lamp.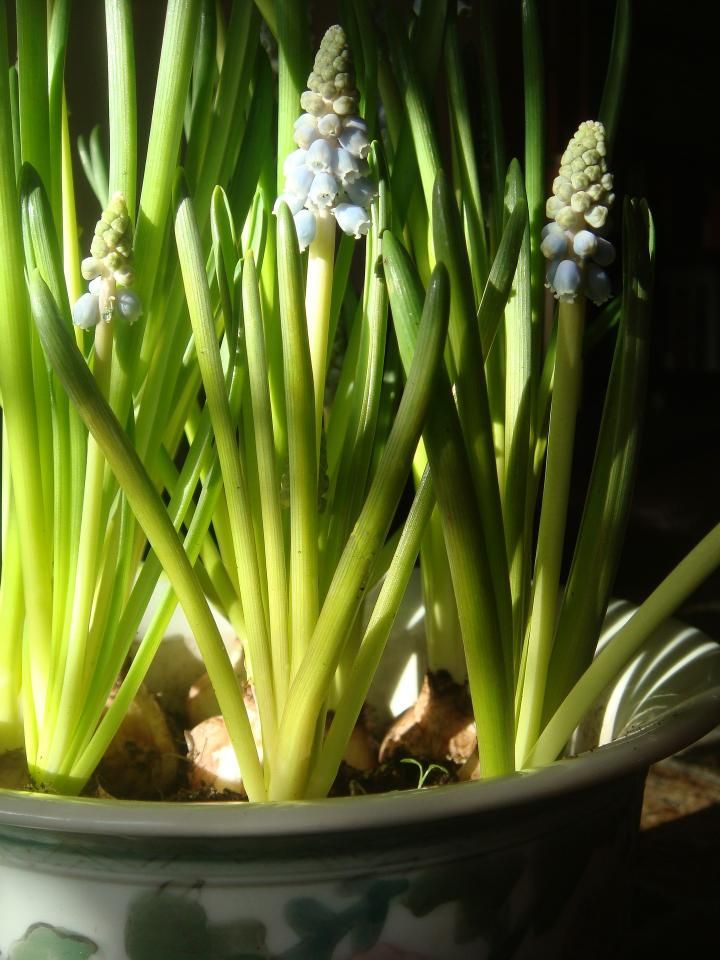
The numbers next to the letter of the base designation indicate the outside diameter of the threaded connection in millimeters or the distance between the contacts in millimeters. For example, GX53, where 53 mm is the distance between the pins
The letters after the diameter (or distance) indicate the number of contact plates, pins or flexible connections:
s - one contact
d - two contacts
t - three contacts
q - four contacts
p - five contacts
For some types of socles, one more letter is added to clarify:
U - energy-saving light bulb;
V - base with a conical end;
A - car lamp.
An example of deciphering the lamp base: E14U - an energy-saving lamp with a threaded base, 14 mm in diameter.
If we divide the lamp bases globally, then they can be divided into two groups: threaded bases and bases with surface contacts (bayonet, recessed contact, etc.)
THREADED (OR SCREW) PLINTH E
Edison base is the most popular type of base. This is the base of a conventional incandescent lamp. This is the most convenient base to use and is currently used not only in incandescent lamps, but also in LED and energy-saving lamps. In addition, the lamp with an E-base is notable for its size - it is light in weight.
This type of base is found in the following variations: E5, E10, E12, E14, E17, E26, E27, E40. But the most popular are E14, E27, E40
Lamps with E27 base - the most common type of base in everyday life. Lamps with an E27 base are most often used in chandeliers, ceiling lamps, wall and table lamps.
The E14 base is the second most popular type of base in the home. Lamps with an E14 base are often called "minions" in everyday life. In almost any apartment there is a place where lamps with such a base are installed. Most often it is a kitchen, toilet or bathroom, corridor.
Lamps with E40 base are the largest base in the "E" type category. Most often, lamps with an E40 base have high power and are used in industrial and street lighting.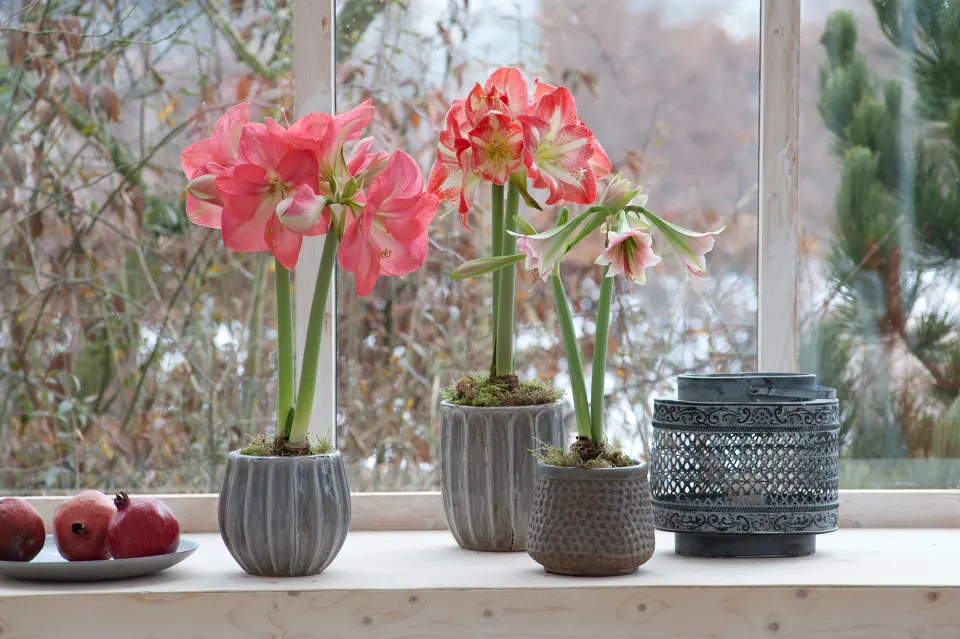
In America, standard plinth dimensions are quite different from those in Europe. This is due to the fact that the voltage in the network is 110 V. In order not to accidentally screw in a European light bulb, you need to remember that they have a different diameter: E12, E17, E26 and E39.
PIN SOCKET G
This type of socket does not use a screw thread, but a pin system for connecting the lamp to the socket. The pins hold the instrument in the chuck because they are inserted very tightly into the chuck. The G pin base is used for various types of lamps, ranging from small halogen to ceiling fluorescent. Since there are many pin bases with a difference between the contacts of only a few millimeters, it is easy to confuse them, but this should not be done. The designation in numbers after the letter G corresponds to the distance in millimeters between the contacts.
For bases of this type, additional designations are often used indicating non-interchangeable lamp modifications: U, X, Y, Z.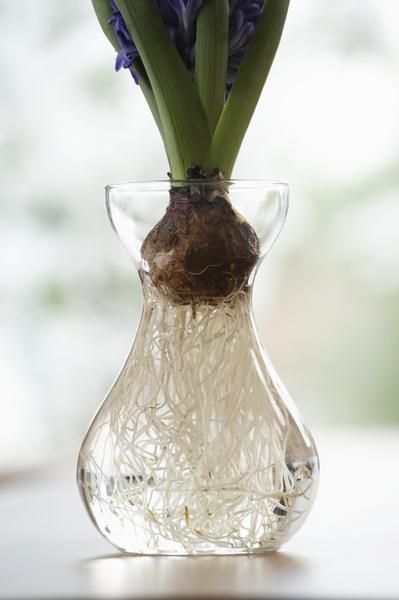 For example, lamps with bases GX53 and G53 have the same distance between the centers of the pins (53 mm), but require completely different connectors for connections.
The GU5.3 base is most commonly found in MR16 halogen and LED lamps used in niche, home, decorative and display lighting applications. Typically, these lamps are powered by 220V (AC) or 12V (AC/DC). By the way, this base is very popular among LED lamps.
Lamps with a GU10 swivel base also have a standard size MR16, are inserted into the socket and turned to the stop in a special lock. Therefore, they are used where, due to vibration or external influences, other lamps can fall out. Lamps with a GU10 base are usually powered by 220V AC.
Externally, lamps with GU10 and GU5.3 bases differ only in the thickness and appearance of the pins.
The G4 base is designed for miniature lamps with MR11 body, which are widely used for decorative lighting due to their bright spot light. These are mainly low-voltage lamps for 12 / 24V, but there are also 220V (AC).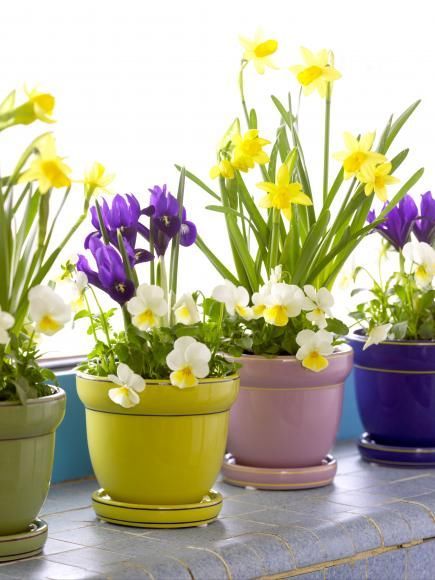 The advantages of these lamps are manifested primarily in recessed ceiling luminaires and flexible lighting systems.
Base G6.35 is very similar to the previous ones. The distance between the pins is 6.35 mm. The power supply of such lamps usually comes from an alternating current 220V (AC).
Base G9 - also a pin base, in the form of two elongated wire loops with a distance between the pins of 9 mm. Lamps with a G9 base are used in accent and decorative lighting fixtures, and recently they are often found in home chandeliers. The pin base is very convenient to use - the installation and replacement of lamps is quick and easy.
Base G13 - pin base with 13 mm pin spacing. Lamps with this base are most often installed in lamps such as Armstrong, LPO, LVO, LSP and others.
T8 tubular fluorescent and LED lamps have the same G13 base and are identical.
Base G23 is a base with 23 mm pin spacing. Lamps with this base are often used in table lamps, shower and bathroom fixtures.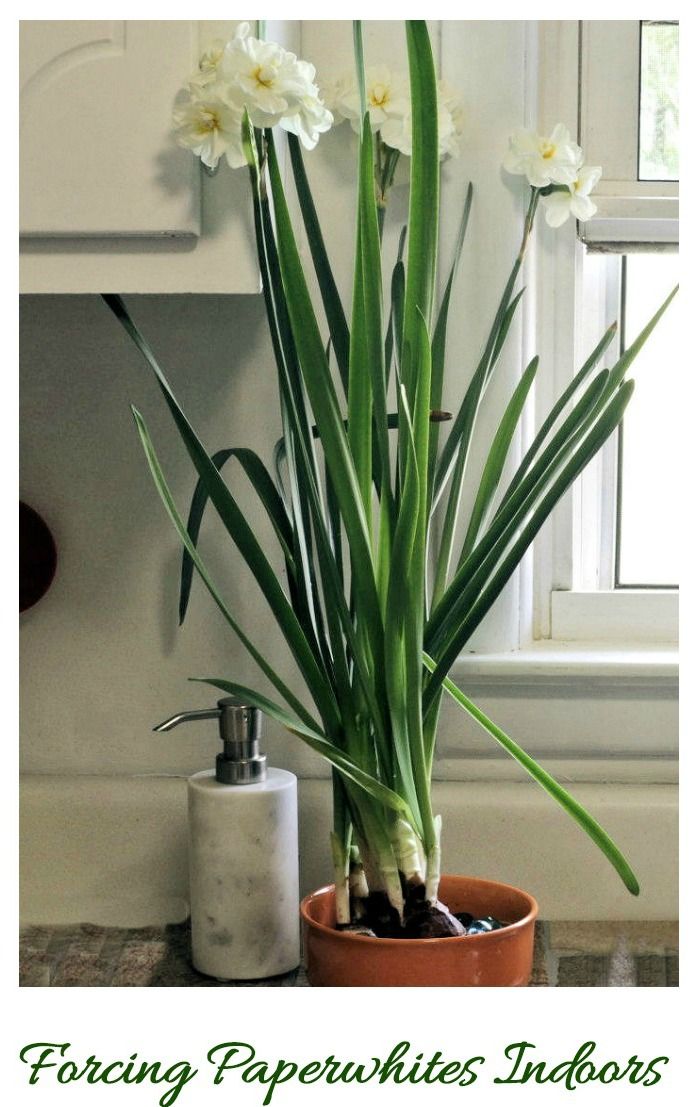 The base sockets of such lamps have special holes for mounting in ordinary wall lamps.
The GX53 base is often used for false and stretch ceilings in residential and office buildings due to the small height of lamps with such a base (28 mm). Such lamps also turn all the way with a special lock (like lamps with a GU10 base). The distance between the centers of the pins is 53 mm. Lamps with GX53 base usually operate on 220V AC and do not need any transformers. To connect such lamps, a lamp suitable for the base is usually sufficient; additional cartridges are not required.
GX70 plinth - "older brother of the GX53 plinth". It is absolutely similar to it with the only difference that the distance between the centers of the pins is 70 mm.
The G53 lamp is used in areas where directional lighting is required, such as accent lighting of objects in salesrooms, restaurants, exclusive boutiques and galleries, high-ceilinged rooms, stage. A lamp with such a base is most often used in luminaires with a swivel lamp type "gimbal".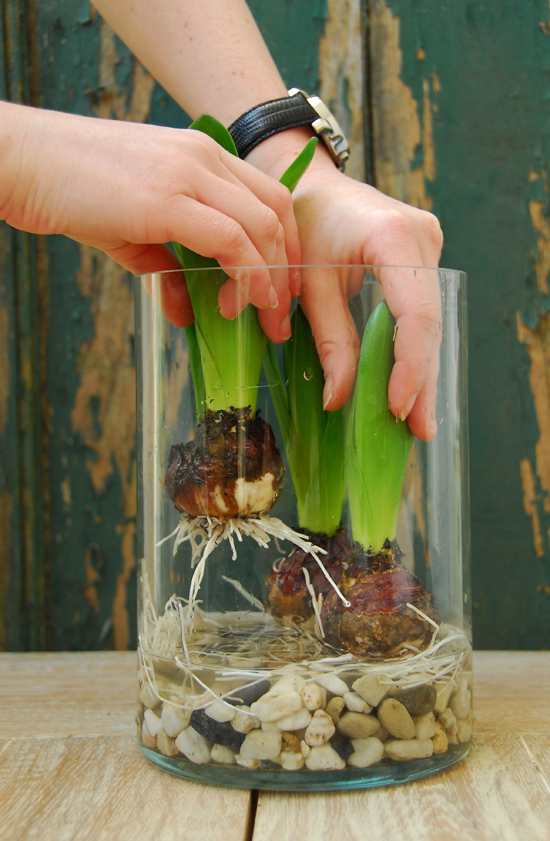
Types and sizes of bayonet bases and their applicability in various lamps:
Recessed contact type (R). It has been widely used mainly in machinery that operates at high intensity with AC power. The main representatives of lamps with R7s base are quartz halogen lamps, which are used in high-intensity lighting installations. Such lamps are light and small, they are used in alternating current networks 220V, 50Hz. It is worth noting that after the designation of the base R7s, the numbers 78 or 118 are indicated. They show the total length of the lamp in mm.
Pin base B. This type of base evolved from the evolution of the Edison base. It was developed in order to speed up the process of replacing light bulbs and make them more compact. Its characteristic feature is the asymmetric side contacts, with which the lamp is fixed in the holder (cartridge) in a strictly specified position, for example, to focus the light flux in car spiral lamps of "near-far" light.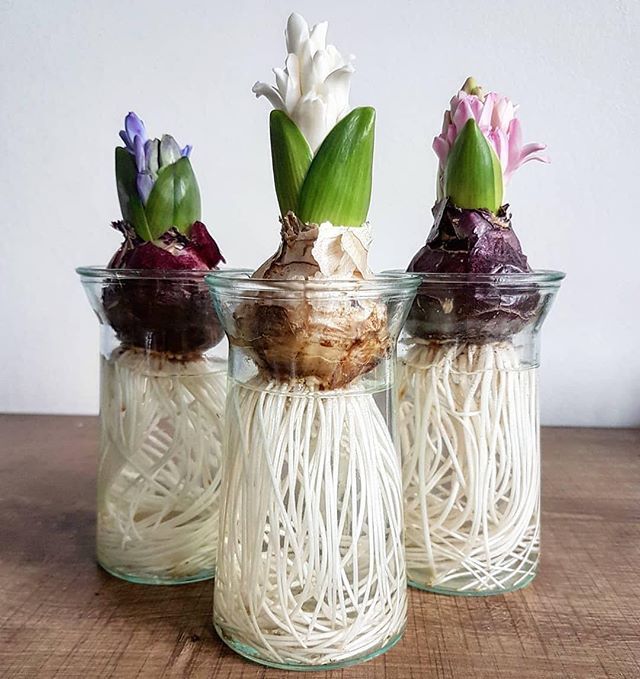
Soffit socket S. The Soffit double-sided socket S is usually used in bathroom lighting, mirror lighting or vehicle and license plate lighting. Contacts in it are located symmetrically on both sides. The numbers indicate the diameter of the body (S6, S7, S8.5). For example, S19- this is a soffit base with a case diameter of 19 mm; S14s is a soffit base with a diameter of 14 mm and one contact.
Focusing base P. This type of base is used in navigation lights, movie projectors, spotlights and lanterns. With the help of a prefabricated lens, which is placed inside the base, the light flux is focused in a given direction. The numbers in the base type marking indicate the diameter of the focusing flange or the part of the base body on which the lamp is mounted horizontally. For example, the P20d base is a focusing base with a focusing flange diameter of 20 mm and two pins.
Telephone base T.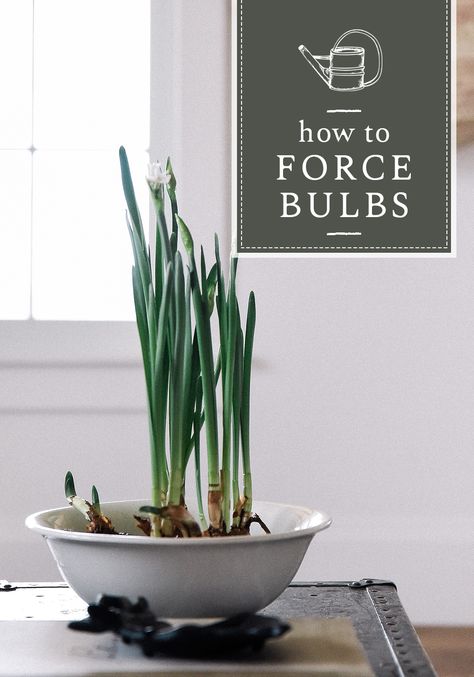 This type of base is mainly used for lighting in control panels and automation panels. It is equipped with a small light bulb. The numbers indicate the outer width measured on the contact plates. For example, the base T5.5 has dimensions of 5.5x30mm, while:
- base diameter - 5.5mm
- bulb diameter - 4.8 mm
- lamp total length - 30 mm
Cable base K. Non-standard base used in some projection lamps
Without socket type W. Contact with the socket is made directly through the current inputs, which are located on the glass base of the lamp. The numbers indicate the total thickness of the glass part with one current input. This is followed by the multiplication sign and the width of the base of the base in millimeters.
To date, there are a number of non-standard bases, for example, special bases for xenon lamps, denoted by the letter H and numbers in accordance with the modification.