Drying oranges christmas
How to Dry Oranges for Christmas Decorations
Today I am sharing a simple method to dry oranges for the holiday season. Family gathered in, fires crackling, festive aromas, music, food, warm lights twinkling are the things that Christmas memories are made off and it all begins with my sense of smell – there is nothing to start my season off better than the scent of oranges permeating my home!
How to Dry Oranges for Christmas
Let me show you how to dry oranges for Christmas! Drying oranges is guaranteed to put me in a festive mood, it is so easy to do and the house smells fabulous while I’m at it!
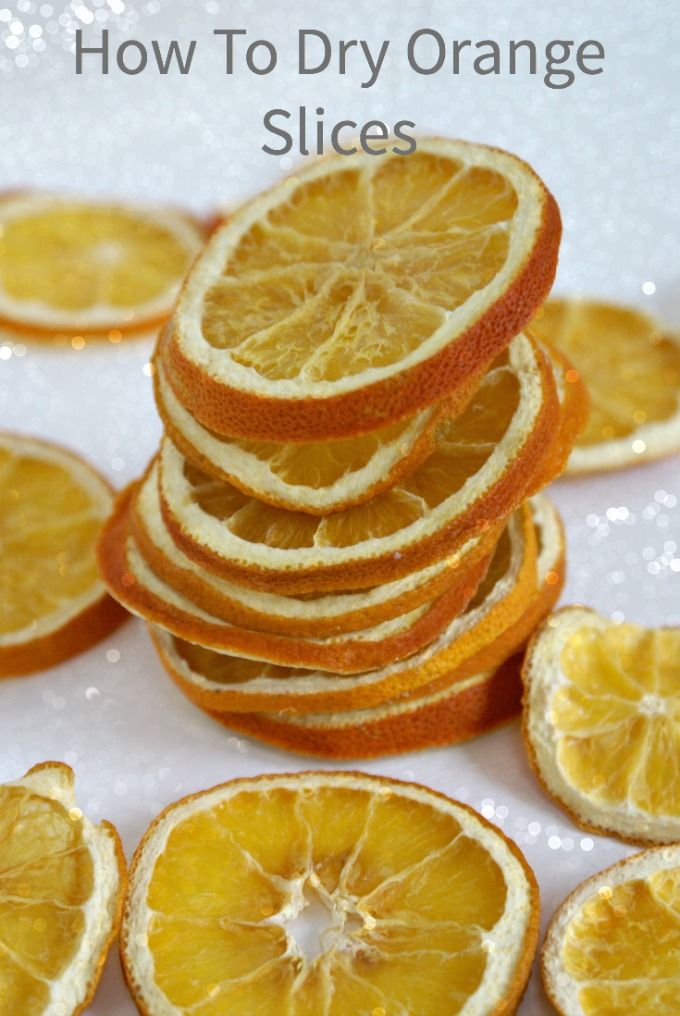
I keep my eyes open for bargain bags of oranges (usually at the end of the day at the market), snap them up, slice them into 1-2cm slices, pat them dry and pop them into a low oven (120°C) for about three hours.
It’s important to turn them every half hour or so and to put them on a metal cooling rack over a baking tray so the air can circulate around them easily and they don’t burn or stick but that’s it!
I hang some in the kitchen where the warm air from the oven ensures I am surrounded by their delicious citrus smell as I’m baking for Christmas.
They are easy to thread onto pretty ribbons and I also pile them into a basket with pine cones, cinnamon sticks and walnuts which I put in front of the wood burner to fill the sitting room with the scent of Christmas.
Drying Whole Oranges
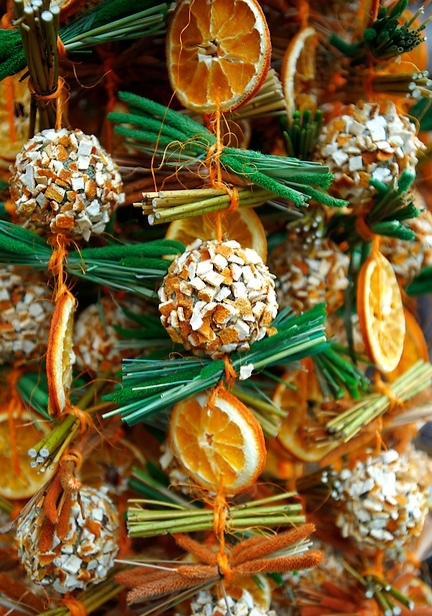
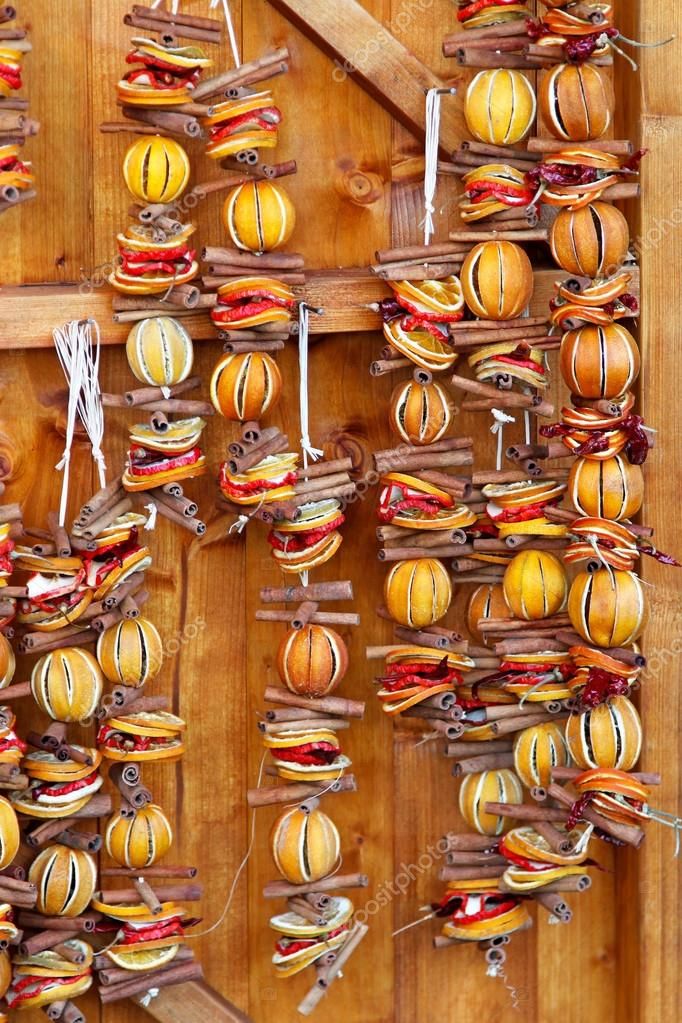
I don’t have a mantle piece over my fire but if I did I would love to have a go at making a swag out of whole dried oranges, dried orange and apple slices and dried chillies like these beauties I saw at the Bath Christmas Market last year!
Whole oranges take longer because of all that juice, you need to cut slits in the skin and put them in a very low oven for 12 – 24 hours.
It’s worth making a batch or two of meringues, drying some chilli, peppers and tomatoes at the same time with all that lovely heat!
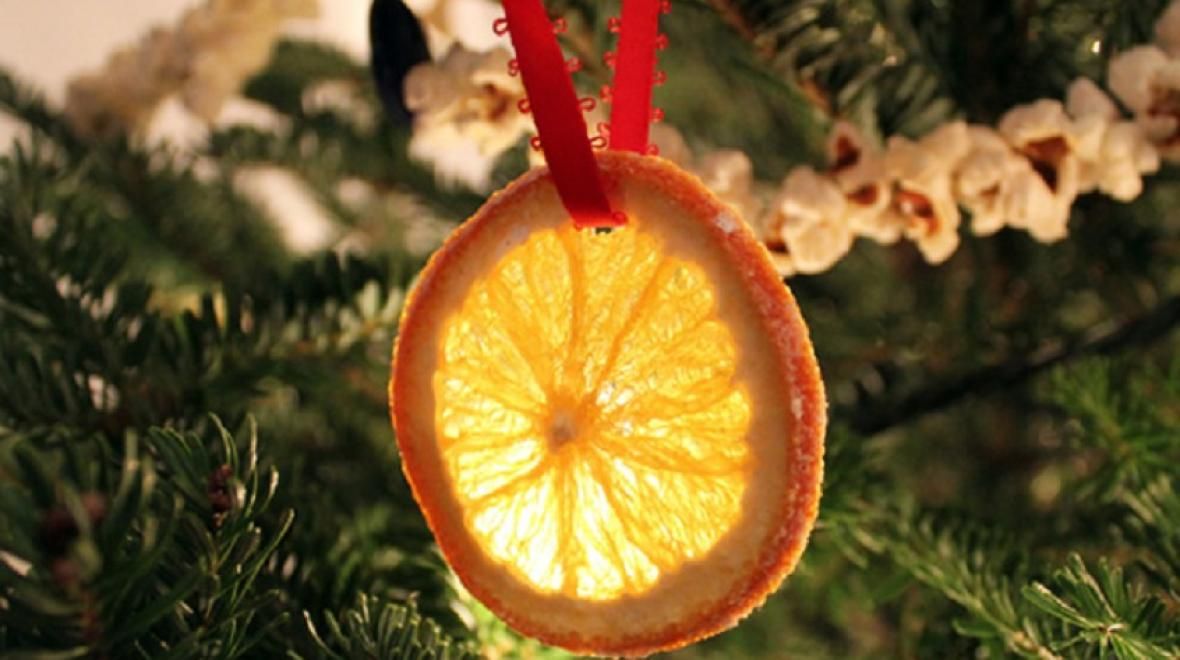
Hanging your dried oranges in front of a light really allows them to shine – I just made a little hole through the top of each orange and threaded them with string. Christmas has begun!
I know this isn’t, strictly speaking, a recipe but I’m popping it into a printable just for you!
Follow me on Pinterest, Facebook,Twitter and Instagram where I share recipe ideas, links to vegan events and articles and where I natter on about my favourite subject – vegan food
Print Recipe5 from 1 vote
How to Dry Oranges for Christmas Decorations
Simple instruction to dry orange slices for Christmas decorations and suggestions for drying whole oranges.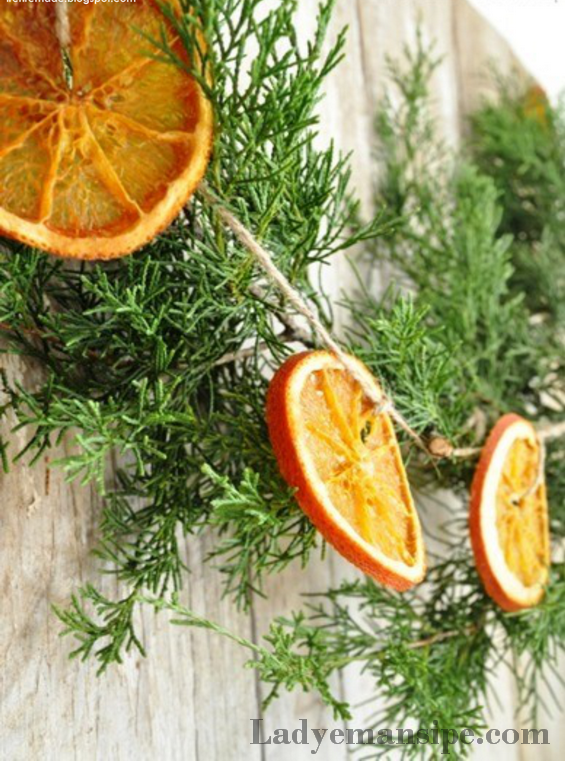
Author: Chris Mosler - Thinly Spread
Slice oranges into 1-2cm thick slices
Pat dry with a clean tea towel
Place them on a metal cooling rack over a baking tray so that air can circulate around them easily and they don’t burn or stick.
Pop them into a low oven (120°C) for about three hours.
Turn them over every half hour or so. It is really important to keep checking them, the thinner they are the quicker they will dry - you don't want burnt oranges!
Your oranges are ready when they are dry to the touch - they will still be a little bit sticky. The longer you dry them for the longer they will last
If you’re looking for more ideas for your Christmas home you might like these
Stunning Ice Lanterns with Foraged Leaves and Berries
Giant Paper Pom Poms
Simple Tin Can Lanterns
How to Dry Orange Slices for Holiday Decor, Two Ways ~ Homestead and Chill
Dried orange slices are the perfect eco-friendly addition to winter holiday decor, bringing a beautiful natural pop of color and cheer to your home – all for minimal cost and effort! Use them to adorn festive garlands, wreaths and centerpieces, or as ornaments, garnishes, in potpourri, and more.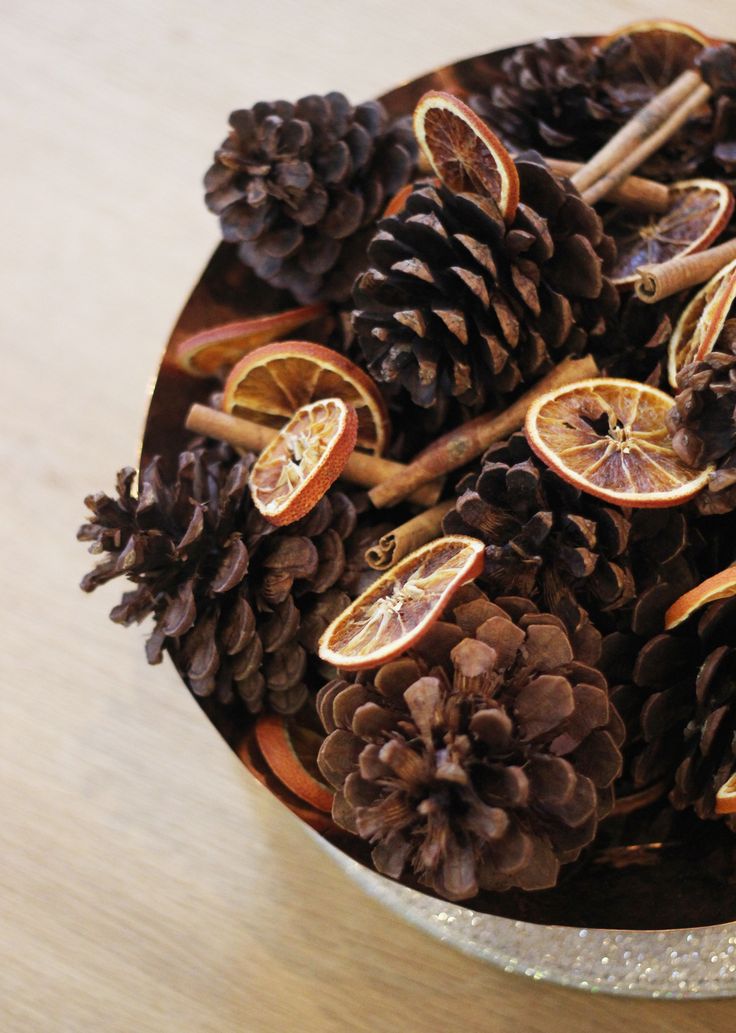 Thankfully, it’s really easy to dry orange slices at home! Bonus: they make your home smell amazing while they dry.
Use this guide and learn how to dry orange slices two ways: in the oven, or in a food dehydrator. We’ll also cover some frequently asked questions about making dried orange slices, including their history, shelf life and storage. I’ll also show you several cute ideas for how to decorate with dried oranges.
Why do people decorate with dried oranges for Christmas or during winter?
It’s always good to understand the background or history of a tradition, don’t you think? Oranges are associated with winter holidays for a number of reasons. First of all, the majority of citrus ripen during the winter season. Here on the Central Coast of California, our neighborhood trees are dripping with oranges from November through spring!
During the Great Depression of the 1930s, fresh oranges were rare and viewed as a luxury item to splurge on at Christmastime.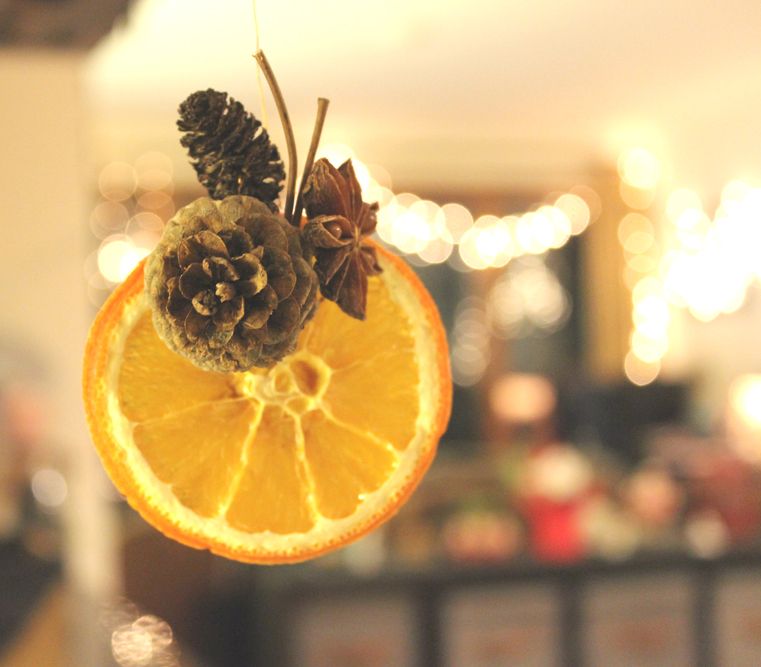 Folks would give them as gifts, often tucking them into their children’s stockings as a nod to the “sacks of gold” that old Saint Nick would deliver down the chimney.
Long before American Christian traditions, cultures around the world adorned their homes with elements of nature as part of Winter Solstice celebrations, including bows of greenery, wreaths, and garlands with dried fruit. Winter Solstice occurs around December 21st each year. It is the shortest day of the year, marking the time when the days once again grow longer. Oranges, being just about as bright and cheery as fruit can get, are thought to represent the sun and the return of light.
hello sunshine.Adding cheerful dried oranges and lemons to brighten our winter holiday tree.What kind of oranges should I use to make dry orange slices?
Classic Navel or Valencia oranges are best. They are large, have a uniform round shape, and make the most beautiful dried orange slices. Choose oranges with the deepest orange color rind for the most vibrant results. Also, firm oranges will be easier to cut into uniform thin slices than softer fruit.
We’ve also used blood oranges to make dry orange slices before. The stunning red and purple centers look amazing! Yet because they’re already darker in color, it’s especially important to not accidentally overcook or burn them, since they’ll look even more brown than the orange ones.
Really, you can use these methods to dry any type of citrus – including lemons, limes, or grapefruit! Note that smaller “orange” citrus fruits like tangerines or mandarins typically have thinner rinds and more membranes inside, so they may be less attractive when dried.
How to make dried orange slices stay orange?
To avoid your dried orange slices from turning brown, it’s best to dry them on the lowest temperature possible. They will turn brown if they’re accidentally overcooked or burned.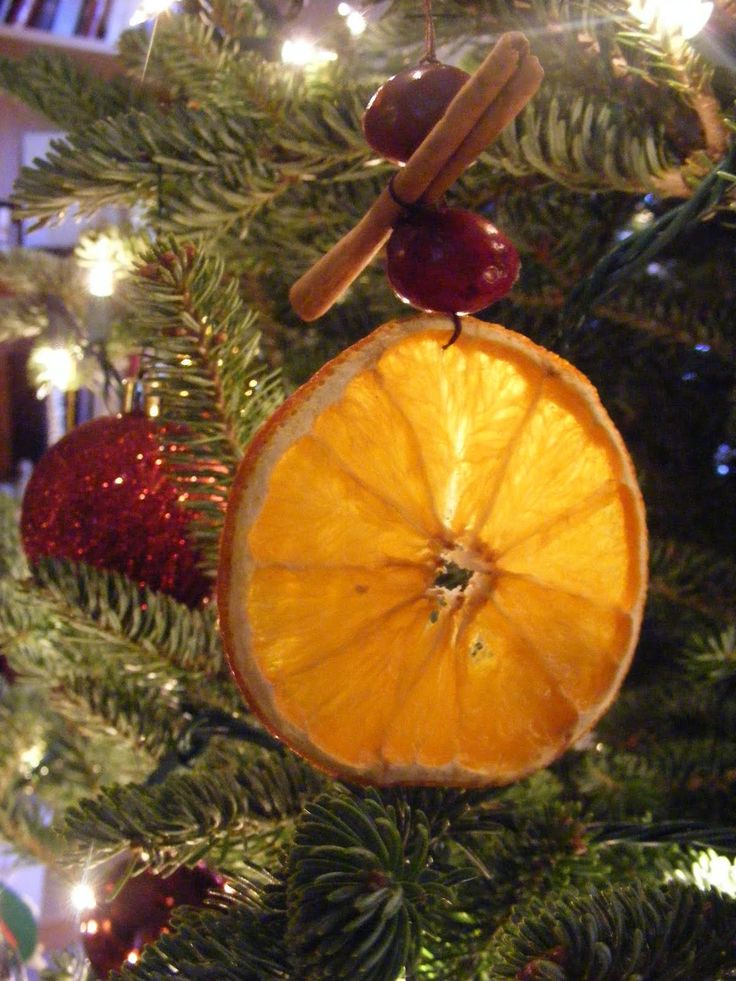 Dry orange slices may also turn more brown over time, as their natural colors fade over the years.
However, keep in mind that the lower the temp, the longer they’ll take to dry. To speed things up, you can experiment with turning your oven higher than the lowest setting, but keep an eye on them as you go.
If you have one handy, I suggest using a food dehydrator to make the most fuss-free and bright-colored dry orange slices. Since you can dry the oranges at a lower temperature than the oven, it’s virtually impossible to accidentally burn them. They also stay more flat instead of possibly curling slightly.
If you’re in the market for a food dehydrator, I can’t say enough good things about Excalibur dehydrators. They’re made in the USA, BPA-free, and dry things evenly and efficiently! (They’re also on sale for 25% off until midnight December 5th!)
You can dry oranges either way, but you need to keep a close eye on oven-dried oranges since they have the tendency to turn brown or burn more easily.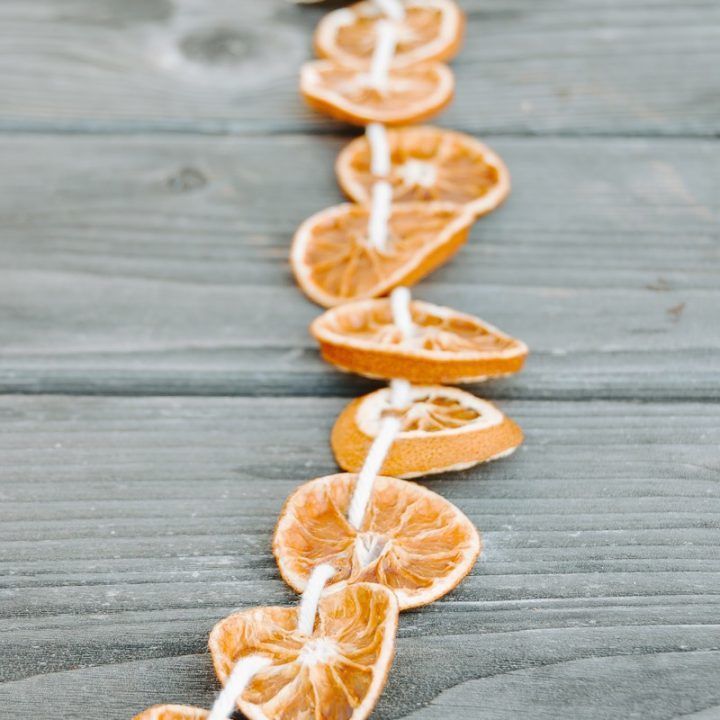
How to Make the Best Dried Orange Slices
Supplies
- Oranges
- Sharp knife and cutting board
- Baking sheet lined with parchment paper (for oven method) OR a food dehydrator
- Lint-free cloth towel or paper towels for blotting
Instructions
Step 1: Slice the Oranges
Begin by cutting your oranges into thin slices. Aim for ⅛” to ¼” thick. As best you can, try to cut each slice the same thickness. The more thin and even you cut them, the faster and more uniform they’ll dry. Also, cut across the “equator” or center of the orange (as opposed to top stem to bottom) to reveal the perfect cross-section.
Tip: Now is a good time to preheat your oven to 200-225°F. See more information about the temperature range to follow.
Thin and even is the ticketStep 2: Blot and Spread
Before putting the orange slices onto trays, it’s best to blot them to remove excess juices first.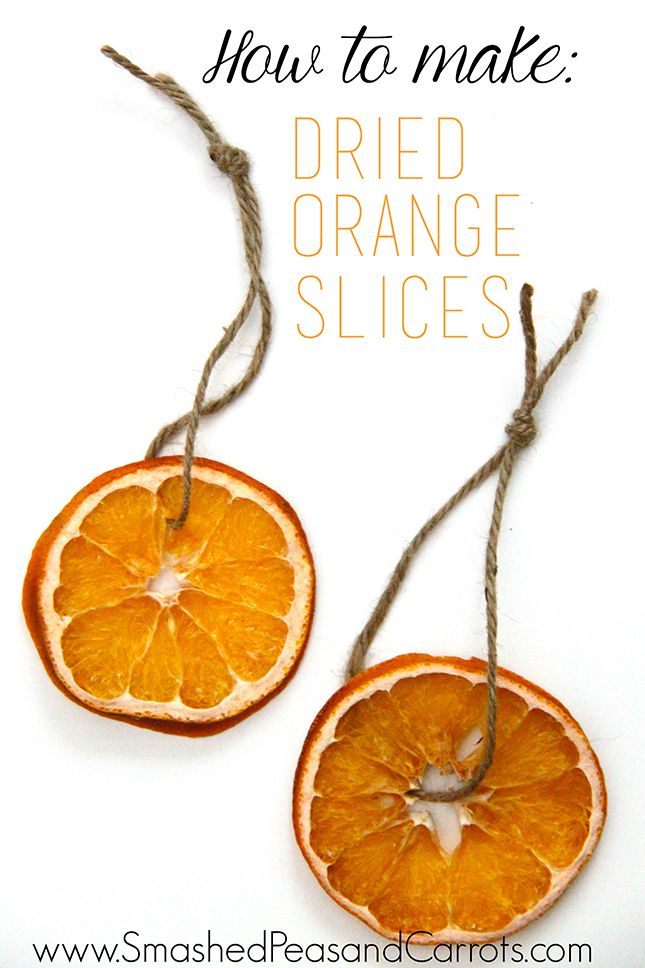 This helps them dry much faster, and also stick to the trays less. Some folks use paper towels for this. Instead, I like to lay out a lint-free tea towel, set several slices on top, then fold it over to blot the tops. Don’t push hard or squish them! Just enough to soak up some juice. (Tip: When you’re done, rinse the towel well with water before adding it to your laundry pile.)
Next, spread the orange slices out on either a baking sheet or your food dehydrator trays. If you’re using the oven method, line the baking sheet with parchment paper first. Oranges get sticky! Lay the slices out in a single layer. It’s okay if their sides are touching, but they should not overlap.
Blot blotStep 3: Dry Orange Slices
In a Dehydrator:
- To dry orange slices in a dehydrator, set the thermostat to 130-135°F.
- If your machine doesn’t have a precise temperature control, choose a “fruit” setting or medium heat.
 When in doubt, check them after an hour or two to ensure they’re not turning brown and adjust as needed.
 - Allow them to dry until no moisture remains. (See notes below.) In our machine, the orange slices were mostly dry within about 8 hours, though a few damp pieces remained, so I turned the temp down to 125F and let it continue to run overnight to finish off.
- Depending on your dehydrator (e.g. if it has a top or bottom fan), you may also want to rotate the trays after several hours to promote even drying. I don’t find the need to do this with our Excalibur since the fan is located in the back of the machine for more even airflow.
In the Oven:
- Dry the orange slices in the oven on 200 to 225°F for several hours, until they’re fully dry*. (See notes below)
- It should take anywhere from 3 to 5 hours, depending on your oven and size of orange slices.
- Carefully flip the slices every hour or so to promote even drying.

- Once they are done, transfer the dried orange slices to a cooling rack.
A note on oven temperature: Every oven is slightly different, so you may need to experiment with what temperature works best for you. In our current oven, I found that 200°F felt like it was taking a bit too long, but when I turned it up to just over 225, the oranges quickly started turning more brown. So, I turned it back down to about 215 for the remainder of the time. This particular batch took about 4 hours. At that time, I removed the dry ones (which was most of them) and let a few remaining thicker slices continue to dry for another half an hour.
*The orange slices are considered “fully dry” once they appear dry, and thickest parts of the fruit are no longer gooey or soft to the touch. It is okay if they feel ever-so-slightly sticky still, since they will continue to dry and harden once they’re removed from the heat.
Ways to decorate with dried orange slices
- Add twine or string to your dried orange slices by making a small hole near the top, and tie a knot around the rind if needed (since it’s the most sturdy part).
 Dried orange slices may also have a natural hole in the center that you can insert string through instead.
 - Attach dried orange slices to green wreathes or garlands using twine, wire, or pipe cleaners. See photos below.
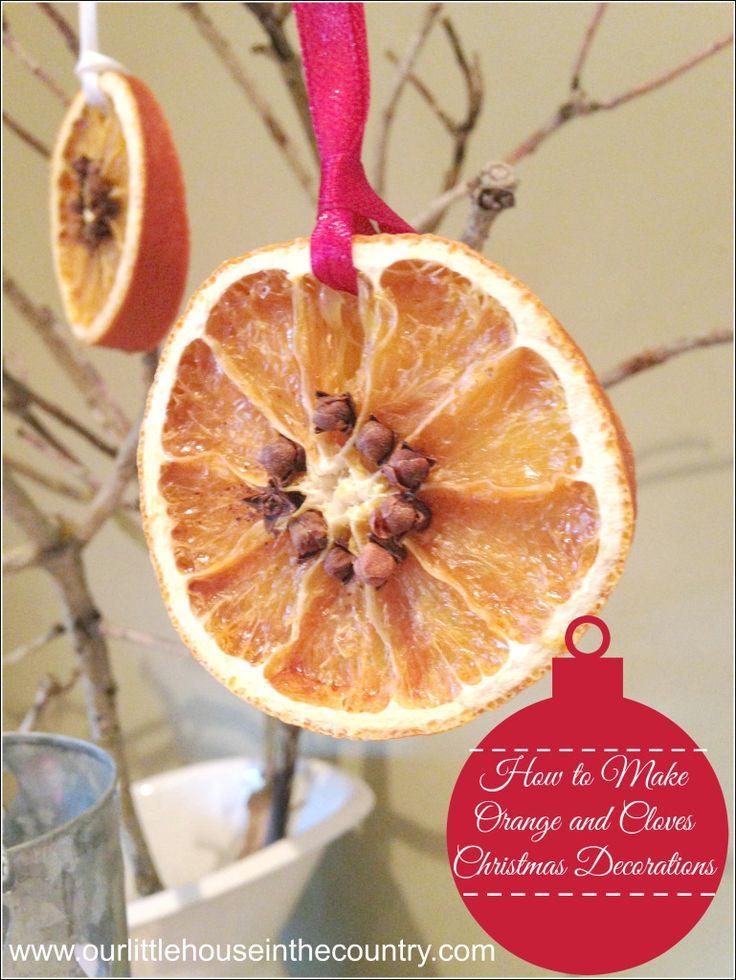
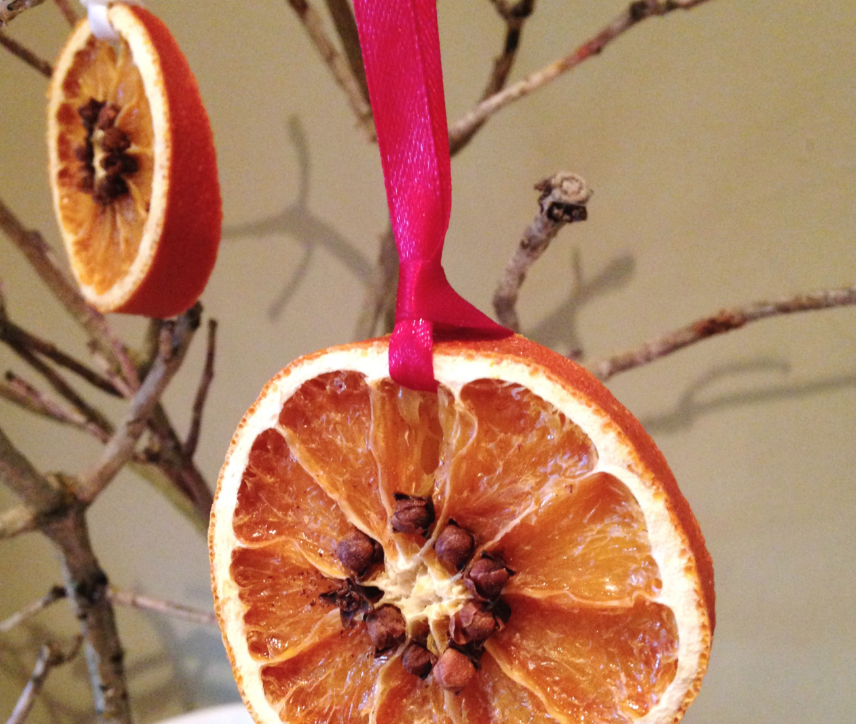
- String up dried orange slices as tree ornaments using ribbon, twine, or string. Get creative and add bows, bells, beads, feathers, or other fun additions.
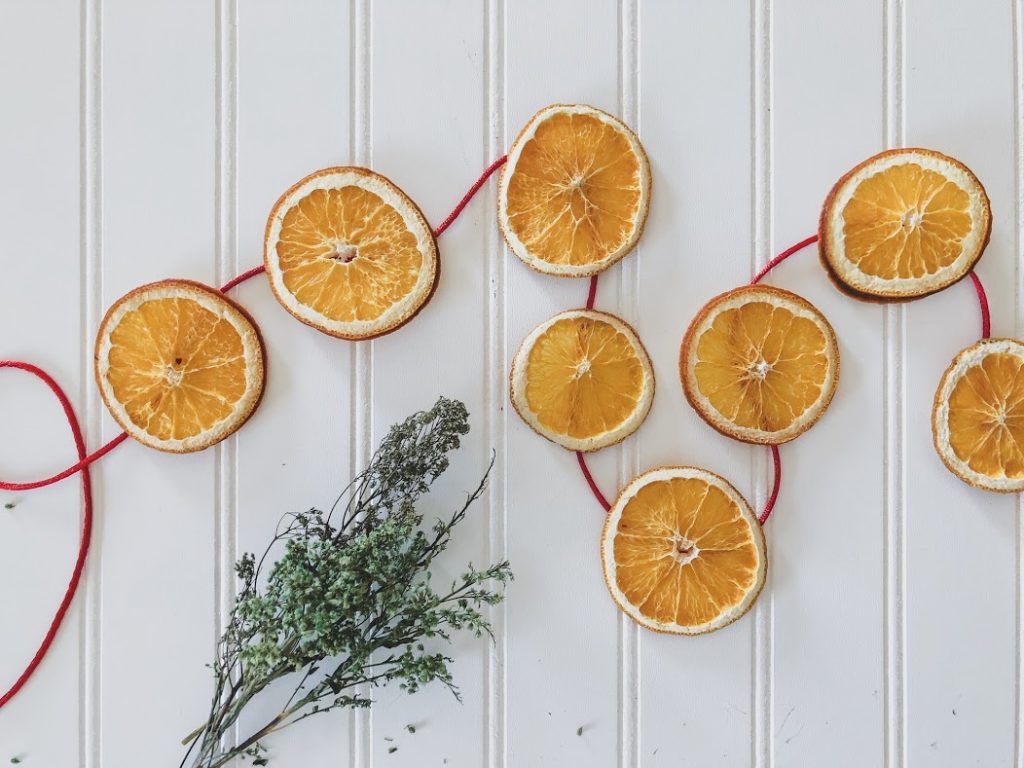
- Create a dry orange garland by stringing your orange slices on twine or string, either alone or together with popcorn, wood beads, cinnamon sticks, pinecones, or similar seasonal items. These are beautiful on a Christmas tree, streaming down a stairwell banister, strung across a sunny window, doorway, or fireplace mantle.
- Combine dried orange slices with natural greenery like pine or cedar, sprigs of rosemary, rustic pine cones, branches, acorns, chestnuts or walnuts to create a festive centerpiece, such as in a shallow bowl or tray.
- When wrapping gifts, affix them to the package with twine in lieu of curling ribbon or a bow.
- Last but not least, stick a dry orange slice or two inside your favorite tea, holiday cocktail, or mocktail for a beautiful citrusy flair.
 The little bells were leftover from making blown egg ornaments – also incredibly cute and fun to make! Dried orange slices adorn our living rosemary winter solstice tree. We’ll plant her in the garden next month. (2021)
How long do dry orange slices last?
Dried orange slices will last about two or three years. That is, they’ll look their best for the first couple of years, and start to turn increasingly brown thereafter. Yet that doesn’t mean they are “bad” or unusable after that time! We’ve hung much older dried orange ornaments on our holiday tree before.
Once they’re no longer welcome in your home, simply toss old dried orange slices in your compost heap. Or, give them one final shot to fulfill their festive destiny and add them to a pot of stovetop potpourri with other seasonal aromatic goodies before hitting the compost.
This year we mostly used dry orange and lemon slices leftover from last year, plus a few freshly dried ones. The older ones still look great! (2022)How to store dried orange slices
Store dried orange slices in an air tight container such as a large mason jar or inside ziplock bag. (You may want to lightly pad them between layers of newspaper if you use a bag.) Store them in a cool, dry, dark location, and somewhere they won’t easily get crushed or break, such as tucked in a storage tote with your other fragile holiday decor. We usually leave a jar in our pantry to add to hot tea!
Do dried orange slices smell good?
Dry orange slices smell amazing while they’re drying! Yet once they’re fully dry, they honestly don’t smell like much. Sure, if you stick your nose right in them, you can catch a faint whiff of citrus aroma, but don’t expect them to add significant fragrance to your home. However, if you toss dried oranges (or fresh ones) in a simmer pot – also known as stovetop potpourri – they smell absolutely divine!
Will dry orange slices grow mold?
As long as they’re properly and fully dehydrated, dry orange slices should not grow mold. Mold will only grow if they are not dried fast or long enough, and have too much remaining moisture. Yet even if they’re slightly sticky right out of the oven, your dried orange slices will also continue to air-dry as they hang out as decorations, further protecting them from mold. After drying, mold will only be a concern in extremely humid climates.
Can you air-dry orange slices?
Theoretically yes, you can air-dry orange slices, but only under ideal conditions. They will need to be spread on wire rack, screen, or other surface that allows for air circulation on all sides, and set out in warm, arid conditions with ample airflow – such as outside on a breezy summer day, in a warm attic space with fans, or similar.
Yet in the middle of winter, those conditions are difficult to achieve in most places. Heck, we can’t even do that in the summertime here! If the orange slices don’t dry fast and warm enough, they will surely mold first. That is why we recommend using an oven or food dehydrator to dry orange slices, rather than passively air drying them at room temperature.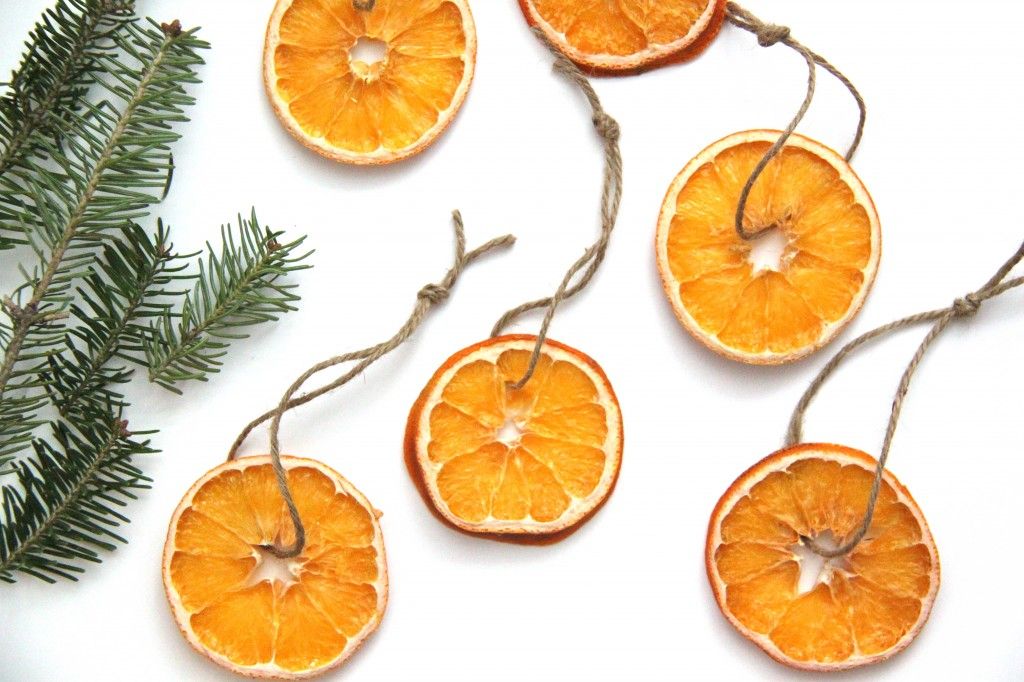
And that is how you dry and decorate with beautiful orange slices!
Gosh those are pretty, aren’t they? I hope you have as much fun making and decorating with dry orange slices as I had putting this post together for you. If you found these tips useful, please feel free to spread the love by pinning or sharing this article – and leave a review below! I can’t wait to see what you all come up with! Have a wonderful winter holiday season.
Looking for other clever ways to use oranges (and any citrus), or ideas for other holiday crafts? Check out:
- Homemade Citrus Vinegar Cleaning Spray: Natural, Non-Toxic & Effective!
- How to Make Dehydrated Lemon Powder + 13 Ways to Use It
- Fire Cider Recipe for Immune Health
- How to Make Blown Egg Ornaments
- DIY Beeswax Wraps (Reusable Food Wraps)
- Fruit & Veggie Stamped Kitchen Towels Tutorial
Pin Recipe
4. 80 from 5 votes
How to Dry Orange Slices (Citrus) Two Ways
Dried orange slices are a beautiful, inexpensive, eco-friendly addition to winter holiday decor. Come learn how to dry orange slices in either the oven or a food dehydrator, plus ideas for how to decorate with them! Use this tutorial for lemons or grapefruit too.
Prep Time20 mins
Cook Time3 hrs
Course: Drinks, Holiday Decor, Holiday Dish
Keyword: diy holiday decorations, dried citrus slices, dried orange slices, dried oranges holiday decor, dry oranges, how to dry oranges, natural holiday decorations, orange slices christmas
Oranges (or lemons, grapefruit)
Sharp knife and cutting board
Baking sheet lined with parchment paper (for oven method) OR a food dehydrator
Lint-free cloth towel or paper towels for blotting
Prep
Begin by cutting your oranges into thin slices. Aim for ⅛” to ¼” thick.
 Try to cut each slice the same thickness for even drying. Cutting across the “equator” or center of the orange (as opposed to top stem to bottom) to reveal the perfect cross-section.
 Before putting the orange slices onto trays, gently blot them with paper towels or a cloth towel to remove excess juices and expedite the drying process.
Next, spread the orange slices out on either a baking sheet or your food dehydrator trays. If you’re using the oven method, line the baking sheet with parchment paper first. Oranges get sticky! Lay the slices out in a single layer. It’s okay if their sides are touching, but they should not overlap.
Drying Oranges in a Dehydrator
Set the thermostat to 130-135°F. If your machine doesn’t have a precise temperature control, choose a “fruit” setting or medium heat. When in doubt, check them after an hour or two to ensure they’re not turning brown and adjust as needed.
Allow them to dry until no moisture remains** (See notes below.) In our machine, the orange slices were mostly dry within about 8 hours, though a few damp pieces remained, so I turned the temp down to 125F and let it continue to run overnight to finish off.
Depending on your dehydrator (e.g. if it has a top or bottom fan), you may want to rotate the trays after several hours to promote even drying. I don't need to rotate ours since the fan is in the back of the machine for even airflow.
Drying Oranges in the Oven
Dry the orange slices in the oven on 200 to 225°F for several hours, until they’re fully dry* (see notes below). It should take anywhere from 3 to 5 hours, depending on your oven and size of orange slices. I found the sweet spot in our oven to be 215F, where 200 was going too slow but 225 was turning them brown.
Carefully flip the slices every hour or so to promote even drying.
Once they are done, transfer the dried orange slices to a cooling rack.
Enjoy!
Ways to decorate with dried orange slices
Add twine or string to your dried orange slices by making a small hole near the top, and tie a knot around the rind if needed (since it’s the most sturdy part). Dried orange slices may also have a natural hole in the center that you can insert string through instead.
Attach dried orange slices to green wreathes or garlands using twine, wire, or pipe cleaners.
String up dried orange slices as tree ornaments using ribbon, twine, or string. Get creative and add bows, bells, beads, feathers, or other fun additions
Create a dry orange garland by stringing your orange slices on twine or string, either alone or together with popcorn, wood beads, cinnamon sticks, pinecones, or similar seasonal items. These are beautiful on a Christmas tree, streaming down a stairwell banister, strung across a sunny window, doorway, or fireplace mantle.

Combine dried orange slices with natural greenery like pine or cedar, sprigs of rosemary, rustic pine cones, branches, acorns, chestnuts or walnuts to create a festive centerpiece, such as in a shallow bowl or tray.
When wrapping gifts, affix them to the package with twine in lieu of curling ribbon or a bow.
Last but not least, stick a dry orange slice or two inside your favorite tea, holiday cocktail, or mocktail for a beautiful citrusy flair.
**For either method** The orange slices are considered “fully dry” once they appear dry, and thickest parts of the fruit are no longer gooey or soft to the touch. It is okay if they feel ever-so-slightly sticky still, since they will continue to dry and harden once they’re removed from the heat.
How to dry oranges for decoration in slices and whole at home
New Year and Christmas decor often uses natural materials - wood, spices, dried oranges, lemons, apples, pears. It is dried citrus fruits, cinnamon, star anise and the smell of pine needles that create the aroma of Christmas and New Year in our homes. After all, New Year's decorations suggest not only glitter and lights, but also comfort, warmth and aroma of hand-made New Year's decorations and gifts.
How to dry oranges in slices or whole, how to dry oranges quickly or slowly, in the oven, without an oven or in the microwave, on a radiator or without bothering at all. How to make dried oranges for decoration and get amazing material for festive creativity.
I will show you 6 ways to dry citrus fruits and also how to dry whole oranges.
Contents
1. Dried oranges for home decoration.
1.1. How to dry orange slices: 6 ways
1.1.1. In the oven - quick way - 1.5 hours
1.1.2. In the oven - slow way - leave overnight
1.1.3. On top of battery
1.1.4. On the battery inside
1.1.5. In air
1.1.6. In the microwave - extreme method
1. 1.7. Useful Tips
2. Dried oranges for decoration in slices - uses
2.1. Dried orange slices in tea is also good
2.2. Dried oranges in circles for decoration
3. Whole dried oranges for decoration
3.1. How to dry whole oranges
3.2. How to dry whole oranges - useful tips
4. How to dry oranges beautifully?
4.1. Let's compare drying methods for lemon and orange slices
one 1. Dried oranges for decor at home
2 2. Dried oranges for decoration with slices - use cases
2.1 2.1. Dried orange slices in tea is also good.
2.2 2.2. Dried oranges in circles in the decor
3 3. Whole dried oranges for decoration
3. 1 3.1. How to dry whole oranges
3.2 3.2. How to dry whole oranges - useful tips
four 4. How to dry oranges beautifully
4.1 4.1. Compare drying methods for lemon and orange slices
1. Dried oranges for home decoration
Many people decorate their homes on the eve of the New Year. Filled with beauty and aromas. Many people associate the smell of oranges with the New Year and Christmas. Let's combine our feelings and try to make decorations from dried oranges, which, if properly stored, can last for many years.
You can dry not only oranges, but also any citrus fruits. And when you get slices of lemon, grapefruit, and any of the citrus fruits, you will have decorations of different colors and shapes. So don't just stop at dried oranges.
1.1. Variants of how to dry orange slices: 6 ways
I dry citrus slices myself without bothering at all.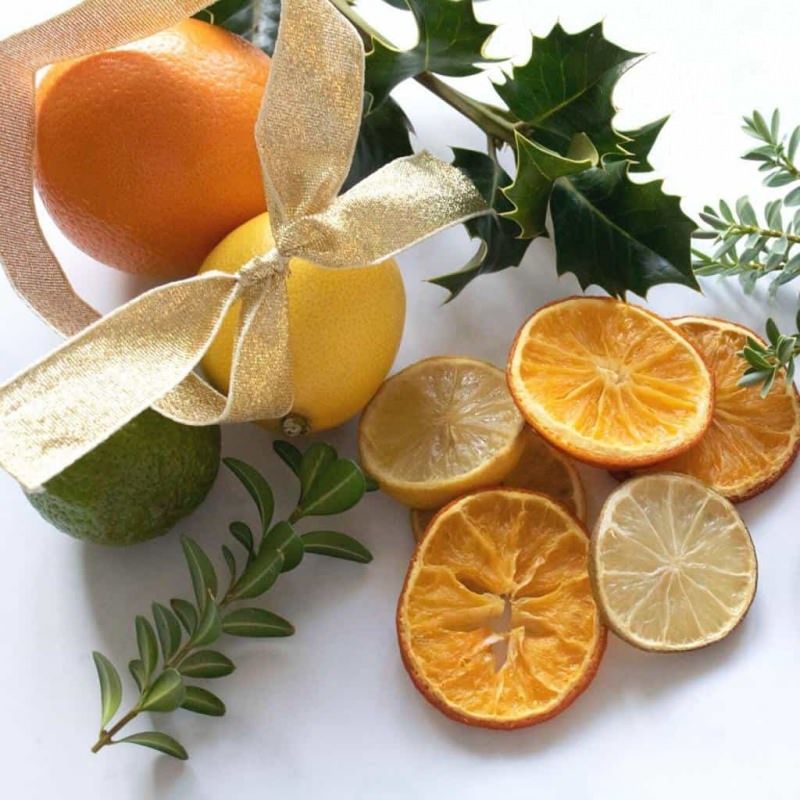 After all, I do not need a huge amount of material, and I am not going to use them on an industrial scale. I apply method 1.1.3 this on a heating radiator, just from above.
And this is my favorite way, but I didn’t come to it right away, because I was worried that I would do something wrong, I thought that there were some tricky and proven ways to create perfect dried orange slices, the secret of which is kept behind seven locks. This, of course, is all nonsense, so I will tell you about all that I had a chance to experience, but the only true one still does not exist. Do what you like, what is comfortable and pleasant for you.
To dry, cut the citrus fruit into slices crosswise, horizontally. This is necessary so that the pulp pattern is equally beautiful for all dried slices. The thickness of the cut should be approximately 3-4 mm. If you cut thicker, the orange slice will take longer to dry out or even rot. And if it is thinner, then during cutting and drying it can be deformed.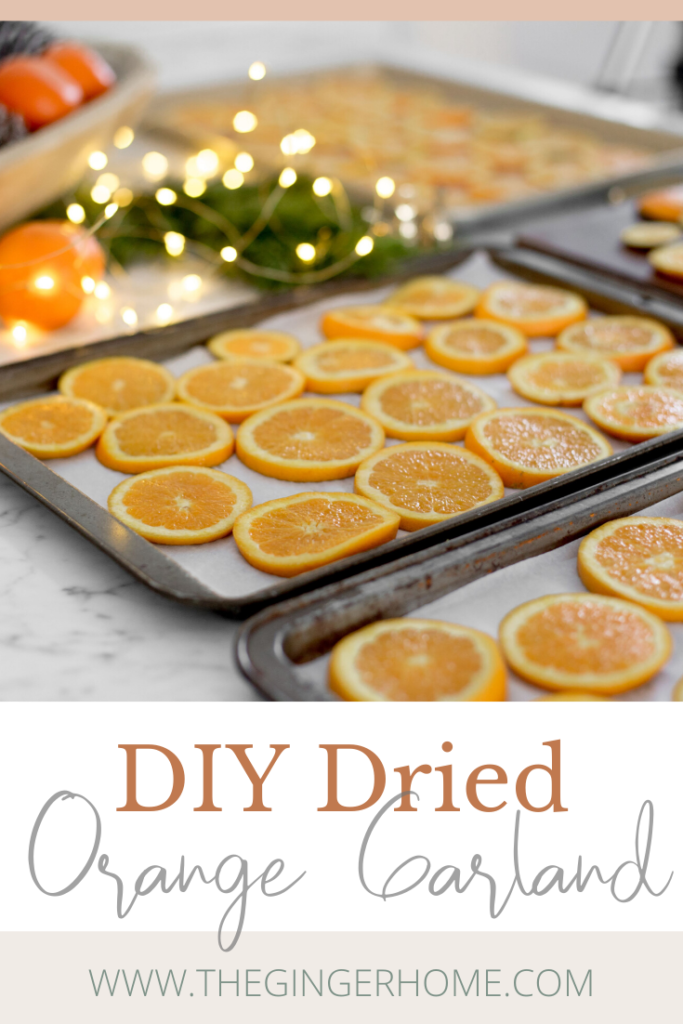 So the question of the thickness of the slice is actually very important.
1.1.1. In the oven - a quick way -1.5 hours
Lay the slices on a baking sheet on baking paper. Or on a grid and on paper. We heat the oven to 150 degrees. You need to use the convection mode. This is forced air circulation in the oven. Modern ovens usually have. It's just a fan in the oven itself. We hold the slices for 15 minutes, then turn them over and hold for another 15 minutes. Then lower the temperature to 70 degrees and wait another hour. In total it took 1.5 hours.
1.1.2. In the oven - slow way - leave overnight
We also spread it on baking paper, but in this case it is better on the grate itself, and not on a baking sheet. Set the temperature to 70 and leave overnight. In the morning we get perfectly dry, perfectly dried oranges.
1.1.3. On top of the battery
This is my favorite way. I just put circles on the same baking paper.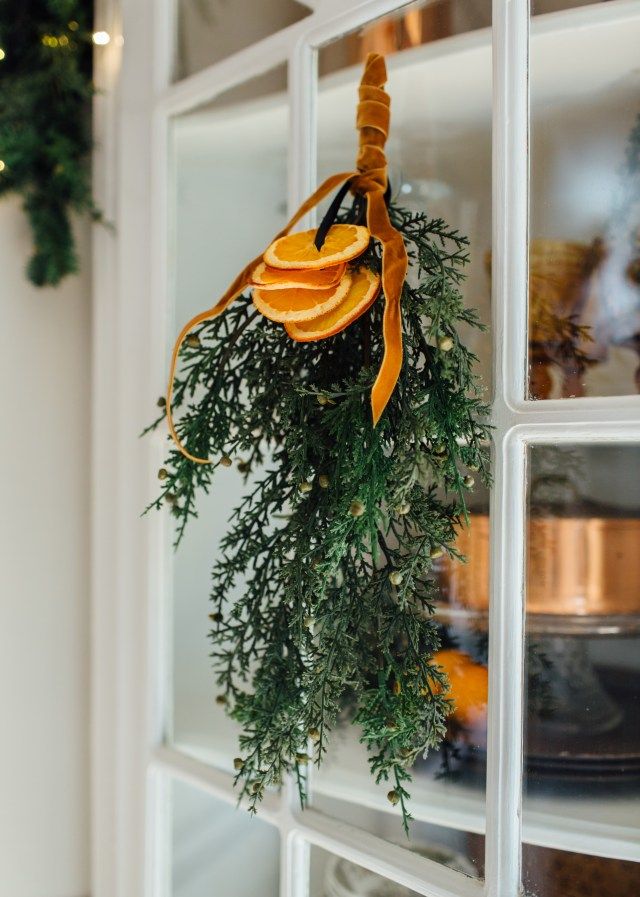 From time to time I come up, admire and turn over. And at the same time I'm aligning. Circles tend to curl, or bend the edge. I just press my palm on the circle and that's it. Only this should be done on the first day, while they are still wet. As soon as they dry out, they become brittle, especially at the very edges of the crust.
1.1.4. On the battery inside
This method is not for the lazy. I found a video here especially for the most hardworking. Props needed here:
- Corrugated cardboard
- Any punching tool
- Paper clips or clips
And the result is basically the same. But there is a very pleasant moment in this method. This is when you open this design in a couple of days, and there are perfectly even dry slices. And the cardboard also smells a bit of orange.
Be sure to blot the cut orange with a tissue.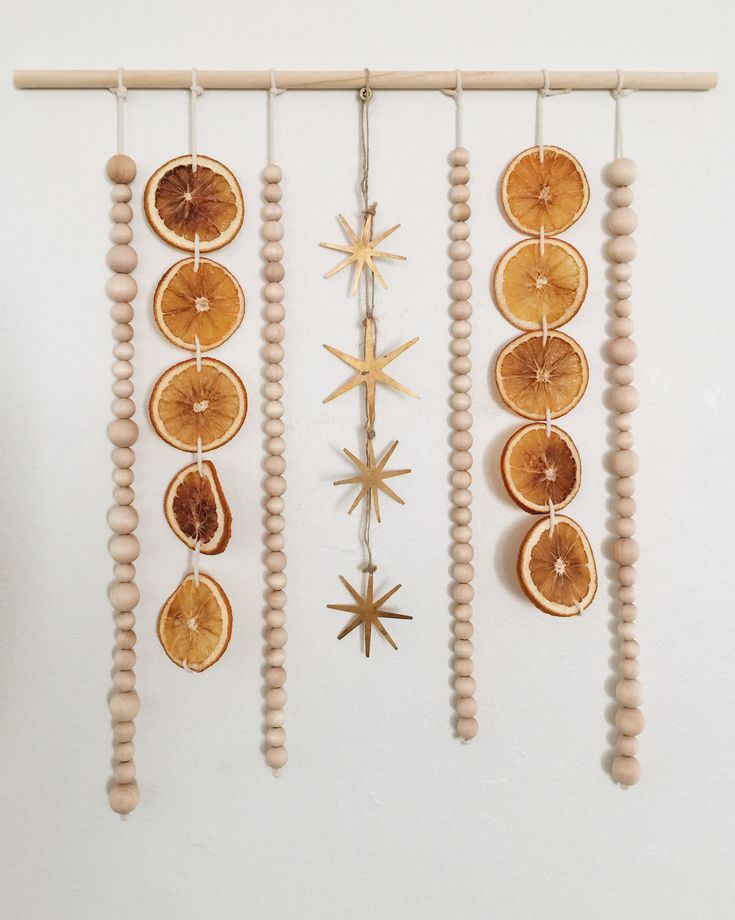 So that it does not rot inside there without supervision.
1.1.5. Outdoors
After slicing, thread the orange slices onto wooden skewers or thread them and hang them in the kitchen. So New Year's decorations hang for about a week. The smell in the kitchen is excellent and the mood is New Year's Eve. If it is a pity to let several fruits dry, you can do this periodically, several slices at a time. This method has a feature - orange slices, when dried in limbo, come in various shapes, not flat. Sometimes it adds a special charm to jewelry.
1.1.6. In the microwave - an extreme method
This method is for the brave. I'll explain why. No matter how you cut into 3mm or 2 or 4, the fruits are all different and there will be no ready-made absolutely accurate recommendations on the time. Even if you start with 10 seconds and be very careful.
But one has only to overdo it, as a slice of lemon or orange will flare up like a torch. I experienced it. I can not say that these are very positive emotions. Here in the photo I can show an instantly burned circle of lemon.
And the physics of this process is as follows. If the juice slowly evaporates on the battery or in the oven, then in the microwave it simply flows out of the fruit. And it needs to be drained, and again put in the microwave and turned on for the next 10 seconds.
For me it ended up with the fact that I still dried one slice, but dried it all the same on the battery, so the process is more controlled.
1.1.7. Helpful Hints
- Cut into pieces 3mm thick.
- The juice is sweet and the mugs will stick in the paper. Don't worry, you can gently peel it off with your hands or something sharp
- Mugs are very brittle when dry and should be handled with care.
- To get slices like from frost, you need not sugar, but gelatin. I usually dry on a battery on a battery.
 If dried in the oven, the temperature should not be higher than 70 degrees.
2. Dried oranges for decoration with slices - uses
Like any creative process, the process of drying oranges can be so exciting that it will be difficult to stop (until the oranges run out). Therefore, I will take the liberty of suggesting use cases.
2.1. Dried orange slices in tea are also good
Dry orange slices in jars look very nice, and from time to time it is also nice to take a slice from there and put it in tea. In addition, it can be used to make mulled wines or any warming aromatic drinks.
2.2. Dried oranges in circles for decoration
Christmas decorations, under the Christmas tree, we use to decorate New Year's gift wrappings, to make compositions.
3. Whole dried oranges for decoration
Whole dried oranges or tangerines or small lemons look incredibly attractive.
3.
The method was simple. We cut the orange with a sharp, sharp knife from top to bottom, leaving the top and bottom uncut, which is logical. The fruit must not fall apart.
And just put it on the battery to dry. Watch as it dries, turn over. The incisions should, as it were, open up, but sometimes they “grow together”. Do not let them do this, renew the incisions, the juice evaporates through them. After a while, the incisions will become wider, and the crust will become hard and dry. I dry small dryish fruits, these dry for almost a week on my battery.
3.2. How to dry whole oranges - useful tips
I would not recommend using the oven when drying whole oranges, as they will dry out faster on the top than the core and the inside of the fruit can then rot
4. How to dry oranges beautifully
You always want to make it more beautiful, more ideal and more perfect.
4.1. Let's compare the drying methods of lemon and orange slices
- The color of the slices will be lighter, more natural when drying on a battery in an open way
- The color of dried fruits in the oven will be darker, not because they are "roasted", but simply when dried in the oven, the fruits give off more moisture.

- By the way, over time, all slices dried in any way will darken, all for the same reason, they will give even more moisture. And of course, they will become more fragile.
- If oranges are thoroughly blotted before drying, the cell pattern of an orange or lemon will appear to be smeared, but in general this can only be seen in direct comparison.
- When dried between cartons, the slices will be perfectly even, and when dried in the form of garlands, they will have an uneven surface.
Dried oranges for decoration, dried in any of these ways, is an amazing material for festive pre-New Year creativity.
How to dry oranges for decoration / Basic methods and life hacks - article from the "How to store" section on Food.
 ru
ru Choose ripe fruits with even skins
For drying, you need to choose the best of oranges. Pay attention to such points:
-
Let them be bright, unripe citruses look ugly after drying;
-
Try to look for fruits with pulp of different colors, it will be more interesting to use candied fruits in the decor;
-
The peel of oranges must be even, without dents, stains or damage;
-
It is good to combine large citruses with small ones, they will create an interesting rhythm in a panel or garland.
Prepare the oranges for drying
Rinse the oranges well under running water. It is important to remove a layer of wax from them, which is often rubbed on fruits for safety during transportation, but do not be zealous so as not to remove part of the peel.
On a cutting board, cut the fruit into even rings, their thickness should be approximately the same - about 5 mm. It is better to take a board with grooves, because the juice will stand out when cutting, do not forget to drain it.
If you want to dry the orange completely, make 8-10 cuts from one "pole" to the other, in the same way as the slices are arranged.
Carefully remove the pits from the slices and place the citrus circles in water acidified with citric acid (½ teaspoon per 1 liter of water): this is necessary so that the candied fruits remain bright even after drying. Leave them for about half an hour.
Lay the slices on paper towels or a clean wafer towel so that all the liquid is glassy, blot gently with another thick cloth (thin ones will stick and tear). If you want, you can stick clove sticks in them or sprinkle with cinnamon: this way the candied fruits will turn out more fragrant.
Choose your preferred drying method
There are several ways to dry oranges for decoration, each with its own pros and cons.
-
Oven dry
Fruit drying on a tray. To do this, you can put a sheet of thick parchment so that it absorbs moisture either on the grill with the convection mode turned on or with the oven door ajar at a minimum temperature of no higher than 60-80 ° C, this takes on average from 5 to 11 hours. It is important to constantly monitor that the temperature does not rise, because candied fruits can easily burn or turn brown. Turn the oranges over several times during drying, making sure they do not lie on top of each other.
Before drying the oranges in the oven, you can sprinkle the slices with sugar or icing sugar (some of the oranges can be replaced with yellow lemons and green limes): then they will shine beautifully and elegantly after drying, creating the effect of being powdered with snow. This decor is great for cakes and other confectionery.
This method is considered the simplest and most reliable: the design of the device is designed specifically for drying fruits, so there is no risk that the candied fruit will burn. The dryer must be heated to a temperature of 75 ° C and put sliced \u200b\u200band whole oranges on pallets. Depending on the power of the electric dryer, you will receive ready-made candied fruits in 9-20 hours (the larger the slices, the longer they will dry and the more bizarre shape of the slices will result - they will deform, shrink and darken, and this is completely normal).
Too many candied fruits cannot be dried in this way in a standard city apartment, and drying takes more time - at least 2-3 days. Lay the sliced oranges on the parchment on the battery. If the surface is uneven, place a suitable sized grate on top, or just a piece of thick cardboard with holes pierced for air circulation. Turn oranges from time to time to dry evenly.
-
Drying in a pan
You will need a cast iron pan with a thick bottom and walls: note that non-stick cookware will not work! Lay the orange rings on parchment and dry them over low heat. Turn constantly and make sure that the candied fruit does not burn.
The method that takes the most time, but practically does not require attention: just hang mugs of oranges strung on threads in a garland or lay them out on clean gauze or thick paper and calmly go about your business. In summer, a balcony, a sofa, a space under a canopy in the garden - any place that is well ventilated - is suitable for drying.
If the orange slices are hanging, then nothing needs to be done at all, in the second case, the slices should be turned over twice a day. It will take 2-3 days for complete drying.
How to tell when oranges are dried out
It is very important to dry the candied fruits completely, otherwise, if there is a little damp pulp inside, they will mold rather quickly, so you will have to throw out the whole batch.
In well-dried citrus circles, the core is completely dry and coarse (if you press it with a match, it will begin to crumble), and if you tap the candied fruits against each other, you get a dry and rustling sound.
How to store dry oranges correctly
It is very important to store dried oranges in a cool, dry place. It can be a clean glass container with a lid, a bag with a zip fastener, a bag of thick paper. Add a couple of cloves, a cinnamon stick, a dried vanilla stick, or a sachet of vanilla sugar to add flavor to dry oranges. Check the candied fruit from time to time to make sure they don't stick together.