Create a craft room
13 Tips for Setting up a Craft Room
How to Establish Your Creative Space
By
Rita Shehan
Rita Shehan
Rita Shehan is a crafting expert and writer focusing on paper crafts. She shares over a decade of paper crafts experience, including quilling, origami, scrapbooking, paper flower creations, and designing invitations. Rita is also the founder of the website EasyPaperCrafts.com.
Learn more about The Spruce Crafts' Editorial Process
Updated on 01/17/20
Betsie Van der Meer / Getty Images
There are several home design ideas to consider when designating a space devoted solely to the pursuit of crafts. Make sure to think about the following points when establishing your work area.
First of all, is the room big enough for your needs? Does it have enough space for you to work comfortably plus enough space for your tools and supplies?
You might choose to use an extra bedroom, basement room, or part of another room that is designated for another purpose. Make sure to consider the type of flooring the room has. A carpeted room might not be such a good idea if you work with paints, chemicals, or solvents when creating your projects.
Does this room have privacy? Your area should be away from the active spaces of your home. You will need a quiet place to think and come up with creative ideas. This space will be your creative studio!
-
01 of 13
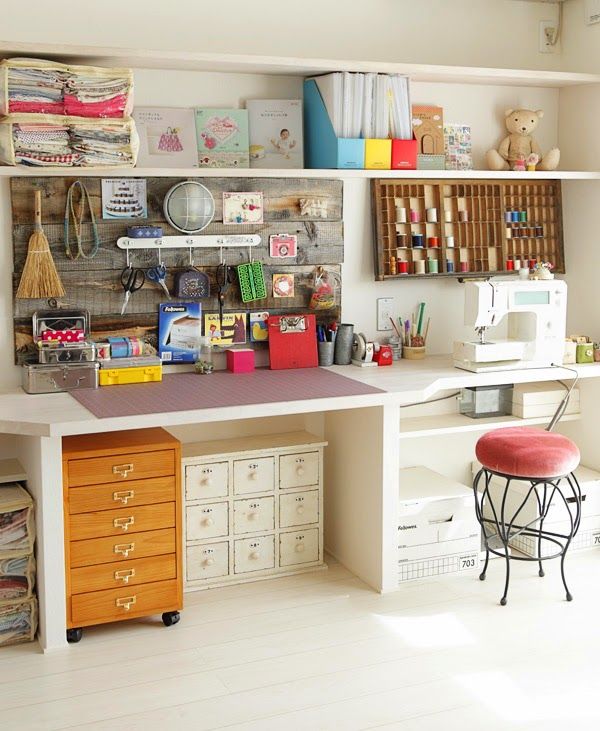
Find the Right Work Table for You
The most crucial piece of furniture necessary for a craft room is a big, sturdy work table. The surface should have plenty of room for you to spread your materials and supplies out comfortably. You should be able to work efficiently, and with comfort, Creativity does not flow in areas that are small and cramped.
-
02 of 13
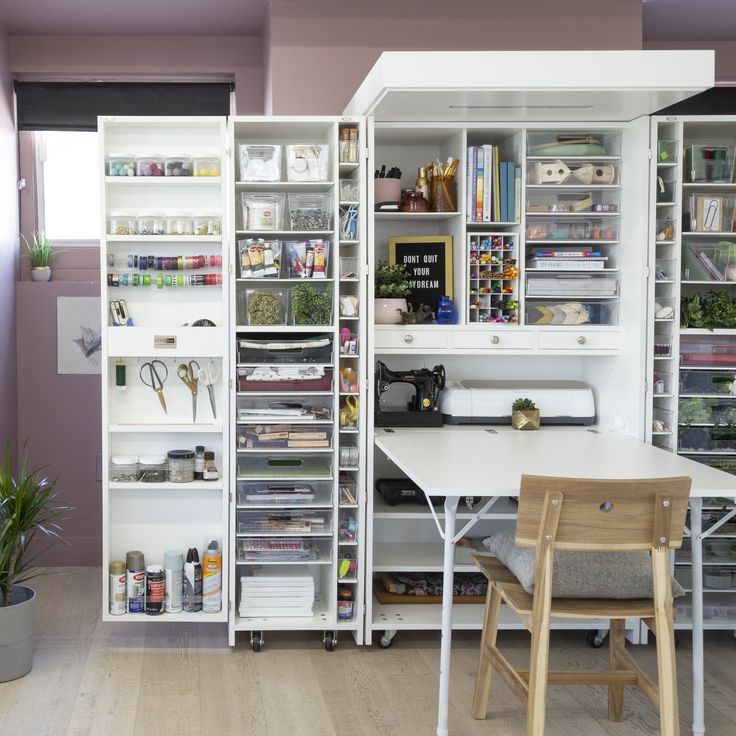
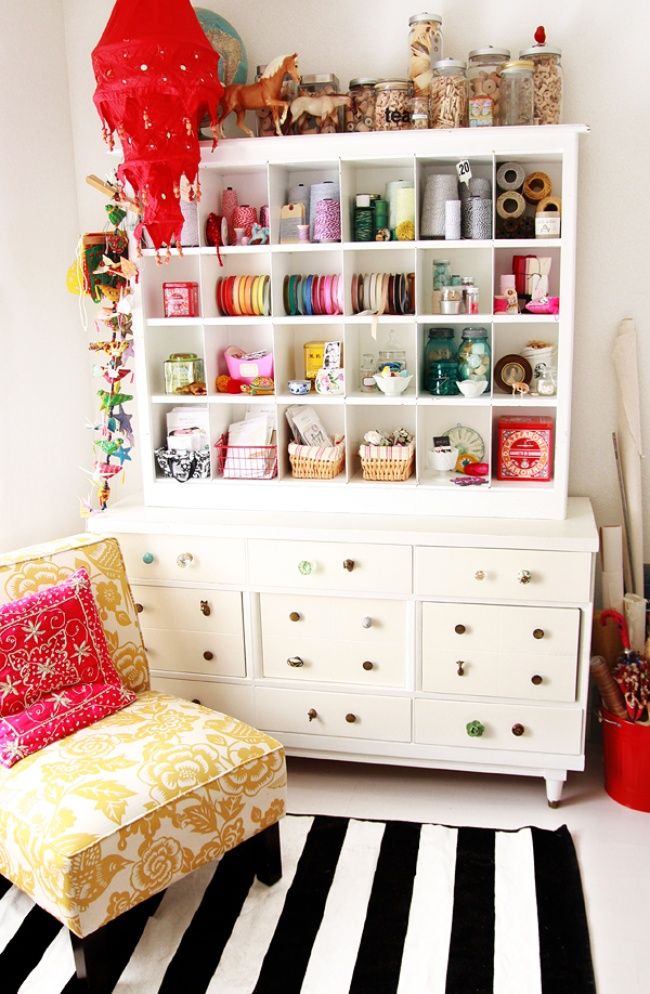
Find the Right Shelves and Splurge on Them
Shelving units, both open and closed, are essential for the craft room. Keep the crafting supplies you use most often on the open shelves in plain view, and store less often used art supplies and tools behind closed doors. You can never have too many shelves in a craft room. Crafters love to stock up on good crafting supply deals.
-
03 of 13
Don't Forget the Countertops
If you are lucky enough to have an ample workspace, adding, countertops can be a beautiful addition to your work area. These allow more than one crafter to work in your space and also help when you have to move around a lot.
Install your countertops at standing height. You should be able to work on a countertop without bending your back. The right height prevents back pains and sprains. Use bar stools if you want to sit and work at your craft bars. -
04 of 13
Divide Your Workspace Into Zones
Bring order to your workspace by dividing your area into zones.
 Have an area for your computer and digital needs. Have another area for crafting projects (painting, sewing, paper crafting, etc.). Designate yet another area as a gift wrapping station. Set up your photo equipment near a window if you take pictures of your crafts.
 Everyone works differently, and there is no one standard size fits all plan to establish work zones. You have to determine your crafting needs and set up zones according to your preferences. Orderly zones help you stay organized and efficient.
-
05 of 13
Have Windows Which Allow Natural Light Into the Room
One of the most helpful things your craft room can have is large windows with natural light pouring in. Granted this is a luxury that is not possible for all crafters, as many people are stuck in basement areas with small or nonexistent windows.
Numerous crafters have blogs and share photos of their crafts. If you want to take excellent pictures of your work projects, a natural light source is an absolute must-have.
-
06 of 13
Consider Storage Space and Storage Containers
If you are planning to use a closet or utility cabinet for storage, don't forget to have plenty of storage boxes and baskets on hand for your supplies. You don't have to spend a ton of cash if you don't want to. Buy baskets at thrift stores or yard sales. Repurpose some of those Amazon mailing boxes by decorating with fabric or paper.
Labeling storage containers is crucial! A label machine comes in handy for keeping track of your crafting supplies that are stored in those boxes and baskets. Crafters often forget what supplies they have on hand, and if you don't label the containers, you will end up wasting money. Who wants to spend precious hard-earned cash buying replacements for tools and supplies that you already have on hand?
-
07 of 13
Get a Pegboard and Hooks
A pegboard mounted on a wall near your craft table is an incredibly useful addition to your craft room.
 Use hooks to store your art tools on the board and never have to deal with disorganization and frustration, searching for a needed tool.
 -
08 of 13
Get a Chair With Wheels
An office chair with wheels comes in very handy! There will be times when you want to move to an area and not leave your seat. Some might view this as incredibly lazy, but you will appreciate your chair with wheels when immersed in a craft project.
-
09 of 13
A Desk
A computer is an integral part of crafting these days. You may use it for editing pictures in Photoshop or attach it to a digital die cutter for cutting out scrapbook elements. You will need a desk for your computer with ample drawers for storage space.
-
10 of 13
Get a Bulletin Board
Bulletin boards are handy for pinning to-do lists, photos, inspirations, bills and a host of other papers. Decorate your bulletin board with fabric or paper to coordinate with the rest of your craft room decor if you so desire!
-
11 of 13
Get Built-in Wall Units
Built-in wall units used for storage is another luxury item for your craft room.
 It's nice if you can afford it! One hack to achieve this look is to place affordable Ikea storage units next to each and trim with molding. It's a high-end custom look with a reasonable price tag!
 -
12 of 13
Consider Your Lighting Needs
Lighting is an important consideration, especially if you have a basement craft room. Halogen task lighting which mimics natural light is easy on your eyesight and makes sewing, painting, and drawing much more enjoyable.
-
13 of 13
Get Soft Rubber Mats
If you stand for extended periods when crafting, you may want to buy a soft rubber mat. Standing on your feet might cause leg pain and backaches. Rubber mats help absorb and alleviate foot and leg stress.
10 ways to create a practical yet stylish space |
(Image credit: Vanessa Arbuthnott / Dan Duchars / Brent Darby)
Well-thought-out craft room ideas are handy for those that enjoy pursuing creative passions.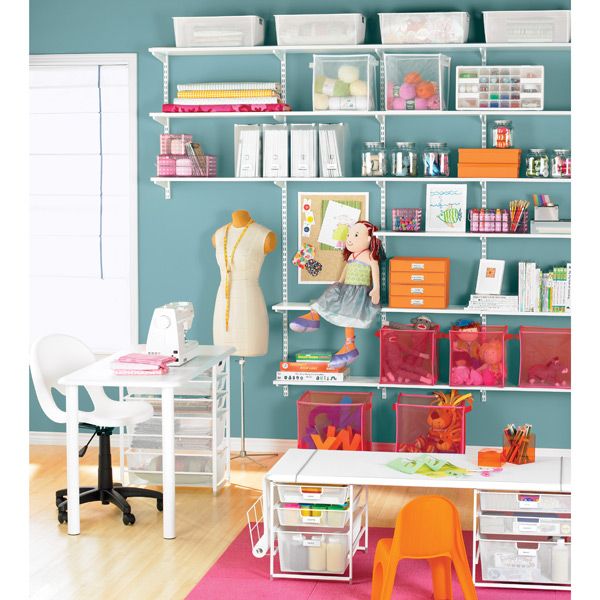 Whether you're a professional painter or budding potter, having a dedicated space away from the hustle and bustle of the home, which is kitted out with all your crafting tools, is the perfect way to keep things organized and to get into the creative zone.
Whether you're planning a crafting area as part of an existing home office, or embarking on an entirely new room design, these craft room ideas and handy tips will help inspire a practical yet stylish space.
Craft room ideas – 10 beautiful schemes to inspire
Craft room ideas are becoming increasingly sought after as we seek to make more time for mindful activities at home. When it comes to designing a craft room or home office setup, practicality is a priority, but equally important is making the space an inspiring place to be.
'While my work space is a place to get things made, it's also a source of inspiration to me,' says block printer and fabric designer Molly Mahon. 'Make sure your studio is a place you long to head to, a special sanctuary for you and your creativity only,' she adds.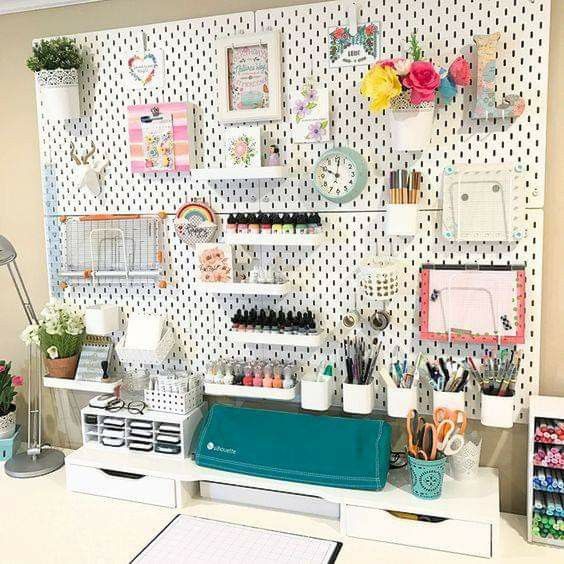
The key to organizing a craft room is to ensure that there is a dedicated space for everything you need to store and do, so before investing in furniture and creating a layout, do an inventory of the things you need and be clear about what tasks you will undertake in the space.
1. Turn a summerhouse into a craft space
(Image credit: Dan Duchars)
Set away from the house, a garden room or she shed idea makes the perfect creative space to escape the chaos and get stuck into some mindful crafting activities. Available fully insulated, double glazed, wired and plumbed, these self contained spaces are ideal for whiling away the hours all year round.
When choosing craft room furniture consider freestanding pieces as these will give flexibility over your room layout. Choosing lightweight, portable pieces such as folding tables or storage trolleys on casters means the room can easily be reconfigured, which is handy if you are working on a big project, or if your craft room doubles as a multi-functional space.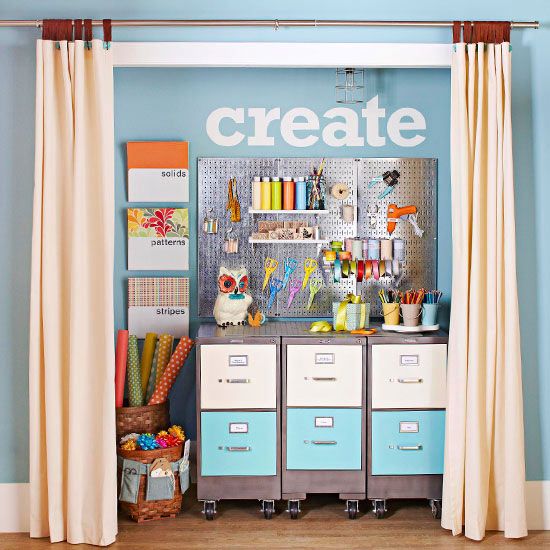
2. Consider lighting in a craft room
(Image credit: Anya Rice)
Ample home office lighting is essential when doing detailed crafting work, so be sure to position your desk or work table near a window and to factor in plenty of task lighting.
'An overreach floor light or clip light can provide an immediate solution to illuminate targeted areas for the performance of specific tasks or activities,' explains Charlie Bowles, director of lighting company Original BTC . 'Easily moveable, they can transform your lighting scheme without any installation costs or need for an electrician.'
3. Mix closed and open storage
(Image credit: Molly Mahon)
Good home office storage is essential when it comes to organizing a home office and craft space, to maximize every inch of space consider made-to-measure open shelves floor-to-ceiling which can be fitted around your architecture. As well as being practical, the storage ideas and office wall décor you choose should help create an inspiring environment to work in, explains fabric designer and block-printer Molly Mahon .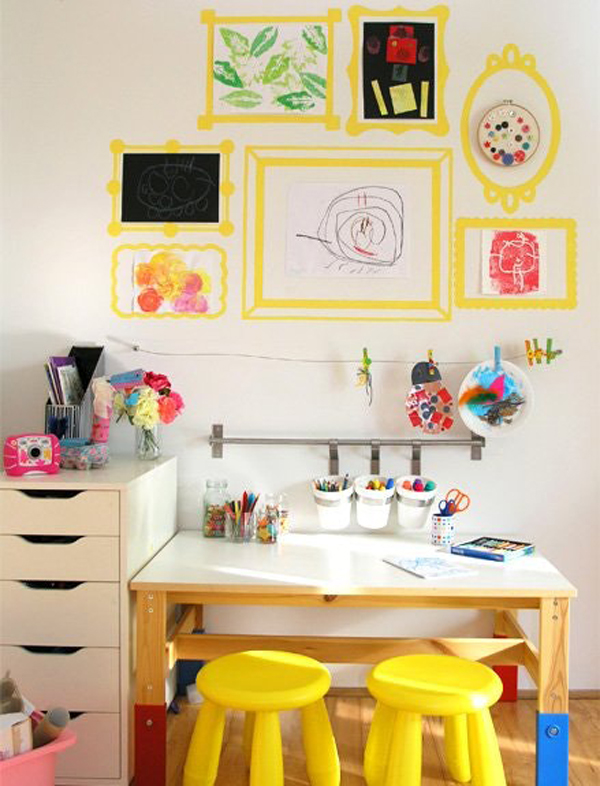
'I like open shelves as I like to have everything accessible and on view in my studio, so things are easy for me to locate. It also makes me feel happy and inspired to see my wooden blocks and mugs of paint brushes, or pots of lovely colored paints.'
However, having some closed storage is handy for concealing clutter and eye-sores. For a fun way to brighten up closed storage, why not give the doors a colorful paint idea? 'Perhaps paint the name of the item inside, too – this keeps things ordered and adds charm,' says Molly Mahon.
4. Choose a swivel chair
(Image credit: Vanessa Arbuthnott)
Craft rooms are spaces where we may spend long hours sitting at a work table, so be sure to invest in comfortable, ergonomic home office seating. Swivel chairs that have an adjustable seat are handy as they allow you to easily manoeuvre around your workspace, plus, like they can quickly wheeled away to make space for large projects.
For fabric designer Vanessa Arbuthnott , 'a really comfortable swivel chair,' is a must-have in her craft room, but it also needs to be stylish, too.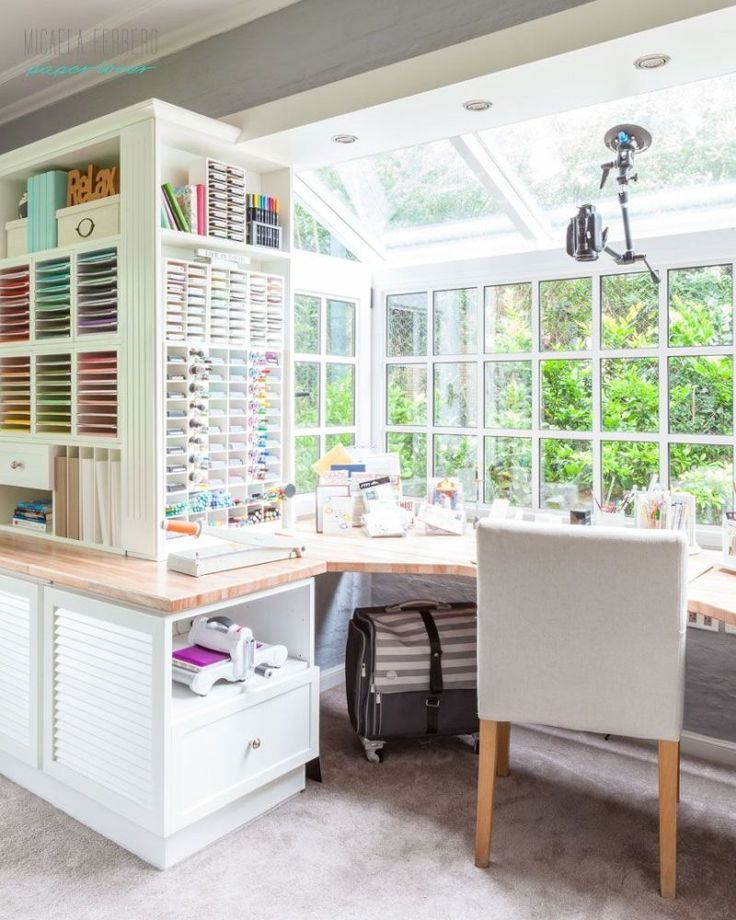 'I love recovering vintage office chairs from online auctions, which I then reupholster with a strong linen for durability,' she adds.
5. Create a crafting corner
(Image credit: Future)
You don't need a separate room to get crafting, if space is at a premium try creating a creative space in a bedroom, or even a shed office. If you're considering a bedroom layout with a desk, position it by the window to make sure there is plenty of daylight.
For the perfect sewing craft room, a desk or table set at the right height and an adjustable chair are both essential purchases. Factor in plenty of storage for fabrics folded on shelves and make sure there is enough height to house large rolls of fabric. 'Boxes covered in fabric to hold remnants and scraps for crafting, are also handy,' adds Vanessa Arbuthnott.
Small haberdashery items like ribbons, pins and buttons can easily go amiss, so be sure to factor in small desktop storage for them. Small filing cabinets work well, alternatively clear jam jars will allow things to be seen at a glance.
6. Hang an inspiration board
(Image credit: Future / Alun Callender)
No craft room is complete without a noticeboard to pin up inspirations that spark creative ideas. 'I like to use my inspiration board for tear out pages from magazines, hand printed wrapping papers, greetings cards, photos and scraps of fabric – in fact anything that catches my eye,' says Vanessa Arbuthnott.
There are all sorts of designs available, from craft room pegboards to wire designs to eye-catching padded fabric boards.
7. Consider your color scheme
(Image credit: Future)
When it comes to selecting home office paint color ideas for craft rooms, think about how you want the space to feel. While creative spaces should be inspiring, it's also important that they allow you to focus and are not overwhelming.
Decorating with white is a perfect neutral base for experimenting with color, plus it will make small home offices and craft corners feel brighter, alternatively, a soft pastel will provide a hint of color and personality without feeling too dominating, or decorating with yellow will provide an energising space.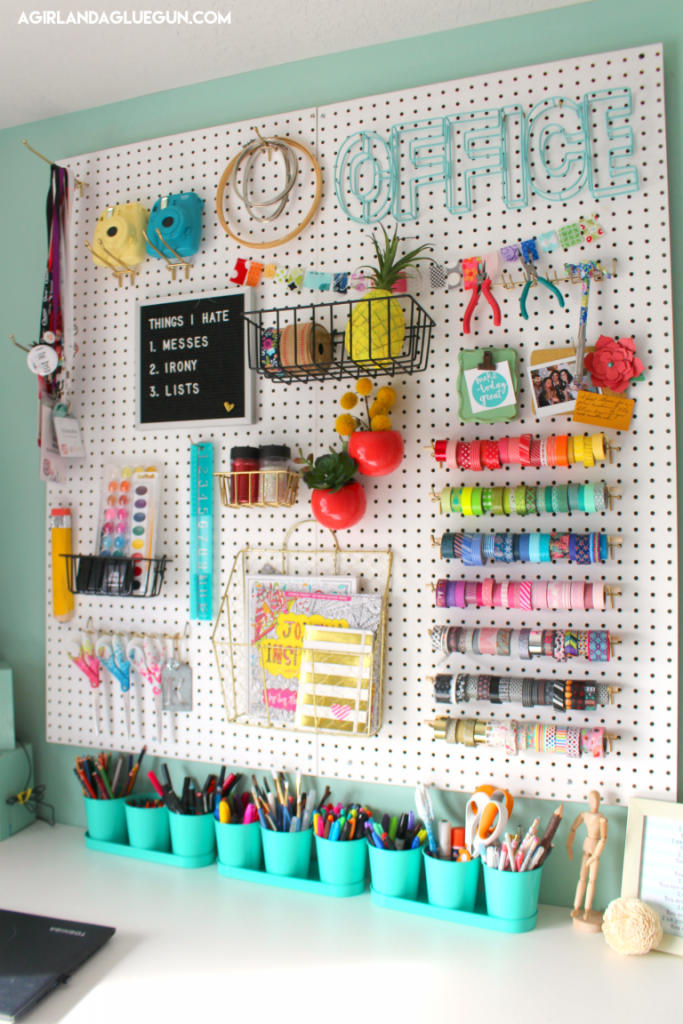
'Soft Pinks such as ‘Dorchester Pink’ and ‘Confetti' provide warmth to a space whilst remaining light and airy. They are not too serious and often make us feel uplifted and calm,' explains Ruth Mottershead, creative director at Little Greene.
8. Add in vintage furniture
(Image credit: Brent Darby)
Bearing the patina of age, vintage home office desk ideas and cabinets are a wonderful way to bring character to a creative space. With multiple drawers and compartments, this old glazed haberdashers unit is great for keeping materials stored and organized while allowing you to easily see what you have and where.
9. Consider window treatments
(Image credit: Hillarys roller blind)
Choosing the right window treatment can really enhance a craft room. While plenty of natural light is essential, sometimes the glare from the midday sun can make for an uncomfortable working environment, so it's worth fitting blinds to help control the light levels.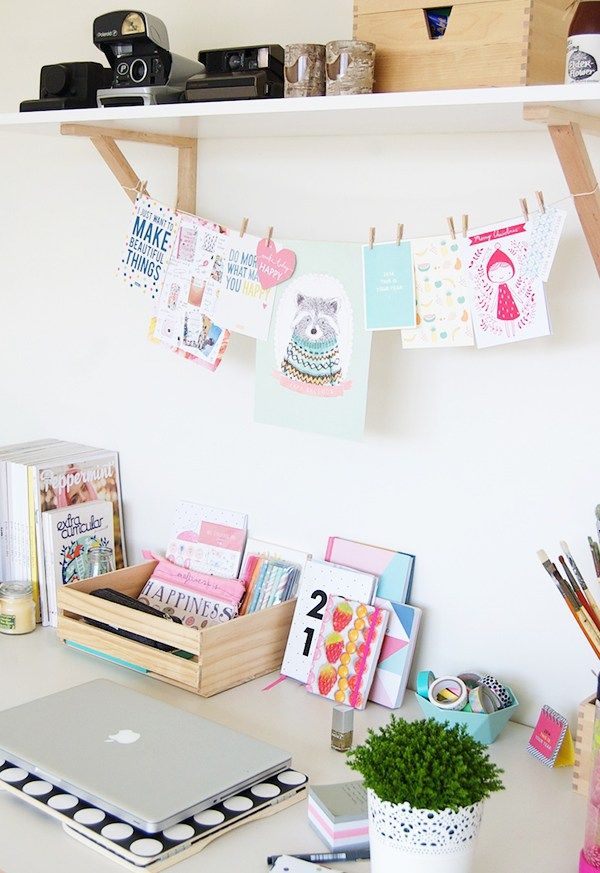
'When getting creative in your craft room, it’s likely your window treatments will suffer from a little wear and tear, so opting for roller blinds with an easy clean finish is the most practical choice,' says Hannah Cooley, product manager at Hillarys .
'Roller blinds are also very versatile, coming in lots of shades and textures, so they can be used as the final touch for transforming your craft room into a space of color, electricity and creative inspiration.'
10. Make a creative space under the stairs
(Image credit: Kasia Fiszer)
It can be challenging to know what to do with under stairs spaces, as they are often small with awkward angles – why not make the most of them by adding a desk and transforming it into a little writing nook? Opting for a desk with drawers will give extra storage and make sure the small craft space is well lit with an adjustable desk lamp.
What are must haves for a craft room?
A sturdy desk, adjustable chair and plenty of versatile storage solutions are all must haves for craft rooms.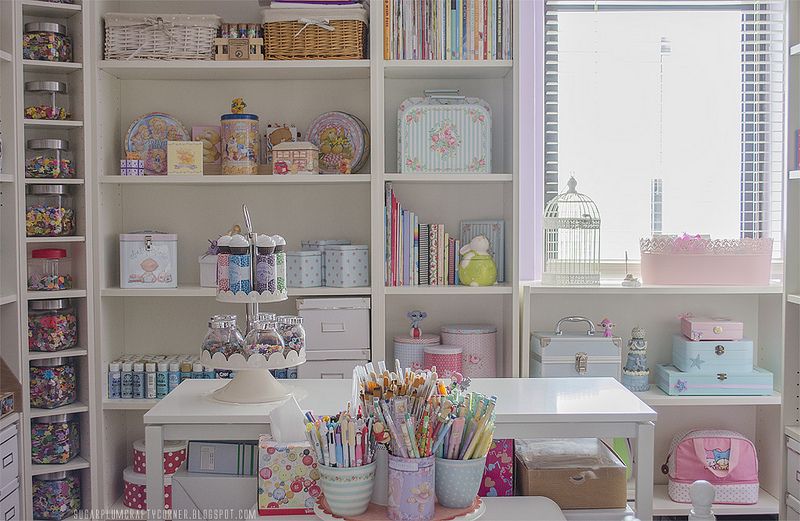 Lighting is also key, and any craft space will need good levels of natural light as well as layered task lighting.
Custom-made cabinetry and shelving tailored to your space, and integrated with a variety of storage solutions designed around your needs, is a brilliant way to maximise storage and keep a craft room organized.
'The big advantage of bespoke furniture is of course that it can fill the space and cope with any idiosyncrasies. It is amazing how much storage you gain by going high up the wall, and if you make it no deeper than it needs to be your room will still feel spacious,' says Simon Tcherniak, senior designer at Neville Johnson.
When designing storage a combination of open and closed is also often favourable. 'Seamlessly integrated storage means unsightly cables, stationery and messy papers can be hidden away easily. While open shelving allows for some decorative flair to showcase your favourite possessions,' adds Simon Tcherniak.
Freestanding and lightweight pieces of furniture are recommended if you want flexibility over your layout, plus units on casters are handy as they can easily be wheeled around the room if it needs to be reconfigured.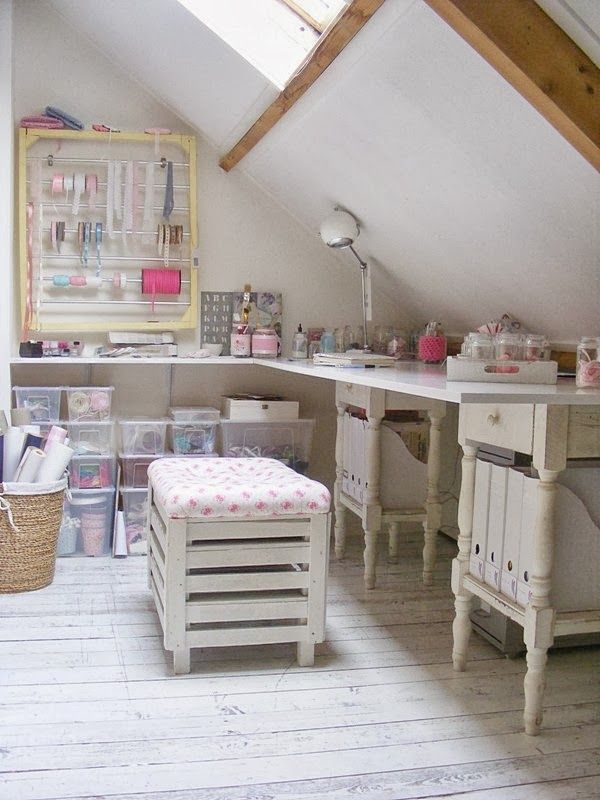
(Image credit: Future / Brent Darby)
Pippa is Content Editor on Homes & Gardens online contributing to Period Living and Country Homes & Interiors print issues. A graduate of Art History and formerly Style Editor at Period Living, she is passionate about architecture, creating decorating content, interior styling and writing about craft and historic homes. She enjoys searching out beautiful images and the latest trends to share with the Homes & Gardens audience. A keen gardener, when she’s not writing you’ll find her growing flowers on her village allotment for styling projects.
How to create your own workshop or workplace
Workshop. A place where the ideas of the master are embodied.
The cradle of inspiration, a place of concentration "on prayer", things filled with love and positive energies.
Workshop. What is the most important thing for her?
First, this is our workplace.
Second, the atmosphere.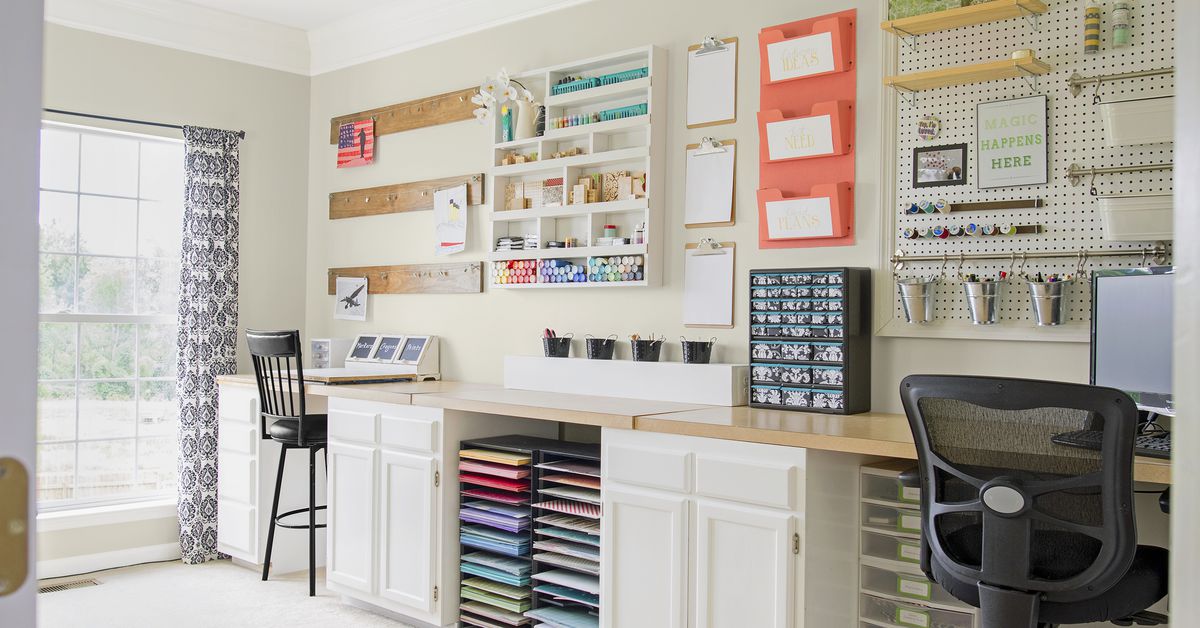 For creative people, it is special, it should inspire.
Third. I, like many of you, build houses. And here you need to be able to combine living quarters, everyday life and the workshop itself so that it would be convenient for all households.
It took me a long time to get to my workshop, to furnish it. And now I understand that I need to share my experience of its creation. I think that this will help to avoid many mistakes, reduce your precious time and inspire you to do something. So, let's begin.
Where does it all begin?
From an idea, a thought - you wanted to create something with your own hands in some specific place equipped for this.
At this stage, it is best to turn on the desire to be unlimited. The desire to have the kind of workshop or workplace that you want.
Now take a piece of paper and write what you will do, what kind of creativity you will do, what kind of creativity you would like to master. Opposite or under each activity, write down what materials and tools you will need for it.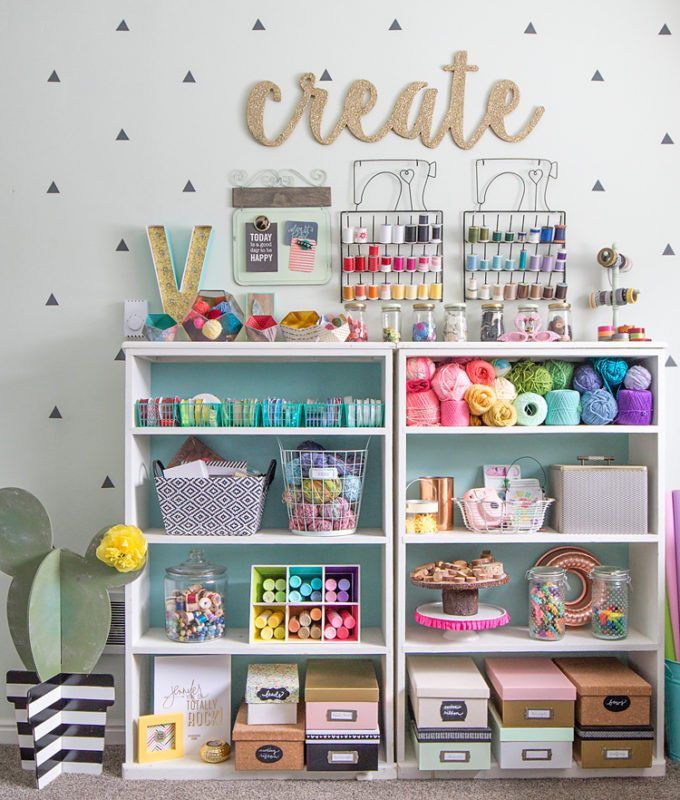 So that you have the most convenient place to create your ideas, do not miss anything. For me it looked like this:
While you are writing, ideas come to you about what table and chair you need for this, how many places you need to store materials and where they can be stored. What tools are needed and where will you store them, where will you store the blanks for future work, and so on. Do you understand?
Do not miss this thought immediately draw it, sign it so that it would be clear what it is and what it is for. Let it look like a sketch, but a sketch that is understandable to you, as you see it, so that this idea does not run away anywhere and you would then realize it. You can sign what color you will have a table, organizer, walls, shelves and so on. Draw how they will be located. At this stage, do not limit yourself (this is very important). Create in your imagination a workplace where you feel comfortable, a place that includes all your potential for creativity. No matter what material you have, no matter how much finance, no matter how much free space for it. At this stage, we do not limit ourselves to anything. Here only the flight of free thought.
I will show you examples of my notes and sketches.
Due to the fact that I did not make such a list at the very beginning, a lot of time was wasted on alterations, “thinking up” and so on. I don't want this to happen to you.
Good. We have made pre-recordings. The more carefully and in more detail we made them, the less time it will take us to create our workplace and, of course, it will be as convenient as possible. And since we strive for professionalism, our workshop will correspond to this.
Now let's start implementing our idea. You can just follow these steps:
1. Take a tape measure and paper. As a paper, a squared notebook is best. It is easier and more convenient to draw schematic drawings by cells.
2. Choosing a place for your future workshop.
Here we look at how best to combine life, the convenience of our household and our creativity.
Let me give you an example from my own experience.
At the moment when I needed to create a workplace, my son and wife were going to come to us to live with us. There were circumstances when you need to quickly find the right solution. To make everyone feel comfortable. The apartment was in a state of repair. In the hall, as they say, "the horse did not roll." Only our room was in good condition. My husband and I decided to put the children in our room, and equip the hall with a workshop and our own bed.
This is where I made my first mistake - I rushed to the Internet, looking for suitable interior options for us.
If I had then identified on a piece of paper all the activities that we want to do, including tools and materials for them, I could understand exactly how much space is needed for all this, then I would have saved a lot of time. I did not find anything interesting on the Internet. There are very few examples of workshops for puppeteers. A lot for people who, for example, sew, knit, draw. I think that each of you has accumulated one or another part of the experience in creating your own workplace, and you already understand that, of course, a workplace for a creative person is an individual thing and everyone has their own. In my case, this list, which I still thought of writing, helped me a lot. It was in the middle of the process, when, let's say, some of the large equipment had already been created and it was difficult to change it. Therefore, I strongly advise you to write such a list.
For example, my list includes: making dolls, furniture for dolls, painting, leather goods, sewing and a lot of things that I have planned myself. We needed a place for tools of various calibers, where we could dust and knock, sew and draw, and sleep somewhere. The most optimal solution was the creation of the second floor, and then the third.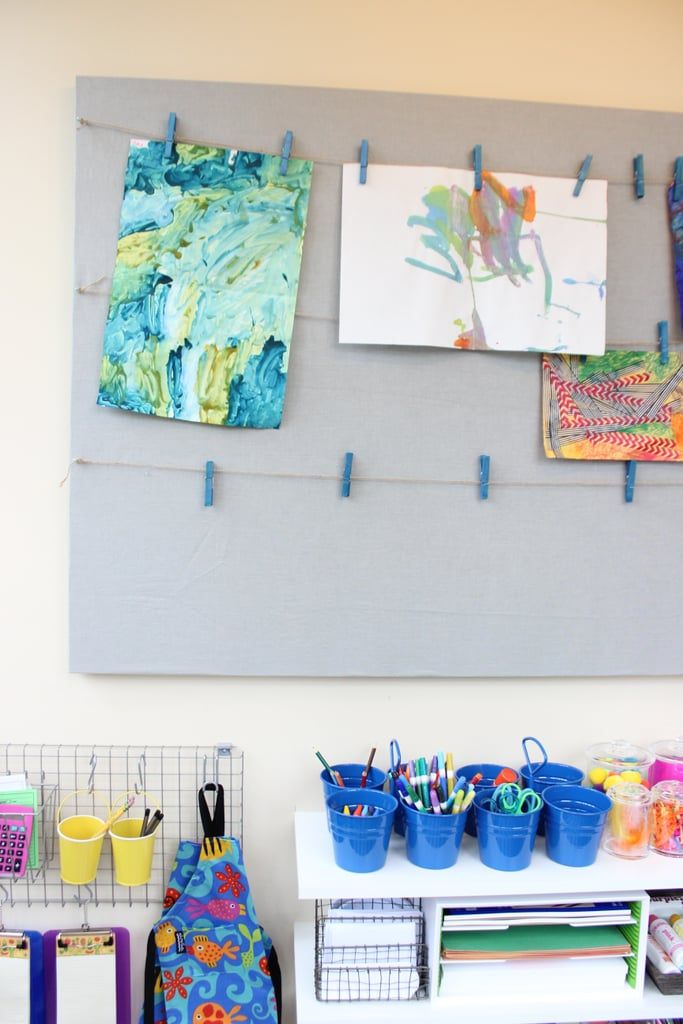 When they thought about where to put the computer, it turned out that he stood on the second small floor, and the bed went to the third, solid floor, here is a photo:
Design sketch:
Here is the result. It remains to make a second doll and a drainpipe. And there will be two big theater curtain style curtains.
Our bed. Very comfortable and cozy. Behind the pillow is a large bedside table. Hinged doors, covered with polka dot fabric:
I painted the sky on the ceiling. I'll show you his sketch, drawn in a hurry, so as not to miss the idea and how it turned out as a result:
So. Consider all circumstances. With the thought: “everything is possible”, and “everything will work out!”, Take a tape measure, pencil, checkered notebook and walk around the apartment. Take a look at it in a new way and choose a place. Your magical place.
3. You have found a place. Take measurements: height from floor to ceiling, width and length of the walls. Draw this rectangle or whatever shape you get and write all the dimensions there.
4. At this point you have a place with dimensions. Before you start creating a workshop, of course, you need to make a sketch of it, the more detailed the better. The most important thing is that it be understandable to you and to the person or people who will make your workshop. Draw what it will look like. Table, shelves, organizers. Look again at your list of activities. What materials and tools are needed for it. Draw on paper where and how your materials and tools will be stored, so that everything is convenient, everything is at hand. Here you already define the dimensions. Look at the sketches you drew when you wrote the list. See how you can make them come true. Do not forget to choose a place for finished work.
Here are the sketches I had. This is the place to sew:
Here is the result.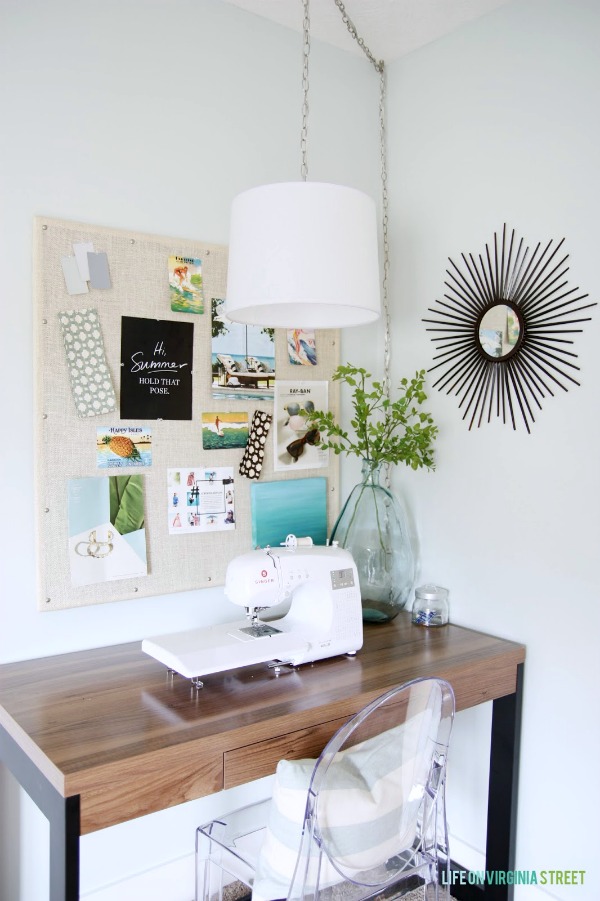 It remains to finish the little things:
I won’t say that the sketches were the best, but since we did all this with my husband, they were clear to us. At this stage, you make a sketch of the workshop. When you decide to do some of your work, you first create a sketch, also here.
5. Sockets, switches, lighting.
This is also a very important point. Before you hang something on the walls, you first need to find a place and lay the wire for sockets and switches. How many do you need? For sewing machine, for hot gun. How many gizmos do you need to turn on at the same time. Extension cords usually get in the way under arms and legs. Take a pencil and put crosses for your future outlets.
Lighting. Of course, you need good light. Table lamp or lamp attached to a shelf. You may also need an outlet for lighting. On the walls, draw places for sockets and where the wires will go so that they do not interfere with you and look beautiful, keep in mind that you need a socket in a convenient place.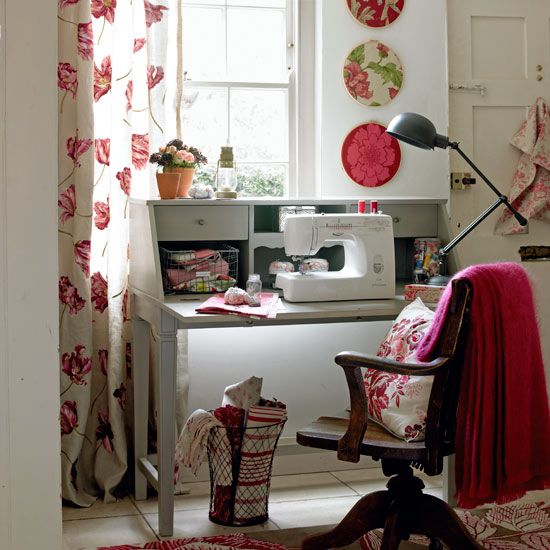 When you have laid all the necessary wires, only after that you can hang something on the walls. I have some sockets built into the table, one socket in the tree.
This option can also be. Discuss this with the person who will install the sockets for you, consult with him, of course. Show where they are needed, and he will do everything for you.
6. What is all this made of.
We look at what is already there. Bedside tables, shelves, cabinets, tables and so on. You can remake and decorate them however you like. Make the surface of the table such that you will be comfortable and pleasant to work on. This is a separate, large and tasty topic for a separate discussion.
What my husband and I used. One customer gave me, at one time, a pair of desks. We took them apart. All the details - both countertops, the sides went to three tables. From one side, they made a folding, working table for working with paints, glue, and so on. On it you can safely saw, sand, without fear of spoiling its surface.
Second table.
Here is an example of a wall decoration. I glued fabric on it. The drawing is made with white acrylic.
We had a closet. He also went into business, instead of him we made this one. Above this closet is a bed.
It remains to be finished.
Bought beams and boards for the bed above the workshop at the construction market. It came out pretty cheap. One more piece of advice. Think through all the nooks and crannies, how they can be used for cute storage of materials and more. Think right down to design. As a result, you will quickly find everything, “pleasing to the eye” and make cleaning easier.
7. Pos.
I am writing about him separately. We all have different types of creativity, now I will explain. I made a floor on which I can put something and draw, drill a hole, I'm not afraid to get it dirty, make a small hole, saw on it and so on. Then wash it, lay out a large fabric and cut it.
Which floor do you need? So that it can be used and easily cleaned, again, so that it is pleasing to the eye and inspires you. Don't miss this moment. Here is a photo of my floor.
8. Window.
If there is a window in the area of your workplace, think about how to arrange it and possibly use it as storage or make a beautiful decoration on it or an area for photo sessions. I mean curtain shelves and so on.
My example. We found and installed two of the most beautiful, textured logs and attached shelves to them.
Stained glass film saves from heat and prying eyes from the street (we live on the ground floor). I don’t hang curtains yet, because for me this is an extra collection of dust.
Each of you has an individual case. Windows are also a great place to take pictures of your work. Think over these little things and decide in what form and quality you need a window.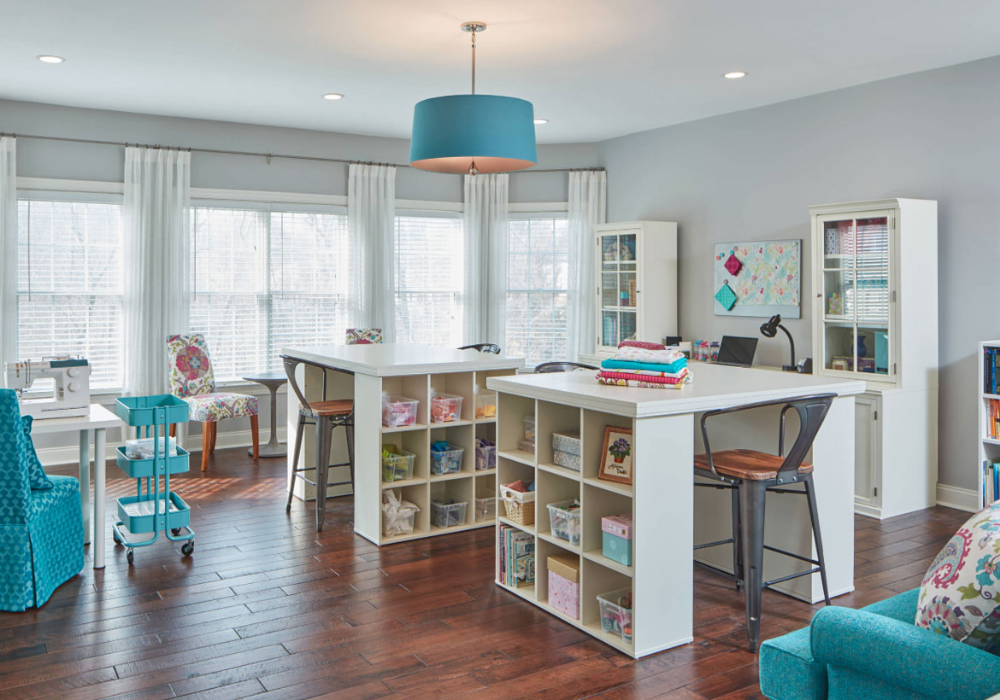
My workshop is almost finished. There are places that need to be decorated. Not all organizers are ready. If I had stumbled upon the tips that I wrote here, I would not have made a bunch of mistakes and rework, and would have made my workshop more convenient. Creating it, my husband and I got great pleasure from the fact that we were able to create it with our own hands and as we wanted. She taught us a lot. I use this experience in my miniatures and share it with my friends. We've put enough love into her and now she's giving back to us a hundredfold. She wants to work. There is enough space here to gather with friends for creative "sessions".
Children of friends love the second floor.
The topic "How to create your workshop or workplace" is very extensive. I wrote the main points that must be taken into account before doing it. For example, I found a lot of ideas, great ideas on how to store threads, wire tools, fabrics. Simply brilliant ideas! But I didn’t find the main points on how to create a workshop, as they say, “from A to Z”. Maybe I didn't search well.
Created this publication so that you also have your own, inspiring and atmospheric place for creativity.
More photos:
With boundless love. Hugs, Maria.
How to open a creative workshop
Olga Lurie
asked questions
Author profile
A separate space for work and creativity often opens up new possibilities.
A reader of Tinkoff Magazine told how in January 2021 she created her own art workshop in Rostov-on-Don and made repairs in it herself, as well as how her income grew thanks to this.
This is a Community story. The editors asked leading questions, carefully edited and designed according to the standards of the journal.
Natalie Ustimenko
paints
Author profile
I am an artist: I paint on canvases, walls and other surfaces suitable for this. And also - portraits to order and a series of paintings for exhibitions, I teach painting and airbrushing to adults and children. I hope that my experience will help creative people cope with fears and also organize a separate workspace.
The need for a separate workspace
At the end of 2020, my husband and I realized that our one-room apartment no longer fit all my paintings and art supplies. In addition, calling clients and students home is inconvenient and undignified. Therefore, we decided to buy a commercial space and organize an art workshop in it.
We wanted to own the workshop, not rent it. They reasoned like this: the payment on the loan is the same as the cost of rent. We had about 40% of the required amount, and we also considered the purchase as an investment.
They took a consumer loan for a period of five years in the amount of 1,000,000 R at 12.9%. They gave 28,000 R per month. Now we are trying to repay early, so we managed to reduce the payment to 25,000 RUR.
Room search
We were looking for a commercial premises with an area of approximately 50 m² in Rostov-on-Don with all communications. The city center is mostly either old houses - rather dilapidated historical buildings, or new buildings with very high prices. We simply couldn't afford to buy a workshop in such a house.
Our budget was 2,000,000 R. At the same time, we wanted several rooms and a separate entrance from the street. But I understood that I would have to sacrifice something, because there are no ideal premises for such an amount.
/nezhiloe/
How I invested in commercial real estate
Central communications were a prerequisite. We often encountered the fact that there is a pump for sewage in the bathroom. It is used if the room is located in a semi-basement or basement. Pumps often break, and then the sewer stops working. When viewing one of the premises before our eyes, the system did not work, the water level in the toilet bowl almost overflowed its banks and a terrible smell appeared. Since we did not know how well the pump was installed, we were afraid to buy such a room so as not to worry about the sewerage.
In another room there was only a sink. The third had no central heating, and the water in the batteries was heated by electricity. The former owner said that in winter he pays 17,000 R for heat, because the floor area is 100 m². It's too expensive for us.
I really wanted to make it before the New Year: I believe that large goals should be closed before the holiday. And in the end, we found what we were looking for - on December 27, we signed the contract and bought the premises.
We got a workshop with an area of 70 m² in an old house: semi-basement, entrance from the yard. It has four rooms, a toilet and a kitchenette. Of the shortcomings - there are only two windows, this is not enough. On the other hand, central communications have been carried out, preparations have been made for fine finishing, electrics and ventilation. A good laminate was left from the old owner, and we spent only 5000 R on wiring - we just bought what was missing.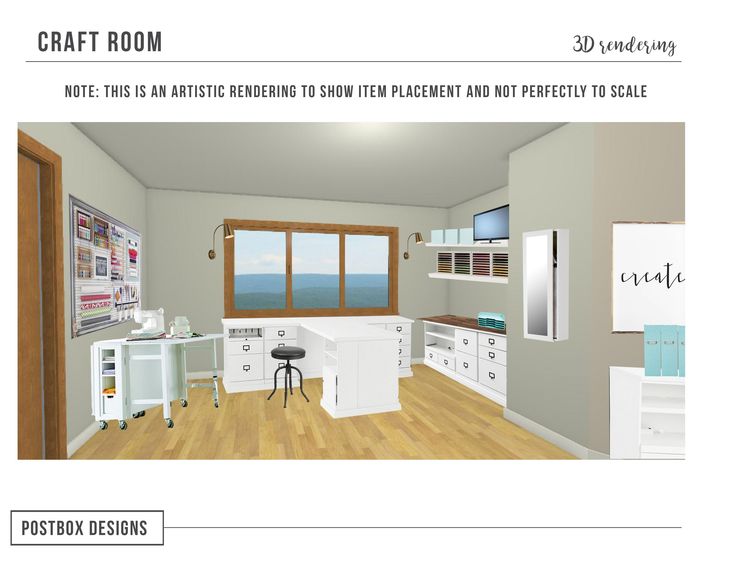
The room turned out to be even larger than we were originally looking for, so now I want to find an artist colleague and rent one room to him.
Community 07/01/21
Is it possible for a self-employed person to sublease non-residential premises?
Workshop arrangement
To make repairs, we did not hire a team. They did everything themselves and with the help of their parents. They painted and painted the walls, installed lighting, alarms and video surveillance, and arranged new furniture.
The space inside the workshop was divided as follows.
Great Hall 30 m². The main series of my works hangs here, plus I conduct classes here, paint pictures and shoot videos for blogs.
This is a large hall: here I conduct classes and create. We deliberately made the small walls dark and the large ones white. The room is narrow, but in this color it seems wider Small hall 12 m². At first, I wanted to work with an airbrush here and conduct airbrush classes. But this requires expensive equipment: the device itself, a compressor, a printer, a paper cutting kit, as well as special paints and thinners.
It would also be nice to make enhanced ventilation, because the paint is sprayed and gets into the air. I would invest if there were many students for this course. But so far only one person wanted it. Therefore, the small hall is still empty, and I am looking for a partner who will rent this area.
This is the room right after the renovation - they haven't hung the paintings yetHusband's workshop 9 m². Here he makes frames and easels for me.
Lounge 10 m² and coffee corner. Here we rest, eat, drink coffee and communicate.
We invested in the safety of the workshop because we want to sleep peacefully and not worry that something will happen to the paintings or the room. We installed an alarm system, video surveillance, insured the walls and finishes.
We also posted information about ourselves on Yandex Maps and Google Maps and hung a sign at the entrance. We did not coordinate it with anyone, because it looks like an information sign that can be hung just like that. Our sign conforms to the permitted sizes, contains the name of the organization, and does not contain a call to action - from the point of view of the law, this is not an advertisement. Contacts are placed using a QR code. So far, no one has had any complaints.
Arrangement of the courtyard and cosmetic repairs of the building
In February 2021, I moved with my junk to a new workshop and started creating. Visitors and friends praised us and noted that it was very beautiful inside. But at the same time, they said that our yard was unkempt and made a depressing impression. After it, it takes time to recover and catch inspiration for creativity.
The facade of the building was really sloppy: the walls were shabby, the paint was peeling. Inaccuracies were added by leftovers from advertisements. Previously, the yard was open, anyone could get into it - so they glued it. There were deep holes in the asphalt. During the rain, all the water from the yard flowed to us and impenetrable puddles formed. The stairs leading to the neighbors' apartments were also worn and untidy.
/pvz-ozon/
How I opened the Ozon order pickup point
This is how the entrance to our yard looked before the renovation. My plateis already hanging to the right of the arch First of all, I decided to go to the management company and find out if it is planned to repair the facade and courtyard. They said there was no money. They suggested organizing a meeting of residents and putting the yard in order at their own expense. The overhaul of the facade is scheduled for 2032.
I made sure that no one would help us and again we would have to solve everything on our own. We went to a hardware store, bought materials, picked up rollers and did everything ourselves: we painted the walls in the archway, other people's doors and hatches. They persuaded the neighbor to put the stairs in order and repaint them red. The owner of the second apartment was inspired and put her staircase in order herself.
/respublika-lodygina/
"Republic of Lodygina": how we united with neighbors and improve the yard
The residents of the house passed by and said how great we were. But no one helped.
It was decided to pave the pits in the yard. The area of the yard is approximately 70 m², the work with materials cost 45,000 rubles. The team was found at Avito. On the first day, the workers cleaned the yard of rubbish that had accumulated there for decades, and on the second, they laid a new coating. It was raining at that time, and the work was postponed several times.
I also hung two life-sized paintings on the walls to give the yard a creative ambience. One job was stolen six months ago.
And this is our patio after we put it in order. Stairs lead to apartments, and I persuaded the hostesses to repaint them red Additionally, we installed an outdoor lighting lamp, although the light in the yard was already bright enough, even with motion sensors.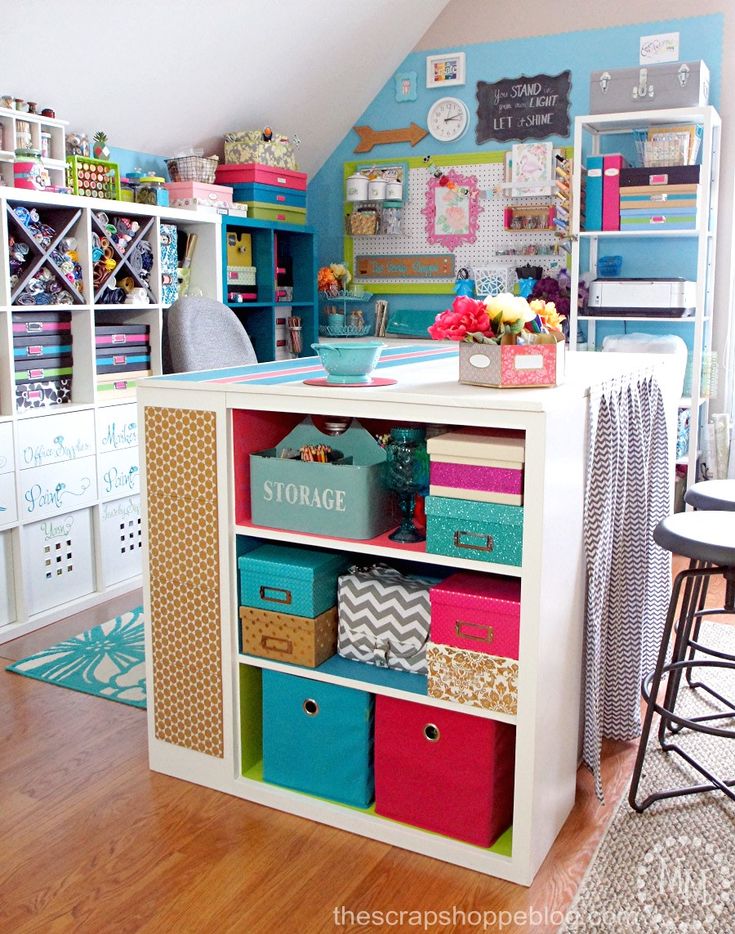
Many say that it was possible to buy a smaller ready-made office space and not bother with this repair. But I wanted my workshop not to look like an office. I wanted a renovation to my liking, paintings on the walls, and a creative environment. With all the disadvantages of this room, it sunk into my soul at first sight.
Monthly expenses
| Expenses | Amount |
|---|---|
| Room | 1 900 000 R |
| Interior and exterior repairs | 150 000 R |
| Furniture | 60 000 R |
| Engineering and electronics | 30 000 R |
| Alarm from Aliexpress | 7000 R |
| Legal services for the purchase of premises | 7000 R |
| Surveillance cameras, 3 pcs. | 6000 P |
| Insurance of premises with finishing for 1,000,000 R, per year | 4000 P |
Expenses 4 Sum Premises 1 900 000 0007 Control inside and outside 150 000 R 9000 Alarm system from Aliexpress 7000 Р Legal services when buying premises 6000 R Insurance of premises with finishing for 1,000,000 R, per year 4000 R There is a place to work. There is a place to store paintings , so there are always works for sale. This is important, because they called me more than once and said: “We want to buy, do you have it?” I offered to write to order, but people refused, because they needed the picture right now. The number of transactions has increased. Before ordering a painting, people now come and see my work live. Trades grow together in 100% of cases. Previously, they bought less - just because they did not see the work with their own eyes. Word of mouth is working. /guide/how-to-rent/ How to rent an apartment Additional costs. There are also negative points. You have to pay a loan and utility bills every month. Sometimes it's hard. The earnings of a freelance artist are unstable. A particularly difficult period is summer. At this time, there is little work, since all the students are leaving, but the payments do not go anywhere. Sometimes something breaks and needs to be fixed. For example, we were flooded by a neighbor from above, light bulbs burned out, ventilation broke down. But we are creative people and could not repair and fix all this, so we had to involve specialists. Regular expenses for maintaining the workshop - 32,000 R per month: of which I pay 25,000 R for a loan and another 7,000 R for utilities. How life has changed after the opening of the workshop
 I have a personal workspace where no one bothers me to be inspired and create. This is perhaps the most important thing for an artist. The number of students who come to study in the workshop has increased, because now I can invite entire groups. A platform has appeared where we hold creative evenings and get-togethers with friends. My status has risen to a "serious solid artist" - at least in my region.
 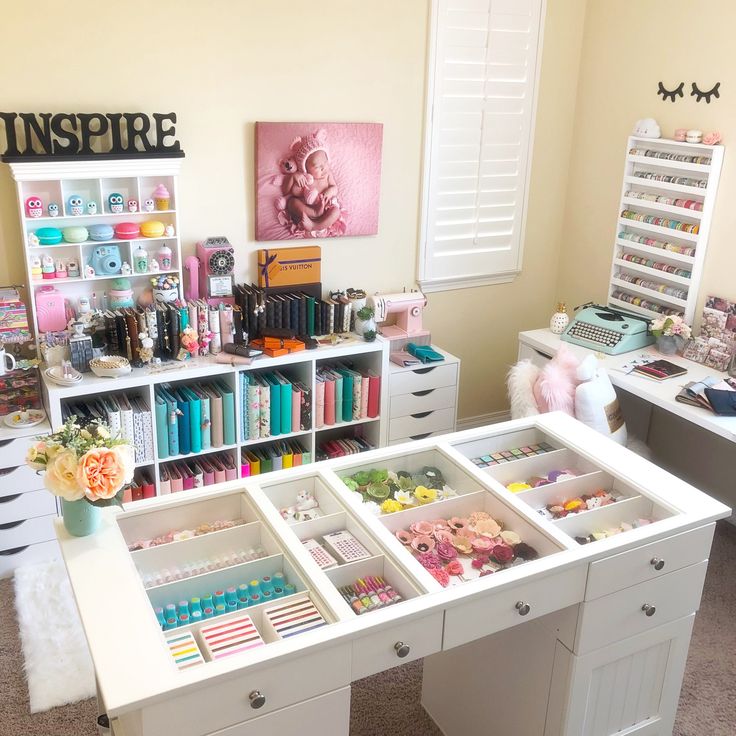 Sometimes colleagues rent space from us for creative events, and this provides a small additional income. Plus, more and more people will learn about me and my workshop. They tell their friends, and I get more subscribers and customers.