Country kitchen colour ideas
How to Paint Kitchen Cabinets
Painting kitchen cabinets doesn’t have to be daunting. While it does require a lot of preparation, organization, and a bit of patience, it’s definitely possible to do it yourself. If you're wondering how to paint kitchen cabinets without hiring a professional, our step-by-step guide below takes the guesswork out of giving your kitchen the makeover you’ve always dreamed of. Here, we'll tell you how to prep and paint kitchen cabinets, how to paint kitchen cabinets without sanding, and how to paint laminate kitchen cabinets—plus the materials you'll need for all projects. And if you need paint brand and paint color advice, make sure to check out the best paint brands and the best neutral paint colors for some inspiration.
Here's What You Need to Paint Kitchen Cabinets
Plastic Sheeting
$25 at Home Depot
Drop Cloth
$5 at Home Depot
Painter's Tape
Now 17% Off
$12 at Walmart
Scrub Sponge
$21 at Amazon$23 at Walmart
All Purpose Cleaner
$6 at Staples
Drill
Now 51% Off
$49 at Amazon$70 at Walmart
Cup Hooks
$2 at Lowe's
Sawhorse
$60 at Home Depot$80 at Walmart$57 at homedepot. com
2x4 Planks
$6 at Lowe's
Primer
$30 at Home Depot
Cabinet Enamel Paint
$26 at Lowe's
Pro Grade Paintbrushes
Now 33% Off
$6 at Amazon
How to Prep and Paint Kitchen Cabinets- Cover countertops and backsplash with plastic sheeting with painter’s tape.
- Prep cabinets. Before removing hardware, scrub all cabinets with a grease-cutting cleaner and scrubbing sponge.
- On the inside of each cabinet door, label its placement to make it easy to rehang after painting. Remove from hinges and take off all hardware.
- Remove shelves and wipe out cabinet interiors.
- Screw cup hooks into the top of each cabinet door. This will offer an easy way to dry doors later on.
- Lay out cabinet doors on a sawhorse with 2x4 planks on top. Prime cabinet backs. Let dry to touch, then turn over and prime fronts. While waiting to dry, prime cabinet boxes and shelving.
- When cabinet fronts are dry to touch, hang them from cup hooks to dry completely.
- Once primer has dried, use a random-orbit sander and medium-grit sandpaper to smooth out brush strokes.
- Using a new paintbrush, repeat priming process with cabinet enamel paint—paint backs, let dry to touch, and flip to paint fronts. Paint cabinet boxes and shelving in the meantime.
- When cabinet fronts are dry to touch, hang again on cup hooks. Dry for two hours.
- Repeat steps 9 and 10 as needed until desired coverage is reached, then let dry for one or two days to let cure.
- Reinstall cabinet doors to cabinet boxes. Reinstall or attach new hardware.
bilderlounge/Tips RF//Getty Images
- Cover countertops and backsplash with plastic sheeting with painter’s tape.
- Prep cabinets. Before removing hardware, scrub all cabinets with a grease-cutting cleaner and scrubbing sponge.
- Apply liquid deglosser to all surfaces of cabinetry: Pour a small amount onto a soft cloth, then wipe in circular motions.
- On the inside of each cabinet door, label its placement to make it easy to rehang after painting.
- Remove from hinges and take off all hardware. Remove shelves and wipe out cabinet interiors.
- Screw cup hooks into the top of each cabinet door. This will offer an easy way to dry doors later on.
- Lay out cabinet doors on a sawhorse with 2x4 planks on top. Using a new paintbrush, repeat priming process with cabinet enamel paint—paint backs, let dry to touch, and flip to paint fronts. Paint cabinet boxes and shelving in the meantime.
- When cabinet fronts are dry to touch, hang again on cup hooks. Dry for two hours.
- Repeat steps 7 and 8 as needed until desired coverage is reached, then let dry for one or two days to let cure.
- Reinstall cabinet doors to cabinet boxes. Reinstall or attach new hardware.
JodiJacobson//Getty Images
How to Paint Laminate Kitchen Cabinets- Cover countertops and backsplash with plastic sheeting with painter’s tape.
- Prep cabinets. Before removing hardware, scrub all cabinets with a grease-cutting cleaner and scrubbing sponge.
- On the inside of each cabinet door, label its placement to make it easy to rehang after painting. Remove from hinges and take off all hardware.
- Remove shelves and wipe out cabinet interiors.
- Screw cup hooks into the top of each cabinet door. This will offer an easy way to dry doors later on.
- Lay out cabinet doors on a sawhorse with 2x4 planks on top. Use a random-orbit sander and medium-grit sandpaper to sand all surfaces on front and backs of doors.
- Prime cabinet backs. Let dry to touch, then turn over and prime fronts. While waiting to dry, prime cabinet boxes and shelving.
- When cabinet fronts are dry to touch, hang them from cup hooks to dry completely.
- Once primer has dried, sand again to smooth out brush strokes.
- Using a new paintbrush, repeat priming process with paint specially-formulated for laminate surfaces (we like Cabinet Rescue).
 Paint backs, let dry to touch, and flip to paint fronts. Paint cabinet boxes and shelving in the meantime.
 - When cabinet fronts are dry to touch, hang again on cup hooks. Dry for two hours.
- Repeat steps 10 and 11 as needed until desired coverage is reached, then let dry for one or two days to let cure.
- Reinstall cabinet doors to cabinet boxes. Reinstall or attach new hardware.
This content is imported from OpenWeb. You may be able to find the same content in another format, or you may be able to find more information, at their web site.
30 DIY Home Decor Ideas
David Hillegas
We have all been at home A LOT lately, and after a year plus of staring at the same four walls you might be feeling like it's time for a little decor redo. Don't fret, there is no need to tear down walls, buy all new furniture, and, well, break the bank. You can shake things up by simply doing a bit of DIY decor. But don't worry if you're not feeling so crafty; many of these ideas simply require a trip to the antiques store or flea market. Stock up on different size and color baskets or Bundt pans, arrange them artfully on the living room or kitchen wall and voila, a whole new look! Maybe you are ready to step away from the computer and heat up the hot glue gun? We've got you covered there, too. There are a plethora of ideas here that'll have you reaching for your smock. Trying making sponge-painted nature silhouettes that can hang above your bed. Looking for a smaller project? Then try your hand a creating canning covered coasters—we promise they will look great on the picnic table at your next BBQ party. These handmade projects are guaranteed to add a lot of charm and good vibes to you new and improved spruced up home. Post a picture of your project in the comments section below. We would love to see what you create! Happy crafting!
David Hillegas
1 of 30
Spoon Display
A collection of spoons takes pride of place in the kitchen when mounted on a painted board. For an extra special look, mount them in an ombre pattern.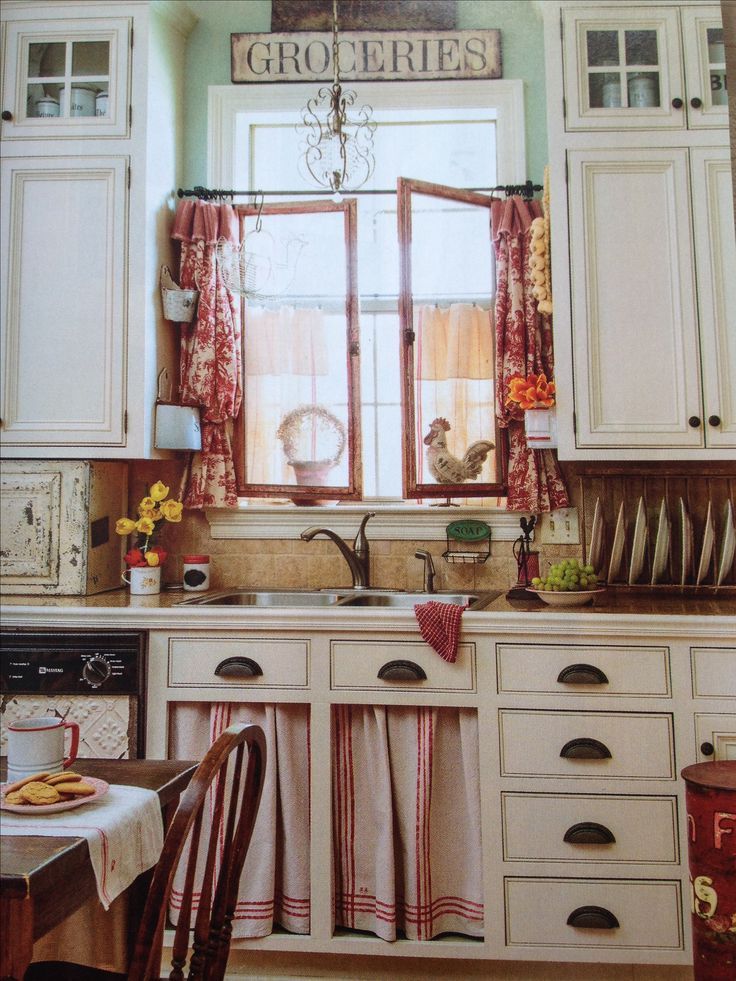
To make: To assemble, cut a piece of plywood to the desired size and paint. Lay spoons in a light-to-dark pattern on the wood, and use a pencil to mark a spot on both sides of each spoon, typically
just below the bowl. Remove spoons, and drill holes at markings. Working with one spoon at a time, loop fine-gauge wire over the handle and through the holes; twist together wire ends behind the wood to secure. Repeat until complete, then hang.
Becky Stayner
2 of 30
Cane Webbing Bookshelf
That blank wall in your home office is about to get a lot cuter with the addition of a bookshelf that been adorned with cane webbing.
To make: Trim a piece of caning just larger than the opening on
the shelf (Brightmaison’s floating bookshelf; amazon.com). Use a foam brush to spread glue (we used Aleene’s Original Tacky Glue) to the back of the shelf opening. Attach caning, holding it in place
with binder clips while it dries. Once dry, remove clips and hang shelf.
David Hillegas
3 of 30
Oversize Quilt Square
Gus loves the hanging out with the colorful painted quilt square. Simply lean it against the wall for easy installation.
To make: A large-scale piece of painted plywood lends graphic punch to any space. First, cut a piece of plywood to desired size
(ours is four feet square). Draw a quilt block (here, Twin Star–style) on the wood with pencil, using a ruler or painter’s tape for straight lines, then paint with acrylic paint. Nail strips of 1/2-inch trim along
the edges to finish. Lean or hang on the wall.
David Hillegas
4 of 30
Wall String Art
Update a laundry room wall with a craft straight from the 70s: string art. Want to give it a go in other rooms, too? Try writing "PLAY" in a kids room or "REST" in a bedroom.
To make: Start by cutting out letters from craft paper. Mark nail holes with a pencil on the wall using the letters as a guide.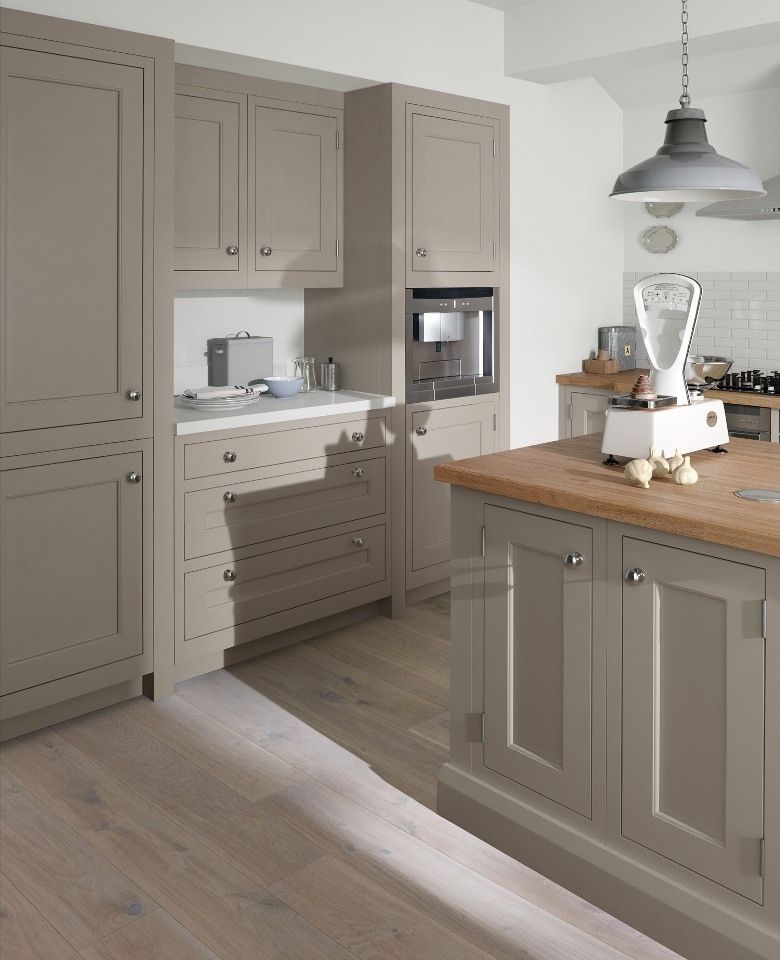 Hammer copper nails into the wall, and wrap nails with lengths of assorted-colored thick yarn.
David Hillegas
5 of 30
Rope Covered Mirror
Give a boring, ho-hum, mirror new life by covering it in different sizes and colors of rope.
To make: Cover frame of a mirror with 1/2- to 3/4-inch manila rope,
braiding one section for a decorative effect and adhering rope with hot-glue. Add a decorative band to center of top and sides with thin sisal rope.
Becky Stayner
6 of 30
DIY Cane Webbing Coasters
The base for these coaster can be painted any color so they'll fit right in to your already existing decor.
To make: Paint unglazed ceramic coasters ($14 for 10; amazon.com) desired color. Cut pieces of caning that are just larger than the coasters. Spray the backs of the caning with adhesive spray, such as Super 77, then attach to the coasters, pressing to adhere. Trim excess caning with scissors.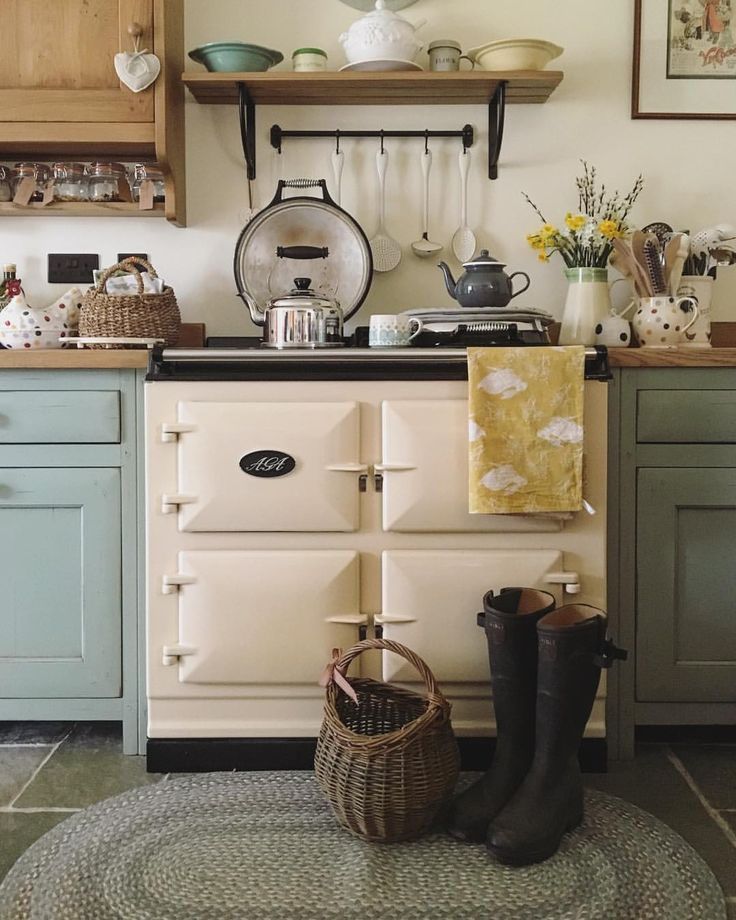
David Hillegas
7 of 30
DIY Rope Table Lamp
Have a lamp you are just tired of looking at? Try wrapping it with rope to give it a whole new, modern vibe.
To make: Wrap a cylindrical lamp base with 3/4-inch-thick manila
rope, holding it in place with hot-glue. For added flair, hang burlap tassels ($9; amazon.com) from the lamp’s neck.
Becky Stayner
8 of 30
Stamped Napkins
Nothing classes up dinner like a cloth napkin and these DIY stamped ones transform plain white napkins into a real treat.
To make: Create a stamp by cutting out a four-inch square of caning. Brush fabric paint on the front side of the caning, and press caning on an off-white linen napkin. Repeat, lining up the pattern as best you can, until one side of a napkin is fully covered.
David Hillegas
9 of 30
Rope Basket with Fringe Detail
Cover up unsightly clay pots with a DIY coiled rope basket.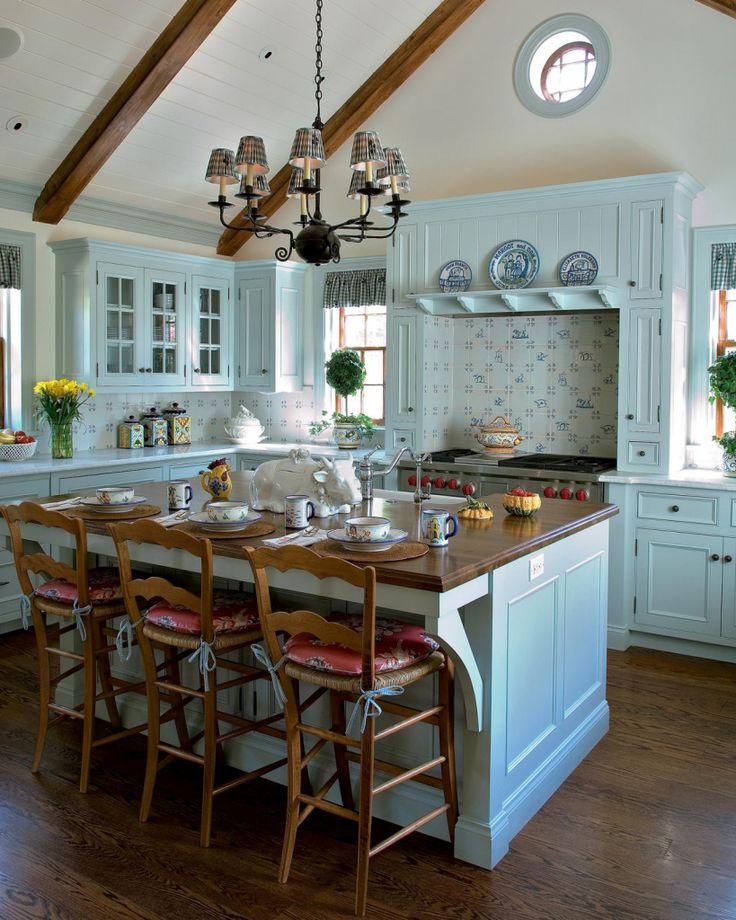 Only a few hardware store supplies needed.
To make: Start by coiling 1/2-inch-thick sisal rope into a mat, affixing the rope together with hot-glue as you work. Once you have a mat, start working upward by gluing the rope on top of itself to create the basket. Create fringe by tying lengths of raffia together, pinching in the center; glue to basket.
Becky Luigart-Stayner
10 of 30
Canning Hanging Baskets
Store fruits or herbs in these sweet DIY baskets that will add charm and storage to your kitchen.
To make: Cut a 3 1/2-inch-tall strip of caning slightly longer than the circumference of a wood round. Hot-glue the bottom edge of the strip around the outside edge of the wood to create the sides of the basket. Thread twine through caning (three or four lengths, evenly spaced), and attach with hot-glue, leaving plenty of length to thread through a second basket, if desired. Hot-glue lengths of flat reed around the top and bottom of the basket.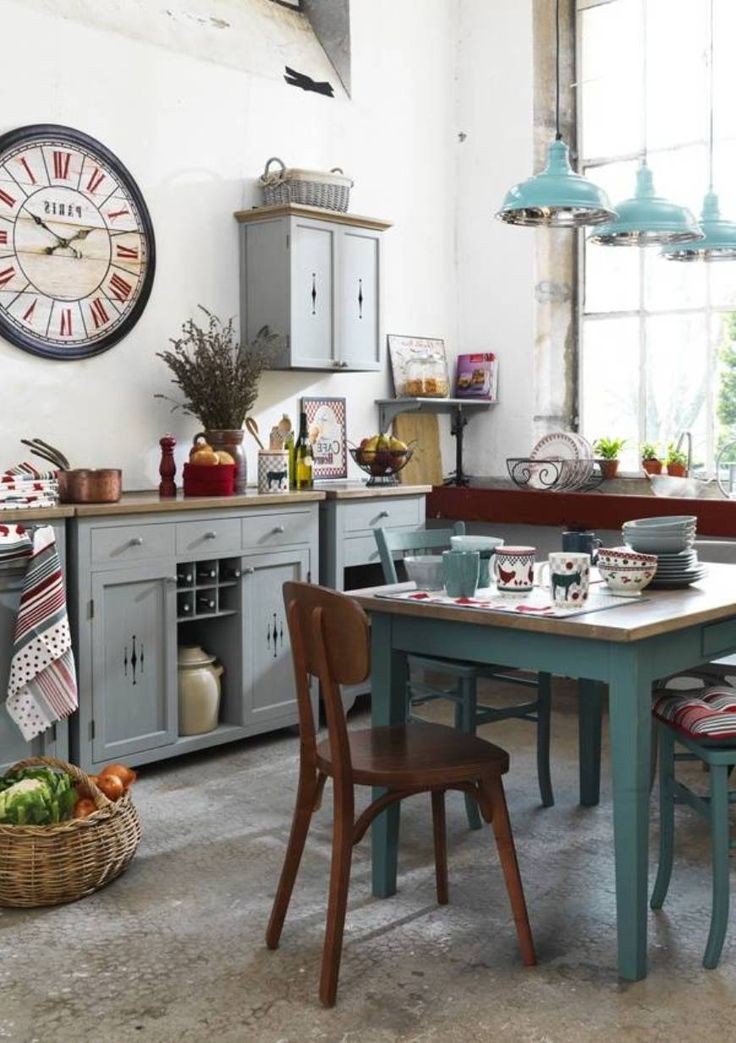 Tie twine together at the top to hang.
David Hillegas
11 of 30
Rope-Covered Hanging Mason Jar Lamp
Add a warm subtle glow above your desk or kitchen island with this simple DIY hanging lamp.
To make: Hot-glue manila rope to top three-fourths of a regular-mouth mason jar. Wrap the wire of a mason jar pendant light kit with cotton rope, and hold in place with glue. Thread light kit onto jar, and hang.
Becky Stayner
12 of 30
Croquet Mallet Towel Rack
A bathroom get an instant upgrade with the addition of this bright and cherry towel rack. Paint the wood any color desired.
To make: Cut a 1-by-5-inch piece of wood 27 inches long. Cut a piece of 2 1/2-by-1 1/4 wood into two 5 1/2-inch-long segments; drill a 1-inch hole 1 inch deep in centers of each. Cut mallet handle 20 inches long, and fit in holes; glue in place. Glue blocks to top shelf. Paint desired color.
Becky Stayner
13 of 30
Croquet Mallet Wreath
Welcome guests with a spirited wreath made from the heads of croquet mallets.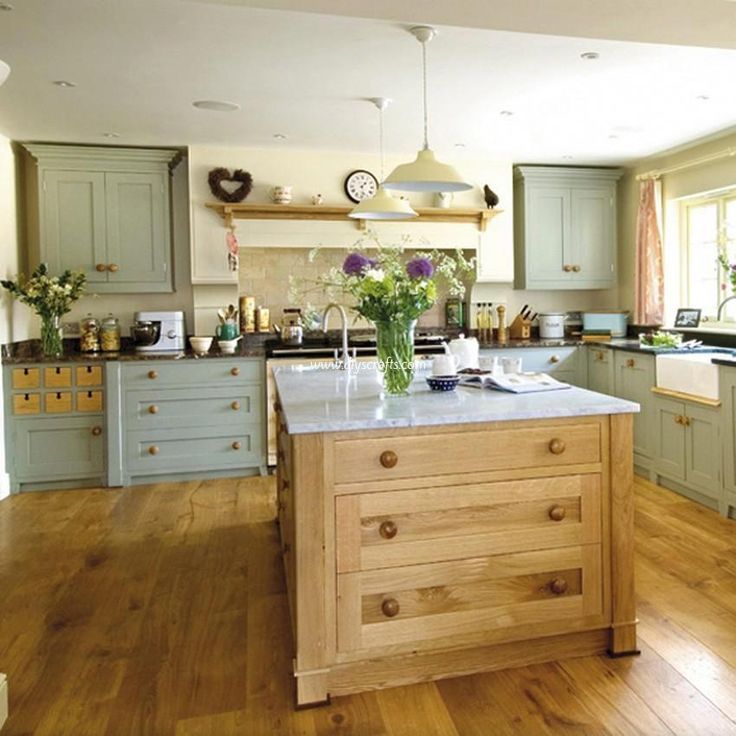 A brightly colored door (here Arsenic by Farrow & Ball) adds to the cheer.
To make: Cover a 14-inch biodegradable craft ring with a peel-and-stick moss mat. Remove the handles from about 16 croquet mallets. Hot-glue heads to wreath, offsetting every other one slightly (reserve handles for another DIY). Carefully turn over wreath, and use a nail gun to permanently attach heads.
David Hillegas
14 of 30
Chalk Wall Calendar
As life gets back to normal, the chaos (carpooling, dinner parties, etc.) of everyday life will start to ramp back up. This chalkboard paint wall calendar will add fun decor to you entryway or kitchen wall while also helping to keep you organized!
To make: Keep everyone in the loop with an entryway wall calendar. Use painter’s tape (we used a 1/2-inch-wide roll) to tape off a 35-square grid to desired size, as well as two rectangles, as shown. Paint with acrylic chalkboard paint (we used Behr’s Interior Chalk Decorative Paint).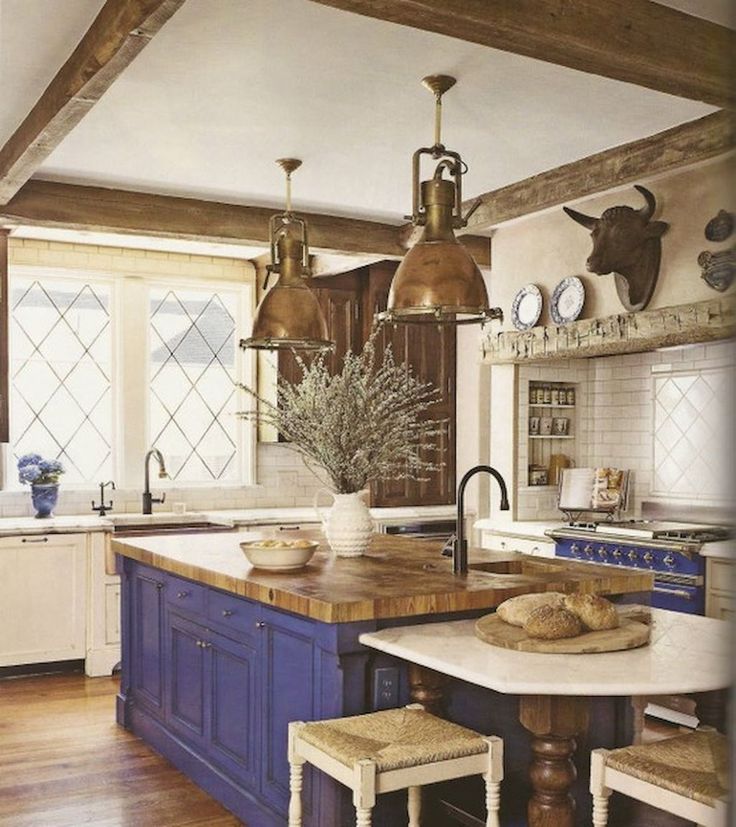 Once dry, remove tape, and touch up any rough edges. Tie a length of twine around a piece of chalk, knot end, and hang on wall with a pushpin.
Becky Stayner
15 of 30
Croquet Ball Footstool
Customize this sweet footstool by using all one color or maybe two croquet balls and covering the top with a fabric that matches your already existing color scheme.
To make: Cut a piece of plywood into a 13 1/2-by-11-inch rectangle. Drill a 5/8-inch hole 2 inches deep in eight croquet balls. Glue one ball, hole side down, 2 1/4 inches from each corner of plywood. Cut a 5/8-inch dowel into 4 four-inch-long pieces. Glue one length in each unused ball. Thread dowels into balls attached to board, gluing in place. Cover wood with batting and fabric. Secure in place with a staple gun.
Becky Luigart-Stayner
16 of 30
Cane Webbing Serving Tray
Breakfast in bed (yes, that should still be a thing) just got a whole lot prettier when served on a DIY tray that's been decked out with cane webbing.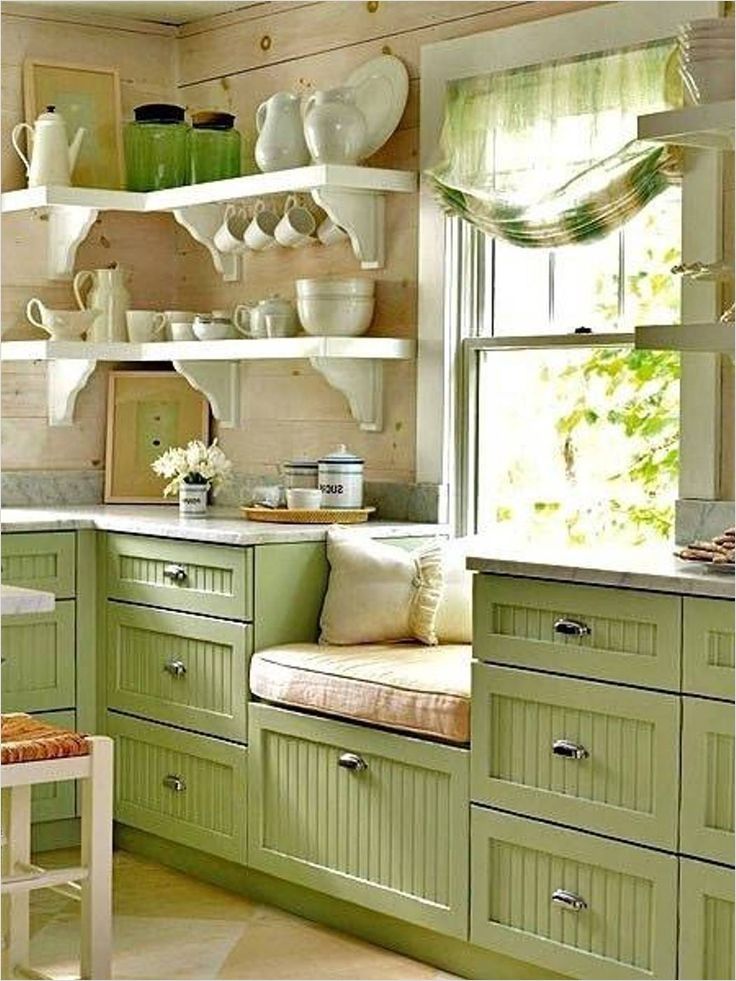
To make: Insert a piece of caning that is the same size as the opening of a picture frame (here, a 16-by-20- inch frame by Barnwood-USA, $45; amazon.com). Hold in place with craft glue or glazing points. Attach three-inch cabinet-style handles (wrapped with twine, if desired) to the short ends of the frame. Insert a piece of glass that covers the full opening, if desired.
Becky Stayner
17 of 30
Croquet Mallet Frames
Colorful and poppy, these DIY frames will look great in a cabin or kids room.
To make: For an 8 1/2-by-11-inch “frame,” cut four pieces from croquet mallet handles, two 10 1/2 inches long and two 12 1/2 inches long. Chisel a small rectangle the width of the mallet near the ends of the long lengths for the short lengths to rest in. Glue the four pieces together, then to a frame. For a 5-by-7-inch frame, cut the handles to7 inches and 9 inches.
DAVID HILLEGAS
18 of 30
DIY Wall Art in Clipboard Frames
Gallery walls add instant decor to an unadorned wall but frames can get quite expensive.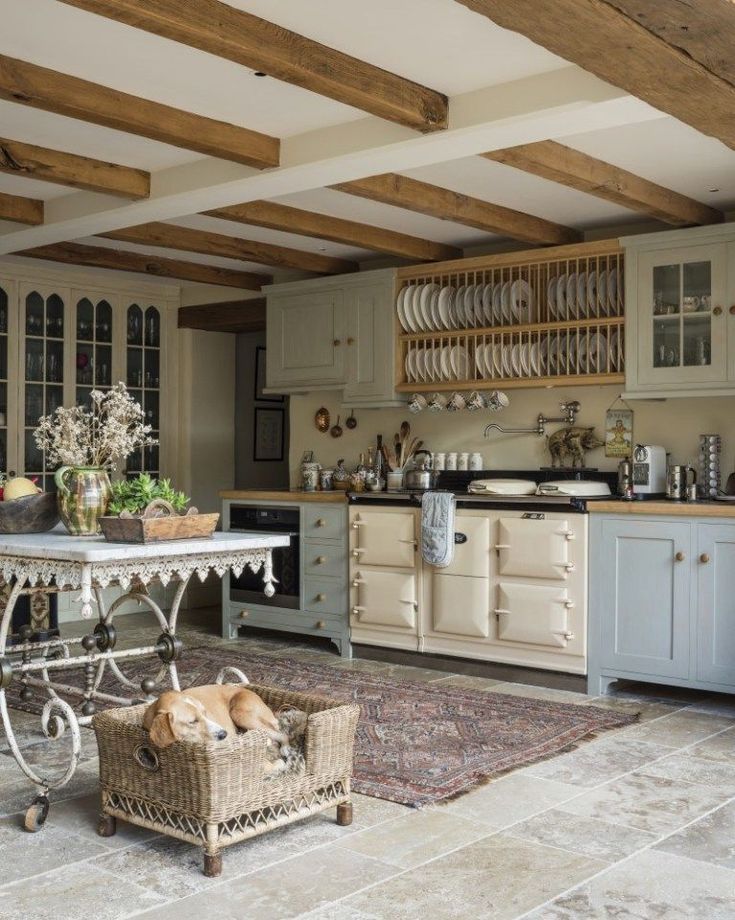 For this budget-friendly arrangement, simply clip prints to vintage clipboards. Thread a piece of leather jewelry cord under the clip, knot it at the top, and hang with a pushpin. Bonus: You can easily change out the images every season.
Becky Stayner
19 of 30
Cane Webbing Votive Holders
Running down the center of the dining table, these cane webbing covered votive holders add texture to a pretty centerpiece.
To make: Measure the height and circumference of a glass votive holder. Cut caning to fit around the holder. Spray the back with adhesive spray, such as Super 77; attach to the glass. Cut pieces of flat reed the diameter of the holder, and attach to the top and bottom edges with hot-glue.
DAVID HILLEGAS
20 of 30
Trip Mementos Wall Art
Memorialize a vacation, hiking excursion, rowing adventure, or road trip by outlining the route traversed with ribbon or twine on a new or vintage map. Hold both options in place on the map with hot-glue.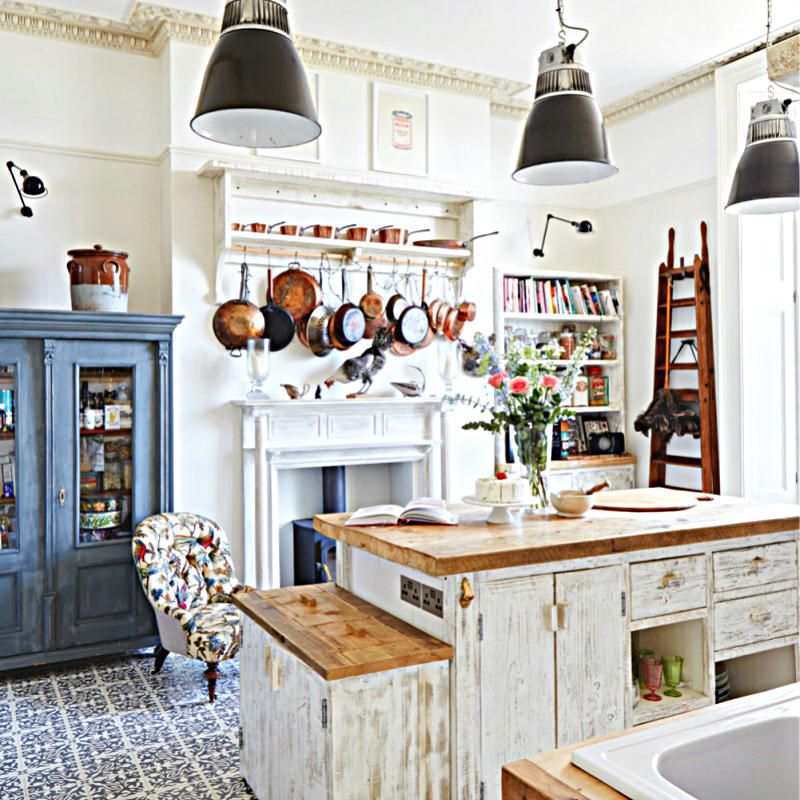
Becky Stayner
21 of 30
Cane Webbing Covered Lampshade
This easy upgrade to a drum-shaped lampshade add loads of texture and a bright pop of color to any room.
To make: Cut a piece of caning to the height and circumference of a drum-shaped lamp shade. Spray the back of the caning with adhesive spray, such as Super 77; attach to shade. Cut two pieces of flat reed to the diameter of the shade; paint desired color. Once dry, attach with hot-glue.
Becky Stayner
22 of 30
Bandana Chair Cushions
Refresh your dining room or outdoor chairs by adding pops of color with these DIY bandana chair cushions.
To make: Measure the seat of the chairs you wish to cover, and cut 1-inch-thick upholstery foam to size. Trim two bandanas to same size plus 1/2 inch all around to accommodate cushion’s thickness. Sew bandanas together, leaving an opening large enough to slip foam through.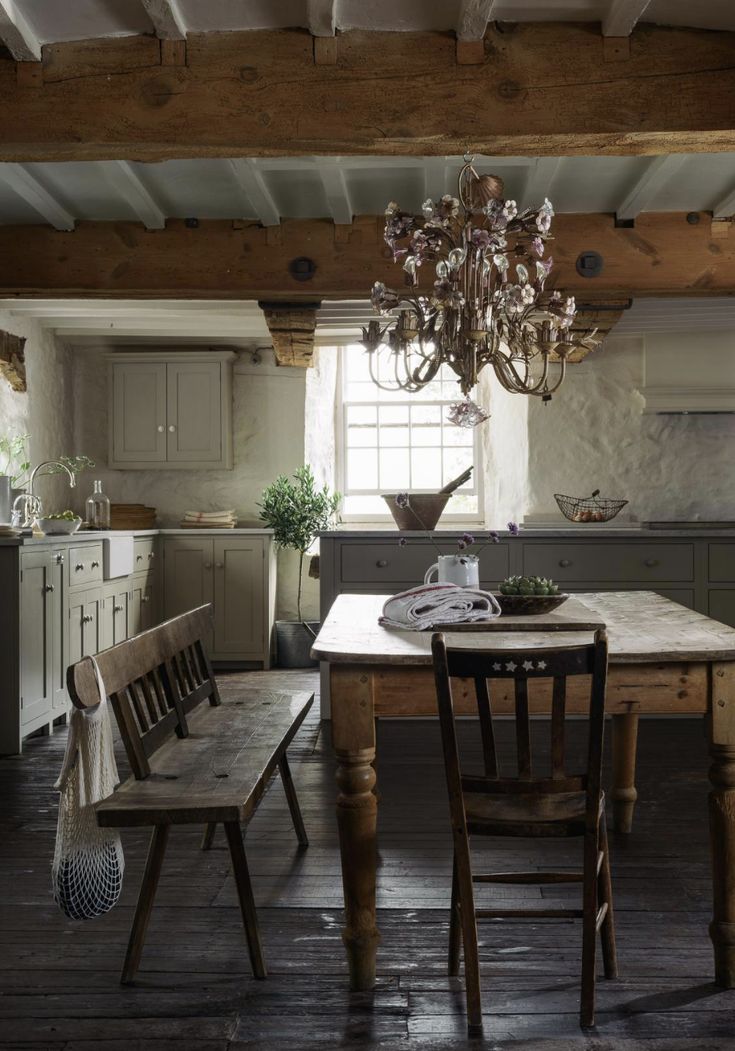 Turn inside out, insert foam, and sew opening closed. Sew ribbon or strips of bandana to back corners for tying to chairs.
Becky Stayner
23 of 30
Stitched Artwork or Jewelry Holder Embroidery Hoops
Embroidery hoops filled with cane webbing can be turned into art work by stitching with yarn or simply used to hang ear rings. Either way, they are perfect for embellishing a wall or a shelf.
To make: Separate rings of embroidery hoops. Cut pieces of caning that are just larger than the inside ring, then attach to the ring with hot- glue. Paint outer ring, if desired. Once dry, slip over inside ring and tighten. For artwork, thread yarn on a large-eyed needle, and stitch desired pattern. To use as a jewelry holder, simply hang or attach earrings through caning holes.
Becky Stayner
24 of 30
Bandana Covered Lanterns
Use vintage or new (like the ones here) lanterns for this easy DIY. Either way they'll look great lighting up the back patio or on the dining room table.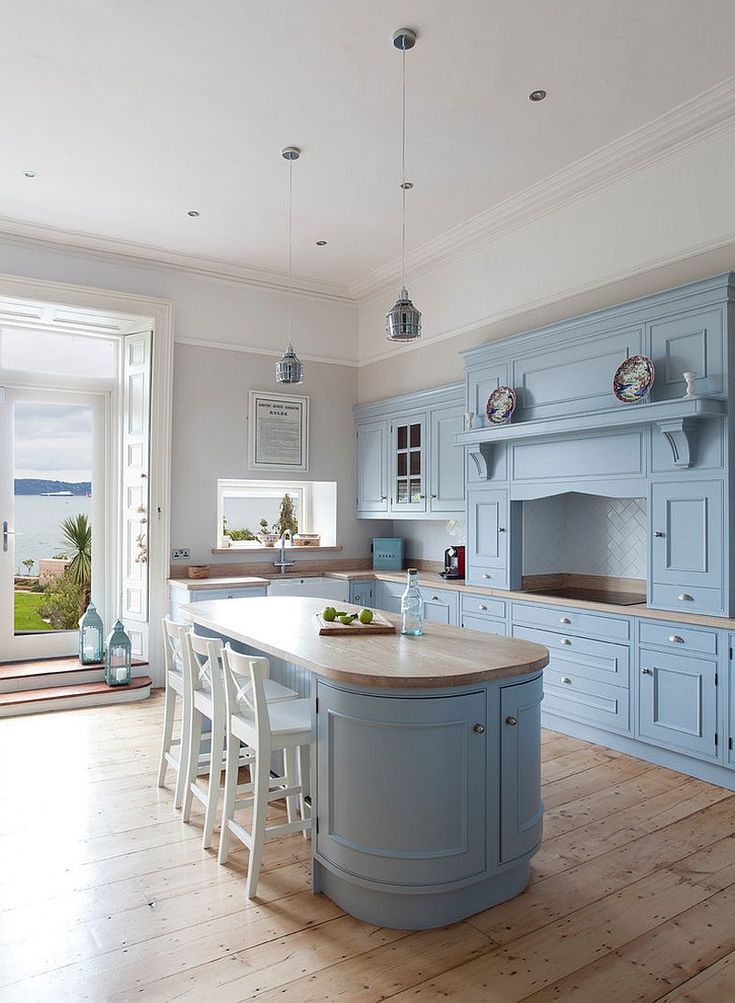
To make: Cut bandana to size and attach to the outsides of glass using Mod Podge.
Becky Stayner
25 of 30
Cane Webbing Headboard
Update any open-framed headboard by cutting pieces of cane webbing just larger than the openings you wish to embellish, then attach to the back with a staple gun.
David Hillegas
26 of 30
Bundt Pan Wall Art
A collection of colorful vintage Bundt pans in assorted shapes lends retro flair to a kitchen or pantry wall. Bonus: You can take ’em down and use them as needed. Hang using magnets or strips of double-sided velcro.
Becky Stayner
27 of 30
Canning Napkin Rings
Dress up your table with these oh-so simple to make napkin rings.
To make: Cut out a piece of caning that is 8 inches long by 2 1/2 inches tall. Use hot-glue to adhere the ends together, creating a ring. If desired, remove some of the cross canes to create a loose edge.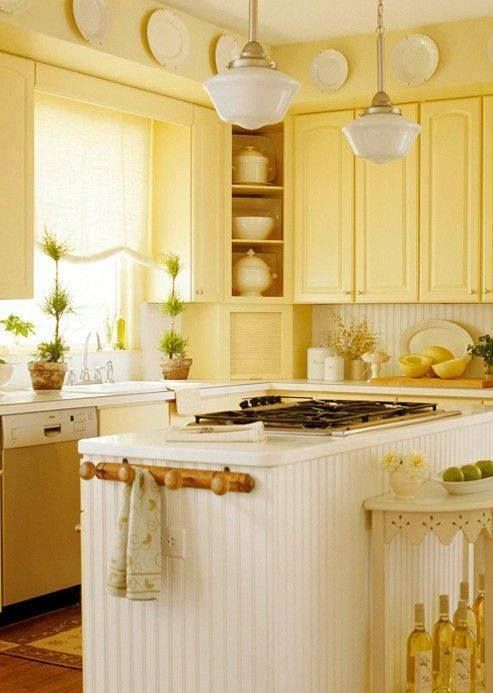
David Hillegas
28 of 30
Nature Silhouettes
Bring nature inside in a colorful way with these DIY nature silhouettes. Get the littles involved by sending them out back to collect branches.
To make: Start by collecting leaves and thin-stemmed branches. Lay them on 11-by-14-inch canvas boards. Use a round foam stencil brush to paint around the leaves with acrylic paint, covering the
canvas. Remove leaves, and allow boards to dry.Use white paint for any touch-ups. Frame as desired.
Becky Stayner
29 of 30
Bandana Covered Pots
Brighten up your pots by covering them in an array of colorful bandanas.
To make: Use Mod Podge to attach a bandana to the outside of desired-size clay pots, folding fabric one inch over the top rim and cutting off extra fabric as needed. Once dry, fill with seasonal blooms or ferns.
David Hillegas
30 of 30
Basket Wall Art
An array of baskets in different sizes, shapes, and colors is all it takes to transform a ho-hum wall into the rooms focal point.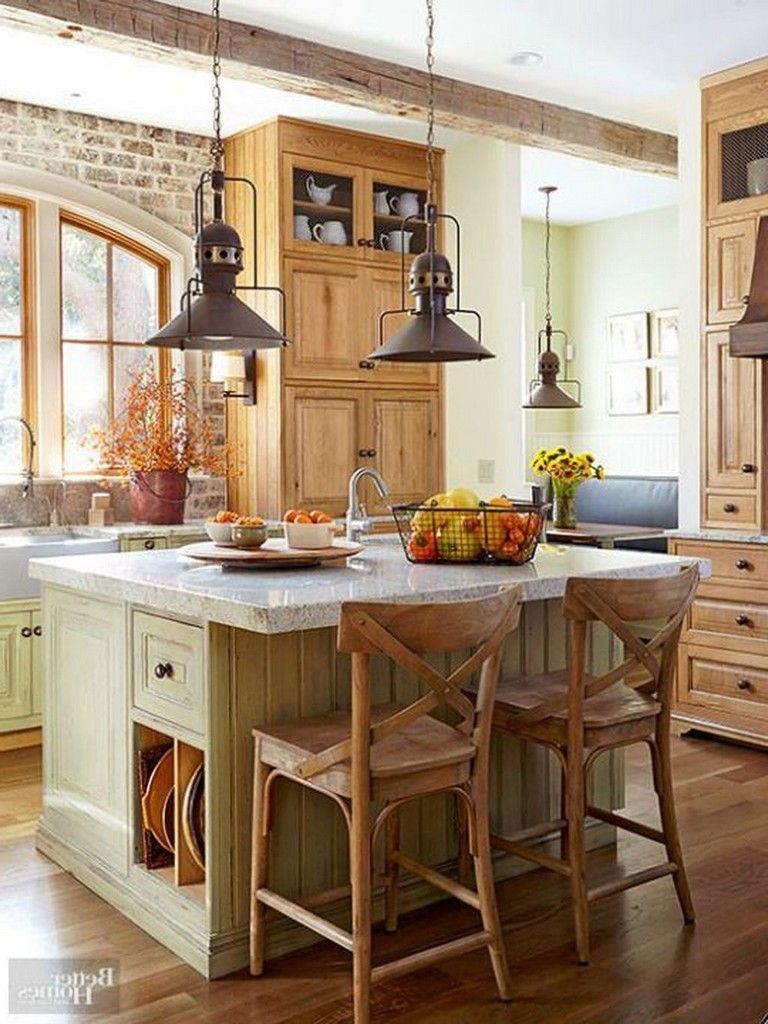
To make: Using nails, hang a larger basket in the middle, then surround with smaller baskets in a circular or starburst pattern.
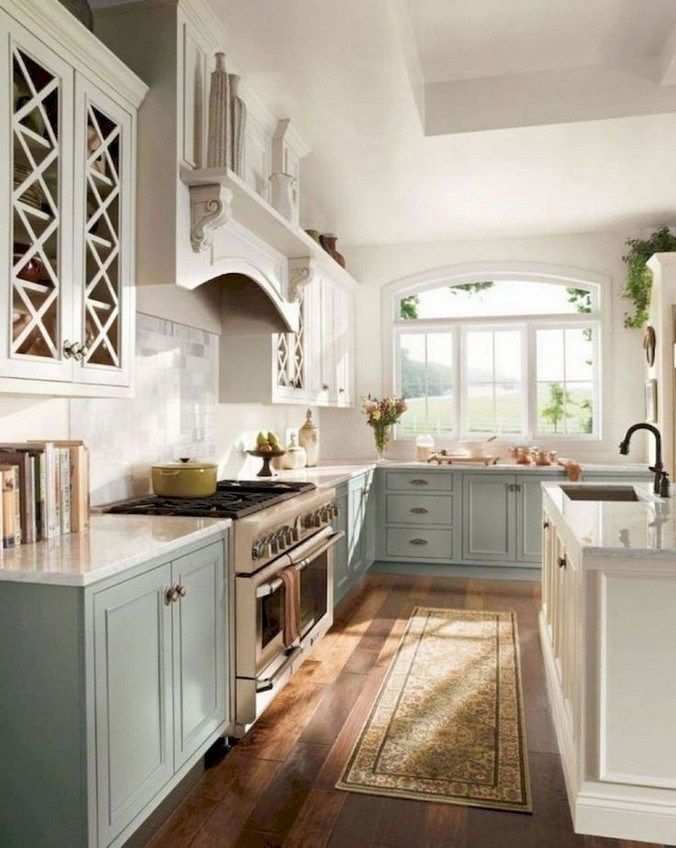
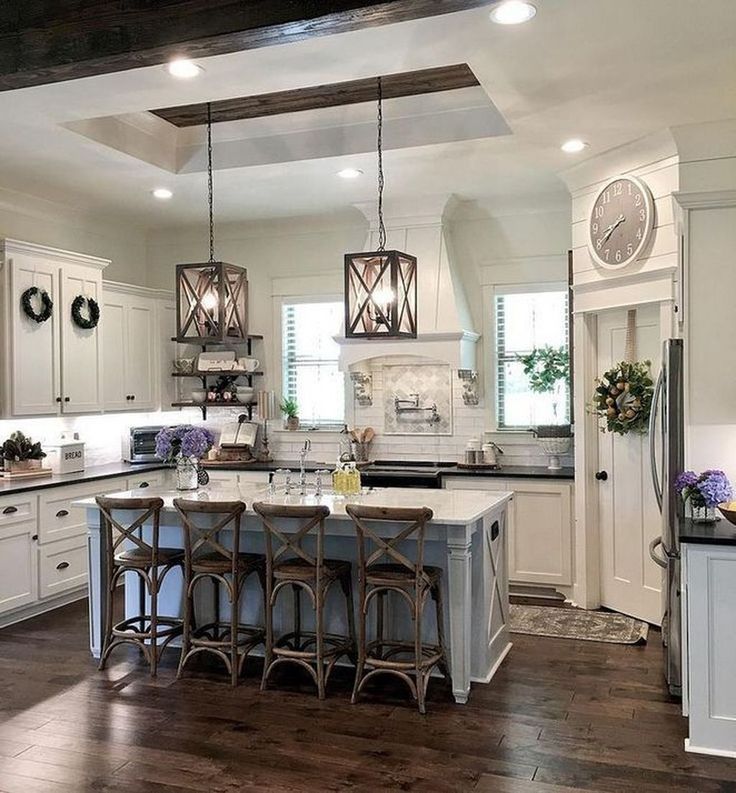
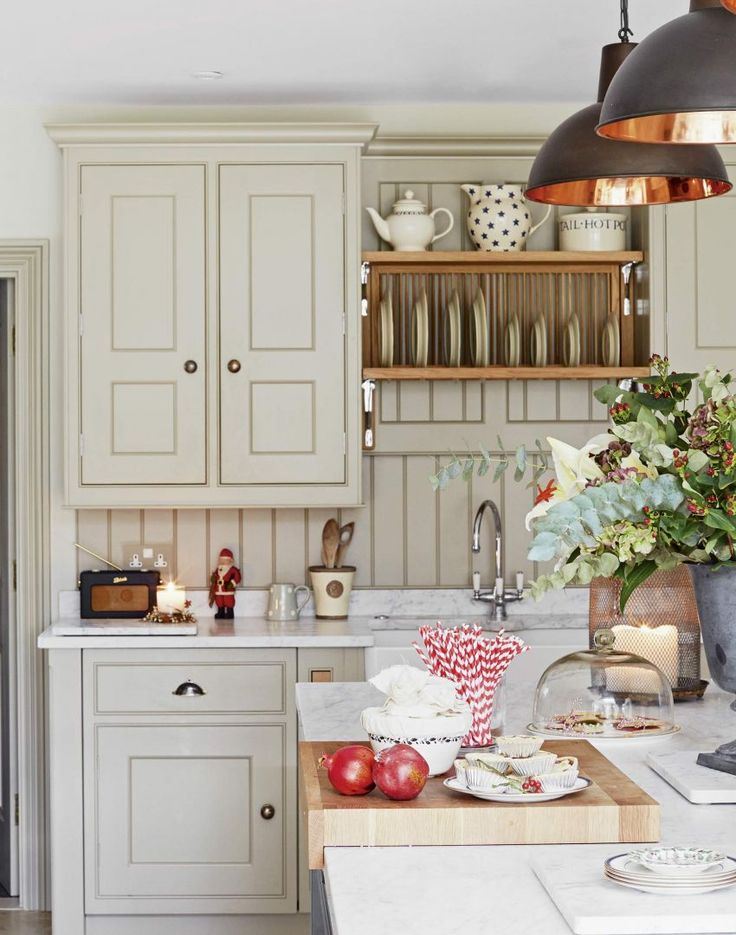
Country style kitchen design - photos of real interiors and tips
If you want to design a traditional kitchen with a country house atmosphere, country style is the perfect solution. What finishing materials and furniture to choose, we tell in this article.
Publication date: 05.12.2019
Material prepared: Ira Ryzhova
Country-style kitchen is suitable for those who want to escape from the bustle of the city in a cozy and homely atmosphere. The rustic style will perfectly fit into the interior of the kitchen both in a private house and in an apartment.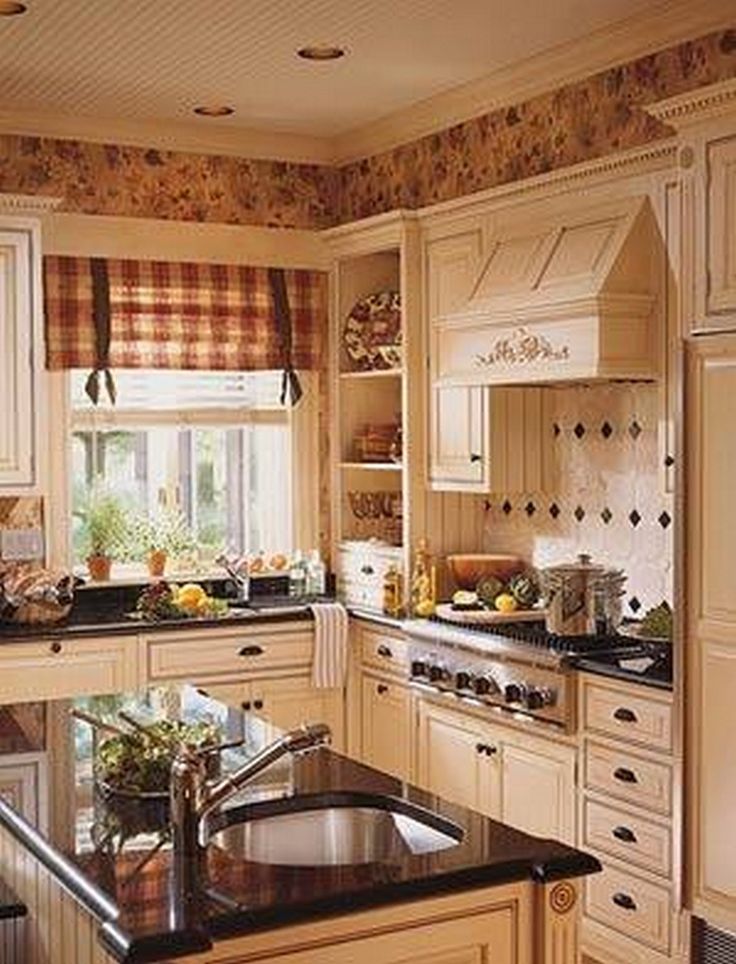 Notably, the design can range from completely traditional wood furnishings to more neutral interiors with recognizable country style elements.
Project authors: Dmitry Bykov, Natalya Ermakova
Photo: Wendel T Weber
Photo: Sarah Dorio
Authors of the project: Gulya Akhmetshina, Sergey Barabazde
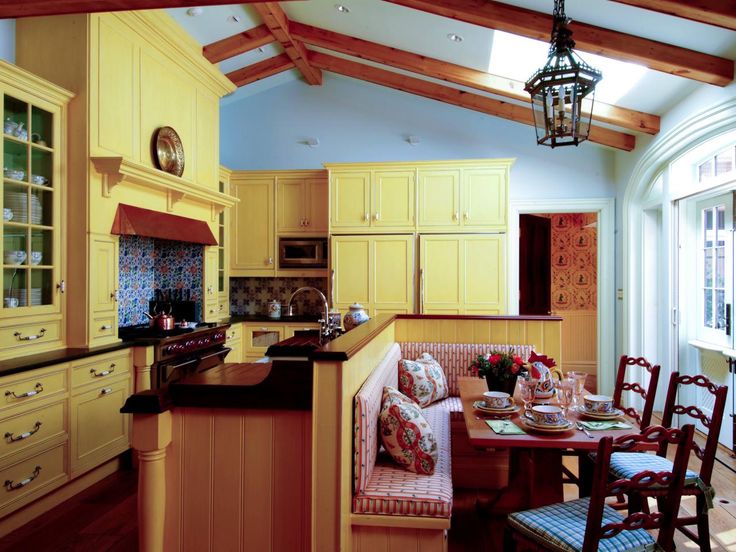
Country style kitchen design: 5 features
- Natural color palette. Shades in decoration and furniture are not bright and flashy, mostly brown, olive, sand.
- Natural materials. There is a lot of unpainted wood, stone, ceramics in the decoration. Not welcome plastic, chrome, synthetic fabrics.
- Some forged items. Brass faucets and fixtures, aged metal objects can be added to the country-style interior
- Rough and massive furniture.
 Country style involves the presence of large wooden tables and chairs, natural wood sets with an island, if the kitchen area allows.
 - Colorful tableware. It is used not only for its intended purpose, but also as a decoration. These can be ceramic baking dishes, plates, vases with traditional folk patterns.
Photo: Alex Hemer
Photo: Bjorn Wallender
Photo: Bjorn Wallender
Photo: pearsondesigngroup.com
Photo: pearsondesigngroup.com
Photo: realhomes.com
Photo: Ryann Ford
Design: BK Interior Design
Color palette
The interior color palette mainly depends on the wall finishes. If natural wood prevails, then the interior is best kept in muted natural tones - beige, sand, olive.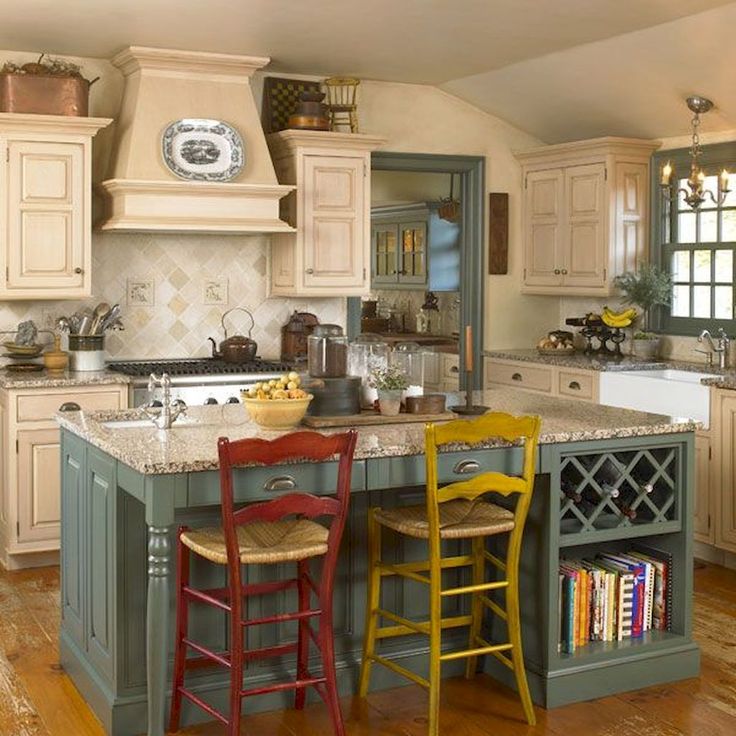 If the walls are light, you can use brighter shades - blue, green, ocher, but no acidic or flashy colors.
Project authors: Natalia Lomeiko, Tatiana Trofimova
Photo: Bjorn Wallender
Photo: realhomes.com
Photo: realhomes.com
Finishes
Recreating the style of a country kitchen is easy, if you remember the traditional village houses, you will not find plastic panels on the walls, gypsum moldings and self-leveling floors in them - only the simplest and at the same time environmentally friendly materials.
- For flooring , use wooden boards or engineered boards with a bright wood texture, such as imitation of antiquity and an aged surface. Porcelain stoneware with imitation of natural wood is also suitable - do not forget to provide a floor heating system so that the kitchen is comfortable all year round.

- Wall decoration depends on whether you are renovating a house or apartment. Walls made of timber or logs do not need to be covered with additional layers of finishes - on the contrary, natural wood will help create a more traditional country interior, with a reference to the atmosphere of a chalet and hunting lodges. To add light and visually make the space look bigger, paint the wood in lighter colors. The walls in the kitchen in the apartment can be upholstered with high-quality clapboard and painted or decorated with decorative plaster with the effects of unevenness and aging.
- For kitchen backsplash in a country style, plain white tiles of a small size - such as a “boar” or in the color of walls with a scuffed effect, decorative brick or varnished wood are suitable. Stone panels and metal brass sheets will look harmonious.
- Ceiling can be left plastered or natural wood color beams added.
 Another option is to completely decorate the ceiling with wood - clapboard or engineering board.
Photo: Brian Woodcock
Photo: Brian Woodcock
Photo: David Tsay
Photo: devolkitchens.co.uk
Photo: lecollectionist.com
Photo: Emily Fillovill
Photo: Joan Gruhen
Photo: lafirme.ca
Photo: orestudios.com
Photo: pearsondesigngroup.com
Kitchen furniture
Country-style kitchen set traditionally made of natural wood. The design of the facades ranges from rough wooden panels with an antique effect to more classic facades with panels. If the size of the room allows, do not refuse to equip the kitchen island - it will serve as an additional work surface and storage system.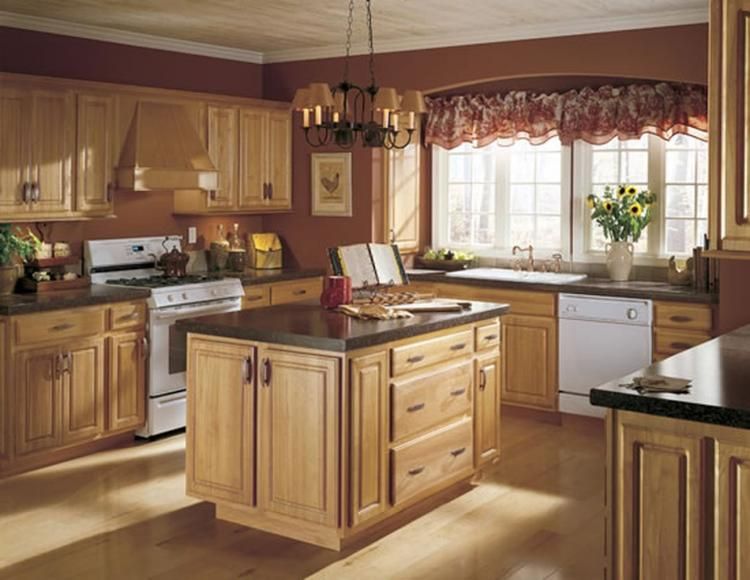
Design: Bria Hammel
A wooden dining table and chairs complete the decor. You can often see country-style kitchens without upper cabinets, then they are replaced with massive shelves on which you can place dishes and kitchen utensils.
Photo: Troa Giavan
A small country-style kitchen will also look very cozy: install only the most necessary cabinets in it, and replace the dining table with a wooden countertop bar.
Photo: Eric Piasecki
Photo: frenchiecristogatin.com
Photo: Gridley + Graves
Photo: heidicaillierdesign.com
Photo: Jean Allsopp
Photo: Joan Gruhen
Photo: Lucas Allen
Photo: Max Kim-Bee
Photo: Michael Paul
Décor and textiles
The finishing touch to your kitchen design is folk style decor and simple textiles. You don’t need to buy any special items to decorate the decor, the most ordinary things can become decor, for example, dishes made in the technique of one of the folk crafts, clay vases and pots, old metal plates, embroidered paintings and herbariums. You can add indoor plants in plain flower pots or a bouquet of dried herbs.
Design: BK Interior Design
Photo: Stephen Kent Johnson
And do not forget about textiles: the windows must have curtains - natural cotton or linen, with a floral pattern, with embroidery or a checkered pattern. Towels, cushions on chairs and tablecloths will also come in handy.
Photo: Jean Allsopp
Photo: Joseph de Leo
Photo: Lincoln Barbour
Photo: Lisa Furey
Photo: Lucas Allen
Photo: Lucas Allen
Photo: Max Kim-Bee
Photo: Max Kim-Bee
Photo: Miki Duistehof
Photo: Mikkel Vung
Photo: Monica Buck
Photo: room-decorating-ideas.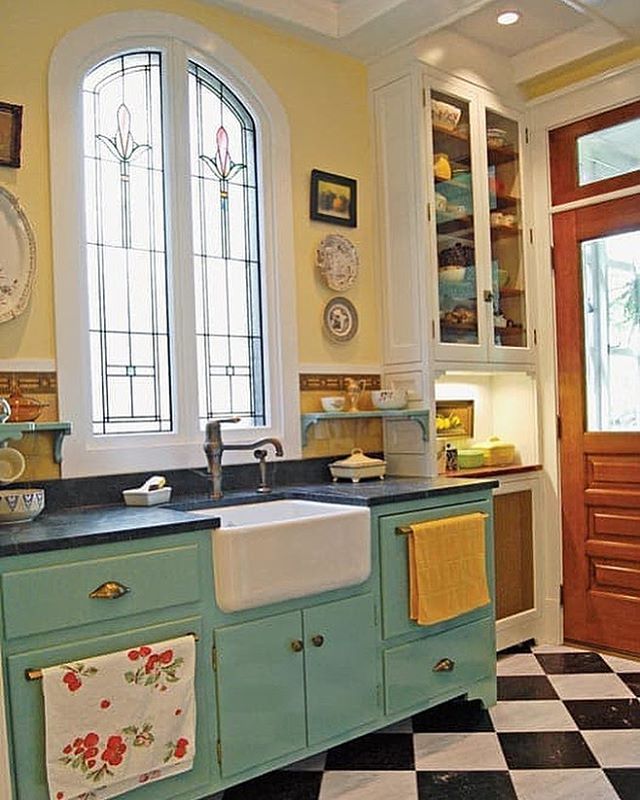 net
net
And 5 more tips to make your country style interior more interesting:
- Add black elements - in wall decoration, furniture and decor. They will add a little rigor to the atmosphere and at the same time charm.
Photo: Emily Guilbert
Photo: realhomes.com
- Use mono decor. For example, place only brown ceramic pots or plates with primitive designs on open shelves.
Photo: Duanne Simon
- Add wicker to your decor. Baskets can be turned into planters or hung from the ceiling if the height allows. They are also great for storing towels or cookbooks.
Photo: Marta Perez
Photo: Muki Duisterhof
- Highlight the stove with color. Let the hearth zone become central in the interior.

Photo: Buff Strickland
- Combine light white trim with contrasting dark wood. An interior with such details looks especially impressive.
Photo: Victoria Pearson
Advertising on SALON.ru
You may like these articles:
Crimson Viva Magenta: 7 items in Pantone Color of the Year 2023 And we have selected items that match the description.
#Where to buy
Pop Art Totems - New Items Slide
The Italian manufacturer of designer furniture made of plastic has presented the novelty Threebù Totem.
#News
The most convenient solutions for a small hallway: 5 designers' opinions
See what design techniques the pros use to design a comfortable entrance area in any interior.
#Interior #Hallways and halls
Sculptural lamp in the spirit of Alexander Calder
The novelty of the Paolo Castelli factory refers to the famous mobiles of the avant-garde sculptor.
#News
Get the most popular articles by email.
Subscribe so you don't miss anything. You can unsubscribe at any time.
Email:
By clicking on the "Subscribe" button, I consent to the processing of personal data.
Country style kitchen design (+55 photos) – Interior ideas
Translated from English, “country” means countryside, but even in the center of the metropolis, a kitchen decorated in this style will give a relaxed atmosphere of a ranch, cozy cottage or country estate. The inspiration for such an interior can be found in American westerns and traditional rural culture, borrowing from them natural simplicity, solidity and convenience. If you approach the design of a country-style kitchen with a soul, then the result will bring you the most positive emotions!
Country style highlights
Rustic business card - natural materials. Roughly crafted wood and stone, solid solid furniture, wickerwork and earthenware are the basis of the interior, while cute trinkets, rustic textiles and vintage decor give it a lived-in look.
The natural harmony of natural textures and shades contributes to relaxation - in such an environment, problems and hardships are quickly forgotten, and instead of them there is a mood to cook a delicious cake or arrange a festive dinner. It is pleasant to touch matte wooden surfaces, they exude home comfort.
Country style is very practical, you want to spend as much time as possible in it, feeling the calm regularity of country life.
Colors
Brown country style kitchen
At the mention of a rural house, wooden walls and antique furniture in brown tones immediately appear.
The color of chocolate, from bitter to milky, is simply irreplaceable in country style. Even if the kitchen is entirely made in light colors, it should still contain at least minimal dark accents. For example, the surface of the tabletop or the upholstery of chairs can be brown. At the same time, harsh black in a rustic interior is out of place.
Country white kitchen
Instead of a cold snow-white shade, the country uses slightly diluted matte tones: milky, cream, vanilla, light beige and sand.
Walls or ceilings are often painted white, kitchen furniture is often presented in this color - but, unlike the classical design, neither carved curls nor golden frames adorn the facades.
Country green kitchen
The life-affirming color of grass and leaves looks as organic as possible next to natural wood. Green walls and textiles wonderfully emphasize the texture of solid wood furniture.
Delicate olive, mint and emerald shades are usually chosen for kitchen sets, for which the best complement is beige or gray of equal saturation.
Red country style kitchen
Red kitchen is a bold and unusual solution, but in country style it looks quite calm.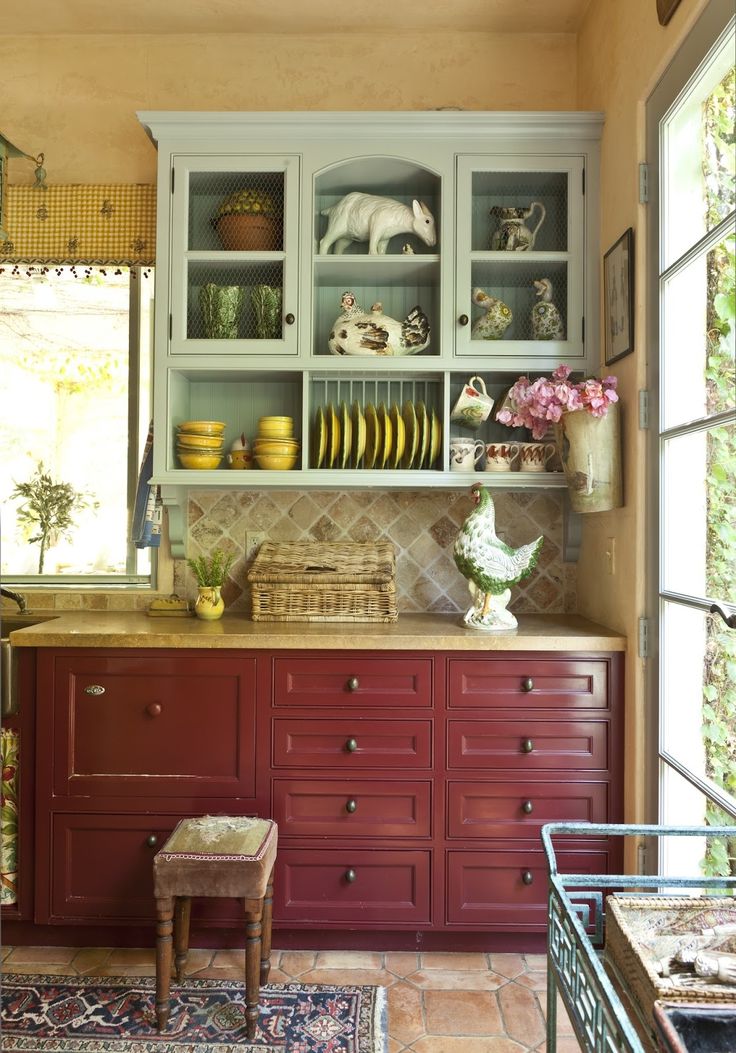 Matte lingonberry, terracotta and burgundy tones look great on the facades of the headset, they are elegantly repeated in the small pattern of textiles, dishes and decor.
The ideal background for such rich furniture will be white or light wood color.
Kitchen finishing in country style
Until the end of the 20th century, natural materials were the only ones available for home improvement. Now, when plastics and polymers are gradually replacing them, the once simple wood, limestone, vine and clay have gained elite status - often the price of such an eco-friendly design exceeds even cutting-edge high-tech. However, it is possible to equip a country-style kitchen even with a limited budget, especially since high-quality natural finishes will subsequently last for decades.
Floor
It is impossible to imagine a rustic kitchen without a plank floor. To increase the life of a parquet board, it should be coated with a matte varnish or moisture-proof oil impregnation.
A more practical finish is white or brown tiles, as well as porcelain stoneware imitating stone or wood.
In a small kitchen, it is better to make the floor plain or checkerboard, using small tiles (10x10 cm).
Walls
Moisture-resistant coatings and materials should be used to finish the walls in the kitchen. In country style, decorative “chipped” stone, ceramic and clinker tiles are ideal for this purpose. If desired, they can only be lined with an apron, and the rest of the walls can be left for painting, upholstery with wooden clapboard (in extreme cases, with plastic wood-like panels) or wallpapering.
Even in rustic design, textured plaster with the effect of antiquity, brick and stone masonry, wallpaper with floral ornaments, patchwork tiles, and mosaics with pastoral scenes will be appropriate.
Ceiling
The ceiling in a country-style kitchen is usually decorated with wooden beams. If the height of the room allows, then you can use false MDF beams.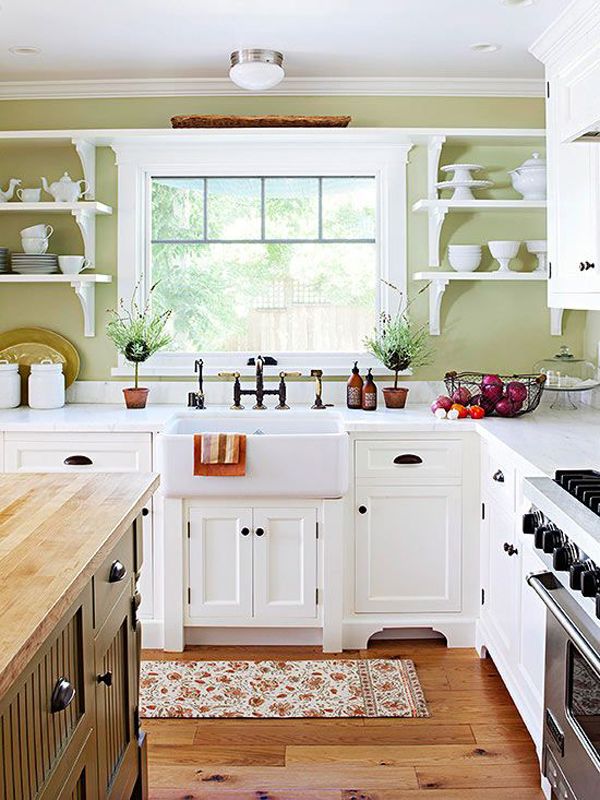 Hollow inside, they will help hide the wiring and will not hang menacingly over your head.
In small kitchens, it is better to simply whitewash the ceiling or paint it with white water-based paint. If a stretch film is used, it must be matte, as light as possible.
Textile
Rustic coziness is inconceivable without beautiful light fabrics. Curtains, tablecloths, napkins, kitchen towels, upholstery of chairs - all this gives the interior of a country-style kitchen a very nice homely look.
Chintz, cotton and linen are traditional for this style of design. However, given how difficult it is to care for these materials, it is better to give preference to synthetic imitations, which are easier to wash off stains, do not wrinkle and do not fade in the sun.
Country kitchen will be decorated with textiles with small floral patterns, as well as checks or polka dots. Ruffles, lace, ruffles, ribbons and bows are welcome.
Country style kitchen furniture
Beautiful country-style kitchen furniture is sometimes found in elite salons, and its price is quite high.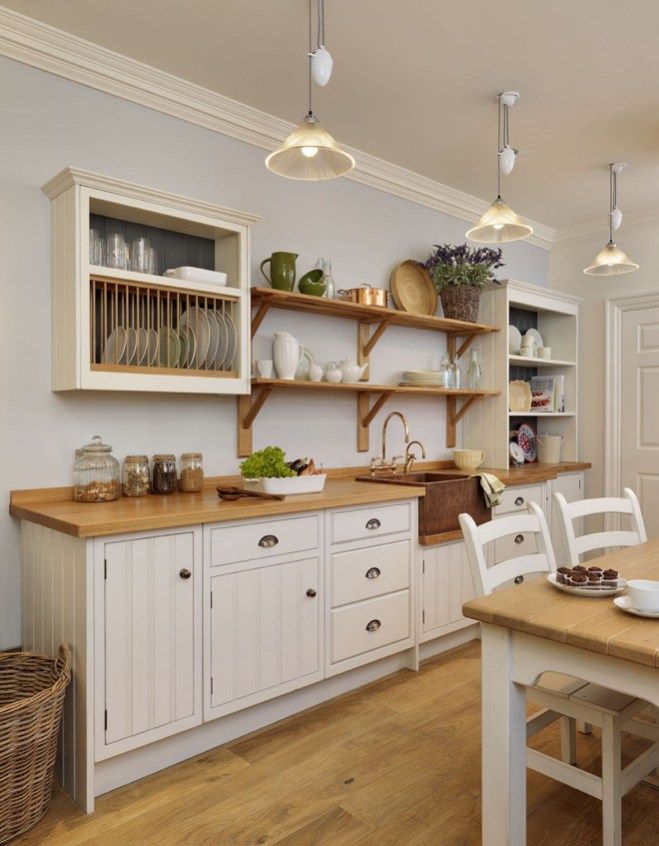 But you can always find a compromise, for example, turn to craftsman carpenters, restore antiques, or do it yourself.
Kitchen set
The headset, which at first glance gives the impression of reliability, durability and rough simplicity, is very likely to belong to the country style. It can be made of solid wood, MDF or chipboard, with a unique wood texture or painted, but it is always solid functionality without any frills.
The facades of the set can be decorated with simple geometric carvings, diamond-shaped grilles or perforations. Doors are always with handles, the old fashioned way. Fittings are used mainly copper, brass or iron. The hood can close the facade to match the rest of the wall design or in the form of a chimney.
As for the placement rules, for a small country-style kitchen, it is better to choose a high, but narrow, L- or U-shaped. In a large space, you can afford an island option, when a place in the center is reserved for a functional high table.
Dining area
Furniture for a rustic dining area is a traditional rectangular or round wooden table, stable chairs with high backs or a massive bench. Hammered metal elements, wickerwork from rattan or wicker are possible. Seats are often upholstered in soft fabric with a floral pattern or brown leather.
In a small kitchen, the function of a dining table can be played by a folding shelf mounted vertically on the wall, a large window sill or other device.
Storage systems
In a country-style kitchen, it is not necessary to hide everything behind blank facades. Beautiful crystal and painted ceramic sets will only decorate the interior, being behind a glass partition; for pans and improvised appliances, you can make wooden hangers with hooks - so they will always be at hand.
Open shelves, no matter how attractive they may seem, are rather impractical - dust, grease and moisture particles will accumulate on the objects placed there. Therefore, most products and kitchen utensils are best placed in closed cabinets, drawers, mounted on hooks or magnets on the inside of the doors. It will be more convenient to store plates and lids vertically in special grids, rather than stacking them.
Separately, organizer boxes should be provided for various small things, cutlery or spices. You can store vegetables, bread and other food in a rustic kitchen in pull-out wicker baskets or slatted pallets.
Country style kitchen decor
Old things from grandma's attic are ideal for rustic style: a cuckoo clock, a wooden chest with metal corners (by the way, a fairly roomy storage system for stocks of flour, sugar and cereals), an oil lamp, antique stove tiles (any of them looks like a work of art). art and can be used as a panel), embroidered towels or crocheted napkins.
Any wooden, wicker and forged decorations can also become a highlight of the interior. Do not neglect hand-painted wall plates in folk style, earthenware, figurines of domestic animals and birds.