Caring for elephant ears in the winter
Saving Elephant Ears For Next Year
Home › Ornamental Gardens › Bulbs › Elephant Ear
Elephant Ear
By: Heather Rhoades
Image by kuarmungadd
Elephant ear plants are a fun and dramatic feature to add to your garden, but just because these beautiful plants are not cold hardy does not mean you can’t keep elephant ear bulbs from year to year. You can save money simply by storing elephant ear bulbs or plants for the winter. Read on to learn more about how to overwinter elephant ear bulbs and plants.
How to Overwinter Elephant Ear Plants
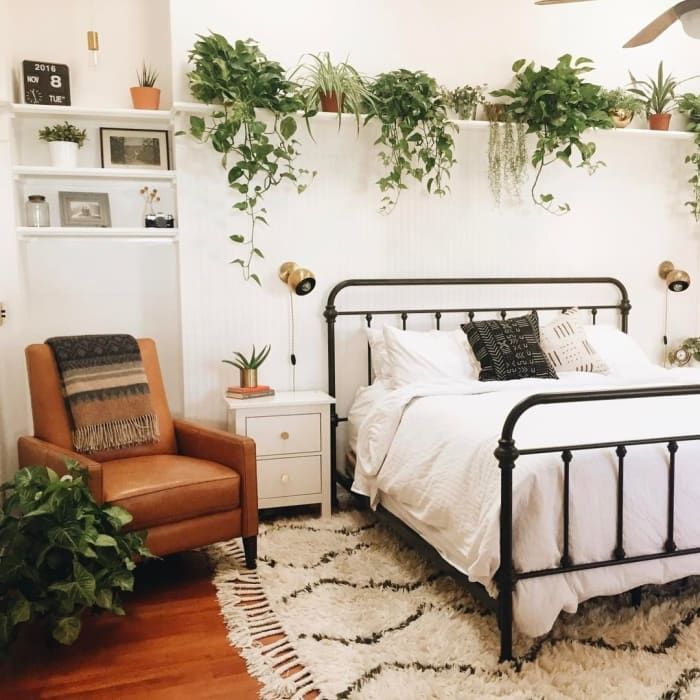
If you would like, elephant ear plants can be brought into the house and treated as a houseplant for the winter. If you decide to keep your elephant ear as a houseplant, it will need high light and the soil needs to stay constantly moist. You will also want to make sure that it gets plenty of humidity.
In the spring, once all danger of frost has passed, you can put your elephant ear plants back outside.
How to Overwinter Elephant Ear Bulbs
While many people use the phrase “elephant ear bulbs,” elephant ears actually grow from tubers. Since so many people use the incorrect term, we will use it here to avoid confusion.
The first step for storing elephant ear bulbs is to dig them out of the soil. It is very important to the success of saving elephant ears for the winter that you dig the elephant ear bulbs out of the ground undamaged. Any damage to the elephant ear bulb may result in the bulb rotting over the winter. In order to keep the bulb undamaged, it is a good idea to start digging about a foot (31 cm.) away from the base of the plant and gently lift the plant and bulb.
The next step for saving elephant ears is to clean the elephant ear bulbs. They can be gently rinsed, but do not scrub them. It is okay if some dirt is still on the bulb. You can also cut off any remaining foliage at this time.
After you clean the elephant ear bulbs, they must be dried.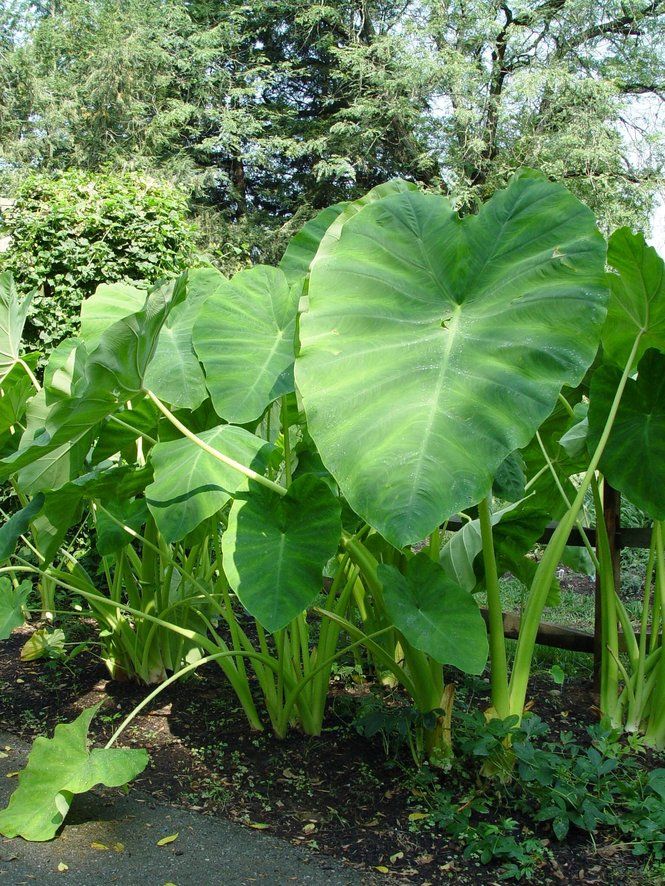 Keep elephant ear bulbs in a warm (but not hot), dark place for about a week. Make sure that the area has good air circulation so that the bulbs dry properly.
After this, keep elephant ear bulbs wrapped in paper and in a cool, dry place. While you are storing elephant ear bulbs, check on them every few weeks to make sure that there are no pests or rot. If you find pests, treat the bulbs with an insecticide. If you find rot, discard the damaged elephant ear bulb so that the rot does not spread to the other bulbs.
NOTE: Please be aware that elephant ear bulbs and leaves contain calcium oxalate, or oxalic acid, which may cause skin irritation and burning in sensitive individuals. Always use care when handling these plants.
This article was last updated on
Read more about Elephant Ear
Next>
Did you find this helpful? Share it with your friends!
You might also like…
How to Harvest and Store Elephant Ear Bulbs in the Fall
This post shares how I’m storing elephant ear bulbs for winter. If you live in a climate where you can’t grow beautiful plants outdoors all year long, harvesting your bulbs and saving them for the spring is a great way to bring them back year after year. This post also contains affiliate links.
Alright, I recently shared a post about how to debug plants to bring them indoors for the winter. Sadly, we live in a townhouse, so we don’t have room to bring everything inside. *tear* So I prioritized cleaning and debugging the plants we can bring inside first, and then I decided to save bulbs/tubers from all of the plants that had them.
Because why buy another elephant ear plant next year if you can save this year’s bulbs and regrow them next year? It saves money, and growing your own stuff is always super rewarding. So let’s chat about some basics here.
Why can you regrow elephant ear plants every year?So first let’s talk about why you can save elephant ear bulbs for next year. Elephant ear plants grow from tubers (but people call them bulbs…same confusion with dahlias). For the purposes of this post, it’s not super important.
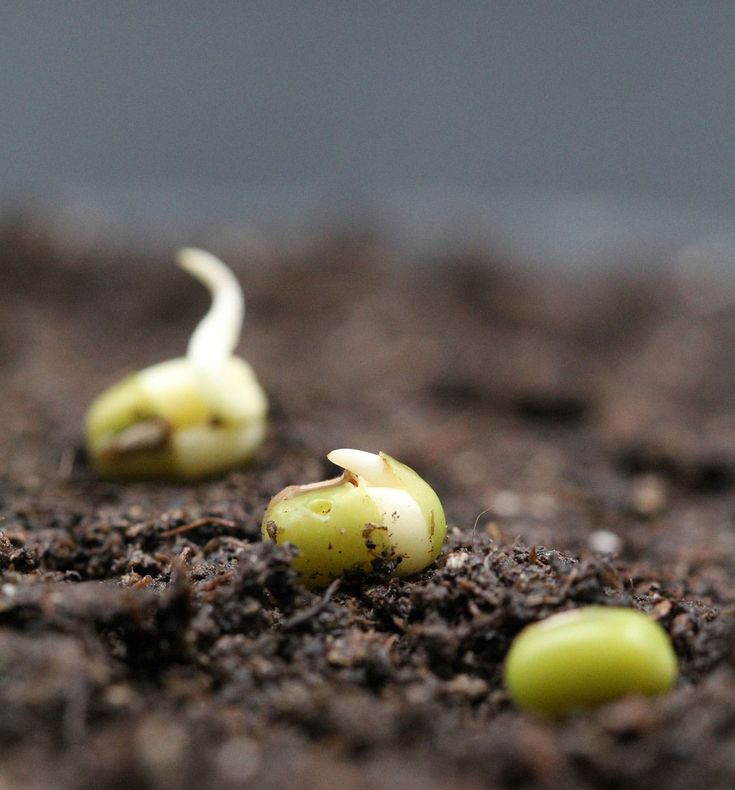
You’re able to save elephant ear plants year after year because they grow from tubers. (Again, they are not the same thing as bulbs, but they’re similar, so that’s what I’m gonna call them because I want people to be able to find this post and have it make sense). Tubers—like potatoes!—have “buds” all over them. Those buds then sprout growth that can grow plants.
When to dig up elephant ear bulbs for winterI dug mine up when I debugged all of my plants I was bringing indoors, so about 1–2 weeks before my area’s average first frost date. (You can look up your average first and last frost dates here.)
They’ll probably be fine if you let a frost happen, but if it’s a wicked frost that really permeates the ground or whatever the elephant ear bulbs are planted in, it might damage them. So just shoot for before the first frost and you’ll be golden.
Want more plant care tips? You’ll also love my guides on how to take care of snake plants, how to take care of pothos plants, how to take care of rubber plants, caring for peperomia plants, and how to care for philodendron.
How to prep elephant ear bulbs for storage over the winterStep 1: Dig up the bulbsThe first step is to dig them up. I cut off all of the foliage first, which was really sad. But necessary. I’ll miss you until next year, foliage! Then I used a small shovel to dig out around the base of the plant. Until you know how big your plant is under ground, start digging wider.
Once you’ve found the bulbs, pull out from the base of the plant. Brush/gently shake the excess dirt off, but don’t worry about getting them super clean. Then gently separate each bulb from whatever the main mass is. If there are very small bulbs attached to a much larger one, you can just leave those attached. Remove dead foliage if necessary.
Once you’ve separated as necessary and have a better idea of what you’re working with, you can trim the roots and wash them off. I used scissors to trim off all of the excess roots. Then I laid the bulbs on the ground and cleaned them off with the house. I wanted to be able to examine each bulb, mostly out of curiosity and wanting to learn more.
I then spray them down with neem oil to kill off any rot or fungus that might have been lingering and left them sit out to “surface dry” for about 10 minutes or so in the sun.
Step 3: Store to dryThen I moved them into a cardboard box to dry for about a week. I left them uncovered in the garage. Once they were pretty dry, I removed any extra dead foliage that had dried up and fallen off.
Step 4: Store for the long winterThen I wrapped each one loosely in brown packing paper I saved from a package we got in the mail. Make sure it’s loose enough that you can remove it to check on them every few weeks over the winter. If any rot or pests appear, treat appropriately or remove the rotted bulb and chuck it.
You can start your bulbs indoors in a container for about two months before they’ll go outside—just like you would with starting seeds. They will need sun and warmth while indoors. Use a rich soil and plant them about 1 inch below the surface.
Make sure they are pointing the right direction, too. Wondering which side of the elephant ear bulb is up? It’s the pointier one 😉 While they are still indoors, water when the top 1 inch of soil becomes dry. Elephant ears like moist soil, but since they are still indoors, you don’t want any mold growth to develop on the surface by overwatering.
Want more plant propagation posts? Check out my guides on propagating pothos plants, snake plants, peperomia, string of pearls, succulents, monstera deliciosa, and prickly pear cactus pads.
Plant in the spring after any danger of frost has passed. This will ensure the soil is beginning to warm up. If you started your bulbs indoors, just transfer them to the ground with whatever growth they have in tact.
Plant them about 1 inch below the surface. Make sure the right side it facing up, just as with starting them indoors in a container! Then cover with soil and water. Keep the soil moisture to get this plant going—elephant ears love rich, moist soil.
Share my tips about storing elephant ear bulbs for winter on Pinterest!Elephant Ear Care | Gardening
Today we will talk about a spectacular plant. Surely for many of you it decorates the living room in the house or even in the garden. Something is not surprising, because his leaves are very beautiful.
The scientific name of this plant is Alocasia macrorrhiza and bulb sprouts, but unlike bulbous flowers (such as tulip or daffodil), elephant's ear leaves all year round. Its color is pale green due to chlorophyll.
Do you want to buy an elephant ear, but you don't have much space? Take advantage of this opportunity and get your copy of Alocasia cuculata , a smaller species. To do this, you just need to click on the link.
Its origin is in Asia, particularly in India and Sri Lanka. . Later, primitive and domesticated cultivation of this plant spread to the Philippines and Oceania. Elephant ear grows in various tropical and subtropical regions. , especially in the southeastern regions of China and Asia in general.
On the American continent, in Colombia, it grows in the lowlands of the Pacific and Atlantic coasts, although it also develops in the inter-Andean valleys of the country and in the mountain range, where plants of other genera of the same family may grow. .
Index
- 1 characteristics of the EPLE ELUSELE Plant
- 2 Cultivation of the Marquis
- 2.
 1 Plague and illness
 - 2.2 Mod
- 2.3 Multiplication
- 2.
- 3 ELEPLY ELEDOME ELODURE?
- 4 Is there a black elephant's ear plant?
Characteristics of the elephant ear plant
Subscribe to our Youtube channel
Elephant's ear is a plant that has large Leaves, as mentioned above, can reach one and a half meters in length and radiate from their base, becoming smaller until they reach a triangular tip.
Most of these s are usually green in various shades of although you may find some with purple or bronze highlights.
Article subject:
How is the elephant's ear flower?
They have an elongated, underground and porous stem, and below it are their roots, and above the buds, leaves and flowers sprout. However, on rare occasions this plant blooms but when it does, this flower is called cane flower and has a whitish appearance.
This plant does not tolerate freezing temperatures, so is recommended in climates that do not experience very cold winters unless the frosts are very short or during which time its leaves do not fall. But don't worry, next spring they will sprout again.
The best thing for this type of plant is to grow in a hot climate. in a slightly shaded area in your garden. This is an ideal plant for a home, in a room with plenty of light and away from drafts.
Elephant's ear, which is in a very dry environment, may need to be sprayed in certain cases to avoid burning the tips. This is a plant that needs a lot of care , especially after planting, but dormant, then only spraying is required.
He needs the sun to shine constantly throughout the day, so it's best to place him in a strategic location.
Growing an awning
Article subject:
Caring for indoor alocasia
throughout the growing season (spring to late summer or early autumn, depending on the weather) with organic fertilizer or liquid green fertilizer, such as Flower, which can be bought here every fifteen days.
As for irrigation, it should often be , but the surface of the substrate should always be allowed to dry so that the bulb does not rot. This is a plant that, as we have already mentioned, will require that after planting you water it constantly at first, but then with a few sprays it will be fine.
One of the advantages of this plant is that it can be grown or propagated in a pot of seeds, or using children that sprout from their roots that in a few days they will have the necessary strength for their development.
If you want to sow directly in your garden, the soil should be moist and well drained.
The most recommended plant is 15 cm deep and has at least one bud on the stem. which must be dry. To do this, let the stem air dry for two to three days, so it's best to do this in the spring.
Plagues and diseases
Elephant's ear is one of the plants that is rarely attacked by any pests or diseases.
However, you can drop mealybug , a parasite that feeds on sap , resulting in unusual spots on the plant, which must be removed with a cotton swab moistened with alcohol, or can also be washed with soap and water . Another option is to treat it with diatomaceous earth, which is a highly effective natural insecticide that you can buy at here.
If you have one of these in your home, you must be careful when cutting it. Since the sap from its stem is irritating to the skin and eyes, be careful not to come into direct contact with it.
In the same way, you must be aware of the appearance of your plant, since it should always be with a characteristic green color , but if its leaves turn yellow, this is due to the fact that something is wrong with it, therefore it is affected by humidity or improper spraying of roots and leaves.
Poda
Image - Wikimedia / Fanghong
The plant does not require pruning, as other plants do. However, if some of the leaves on your plant have turned yellow, you will need to remove the leaves from the plant to prevent it from becoming a parasitic disease vehicle.
Used to trim spoiled leaves, utensils that are clean and disinfected when you are going to have an operation in the plant, as you must avoid that through them you can transmit a parasitic disease to the elephant's ear.
multiplication
Article subject:
Elephant's ear: reproduction
Propagation of this plant is done by dividing the rhizomes This should be done at the beginning of spring, dividing into proportions or separating the rhizomes from the main kidney, which, in turn, should have at least one kidney, preferably two.
Treat the cut surface of the rhizome with a fungicide. is sulfur based in powder form and you need to let it dry for a few days and then bury it in a small pot with compost and soil at a depth of 2 to 3 centimeters.
Now you will need to put the pot at a constant temperature of around 24ºC. plus it should have shadow . The substrate of your new plant should be kept moist until the fourth leaf has come out, and then you can transfer it to a larger pot with the same substrate.
Is elephant's ear poisonous?
This plant is not poisonous at all. Level Used to feed fish as a substitute for concentrated feed. this is granted to them, allowing their owners to carry food.
This plant is fed to pigs in some regions. where farmers use from plant stem to leaves as they can replace more than half of the concentrate they need in their diet.
Another route of consumption is for human consumption, although the presence of calcium oxalates may irritate humans . However, in some cultures, its leaves are used as vegetables, are the most tender and have different cooking methods.
Although this plant is not poisonous, be very careful not to confuse it with the ear of the black elephant, which we will explain below and whether it is really dangerous.
Is there a black elephant's ear plant?
There is a black elephant's ear which has a similar appearance to those already mentioned in terms of its leaves, but this has features that make it stand out quite a bit. Its scientific name is Taro "Black Magic" .
The leaves, in addition to their characteristic coloration, have a velvety texture that does not have the "original" . In fact, the tone that we might think of as black is actually a very dark green.
This plant is medium to small in size, so you won't need much space to have it, and in addition to its slow growth, you won't have to move it much.
The most important thing to note is that is poisonous so if you have children at home be very careful with them as they can poison you if swallowed. As for the flower that this plant has, it is really insignificant, but its inside is very similar to calla lilies due to the shape of the inverted cone.
It needs a special substrate to keep its green almost black color. This plant, if it needs good watering, then " original does not need ", which means you should have a pot with good drainage and more careful attention to it.
In short, elephant's ear is the perfect home plant. plus low maintenance It has a very ornamental look that can match well with your decoration, so you can safely have it without any problem.
Elephant ears in the garden: the rules for planting and caring for original bergenia
The large leathery leaves of the plant resemble elephant ears in shape, which became the basis for the culture's amusing nickname. However, the perennial has gained popularity among gardeners not only because of the picturesqueness of the huge shiny foliage that can change shade throughout the season. The showiness of early flowering, the juiciness of the colors of the petals, the ability to form unique arrays, the exceptional ornamentation of the plant - this is an incomplete list of the talents of a culture that does not require exceptional planting and growing conditions from the grower.
Planting bergenia in the open ground
- Shade-tolerant perennial does not require a place completely flooded with sunlight, it will be content with a somewhat shaded area.
- Planted in the sun, the plant quickly changes the color of the foliage, which seems to burn a little under the influence of direct sunlight.
- The massive rhizome of the crop can be threatened by stagnant groundwater or meltwater, so in places with high humidity, a reliable drainage layer should be laid out when planting the plant.
- The crop develops well on loose, light soils with a neutral level of acidity or slightly alkaline.
- Heavy clay soil can be improved by adding fine sand to it.
Planting time
Spring planting will allow the young plant to not only successfully take root in new conditions, but also begin to grow. A good time can also be considered the moment of completion of flowering, which falls at the end of summer and the beginning of autumn. When planting in the fall, the place where the stem is buried should be mulched so that the early cold does not interfere with the rooting of the bush. On the eve of a cold winter, you can cover the plantings with agrofiber so that the seedling can more easily survive severe frosts.
Container plant can be planted in the field any month from early spring to late autumn.
Planting features
When planting, seedlings are placed in pre-dug planting pits 10 to 30 cm deep: the exact size of the hole is dictated by the size of the rhizome of the seedling. In group plantings, the interval between young plants should be at least three meters: such a distance is due to the ability of the culture to quickly grow in width, forming lush curtains. Having installed the seedling in the hole, you need to fill the hole with a mixture of sod and leaf soil with sand and compost, gently tamp the ground and moisten the plantings well.
Caring for bergenia
Minimal care for an unpretentious crop is within the power of the busiest florist. With the advent of spring, you can remove some of the dried leaves that have not coped with a successful wintering. It is not recommended to remove many lower leaves, even if they have lost their former decorative effect: they solve important problems, saving the rhizome from overheating and retaining moisture in the soil. A well-growing perennial crowds out other crops near it, so weeds do not grow around it and there is no need for regular weeding.
Watering
Moisturizing the soil around the perennial should be done only as needed: the ground should not be overdried, but moisture stagnation should also be avoided.
Fertilizer
Do not get carried away with excessive feeding of the plant: an overfed perennial can begin to fatten, increasing its green mass and not bothering itself with generous flowering. Once a season, in spring or at the end of flowering, moderate top dressing with a complex mineral fertilizer is recommended. In the case of perennial growth on poor soil, you can additionally water the culture with a solution of superphosphate.
Care after flowering
With the onset of autumn, dried inflorescences and old dead leaves should be removed - such a measure will have a positive effect on maintaining the decorativeness of the plant. If it becomes necessary to collect the seeds of a plant, you need to put a thin gauze bag on the inflorescence to prevent the ripening seed material from falling to the ground. With the advent of September, the inflorescence should be cut off without removing the bag from it, and transferred to a dry room with good ventilation: after a few weeks, ripened seeds can be shaken out of the flowers and placed in storage.
Do not cut dried or dead leaves with scissors or a knife: it is better to carefully cut off the foliage, leaving no petioles on the stems.
Preparing for winter
The perennial weathers the cold well, keeping its luxurious leathery leaves alive throughout the winter. However, the main condition for the preservation of living foliage is the presence of a reliable snow coat: in snowless winters, the rhizome of the plant, located near the surface of the earth, may suffer from freezing. To protect the perennial, the ground around it is mulched with fallen leaves or dry straw, covered with spruce paws on top. With the advent of spring, it is important to remove the shelter without waiting for the positive temperature in order to avoid the threat of warming up the plant.
Diseases and pests
- The unique chemical composition of the plant helps it not be affected by diseases and pests. When planted in a site with stagnant water, the perennial rhizome can rot and become a target for fungal diseases. Transplanting a plant with pre-treatment of the affected fragments with fungicidal preparations will save it from the problems that have arisen.
- When a plant is infected with a slobber penis, the issue of treatment with the use of insecticides can be resolved. In case of infection with nematodes, it is necessary to dig up the plant and place its rhizome in a disinfecting solution of potassium permanganate. At the same place of perennial growth, it is better not to temporarily plant any plants; you can additionally shed this area with a concentrated solution of potassium permanganate.

Propagation of bergenia
The most popular method is perennial propagation by dividing the bush, but this method does not allow obtaining enough planting material, and the plant itself does not like frequent transplants. The seed method involves obtaining seedlings, the seeds for growing which are sown in containers in early spring. Two weeks later, the first sprouts appear, a month later the seedlings are ready for planting in the school.
Propagation by division
After flowering, you can carefully dig out the soil near the rhizome and cut off small fragments from it, making sure that each of them has at least several points of renewal. Planting parts of the rhizome should be made according to the general rules for planting a plant.
Propagation by cuttings
The role of cuttings in perennial propagation is played by young basal rosettes that appear next to the mother plant. You can cut them both in spring and at the end of flowering: planting material should be taken from an adult and healthy bush.