Best stains for kitchen cabinets
How to stain kitchen cabinets: an expert guide |
(Image credit: Alamy)
Staining kitchen cabinets is one of the easiest and most cost-effective ways to transform wooden cabinetry from tired and drab and in need of some TLC, to good as new.
Perfect for traditional designs, wood stain can be used to create various color tones, as the stain soaks into the wood, allowing the natural knots and grains to show through. ‘Staining kitchen cabinets shows off both color and texture,’ says Lucy Searle, Global Editor in Chief of Homes & Gardens. ‘It’s a great way to refresh old or dated furniture and can add warmth and character to the kitchen. It also makes it easier to touch up in the coming years if any marks or blemishes appear.’
The process is pretty simple, similar to how you paint kitchen cabinets, and the key lies in the preparation. Ryan McDonough, interior design expert at My Job Quote says that you can use a wood repair filler in a natural tone to disguise any cracks or nicks in the surface and use a furniture touch-up pen to even out any areas where the old stain has worn away. ‘You can now apply a new coat of stain,’ he says. ‘Always pick wood stain for interior use to avoid harsh chemicals inside the home and follow the application advice on the tin. Finishing with a wax will help provide a protective coat to your cabinets.’
Below we take you through the process of staining kitchen cabinets step-by-step.
How to stain kitchen cabinets
Staining is a great way to refresh the space without having to remove kitchen cabinets and install kitchen cabinets with a different look.
Not only does a wood stain enhance the look of wood kitchen cabinet ideas in the same way that refinishing kitchen cabinets can, but it also protects them so your kitchen will look better for longer.
Michael Rolland, interiors expert and MD at The Paint Shed , shares his step by step guide on how to update kitchen cabinets without replacing them when they’re made from real wood.
You will need:
- TSP (Trisodium Phosphate)
- Microfiber cloths
- Drop cloths
- Protective plastic gloves
- Chemical paint stripper (depending on cabinet condition)
- Paint scraper
- Palm sander (optional)
- Fine-grit sandpaper
- Medium-grit sandpaper
- Wood treatment
- Long-haired, soft bristle paint brush
- Steel wool
- Wood stain
1.
 Clean and protect
Start the process by removing the cabinet hardware, including the handles and knobs. Put these aside in a bag to ensure you don’t lose any of the screws. Unless you are replacing them, in which case you can donate or sell the originals.
The next step is to thoroughly clean the cabinets. As the kitchen is a place where there is a lot of grease, it is vital that you use something a little stronger than just water to clean the cabinets. TSP (Trisodium Phosphate) is often recommended for jobs like these. It can come as a ready-made spray or as a powder to be mixed with warm water.
It is important that if you are using TSP for cleaning, you are properly protected with gloves and goggles. Once the TSP has properly dried, there will likely be a white residue. Remove this with a clean damp cloth and wait for it to dry.
It is important to note that unless your cabinets are raw wood, the existing finish must be removed. Whether this is paint or a different stain, it should be stripped using a paint and varnish stripper before applying the new stain.
Next, protect your surroundings. Be sure to remove any appliances on the countertop and lay down dust sheets to protect your floor.
If you haven’t got the steadiest hand then use painter’s tape to protect the places where the cabinets meet the countertop and walls.
2. Prep and sand
Once the cabinets are clean and dry, move on to sanding the cabinets with 80 to 120-grit sandpaper. If you have access to a palm sander, this will make the process quicker and easier, but it is not essential.
Sand in the direction of the wood grain until the cabinets' surfaces are smooth and even. If you notice any imperfections in the wood, such as deep scratches or dents, you can use a wood filler to fix them then sand until smooth when dry.
Sand the cabinets again but this time with 150 to 220-grit paper. Use a vacuum cleaner to clear the sanding dust and wipe the excess dust from the cabinets then leave to dry.
3. Treat the wood
Once dry it is recommended that the wood is treated prior to staining. As the kitchen is a high traffic area that is exposed to a lot of moisture and grease, it is important that in the interest of longevity, the wood is treated. Wood treatments can be applied using a brush or a cloth. Check the manufacturer’s recommendations for the number of coats required and drying times.
4. Stain the wood
The stain should be applied in a full flowing coat, ensuring all surfaces and end grains are fully coated. For best results use a good quality, long-haired, soft bristle brush. Avoid over brushing as this will cause brush marks and result in a poor quality finish.
Be sure to work in the direction of the grain and aim for a light, even coating. If you do notice sections looking darker than the rest, you can lighten this by rubbing off the excess stain with a fresh rag or cloth.
Allow the first coat to dry, which takes 2-4 hours, before applying a second coat. It is also recommended that you lightly scuff the cabinet surfaces with steel wool after the first coat before applying the second.
Many stains will have a sealer built into the product, meaning that no topcoat is needed. However, make sure you check the stain before calling it a day.
Can you stain over existing kitchen cabinets?
Yes, you can stain over existing kitchen cabinets, though you will need to remove all traces of the existing finish first to get the best and most professional result.
Is it difficult to stain kitchen cabinets?
It is not hard to stain kitchen cabinets – most DIYers can tackle the job perfectly well. The keys to success are: good and thorough preparation; the right wood stain and brush for application; ensuring a top coat is applied if needed. If you aren't confident of staining wood kitchen cabinets in place, removing doors and drawer fronts to stain them flat can give you better results.
Is staining kitchen cabinets a good idea?
Yes, if you want a really hardwearing finish. Staining kitchen cabinets allows you to easily touch up over time, as any marks or scuffs can quickly and effortlessly be covered up.
What is the best stain for kitchen cabinets?
The best stains for kitchen cabinets are water-based but always ensure that your wood stain matches your wood finish for best results.
Hayley is an interiors journalist, content provider and copywriter with 26 years experience who has contributed to a wide range of consumer magazines, trade titles, newspapers, blogs and online content. Specialising in kitchens and bathrooms, she has twice won the CEDIA Award for Best Technology feature. Hayley writes for H&G about kitchens, bathrooms, cleaning, DIY and organizing.
9 Cabinet Stain Colors and How to Coordinate Them
By
Ashley Knierim
Ashley Knierim
Ashley Knierim is a home decor expert and product reviewer of home products for The Spruce. Her design education began at a young age. She has over 10 years of writing and editing experience, formerly holding editorial positions at Time and AOL.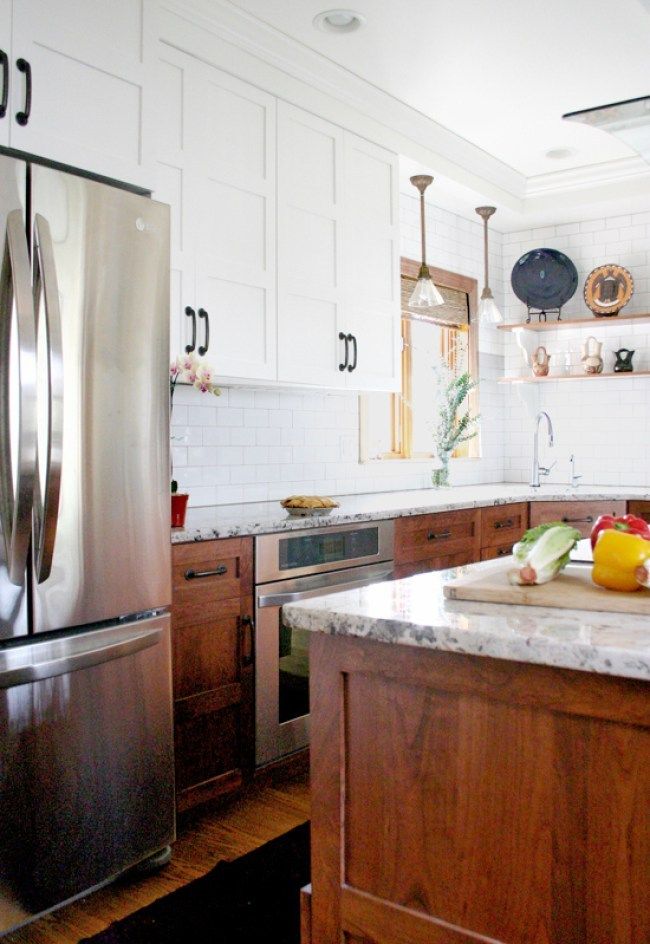
Learn more about The Spruce's Editorial Process
Updated on 01/26/22
The Spruce / Christopher Lee Foto
If you have natural wood cabinetry in your bathroom or your kitchen, you have a couple of options if it's time for a refresh: You can paint it or you can stain it. Stained cabinetry has risen in popularity over the past few years, particularly for homeowners who want to embrace a more rustic look that really shows off the natural texture of the wood. Plus, oftentimes staining is much easier than repainting your cabinets, especially if you are going darker.
If your cabinets are in need of a refresh, we've rounded up some of our favorite wood stain ideas and how to style them in your own home.
-
01 of 09
Classic Chestnut Stain
Design: Michelle Lisac Interior Design
Photography: Jennie Corti
This classic chestnut wood stain from Michelle Lisac Interior Design really highlights how beautiful natural wood really can be.
 The eye-catching wood grain here really shines through and adds a lot of texture to the bathroom.
 Because this stain is so rich and the wood textures are so vibrant, we recommend pairing with lighter colors like white or gray and keeping the rest of the space toned down to allow the cabinetry to really take center stage.
-
02 of 09
Clear Stain for a Weathered Look
The Dotted Bow
This cabinet stain idea from The Dotted Bow is a wonderful DIY if you want to lighten up your existing dark brown wood cabinetry. Here, the original varnish was stripped off to create a rustic look, and a clear stain was used to seal it. We recommend this look on smaller projects (like this bathroom vanity) instead of a larger one like a kitchen, but it's a wonderful way to revamp a tired vanity.
-
03 of 09
Medium Gray Stain
designersbuildersinc / Instagram
If you love neutral cabinets but don't want to go for the painted look, this medium gray strain from designersbuildersinc is a great choice.
 It's perfect for modern farmhouse kitchens and works well with lighter countertops. You will want to avoid darker accents with this color to keep the space from feeling too dark.
 -
04 of 09
Gray and White
indianakitchencompany / Instagram
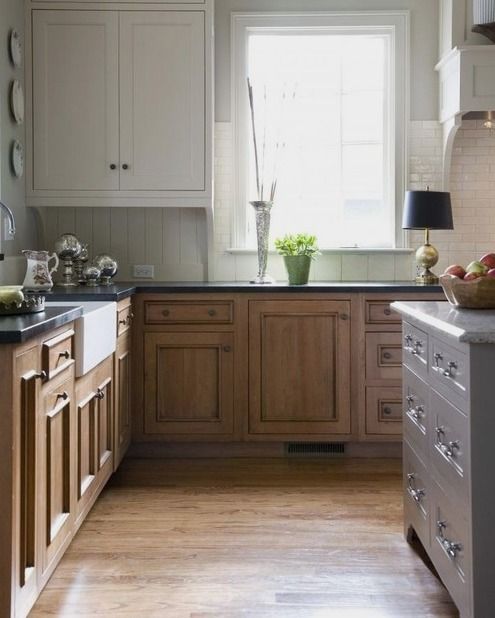
This oversized kitchen from indianakitchencompany not only features beautiful white painted kitchen cabinets, but the island sports a light gray stain that helps to give the space a little more depth and create a more rustic feel. Pairing a stain with a painted cabinet is a wonderful way to mix a modern look and feel into the more traditional style of using a wood stain.
-
05 of 09
Blue Stain
Design: townandcountrykitchenandbath
Photography: patriciaburkephoto
Can't decide between paint and stain for your cabinets? We love this look from townandcountrykitchenandbath that features wonderful white painted cabinetry with a custom blue stain on the island. This combination adds a pop of color without clashing or feeling too bold.
 The blue stain is a great choice for someone who wants a bit of color but still wants a neutral look.
 -
06 of 09
Blonde Wood Stain
eyeforpretty / Instagram
The minimalist Scandinavian is hugely popular, and a cabinet stain is a great way to get it in your own home. This lovely kitchen from eyeforpretty features a blonde stain that gives off the illusion of unfinished wood in the best way. It's perfect for small or large spaces and a great alternative to a white kitchen.
-
07 of 09
Dark Brown Stain
normandyremodeling / Instagram
A dark wood cabinet is traditional and classic and though white kitchens and bathrooms have become more and more popular, there's still a place for a deep brown stained cabinet. This bathroom vanity from normandyremodeling features a mahogany stain that gives it a rich, warm appearance.
When working with stains this dark, focus on lighter or cool colors. While dark colors can work with rich stains like this, a lighter one will create a lovely contrast and a more neutral color palate.
-
08 of 09
Natural Wood Stain
ourhamptonhouse / Instagram
If you love a more natural look, check out this bathroom vanity from ourhamptonhouse. This medium brown stain is light enough to show off the unique grain in the wood, giving it a textured look.
Here, the natural wood is paired with shiplap and industrial accents, but this stain is a versatile one that pairs well with lighter or darker palettes.
-
09 of 09
Dark Gray
indianakitchencompany / Instagram
This rich gray stain from indianakitchencompany is a nice option between a darker brown and a gray. The depth of the color gives it a richness that adds warmth to the space. We love this stain paired with black accents or lighter ones like light gray or beige. Here, both black and white work well with the deep gray and create a nice contrast.
How to paint kitchen furniture with stain
There are many adherents of the natural style, who are sure that wood should never be painted, and if they do, then use brown tones as close to natural as possible.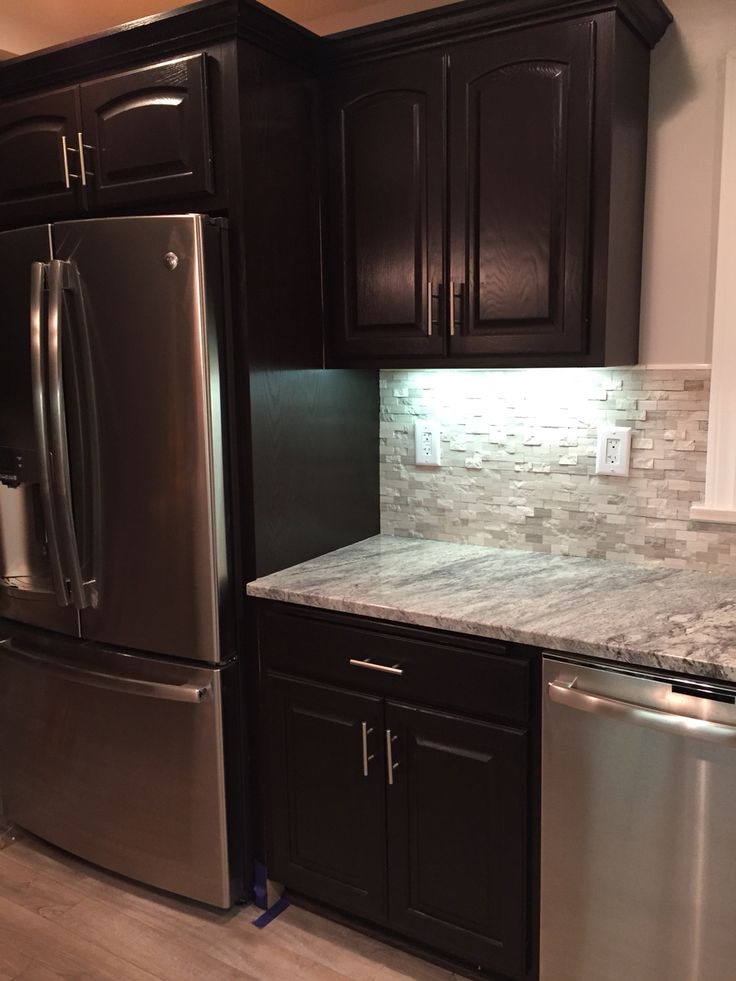
More daring natures enjoy the process of transformation of wooden surfaces treated with bright dyes. We think that most of us are neither one nor the other, but stick to the golden mean.
It's hard not to admire the inner perfection of unfinished wood, but there are many examples of successful furniture finishing with expressive colors. Stain is an easy way to personalize your kitchen.
Thanks to it, you can experiment with the palette without losing the opportunity to contemplate the natural structure and pattern of wood. Whether you paint your cabinets yourself or hire a professional, it's up to you, and the online magazine Kitchen Interior Ideas is ready to showcase 8 stunning stained wood kitchen interiors.
In addition - a story about 8 exotic shades of wood stain, one of which is sure to please you.
1. Light Green
This light and open interior was given its own personality after the entire kitchen unit was treated with green stain.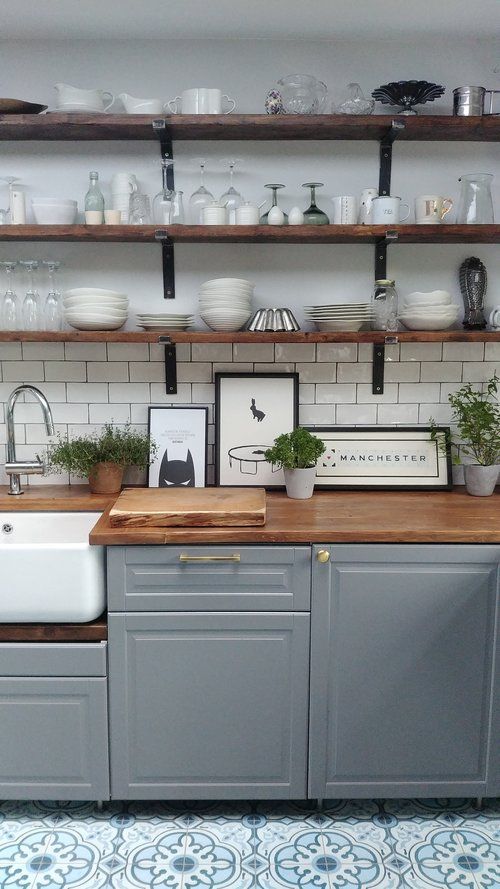 Its shade is so light that the image turned out to be very natural. And everything else is fresh, cheerful and unique.
2. Smoke gray
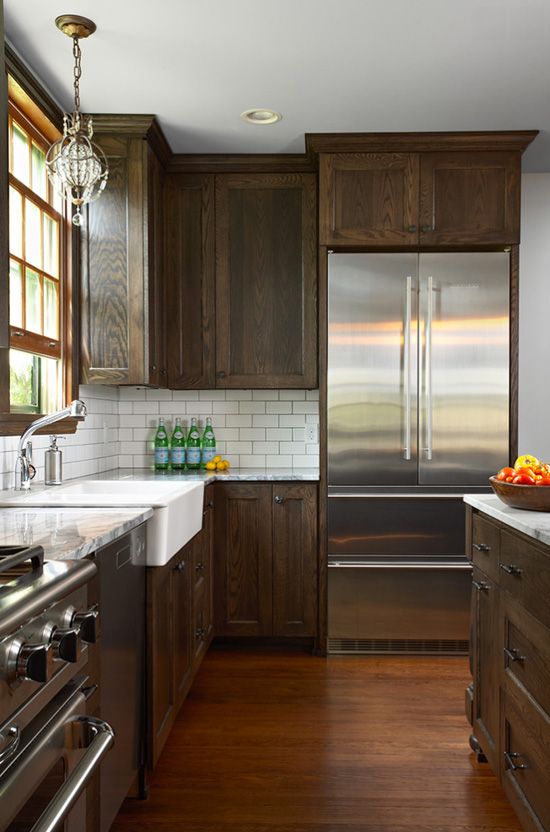
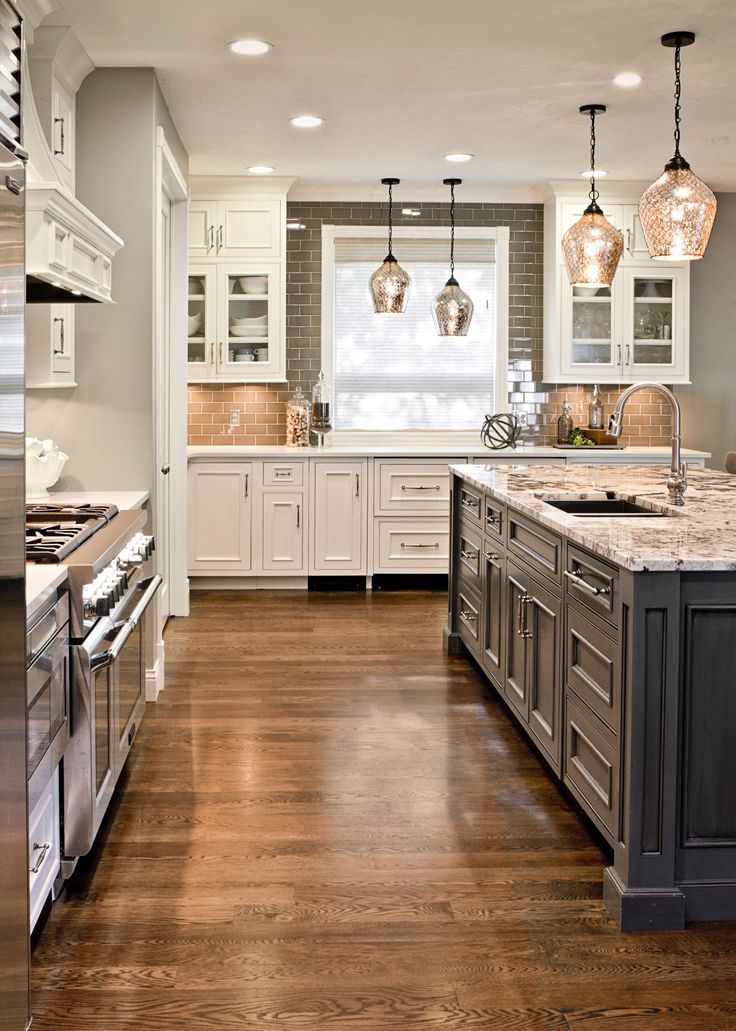
A stunningly deep and rich shade that is colder and more intense than we are used to seeing in kitchen furniture. As you can see in the photo, it pairs beautifully with modern stainless steel fittings and marble countertops.
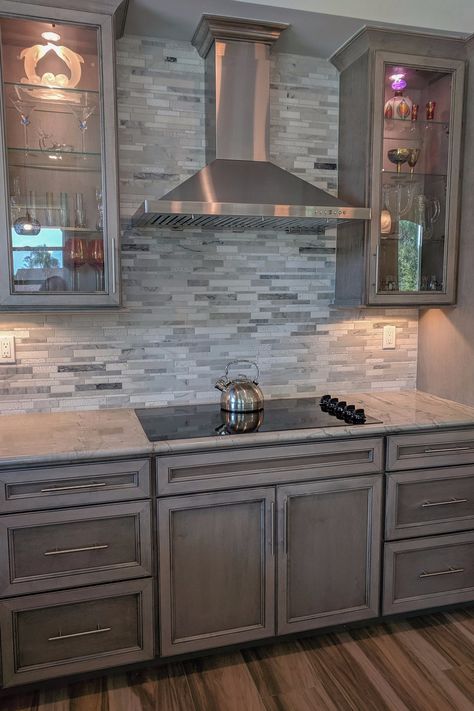
3. Silver Gray
This shade will give the interior character, but retain some neutrality that allows it to work with any style. It would seem that the kitchen in the photo consists almost entirely of wooden elements, but the feeling of redundancy does not arise due to the exquisite finish of the furniture.
4. Grey-green
Here is another beautiful and unique kitchen with grey-green wall cabinets. The advantage of this shade is its absolute versatility, which allows you to create any images in the interior.
5. Burgundy Red
This color will show off your boldness and make a kitchen look great with minimal decor. Dark red cabinets will look especially advantageous in a dimly lit room.
6. Green with black
This stain is ideal for wooden surfaces with a pronounced longitudinal texture. In the modern interior in the photo you can see a surprisingly harmonious combination of greenish-black cabinets with a turquoise kitchen island.
7. White
Whitewashed furniture seems to have always been around, but today it often forms the image of a modern kitchen with a rustic character.
Some bleached woods tend to look pinkish, this effect is enhanced when combined with yellowish green elements. The fact is that pink and yellow-green are opposed to each other on the color wheel, which means they are contrasting.
By adding orange or blue-gray details, you can make the pinkish tint less pronounced or even level it out.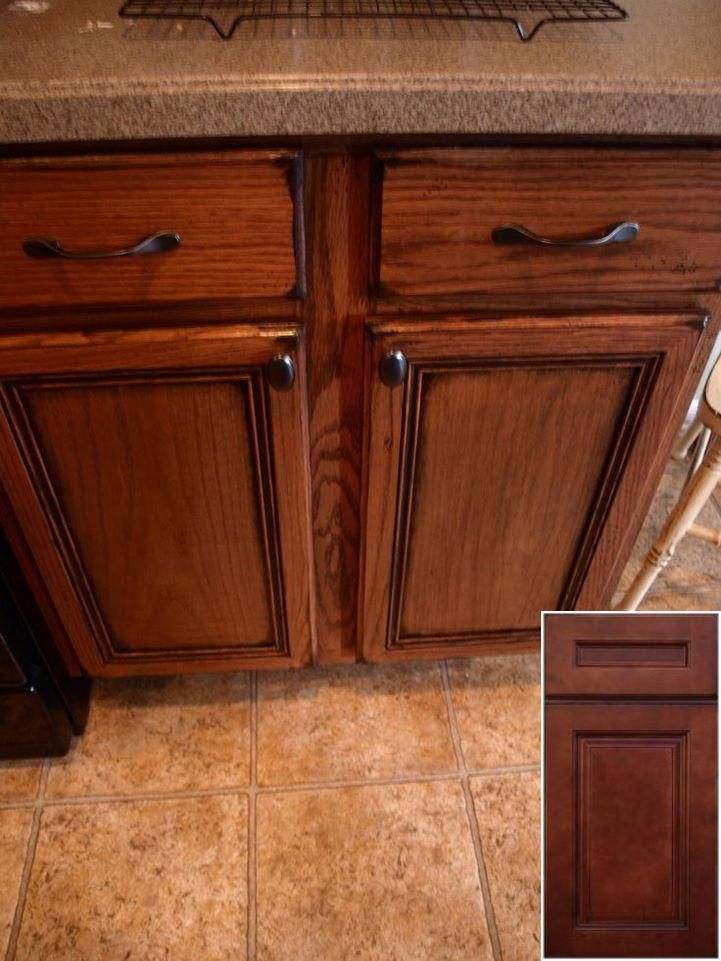 This is exactly what the owners of the kitchen in the photo did.
8. Ebony or black brown
Black kitchens are not uncommon today, but this interior seems so elegant and warm that you immediately want to touch the matte surfaces of the cabinets that make it up.
This shade can create a unique look when paired with brushed stainless steel countertops and jet black flooring like the Marmoleum sample shown here.
Approximate combinations: greenish blue
The yellowish tint, characteristic of many types of wood, must be brought to the intensity of mustard. Shown here is a sample of a white countertop with slightly translucent amber filler, which subtly emphasizes the expressiveness of such cabinet finishes. The third recommended component is soft gray floor tiles.
Sample combinations: yellow-orange
Spring green wardrobes just need the addition of a dark walnut floor. And the countertop can be quite simple - gray quartz is perfect.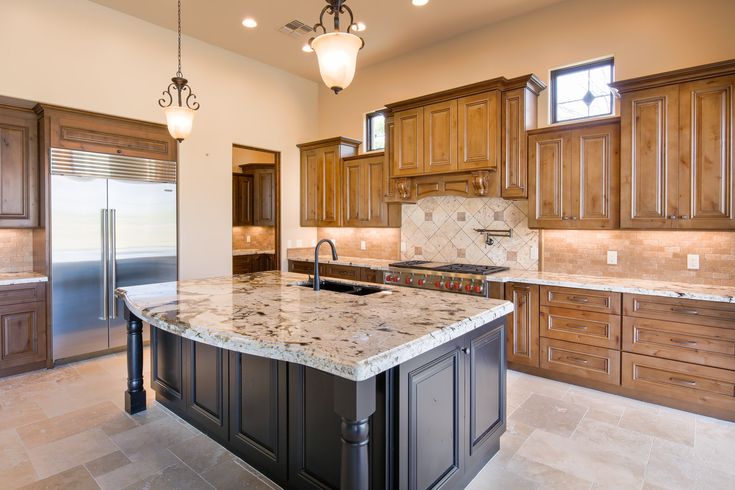
Sample combinations: juicy green
Categories: Kitchen colorwhich wood stains are best, tips
one Impregnation types
2 Type of material and type of work
3 Impregnation basis
four Application methods
5 conclusions
Impregnations and Stains are used to protect various materials and make them attractive. These terms are often confused or used interchangeably. And that's why!
Stain is one type of impregnation. It serves to give the wood a certain color. Initially the color of bog oak, now the range of colors is much wider. Impregnations are substances that penetrate into the structure of the material, impregnate it. First of all, they serve to improve the protective properties of the material and, secondly, to give it color.
To sum up, modern stains and impregnations both color and protect wood, so the line between these concepts has become blurry.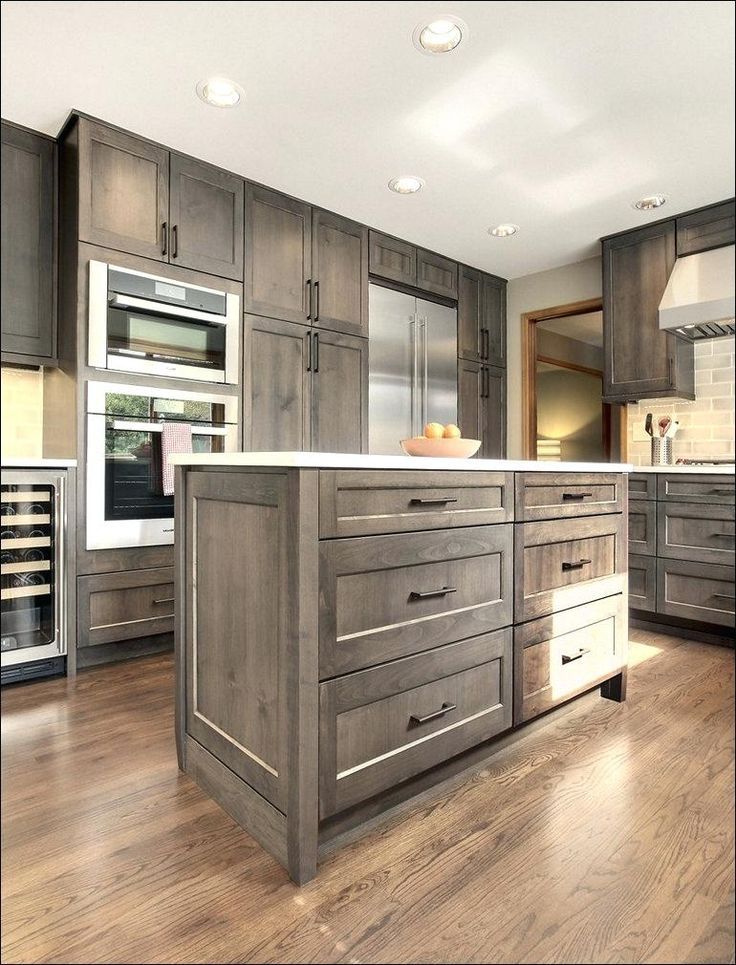
We have mastered the terminology - let's understand the types and properties!
Impregnations are designed to protect wood, concrete, brick or metal from fungi, mold, microorganisms and insects. They are colorless or colored. The compositions have different properties. For example, there are impregnations that protect materials in conditions of high humidity.
Stain is a liquid used to coat wood products. It penetrates into the wood and changes its color. Stains are often used to give a wood texture a more advantageous look. Moreover, stain can make even a modest breed luxurious. In addition to aesthetics, stain also protects the tree from fungi, mold and high humidity.
Antiseptic for wood is a composition that is designed to protect wooden products from decay, fungus and mold. The antiseptic contains chemical elements that repel insects. Moreover, in the composition for outdoor work, the content of such elements is increased.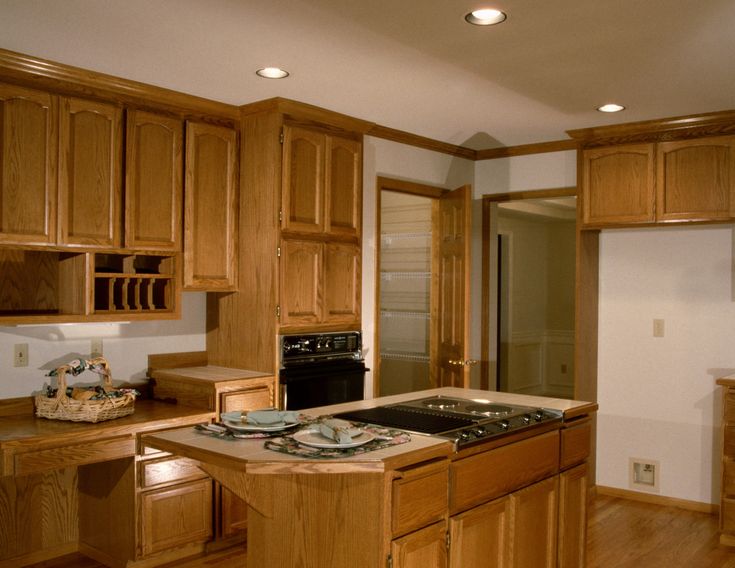
protective and decorative compositions , lakobeitsy and various glazes for wood serve as protection and decorative coating at the same time. They are made from resin. Also in their composition they may contain various oils, biocides, coloring pigments and functional additives.
Such impregnations are very popular, therefore they are presented in a wide range of colors. When choosing a color scheme, consider not only your own wishes, but also be guided by the recommendations of a specialist. For example, for outdoor structures, it is better not to choose light colors. This is due to the fact that under the influence of ultraviolet rays, a tree with such an impregnation may darken.
Wood Treatment Oil is a natural remedy for protecting wood products from biological contamination, decay and high humidity. Most often, linseed oil is used for the base, which is well absorbed and polymerized. Tung and walnut oils or teak oil are used less frequently.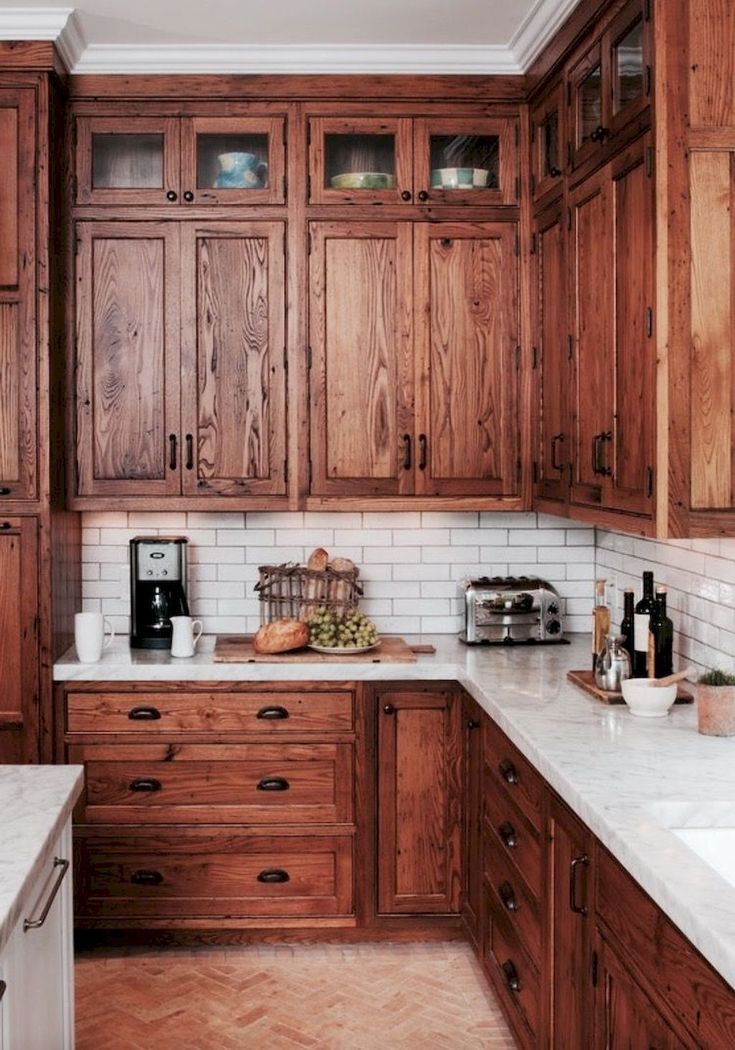 They are better than linen, but much more expensive.
Oil coatings may contain wax, natural resins, various solvents and pigments. The main task of the oil is not to “powder the imperfections”, but to preserve the natural look of the wood.
Another oily product is drying oil . It appears in the process of oxidation of vegetable oils, which contain linolenic acid, which gives the oil the ability to dry completely. Depending on the base, drying oil can give the surface different shades. After it dries, a film is formed that protects the treated material from the effects of harmful factors (rotting, fungi, insects).
Due to high humidity and fungi, the wood starts to darken, and to fix this, apply wood bleach . The principle of their work is that bleaching agents discolor lignin, the pigment that stains wood.
Life hack: bleach will be more effective if the treatment is carried out at a temperature of +18–20°C and humidity of 60%.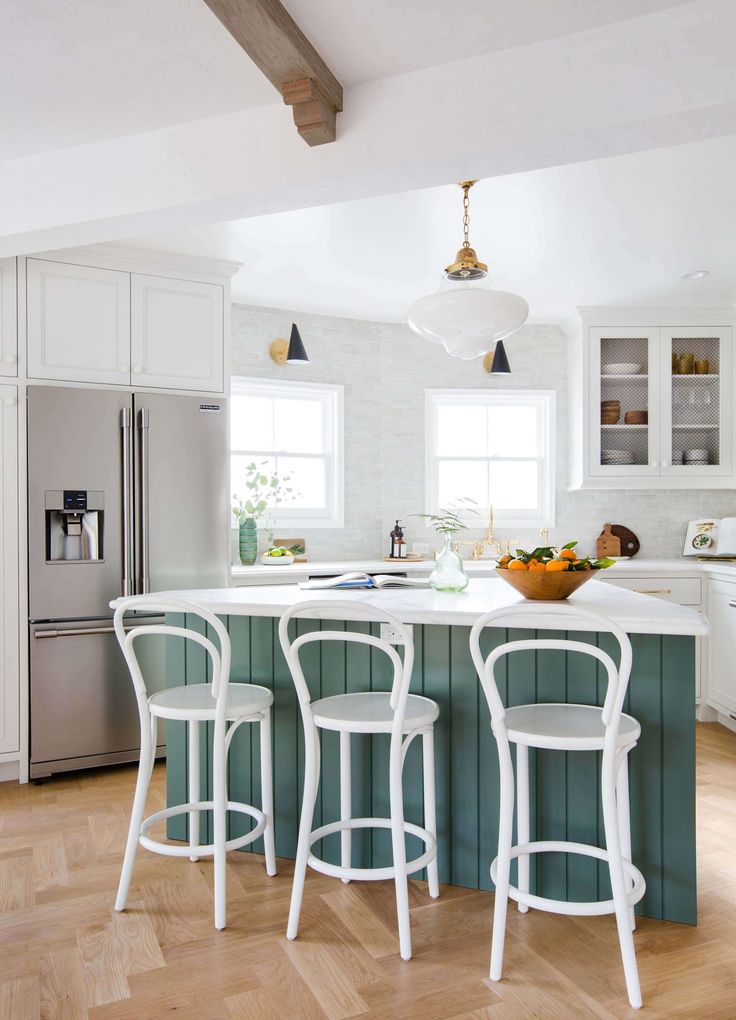
The choice of impregnation depends on the type of coated material and type of work . More often, impregnations are bought for wood products, less often for concrete, brick, plaster or metal. At the same time, the range of impregnations for concrete and ceramic products is expanding. For example, dust-removing impregnations for concrete structures are gaining more and more confidence.
For wood , chipboard and chipboard antiseptic and fire retardant impregnations are selected. The first protect against fungus, the second will save in case of fire. Fire retardants (the second name for fire retardant impregnations) are made on the basis of aqueous solutions of carbonic, boric or phosphoric acid with the addition of surfactants.
Wood impregnations often not only protect but also increase the attractiveness of the material. For example, an inexpensive pine product can be disguised as an expensive oak with a stain.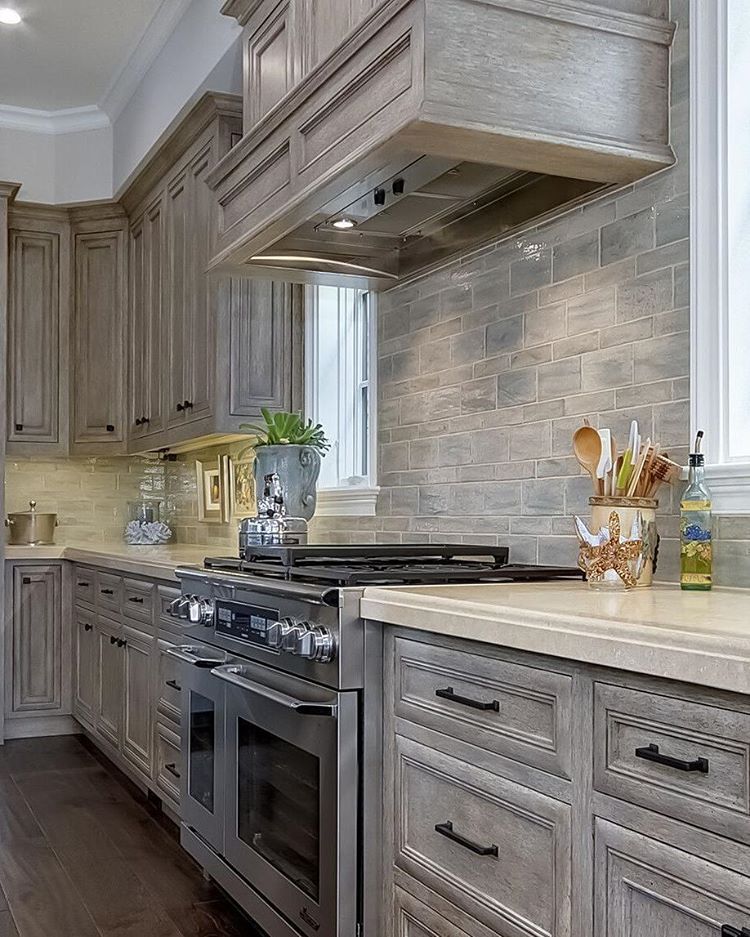
Interesting to know: formulations that combine antiseptics and fire retardants are called biopyrenes.
Impregnations for concrete and bricks strengthen the porous structure of materials, protect against waterlogging, increase frost resistance and strength. They help protect the material from fungal infections and mold. Compositions for the prevention and treatment of biodamages are sold. In addition, impregnations for concrete and bricks do not affect their vapor permeability.
To cover plaster , so-called "stabilizing impregnations" are used. Their main function is to strengthen the structure, protect against the influence of the atmosphere and humidity. Drying oils are often used to protect metal . They form a thin film that protects the metal from moisture. For example, without such protection, galvanized steel will quickly become covered with "white rust".
Interesting to know: Noble group metals such as gold, silver, platinum do not rust!
For exterior , wax or oil based stains work well. A distinctive feature of stain for outdoor use is increased resistance to ultraviolet radiation, fading and moisture. When choosing an impregnation for interior work , safety for human health is an important factor. Such stains should be non-toxic and not have an unpleasant odor.
To make your search easier, use the "Work type" filter. So you will find what you need, without wasting time studying technical nuances.
The properties of impregnations depend on the components of which they are composed. They can be natural or synthetic. Here the choice is wide: water, oils, acrylic, alkyd, solvent, biocide and even resin.
The most popular and budget option is water base . It does not emit strong odors, which is a great advantage when working indoors. It is convenient to work with it, it has a low consumption. To achieve different shades of intensity, you will have to apply stain in several layers. Each layer in this case must be dried well.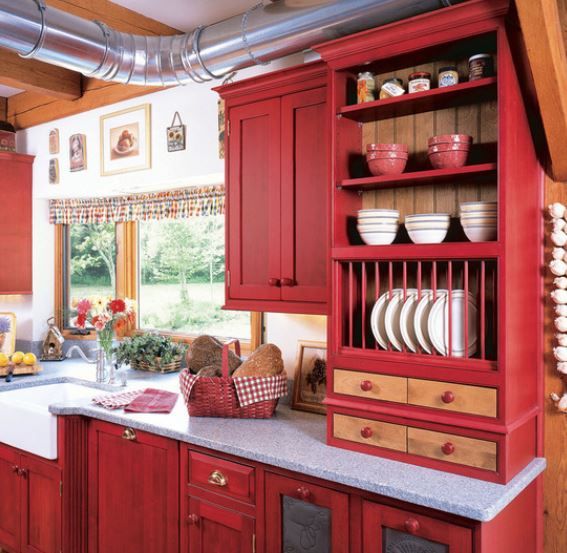 Water stain is available in two versions: liquid or dry powder, which must be diluted with water.
Wood stains also have some drawbacks, the main one being a long drying time, 12–15 hours on average. In addition, an excess of water stain on the product can cause cracks.
Life hack: in the process of application, water stain lifts the wood fibers, which worsens the moisture resistance of the material and tactile sensations when in contact with the surface. To avoid this, before applying the stain, the product is wetted, dried and polished with sandpaper.
Oil stains are made from linseed oil. These are environmentally friendly impregnations that are great for indoor and outdoor use. They are not afraid of exposure to sunlight, do not fade and increase the moisture resistance of the material. They do not have an unpleasant odor and toxic impurities. Well absorbed into the material. There are two significant disadvantages of oil stain: high cost and long drying time.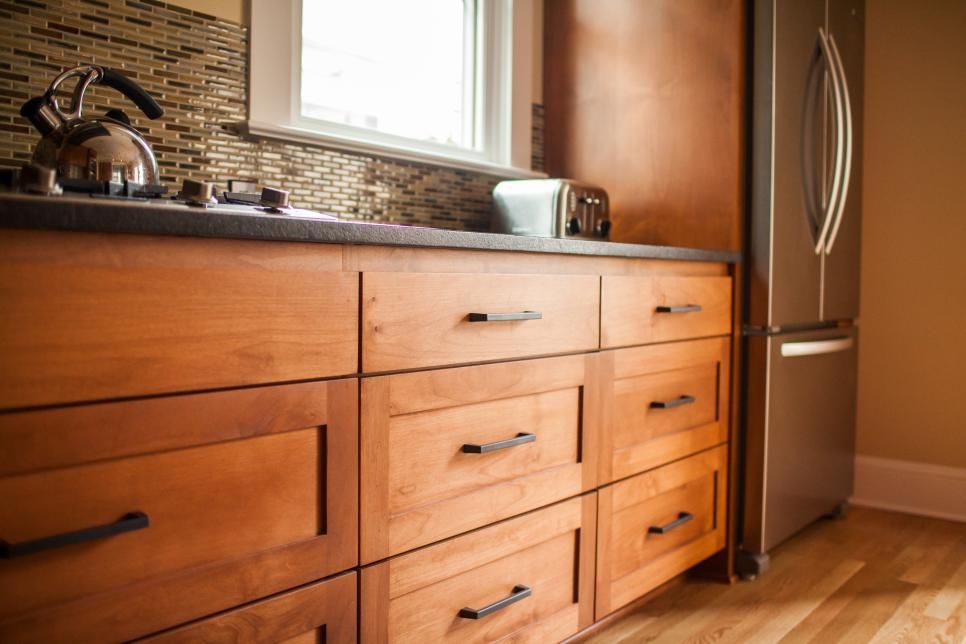
Acrylic Stains are based on acrylic resins. Such stains have antiseptic properties, reliably protect the material from insects and microorganisms. They are completely safe for humans, do not contain harmful chemical additives, do not emit an unpleasant odor.
Acrylic-based stains are UV and moisture resistant. They have a large number of shades. Of the minuses - high price and poor tolerance of low temperatures.
alkyd impregnations contain wax, oil and antiseptic components. Such impregnations perfectly protect the material from moisture, increase resistance to dust and dirt, emphasize the structure of the material, penetrate deeply and protect the wood from fungi and mold. Of the minuses - they dry for a long time.
Acrylic Alkyd Impregnations are made from a mixture of acrylic and alkyd fatty resins. They well protect the product from fungal infections, mold, insects, create a water-repellent film. Such impregnations can be used both on previously untreated surfaces, and on painted with oil or alkyd compounds.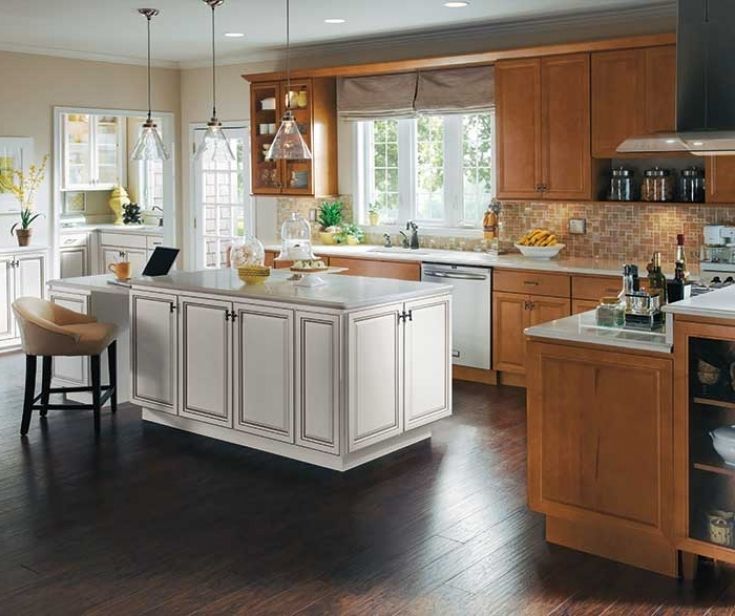
Oil-alkyd impregnations are suspensions of inorganic pigments, drying oils of vegetable origin and various fillers or oil-containing alkyd resins. Such impregnation will protect the material from decay, the effects of fungi and parasites.
Impregnations based on solvents will protect against high humidity, ultraviolet rays, the spread of fungi and mold, and increase the fire resistance of the material. However, such impregnations are toxic and have a pungent, unpleasant odor, so they are not recommended for indoor use.
Impregnations based on biocides are well suited as an antiseptic. Biocides are chemicals that inhibit the life processes of organisms. Penetrating deep into the structure of the material, they fight against mold and fungi that have already appeared and prevent the emergence of new ones. But biocidal impregnations must be used carefully, since all biocides are toxic substances. It is not recommended to use them for interior work.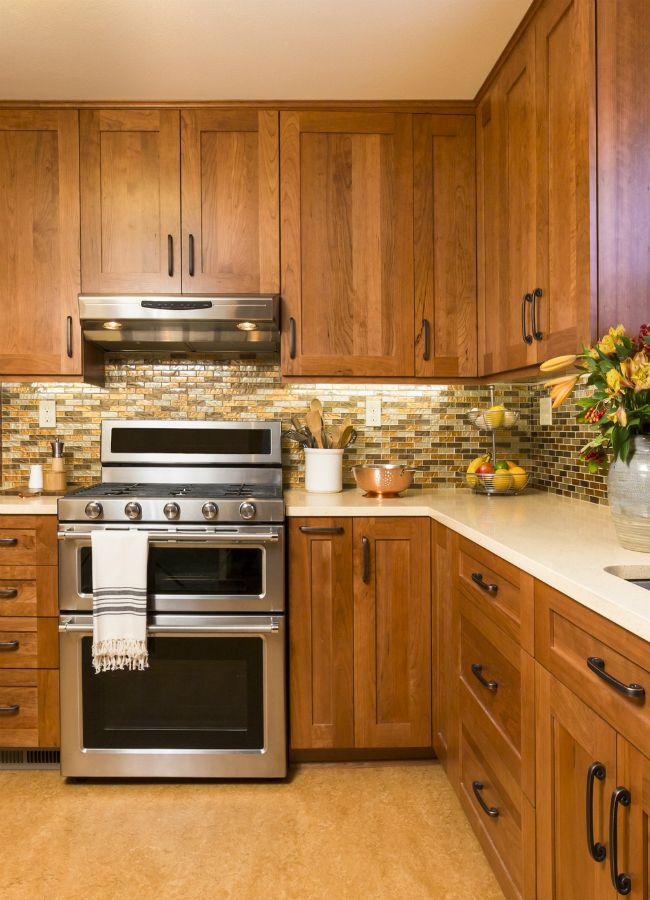
Impregnations based on petroleum resins are a budget option that will protect the surface from fungi and mold even in high humidity conditions. At the same time, such impregnations have an unpleasant odor and are easily flammable, so they are used only on the street.
Life hack: If you need to impregnate a previously treated or painted surface, then before working it must be cleaned of dust and dirt, the old coating removed and sanded.
There are many ways to apply impregnation. Which one to choose depends on the type of material, the impregnation itself and the desired effect. You can apply impregnation on the material:
- Roller Covers a fairly large area in one stroke. One of the fastest manual methods for applying paints and varnishes;
- with a rag or sponge - useful when a small area is to be treated or an even coat is important;
- brush - for large smooth surfaces it is convenient to use wide brushes, and where you need to smear curves, it is better to use a smaller brush.
 Such a tool is most often applied with oil and water stains. For oil, it is better to choose a brush made of natural bristles, and for water - from synthetic;
 - by dip - in one go you can create a coating with maximum protection and intense color. At home, the method is used only for small products;
- by spraying - painting is carried out using special spray guns or spray guns. This is the most convenient way to process large surfaces. This method ensures uniform and high-quality application of impregnation to the material.
uses more efficient application methods. For example, pouring or electrostatic painting. Such methods require large equipment and safe work organization.
In order to choose an impregnation, you need:
- 1. Decide on the type of impregnation. Antiseptics will protect, but not color the product. Protective and decorative compositions, lakobeytsy, stains - two in one: both protection and a presentable appearance.
 Wood oil will protect and preserve the natural look. Drying oil will protect and help achieve the desired shade of the product. Wood bleach will get rid of darkening and prevent the destruction of the material.
 - 2. Consider the type of material to be coated and the type of work. Impregnations for wood differ from impregnations for brick and concrete. For outdoor work, the use of chemical impregnations with a pungent odor is permissible, and for internal work it is recommended to use more harmless compounds.
- 3. Pay attention to the impregnation base. Water - the most common, inexpensive and versatile, but not very durable and does not resist abrasion. Oil impregnation is environmentally friendly, does not have an unpleasant odor, but it is quite expensive and dries for a long time. An almost ideal option is an acrylic composition, there is only one “but”: it does not tolerate low temperatures. Alkyd impregnations have good antiseptic properties, but dry out for a long time.
Learn more