Best material for garden pathways
Affordable Walkway and Garden Path Ideas
Our favorite walkway ideas for your landscape: Paths you can build in a weekend without breaking the bank or your back.
1 / 15
Family HandymanFamily Handyman
Affordable Garden Path Ideas
Instead of an expensive, labor-intensive formal path, save money and time with one of these casual garden paths. These walkway ideas will blend in better and will look like they’ve been in your garden forever.
2 / 15
Family Handyman
Required Tools for these Walkway Ideas
Have the necessary tools for this DIY project lined up before you start—you’ll save time and frustration.
- Bucket
- Drywall saw
- Garden rake
- Spade
- Wheelbarrow/Dolly
- Tamper
- Garden trowel
3 / 15
Family Handyman
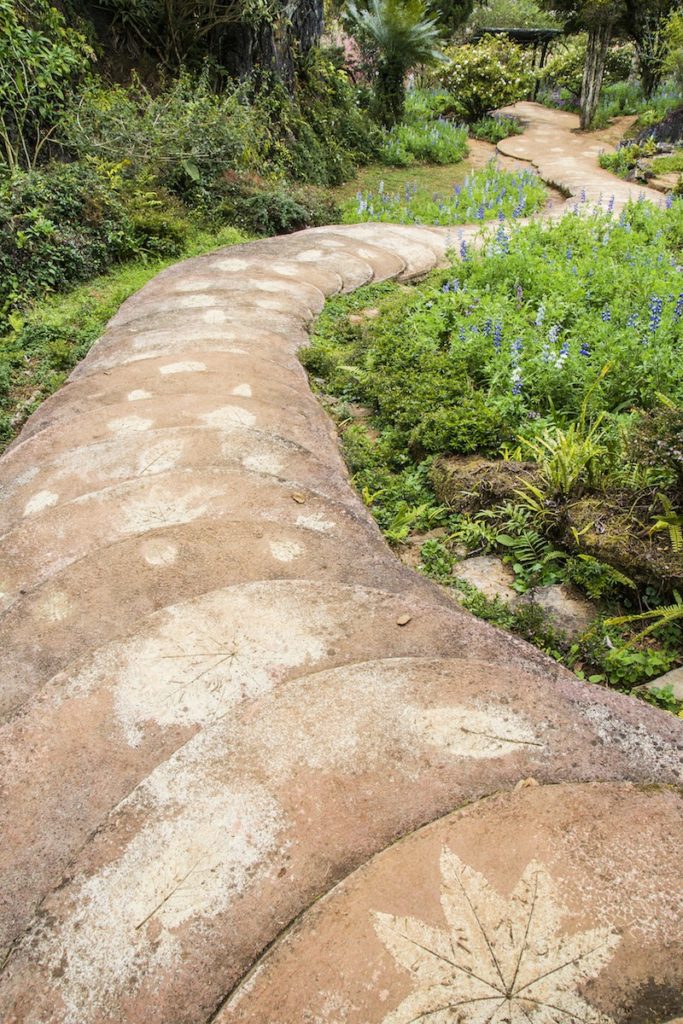
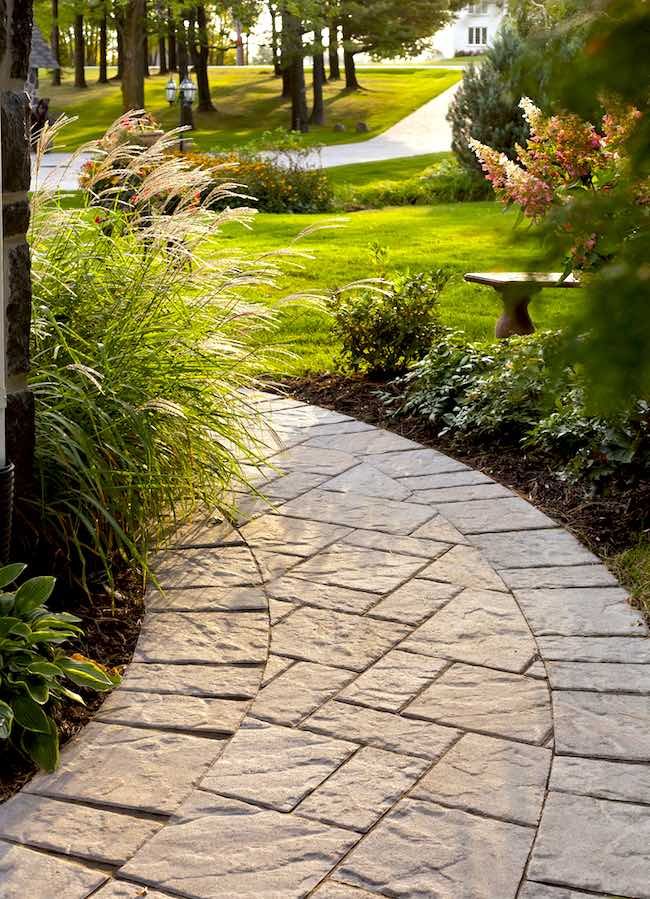
Informal Garden Paths and Rock Walkways
This winding gravel path reflects the informality and ease of maintenance of the garden. Mulch and gravel are the cheapest pathway materials you can buy for rock walkways, and they make construction simple, too, making them two of our favorite walkway ideas. All you have to do is remove the sod, roll out landscape fabric and spread the mulch or gravel.
Mulch and gravel paths can be meandering, wood chip–covered trails or carefully planned designs, and they range from casual to formal depending on the design and edging material. You can choose from a wide variety of loose materials including coarse bark, decorative mulch, washed stones and crushed gravel or shells.
4 / 15
Family Handyman
Mulch Walkways
As stated above, the three common types of mulch suitable for garden paths are wood chips, cocoa bean and cypress bark. Since these path materials are lighter than stone, they’re easier to haul and spread. Mulch is also a bit cheaper than gravel or stone pebbles. Remember, though, that organic paths decompose over time, so you’ll have to rejuvenate them every two to five years with new material. Also, don’t use bark, wood chips or mulch for paths that run through areas with poor drainage or that are wet. It’ll lead to a soggy path.
You’ll find bags of mulch at home centers, but for the best selection of organic materials for a path, check your local nursery or landscape supplier. Depending on how big your path is, it may be cheaper to have bulk material delivered than to buy bags. Plan on a 3-in.-deep layer of mulch about 3 ft. wide as an alternative to grass. Call the public works department at your city hall or check with local tree trimming services. They often have piles of wood chips or mulch that are free for the hauling.
5 / 15
Family Handyman
Gravel Walkways
Several types of inexpensive gravel are available for paths. Common types are: crushed gravel, crushed limestone and pea rock. For a path that’s more formal or longer lasting than a mulch path, consider washed gravel, crushed stone or crushed shells.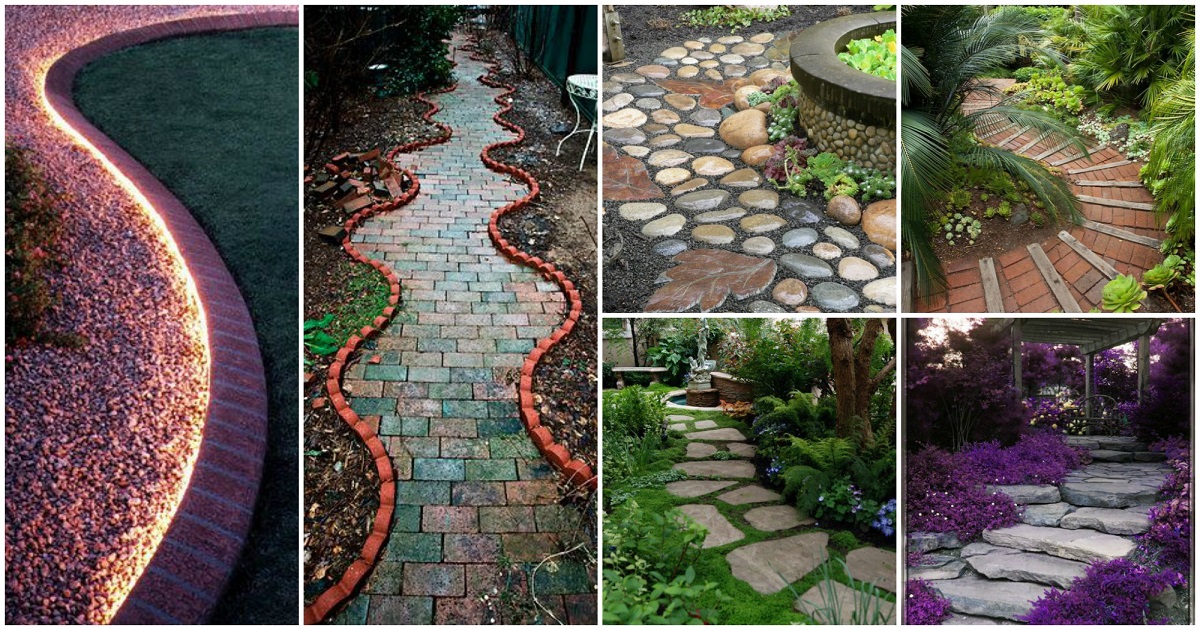 These materials last indefinitely and only need occasional weeding to look their best. If you want to run a wheelbarrow or lawn mower along the path, choose crushed stone rather than smooth pebbles. The jagged edges of crushed stone lock together to form a firm surface. Crushed stone is also less likely to get kicked out into the yard.
Gravel for paths is sold by type and size. Smaller stones, averaging under 1/2 in., are best for paths because they offer more comfort underfoot and pack together better. Visit your local nursery or landscape supply specialist to see what’s available in your area. Gravel is usually sold by the ton. Measure the length and width of the path. Take these measurements to the supplier and ask for help to figure out the quantity of gravel you need. Unless your path is very short, it usually makes sense to have the material delivered. Gravel for a path 3 in. deep and 3 ft. wide will cost about the same as mulch.
Gravel paths do have a few limitations, though.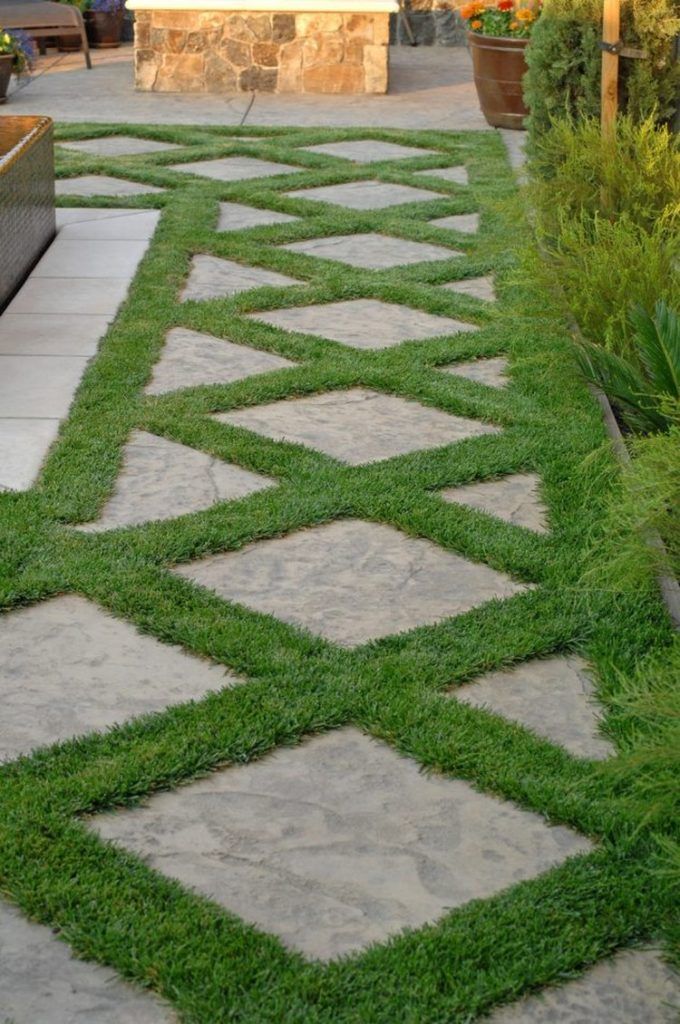 The stones can get tracked into the house, so don’t use them near entries. And gravel paths are a bad choice in areas where you have to shovel snow off them. The gravel can end up in your lawn or flower beds.
6 / 15
Family HandymanFamily Handyman
Walkway Ideas: Tips for Building Mulch and Gravel Paths
- Rent a gas-powered sod cutter to remove grass if the path is long. For short paths, use a garden spade to slice off the sod.
- Set edging so it ends up about an inch above the fill material.
- Use a spacer stick cut to the width of the garden path as a guide when you set the edging or border. You won’t have to keep pulling out the tape measure to make sure the edges run parallel.
- Cover the soil with landscape fabric to deter weeds and prevent the fill material from mixing with the soil. Don’t use plastic. It’ll catch water and create a soggy path.
- Have gravel delivered, especially if you need more than a half ton.
- If you want a path that’s firm enough to roll a wheelbarrow on, use crushed stone and tamp it after leveling it. (Pea rock or other rounded stone won’t compact.) Use a hand tamper for short paths. Rent a vibrating-plate tamper for long paths.
7 / 15
Family Handyman
Borders and Edging for Walkway Landscaping
Gravel or mulch paths require edging to keep the material from spreading out onto your lawn or flower bed. You can also add a border or an edge as a design element. Here are some common types of edging you can use for walkway landscaping:
- Plastic landscape edging is cheap. And it’s fast and easy to install. If you object to the look of the rounded top edge, hide it with a border of plants.
- Steel or aluminum edging forms a crisp edge that gives the path a neat appearance. It costs more than plastic, though, and is less forgiving on sloped terrain.
- Brick and stone borders are attractive and versatile, but they’re more expensive and a lot more work to install.
- Concrete edging is less expensive than brick or stone but has the same advantages. Newer types that look like random pieces of tumbled stone are a great lower-cost alternative to a real stone border.
- Landscape timbers are an economical alternative to stone or brick borders. They’re especially useful for building shallow steps on gradually sloping terrain.
8 / 15
Family Handyman
Metal Edging
Metal edging is a must for mulch or gravel walkway ideas because it keeps gravel or mulch from overflowing into the yard or garden.
9 / 15
Brick Edging
Brick or pavers create an attractive edge treatment, though they’re more expensive and labor intensive to install.
10 / 15
Family Handyman
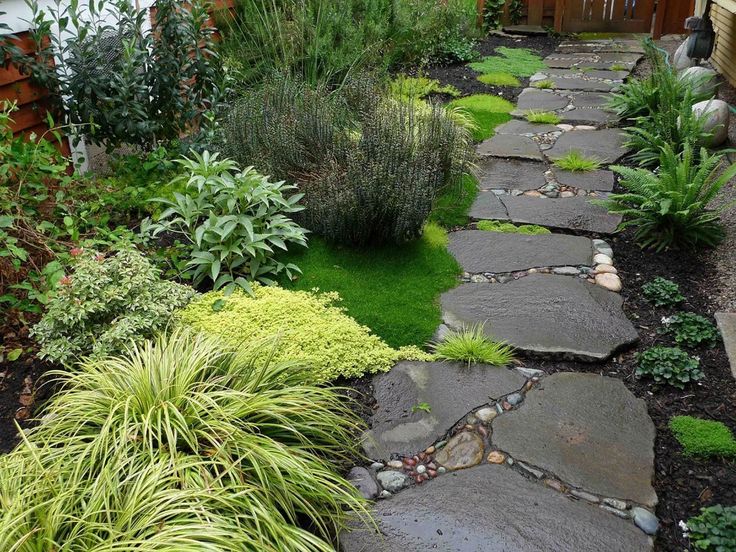
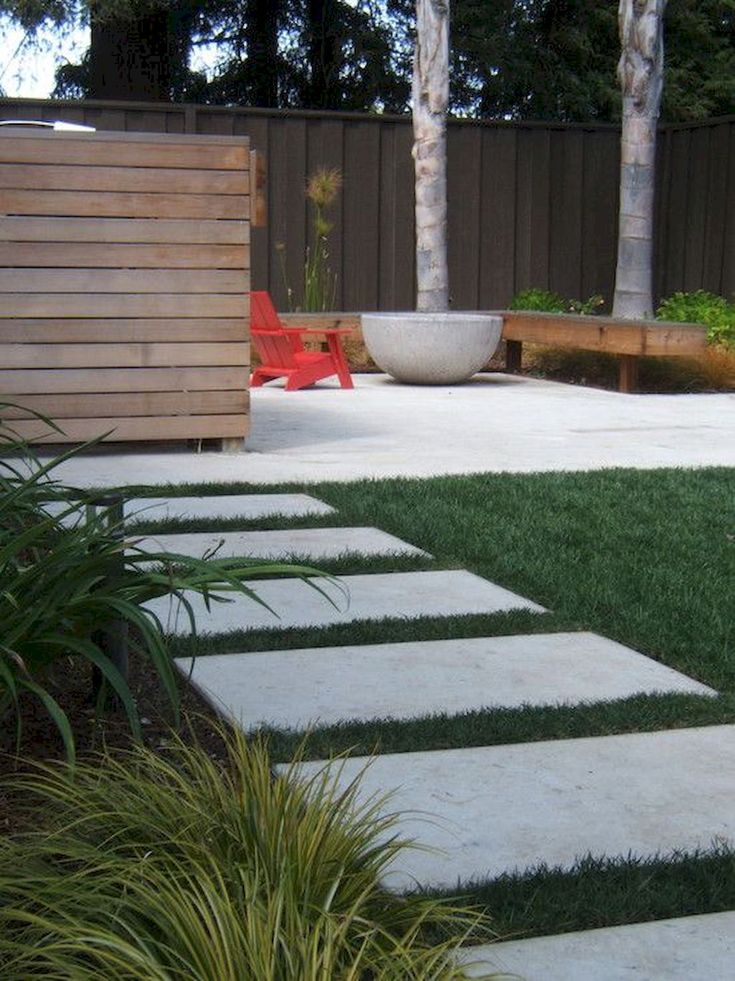
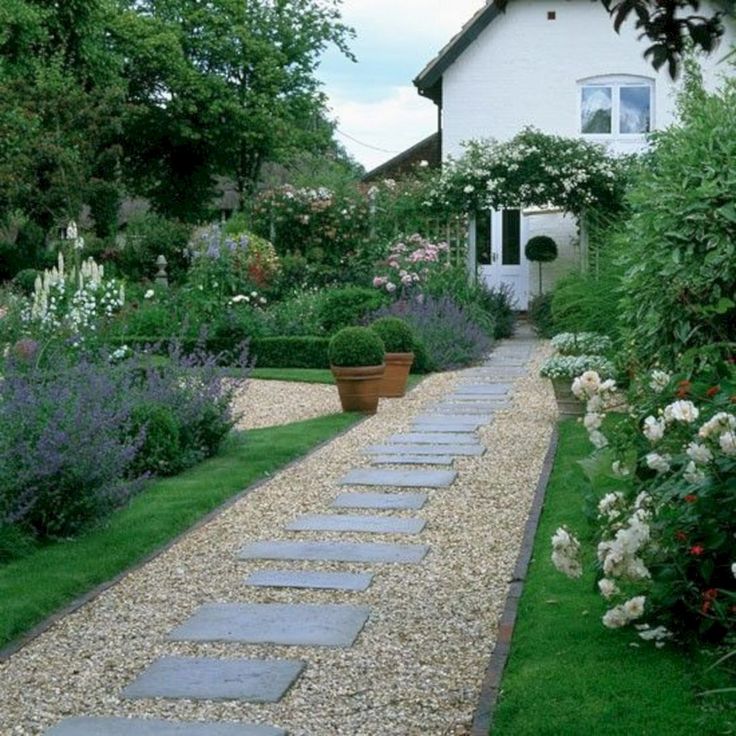
Stepping-Stone Paths with Yard Stones
Stepping-stones are the fastest, easiest way to build a path, and another one of our favorite walkway ideas. There’s very little digging involved. And although the stone is heavy, a little goes a long way. Since there’s distance between the stones, you don’t have to worry about leveling them with one another. Stepping-stone paths also cost less because you’ll cover more distance with less stone. Stones that are flat and about 18 in. across and 2 in. thick are ideal. Check your local landscape supplier or quarry to see what’s available. If you’re building a short stepping-stone path, you can usually pick the stones you want from the pallet or pile of stones on hand at the supplier. For longer paths, ask for help to figure out the quantity and have the stone delivered. If you’re lucky enough to live in an area with naturally occurring outcroppings of stone, you may find stepping-stones free for the hauling.
You can also make attractive stepping-stone paths using 12-in. square or round concrete patio blocks. These are available in a wide selection of colors and textures from home centers, landscape suppliers and masonry dealers.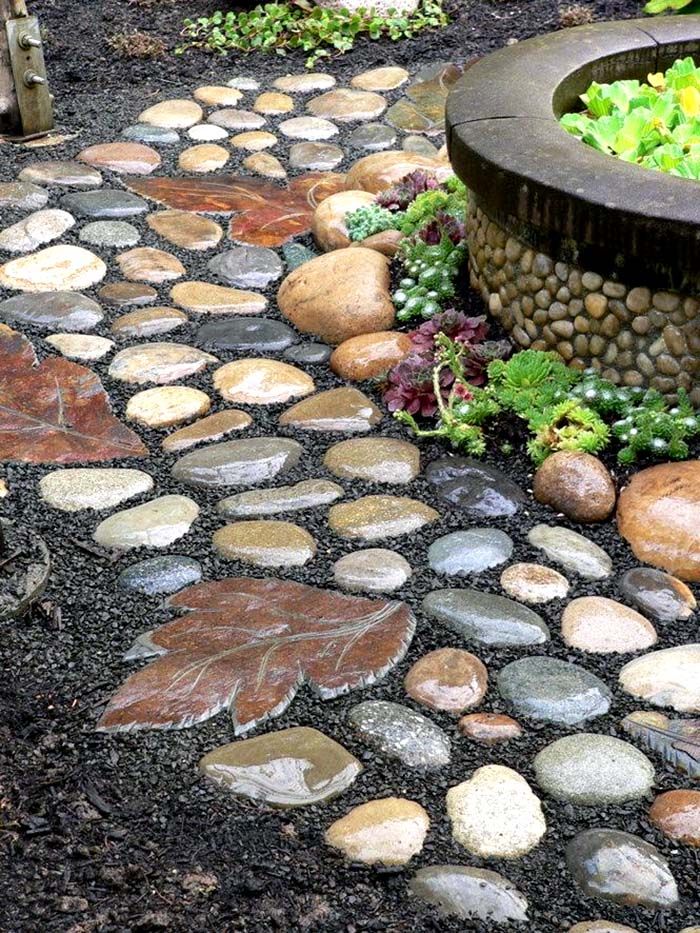 Search online for “patio blocks” to see the variety.
11 / 15
Family Handyman
Trace the Stone
Place the flagstone where you want it, then cut the outline in the grass.
12 / 15
Family Handyman
Remove the Sod
Pry up the sod, then set the yard stone. Use sand to level it, if necessary.
13 / 15
Family Handyman
Tips for Building a Stepping-Stone Path
- Arrange stones so the distance from the center of one to the center of the next one is 20 to 24 in.
- Set the stones in place and cut around them with a spade or rock saw. Then lift the stone and dig out the grass and a little soil.
- Spread a 1/2- to 1-in.-thick layer of sand under the stone if you want to make leveling the stones easier. Sand is easier to work with than soil.
 A 60-lb. bag of sand is enough for about four to six stones.
 - Set the top of the stepping-stones about 1 in. above the soil level. This will give you a dry place to step while still allowing you to run a lawn mower over the path.
14 / 15
Family Handyman
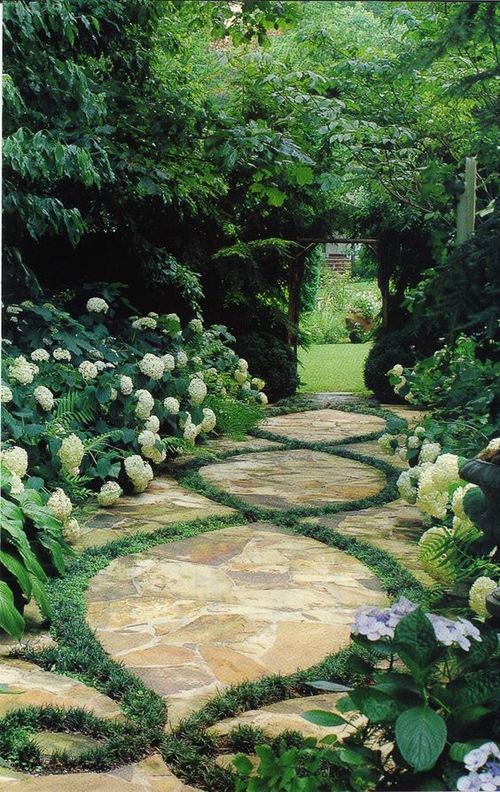
Planted Paths with Yard Stones
Ground cover attractively fills the space around and between pieces of yard stones such as flagstone. Including ground cover plants in your garden path makes a stone walkway easier in two ways: First, you can skip the thick, compacted gravel base underneath. That eliminates the backbreaking digging, plus the hauling and compacting of gravel. Without the solid base, the stones will shift and become uneven, but the plants will hide that. The second advantage is that you don’t have to spend extra time laying the stones perfectly. The plants will hide wide gaps.
There are quite a few perennial plants that can withstand foot traffic and will grow between stones.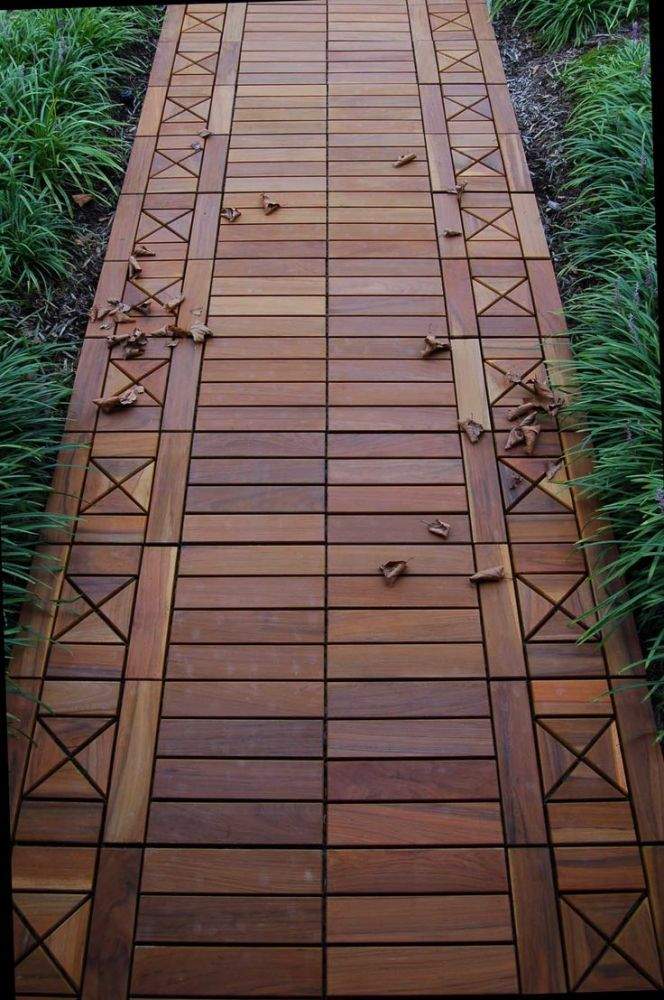 Check with your local nursery to see what’s available that will grow in your area. Here are some ground cover plants that can tolerate some foot traffic: Creeping Thyme, Blue Star Creeper, Brass Buttons, Creeping Mazus and Sedum.
Try adding some more features like a sub-irrigated planter system, shown in this video:
15 / 15
Family Handyman
Paver Walkway Ideas: Tips for Building a Planted Path
- Arrange the stones along the walkway, leaving at least 4 in. between them for plants. Then cut along the edge of the stones with a flat spade to outline the path.
- Slice off a layer of sod and soil about 1-1/2 in. deep.
- Spread a 1/2-in. layer of sand. This will allow the stones to settle in slightly and keep them from rocking.
- Choose plants that will stand up to traffic and grow in the available light and soil type.
- Water the new plants frequently for the first few months until the plants are well-established.
- Pull weeds and grass from between the stones every few weeks to prevent them from overrunning the plants.
Originally Published: April 26, 2019
Garden path materials - the good, the bad and the beautiful - The Middle-Sized Garden
January 27th, 2019
Posted In: Garden trends & design, Gardening know how
Garden path materials are usually a big investment, so it may be tempting to go for something cheap.
But a beautiful garden path will make such a difference to your garden. And it’s likely to be a one-off investment, although some garden path materials need more maintenance than others.
Our garden path was originally gravel inset with concrete pavers. When we had to top up the gravel we used sea shells. Read the full story about a seashell path here.
I have seen a wide range of garden path materials in the gardens I’ve written about, so I thought I’d pull all my favourite garden path ideas together for you.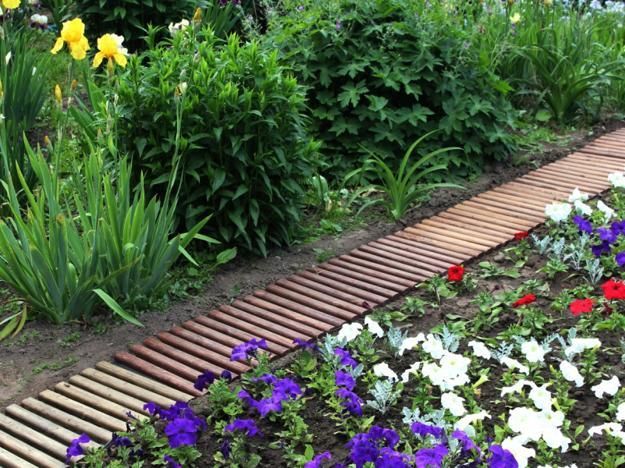
You may wish to think about the design of the garden before choosing a garden path. I recommend reading 5 garden design tips (and 2 mistakes to avoid!) and the essentials of garden design.
Note: if you’re digging out a garden path yourself, find out where mains water and electricity runs are. You don’t want to sever them!
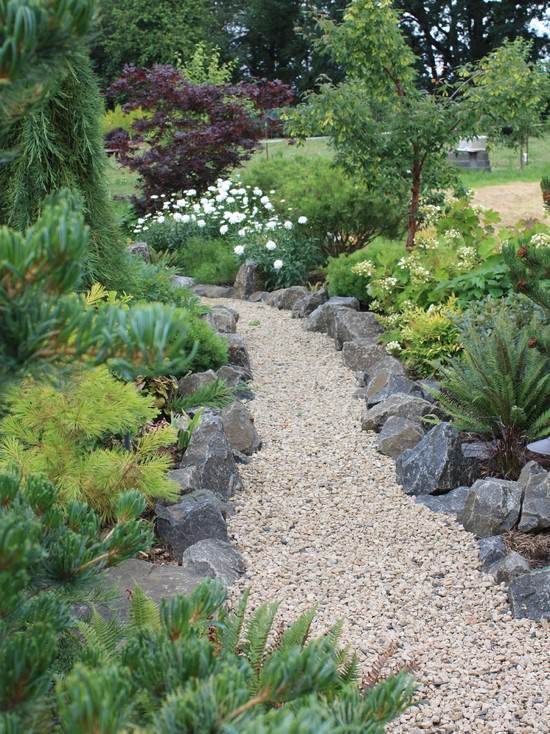
Gravel paths
Gravel is one of the cheapest garden path materials. However it does need a bit of maintenance – blown-in weeds will establish themselves easily in the gravel, even if you have a weed-suppressing membrane.
Is gravel environmentally-friendly? It’s more permeable than stone or concrete, so it allows water to drain. But gravel and shingle is mined and transported, so there is an environmental cost.
Gravel will also need renewing every so often – I’ve found my gravel paths probably need topping up every five years or so. Last year, we renewed our gravel paths by using seashells instead. They’re a by-product of the seafood industry, so are environmentally-friendly.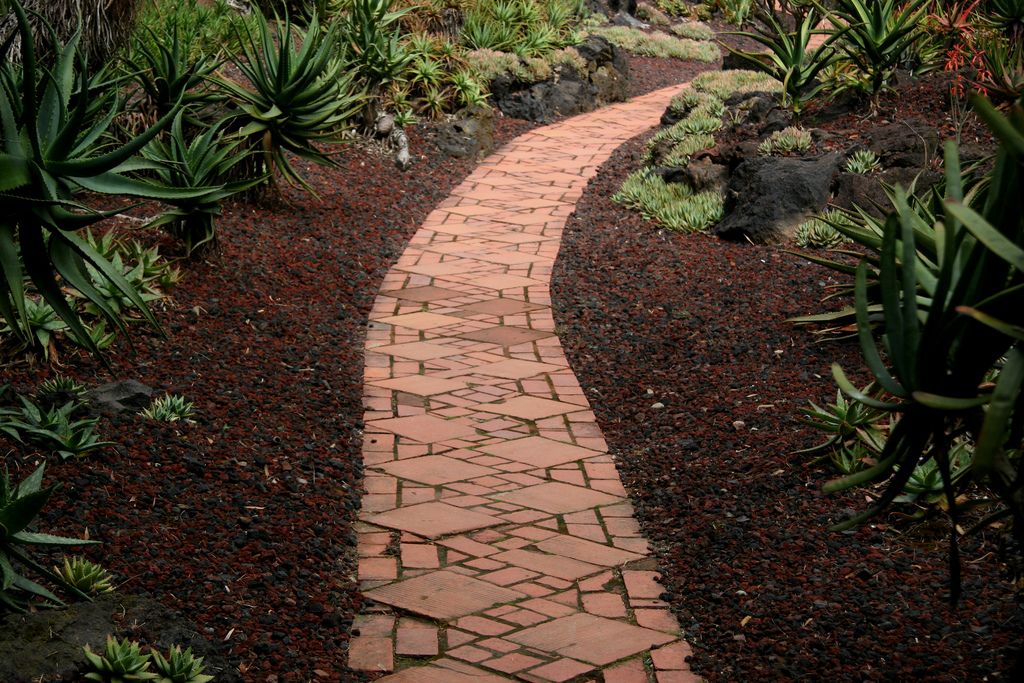
Garden designer and BBC Gardeners’ World presenter Mark Lane shows that a gravel path – if properly laid – can also be wheel-friendly. Gravel is one of the least expensive garden path materials.
Laying a gravel path yourself means measuring it out, digging it out and then laying a crushed concrete or aggregate (MOT type 1 base) on it, then tamping that down. You’ll then add one or more layers of crushed aggregate until you add the top level of gravel.
There’s more about having a gravel path laid in this interview with garden designer and BBC Gardener’s World presenter Mark Lane.
Mulch paths
These are easy, inexpensive and environmentally-friendly. They’ll need topping up with more mulch every year or so, but you can lay them yourself.
A mulch path is an inexpensive, easy and flexible choice, and it’s environmentally friendly. This is in No Dig expert Charles Dowding’s vegetable garden.
You don’t need to dig out a base for a mulch path. I interviewed a garden owner who had mulch paths everywhere.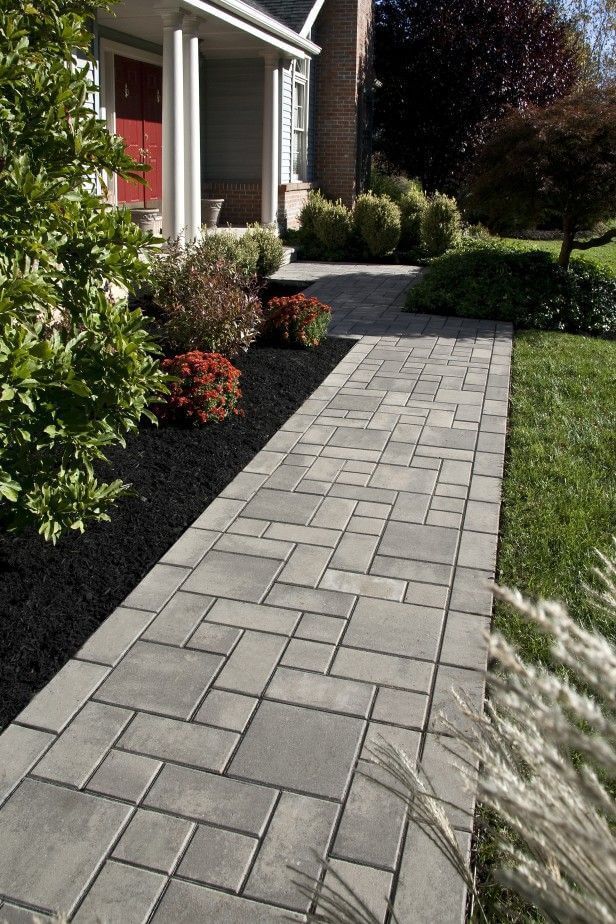 When a tree blew down over one of the paths, they just re-routed the path around it by buying more bags of mulch.
This is a mulch path in the exotic garden of Steven Edney, head gardener at The Salutation in Kent and his partner, gardener Lou Dowle.
Mown paths
These work in relaxed country-style gardens where there are patches of meadow or orchard.
They’re very easy. You just mow where you want the path. Obviously, you have to keep mowing, so they require a little more maintenance than other paths.
But otherwise they’re free. However, they will get worn and muddy in very high traffic areas.
A mown path through a mini-meadow in a town garden.
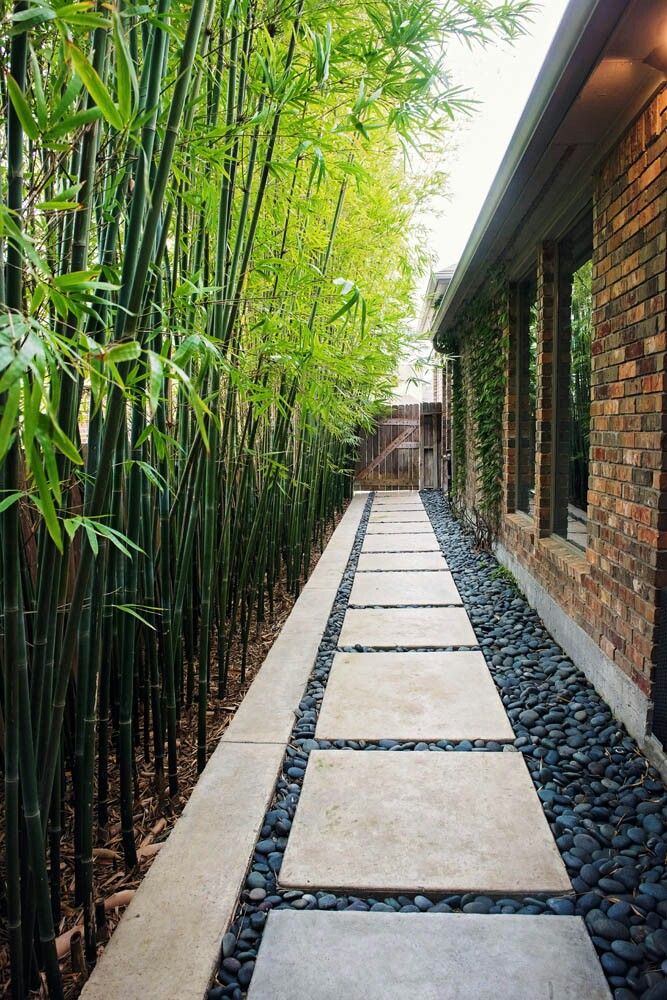
Stone garden paths
Stone is generally a more expensive choice for a garden path.
However, it may never have to be replaced. Our front garden path is made of the original Georgian stone, so although it is a little cracked and weathered, it’s still looking good at 200+ years old. I love its patina and the worn dip in the front step where thousands of feet have trodden over the years.
Our stone front path probably dates back to the 18th century. It’s a little worn and cracked but a smart new path would look wrong, in my opinion.
Stone is also an easy-care choice. You only have to clean it when it gets moss or algae, which often takes several years to build up. It may look pretty, but it’s a slip hazard.
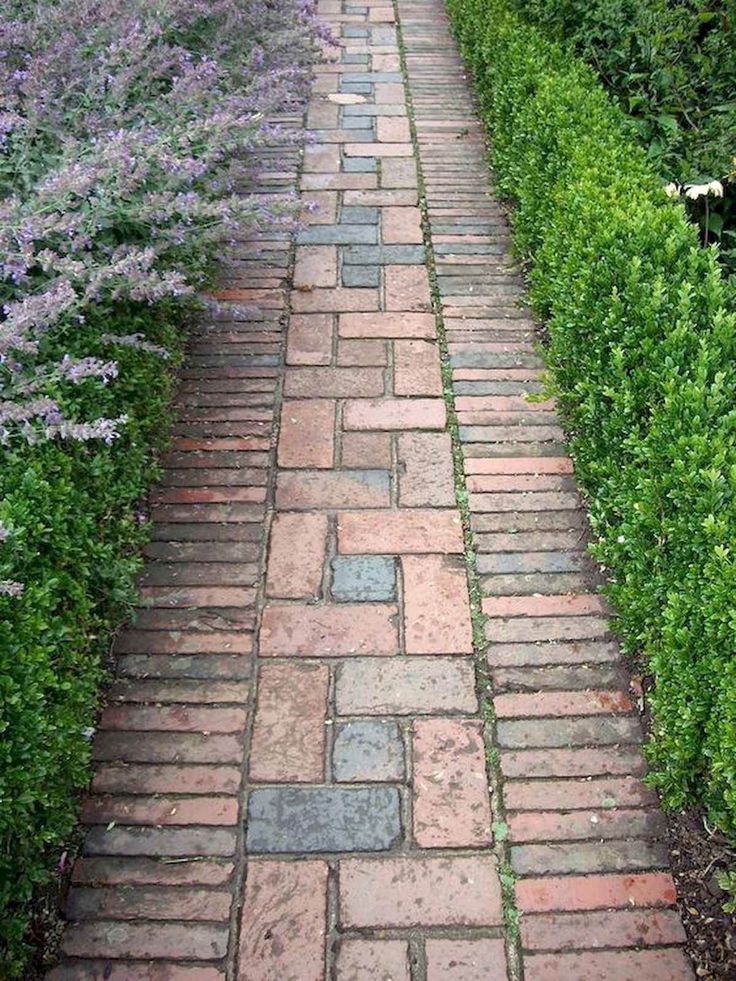
Brick paths
If you use brick for garden paving, it’s a good idea to look at your house. If it’s built of brick, it will usually look better to echo or match the building.
The Salutation in Kent is designed by Edwardian designer Edwin Lutyens. He used the same brick to mark out the garden paths.
When you choose brick or stone garden path materials, think about how you are going to fill the joins. We have pavers on our terrace. Their joins are filled with sand and get weedy.
So when I picked an Indian sandstone for the path, I had the joins filled with cement. After 8 years, the path has more or less weathered in, but until recently it looked very hard compared to the rest of the garden.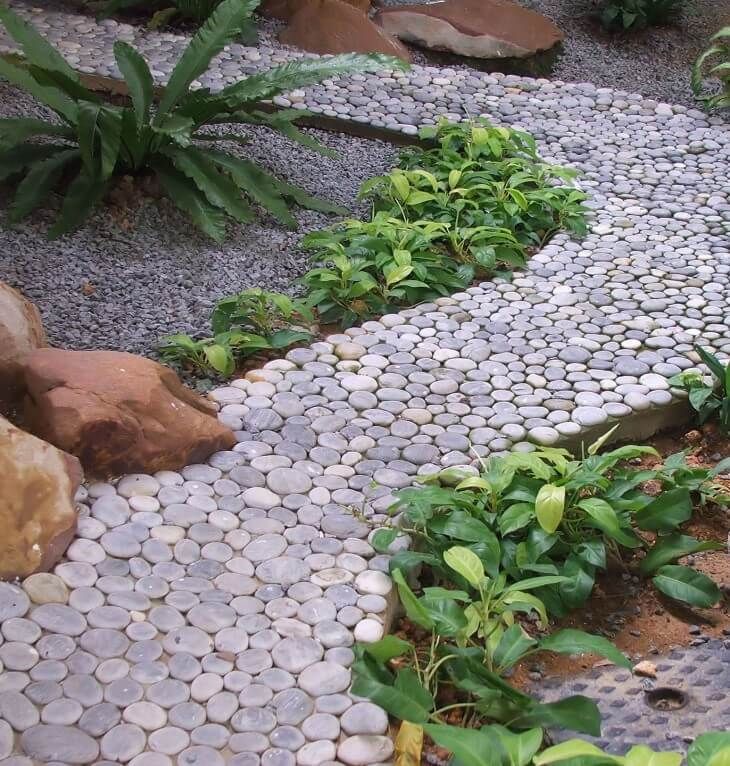
I really wish I hadn’t asked for cement in the joins between these pavers. I don’t have to weed between them, but it doesn’t look as nice to have a continuous hard surface. It has weathered down a bit, though.
Choosing a ‘colour’ for your garden path materials
Although stone, brick and gravel are largely made of natural materials, they still have a hue or colour. It’s really worth thinking about what colours or hues you already have in your garden. Then ask yourself whether you want to echo the themes or contrast with them.
The gravel path at Mark Lane’s garden doesn’t match the blue grey fence, but the two materials are harmonious.
The gravel in the Rock Garden at Doddington Place Gardens harmonises nicely with the rocks.
Echoing – using a yellow brick or creamy stone with a yellow brick house – is usually calmer.
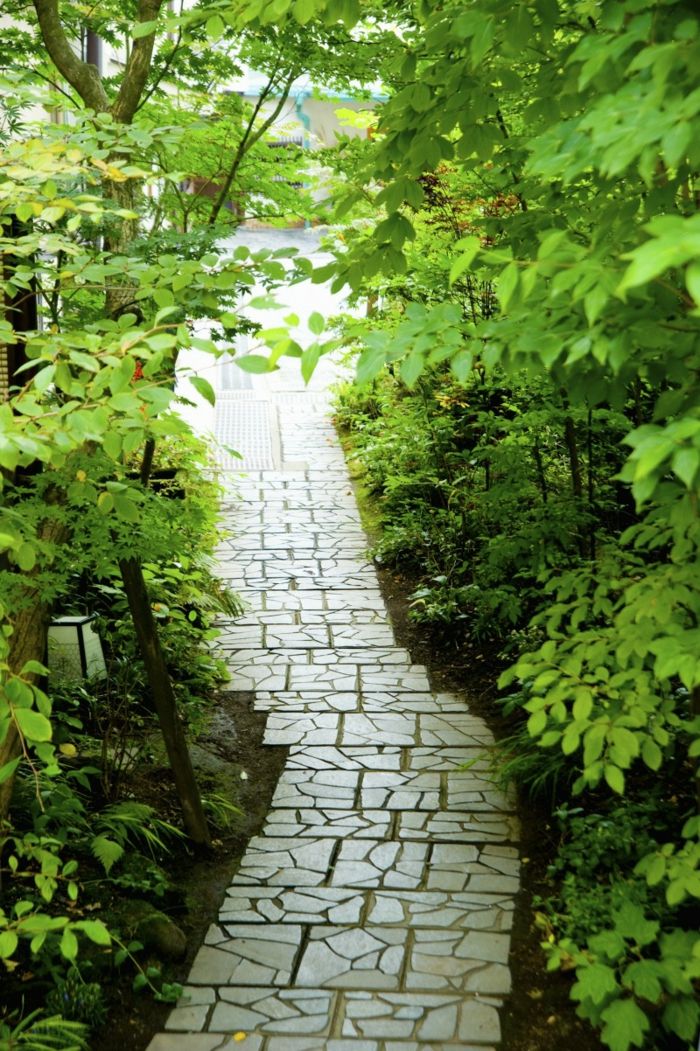
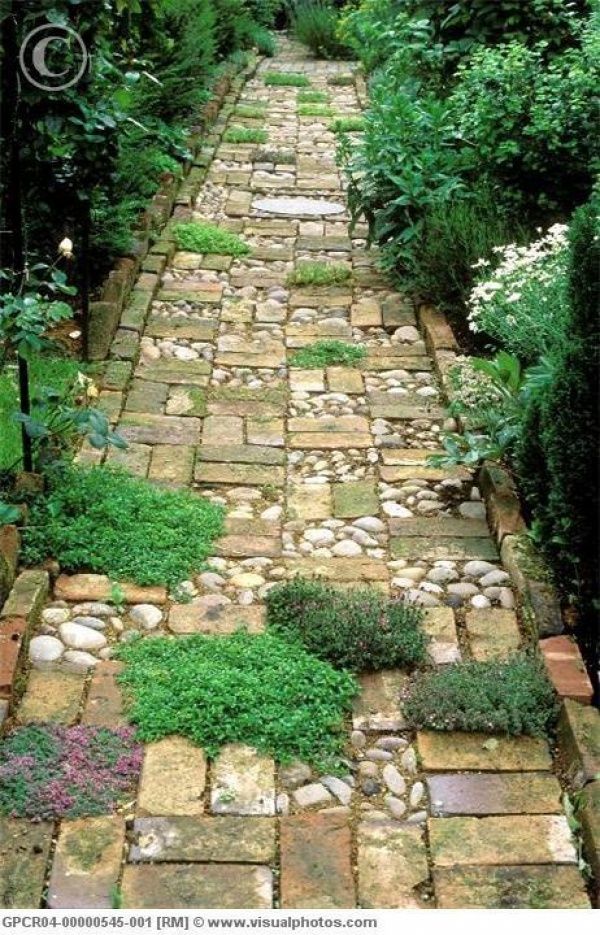
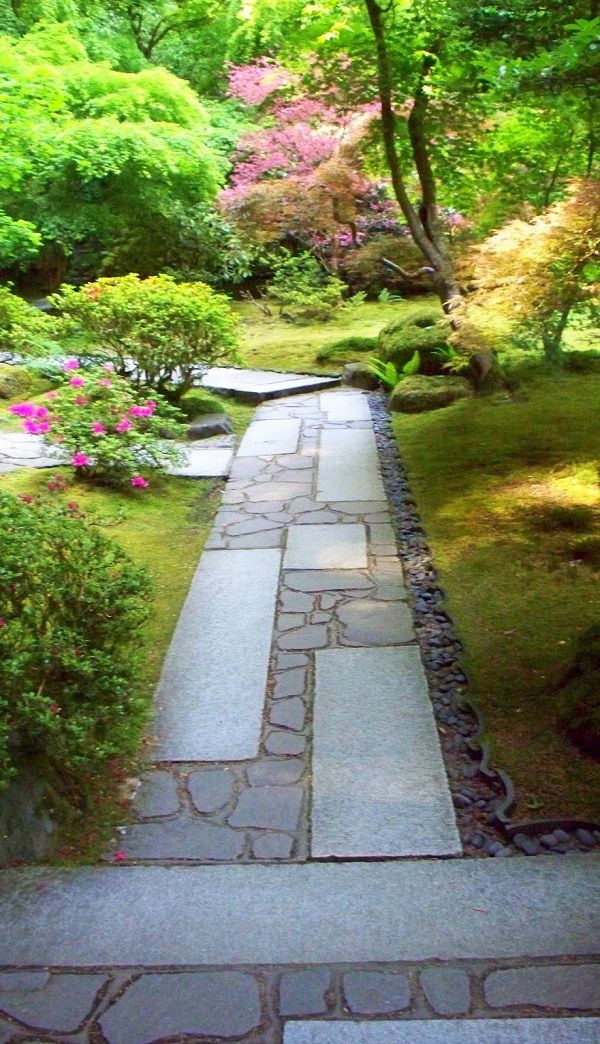
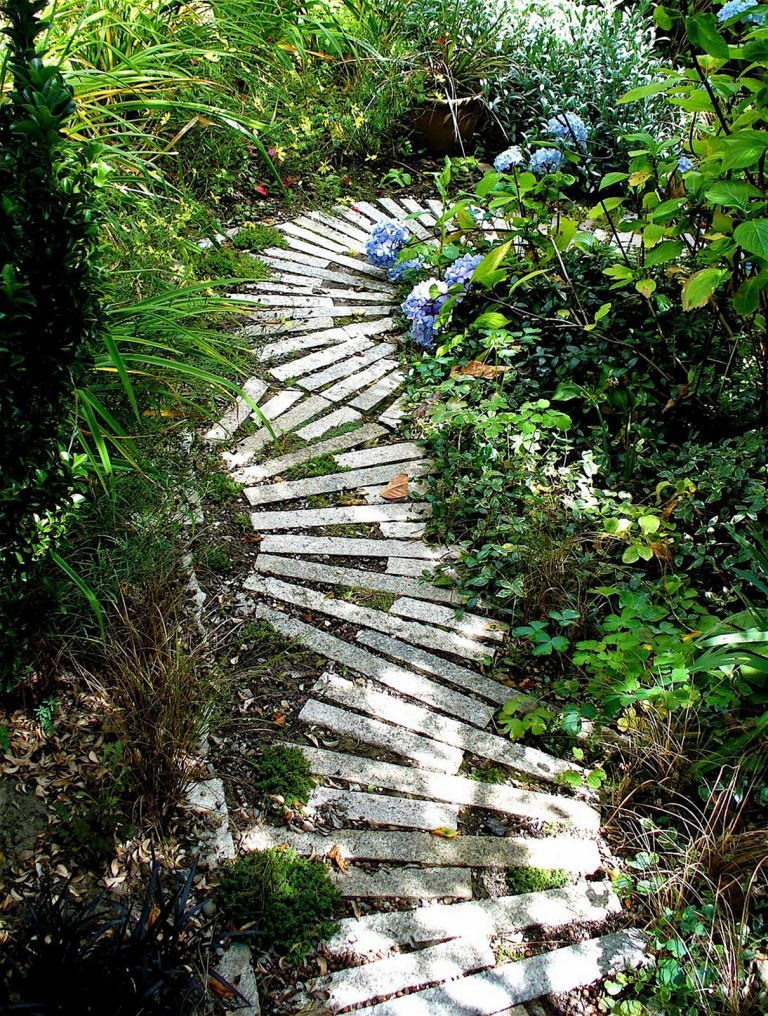
Stepping stones, mixing materials and crazy paving
Crazy paving – or using a mix of materials and shapes – was very fashionable in the mid 20th century.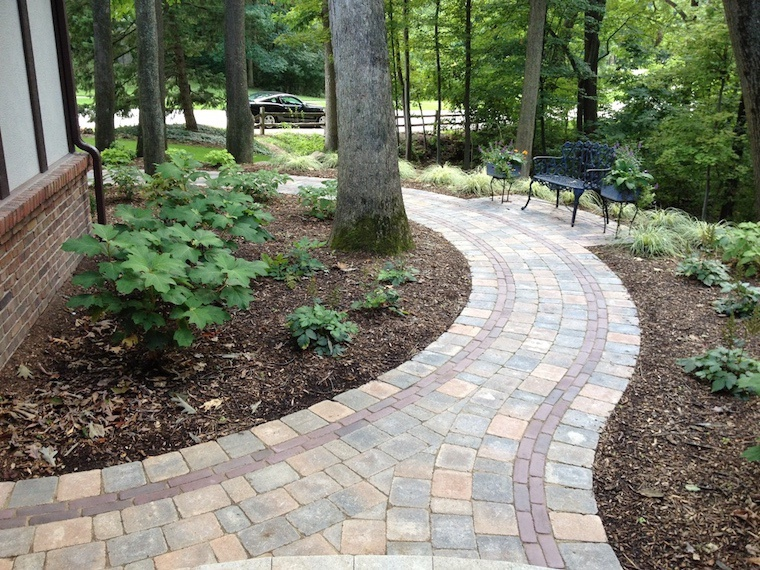 Most mass-market crazy paving doesn’t look great, but it can be very creative. And it’s an economical choice of materials.
Stepping stones in river sand at the Agapanthe garden in Northern France.
It’s environmentally friendly as it can use up off-cuts and scraps that might otherwise be thrown away. And unless the pattern is set in with concrete, it allows rain to run off into the ground between the stones.
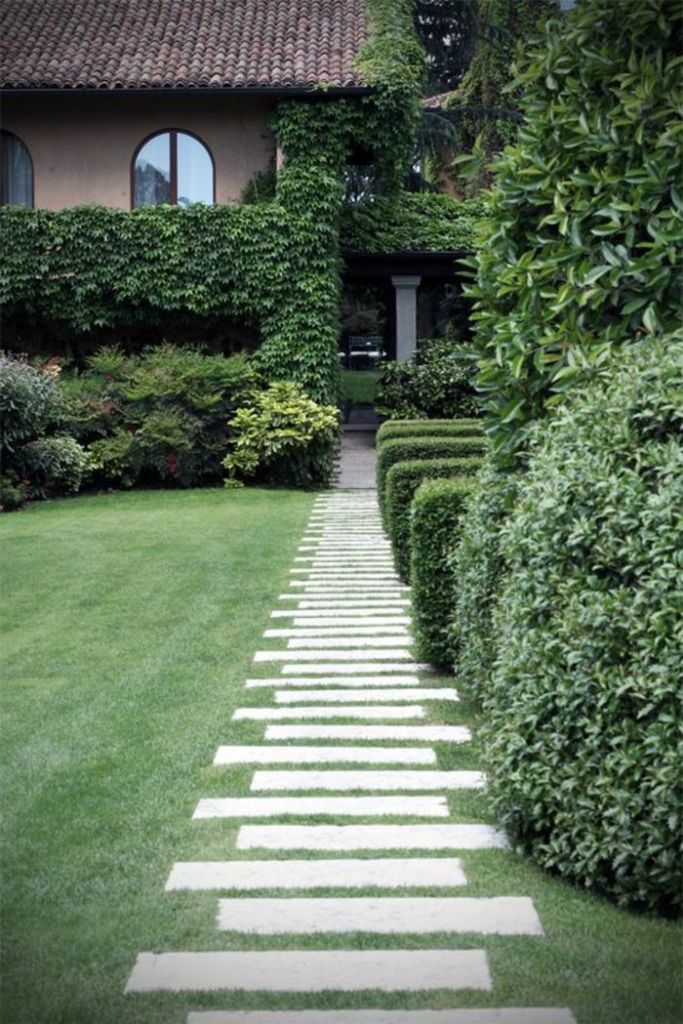
Stepping stones are the simplest way of getting across a garden. Many people use off-cuts and set them into the lawn. Even if you need to buy the pavers, you won’t need many.
I love garden writer Francine Raymond’s simple diamond pattern – she has used just a few square pavers to make a short path.
Gardening writer Francine Raymond has inset square pavers to link the more formal part of her garden to the wilder bit at the back.
Unusual garden path materials
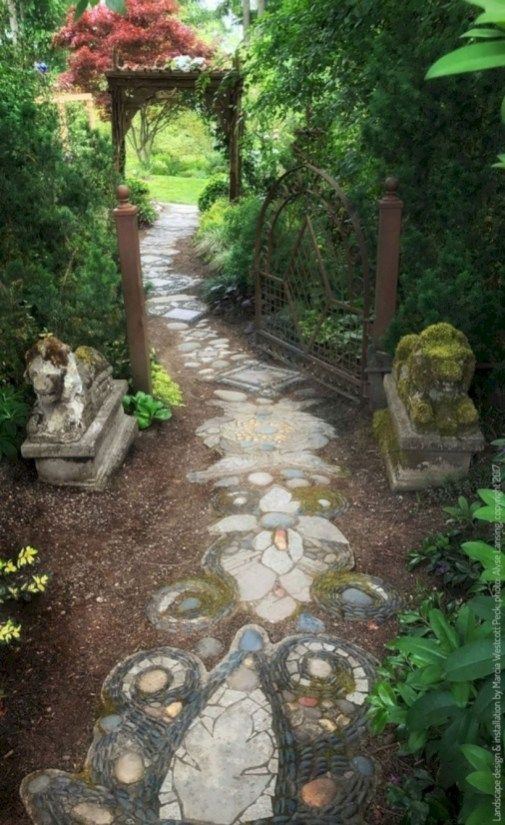
A garden in Whitstable has terracotta, tiles and scraps of stone set into an old concrete path.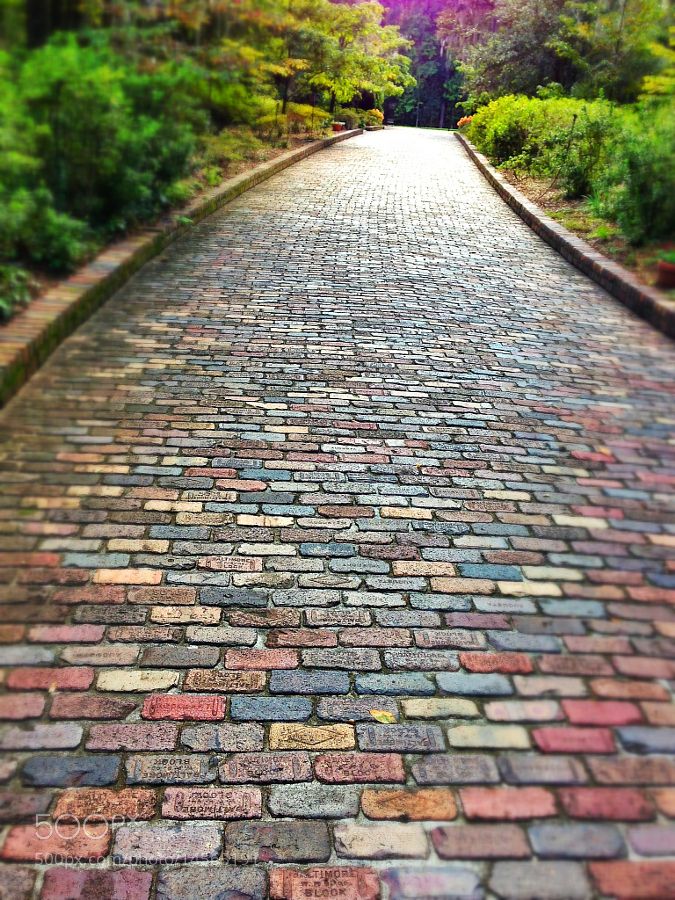 When the owners bought the house, there were worn concrete paths and terrace.
Instead of replacing the paths, they worked patches of concrete free and filled them with patterns made of brick, shells, terracotta and stone.
A creative way to deal with an old concrete path.
Another friend of mine has used old tyres, delivered for free by a local garage. However, when she opened her garden for the Faversham Open Gardens & Garden Market Day (held every year on the last Sunday in June), the pressure of hundreds of feet walking over it made it sag.
This path is made of car tyres. Two rows of tyres mark out the sides, and there are more tyres laid flat under the grassy part.
Garden designer Posy Gentles also chose seashells for her garden path.
Can you DIY your garden path?
Some friends of mine have simply wedged bricks or stone into their lawn or beds to create a path. This is fine, but if it’s a main way, then they may get dislodged and prove a trip hazard.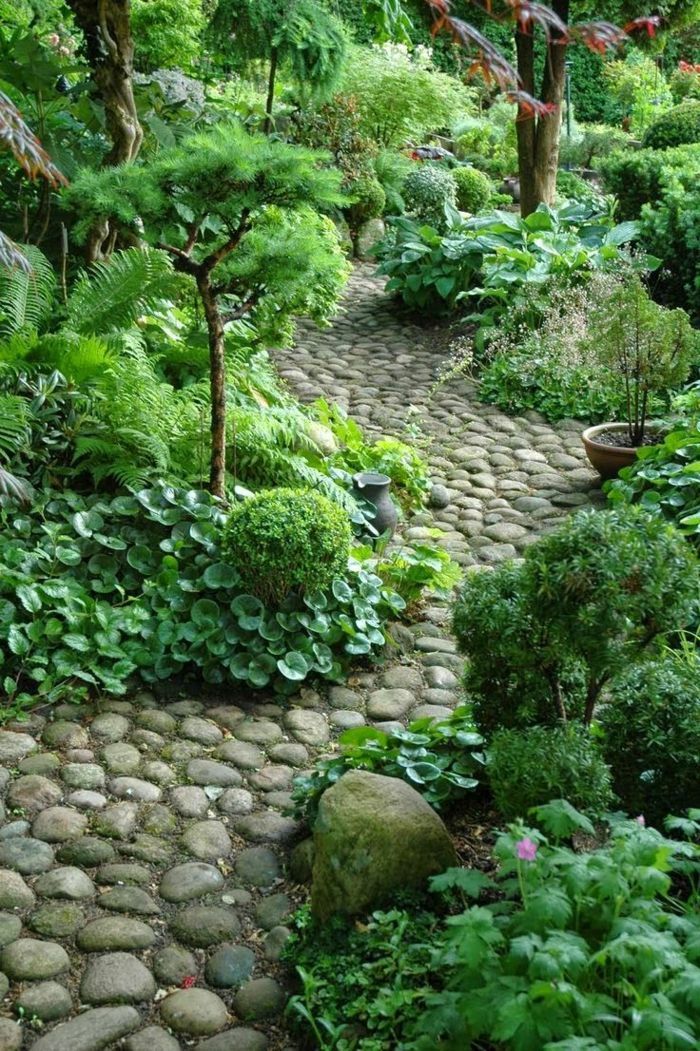
The proper way to lay a brick, stone or gravel path is to check where your utilities are. Then measure out your path, either using a garden hose or posts and string.
You dig out the path. It will need to be deep enough to take a membrane, at least one layer of base material and then your topping. If you have a gravel path, you need to make sure the little stones can’t spread over the lawn so it needs an edging.
If you have a stone or brick path, you may want to make it easier to mow by making it flush with the lawn. We did this in our parterre and Mr Middlesize mows straight across.
I am not a DIY expert, so I suggest you search on YouTube for tutorials if you want to take laying your own garden path further. Watch a few of them to get a sense of which ones are good or not.
There is some good advice on saving money on garden design here.
Who will lay my garden path?
If you’re not going to DIY your garden path, you’ll need a landscaping company. Landscaping is the digging, building, excavating and laying side of gardening.
In Britain, you can search BALI (The British Association of Landscape Industries) or the Association of Professional Landscapers for qualified member companies.
Before looking for a landscaping company, read these 12 professional insider tips for landscaping your garden.
And garden paths often involve steps, so read this to find out how garden steps differ from house steps.
This post has more garden paths and garden path advice.
Join us every Sunday morning
To get the Middlesized Garden blog into your inbox every Sunday morning, just follow us by email (see top right of this page).
Pin for reference:
Choosing material for garden paths.
It is difficult to imagine a well-groomed garden without neat paths. Garden paths primarily serve for convenient movement around the site, transportation of goods on a trolley, provide access to beds and flower beds.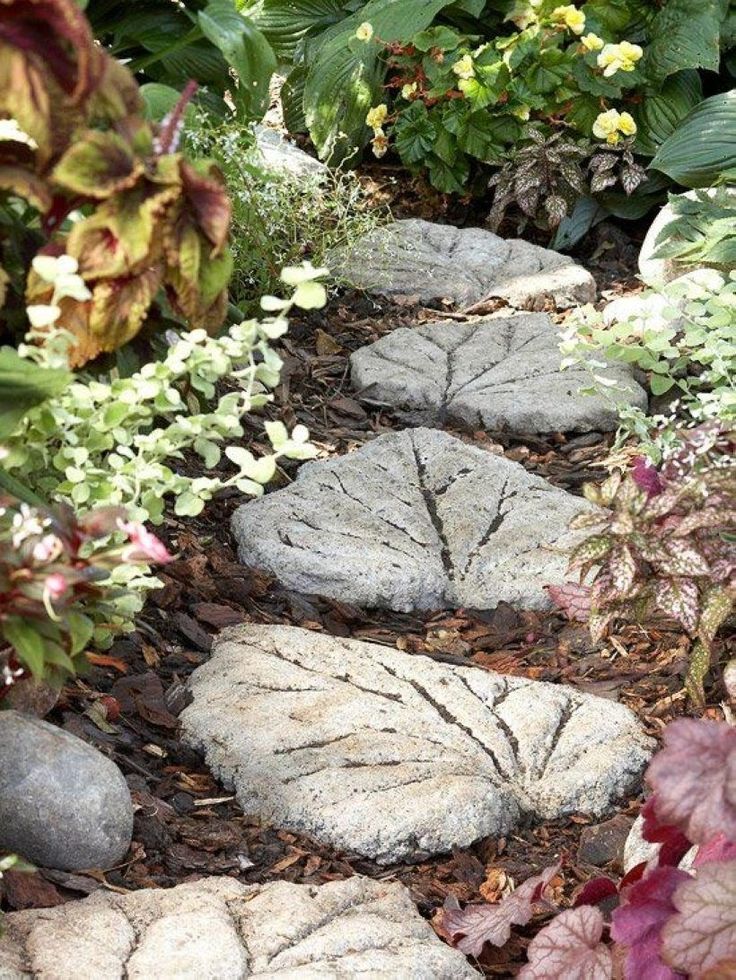 In addition, they give the garden a neat appearance, emphasize its style, and divide it into zones. Today, when the "garden industry" is booming, the construction of garden paths is not a problem. You can invite an experienced craftsman to lay the track, but if you wish, it is easy to do it yourself. There are a lot of materials for covering garden paths: natural and artificial, purchased and improvised, economical and more expensive. The general requirement for all materials: strength, moisture and frost resistance, environmental friendliness, durability, ease of cleaning. The covering of the path should be a harmonious component of garden design. With the help of computer programs for landscape design, you can simulate a summer cottage and draw up a visual plan-scheme of garden "routes" and choose the best option for paving. 9Ol000 stone
- Materials and Tools:
- Laying Wooden Woods
- necessary tools and materials:
- Plastic curb
- Metal curb
- Wooden curb
- Brick curb
- Natural stone curb
- "Green" curb
How to choose the right road material
By functional load
- When buying material for garden paths, the expected functional load is taken into account.

- In places of frequent walking, dense solid paving is laid.
- The pavement of access roads must be particularly reliable and durable.
- Loose materials are sufficient for little-used paths: sand, pebbles.
According to the peculiarities of the garden landscape
Covering for garden paths is selected taking into account the relief of the site, garden style and architectural features of the house. It is not necessary to make the same paths throughout the site. Near the house, the adjacent platform and paths can be laid out of paving stones, and paths in the depths of the garden from gravel and rubble. A smooth transition from one type of coating to another is achieved by combining or repeating elements at the junctions.
Types of garden paths
Depending on the type of material and technological features of laying, the following types of garden paths are distinguished:
- rigid,
- soft,
- combined,
- special.

Rigid tracks
Hard surfaces include: concrete, natural and artificial stone, paving slabs, wood, clinker bricks.
Wooden garden paths
Quite often, wood is used for laying garden paths. The most suitable type of wood for paving is larch. Its advantages include greater strength, moisture resistance, beautiful pattern and color of wood, and a pleasant smell of resin. Wooden paths are usually laid from cross cuts buried in the ground or solid boards. For a summer cottage with a pool, wide wooden plank paths are a good choice.
Wood flooring is a natural material that is pleasant to walk on and suitable for any garden. There are bulk wooden paths made of sawdust or mulch. A mound of mulch and sawdust settles and shifts when walking. Paths of this type are laid in places with low traffic. They require regular backfilling. The main disadvantage of wood flooring is susceptibility to decay and fragility.
Decking - garden parquet
Garden parquet, decking or anti-slip - a new interesting material for garden coverings. For its production, natural solid wood is used.
Garden parquet has the form of rectangular or square sections of wooden planks. Planks are attached parallel to each other or with a specific pattern. Standard sizes 30x50 and 50x50 cm.
Sections of garden parquet are connected during laying. They are fixed on special supports. The different heights of the supports allow the paths to follow the terrain of the site or smooth out differences in ground level. The garden parquet has ventilation slots up to 8 mm wide. Sections of a garden parquet happen with rigid and soft fastening. The hard parquet is completely wooden, while the soft parquet has a plastic slatted substrate with fasteners. Installation of a garden parquet is made simply and quickly.
Benefits of garden parquet:
- environmentally friendly material,
- durability (up to 50 years),
- heat retention capacity,
- fast drying,
- moisture and decay resistant,
- anti-slip profile,
- strength,
- easy installation,
- easy care,
- variety of drawings.
The surface for laying garden parquet must be carefully leveled and compacted.
There are various base options for garden decking:
- concrete screed with drains,
- wooden joists dug into gravel,
- sand and gravel pad,
- compacted earth worked from grass growth.
A properly prepared subfloor will ensure that the garden parquet is securely placed and has good drainage.
Garden parquet requires maintenance, it is washed with water, heavily soiled with a brush.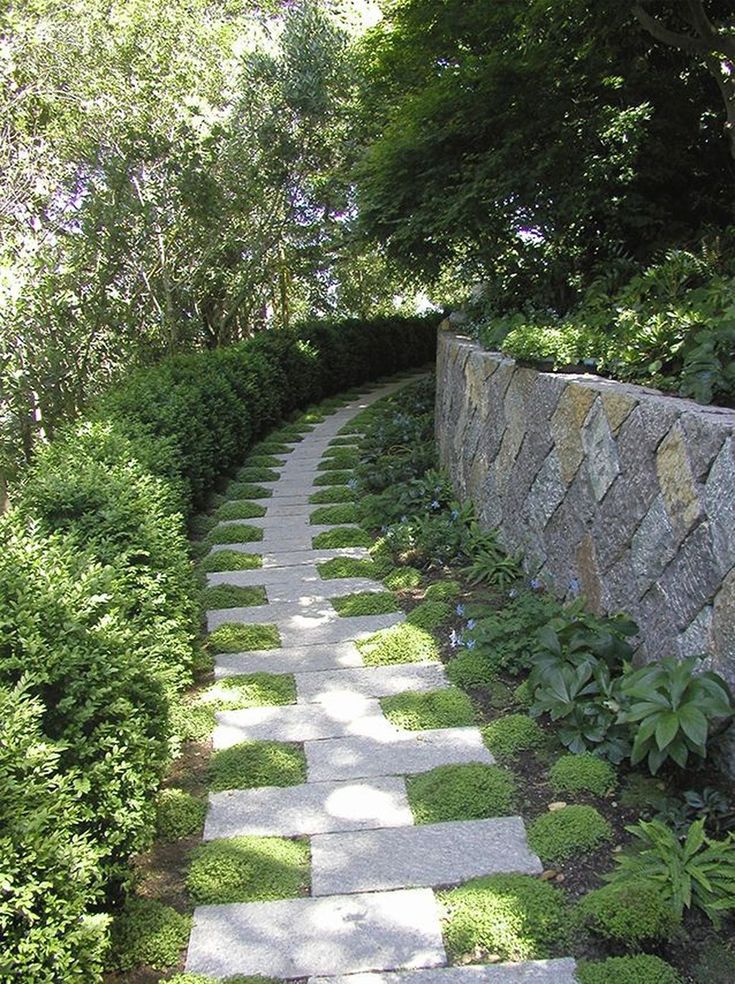 At the end of the season, the parquet is dismantled and stored in a dry room until next spring.
To protect against fading, the parquet is coated with a special oil twice a year. This will further extend the service life and maintain an attractive appearance of the decking.
Stone garden paths
Stone is traditionally used for building garden paths. This is material for the ages. It looks great in any garden. Due to its natural origin, durability, beauty, variety of rocks and shapes, the stone is widely used in arranging the garden landscape.
Various types of stone are used for paving paths in the garden. The texture of the stone coating can be rough, rough and smooth to a shine. The range of colors and shades is the most diverse: gray, dark red, black, greenish-gray. The main disadvantages of natural stone are its high cost and heavy weight. The most expensive rocks are granite, basalt, marble and porphyry.
Cheap types include limestone and sandstone.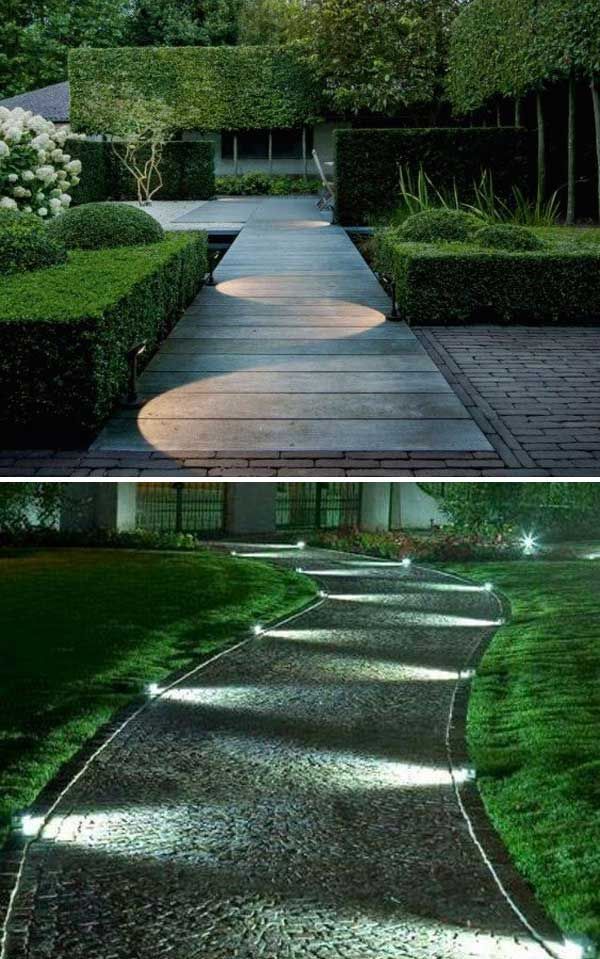 In winter, an ice crust forms on granite and marble. To get rid of ice, a heating system is mounted under the stone coating like a warm floor.
For paving garden paths, processed and unprocessed stone is used. Sandstone, limestone, dolomite, quartzite, slate, gneiss, granite are used without processing. They are used in the form of flagstone and chips. Rocks are processed: quartzite, gabbro, basalt, granite, diabase, which are used in chopped and sawn form. A common material for paths are various types of pebbles: sea, river and lake. There are even mosaic paths made of multi-colored pebbles cut into layers on a special fabric base.
Granite, diabase, gabbro and basalt are igneous rocks and are very durable. These types of stone are used to make paving stones and slabs.
Dolomite, limestone, sandstone and shales are sedimentary rocks. When arranging garden paths, they are used in the form of plates with a thickness of at least 4 cm. These rocks have a porous structure.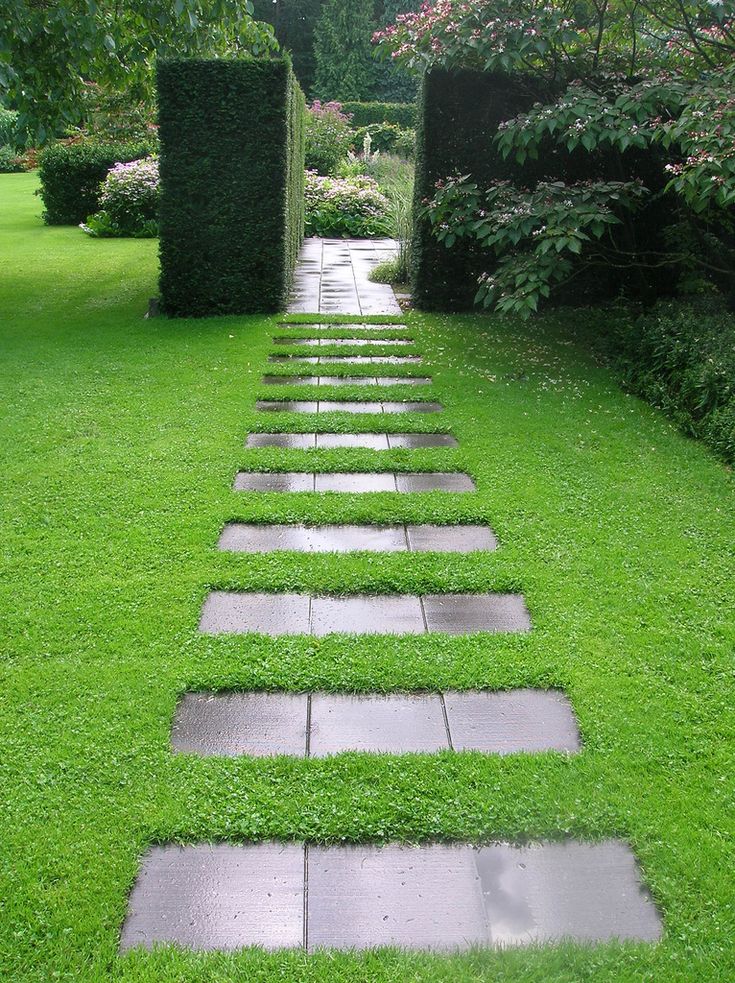 Limestone and tuff absorb moisture. It is desirable to treat a coating of such a stone with a special water-repellent composition every 3 years.
Concrete paving stone
Concrete paving stone is an economical alternative to natural stone pavers. It is available in several sizes and different shapes, rectangular and rounded. Concrete paving stone is most suitable for walkways with traffic loads.
Paving slabs
For the production of modern paving slabs, a cement-sand composition with the addition of dyes is used. Tiles are comparable in strength to natural stone. Paving slabs have a thickness of 45-80 mm. According to the production technology, tiles can be vibrocast and vibropressed. For front entrances, car driveways, thinner and more durable vibro-cast tiles are preferable; footpaths are laid out with vibro-pressed tiles.
Tiled paving is performed in different ways: "dressing", "herringbone", "ladder". There is a way of laying "out of the way", when wide tile gaps are filled with lawn grass or gravel, crumbs, sand.
Paving slabs are concrete and ceramic. It is better to choose ceramic tiles with a rough surface to avoid slipping. There are ceramic tiles imitating natural stone, "ceramic granite" or glazed in different colors.
When buying paving slabs in Moscow, the following characteristics should be considered:
- Frost resistance (200-300 cycles). One cycle according to GOST means keeping a prototype tile at a temperature of -20 to +200C. In winter, paving slabs go through approximately 5 cycles. Thus, the service life is 40-50 years.
- Water absorption (3-6%). The smaller this parameter, the better, since water freezing inside the tile destroys it.
- Compressive strength (400-1000 kg/cm2). This is an indicator of the load that the tile can withstand. For garden paths, tiles with a lower compressive strength are quite suitable.
- Flexural strength (40-150 kg/cm2). Characterizes the strength of the tiles located at an angle.
Paving slabs and figured paving elements of various geometric shapes are used for garden paths. In addition to the usual rectangular paving stones, tiles are produced in the form of a rhombus, honeycombs, coils and other more complex shapes. There are edge modules of paving slabs with a straightened side for laying close to the curb or wall of the building. This is very convenient, as it eliminates the need to trim the tile. On sale there is a paving slab of the most various color scale. The tile is completely colored and surface painted. The paint in the form of the top layer is fragile and quickly erased.
Paving slabs are durable, strong, frost resistant, suitable for driveways and footpaths. Tiled flooring heats up moderately in the sun. Melt and rain water quickly goes into the gaps between the tiles, leaving no puddles on the path. Subject to the laying technology, the tiled coating does not settle and does not form depressions.
Clinker brick
Clinker brick is specially designed for paving paths. It is available in a variety of shapes (tile, ordinary or slotted brick). This material practically does not absorb moisture, is characterized by increased abrasion resistance, has an original color.
Clinker bricks are laid on top of pebbles or crushed stone on a concrete mortar with a layer of 2-2.5 cm. The seams between the bricks are filled with a sand-cement mixture in a ratio of 1:4. Slotted clinker bricks are recommended to be laid on a sand and gravel pad. The cracks are filled with fertile soil and sown with grass. Brick is one of the most durable materials for garden paths. It is strong, frost-resistant and does not fade in the sun. Using different brickwork methods, you can lay out geometric patterns in the form of herringbone, wickerwork, bricks and perpendicular rows.
Plastic
Plastic garden paths are a simple and economical option for summer cottages. The most commonly sold floorings are 30x30 cm in size, which are easily and quickly fastened to each other. Recently, paving slabs made of plastic have appeared. Its installation is not difficult: the tile is simply stuck into the ground, which is especially convenient for quick laying of temporary tracks.
Soft tracks
Raised garden paths
For laying soft paths, a variety of bulk materials are used: crushed stone, gravel, screenings, sand, tree bark, sawdust.
Loose materials up to 2 cm in size are used for garden paths. The smaller the fraction, the more comfortable the walking surface. Bulk paths look especially good with plants planted along them. Bulk paths can be uniform and monotonous, or you can create a mosaic of multi-colored stone chips, screenings, pebbles, tree bark.
Bulk coating of garden paths is considered the simplest and most inexpensive. On the prepared base of the track, the embankment is laid in several steps in thin layers, followed by tamping each layer with a roller or vibrating plate. To prevent the germination of grass, geotextiles or a film for mulching are laid on the base.
Eco-friendly and pleasant walking paths made of tree bark. When a layer of bark settles, it is periodically sprinkled. Relatively recently, pine nut shells began to be used for bulk paths. Cedar phytoncides purify and disinfect the air. After two years, the spent shells are used for fertilizing and mulching the soil. The disadvantage of such a coating is wind blowing due to the lightness of the material.
Grass paths
The most time-consuming and unpredictable material for paths in the garden. Such a grass surface should be resistant to trampling and shade-tolerant if the path passes in a shady place. Caring for "green" paths is the same as caring for a lawn. Garden paths with grass cover are quickly trampled down with frequent use, so they are made wide enough.
Gravel
Gravel refers to inexpensive and affordable materials. It fits easily. Its disadvantages include: noise when walking, spreading to the sides and difficulty in cleaning foliage and snow.
Expanded clay gravel
Expanded clay gravel is a relatively new material for paving garden paths. Its indisputable advantages include: light weight, environmental friendliness, low cost. Expanded clay is obtained as a result of heat treatment of fusible clay rocks. Fractions of expanded clay gravel can be from 20 to 40 mm. Expanded clay gravel has a small water absorption of 8-10%, frost resistance, thermal insulation.
Combination tracks
These tracks are a combination of fragments of hard and soft surfaces.
Special tracks
Special paths are laid from materials made in a complex technological way.
Decorative concrete
Decorative concrete is a monolithic concrete coating with a special reinforcing additive made of polypropylene fibers. Decorative concrete is produced directly at the place of laying. The thickness of the concrete layer depends on the degree of load on the coating. For pedestrian areas, at least 50 mm, for driveways - 100 mm or more.
For the manufacture of decorative concrete, special dyes are used to impregnate sealants. The result is a surface that imitates various materials: paving stones, brick, flagstone, wood flooring. Decorative concrete is characterized by very low water absorption (0.5%), frost resistance (250 cycles) and abrasion resistance. The decorative covering from concrete is not subject to emergence of thermal and shrinkage cracks.
The surface of such a track does not slip after rain. Decorative concrete is not destroyed by aggressive chemicals. The composition of the dye includes granite chips and quartz sand. Due to the chemical composition, the dye penetrates into the concrete structure, forming a durable composite. For finishing, sealants are used that create a durable polymer film.
A decorative concrete garden path is beautiful and durable. It can be laid over an old concrete base.
Lawn grates
Special coating includes honeycomb panels (lawn grates). They are made from high density polyethylene and plastic. Lattices are placed on a prepared base, filled with fertile soil and sown with lawn grass. Lawn paths with high mechanical strength are obtained. They are capable of withstanding loads up to 200 t/m2 and can be used for car parking or driveways.
Asphalt
Asphalt pavement is more suitable for paths with heavy traffic. They are not attractive, therefore they are laid in inconspicuous places in the garden, for example, towards the hozblok. Asphalt for garden paths is available in black, green and red. Asphalting of tracks is carried out in warm, dry weather on a specially prepared durable surface.
Tennisit
Tennisit is a new paving material originally used on tennis courts. Tennisite is red or yellow. It consists of clay, a filler of brick ceramic chips, lime. Clay fractions absorb water and swell, which contributes to the formation of an integral dense structure and prevents the appearance of dust.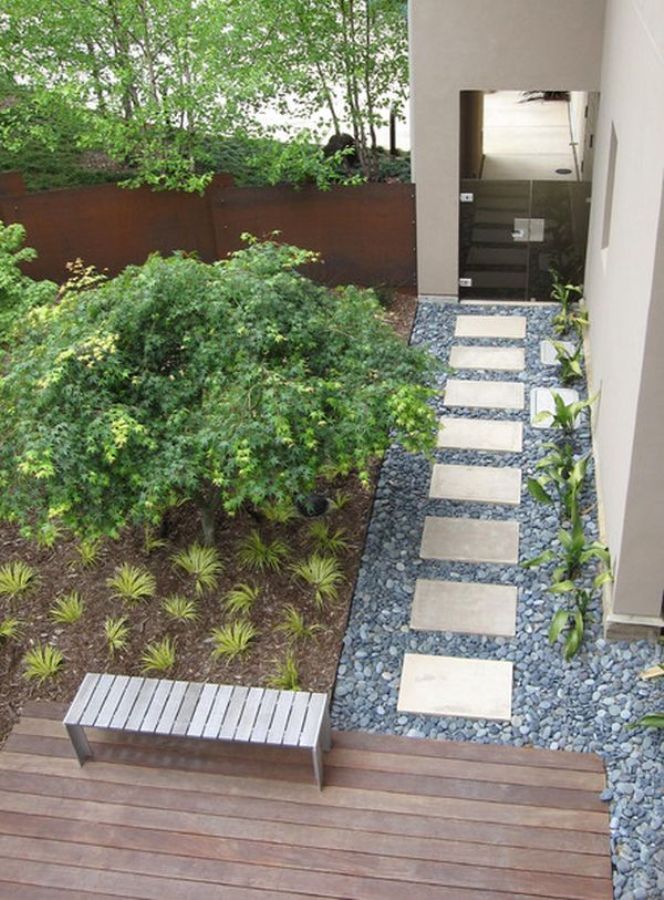
Brick chips are durable. It consists of granules without sharp edges. Tennisite allows water to pass through and retains moisture, which prevents cracking of its surface. Tennisite coating is characterized by relative softness, safety and environmental friendliness.
Tennisite coating density 1.1 t/m/cu. The optimal layer thickness is 5-6 cm, taking into account subsidence, a layer 10-11 cm thick is initially poured. Tennisite consumption is 0.1 m / cu. per 1 m / sq. As a base for tennisite, a crushed stone-sand mixture or a sand-gravel mixture with a fraction of 0-40 mm is used.
The depth of the trench under the base is 100 mm, the bottom is covered with geotextile, the base is poured and compacted with a vibratory roller.
Geotextile is laid again between the gravel-sand layer and tennisite. Within two weeks, the coating will settle. After that, you can walk on it. Tennisit is combined with a stone or tile border. Garden paths covered with tennisite are easy to maintain and repair.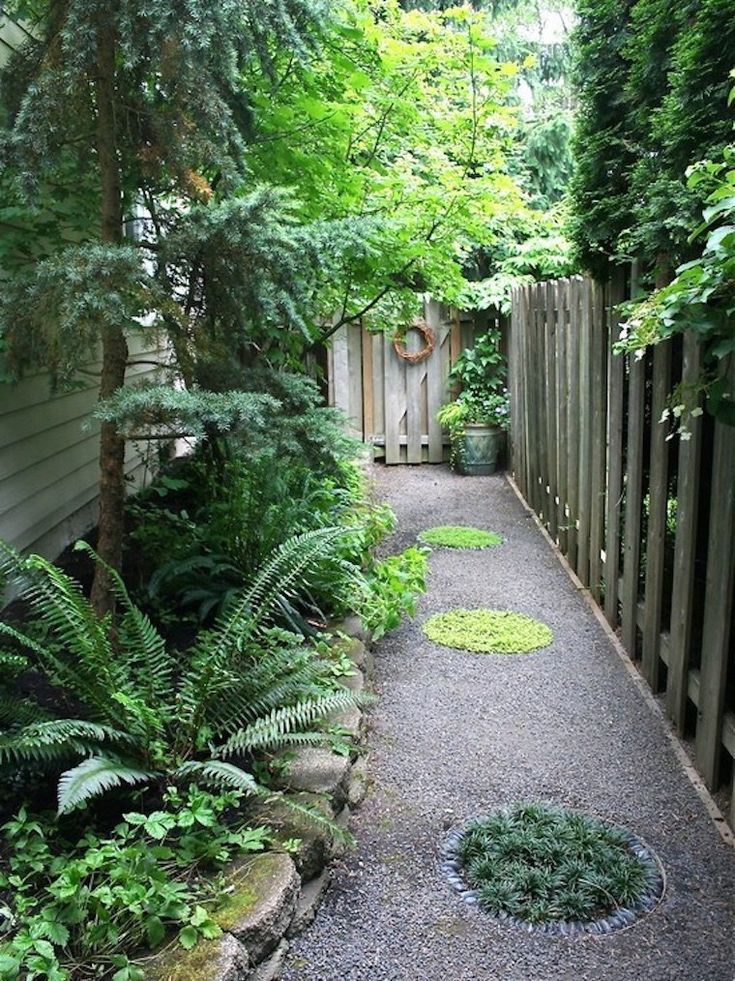 If necessary, once a year pour the material and compact the surface. In dry weather, tennisite tracks are poured with water from a hose with a sprayer so that the coating does not crack or dust. The material is sold in bags of 50 kg or by weight.
General technological rules for the construction of a garden path
When arranging garden paths, it is important to prepare a good foundation. For a path on clay soil with an expected heavy load, a base at least 50 cm deep and a sand cushion 30 cm thick are required. For footpaths on heavy soil, a sand and gravel base 30 cm thick is sufficient, in which the sand layer is 15 cm. crushed stone and sand are compacted and spilled with water.
The bottom of the trench is rammed and covered with geotextile. After compaction of the bottom, geotextiles are spread. Geotextiles are also laid between the sand and gravel layers, which increases the strength of the base and its service life. This material was developed specifically for road construction in permafrost regions. By isolating the layers of soil and cushion, geotextiles prevent sand from washing out and subsidence of the gravel and crushed stone cushion into the ground. It eliminates the germination of weeds and passes water well.
When paving paths made of stone or tiles, sand with a grain size of 0-7 mm is used under the base. Sand is poured in a layer of 5-7 cm and leveled. Laying of road material is started from the two extreme rows. Side stones are installed on a cement mortar or a special curb with a ledge.
Leave gaps between the stones, at least 2-3 mm, which are filled with clean fine-grained sand or dry mix. The sand in the cracks is rammed, if necessary, sprinkled with more and spilled with water.
When constructing paths of any kind, a slope for water flow must be observed. For this purpose, a base is made with a convex profile, so as to provide a slope of 2-3 cm per 1 m from the axis of the track or special drainage. For paths with a slope of more than 5 cm by 1 m, steps are required.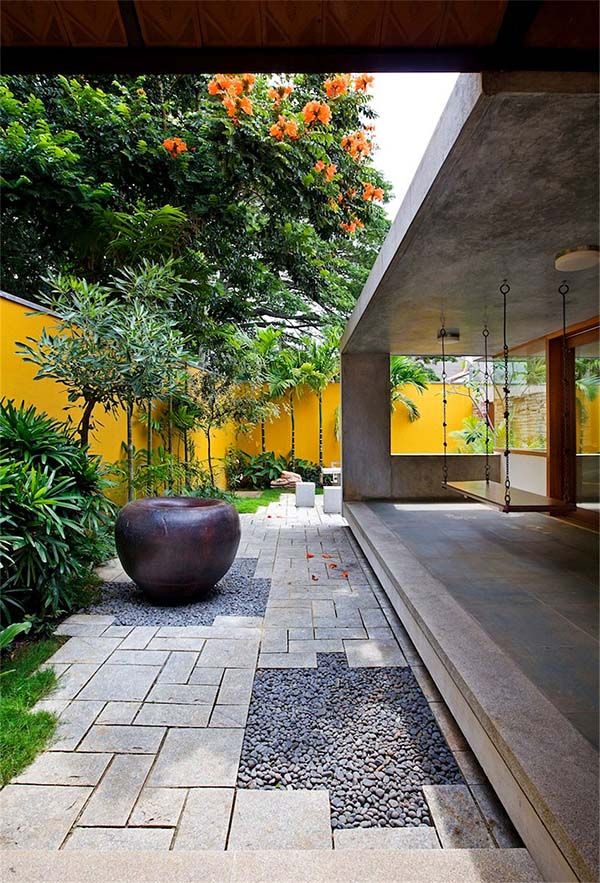 To determine the size of the steps, the rule applies: two step heights plus a depth equals a step length of 60-70 cm. A step-by-step garden path is made of 40x40 cm slabs at a distance of 60-70 cm between their centers.
DIY tile garden path
Materials and tools
To lay a garden path with your own hands, you need to prepare tools and building materials:
- sand,
- paving slabs,
- curb,
- cement,
- cord,
- metal or wooden stakes,
- hammer,
- rubber hammer,
- shovel,
- long rule,
- two pipes 2.5 cm,
- rammer,
- cart,
- building level,
- trowel,
- buckets,
- broom,
- grinder with diamond blade,
- knee pads.
Designation of the route of the future track
The route of the garden path is marked with metal or wooden stakes and cords stretched between them.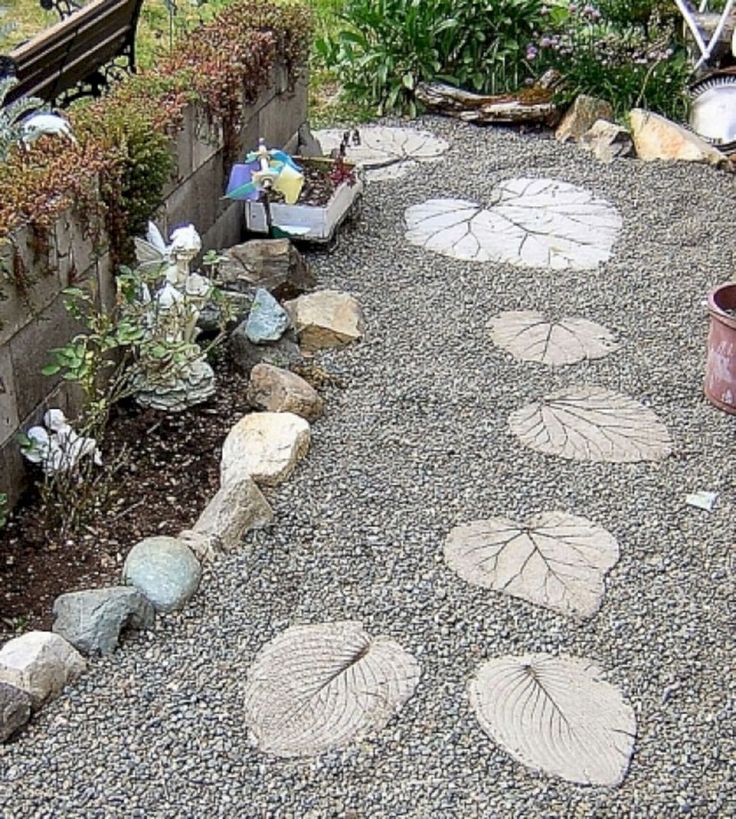 In places where the path bends, the pegs are driven in more tightly. The marking of winding paths is done with an ordinary watering hose.
Soil is removed along the width of the marked path to a depth of 25 cm. The removed sod is used for lawn. The base of the track is checked with a building level.
Laying curbs
Install curbstones first. With the help of a long rail and a long level, the slope of the prepared base of the track is checked. If the soil is loose, curbstones are placed on a thin concrete layer.
Preparing the base
The first layer of crushed stone or stone, brick chips is poured into the prepared trench. The layer thickness is 10 cm. It performs a drainage function. Bulk material is carefully compacted.
Gravel or coarse-grained sand is poured over the rubble, leveled and compacted with a layer of 10 cm. To ensure that the sand cushion is well compacted and does not spread when walking, it is recommended to put temporary wooden bridges on it before laying the tiles.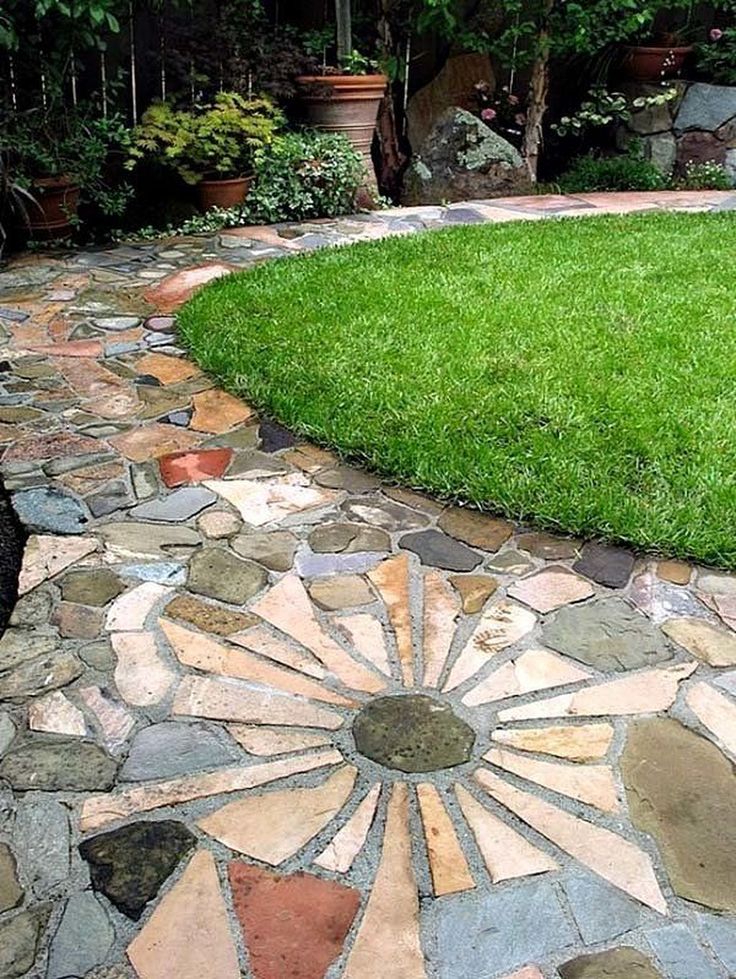
Tiling
Rectangular and square tiles are laid leaving gaps (joints) which are later filled with sand. Seams provide drainage of rain and melt water. More complex profiled tiles are laid seamlessly and tightly fitted so that they “hook” like puzzles.
If the sand is tightly compacted, then the tile is simply laid on its surface. If loose, then the stones are pressed into the sand with a slight rotation. The stones are knocked out with a hammer through a wooden block so that they lie in the same plane. The building level controls the slope.
Sand is poured onto the laid tiles and swept into the seams, then the path is abundantly watered with water from a hose or watering can. In case of poor-quality sealing of the seams, after the sand has settled and the water has dried, the procedure is repeated.
Paving garden paths with homemade concrete slabs
Paths made of concrete slabs look good in any garden area.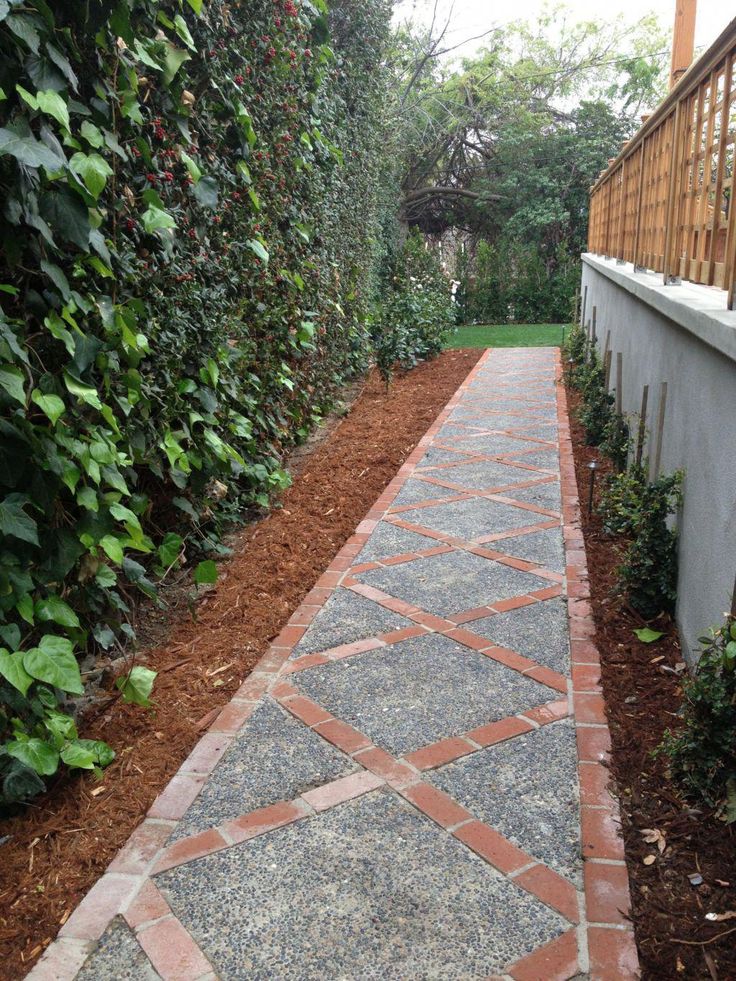 They are durable and practical. The technology for arranging such paths includes two stages: the manufacture of slabs and their laying.
Materials needed:
- wooden beam,
- steel sheet,
- cement,
- sand,
- gravel,
- ready-mix concrete,
- reinforcement - steel bars, steel mesh, polymer fiber,
- pigment,
- decorative elements (broken ceramic tiles, pebbles).
Mold for self-made concrete slabs
The size and shape of concrete slabs depends on the width of the garden path. On sale there are special plastic molds for the manufacture of concrete slabs of various shapes and sizes. It is not difficult to make a mold for concrete slabs with your own hands.
Most often, square slabs with a side of 30 to 50 cm are used. For casting slabs, several wooden molds are prepared, the total volume of which is equal to the amount of concrete in one batch. To assemble the molds, wooden bars with a section of 50x50 mm and a steel sheet are used.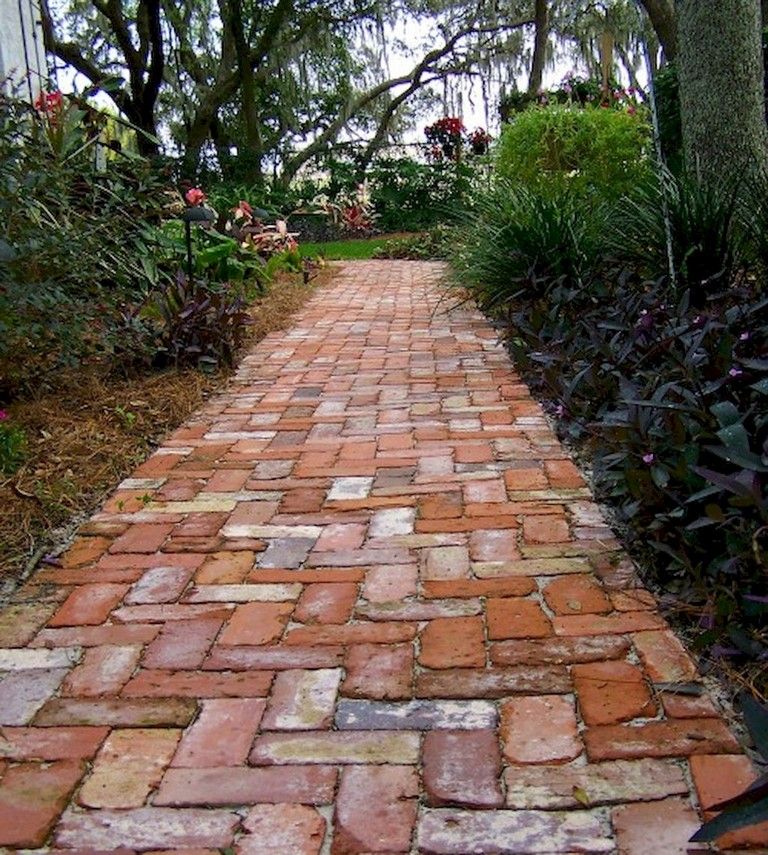
The bars are fastened with nails. To prevent the finished plate from getting stuck in the mold, the bars are ground from the inside and painted with oil paint.
This form can withstand multiple pouring. There is a simplified way: a form without a bottom on a flat surface covered with polyethylene. When the concrete hardens, the mold is slightly expanded with a chisel and the finished slab is removed.
Preparing concrete for homemade slabs
Mixing concrete requires cement, clean sand and gravel in a ratio of 1:2:4. Ready mixes are sold in construction stores. For small jobs, concrete is kneaded by hand. For large-scale construction, they buy or rent a concrete mixer.
When mixing concrete, an amount of water equal to 20-40% by weight of cement is required. Water is added gradually. Excess water reduces the strength of concrete. High-quality concrete is a wet plastic mass that holds its shape and does not crumble.
Decorating concrete slabs
To impart color to the concrete coating, pigment dyes are used, which are filled into the concrete during mixing.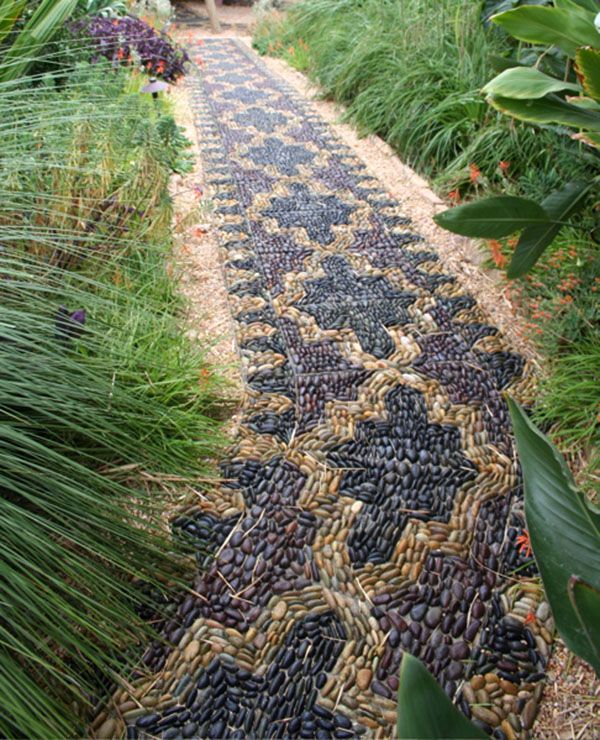 Natural, synthetic pigments and complex compositions of coloring additives of different colors are sold. More often than others, mineral dyes are used: yellow ocher and brown umber.
They also use another method of decorating: pebbles, fragments of ceramic tiles are sprinkled into the concrete surface.
To do this, first a sheet of paper is placed on the bottom of the mold, a decorative material is attached to it with a water-soluble adhesive and poured with a concrete mixture. From the frozen plate, the paper is easily washed off with water.
Reinforcing and pouring the form with concrete mortar
Concrete mortar is poured into the form to a third or half the height. Install reinforcement. As reinforcement, steel bars (section 5-8 mm) are used in the form of a lattice, a finished reinforcing mesh. The mold is filled to the top with concrete. Polymer fiber is also used to reinforce the plates, it is added to concrete during mixing.
The concrete mixture in the mold is leveled and cured for two to three days, regularly wetting the surface with water or covering with a wet cloth.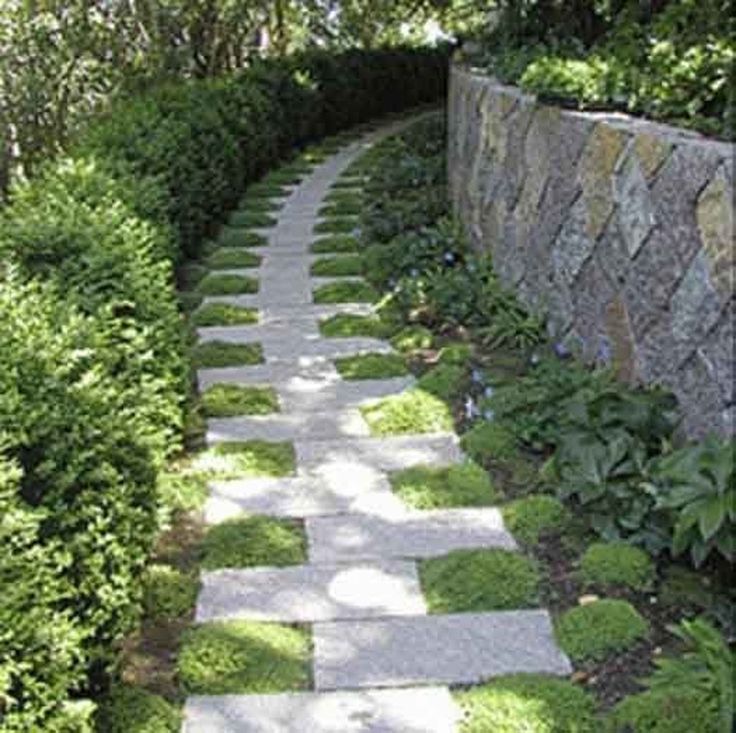
Concrete slab laying
If a significant functional load is planned when using the track (trolley with cargo, bicycle), then a minimum gap of 2-3 cm is left between the plates. A gap of 5-6 cm looks more aesthetically pleasing and hides laying imperfections. For footpaths, it is possible to place slabs with a step interval.
Marking the route. The top layer of soil is removed by 10 cm. The trench is covered with sand at half the depth. Concrete slabs are placed on a flat sandy base in one or more rows along the width of the track.
It is important that each slab rests flat on the sand cushion and is level with adjacent slabs. For a tight fit, the plates are tapped with a hammer through the board.
The gaps between the slabs are filled with sand. Garden paths look very decorative if lawn grass is planted in wide gaps. To lay a path on the finished lawn, a hole is cut out under each slab and a layer of turf is removed. The bottom of the hole is covered with sand so that the slab lies flush with the grass cover.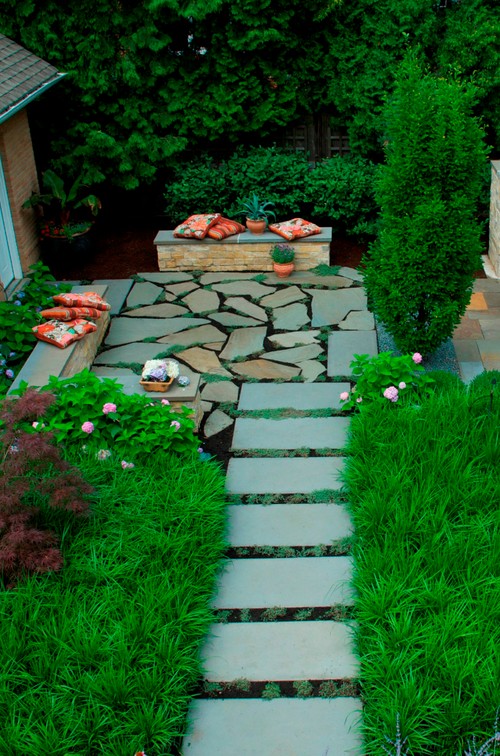
DIY garden paths from improvised materials
A garden path made from improvised means will be inexpensive and will give a lot of positive emotions. To cover the tracks, a variety of materials are used: steppingstones, saw cut ends of logs, pebbles, plastic caps, round stones.
The optimal width of the garden path is 1-1.5 m, and the path is half a meter. It is necessary to make a slope of the path so that water does not stagnate on it. The path near the beds and flower beds is made a few centimeters higher, then it will remain dry after watering the plants.
With the right combination of materials, improvised paths look very stylish.
DIY wooden garden path
A garden path can be paved from the trunk of an old or fallen tree.
Materials and tools:
- old tree log or trunk,
- petrol or electric saw,
- polyethylene film in roll form or red clay,
- brush,
- metal container,
- sand,
- concrete,
- drying oil.
The trunk and thick branches are sawn into rings 5 cm thick of different diameters. In a large metal container, heat the drying oil to a boil. Using a brush, the rings are treated with hot drying oil from all sides. Leave until completely dry.
Laying a path of wooden cuts
First determine the dimensions and route of the future track. For paving the paths from saw cuts and logs, a trench is prepared with a depth of 30 cm. The bottom of the trench is covered with plastic wrap or covered with clay. This is necessary for waterproofing and protecting the wood from decay. They fall asleep in layers of 5 cm with coarse-grained sand, tamp and water. Saw cuts 10 cm high are placed on a sandy layer tightly to each other. Smaller ones are inserted into the gaps between large checkers. The building level checks the location of the rings in the same plane. The remaining gaps are filled with sand or poured with concrete. Paths from saw cuts are usually made with a border.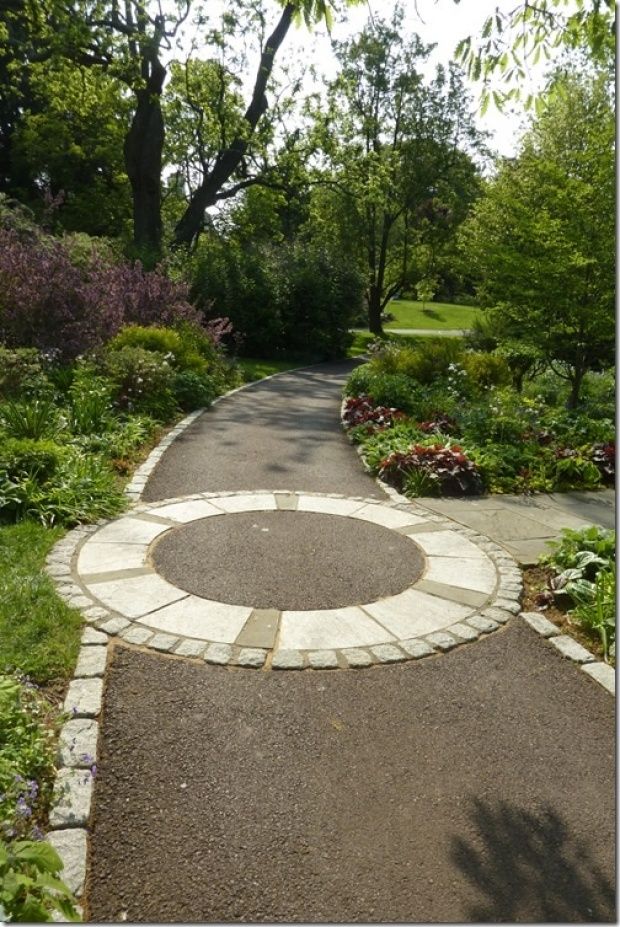
DIY stone garden path
For the construction of garden paths, quartz sandstone is most widely used, otherwise known as "savage", Luhansk stone or ocher stone. Sandstone has the appearance of dense plates of torn shapes of different sizes. They make decorative tiles and paving stones from it.
Sandstone is a strong, dense, frost-resistant stone. It practically does not absorb moisture.
Required tools and materials:
- cord,
- gravel,
- sand,
- shovel,
- trowel,
- building level,
- mallet or rubber mallet.
The borders of the future track are beaten off with a cord.
They dig the ground on the spade bayonet.
Fall asleep tamp gravel. Sand is poured over the gravel cushion. The paving stones are tightly laid and adjusted with a hammer.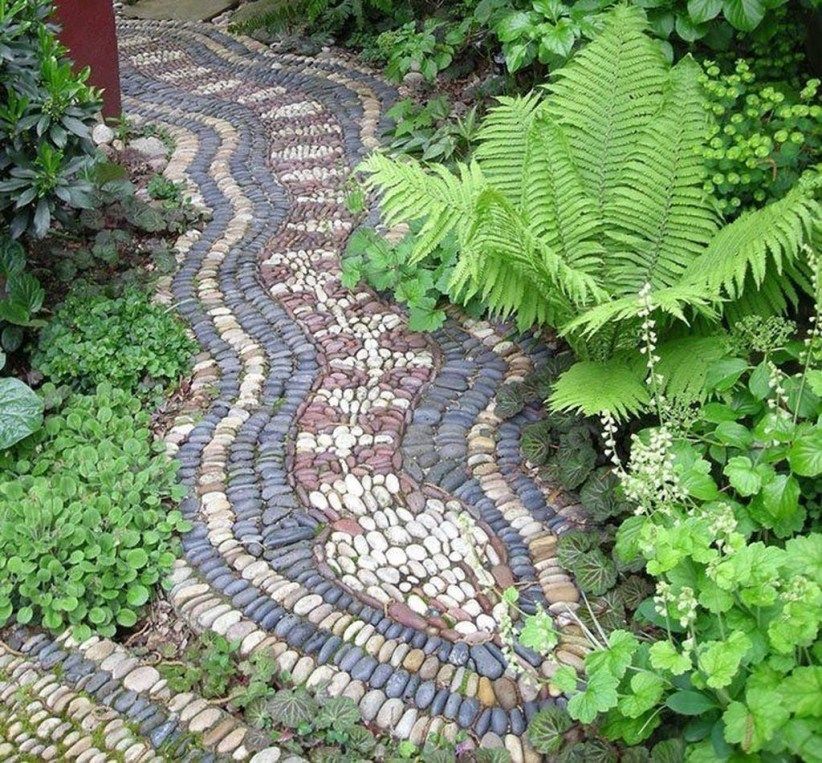 The building level checks whether the surface of the track is even. Stone slabs or paving stones are laid from one edge to the other. Sand is poured onto the laid path and swept into the cracks.
DIY pebble garden path
Decorative pebbles - a finishing material that is always relevant. It is durable, practical, with a spectacular appearance.
From such a simple and affordable material as pebbles, garden paths of extraordinary beauty are laid out. The coating can be completely pebbly or combined with other materials. Almost all types of coatings for garden paths are successfully complemented by pebble paving elements.
First, a track plan and a color scheme are drawn up on paper. You can create a pattern model using a computer program. The stones are sorted by size, shape and color. Spread a test sample of pebbles on the sand.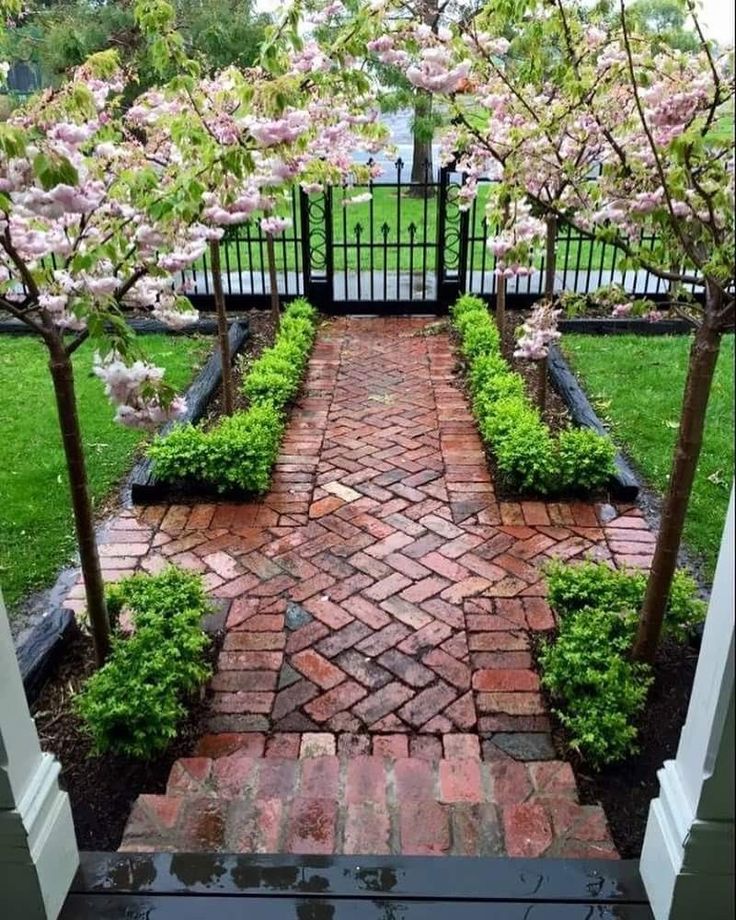
Dig a groove 30 cm deep, level the bottom. Sand is poured in a layer of 10 cm and compacted. The next layer is 20 cm thick from fine crushed granite. Compacted crushed stone is covered with a sand-cement mixture in a ratio of 3: 1 and leveled.
Lay the pebbles according to the pattern, taking into account the size of the stones and the distance between them. For marking, pegs with stretched twine are used. I lay the pebbles on the edge or flat, in the second case, the stone consumption will be less. The laid pebbles are trimmed with a rubber mallet.
The pavement surface of the walkway must be above the level of the surrounding ground so that water does not accumulate. After laying the pebbles, the path is watered with water from a hose with a spray, the water jet should not be strong. The cement-sand mixture absorbs water and settles. Until the mixture hardens, you can not walk along the path. Then a cement-sand mortar is kneaded and the gaps between the stones are filled with it, so that the pebbles protrude from the concrete by several millimeters.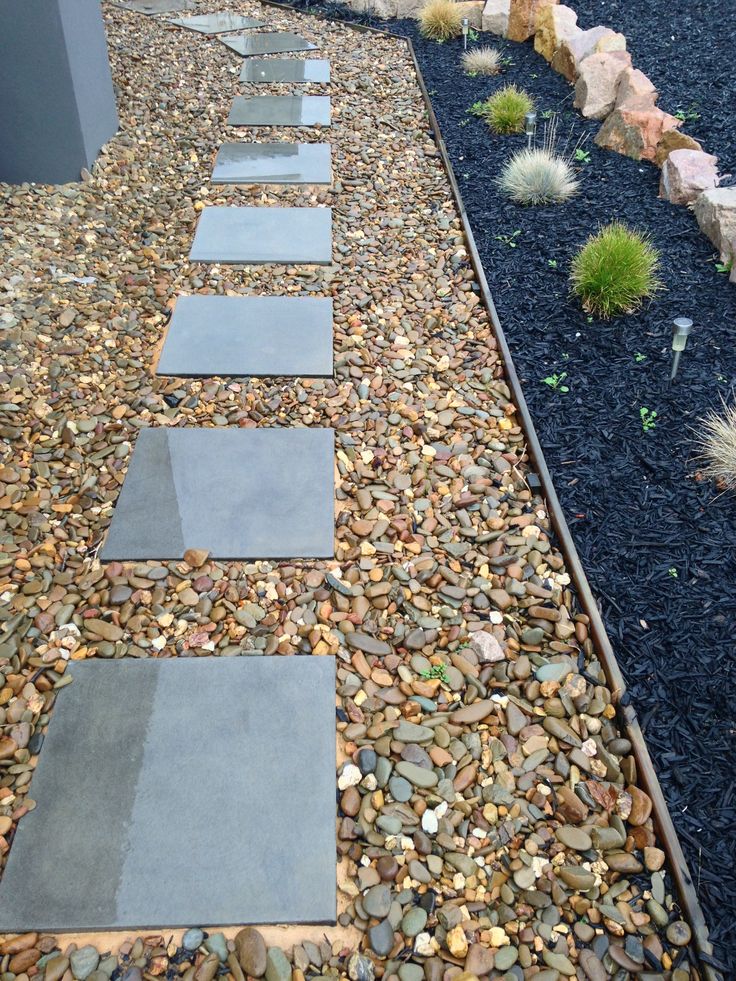
Round stone garden paths
Boulders look very natural in any garden. They are used both as a covering and instead of borders. Particularly beautiful boulders with a variegated structure of sandstone, granite and porphyry.
The boulders are laid close to each other on a sand cushion 15-20 cm thick and driven into the sand with a rubber-tipped hammer. Stones are placed flat side up. It is necessary to observe the bevel of the path for the flow of water. After laying the stones, the gaps between them are filled with sand. The finished path is watered with water and sand is poured again between the boulders.
Borders
Borders serve to strengthen and support the edges of garden paths, give them a finished look and prevent grass from growing. The border comes in various heights and shapes. It must match the track surface.
Plastic curb
Plastic borders are comfortable and durable. They are distinguished by simple installation, as they are attached with anchor pins, which provide a strong fixation.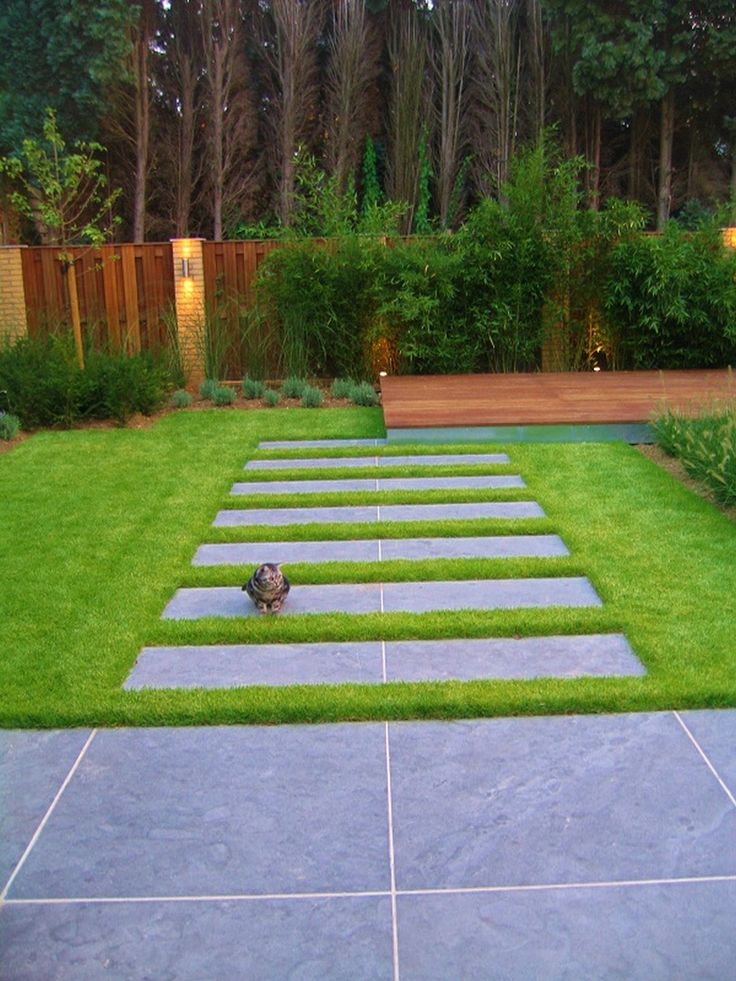 Due to its flexibility, plastic curbs are indispensable for decorating winding paths. They are used to strengthen the contours of garden paths of any type. Plastic borders are not noticeable, but they are a reliable barrier against the growth of lawn grass and rolling of the bulk coating.
Metal border
Metal border - ideal for fencing paths covered with gravel. Metal borders are strips of steel, copper and aluminum. They firmly hold the contours of the path, prevent the germination of weeds. The metal tape is deepened into the soil by 10-15 cm and protrudes above its surface by no more than 2 cm.
Wooden curb
Wooden borders are often used in rustic gardens. Usually they protect bulk paths and paths with a wooden coating.
A wooden beam treated with an antiseptic or small logs is installed as a curb. On sale there are ready-made sets of logs connected by wire.
Brick curb
Brick border is traditional and goes well with boulder and paving stones.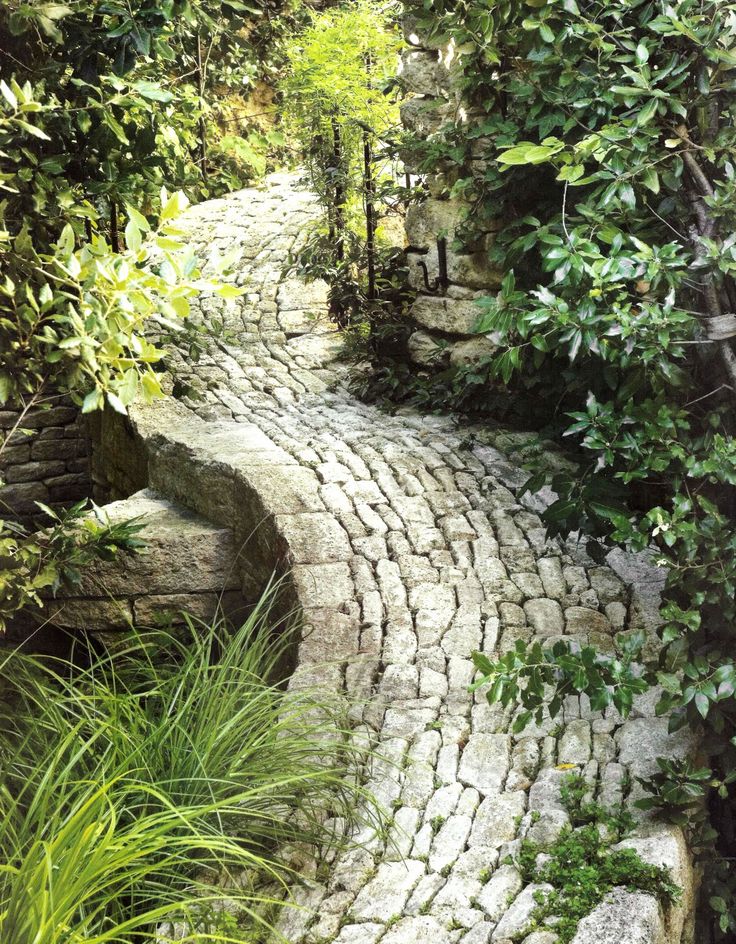 It harmoniously looks in a classic English garden and country-style summer cottage.
When installing a curb, bricks are dug into the ground along the edges of the garden path in the form of teeth. Under the influence of harmful climatic factors, ordinary bricks quickly collapse. For borders, it is preferable to use durable facing bricks.
Natural stone borders
Marble, granite, limestone, shell rock and sandstone curbstones look great in natural landscape gardens. A stone border goes well with a covering of granite, paving stones and paving slabs.
Before installing the stone curb, the ground is covered with mulching non-woven material (spunbond). Small stones of the same size and shape are laid, the gaps are filled with small stones and the gaps are filled with dry cement.
"Green" border
Living border is versatile for all garden styles. A low hedge with gravel, crushed stone, natural stone and paving slabs looks beautiful.
This is the most time-consuming track design. To create a green border, plants are planted in a row 30 cm wide. Most often, boxwood and horizontal cotoneaster are planted along the paths.
The material of the curb may differ from the pavement, the main thing is that it be durable, stable and aesthetic.
successful tracks!
Even the smallest garden is indispensable without paths. They help to organize the space of the garden plot, make it easier to carry out summer work, decorate the garden and make walks pleasant. A well-thought-out arrangement of paths, the choice of a suitable coating, compliance with the laying rules and a little creativity - these are the necessary conditions for arranging a durable and beautiful garden path. It does not matter what the track is made of, from expensive modern materials or improvised means. If you work with your soul and great desire, a successful result will be ensured.
10 Best Materials for Garden Paths
Garden paths must be easy to move, not deform under mechanical stress and withstand climatic changes in the environment.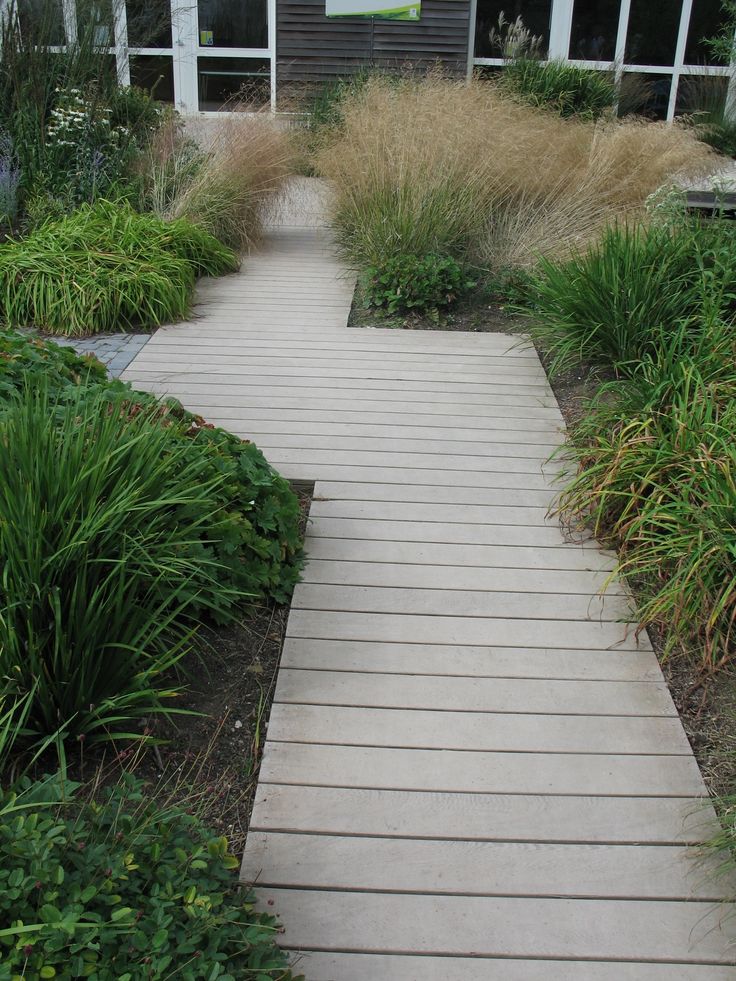
Contents
Why garden paths are needed
If there are no well-maintained paths on the site, then problems arise related to the characteristics of the soil: such a situation is difficult to avoid falling.
In addition to being practical, well-decorated garden paths effectively decorate the landscape and create a harmonious space.
Design solutions
The landscaping of a garden plot begins with a plan of the area, on which permanent and temporary buildings are marked, as well as the location of green spaces.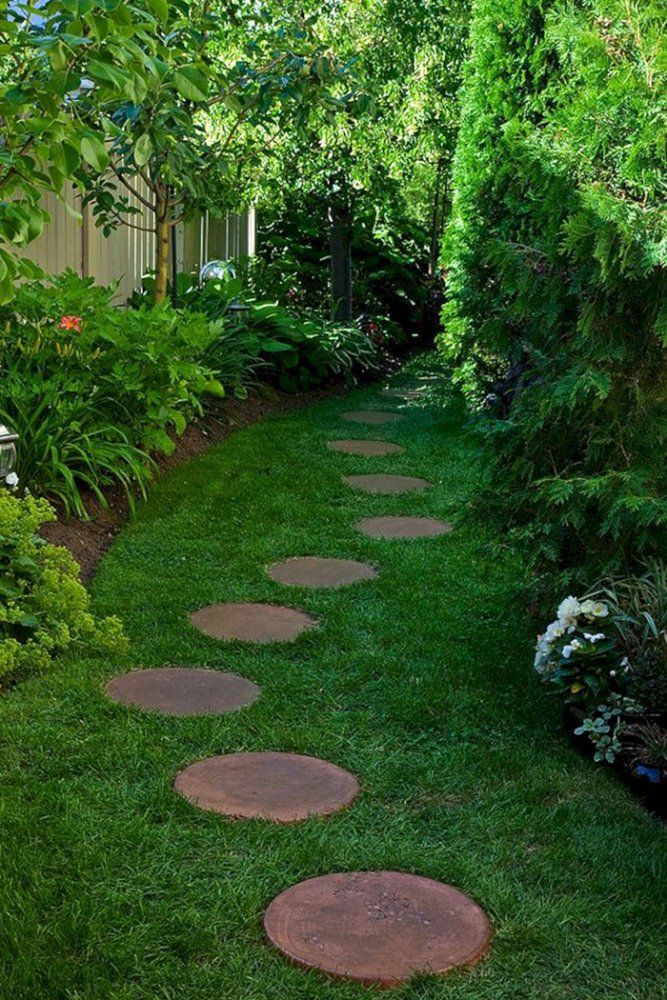
To create an aesthetic and useful space when arranging garden paths, it is recommended to follow the simple rules of landscape design:
- Paths must connect all areas used by hosts. Short paths, breaking off in an arbitrary place, create a feeling of unfinished decorative work.
- Paths with natural curves for entering a recreation area or enveloping flower beds and flower beds look harmonious. Chaotic waves from the paths visually overload the landscape.
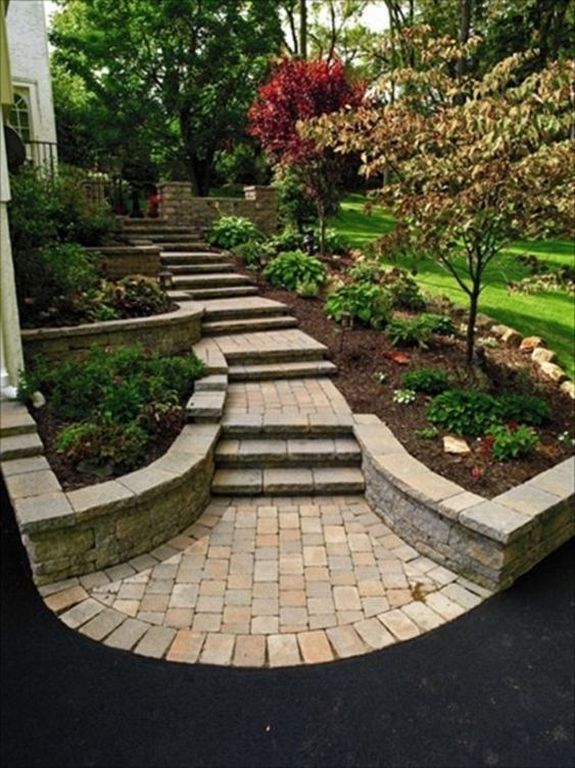
Paving stones
- For large gardens, wide walking paths are provided so that two people can freely pass along them or special vehicles can pass through them.
- If the garden has a symmetrical layout with geometric shapes, then the paths are made straight. The landscape style, close to the natural arrangement of plants, is decorated with curved lines of paths.
- In places with slopes, it is advisable to form steps for safe passage.
- Paths that are used year-round use different technologies than summer paths.
The size of the paths may vary depending on the purpose - the main passages are made wide, and the auxiliary paths can be narrower. It is allowed to apply various methods of creating pavements and combine diverse road materials in one landscape space.
Types of garden paths
Before proceeding with the choice of material for creating paths, it is necessary to draw a plan of the site, mark on it all the buildings and the location of plantings.
The main walkways, which are often used, are preferably made of hard materials, while auxiliary paths can be made of soft materials.
Chip garden path| Cover type | Materials | Pros | Cons |
| Soft | Sand, gravel, gravel, boards, tree bark. | + budget option; + are created in a short time; + do not require special skills. | - suitable for operation only in the warm season; - short-lived; - you have to often backfill. |
| Hard | Concrete, brick, tile, stone, paving stone. | + durability; + year-round operation; + can be used to pass garden machinery; + no need for regular maintenance. | - expensive materials and fixtures; - active physical strength required; - some ways of creating tracks require the involvement of specialists; - complex dismantling of coatings, if a decision is made to change the direction of an already finished trail. |
Concrete walkways
Concrete is a mixture of a binder component (usually building cement is used), crushed stone and water. In order for the solution to quickly harden, special additives are used. To create a garden path from a continuous concrete pavement, perform the following steps:
- Mark the boundaries of the path and remove the top layer of soil to a depth of 30 cm.
- Mount the formwork from wooden boards and pointed pegs.
 The upper edge of the formwork protrudes 5 cm above the ground. Stakes are located between the boards and the walls of the trench. For winding paths, the formwork is made of plastic materials.
 - Geotextile or any other agromaterial is laid at the bottom of the trench, the edges of which lead to the walls. This is necessary so that the subsequent layer of sand is not washed away by rainwater penetrating into the soil.
- Fill the hole with 7 cm sand, then spill it with water.
- 10 centimeters of crushed stone are poured over the sand and compacted.
- If you plan to use the paths not only for walking, but also for the passage of garden vehicles (trolley, lawn mower, walk-behind tractor), then it is necessary to lay a reinforcing mesh on a layer of crushed stone.
- Pour 7-10 centimeters of concrete evenly into the structure. Approximate proportions of a strong mortar (in buckets) per 12 kg of dry cement: water -1, sand -2, crushed stone -3.
 It is advisable to use a concrete mixer, it is very difficult to manually prepare the mortar.
 - Level the surface of the concrete pour with a trowel.
- For easy drainage of water, the central part of the path should be 1 cm higher than the longitudinal edges, and the entire structure should rise 2-3 cm above the soil.
- After the concrete has dried, the formwork must be removed.
Please note! Every two meters it is necessary to create expansion joints across the track. If this is not done, then the concrete will crack under the influence of seasonal changes in air temperature.
Garden paths created with molds for casting cement mortar look interesting and provide an opportunity for the implementation of design creativity.
To make the mixture decorative, special dyes, marble chips or artificial elements are added. Forms can be made of metal, plastic or wood.
The use of stencils reduces the time of work on creating paths in the garden, but requires careful adherence to the technology:
- Mark the contours of the future track.
- Remove the top layer of earth.
- Place geotextile on the bottom.
- Pour and compact sand well, then spill it with water.
- Level the sand layer with a spirit level so that further laying is carried out strictly horizontally.
- Brush on the inner surface of the mold with used car oil or any lubricating fluid.
- Set the stencil to the pouring point according to the level.
- Fill the bottom with one layer of gravel.
- Mix 1 part cement and 3 parts sand with water. You should get a thick mixture in which you can add dye.
- Pour the mixture into the mold and level with a spatula. If necessary, you can smooth and pour a little water on top to obtain a smooth surface.
- After 1 hour, remove the stencil by lightly tapping it with a mallet.
- Clean the mold from cement residues, grease with oil and place next to the cast tile, leaving a small gap.
- Follow the example of the first casting to form all subsequent plates.
Please note! The concrete path is covered with a film for three days so that the coating does not dry out quickly and does not crack from this.
Stone paths
Lemezit flagstone pathsLimestone and shell rock are not suitable for stone paths, because they do not have the necessary strength and quickly collapse during operation. When creating a reliable coating, preference is given to granite, wild stone, sandstone and pebbles.
Laying technology is not difficult for independent work:
- Drive pegs along the marking contour and connect them with a stretched cord. The distance between the marks is determined by the degree of curvature of the lines - the straighter the segment, the greater the intervals.
- Remove topsoil to a depth of 40 cm to prevent grass from growing through the pavement.
- Pour a small amount of sand and lay geotextile on it in one layer.
- Lay out the reinforcement mesh along the bottom of the trench.
- Sprinkle 10 cm of sand first, then 5 cm of dry cement.
- Sprinkle with water.
- Place a stone (sea pebbles, paving stones or granite blocks) tightly on the resulting pillow.
- Fill gaps with cement mortar.
- Install curbs along the edges of the path.
Especially popular is flagstone - a flat stone 10-15 centimeters thick with an arbitrary contour. For the arrangement of garden roads, sandstone flagstone is chosen. It is easily cut with a grinder, and self-assembly will not be difficult. Flagstone is laid on a cement base or on a bed of sand and gravel.
The simplest paths are made from two types of medium-sized stone:
- Crushed stone - mined in quarries by blasting rocks, and then crushed on industrial machines. It has sharp edges on the surface.
- Gravel - small flat stones with a smooth surface.
To create a path from crushed stone or gravel, a pit is dug 20-30 cm deep, the bottom is dug up and leveled - this is necessary so that the shrinkage is evenly distributed over the ground.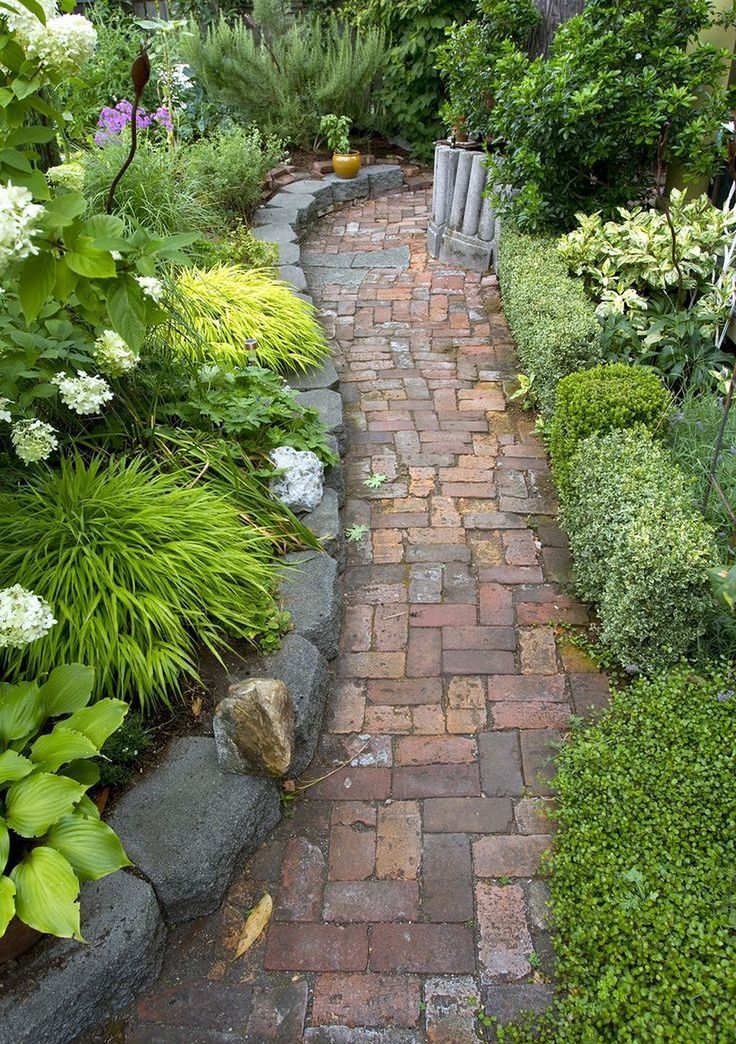 A curbstone is installed, the trench is covered with coarse gravel or broken bricks, and then a layer of sand is added.
Geotextile is spread on the prepared pillow and covered with gravel or crushed stone. At the end of the process, the surface is leveled with a rake and spilled with water.
Pavement Brick Budget
Destroyed old brick buildings can provide road material without great financial outlay. Not only whole products will be used, but also broken pieces of various fractions. If possible, it is better to use silicate brick. In the case when an artificial clay stone is used, before laying it is necessary to treat it twice with a hydrophobic solution - this will protect the material from the destructive effects of rainwater.
The layout of the bricks on the path is simple and can be:
- longitudinal;
- transverse;
- herringbone;
- braided;
- alternating blocks of horizontal and vertical lines.
In order not to disturb the symmetry of the pattern and to ensure comfortable passage of the garden wheelbarrow, the turns are made smooth.
The construction of a brick path consists of simple steps that do not require special training:
- Dig a trench 25-20 cm deep, compact it.
- Line the bottom with geotextile, under which it is desirable to pour sand.
- Lay temporary boards strictly vertically along the walls of the trench and secure them with pegs.
- Create a drainage pad consisting of 5 cm of sand and 10 cm of gravel.
- Level the top layer using a rule.
- Cover with a mixture of cement and sand in a ratio of 1:5 to a thickness of 5 cm and tamp.
- Remove the guide boards and install curbs in their place.
- Lay bricks on the sand bed, push in and level. The curvature can be corrected by removing some of the sand under the brick or putting some rubble under it.
- Tap the laid row with a mallet, placing a board under it.
To fill the joints, a mixture of sand and cement is poured onto the surface of the finished track. Then brush it into the cracks with a brush and spill the coating with water. After a few days of operation, repeat the procedure to fill the remaining voids.
Wooden walkways
Wood is now rarely used for landscaping garden paths. The reason for this is the high cost of the material and the fragility of wooden flooring. In addition, in rainy weather, the coating becomes slippery and unsafe for movement. But wooden paths look beautiful and are easy to install, so some owners choose this way of landscape design.
Sod is removed under the path to reduce the chance of breaking grass.
Without geotextiles, grass will definitely grow! It is desirable to lay a layer of geotextile or roofing material on the bottom of the base. Next, sand and a little gravel are poured. Logs treated with bituminous mastic are laid on top, on which boards impregnated with an antiseptic are attached in the transverse direction.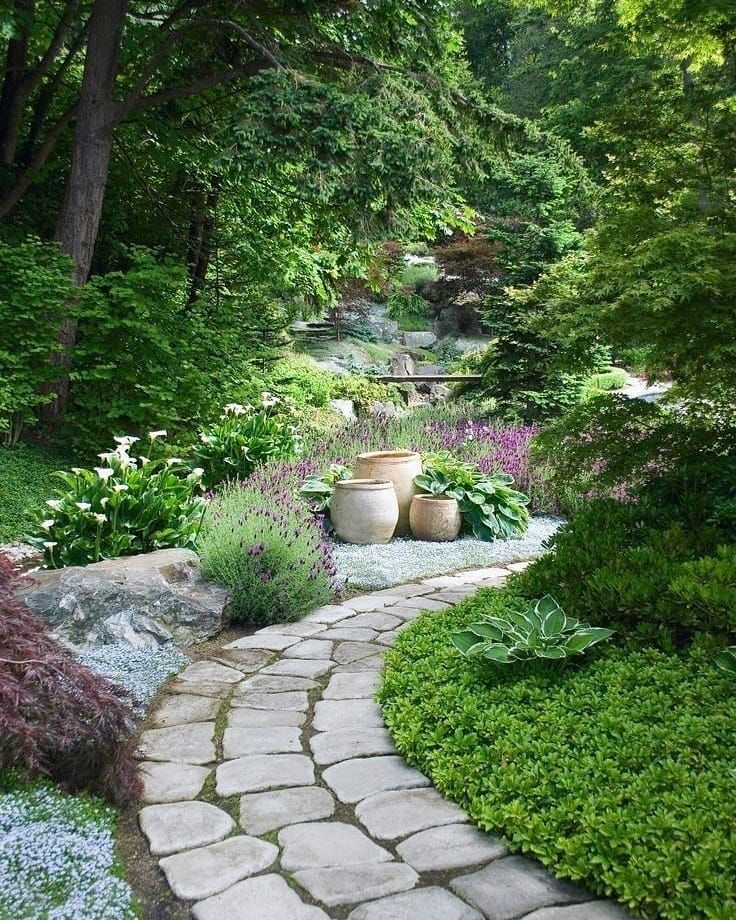
To create an atmosphere as close to nature as possible, wooden paths are formed from cut logs or stumps. The blanks are soaked in hot drying oil or antiseptic, and the bottom side is additionally impregnated with bituminous mastic.
Lay saw cuts in random order on a pillow of sand and gravel, tapping with a mallet. The gaps are filled with coarse sand or gravel.
Paths made of artificial materials
Polymer sand slabs do not lose their strength for 30-40 years, do not break and withstand sudden changes in air temperature without problems. They are made from a mixture of sand and crushed recycled polymers with the addition of a coloring pigment. The composite is heated in industrial furnaces and pressed - a reliable building material is obtained.
The work on laying polymer plates is carried out in the following sequence:
- Remove the top layer of soil on the shovel bayonet.
- Tamp the bottom, and form grooves for installing curbstones.
- Designate a curb line - put pegs and pull a cord between them.
- Sand is poured into the recesses for the fence of the path and a concrete cushion is formed on which the curb stone is attached.
- Geotextiles are spread on the ground, overlapping the canvases along the length by 15-20 cm.
- Sand is poured in several stages, compacting and spilling each layer. You should get a sand cushion 20 centimeters high.
- Polymer tiles are installed on a sandy base tightly to each other, tapping horizontal rows with a mallet.
If it is planned to move heavy loads along the tracks, it is advisable to strengthen the base with a reinforcing mesh with a mesh of 50 mm and fill the structure with a mixture of sand and cement in a ratio of 3: 1 to a height of 10 cm.
The pressed rubber crumb boards create a level surface with high anti-slip properties. Tiles are available in two types - with evenly cut edges and with end sleeves. For garden paths, the second version of the material is better suited, because it makes it possible to firmly adhere the plates to each other. The optimal thickness of the rubber tile is 40 mm.
To create a rubber coating, remove a layer of soil 25 cm thick, and then level the bottom with coarse sand. Geotextiles are spread and 10 cm of fine gravel are poured onto it. Be sure to install rubber curbs, after which a layer of geotextile is laid again. Wet sand is poured, leveled and compacted to obtain a pillow 10 cm high. Tiles are laid on the prepared base.
Please note! If there is a gap between the slabs and the curb, it must be filled with strips of laying material.
Garden walkways can be easily formed from modular covers with interlocks. Durable, flexible plastic mats withstand temperature fluctuations and are resistant to mechanical stress.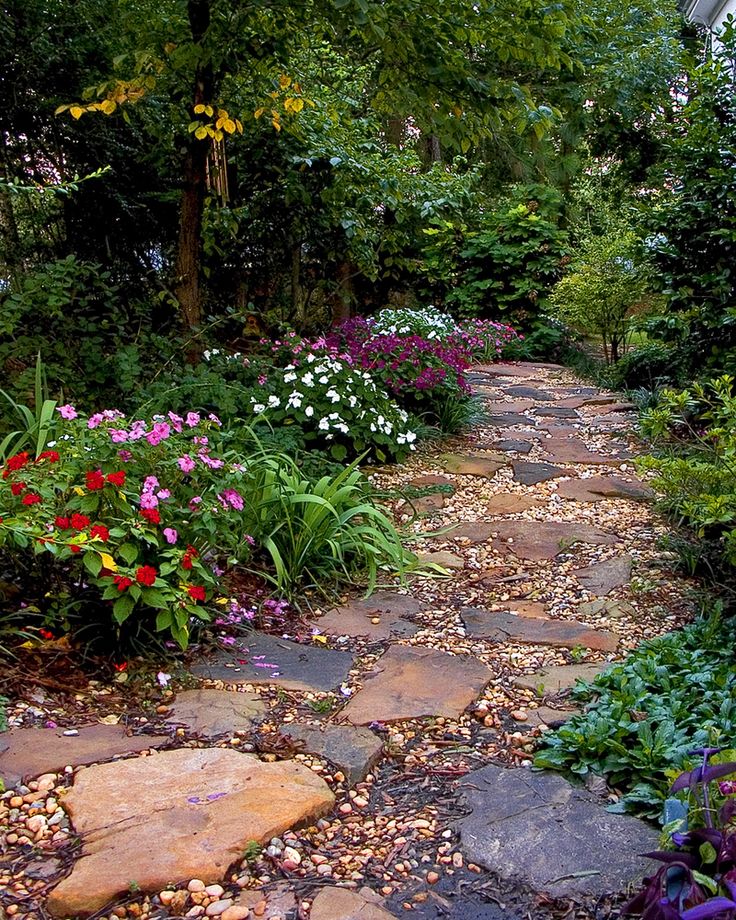 Are issued in the form of lattices or modules with drainage openings for removal of moisture.
Laid directly on the lawn or on a concrete base. For the winter period, it is advisable to dismantle, rinse the modules with running water and store them in the room.
Old car tires can be used for secondary roads. The wheels are dismantled and their side parts are cut off - ring tapes are obtained, which are cut in only one place. The resulting rubber strips are interconnected with a plain weave. Several rugs are assembled into a track, fixing the ends to wooden bars. Lay the coating on the ground, sprinkled with gravel.
A variety of materials for creating garden paths allows you to independently improve the site in any landscape style!
Concrete monolithic
6.66%
Concrete mold
7.63%
from wood
7.52%
14.11%
from brick
4.48% 9000
From artificial materials
15.