Backsplash stove area
Stove Backsplash - Etsy.de
Etsy is no longer supporting older versions of your web browser in order to ensure that user data remains secure. Please update to the latest version.
Take full advantage of our site features by enabling JavaScript.
Find something memorable, join a community doing good.
(1,000+ relevant results)
10 materials, looks and design tricks |
(Image credit: Maestri Studio Photograph: Nathan Shroder)
Stove backsplash ideas with style turn a functional feature into a chic one. Whether attention-grabbing because of its material, color, pattern, or texture, or a more understated design, a backsplash can be a beautiful part of the kitchen.
Of course, it’s a hardworking feature, too, protecting walls from splatters, splashes, and grease as you cook, so it’s imperative that a backsplash is easy to clean to make keeping the room pristine an easy task.
Considering the stove backsplash should always be part of your kitchen ideas in order to select a harmonious palette of colors and materials for the room, and we’ve gathered suggestions to inspire you here.
Stove backsplash ideas
The kitchen is a busy space, so stove backsplash ideas must be quick and easy to maintain, resist staining, and keep their good looks after being exposed to splatters, grease, and steam. Be inspired by these examples and draw on the expertise of designers in selecting your kitchen backsplash ideas.
1. Create natural shine
(Image credit: K Kong Design Photograph: Mali Azima)
A backsplash can be a striking feature even in subtle neutral color tones and with gentle shine.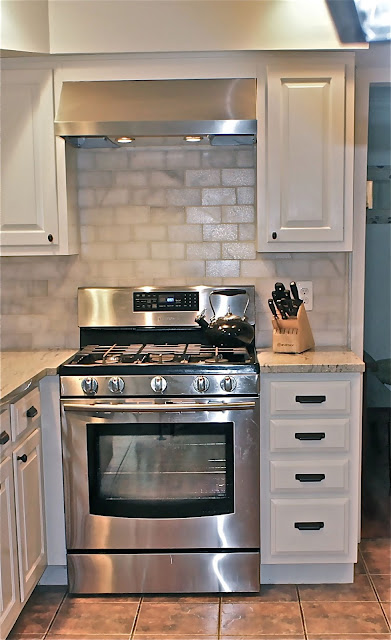
‘These kitchen wall tile ideas are wonderfully unexpected,’ explains Kristin Kong of K Kong Design . ‘They look like capiz shells but are back-painted glass. While it would never be practical to use real shells behind a range, these tiles provide the same look with all of the functionality and durability needed in a busy kitchen.’
2. Turn up the volume on color
(Image credit: Future/ Brent Darby)
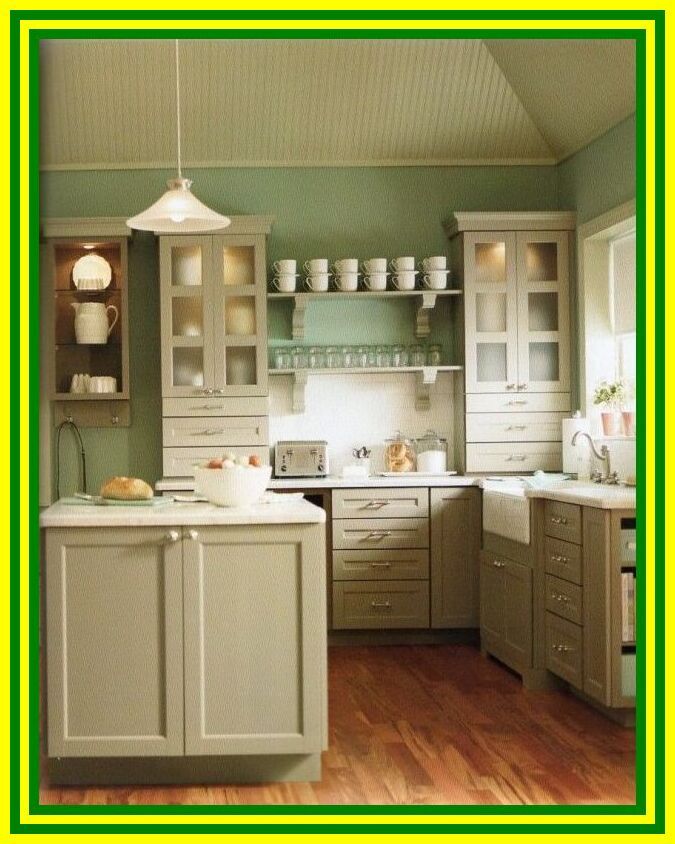
The limited area of a stove backsplash makes it the spot to choose for a bolder version of kitchen color ideas you’ve used elsewhere in the room. Here, it’s a beautiful lime that draws the eye against a backdrop of cabinets painted in a nature-inspired take on green.
Select a tile with variations of tone like this one and the backsplash will be an even more arresting feature. This tile includes yellower tones alongside the lime hues.
3. Opt for industrial style
(Image credit: La Cornue)
Consider taking your cue from the detail of your appliance as part of your stove backsplash ideas.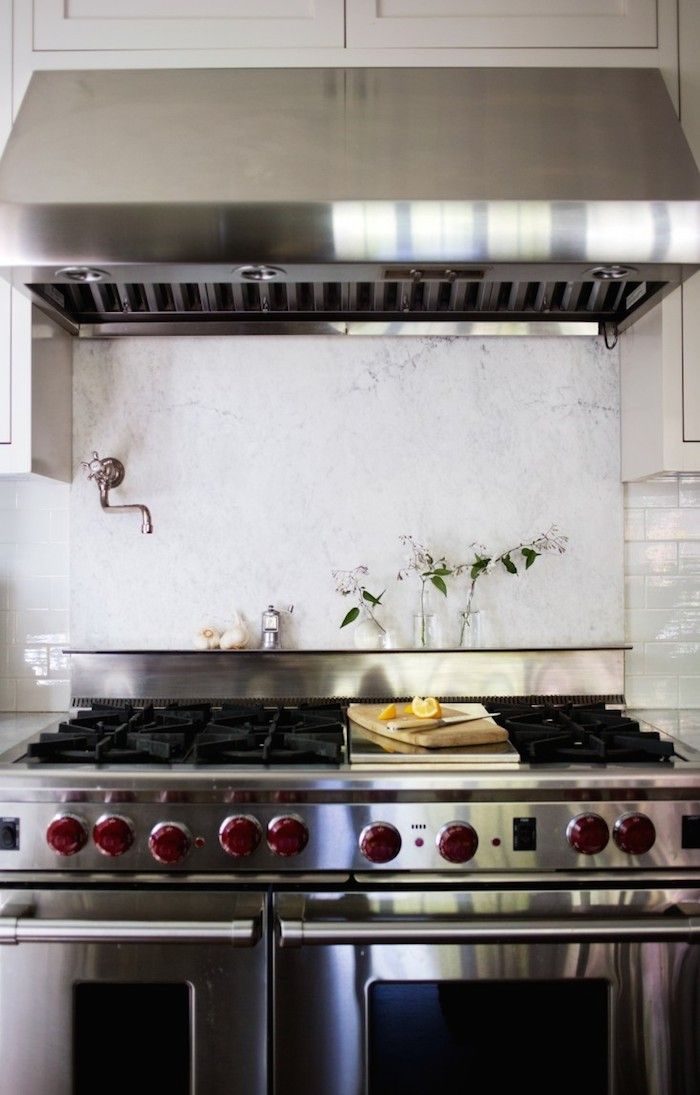 The metal trim of this iconic design is complemented by a metallic-effect backsplash that repeats its tones.
These tiles aren't actually metal backsplash ideas – in fact, they are porcelain tiles, which is a highly durable option. They’re stain and moisture resistant, and easy to clean.
4. Scale down for standout
(Image credit: JL Design Photograph: Leslee Mitchell)
Even in a room with an extensive tile backsplash, think about choosing a different design for the area behind the stove to distinguish this zone of the kitchen. In this kitchen the wall white kitchen backsplash idea is contrasted with the smaller scale backsplash above the stove, which features a range of neutral tones that complement the statement hood.
The change from the horizontal lines of the white tile wall to the verticals of the stove backsplash make it distinct, too.
5. Make maintenance simple
(Image credit: Mark Williams Design Photograph: Sarah Dorio)
In selecting stove backsplash ideas, it’s worth considering how much time will need to be spent on maintaining the appearance of the kitchen.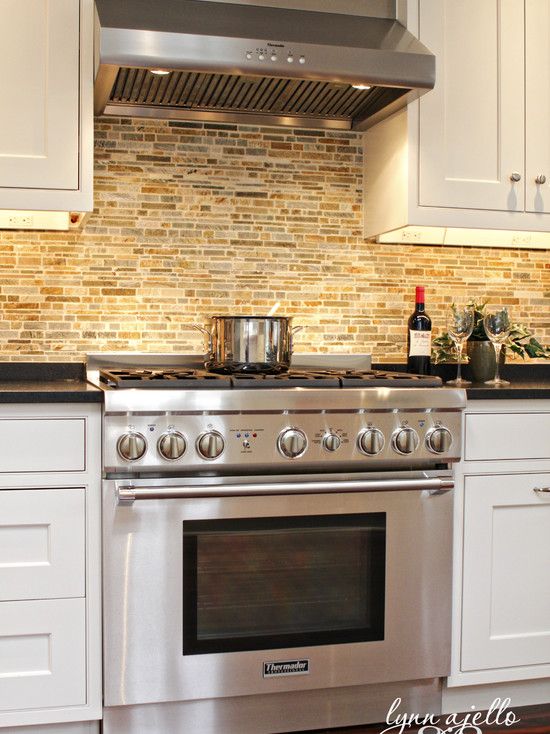
‘We like to use solid surface materials as a backsplash behind a stove because grout lines in a tile backsplash can sometimes be hard to keep clean,’ say Mark Williams and Niki Papadopoulos of Mark Williams Design .
‘In this kitchen, we used the same natural stone for the stove backsplash that we used for the countertops. Because the stove backsplash is so large and prominent in how we see our kitchens, using a beautiful material can add immediate luxury and sophistication.’
6. Give it a modern edge with stainless steel
(Image credit: Richard Gadsby )
Whatever the style of your kitchen, stainless steel is worth listing as part of your stove backsplash ideas. It’ll suit a chef’s style kitchen with an industrial aesthetic, but it could equally bring a modern edge to a room with traditional style, and its soft color can blend beautifully into a room with white cabinets and a wood floor.
It’s also a practical choice as a stove backsplash as it’s hygienic, simple to maintain, and hard wearing.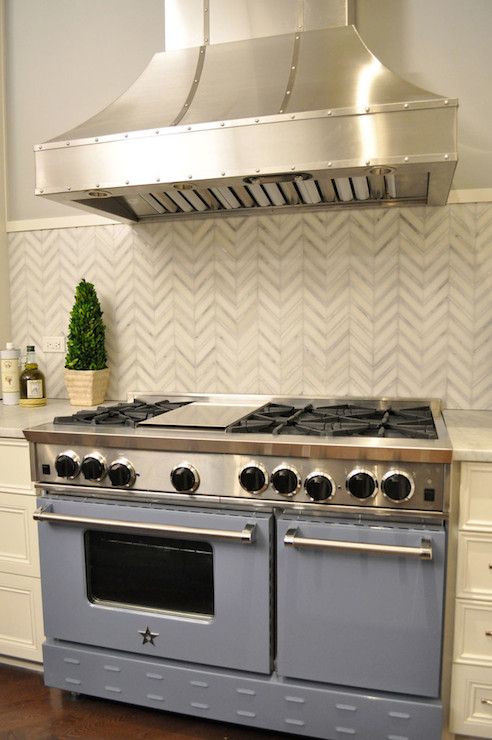
7. Opt for luxury
(Image credit: Kara Adam Interiors Photograph: Michael Hunter)
Marble’s a desirable kitchen material and using it as a stove backsplash can create a look of luxury in the kitchen.
‘In my old home, I wanted a white marble kitchen,’ says Kara Adam of Kara Adam Interiors . ‘I chose white marble slabs for my island and backsplash, and a Caesarstone for the peninsula (there isn’t a marble slab big enough for that peninsula). By using white marble on the backsplash, you can give the illusion of an all marble kitchen, even if other white materials are used.’
8. Add an accent color
(Image credit: Morse Design Photograph: Tara Carter)
Looking for stove splashback ideas that will prove a sound choice for any kitchen? ‘Keeping your backsplash simple will make the kitchen look and feel cohesive, regardless of size,’ says Andi Morse, founder and principal designer of Morse Design . ‘A simple subway tile always works, but I recommend changing up the color to instantly elevate and impact your space.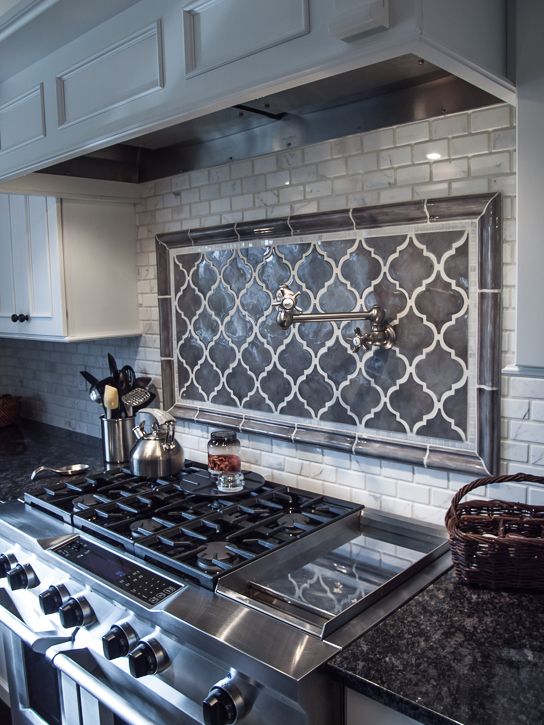 ’
’
9. Play with pattern
(Image credit: Living with Lolo Photograph: Life Created)
In a kitchen with white cabinets and light-toned wood, stove backsplash ideas that add to the room’s subtle detail are required. The solution in this room is a design with elegant geometric pattern that catches the eye and adds interest without becoming overpowering.
Follow this room’s lead by extending the backsplash from the stove area to the entire run of cabinets to allow a motif like this to make an impact.
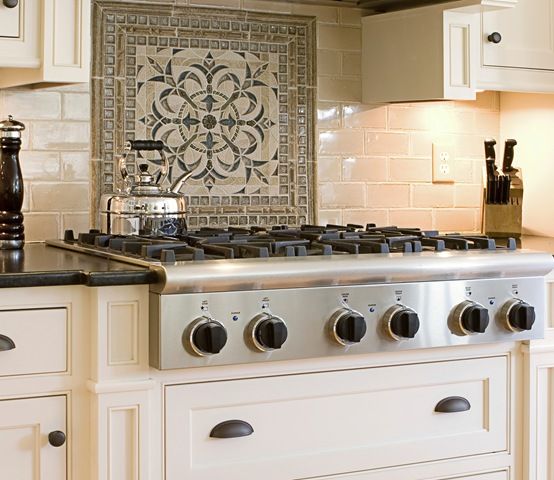
10. Showcase organic pattern
(Image credit: Maestri Studio Photograph: Jenifer McNeil Baker)
The veining of natural stone – and stone lookalikes such as quartz – are fabulous for countertops, but make even more of an impression when they’re used vertically as a stove backsplash.
If using natural stone, make sure that it is correctly sealed to avoid the possibility of staining which will compromise the look of the material.
Do I need a backsplash behind the stove?
A backsplash behind the stove is necessary to prevent the wall becoming marked, stained, or discolored by splatters and grease.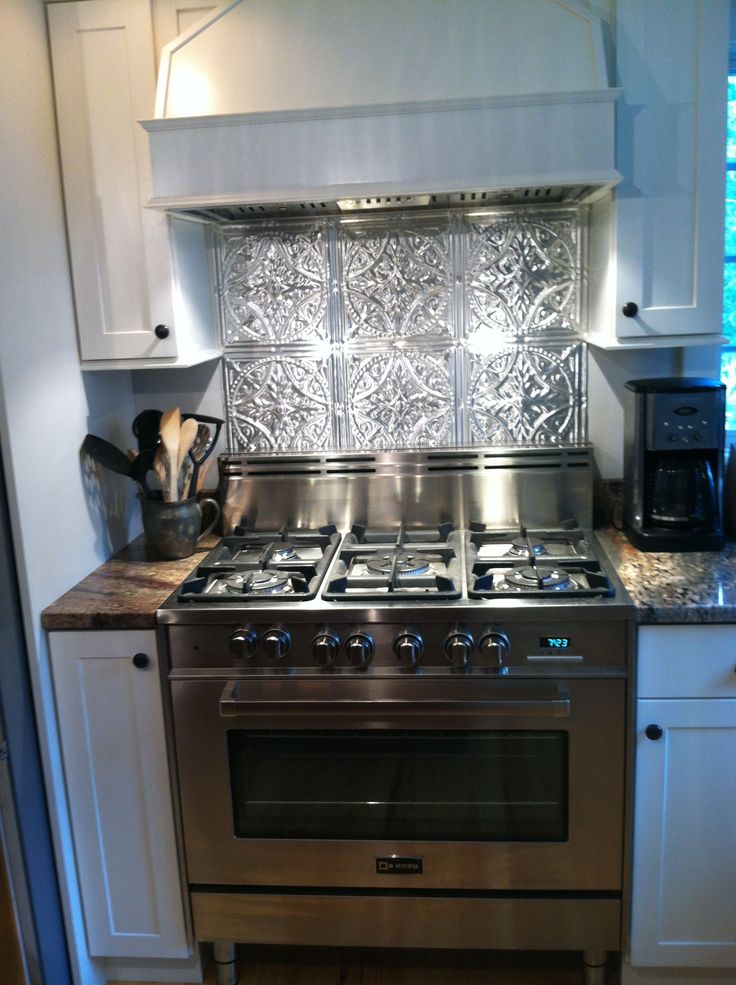 It will also protect it from moisture. A backsplash also ensures that when a cooktop is set into a counter there’s no gap between the wall and cabinets below that could allow water to drip downwards.
If you have a freestanding range rather than a cooktop, there will be a small gap between the range and the backsplash. In this case, it’s worth installing a backsplash down the wall a little to avoid any visible wall surface.
What is a timeless stove backsplash?
A tile backsplash is a timeless choice for a kitchen. Subway tile is classic, but consider, too, square tile which has enduring style. As for tile options, both ceramic and porcelain are possibilities, but equally timeless are marble or slate mosaic; the former will create a more opulent effect, while slate might suit a more country style room.
Sarah is a freelance journalist and editor. Previously executive editor of Ideal Home, she’s specialized in interiors, property and gardens for over 20 years, and covers interior design, house design, gardens, and cleaning and organizing a home for H&G. She’s written for websites, including Houzz, Channel 4’s flagship website, 4Homes, and Future’s T3; national newspapers, including The Guardian; and magazines including Future’s Country Homes & Interiors, Homebuilding & Renovating, Period Living, and Style at Home, as well as House Beautiful, Good Homes, Grand Designs, Homes & Antiques, LandLove and The English Home among others. It’s no big surprise that she likes to put what she writes about into practice, and is a serial house renovator.
WATERPROOFING PIPE ON THE ROOF | Pezina
Today it has become commonplace to build houses and cottages with fireplaces, stove heating, sauna and solid fuel stoves.
Therefore, one of the main concerns of the owners is the “chimney on the roof”, i.e. waterproofing the chimney (or pipes).
If the chimney is not properly protected, the temperature difference will cause condensate to flow down the chimney. Its evaporation interferes with traction and creates excessive pressure, under the influence of which the furnace can even collapse.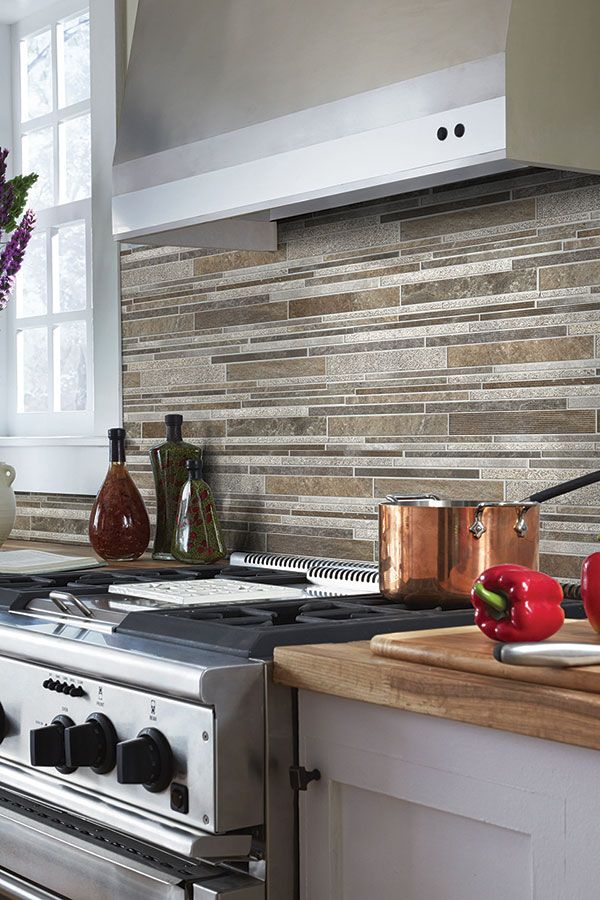 Do I need to say how difficult the repair will be? nine0003 Chimneys with waterproofing warm up more evenly in the process of heating the room, increase heat transfer, make the use of stoves safer, since condensate leaves with smoke. A properly arranged pipe on the roof promises the owner of the house a quiet life.
How to properly waterproof a pipe?
Today the market offers a variety of modern materials needed to seal the pipe on the roof:
- galvanized iron;
- metal corners; nine0003 - diffuse membranes;
- stone wool;
- bituminous mastics;
- sealants;
- Portland cement;
- liquid rubber and rubber paint.
Do not waterproof chimneys with silicone-based construction and household sealants, or fill joints with bitumen.
Tools needed for work:
- ruler;
- knife or scissors for cutting roll materials;
- paint brush;
- metal roller;
- chisel and hammer; nine0003 - screws or nails;
- work gloves.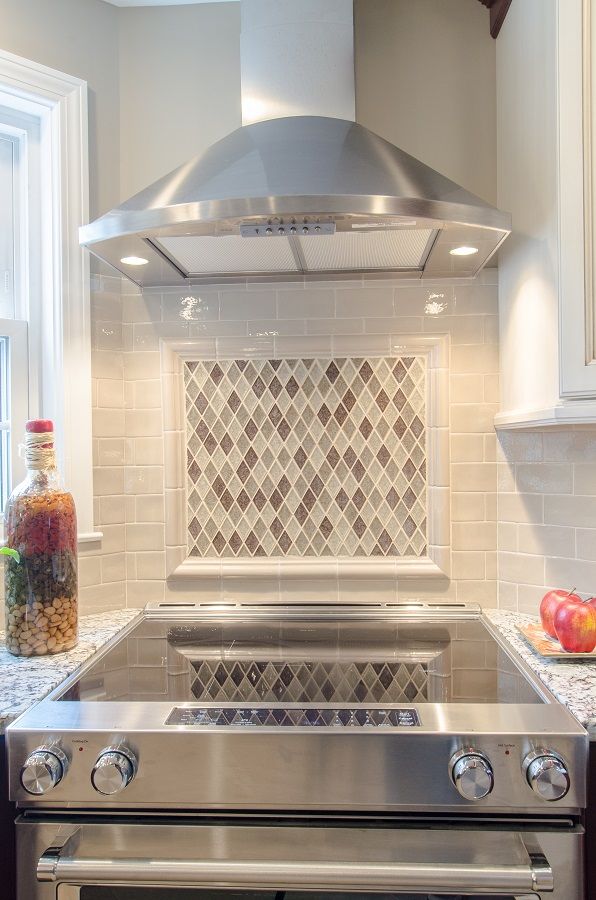
Sealing of the pipe is carried out in stages and is done in the following way:
First, the damaged area of the roof is carefully cut. Then a diffuse membrane is glued to the pipe with bituminous mastic. Before this, the pipe is primed for better adhesion to bitumen. Then the edges of the membrane must be wrapped up and glued with mastic. Now, if moisture gets on the membrane, it will not penetrate deep into the roof through such a device. nine0006
The method of insulating the chimney by welding is also suitable. The only disadvantage of welding is the need to cover the place of insulation for reliability with epoxy putty and paint. Special attention usually requires a place located above the chimney. You should not feel sorry for the sealant, then you will not have to make complex repairs.
The best option for waterproofing a chimney is to separate the area adjacent to the chimney from the rest of the roof by creating a separate box. It can be assembled from wooden beams and rafters.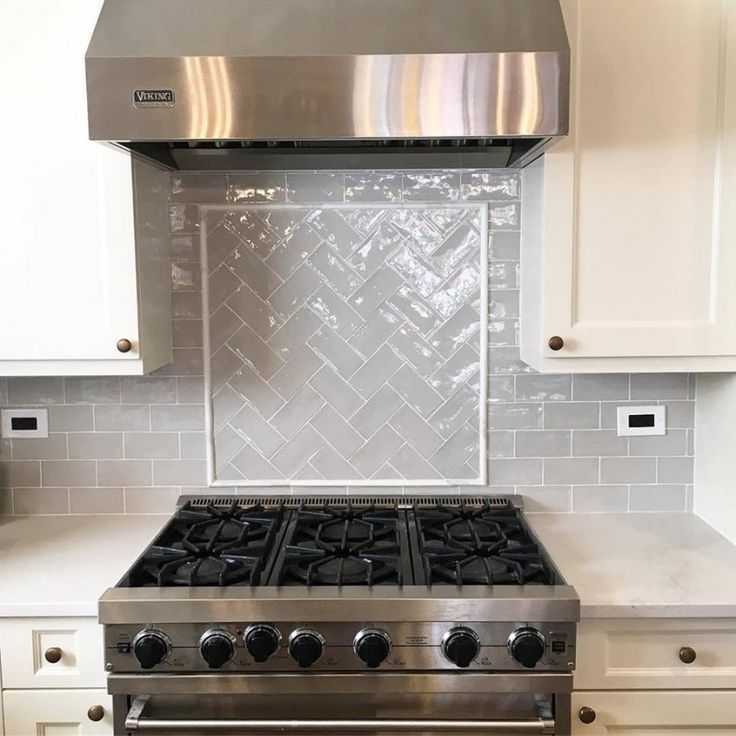 Be sure to observe the distance from the pipe to the walls of the box: it must be at least 15 cm. The area around the chimney, after cutting the place of leakage, must be filled with non-combustible thermal insulation (stone wool). Layers of roofing cake are brought to the chimney box in the traditional way. For maximum protection against moisture, the joints of the box and films are hermetically sealed with special adhesives, which guarantee a slow repair. Such a device is suitable for those who have a brick pipe on the roof. The insulation is excellent. nine0003 Manufacturers of chimneys and roofing equipment now offer homeowners who have a chimney on their roof a special device for round chimneys - the roof duct. This is a flat steel base sheet connected to a cap-shaped apron through which a round chimney is passed. It is correct not to fasten the device to the chimney "tightly" so that the structure is not damaged when the roof shrinks. A special steel collar (“skirt”) is put on the junction of the apron and the pipe and fixed with a heat-resistant gasket.
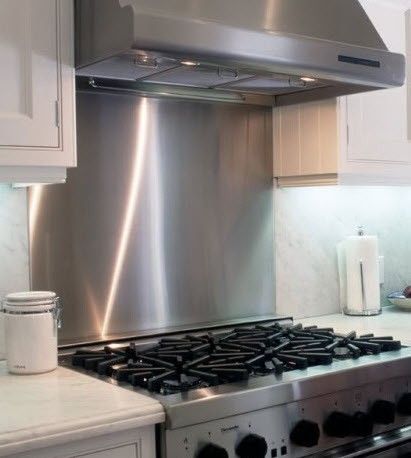 Through it, water does not get under the apron, the sealing is reliable, and the pipe on the roof does not cause trouble. nine0006
How to protect against leaks through joints?
It is clear that cutting and repairing a leaking roof is a troublesome and difficult process. Therefore, for a tight connection to the chimney of the roofing material, the craftsmen recommend making an internal apron. For this, the lower junction bars are used. Applying the bar to the pipe walls, mark the upper edge of the bar on the wall. A strobe is pierced along this line with a grinder. The installation of the inner apron starts from the bottom wall of the pipe. The edge of the apron is inserted into the gate and then mounted on the remaining walls with an overlap of 15 cm. The edge of the plank inserted into the gate is sealed. The lower abutment strips must be properly cut in place and secured with self-tapping screws. nine0003 After the bottom apron, it is very important to make the “tie” correctly - this is a flat sheet of waterproofing that is placed under the bottom element of the inner apron.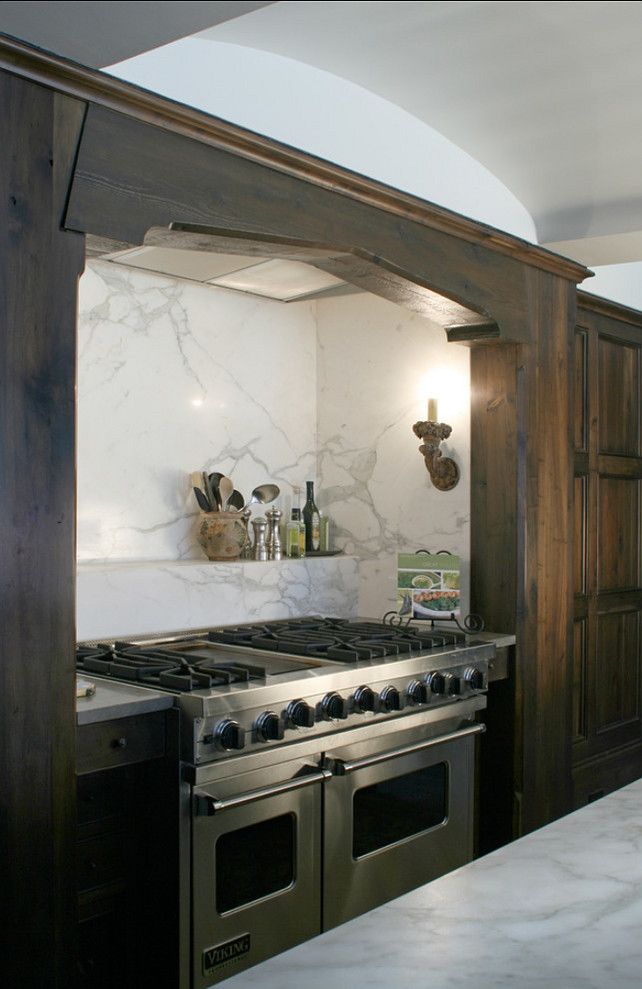 Water will flow through the tie, it must be installed in the downward direction to the roof eaves. Along the edge of the tie, it is usually advised to make a side.
The roofing material is then mounted on top of such a device. When the roof covering around the chimney is completed, you need to make an external decorative apron. Usually it is made from the upper adjoining strips and installed in the same way as the internal one. The only difference is that its upper edge is attached without a strobe, directly to the pipe wall. The correct device for waterproofing the pipe will allow you not to remember the word “repair” for many years, and the pipe on the roof will not become a headache. nine0006
For a free consultation with a specialist, you can contact the number +7 900 281-65-68
Passing a pipe through a roof made of metal tiles - consider the procedure for arranging a chimney passing through the roof
Contents:
- metal roof
- Recommended locations for chimneys
- Recommended chimney heights
- Exterior apron system at the junction
- Circummer of the chimney from the brick pipe, the device of the apron
- Passing of the chimney of the round and square section
- How the passage of steel tube workpiece is made through the roof
- The passage without a flush
- , how to conduct asbestos and sandwiches pipes through a roof covered with metal tiles require a very serious approach during installation.
- rectangular;
- square;
- round.
- waterproofing is cut in the form of an envelope;
- the extreme parts of the canvas are brought to the rafters and fixed to the building, which plays a supporting role, with brackets;
- then the waterproofing film is pressed by the bars included in the crate, and the vapor barrier layer is pressed by the base for installing the finishing material;
- in order to protect the insulation material as much as possible, the adjoining areas are glued with a special tape; nine0053
- at the end, the surface where the work was performed is covered with metal tiles.
- The passage element is laid on a tiled base and outlined. So the place where it will pass is determined.
- The metal tile is cut according to the applied marking.
- The rubber seal is fixed with self-tapping screws to the metal profile. Then it is carefully processed with silicone. nine0053
- The ventilation duct pass-through is fastened with a rubber seal and fastened with screws to the roof.
 Because a properly installed chimney pipe becomes the key to the safety of the entire structure. nine0006
 Arrangement of a chimney through a metal roof is calculated even when developing a heating system scheme. Most often, they try to make a chimney outlet in the ridge area. With this arrangement, the pipe will be led through the "warm zone", and thus the possibility of condensation is reduced.
The easiest way is when the exit passes through the ridge. In such a situation, the installation of the overlap of the junction node is greatly simplified. In addition, in winter, “pockets” of snow do not appear in such a design, and as a result, there are no leaks. nine0006
Another placement option is when the chimney structure is somewhat removed from the center of the roof. This happens due to the fact that stoves are built in any area of \u200b\u200bhousing, and it is easier to equip a chimney above them. During construction, it is important to properly equip and remove the connection between the ceiling and the chimney.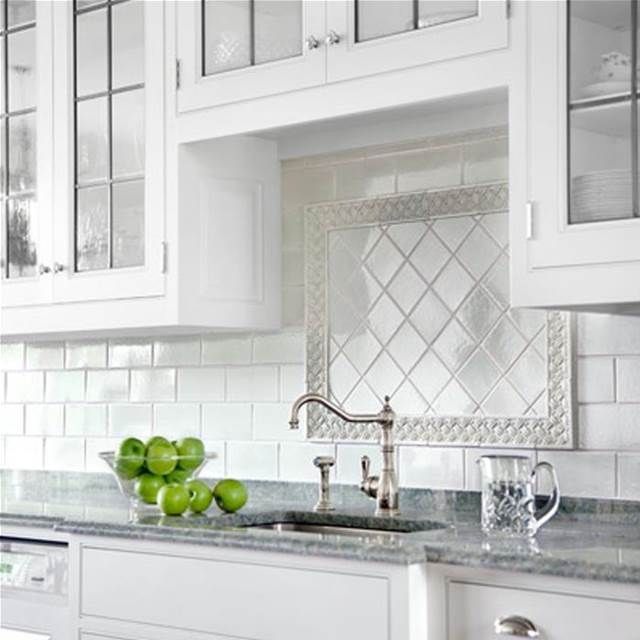
How to install a chimney through a metal roof
The biggest problems can arise when arranging a pipe through a insulated roof0087 . Because it consists of a certain number of layers of insulation, including roofing insulating material and roof battens.
Watch video: chimney bypass through metal tiles
Chimney bypass with metal tiles. LIFE.
Watch this video on YouTube
Experienced craftsmen advise in this situation to build a separate box around the circumference of the chimney passage through the ceiling. The main thing you need to know when performing this exit is to maintain the safety of the wooden structure on the roof. nine0006
The duct, passing through the ceiling, must be reliably protected from contact with the stove flue pipe. This is achieved through the use of mineral wool, which is based on basalt or fiberglass.
The building assembly for the passage of the chimney can be of various shapes. It depends on the type of material used in the construction of the passage through the ceiling. As a rule, the shape of the chimney on the roof is of the following types:
The first and second types are created during the construction of a building made of bricks and blocks. And through the use of metal products and cement, they create a passage for the chimney, which has a round shape.
Recommended locations for chimneys
The area where the chimney will pass through a metal roof should be determined at the initial stage of project development.
IMPORTANT! No need to bring it out through the valleys. In this case, there is no confidence in tightness in the area of adjacency with a roof covered with metal tiles. nine0006
In addition, in the indicated places on the roof, the largest amount of snow accumulates, which will put a high load on the joints themselves, which can destroy the integrity of the entire roof.
It is also irrational to draw a chimney near the windows of the premises - attics. This option is fraught with situations of high probability of smoke entering the rooms.
Watch video: chimney bypass through a metal roof
Chimney bypass on a slope. Adapter M28. Part 1. Installation of metal tiles. UNIKMA
Watch this video on YouTube
Experts recommend stopping at the exit of the chimney next to the ridge. In winter, a little snow collects in such a place. In this situation, it is not necessary to make the highest possible design, which minimizes the effect of precipitation.
Recommended height of the chimney
Whichever of the options for removing the pipe is chosen, you need to remember one very important rule. 9 must be placed on the chimney0044 protective umbrella .
The passage of a brick or other pipe through a flat roof is carried out under such a condition that the chimney cannot be lower than 0.
5 m.
If a brick or other pipe is located at a distance of 1.5 m, then during installation its height must exceed the height of the ridge by at least 0.5 m. When the distance to the ridge is in the range of 1.5 - 3 m, then the building is placed at the same height as the ridge. nine0006
In a situation where the distance from a brick or any other pipe is more than three meters, the height of the building is determined by a conditional line. It passes at an angle of 10 0 from the ridge run to the horizon.
External apron system at the junction area
Specialists highlight the junction of the chimney with the metal tile as a very important factor. To ensure the tightness necessary in this situation, an apron is built from the outside. Installation work begins to be carried out from the device of the internal apron. At the same time, they put a bar or steel sheet at the top and bottom and the same elements on the sides. nine0006
The plank below is applied to the walls and a line is drawn with a marker.
The remaining parts are also used as a template for subsequent marking. When the line along the perimeter is completed, proceed to the trick of the strobe. It is better to make them with a grinder, deepening by 15 cm.
In order not to break the tightness when adjoining the smoke exhaust structure to the metal tile ceiling, it is important to control that the strobes pass exactly at the place where the bricks are laid. nine0006
When installing the outer apron of the smoke exhaust structure through the soft roof, use a heat-resistant waterproofing protection. It is brought onto the pipe blank by 5 cm.
The cut itself is glued to the pipe product using construction tape. And the place where the pipe goes beyond the soft roof is wrapped with a film. For a reliable connection to a soft roof, it is recommended to use Ecobit.
Ventilation between the structure and the rafters is provided by an optimal distance between them. To prevent overheating of the brick chimney from the stove and to avoid cracking of the brick, the pipe is wrapped with a steel sheet that has a polymer coating.
For ventilation, a gap of 20 cm is made.
Brick chimney bypass, apron installation
Two problems need to be addressed in order to build a connection. The first is to transfer the water that flows from the slope, redirect it on both sides of the structure being erected. After that, it is released onto the slope under the building. The second is to prevent water from entering the housing, and direct the liquid that descends along the walls of the chimney to the roof.
To solve all this, you need to build a metal apron. He must stand on the surface of the roof and on the pipe (at a distance of 15 - 20 cm, towering above the plane). nine0006
Before starting work the chimney is plastered . After that, waterproofing protection is installed on its sides. From the side of the edge at the back, no more than 80 cm, a gutter is built into the waterproofing to drain water.
Before asbestos or other chimney pipes are led through the covered metal tile, a crate is installed and a bottom apron is installed on it. For this task, the left and right sheets are cut along the contour and then they are cut in width. At the same time, the length is maintained 5 cm from the place where the first wave begins, which will pass from above over the chimney in the house or in the bath. nine0006
Watch video: brick chimney - how to pass a metal roof
How to pass a brick chimney roof
Watch this video on YouTube
Lines are drawn on the sides of the side, which are located 15 cm above the surface of the roof. they are connected along the entire length of the circuit. According to this basting, strobes are made having a width of 2 mm.
The strobes should be driven out on the brick, not on the masonry. The place after treatment is cleaned of contamination and thoroughly washed with water. When it dries, the strobes are filled with a silicone-based sealant. nine0006
After preparing the junction bar and the necessary elements of the apron. Next, the extreme part of the plank is introduced into the sealant and attached to the metal tile by means of self-tapping screws.
Round and square chimney passage
The problem of how to properly route a round pipe through a metal tile is becoming quite relevant. If the round pipe blank is already equipped with insulation, then the roofing pie must be protected from fire.
If materials that are easily flammable are used when mounting through the ceiling, they must be at least 20 cm from the chimney. At the same time, a passage opening in the form of a wooden box is made. And the empty space is filled with heat-insulating material. nine0006
Equipping the passage channel for round tubular blanks, the following technological sequence is used:
How to make the passage of steel pipe blanks through the roof
Dealing with such a construction does not like to be rushed. The master who took up this business must clearly understand the features of each ceiling. For example, the passage of a brick structure through a wooden floor, as well as through any other, must be carried out without losing the integrity of the roof.
Otherwise, after the first rains, the roof will leak. It is also important to consider that the waterproofing of a steel chimney on a slate floor will not be the same as on a wooden floor and metal tiles. nine0006
How to make a pipe outlet on a metal profile/tile roof
Watch this video on YouTube
Single layer steel pipe gets very hot. Therefore, the ceiling opening, where wood is used for construction, must be equipped with a thermal insulation barrier or a special box. Thus, they act not only on a wooden floor, but also on any other.
Making a passage without fluffing
The chimney made of bricks is designed to protect combustible materials from overheating. The part of the structure, which is carried through the ceiling, becomes cutting, and has the name - "fluff". This element plays the role of the necessary thickening of the pipe walls, which protects against overheating. nine0006
Recently, expanded clay or vermiculite is used to pass a brick smoke outlet structure through the ceiling without fluff. These materials have good thermal insulation characteristics.
Plain sand is rarely used for this task. The whole problem lies in the fact that the sand has too fine a fraction and a large mass. For such a "fluffing" function, the thermal conductivity of this material is too high.
An easier and simpler solution to this problem is to use a box filled with heat-resistant basalt wool. When installing mineral wool, the building from the attic is equipped with free access to it.
nine0006
In cases where the building is brought to the second floor, the opening in the floor with insulation is covered with a sheet of metal.
Ventilation passage
Ventilation outlet to the roof is a prerequisite for construction. Equipped with a full-fledged ventilation system in the roof is the key to the use of housing for a long time. The circulated warm air from inside the room causes condensation to form on cold surfaces.
The conclusion from this is simple. Being under such influence, erected structures quickly lose their integrity. For this reason, forced ventilation is installed. nine0006
It is not difficult to buy ventilation of any type in building stores. It doesn't take a lot of time and effort to make a conclusion. This setup is carried out in this way.
How to lay asbestos and sandwich chimneys
In many situations, running a sandwich chimney to the roof through a metal tile becomes an excellent alternative to a brick chimney for a stove. This building is easy to install. Since the main elements are two branch pipes of different diameters, between which a heat-insulating layer of basalt wool is placed. nine0006
The removal of a passage for a sandwich building on a roof made of metal tiles can be carried out even by a person who does not have much building experience.
And the ease of installation in this case is complemented by excellent performance and a long service life.
Experts say that for the removal of combustible substances, a better option than a sandwich is difficult to find a pipe.