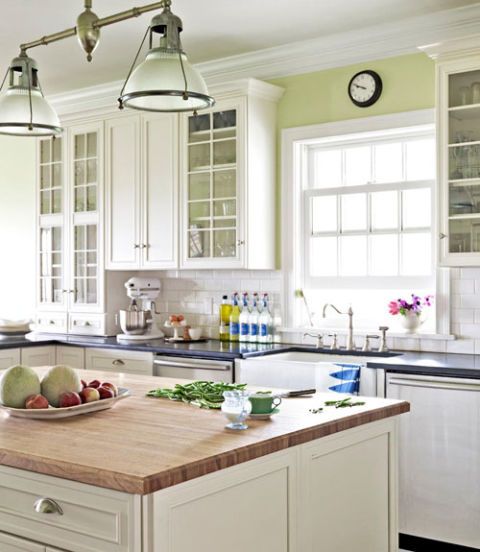
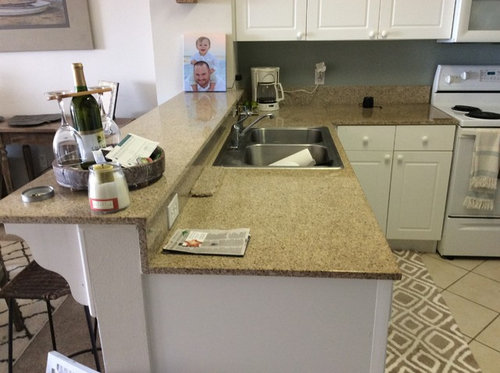
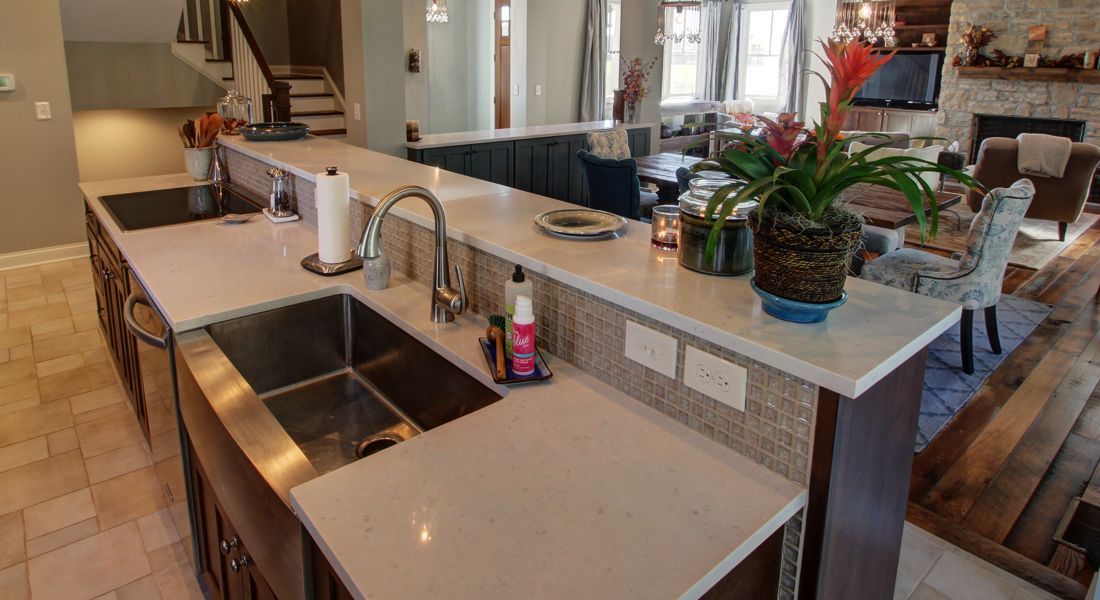
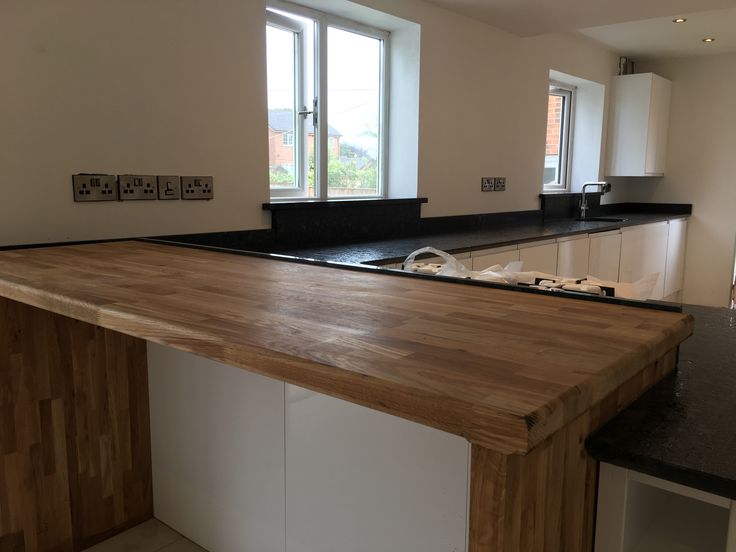
Adding breakfast bar to existing countertop
Breakfast bar ideas: 10 clever ways to add a bar area in your kitchen
Ideal Home Newsletter
The Home Of Great Ideas For More Than 100 Years
Thank you for signing up to . You will receive a verification email shortly.
There was a problem. Please refresh the page and try again.
By submitting your information you agree to the Terms & Conditions and Privacy Policy and are aged 16 or over.Our breakfast bar ideas are all about maximising the functionality of your kitchen. Of all the kitchen diner ideas out there, incorporating a breakfast bar is one of the best for flexible living. Perfect for enjoying a quick coffee break, lunch on the hop and easy family suppers. When entertaining, a breakfast bar can also double up as a buffet area to serve drinks and canapes.
A breakfast bar will take up less space than a dining table surrounded by chairs and can be used to boost the prep areas in your kitchen, too. Where to install a breakfast bar depends on your kitchen layout and how much space you have to spare.
One of the most popular kitchen island ideas is to add a breakfast bar. ‘Positioned away from the ‘working zone’ of the island, a breakfast bar allows friends and family to comfortably socialise with the hosts, without getting in the way when cooking is in full flow,’ says Richard Moore, Design Director, Martin Moore.
Breakfast Bar Ideas
Before you get carried away with Insta-worthy breakfast bar ideas, decide how many stools you would like to accommodate. If you’re just seeking a quiet spot to check Socials, then a single stool tucked in a corner is ideal. But if you want to enjoy breakfast together as a family, each member will need a seat.
Allow at least 50cm width per stool, plus about 15cm either side for easy access. ‘Don’t forget to consider how much space the stools will take up in the room when in use,’ adds George Forsyth, Director, Drew Forsyth & Co. ‘You’ll need to allow sufficient space behind seated guests for others to pass by without getting stuck!’
1.
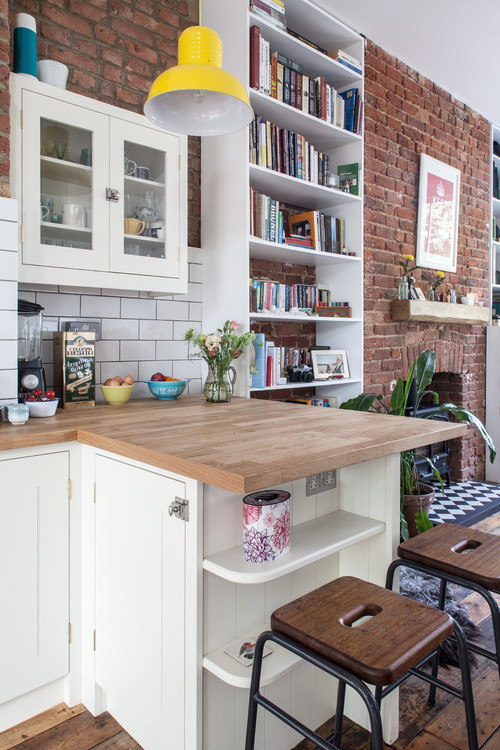
 Tuck a breakfast bar into the corner
(Image credit: Future PLC)
If you don’t have an island or other kitchen surface to spare, consider building a standalone breakfast bar in a quiet corner away from any busy entrance or exit routes. Bring it away from the corner to accommodate extra stools and create a more sociable experience without sitting with your back to the room.
Make it super functional with storage above and below for breakfast supplies and tableware. Using the same worktop as the kitchen will achieve a sense of cohesion and prove practical in terms of easy cleaning and stain resistance.
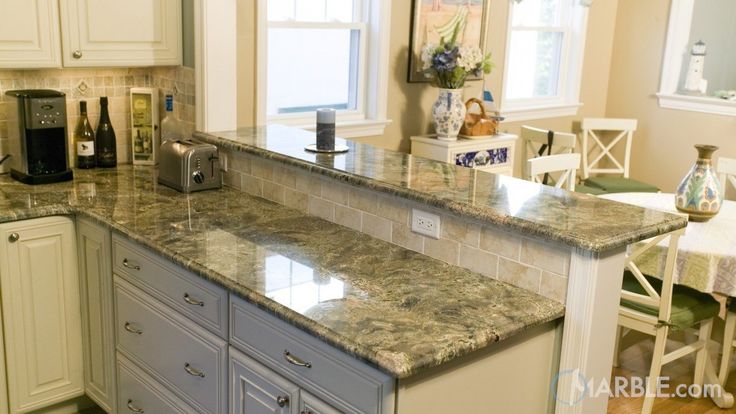
2. Raise the bar
(Image credit: Future PLC)
High-level breakfast bars have a host of benefits. In terms of design, it enables a switch in surface materials that can create a striking feature and allows something a little more forgiving to rest your arms on than cold stone or quartz.
From a safety point, a raised bar can provide a level of protection from hot oil splashes if there’s a hob on the island and keeps children away from sharp knives when you’re prepping.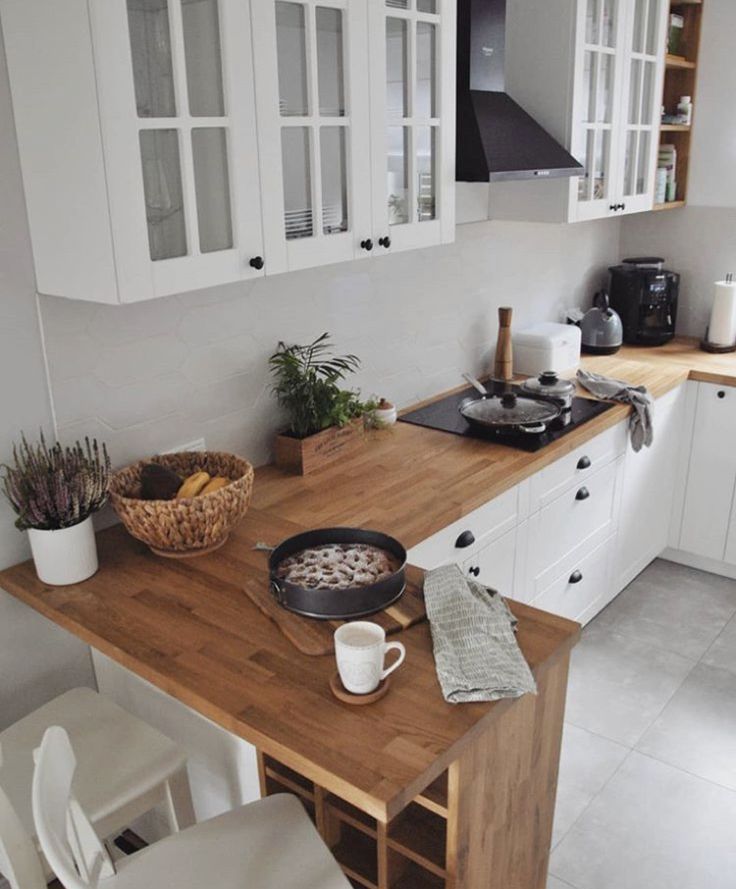 Don’t be tempted to go too high though, ideally no more than 106cm/42in, or you’ll struggle to source stools that are tall enough to sit comfortably.
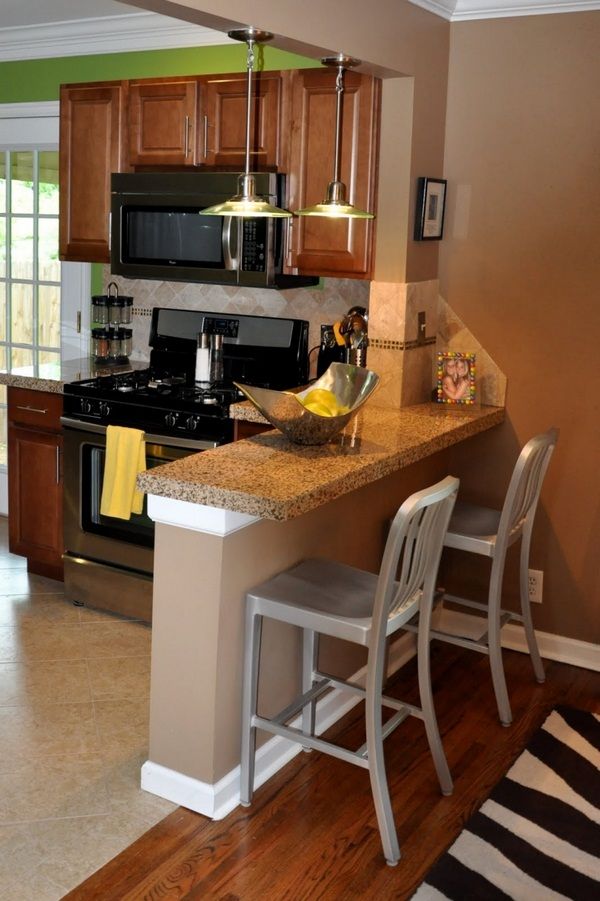
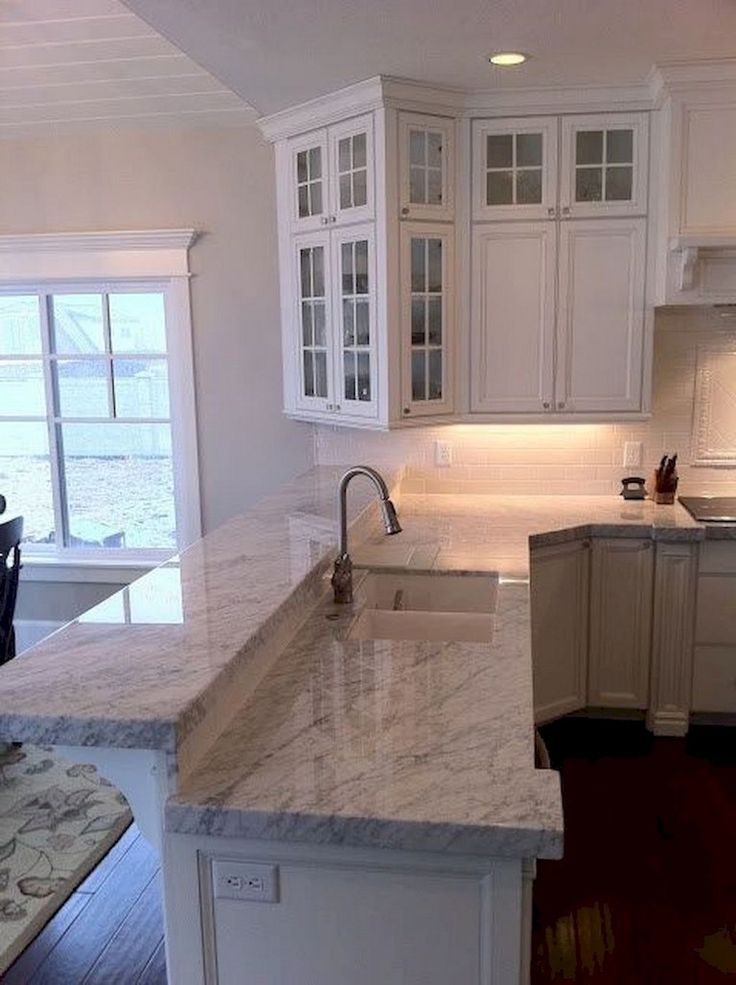
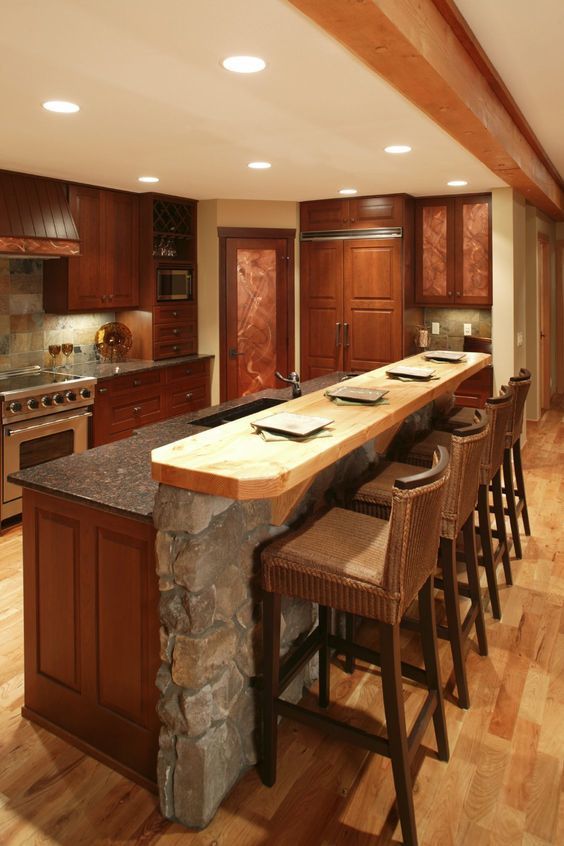
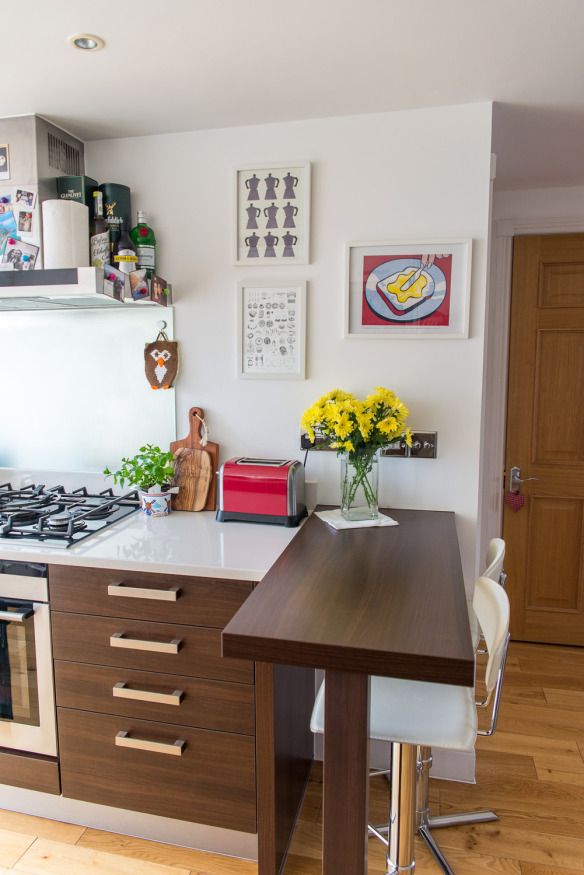
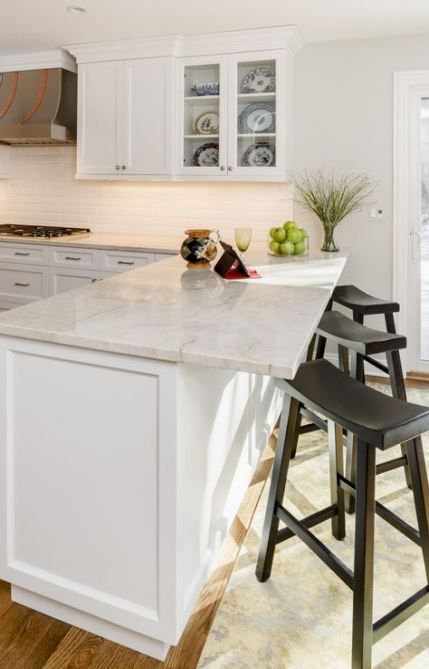
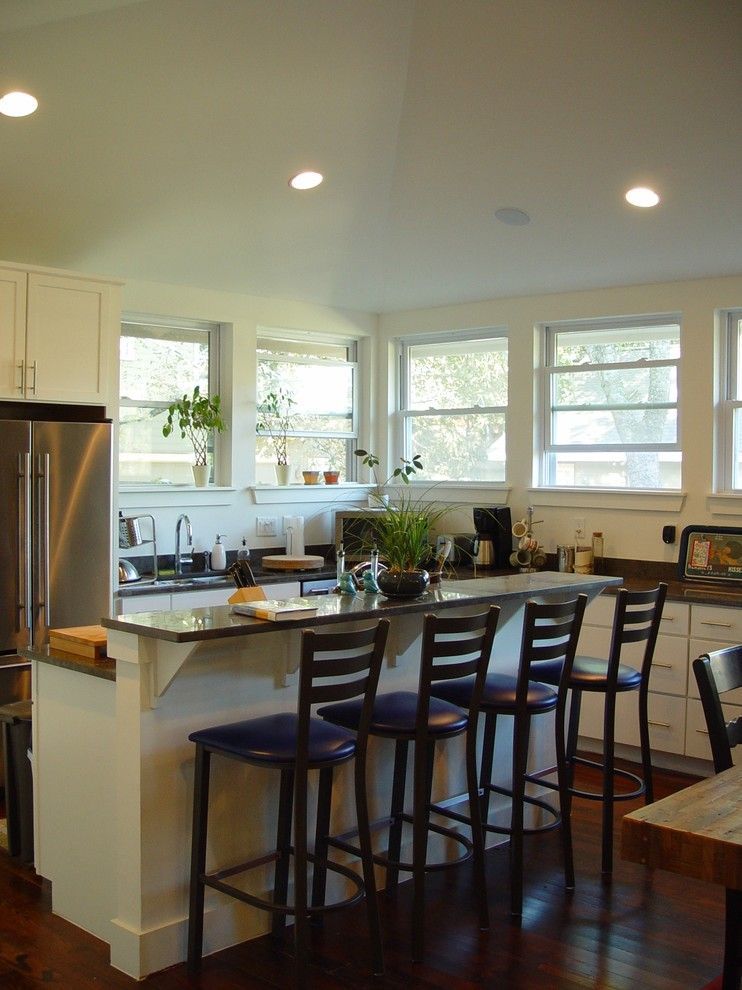
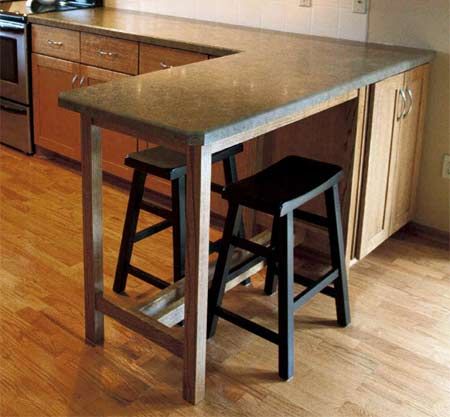
3. Add a simple island overhang
(Image credit: Future PLC)
In smaller kitchen one of the simplest ways to add bar-style seating is to overhang the worktop on the front or ends of an island. If you’re overhanging worktop without any additional corner supports, don’t go deeper than 30cm/12in to avoid load-bearing issues when guests inevitably lean on the bar.
Two or three standard 60cm/24in base units with a 90cm/35in-deep worktop above is an easy, off-the-shelf solution that won’t break the bank. Choose backless bar stools that can be tucked underneath when not in use.
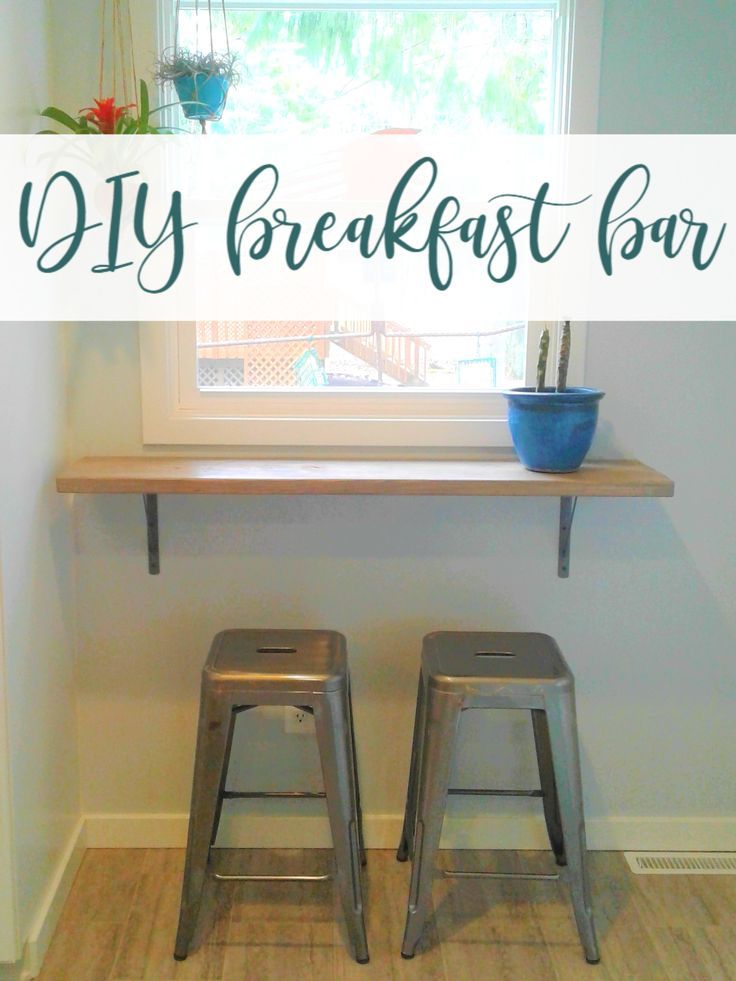
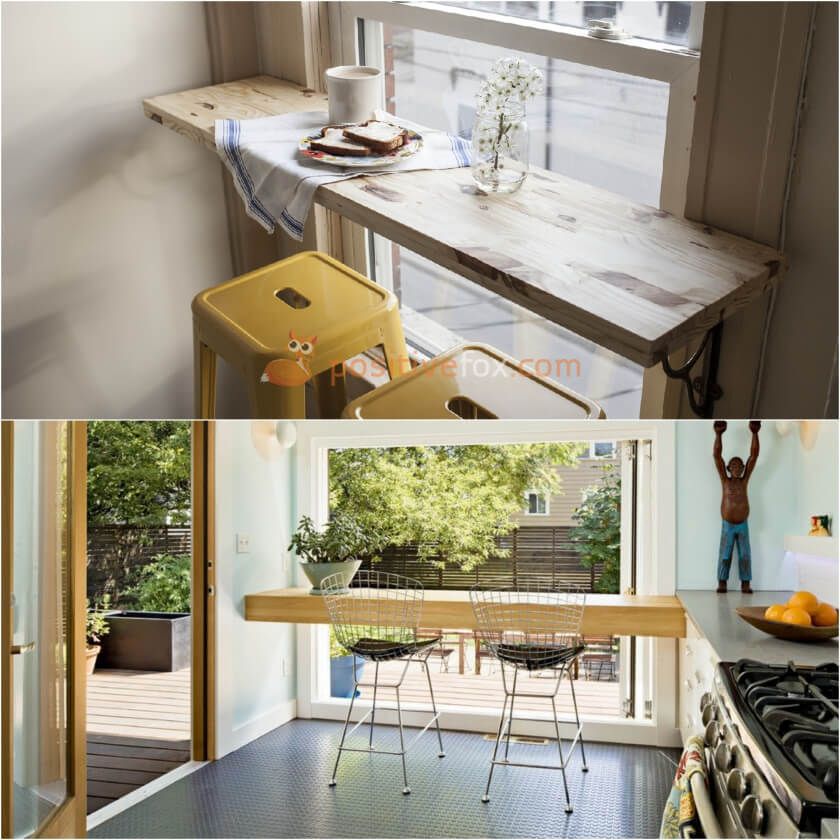
4. Work with a wall-mounted breakfast bar
(Image credit: Dunelm)
No island? No problem. A section of kitchen worktop installed shelf-style at the end of a run of units can provide a quiet spot for your morning coffee.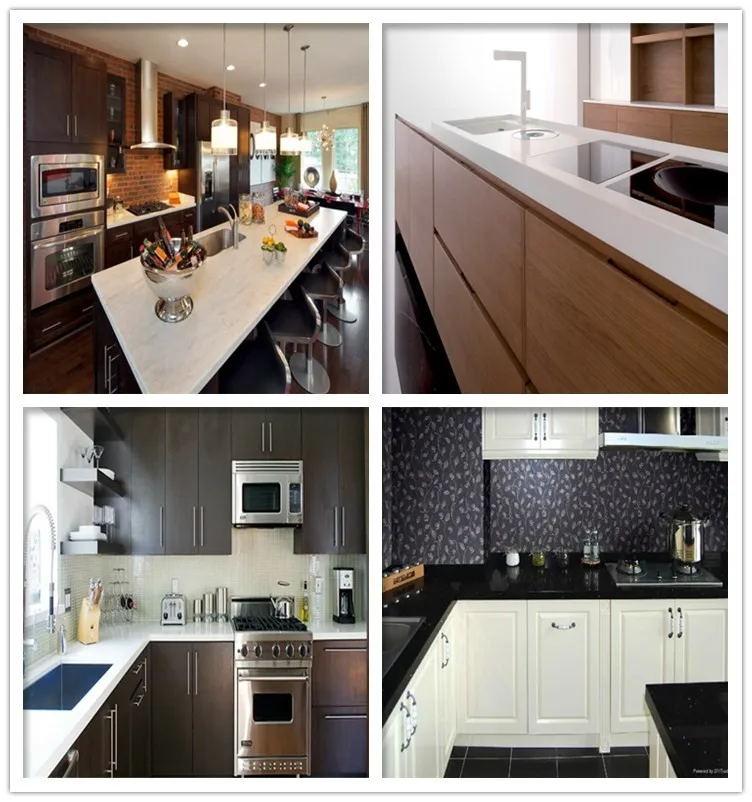 Yes, you will have your back to the room, but that’s not always a bad thing, especially if you’re busy at a laptop or children are beavering over their homework.
Be as generous as possible with space so the area doesn’t feel compromised or cramped. Aim for at least 1m-width of worktop for two stools, 1.5m for three if possible.
(Image credit: Future PLC)
Use benches instead of bar stools to accommodate more guests – perfect for children’s parties, and it looks great, too. This chic design idea requires a lower-level breakfast bar for ease when it comes to getting on and off the benches as those sat in the middle will need to slide along.
Add cushions and faux fur to boost comfort levels and create a cosy Scandi-inspired look. Make sure the benches you buy are solidly built and heavy, so they won’t tip backwards when loaded up with kids!
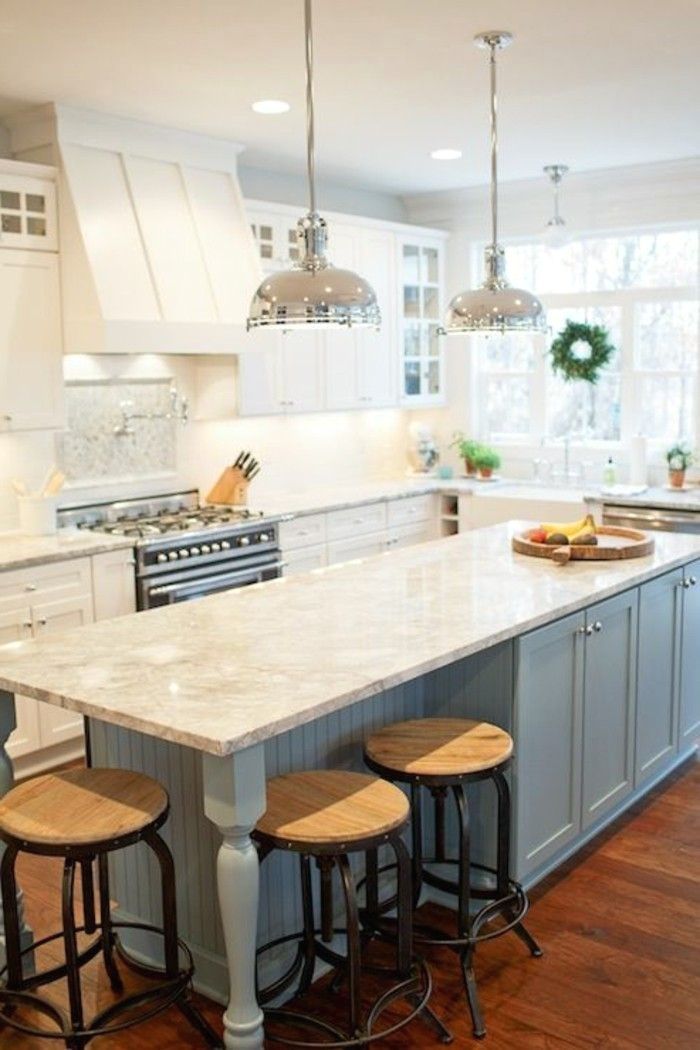
6. Impress with a floating bar
(Image credit: Woodstock Furniture/Nichola Yarsley)
A cantilevered breakfast bar is hard to beat on the wow-factor front.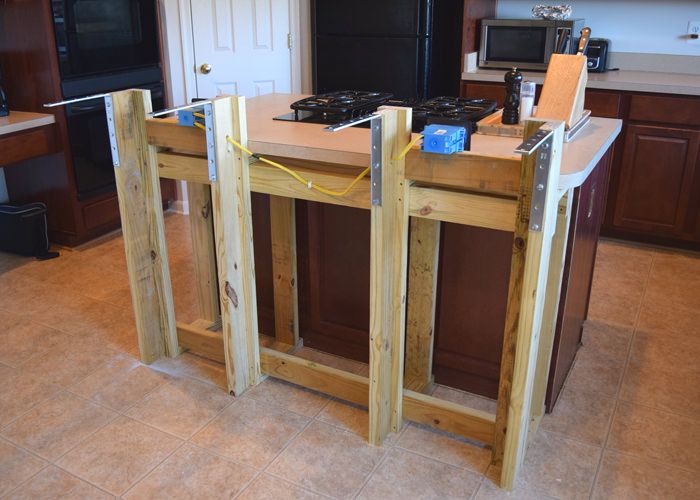 This structural bar also offers plenty of leg space beneath for seating comfort.
‘A floating breakfast bar requires careful engineering for stability – usually a steel frame is concealed under the worktop and bolted to the floor under the island,’ explains Andrew Hall, Director, Woodstock Furniture . ‘But the results are well worth it. Not only is it guaranteed to impress, but it also leaves more flooring visible, which boosts the sense of space.’
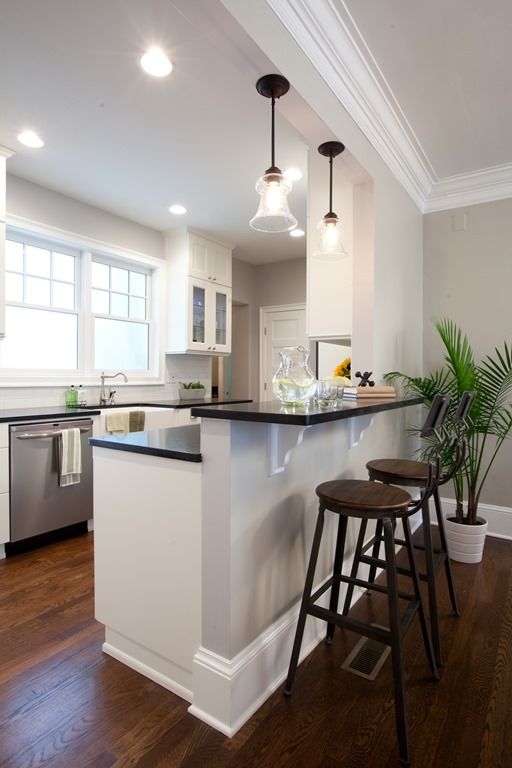
7. Consider stools on two sides
(Image credit: Future PLC)
A linear line of bar stools may be one of the most popular breakfast bar ideas for an island but it’s not the most sociable way to sit. If you’d prefer to make eye-contact while quaffing that wine, go for an L-shape configuration.
Containing the breakfast bar in one corner of an island will also leave more worktop space clear, leaving room for a generous hob. Use lighting to define the bar area – a low slung pendant on a separate light switch will illuminate the bar by night, while throwing the rest of the kitchen into darkness.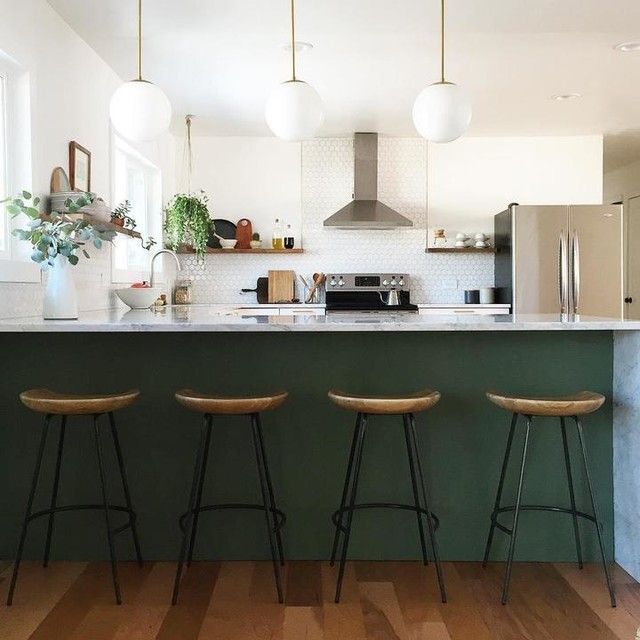
8. Drop a breakfast bar down to dining level
(Image credit: Future PLC)
Perching on a bar stool is no problem for short periods, such as a quick lunch stop or coffee break, but if you’re lingering for longer dining chairs are undoubtedly comfier. Go for chairs with cushioned seating and high backs for maximum support.
Dropping a breakfast bar down to dining height (76cm/30in) will also provide a small splashback area to install electrical sockets – perfect for plugging in a laptop or charging devices when working from home.
9. Save space with a slimline bar
(Image credit: Future PLC/Chris Snook)
Experts recommend leaving a walkway of at least 90cm-1m wide around an island or dining table to prevent obstructing the flow of movement when cooking. One of the advantages of a breakfast bar is it can be made much narrower, without effecting functionality.
‘Freestanding breakfast bars take up much less space than dining tables or islands, particularly when styled with stools that will be tucked underneath,’ says Melissa Klink, Head of Design, Harvey Jones .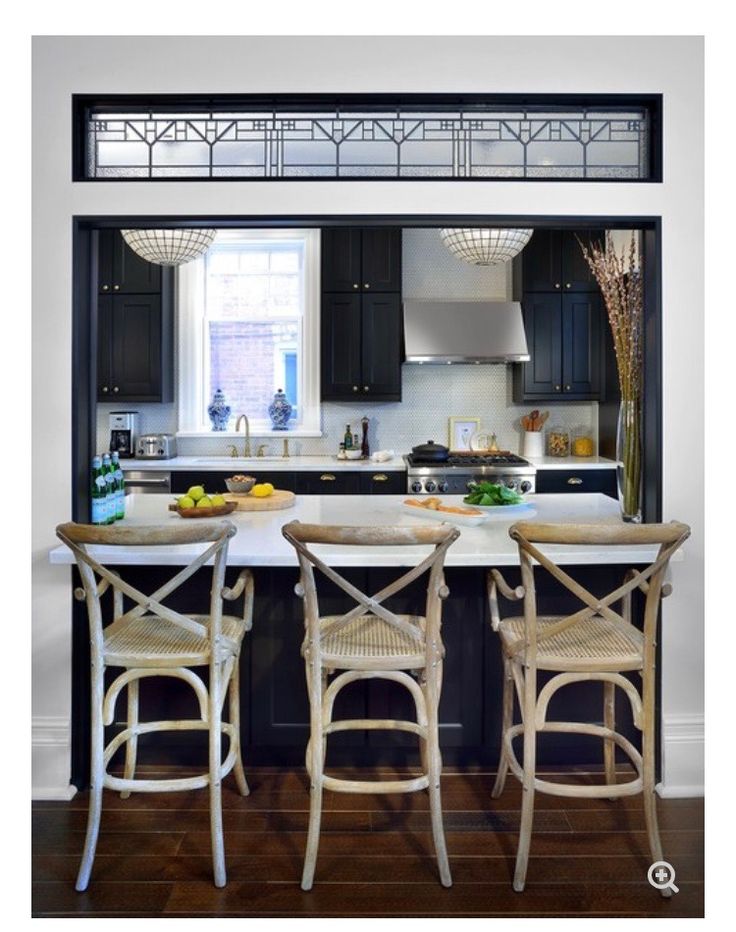 ‘Before investing in a breakfast bar, make sure you choose the right size for your space. A small breakfast bar will look out of place in a large room and vice versa.’
10. Take a decorative approach
(Image credit: The Main Company)
The empty void beneath a breakfast bar is ripe for an injection of colour and pattern. As the surface often comes under fire from flailing feet, especially those of small children, choosing finishes that are scuff-resistant and easy to clean.
Patterned tiles can look particularly striking and can be matched to a kitchen splashback idea for a coordinated scheme. We also love metal cladding like aged bronze or copper sheets, which can be made-to-measure and attached using adhesive.
What is a breakfast bar?
A breakfast bar is essentially a casual spot to pull up a stool in your kitchen. It can run the full length of an island, complete with four-to-six stools, or be little more than a shelf in the corner, or a short overhang at one end of an island.
‘A breakfast bar is a great way to get more out of your kitchen,’ says Graeme Smith, Head of Retail and Commercial Design at Life Kitchens . ‘Breakfast bars keep everyone socially connected in the space and can make it easy for hosts to cook away while guests chat.’ In more recent years, breakfast bar ideas for kitchen life include another place to work from home – one where you’ll never be too far from the coffee machine!
What should you consider when planning a breakfast bar?
Location is likely to be your first consideration. Some layouts, for example one with an island or peninsula, lend themselves more readily to a breakfast bar. The keys thing to think about location-wise is whether there is enough space behind the breakfast bar for people to pass by – allow at least 60cm, but ideally 90cm. It should never cause an obstruction.
‘In terms of materials, any surface used for a breakfast bar should be easy to wipe clean, durable and ideally resistant to scratches and stains too,’ says Simon Boocock, Managing Director, CRL Stone . 'Quartz and stones are very low maintenance but can be unforgiving on glassware, not to mention cold on your arms. Switching from quartz on your main kitchen surfaces to a warmer surface like wood for the breakfast bar is a great solution.'
What height should a breakfast bar be?
There are no set rules on what height a breakfast bar should be, but you’ll make stool shopping easier if you plan the height according to the dimensions of the two most popular stool options, which are counter stools or bar stools.
A counter stool, sometimes called kitchen stool, is aimed at breakfast bars that sit at standard kitchen worktop height. This is around 90-95cm/35-37in from the floor, with the stools ranging from 60-75cm/24-30in high (to seat height).
A bar stool is aimed at higher breakfast bars, be that a standalone bar or a raised section on an island or peninsula unit. If this is your preference, go for a height of about 100-106cm/39-42in, and buy bar stools with a seat height of 75cm/30in or above. You can take the stress out of bar stool shopping by choosing a height adjustable design that can be made higher for children and lower for adults.
Linda Clayton is a professionally trained journalist, and has specialised in product design, interiors and fitness for more than two decades. Linda has written for a wide range of publications, from the Daily Telegraph and Guardian to Homes & Gardens and Livingetc. She has been freelancing for Ideal Home Magazine since 2008, covering design trends, home makeovers, product reviews and much more.
How to Build a Breakfast Bar
Every kitchen needs a little perch where you can sip your morning cuppa and scan the headlines before heading out the door each morning—or where the kids can munch on cookies after school or do their homework while a parent prepares supper. If you crave that extra space in your kitchen, here are a few DIY breakfast bar styles for you to choose from.
Measurements and Choosing Your Bar TopBefore you start constructing anything, consider a few details.
The average bar height is 42 inches tall. You want to keep your bar between 36-42 inches or else your barstools won’t fit under comfortably.
Whether you want your bar built extending out from a wall, to create a division between spaces—or along an empty wall as a shelf—you need to leave an adequate passageway. Forty-two inches is the magic number, here, too. Remember, even if you have enough room to walk, you may need to fit appliances, furniture, or even a wheelchair through the space at one point or another.
Before deciding where to build your bar, find the studs in the wall. You want to mount the bar on at least two studs, which are spaced 16 inches apart behind the drywall. Use a stud finder to locate them, then measure out where the bar will go.
How Deep Should a Bar Top Be?Pretty much any solid surface, at least 24 inches deep, could make a beautiful bar top. Consider a solid piece of hardwood, cut straight or with its natural live edge. Or, purchase a solid surface countertop like Corian, use ¾-inch plywood, or something salvaged like an old door. Once you choose your top, cut it to size and finish as desired before making the base.
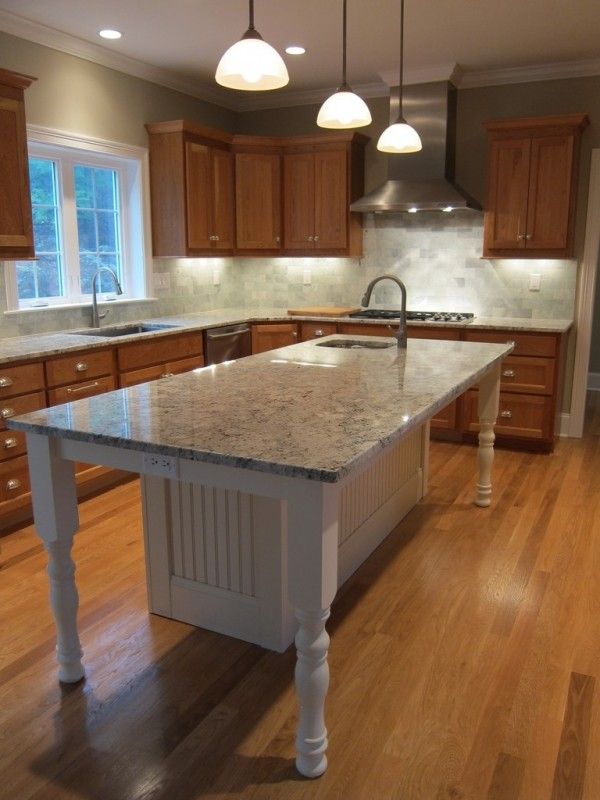
This style extends out from a wall, supported by a pedestal at the other end. Homeowners often choose this style to provide a division between the kitchen and family room. For the pedestal, you can purchase a 5-by-5-inch pre-made wooden beam, or use a salvaged porch pillar or an old barn beam.
- First, create a support system using the 2x6 pieces by screwing them together to form an I shape. You’ll mount one end of the I to the wall and secure the other end to the pedestal. Paint, stain, or finish to match the top.
- Once you have the base support finished, mark a small line 42 inches from the floor at each stud you chose in your supporting wall. Use your level to make sure they’re even. Also, make a center mark on the side of the pedestal that will face the wall.
- With someone assisting you to hold the base in place, use your drill to secure one end to the wall with two screws, one above the other, on each side of the central piece.
- Next, screw the other end of the base to your pedestal, lining up the center mark you made with the center board.
- Run a bead of construction adhesive along the top edge of your base. Lay the bar top in place, centered.
- Once it’s where you want it, screw in place from the underside.
If you don’t have the room for a bar to extend out into the room, a shelf along the wall makes a nice place to eat your morning toast. For this style, you only need the bar top of your choice and a few shelf brackets or architectural corbels. If your bar is over 4 feet long, use more than two.
- Find the studs in your wall using a stud finder and mark lines 42 inches up from the floor. Use your level to make sure they’re even.

- Screw your shelf brackets or corbels to the wall at those marks.
- Lay the bar top, centering it over the brackets, and screw in place.
If you already have a kitchen island, adding a breakfast bar is easier than you think. Simply buy and install a new countertop for the island that is a few feet larger on one side to create an overhang. If you can’t match the old counter you’re removing, never fear. Just opt for another color or material that coordinates equally well with the room
Other Breakfast Bar OptionsIf you’re not the handy type, or you want something temporary, consider purchasing a ready-made island on wheels. Here are some ideas to whet your appetite: a kitchen center and breakfast bar, and a breakfast bar on wheels.
Once you have your breakfast bar in place, pop some cookies in the oven so you have something to savor while trying it out.
Recommended Tools:
Tools & Materials
-
Saw
-
Drill
-
Pencil
-
Tape
-
Level
Installing a bar counter in a wooden kitchen: do-it-yourself video tutorials
Arranging the kitchen space, especially if it is small, requires the use of certain design tricks.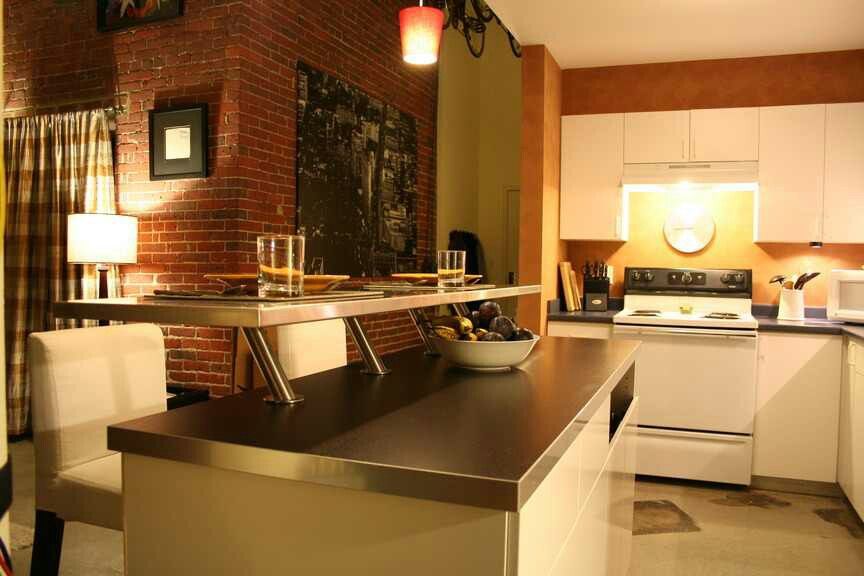 For example, in many cases, the installation of a bar counter saves. Moreover, this element of the interior can not only be used instead of the kitchen table, but also in addition to it, if the area of \u200b\u200bthe room allows it. The attractiveness of this solution is that the bar counter can be made by hand. And there are enough various materials with videos and photos on the Web, how it might look. By the way, this is a good way to choose a great option for your kitchen, and then copy it.
We will consider everything in order, where to start and how to do it. The advantages of the “do-it-yourself” process is that you need to spend less, and the admiration for the result will be much higher than when buying a ready-made version and installing it by specialists.
Materials
There are a huge number of materials suitable for making a bar counter today. It can be metal, laminate, wood, plastic, drywall. You can even use marble imitation material or special glass.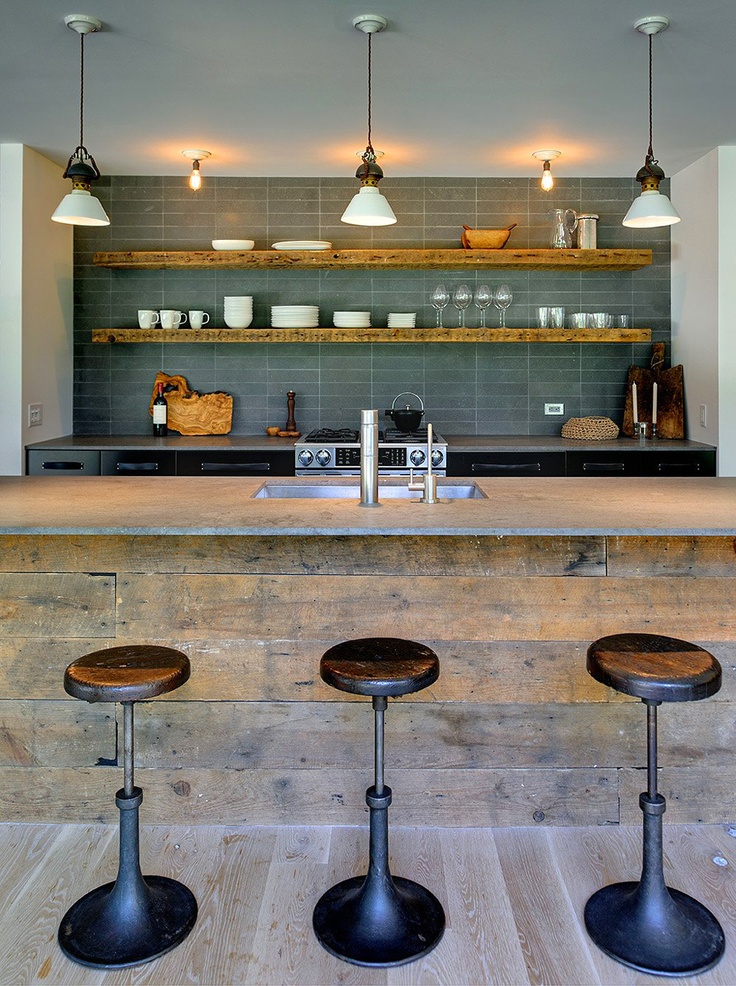 However, the choice must be matched with the existing or planned design, so that the material, color and shape of the bar counter matches the materials and colors of the kitchen furniture. Then you get a harmonious and stylish option.
Very often, for such reasons, a rack shelf is chosen in the form of a table top, which was used to make furniture. You can add a rack with shelves, cornices, original lighting and other elements. At the same time, a bar counter decorated with your own hands will look beautiful. It is not difficult to do this, it is enough to show ingenuity and turn on your imagination. Moreover, you have the Internet at your fingertips, where you can always find options with a photo.
Ideas and implementation
In general, conditionally all options can be grouped into two types of bar counters: with and without a frame.
Frame version
Often a plasterboard structure can be used as a frame. This will require a profile, self-tapping screws, dowels, drywall itself, as well as a screwdriver and a puncher.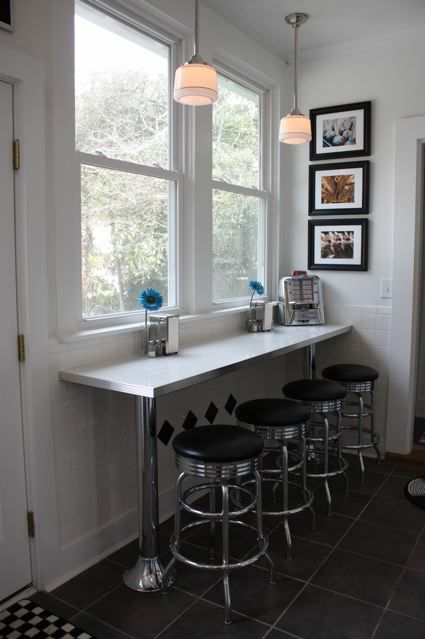 Instead of the last two tools, you can use an impact drill with adjustable speed. Due to the profiles and their fastening to the walls and floor, a stand is made. The fastening step is 30-40 cm. Later, transverse guides are installed to improve the rigidity and reliability of the structure. They need to be secured with screws. After that, the drywall is cut in place and screwed to the profile frame also with the help of self-tapping screws, but more elongated.
On top of the resulting structure (its width and height is determined - as it will be convenient) you can install a sheet, for example, made of wood, which will play the role of a rack. You can supplement the design with a metal pole, on which it is convenient to install shelves for placing fruits or any other items.
Despite the apparent complexity of this option, it can be done quite quickly and easily. The main thing is to draw in advance what you want to get in the end, indicating the dimensions. Then there will be no problems.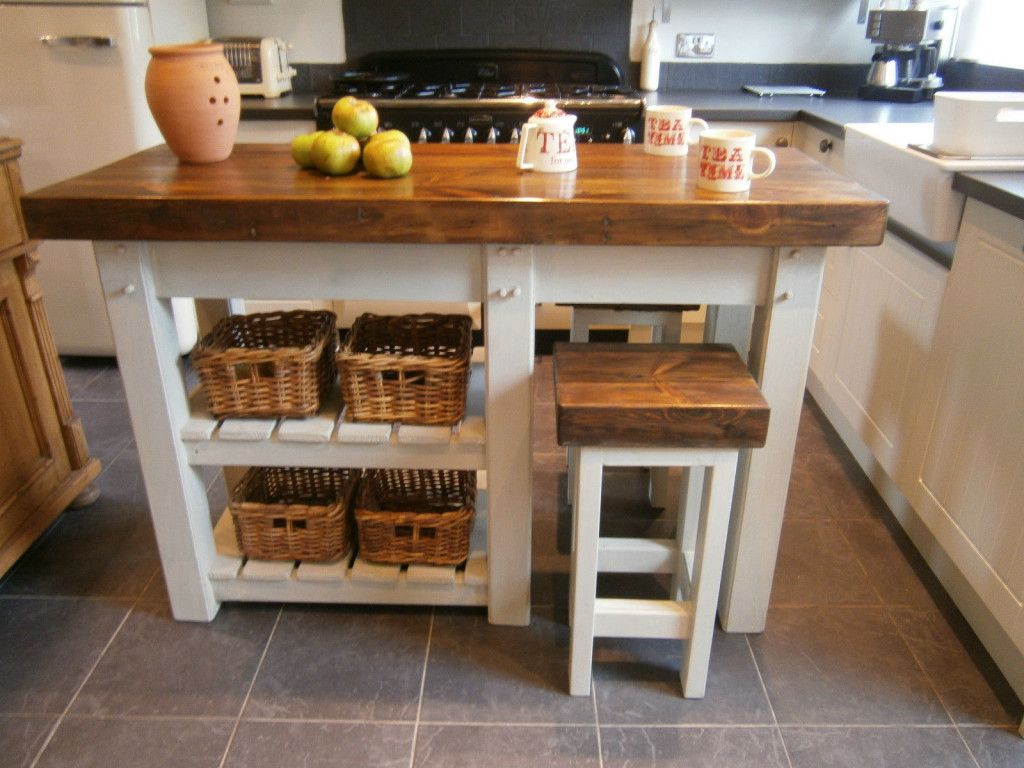
Version without frame
There is also a simpler version of the implementation of the bar counter in the kitchen. To do this, take a countertop or a sheet of wood, maybe plastic. One end is fixed to the wall (most often near kitchen furniture), and the other is installed and held by a metal pole.
So, you need material for the bar counter. The choice depends on the kitchen furniture - everything should be in harmony. It is desirable to make an additional shelf under the ceiling. It will be possible to install lamps in it. And such a design will look more profitable.
We select the required length of a metal pole with the necessary fastening. As a rule, you can buy it from bar equipment sellers. We drill a hole in the selected material that corresponds to the outer diameter of the pole. Next, we fix the pole and the tabletop, determining the required height. Do not forget that it must be correlated with the height of the chairs that will be used.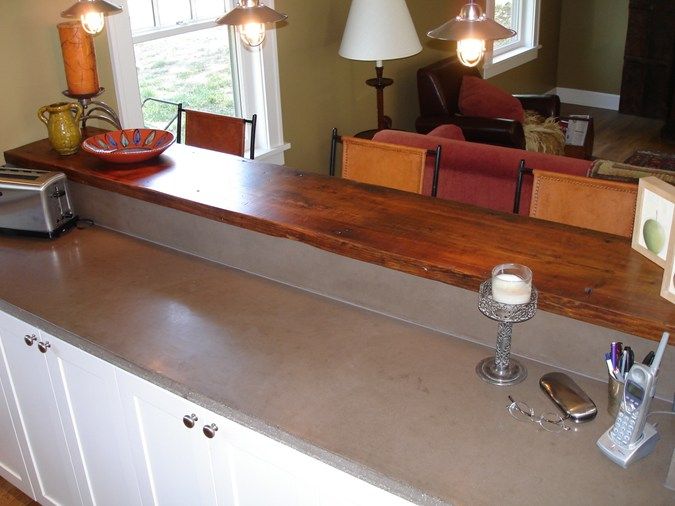
After that, it remains only to fix the second end of the canvas on the wall. It is easier to do this with the help of a corner, one side of which is facing the wall, the other - to the canvas. We fix with self-tapping screws (dowels are required for the wall).
The joint between the leaf and the wall from above can be covered with a skirting board or a plastic corner.
If the distance from the top shelf to the ceiling allows, the luminaires can be connected and installed on site. Otherwise, you will have to do everything in advance. Do not forget that it is better to make the lighting for the bar counter separate - a personal switch.
Recommendations
It is better to make the corners of the stand rounded, this will save you and your children from unwanted injuries. In addition, in a small space you can feel more comfortable in this case.
You can decorate and arrange objects as you like, the main thing is that it is both convenient and beautiful.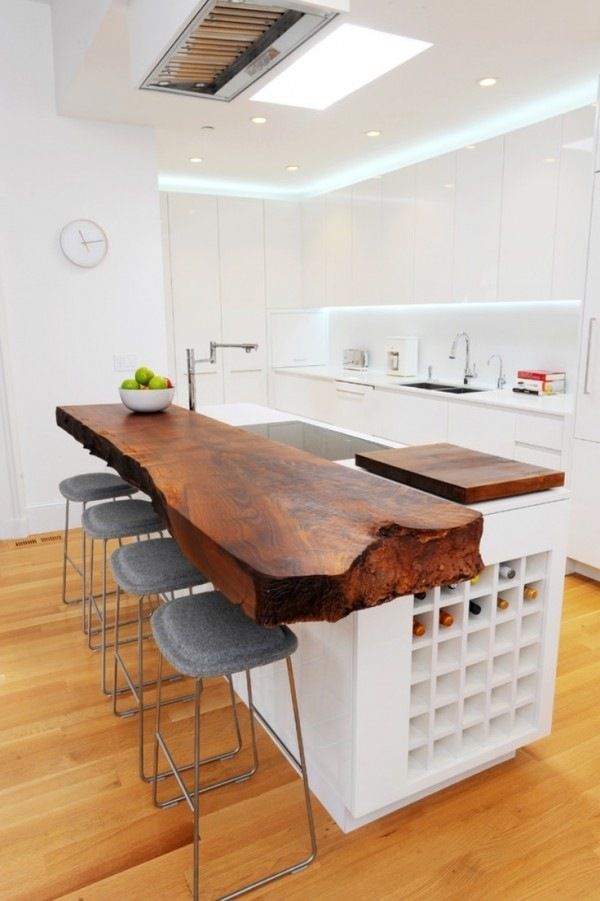
It is a simple task to make such a structure with your own hands with modern possibilities. In this case, the rack can be made of wood, plastic and other materials. It is only important to think over everything so that the use is convenient and practical.
Bar counter options in the kitchen
Contents
- Organization of the kitchen space with a bar counter
- Types of kitchen bar counters
- Design solutions for kitchen bar counters
- Variety of interior with kitchen bar counter
- Bar counter as a boundary between the kitchen and the room
- Types of bar counters
- Pros and cons of placing a bar in the kitchen
- Bar counter application solutions
- Kitchen space with breakfast bar
- Compact kitchens with breakfast bars
The bar counter is still considered a non-standard structure for the kitchen, so it is quite rare in urban interiors. This is largely due to the small size of most Russian kitchens - the bar counter simply does not fit into the available space. Modern bar counters are available in many variations, among which you can find a model for both spacious and compact kitchens. The bar counter gives the interior a modern look and will suit any kitchen style. It is ideal for a quiet morning coffee and an evening glass of wine.
Organization of the kitchen space with a breakfast bar
Need to understand whether the bar is a necessity for the kitchen interior or just a fashionable accent? The bar counter in the kitchen space is quite functional:
- it can be equipped as a dining area, which makes it possible to use the kitchen space wisely;
- sufficient height of the rack allows you to improve the process of cooking, for example, there is no need to bend over to a low cutting table and strain your back;
- bar counter is very ergonomic - when necessary, it can be unfolded and used as an additional work area; when assembled, it saves a lot of space.
Thus, the bar counter is not just a tribute to fashion. It is an extremely functional piece of furniture. If the kitchen space allows, installing a breakfast bar is undoubtedly a smart decision.
Features of placing a bar counter
There are a number of ways to organize a kitchen space with a bar counter installed in it. The most popular of them is the traditional bar counter, which is made in the form of a work surface made of chipboard, acrylic stone or wood and is located on consoles or on the legs of kitchen units. The ideal dimensions of a traditional bar counter: height - 105-115cm from the floor, length for 1 person - 50-65cm. Please note that this type of bar counter requires chairs, stools or armchairs of suitable height. For the rational disclosure of all the functions of the kitchen bar counter, it must be decorated with traditional bar accessories: roof rails, coasters for glasses, and so on. The coffee machine or juicer standing on it will be harmoniously combined with the bar counter system.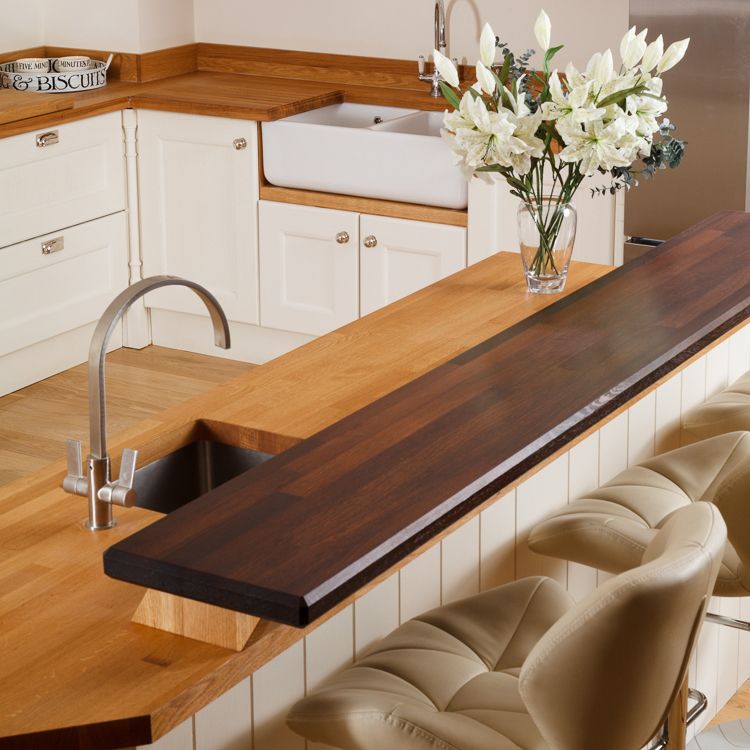 Cons of a traditional bar counter:
- significant cost;
- design takes up a lot of kitchen space.
If these disadvantages are not significant in your case, you can install a similar rack without any doubt. For a compact kitchen, a small-sized bar counter connected to the worktop will be appropriate:
- It can be used both as a cutting and dining area. She will perform the appointment of a bar counter during any celebrations.
- Such a rack should be compact: the maximum height should not exceed 90 cm, the length should not exceed 1 m.
- In conditions of limited space, you can place the bar counter close to the windowsill. At the same time, the rack design is often made folding - when necessary, disguised legs are pulled out and the bar counter is used for its intended purpose.
In the same way, you can place the counter at the intersection of the kitchen with the balcony - instead of the windowsill. This option will provide a good economy of kitchen space.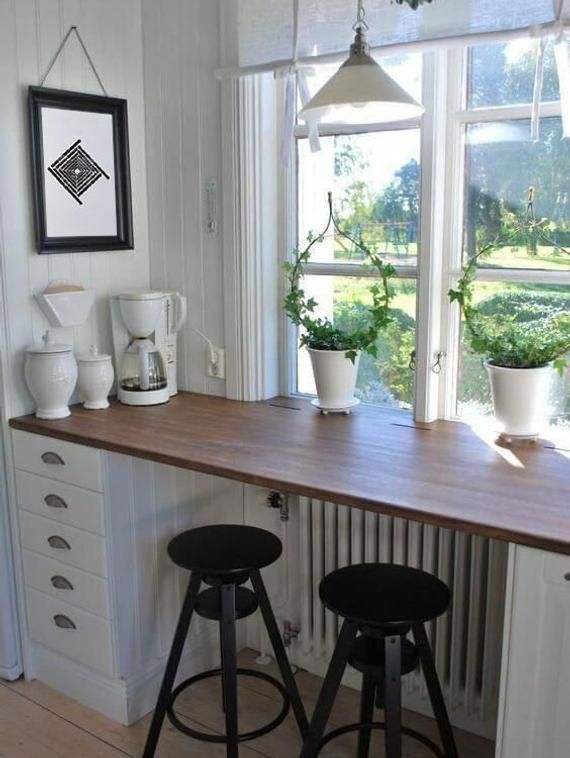 Bar counter in the kitchen-studio. The studio is also quite suitable for installing a bar counter. The abundance of free space allows you to place even an overall rack, while it will look quite harmonious. The bar counter in the studio will serve as a tool for zoning the area. It will become a bright detail of the interior, which will bring additional solemnity. It is recommended to equip the studio with bar counters that will be in harmony with the furniture in the room and with the colors and textures of the kitchen set. In this situation, the rack will become a kind of connecting element that balances the atmospheres of both rooms. Island construction. The island bar counter will fit perfectly into the interior of a large kitchen. It is installed in the middle of the kitchen, access to it opens from any side. The main features of the island design of bar counters:
- Height - 1-1.2 m.
- Width - 0.6-0.8 m.
- Available space over 0.5 m per person.
- There is a variant of connecting the counter with the table top: on the first tier there is a work surface (if necessary, a sink is mounted), on the second - a bar counter.
 In this situation, you can approach the rack only from one side.
Island construction is not easy to install, but it is extremely comfortable to use. All of the above methods of organizing space with a bar counter are advisory in nature. You can independently create an individual project for placing a bar counter and enjoy the results. It is important to remember that the bar counter is not just a fashionable piece of decor, but a functional full-fledged piece of furniture.
Types of kitchen bar counters
The bar counter can take its rightful place in a standard kitchen, and can also be used as a space zoning tool. There are a number of varieties of kitchen bar counters.
Traditional bar counter
This counter is a tall structure with cantilever support. Its height is about 110-115 cm. The bar counter set will be complemented by chairs or stools of the appropriate height. An interesting option is the combination of a bar counter and a dining area.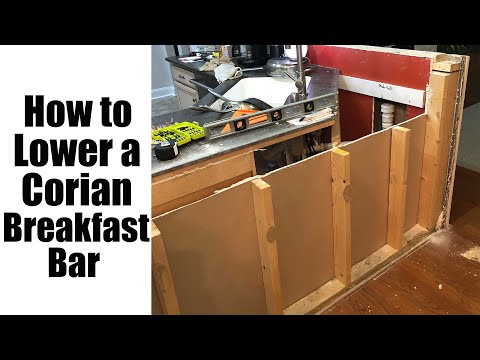 At the same time, the heights of the bar counter and the table must be identical - 90 see
Combined system
This system is becoming more and more common these days. As a rule, in a combined system there are 2 levels, different in height. This system is being built to establish a kind of boundary between the kitchen and the room: the dining area is placed towards the kitchen, the higher level is towards the room. This design is attractive and comfortable to use.
Bar counter integrated into the set
Such a system will be appropriate in large kitchens and is an island structure, when a kitchen set is installed in the center, which is extended by a bar counter with a cantilever mount. The bar counter is designed to diversify the atmosphere of a compact kitchen, but often the standard model cannot fit in a small area. A good way out is a mini-stand or cocktail stand. Despite the simplicity of the design, it can act as a dining table and an entertainment and leisure area. For large families with children, such racks are not suitable. An excellent solution is a combined system, which consists in a combination of a compact dining table and a bar counter. If there is very little space, it can be placed along the wall. Another function of the bar counter is to store dishes and kitchen utensils. Placing cabinets above the bar will make it too massive. The best option is to build them into the main part of the rack. Perfectly suited to the interior of a compact kitchen, tempered glass worktops, as they do not clutter up the area and have an elegant design. For a cocktail counter, a work surface made of any material (chipboard, wood, stone, laminate) is suitable - the main thing is that it is in harmony with the kitchen set. To date, the material Corian, which is similar to marble, but with a much lower price, is gaining popularity. The standard height of this design is 110-120 cm. Do not forget about suitable seating. For a more harmonious combination, it is better to choose transparent plastic chairs or stools.
Design solutions for kitchen bar counters
What is a bar counter and how does it differ from a table? As a rule, the bar counter is equipped with a longer working surface, it does not have supports or they are made in the form of consoles. However, the main difference in the height of the counter is that it is significantly higher than a standard countertop or dining table. High chairs are designed to complement the set. The bar counter can be a separate piece of furniture, located in the middle of the kitchen (island system) or serve as part of the design of the headset. Many prefer work surfaces attached to one side of the wall. The palette of colors and designs of bar counters is diverse. Kitchen racks can be made in a traditional style or have an original design. The color of the bar counter can be combined with the shade of the kitchen facade or be a contrast.
Allocation of zones using a bar counter
Rational application of the principles of kitchen zoning will help to get more free space. The spacious kitchen allows you to install any type of bar counters. Currently, the trend of zoning space through furniture and kitchen utensils is gaining popularity: cabinets with open shelves, all kinds of screens. For these purposes, the bar counter is perfect. A traditional bar counter will help visually separate the kitchen from the room (in the case of a studio layout) or zone the kitchen space into a cooking area and a relaxation area. In addition to performing the zoning function, the bar counter increases the ergonomics of the kitchen space - when one person is preparing food, other family members can relax without disturbing him. In addition, the bar counter can be used as a place to store dishes and various kitchen utensils.
Ergonomics
Very often there is not enough space in the kitchen to store all the utensils. Even in a spacious kitchen, sometimes there is a need to use auxiliary pieces of furniture to store all the necessary things. A bar counter can come to the rescue in this situation.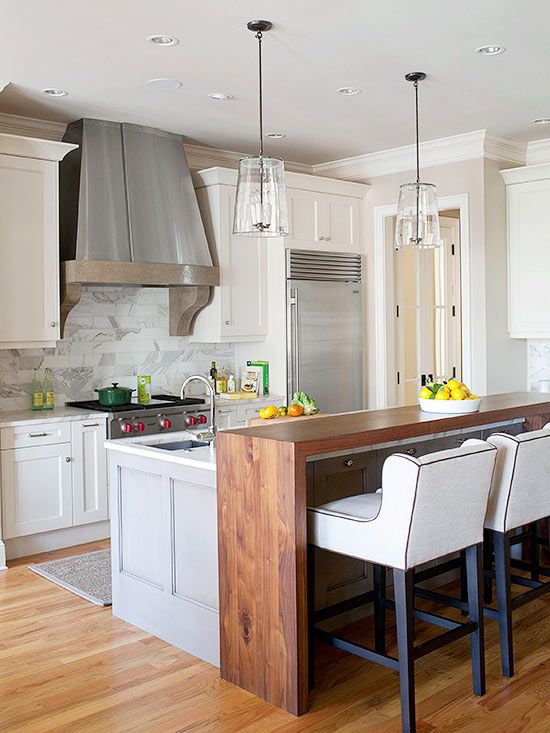 Small cabinets and shelves, equipped under the work surface of the counter, can be used to store dishes and various kitchen items. To hide all these household units from prying eyes, it is better to install a rack with a closed outer part. For storage, not only shelves and cabinets under the work surface can be useful, but also the space above it. For this, special fittings are equipped. Above the rack you can place small dishes, books, magazines, spices. All these items, if properly arranged, can be a wonderful decoration.
Variety of the interior with the help of a kitchen bar
First of all, it is necessary to define the bar and understand its functions. So, the bar counter is, in most cases, the end part of the kitchen set, a high countertop, which is often called a “coffee table” abroad. Its main function is an additional comfortable place for eating. According to statistics, bar counters as a piece of furniture are popular with non-family people. Everyone loves the wonderful morning ritual of having a light breakfast while leaning on a counter or sitting in a high chair while reading the news or watching TV. Another function of the bar counter is an auxiliary countertop. This is very convenient in a compact kitchen space and during celebrations, when you need to cook a lot of food and there are simply not enough work surfaces. In addition, the bar counter can be used to store dishes and various kitchen utensils. This is also very true in a small kitchen. If necessary, you can even contrive and mount a microwave or a small refrigerator in the rack.
Bar counter as a boundary between the kitchen and the room
A simple dining table is not suitable for zoning the kitchen space in compact apartments. A bar counter can solve this problem, which you can even manage to mount a microwave or a small refrigerator in the counter. The kitchen bar counter can be used for zoning the kitchen space: with it, you can select a dining area, a cooking area, a relaxation area. Also, the bar counter can delimit the space between the kitchen and the room, if the layout is a studio. In this case, it is necessary to observe the principle of compatibility between the interiors of neighboring rooms and the design of the rack itself. If the rack is installed within the kitchen, it must be made of identical materials with the kitchen set. For large families with children, the bar counter, most likely, will not be particularly relevant. If the family is small, then the rack can be easily made the main element in the kitchen without installing a standard table at all and having only a folding model in case of receiving guests. Next, you need to decide which type of bar counter will be most rational in the existing conditions. The main types of bar counters:
- Island design - suitable for large kitchens. It is located in the middle of the kitchen, one part of the structure is tightly closed, the other has space for legs and seats (from 25 cm deep). As a rule, the working surface of such a system is wide (1-1.2 m) so that there is enough space to install a stove or sink.
- Traditional fixed bar counter is a common option for studio layout. A vertical stand made of chrome or wood is securely fixed.
 There is space for chairs under the counter.
 - Wall or window counter ideal for compact kitchens. It is a narrow work surface, fixed close to the wall. A wide window sill can act as a countertop.
- Folding divider racks are a common option for small kitchens. They act like a folding table.
- Bar counter-continuation of the corner set. The working surface is fixed 10 cm below the table top of the headset or shifted 15 cm higher with the help of consoles. The optimal height is 1.1-1.2 m, the gap between the work surface and the chairs should be at least 0.3 m.
To increase the functionality of the bar, you can equip it with a mini-TV or LED lights. To visually expand the space, a rack with a working surface made of impact-resistant glass and a vertical support up to the ceiling is suitable.
Types of bar counters
Depending on their appearance and functionality, bar counters are divided into several types.
Traditional bar counter
It is a work surface fixed on chrome supports, usually 110-115 cm high.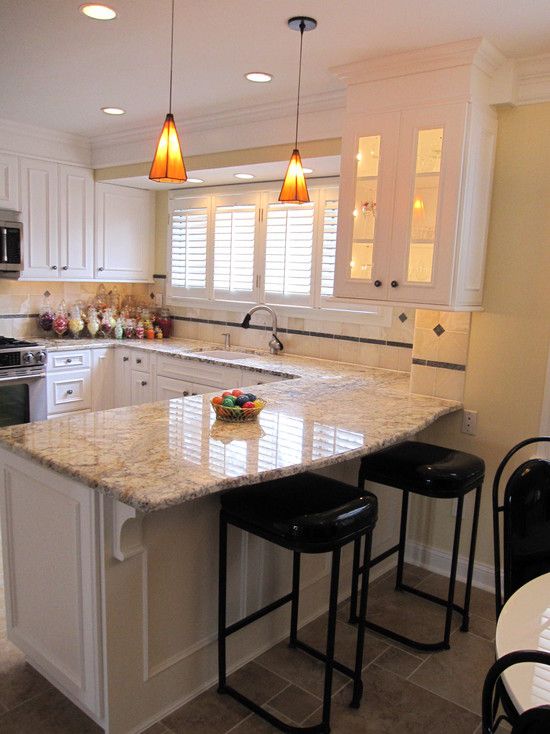 Such a counter has a low cost and will fit perfectly into the interior of a small kitchen. It does not clutter up the room and combines the functions of a dining and cutting tables. In the case of a studio layout, when installing a bar counter, more space is needed. In this situation, it is used as a separate work surface connected to the stove, while also serving as a place to eat. The color palette of the rack is not always identical to the color of the kitchen set, it is important that they harmonize in style. The location on the top tier of the work surface, and on the bottom - shelves or cabinets - ideal for studios or small kitchens. What is great for limited space is the movement of the work surface in the right direction, when it can act like a book table or move on a roller inserted into a support and able to gain a foothold in any position. The design of the bar counter can be linear, angular or rounded.
Location
For a compact kitchen, the ideal dimensions of the bar counter will be: width - from 0.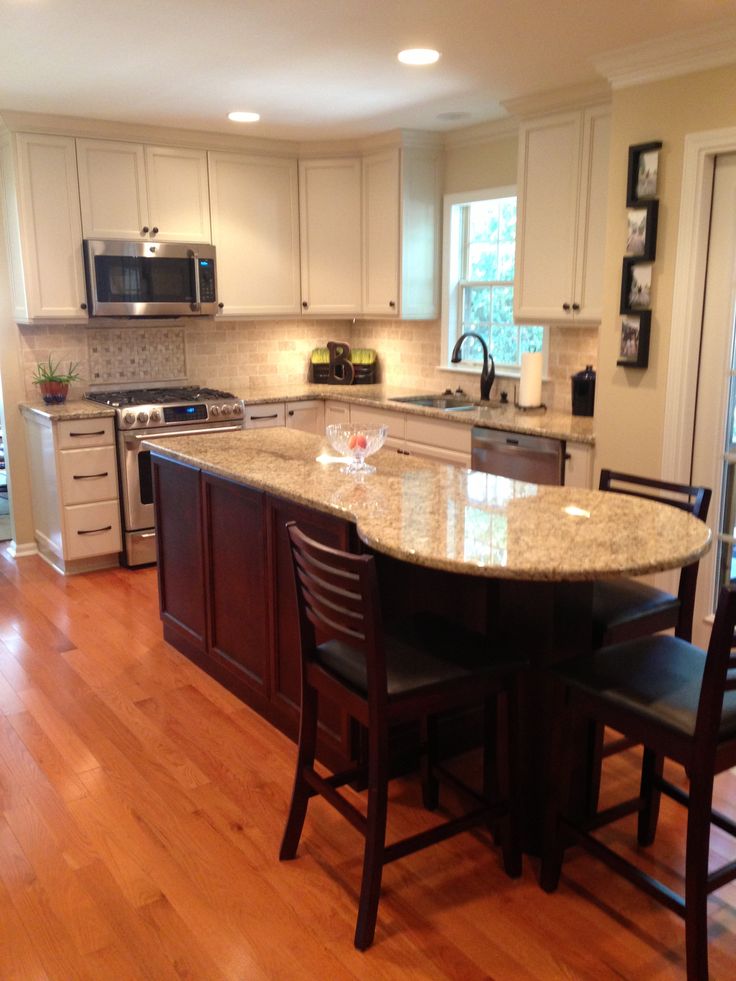 4 m, height - 85-120 cm (this size must be determined strictly individually, since everyone's height is different). The standard length for 1 person is 0.6 m (it is also set individually).
Types of materials
The appearance of the bar counter directly depends on the material of its manufacture. The colors of the rack and the kitchen set should not be the same, but they must be in harmony in style. The most common materials for the manufacture of bar counters:
- Natural or artificial stone. To maintain stylistic compliance, it is necessary to finish both the bar counter and the work surface of the set with a stone of a certain type. The support of the bar counter can also be made of artificial stone.
- Acrylic cladding is an excellent material for custom and curved designs.
- Laminated chipboard is a budget material with an extensive palette of colors and decor. Chipboard can be made with imitation of ornaments, stone, wood.
- Wood is the most suitable material for decorating a kitchen in ethnic, country or modern style.
- Glass is an attractive but fragile material. The ability to refract light provides beautiful visual effects.
Regardless of the design of the bar counter, lighting is an essential element. Above the rack should be a row of fixtures or lamps. This is a necessary condition for proper interior design, kitchen zoning and comfort in the cooking process.
Pros and cons of placing a bar counter in the kitchen
There are 2 types of bar counters, which are different in almost all characteristics, except for functionality.
- A traditional bar counter is a fairly large, separate interior element that has the function of storing kitchen utensils and appropriate fittings. Such racks are very common in places of entertainment and catering.
- Mini bar counter is a compact work surface on a chrome pedestal or console, suitable for small kitchens. The use of this type of rack eliminates the need to install a standard kitchen table. On celebration days, the mini-rack can be used as a serving area.
Types of racks vary greatly in size, type of cladding, accessories, etc.
Advantages of the bar counter
The most significant advantages include:
Shortcomings of bar counters
As you can see, the main disadvantage of the racks is insecurity for certain age groups. The disadvantage in the form of a limited usable area is easily compensated for by a system of rails and shelves. The advantages of bar counters far outweigh the existing disadvantages, so the rationality of its installation does not need to be discussed. Corner kitchen set with a bar counter that continues it - a guarantee of excellent style. In this case, it is important that the materials for making the rack and the headset are in harmony with each other or are completely identical, otherwise the rack will look like an alien element in the kitchen. When installing a bar counter in a studio layout, the design of the counter should be combined with the interior of the room and the interior of the kitchen, but the color should not be identical. A corner set with a bar counter adjacent to it is very popular these days - the bar is adjacent to the working surface of the headset 10-15 cm lower. When buying a bar counter, you must first of all pay attention to the material of its execution and the type of fixation (console, legs, etc.). The material of the stand itself and the work surface must be the same. In the case when the bar counter is a continuation of the set, it would be rational to use an artificial stone - corian. The type of fixation must be selected individually. There are many options - from a chrome support to an overall wooden stand. A set of roof rails often comes with a chrome support. Designers advise equipping additional storage space at the base of the bar counter. If desired and the availability of funds, you can even mount a mini-fridge in it. Installation of a standard bar counter or an extension of a corner set is impossible without a smooth floor covering and reliable fittings. This system is suitable for spacious apartments. The detached work surface of the counter is placed in the middle of the kitchen, allowing you to have access to the structure from all sides, which is extremely functional when preparing food and serving. This design saves space in the kitchen and is more convenient. It is suitable for compact kitchens and studio layouts and works well for zoning. The corner counter is perfectly combined with the kitchen set, in harmony with the existing interior. This system consists in the arrangement of two work surfaces at a certain height from each other. Based on their type of construction, bar counters are: This system is the traditional way of arranging furniture. The island structure in this case acts as a cutting zone. Placing a bar counter here ensures comfortable cooking, because it is located near the hob and sink. Reasonable placement of furniture perfectly saves space. Such racks should be installed only in spacious kitchens with an area of 15-18 square meters. m. In addition, it is important to ensure that the gap between the end of the rack and the wall is more than 0.9m. Mounting such a rack in a narrow room will cause certain problems. For compact kitchens, the option of installing a bar counter at the end of the kitchen set is typical. In this case, the rack is located close and at right angles to the kitchen set. Basically, there are L-shaped and U-shaped layouts. Such racks are used as an additional dining or cutting area. The optimal width of the working surface is from 50 cm, height is 1-1.2 m. To fix the rack, a special pipe is used that connects the working surface with the hinged part. This pipe is connected to the ceiling or floor. If necessary, stands or rails are attached to it. The location of the bar counter along the window provides a beautiful view while eating, and also increases the usable space. The main condition is that the rack must be folded in a vertical position. Mounting the bar counter as a continuation of the window sill eliminates the need to purchase a regular table, which significantly saves space. The type of material from which bar counters are made determines their quality indicators: service life, susceptibility to aggressive conditions, etc. The main types of materials used for the manufacture of bar counters: Features of installing a bar in the kitchen are always associated with the preferences of the customer. If the rack has a similar color with other pieces of furniture and decor, a very harmonious picture is obtained. Otherwise, the opposite happens. Experts advise highlighting 2 colors in the kitchen space: one is basic, the second is secondary. This gives the kitchen space dynamics. So, the bar counter is not just a stylish design solution, but also an independent functional piece of furniture. Being a useful piece of kitchen furniture, the bar counter can be used as a main or auxiliary dining table, a tool for highlighting different areas. Standard bar counter is a narrow work surface on supports about 115 cm high. Its length is determined by the dimensions of the kitchen, the ideal width is 50 cm. to the end side of the kit, window sill or table. The type of installation of the rack depends on its purpose. There are many ways to install a bar counter in a kitchen space. The most common in this list: In a small kitchen, the bar counter is designed to act as a separate dining surface, even though no more than two people can sit behind it. The bar counter has, among other things, a decorative function. It can be used to delimit the kitchen space or as a boundary between the kitchen and the living room (in the case of a studio layout). The rack will acquire even greater functionality complete with a railing system, all kinds of shelves and stands for kitchen utensils. For the bar counter, similar materials are used as for the working surfaces of the headset: MDF, glass, wood, stone, acrylic. Features of an individual model of a bar counter are determined by existing or designed pieces of furniture and decor. The bar counter is extremely functional, it gives the kitchen space a dynamic and unique style. Limited kitchen space is no reason to abandon the idea of installing a bar counter. It is only important to choose the right model. Of course, a traditional rack with many accessories and built-in parts will not work in this case because of its overall dimensions. An excellent option is a narrow work surface on the console with enough free space below for pushing chairs. As a rule, the height of the bar counter is about 1.1 m, so you need to complete the set with seats of the appropriate height. Please note that due to its height, this stand will not be safe for use by children or older people. In this case, it will be useful to connect the rack to a regular table. The height of this system will be about 0.9m, height of chairs - 0.65 m. Such designs will ideally fit into the interior of a small kitchen and take up minimal space. Among others, there are special mini-racks attached to a table or wall. In a small kitchen, the best manufacturing material is tempered glass, which makes the design elegant.
Bar counter and its place in the kitchen space
 This design is very comfortable, accommodates many people, but is overall and not suitable for compact rooms. Another way to mount the bar counter is along the wall (installation is allowed with a gap of no more than half a meter from the wall).
 Recommendations when buying a bar counter
Installation procedure for a bar counter
 The flooring and walls must not have any flaws that could cause the rack to warp. When installing the base, it is better to strengthen it with a concrete solution for maximum structural reliability. When fixing the rack to the wall or the work surface of the headset, you need to pay great attention to high-quality fittings, it is rational to install fasteners - after 0.5-1 m. When mounting the rack to the wall, it is good to use liquid nails or metal corners that hold the structure up to 200 kg. The bar counter is extremely functional: it is used as a dining or cutting area, a place to store kitchen utensils, a place to relax and have a small snack. One restriction: you should not let young children and the elderly near the counter for their safety. The high work surface looks very stylish, and the atmosphere in the kitchen becomes much more comfortable.
 Island bar counter
 Often, a standard dining table is crowded with many kitchen utensils, utensils and appliances, which makes it cramped for eating and preparing food. The bar counter also solves this problem: additional storage space can be equipped at the base of the counter. As a rule, only a lamp is located above an ordinary table, and the functionally free space is almost never used. Installing a bar counter will allow you to use this place! Above the "island" it will be rational to place the hood, and above the structure, rails and shelves for storing dishes and decor elements can be fixed. When using a bar counter as a boundary between rooms, designers advise choosing lighting in the form of hanging lamps.
 Corner bar counter
Two-tiered bar counters
 In this case, the first countertop acts as a dining area, the second - a towering bar counter.
 Varieties of bar counters
Bar counter solutions
Island design
 The image of the finished structure in a similar interior will help visualize the intended result.
 Combination bar counter
Counter near the window
 When installing, you must take into account the layout of the kitchen. An important condition is that the countertop must be flush with the main profile. The best solution in this situation is to cover the rack with acrylic stone, as this material is very light.
 What racks are made of
 Installation of such a rack can be done with your own hands. Drywall is fixed on a profile made of wood or metal, which ensures the reliability of the system. Drywall is natural and safe, absorbs liquids well, and is fireproof. The gap between the layers of the material does not contain air, so the material is not capable of burning.
 Color options
Kitchen space with breakfast bar
 In addition, the bar counter is a kind of decor element that can give originality and relevance to the kitchen space.
 Mounting options
Types of racks
Place of the bar counter in the interior
Compact kitchens with bar counters