Wet room layouts
16 stunning wet room bathroom designs |
(Image credit: Richstone Properties / Mandarin Stone / l Drummonds / Darren Chung)
Wet room ideas open up the opportunity for contemporary creative design, without the need to squeeze in a shower enclosure or raised shower tray.
A wet room can be a real luxury at home, even when the space you have to work with is limited. Try thinking along the lines of colorful floor-to-ceiling tiles, built-in seating and sleek, concealed pipework.
A true wet room without any panels provides you with more room to move, and an open-layout is easier to keep clean than a regular shower.
However, wet rooms are a big project to take on when it comes to bathroom ideas. The tanking process to ensure your room is completely watertight can be a significant upheaval, not to mention costly, too.
You may want to weigh this up against the longevity of the space, as a wet room’s seamless design makes it a great option for accessibility and future-proofing your home for years to come.
Wet room ideas
Wet rooms have become an increasingly popular choice for shower-lovers because they are the perfect solution for small bathrooms when you don’t have the space for both a bath tub and a separate shower.
The key difference between a shower and a wet room is the fact that while both may have shower screens, wet rooms are completely open spaces without the stand-in tray you will normally get in a shower. The floor is at one level and water is allowed to flow freely to a drain.
A wet room can provide a spacious showering area and the high-end look of a luxurious spa hotel because the look tends to be very streamlined. Wet rooms are also level entry, so easily accessible to all, not to mention hygienic and easy to clean. Done well, a wet room is incredibly desirable and can boost your home’s value, too.
There are a number of things to consider when planning a wet room or walk-in shower – from suitable flooring to drainage points – so that you can achieve the best results.
1. Ensure the space you intend to use is fully tanked
(Image credit: Sarah Hogan)
It goes without saying that a wet room needs to be waterproof. Luckily builders are a lot savvier about how to achieve fully tanked spaces nowadays and wet room tanking systems and products are readily available.
'In particular, hidden tray systems, which fit under the floor tiles and take care of drainage gradients and watertightness have proved a real game-changer,' says Nicholas Cunild, MD of luxury shower brand Matki . 'Low-level shower trays that fit flush with the tiles are also popular and can help define the shower room in a bigger room. Wet room installation is not for novices, it’s important to find a tanking specialist or builder with verifiable experience.'
2. Consider underfloor heating to keep the space dry
(Image credit: Mandarin Stone)
'It’s important to take extra steps with regards to heat, ventilation and drying than you would in a regular bathroom,' continues Nicholas Cunild.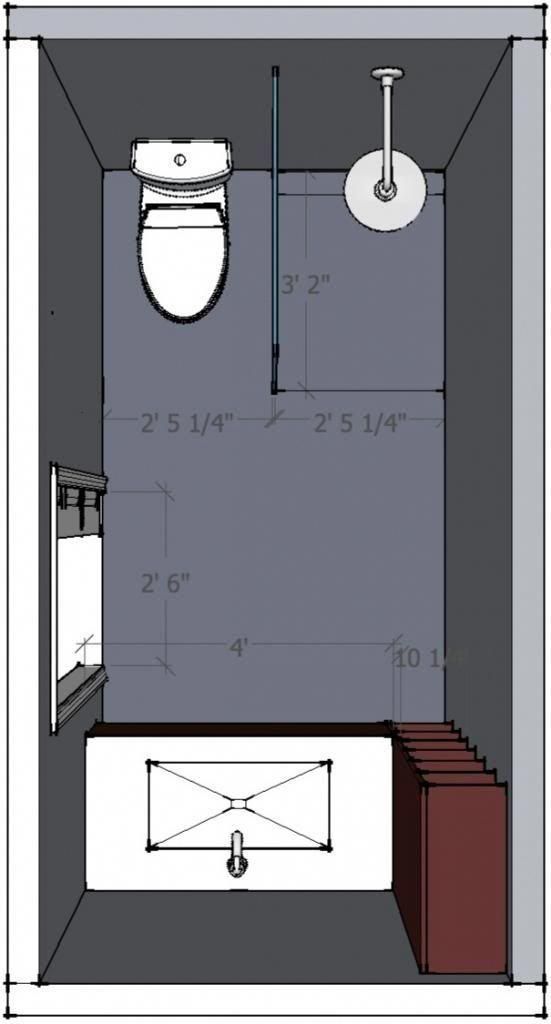 'You may be lucky enough to live in a hot climate which naturally gives a warmer bathroom. But if you live in a colder climate and you exit a wet room onto carpeted rooms – add kids, dogs and all the rest – it is a recipe for waterlogged, messy floors everywhere.
'A screen will help contain major puddles, but underfloor heating and heated towel rails will also speed up the drying process and help prevent slip hazards. Mechanical ventilation is a must and will help clear steam quickly – look for models with intelligent humidity sensors that automatically boost when required.' You can also pair this with a beautiful, easy-to-wash bathroom rug idea.
3. Consider different surfaces ideas, not just tiles
(Image credit: Base Interior)
Tiling from floor-to-ceiling is practical but can feel cold and uninviting in large volumes. Nicholas points out the importance of exploiting other options.
'We’ve noted a rise in polished plaster – both traditional Tadelakt and more modern Microcement – in wet room designs and the results are stunning,' he says.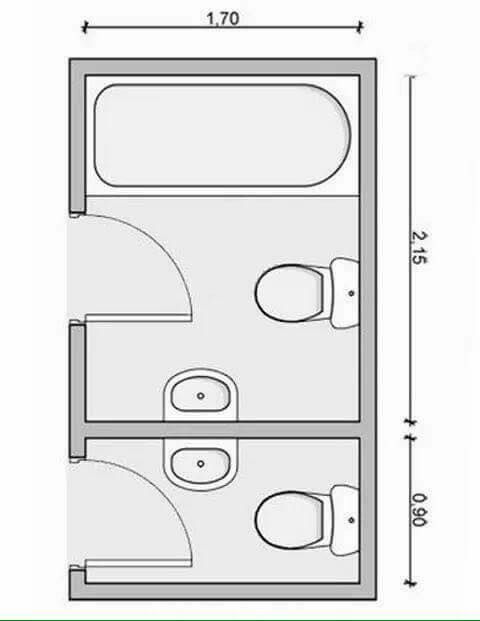
Built up in layers, the finish is waterproof and seamless, so there’s no grubby grout to tackle.
4. Pick the right sanitaryware
(Image credit: Future / Mark Bolton )
'If you are embracing the full wet room in a large bathroom look and omitting any sort of enclosure or screen, it is fundamental to think about your choice of sanitaryware, as it is likely that it will get wet from the spray of the shower or the condensation in the room,' advises Rebecca Milnes, designer at CP Hart .
'Opt for ceramics that are flush to the wall and are ideally wall-mounted. A wall-hung toilet is a brilliant choice in a wet room, as there are no areas for water to pool and it makes cleaning easier.'
Though a bathroom that has been tanked doesn’t necessarily need a shower panel, you may want to add one to prevent towels or toilet rolls getting wet. Opt for a fluted or frosted finish to maintain a level of privacy if your wet room forms part of the main bathroom.
'In order to create a true wet room, a watertight environment must be created by tanking both the floor and walls of the room to thoroughly protect it from leaks. First a watertight membrane is laid, then the room will need to be tiled throughout with a gentle gradient in the main a shower area so the water flows away easily into the waste.'
5. Choose the right size sanitaryware to enhance the sense of space
(Image credit: Matki)
It’s important to choose sanitaryware that is slightly smaller than the average in size so that it can make the room look bigger. A wall-hung toilet with a concealed cistern, is not just easier to keep clean, but being able to see the floor gives the illusion of a bigger room. Wall-hung bathroom vanity ideas will also help reduce visual clutter and use the bathroom space more effectively.
6. Play with the illusion of space
(Image credit: Future / Jonathan Gooch)
Using matching tiles or composite panels on both floors and walls is a good idea for wet rooms and small bathrooms as it will accentuate the sense of space.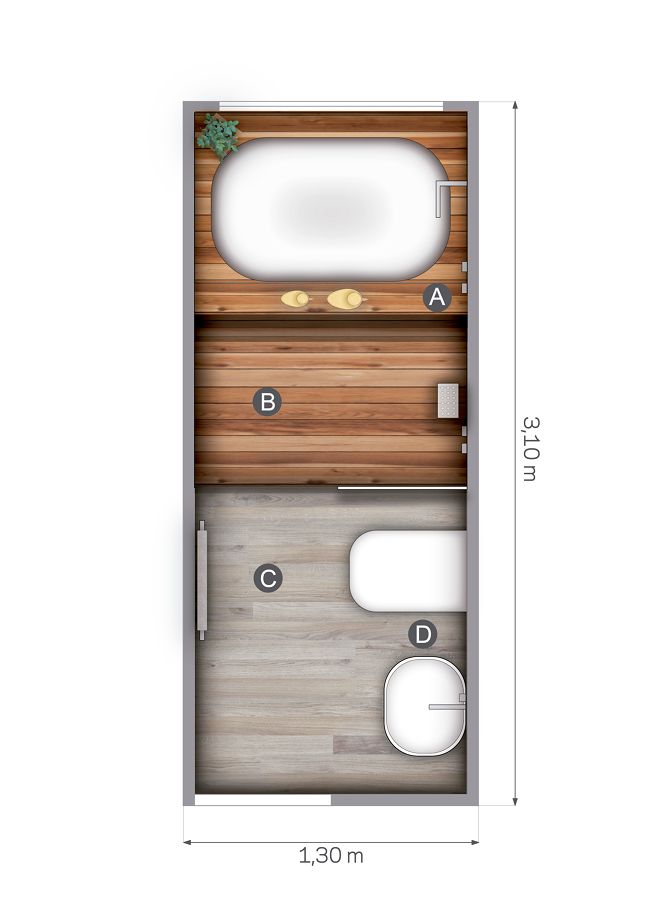
Create areas of bathroom color, and even patterns using mosaics or tiles in a variety of formats, to give definition to your shower space, or mix shapes, sizes and shades for a unique look.
'Add glossy finishes and sleek chrome fittings and use matching shower tile ideas or composite panels on both floors and walls to accentuate the sense of space. Create areas of color and even patterns using mosaics or tiles in a variety of formats to give definition to your shower space, or mix shapes, sizes and shades for a unique look.'
Make sure the floor tiles you want have an appropriate non-slip bathroom flooring rating for wet areas – look out for raised, textured finishes or anti-slip properties in your search.
'Good-quality porcelain tiles are perfect for use in wet rooms and walk-in showers,' says Jo Oliver, Director at Stone & Ceramic Warehouse . 'Firstly, they are impervious to water, making them an ideal solution for everyday use. They also won’t be damaged by detergents or any of the other chemicals we frequently expose our shower surfaces to. '
'
(Image credit: Max Kim Bee)
While it’s easiest to install a small wet room in a new-build or extension, any bathroom, upstairs or down, can be fully tanked for wet room use.
There are certain situations where a wet room comes into its own. 'Wet rooms are particularly effective in small or awkward scenarios, like rooms with sloped ceilings or strange layouts, as you can maximize the showering area without the restrictions of standard shower tray sizes,' says Nicholas Cunild.
Issues like the direction of floor joists can be problematic but not insurmountable. 'In some cases, you may need to accept a step up into the room, in order to achieve the necessary gradients for efficient water drainage. If it’s done by a good professional, it will be unnoticeable.'
8. Fake a wet room
(Image credit: Future / Darren Chung)
If you are not able to create a true wet room, the latest ultra-low profile shower trays are a clever alternative.
A frameless shower enclosure will give any bathroom a modern, seamless feel and create a contained area for showering without the need for a separate cubicle.
Paired with a low-profile shower tray, these walk-in shower ideas with frameless, clear glass panels help to make even the smallest of spaces feel less claustrophobic and therefore a more calming showering experience.
Don’t forget to allow for adequate drainage at the planning stage. Your shower floor ideas may need to be fitted at a sloped angle away from any doors so water can drain away easily. A sunken shower tray that can be installed flush to the rest of the floor.
9. Bring in pattern to help zone the shower area
(Image credit: Bert & May/ Fired Earth)
Many wet room designs lean towards a minimalist look but it can also be a great opportunity to introduce color and pattern into the space.
Even in an open plan space you can use a showstopping tile on the shower walls and floor to zone the shower area. If you are feeling even braver you can contrast the tiles you use on the floor and walls for even more impact.
10. Find the right tile
(Image credit: Future / Artisan of Devizes)
Bright and colorful wet rooms make for an invigorating shower experience.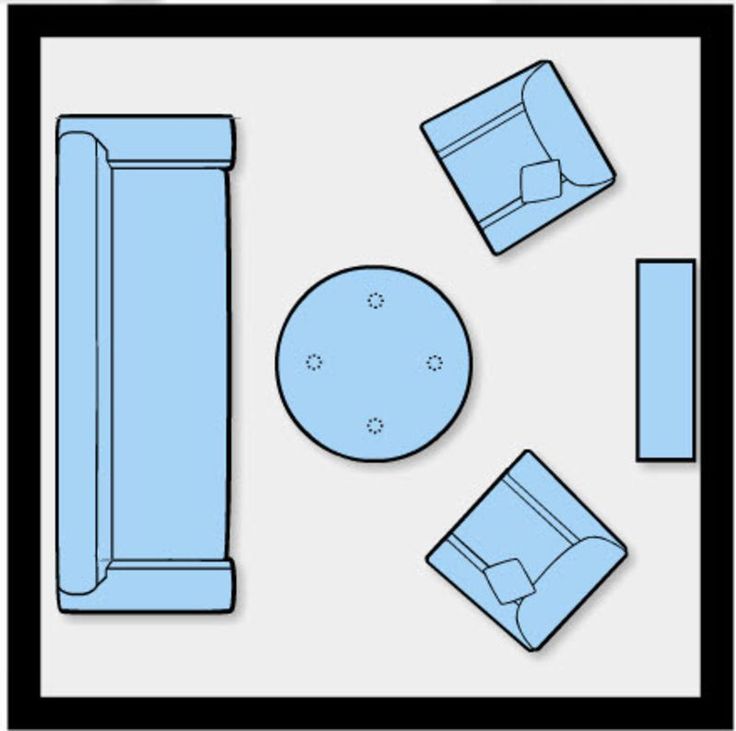 Ideal if you're not naturally a morning person. Smaller bathroom tile ideas like mosaics are a great choice for wet rooms, as they’re easy to lay in a slope towards the drainage hole.
Alternatively, a mix of metro and patterned tiles create a cool and contemporary appearance.
Maintain a seamless look by incorporating a recessed shelf within the shower – a great shower storage idea to keep essential bottles without encroaching on the rest of the space.
11. Enhance the floor factor
(Image credit: Future / Jonathan Gooch)
Shower floor ideas are one of the most important factors when planning and developing a wet room.
Most bathroom flooring types can accommodate the pipes needed for drainage in a wet room – even concrete. But in some instances, the flooring will need to be taken up before tiling takes place to ensure the drainage pipes can be positioned with the necessary slope for the water to drain away.
Tiles are the best type of flooring for a wet room.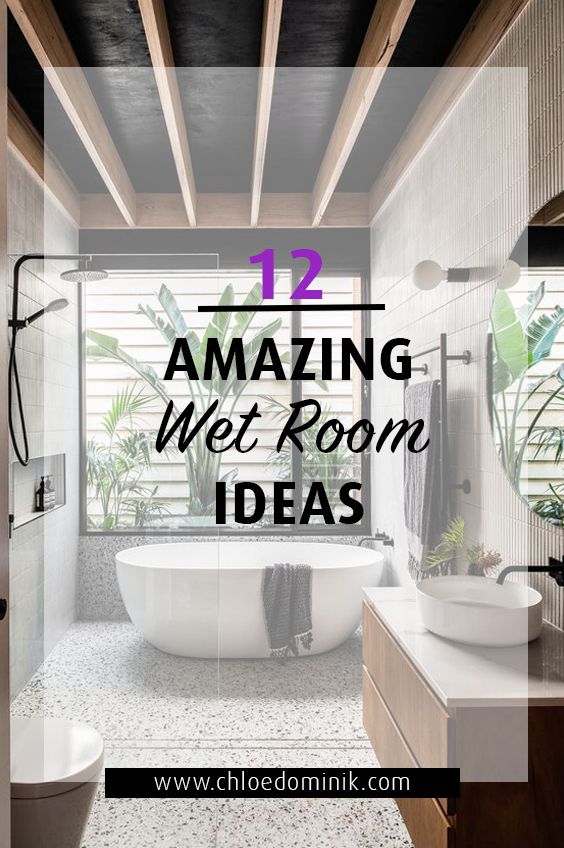 Damla Turgut, founder of Otto Tiles & Design , advises: 'The most suitable types of tiles for a wet room floor are porcelain or natural stone such as marble, terrazzo, encaustic cement or mosaic tiles. Because of their construction and high-shine finish, we would not recommend the use of ceramic tiles on a wet room floor, they are however suitable for wet room walls as are the very on-trend zellige tiles.'
12. Turn a loft space into a wet room
(Image credit: Future / Davide Lovatti)
There are so many advantage to having a wet room.
You can create a more impressive shower room design in an average-sized bathroom simply by removing the bath and freeing up the space needed for a walk-in shower. For instance, if you have a loft space, consider installing a wet room here.
You probably will need a special extractor fan in your wet room. The build-up of moisture and condensation is greater in a wet room than in a traditional bathroom. Fans operated by light switches alone often aren’t effective enough.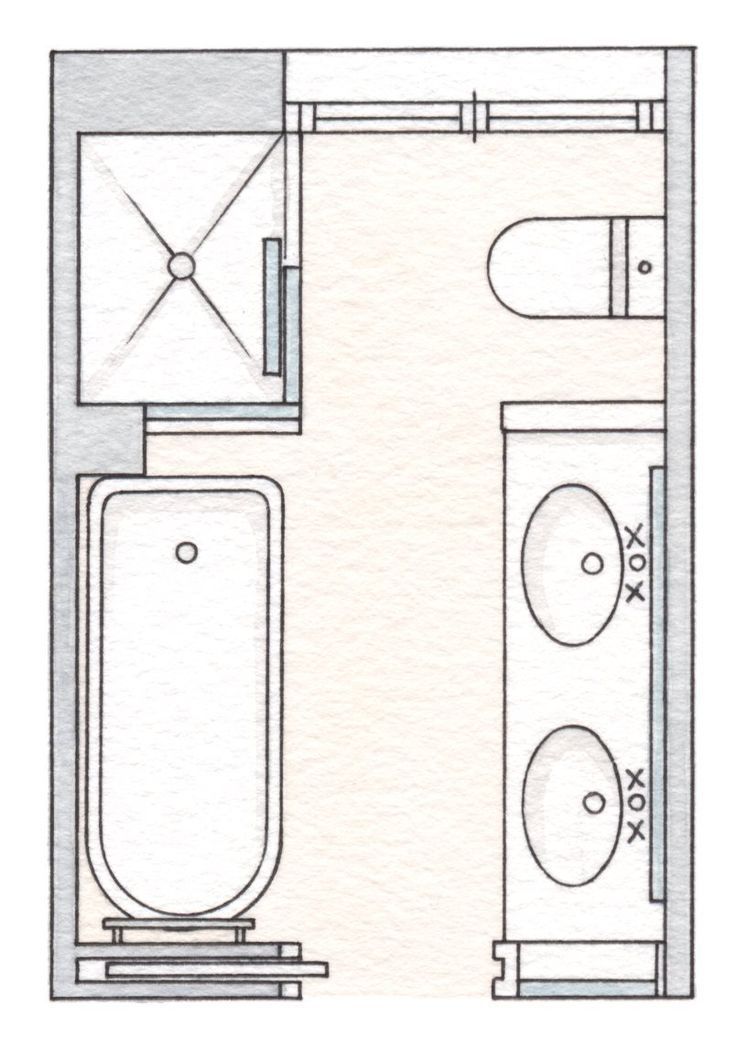 A good fan needs to be wired into the room (still coming on with the light switch) but with a separate cut-off switch, which is outside the room. Humidity-tracking extractor fans are best for wet rooms as they work continuously and incrementally with automatic extraction for however much steam is in the room.
13. Create a spa-like sanctuary
(Image credit: Future / Mark Luscombe-Whyte)
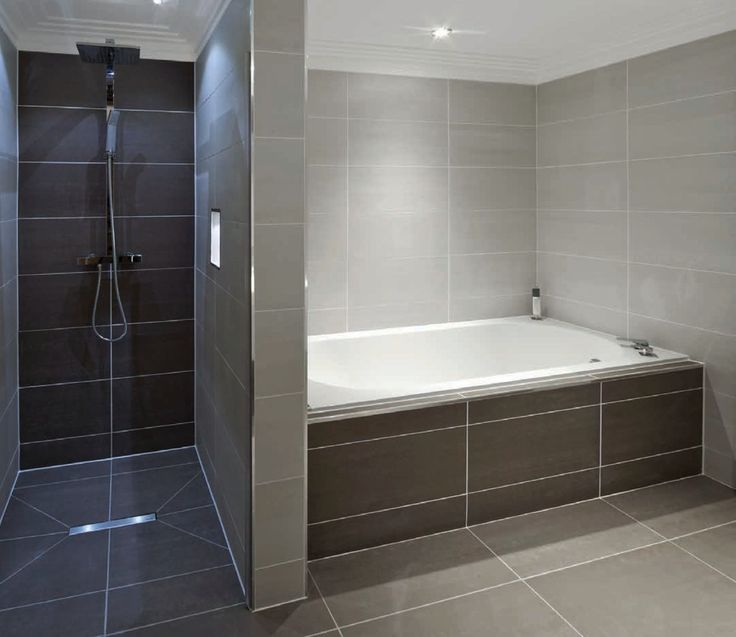
Real estate agents are quick to point out that a family home without a bath will be less saleable, but there are creative wet room ideas with baths you can explore.
If space allows, the bathroom can be turned into a spa-like sanctuary with a bath, vanity unit and smaller wet room-style cubicle.
'Wet rooms give an added level of luxury, allowing a continuous floor finish making a space feel seamless and bigger,' says Gemma Holsgrove, Associate Director at interior design agency Sims Hilditch . 'With cleverly positioned fittings it can certainly feel well thought through. '
'
A wet room design can also work alongside a bath, as Sally Cutchie of BC Designs explains. 'Choosing to have a wet room can actually be hugely beneficial when wanting a bath to sit in the same space,' she says.
'As a wet room is fully waterproof it doesn’t need a shower enclosure fitting,' she adds. 'This can free up a lot of extra space for the all-important bath.'
If your bathroom is on the small side, then use the same material to clad your whole space. A strong stone, like marble, is a stylish option.
14. Take a seat
(Image credit: Fameed Khalique)
Add built-in seating to your wet room for a sauna-like experience. Complete the look with a large rainfall showerhead, then simply sit back and relax.
A wood look can offer a holistic spa bathroom experience, but you'll need to ensure any timber is treated so that it's suitable for a wet area. Or you can mimic the look with tiles. Just make sure they have a non-slip treatment and are comfortable to sit on.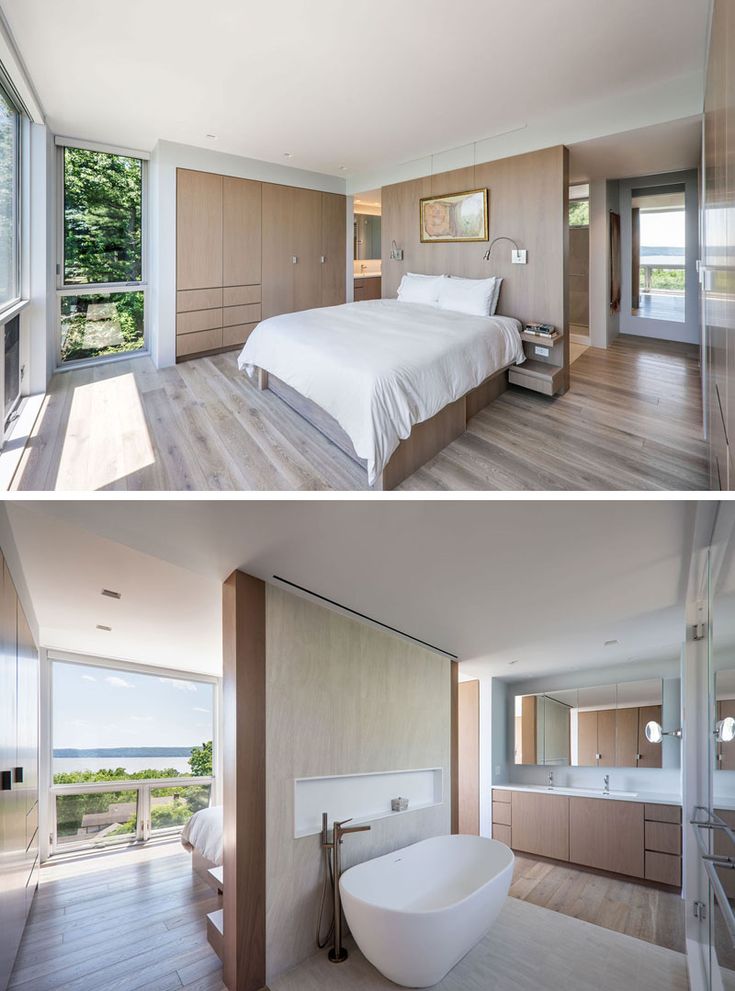
15. Let the light in
(Image credit: Future / Jonathan Gooch)
If you are creating a new space for your wet room, you will need to think about light sources during planning. A huge skylight like this creates the illusion of showering outdoors. So if you've been inspired by trips to tropical climes such as Bali or Thailand, this could be a practical way to recreate that magic.
The best bathroom lighting ideas feature at least two lighting circuits – one for overhead lighting and another for adjustable mood and task lighting. Where you place these will depend on any natural light sources, too.
16. Install a space to rest and recharge
(Image credit: Future / Mark Bolton)
When considering how to choose a shower for your wet room, Paul Bailey, Senior Category Manager at GROHE , says: 'Features such as steam, sound and chromotherapy through built-in lighting modules are increasing in popularity, due to growing demand for spa and wellness inspired bathroom spaces. '
'
Wet rooms are considered a practical and luxurious addition to a home. However, they can be costly. Nick Cryer of Berkeley Place says: 'Wet room installations are more specialist, more time consuming and more expensive. All the materials and kit is very readily available, however, we recommend only experts are employed to complete the installation.'
Are wet rooms a good idea?
There are lots of benefits to having a wet room – from being able to utilise a small or awkward space where a bath or standard shower enclosure cannot fit, to future-proofing your home.
Estate agents are quick to point out that a family home without a bath will be less saleable. But there are creative options you can explore. For instance, if you have a large master bedroom, consider installing a freestanding, statement tub here for a dash of hotel chic.
'Investing time and money into creating a wet room and properly tanking it can also be incredibly useful when it comes to busy family bath times,' says Paul Bailey, Senior Category Manager at GROHE UK.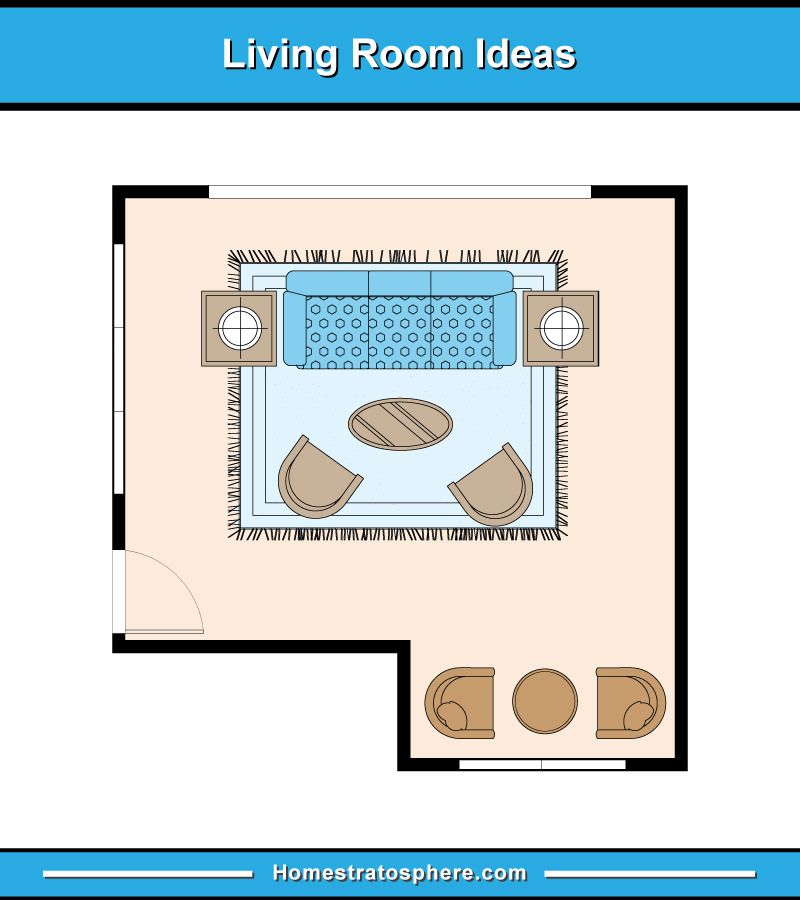
The main drawback is the investment and upheaval a wet room project brings, mainly due to the fact that all wet room ideas require proper tanking.
'One other point worth noting is that wet rooms can get quite cold, because there’s no enclosure to keep the steam in,' adds Yousef Mansuri, head of design at C.P. Hart.
How small can a wet room be?
While wet rooms are not limited to incremental sizing, most bathroom designers would recommend that the showering section of a wet room measures a minimum 800 x 800mm.
When planning a shower design for a small bathroom, there are a few aspects which may determine the space required. Will pipework be exposed or concealed? Do you need to install a glass panel to prevent other areas of the room from getting wet?
Don’t forget that adequate ventilation must also be installed in line with building regulations to prevent mould and damp spots.
Get the right layout for a wet room
There's no denying that plumbing can limit the layout of a wet room.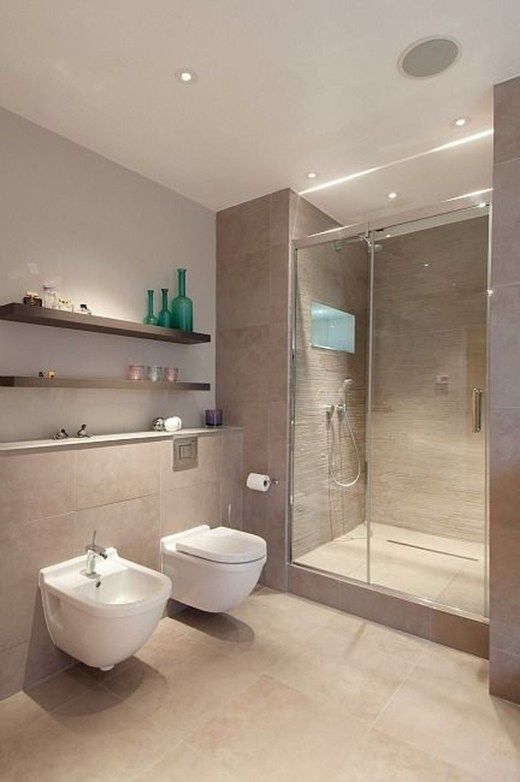 Basins, baths and showers only have to take away water but, if placed 12ft from an outside wall, the drainage will have to slope gently downwards for quite a long way, avoiding joists, which may not be running in a helpful direction. The sooner an architect or plumber raises a few floorboards, the sooner you’ll know your options.
'In a wet room, the shower area is flush with the floor level and the drain is fitted into the fully tiled floor. Originally wet rooms were completely open without any glass partition. However, a simple fixed glass panel creating a walk-in shower area is a much more practical choice and has become the most popular trend,' advises Rebecca Milnes, designer at CP Hart .
'Wet room systems are not limited to incremental sizing, like shower trays often are, so they are a great solution for awkward or tight spaces.
'In small rooms it is possible to turn the whole area into a walk-in shower. However, it is best to be mindful of the items in the bathroom that need to be kept dry, such as towels and toilet rolls.
'One of the first things to consider when planning a wet room is where to position the drain. Ideally the drain should be as far away from the bathroom door as possible, to minimise any risk of water escaping the room.
'If you have a wooden sub-floor, the way your joists run is crucial to where your drain can be positioned. You’ll also need to think about which way the gradient fall towards the waste will run, to avoid any tricky wedging effects.'
What's the difference between a wet room and a walk-in shower?
‘A true wet room is a fully waterproofed space without a fixed shower door or tray, and usually has an open tiled shower area,’ explains Nicholas Cunild, managing director of Matki.
A walk-in shower, on the other hand, is an area in a bathroom or shower room with a low-level shower tray and glass surrounds. While completely watertight, you may still wish to include a glass panel in a wet room to contain the water spray.
Is a wet room expensive?
There’s no doubt that a wet room is an investment.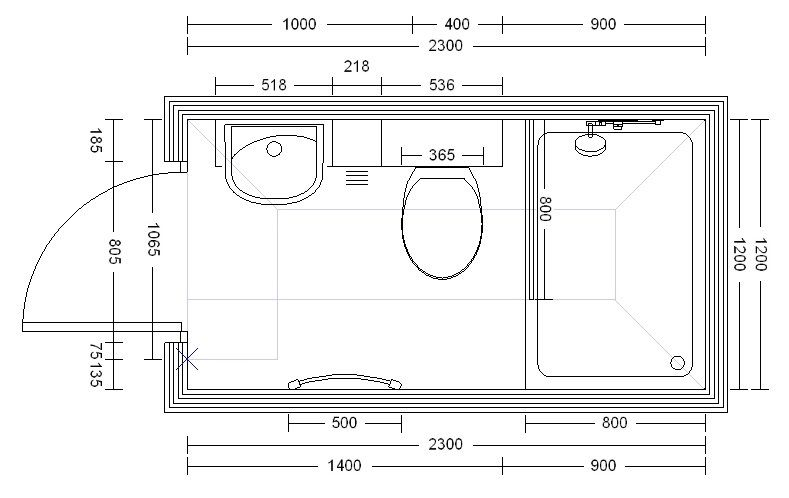 The tanking process to ensure the room is completely waterproof can be costly and takes time. All wet room ideas involve tiling the space from floor to ceiling carefully while ensuring proper drainage.
Concealing pipework can also be an investment, though this can often allow recessed shelving and storage to be created as an additional benefit.
You can find out how much it costs to install a wet room in our guide.
What kind of costs are involved in a wet room?
It is never cheap to re-do a bathroom. In a family bathroom with two basins, a WC, a bath and a shower, quality items will easily add up to £5,000.
Installation adds a further £3,000 or so and, with cabinets and storage, good quality mirrors, tiles and lighting, it generally adds up to between £10,000 and £15,000.
(Image credit: Future / Davide Lovatti)
The build-up of moisture and condensation is greater in a wet room than in a traditional bathroom. Fans operated by light switches alone often aren’t effective enough.
A good fan needs to be wired into the room (still coming on with the light switch) but with a separate cut-off switch, which is outside the room. Humidity-tracking extractor fans are best for wet rooms as they work continuously and incrementally, with automatic extraction for how much steam is in the room.
Pick the right wet room flooring
'When deciding which wet room system to go for, think about what your sub-floor is made of. There are systems for both solid and wooden floors. If you have a concrete floor, it can be quite invasive to channel in a waste and create the gradient fall required for drainage,' advises Rebecca Milnes of CP Hart.
'Forgoing a shower tray in favour of a wet room allows the floor tiles to run through to the shower area, which adds visual space to a room. However, not all surfaces are safe to use in a wet room setting and it is crucial to know what the slip rating of the material is. I’d recommend using a material with a structured, textured finish to give extra grip in wet areas.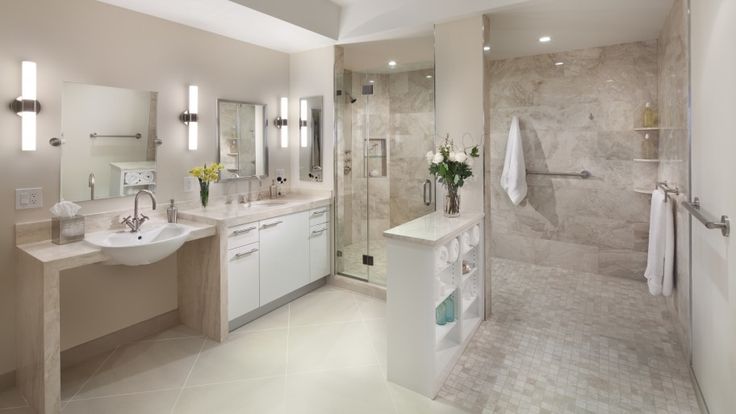 Mosaics are also a great choice for wet areas, as the grout lines between the tiles give appropriate grip.
'In cases where a step-up to the wet area is needed, the step should be at least 10cm high, as anything lower can be easily overlooked by those not familiar with the room and can become a trip hazard. Adding under-plinth lighting can highlight the step and add ambiance to the room.'
Tanking a wet room
'Tanking is essential in a wet room,' says Rebecca Milnes. 'This is a multi-step process which entails several layers of waterproofing to ensure an excellent seal – much like a swimming pool.
'The two main approaches for tanking a wet room are using a self-adhesive bitumen-based waterproof membrane, or applying a paint-on liquid wall membrane. It is always best to speak to your supplier about the best system for your project.'
Jennifer is the Digital Editor at Homes & Gardens. Having worked in the interiors industry for a number of years, spanning many publications, she now hones her digital prowess on the 'best interiors website' in the world.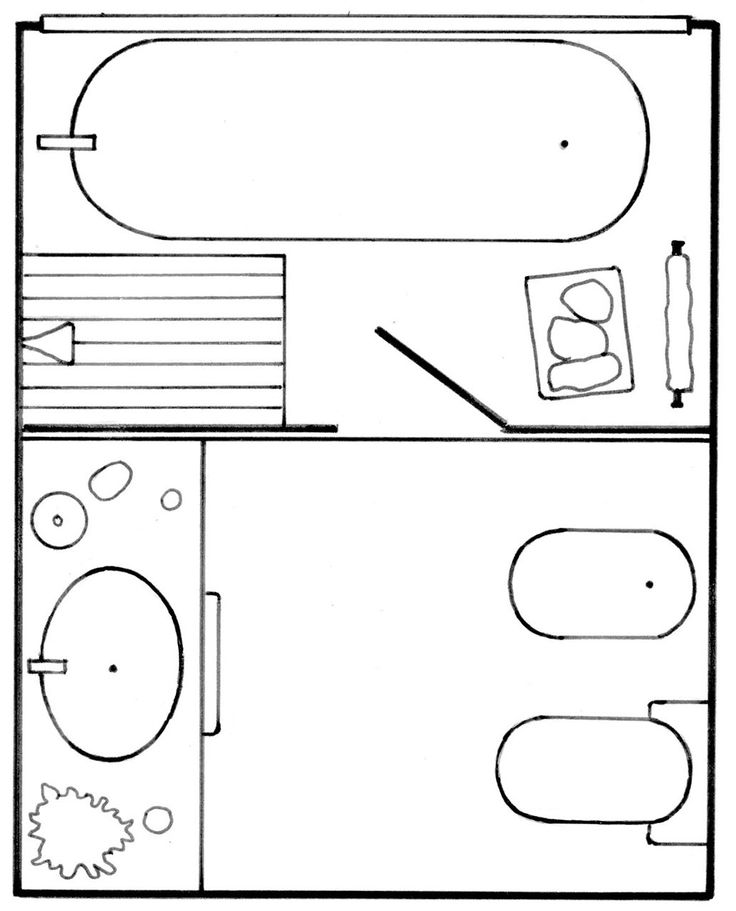 Multi-skilled, Jennifer has worked in PR and marketing, and the occasional dabble in the social media, commercial and e-commerce space. Over the years, she has written about every area of the home, from compiling design houses from some of the best interior designers in the world to sourcing celebrity homes, reviewing appliances and even the odd news story or two.
13 wet room ideas and tricks for a minimalist bathroom |
(Image credit: Darren Chung)
For many years, wet room ideas were a divisive choice for a bathroom renovation. While they were favored for the idea that they could make your space look bigger, and that they work well for small spaces, the major drawback was the idea that when you shower, the whole bathroom gets wet.
Originally, wet rooms were completely open without any glass partition, however, a simple fixed glass panel creating a walk-in shower area is a much more practical choice and the general trend for wet rooms has evolved to include some sort of shower screen.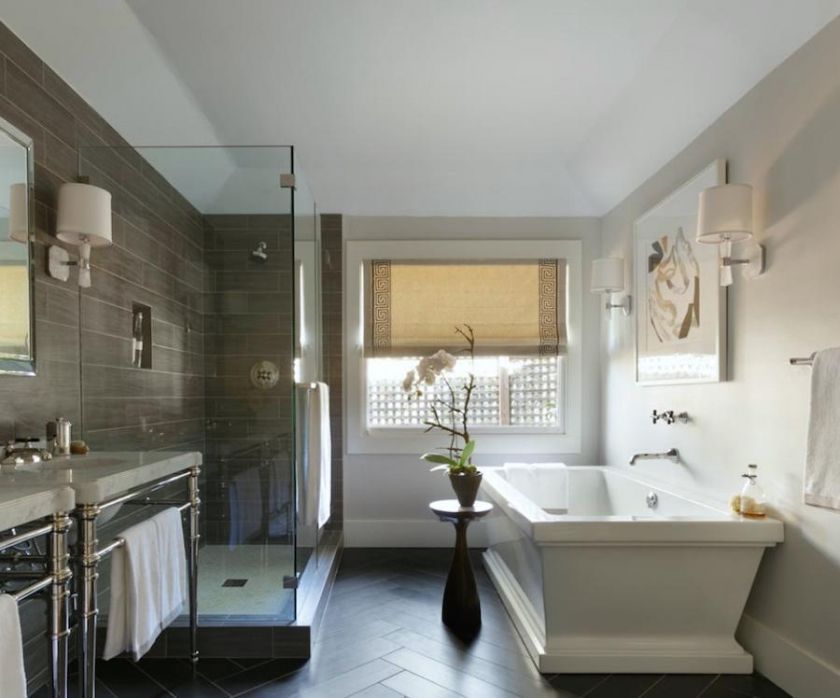
Now, in terms of modern bathroom ideas, wet rooms are certainly up there with the most popular. While the process of installing a wet room might be more disruptive and expensive than a standard bathroom re-fit, by tanking the envelope of your bathroom, you can streamline your floor tile finishes and create level-access showers which are more practical.
All-in-all, this means a more minimalist, modern bathroom, but the design possibilities don't end there. From types of floor and wall finishes to screens and alternative bathroom layouts, take a look at our gallery of the very best in wet room ideas to inspire your space.
Wet room ideas
Wet rooms are ideal as small bathroom ideas or awkward spaces such as below sloping ceilings or in rooms with height restrictions. They’re a job best left to the professionals to ensure adequate drainage, tanking, and slip resistance. If you love the spacious look of a wet room, creating a wet room-style showering area is much easier thanks to the variety of off-the-shelf low-profile shower trays, recessed storage niches, and frameless glass shower screens and hinged doorways now on offer.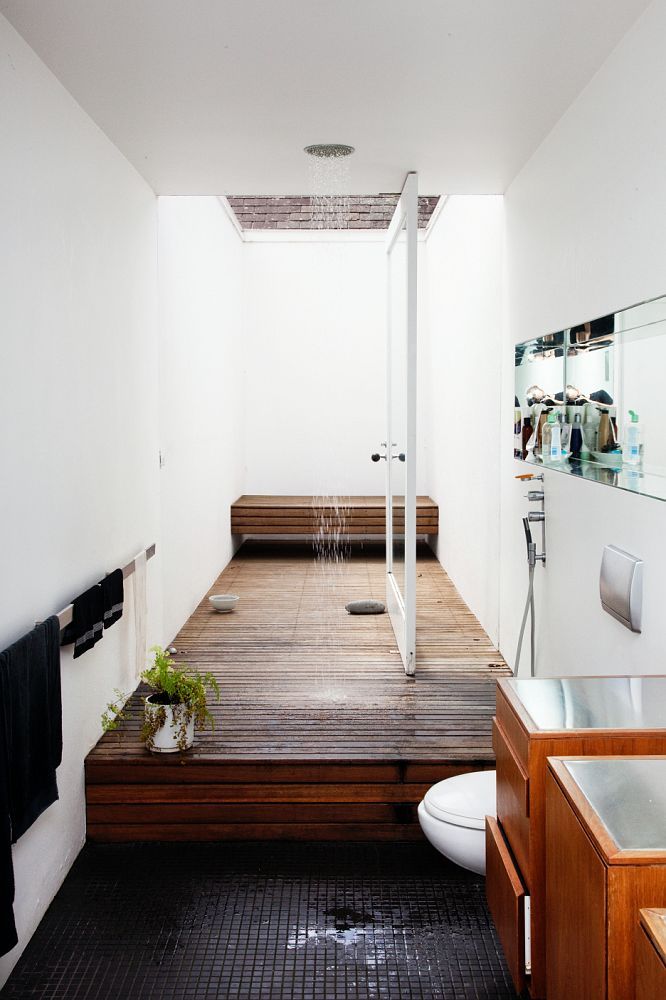
Bespoke trays and screens offer the option of creating a generously sized shower room – perhaps for two – where you can take advantage of the latest shower systems that transform washing into a wellbeing experience, with their wall-mounted body jets and rainfall showerheads incorporating steam, aromatherapy, and chromotherapy features.
(Image credit: Future)
There are some practicalities to consider as part of your wet room design too. One of the first things to consider when planning a wet room is where to position the drain. Ideally, the drain should be as far away from the bathroom door as possible, to minimize any risk of water escaping the room. If you have a wooden sub-floor, the way your joists run is crucial to where your drain can be positioned. A gentle slope or gradient in the main shower area will help ensure that water flows away easily into the waste.
In a wet room, the shower area is flush with the floor level and the drain is fitted into the fully tiled floor.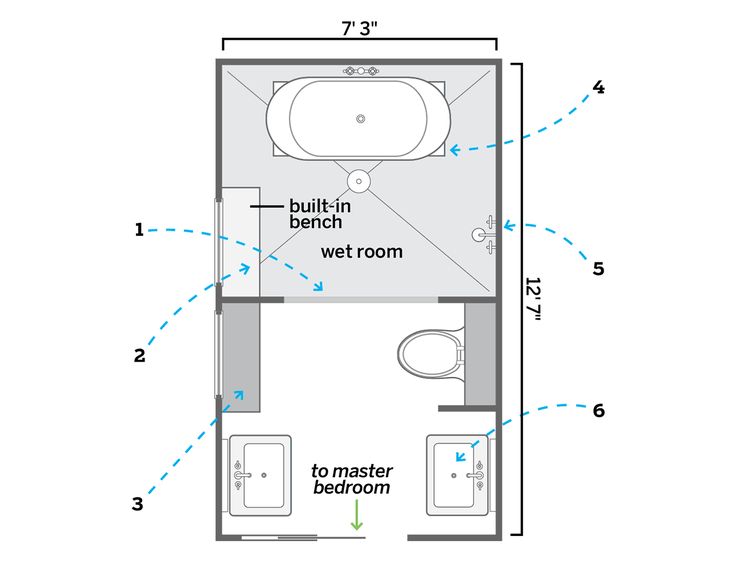
1. Use tadelakt for an on-trend wet room
(Image credit: Darren Chung)
Tadelakt, a traditional Moroccan polished plaster has become a bathroom trend for wet rooms thanks to its good looks and practical nature. 'Homeowners are creating design-led wet rooms without grout lines that can collect dirt and grime,' explains Ian Kozlowski, founder of Decor Tadelakt , 'but it's also an eco-friendly, unique wall covering, offering minimalist beauty and texture.'
Polished with olive soap for a waterproof finish, tadelakt can be used across all the walls in a wet room for a seamless finish, however, it's not really suitable for flooring, and should be combined with tiles or another bathroom flooring idea.
(Image credit: James Merrell)
When it comes to choosing bathroom tile ideas, mosaic tiles have a lot to offer. They are not only easy to apply, and can be worked well around a shower drain without awkward cuts and fussy detailing, but they can also be used to create bold designs like this two-tone stripe wet room, which runs into the shower area.
Mosaic tiles are also great underfoot, with extra grout lines creating a non-slip surface. However, be wary that all this extra grout isn't always a practical choice when it comes to keeping your wet room clean and looking its best.
3. Or choose large format tiles for a practical wet room
(Image credit: Anna Stathaki)
If you ask Roisin Lafferty, creative director of Kingston Lafferty Design , she'll warn you against using excesses of small tiles in wet rooms. 'I am an absolute lover of detailed and intricate tiling, however not for a wet room – where it’s a case of the less grout the better for longevity and cleanliness,' she says.
'Large-format marble is timeless and very practical, just make sure you have a slip rating if required. Large-format terrazzo or tiles give a similar streamlined effect. And for the highest-end finish, opt for a seamless full-height glass screen with minimal framing or fittings.'
When using large format tiles for a walk-in shower, you need to make sure you specify anti-slip tiles on the floor, especially for shower tile flooring ideas where there's the greatest chance of slipping on wet flooring.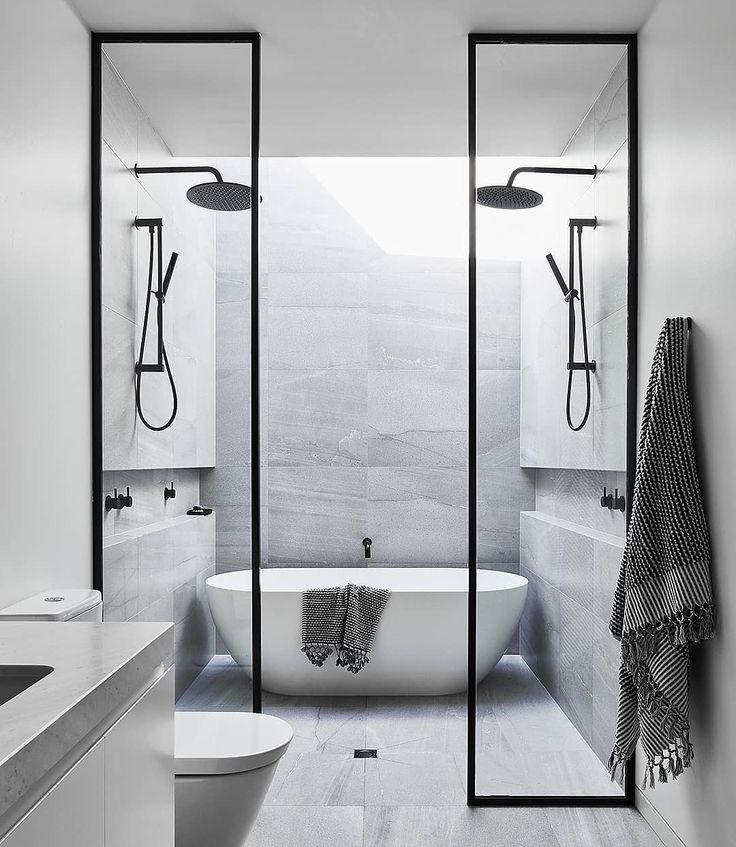
4. Pick a folding shower screen for a small wet room
(Image credit: BC Designs )
Wet rooms have a great advantage in a small bathroom layout in that they don't require bulky shower trays or enclosures, meaning that it's possible to squeeze a shower into a tight corner, often next to a bath.
'When it comes to showers, a separate shower can often be considered a luxury if space is tight. However, there are a couple of clever ways around it including wet rooms and folding shower screens that take up much less room than a typical shower,' says Barrie Cutchie, design director at BC Designs.
In this small bathroom shower idea, a fixed screen would have made access to the shower and the bath difficult and cramped, while the folding shower screen still helps to keep water in one area of the wet room.
(Image credit: Drummonds)
Reeded glass isn't just a huge interior design trend, it's a no-brainer for a beautiful wet room. Not only does the texture of this glass add to a richer scheme, but it can also be used to create pockets of privacy in a wet room, whether it's being used by more than one person at once, or shielding a shower from the view of a window. There are plenty of shower screens on the market featuring reeded glass too, while enclosures using this type of glass are harder to come by.
Reeded glass is also a little more forgiving than standard glass when it comes to watermarks and limescale, making it a practical choice too.
6. Opt for a modern Crittall-style shower screen
(Image credit: Day True)
Just as steel-framed dividers and doors are much-loved elsewhere in our homes, Crittall-style shower screens are a popular choice for bathrooms and wet rooms for a luxe addition to the space.
In this design by Day True , the wet room also positions the shower underneath a large roof light, bathing the space with natural light while retaining its sense of privacy.
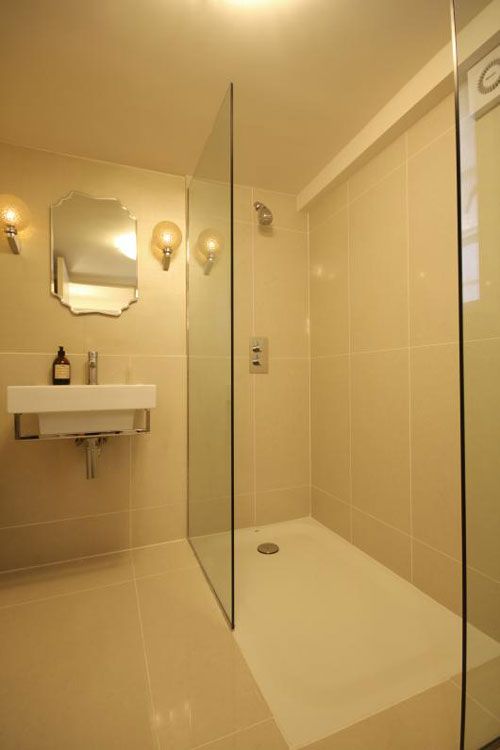
7. Or go for a minimalist shower screen
(Image credit: Brian O'Tuama Architects)
While you may be tempted by these feature shower screens, sometimes the best option for a wet room is the simplest. As you have the design possibility to use one tile for flooring throughout a wet room, and with no trays or enclosures to carve up the space, a minimalist shower screen, like this used in this project from Brian O'Tuama Architects , which highlights the seamless nature of the space.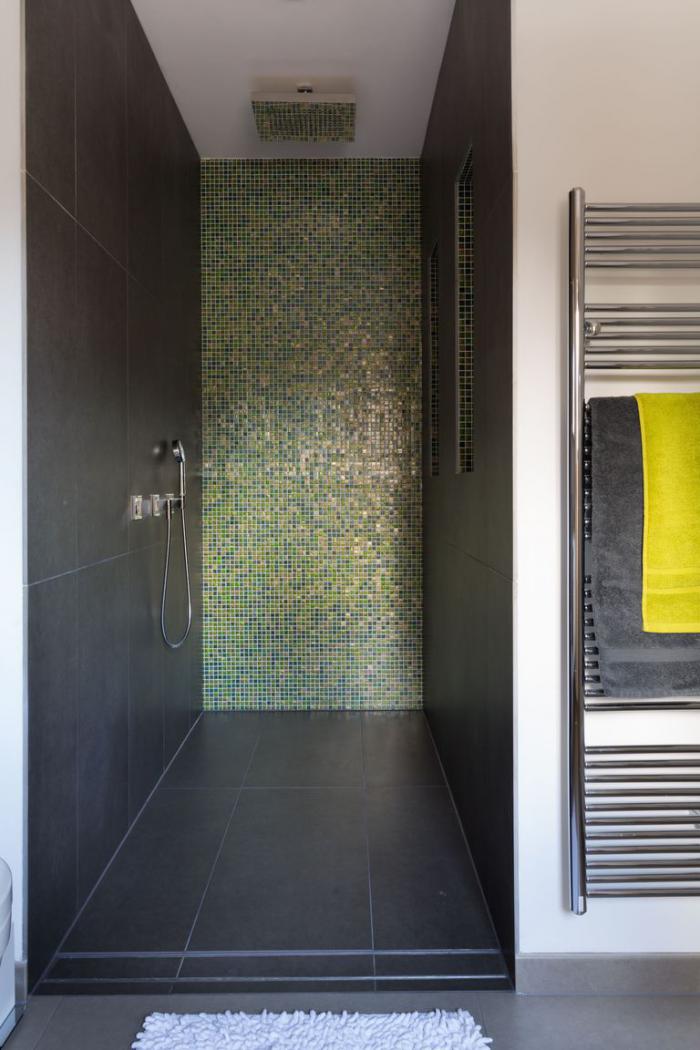
Consider slimline frames and concealed fixings, as seen in this brass and marble bathroom idea, reducing visual noise for a picture-perfect wet room
(Image credit: Mandarin Stone)
The beauty of a wet room is that you don't have to have a screen at all if you don't want to. However, practically when using the space, and for those using it after you, it can help to consider where water will sit in the space. In an ideal world, you'll want water and spray to not reach areas like the basin, where you might want to later stand with dry feet.
'If you are embracing the full wet room look and omitting any sort of enclosure or screen, it is fundamental to think about your choice of sanitaryware, as it is likely that it will get wet from the spray of the shower or the condensation in the room,' says C.P. Hart 's Rebecca Milnes. 'Opt for ceramics that are flush to the wall and are ideally wall-mounted. A wall-hung toilet is a brilliant choice in a wet room, as there are no areas for water to pool and makes cleaning easier.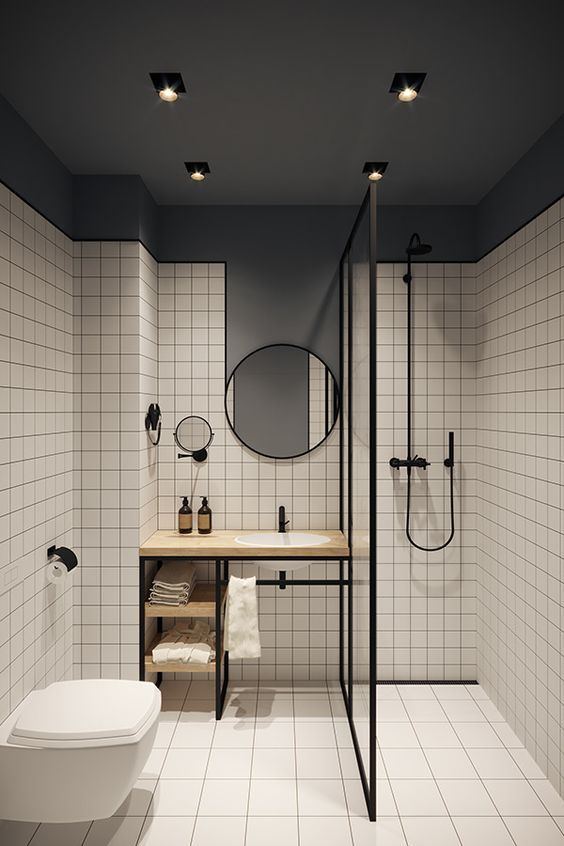 '
'
(Image credit: Darren Chung)
As wet room ideas don't have to have fixed shower enclosure sizes, you can use this as an opportunity to install a double shower set-up. Do you need or will you use two showers in the same space? Only you can answer that, but for a luxury bathroom idea, they can't be beaten.
This bathroom design, which includes a BC Designs bathtub, incorporates a micro cement shower floor running throughout the wet room, adding an industrial contrast to the marble and luxury fittings used.
10. Create an enclosure for a partial wet room
(Image credit: Matthew Williams)
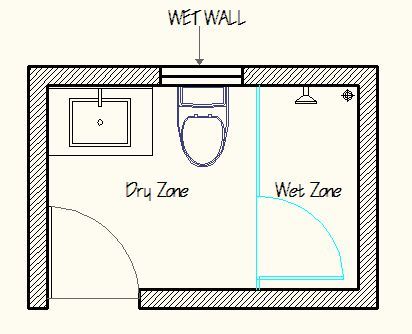
To get the best of both worlds of a wet room, it's possible to divide your bathroom into wet and dry zones. This is usually done by combining the bath and shower into a wet room set-up, separated by an enclosure, but properly tanked in the way a wet room should be.
This leaves your basin and WC out of the wet zone, making it easier to use these spaces after someone has showered without entering into a wet, humid space.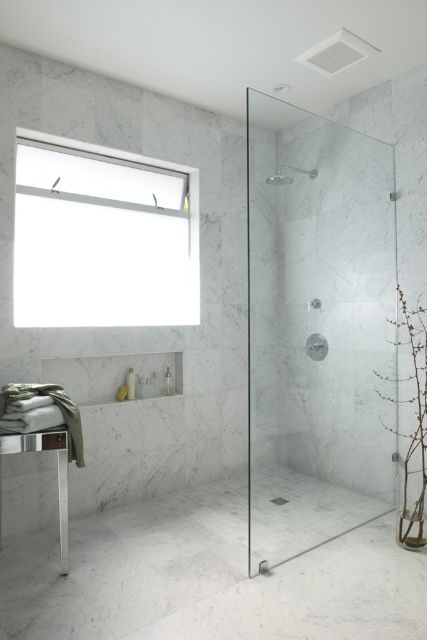
11. Create a broken-plan wet room
(Image credit: McCrum Studio)
This wet room set-up by interior designer Katie McCrum of McCrum Studio is another way you could look to divide up a bathroom for a more contained wet zone. This broken-plan enclosure means that the wall intersecting the bathroom could be used for this clever bathroom mirror idea, freeing up space in the bathroom, while the showers and bath sit beyond in a dedicated wet zone.
(Image credit: Anna Stathaki c/o BC Designs/C.P. Hart)
Wet rooms are well-loved for their walk-in shower designs, but how about a walk-through shower? In a design such as this, from C.P. Hart, a walk-through wet room set-up allows for an unusual freestanding bath idea, laid out with the tub in the center of the room, meaning the shower can be used from either side without disturbing the flow of the room.
While walk-through showers may take up extra space for both an entry and exit to the showering area, they have a luxurious feel about them that makes them well-suited to high-end bathrooms.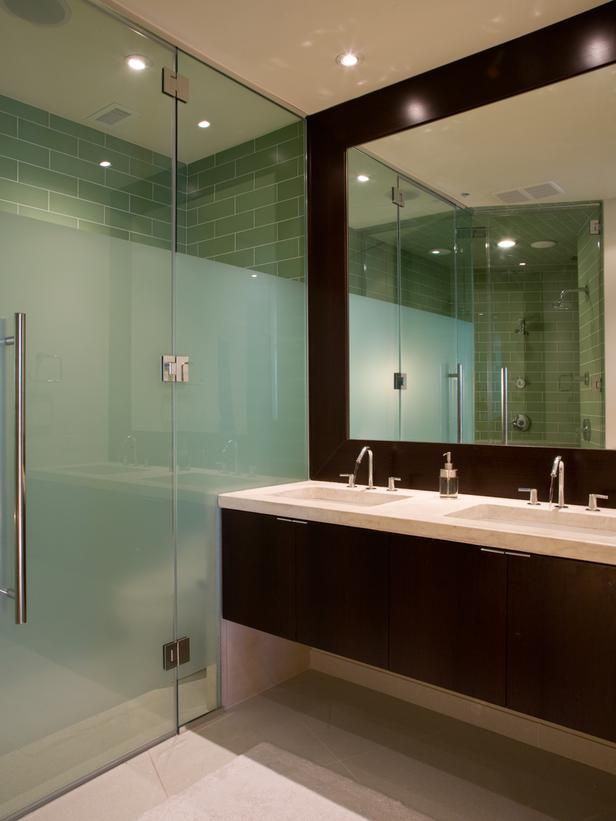
13. Try this clever idea to protect wet room windows
(Image credit: West One Bathrooms)
While this wet room from West One Bathrooms might be small, it's perfectly formed. Not only does this Crittall-style shower screen and hexagonal tile create a modern look, but the designers have come up with a clever way to be able to position the shower next to the window, without exposing it to water spray and excess moisture.
A hinged screen over the window not only protects it from the shower, but provides privacy when using the shower without sacrificing natural light. Plus, it can still be opened, like a traditional window treatment to enjoy the view.
What do you need to have a wet room?
To create a wet room, you'll need to create a watertight environment, for example by tanking both the floor and walls of the room to protect it from any leaks. Once a watertight membrane is laid, the room can then be tiled.
When deciding which wet room system to go for, think about what your sub-floor is made of. There are systems for both solid and wooden floors. If you have a concrete floor, it can be quite invasive to channel in a waste and create the gradient fall required for drainage.
Forgoing a shower tray in favor of a wet room allows the floor tiles to run through to the shower area, which adds visual space to a room. However, not all surfaces are safe to use in a wet room setting and it is crucial to know what the slip rating of the material is. C.P Hart's Rebecca Milnes recommends using a material with a structured, textured finish to give extra grip in wet areas.
Tanking is also essential in a wet room. This is a multi-step process that entails several layers of waterproofing to ensure an excellent seal – much like a swimming pool. The two main approaches for tanking a wet room are using a self-adhesive bitumen-based waterproof membrane or applying a paint-on liquid wall membrane. It is always best to speak to your supplier about the best system for your project.
Hugh is the Deputy Editor of Livingetc. com. From working on a number of home, design and property publications and websites, including Grand Designs, ICON and specialist kitchen and bathroom magazines, Hugh has developed a passion for modern architecture, impactful interiors and green homes. Whether moonlighting as an interior decorator for private clients or renovating the Victorian terrace in Essex where he lives (DIYing as much of the work as possible), you’ll find that Hugh has an overarching fondness for luxurious minimalism, abstract shapes and all things beige. He’s just finished a kitchen and garden renovation, and has eyes set on a bathroom makeover for 2022.
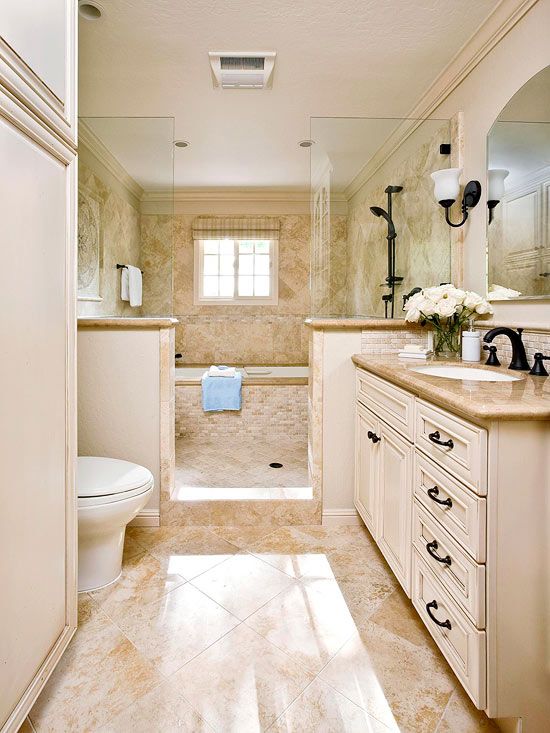
135 photos of the best decoration and design ideasDecoration and interior design
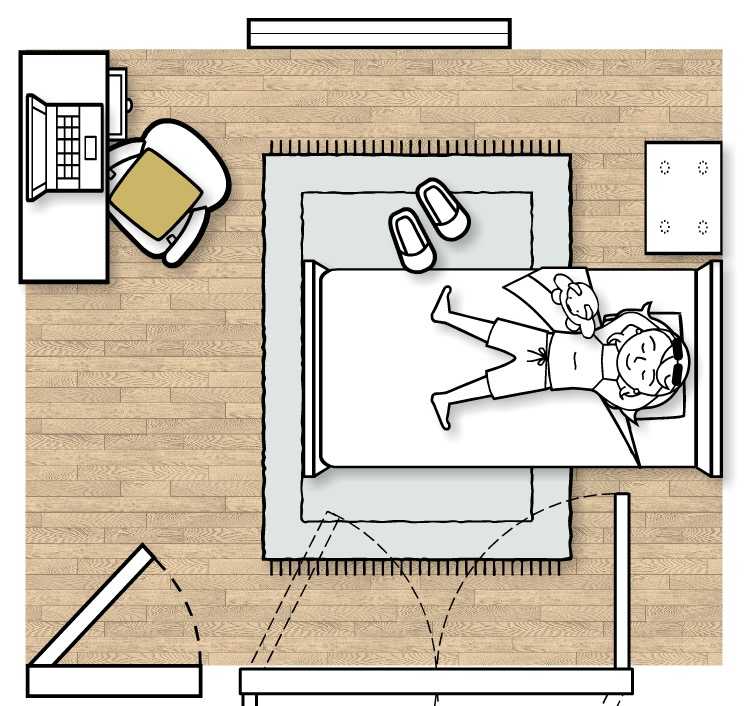
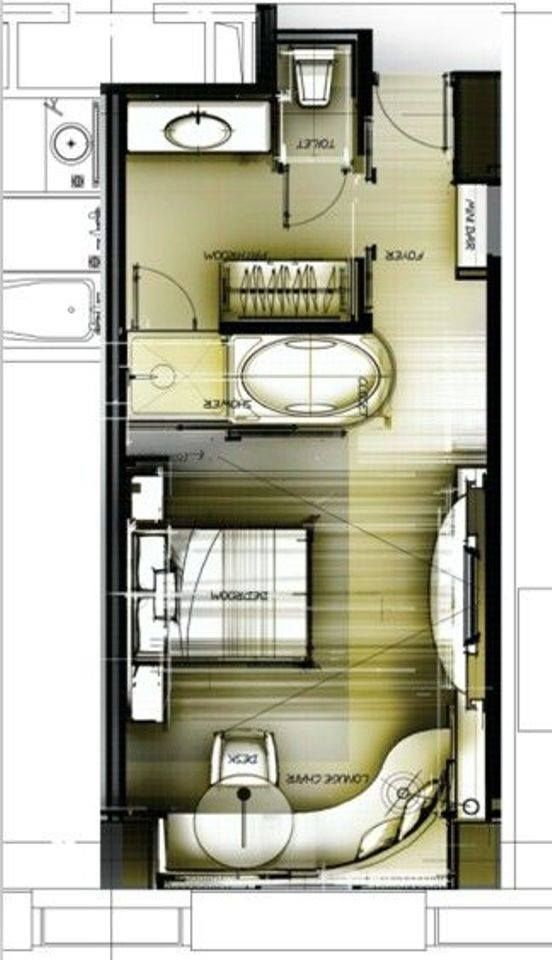
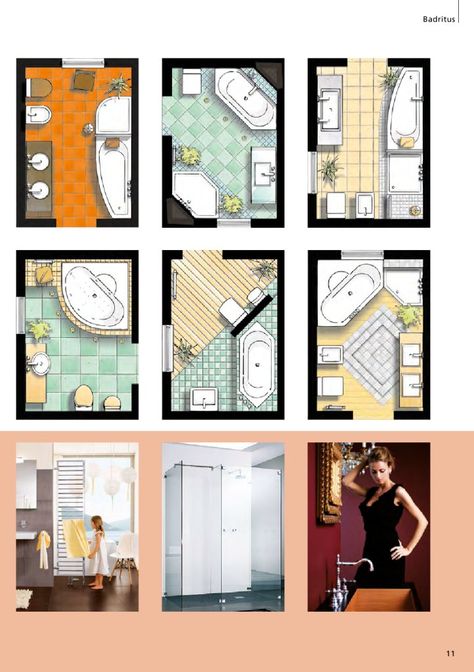
General layout of the room and preliminary design
When creating an ideal layout, it is important to draw up a preliminary project, taking into account the architectural features of the room and existing plumbing fixtures and individual pieces of furniture needed to create a cozy corner for relaxation .
A cozy and comfortable environment with the right organization of space helps to turn even a small and compact bathroom into a spa and a place for obligatory procedures, with laundry elements and storage systems for textiles and hygiene items.
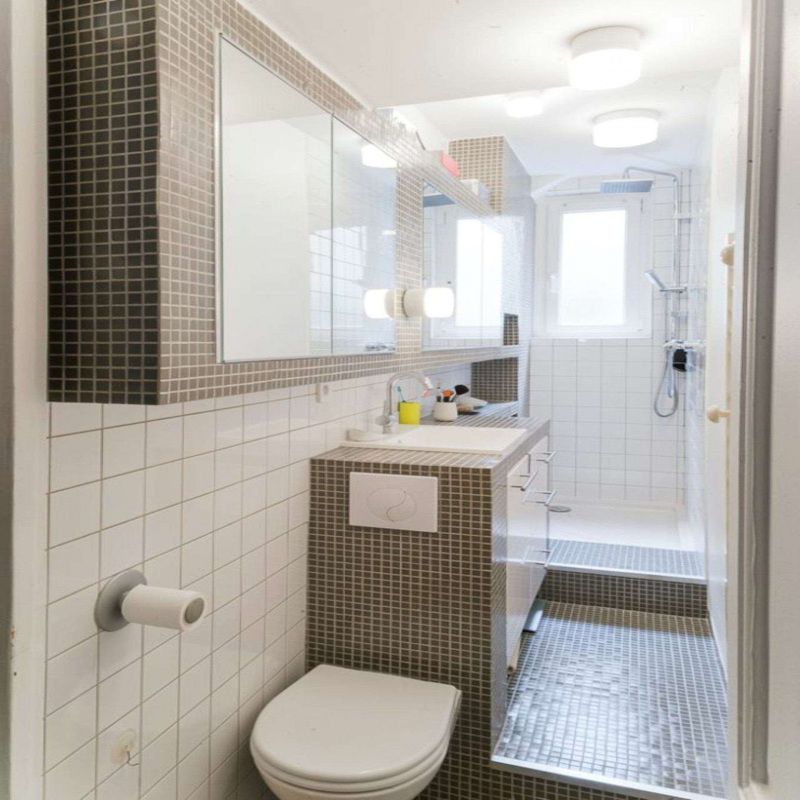
Plasterboard – an inexpensive and easy option
Moisture-resistant plasterboard makes it easy to divide a bathroom
into several functional areas. The easiest option is to mount blind partitions that separate areas that need insulation from each other. But designers do not recommend looking for easy ways. It is easy to turn a plasterboard partition into a wall with windows or niches, which can later be used to arrange decor and all kinds of accessories needed in the bathroom.
Another option to get the most out of drywall constructions is to equip them with side drawers. In such cabinets it is very convenient to store washing powders, stocks of soap, cleaning products.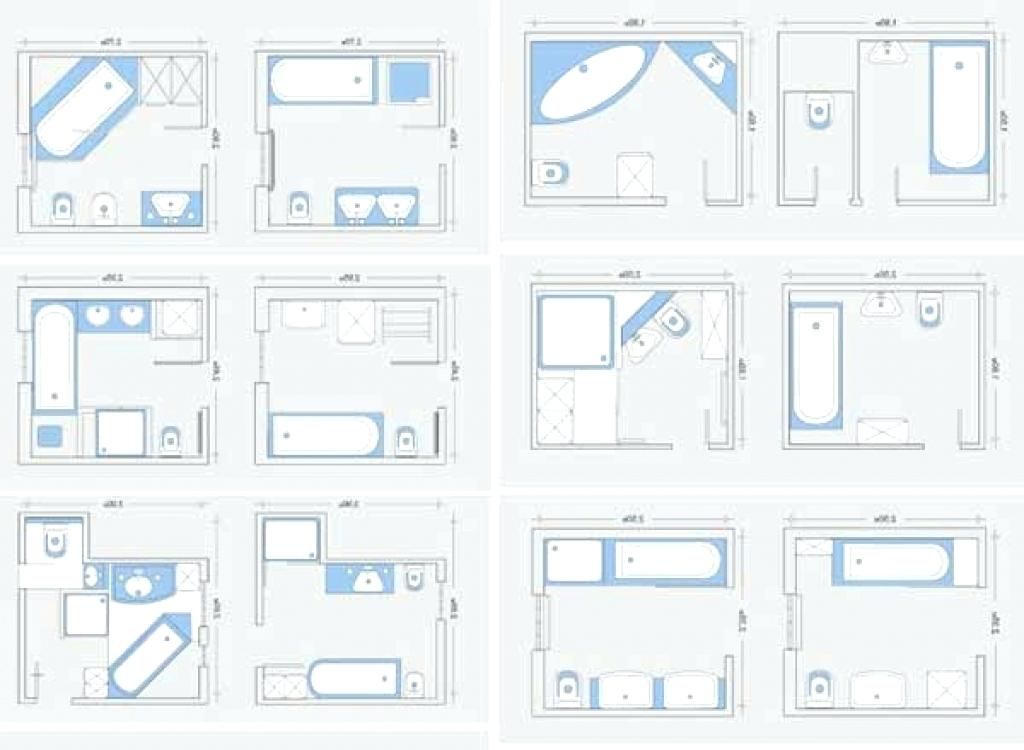 If you dream up a little, you can combine the solid part of the design with a side drawer with the top part, complemented by niches. Such zoning of the bathroom with partitions will be as functional and convenient as possible.
To hide unattractive drywall, it can be decorated with tiles, mosaic tiles, decorative plaster, textured paint, artificial stone, and any other finishing technique suitable for use in wet areas. The right finish will help fit the drywall construction into any design style, whether it be luxurious baroque or plain country.
Zoning the bathroom for useful use of the area of the room
Positive energy and a comfortable psychological environment are achieved by zoning the room, distributing the main zones and maximizing the use of the area with the possibility of creating personal space for all family members.
Free access to the bath or shower, sink or cabinet with accessories, washing machine or mirror is ensured by the correct layout and distribution of functional areas, highlighted by arranging a podium or choosing the right lighting system.
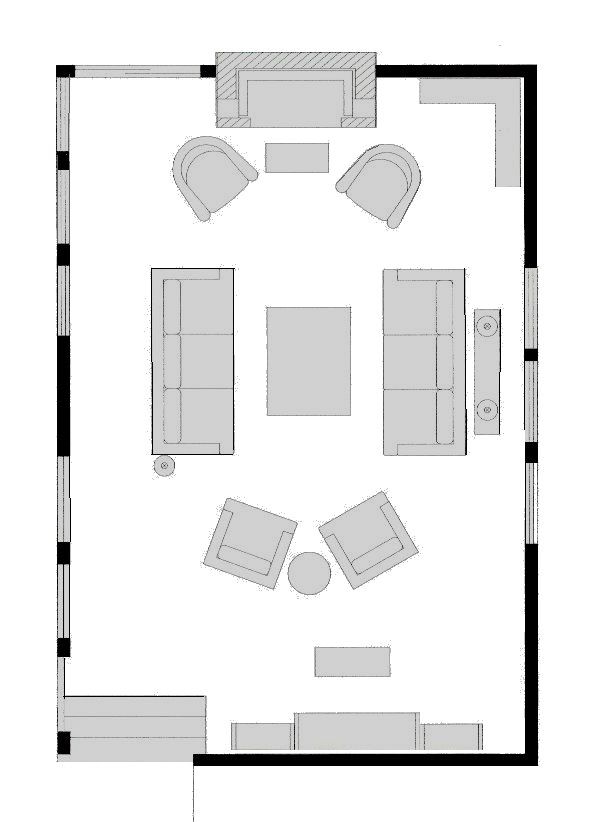
Equipment layout in a large bathroom
A large bathroom offers more room for imagination. Here you can experiment with styles, colors, decorative materials.
Designing a large bathroom can be as challenging as planning a small one. If in a cramped room it was more important to correctly place plumbing and use every square centimeter, then in a large bathroom it is important to avoid “dead zones”.
How to design a large bathroom without being too empty?
1. Try to highlight additional areas:
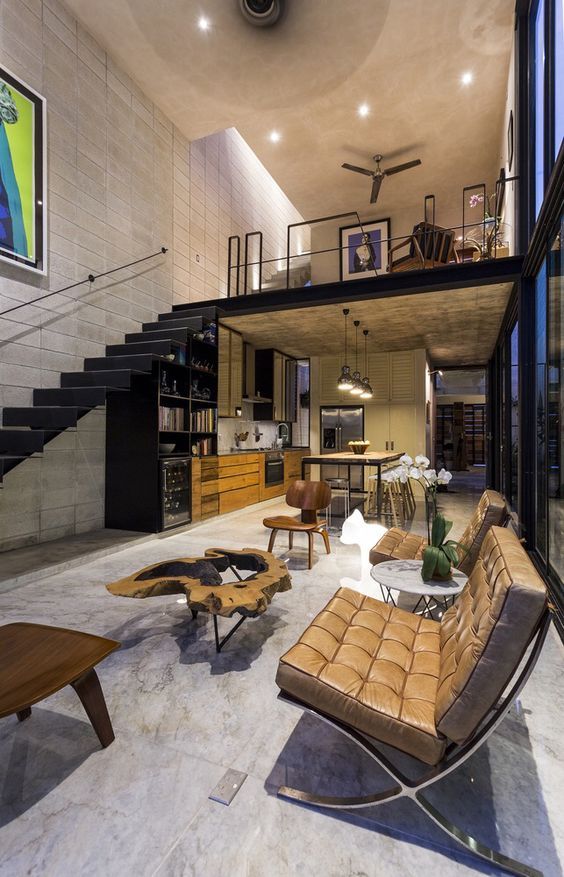
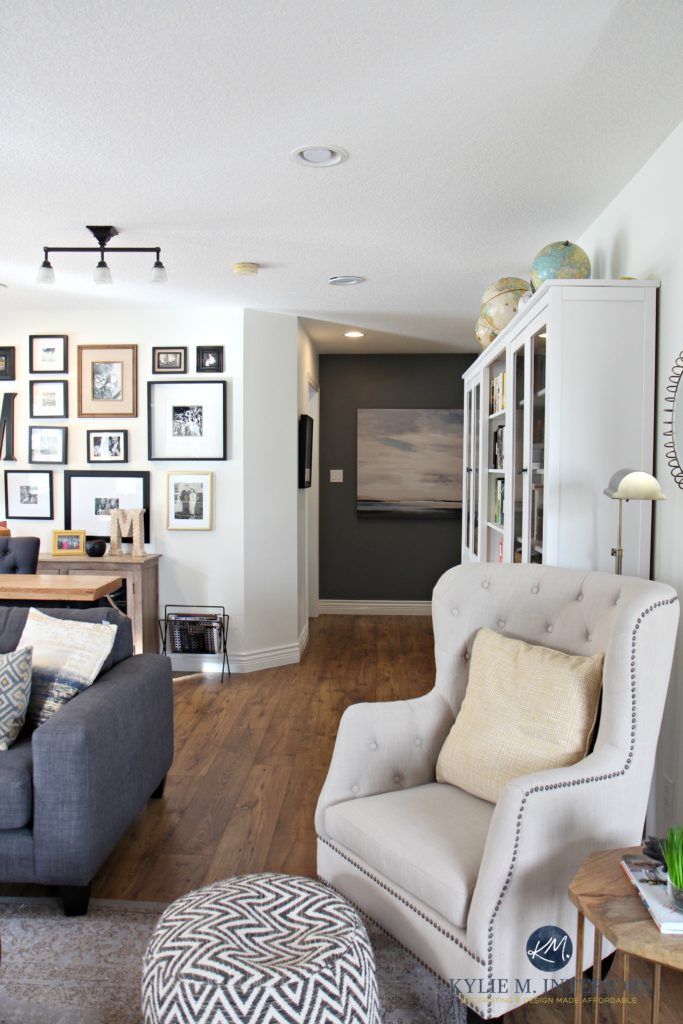
- Recreation area (with a comfortable armchair or pouffe and a glass coffee table).
- Storage area . The spacious bathroom can fit a large closet, and several cabinets or a chest of drawers at once.
- SPA area . Here you can install a massage chair, a portable spa pool or even an infrared cabin.
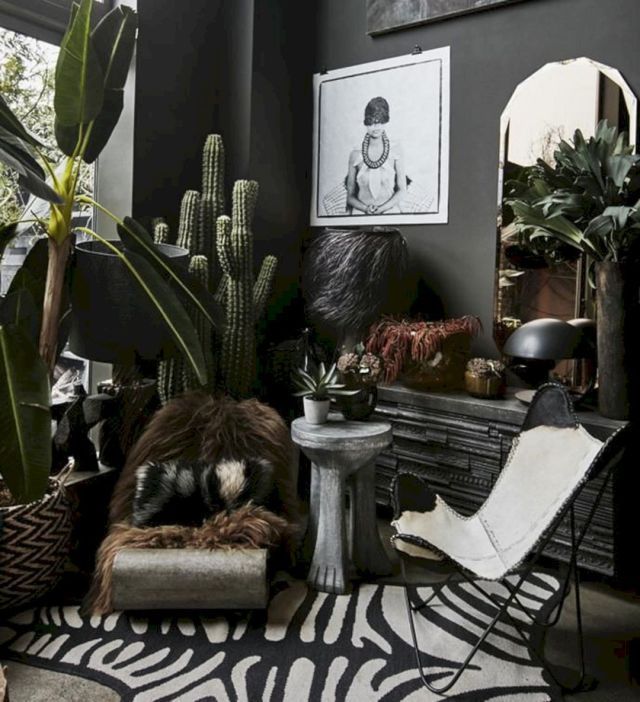
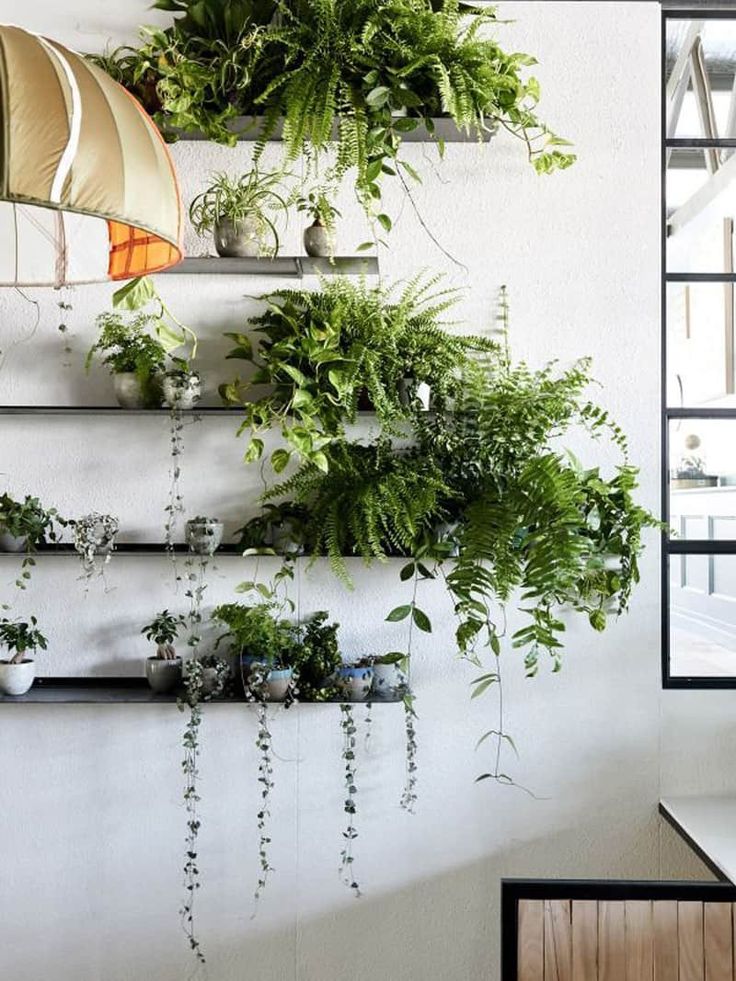
- Green area with live plants.
 Why not arrange a small garden in the bathroom? The abundance of moisture is a comfortable environment for tropical plants.
2. Consider a system of additional partitions. It is a spacious bathroom that allows you to highlight individual areas not only visually, but also with the help of partitions. So, a mini-sauna can be hidden behind a glass partition.
3. Particular attention should be paid to decor. It is important not to overdo it here: an abundance of small decor details will break the overall composition and break the harmony. On the other hand, without decor, the interior of the room will look unfinished.
The possibilities of a large bathroom
- There is no need to worry about the layout of the plumbing. For example, a bathtub can be installed not against a wall, but near a window or even in the middle of a room, making it the main compositional center of the room.
- Do you like to sit on the side of the bathroom? Now it is possible to make this side wider and more convenient if you mount a special frame.
 Or even “drown” the bath in the floor by organizing a relaxation zone next to it.
 - The spacious bathroom is regarded as a complete room for rest and relaxation. What will make you relax? If there is an abundance of water, then in the bathroom it is possible to provide for the installation of a large aquarium, a decorative waterfall or a fountain. If you are a fan of the element of fire, then why not install a fireplace in the bathroom? Live flame (or its imitation) will create a special atmosphere. If you can’t imagine a good rest without a TV, then in the spacious bathroom there is a place for a “home theater”.
- Layout of a large bathroom with a walk-in shower
Plan of a bathroom with two sinks and a separate toilet Arrangement of equipment in a large bathroom Large bathroom with a Jacuzzi partitions
Niches and corners are great for filling functional furniture, corner structures help to properly and fully use the free space of the room, and in niches you can organize spacious storage systems with mirrored doors.
Low partitions with hinged or built-in shelves help to place the necessary toiletries and towels, while they are used for space zoning, and on full-fledged structures you can place hangers for bathrobes and other textiles.
The task of zoning is to place all bathroom facilities as functionally as possible, as well as to hide architectural flaws.
The main thing in such a layout is to ensure maximum human safety and create conditions under which visiting this room will be as convenient and enjoyable as possible.
Unfortunately, bathrooms are often so small that one can only dream of convenience. However, it is worth at least approximately following the rules, taking into account the available opportunities.
Rule #1.
Leave 75 cm of free space between each piece of plumbing fixture and between fixture and wall/door.
Rule #2.
However, this rule of 75 cm of space between equipment does not apply to the toilet and bidet. The distance between them should be approximately 35 to 45 cm. To the right and left of these two objects, the distance to walls or other plumbing fixtures should be at least 35-45 cm. There should be 50 cm or even more free in front of the toilet, regardless of what is located there - a door, a shower cabin or a sink.
Rule no. 3.
When washing over the sink, a person bends over, which means that there must be enough space in front of the washbasin.
Rule No. 4 the edges of the toilet bowl by 20-30 cm, and the height of its attachment from the floor is 60-70 cm.
Rule No. 5.
When a fixed shower enclosure is installed, its size must be at least 75 x 75 cm, and this is provided that people of average build will take a shower. Ideally, the shower enclosure or shower enclosure should be at least 90 x 90 cm.
One of the most common zoning methods is: to date. They do not have to reach the ceiling: the option looks cozy when the partition is made a little lower in height. Zoning with finishing materials Suspended and multi-level ceilings, cleverly combined with the floor, can play a major role in zoning the bathroom. With the selected material (tiles, mosaics, etc.), a kind of “carpet” is laid out on the floor, and the bath and toilet areas are highlighted in various shades, combined with the colors of the “carpet”. Visual zoning The use of accents made by light also falls under visual zoning. The main role in such cases is played by the ceiling - it is made multi-level, various niches, spotlights and lighting are placed under it. Glass mosaics can be laid out on individual walls, partitions or plumbing installations covered with plasterboard. If you make a bright color accent on the area that you want to emphasize, then it will not go unnoticed. For the sanitary area, on the contrary, it is recommended to mute the colors and choose discreet pastel colors. EC "Construction Rules", No. 35/2, December 2013 The copyright holder of all site materials is Construction Rules LLC. Full or partial reprinting of materials in any sources is prohibited. Planning your own bathroom/toilet or individual rooms requires the selection of the right lighting system, which will help to saturate the space with light and visually complement the interior. For small spaces, an excellent option is the American system, which does not use the main light source, but uses several spotlights or ceiling lights, for an intimate setting, not bright and subdued lighting is used. A combination of shades and different finishing materials is used to emphasize the main design elements and slightly level out auxiliary areas. So, for example, with the help of a contrasting color scheme, you can highlight one wall or part of it in order to emphasize its significance and decorative advantages. The play of textures also copes well with this role. Wall panels made using tiles or mosaic technique, stained glass inserts, relief on a smooth surface, a play of contrasts - all this also divides the room into several sections. The flooring also divides the space very well. You can pick up tiles of different colors and lay them out so that the contrast is as pronounced as possible. The texture is of great importance: it is appropriate to put embossed non-slip tiles near the shower stall or bathtub, and further, in the recreation area, you can apply a smooth glossy surface. To zone the bathroom, you can use different techniques: from pretty baskets and shelves to expensive works of art and architectural delights. The main thing is to focus on one method: this will create the desired effect and help maintain the integrity of the design idea. Source Bright and shiny mirror surfaces reflect light well, so they are often used in bathroom interiors to saturate the space with light and give it extra volume and create the illusion of spaciousness. Matte cladding materials are not so popular, but in combination with textured cladding they are necessary to hide water stains, therefore they are used to decorate partitions in the bathing area, decorate the doors of the shower cabin or dressing screen that looks effective in the interior. This technique is also called architectural zoning and can be used at the construction stage of an object or during a major overhaul of the premises. Empty space is easier to refine: with the help of special techniques, a room can be completely redone, give it the desired shape and place the necessary accents. Partitions and screens in various heights and widths are the main method to turn a boring bathroom design into a well-thought-out conceptual project. Depending on the style of the future interior, partitions can be plasterboard, glass, brick. Their shape, size, as well as whether they are static or sliding - depends only on individual preferences. Niches and shelves are also often used to visually divide a space into zones. They can be either free-standing or wall-mounted. In addition, niches carry both a decorative function and an engineering one. They can be used as a place to store the necessary things, as shelves for jewelry and decor. Also, a protruding niche can separate, say, a washbasin from a toilet bowl. Podiums and steps are used to make a visual accent on the main object. As a rule, this is a bath, especially if it is designed in a certain style and is an example of design excellence. The podium can be low, the size of one step, or, conversely, have a fairly significant elevation: this technique is good for creating the effect of a bath deepened into the floor. Properly selected furniture and functional sanitary ware are necessary for the practical arrangement of the room. An excellent solution would be a shower cabin with a high bathtub, a sink built into a solid countertop will allow you to arrange it with sliding doors and use the space for organizing storage systems where you can hide the necessary engineering communications and pipelines. The arrangement and furnishing of the functional areas of the bathroom as part of the layout of the bathroom in the apartment is based on the concept of harmonious combination and compliance with a single stylistic idea, complementing it with thematic accessories, you can create an original and sophisticated interior. The first thing that should puzzle you when building a partition between the bathroom and the toilet is the material from which it will be made. In the latest designs, everything is used for these purposes - glass, plastic, aluminum, wood and wood derivatives, and so on. Separating the toilet from the bathroom in a shared bathroom is necessary for those who have several families living in the same apartment - this is a more practical option, since you can use different plumbing equipment without interfering with each other. Also, these changes are convenient if your children are growing up, since it is not convenient for adults to use, for example, the toilet when the child is bathing. Secondly, this is what kind of this partition will have - decorative (when only visibility is closed) or solid, when one room is completely separated from another and another door is installed. Now the trend is such that just decorative partitions predominate. It will not be difficult for you to choose the option you like for yourself - they are full of periodicals of the corresponding direction and ideas of your environment that have already been put into practice. Glass partition between bathroom and toilet Before answering the question of how to make a partition in the toilet, we will analyze their types in more detail, and only after we move on to the installation features. The 10.3 m² bathroom has an additional niche. If you make the right arrangement, then in such a room you can easily organize a guest area. To do this, you will need to move the interior doorway and put three small partitions. This area has a washbasin and a toilet for guests. The entrance to the master bathroom can be made separate, or it can be passed through the guest area - then additional space will be freed up for placing cabinets. The bathtub and washbasin for the owners are located on a raised platform, and the bath bowl is set diagonally and recessed. This is the case when zoning is emphasized by different levels of sex. In large bathrooms, a mistake when arranging is to place sanitary ware and furniture along the walls, while the central part of the room is not used. This redevelopment is suitable for a room of 7.2 m² and aims to create an intimate corner for taking baths. The bath is placed in a corner and separated from the rest by a special translucent screen, which additionally performs the function of splash protection. In addition, space is freed up for installing cabinets or a washing machine. The double sink can be abandoned in favor of a bidet or urinal and, if desired, hidden behind a partition. Here you can choose between showering or bathing, washing your face alone or with family members. A bathtub is placed against the wall opposite the entrance, next to which there is also a shower cabin. Instead of a single sink, a double one is placed, for this you have to slightly move it deeper into the room. Related article: Do-it-yourself shower in the country: self-care in the field (35 photos) So how many bathrooms are needed in a room: two or one? Is it worth it to combine two rooms together? There is no single answer. Pros: Negative sides of the combination: In any case, the decision will be yours, you just need to carefully weigh the pros and cons. 
 This solution visually adds a certain "constructiveness" to the room. Today it is customary to raise the bath to the podium or “sink” it into the floor. This area should be developed with the utmost care. A large spa bath can be enclosed in a rotunda with columns, a stretch ceiling and local lighting, or you can create a whole rock composition
Visual zoning with the help of mobile items that are easy to move in space is one of the most popular methods with which it is easy to make small changes to any interior from time to time. Turntables and cabinets can save space in a small bathroom.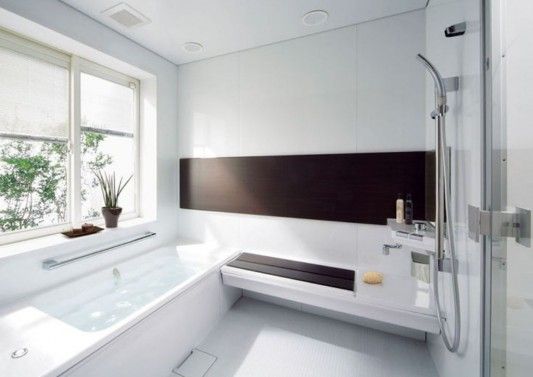 The bath itself can become an independent compositional center of the room.
 Color zoning
It consists mainly in the selection of tiles, which can be of the same color range. To shift the accents to certain objects, they can be highlighted with bright colored, colorful, patterned tiles. A monophonic, made in the same color scheme, you can finish the rest of the room. The result will be a game of contrasts, at the same time the room will be united by a common color scheme. 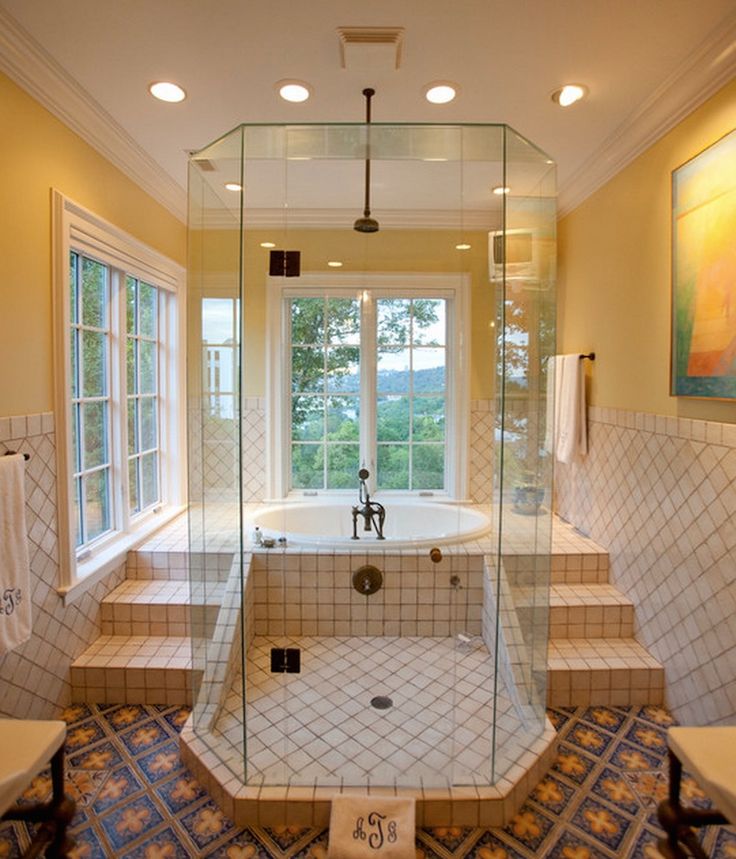
Choosing a lighting system
Bathroom interior: a play of colors and textures
Cladding and materials

Zoning at the design stage
 So, glass partitions will visually enlarge the space and give it lightness, but partitions made of opaque materials will more reliably protect the divided zones and make the bathroom interior more intimate.
 Choice of sanitary ware
 When choosing a bathroom, you can pay attention to the original corner structures.
Practical Issues
 The choice is huge and it depends only on what you want to achieve in the end, what material possibilities and design preferences you have.
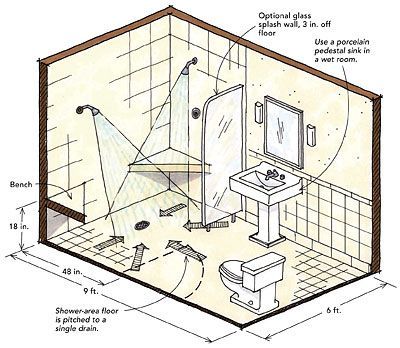
Bathroom from 10.3 sq. meters – making good use of a large space
 If you turn the bath to the center, then this will allow you to put in addition a shower cabin, a second washbasin, and storage cabinets. Free-standing models look best with this installation. For example, on paws.
 Everything at once - 7.2 sq. meters
 A washing machine is placed on the left behind the door, and a toilet bowl is next to the shower cabin.
 Photo gallery of interesting projects of a combined bathroom with a bathtub and a shower Finishing - Kerama Marazzi tiles, British Collection, Wales and Lancaster
Even a small room divider can provide the much-desired sense of privacy in delicate moments
Accordion curtains made of corrugated glass perform not only a practical, but also a decorative function
Another zoning option is a partition made of tinted glass blocks
In this spacious bathroom, separate cubicles are allocated for the shower and toilet
Zones can be divided and so Number of bathrooms in a residential area
 Everywhere has its pros and cons.
Relocation of the wet zone in the apartment. All norms!
Change of area and/or relocation of wet areas of bathtubs and toilets is one of the most common measures during renovation work in an apartment. Redevelopment allows you to make the apartment more comfortable and give it individual features.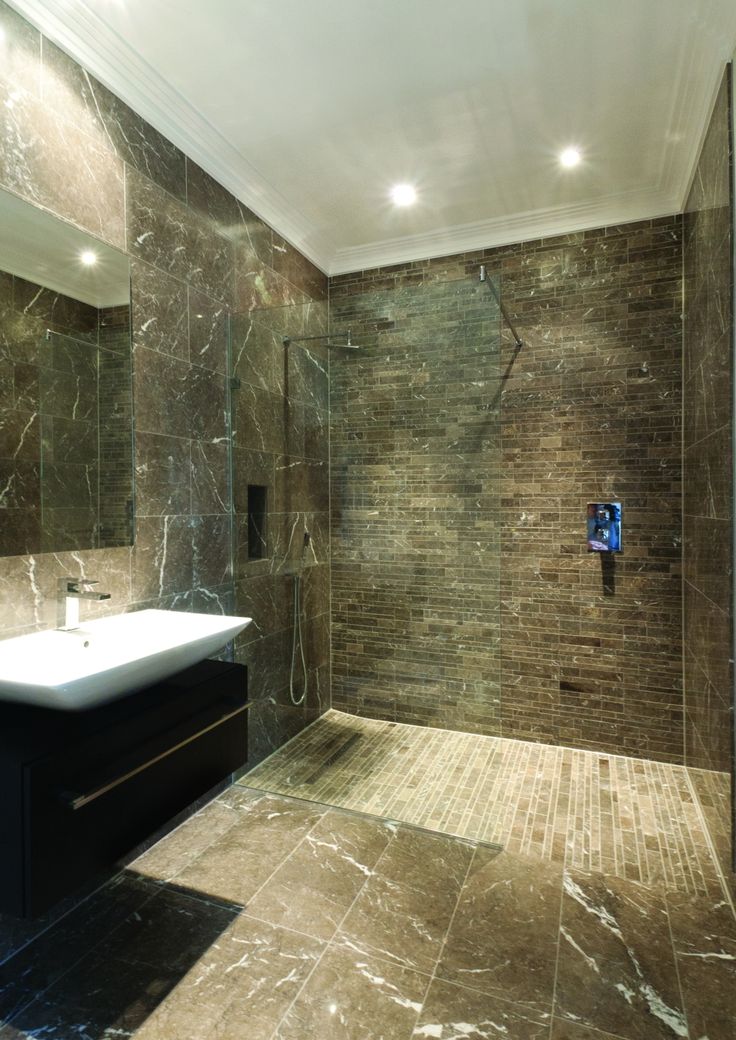
Contents of the article
Wet zone in the apartment - what is it?
There is no strict definition of which places in an apartment should be classified as wet areas. According to established practice, we are talking about rooms in which, according to SNiP, there should be floor waterproofing that protects the lower floors from possible leaks.
In a residential building apartment, waterproofing is required in the bathroom, bathroom, shower room and toilet.
Wet areas often include the kitchen and laundry. These rooms are not as “wet” as a bathroom, and when laying floors in them, laying a waterproofing layer is not necessary, although it is highly recommended.
Wet point relocation
When remodeling an apartment, a combined bathroom, toilet, bath or shower is often moved to a new location or arranged in addition to existing sanitary facilities.
It is not uncommon to move the wet zone when redevelopment of new buildings with free planning and in studios, where the boundaries of these premises are indicated only on paper or laid out from blocks in one row.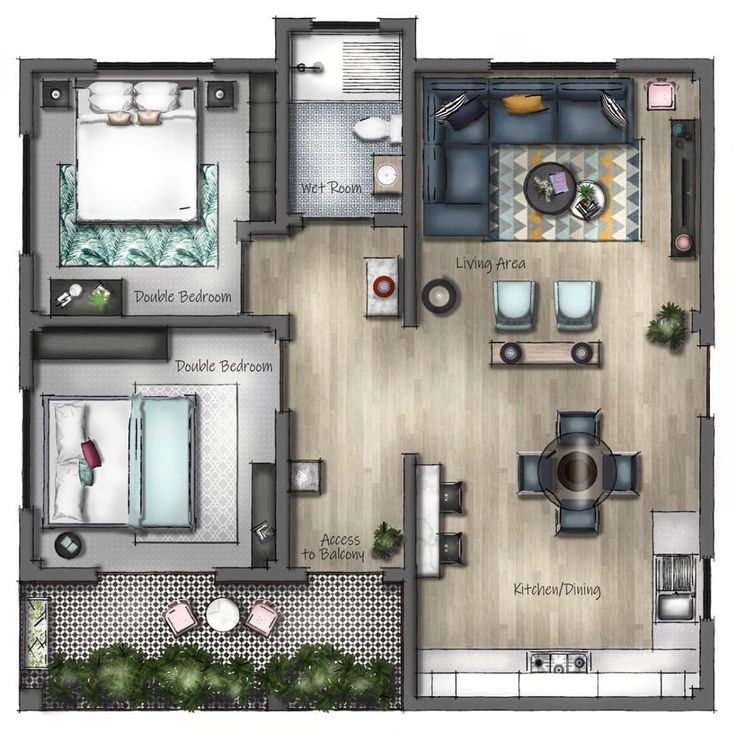
In these cases, special attention must be paid to the laying of utilities, as there are a number of restrictions on the installation of pipelines and installation of ventilation.
The transfer of the wet zone, if there is a residential area below, can only be carried out to a non-residential area. This rule equally applies not only to the bathroom, but also to the kitchen.
Expansion of the wet zone due to the corridor
Most often, when carrying out repair work, a bathroom or bathroom is enlarged due to an adjacent non-residential (auxiliary) room - a corridor, a pantry, a dressing room or a dark room.
Expansion of the combined bathroom in the photo:
Current regulations (SP 54.13330.2016) do not allow the placement of sanitary facilities above the living rooms and kitchens of neighbors. The exception is duplex apartments, where, according to the law, it is possible to place a bathroom above your own kitchen.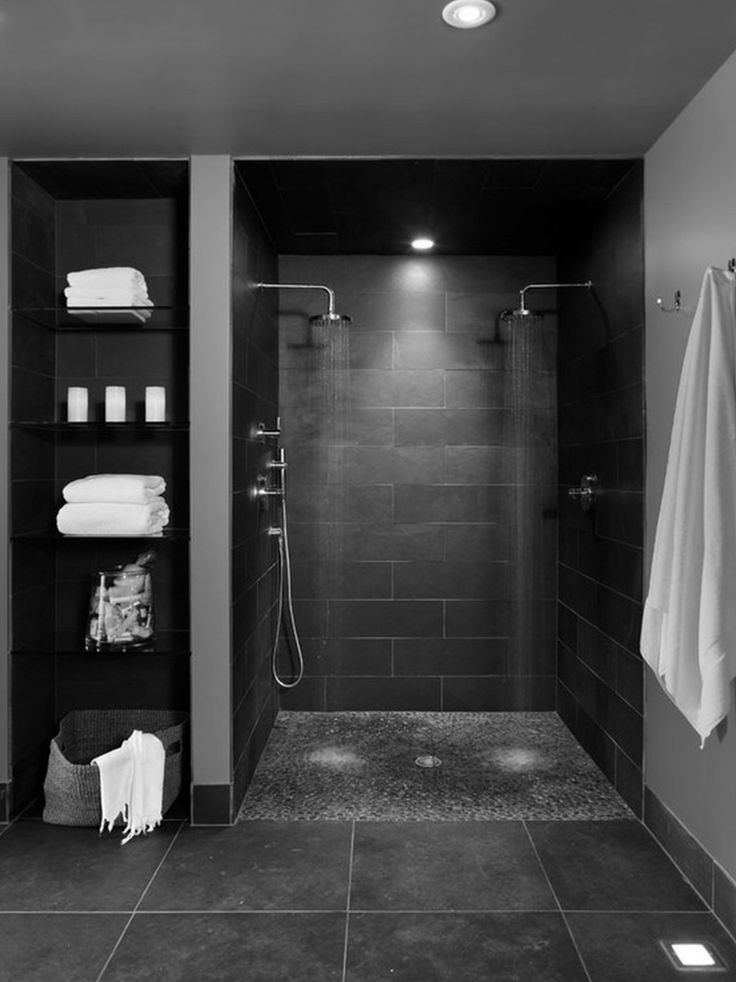
It is also forbidden to enlarge the kitchen by placing it above the living rooms. And it is possible to expand the kitchen space at the expense of the area of the bathroom only on the top floor.
The exit from the bathroom should not be into the living room or kitchen. There is also an exception to this rule - it is allowed to leave the combined bathroom in the bedroom if it is not the only one in the apartment.
Waterproofing of wet areas
The current regulations provide for the mandatory presence of hydro-sound insulation of the bathroom premises, as well as the installation of an overflow sill.
To protect the apartment from the spread of water, the floor level in the bathroom is either made below the level of the corridor, or separated by a threshold more than 1.5 cm high (according to clause 4.8 of SP 29.13330.2011, updated version of SNiP 2.03.13-88)
Technical requirements for waterproofing are set out in SP 71.13330.2017 "Insulating and finishing coatings" (updated version of SNiP 3.04.01-87). Modern combined materials provide both waterproofing and soundproofing floors.
Examples of waterproofing wet spots:
Coordination of the transfer of the wet zone in apartment
An increase in the size of the bathroom, displacement and installation of additional plumbing equipment require mandatory approval (PP-508, art. 25 RF LC).
Coordination of repair work is carried out by supervisory authorities exercising control in the field of redevelopment, on the basis of documentation, including a project and a technical report.
An example of a redevelopment project with an increase and combination of a bathroom:
This project includes the combination of a bathroom (5) and a toilet (6) into a combined bathroom with its increase to the entire width of the corridor (7).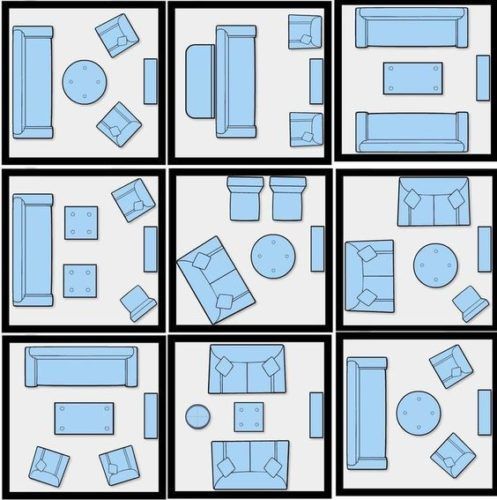 The entrance to the kitchen (4) is moved.
It is possible to legalize the work performed on the basis of a technical opinion on their admissibility and safety.
In Moscow, the coordination of the planned and completed repairs with the displacement of the wet zone, as well as other redevelopment works, is carried out by the Moscow Housing Inspectorate, and in the Moscow Region by local administrative authorities.
If the whole house is one large non-residential building, and in them wet areas can be moved anywhere.
The specifics of agreeing on the redevelopment of wet areas is that measures for their waterproofing and soundproofing must be formalized by an act of covert work from a contractor with SRO approval.
Consequences of moving a wet point in an apartment
Unauthorized enlargement or transfer of rooms belonging to the wet areas of baths and lavatories, most often does not go unnoticed by neighbors or employees of the management company.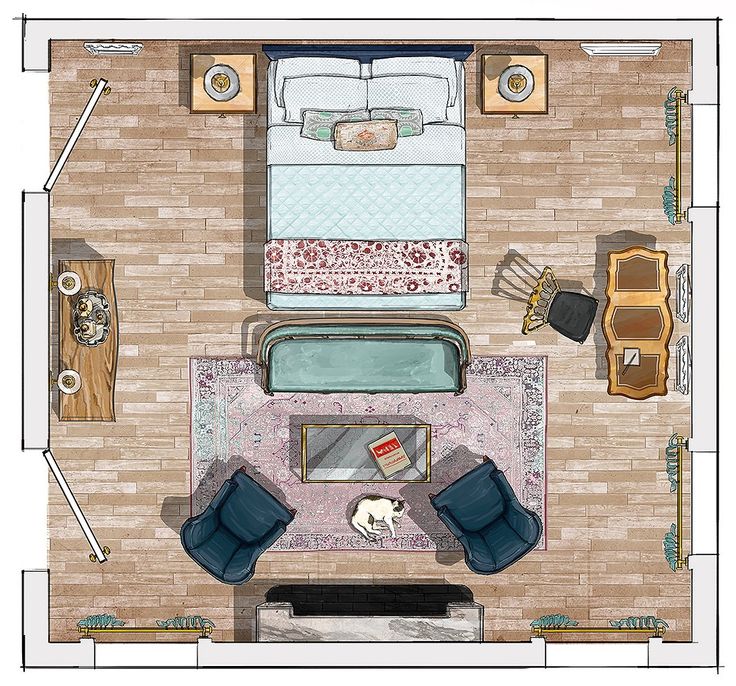 If an uncoordinated redevelopment or transfer of a wet point is found, in addition to a fine, it leads to the need to fulfill the order of the supervisory authority to restore the original state of the apartment or legalize the work performed in the prescribed manner. In case of failure to comply with the order, the law provides for legal proceedings against the owner of the apartment.
In case of preliminary approval of repair work, the stage of development of project documentation allows you to avoid activities that cannot be agreed upon later.
Waterproofing of wet areas
Waterproofing of wet areas, which include bathrooms and toilets, serves to prevent water from a sudden leak from penetrating to the lower floors within a specified time.
For example, when expanding these premises, the floors on the attached area do not protect against water in any way. Another option is the dismantling of bathrooms or partitions between the bathroom and the toilet: water seeps into poorly sealed grooves in place of the former partitions.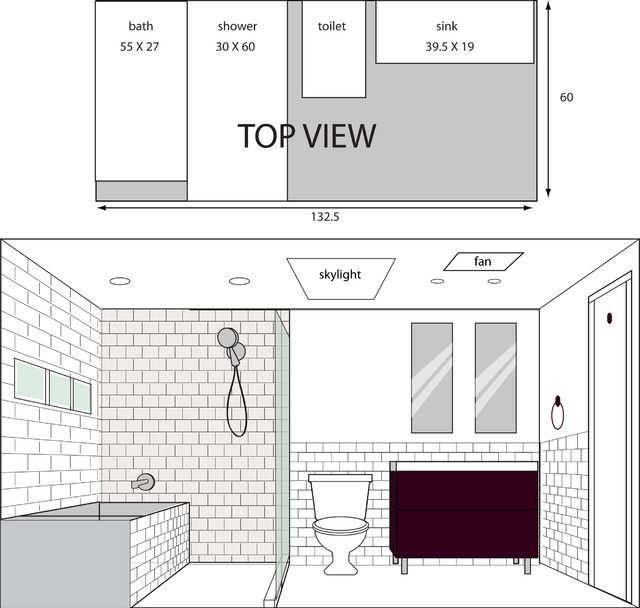
That is, if an unauthorized redevelopment of a bathroom or toilet was carried out in your apartment, then with a high probability it can be said that the installation of waterproofing of wet areas in the bathrooms was carried out incorrectly, or even completely absent.
Suppose you have combined a bathroom and a bathroom, and in addition you want to attach a part of the corridor to it and move the plumbing. According to all the rules, the first thing you had to do was prepare the relevant documents, order a redevelopment project from a specialized organization, and only then proceed with waterproofing wet rooms. But this is not always the case. And if you decide to do the work at your own peril and risk, inviting a team to redevelop the bathroom according to an ad in the newspaper, then the consequences of such work can be the most unpleasant for both you and your neighbors.
When redevelopment is legally agreed upon, laying waterproofing of floors in bathrooms refers to the so-called hidden work, and the correctness of its implementation is controlled by drawing up an act of examination of hidden works and field supervision.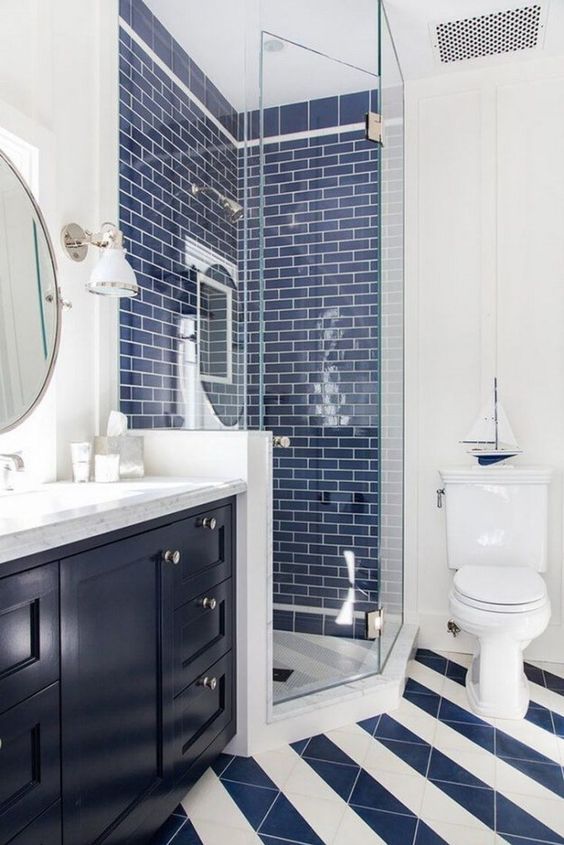 To be more precise, paragraph 4 of Appendix 7 of PPM 508 refers to works requiring activation, waterproofing of toilets, bathrooms, balconies and showers.
Checking the waterproofing of wet areas and its quality is carried out as follows: a layer of water about 5 cm thick is poured into the bathroom and left for 2 hours. If during this time no leaks were found on the floor below, then the waterproofing of the bathroom was done correctly.
However, in self-planned renovations, hired builders usually don't bother laying, much less checking waterproofing layers. And, as a rule, they do not have the right to draw up acts (for this you need to have an SRO permit). Therefore, even with a small accident, the water does not remain in your bathroom on the floor, but immediately “leaves” to the neighbors on the lower floor. For those who are planning to carry out redevelopment on their own, it will be useful to know that in most cases it is the occurrence of an emergency that causes the housing inspectorate to find out about your redevelopment.