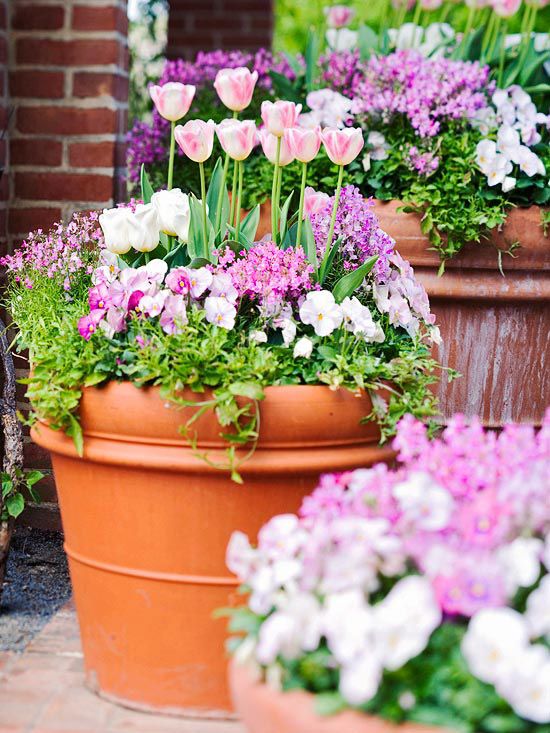
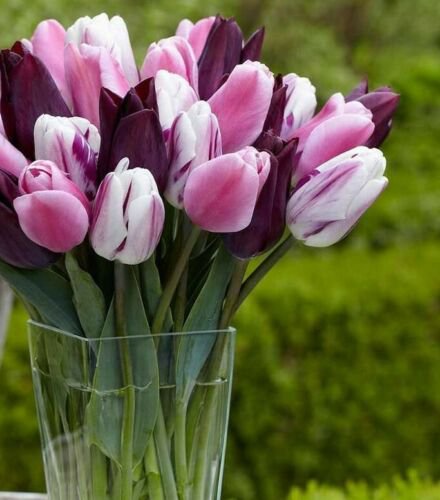
Tulip bulbs in containers
How to Grow Tulips in Pots or Containers?
A movable flower feast – growing tulips in pots and containersGeraniums in a windowsill, fresh basil for cooking, a cactus that can withstand any kind of neglect…Putting nature in pots and placing it in and around the house is something that people have been doing for millennia. And maybe you’ve been looking at the beauty of tulips and wondering whether they would do well in a pot or container too, and if they would need any special care or consideration. In this blog we’ll answer all your questions around how to grow tulips in pots or containers.
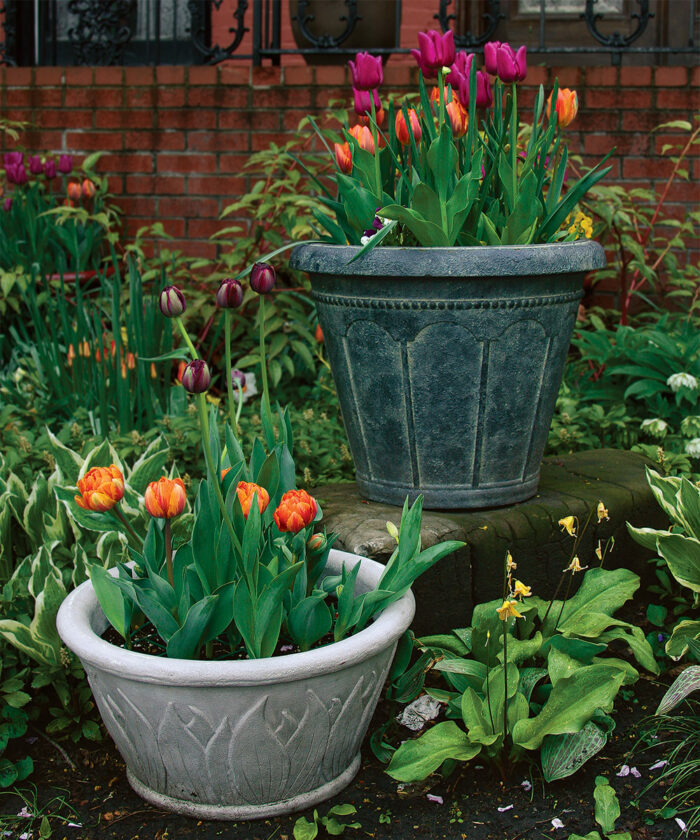
How to grow tulips in pots or containers – the best containers
Tulips will need a large container. You want a minimum diameter of 18”, with an outside height of at least 15”. If you use a smaller container your flowers will have less of an impact, and the bulbs might not thrive. If your pots need to stay outside all winter long, you’ll have to go even bigger, and get a container that’s at least 24” in diameter. This way the pot will have enough soil to isolate the bulbs and protect them from freezing. As with all flower bulbs, your main mantra should be drainage, drainage, drainage. Make sure your container has holes in it for water to drain out of, as tulips bulbs that sit in waterlogged ground will rot.
Growing tulips in pots or containers – soil and planting
Planting time for pots and containers is the same as for your garden: Fall. It might seem a quick solution to fill your container with soil from your garden, but it’s better to use a mix of potting soil and sandy soil to mimic the ground the bulbs came from. Fertilizer is not necessary. Plant the bulbs just as deep as you would in the ground, 6-7”. You can however ignore the standard spacing guidelines and plant the bulbs in a circle, really close together but not touching.
How to grow tulips in pots and containers – after plantingThe first thing to do after planting is to water well. If you live in hardiness zone 4-7 and your pot is made from terracotta or is smaller than 24” in diameter, it’s best to place the pot indoors in a cool spot where there is no chance of freezing temperatures. The optimum temperature is between 35-45 degrees F. During this time, the tulip bulbs don’t need much water, just a little bit every week.
Tulips in pots or containers – going outside and aftercare
Once early spring comes around, your tulips will start peeking above the surface. This is the time to place them outside in a sunny spot. Once they’re outside, water them whenever you water your other flower bulbs. When the blooms have faded you can snip them off, but leave the foliage until it’s withered. That way the nutrients can flow back into the bulb for the next season. However, there is a good chance these bulbs are spent and ready to be composted. An excellent reason to start planning a new color scheme for next year!
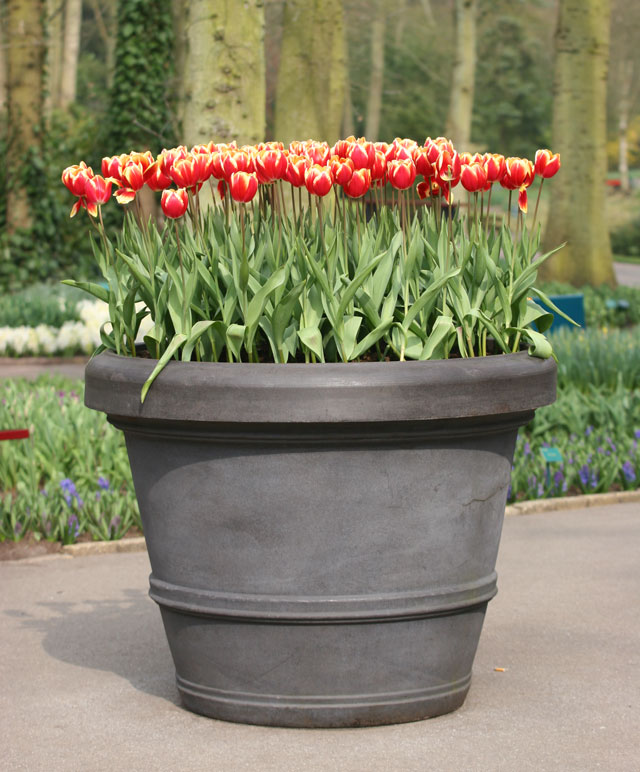
Beautiful tulips in pots or containers – the best varieties
For the most stunning result it’s best to stick to one variety per pot, so they will all bloom at the same time.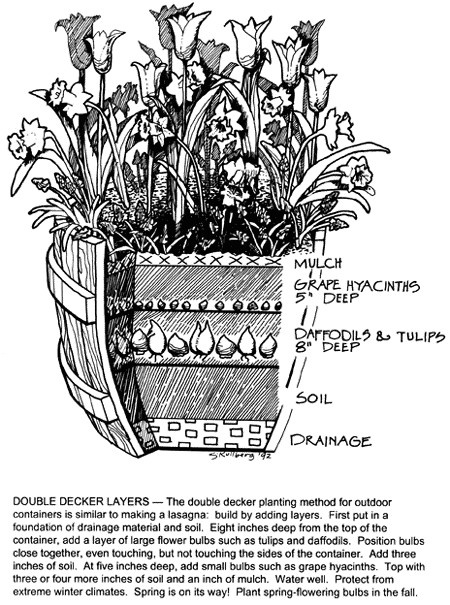 Shorter tulips such as Double Tulip Exotic Emperor, Tulip Princess Irene, Tulip Queensland, Triumph Houston Mix and Miniature Tulip Batalinii Bright Gem are very suitable for pots and containers.
Tulips at your doorstep
Do you want to add a dazzling splash of color to your deck, entryway or windowsill? Tulips grow really well in pots or containers and need very little care. Take a look at our constantly updated website and browse around for the perfect tulips for you. If you order today, your bulbs will be delivered at the optimum planting time.
Meet Ben, our Flower Bulb Specialist
Gardening challenges?
Send me your questions! or read more about me.
- How-to Guides
- Bulb News
- Planting Tips
- Featured Varieties
- Garden Design
- Bulb Info
Search our store
- All Flower Bulbs
- All Spring Planted Bulbs
- Alliums
- Amaryllis
- Anemones
- Calla Lilies
- Camassia
- Chionodoxa
- Coneflower
- Crocus
- Daffodils
- Dahlias
- Dichelostemma
- Echinacea
- Eranthis
- Eremurus
- Foxtail Lilies
- Fritillaria
- Galanthus
- Giant Snowflake
- Gladiolus
- Glory of the Snow
- Grape Hyacinths
- Hyacinthoides
- Hyacinths
- Irises
- Ixia
- Leucojum
- Mixture
- Muscari
- Ornithogalum
- Paperwhites
- peonies
- Puschkinia
- Saffron Crocus
- Scilla
- Siberian Squill
- Snowdrops
- Spanish Bluebells
- Striped Squill
- Swamp Milkweed
- Tuberoses
- Tulips
- Winter Aconite
Show more Show less
How to Plant Tulips in Pots
Most Popular
Hybrid tulips can be unspeakably beautiful, but they also come with a daunting array of caveats. For starters, most don’t reliably return for more than two or three years—and ideal conditions are necessary for even that much longevity. Then there are the issues of disguising their dying foliage and filling the bare spots they leave behind—assuming, of course, that voles, squirrels, and other garden predators don’t snatch the bulbs well before they bloom.
Growing tulips in containers, however, lets you skip most of these frustrations. In pots, tulips are eye-catching, portable, and protected. All gardeners—regardless of whether or not they’ve had success growing tulips inground—should give this simple technique a try.
The best time to pot up tulips is in early fall, the same as if you were planting them in the ground. Have ready several containers with outside diameters of at least 18 inches and outside heights of at least 15 inches. Using anything smaller reduces the impact of the planting and the viability of the bulbs.
If you want a certain mix of colors to emerge at the same time, choose from the same class of tulips. Short groups, such as Single Early, Double Early, and Triumph, are obvious container choices as they mix well with spring annuals and will not tower over their pot. There’s no harm, however, in experimenting with taller or more exotic types, such as Parrot and Viridiflora.
Tulips of every type and color can work—just be sure to group together varieties with similar bloom times. You’ll only have room for 18 to 22 bulbs per container, so successive blooming (six tulips blooming one week and another six blooming two weeks later, for example) won’t look nearly as stunning as a design that flowers all at once.
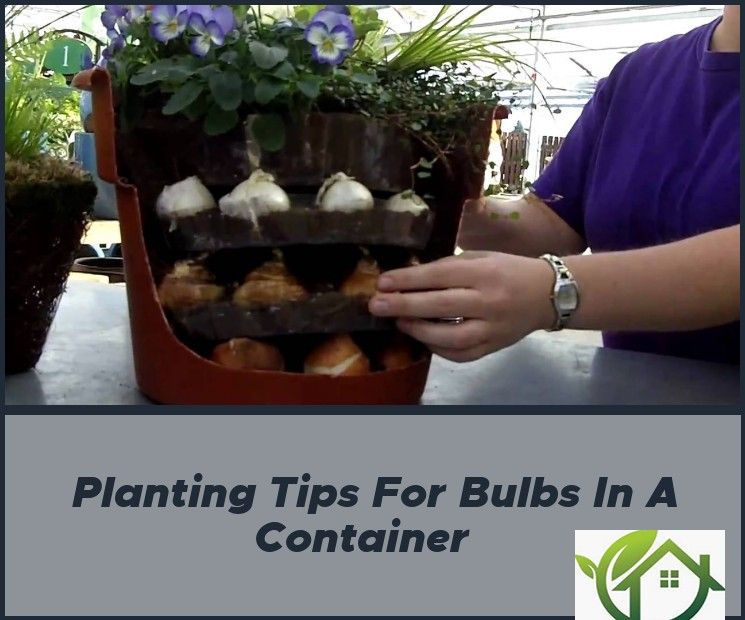
Step 1: Plant bulbs so that they almost touch
To make the containers less heavy and easier to move, place an upside-down plastic grower pot at the bottom of each container. Fill the containers two-thirds full with any inexpensive, lightweight potting mix. Don’t bother with fertilizer. Ignore traditional spacing guidelines, and place the tulip bulbs in a tight circular pattern.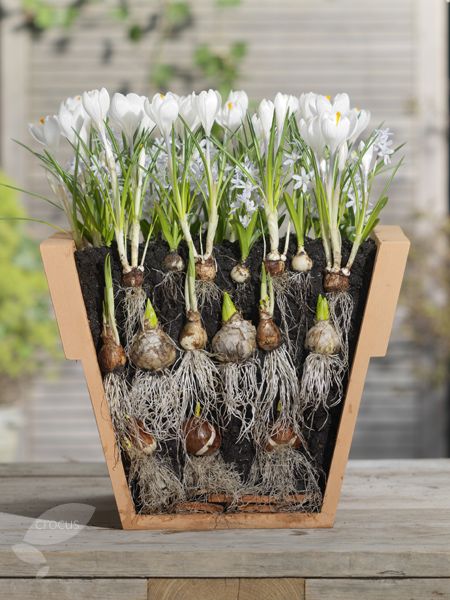 Cover the bulbs with potting mix, planting the bulbs at the same depth you would plant them in the ground: generally two to three times the bulb’s height.
| Plant the bulbs right next to each other. | A grate protects the bulbs from critters. |
Animals are less likely to disturb tulips planted in containers than those planted in the ground. But for added protection, place a wire grid, such as a round peony support, on top of the soil, and cover it with a thin layer of potting mix.
Step 2: Give them a sheltered spot to spend the winter
If you live in USDA Hardiness Zones 4 to 7, place the planted pots in an unheated garage. This protects them from undergoing a freeze-and-thaw cycle, which turns potted bulbs into mush. Water them when they’re in place; you won’t need to water again until spring. If you don’t have an unheated garage and live in a region with freezing temperatures, you’ll need another strategy for keeping the containers cold, dry, and insulated.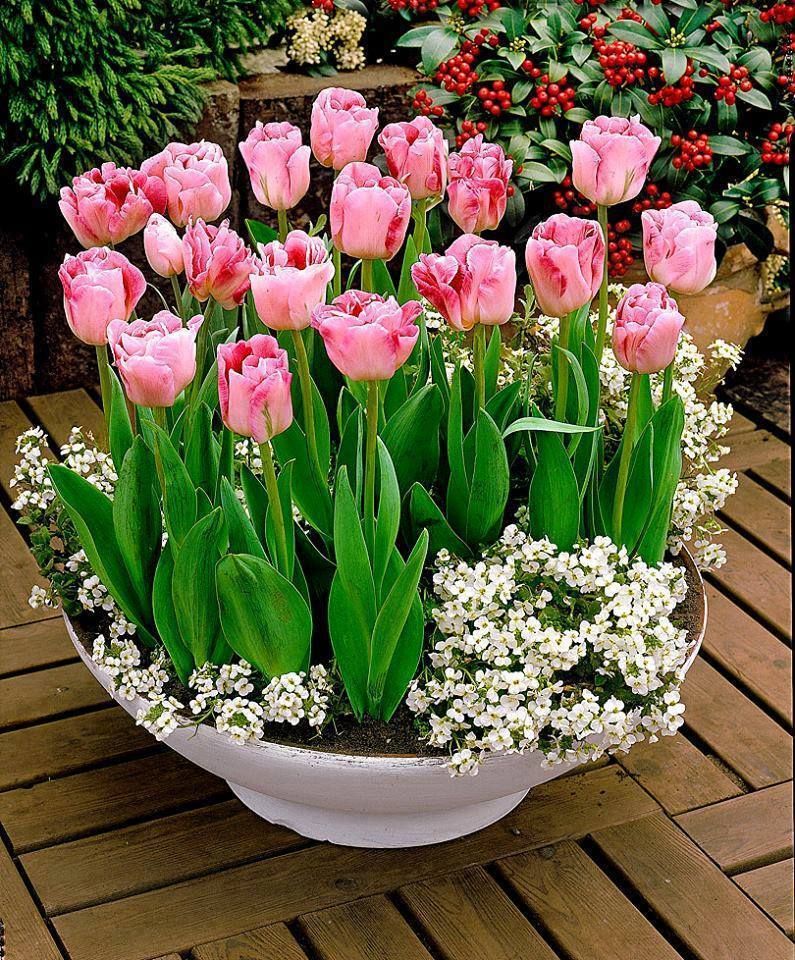 The goal is to keep the planted bulbs just above freezing.
Check on your pots in early spring. Water them lightly. When the tulips start peeking above the surface, bring them out and place them on display. Water as you would any container plant; the tulips will bloom at the same time as those planted in the ground.
Once the blooms fade, you can gently transplant the bulbs into a sunny bed, but all the caveats regarding inground planting still apply. The best and bravest option is simply to compost the spent bulbs and start planning a different color scheme for the following year.
Keep the show going
If you know which group a tulip belongs to, you can usually predict when it will flower. Designing a few containers that contain tulips with different bloom times is an easy way to prolong the tulip season for as long as possible. This is not a perfect science, however, so be prepared to welcome your tulips if they flower a little early or a little late.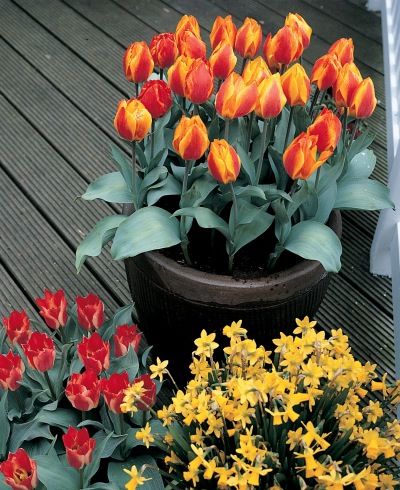
| Early bloomer: ‘Schoonoord’. Photo: Jennifer Benner | Mid-season bloomer: ‘Ivory Floradale’. Photo: Jennifer Benner | Late Bloomer: ‘Dreamland’. Photo: Jennifer Benner |
Early Bloomers: Double Early, Fosteriana, Greigii, Kaufmanniana, Single Early
Mid-Season Bloomers: Darwin Hybrid, Fringed*, Lily Flowered*, Triumph
Late Bloomers: Double Late, Parrot, Single Late, Viridiflora
*Some cultivars in this division are late bloomers.
Not all potted bulbs are forced
Forcing bulbsIt’s easy to confuse growing tulips in containers with the time-honored tradition of bulb forcing, but the two methods are quite different.
Potting up bulbs and storing them in an unheated space mimics inground planting, and the flowers will emerge in midspring.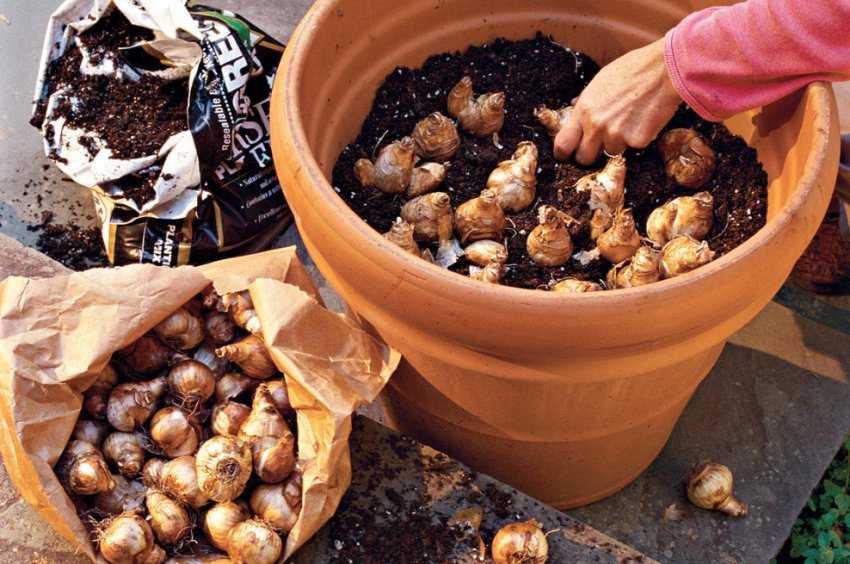 Forcing bulbs involves planting the bulbs just below the soil surface, with their tips peeking out.
Potted in fall, forced bulbs are stored in the dark at root-cellar temperature (about 40°F), then moved from the cellar into an area with light and warmth after just 10 to 12 weeks. They flower in midwinter, well before bulbs planted at normal depths outdoors or in containers.
Elizabeth Licata blogs at gardenrant.com and pots up hundreds of bulbs every fall at her home in Buffalo, New York.
Photos, except where noted: Ann E. Stratton
View Comments
Design
Plants That Bloom in Late Winter or Early Spring
After the bright lights of the holiday season have been turned off, the dark days of winter seem to drag on forever. Gardeners begin to look through the catalogs, dreaming…
Planting tulips in baskets, boxes, containers: technology
Contents
- How is a container better than open ground
- Features
- Defects
- How to choose a container
- Plastic containers
- Flower pot
- Double drawer
- Bucket
- Fit technology
- Best terms in different regions
- Soil selection
- Preparation of planting material
- Planting
- Differences in the care of tulips in containers
Depending on climatic conditions, the technology and timing of planting tulips may vary.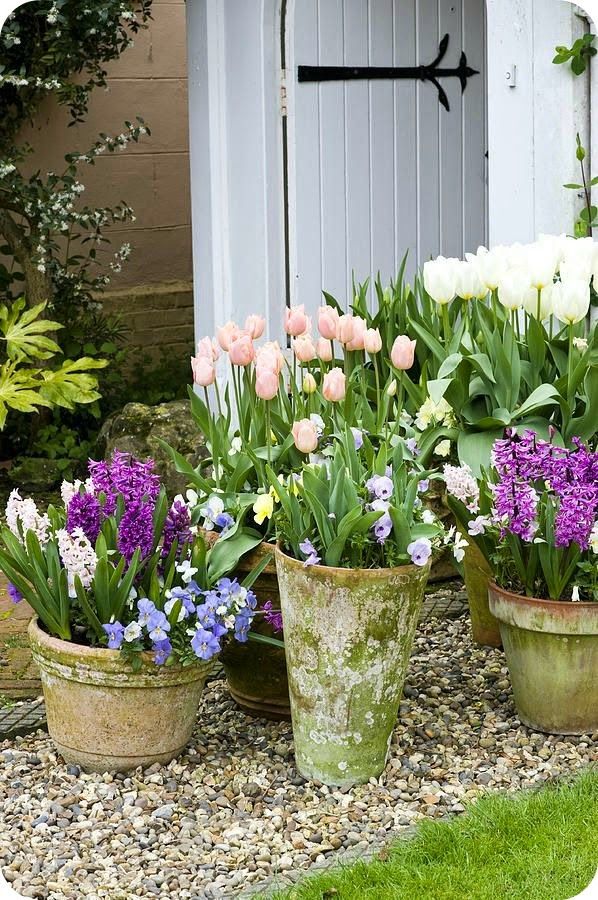 You can not plant bulbous plants in the soil with excess moisture, because this provokes rotting and death of the bush. But this problem can be solved by planting tulip bulbs not in open ground, but in special containers.
nine0044 Why is a container better than open ground
Tulips are planted in baskets very often. In almost every flower shop you can find such a device. These are containers with slots made of plastic. Holes can be both on the bottom and on the walls. In diameter, such baskets do not exceed 50 cm. The method has a number of positive aspects, therefore it can be safely used at home.
Advantages
There are many benefits to using containers, baskets and boxes for planting tulips. nine0003
It is easier for the bulbs to winter in such containers, because they are completely covered from frost. To reduce the time of digging the bulbs out of the soil, you need to buy a special basket. This reduces the risk of cutting a small bulb while digging at random.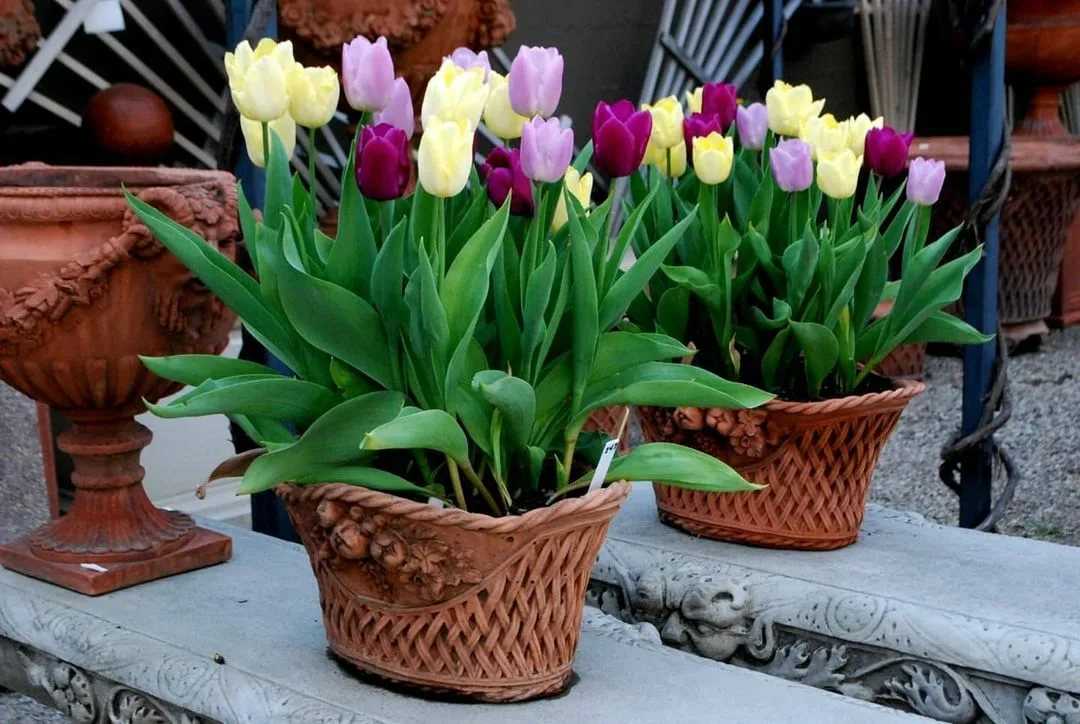 It is much easier to get the seed by moistening the soil and turning the basket over. You just have to sort out the ground with your hands and get the bulbs out of it.
If you plant a tulip in a basket, box or container, the plant will not grow. As a result, the beauty and composition of the beds will be preserved. nine0003
The use of various containers is a reliable prevention of parasites that live in the ground.
The advantage of using different containers is that you can plant several different varieties in one box. This will create an unusual beauty in the house and on the site. You can supplement planting tulips with other plants that will help maintain the beds in an aesthetic state.
Some summer residents who want to decorate their beds plant a certain variety of tulips in each container. If you put them side by side, a composition of amazing beauty will be created. Once flowering is complete, the containers can be easily moved to another location, protecting the bulbs from damage from parasites and rodents.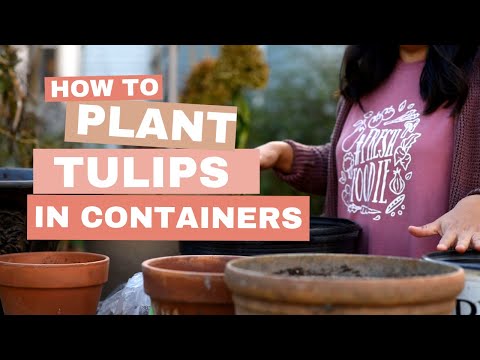 nine0003
Defects
The main disadvantage is small dimensions. During their growing season, tulips develop and expand. Literally in 1-2 months, the plants will experience a lack of space, which will negatively affect the quality of their flowering. To avoid such troubles, transplant seedlings on time or buy a larger basket that will increase the development time of tulips, then you will have to transplant bulbs much less often.
How to choose a container
nine0002 To start growing tulips, you need to choose a container in which you will plant the bulbs. Try to choose containers and baskets that are not the smallest in size so that the plant does not experience a shortage of space for development. This should be done based on the number and size of planting material. The larger the bulbs you have, the larger the basket or container you will need. This will positively affect the health and appearance of the future flower.
It is not uncommon to use ordinary plastic boxes in which holes are formed. The only downside is their size. It is not always possible to place them in a convenient place. nine0003
Instead of a basket or box, you can use the most common mesh. It must be placed in the ground, and flowers should be planted on top. In use, this option is not always convenient due to the fact that mice can gnaw on the mesh.
The best solution would be to contact flower shops, where you can buy ready-made containers for your flower beds.
Plastic containers
It cannot be said that planting tulips in containers in autumn is very different in technology from planting in open ground. To plant bulbs, you need to select better ones, treat them with a manganese solution and prepare a seat. nine0003
How to plant tulips in autumn in containers: they must be rectangular and their walls smooth. If you choose a container with sharp corners, this will not only complicate the care process, but can also provoke a violation of the root system.
First dig a hole to match the size and shape of the container. After that, the container is immersed in the landing hole. A little sand is poured at the bottom of the container for better air exchange. Bulbs are laid on top of it and gently pressed into the soil. nine0003
The planting pattern will depend on how large the seed you have selected. Large varieties should be planted at a distance of 30 cm. Medium bulbs are planted at a distance of 10 cm. If the seeds are small, then the distance between them can be no more than 5 cm. When you finish pressing the seed, cover it with earth.
Tulips prefer to grow in loamy or chernozem soils. To protect the area from freezing, you can mulch using humus or peat. The layer of such flooring should be 3 cm.
Flower pot
If you notice that the bulbs have sprouts, and severe frosts do not allow planting in open ground, there is only one practical solution - to plant in pots. This should be done in November or December.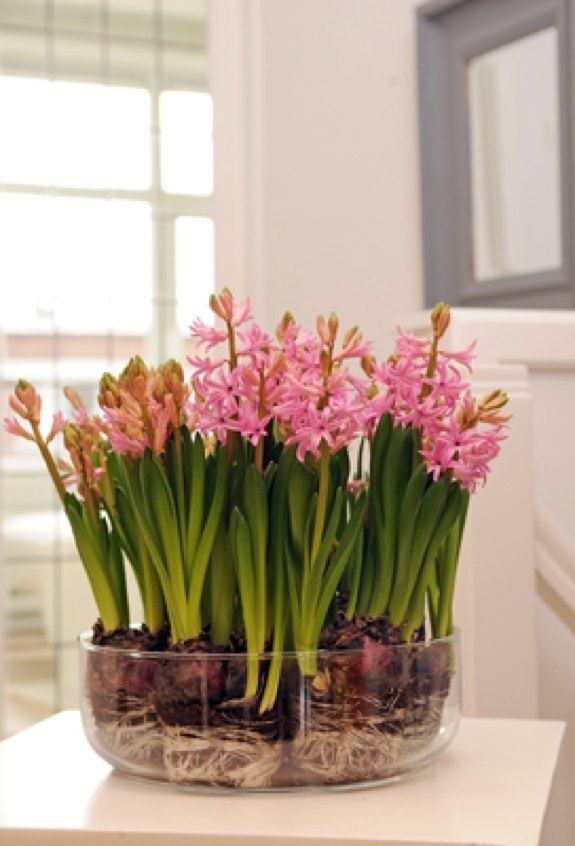
Tulips are often planted at home in a pot. Usually this option is practiced when:
- a person wants to see a tulip bloom in winter;
- Bulbs already sprouted disappear and have to be rescued. nine0006
To plant a quality plant, follow simple steps.
- Prepare the soil: take a soil base to be mixed with additives (humus, perlite). This is done so that your plant is 100% rooted.
- Select and disinfect the most live bulbs.
- Plant flowers. Distribute the seeds in the pot according to its size. You can experiment and plant several species in a large pot. nine0005 The final step is to place the pot of tulips in a cool place.
An important point after planting will be proper care. So that the flowers do not disappear, they will have to be kept in a cold room all winter. The calculation is that as soon as the tulips are warm, they will immediately germinate and bloom. Plants are watered infrequently, the soil is not waterlogged to avoid rotting of the roots.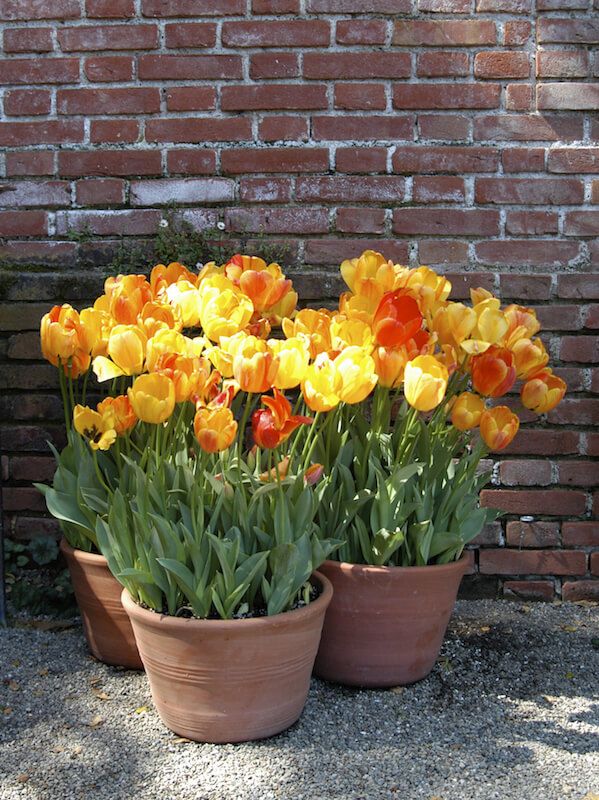
Double drawer
The double box method allows plants to overwinter without being exposed to low temperatures. To do this, you will need several tools:
- boxes, 60x10x10 cm and 80x20x20 cm. Better if they are made of fiber cement;
- expanded clay is the ideal ingredient for drainage;
- landing ground. It is better to choose nutritious soils that consist of loam or chernozem;
- waterproof canvas to protect containers from rainy weather;
- film;
- spruce branches;
- styrofoam and tulip bulbs.
The dates for planting tulips in boxes in the middle zone of the country are within mid-September or its end.
Watch this video on YouTube
Drawers should contain 5 cm of expanded clay, which will act as a drainage system. It is important to do this so that it does not mix with the ground. Pour nutritious soil on top, the height of such a layer should be at least 5 cm.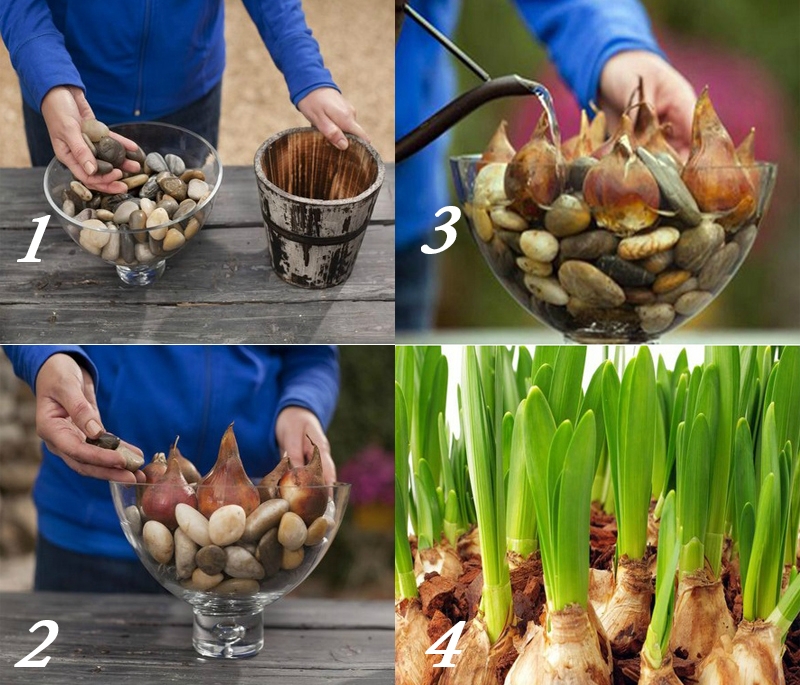 Bulbs are stuck inside so as not to damage the shoots on them. After that, 5 cm of soil is poured again and tamped down. nine0003
The second box must be completely wrapped in polyethylene film and sprinkled with styrofoam granules. A smaller container is placed in the second, and the distance between the boxes (walls) is filled with the same granules. Before the onset of frost, it is necessary to water the soil regularly. As soon as the temperature is below zero, cover the plantings with spruce branches. In the spring, the shelter is removed so as not to provoke root rot.
Bucket
If you will be growing tulips in a bucket, you need to know the basic planting dates. Try to plant the bulbs in the fall rather than the spring so that they have time to establish themselves in the soil before the onset of heat. At a temperature of 7-10 ° C, the root system is correctly formed. Planting dates may be delayed if weather conditions do not allow planting. nine0003
A drainage layer is required at the bottom of the bucket.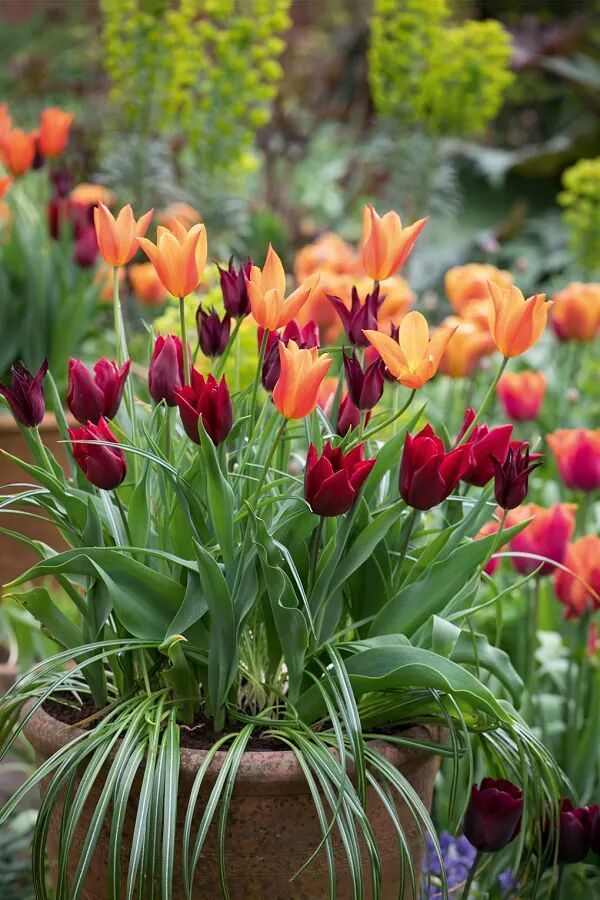 For this, it is advisable to use small stones or expanded clay. A dense layer of soil is poured over it. The depth of planting tulips in a bucket should be 15 cm. Once all the steps have been completed, you can dig a bucket in an open area.
Plants are covered with leaves and snow to prevent frost damage. If you have a basement, place the buckets in it. In winter, try to regularly water the ground so that the plant does not experience a lack of moisture, otherwise it will not bloom in spring. nine0003
Watch this video on YouTube
Fit technology
Tulips should be planted in baskets in autumn.
Containers with a height of 15-20 cm are used for growing. This volume will be enough for the development of the root system and the correct formation of the stem. If you take smaller containers, the plant will not have enough space, and the stem may become deformed.
There is no need to be afraid of this method, it is not difficult to care for flowers: the process is the same as for tulips in the open field.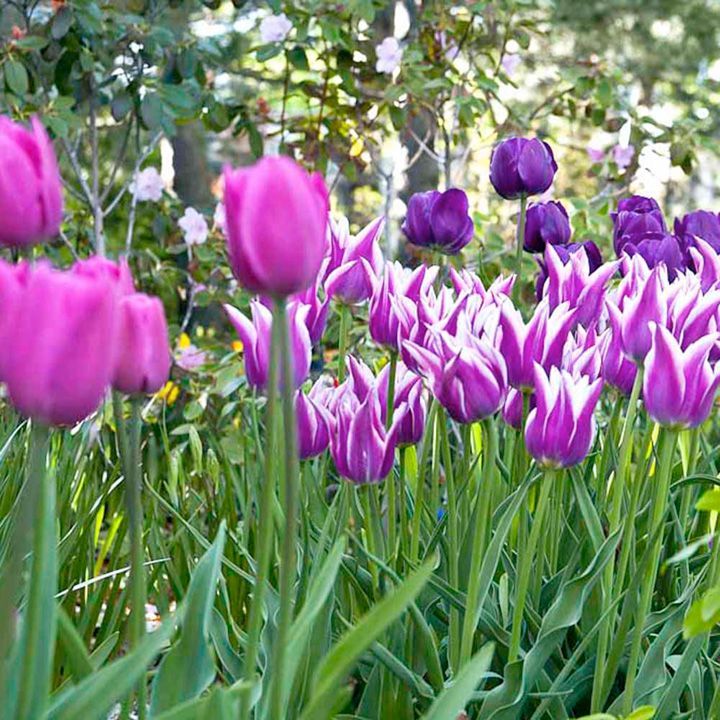 nine0003
Best terms in different regions
Each region has its own characteristics, so tulips need to be planted at different times.
- Bulbs are planted in the middle lane in mid-September. So the plant has time to prepare for winter.
- In the Leningrad region, as well as in the Urals, they start planting a little earlier - in early September.
- In Siberia, tulips should be planted in August, because September is already a cold month here.
- Landing in the South and in the Volga region falls on October. nine0006
It is impossible to predict the weather conditions of each region, so the gardener has to rely on his knowledge and intuition. If you made a mistake with the planting time, you should not despair - there are many options for how to keep tulip bulbs not in open ground. To do this, you need to properly dig the seedling out of the ground and move it to optimal growing conditions during the cold season.
Soil selection
Tulips are unpretentious crops, but they bloom best in loose and nutritious soil, so you have to spend a lot of time and effort to prepare quality soil for planting. It must pass water without provoking stagnation of moisture. nine0003
To prepare fertile and loose soil at home, you need ordinary garden soil. Perlite, humus, peat and coconut fibers are added to it. All these ingredients have a positive effect on the looseness of the earth, as a result of which the bulbs do not rot. Through the use of these organic fertilizers, you promote the development of the root system.
Humus will saturate the soil well, which in the future will have a positive effect on the development of tulips. You can also choose dry fertilizers - they can be bought ready-made. nine0003
Preparation of planting material
Before you start planting, you need to select planting material. The quantity and quality of the future flowering site will depend on it.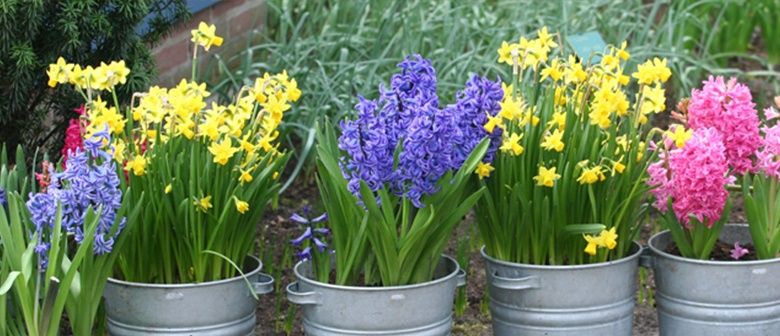 Defective specimens include those on the surface of which there are stripes, spots and voids. Checking the bulb for germination is easy. Press on it with your finger: if you notice a depression, the seed is unsuitable for planting.
Material suitable for nursing is decontaminated. A solution is isolated from chemicals: "Epin" (60 g per 5 liters of water). You need to soak the seeds in it for 3 hours. From folk remedies, a solution of onion, garlic or cayenne pepper is used. To prepare the tincture, you need to mix 2 kg of onion, 3 heads of garlic and 2 hot cayenne peppers. All these ingredients are passed through a meat grinder or blender. The resulting mixture is poured into 10 liters of water and infused in a dark place for 3 days. After that, the seeds are immersed in the prepared tincture and kept in it for 40 minutes, dried and planted. nine0003
Planting
How to plant tulips in baskets: first of all, you need to follow the planting technology.
Bulb planting depth depending on size
- Examine the bulbs.
 They should be free of signs of disease and parasites. If specimens are found covered with a dense peel with stripes or spots, they cannot be planted in containers. Selected bulbs should be watered with a weak solution of manganese (2 tablespoons per 5 liters of water).
 - Place the seed inside and completely cover it with earth, 2 cm high. So it will be more convenient for you to take a container to carry. nine0006
- Baskets, after planting tulips in the autumn in the middle lane, are determined in a dark place. It should have a constant temperature of 10 ° C so that shoots appear faster.
- During cultivation, you need to monitor what level of soil moisture. As soon as it begins to dry out, you must immediately pour it with a small amount of water, otherwise the shoots may fall off, flowering will not occur.
- As soon as the first shoots appear, the basket is placed on the balcony or windowsill. nine0123
- 1 9 advantages of using baskets
- 2 Planting Tips
- 3 Important Points and Alternative Capacities
- 4 Diseases and Pests
- 5 Growers Reviews
- 6 Things to Remember
- Space control . As I already mentioned, bulbs in the open field tend to either float away to the sides or go to the depths. If they are planted in boxes in the ground, then they will not go anywhere.
- Insulation . In a flower bed, it is easier and cheaper to insulate a specific small place, plus the container can be insulated both from above and below. nine0006
- Preserved . If you plan to dig up the material after flowering, then everything, even the smallest bulbs, will remain in the container and will be easier to find.
- Transportability . After flowering, tulips lose their attractiveness and spoil the appearance of the flower bed, if there is no desire to get the bulbs for summer rest, then you can move the container to the back of the garden without damaging the flowers.
- Protection . When digging up, individual bulbs are very easy to damage with the same shovel, this problem does not exist with a container. nine0006
- Pests . Shrews of various kinds, for example, moles or bears, will not gnaw at a buried box from below, though there are still mice of voles, but you can cover the container from above with spruce branches from them.
- Ground preparation . To fertilize the soil well on a large plot, you need to spend a lot of effort, and sometimes money, while preparing the soil in a relatively small box is easier, faster and cheaper.
- Measured fit . For bulbs, containers are available from 10 to 70 cm in diameter, respectively, you can prepare several islands of different sizes and then arrange them, or move them around the flower bed as you like. The larger the basket, the more opportunities for creativity.
- Design .
 The basket allows you to move even blooming tulips from place to place, this is how professional landscape designers equip a chic blooming flower bed in a couple of days.
 - All factory bulb baskets are made of plastic, and as the demand for them has grown, you can run into a fake with thin walls, so immediately look at the strength and condition of the product. nine0006
- The next parameter is the dimensions. The height of the sides varies from 7 to 20 cm.
 For planting small and medium-sized bulbs in one layer, 7 - 10 cm is enough.
 - If you plan to plant multi-layer planting of different colors in one tray, then take from 12 cm or more
- Tray can be round, square or rectangular. When choosing, you need to build on the minimum distance between plants. The tray can hold from 1 to 30 - 40 bulbs. nine0006
- Distance between small tulip bulbs - 6 - 8 cm.
- Daffodils and large tulips - 10 cm.
- Hyacinths minimum - 10 - 12 cm.
- Grouse min. 15 - 20 cm.
- In baskets up to 20 cm in diameter, you can plant 2 large and 5-6 small bulbs.
- Baskets up to 27.5 cm - 7 large and 12 small.
- Large baskets - 10 - 12 large and up to 25 small onions
- The ideal option would be to buy a ready-made flower primer, but for large volumes the price will be solid.

- For a homemade soil mixture, take equal proportions of peat, rotted manure, humus and local soil. Here you also need to add 10% wood ash and 10% baking powder (sand, coconut fiber or perlite).
- So that tulips do not get sick, immediately check the homemade mixture for acidity, the upper limit is 5 - 6 Ph.
- To reduce acidity, it is better to use phosphate rock, it needs 30 g per 1 m², and 1 tbsp will go to the middle tray. plus she works like fertilizer
- Select and calibrate clean, healthy planting material, i.e. without rot, mechanical damage and holes from insects.
- For half an hour, immerse the material in a disinfectant solution of Fitosporin or potassium permanganate.
- Let the bulbs dry for a couple of hours.
- Then the material is immersed for 6-12 hours in a nutrient solution (Epin, Kornevin, Heteroauxin, Ribav, Cytodef or a steep infusion of wood ash)
- If the tulip is valuable, varietal, but slightly spoiled, then the damage should be cut out a couple of days before the main treatment and the cut point should be rubbed with wood ash or Fundazol.
- Next is processing according to the above instructions.
- But such tulips should be planted in separate containers at least half a meter away from healthy flowers
- These flowers are planted in autumn when the weather is dry. You need to focus not on the calendar, but on the temperature of the soil.
- As soon as the soil temperature reaches 10°C, start planting tulips (minimum limit 8°C).
- In the middle lane, this is mid-October. Closer to the north, the end of September, and in the south, the end of October
- According to the rules, the depth of laying a tulip should be 3 bulb sizes. For children - this is 5 - 7 cm, for medium material up to 12 cm, for large bulbs up to 15 cm.
- Dig a hole slightly deeper than the dimensions of the tray.
- Down 2 - 3 cm, pour sand, it is needed for drainage.
- Place the container nearby and fill it 2 - 3 cm with fertile soil.
- With the prescribed distance, strictly vertically with the sprout upwards, stick the bulbs into the ground. nine0005 Lower the tray into the hole and fill it to the top with fertile soil
- Only high trays are taken here, from 15 cm. The largest bulbs are planted in the first tier, immediately covered with soil, and thin sticks are placed to mark the place.
- On the next level, medium bulbs are planted and also marked with sticks. nine0006
- The top layer is babies or small bulbs. Above the extreme layer there should be at least 5 cm of soil.
- It is not necessary to plant only tulips, flowers can be combined.
- The sticks are inserted to prevent accidental planting of tulips on top of each other.
 Then these marks can be removed
 - Nitrogen organics (humus, compost, etc.) are laid at the start, during planting. nine0006
- After the appearance of the first leaves, they are fed with complex compositions, for example, Kemira universal, Kemira luxury (according to instructions) or Nitroammophoska (30 g per 1 m²).
- During and after flowering, potassium phosphate fertilizers are given - potassium monophosphate or wood ash
- The main thing here is that the container is large enough, has many drainage holes and does not decompose in the ground. The most suitable option is plastic boxes for vegetables. nine0006
- You can bend a metal mesh box with cells up to 2 cm in section, but the mesh will rot in the ground in a couple of years.
- The easiest way is to cut out containers from plastic bottles with a volume of 5 liters or more, but the plastic there is thin, it is highly deformed.
- Plastic pails for paint or chemicals work well, they only need to cut drainage holes
- Gray spots with a yellowish coating appear on the leaves and stems. At the same time, the bulb is affected, brown watery spots appear on it and the plant dies.
- Treatment of the flower bed with Bordeaux mixture.
- Disinfection of planting material with potassium permanganate, blue vitriol or special compounds.
- In a neglected form, Euporen is used in a solution of 0.5% (sprayed three times, first seedlings, then buds and a third time a flower bed after flowering)
- In the affected bulb, the roots turn yellowish-brown.
 Such planting material gives weak seedlings with thin stems and small buds.
 - Fusarium is not treated, for prevention before planting and after harvesting, the bulbs are kept for half an hour in a solution of Uzgen (0.2%) or Maxim
- Small, up to 2 mm light green sucking insect. Lives in colonies, affects young shoots and leaves.
- Treat the flowerbed with tobacco infusion with laundry soap added to it.
- Also helps Antitlin and Biotlin
Baskets are often used for planting outdoors.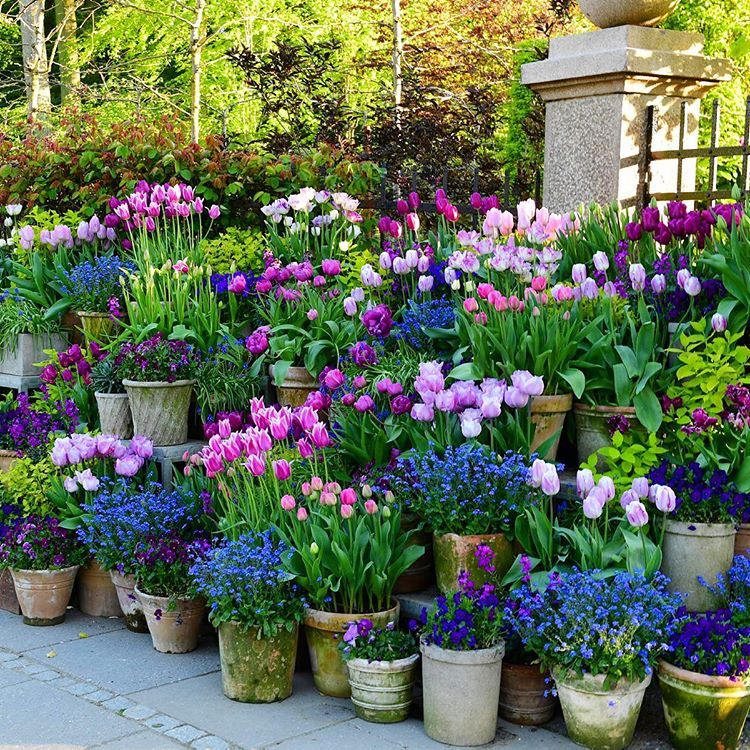 To do this, dig a hole similar to the size of the container and place a container in it. Tulip bulbs are covered with the top layer of soil. To protect from frost, cover the basket with leaves and snow.
Watch this video on YouTube
Differences in the care of tulips in containers
Tulips planted in special containers are easy to care for.
If you have previously used quality soil, loosening it and removing weeds is not required. All substances that are applied at the preparation stage neutralize the appearance of a crust on the surface of the earth and do not allow weeds to develop. nine0003
Avoid frequent watering by using hydrogel. With the help of this drug, premature evaporation of moisture from the soil can be prevented. If, when examining the container, you find that it is dry, you need to water the tulips with a spray bottle. Try to do this so that moisture does not get on the leaves, otherwise exposure to sunlight will cause burns on them.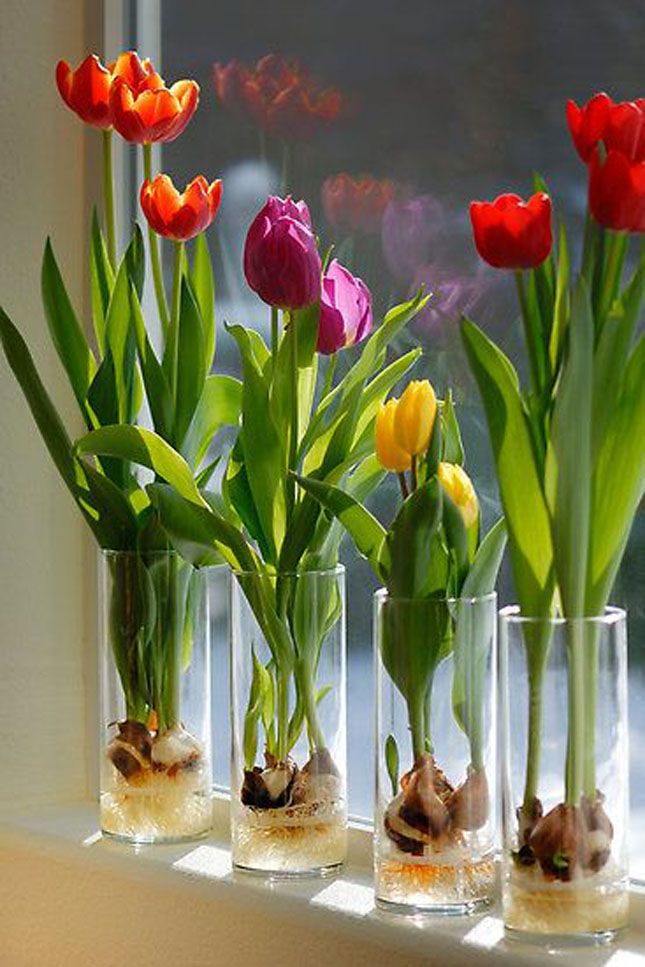
In the spring it is necessary to apply complex fertilizers, which include nitrogen. This will normalize the growth and development of plants. nine0098
A few weeks before flowering, potassium and phosphorus are used as top dressing. Mix 100 g of potassium and 200 g of superphosphate, add 50 g for each plant. As soon as the flowering is over and the leaves dry up, you can dig up the bulbs and store them in a dark place.
Planting tulips in bulb baskets?: how to plant tulips, planting tulips in containers in autumn, boxes in the ground
Contents
Most of my flower beds are tulips and other bulbs. Caring for them is simple, but my bulbs have spread or gone deep. I heard from an experienced gardener that planting tulips in bulbous baskets solves all such problems.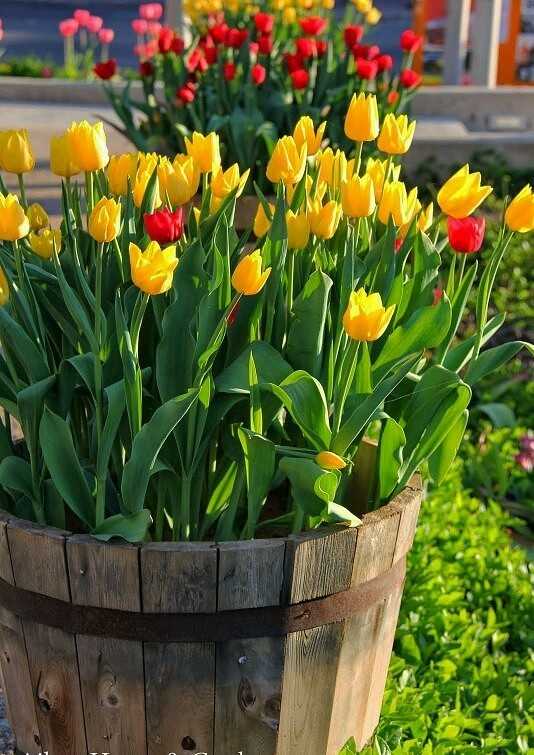 The method turned out to be working and now I recommend it to everyone. nine0003
9 Benefits of Using Baskets
All perforated boxes of suitable size can be used for planting bulb crops. Photo: prosorta.ruThe video shows in detail planting tulips in containers in autumn. The agrotechnician tells whether it is possible to combine bulbous crops in baskets and containers and how to do it correctly.
Fittings
| How to choose the depth of the basket | |
| Basket diameter | |
| Soil preparation | |
| Bulb preparation before planting | |
| Can damaged material be taken | nine0333 |
| When to plant tulips | |
| How to plant tulips nine0114 |
Important points and alternative containers
| Tiered planting | |
| Tulip fertilizer | |
| Alternative containers |
Diseases and pests
| Gray mold Symptoms: Treatment: | |
| Fusarium Symptoms: Treatment: | nine0333 |
| Greenhouse aphid Symptoms: Treatment: |
Florist reviews
georginka
when planting and digging out my bulbs, I do not pickle anything . I plant them as they are, but each time in a new place. I plant tulips in baskets for bulbs, if there are not enough baskets, then in the ground.