Tray wall hangers
Tray Wall Hanger - Etsy.de
Etsy is no longer supporting older versions of your web browser in order to ensure that user data remains secure. Please update to the latest version.
Take full advantage of our site features by enabling JavaScript.
Find something memorable, join a community doing good.
(983 relevant results)
How To Hang Plates on the Wall (The Best Plate Hangers & More!)
Updated: by Kris Jarrett
Want to know how to hang plates on the wall? I’m sharing my tips & tricks and the plate hangers that I used to get the job done right!
For months I kept my beautiful new plates sitting in a cabinet where they weren’t used or seen. And the big bare wall in my dining room? It stayed bare. Because honestly the whole idea of designing and hanging a decorative plate wall intimidated me. But last month I finally did it – I hauled my plates out of the cabinet and hung them up on our dining room wall:
The trickiest part was figuring out the how-tos of hanging the plates so I thought I’d share what worked best for me, what’s worked for others, and why you may want to choose one method of hanging plates over the other (post includes affiliate links – see my full disclosure statement {here}):
Step 1: Figure Out How You Want to Arrange Your Plates
Take all the plates that you’re thinking about using in your plate wall and lay them out on the floor. If you space constraints for the wall that they’ll be hanging on, it helps to put some painter’s tape on the floor to mark the max width and height that you have to work with. Arrange and rearrange until you figure out a design that you love!
All of my plates are from Juliska – the ones with the printed scenes are from their Country Estate collection in Flint color that you can find {here}.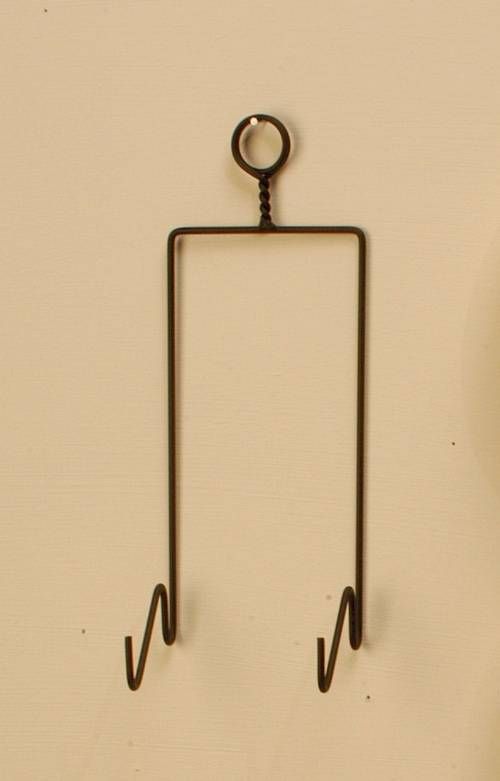 I also have two of {these dinner plates} from their Berry & Thread collection, and multiple different sized plates from their Jardins du Monde collection {here}. The center platter is the Jardins du Monde grande charger that is no longer available but can sometimes be found on eBay {here}.
Step 2: Trace Each Plate on Paper
I wanted to see the arrangement up on the wall before nailing in 20+ hangers and realizing that I should have shifted it up or down or changed some plates around so I traced the plates on kraft paper and cut each of them out. Once each plate was cut out, I drew both a horizontal and vertical line through the center of each paper plate, which helped me line them up evenly on the wall using a level (I wish I was a girl who could just wing it and not worry if things don’t line up quite right but I know myself enough to know that it would bug me if the arrangement was visibly “off”…).
Step 3: Tape Your Templates to the Wall
Once I had my plate templates arranged and level on the wall, I taped them to the wall with LOTS of tape to make sure they wouldn’t fall down overnight (I was doing my hanging the next day). And then when I was getting my girls their breakfast the next morning, I heard a rustling in the dining room and found them in a heap on the floor. Nooo! I had used Delicate Surfaces painter’s tape and it didn’t hold. Ugh. Lesson learned. I redid the arrangement but this time used regular painter’s tape and put a tiny nail through the center of each plate just to be extra sure we didn’t have a repeat incident.
Step 4: Figure Out the Best Plate Hangers for You and Hang Them Up!
My original plan was to hang my plates using {these} Disc Hangers, which are adhesive discs that you adhere to the back of your plates. The advantages of the Disc Hangers are that they allow your plates to hang flat against the wall and they are invisible once you hang them. Unfortunately, I realized that most of my plates have a raised pattern on the back – definitely not a good surface for adhering a flat Disc Hanger.
The other disadvantages of the Disc Hangers are that you can’t easily remove them to use the plates – I wanted to be able to take some of the platters off of my wall if needed to use them for serving food at parties every now and then and the Disc Hangers wouldn’t allow me to do them. Also, according to the reviews some people have had issues with their plates fall off the wall when using them. But there are others who have used them with beautiful results (and no broken plates!) such as Emily of Timeless Paper who used them to hang this gorgeous plate wall over her bed (don’t you love it?!):
Since the Disc Hangers weren’t going to work for me, I ended up hanging my plates using Tripar’s white vinyl coated plate hangers found {here}. Beware that they do “run small” – my 9″ plates did not fit the 7″-9″ hanger size – I had to use the 10″-14″ size.
Since they are vinyl coated, they won’t scratch the plates like plain wire hangers can and I love that when you use this type of plate hanger, you can easily remove the plates from the wall and use them. The key to working with these hangers is to bend the top of the hanger so that your plate will lay flat on the wall once hung. The best way to do this is to first attach the plate hanger to the plate and lie the plate on a flat surface. The top of the hanger should (barely) touch the flat surface that your plate is lying on. If it doesn’t, take the hanger off the plate, bend it, and place it back on to see if it’s where you need it to be.
Once all of your plates have hangers, it’s time to get them up on the wall! I used {these OOK picture hooks} – hook your OOK hook onto the wire hanger that is attached to your plate and measure the distance from the top of the plate down to where the nail will go into the OOK hook. Transfer this measurement to your plate template and gently tap the OOK hook nail in just a bit.
Then remove the template from the wall, put the nail through the OOK hook, and hammer it in at the same spot that you tapped it into moments ago. Now hang your plate!
Repeat.
It’s definitely my favorite thing about our dining room – you can take a tour to check the entire space out including a bunch of fun “before” and “after” pics (it wasn’t too pretty when we moved in!) {here}!
- Pin
- Share
Categories: Decorating Tips Tags: wall art
✉️FREE EMAIL SERIES ✉️
5 Secrets to Reinventing Your Home on a Budget
Simple tips to instantly transform five rooms in your home!
Reader Interactions
crockery, textiles, decorative and household goods
Hits shop
Our customers choose, you choose too!
-
Utensils
-
Textile
-
Decor
- 9000 9000
CHOZTOMS0002 Household appliances
-
Light
-
Furniture
DACH, Repair
All categories
Style Blog
How to choose the right frying pan?
Types of glasses
How to choose wallpaper?
Types of kitchen knives
Garden lighting
Organizing the perfect picnic
How to choose bed linen
Summer holidays
Stained glass: a trend that your home needs
7
Spring gardening
Easter table: traditions and new ideas
Holiday table setting
Organizing space in the house
How to choose wall decor
5 ways to prepare the perfect breakfast
0 window sill
Walmer Organic Collection
How to choose a stylish wallpaper for your kitchen?
Bedroom lighting
How to choose a planter?
New Year's catalog
-
STM bed linen 1.
 5-SP
5-SP RAMS: under 148x215cm, simple 148x215cm, all 70x70cm 2pcs, 100%HL
-
Nordic owls salad bowl, 13.5 cm, ceramic
-
Nordic owls tea pair, 220 ml, ceramic
9001 ceramic, -
Steppie Nordic OWLS, ceramics
-
SIMI VARI Bordeaux, 28 cm, a/n coating, casting aluminum
-
Bank with a spoon of Nordic OWLS, 550 ml
Kyramika
-
Tinsel, 6x200cm, red
blanket Home Decor bones.
140x205 cm
Nordic owls mug, 5 ml 0 ml0007
Scandinavian catalog
-
Set of HOMSU anti-slip hangers
with velvet cover 20 pcs, black
-
Box with a universal lid Luxe
380 x 276 x 220 mm, 18 l, polypropylene
-
Basket for IDEA
- 11111111111111111 9011 9011 9011 9011 9011 9011 9011 9011 9011 9011 9011 9011 9011 9011 90AR
-
STM Allure bedding set 2-sp
satin: under 180x215cm, simple 200x220cm, nav 50x70cm 2pcs, 100% cotton
-
Salad bowl Pink, 14 cm, ceramic
-
Bank for products with a mound
Glass
-
Decorative hook, 20 cm, metal/plastic
Transparent, 65 l
Velvet liquid 9000
Liquid , white
Trendy
-
Hanging storage organizer with
3 pockets, Eva Classic, 25 x 60 cm
-
Basket for storage EVA Classic
with handles, dark gray, artificial felt, 30 x 30 x 30 cm
-
COST FUNYA
Artificial warriors 9000 9000 9000 9000 9000 9000 storage Eva Funny Shark
artificial felt
-
Eva Sweet Home storage basket
light grey, artificial felt, 30 x 30 x 30 cm
-
Basket for storage EVA Funny Kotyara
Artificial felt
-
Storage Eva Sweet Home
with handles, light gray, 25 x 20 x 22 cm, artificial warriors 9000
, artificial warriors 9000 . -
Eva Elegance Storage Basket
with handles, light gray, 25 x 21, artificial wool0007
-
Basket for storage EVA ELEAGANCE
light gray, 28 x 28 x 24 cm, artificial felt
-
Bellya EVA Sweet Home
, , artificial vinda olive, artificial olive egg Bernadotte -
Egg stand Bunny on wooden stand
porcelain
-
Egg stand Hen, porcelain
Chicky Ricky
Club Choice: Promotion of the Week 🏆
Crockid. Clothes for children 0-11 years old
Open the action
Chiki Ricky
Your order No.
 100500 Sent
 Available track number
Open my orders 9000
Chiki Ricky
Keshbek 9000
Now on a bonus account 315 r.
Open My money
Sometimes we send personal order notifications and most important promotions in Chicky Ricky nine0007
search
Top promotions
Happy Choice
Webbis
Galean Style
nine0002 BrividiFly
Kaloris
Rivoli
ElectraStyle
nine0002 Dress MeAdelis
Mirolia
Nicolette
DeNastia
nine0002 Dressesin all promotions
Underwear
in all promotions
Suits
in all promotions
Briefs
in all promotions
nine0002 Shoesin all promotions
Jumpers
in all promotions
Pants
in all promotions
Pants
in all promotions
nine0002 Setsin all promotions
Bedspreads
in all promotions
Blouses
in all promotions
Bags
in all promotions
nine0002 Towelsin all promotions
Bras
in all promotions
Coat
in all stocks
Bedding sets
in all promotions
T-shirts
in all promotions
Furniture
in all promotions
Hats
in all promotions
nine0002 Slippersin all promotions
close Click to access sales and club prices
left until the end of the promotionarrow_back_ios
First select size:
You can always see the special prices for club members
timer Promotion
- Send order
- Design, color
- About
- Composition
- Trademark
- Country of origin
- Return
- Conditions navigate_next
arrow_left
arrow_right
Collection of Greek interior brand.
 Inart promises to turn your home into your personal kingdom with a unique offer of furniture and decorative lighting.
 Inart promises to turn your home into your personal kingdom with a unique offer of furniture and decorative lamps.
The promotional offer is valid until 15:59 Sunday, January 15. Delivery from January 23 from Moscow. nine0007
forum 216 brand reviews Inart forum 1 opinion about the brand Ixia
nine0002 Benefit up to40%
Glasar furniture. Decorative consoles, tables and pouffesA collection of furniture assembled under its own brand by the Russian company Glasar.
Benefit up to
25%
ByObject Home Collection. Decor and furniture collectionByObject has been creating unique collections of furniture, gifts and decor for over 15 years to make our world brighter and better.
Learn more
Eva Funny Storage Basket Dark Bear
dark grey, artificial felt
layer gold, porcelain