Start sweet potatoes
Starting Sweet Potato Slips - How to Grow Sweet Potatoes From the Store
If you have never tried to grow sweet potatoes before, you are in for a treat. Starting sweet potato slips is easy to do and lots of fun.
Slips are the rooted sprouts that grow from an actual mature sweet potato. They are used to grow new sweet potato plants.
Growing sweet potato slips is a fun project to do with kids.
You can buy rooted sweet potato slips, or use sweet potatoes purchased from the store to start slips that will produce dozens of sweet potatoes by the time fall arrives.
This tutorial shows how to grow sweet potato slips two ways – in water, and in potting soil.
This post may contain affiliate links. I earn a small commission, at no extra cost to you if you purchase through an affiliate link.
Sweet potatoes – ipomoea batatas – enjoy a long frost-free growing season. They are a warm weather vegetable that takes about 90 days to mature.
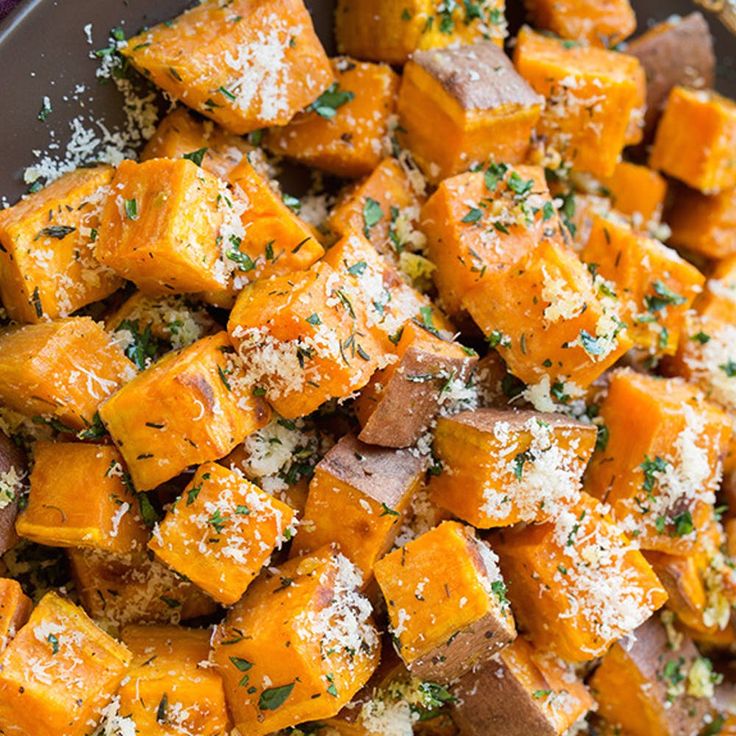
Sweet potatoes are a wonderful, earthy vegetable that can be used in so many ways in cooking. See this recipe for sweet potato stalks for an unusual breakfast idea.
These Italian sweet potatoes make a wonderful, one-pot, side dish that goes well with so many protein choices.
What is a sweet potato slip?
Internet Archive Book Image from page 470 of “Southern field crops (exclusive of forage plants)” (1916) (no known copyright restrictions)
Sweet potatoes are not started by seed like some vegetables are. They get their start in life from what are called “slips.”
These potato starters are sprouts which grow on sweet potatoes and then develop roots when they come in contact with water or soil.
The slips can be used to start new sweet potato plants.
You can order bundles of sweet potato slips online or start your own slips from a sweet potato that has been purchased from a store. You can also start slips by using pieces of sweet potatoes that you have grown in your garden.
Do you have some sprouted sweet potatoes? Don't throw them out. Plant them in water or in soil to make sweet potato slips. These sprouts will grow new plants! 🌿🥔🌿 Click To Tweet
Starting sweet potato slips
Sweet potato slips are easy to start. You can use both water and soil to get them going.
To start sweet potato slips, you will need several healthy, clean sweet potatoes.
Depending on the size, each sweet potato can produce dozens of slips, so just a few sweet potatoes will give you enough starters for many sweet potato plants.
Rooting sweet potato slips in water
This technique works in a similar way to that of sprouting an avocado pit in water.
Wash the sweet potato well. Inspect your sweet potato to see if you can find any tiny roots showing. This is the root end of the sweet potato. It usually tapers to a point.
Normally, one end of the sweet potato is larger and has more “eyes” on it. This is the sprouting end. Both ends of the sweet potato come into play when starting sweet potato slips.
If you cannot tell the sprouting end from the rooting end, place the sweet potato in a warm place for a few weeks. Buds will emerge and you’ll know which end goes up!
Suspend a sweet potato portion in a Mason jar filled with water. Place the sprouting end of the sweet potato above the water level and the rooting end below it.
You can use toothpicks to support the potato in the jar at the right level. Be sure there is some room for the roots to grow.
The sweet potato slips enjoy a warm location, so place the Mason Jars on top of a heat mat or on a sunny window sill. Grow lights also help to speed up the process of starting sweet potato slips.
Keep the water level mid way up the potato during the process and change the water every week to keep it fresh. I put mine in a sunny South facing window that gets a nice amount of heat and light.
In about a month, roots will form from the rooting end first, and sprouts will grow from the top sprouting area of the sweet potato.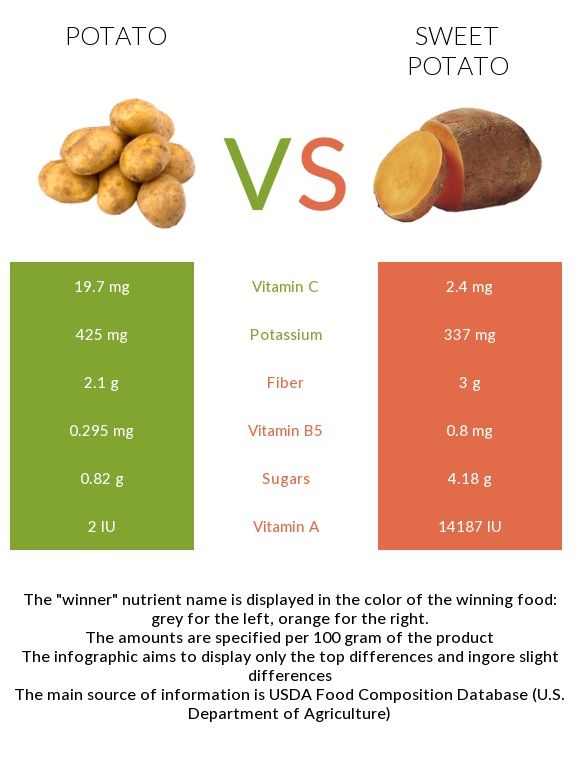
Once you have 5-6 sprouts formed, you’ll be able to separate the sweet potato slips so that you can transplant them into soil.
Starting sweet potato slips in soil
This method of starting sweet potato slips is faster to get going. If you have a sweet potato in the cupboard that is starting to sprout, you have an even better head start!
Choose a container with drainage holes or add gravel to the container. A clean rotisserie chicken tray works great if you plan to use just one sweet potato.
Fill the container with potting soil or seed starting soil. Moisten the soil well.
Place sweet potatoes in the soil mix so that the potatoes are covered about half way up with soil. Cover the container and mist often to keep the soil moist.
Again, provide warmth. In about a week, you will see roots forming in the soil. In another week, sprouts will begin to grow from the top of the sweet potato.
When the sprouts are about 5-6 inches long, they will be ready for separating and then transplanting.
Separating the sweet potato slips
Whether you choose to start with the water or the soil method, once the sweet potatoes have sprouted and grown some roots, it is time to separate them into slips for planting.
To do this, carefully twist each sprouted area away from the sweet potato. You might even be lucky enough to get some slips with roots already growing!
Place the slips in a small Mason Jar with the bottom part of the stem area submerged in water and the sprouted leaves hanging over the edge of the bowl.
In a few days, roots will form on the bottom of each plant. Be sure to keep the water fresh by changing it daily.
The slips are ready to plant when the roots are several inches long. Any slips that don’t have roots and those that appear to be wilting can be discarded.
Note: after separating the slips from the sweet potato, you can continue trying to grow more slips on the potato to plant later! I kept having mine sprout for many weeks after I got my first slips.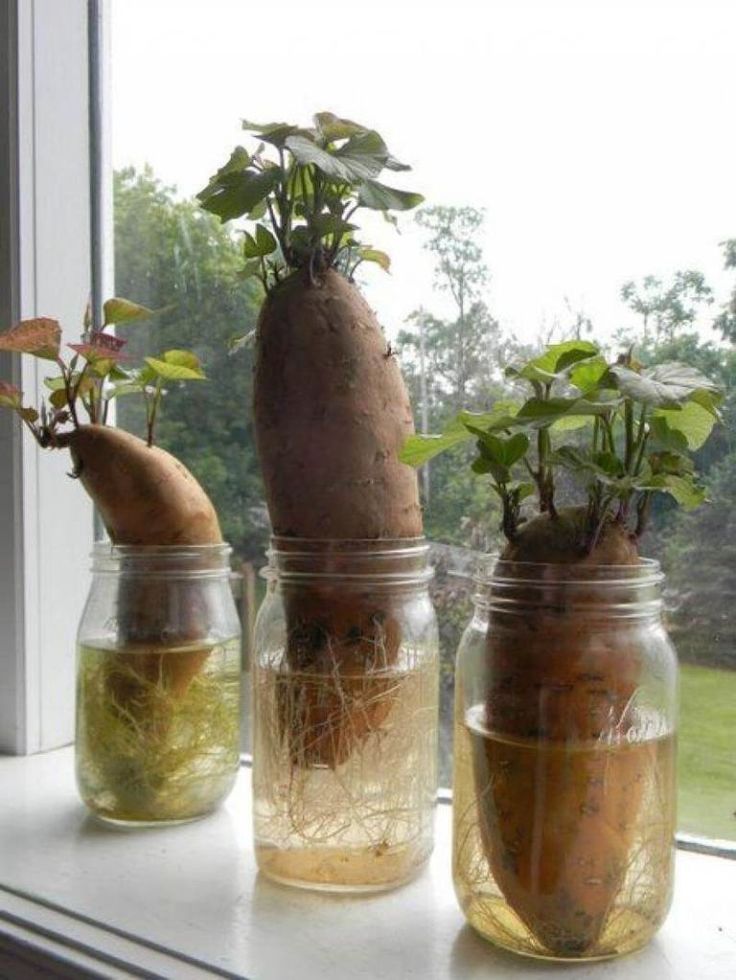
How many slips will grow from each sweet potato?
The answer to this depends on whether you have a bush or vining sweet potato slip.
Normally, sweet potatoes can produce a pound for each plant. Long-season varieties produce more because their tubers continue to grow until the frost hits the region.
Bush varieties of sweet potatoes produce less, but they are easier to grow in containers.
The yield can vary, but as a rule of thumb, each sweet potato will produce about 6 slips and you will get about 3-5 potatoes from each slip.
This means that an average sweet potato is capable of giving you 18-30 new sweet potatoes. That is quite a yield!
What type of soil do sweet potato slips like?
Sweet potatoes like soil that is loose and well draining. It also likes slightly acidic soil. Coffee grounds added to the soil will help with the acidity level.
Well draining allows larger tubers to form easily. If your soil is compacted and firm, adding compost or other organic matter will make it looser and more friable.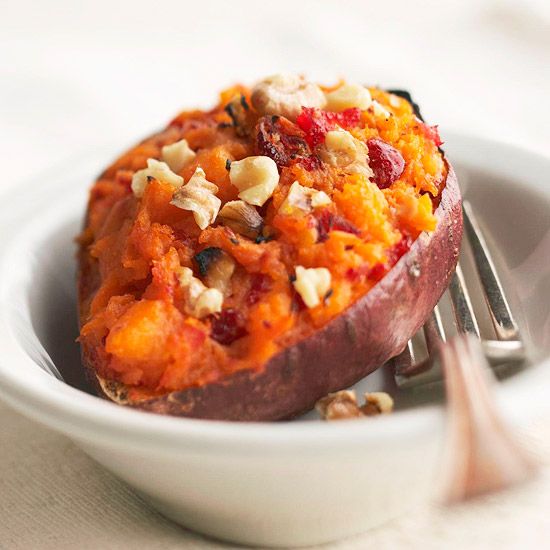
Also be sure to keep the soil consistently moist during the growing season. They prefer a soil temperature of 70 – 80° F. This means that sweet potato slips should be started in mid-summer in most regions.
Sweet potatoes can be grown in the ground, in raised beds, or in large containers or potato bags.
Plant the slips in an area with full sun. Partial sun or a bit of afternoon shade in the hottest climates is best.
How to plant sweet potato slips
Sweet potato slips are ready to be planted as soon as all chance of frost is over and the ground has warmed sufficiently.
Plant the slips about 12 – 18 inches apart with rows about 4 inches deep. Sweet potatoes can take a lot of room when growing, so you don’t want to crowd them.
Soak the soil thoroughly after planting, making sure the area around the slips is very wet. Water the slips every day for the first week and 3 times during the second week.
Gradually make the time between each watering a bit longer until you are giving the slips water about once a week.
If your soil is very dry, (or if you have had a lot of rain) you may need to adjust the watering cycle slightly.
Even though sweet potatoes can withstand dry conditions, they don’t produce as well , so be sure to keep the watering up, especially in the hottest part of the summer.
It takes about 3 months for the sweet potato slips to produce sweet potatoes for harvesting.
Can you plant a whole sweet potato in the ground?
If you want to forego the task of producing the slips, it is possible to plant the whole sweet potato in the ground and partially cover it with soil. Each sweet potato will produce dozens of sprouts.
The problem with taking this short cut is that the sprouts will not be spaced out, so the plants (and sweet potato tubers) will be crowded. This will result in smaller sweet potatoes.
For best results, using slips will allow you to space the plants well.
Can you grow sweet potatoes indoors?
Sweet potatoes need lots of sunlight and are ideally suited for growing outside.
However, if you have the right conditions, you can grow sweet potatoes from slips as indoor plants in a container.
You can use the technique above shown for growing slips in water and just let the sprouts develop and the vines grow will eventually grow.
Alternatively, choose a larger container filled with good quality potting soil and plant the root end down so that the vines will grow from the top. The sprouting end of the sweet potato is left above the soil line.
How to grow sweet potatoes in a decorative cup
Sweet potatoes are very versatile. You can even grow them as a decorative potato plant in a cup!
Fill the cup about half full with water. Place the sweet potato into the cup making sure that the end having the most eyes is above the water.
Place the cup in front of a warm, sunny window. Check the water daily, making sure that the bottom part of the sweet potato remains covered, so roots will develop.
Change the water every few days. In about three weeks, roots will start to appear. After roots have formed, the top of the potato will send off leaves and a vine will eventually develop.
You will need to keep changing the water unless you move the potato to soil.
Where to buy sweet potato slips
What if you are not in the mood to start your own sweet potato slips? Never worry – sweet potato slips can be purchased! Early spring is the best time to order. Later in the year, you may find that they are out of stock because of the long growing season needed for sweet potatoes.
Here are some places with sweet potato slips for sale:
- Sweet potato slips on Etsy
- Sweet potato slips at Sand Hill Preservation Center
- Sweet potato slips from Southern Exposure Seed Exchange
- Sweet potato slips from Amazon
Critters and sweet potato plants
It is not just humans that love sweet potatoes, many animals do, as well.
Deer will love to chew on sweet potato vines and leaves.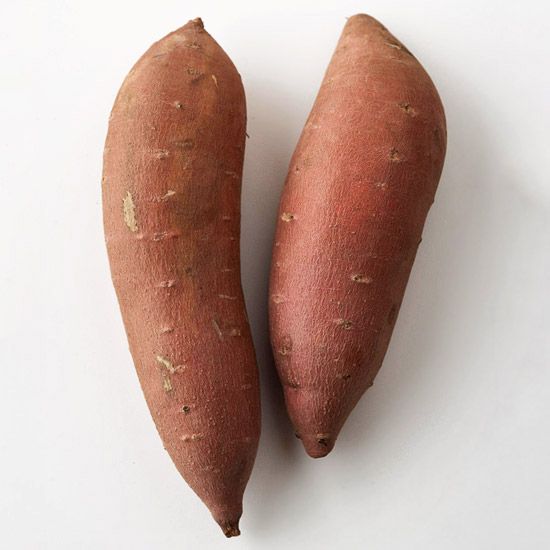 Rabbits especially love them and will often slice the shoots entirely off the plant. Voles and moles love the tubers.
If you cannot fence for rabbits and deer, row covers will help to deter them from feeding on the plants. Install mesh fencing under the soil around the plantings of sweet potatoes as an aid to help keep voles away.
Other vegetables that will re-grow from pieces
Sweet potatoes are just one vegetable that can be used to grow more vegetables. There are many others.
Some are cut and come again vegetables which will keep growing after you harvest them each time.
Others are vegetables that you can use to grow entire new plants from a part of piece of the vegetable. See my post on re-growing food from kitchen scraps here.
Pin this post for starting sweet potato slips for later
Would you like a reminder of this tutorial for growing sweet potatoes from slips? Pin this image to one of your vegetable gardening boards on Pinterest so that you can easily find it later.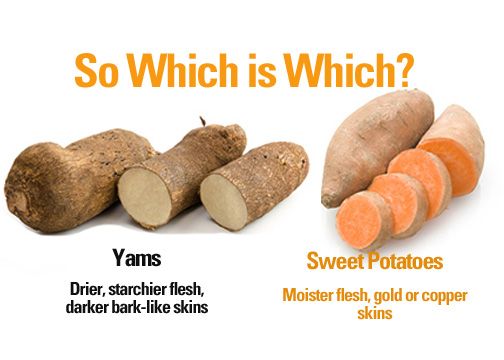
Admin note: This post first appeared on the blog in April of 2013. I have updated the post to add all new materials, a tutorial, a project card and a video for you to enjoy.
Prep Time 15 minutes
Active Time 6 days
Additional Time 3 months
Total Time 3 months 6 days 15 minutes
Difficulty moderate
Materials
- Sweet potato
- Water
- Potting soil
- Rotisserie Chicken container
- Mason Jar
- toothpicks
Tools
- Garden spade
Instructions
To start sweet potato slips in water
- Wash the sweet potato well.
- Suspend a sweet potato in a Mason jar filled with water. Place the sprouting end of the sweet potato above the water level and the rooting end below it.
 You can use toothpicks to support the potato in the jar.
 - Keep in a warm location.
- Be sure the water stays half way up the jar and change it each week to keep it fresh.
- Roots will form in about a month and then sprouts will form.
- When 5-6 sprouts have formed, separate the slips and transplant in soil.
To start sweet potatoes in soil
- Add soil to a clean rotisserie chicken tray lined with pebbles.
- Place a sweet potato in the soil and cover half way up with soil..
- Cover the container and keep the soil moist.
- Keep warm.
- In about a week, you will see roots forming in the soil. In another week, sprouts will begin to grow from the top of the sweet potato.
- When the sprouts are about 5-6 inches long, they will be ready for separating and then transplanting.
Separating the sweet potato slips
- Once the sweet potatoes have sprouted and grown some roots, it is time to separate them into slips for planting.
- Twist each sprouted area away from the sweet potato.
- Lay the slip in a Mason Jar with the bottom part of the stem area submerged in water and the sprouted leaves hanging over the edge of the bowl.
- In a few days, roots will form on the bottom of each plant.
- Keep the water fresh by changing daily.
- The slips are ready to plant when the roots are several inches long.
- Discard any slips that don't have roots and those that appear to be wilting.
- Plant the slips in soil in a sunny location in well draining soil when soil is warmed to 70 -80 degrees F.
- Space 12-18 inches and plant 4 inches deep. Keep well watered.
- Sweet potatoes will be ready to harvest in 3 months.
Share on Social Media
- Share
- Tweet
How to Grow Sweet Potatoes.- The Art of Doing Stuff
SKIP TO HOW-TO A step by step guide on how to grow sweet potatoes & how to start slips.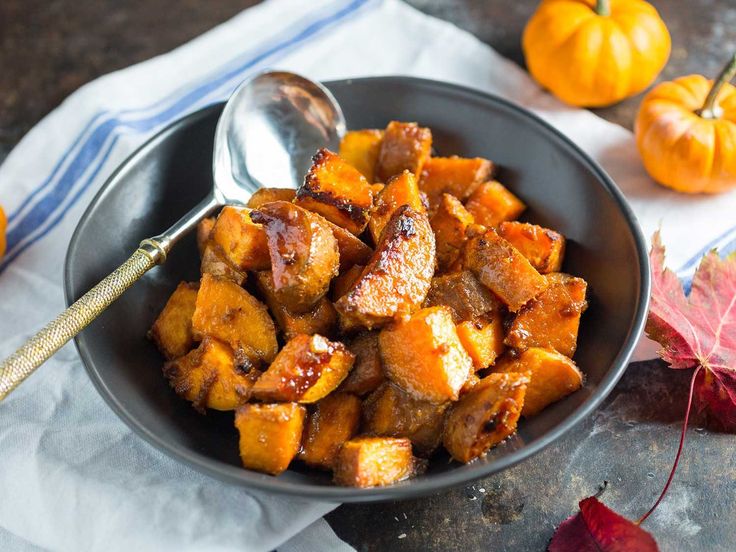 Growing sweet potatoes used to be a closely guarded secret among farmers. A mystical, mysterious process - like how to perfectly apply liquid eyeliner. Not anymore!
I've successfully taught thousands of you how to grow luffa in a cold climate (zone 6) and sweet potatoes (known as Kūmara where it's hugely popular in New Zealand) are no different.
It can be done and you can get a HUGE harvest even in a short season - you just need to follow the steps.
In 2010, when I first started growing sweet potatoes (Ipomoea batatas), there was almost no information on the Internet about it. At that time, growing sweet potato slips was a closely guarded secret in the farming community.
Not anymore.
Table of Contents
Two ways to grow sweet potato plants🌱 It starts with growing the slips. 🌱
In order to grow sweet potatoes, you have to first grow sweet potato slips. These are the sprouts that come off of the sweet potato.
Every slip will grow into a sweet potato plant that will produce around 2 pounds of sweet potatoes
1. IN WATER
2. IN SOIL
WATER METHODSOIL METHODSweet potatoes sprout after they break dormancy just like the perennial plants in your garden do. These sprouts are called slips and they're what you use to grow sweet potato plants.
You can encourage your sweet potato to break dormancy by putting it in a warm room in either a glass of water or some soil.
Water Method
With this method you're generally safe to start your slips 6 weeks prior to when you want to plant them out.
STEP 1. Place sweet potatoes in a glass jar of water with half the sweet potato under water and the rest not. The part under water will grow roots and the part above water will grow slips.
STEP 2. Put the jar somewhere WARM - over 80℉ is ideal. Now you wait about a month for it to root and sprout.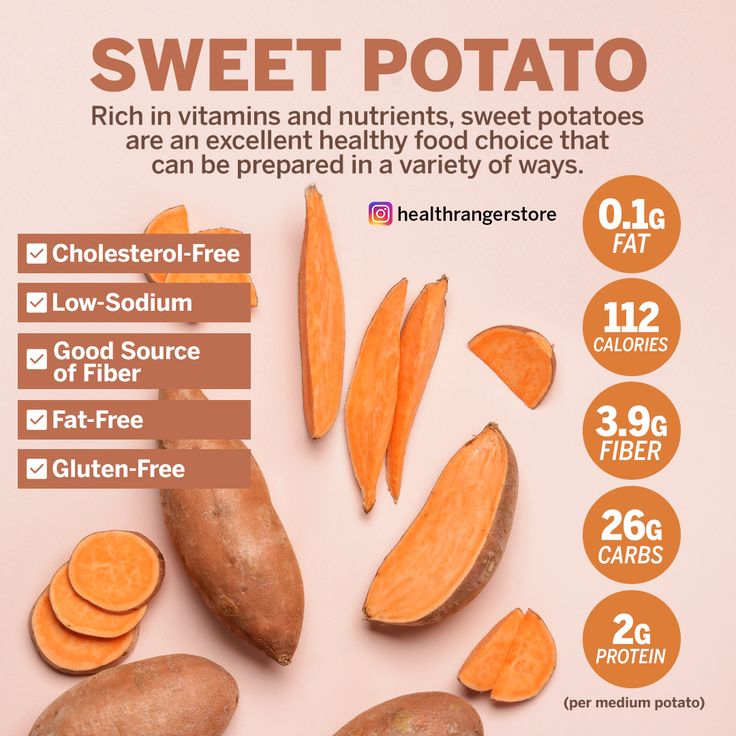
STEP 3. Once the slips are a few inches long they can be pinched off of the sweet potato and rooted in water or planted in 4" pots.
STEP 4. Slips can be planted outside once the soil temperature is 65ºF (or 18ºC).
Soil Method
The soil method produces slips more quickly. With this method you're generally safe to start your slips 4 weeks prior to when you want to plant them out.
STEP 1. Place whole sweet potato(es) lengthwise in a pan of soil so the soil comes halfway up the side of potato.
STEP 2. Place the pan on a seedling heating mat.
STEP 3. Make sure the soil stays moist and wait for it to produce roots / slips in 2 weeks or less.
STEP 4. Once the slips are a few inches long and you can either put them in a glass of water to root, or plant them directly in soil to root. Either way is fine. Rooting in a glass jar takes up a lot less space than putting each slip in a 4" pot with soil.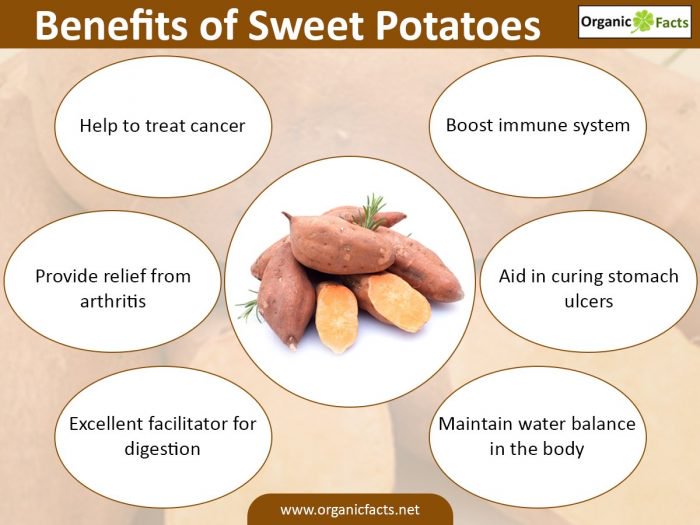
STEP 5. Slips can be planted outside once the soil temperature is 65ºF (or 18ºC).
TIP! It's the warmth of the heat pad that speeds up the sprouting process.
How to plant
Sweet potatoes will be one of the last things you plant in your garden. They must go in later than peppers, tomatoes and other heat loving plants because sweet potatoes need more than just warm weather. They need warm soil as well as warm air.
STEP 1. Apply a couple of inches of compost to the top of your soil. You can also use a slow release fertilizer; I use Gaia Green's 4-4-4 fertilizer in my garden.
STEP 2. Lay black thermal mulch (plastic) on the planting area 2 weeks before setting out. Sweet potatoes need full sun so make sure your area has that.
STEP 3. On planting day cut a circle in the plastic and push one slip in. Make sure the slip has contact with soil all around. Repeat for all your slips.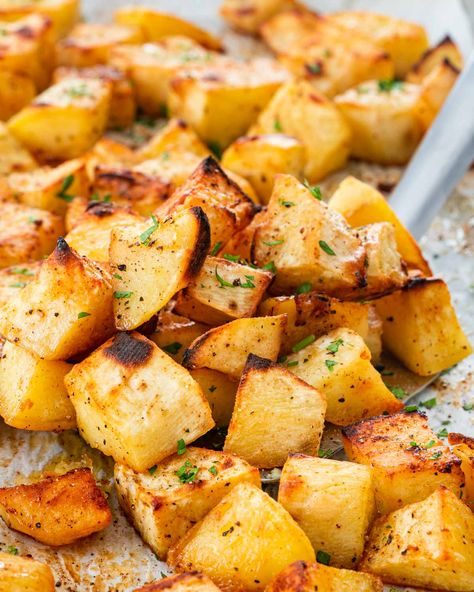
STEP 4. Proper spacing for planting is 1 sweet potato slip per square foot. HOWEVER, I find spacing of 16" between sweet potato plants increases your yield & the size of your sweet potatoes.
STEP 5. Keep the plants well watered throughout the summer. Using the plastic eliminates the need to weed and helps retain moisture.
STEP 6. Harvest before the first frost. Once the weather cools down they won’t grow anyway.
* Speed up your soil warming by laying a layer of black thermal plastic in your garden bed. I use biodegradable plastic made of cornstarch that just decomposes on the soil by the end of the season. It will heat the soil up by as much as 10 degrees which means you can plant the slips 1-2 weeks sooner than if you don't use thermal plastic.
.
Growing in beds
Growing in containers
Sweet Potato Plants If you grow sweet potatoes in the ground you may find voles & mice get to them before you do. Hardware cloth can help with this. If you can't find it locally, Amazon carries hardware cloth.
- Cover your sweet potato bed with ¼" hardware cloth. Grow your sweet potatoes in a raised bed with wood sides. After laying your plastic down, staple hardware cloth around the edges of your bed.
- Plant the slips you have to punch a hole into the plastic with a pencil and push the slip through the hardware cloth, plastic and into the soil. THIS IS A PAIN. But it eliminates 100% of rodent damage.
I grow all of my sweet potato plants in containers.
- Plant 1-2 sweet potato slips in a 60 litre pot that measures 60 cm across.
- Remember to keep the pots watered as they'll dry out more quickly than a garden bed.
Once your plants are well established you can also harvest and eat the leaves.
Use them in: salads or cook them like you would spinach or chard.
This video shows my sweet potato harvest in 2016 after I tried using the hardware cloth the first time in a raised bed in my 40' x 40' community garden plot.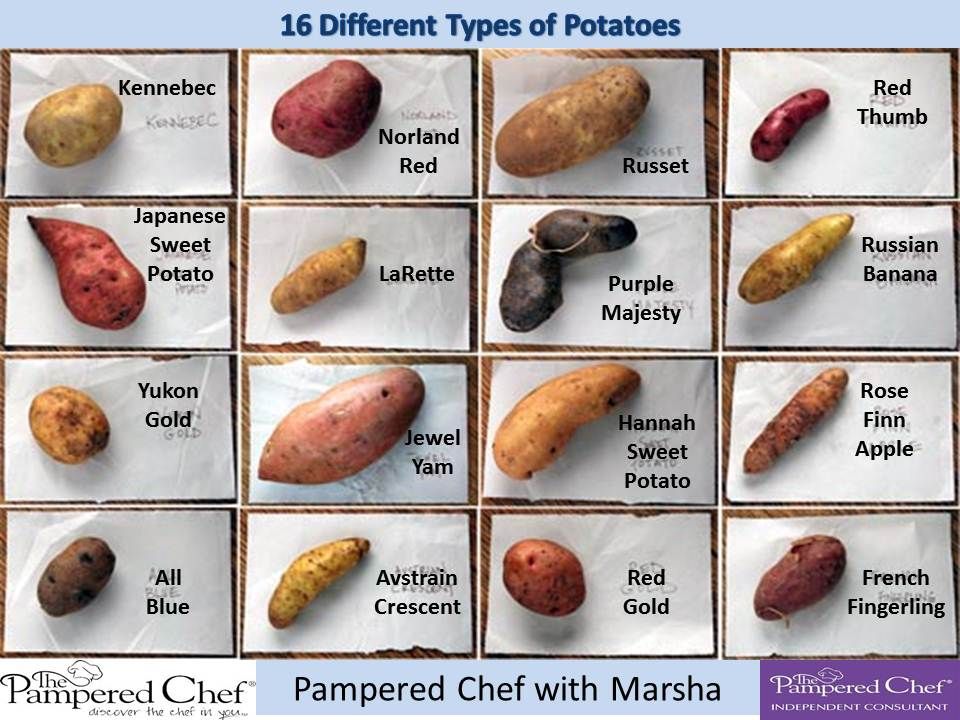 In this video I'm using regular thermal plastic, not the biodegradable plastic.
How & When to Harvest
Near the end of their growing life sweet potato vines will start to yellow and croak. This is a GOOD sign! They're ready to harvest.
- Cut the tangle of vines away, leaving only a few stubs to let you know where the plants are.
- Using a shovel or digging fork, dig em up! Honestly, the most fun crops to grow are the ones that grow underground because you have NO idea what you have until the day you dig them up.
- Be careful when you're digging them and pulling them out. They bruise and break easily.
- Once they're all dug let them sit in the sun for a few hours to dry and begin the curing process.
If the vines get touched by frost and start to turn black the sweet potatoes can rot quickly so dig them up right away!
How to Cure & Store
CuringSweet potatoes need to be cured for 10 days in an area that is 85ºF with 85% humidity. Getting those conditions at home probably seems difficult but just get as close to those ideal conditions as you can.
Why do you have to cure sweet potatoes? Curing toughens the skin so they keep longer and it develops their distinct sweet flavour. A sweet potato dug straight out of the ground won't taste sweet at all! Try it.
Here's how:
- Put your sweet potatoes in a rubber bin with the lid offset so it isn't completely sealed off. Store this near a heat register, wood stove or sunny spot. This will create conditions as close to perfect as you can get in most houses. DO THIS FOR 10 DAYS.
- After the initial 10 day curing period move your sweet potatoes to an area that is between 55-60ºF for one month. This develops their flavour. After 1 month they will have developed their sweet potato flavour which will get even stronger as time goes by.
Storing
Store sweet potatoes in an area that doesn't get below 50 degrees in a container that breathes like a slatted wood box or a burlap sack.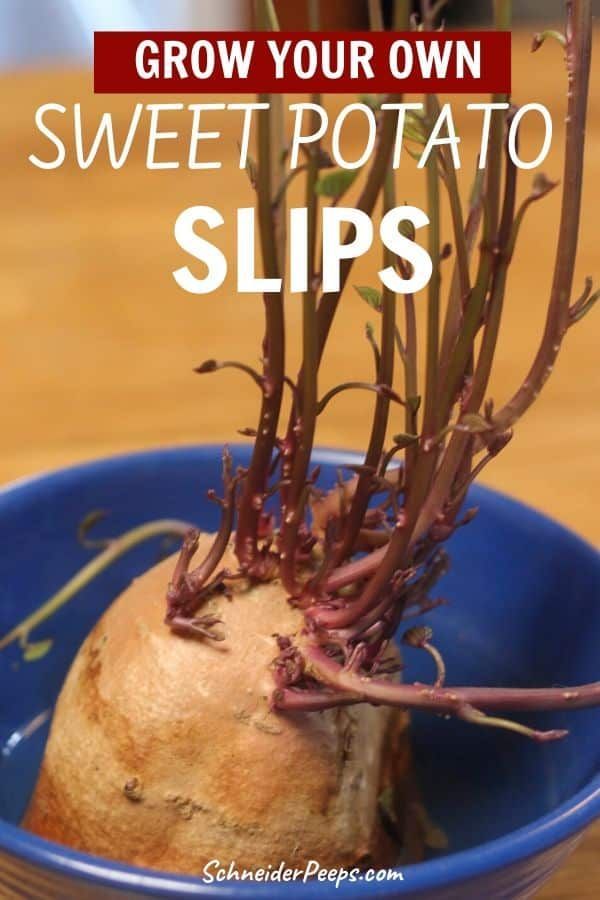
How many sweet potatoes do you get per plant?
2 lbs or 4 sweet potatoes per sweet potato plant.
1 sweet potato plant will produce about 4 large sweet potatoes, or 2 lbs of sweet potatoes. Some varieties will produce 6 or more per plant.
The plant usually creates 1 very large sweet potato, along with a few smaller ones.
A single sprouting sweet potato can provide you with at least 15 slips (that's a low estimate). Those 15 slips will create 15 plants, which will give you around 30 lbs or 60 individual sweet potatoes.
Where to buy slips
If you don't want to grow your own you can buy potted sweet potato plants at many garden centres now and you can order live slips online.
Growing from store bought sweet potatoes
To grow your own slips all you need is a sweet potato that hasn’t been treated to stop sprouting which you can get at the grocery store.
How do you know if it’s been treated? You don’t.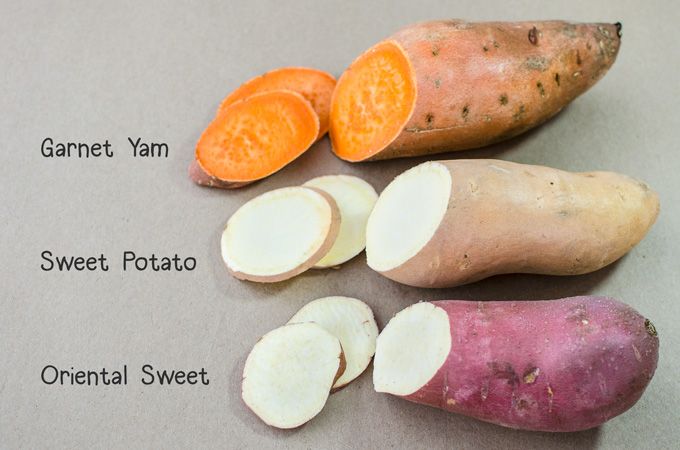 You go to the store, buy your sweet potato and hope for the best. Organic is your best bet for an untreated sweet potato, but both organic and "regular" store bought sweet potatoes have produced slips for me.
Tips on picking a sweet potato from the store to grow
- Check for cold damage. If the sweet potato has been exposed to below 55 degree temperatures it will probably rot rather than sprout. Cold damage presents with dark marks and lesions.
- Bigger isn't necessarily better. Small sweet potatoes, in my experience, have produced more slips than larger ones.
- Ask if they were grown locally. Locally grown means it will grow well in your region.
Sweet Potato with cold damage
Once you've established your very OWN crop of sweet potatoes you can use those for producing slips year after year.
Are ornamental sweet potatoes edible?
You may have noticed that your ornamental sweet potatoes also produce tubers.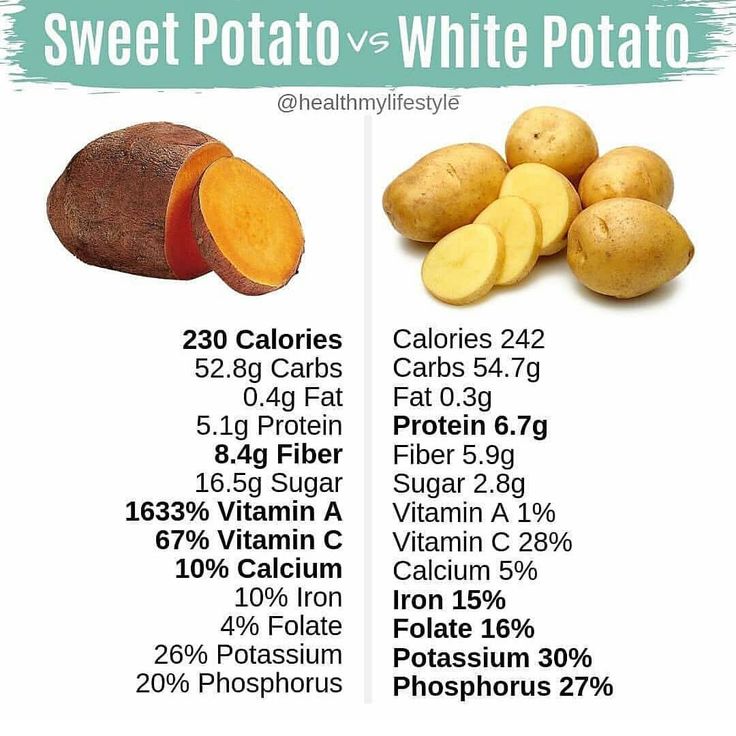 These tubers are edible but not delicious.
The good news is you can propagate ornamental sweet potato vine the same way as regular sweet potatoes! Just dig up the decorative sweet potato tuber in the fall, store it in a cool room, and then encourage it to grow slips in the spring. These slips can be planted directly outside or rooted and potted up for later planting.
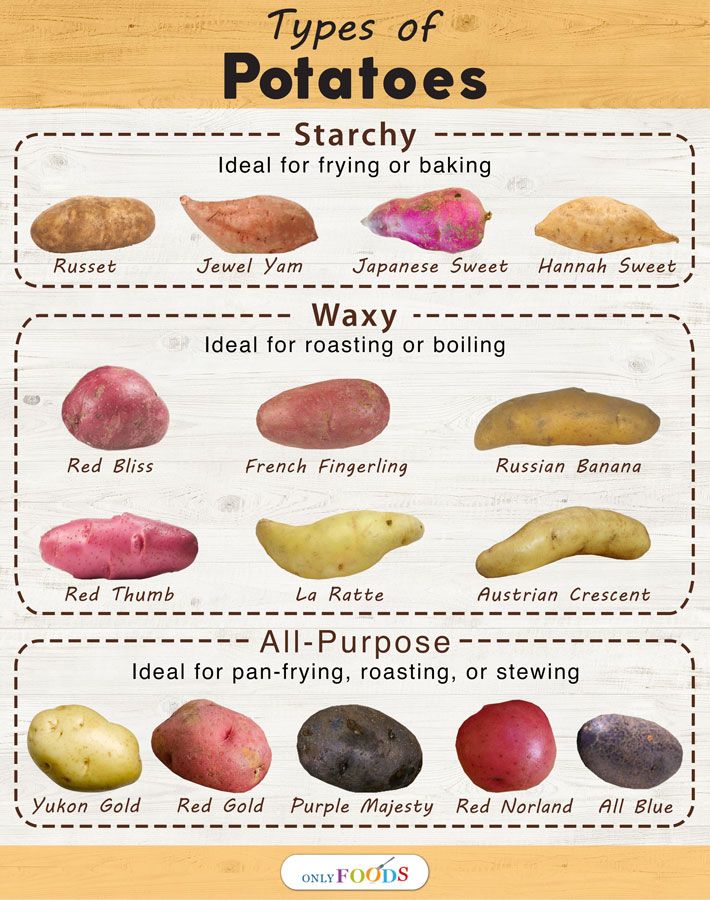
Varieties of Sweet Potatoes
The most popular sweet potato variety by far is Beauregard and it'll be the easiest for you to find. But there are a lot more varieties than that.
- Beauregard* (best all around sweet potato variety)
- Georgia Jet (short season variety)
- Jewel (longer season but still doable in colder climates)
- Garnet (a purple variety with purple skin and flesh)
- Stokes (bright purple variety that retains its colour after cooking)
- Covington (a standard variety that grows well in cooler cliimates)
*this is the sweet potato I most often grow.
Note: I have successfully grown all of the above (with the exception of "Stokes") in my Canadian garden. I just haven't tried Stokes, but I'm sure it would be fine.
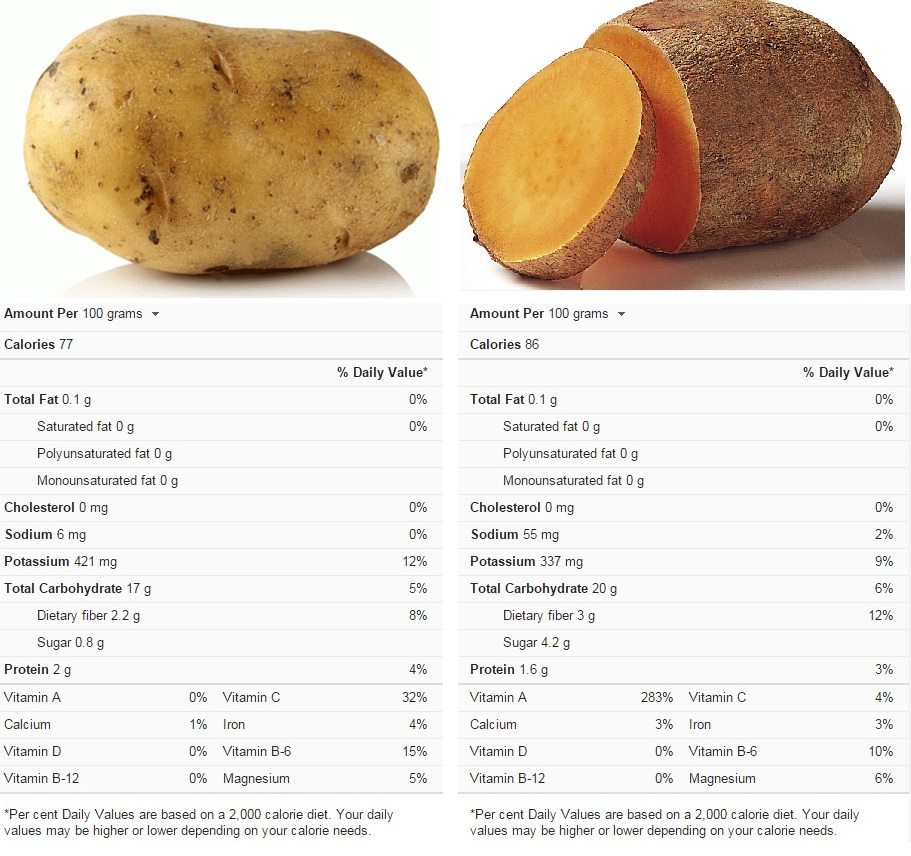
Sweet Potato VS Regular Potato
"Chitting" regular potatoesGrowing slips from sweet potatoTo clear up any confusion, sweet potatoes don't grow like regular potatoes. A regular potato is a tuber, a sweet potato is a root.
Regular potatoes are grown by planting whole "seed" potatoes into the ground. (here's my guide on how to grow regular potatoes)
Sweet potatoes are grown by planting only the sprouts aka slips that grow from the sweet potato.
Materials
- Glass of water
- Foil pan with soil
- A sweet potato
Tools
- Heat mat
Instructions
- Start sweet potato slips 6 weeks prior to planting out.

- Rest a whole, undamaged sweet potato in soil and set on a heating mat. Slips will start to grow in around 2 weeks. When around 5", break slips off of sweet potato and plant out or root in water.
- Rooted AND unrooted slips can be planted directly in the soil.
- Speed up how quickly you can plant your slips outside by laying down thermal plastic
- To prevent vole/mole/mouse damage either grow sweet potatoes in very large pots or grow in a raised bed with wood sides and ¼" hardware cloth across the top.
- Dig up sweet potatoes when the weather cools in fall.
- Cure sweet potatoes at 85F and 85% humidity for 10 days.
- Cure another month at 55-60F allowing potatoes to develop sugars.
- Store long term in vented crates or burlap bags at no colder than 50F
How long does it take for sweet potatoes to grow?
Sweet potatoes can be harvested 4 to 5 months after planting.
How many sweet potatoes do you get from one plant?
You get around 4 sweet potatoes per plant. Usually one very large one and a few smaller but still substantial ones. Some varieties under the best conditions will produce even more.
What soil should I use for growing sweet potatoes in pots?
Any potting soil will work well. It has the nutrients you need. If you are reusing potting soil you'll need to amend by adding fertilizer. Adding a 4-4-4 fertilizer or a few inches of compost to the top of the depleted potting soil will revive the soil. I also use native garden soil in my sweet potato containers.
Can I grow sweet potatoes from a sweet potato?
Yes, that's exactly how you grow them but you don't plant the entire sweet potato. You let the sweet potato sprout in a warm place, pull the sprouts off when they're a few inches long and then root or plant those in soil.
What month is best to plant sweet potatoes?
May or June are the best months to plant sweet potatoes outside when the soil at planting depth has warmed up to 65ºF (or 18ºC).
Can sweet potatoes be planted in a raised bed, bucket or pot?
Yes! Sweet potatoes do really well in beds, buckets or pots. Buckets and pots are especially good for growing sweet potatoes because they keep the soil warm and prevent moles and mice from eating the growing tubers.
Once you have a whack of sweet potatoes that you've grown yourself, if stored in good conditions, they'll last you into April or even May.
You can turn them into my personal favourite guaranteed crispy Sweet Potato fries with a Sriracha/mayo dip, Sweet Potato soup or sweet potato casserole.
Now go forth and grow.
→Follow me on Instagram where I often make a fool of myself←
How to Grow Sweet Potatoes
How to Plant Sweet Potatoes
When to Plant
These plants are tropical in origin, so wait until the soil is fully warm before planting.
To give them a head start, sweet potatoes are often planted in tall rows about 20 cm high.
 This will help the soil warm up faster and keep them well-drained. If you're gardening in a cooler climate, spread black plastic over the soil to warm it up faster. nine0004 Planting Site Selection
 Sweet potatoes generally do well in any medium well-drained soil in a sunny position. If your soil is too dense or rocky, consider planting sweet potatoes in raised beds with sandy but rich soil.
Spacing, Depth and Support
Plant slides 12 to 18 inches apart with 3 to 4 feet between rows. The vines will grow and fill up, so give them enough space. nine0007
Caring for sweet potatoes
Lighting
Be sure to plant sweet potatoes in full sun with partial shade. They generally prefer full sun but appreciate midday shade in hot, dry regions.
Soil
Sweet potatoes prefer well-drained soil with a high organic content. Sandy soil is preferable to dense clay soil.
Watering
Once established, sweet potatoes will tolerate growing in dry soil. It is best to keep it evenly moist by adding 2-3 cm of water once a week. Do not water sweet potatoes during the last three to four weeks before harvest to prevent splitting of mature tubers. Keep plants moist, especially during dry periods. nine0007
Temperature and Humidity
Sweet potatoes should not be planted outdoors until the soil temperature is around 60 degrees Fahrenheit. They need growing soil temperatures of 15 to 30 degrees and growing air temperatures of 18 to 35 degrees. If you live in the northern part of the country, choose early maturing varieties.
Fertilizers
Sweet potatoes are not nutrient heavy, but it is important to give them a balanced diet, usually with proper soil preparation. Overfeeding tends to promote foliage growth rather than tubers. The best approach is to add compost to the beds before planting sweet potatoes. Alternatively, you can apply organic liquid fertilizer to the soil before planting. nine0007
Sweet potato varieties
- ‘Beauregard’ : This popular commercial variety produces potatoes with pale reddish skin and deep orange flesh that take 100 days to mature.
- ‘Bush Porto Rico’ : This compact vine produces copper-skinned, orange-fleshed potatoes after 110 days. This variety produces large yields, so it is a good choice for small gardens.
- ‘Centennial’ : this variety has good disease resistance and matures relatively quickly, averaging about 90 days to maturity.
- ‘Georgia Jet’ : another fast maturing variety, ‘Georgia Jet’, valued for its reddish skin and orange flesh; it matures in about 90 days.
- 'Patriot' : Outstanding pest resistance makes this variety a popular choice for organic gardens. The potato has a copper skin and orange flesh.
Sweet Potato Vs Sweet Potato Vine
Sweet Potato can grow in almost any garden anywhere. The part we eat is the tuberous root of this thermophilic perennial grape plant. The edible sweet potato is closely related to morning glory ( Ipomoea tricolor ) and belongs to the same species as sweet potato vines commonly grown as ornamentals.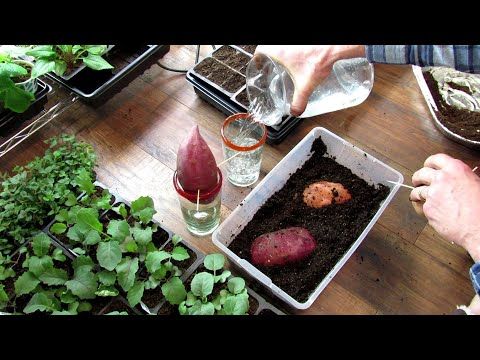 Edible and ornamental species are different varieties of Ipomoea batatas.
Picking sweet potatoes
Three to four months after planting, the tubers should be ready to eat, depending on the variety. If you enjoy eating leaves as greens, you can do so in moderation throughout the season. Be sure to leave enough leaves for the plant to grow. nine0007
You can dig up the tubers as soon as the leaves begin to turn yellow. If the foliage is affected by frost, the tubers are probably still fine. Just don't let them sit in the ground too long after the tops have dried out or they may start to rot. Be careful when digging. Sweet potato tubers grow close to the surface. Their skin is delicate and can be easily damaged and bruised.
How to grow sweet potatoes in pots
If you want to experiment with growing edible sweet potatoes, try growing them in pots. Sweet potatoes are easy to grow in pots. You can grow small plants that you can buy in the spring, or you can grow cuttings in pots.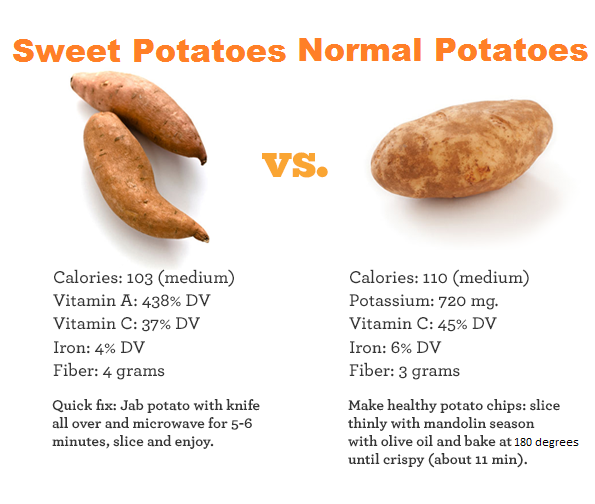 Loosely fill a large container of any material with plenty of drainage holes with good quality soil. nine0007
Make a hole large enough to cover the roots of your plant or weeds. Water thoroughly, place the pot in a sunny spot, and take the pot outside once all danger of frost has passed.
Pruning
Sweet potato vines will grow erratically but should not be pruned because they are important to the nutrition of the potato. If your vines are getting out of control, use your hands to turn the vines back into the garden.
Sweet potato propagation
Propagate sweet potatoes by cuttings or by saving tubers for replanting. If your winters are longer than a couple of months, you can propagate sweet potatoes by storing the tubers for the winter and planting them next spring. If you live in an area with short winters, new cuttings can be grown from grapevine cuttings or whole potatoes.
Propagate from stored tubers using the following steps:
- Use a shovel to carefully dig up the tubers before the first autumn frost.
 Gently shake the soil off the tubers to prepare them for storage. nine0046
 - Store them in a strong cardboard box filled with peat, vermiculite, sand or other dry material during the winter. Make sure the tubers do not touch each other in the box.
- Store the box in a cool, dry place without light (eg basement or cellar). Make sure the tubers in the box do not freeze. Cover the box with a blanket to keep warm.
- The tubers will begin to sprout in spring. Divide them into sections, making sure each section has at least one eye. nine0046
- Plant them in the garden after the danger of frost has passed and the soil temperature is at least 15 degrees.
Propagate by making vine cuttings using the following steps:
- Use a sterile sharp cutting tool to cut about 6 inches from the tips of healthy vines before first frost.
- Place the cuttings in a jar of room temperature water.
- Once they have roots, plant them in pots filled with good quality soil.
 nine0046
 - Keep them in a sunny place until it's time to plant them outdoors.
Propagate to create sheets from fully grown whole sweet potatoes using the following steps:
- Use a sterile sharp knife to cut a full sweet potato in half lengthwise.
- Place each half on a layer of moist potting soil using a deep tray.
- Cover parts with a few inches of soil. nine0046
- Keep the pieces moist and warm.
- Small roots should develop within a few days, followed by leaves.
- When they reach a height of 10 to 15 cm (approximately six weeks), they can be picked up and planted in containers. Keep them in a sunny spot until it's time to plant them outdoors or in large containers.
Wintering
Overwintering sweet potatoes is similar to propagating them for the next growing season. Before the first autumn frosts, the vines are cut to the ground. Carefully dig up the tubers with a shovel and gently shake the soil off the tubers. Then store them in a box filled with dry material, make sure the tubers don't touch, and place the box in a cool, dry place where the tubers won't freeze. Cover the box with a blanket to keep the tubers out of light. nine0007
Common plant pests and diseases
Wireworms and root-knot nematodes are the biggest problems in home gardening of sweet potatoes. 1 Damage is reduced if you change crops every year. Many diseases can be avoided by choosing disease-resistant varieties and using certified disease-free sweet potato leaves. Mice can also be a problem, so be on the lookout.
FAQ
-
Sweet potatoes are surprisingly easy to grow. Because vines take root wherever they touch the ground, a few plants can easily produce a bountiful harvest.
-
Growing an edible sweet potato requires warm weather and a large container with many drainage holes; In other words, growing sweet potatoes indoors can get pretty messy. Sweet potato plants also tend to take root in small pots, so it's best to grow them outdoors in large containers or in the ground.
 nine0007
 -
Sweet potatoes grown for consumption are usually planted from purchased cuttings - small, rooted tuber pieces - or from tubers that can be rooted at home. You can try growing sweet potatoes at the grocery store, but the only way to make sure you have certified healthy roots is to buy seed sheets from a reputable seed supplier.
4 ways to include sweet potatoes in your diet
Sweet potato (yam) is a root vegetable with a pleasant taste and a rich composition of nutrients: it is a source of protein, carbohydrates and soluble fiber, vitamin B and vitamin C, and calcium. An interesting feature of sweet potato is that it contains a source of the female hormone progesterone, therefore it is a valuable product for women in the premenopausal period.
Sweet potato is perfect for you if you
- do not tolerate coarse fiber (for example, beets) - sweet potato is used as an enveloping agent for medical purposes
- don't like pumpkin
- you need to limit high starchy vegetables (potatoes)
1.
 Bake and add to salads or pureed soups.
 Excellent in salads with herbs and avocados. If you don't like pumpkin, this can be a great alternative.
For baking, peel the sweet potato, cut into 2x2 cm cubes, and roll in olive oil, salt and spices.
Spread on baking paper, place on the middle rack of the oven heated to 180C for 15-20 minutes. nine0044
2. Burger for breakfast or afternoon snack? With sweet potatoes, this will be a light and hearty dish
Ingredients (for 2 portions):
4 rings of baked sweet battery (about 1 cm thick)
2 eggs
100 g of spinach 9000 9000 2 thin tomato rings
50g young cheese
salt, pepper, herbs de Provence, turmeric (to taste)
Preparation:
- Bake sweet potatoes: wash thoroughly with a brush and cut off 4 rings 1 cm thick from the tuber. Brush with olive oil, sprinkle with seasonings on both sides and place on baking paper.
 Bake at the middle level of the oven at a temperature of 180C for 15-20 minutes.
 - While the potatoes are baking, boil the poached eggs or make fried eggs at a low temperature
- Sweat spinach, add spices to taste, drain excess juice
- Assemble the burger: sweet potato ring, spinach pillow, tomato slice, egg, some cheese, second sweet potato ring. nine0046
3. Sweet potatoes with scrembl eggs for breakfast
Ingredients (for 1 portion):
Slote of sweet potatoes cut along 1cm
1 Egg 9000 ½ of the tomato or 3-4 Tomatoes Chernry
small handful of arugula
1 teaspoon sesame or pumpkin seeds
salt, pepper
1 tablespoon olive oil
Preparation:
- 0046
- Make a scrambled egg: place the egg on a greased frying pan at medium temperature, salt and stir with a fork or whisk during cooking (1 min)
- Place a scrambled egg on a baked sweet potato slice, garnish with cherry tomatoes and arugula, sprinkle with sesame or pumpkin seeds and spices of your choice.