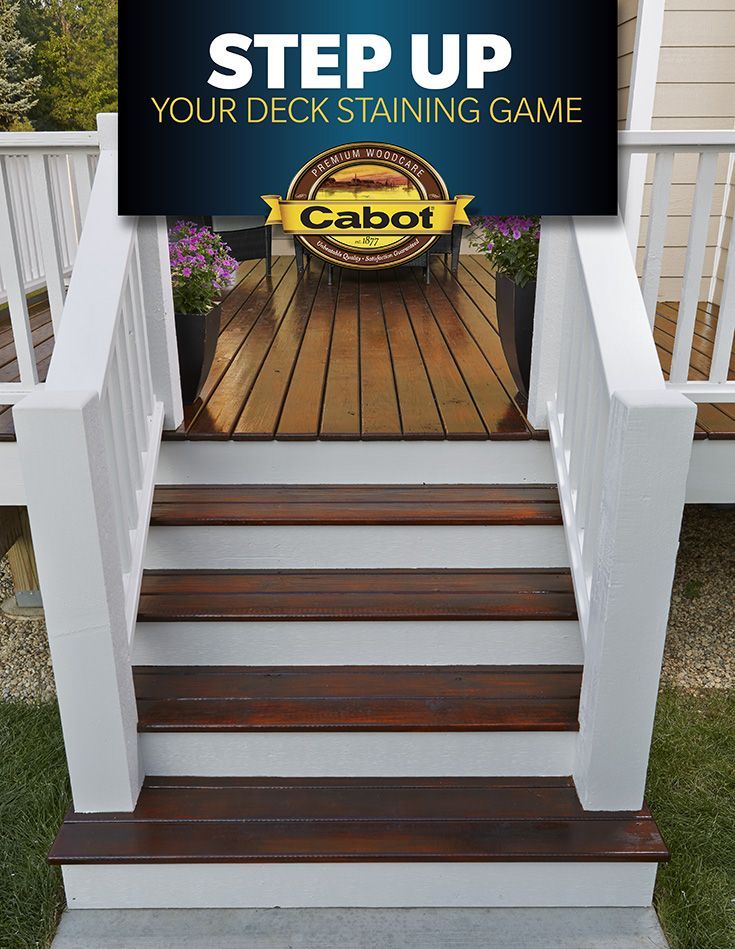
Staining decks best way
How to Stain a Deck FAST
Don't put off this chore for another summer! I'll show you how to stain a deck FAST, with the right tools and techniques for the job.
Is your deck stain worn and peeling? You should tackle the chore of applying a new coat of stain to your deck every few years to protect the wood and keep it looking its best. Here are my deck staining tips and tricks, so you can get this task done quickly and go back to hosting summer BBQs in no time!
This post contains affiliate links for your convenience. Purchases made through these links may earn me a small commission at no additional cost to you. Please visit my disclosures page for more information.
Check out my video on how to clean and stain a deck first, then read further for more detailed instructions!
Repair Any Problems First
Before you pick up a can of stain, give your deck a good look. Are there popped nails or uneven boards? Here are some easy deck repair tasks any homeowner can tackle themselves. Fix the problems now, to make it easier to stain later.
Staining a New Deck
Believe it or not, new decks should not be stained right after they're built. The mill glaze and high moisture content of the wood will prevent the stain from soaking in. If your deck is made of pressure treated lumber, it needs time for the chemicals to dry out before it will accept stain properly.
It's common to allow a new deck to "season" or "weather" for 6-12 months, leaving the wood raw and exposed to the elements. Before staining a new deck after weathering, the UV damaged fibers, dirt and mildew need to be removed first.
How to Clean a Deck Before Staining
After repairing any issues and allowing the wood to weather (if it's new), the deck needs a good cleaning. Stripping off the old stain is a good idea if it's peeling, worn down or you want to change the color.
It sounds daunting, but all you need is a power washer and the right chemicals.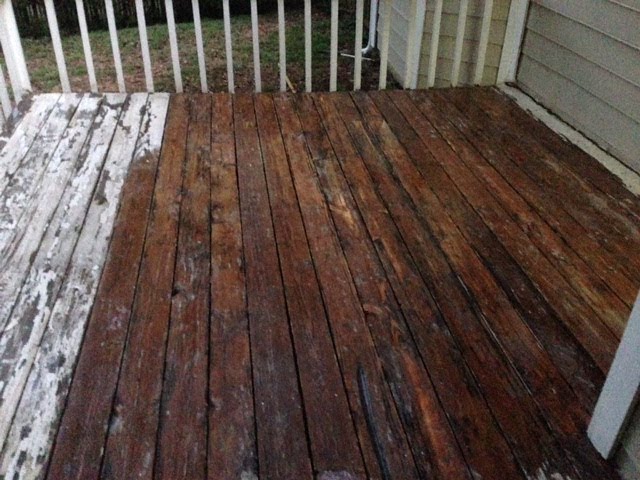 This tutorial on how to use deck cleaner and brightener will show you how to remove the old stain to get it ready for a new coat!
If you're keeping the same color and it's in good condition, a homemade deck cleaner may be all you need to get the wood ready for a new coat of stain. This cheap and easy solution can be applied with a scrub brush and rinsed off with a hose for a quick clean at the beginning of the season.
Allow the deck to dry for at least two days after cleaning. With the wood sufficiently prepped, it's time to make it shine again!
Materials Needed to Stain a Deck
Gather up all the necessary tools and materials before you start. There's nothing worse than running out to the store for another can of stain midway through the process! Here's what you'll need:
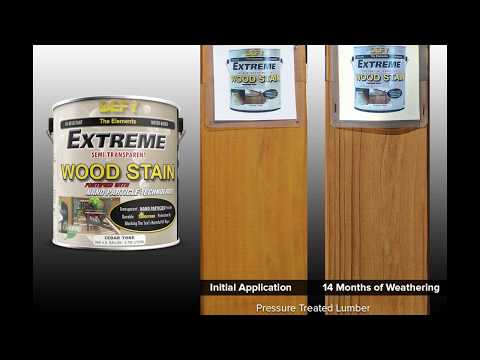
- Outdoor deck stain
- I used three gallons of Ready Seal in the Natural Cedar color for my 300+ square foot deck.
- Stain sprayer
- Homeright kindly provided me with their stain sprayer to try out for this project.
- Homeright kindly provided me with their stain sprayer to try out for this project.
- Drop cloths
- Paint brush
- Shur-line stain pad with groove tool
- Shur-line extension pole
- Paint roller tray
- Face mask
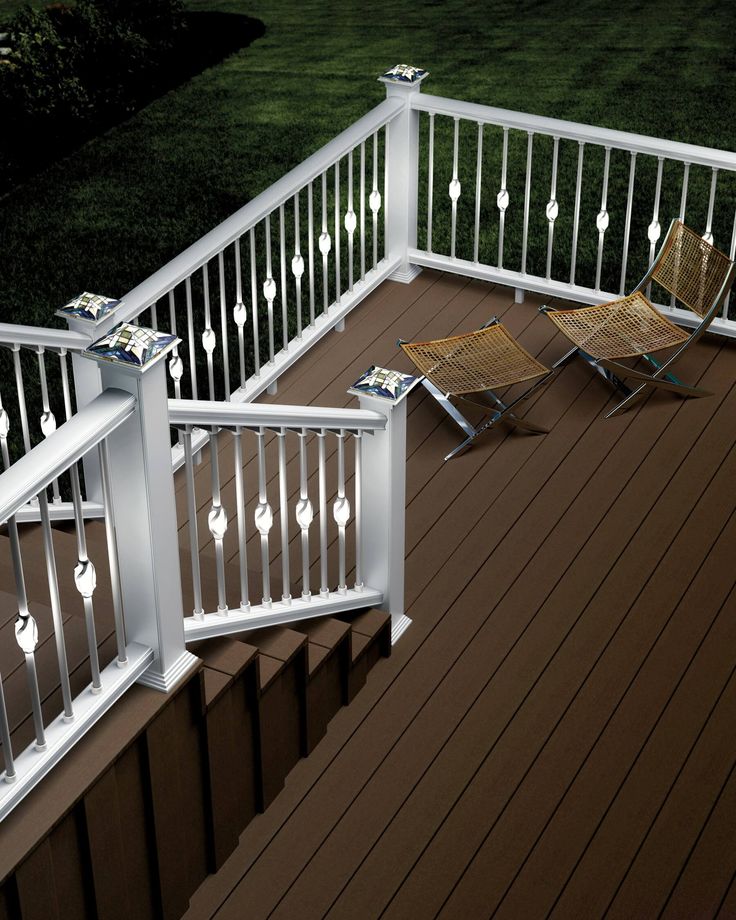
How to Stain Deck Railings and Spindles
The first time I stained our deck, I made the mistake of doing the deck railings and spindles with a paint brush by hand. It took for-ev-er!
Now I've learned how to stain deck railings fast! Meet my secret weapon...a stain sprayer!
Protect the Surrounding Area
Lay down drop cloths on the deck floor and over any plants or furniture you don't want covered in stain. Pour the stain into the reservoir, and don your face mask. Even though you're outside, a light gust of wind can send a cloud of stain right back into your face!
Spray from the Top Down
Working from the top down, spray a light coat evenly over every surface. Keep a paint brush on hand to catch any drips. Within minutes, I had an entire section complete! Below you can see how well it coated the section on the right.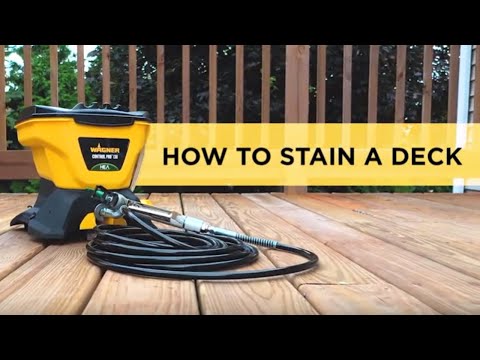
A word of warning: the light mist of stain that falls on the plastic tarp makes it incredibly slippery! But if you leave the surface of the deck uncovered, the drips and splatters will show up even with a full coat of stain. I recommend a canvas drop cloth for areas like stairs so you don't slip and fall.
How to Stain a Deck Floor Fast
With the railings complete, it's time to move on to the floor boards. Remove the tarps from the floor, but keep them on any plants or items under the deck. Move any furniture to one side so that the entire length of the floor boards is exposed.
Use a Deck Stain Applicator
Pour the stain into a paint roller tray, and dip the deck stain applicator into it. Don't get it too saturated or it will drip. With the groove tool retracted, stain the entire length of one board from end to end. Stopping and starting on the same board will leave lap marks, so make sure to apply finish to the entire length before it dries.
How to Stain Between Deck Boards
Here's the cool part about this particular stain applicator.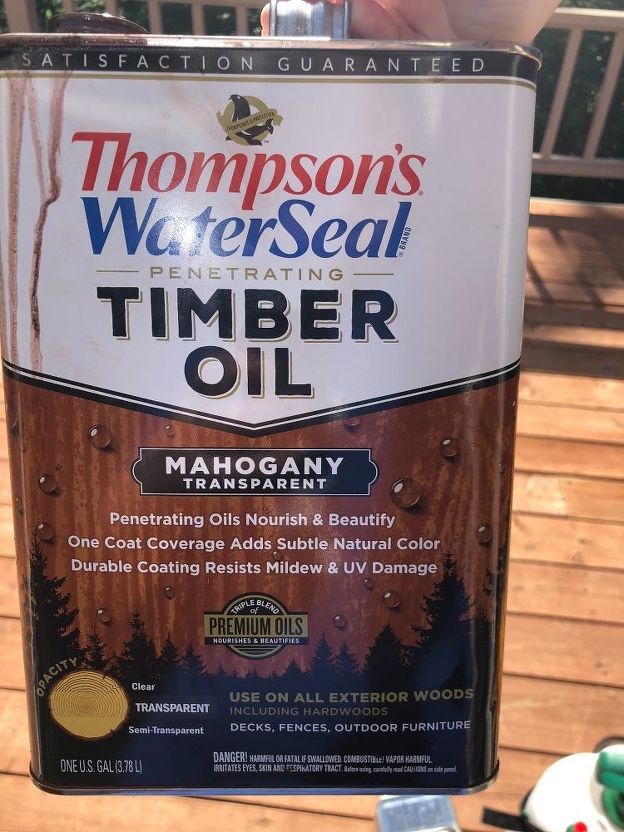 Just flip the handle around, and the groove tool pops out of the bottom! Now you can stain between the deck boards without resorting to a paint brush! This quick video shows you how to stain a deck super fast with this tool.
https://youtu.be/VWkIKdl-Z6oVideo can't be loaded because JavaScript is disabled: How to Use the Shur Line Deck Stain Pad with Groove Tool (https://youtu.be/VWkIKdl-Z6o)
Allow the Deck Stain to Dry Overnight
I stained half of the deck in less than an hour, then let it dry overnight. The next day, I moved all the furniture to the stained side and completed the job. If you have a completely empty deck, you could complete this task in an afternoon!
Frequently Asked Questions
How Much Deck Stain Do I Need?
The amount of deck stain you'll need depends on a few different factors:
- The size of your deck
- The method you'll use to apply the stain
- How many coats you want to apply
- How dry the wood is
As a general rule of thumb, you'll need a gallon of deck stain per 100 square feet.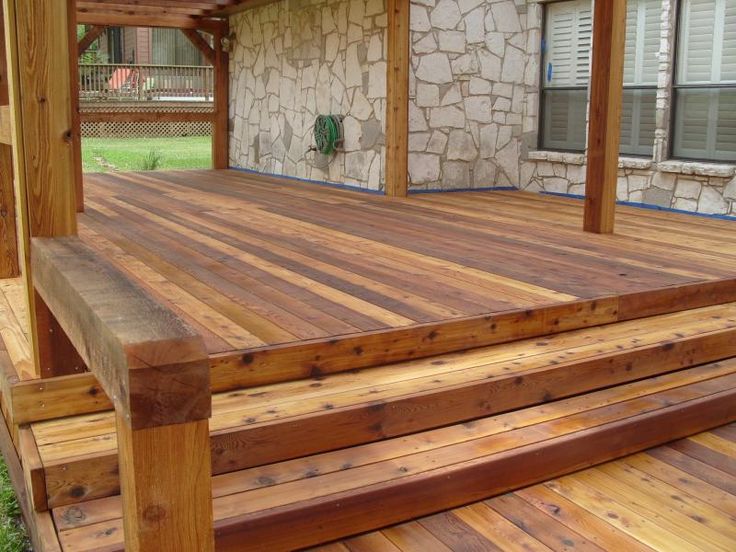 Don't forget the railings! If you plan to spray, keep in mind that you'll lose some of the stain in the air and the surrounding area, so you'll use more.
This handy deck stain calculator will help get you in the right ballpark. Keep in mind that you can always return the gallons you don't open, so you may want to pick up an extra just in case!
How Long Does it Take to Stain a Deck?
This really depends on how big your deck is, whether there are railings and stairs involved, and how much cleaning is required before applying the stain.
It took me a full weekend to remove the old stain and clean the surface of the wood with a power washer. I had to work in sections, because there was a lot of outdoor furniture to move around! Our deck is 10 feet off the ground, so I couldn't easily move it all down to the yard below. It'll go a lot of faster if you can clear away any obstacles first.
But once everything is clean, the staining process goes pretty quickly! Use a sprayer on the railings to make the job much faster.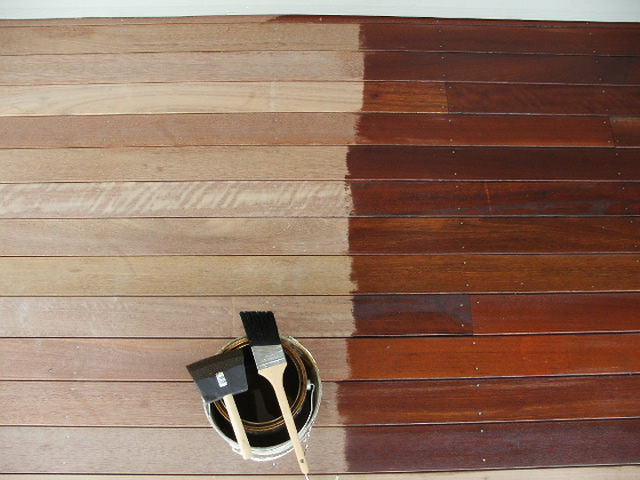 You can also use a sprayer on the deck surface if you prefer to go that route. I'd plan on two days to apply two coats, allowing the stain to dry overnight between coats.
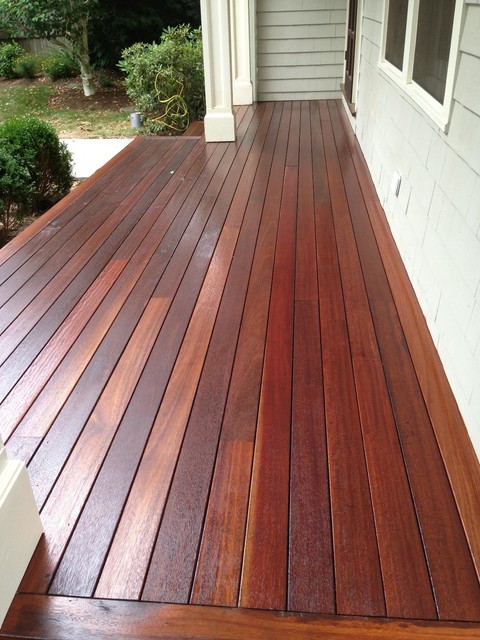
Can you Stain over Old Deck Stain?
If your new stain color is the same or darker than the old color, then you can stain over the old deck stain. But a lighter color won't show up on a darker deck, so you'll have to strip off the old color first. The deck cleaner I used also removes the old stain, so you can start with a fresh slate without any scrubbing!
No matter what color you're planning to use, you have to clean the surface of the wood thoroughly first. The wood stain won't soak into the fibers if it's covered with dirt and mildew, and the resulting finish will be blotchy. Use homemade deck cleaner or buy a bottle of premade solution and start scrubbing before staining!
Can you Roll Stain on a Deck?
Yes, you can use a roller to apply stain on a deck. But the type of roller you use matters! Make sure yours is made of high density foam that won't break apart if it gets snagged on a splinter. Thicker, fluffier rollers will leave a trail of fibers on your deck that will be a pain to remove!
I prefer to use the deck stain pad over a roller because it's much easier to get into corners and edges. The square shape allows it to get into these tricky areas without having to switch to a paint brush.
When is the Best Time to Stain a Deck?
Check the weather report for the next week before tackling your deck staining project. You need a window of two or three warm (but not hot) days without a chance of rain. You'll have to wait at least two days after the last rainfall, or after you've cleaned your deck, before applying the first coat of stain. I usually wait until early summer to stain our deck, when Seattle's rainy season is over.
You also want to avoid staining your deck in direct sunlight. The heat from the sun can cause the stain to dry too quickly, leaving lap lines and uneven coverage. This can be difficult to achieve in the heat of summer, so the best time of day to stain a deck would be the morning or early evening when the wood isn't hot to the touch.
Now you know my secrets for how to stain a deck super quick! You could easily knock this project out in a weekend and be back to grilling and entertaining al fresco in no time!
Check out these other outdoor projects!
How to Stain a Deck - A First-timer's Deck Stain Guide
Credit: PPG / PPG.Com
Written by: PPG Industries
Published by: PPG.Com Copyright holder: PPG on
<script type="application/ld+json">
{
"@context": "https://schema. org",
"@type": "Article",
"mainEntityOfPage": {
"@type": "WebPage",
"@id": "https://www.olympic.com/advice/how-to-stain-deck-first-timers-guide"
},
"headline": "How To Stain A Deck - A First Time Deck Staining Guide",
"description": "Learn about how to stain a deck with your own wood stain using our easy, 4 step Deck Staining Guide that is specifically built for first time home buyers.",
"image": "https://www.olympic.com/cms/getmedia/7c1666dd-2dc3-4e09-ad55-2d5cae6fd001/deck_with_people_51.jpg?width=500&height=500&ext=.jpg",
"author": {
"@type": "Person",
"name": "Will Wright"
},
"publisher": {
"@type": "Organization",
"name": "Olympic.Com",
"logo": {
"@type": "ImageObject",
"url": "https://www.olympic.com/Content/images/olympic-logo.png"
}
},
"datePublished": "2020-06-23",
"dateModified": "2020-06-24"
}
</script>
<p>A: Staining your deck for the first time may sound intimidating.
org",
"@type": "Article",
"mainEntityOfPage": {
"@type": "WebPage",
"@id": "https://www.olympic.com/advice/how-to-stain-deck-first-timers-guide"
},
"headline": "How To Stain A Deck - A First Time Deck Staining Guide",
"description": "Learn about how to stain a deck with your own wood stain using our easy, 4 step Deck Staining Guide that is specifically built for first time home buyers.",
"image": "https://www.olympic.com/cms/getmedia/7c1666dd-2dc3-4e09-ad55-2d5cae6fd001/deck_with_people_51.jpg?width=500&height=500&ext=.jpg",
"author": {
"@type": "Person",
"name": "Will Wright"
},
"publisher": {
"@type": "Organization",
"name": "Olympic.Com",
"logo": {
"@type": "ImageObject",
"url": "https://www.olympic.com/Content/images/olympic-logo.png"
}
},
"datePublished": "2020-06-23",
"dateModified": "2020-06-24"
}
</script>
<p>A: Staining your deck for the first time may sound intimidating. However, with the right prep work, and following the right <a href="https://www.olympic.com/advice"><strong>wood staining advice</strong></a>, your deck will be protected and beautifully finished. Learn how to stain your deck easily with these 4 simple steps.<br />
<br />
Buy Deck Stain Online
</p>
However, with the right prep work, and following the right <a href="https://www.olympic.com/advice"><strong>wood staining advice</strong></a>, your deck will be protected and beautifully finished. Learn how to stain your deck easily with these 4 simple steps.<br />
<br />
Buy Deck Stain Online
</p>
How To Stain A Deck
A: Staining your deck for the first time may sound intimidating. However, with the right prep work, and following the right wood staining advice, your deck will be protected and beautifully finished. Learn how to stain your deck easily with these 4 simple steps.
Buy Deck Stain Online
How To Stain A Deck - Step 1
Inspect the Deck
First, walk around your deck, looking for any imperfections such as:
-
Broken screws
-
Warped pieces of wood
-
Broken pieces of wood
-
Nails that are raised above the surface
After you finish inspecting the deck, you may have to remove and replace any imperfections.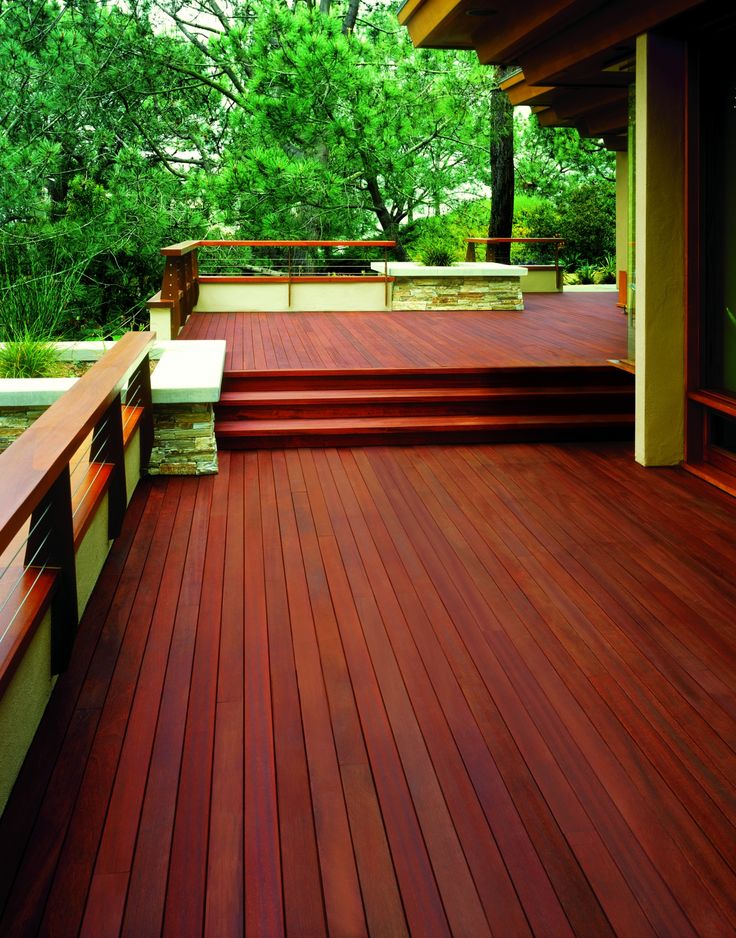 Repairing may be an option. Use your best judgment.
Find the Right Stain Color for Your Deck Buy Deck Stain Online
How To Stain A Deck - Step 2
Clean the Deck
The most important step to staining is cleaning your deck. A clean surface allows the stain to soak in and properly cure. Deck cleaners, such as Olympic Premium Deck Brightener & Wash, are great at removing dirt and stains that may have been caused by mildew, algae, and mold.
-
Apply the product.
-
Scrub your deck with a mop that has stiff, hard bristles.
-
Wash away the residue with a hose or pressure washer, using low to moderate pressure.
-
Allow your deck to thoroughly dry before you stain.
Get Olympic Premium Deck Brightener & Wash
Buy Deck Stain Online
Please refer to the Product Label, Technical Data Sheet (TDS) or Safety Data Sheet (SDS) for safety and detailed application instructions.
Olympic Staining Tip
Always test a small, hidden area, using the same number of coats you will be using on the deck and let it dry so that you can be sure to get the wood stain color you want.
How To Stain A Deck - Step 3
Stain the Deck
Use standard painter's tape to block off any surface that you don't want the wood stain to adhere to. Cover nearby vegetation to prevent stain from damaging it.
You should use a roller brush or sprayer to apply a steady coat of quality stain, such as Olympic Elite stains or Olympic MAXIMUM stains. If you see that too much wood stain has been used in an area, use a roller or brush to fix the imperfections.
PRO TIP: Back brushing your stain will help the stain soak into your deck boards, allowing better, long-lasting results.
Find the Right Stain for Your Deck
Buy Deck Stain Online
Please refer to the Product Label, Technical Data Sheet (TDS) or Safety Data Sheet (SDS) for safety and detailed application instructions.
How To Stain A Deck - Step 4
Wait for It to Dry
Wood stains needs 24 to 48 hours to dry, but this may vary depending on the deck and wood. The time that it will take for the stain to dry will also depend on the temperature and humidity in your location.
Once the stain is dry, you can put back your furniture and start entertaining.
See Which Stains Dry the Fastest Buy Deck Stain Online
Locate a retailer near you
An Olympic stains retailer is nearby
See where you can buy your favorite wood stains at a location close to you.
Find a nearby Olympic stains retailer
PPG Industries
Types of hair coloring: 8 fashionable ways
Fashion trends are becoming more and more perfect every year.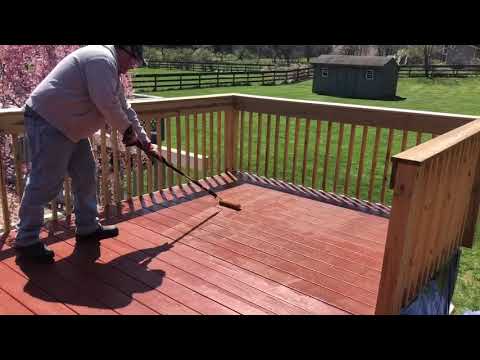 There are many hair coloring options to freshen up your hair, completely change your look or add some mystery to your look. Highlighting, bronding, shatush, ombre - all these are hair coloring techniques used by modern masters. You can add spice to your hair with a touch of a different shade, or you can dye your entire hair a completely new color. The choice is yours! And we will help you figure out what types of hair coloring are, and describe their nuances.
Content:
- Highlights
- Coloring
- Armoring
- Ombre
- Shatush
- Balayazh
- Mazhimesh
- Toning
1. Highlighting
Highlighting is a partial hair coloring. With it, you can make your hair visually more magnificent. Glare of light seems to appear on the hair - the masters choose the right shades for this purpose. After the procedure, the strands look well-groomed, “revived”, acquire a pleasant shine. If you want to gradually change the dark shade to blond, highlighting is exactly what you need.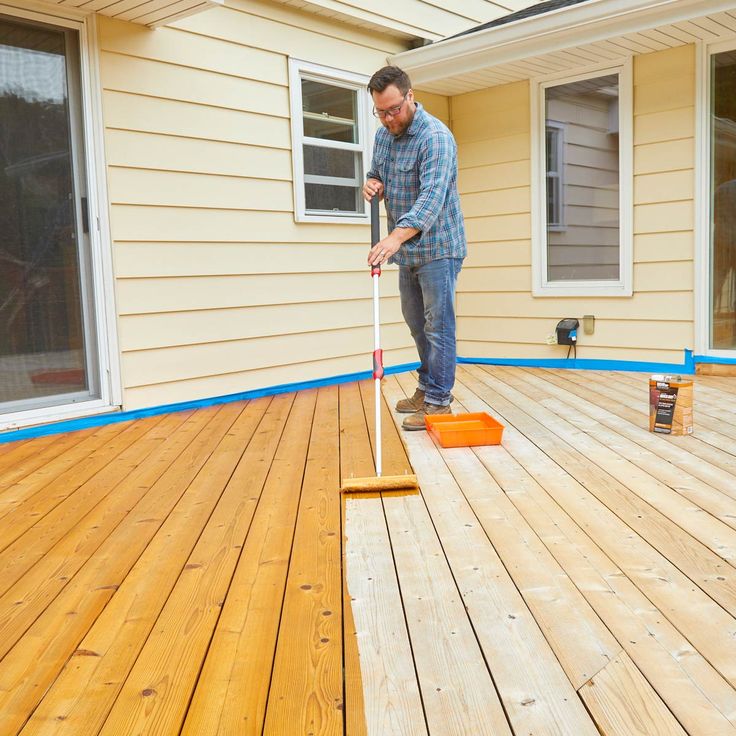 This is a soft version of the transition from one extreme color to another, without harming the hair structure.
This technique has its own types of staining, such as California highlights. Dark hair takes on natural, beautiful transitions to lighter tones, which looks especially good on red, blond and dark brown hair. Individual strands are bleached with a special coloring composition, and foil is not used to dry it.
2. Coloring
Some types of hair coloring may be similar to each other. For example, coloring is similar to highlighting technique. But at the same time, individual strands of hair are dyed not in one tone, but in several. They can be in the same color scheme or contrast with each other. The duration of the procedure varies, depending on the chosen hairstyle option.
Coloring can be both horizontal and vertical. In the first case, three shades are used - the roots are stained dark, then the color becomes lighter, at the tips - the lightest. Due to such transitions, the hairstyle will look natural.
But with vertical coloring, a lot of shades can be used - up to 18 colors. You can choose them yourself, but it is better to trust the master in this matter, who will see what will look perfect on your hairstyle.
3. Bronding
The best modern methods of hair coloring offer a lot of interesting things. Bronding is one of the current trends, which is used quite often. During the procedure, three or four shades are taken in one color scheme. Often, masters make a “mix” of light and dark strands, so that the hair begins to look healthy, natural and beautiful. Bronding is best for brown-haired women and brunettes.
4. Ombre
Different coloring techniques give a lot of unusual effects. For example, ombre allows you to color in two shades with a soft, almost imperceptible transition from one to the other. The master makes a stretch of color along the entire length. Usually the ends of the hair end in a light shade. In the classic version, ombre is made in chestnut or caramel tones. But this does not prevent young women from choosing unusual bright colors, extravagant shades.
Ombre hair coloring gives the hair the desired volume, which is especially important for those with shoulder-length hair and below.
5. Shatush
Otherwise, this staining technique is called French highlighting. After the procedure, it seems that the hair is burned out in the sun. This hair coloring is suitable for both blondes and brunettes. Shatush makes it possible to make soft, smooth transitions of shades so that the color is as natural as possible. Coloring made in this technique does not need frequent correction. And all because the roots that will grow are not so noticeable and not striking. For girls who cannot often visit the salon due to being very busy and lack of time, shatush is ideal.
6. Balayage
Using this method, you can make non-standard horizontal stripes in natural solar tones. Even in the very word "balayage" there is a sense of elegance, natural sophistication and chic. Direct strokes of the brightening composition are applied to thin strands. It is important to remember that professionally only a master can perform such a technique professionally. Balayazh at home is difficult to do - you can create a "zebra" effect on your hair, which is not very beautiful.
7. Mazhimesh
There are successful hair coloring techniques especially for blondes. Mazhimesh involves the use of paints, which do not contain ammonia, but contain natural wax. Ideal for those whose hair is dry, weak or too thin. But at the same time, it will not be possible to get a cold light shade, since the coloring composition does not contain bleaching components.
8. Toning
There are types of hair dyes that do not imply too deep penetration of dye into the hair. One such option is toning. This is a soft, gentle technique for those who are afraid to ruin their hair with various chemical dyes.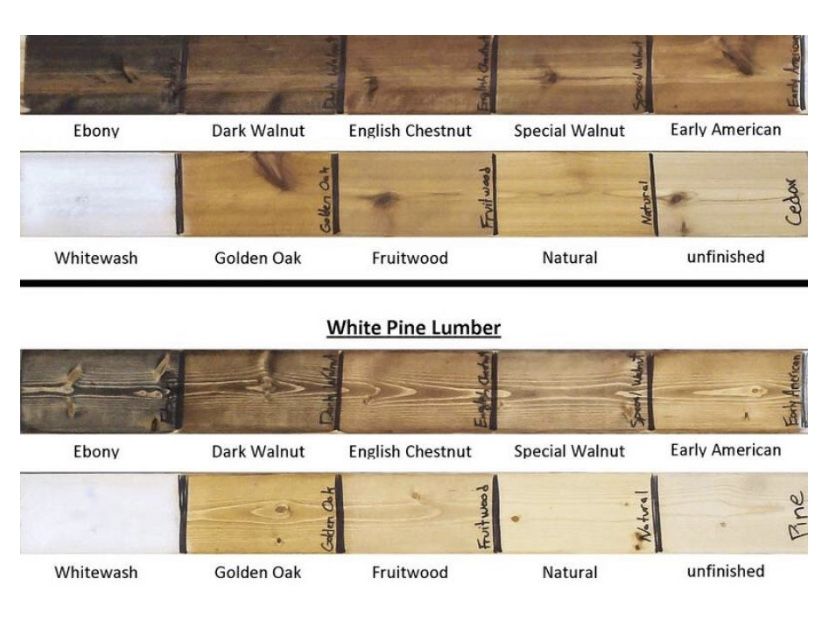 She has a small drawback - the shade is quickly washed out. But you will have the opportunity to experiment more often with your image.
All of the listed types of hair coloring are much more difficult than regular hair coloring. Therefore, it is important that they are carried out by specialists with extensive experience. Hairdresser Beauty Salon offers professional hair coloring services. It's not worth the risk: coloring at home can lead to the fact that you will ruin your hair and your mood. Trust us - we will select the best technique for your image, suitable shades, perform the procedure with high quality and with love for our work.
Posted at 08:19h in Blog by HAIRDRESSER
Gray hair coloring: rules, color matching, ideas
Special sprays, tint balms and an elegant hat are all temporary ways to get rid of gray hair. Stubborn whitish strands will not take long to appear and will again appear in the reflection in the mirror. There is only one way out.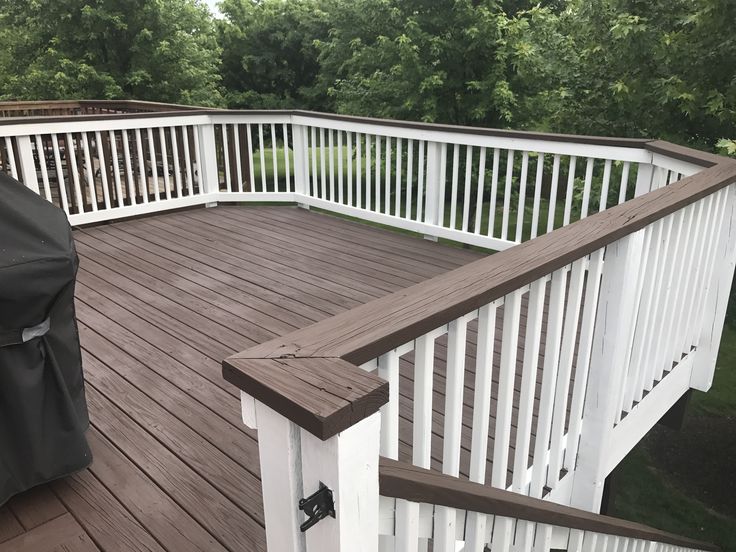 Or rather, four. We will show you how to remove gray hair with professional coloring. Spoiler: in the salon at the master, it is more reliable to do this.
Website editor
Tags:
beauty
Hair
age
Hair color
Hair care
Statistics are merciless. Judge for yourself: every fifth inhabitant of a metropolis under the age of 30 has gray hair in various forms and quantities. The problem is becoming truly serious. Gray curls look extremely untidy, spoil any image and, of course, give age. Many women are looking for options on how to remove gray hair forever without coloring. For the best of intentions: they do not want to subject weakened hair to constant stress.
Elena Bakhareva,
leading stylist-technologist of Charm Distributors
“Unfortunately, it is impossible to solve the problem of gray hair without resorting to coloring.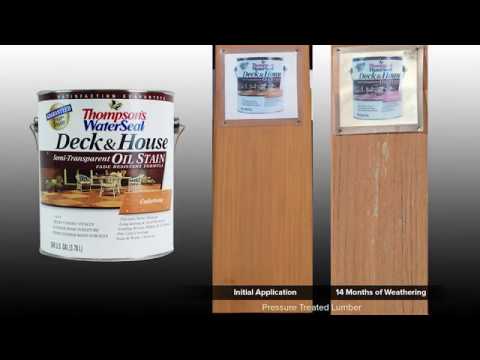 Or you can accept yourself in all its glory. As many European women do, who do not pay attention to gray hair, they are for natural beauty. Russian standards of beauty and attractiveness differ from European ones. In our country, gray hair color (that is, they completely stop dyeing and painting over silver strands) is chosen 90% of women over 60. But what about young beauties?! Today, one gray hair coloring technique is replacing another, suitable for neutralizing an unwanted shade.
How to color gray hair correctly
Coping with gray hair is not so easy due to the fact that coloring pigments are poorly absorbed into their structure. Melanocytes are specialized cells that produce the melanin pigment in the human body. It is responsible for the color of eyes, hair, skin, the degree of tanning. Skin tone changes very slowly, gradually, so with age it becomes noticeable not immediately. And hair reacts to the lack of melanin faster. As a result, gray hair appears, and the issue of fighting it becomes an edge. Then the first gray hair dye appears on your shelf. Before buying it, we want to warn you against a number of mistakes and recommend the right approach to solving the problem.
- If you have lived to see gray hairs (just kidding!), then you know for sure that any dyes are tested for a possible allergic reaction.
- Ammonia-free products are weak against gray hair and wash out quickly. The manufacturer's promises to hide your unexpected curls without this substance are just a marketing ploy. It is better to let the paint have a minimum amount of ammonia, then it will cope with its role.
- When choosing a color for gray hair, look at the code, not the beauty of the hair in the picture. The first number indicates the depth of the shade: from 1 (black) to 10 (platinum blonde). The second indicates the main tone - from blue-violet to red-brown - on a scale from 1 to 7.
 Less often, there are three numbers. So, coloring gray hair with the help of Estel means the presence of an additional color shade - the third digit. Most often, women stop at a dye no lighter than the sixth basic tone.
 - Move away from blue-black, otherwise you risk getting a strong contrast with the roots. Even the best gray hair dyes will not stop their growth. Reddish, brown and bronze shades are acceptable - the closer to natural, the better the result.
- When coloring gray hair, hair color should be applied as generously as possible. Otherwise, the composition will not have enough moisture, it will take it from dry strands devoid of melanin.
- Good gray coverage cannot be done without prepigmentation. It fills each hair with pigment from the inside, preparing for the application of paint. This is true if gray hair occupies more than 50% of the hair and reaches 100, or is unevenly distributed, which makes dyeing difficult.
ADVERTISING - CONTINUED BELOW
Coloring gray hair at home
If going to the salon is only in your plans and you decide to try your luck at home coloring, study the instructions for using the paint well.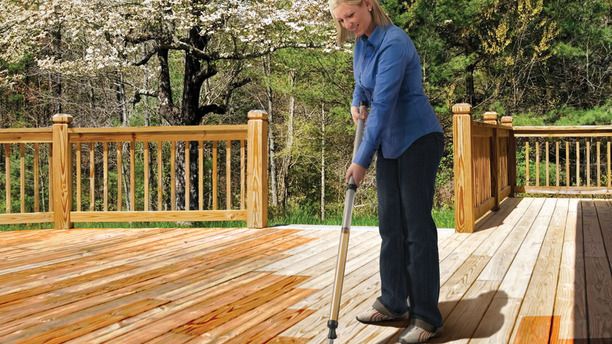 And remember the simple rules.
- Do not wash your hair for two days before the procedure. Sebum will protect the skin from the chemical composition. That way you avoid irritation.
- Do a strand test to find out how long you need to hold the paint to get the desired shade. For owners of thin hair, coloring works quickly - you can hide gray hair in 10 minutes even on dark hair. The stiffer and coarser the curls, the longer you have to wait - up to 45 minutes.
- Lubricate the skin around the hairline with heavy cream or sunflower oil to avoid coloring the skin.
- First of all, spread the composition two millimeters from the scalp along the entire perimeter, and secondly, along the length and on the tips.
Coloring gray hair: reviews of hair stylists
Store shelves are full of products for the care of colored curls. Cosmetic products help maintain color and maintain the health of the hair. It is important to know not only how to mask gray hair with coloring, but also how to take care of your hair after the procedure.
- Special shampoos intensively nourish and moisturize overdried curls, giving them a vital shine. By the way, rinse off with cool water.
- Tint shampoos are needed to maintain color. No matter how high-quality the coloring is, without it you can hide gray hair for the first couple of weeks. Under the influence of chlorinated water, the sun and other factors, yellowness appears. The tint agent provides the curls with a noble color scheme.
- Masks with active ingredients in the composition for deep penetration into the hair structure - to moisturize and make the shade last.
- Lotions make silver less noticeable.
- Multifunctional oils soften, nourish and prolong color life. Hair looks shiny and healthy.
- Sprays improve the overall condition of the hair after coloring.
- Hot styling spoils any hair.
 Having studied the question of how to get rid of gray hair and having mastered the principles of dyeing, it is insulting to dry out and break curls with regular exposure to hot tongs or ironing. Try to do without them.
 - Eat foods rich in omega-3 fatty acids (fish, seafood, nuts, mustard and many other oils).
What kind of hair coloring will hide gray hair
Until you start using henna or basma, powerless in front of a large amount of whitish hair, we suggest considering other, more effective methods. These are options for salon gray hair coloring, where experienced masters will take care of your hair.
Classic one tone
Here the law is as follows: the greater the percentage of gray hair on the head, the lighter the shade should be chosen. In this case, it would be appropriate to dye gray hair in blond. An experienced colorist can choose an incredibly beautiful color in the shade that will favorably emphasize the dignity of appearance.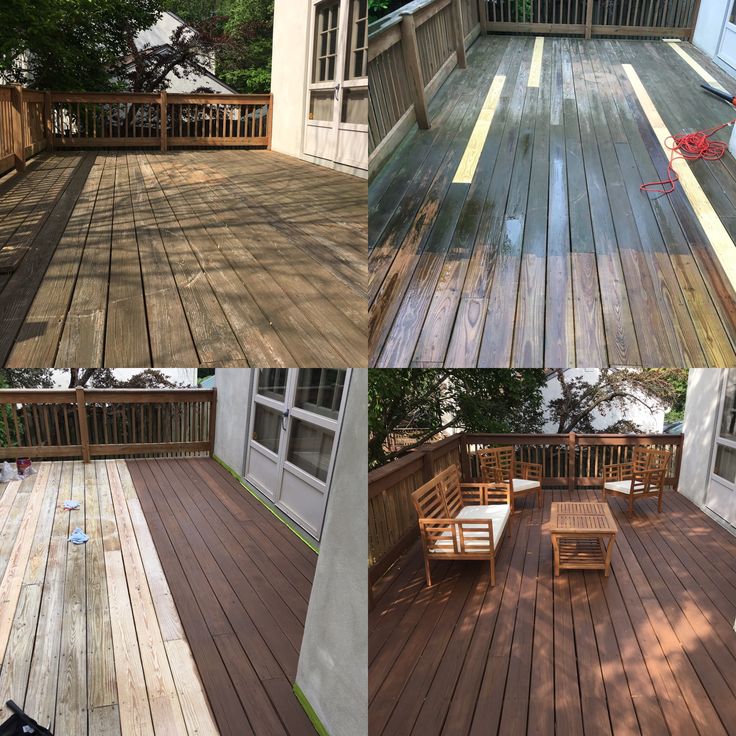
This is important so that the regrown roots do not stand out so clearly. Try, for example, dyeing your hair gray. Similar shades are in trend for several seasons. Agree, burning brunettes with gray roots look extremely ridiculous. In this case, you will have to, as Marilyn Monroe once did, tint the roots too often. On average, this should be done every 3-4 weeks.
In the same category, we will add the camouflage coloring method, with the help of which men hide their gray hair with pleasure. If only because the manipulation lasts from 15 to 30 minutes. It involves working with natural shades. These products do not contain ammonia. At the same time, thanks to ethanolamine, the product changes the color of gray hair without coloring the rest. The camouflage mask is washed off quite slowly, a sharp contrast will not arise.
Fortunately, technology is advancing, and today there are a huge number of sprays that retouch, camouflage gray hair. For example, you do not have time to get to your stylist, and an important event is expected ahead. Then you can buy a bottle of such a spray to match your hair color and apply it along the partings. But be prepared that its effect will last until the next shampooing. At least now you know how to get rid of gray hair without coloring, albeit with a temporary effect.
Classical highlighting and lightening of individual strands
The higher the percentage of whitish curls, the thinner and more often the lightened strands should be. Such hair coloring with gray hair allows you to make the border of regrown roots more blurred and visit a beauty salon less often than with one tone coverage. On average, the highlighting procedure must be repeated every 2-3 months.
If you don't want to completely remove the gray hair, you can color it in dark or light shades. It is necessary to correctly place the tinted strands relative to the hairline, the gray hair will look like part of highlighting.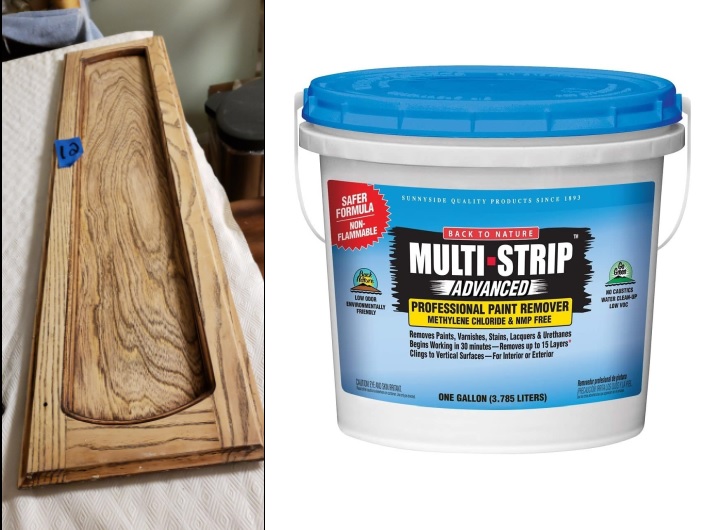
Remember that the coloring of gray roots is done only with permanent dyes. Tinting dyes or henna do not have the ability to completely mask gray hair.
Coloring and 3-D dyeing
These color techniques involve dyeing individual strands in different shades (from 2 to 10 tones) of the same direction - you can choose the color of gray hair. You can choose a more diverse palette of colors, just not to look too colorful. Such methods help to visually make the hair more voluminous.
Alas, such hair coloring cannot completely hide the gray hair or level the regrown white strands. Therefore, staining the roots will have to be repeated every 3-4 weeks.
Shatush, ombre, balayazh
Here you need to consult with the master to understand which from this list - shatush, ombre, balayazh - will suit your hair. From the photo you can see that the complex coloring of gray hair is evenly distributed over the entire head.