Rose hardwood cuttings
How To Take Rose Cuttings
❚ All products were chosen independently by our editorial team. This review contains affiliate links and we may receive a commission for purchases made. Please read our affiliates FAQ page to find out more.
Roses can be grown successfully from cuttings and will grow on to make good flowering plants.
Choose healthy stems of the current season’s growth and follow our step-by-step advice to be sure of success. Roots will be produced over the winter months so that the rose cuttings can be potted in spring or early summer next season.
When to take rose cuttings
Rose cuttings should be taken from the current year’s growth. You can take flexible, softwood rose cuttings of very new growth in late-spring and summer – these root quickly and easily. Semi-hardwood cuttings are taken in late summer and early autumn, when new stems are firmer and more mature. Hardwood cuttings are taken from mature stems in winter, and are the slowest and most difficult to root.
For best results we recommend taking softwood rose cuttings in late spring and early summer, choosing pencil-sized stems just beneath a faded flower.
Here, Monty demonstrates how to take hardwood cuttings from species roses:
Where to buy roses
- Crocus
- Thompson & Morgan
- Harkness Roses
- World of Roses
- David Austin Roses
Secateurs are the best tool to use to take cuttings and to help you choose the right pair for you we’ve reviewed different types of secateurs and put together a list of the best secateurs
There are also more detailed, individual secateur reviews.
And if you need help choosing other pruning tools see our expert, individual lopper reviews and best loppers round up.
In a hurry? Here is a selection of our Best Buys from our secateurs and loppers tests:
- Best Buy: Okatsune 103 Bypass Secateurs
- Best Buy: Darlac Expert Bypass DP1030A
- Best Buy: Burgon and Ball Left Handed Bypass
- Best Buy: Niwaki GR Pro
- Best Buy: Felco 8 Bypass Secateurs
- Best Buy: Wolf Garten Telescopic Anvil Lopper
- Best Buy: Fiskars Power Gear X Anvil Lopper LX9
- Best Buy: Darlac Compact Compound Anvil Lopper
- Best Buy: Spear & Jackson Razorsharp Advantage Telescopic Ratchet Anvil Lopper
More roses content:
- How to pot up rooted rose cuttings (video guide)
- Best roses for scent
- Roses for special occasions
Discover how to take rose cuttings, below.
You Will Need
- Rose plant
- Secateurs
- Rooting hormone (liquid or powder)
- Pots
- Gritty compost mix (Equal parts horticultural grit or perlite and multi-purpose compost)
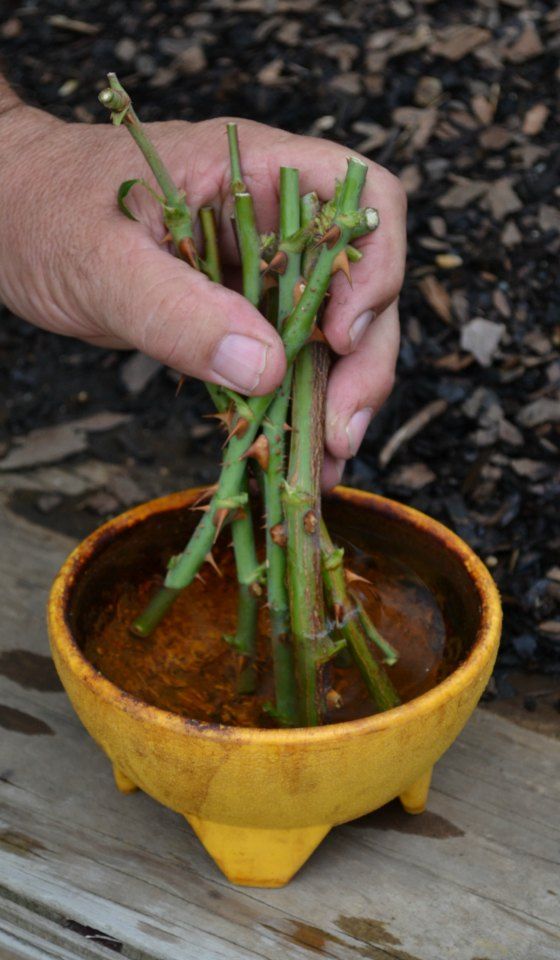
Step 1
You can take cuttings from any type of rose you choose, but make sure you select long, strong, healthy stems from this season’s growth, not old wood.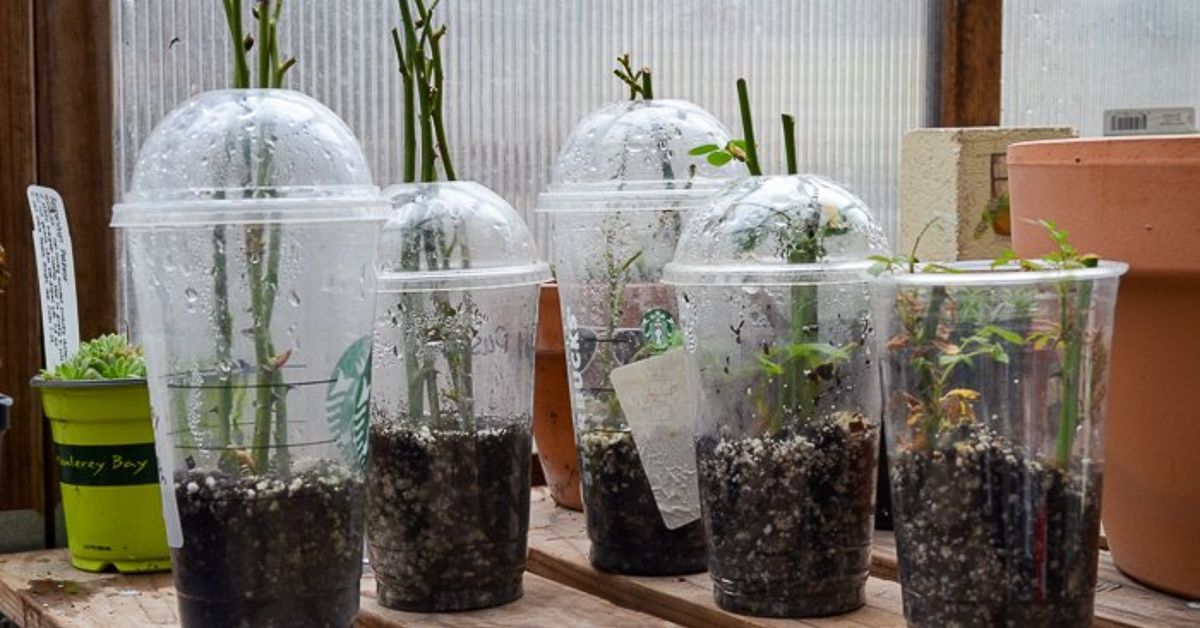
Selecting rose cutting material from the current year’s growth
Step 2
Make the cuttings 25cm long, cutting above a bud at the top to remove the shoot tip and below one at the base. Leave one leaf at the top and remove all the lower leaves.
Removing the leaves from the stems
Step 3
Dip the base of the cutting into rooting hormone mixture. Insert several cuttings into a large pot of gritty compost or a narrow trench bottomed with horticultural grit.
- Buy rooting hormone on Amazon
- Buy horticultural grit on Amazon
Inserting the cuttings into a trench filled with grit
Step 4
Water well, place the pot in a shaded spot and leave until cuttings have rooted. Keep the compost moist. Pot up rose plants individually when well rooted, probably next summer. If growing the cuttings in a trench, carefully fork them out to avoid damaging the roots and plant out in their final location.
- Buy pots for your cuttings on Amazon
Filling in the trench
Rose replant disease
Rose replant disease is a poorly understood disorder affecting roses that have been planted in soil where roses were previously grown. It’s thought to be the result of pest and pathogen build up in the soil. Symptoms include poor establishment, growth and even death of the rose.
Avoid it by swapping the old soil with fresh soil from somewhere else in the garden. Feed with a high-nitrogen fertiliser after planting.
Tags
How to take rose cuttings – tips for propagating roses
Taking rose cuttings is an easy way to create new plants from your favorite roses, and is completely free. In our opinion, you can never have too many roses; the stalwart of a country garden, they bring fragrance and color from June all the way through to December and, with so many types available, there's a variety for nearly every situation.
Roses grown from cuttings have the advantage of being free from suckers, however they can grow with less vigor. Read on for step-by-step instructions on how to grow roses from cuttings.
See: How to plant roses – an essential guide
When to take rose cuttings
(Image credit: Leigh Clapp)
Rose cuttings can be taken at any time of the year, but it will depend on what type of cutting you take. There are two ways to take rose cuttings – as hardwood cuttings or as softwood cuttings. Hardwood cuttings are taken from mature growth, albeit from that current year, during autumn and winter when the rose is dormant. Softwood, stem-tip cuttings are taken in late spring and early summer from new-season growth.
Which method is better is very much up for debate, as various sources recommended different methods. Softwood cuttings are far quicker to root, taking only a couple of months, whereas hardwood cuttings are far slower to root but are generally viewed as more reliable.
See: Rose garden ideas – for a colorful and sweetly scented outdoor space
How to take hardwood rose cuttings
(Image credit: Leigh Clapp)
1. In early autumn, after flowering, select healthy shoots of about pencil thickness. Remove the flower and cut off a length around 30cm.
2. To prepare the cutting remove the leaves and cut the shoot down to around 23cm. At the top cut at an angle, just above an outward facing bud, and at the bottom make a straight just below a bud. The bud is the point at which a leaf attached to the stem. Place these in a polythene bad to ensure they don’t dry out.
3. Prepare a bed for your cuttings. Choose an open site, but one that is shaded from the midday sun. To plant the cuttings, make a narrow, slit-like trench and dribble in sand to improve the drainage. Alternatively create individual holes 15cm apart using a dibber or piece of bamboo cane and sprinkle sand in each.
4. Place the cuttings vertically into the trench so that a third of the shoot is above the soil. Cuttings will need to be placed at least 15cm apart. Infill with soil, firm and water.
5. In a year’s time, the cuttings should have developed a root system and can then be carefully lifted using a fork and planted in their final position.
How to take softwood rose cuttings
(Image credit: Future)
1. These should be cut in late spring and summer from new growth. They should be cut in the same way as a hardwood cutting – above a bud at the top and below a bud at the bottom, however they can be shorter, around 10cm.
2. Remove all leaves apart from the top leaflets, stripped down to two leaves.
3. Before planting the cuttings, you can at this stage dip the bottoms of the cuttings in rooting hormone, available as a powder or liquid, to stimulate growth.
4. Plant the cuttings into a pot filled with an equal mixture of compost and sand. Create holes with a dibber will help protect the cutting.
5. Water well and cover with the pots a plastic bag secured with a rubber band.
6. By autumn a good root system should have developed, the plants can then be potted on into more nourishing compost and, by the following autumn, they should be ready to plant into their final position.
How to root a rose cutting
To root a rose cutting you need to take either softwood cuttings in late spring or summer or hardwood cuttings in early fall to late winter.
If taking hardwood cuttings, plant these into a narrow trench in a prepared bed. Sprinkle in sand before planting to improve drainage and then infill and water.
Softwood cuttings can be done in the same way, but can be smaller and planted into pots filled with an equal mixture of compost and sand and then covered with a plastic bag.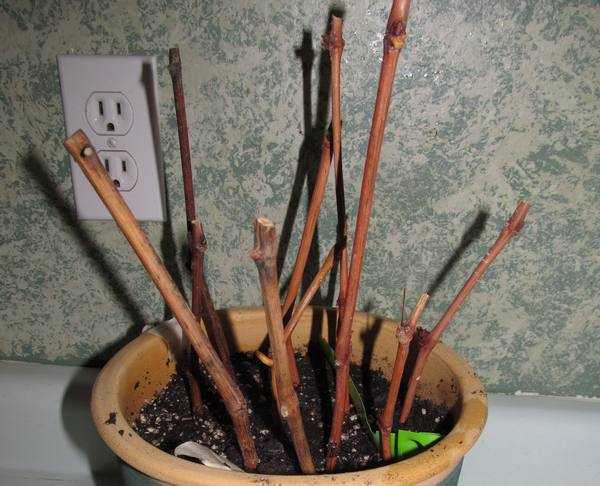
Softwood cuttings should root within a few months, while hardwood cuttings will take longer, however after a year both should have developed a good root system and the plants can then be planted into their final position.
In the BBC TV show Gardener’s World , gardener Monty Don revealed a key tip to growing roses from cuttings. ‘One tip to improve rooting is to damage the leaf nodes – you can either nick them with secateurs; you can bruise them… and that will provoke roots from that point, so if they’re buried I’ll get roots all the way up and hopefully a healthier plant.’
Can you root rose cuttings in water?
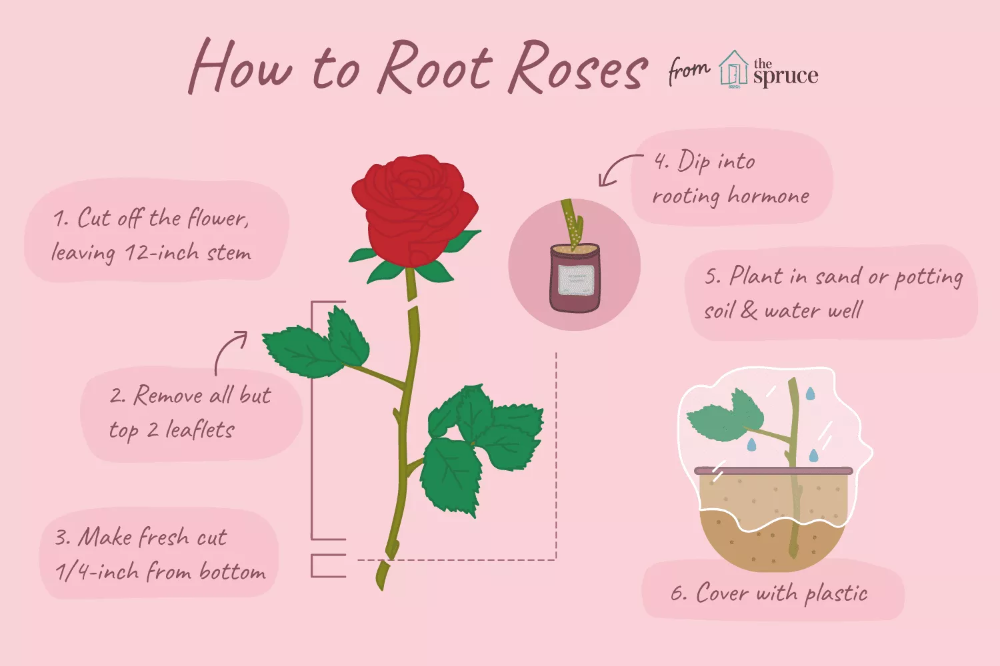
Rose cuttings can be rooted in water, too. To do this, in late spring select a healthy stem from the current year's growth and cut a 15cm section just below a bud.
Remove all the leaves leaving just the top two. Submerge the cutting into a clean jar half-filled with lukewarm water and place it in a sunny spot such as a windowsill. The water should be replaced once to twice a week.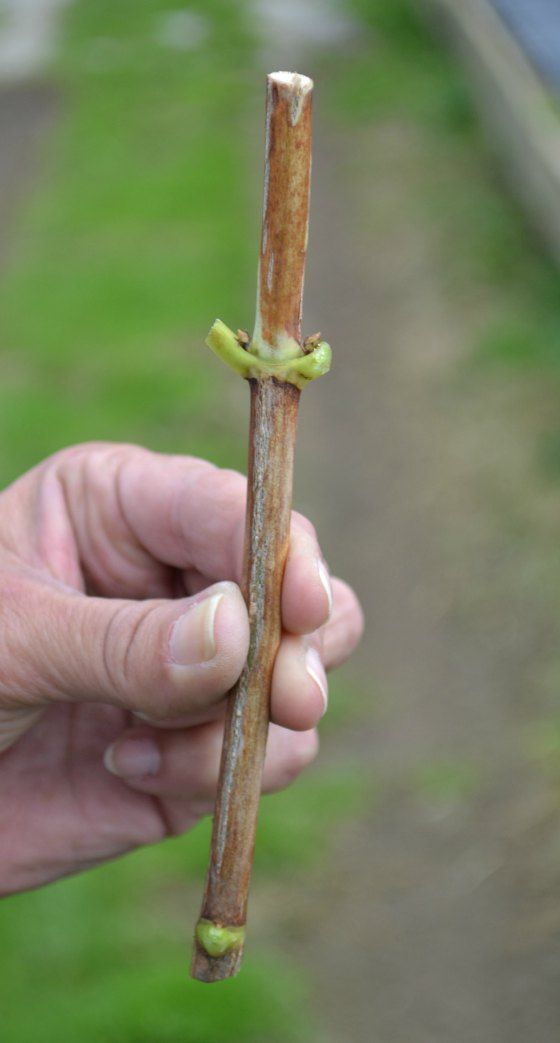
See: How to deadhead roses – for more flowers in a matter of weeks
Roots should start to form within a month or two. Once there is a good network of roots the cutting can be carefully potted until into pots filled with compost and some sand. The pot should be kept moist but should not be over watered.
The rose should be ready for planting out into the garden in the following spring.
Propagation by cuttings of soft and deciduous plants
- home
- Games at home
- Family games for home
- Beginner's Guide to Propagation from Cuttings
Recommended: Zewa Premium Paper Towels White
Try durable and absorbent Zewa Premium Paper Towels!
Use Zewa paper towels
For cleaning
Cooking
In pet care
Propagation from green cuttings is a great way to add more plants to your garden for free. You can even share cuttings with other gardening enthusiasts. But how to do cuttings? Follow our step by step guide to learn how to take cuttings, root cuttings in water, how to cut, grow and care for them.
Tip: Wrap cuttings in damp Zewa Premium paper towels when transporting. These paper towels are strong enough and absorb moisture well - all you need to keep the cuttings fresh during transport.
How to make cuttings?
Propagation by cuttings is suitable for soft and hard woods.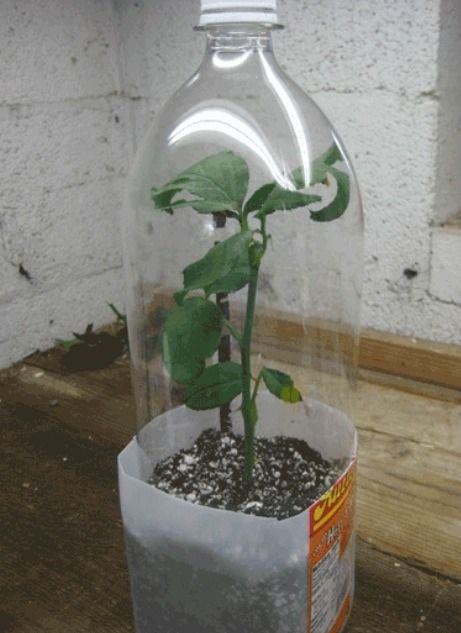 The technique for each type is slightly different, but you will need the same basic equipment, which includes:
- Secateurs
- Pot compost
- Pot / container
- Root stimulants
- Transparent plastic bag or heated propagator (for softwood cuttings).
How to make softwood cuttings
What? First of all, you need to understand which plants fit into this category. They include deciduous shrubs and tender perennials such as:
- Choizia
- Fuchsia
- Serpentine
- Hydrangea
- Lavender
- Pelargonium
- Penstemon
- Petunia
- Rosemary
- Salvia
- Verbena.
When? New shoots appear in the warmer months. They are soft and flexible, yet strong enough to be cut from cuttings and will be able to take root when transplanted into moist compost. Spring and early summer are the best times for rooting to be successful.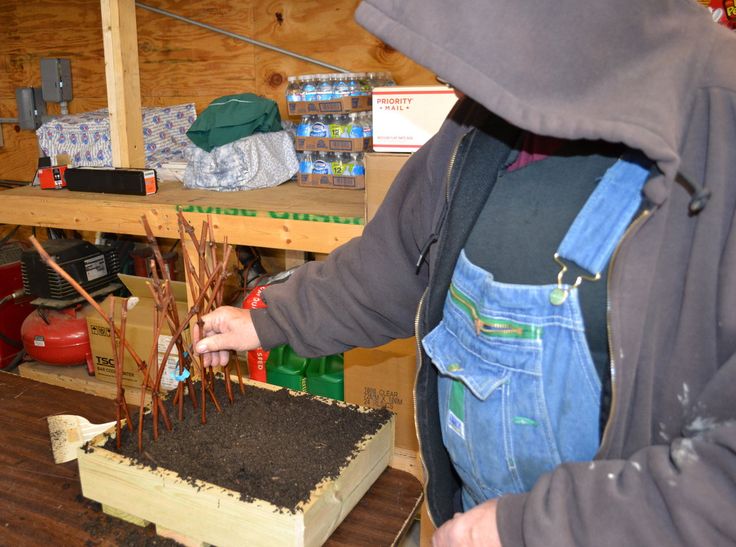
How? The cuttings should be potted by mid-summer as they need strong roots to survive the winter. Here's how to do it:
-
Cut off a non-flowering side shoot right above the bud (do this early in the morning when it is full of moisture). You should end up with a length of 8-10 cm, so first cut off a longer piece.
-
Trim the bottom just below the leaf node and remove all the bottom leaves plus the fleshy top leaves.
-
This is not necessary, but you can dip the base in hormone rooting powder to encourage root growth. Do not forget to remove excess powder afterwards.
-
Place the cuttings in the compost so that the first leaves are just above the compost. To make cuttings root faster, you can mix soil with compost from garden waste or cuttings.
-
Water the cutting and let it dry out a bit before moving on to the next step.
-
Cover the stem container with a clear plastic bag, secure with a rubber band, and place in a warm, bright spot indoors (avoid direct sunlight).
 Remove the bag daily to ventilate and get rid of excess moisture. Alternatively, you can use a heated propagator.
 -
Keep the compost moist and after six to eight weeks the cuttings should be rooted.
How to plant softwood cuttings
After you have done the work of harvesting and rooting the cuttings, you must plant them in the ground. A couple of weeks after the roots have developed, you can plant the cuttings individually in 9cm pots. You want the young roots to develop into a strong root ball. Then in the spring you can plant new plants in your garden.
How to make hardwood cuttings
What? Deciduous shrubs, climbing plants, fruit bushes and trees include the following plants:
- Buddley
- Dogwood
- Forsythia
- Honeysuckle
- Jasmine
- Poplar
- Rose
- Fruit bushes such as currants, figs and gooseberries.
When? Autumn to mid-winter is the best time to take hardwood cuttings.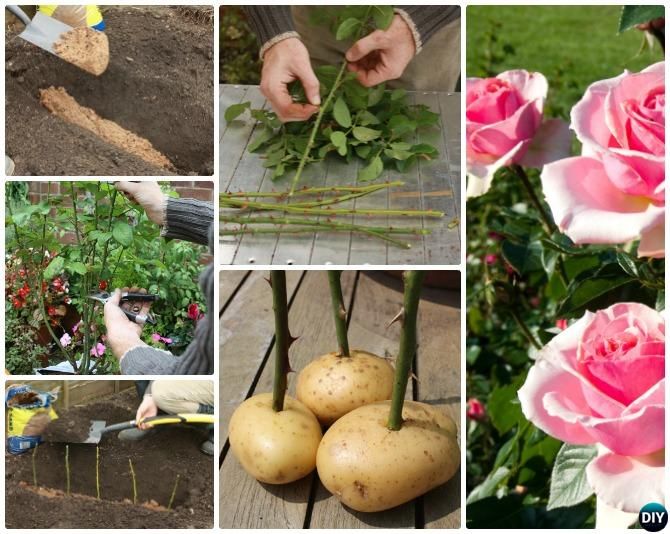 Do this during the period when all the leaves have fallen, but before the onset of frost.
How? Unlike softwood cuttings, you don't need to store hardwoods in a humid and warm environment. But you will have to wait until next year to see the roots and shoots. Here's how to properly harvest hardwood cuttings:
- Cut off a healthy, pencil-thick shoot from the bottom of the bud/knot/leaf junction. You should end up with a stalk about 20 cm long, so first cut it longer.
- Remove the soft shoot at the tip above the bud by cutting at an angle. Trim it at the bottom horizontally under another bud or knot.
- Dip the cut end in hormone rooting powder.
- Compost the cutting in a pot so that two-thirds is below the surface (loam-based cutting compost or potting sand mixed with compost is an excellent option). Make sure at least one node is above the surface.
- If you are planting several cuttings, space them 10-15 cm apart.

- Water the cuttings well and you should see sprouts next spring.
- Leave them in a protected place for at least a year before transplanting.
- If a very cold winter is expected, you may need a greenhouse frame.
With your new knowledge of cutting propagation, you can begin to improve your garden. You will not have time to look back, as you will already be able to enjoy the fruit of your labors!
Was this article helpful? Thanks for the feedback!
or
Share
methods of cuttings in winter, spring, autumn with photo and video
Rules for propagation of roses by cuttings
Cuttings are one of the main methods of rose propagation. There are two options - green and cuttings and lignified. The first case is used for summer propagation of garden roses. The second is for winter and spring. And he is the most popular.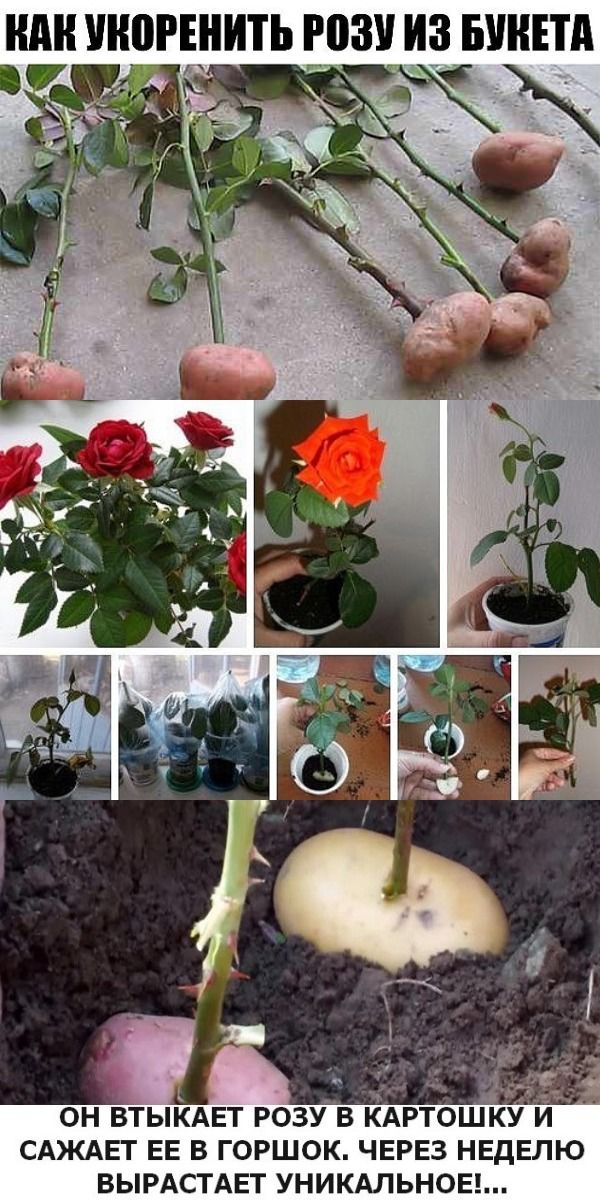 And in this way you can propagate roses from a bouquet, because in flowering shoots the lower part of the shoot is always lignified.
Cutting cuttings
Rooting cuttings can be cut from any part of the shoot, except for the top with a flower. Each cutting should have 2 nodes - this is the place where the leaves are attached to the stem and where the buds are. The thickness of the cutting should be at least 5 mm - too thin will not take root.
The bottom cut should be oblique - it is made just below the knot, stepping back about 5 mm. Why oblique? But because the callus (the tissue from which the roots then grow - a kind of white growth) is best formed around the cut. And the larger its area, the larger the callus. And one more thing: it is very important to make cuts with a sharp knife - if the tissues of the shoot are wrinkled, it will most likely rot and will not give roots.
Here the upper cut must be straight. They do it by stepping back from the node the same 5 mm. Why direct? Moisture escapes through the wound, and besides, it is an open gate for infection. That is why the area of the upper cut should be minimal.
Preparing the cuttings
Remove the lower leaves from the cut cuttings. And the upper ones are shortened - rose leaves usually consist of 3 or 5 segments, and only 2 are needed. For reliability, it is useful to cover the upper cut with children's plasticine.
Soil for rooting cuttings
Rose cuttings give roots, but not as easily as, for example, currant twigs - just putting them in water is not enough. It is best to root them in the ground. And there are options.
River sand. It is light, friable and very well breathable, which is necessary for the formation of roots.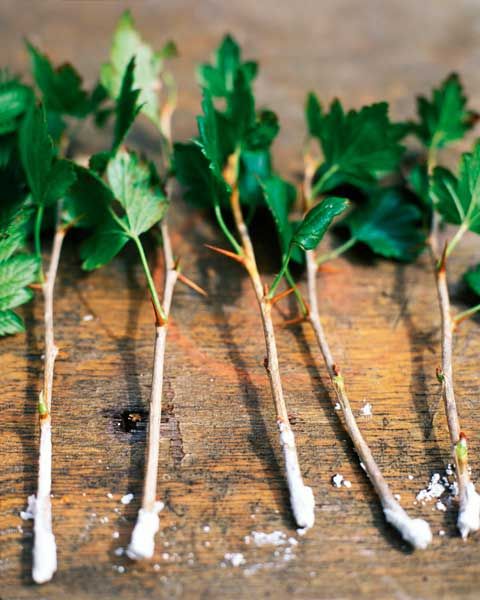 But there is a problem - the sand dries up very quickly. Therefore, it will need to be watered frequently. Or add perlite to it, which retains moisture.
Soil mixtures. There are 2 classic versions:
- river sand with peat in a ratio of 1:1;
- river sand with sheet earth in the ratio 1:1.
The sand in this case is the baking powder. And peat or earth provide moisture capacity, that is, planted cuttings will have to be watered less often.
Rooting conditions for cuttings
Cuttings are buried in the substrate by about 1 cm. You need to make holes with a stick or pencil, insert the cuttings there and lightly compress the soil with your hands.
Then the cuttings should be well watered. And be sure to cover with either a jar or a plastic bag so that there is constantly high humidity around the planted cuttings. But! It is necessary (required!) Once a day to remove the jar (package) so that the cuttings are ventilated - otherwise they will become moldy and rot.
Another important point: the temperature of the soil should be about 21 °C, and the air temperature should be 2-3 °C lower (2). There is no place for cuttings on the windowsill - it is always cooler than necessary, and cold soil, combined with high humidity, always leads to an outbreak of fungal diseases.
Photo: pixabay.comAnd, of course, cuttings need a lot of light. But not direct sunlight is the best - they will provoke increased evaporation of moisture from the leaves, as a result of which the cuttings can dry out.
Methods for cutting roses
Roses can be propagated by cuttings at almost any time of the year. And there are some interesting methods that allow you to propagate roses more efficiently.
Cuttings of roses from a bouquet
The life of bouquets given on March 8 is fleeting - in most cases they will last no more than a week. And so we want this beauty to be with us always ... But this is possible! For example, you can cut cuttings from roses from a bouquet, and then grow them in the garden.![]()
Cuttings will take root only if the roses in the bouquet were fresh. It is useless to root dried shoots. But how to understand how fresh a flower is?
- The first thing you need to pay attention to is the sepals, small green “leaves” at the very base of the flower, advises agronomist-breeder Svetlana Mikhailova. - If they are raised up, literally "hug" the bud, then the flower is fresh. If they are lowered down, then the rose has been cut long ago.
The second indicator of freshness is the leaves.
– If you take a flower in your hands and the leaves begin to crumble, it means that the rose is stale, says Svetlana Mikhailova.
By the way, many buyers are guided by the degree of dissolution of the flower. They think that if the rose is still in bud, it means that it was cut recently. Nothing like this!
– Roses are stored in the refrigerator until they are sold, explains Svetlana Mikhailova. - They are even transported in refrigerators. Under such conditions, the bud will not open. Moreover, flowers are always stored and transported "dry", without water - they are simply packed in paper. And how much the rose spent in this form, no one knows.
It happens that without water and in the cold, roses spend a week or more. The buds will remain unopened, but the plant has already died. And so you bring home a bouquet, put it in water, hoping that now the flowers will bloom. But their heads just hang, never opening. They are dead. And it is pointless to cut such roses.
- This is often the case with Dutch roses, - says Svetlana Mikhailova, - because they are brought from afar. But now there are a lot of Russian greenhouse roses on the flower market. They are usually much fresher.
And that's the easiest way to cut them.
Cutting roses in winter
In winter, you can cut cuttings from purchased roses, for example, from the same bouquets. Or specially buy a flower you like in the store. In this case, the method of propagation by semi-lignified cuttings is used.
Cuttings of roses in spring
Experts do not advise radical pruning of roses in autumn, it is better to pin the shoots to the ground for the winter, and if you use this technology, then spring cuttings of roses are your option. After the winter shelter has been removed from the plants, they need to be cut off - cut out frozen branches and remove excess stems. So these very extra stems are excellent material for cuttings.
In this case, the standard method of propagation by semi-lignified cuttings is also used.
Cuttings of roses in summer
In summer, roses actively grow shoots, and at this time you can use the second method of propagation - green cuttings. They are cut from May to July, but it is better in the budding phase (3).
The shoot intended for propagation by cuttings must be strong and fully green. The cuttings are cut about 10 cm long, but it is important that they have 2-3 buds. The top cut is made directly above the kidney.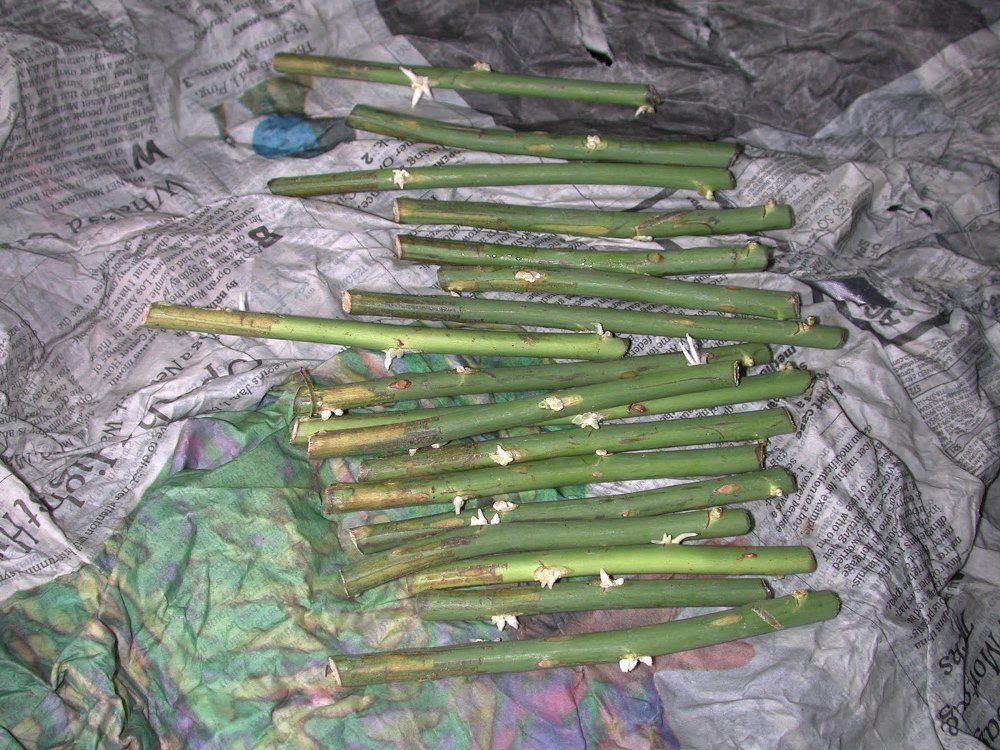 The lower one is oblique, just below the kidney. The lower leaves should be removed, leaving a couple of the top ones. And cut them so that out of 3 - 5 plates only two remain.
Before planting, the cuttings should be placed in a Heteroauxin solution for 12 hours to stimulate root formation.
Prepared cuttings are planted in a school - a secluded quiet place with fertile soil, deepening by 1.5 - 2 cm. Water well and cover with foil. Roses are photophilous plants, however, under the scorching rays of the sun, the cuttings begin to evaporate moisture too actively and dry out rather than give roots. Therefore, the shkolka should be done either under the light shade of trees, or the cuttings should be shaded with coniferous branches or burlap.
Planted cuttings should be watered frequently - the soil should be moist all the time. And in hot weather, it is useful to rinse the film with cold water.
Roots of green rose cuttings usually form after 3-4 weeks - new leaves speak for this.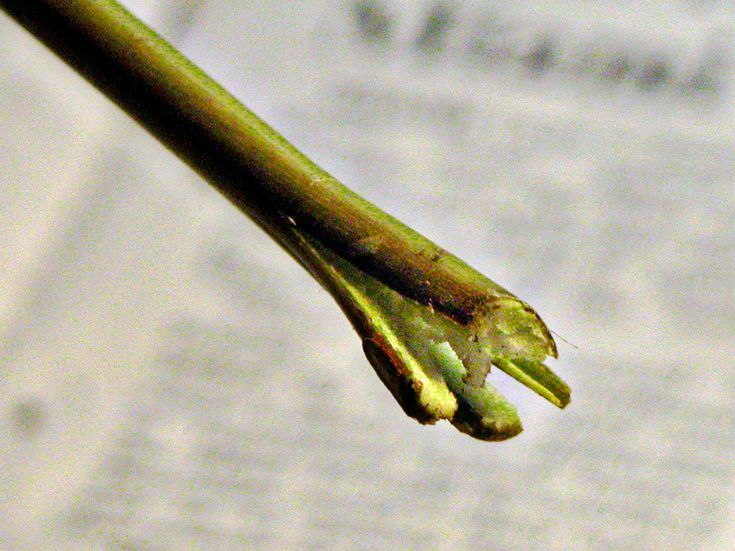 After that, the film must be gradually opened so that the plants get used to the open air - first for a couple of hours in the morning, then longer and longer. After 2 weeks, the film is removed completely.
In the future, young roses should be constantly watered, and carefully covered for the winter. In the spring they can be planted with a clod of earth in permanent places.
Potato rose cuttings
Both green and semi-woody cuttings can be rooted in this way. They are prepared in a standard way, but before planting they are stuck into potatoes, and only then, together with the tuber, they are planted in a school in the garden.
Why do they do it? And in order for the cuttings not to dry out, if it is not possible to water them often, this method is useful for weekend summer residents. Juicy potatoes. The moisture in it remains for a very long time, and even if the soil is dry, the cutting will not die.
Rose cuttings using the burrito method
This method of rooting cuttings is becoming more popular year by year.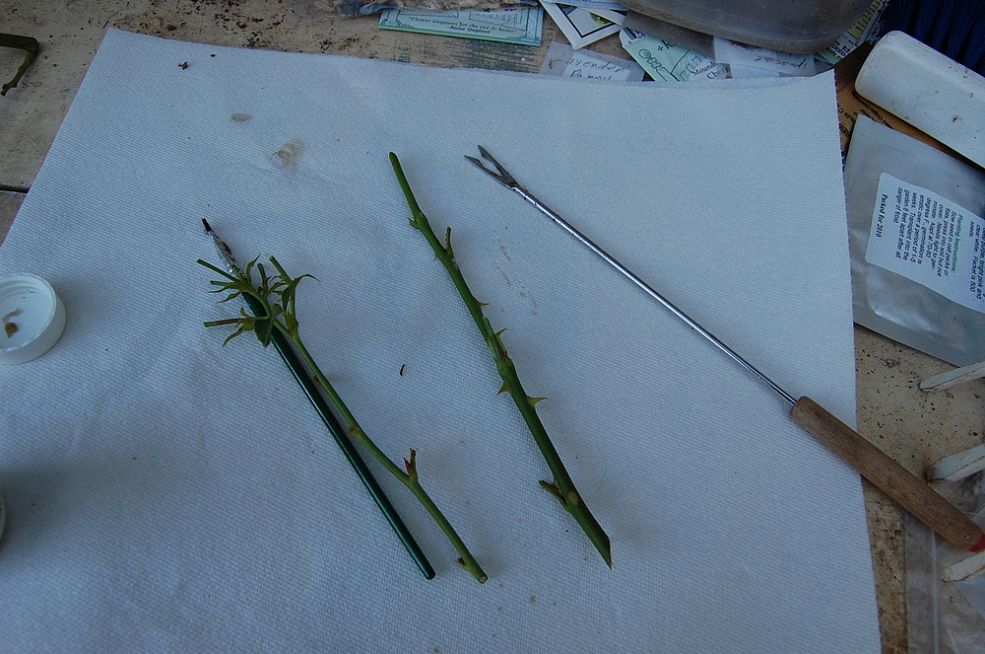 And it got its name from the Mexican analogue of shawarma - burrito. And you will understand why.
The point is this. The lower cut, as with traditional cuttings, is dusted with a root formation stimulator. Then several pieces of cuttings (usually 5-10 are recommended) are wrapped in 2-3 layers of newspaper or paper towels, moistened with water so that the paper is moist, but not wet, and then loosely (it is important that air penetrated inside) wrapped in polyethylene. It turns out a kind of bundle, similar to the same shawarma burrito. It is cleaned in a dark, cool place with a temperature of 14 - 18 ° C.
This is important! If the temperature is lower, the roots will not form. And if it is higher, the cuttings will either dry out (even constant moisture often does not save), or they will become moldy and begin to rot.
As a rule, the callus on the cuttings is formed after 3 weeks. If this does not happen, the cuttings are again wrapped in paper (if it has dried up, it must be moistened again) and the film and again sent to a dark, cool place.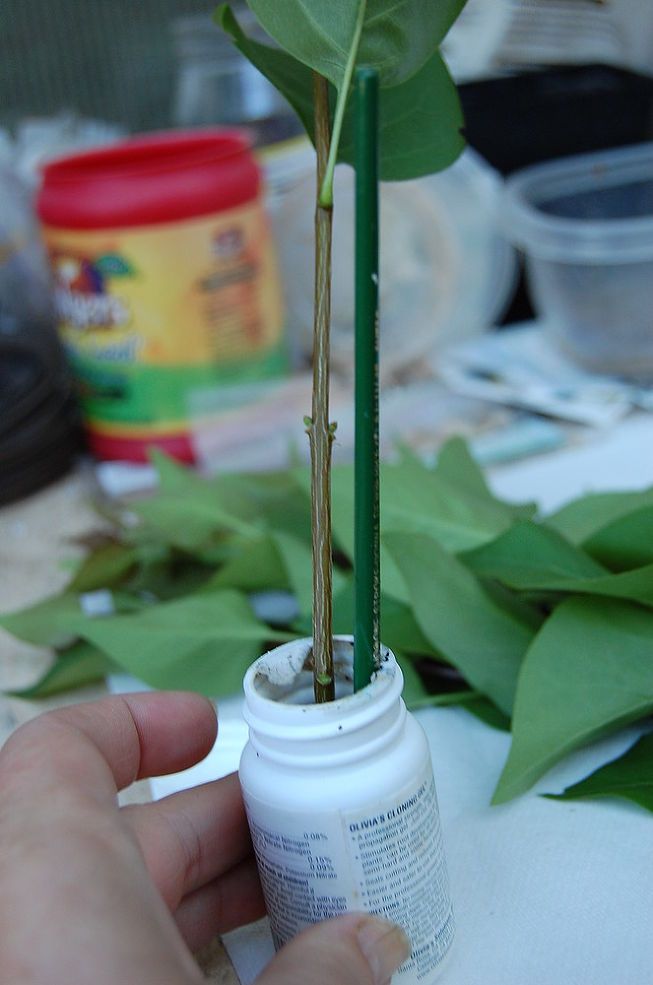
When the callus is formed, the cuttings are planted one at a time in pots in light nutrient soil (traditional rooting mixtures are suitable) so that only 1 bud is above the soil surface, watered and covered with a jar or bag. And now they need to be placed in a bright (but not under direct sunlight) and warm place - the temperature should be 23 - 25 ° C.
The burrito method has been shown to give a higher rooting rate. And even varieties of roses that are difficult to propagate by cuttings, with this method, give roots much more readily.
Popular Questions and Answers
We talked about the propagation of roses by cuttings with agronomist-breeder Svetlana Mikhailova.
Can all varieties of roses be propagated from cuttings?
Cuttings of polyanthus (Border King, Paul Crampel, Holsiein), climbing (Bobbie James, Snow goose, Polka) and floribunda (Apricola, Edelweiss, Tequila) roses are easy to root. Hybrid teas take root worse and give a weak root system.