Painting banisters ideas
Painted stair ideas - 11 creative ways to raise the bar
By Amy Hodge
last updated
If you're bored of your current hallway decor, one way to make an impression is to transform your stairs with paint. There are plenty of staircase ideas using paint that can turn this often overlooked space into a vibrant scheme highlighting key architectural features in the process.
'When decorating an entrance space or hallway, it is really important to create a scheme that flows from room to room,' says Ruth Mottershead, creative director, Little Greene . 'These areas can often be narrow without a lot of natural light so through the use of colour, you can create a colour scheme that brings warmth, light and design interest to the space. Rather than treating them as a separate area, incorporate the hallway and stairs into your design scheme with a coordinated colour palette, or create a statement with the addition of a beautiful wallpaper which will create a personality filled design statement. '
It's a chance to get creative with colour. Try different paint testers on your stairs, checking how the colour looks at different times of the day with both natural and artificial light, before deciding on your colour scheme.
Painted stair ideas
From ombré risers to painted stair runners, we've got some great stair paint ideas to inspire you to brighten up your hallway. Whether you want a quick revamp or you want to spend time creating a whole new look for your stair decorating ideas, there are plenty of ways to inject some personality into your hallway with these stair paint ideas.
1. Paint a stair runner
(Image credit: Annie Sloan)
If your budget doesn't stretch to a carpet runner, you can easily fake the look with paint as an easy stair runner idea. Paint your stairs in your chosen background colour and leave to dry, then use decorator's tape to mark out a runner down the centre of your stairs. Paint in between in a punchy shade that contrasts with the background colour.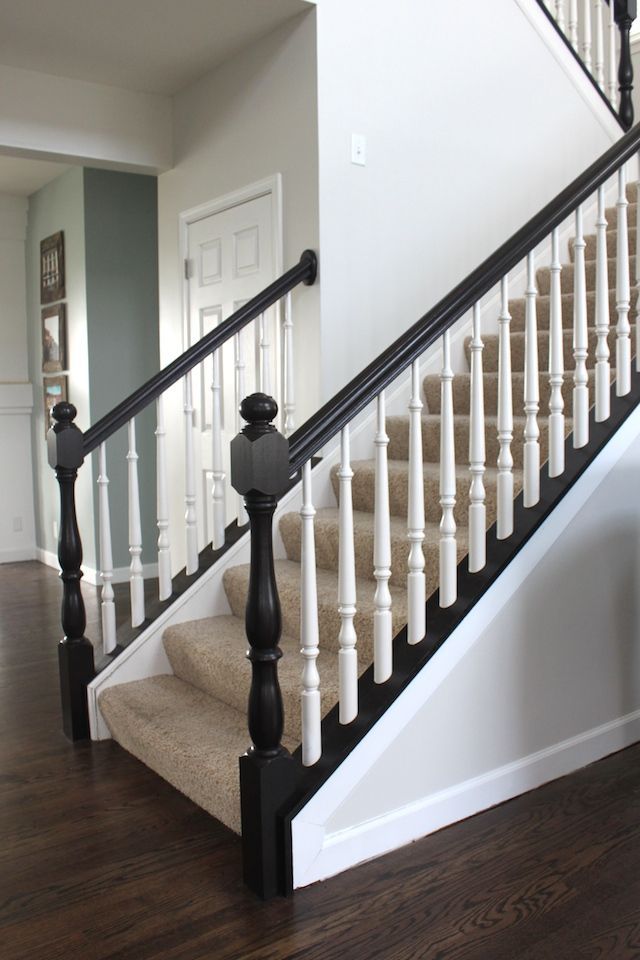
2. Go for a distressed effect
(Image credit: Future PLC/James French)
A fab idea for an older country-style property. If your stairs have previously been painted you can give them an aged look for a rustic vibe. Gently use sandpaper to strip off some of the existing paint so the wood shines through underneath for a distressed effect. Give it a good brush and vacuum and seal with a matt varnish for a time-worn look.
3. Make your stairs pop
(Image credit: Future PLC/Marc O Flaherty)
If your hallway is light and bright but you want to make a feature of your staircase, paint the skirting boards, banisters and stairs in a subtle colour for a gentle pop that shows off the beautiful mouldings of the stairs.
4. Choose bold shades
(Image credit: Future PLC/Rachael Smith)
For a hallway that really wows visitors, go for vibrant shades like this gorgeous bright blue. Paint the wall half height in a contrasting shade such as yellow, which will help draw your eye up the stairs and make the stairs the focal point of the room. Gather your favourite shades when choosing your hallway colour schemes.
'Wooden stairs can be partially or fully painted to create a statement feature in the hallway,' says Emma Bestley, co-founder and creative director of eco paint brand YesColours . 'If you want to stand out from the crowd, consider opting for a vibrant colour, coral, yellow, punchy green or cobalt blue work well.'
5. Highlight your stairs
(Image credit: Crown Paint)
Use the angles of your staircase to your advantage to create a subtle feature wall for an under stairs idea. Section off a triangular shape and paint in a different colour to your stairs to highlight the area. Add further interest by making a gallery wall of your favourite prints and photos. This will frame stairs painted plain white and help to make them the focal point.
6. Create an ombré effect
(Image credit: Crown Paints)
Not just for walls, ombré effects come into their own when used on stairs by drawing your eye upwards.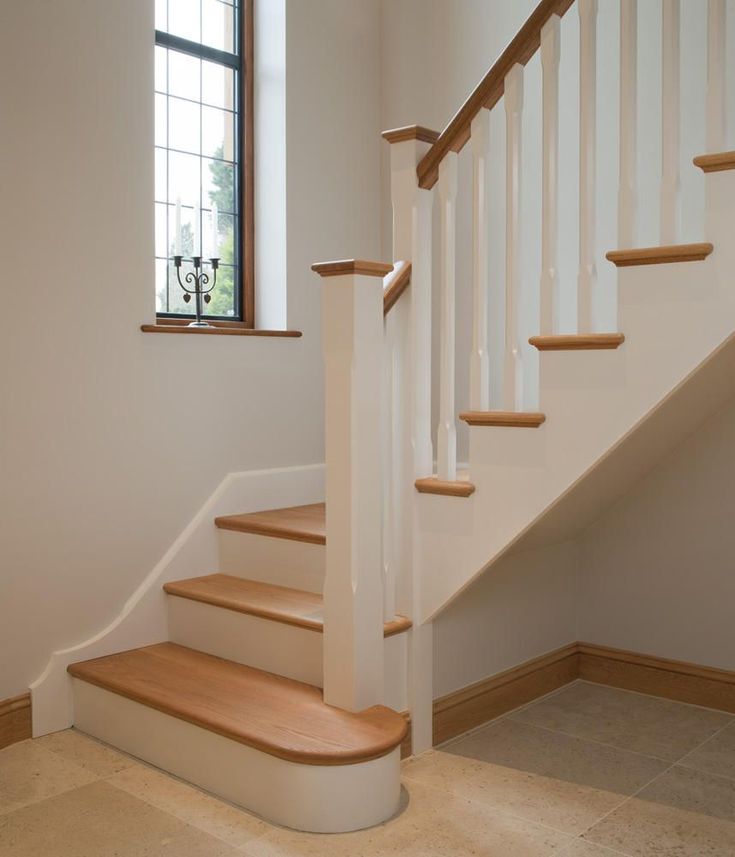 Choose the darkest shade for the bottom, gradually getting lighter as you go up the steps. 'Due to the paint's light and feathered look, this graduation of tonal blues on a wooden staircase creates a relaxing atmosphere in the entrance of the home,' explains Justyna Korczynska, senior designer at Crown Paints .
'It's important to use lighter shades on the top half of the stairs as the balance looks off and too top-heavy if the colours are reversed. Use the darkest shade on the bottom few steps to anchor the colour scheme and add depth to the palette.' Gather all you need to know on how to paint a staircase for a hallway that will make an impact.
7. Go dotty with paint
(Image credit: Future PLC)
A simple but easy stair update is painting your stairs white and using black paint to create polka dots. Paint the walls to the sides of the stairs black too to make them really pop. A splash of colour from a bright feature wall at the top of the stairs brightens the look. Instead of dots you could mimic a terrazzo effect by using several different colours.
8. Create a standout look
(Image credit: Future PLC/Jeremy Phillips)
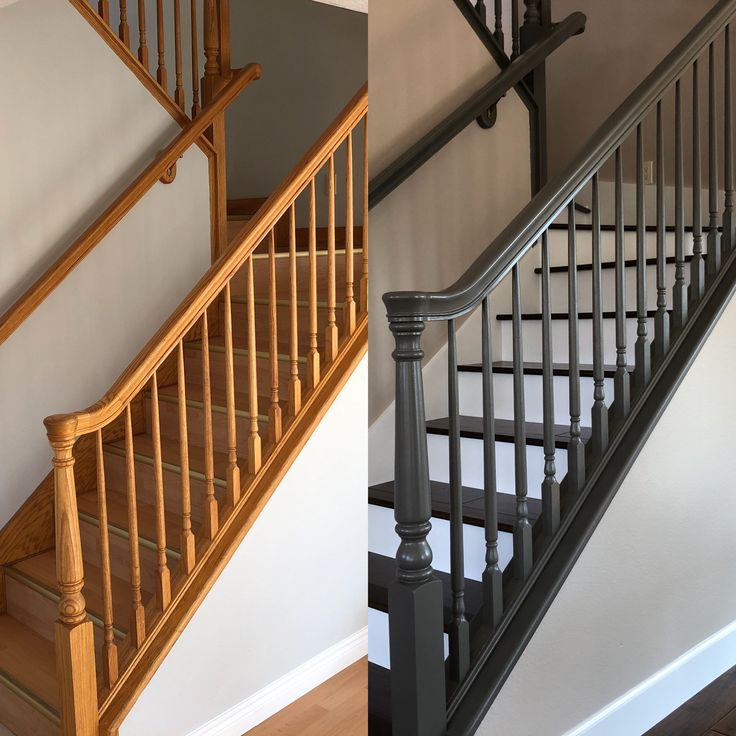
Make your staircase stand out by painting the whole thing in one block of colour. In a neutral space like here, it turns the stairs into a feature, leading your eyes to look further into the house. 'Dark banisters are a particularly effective way of making stairs pop,' says Sophie Smith, founder of Zhoosh Paints .
'Opt for a paler colour or even white throughout the rest of the hallway and then go for black or dark grey on all the spindles and banister frames. It's a complete reversal of the traditional white banister with a coloured wall and is a fresh, contemporary way to make a feature of the staircase. It's also a lot more practical to paint a banister a darker colour – white shows up all the dirty hand marks!'
9. Wallpaper your risers
(Image credit: Future PLC)
Pick a vibrant patterned wallpaper to cover your stair risers and paint the stair treads and walls in the background shade so the wallpaper really pops out at you.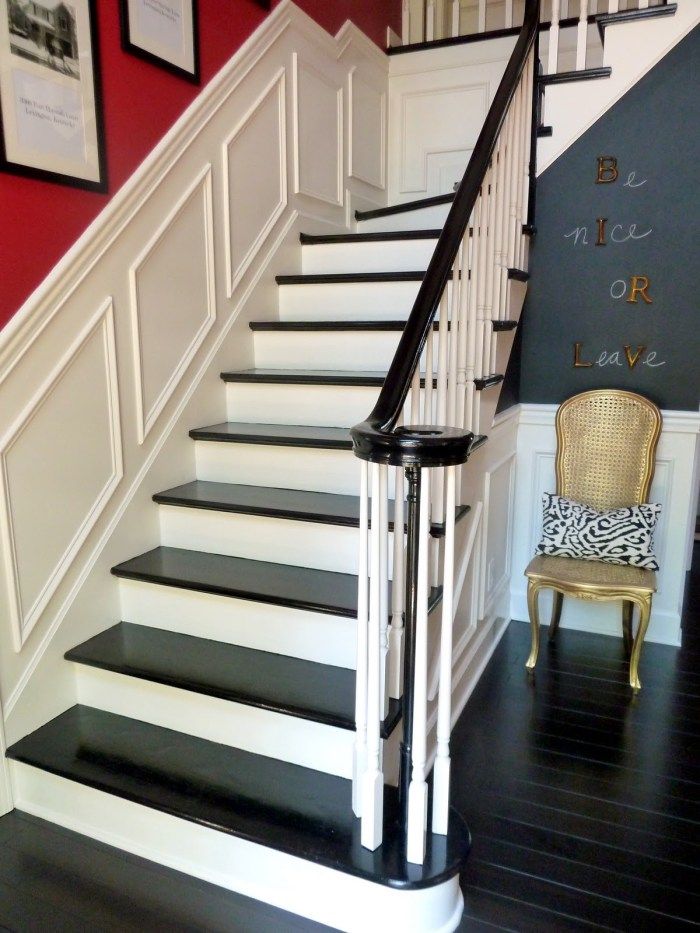 This is a great hallway wallpaper idea with a difference! Give the wallpaper a coat of matt varnish to prevent it from getting scuffed and marked. You could cover each riser with a different style of wallpaper for a more eclectic look.
10. Add a subtle hint of colour
(Image credit: Little Greene)
If you like to keep your hallway in a simple neutral colourway but you want it to feel a bit playful, paint a thin strip in a punchy colour along your skirting to add interest to a classic scheme. 'If adding stronger hues to your staircase feels a little overwhelming, pair a neutral backdrop with smaller details in bolder tones,' says Ruth Mottershead, creative director at Little Greene . 'Grey has a universal appeal and when paired with a brighter highlight it will create a timeless look.'
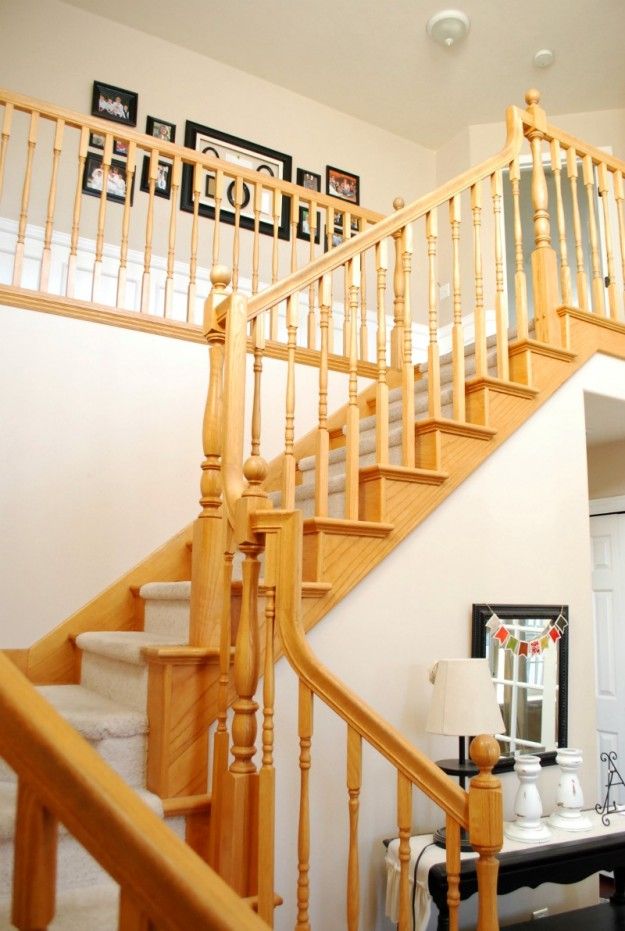
11. Paint banisters
(Image credit: Future PLC/Chris Everard)
Make the banister idea the star in a white hallway with painted stairs. This fabulous space uses graduated shades of green and blue to create a kaleidoscope of colour that rises, shade by shade, to the floor above. A darkwood hand rail adds definition to the design, with a series of ornate white picture frames introducing a touch of glamour.
Which type of paint should I use for stairs?
A hard wearing paint is needed for stairs or flooring, check if the paint brand you want to use has a dedicated floor paint, which will be designed to withstand daily wear and tear. 'Our intelligent paints are perfect for use in busy spaces like this, designed to be quick drying, durable and completely washable,' explains Ruth Mottershead, creative director at Little Greene.
How do I prep my stairs for painting?
Preparation is key when it comes to decorating and never more so than when you're painting a surface which will get a battering from daily use. 'All surfaces need to be thoroughly cleaned, holes filled, wooden surfaces sanded,' says Jason Burns at FrogTape .
'Everything should be primed prior to painting as paint cannot just adhere to surfaces that have not been prepared properly. It could crack, bubble, flake away and peel off because it has not stuck. This does not provide a good finish and the results will be the same, regardless of the tools you use. The best quality paintbrush or top specification spray device cannot mask a lack of prep.'
How to paint a banister - 5 steps to help you paint like a pro
Although a banister may rarely be considered a prime concern when renovating a home, they are the finishing touch in most hallways. For this reason, it pays to take care to learn how to paint a banister properly to keep your home looking fresh.
If you're browsing through painted stair ideas for your next home project the idea of painting a banister yourself might fill you with some dread. Full of small nooks and curving sections banisters are a little trickier than simply learning how to paint a staircase. However, once you get the hang of it with our step-by-step guide you'll be a pro and able to save yourself some pounds (and added bonus).
How to paint a banister
'Banisters can be a beautiful addition to any room in your home, but the paint may peel off if they are not adequately prepared before painting', warns Matt Hagens, Carpenter, Founder, and CEO of Obsessed Woodworking .
(Image credit: Valspar)
Just like every other DIY and decorating project, preparation is key. Although it may be tempting to go all in and just wing it, you may find yourself having to pay the consequences of a careless paint job later down the line.
In this step-by-step guide, we'll show you how you can paint a banister like a pro.
(Image credit: Future PLC)
What you'll need
- Dust sheets, plastic sheeting, or newspaper
- Decorators tape or masking tape
- Sandpaper
- Sponge and sugar soap
- A damp cloth
- Microfibre cloth
- Rubber gloves
- Filler and filling knife
- Primer
- Your choice of paint
- Good quality paintbrushes
- Small radiator roller
- Paint tray
- Old clothes
Painting a banister - step-by-step
1.
 Protect the area
If you have already decorated your staircase or are planning to keep them the same, make sure you lay down newspaper or sheeting to protect your stairs as they are. Consider opting for decorators or masking tape around the more fiddly areas like the spindles. All of this prep will ensure you end up with clean lines at the end of your project.
To ease the job further, Marianne Shillingford, Creative Director at Dulux recommends investing in some self-adhesive carpet protectors for your stairs, making them much easier and safer to get up and down while you are decorating.
(Image credit: Future PLC / David Giles)
2. Clean the surface
Make sure you're wearing your rubber gloves for this one! Give the banister a good scrub using a clean sponge and sugar soap to remove any remaining dirt and grime that has accumulated over time. You can only imagine how many hands have touched it, especially given that a banister is one of the most high-traffic areas inside your home.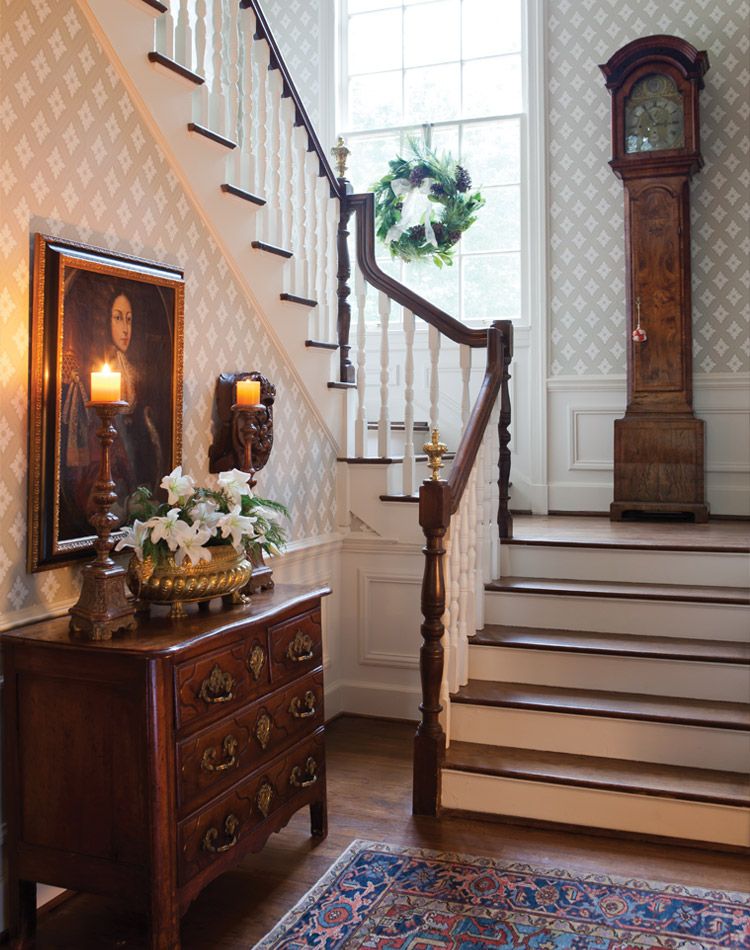
Once you've given the banister a good clean, be sure to wipe off the excess sugar soap with a damp, clean cloth.
(Image credit: Future PLC)
3. Fill and sand the banister
Once your banister is all clean and dry, do a quick inspection to make sure there aren't any cracks in the woodwork or protruding areas on the surface. Will Thompson at Valspar advises that 'if your banister is bare wood, it just needs light sanding to roughen up the surface. If peeling paint is visible, be sure to remove flaking sections before sanding.'
Take time to fill over any cracks and chips and once the filler has dried, sand it down until the area feels smooth and is free from any abrasions.
If you have intricately turned banister rails, Marianne Shillingford at Dulux recommends using flexible sanding pads to ease the job. Clean away any excess dust on the surface with a microfibre cloth and your best vacuum cleaner.
(Image credit: Future PLC/Marc O Flaherty)
4.
 Prime the banister
Primer is only necessary if your choice of paint requires the use of it. If you plan to dramatically change the colour of your banister, Will Thompson at Valspar advises using a suitable tinted primer to ease the job.
If you want to go the extra mile in the priming step, Phil Robinson at Paint the Town Green recommends that you apply a primer that is stain-blocking. 'This not only ensures that the paint adheres well, but also that whatever oils or waxes that have been previously used on the timber won't bleed through the paint and discolour it', he explains.
When priming, be sure to paint in the direction of the woodwork's grain, working in long strokes, and using a finer brush for the more intricate detailing.
5. Paint the banister
The time has come - after all that prep, you can finally start painting! Pick up your paint of choice to complement your chosen hallway colour scheme, and your best paintbrushes and get started on your first coat.
Marianne Shillingford at Dulux recommends using a good quality 2-inch acrylic paintbrush and a small radiator roller to apply the paint. 'The roller will cover bigger areas evenly and quickly whilst the brush will get into all the fiddly bits', she says.
Let the first coat dry, lightly sand with fine surface sandpaper, and then apply a second. For most paint jobs, it's almost always recommended to apply at least two coats of pigment. However, if you're going from dark to light, you may find yourself needing to apply a third coat for good measure.
Once you've finished painting, remove the decorators or masking tape you stuck down to your walls and spindles whilst the paint is still damp to achieve that clean, professional finish. Waiting until the paint is completely dry to pull off the tape may result in hours of your hard work being lifted off in flaky chunks - something I'm sure nobody wants to see.
(Image credit: Future PLC)
If you've perhaps waited a little too long before pulling off your tape or just find it a bit tricky in general, don't be alarmed as Michael Rolland, DIY expert and MD of The Paint Shed has a hack that could be a lifesaver for both new and seasoned DIYers.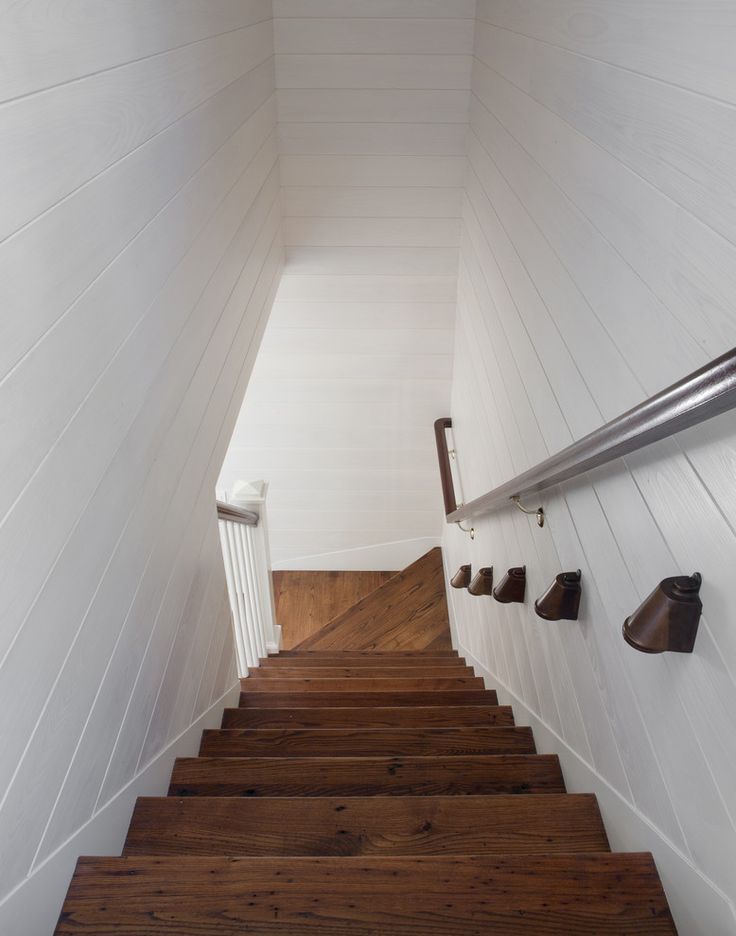
'Grab your hair dryer and blow hot air onto the tape, doing so will reactivate the adhesive making it easier to remove!', he explains. 'Take your time lifting up the painter's tape, pull it back on itself, removing it at a 45-degree angle.'
(Image credit: COAT)
And just like that, you've got yourself a spanking new banister, achieved in just 5 easy steps - and who's to say you've got to stop there with renovating a staircase? Giving your banister a fresh look is simply one of many ways to get stuck in with testing out new staircase ideas.
What is the best way to paint a banister?
'Always start from the top and move down in decorating. So once you've prepped everything, apply paint to the handrail first, the rails second, and lastly the newel post', advises Marianne Shillingford at Dulux.
'If you use a brush, begin by priming the surface with an appropriate coat of primer, then use your chosen paint pigment in a light sanding layer before applying another coat of paint', says Matt Hagens at Obsessed Woodworking. Once dry, take the time to clean up any mistakes with water and white vinegar solution, followed by rubbing alcohol or acetone. Finally, if you wish, seal the finish with a clear coat.
On top of the practical painting tips, Marianne also highlights the importance of health and safety during any DIY project, reminding us to 'be careful on your banisters and use a ladder for bits you can't reach. Most accidents at home happen on the stairs and with a can of paint in your hand, it's definitely not an accident you want to happen', she forewarns.
(Image credit: Future PLC/Oliver Gordon)
How do you prepare a banister for painting?
Ensuring adequate preparation of your banister before painting is the key to the longevity of your paint job. Aaron Markwell, Colour Curator at COAT advises DIYers to check that any old paintwork has been appropriately sanded to a smooth finish. 'When they're detailed, they often can get drips down them. If they've never been painted, they'll need priming first', he adds.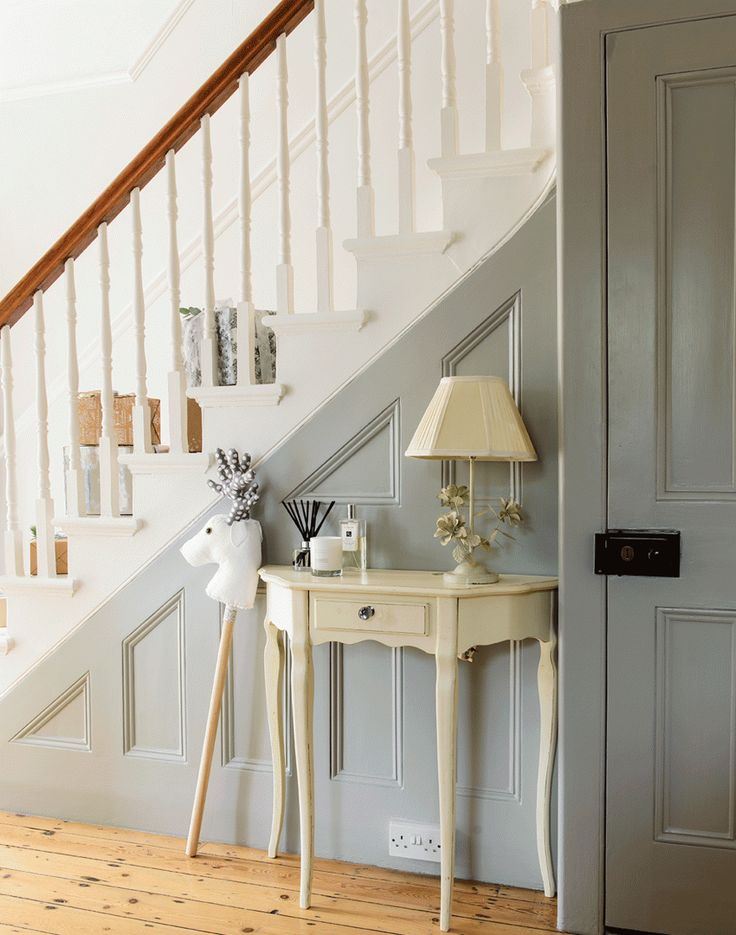
'The most common mistake people make when painting banisters is using an oil-based product that contains solvents - these solvents will degrade the wood surface and damage the finish', says Matt Hagens at Obsessed Woodworking.
He advises first, to clean the banister and rail with hot water and a detergent solution to prevent this from happening. Next, use a marine vanish or another sealant to protect wood against moisture and staining. Lastly, apply your chosen paint job following the manufacturer's instructions.
(Image credit: Future PLC/Colin Poole)
What kind of paint do you use on a banister?
When painting a banister, make sure you're using durable, high-quality paints designed for application on wood surfaces, especially with your banister being one of the most high-traffic areas inside your home. The last thing anyone wants is to spend hours decorating just to see the paint already peeling off and looking lacklustre within a short span of time.
Once you've selected your paint colour, note that wood paint often comes in three finishes: eggshell, satin, and gloss, and whichever finish you choose may change the look of your paint job slightly. Helen Shaw, UK Director at Benjamin Moore explains that satin or eggshell finishes are both hard-wearing but offer different levels of sheen. A gloss finish is also commonly used on wood, but should only be used on smooth surfaces. 'The higher the sheen, the more wear and tear your paint can take', she explains as a rule of thumb.
Will Thompson, Head of Product Marketing at Valspar goes on to remind us that 'when choosing the colour and finish for your banister, consider that wood absorbs light'.
Therefore, if you're painting a dark hallway or landing that doesn't get much natural light, opting for a lighter colour and reflective finish for your banister can help brighten the space.
PAINTING RAILING AND STAIR SPINDLES [COMPLETE GUIDE]
February 6, 2022 Painting stair railings and spindles can be a rewarding and enjoyable task once completed, but painstaking and time consuming. Unfortunately, this is a task that requires attention and time.
Fortunately, artists and hobbyists (who all learned by trial and error) have been gathering and sharing ideas and tips online for some time now. This article brings together some of the best ideas and suggestions on how to prepare, what to do, and what to use.
Contents Hide 1 Should I paint the railing with eggshell paint or satin paint? 2 What is the difference between eggshell paint and satin wood paint? 3 Can railings be painted without sanding? 4 How do I prepare railings and spindles if I don't want to sand them? 5 How to paint railings and stair axles 5.1 Step 1: Preparation 5.2 Step 2: Cleaning 5.3 Step 3: Sand (or remove shine) 5.4 Step 4: Time to refuel 5.5 Step 5: Time to paint 6 Final thoughts 6.
 1 Related posts:
 Should I paint my railings with eggshell paint or satin paint?
Experts recommend satin wood paint as the best finish for railings and spindles because stairs are known to be high traffic areas, and satin wood paint is more durable, easier to clean and better shaped.
Eggshell Paint and Satin Wood Paint basically describe how you want your paint to look. Eggshell and Satinwood are the most commonly used interior paints. They are neither super matte nor super glossy, indicating how effectively the paint reflects light as it dries.
value 1212
Satinwood painted spindles
Satinwood paint is always recommended for areas and spaces that are subject to a constant flow of traffic and where surfaces are touched, hit, held and gripped, such as stairs. In fact, stairs are probably one of the most touching surfaces in your home.
Eggshell paint is not as strong or resistant to dents, scuffs, scratches, or stains, and because it reflects slightly less light, it does not improve the contours, curves, and patterns of a typical staircase.
What is the difference between eggshell paint and satin wood paint?
Eggshell and Satin Wood are classified as low gloss paints, making them common for interior surfaces. The main difference between the two is that satin wood has a slightly higher sheen level than eggshell.
This makes eggshell paint suitable for living rooms and dining rooms where it will bounce and reflect light throughout the room, creating depth and smoothness without the sheen.
A shinier satin wood paint can brighten dull areas by reflecting light and enhancing the contours of architecture such as stairs and components.
Eggshell is named after the smooth surface of the eggshell. Satinwood is known for its satin or velvety finish, which is actually a slightly textured surface.
angel number value 555
Satinwood paint seems to retain its color for a long period of time and is also easier to clean - this is especially useful when the surface is supportive, in other words the railings that maintain balance receive permanent layers of fingerprints that are applied under pressure .
Can railings be painted without sanding?
Sanding or not sanding railings is entirely up to you, but most advice recommends carefully considering the condition of the surfaces you are about to paint before making that decision.
Most advice that starts with no sanding required often recommends sanding anyway if the surfaces to be painted are in poor condition. Sometimes the amount of sanding required is minimal and can be eliminated altogether, but the end results tend to advertise our attention to detail.
Sanding of stair spindles and railings is always recommended.
Sometimes the surface of your railing needs only a little roughness or light sanding - this includes small nicks and chips, scratches, chips, scratches or obvious oil stains.
Some painters spend only about twenty minutes on this: lightly removing all obvious gouges and marks, rather than carefully sanding every surface of the spindle.
Your railings need to be cleaned though. Dust and dirt can be removed with a vacuum cleaner or a damp cloth. Some use a solution of vinegar and water for this.
Try to remove any obvious stains and marks. Those that cannot be removed in this way (such as text marks) may need light sanding.
How do I prepare railings and spindles if I don't want to grind them?
A popular recommendation to treat railings (instead of sanding them) is to purchase a liquid de-gloss or liquid sander to help remove the gloss layer from the wood. The main purpose of a liquid deglosser is not to clean the wood, but to get rid of the shiny surface and make it smooth and ready for painting.
what does it mean when you see 1111
Gloss Remover will dull old paint, varnish or gloss and prepare the surface for a new coat of paint, helping it to bond without peeling or chipping.
1212 - Meaning Doreen Virtue
Liquid degloss is applied to a sponge or cloth and wiped over the entire surface of the railing.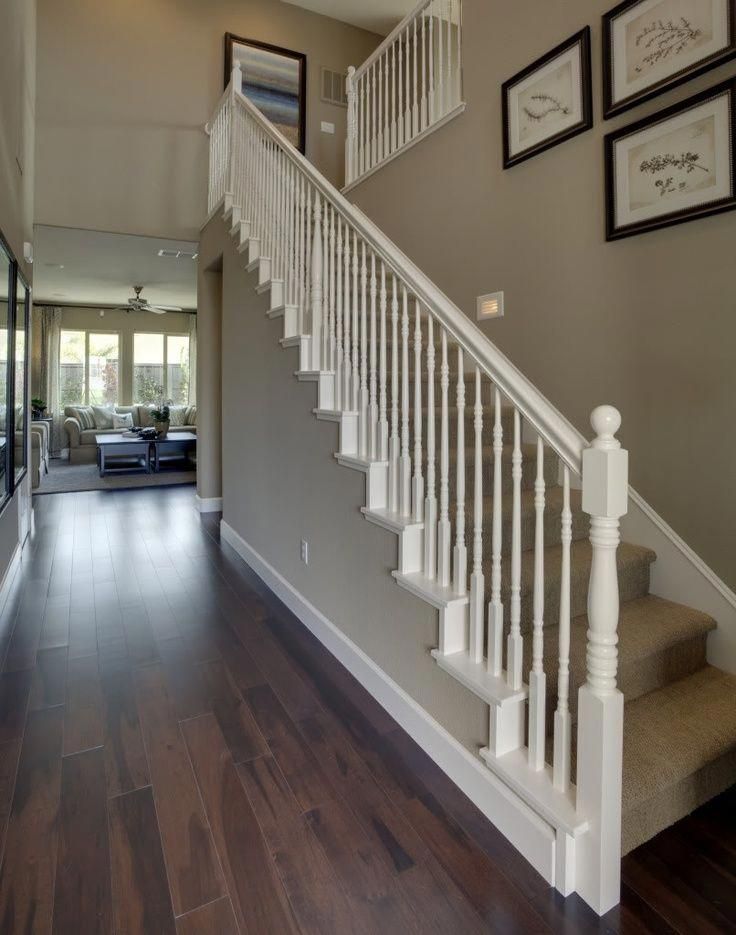 It's not a quick process, especially applying deglaze remover to the spindles, but it's faster than sanding and significantly less messy.
How to Paint Railings and Stair Shafts
Here is a simple guide to preparing and painting railings and spindles, including several surface preparation options available.
Step 1: Preparation
Decide if you can clean and lightly sand or treat the surfaces with a gloss remover and then place protective sheets and/or newspapers on the surfaces to be protected. Remove carpets and runners and secure the edges with masking tape.
Step 2: Cleaning
Clean railings and axles with a soft, damp cloth and then scrape railings with a paint scraper to remove bubbles, flaking or chipped paint. You can apply wood putty to any significant holes or dents, but then it must be left overnight to harden.
Step 3: Sand (or remove shine)
Lightly sand any areas that need it, or apply a gloss remover instead. If you choose to sand, you will need to wipe all surfaces again with a damp cloth.
Step 4: Time to fill up
Apply a special wood primer to help the paint adhere to the surface and increase its durability. Once everything is dry, it's time to paint.
Step 5: Time to Paint
If you're painting by hand, experts recommend brushes with triangular and round ends, which are best for complex and curved surfaces. However, other artists have achieved great results on railings with paint mitts or paint gloves.
Final Thoughts
The task of painting or restoring stair railings and spindles can be daunting, but by following a careful step-by-step process that includes evaluating the surface quality of your project, you can achieve great results without much hassle.
Technology and rules for painting metal railings
09/18/2019, 20:38
Metal is rightfully considered one of the most durable materials for building and decorating houses. It is distinguished by a high service life and reliability of the design made from it.
However, like any other material, various factors still negatively affect the metal. In order to protect railings and any metal structures as much as possible, their painting is used. The right choice of paint can significantly increase the service life of metal elements.
Choice of paint
Choosing a railing paint requires several important criteria:
- corrosion protection. Since railings made of metal are often exposed to precipitation, corrosion can form on them. Railing paint must have protective properties against it;
- protection against mechanical influences. The railings are designed to provide support when moving up the stairs, so the paint on them should be as reliable as possible and not peel off for as long as possible;
- security. The coating of the railing should be environmentally friendly and not evaporate toxic substances.
 This is especially important when installing railings inside the building.
In addition, when painting railings, it is desirable to choose a paint that is easy to apply and can evenly lay down even on uneven surfaces. Ideally meets all requirements and is suitable for painting enamel railings. You can buy enamel pf-115 at tendent.ru/catalog/emali/emal_pf_115 by clicking on the link.
Painting
Painting metal railings involves several basic steps. None of them should be neglected, because the result and quality of staining directly depend on each of them.
Some preparatory work must be done before the railing can be painted. These include thorough cleaning of the surface from old paint and its degreasing. In the presence of corrosion, it is necessary to apply a special compound to the railing. With it, rust becomes a chemically neutral coating and makes the entire structure more durable.
The next step is to prime the railing. This is necessary in order to improve the adhesion of the paintwork material and the base of the metal structure.