Organize home office supplies
How to Beautifully Organize Home Office Supplies: 20 Tips
A tidy, functional home office is essential to staying productive, especially as more of us are working from home. If you’re looking at your home office and wondering how to clean it up (and keep it clean), help is here! I’ve rounded up 20 beautiful and creative ideas to organize home office supplies and create a workspace you’ll love.
This post contains affiliate links. As an Amazon affiliate, I earn from qualified purchases at no cost to you. Please see the Disclaimer for more information.
In this article:
How to Declutter & Purge Unneeded Supplies
Choose Functional Furniture
Desktop Organizers
Filing Systems to Organize Paperwork
How to Organize Mail and Bills
Home Office Printing Station Ideas
Organize Office Drawers
Use Wall Space For Home Office Storage
Labels to Organize Home Office Supplies
Home Command Center & Management Binder
Charging Station Solutions
Cord, Cable & Tech Storage
First, PIN THIS IMAGE to save the article for future reference:
Tip 1: How to Declutter Your OfficeThe first step to organize office supplies: get rid of stuff you don’t need. (It’s the first step in every organizing project.) This is often the most overwhelming step, but take a deep breath and pick one area to start. I like to start with the top of my desk, because a clean desktop makes me happy and feel energized to tackle more!
Addressing the paper clutter is the first priority. Gather all of those loose papers up and sort them into piles like unpaid bills, paid bills, legal/important documents, work papers, etc. Then put everything in a bin to file later. I’ll go through ways to create an effective filing system in another section of this article.
I recommend using a shredder to immediately and safely shred papers like old bills or anything with your personal information on it. Those random notepads and post-it notes from local businesses you’ve accumulated over the years can be recycled, too. (Trust me, you don’t need them)
Be honest about excess paper you keep “just in case,” like colored copy paper or photo paper for those pictures you keep on your phone but never get around to printing. If it’s cluttering up your office, consider donating it to a local school. Teachers always need paper!
If you’ve been keeping CD-ROMs for software you no longer use, it’s time to toss it. The same goes for user manuals for technology you’ve replaced. Old electronic devices can be recycled or donated, along with the power cords, cables and chargers that go with them. (Just be sure to erase any personal data first.) Here’s a helpful article from Consumer Reports on how to get rid of your old tech.
Step Three: Purge the Old Pens & PencilsNext, it’s time to go through all of those pens and pencils you’ve been hanging on to. Dried up? Broken? Toss! This is a project that the kids can help with, too. Once you’ve decluttered, you can sort and group by color or type (Sharpies, ball-point, fountain, etc.).
Step Four: Recycle Those Printer Cartridges!Most of us are guilty of keeping an ever-growing pile of empty printer cartridges to take to the office supply store for recycling.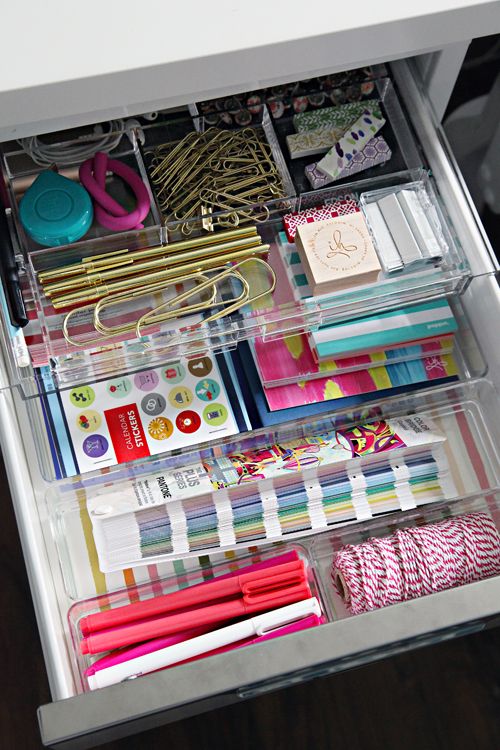 Time to take action! Put them all in a bag or box and place it in the front seat of your car. The next time you run errands, take them in.
Books are another big category of clutter in the home office. It’s tempting to hang on to them, but if you haven’t used them in the past few years, and they’re not first edition collector’s items, it’s time to let them go. Just think of all of the storage space you’ll have!
Some books can be sold to used book stores. Others can be donated. Here’s a list of places that accept book donations.
Step Six: Anything Else That Doesn’t BelongHome offices often become a catch-all for things that really don’t belong in the space. Take one last look around, and remove anything that should be stored elsewhere and place it in the appropriate space. Items that truly have no home should be put in a box and stored out of sight for 30 days. At the end of 30 days, if you haven’t needed or used them, sell, donate or recycle.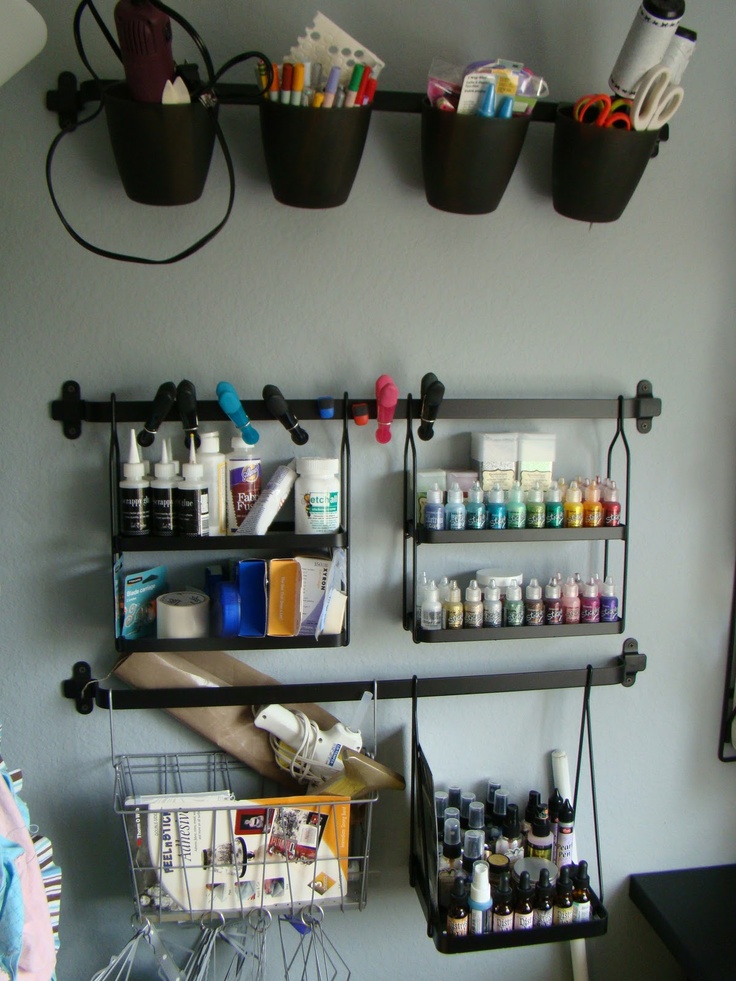
Choosing the right furniture will go a long way in helping you organize your home office & supplies. This is especially true if you have a small space, where every inch should be maximized for efficiency. And it doesn’t have to cost a fortune! It just has to work for you.
When choosing home office furniture, ask yourself:
- Will it fit nicely in my office space?
- Does it provide adequate storage for my office equipment and supplies?
- Is it comfortable?
- Does it fit in my budget?
When you can answer “yes” to these questions, you’ve probably found the right piece!
Tip 3. Ideas for Desks that Add StorageIf you have the space, a corner desk with built-in storage is a nice option that keeps everything you need close at hand. The desk below offers ample surface space for a computer, printer and accessories, plus shelves you can use for supplies in containers or baskets.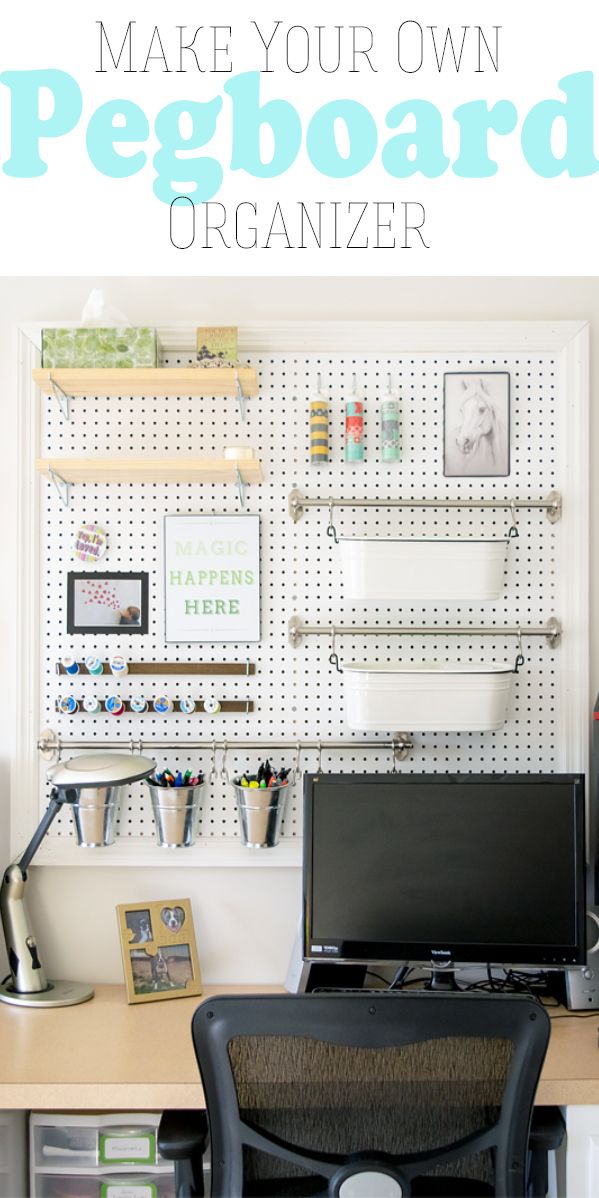
FIND ON AMAZON
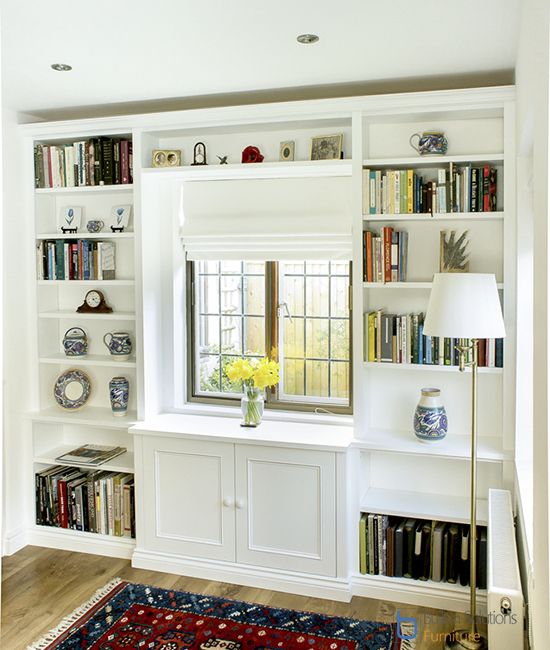
Ample wall space in your home office? Consider an option with a built-in bookshelf like this one:
FIND ON AMAZON
While particle board is lightweight and inexpensive, sometimes “real” is best. I love this solid reclaimed wooden desk, and it’s sturdy enough to hold up to 400 lbs! It may lack built-instorage, but you can always purchase separate shelving, filing systems and other accessories to accommodate your needs.
FIND ON AMAZON
Looking for an entire office furniture suite that won’t break the bank? Consider this highly-rated set, available on Amazon:
FIND ON AMAZON
Cubby Desk With Bins & DIY LabelsPhoto Courtesy of SavingTalents.comCheck out these great cubicle desks with bins and DIY velcro labels on SavingTalents.com. They work well for either a home office or a homeschool setup, as pictured.
Tip 4. Organize the DesktopAn organized desktop is critical to an efficient workspace.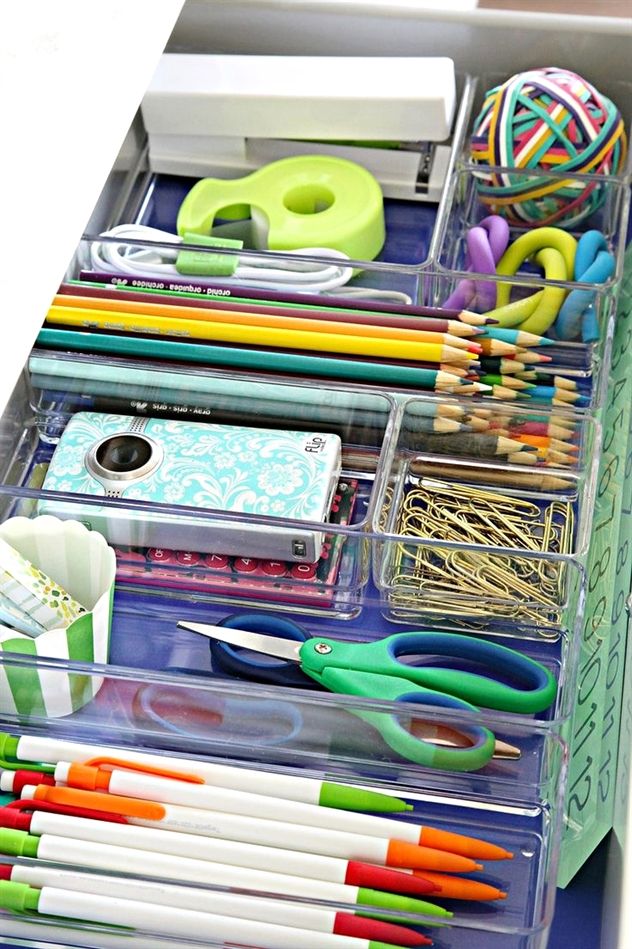 You’ll want to employ desk accessories and organizers that provide adequate storage and keep your most-used items easily accessible.
I love choosing my desk accessories! And because organizing is a passion of mine, I always look for items that are stylish, functional and efficient.
Tip 5. Try Adjustable Desktop Shelf OrganizersI like the versatility of an adjustable shelving unit like this. It comes in two pieces that can be rotated or widened/narrowed to suit your space.
FIND ON AMAZON
If you’re handy and enjoy DIY projects, click here to make your own adjustable desktop organizer, thanks to The Handyman’s Daughter! The article includes free plans to make this super affordable project:
Photo Courtesy of TheHandymansDaughter.comTip 6. Efficient & Stylish Desktop Accessories OrganizersI love the look of these wire basket accessory organizers from The Container Store.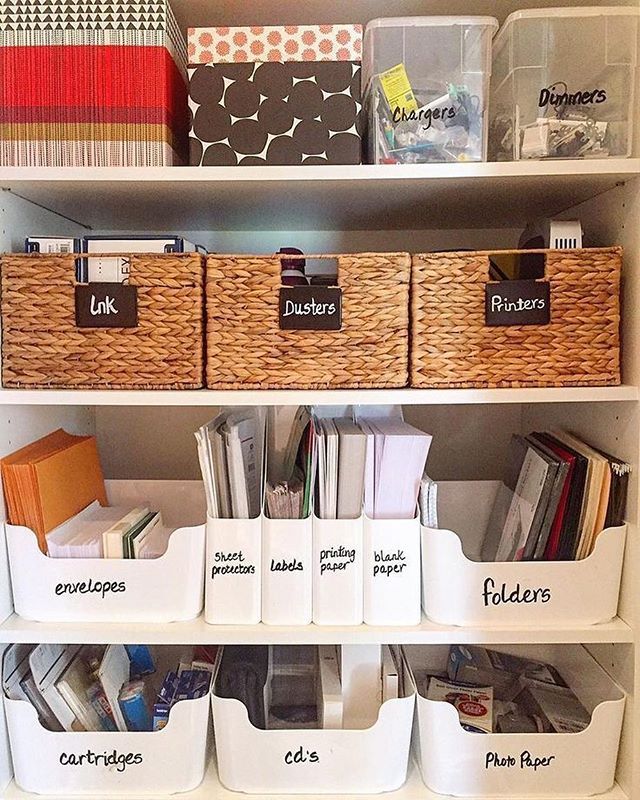 Such a pretty way to organize home office supplies like magazines, books, paper and notebooks, mail and pens/pencils:
Prefer colors like rose gold or aqua? Amazon has really cute metal and wire desktop accessory options in a variety of colors. Check them out here.
If wood is more your style, here’s an option with a rustic finish. It has room for pens, pencils, scissors, tape, mail, papers, notebooks and comes with an adorable set of calendar blocks:
FIND ON AMAZON
Tip 7. DIY Desktop OrganizersAre you a DIYer? If so, you’ll love these creative solutions for desktop organizers — read on!
Organize pens, pencils, paperclips and more in these cute DIY rope organizers for your desktop, courtesy of CraftsyHacks.com.
Photo Courtesy of CraftsyHacks.comGot a Cricut? Then you’re in luck, because Sustain My Craft Habit has some fab Cricut projects to organize your desk, like this one:
Photo Courtesy of Sustain My Craft HabitGotta say, I love DIY projects that use recycled materials.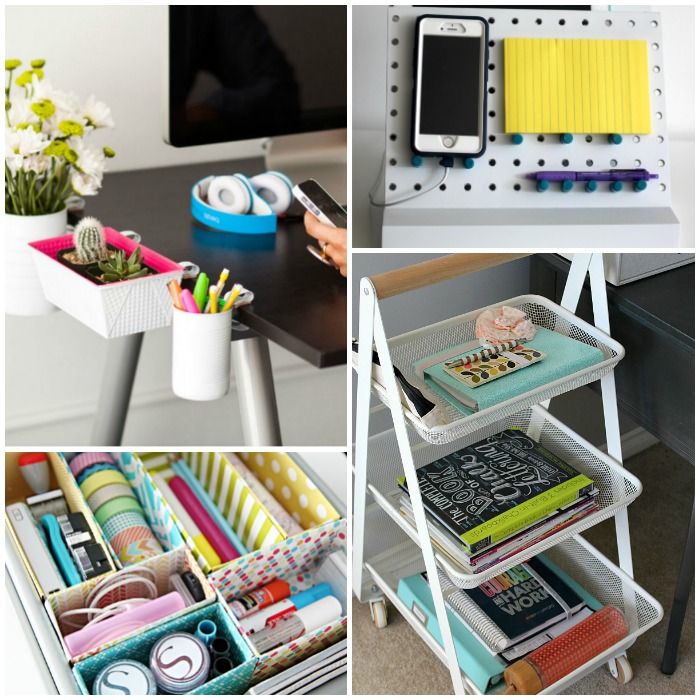 This creative idea from Modge Podge Rocks turns old cereal boxes and toilet paper/paper towel rolls into a truly adorable DIY desk organizer:
Another cute DIY desktop project, these device pillow stands that enable easy hands-free reading from HelloSewing.com:
Photo Courtesy of HelloSewing.comTip 8. Filing Systems to Organize PaperworkRemember all of those papers you sorted in Tip #1? Now, it’s time to create the proper filing system to keep those papers organized. Here’s how:
First, collect important documents like passports, birth certificates, social security cards, property deeds, etc. into one pile and store them in a fireproof safe like this one:
FIND ON AMAZON
Next, take your “household” papers, like warranty and maintenance information for your appliances and home systems, lists of important phone numbers, doctors, dentists, vets (you get the picture) and create a home management binder for them.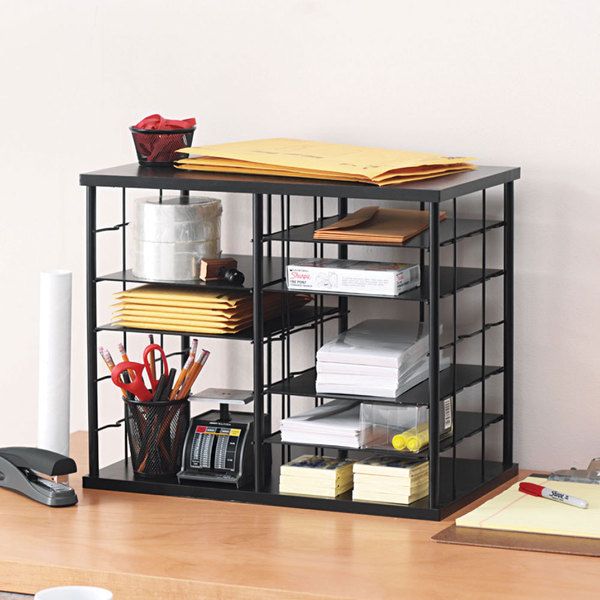 Keep this binder in an easily accessible place in the office or kitchen, or create a family command center to house it.
Keep all tax information, including receipts, in a file folder labeled for each tax year. These folders can be stored in a banker’s box or file cabinet for seven years. After that, they can be shredded. (Be sure to keep at least an electronic copy of your actual tax returns forever, just in case.) Check out this lovely little file box, pretty enough to store on a shelf in plain sight:
FIND ON AMAZON
I recommend going paperless for any and all bank statements, bills, paystubs, etc. to reduce paper clutter. If you can’t, keep these documents for one year (or longer if you need them for tax purposes; just transfer them to the tax file folder every April) and then shred.
Want to REALLY reduce paper clutter (or just have a digital backup of important papers)? Consider scanning and storing documents in the cloud.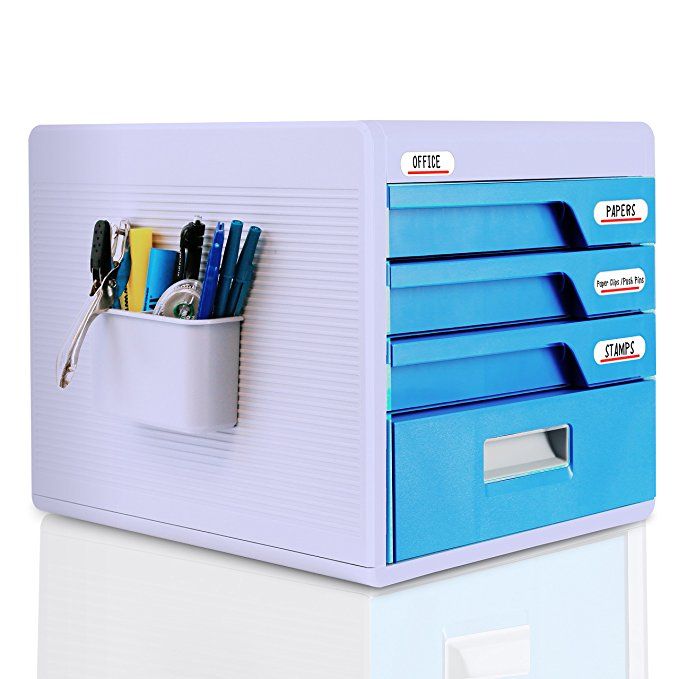 For more information, check out this article on thezhush.com.
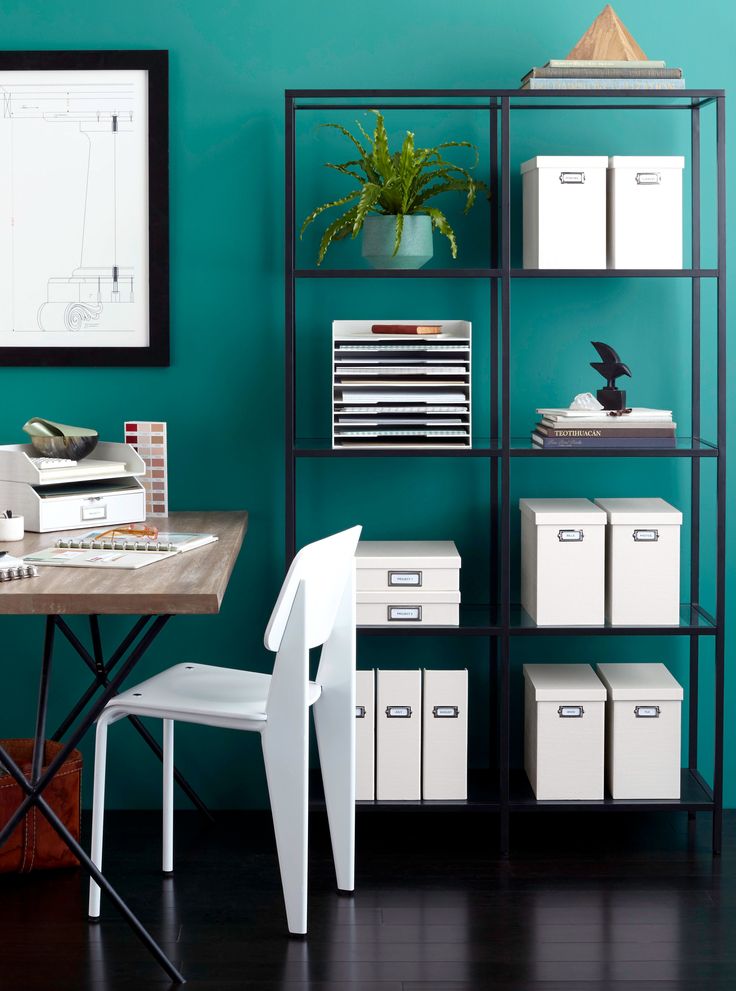
Since we’re discussing how to organize home office supplies, you might want filing cabinet options that work with your personal style. (Rather than business-boring metal boxes.) Here are a few options that are as pretty as they are functional:
Farmhouse Lateral File CabinetFIND ON AMAZON
Letter/Legal Wood Storage CabinetFIND ON AMAZON
Woven Basket File CubbyFIND ON AMAZON
Tip 10. How to Organize Mail and BillsStep One: Reduce Paper ClutterMail clutter is a big issue in many households. The home office is a good place to set up an efficient mail system, but FIRST, see how you can reduce the amount of mail you receive. Cancel subscriptions to magazines you no longer read, switch from paper bills and statements to paperless, and opt out of junk mail like pre-approved credit offers.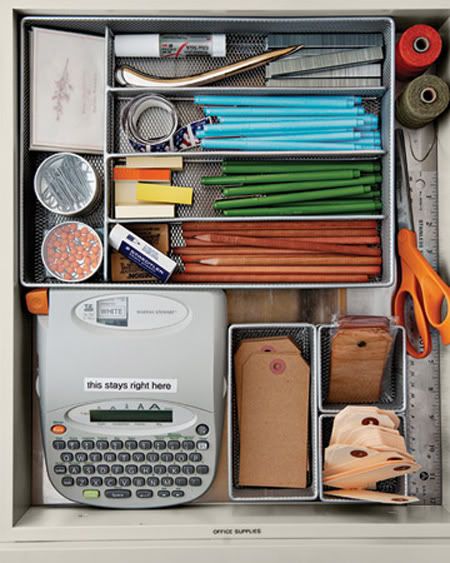 (Check out this info from the FTC on stopping unsolicited mail.)
Next, let’s create a mail system that works for you! Find a spot on your desk (or use free wall space) for incoming and outgoing mail, as well as bills/paperwork that need attention and items to file. Stock up on office supplies like stamps, return address labels, letter opener, etc. Keep a shredder, recycling bin and wastebasket nearby. Check out Organized31.com for an easy DIY Office Paper Recycling Bin project.
Here are some mail sorter solutions:
Distressed Wooden Mail SorterFIND ON AMAZON
Basket Wall RackFIND ON AMAZON
Tiered Desk TrayFIND ON AMAZON
Step Three: Use LabelsLabels are essential for a working system. Make one for each category of your mail sorter (incoming, bills to pay, outgoing, filing, etc.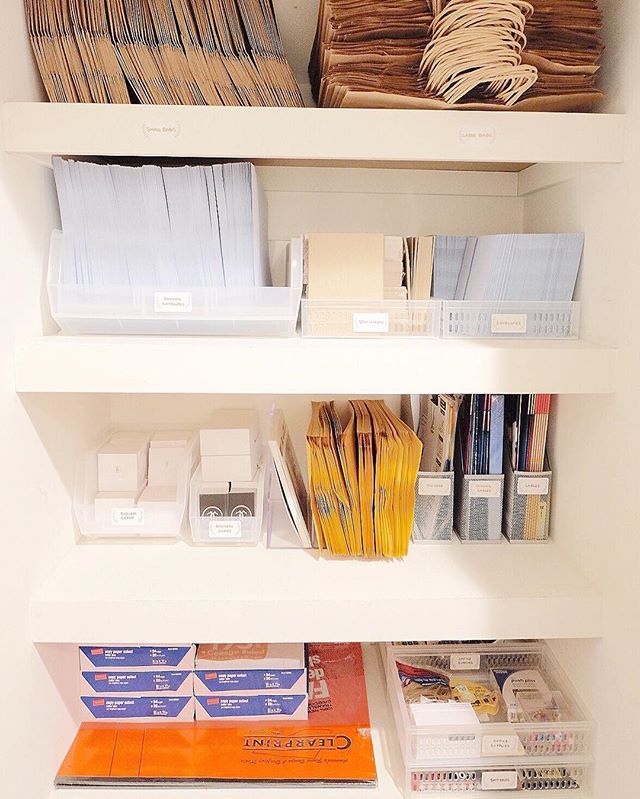 ) For some fun ways to create your own labels, check out 16 Sensational Ways to Make Labels For Organizing Your Home.
Just like any organization project, a key aspect in keeping things tidy is daily practice. Mail, bills and paper clutter are no different. Every day, toss/shred the junk mail, pay bills as needed, take outgoing mail to the mailbox, and file any paperwork that needs to be filed. If you keep up with it, it’ll never get out of hand again.
Tip 11. Home Office Printing Station IdeasFIND ON AMAZON
For extra efficiency in your home office, consider setting up a simple printing station. All it takes is a corner of your desk, a small cabinet or a rolling cart like the one pictured above.
Need something a little smaller? This industrial mobile stand can fit nearly anywhere:
FIND ON AMAZON
Store extra printing paper within reach in a tray, extra printer ink in a lidded bin, and you’re ready to go!
For a fun rustic DIY project, check out this Wine Crate Home Office Printer Stand & Storage from FrugElegance:
Photo Courtesy of FrugElegance.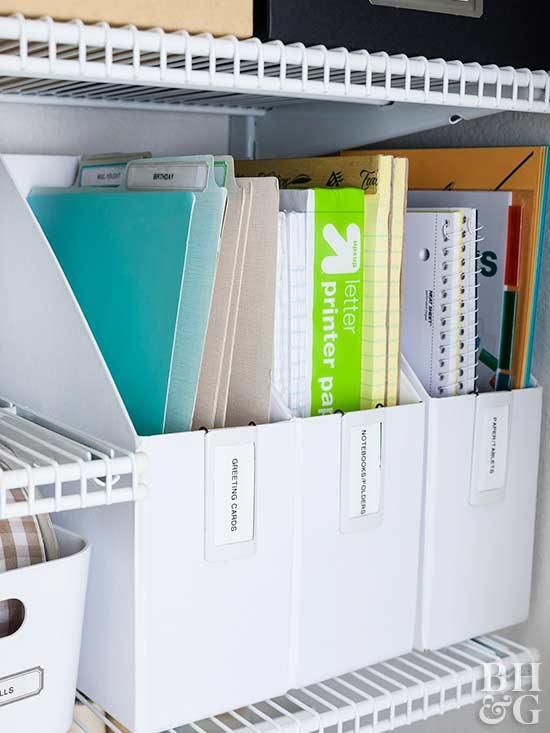 comTip 12. How to Organize Home Office Drawers
The desk drawer is often where office supplies get lost forever! For many of us, it becomes a catch-all for random junk. But with a little organizing effort, it can become a time-saving space that makes you smile (rather than wince).
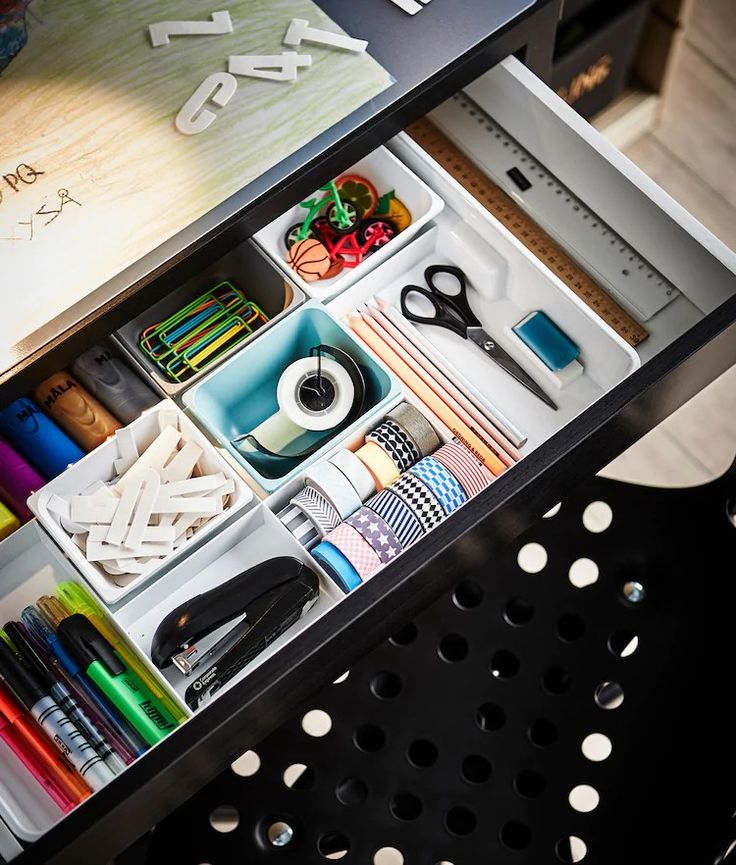
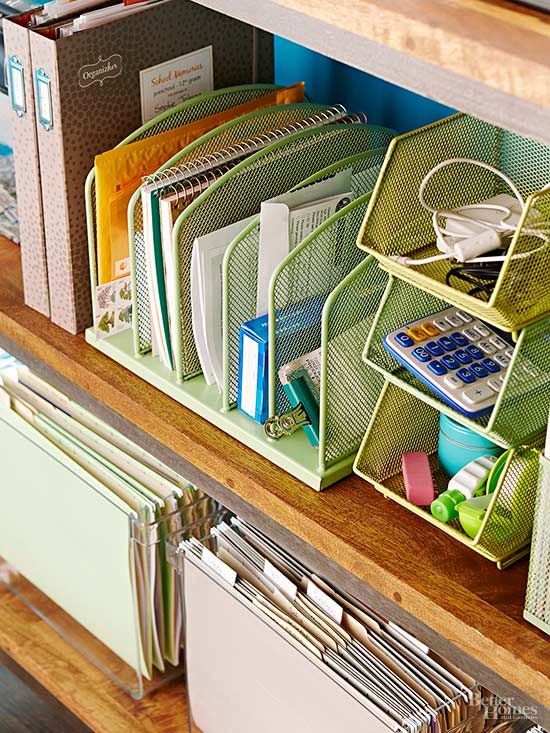
Step One: Prioritize Drawer SuppliesYou’ve already decluttered and sorted your items, so now you need to prioritize. If you’re using desktop organizers, you should fill those with items you use pretty much every day…like pens, pencils, a stapler, paperclips, notepad, etc.
Your top desk drawer (if you have multiple drawers) should house items you use often but not every day. Scissors, rulers, rubber bands, stationery, push pins, extra pens & pencils, portable chargers for devices. Each subsequent drawer should be for items used less often, like thank-you cards, batteries, spare keys. You get the idea.
Step Two: Use Drawer OrganizersThis is the fun part (for me, anyway). Measure the length, width and depth of your drawer(s) and find desk organizers or dividers that will maximize space and house your supplies. I highly recommend an adjustable organizer that will accommodate different sized drawers and supplies. Here are some options:
FIND ON AMAZON
Expandable Drawer Organizer TrayFIND ON AMAZON
Adjustable Drawer DividerFIND ON AMAZON
DIY Drawer OrganizersDrawer organization doesn’t have to cost a fortune! I reached out to my fellow bloggers for some affordable ideas on DIY organizers, and they did not disappoint! Check out these fun projects:
AppleGreenCottage.com made these DIY drawer organizers from upcycled cereal and cardboard boxes:
Photo Courtesy Of AppleGreenCottage.comDIYCandy.com made this DIY drawer organizer in half an hour using leftover wood:
Photo Courtesy of DIYCandy.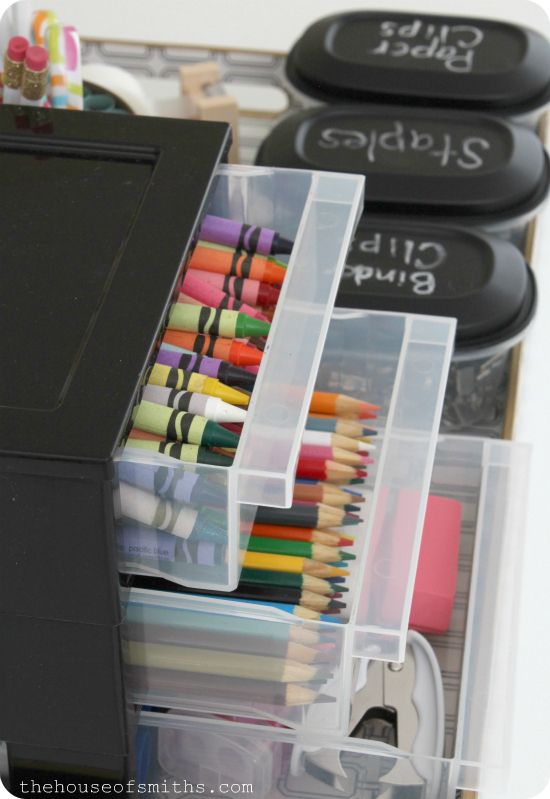 com
comRELATED ARTICLES:
The Best Way to Organize Desk Drawers in a Home Office
Under Desk Storage Ideas You’ll Love
Tip 13. Use Wall Space For Extra Office StorageAn often overlooked place to organize home office supplies: the walls! If your office lacks closet space for storage, simply use the space you have. Some ideas:
BookshelvesAn inexpensive bookshelf can store a lot of supplies, as seen in this image of a craft/office space from CreativeGreenLiving:
Photo Courtesy of CreativeGreenLiving.comDepending on your space and personal style, you can try a tall, narrow bookshelf:
FIND ON AMAZON
FIND ON AMAZON
Or a modular design that you can adjust to fit a sloped or awkward space:
FIND ON AMAZON
If you lack floor space for a standing bookshelf, consider floating shelf options:
FIND ON AMAZON
FIND ON AMAZON
Tip 14. Mount Your Monitor
Large flat-screen monitors take up precious desk space. Try a wall-mount instead, like this setup created by SmallStuffCounts.com:
Photo Courtesy of SmallStuffCounts.comAmazon has a wide selection of wall mounts for monitors and TV screens.
Tip 15. Use Labels to Organize Home Office SuppliesDon’t forget a key element of organizing: labels! Labels will help you keep things in their proper place (and help other members of the family remember to put things away correctly). Unlabeled bins and containers tend to become catch-alls for junk. Let’s avoid that!
In my kitchen office cabinets, I made storage containers from inexpensive photo boxes and labeled the contents of each using Word and my printer. I also love to label things with my Brother label maker!
If you’d like to make your own cute labels for the office (or any other space), check out my post 16 Sensational Ways to Make Labels for Organizing Your Home.
The home office is a great place to keep your command center and home management binder. The command center is a centralized area for family schedules, chore lists, important phone numbers, weekly menus, messages to one another and more.
Read about how to create a simple but effective DIY command center here.
A home management binder is the place to file all of your home maintenance info, model and serial numbers for appliances and systems, numbers for plumbers, repairmen, landscapers, window cleaners, etc. and other important documents for the house. Check out this great setup by OrganizingMoms.com:
Photo Courtesy of OrganizingMoms.comIf you’ve got a home office, chances are you have multiple devices that require charging: laptops, mobile phones, tablets. A great way to keep every battery alive — and every device in one place — is with a charging station.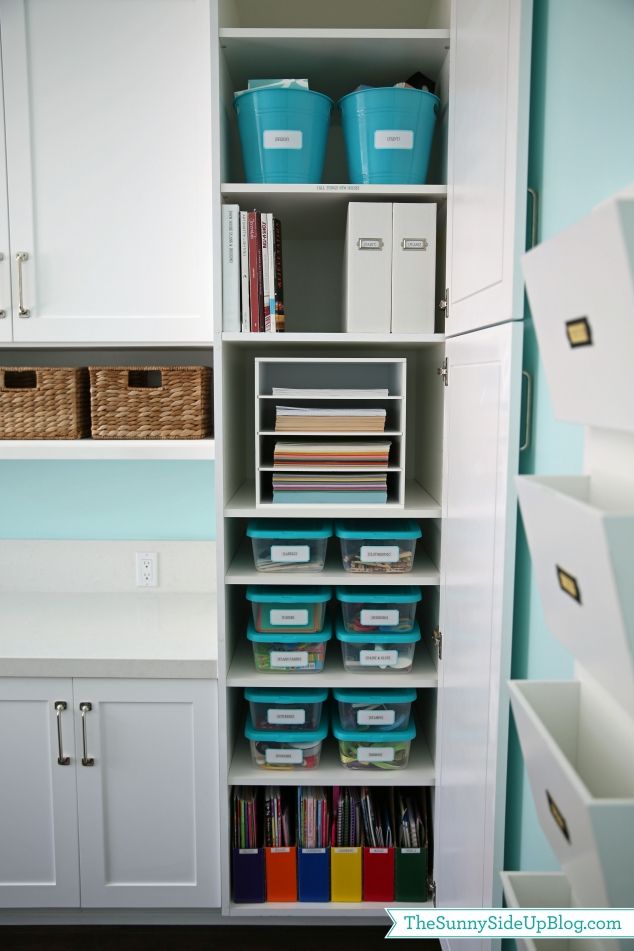
Depending on your needs, this can be as simple as installing a plug-and-play wall outlet like this:
FIND ON AMAZON
Or a solution that holds and charges several devices on your desk:
FIND ON AMAZON
This option even holds a laptop:
FIND ON AMAZON
DIYer? I made my family’s charging station from a wooden farmhouse-style mail sorter (click the link for article with step-by-step instructions):
Tip 18. Organize Computer and Media CablesIf there’s one thing that drives me nuts, it’s messy technology, cords and cables. The home office is typically one area that people struggle to conquer the cable beast; however, with the proper solutions, it’s possible!
NOTE: This section includes some home office solutions for cords and cables.
You might also like my in-depth article on
cord and cable storage and organization for the home, office and travel.
Let’s start with organizing the computer and peripheral cables behind your desk. If your desk has a full backing on it and you just need to keep the cables from getting tangled, I love these wrap-around cable sleeves:
I received a set of four from Blue Key World and they are perfect for keeping cords tidy behind the desk, media center, dresser, etc.!
To hide the surge protector on the ground, try a cable management box:
FIND ON AMAZON
Some desks are more like open tables with no back. This makes cord and cable organization a little more challenging. I found this great solution that mounts to the underside of the desk and keeps everything from piling up on the ground:
FIND ON AMAZON
Tip 19. Keep Charging Cables TidyI typically have my phone and tablet charging at my desk, and it’s super frustrating to have the charging cables slip off the desktop or behind the furniture. My favorite solution is a cable clip that adheres to the side or top of the desk. I received these clips from Blue Key World, and I use them in the office, on my nightstand, and even in my car:
The cable clips come in a packaged set, and are available in single or double clips:
FIND ON AMAZON
Tip 20. Hide Modems, Routers and Cable BoxesSometimes we don’t want our home office to look so much like an office…with routers, modems and cable boxes sitting out in plain site with all of their blinking lights. With a little creativity, it’s possible to hide them and maintain a stylish space. Here are some ways to do this:
Reclaimed Book Storage BoxTuck your unsightly tech behind this clever book box, made from real books! Just place it on a bookshelf and no one will see your modem or router:
FIND ON AMAZON
Seagrass Lidded Storage BasketAnother option is using a pretty storage basket to neatly hide a modem or router. I love the natural look of these seagrass lidded baskets. Place the boxes inside and run the cords and wires through the hole in the back, out of sight! Just be sure to measure before you buy to ensure everything will fit.
FIND ON AMAZON
Use a CabinetSometimes it’s as easy as using part of a filing or wall cabinet. Simply drill a hole in the back large enough to fit wires and cables through, and set the technology inside. We did this with all of our smart home routers and hubs, using a nightstand in the guest room.
Organize Home Office Supplies: Final ThoughtsHopefully these tips and ideas have provided inspiration for you to create a beautiful home office of your own! Just remember, there is no “right” or “wrong” way to organize. Whatever system works for you and your family is the one you should use. And if something doesn’t work quite right, change it until it does! Organizing is a practice, something we all can work on every day.
Happy organizing!
Organize Office Supplies at Home
Organize
BySusan
This post may contain affiliate links provided for your convenience. We earn commissions if you shop through the links on this page. I am also an Amazon Associate and earn from qualifying purchases Read my full disclosure policy.
Sharing is caring!
560 shares
- Share69
- Tweet
As a Wayfair Homemaker, I’m happy to have this post sponsored by Wayfair. As always, all opinions are my own.
To create a productive and useful office space, it’s important to organize office supplies at home. I’ve just reorganized my own home office and am excited to show you how simple it was to make a big improvement and create a useful space.
While organizing office supplies is a simple process, there are many factors to consider.
First general organizing tips for office supplies and then I’ll walk you through the choices I made in organizing my own home office supplies closet.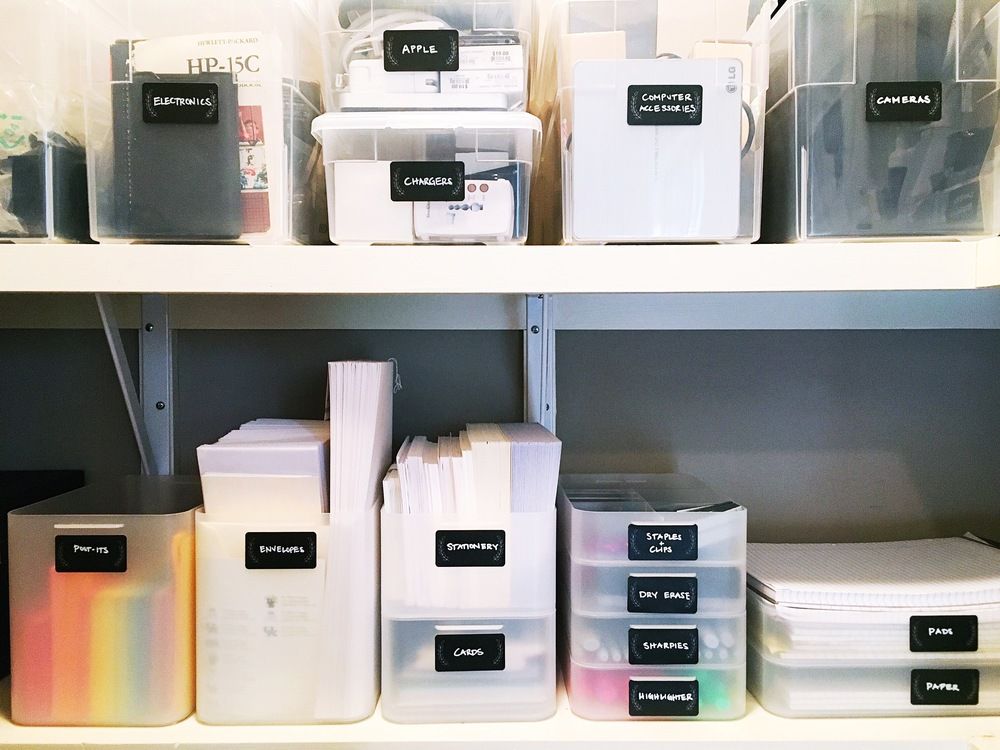
How to Organize Your Home Office Supplies
- Declutter – Go through every single item and declutter ruthlessly.
- Make every single item you keep prove its worth and value to be kept.
- Group office supplies in categories that make sense for you and how you use the items.
- Group like items together.
- Group items together by function.
- Group items that are used together in the same category.
- Place items where they will be used, if possible.
- Pens and pencils in the desk.
- Printer paper near the printer.
- When that is not possible, create an office supplies storage closet or cabinet.
- Measure the space carefully (and then measure again).
- Carefully select furniture, storage bins and tools for your office supplies.
- Look for well-made bins that will hold up to heavy use.
- Look for versatile office organizing products that can still be useful as your needs change.
- Place items into the bins and storage containers so that they’re easy to see and easy to access.
- Place heavier items lower so if they fall, they won’t hurt you.
- Place frequently used items between shoulder and waist height, where they are easier to access.
- Place lightweight items on top shelves.
Now let me show you how I organized my own home office supplies closet.
While my home office supplies closet was organized before, it was a bit messy and not as functional as I wanted. The closet it very narrow and awkward to access, so it was important to make the space as easy to access as possible.
Organize Office Supplies at Home
Declutter
I have a confession. I adore office supplies the way other people love shoes. In addition to my office supplies addiction, I have 3 children and had collected binders, paper, pens, etc. on sale for them for years.
Here’s the the thing. Only one of my children is still at home. I no longer need the same stock of school supplies that I needed a few years ago.
I was ruthless in decluttering all the excess office and school supplies that I had collected. When you’re decluttering, it helps to think about:
- If I let this go, who could put this item to use right now?
- Who would be happy to have this item rather than have it stored in a closet?
- What else can I do with the space this item is taking up?
- Does the decluttering 20-20 rule apply to this item?
I decluttered the contents of this box plus a bag of pencils and pens that I donated to teachers at my local school.
Sort Remaining Items
I sorted the remaining items in three ways:
- I grouped like items together. For example:
- All pens together.
- All spiral notebooks together.
- All sticky notes together, by size.
- I did this sort with all the offices supplies I kept.
- Then I sorted the items into groups of items I access most often.
- Items I use frequently were placed where they will be easiest to reach and access. This easiest-to-access area is most often shelves you can easily reach between your knees and shoulder height.
- I identified items that I access less often and could be placed in less convenient areas.
- Finally, I identified heavy items that should be placed on the bottom shelf. In this situation, the item was printer paper. The reams of paper are heavy and I don’t want them to fall on me. It make sense to place the reams on the bottom shelf.
Furniture
I knew that I wanted to find a bookshelf that would fit in the awkward closet space. I wanted to maximize the vertical space, so I carefully measured the area and then began looking for the tallest bookcase I could find that would fit in the space.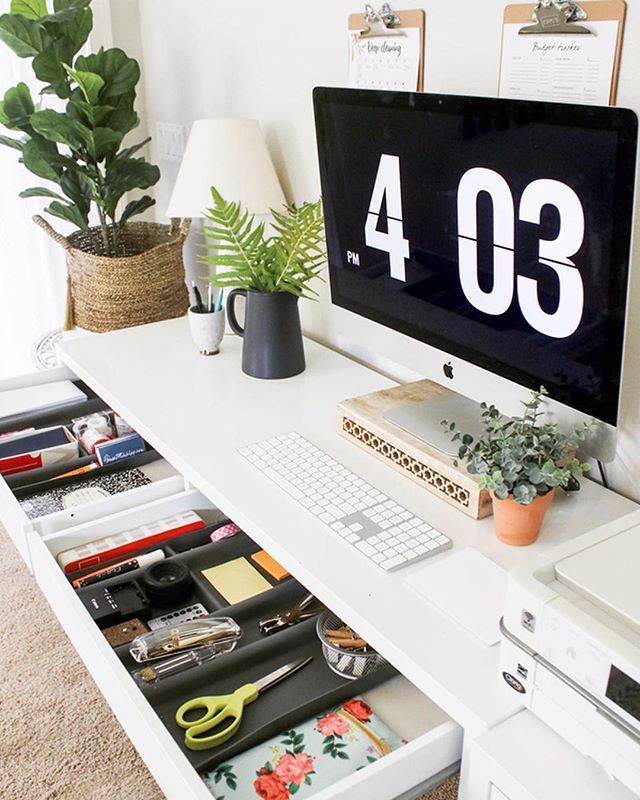
I was thrilled to find this 4 shelf bookcase from Wayfair that fit in the vertical space with only about 2 inches to spare.
Select Containers
Containers create boundaries for the items inside. They are also uniform in shape and size so they are easy to stack, if needed. Bins and containers also look more visually cohesive. There are many containers designed to organize specific types of office supplies.
John File Box More Storage OptionsOnce I selected the bookcase, I then began to look for sturdy containers that would fit on the shelves. It was important to me that the products be:
- Sturdy and well-made
- Be versatile
- Be pretty and coordinate with other storage bins that I already have.
You can read more about the home office organizing products I chose and the many ways that I can reuse each of the containers in the future.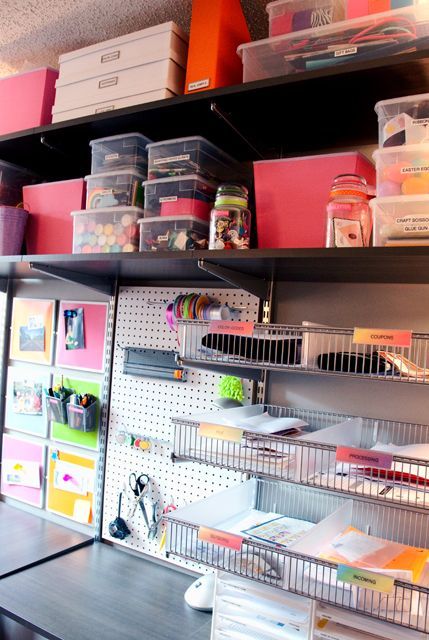
Containerize
It’s key to use containers to keep small and loose office supplies organized and neat.
Letter Document Box More Storage OptionsPlace items inside the container so that they’re easy to access. You don’t want a jumble of unidentifiable items. use smaller containers to separate and organize within the larger bin or box, if necessary.
Label
Labeling containers is fundamental to being able to find office supplies easily. Labels also allow other users to find what they are looking for quickly (and without making a mess of your neatly organized home office supplies)
I was even able to repurpose a name badge holder that I found while decluttering to make the label for the green storage bin.
You can use items you already have to make handwritten labels or use a label maker, as I did for a uniform look.
Place Items Where They Make Sense
Plan where you will place office supplies so that they make sense in the way you use them in your home. Also, consider the weight of the items.
Place items that you need to grab quickly, such as sticky note pads, in open bins so that they are easy to grab-and-go. Place items that could spill out and are less frequently used in a container with a lid.
I’ve been using this newly rejuvenated office supplies closet for about a week now and it’s working beautifully for my family. All the planning, measuring and the right choice of products have paid off with my functional and pretty system to organize office supplies at home.
Be sure to save to Pinterest for later when you are organizing office supplies in your home office.
Find all my best organizing tips, hacks, printables and favorite products in the table below.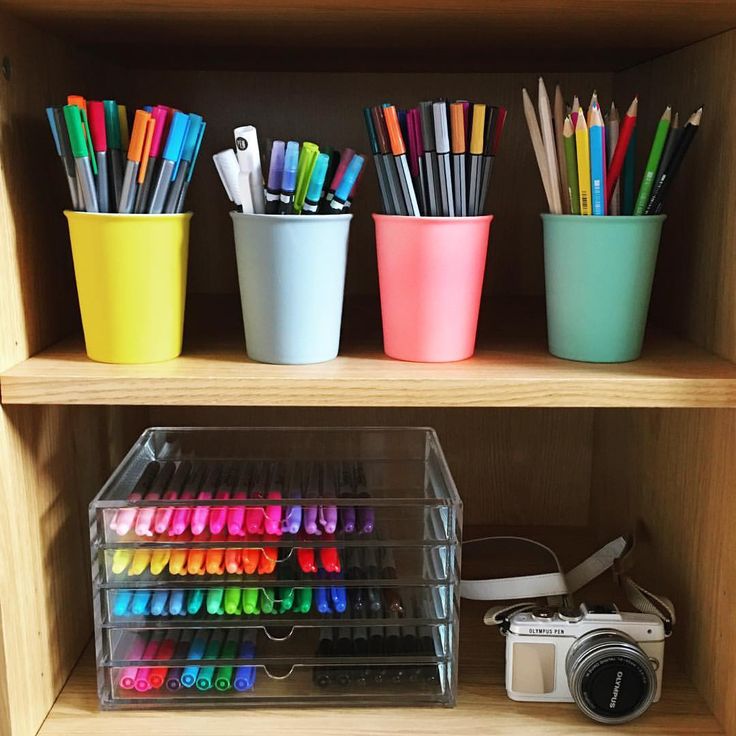 You can scroll though the table and look for ideas or search for specific ideas with the magnifying glass in the upper right-hand corner (on desktop). Click on the topic and then click through the specific article.
Susan
I’m a mom of 3, a veteran and military spouse. I’ve moved into 20+ homes all around the world. My passion is helping busy people make the space and time for what’s really important to them.
Similar Posts
Couch Potato Organizing Your Paperwork
It’s January and the start of the tax prep season. AND I have a pile of papers from before October (the official start of the busy holiday season in my house) to sort, organize and file. Organizing and filing papers is probably my least favorite organizing job. It’s kind of like cleaning floors – I…
Read More Couch Potato Organizing Your PaperworkContinue
Easy DIY Decorated Clothespins
My friend, J., gave me an adorable decorated clothespin that I use for keeping track of my blogging notes (so that I can see it many times a day).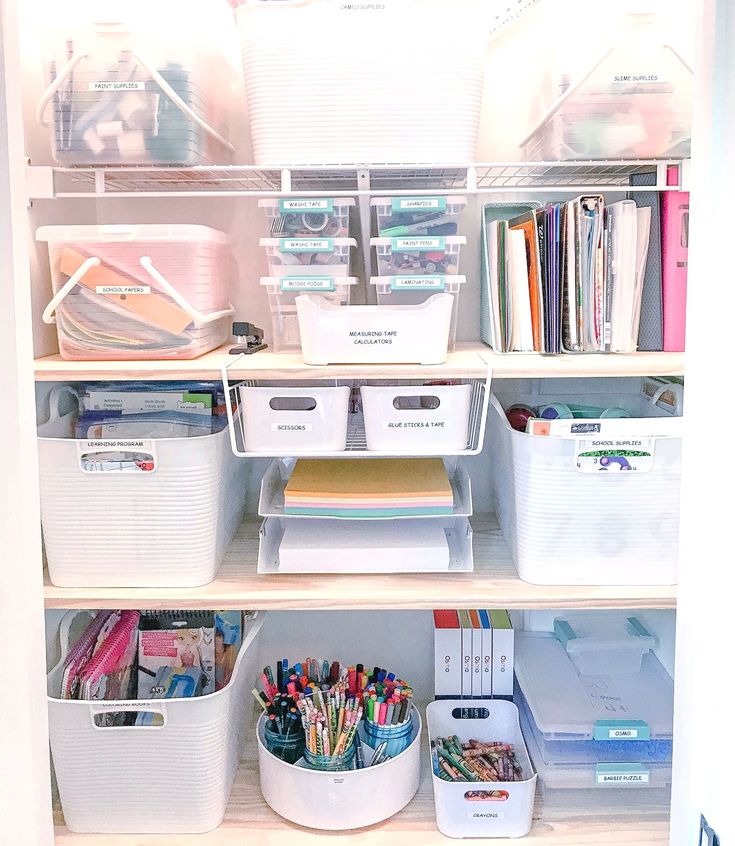 I’ve enjoyed the cute useful clothespin so much that I decided to make my own version and you may remember my DIY Patriotic Clothespins that I…
Read More Easy DIY Decorated ClothespinsContinue
How to Organize Medical Files
I’m so happy to welcome my dear friend, Holly from Pink Fortitude, here today. Her enthusiasm and go-get-it-done attitude is infectious. And best of all, Holly is one of those people who you know truly cares about you, about people, about issues, about helping. So enough of me blabbing, hereeee-reeee’s Holly! Hello to everyone at Organized 31!…
Read More How to Organize Medical FilesContinue
How to organize a home office to work comfortably - INMYROOM
Tips
After quarantine, it became obvious that you do not need to visit the office to work effectively. However, at home there should be a thoughtful and comfortable workplace. We tell you how to create it
Everyone has different requirements for a home office: it is convenient for someone to work in creative chaos with a large inspiration board, and someone needs a perfect order when everything superfluous is removed and there are a minimum of things on the table.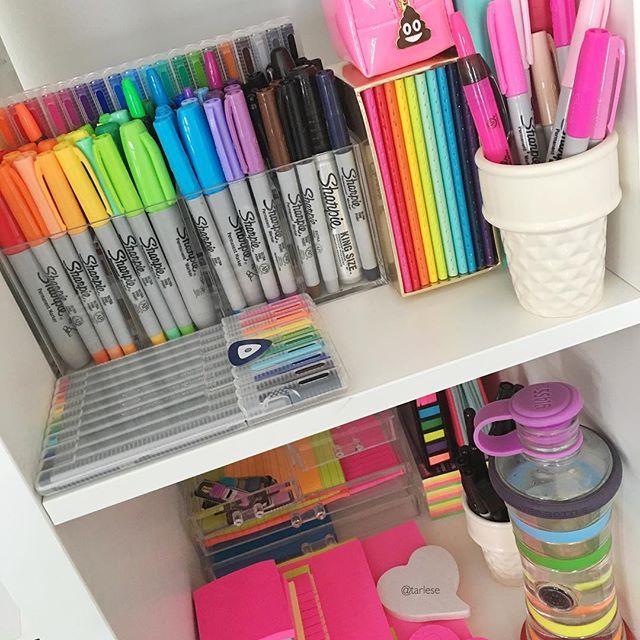
We turned to the pros to compile a universal checklist for organizing the workspace.
Anastasia Filimonova
DECORATOR ARTIST
Creates interior abstractions, advises on the choice of decor. I am sure that art should be present in every home
What a home office should look like depends on your field of activity, duration of work and the need to make video calls via zoom and skype.
If you are a blogger, then you need equipment for filming, a place for a camera, light, sound. Also important is the ability to modify the space around you with the help of decor, light and color.
If you are a young mother with a child and your main activity is on the Internet, you can place a playpen or a corner with toys next to the workplace.
If you work as a psychologist, it is better to isolate the office for visiting and arrange a place for video calls.
Are you an artist? I know for myself that I need shelving, shelves and drawers for a variety of materials and thoughtful lighting for working in the evening.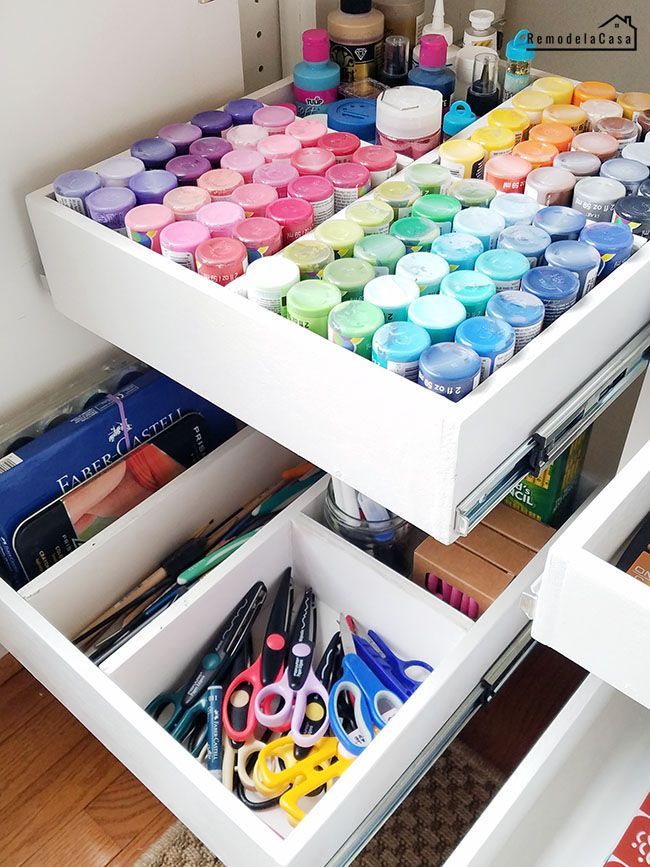 And it should also be possible to scatter canvases, brushes, paints and fabrics around.
So, let's look at the most important elements of the workspace.
The main components of the home office are a table and a chair. These two items should be as comfortable as possible.
Chair
If you want to avoid problems with the spine and vision, then follow the rule of right angles. When you are sitting, your knees and feet should be at a 90 degree angle to the floor, and the same angle should be maintained between your hips and torso.
It is convenient when the back of the chair is solid, smooth, smooth, when there is an adjustable vertebral cushion and a headrest to unload the cervical region.
Table
There are many options for tables. Choose it according to your work style. If you are an artist and draw, then you need a well-lit large wide table with the ability to put paints in drawers or on shelves.
If you mainly work on a laptop or tablet, then a small table with thoughtful charging for gadgets will be enough, perhaps with a laptop stand, wireless phone charger, with evening lighting.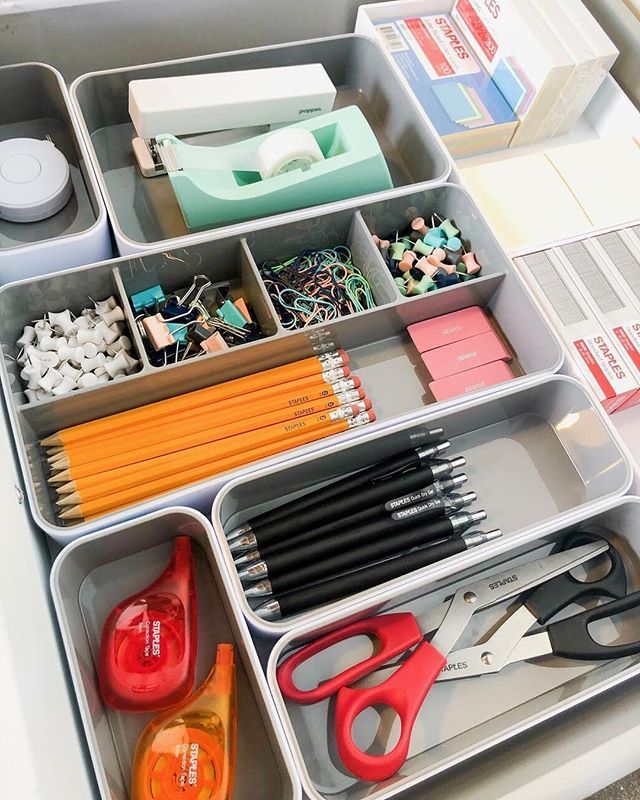
And the printer can be hidden in a cabinet or put away in a drawer, connected via Wi-Fi. From experience I will say that it is comfortable to work at a table with a width of 50 cm or more.
Lighting
Lighting options for your home office are many, depending on how you work. If the office is located in a common room, such as a living room or bedroom, it is worth considering separate lighting so as not to interfere with other household members.
If you work in a separate room, then you can consider general and spot lighting that suits the style of your work.
And two more important points!
Location
In order to save space, you can place your home office behind the doors of a built-in wardrobe, but consider the size, lighting, and whether you can sit there for several hours.
You can set up a mini-office on a wide window sill by a window, in a recessed wall, on a balcony, in a bedroom, in a living room, under stairs (if you live in a private house) or between cabinets.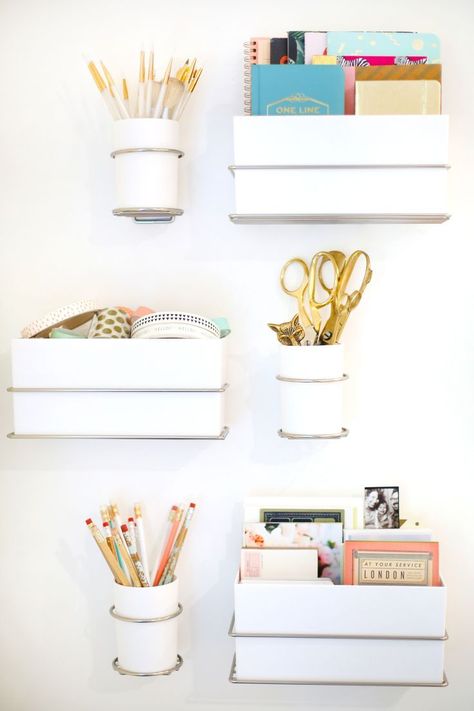 The main thing is to take into account the specifics of your work, so as not to miss the nuances that are important for comfortable and productive work.
Do not locate the workplace in a walk-through area or in a draft. It is also uncomfortable to sit with your back to the door or to the rest of the room, and it is better to sit sideways or with your back to the window.
If your table gets too much light and gets hot from the sun, hang pleated blinds, roman blinds or roller blinds. If there is not enough space for a home office, use wall shelves to free up space on the table.
Mood
Add those details that inspire you and encourage you to set new cool goals.
Dilute the working atmosphere with decorative details and pleasant little things — it can be a vase, an interesting shelf, a small picture as a field for recreation, plants, photos of your loved ones, motivational posters.
Working from home is sometimes not easy - there are many distractions: petting a cat, making tea, watching Instagram.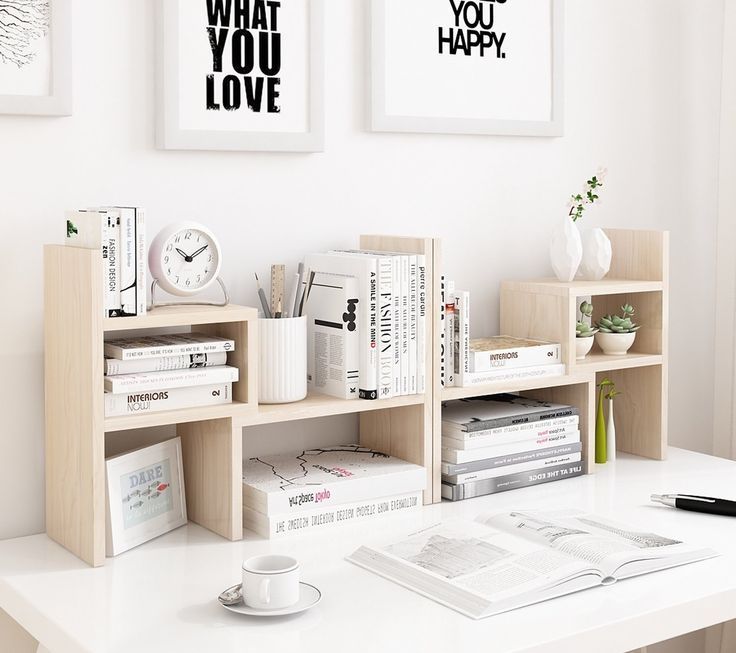 However, if you set up a thoughtful home office that has the right atmosphere, your work at home will be productive and interesting!
Home office: how to organize your workplace and work productively from home
Separate workplace
The first step to productivity is the organization of a full-fledged workplace, separate from other areas of the apartment. It is important not only to find any horizontal surface on which you can put a laptop, but to allocate a small area for a mini-office. At the desktop, it is recommended only to work, not transferring household chores and things to this place. This helps to quickly get involved in the process and creates the effect of coming to work.
Select the brightest place in the apartment for the working area, ideally opposite or to the right of the window. It can be an insulated loggia, a corner in the bedroom or an enlarged window sill in the living room. Daylight, an inspiring view from the window, rest for the eyes - all this affects well-being and productivity. A table lamp will come in handy in the evening.
Separate the workplace, at least visually from the rest of the space, to create a sense of isolation. To do this, you can use a through rack. On the one hand, it zones the space, on the other hand, it is a place for storing books, folders with documents and working equipment.
A place to work can also be found in small apartments: in a niche, on a windowsill and even in a closet. A folding table is also a good solution for those who save space
Comfort and beauty in the design of the workplace
The balance of beauty and comfort when choosing a table and chair is as important as buying other furniture. The dimensions of the table should be commensurate with the area of the room and with your activities. For example, a 100*60 cm table will suffice for working on a computer.
A table with additional storage drawers will hide the creative mess from your eyes. In the drawers of the table, you can store not only working documents, but in general all papers, for example, bills for an apartment.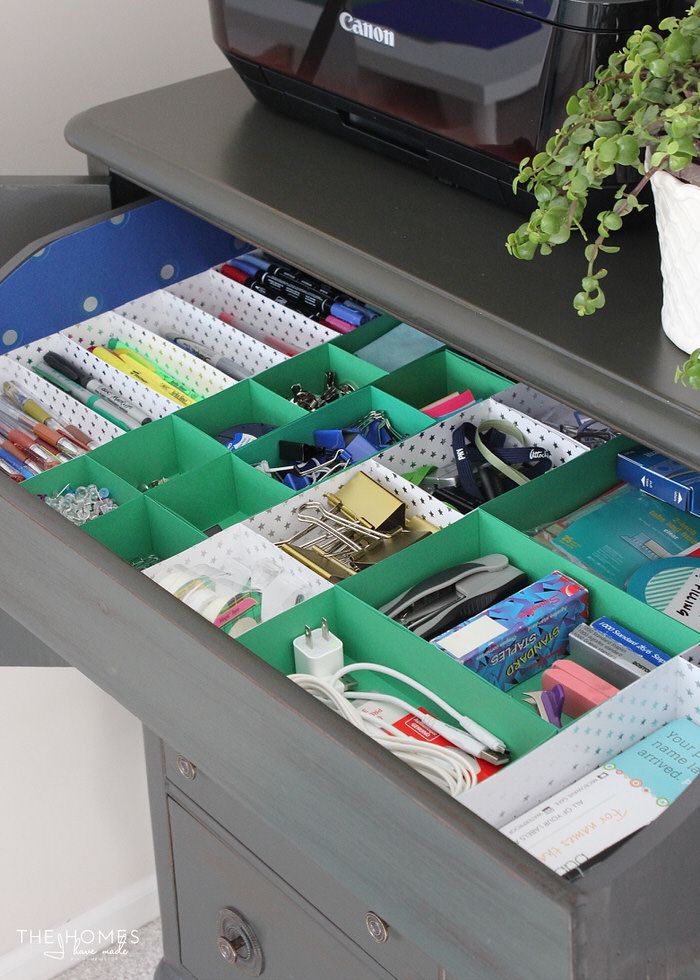 At the same time, if the whole room is made in a minimalist style, a simple desk on four legs will look more harmonious than a bureau with drawers.
Read the advice of those who work a lot from home and are testing different ways to get comfortable: some use a fitball instead of a chair, orthopedic chairs with an emphasis on their knees, or even work standing up like Maxim Gorky
When working from home for a long time, non-obvious details become noticeable that affect comfort. For example, wires from equipment, artificial lighting, storage of documents and stationery. You can avoid inconvenience if you foresee these details:
- Locate your workstation near a power outlet. Keep your gadget charger handy.
- Use hook and loop fasteners and clips to collect wires from appliances and secure them in one place, such as under a table top.
- Consider additional storage: wall shelves, a cabinet with drawers or shelving that can also be used for zoning.
- It is better to choose a table lamp with a flexible base and an adjustable shade. The light should not be at eye level.
- A pile of papers turns into three neat folders using cardboard dividers or document boxes.
A source of inspiration
A home office can become a favorite place if you decorate it to your liking. Inspiration can be drawn from the environment. A cork, magnetic or slate writing board helps to streamline your thoughts and tune in to a creative wave. Motivating posters, postcards and photographs, a beautiful notebook, stationery in a convenient container - all these details make the workflow even more creative.
Advice for those who work from home
There are two extremes in working remotely: endless procrastination or non-stop work. It is important to draw a line between work and personal time and be able to switch.
- Stay on schedule: It's best to stick to your usual office routine, such as doing business from 10:00 to 19:00.
 This helps not to stretch the working day for a day and “leave” work with a clear conscience.
 - Rituals help to get involved in the work process and complete it. Pour coffee, check the news feed, water the flowers, do exercises - these daily actions will be triggers that mark the beginning of the working day.
- Plan your day. A to-do list in a diary or an online task book helps to structure a large amount of work and evaluate the results in the evening.
- It happens that the working day is over, but the tasks are not. You need to be able to close the laptop in time and switch to household chores. Try scheduling household activities right after work so you don't stay up too long.
- Set rules - do not work on weekends, do not answer letters after 21:00, turn off notifications on the phone in the evenings.
Don't forget to schedule lunch so you don't miss it in your online meetings
Various techniques, approaches and life hacks help you fight procrastination.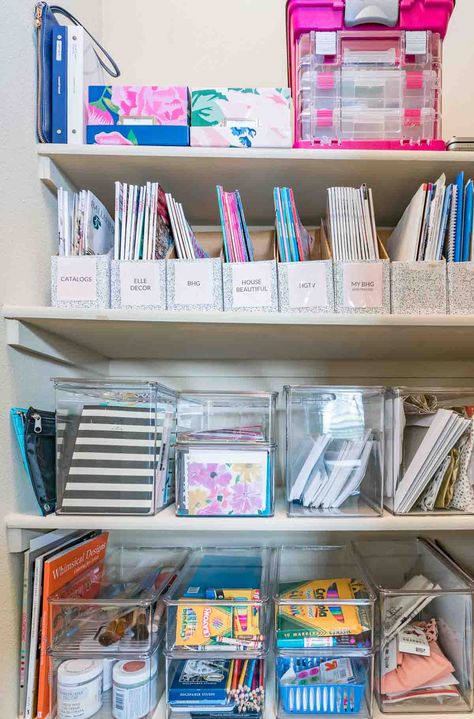
The Pomodoro Technique is described in the book by Francesco Cirillo. Its essence is to continuously work on the task for 25 minutes (one "pomodoro"), and then take a five-minute break. After four Pomodoros, that is, two hours of work, you need to take a big hour break. To answer letters and messages, you can select a separate "pomodoro". The timer helps to count the segments of work and rest.
Basic approach Getting Things Done (GTD) offers five steps to get things done:
- Focus on what needs your attention.
- Be clear about what needs to be done.
- Tidy up what you work with.
- Regularly review and reflect on the state of affairs.
- Act according to circumstances and priorities.
In practice, this means that you focus on one small task and start doing it when you have everything you need at hand: the necessary files are opened, the information is found.
A simple prioritization method helps you choose the most important tasks.