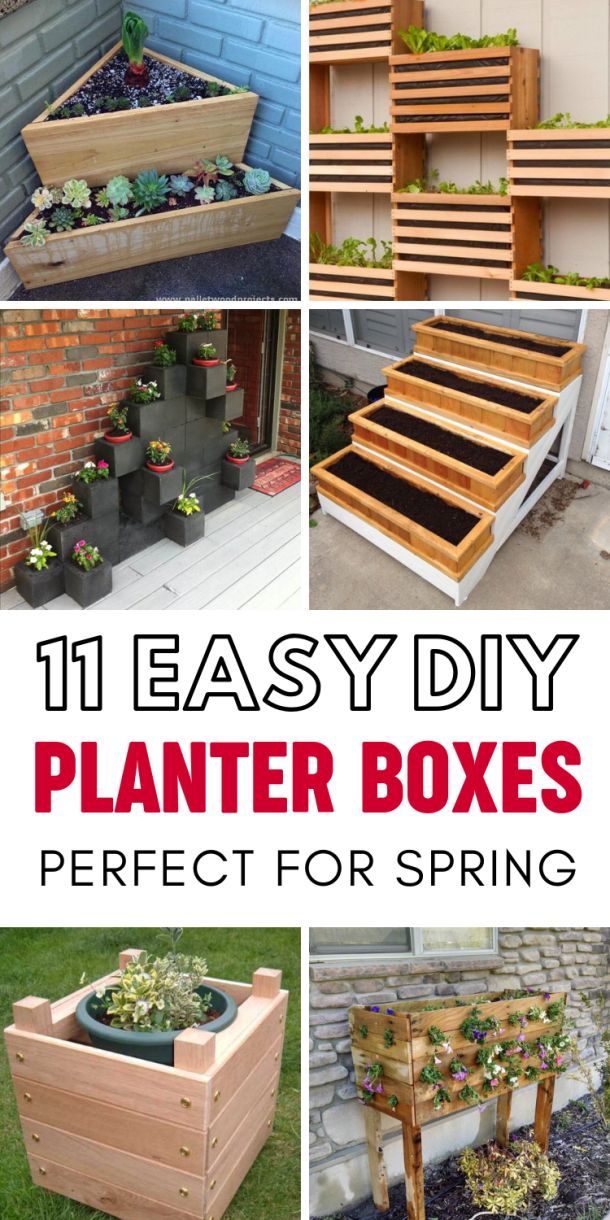
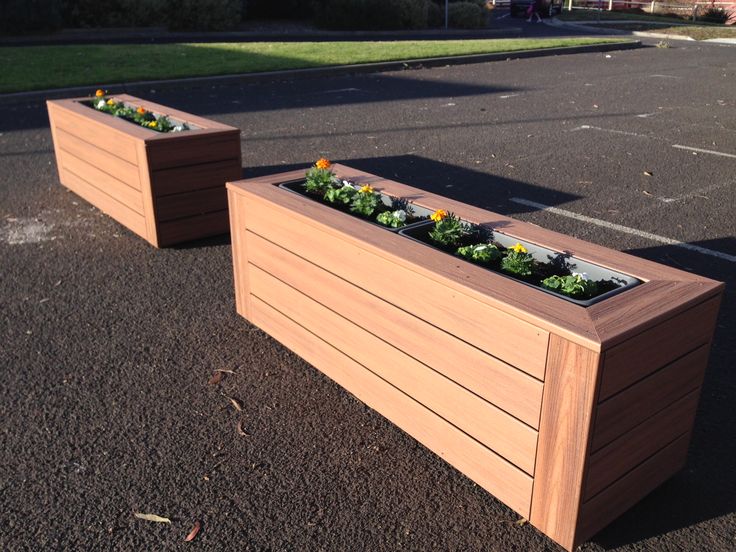
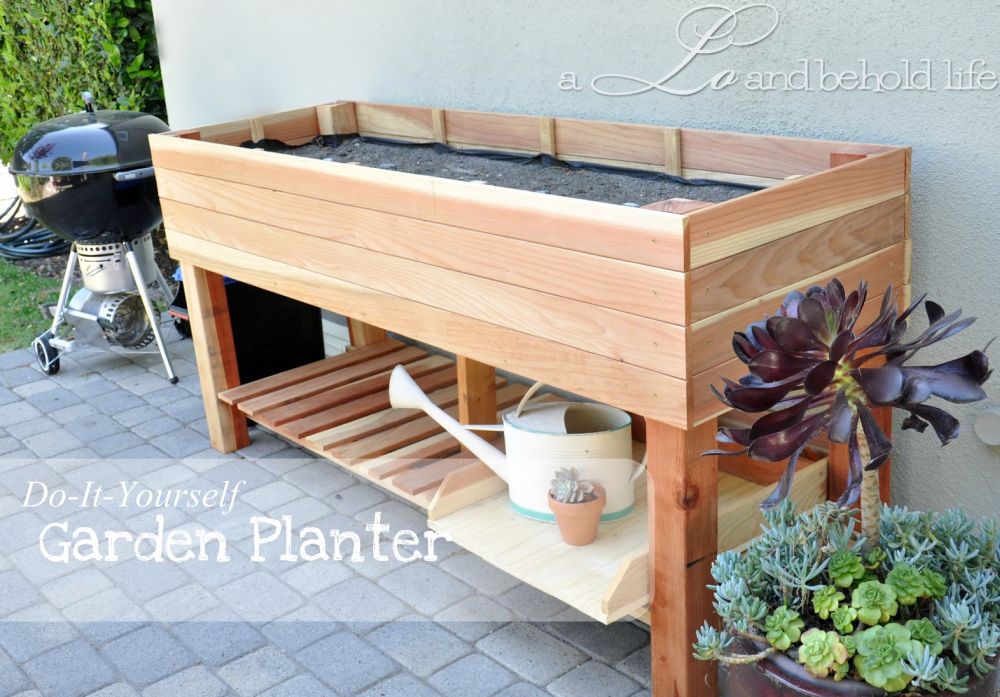
Long planter box ideas
10 ways to create spectacular displays |
(Image credit: Arthur Jack)
If you are seeking stylish planter box ideas to give your yard a lift, then look no further. Choosing stylish containers, pairing plants and pots effectively, and locating them for maximum effect can transform your outside space.
When it comes to choosing the perfect planter to realize your container gardening ideas, there are plenty of materials, shapes and sizes to choose from. And brave and bold planting choices will immediately draw the eye and make an impact.
Whether you are after a window box bursting with seasonal blooms or a majestic large-scale container with small tree, your choice will contribute hugely to your property’s appeal.
Planter box ideas
Planters are ideal when you’re looking for small garden ideas or if you have a larger backyard. Place in pairs either side of the front entrance, line up along the walkway or poolside or plant up a standout design to bring seasonal interest to your porch.
Use them for flowers, foliage, or trees, or opt for herb planter ideas so you can bring your herb garden ideas to life, taking inspiration from the planter box ideas we’ve put together here.
1. Introduce rhythm and interest with planter boxes
(Image credit: Authentic Provence)
If you want your planter box ideas to create a true spectacle, line them up along a terrace or at the poolside and intersperse them with topiary. Choosing a striking shape and color and pairing them with dark leaved evergreens makes them an eye-catching feature.
Wooden planter boxes add a formal note and have a rich heritage, as Sarah Casey from Authentic Provence explains. ‘The handmade Authentic Provence Versailles garden planter is an exact re-edition of the French planter boxes from the 17th century as seen throughout the gardens at the Château de Versailles. Traditionally, citrus trees are planted within these vessels. Our Versailles planters have removable wood panels in order to easily extract the citrus tree, or care for its roots.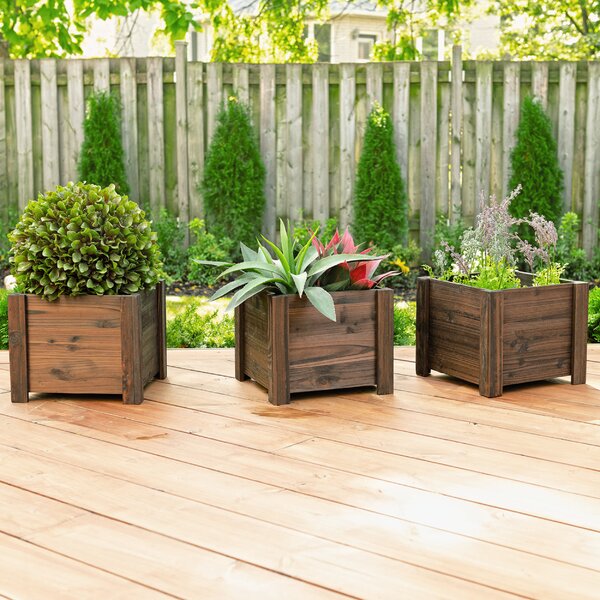 ’
’
2. Go for circular planter boxes
(Image credit: Jo Alderson Design)
Elegant and ideal for planting trees and sprawling blooms, circular planters add instant grace to any outdoor space. Besides adding a sense of movement and gentle lines to a design, they also contrast beautifully with square and rectangular paving, rills, walls and fencing.
Pepper a space with two or three large scale circular planters – as shown in this design by Jo Alderson – to encourage guests to wind their way between them and explore the space beyond. Plant them with an ornamental tree and they will cast a delicate dappled shade beneath them, creating the perfect place to sit out of the sun.
Jo Alderson explains, ‘Being mature these trees did the job instantly and are one of the main architectural features of the garden. These trees weigh well over a ton each so specialists were employed to use tele handlers to place them. Each tree is guyed using tensile steel wires beneath the ground and planted in organic compost with a timed irrigation system. ’
’
3. Brighten up railings and balconies
(Image credit: Elho)
Make the most of flower power with balcony garden ideas like this bridge-style planter. Designed to slot over the handrail it can become home to cheery annuals for a seasonal display, trailing vines and or even herbs and homegrown crops. Place at regular intervals for a smart symmetrical look or maximize the effect by nudging them up right next to each other.
The team at Dutch sustainable flowerpot company Elho say, ‘The flower bridge model offers a simple way to create a sea of flourishing plants that disguises urban surroundings, as they are suitable for almost any balcony, easily slotting on to a variety of railings up to 2.6 inches (6.5cm) wide. Each of these pots has a large growing space allowing plant roots plenty of room to grow.’
4. Style up a corner with planters
(Image credit: A Place in the Garden)
Want to add some leafy interest to an empty corner of your yard? Then planter box ideas are the answer. Not only can you group and position them to make the most of your available space, but you can also tailor the planting to suit your style and your yard’s aspect. Many designs come in a range of sizes and heights, so why not opt for a trio to create a smart and cohesive display at slightly different levels?
Add a touch of variety by mixing in a few containers of contrasting shape or size but do stick to the same finish or material for a smart, co-ordinated display.
When it comes to choosing plants, decide on how bold and colouful you wish the result to be. A mix of clipped evergreens and slender deciduous trees – such as these white stemmed birch trees – create a timeless feel that also reflects the change in seasons, but tropical garden ideas using cannas, fatsia and palms would suit warmer climes or try sculptural drought lovers such as agaves, manzanita, cactus and lantana.
5. Go big with Corten steel planters
(Image credit: Adezz)
Bold and beautiful, large scale weathered steel planters make a striking statement either side of a walkway or in the middle of a border. With their rich rusted surface that develops and intensifies with age, they make the perfect foil for lush foliage and textured grasses. Substantial in size with circular, square and rectangular shapes all on offer, they are perfect for showcasing trees for small gardens, ornamental grasses and low growing evergreens such as carex, brunnera and Coral Bells (heuchera).
6. Choose a planter for the perfect growing conditions
(Image credit: iBulb)
Planter boxes provide portable and versatile growing opportunities. Not only can they be repositioned – with the caveat that some may take more effort and ingenuity to move than others – but the soil and drainage can be tailored to suit the plant you wish to grow.
Water-loving Calla or Arum lilies thrive in cool, moist compost and like to have their heads in full sun, so raising them in a pot is the perfect way to meet their complex needs. Likewise, if the soil in your yard tends to be acidic or clay based it will make growing some plants such as lavender, Euonymus and lilac almost impossible. Naturally lime loving, these striking and fragrant plants could be among your planter box ideas instead as you can go for an alkaline soil mix.
Planters also enable you to make the most of the different aspects of your garden. Cool shady spots are ideally suited to growing ferns, foam flower (Tiarella) and hostas.
7. Plant up a wild and wistful display
The Rectangular Metal Planter, Architectural Heritage
(Image credit: Architectural Heritage)
There’s something magical about a large-scale industrial-style planter teamed with a mass of airy and delicate blooms. The contrast of textures is enchanting and whether the container is made of concrete or sheet metal it’s sure to highlight the intricacy of the tiny flowers.
Go for as big a design as your yard will accommodate and fill with four or five plant varieties to create look of a wild grassland or prairie. A long, rectangular planter such as this antique copper design is ideal for edging a terrace or subtly dividing up a vast patio or courtyard into smaller, more intimate spaces.
Osaka planter in five sizes, the Boulevard range, IOTA Garden
(Image credit: IOTA Garden)
‘On a large terrace or patio, sometimes one or two large planted containers suited to the scale can have much more impact than several smaller ones, which may look insignificant or a little fussy,’ says the team at planter specialists IOTA Garden .
‘If you are looking to plant a tree or large shrub in a container, be sure to pick one that is large enough to accommodate the tree as it grows, so you do not need to re-pot it after a couple of years. If there's plenty of space around the trunk, you can add interest by underplanting with low-growing grasses or add some seasonal color.’
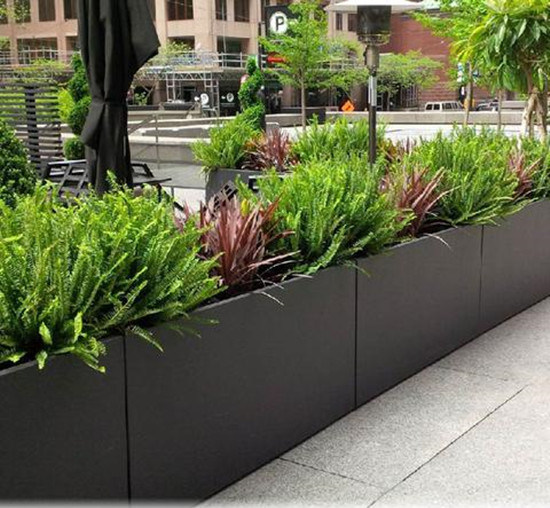
9. Guide the eye with a pair of planter boxes
(Image credit: Arthur Jack)
Nothing says grandeur better than walking down a garden path or terrace flanked with identical containers. Punctuating the walkway at regular intervals, they instantly lend a formal and rather European note to a yard without visually dividing off the space.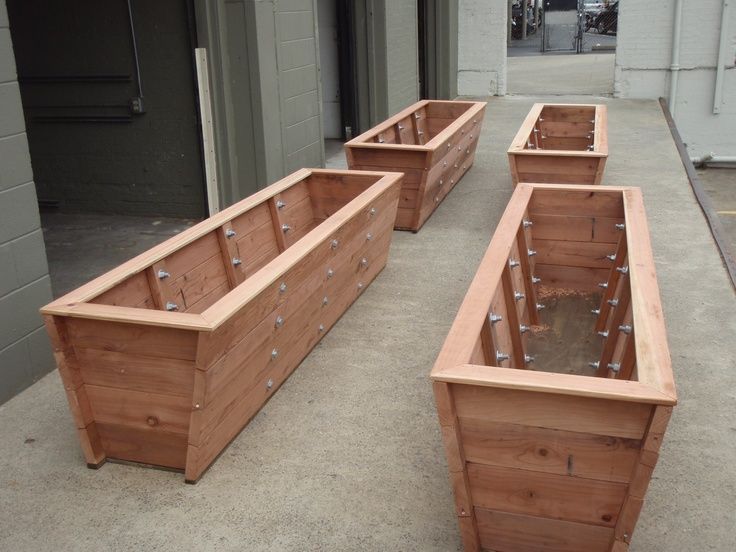
Sticking to the same container and planting scheme is key to maximizing this space-stretching effect. Opt for a dreamy combination of tall standard pink roses in galvanized steel planters to strike a romantic note or try over-sized terracotta flowerpots with sky-soaring cannas or phormiums for pure Mediterranean charm.
10. Fill a planter box with homegrown produce
(Image credit: Suttons)
Not just for blooms, planters are ideal for raising a crop of delicious veggies. Homegrown pole and bush beans, carrots, cukes and peppers will all happily thrive in a container as long as there is adequate drainage and rich soil.
Depending on your available space and choice of container you could stick to one crop per container. A minimum depth of 6 inches (15cm) is enough for most crops – although some root crops prefer more – but aim to go as big as you can. Not only will this mean less watering, but it can help reduce crop stress resulting in healthier and more flavorsome produce.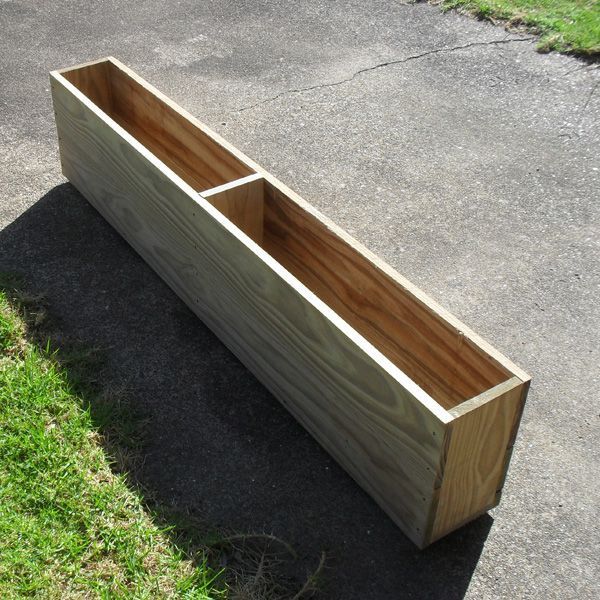
A large rectangular planter doubles as a mini veg garden. Look to arrange crops in strict rows for traditional homestead charm or try a more decorative approach mixing in beneficial flowers – such as marigolds, nasturtiums, and alliums – which also keep pests at bay.
What should I line my planter box with?
Liners are only really needed for wooden or metal planters. In both cases having wet soil against the sides of the container will cause rot or rust to develop over time, weakening it. Cover the inside with a layer of thick plastic sheeting – making sure to pierce several drainage holes at the base – before filling with soil and adding the plants.
How can I fill a super-sized planter box?
Filling a very large container completely with compost not only makes it impossibly heavy to move without bringing in serious lifting equipment, but it can prove very expensive, too.
Instead, bulk out the bottom third of the planter with lightweight material that will also aid drainage. Plastic take-out plastic containers, milk jugs, empty detergent bottles, spare plastic plant pots and plant trays all work well.
How do I pick a planter in front of my house?
Getting the scale and style of a planter right for your home’s front yard is key to creating a stunning first impression. Think about key sight lines and positions and work out how high the container and plant need to be to make a real statement.
Choosing a planter that mirrors an element of your property’s exterior – it could be the color of the front door, timber shingles or stonework – is a great trick for creating a smart, cohesive look. Consider whether you want the planting or the container to be the real feature – neat topiary spheres and cones work well planted in an ornate design, while robust industrial-style planters suit finer and more delicate flowers and grasses.
Jill Morgan has spent the last 20 years writing for Interior and Gardening magazines both in print and online. Titles she has been lucky enough to work on include House Beautiful, The English
Home, Ideal Home, Modern Gardens and Gardeningetc. com. Although much of her career has involved commissioning and writing about reader homes and home improvement projects, her
everlasting passion is for gardens and outdoor living, which is what she writes about for Homes & Gardens.
20 Planter Box Ideas to Inspire You
LisaIsonGetty Images
Just as you’d decorate your living room with a stunning piece of art or cozy up the guest room with throw pillows, planter boxes add a finishing touch to any garden. Place planter boxes near your front door for curb appeal, in a bed as an eye-catching accent, or mounted beneath windows to add a splash of color. They also highlight the beauty of each season when you change the displays: Think pansies or flowering bulbs in spring, heat-loving annuals in summer, mums and gourds in fall, and evergreen boughs in winter.
Any container that can hold soil works as a planter box—but the more creative, the better! Remember that more porous materials such as terra cotta allow water to evaporate quickly, so you’ll need to water more frequently in hot, dry weather. Also, plants don’t like soggy roots; make sure there’s a way for excess water to drain, even if you need to drill a few holes in the container yourself. Finally, fill your box with a variety of plants that offer height, as well as plants that spill over for a more dramatic effect. Or plant all one kind of flower in a single color for maximum impact.
If that wasn't enough, you can check out these fun and creative planter box ideas to spark your imagination.
1
Wicker
Marlijn Vorstenbosch / EyeEmGetty Images
A wicker or basket-style window box lends a genteel English country garden feel, so go ahead and fill it with herbs or lavender.
2
Terra Cotta
Michel VIARDGetty Images
This clay planter overflowing with geraniums has on Old World European feel. Mount it on a fence or beneath a window.
3
Vintage Washtub
Janis ChristieGetty Images
Visit antique shops or vintage stores to find an old metal washtub that makes the perfect addition to any country garden.
4
Rain Boots
ImagesbybarbaraGetty Images
Rain boots make a whimsical garden planter for annuals like these impatiens, vinca, begonias, and pansies. Use one pair of boots as an accent, or line up several in different colors for more visual impact.
5
Wrought Iron
lawcainGetty Images
A wrought iron planter box with scrolls and embellishments makes it feel as if you're strolling along in the French Quarter.
6
Wheelbarrow
LeschenkoGetty Images
Scour yard sales for an old wheelbarrow to fill with summer annuals like these petunias. The more weathered, the better the effect for a cottage-style garden. Bonus: You can move it as needed.
7
Old Suitcase
okskukuruzaGetty Images
Get out of a rut with this creative planter box! A bright and battered suitcase makes the perfect backdrop for cheery marigolds in a country-style garden.
8
Saucepan
Westend61Getty Images
This trio of old cooking pots make a clever home for easy-care succulents with a peace lily as a vertical accent. Place this display near your outdoor dining area as a conversation starter. And don't forget to drill holes for drainage!
9
Hypertufa
ChuBlueGetty Images
Hypertufa, a mixture of coco fiber, Portland cement, and perlite, is a versatile concrete look-alike, only much lighter (and you can make it yourself!).
10
Wagon
Mark Edward AtkinsonGetty Images
An old wagon holds pots of springtime flowers in a casual garden. Move it to sunnier (or shadier) spots as needed throughout the growing season.
11
Tree Trunk
knaufbGetty Images
A tree trunk, with a section hollowed out, makes a rustic planter that's at home in a cottage garden.
12
Boat
plcintercommsGetty Images
An old boat is converted to a planter box with a pond liner and water lilies in this creative take on a water garden.
13
Chair Frame
jeangillGetty Images
An old wooden chair frame is the perfect base for succulents, which are shallow-rooted enough to work well in this type of planter box.
14
Stock Tank
Leon JusticeGetty Images
A galvanized aluminum stock tank makes a great water garden or traditional planter box because it comes in various sizes and shapes. It lends either a rustic or modern edge, depending on the style of the rest of your garden.
15
Bicycle Baskets
Sir Francis Canker PhotographyGetty Images
An old bike with baskets on the front and back offers interest and whimsy to a country-style garden. It's also a way to keep your flowers safe from hungry bunnies if they're a problem in your yard!
16
Colander
Westend61Getty Images
Tiny grape hyacinth bulbs make a cheery addition to your back porch for a springtime display in this old colander.
17
Hayrack Frame
Grace CaryGetty Images
This metal frame, called a hayrack, is lined with spaghnum moss, and has a decidedly formal, romantic feel.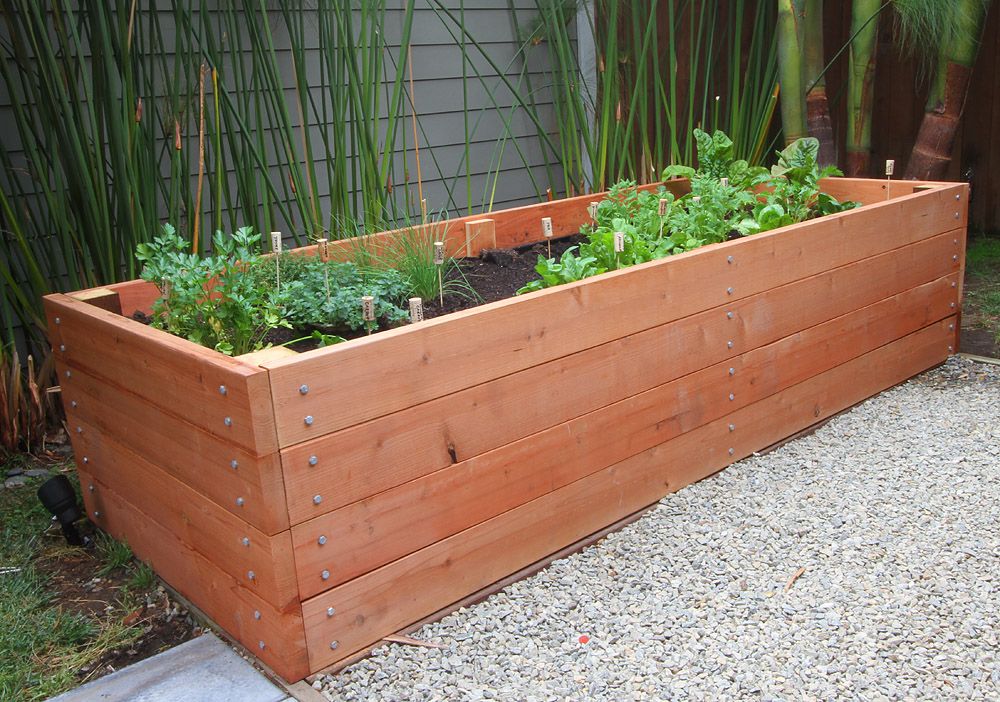
18
Repurposed Pallets
Anfisa Kameneva / EyeEmGetty Images
Use scrap pallets to create a wall planter box in vibrant colors. Plant directly in the box or fill with individual potted plants such as sweet alyssum, begonias and petunias.
19
Old Dresser
wwingGetty Images
Use an old dresser to make an instant garden anywhere, even along a sidewalk. Either plant all the drawers or just one, and store garden tools in the rest.
20
Concrete
Jacky Parker PhotographyGetty Images
Almost indestructible, concrete planters add a solid sense of Old World charm. They work in most garden settings, and they acquire an attractive weathered patina over time.
90,000 2021 ᐈ 🔥 (+40 photos) Making pots for flowers with your own handsContent
- Creation Features
- Selection of form
- necessary tools
- Flower pots of
- tools and materials 9000 concrete flowers
- Tools and materials
- Step-by-step instructions
- Wooden pots
- DIY plastic bottle flower pots
- Original table pots for flowers from tin cans
- How to create a flowerpot from a pallet, barrel, bars or a wooden box for flowers
- Junk items for creating original flower pots with your own hands
- Original ideas for making large flower pots
- Vintage suitcase flower arrangement
- Tools and supplies
- Step-by-step instructions
- How to decorate?
- Interesting options for DIY floor pots and flower vases
- Interesting options for creating hanging flower pots
- Conclusion
- Photo gallery
The design of flower pots, 🪔 especially in the inexpensive segment, is rarely highly decorative.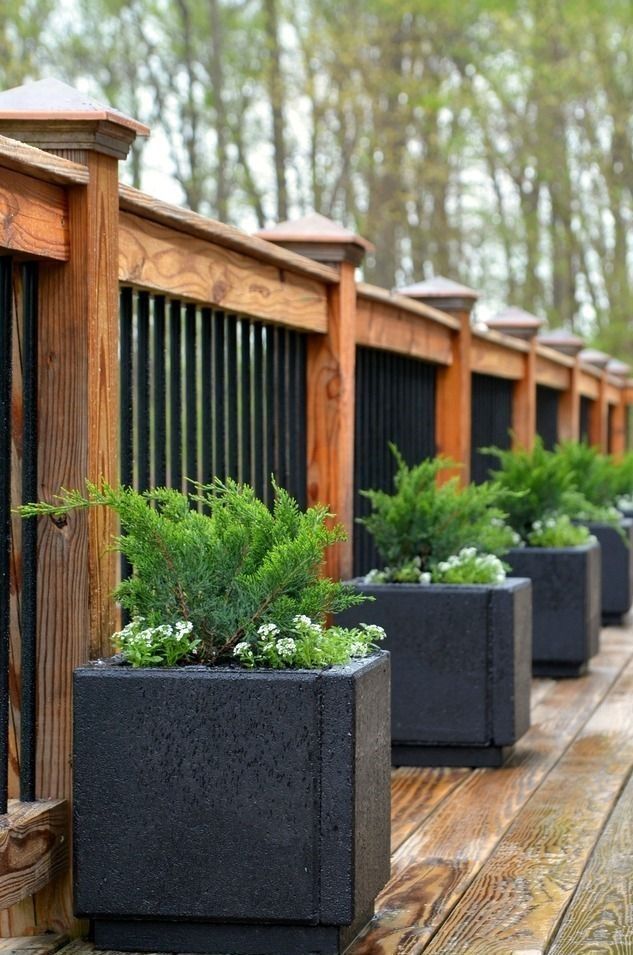 Building them on the windowsill 🌷 gives rise to a rather dull sight, the impression of which cannot be corrected even by the lush greenery 🌼 of the plants living in them. But what to do if the budget does not allow to buy 🌹 something more decent, but you really want to maintain the atmosphere of comfort 🌺 and holiday? Try to ennoble flower pots with your own hands. nine0003
Features of creation
Handmade products are always interesting and relevant. Flower vases made at home look cute and unusual, give a special chic to the room. Such items can become a real work of art, while they are made in a single copy.
You can place a decorative flowerpot not only in the room, but also decorate your backyard, veranda or balcony with it.
Simple materials are used to create even the most unusual flowerpot in appearance and design. It is enough just to give free rein to your imagination and make a little effort to create an extraordinary flower pot with your own hands. Even the most unusual and unsuitable objects for this purpose can be used as a container for growing indoor plants. Homemade flowerpots made from old caskets, cans, and unnecessary dishes will look very impressive. nine0003
Use wine bottle corks, coconut shells, furniture, paint cans, books, and even a bag as a container.
The easiest way to liven up the garden and create an original mini-greenhouse is to plant flowers in dinnerware. For this purpose, suitable cups that remained after the service in a single copy, teapots for tea leaves, clay salad bowls. Thanks to such things, you can decorate the room and complement its style, for example, Provence or country. When choosing a bonsai pot, an old clay salad bowl or a flat plate will do. The main thing is not to forget to drill drainage holes at the bottom of the vessel. nine0003
The choice of material is decisive. To create such a masterpiece, you can take improvised materials or make a pot yourself from clay, cement, gypsum or wood.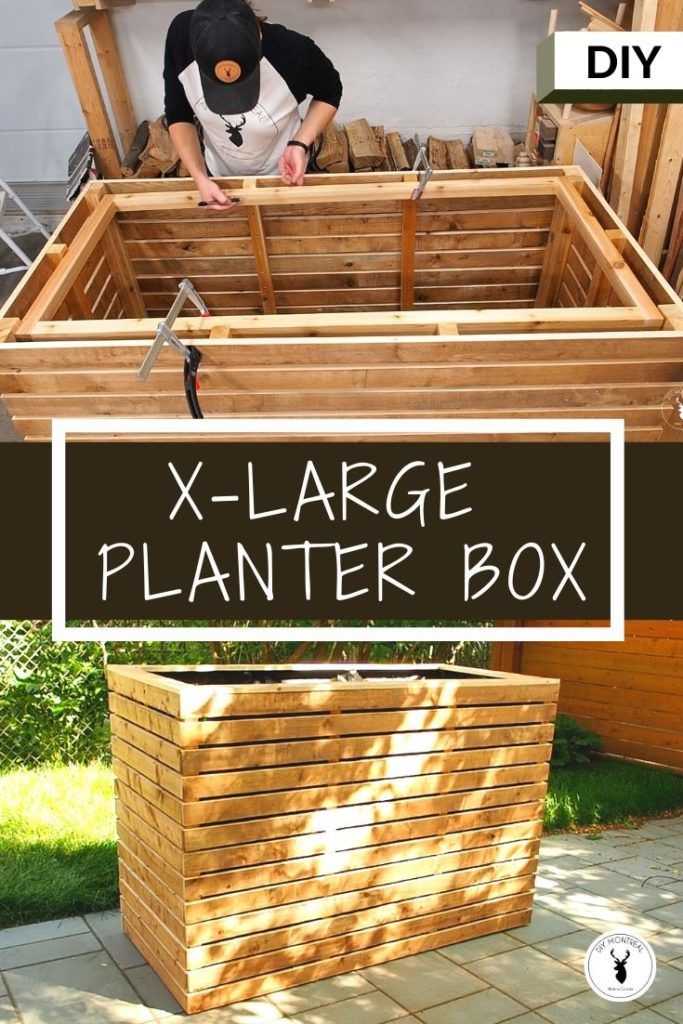
Choice of shape
The shape of flower pots can be very different. The most common are round-shaped containers, but you can make them of any shape, the main thing is that the plant is comfortable in such a vessel.
Some types of plants need a lot of space, they do not like tight spaces, so the shape and size of the pot is is selected specifically for each type.
- For bonsai, it is better to choose a square or rectangular container. These trees will also look good in round or oval pots, as long as they are flat and at the same time spacious enough for the root system.
- Square or rectangular pots will look great on a flat surface. For bonsai, it is better to choose a separate place or niche, this will make it possible to admire the tree without being distracted by foreign objects. nine0006
- Round or oval pots look great on a windowsill. They take up little space, but they look very cute.
- Round hanging pots are especially impressive when hung in the garden or on the balcony.
 You can hang a whole composition of pots by placing them on a flat bar or under the ceiling. Such containers can also have a square shape.
If there are only a few flower pots in the room, they can easily be placed on the windowsill closer to the sunlight, while the shape of the pot does not play a big role. Real flower growers will not be limited to a couple of flowers, but will plant a whole garden-flower garden. nine0003
Required tools
To make your own pot, you will need various tools. Their presence will vary depending on what materials the vessel will be made of. Whatever material the pot is made of, you need to drill drainage holes on its bottom, so you need to have a drill available, as well as drills for different materials. If the products are made of wood, a saw, a hammer and a jigsaw will come in handy.
In addition, the master will need:
- nails;
- self-tapping screws;
- wood glue;
- garden shears;
- work gloves.
You may also need grout for tiles, tin containers and rods, plaster.
Clothespin flower pots
This planter can be made from scrap materials with a minimum of effort. The finished product will perfectly fit into the Scandinavian or eco-style, as it is decorated with natural wood material. nine0003
Tools and materials
To make a flower pot you will need:
- Wooden clothespins.
- Tin can.
- Heavy colored cardboard or paper.
- Plant.
Step-by-step instructions
- We distribute clothespins along the walls of the can. For strength, they can be fixed with hot glue or all-purpose glue.
- The result should be:
- Plant the flower inside: some plants will need a jar, while others will need an extra pot.
- We decorate the craft with a heart cut out of cardboard. You can also decorate the pot with a cord or ribbon.
Concrete Flower Pots
Leftover yogurt cups, plastic pails and bottles can make great molds for homemade concrete pots.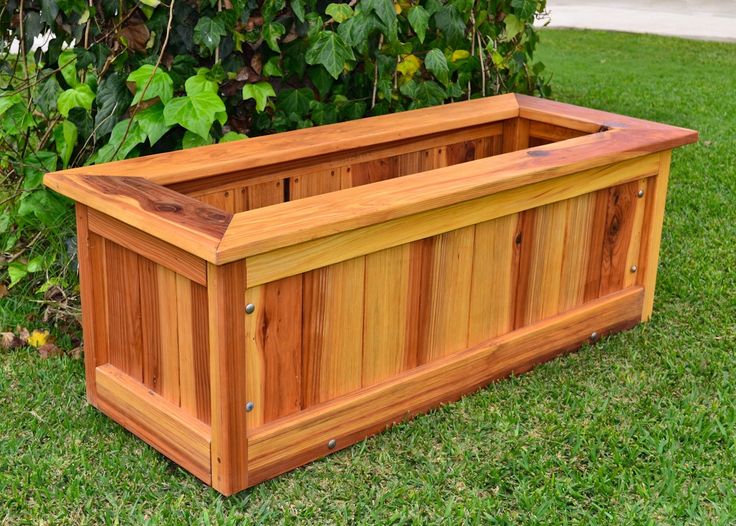 Such products will be an original addition to the interior in the style of a loft or minimalism. nine0003
Tools and materials
You will need:
- Plain or low-dust concrete mix from a hardware store.
- Molds in different sizes (two for each pot).
- Bucket.
- Stirring stick.
- Scotch tape and any weights.
Step-by-step instructions
Getting started with DIY flower pots:
- Mix the concrete mixture in a bucket according to the instructions until the consistency of sour cream.
- If there are holes in the bottom of the mold, get rid of them with tape.
- Take a large mold and fill it with concrete about half way.
- We fix a small mold in the middle, having previously deepened it so that the solution fills the distance between the containers. We monitor the thickness of the bottom and walls. So that the inner form does not crook, we fill it with coins or sand, fix it with adhesive tape.
 nine0006
 - When the concrete has hardened (after about 3 days), remove the finished pot from the mold.
- To get rid of defects, grind the surface with sandpaper. Homemade flower pot is ready!
The product can be decorated by adding various objects - shells and pebbles, or painted with acrylic paints.
Wooden pots
Looks very authentic and original, besides the wood is easy to process and repair. To work, you will need a drill, hammer, chisel, jigsaw or saw, chipboard and a small log. nine0003
Extra parts are removed from the log. Then, using a drill, a series of holes are drilled at the same distance from the walls. With the help of a hammer and a chisel, the holes are expanded, and the core is removed from the log.
A pot with thick walls is formed from the resulting blank. To prevent the interaction of the tree with moisture inside, it is better to put a plastic pot and plant flowers in it.
DIY plastic bottle flower pots
Plastic bottles can be used to build a planter for orchids.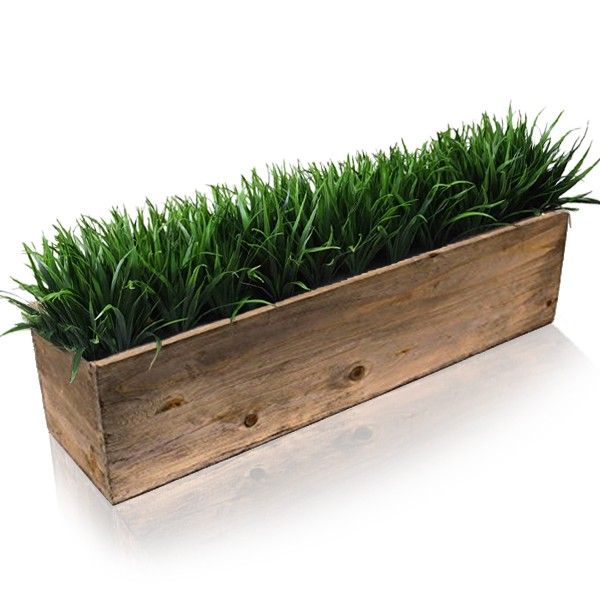 To do this, the container is cut in half. Stepping back from the bottom by 15-20 cm, cuts are made in the amount of 8 pieces to get the petals. They should be bent inside the dishes. The second half is filled with a substrate with a plant and inserted into a prepared base pot. Thanks to the curved petals, the flowerpot will be held.
You can create a flower pot in the form of animals from a plastic bottle. To do this, the muzzle of the animal is cut out in the front of the element, and the tail in the back. To give the workpiece the desired shape, it is important to use sharp scissors. Drainage holes are made in the bottom of the tank. The outer surface of the resulting flowerpot is painted with acrylic paints. With the help of a permanent marker, the muzzle of the animal is drawn: eyes, mouth and nose. The finished flower pot from a plastic bottle should be coated with a non-toxic craft varnish. nine0003
Use a plastic bottle and disc to create an elegant stemmed table pot.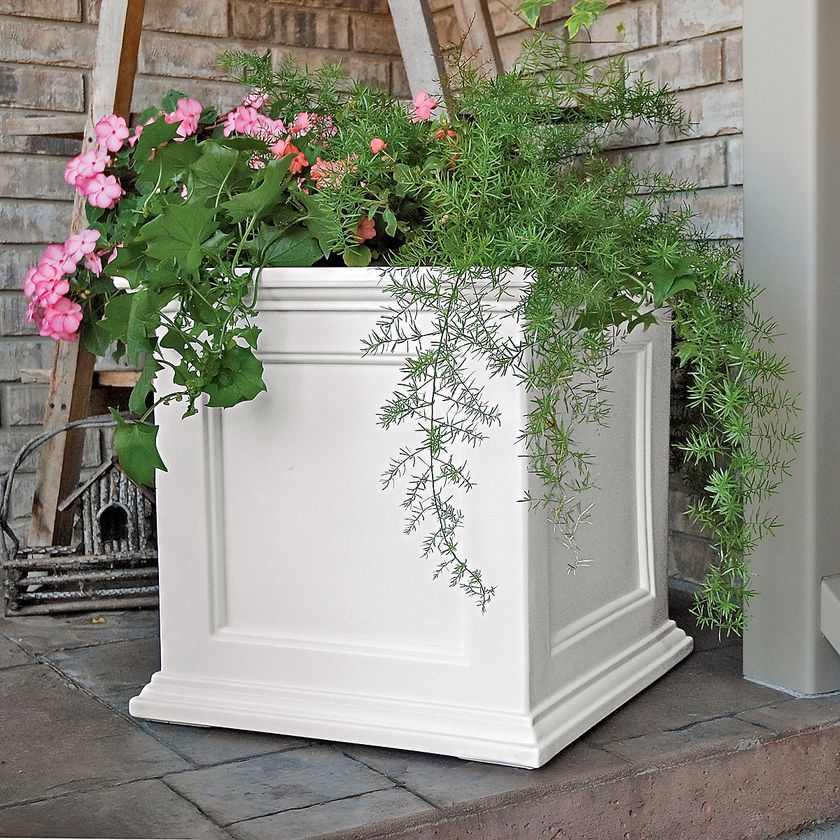 The container is cut into two parts along a wavy line. A necked element with a tightly screwed lid is glued to the middle of the disk. After setting, the workpiece is painted with spray paint.
The plastic bottle can be cut lengthwise, leaving the mouth and bottom intact. It is recommended to make holes on the sides with an awl so that the structure can be hung. nine0003
Original table pots for flowers from tin cans
You can create an original mosaic flowerpot from an ordinary tin can. To do this, the container is coated with a plaster solution, on top of which a mounting grid is laid. Next, the mosaic is performed directly. To do this, you can use pebbles, pieces of tiles, glass or shells. After the pot has dried, all voids should be masked with grout.
DIY low flower pots can be created from tin cans and wooden clothespins that are attached around the circumference of the container. The decor can be left in its original form or painted in different colors. In a similar way, you can decorate a tin can with colored pencils, tying it with twine or a ribbon. nine0003
The tin can simply be coated with different acrylic paints. In this case, the container can be in its original form or you can artistically crush the jar. Another original solution would be to tie the container with twine or colored thick threads around the circumference of the product.
A pot of flowers woven from twigs looks unusual and original. To make it, you will need thin even twigs, a skein of twine, a piece of burlap, a cylindrical tin can and glue. The rods are intertwined and tied with twine according to the mat principle. The jar is lubricated with glue, on which the burlap is fixed. After complete drying, the product is wrapped in a mat, which is attached with twine. nine0003
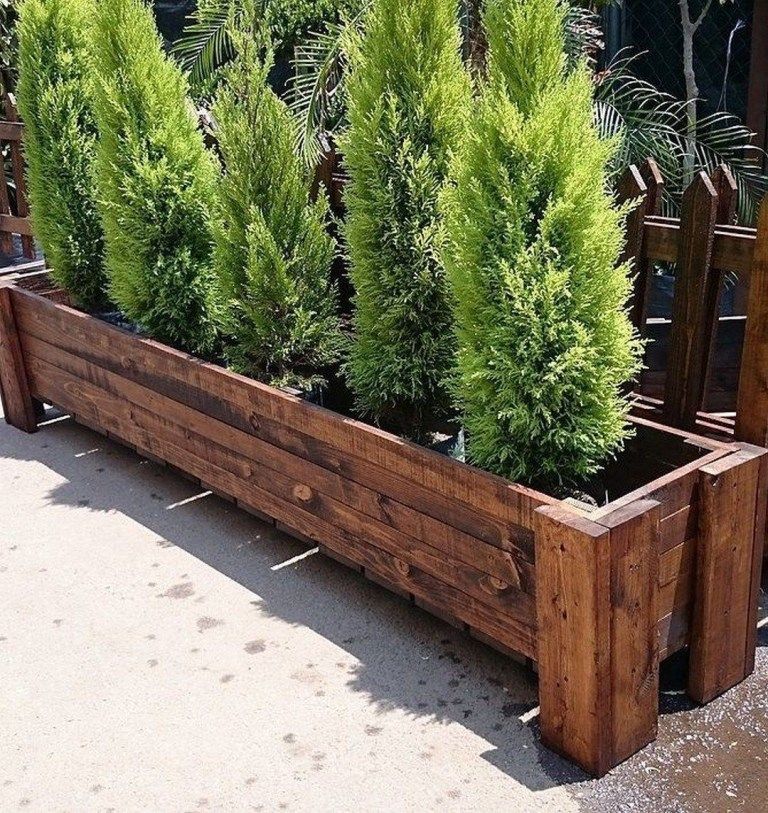
How to make a DIY flowerpot out of a pallet, barrel, bars or wooden box
Woodwork or lumber is the perfect solution to create an outdoor flowerpot. For this purpose, you can use a wooden barrel, leaving it in the form of a solid structure or sawing it in half across or along.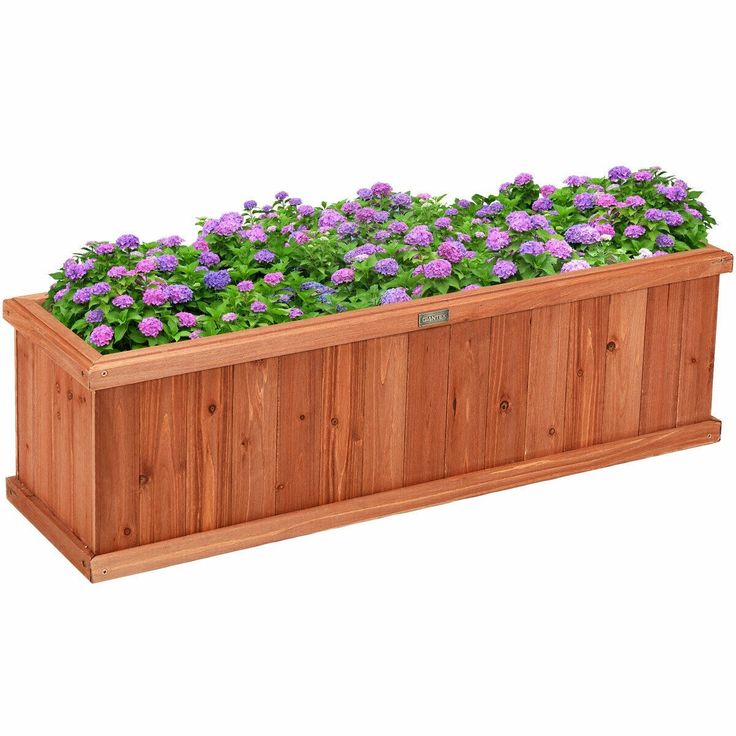 The first option allows you to get two long flower pots at once. And in the second case, the bottom should be made for the upper structure. nine0003
You can build a wooden flower pot from old pallets. To do this, it is necessary to disassemble the structures into elements. The foundation is done first. Then the side elements of the pot are assembled, which are fixed to each other with self-tapping screws.
To do this, long boards are cut in half, and short ones? into three equal parts with the formation of beveled sections. Boards with a bevel are interconnected with self-tapping screws, forming a hexagon. Boards are nailed to each element, which will be the legs of the flowerpot. nine0003
The next row of wooden elements is stuffed to the resulting frame. The finished product can be left in its original form, varnished, or painted.
Important! The finished structure must be treated with a special moisture-repellent and antimicrobial impregnation.

An old wooden box can be used as an outdoor planter. It should be painted or varnished. A do-it-yourself flower box can be created from wooden slats and a sheet of plywood acting as a base. Reiki are attached to each other with self-tapping screws, forming the walls of the flowerpot. They are placed vertically or horizontally. nine0003
A tall flower pot can be made from block house boards. For this, the products are sawn, according to the height of the future flowerpot, into equal segments. The elements are interconnected by means of grooves. From the inside, the boards are fixed with a bar and self-tapping screws.
Good advice! All butt joints should be treated with liquid waterproofing to ensure the tightness of the product.
Waste items for making original DIY flower pots
The most unexpected things can be used to create flower pots. The ideal option would be elements of earthenware, earthenware or porcelain dishes in the form of cups, teapots, deep salad bowls and other containers. Such flowerpots will ideally fit into Provence or country style. In the summer cottage for planting flowers, you can use enameled dishes. For this, kettles, pots, buckets and cans are suitable. Drainage holes are made with a drill.
Good advice! nine0084 A bonsai pot can be made from a wide, shallow salad bowl.
Vases from old shoes look original. For this, boots, shoes, galoshes, boots are suitable. For drainage, holes are made in the sole of the products. Shoes can be painted with spray paint to give the flowerpots originality. When using bright rubber boots, they can be left in their original form.
You can create an unusual flowerpot using old tulle, a tablecloth or a piece of fabric. This will also require cement mortar. The material is lowered into a container with the composition and remains in it until completely soaked. The flap is removed and laid out on a pre-prepared container wrapped in foil. nine0003
The fabric is shaped into the desired shape with wavy edges.
In this form, the container should be until completely dry. A ready-made, do-it-yourself flowerpot made of cement and fabric can be painted using a spray can.
An oddly shaped flowerpot is easy to create from a vinyl record that needs to be preheated and then shaped to the desired shape. The finished product can be left in black or painted in bright colors. A small square flower pot is created from old floppy disks, connecting their edges with glue. nine0003
A street flowerbed created from an old suitcase or chest that can be painted in a bright color looks non-trivial. A flowerpot from an old umbrella looks very impressive. When unfolded, its internal space is filled with earth, where plants are planted.
They also make a flower pot from an old canister. To do this, one of its side parts is cut off. The bottom of the container can be fixed on the wall, which will allow you to create a pot in the form of a face. The surface is coated with glue and sprinkled with sand, recreating the appearance of a sandman. nine0003
Original ideas for making large flower pots
For making large flower pots, one option is to use cement mortar. Such a product will be durable and can be installed on the street. DIY cement flower pot can be created in any size. Depending on this, you should choose a suitable form or make a formwork. You can use any bucket, plastic bottle or tin can.
The mold is pre-oiled. A cement mortar of the consistency of sour cream is prepared and poured into a container. To make a hole in the future pot, you should take a bottle or other rectangular element, previously lubricated with oil, and immerse it in the solution in the central part of the container, not reaching the bottom. After the pot has set, the molding elements are removed. The outer surface of the flowerpot is polished and decorated with oil paints.
Good advice! nine0084 The decor of the pot looks impressive, where the paint is applied in patches and rubbed with a sponge.

Similarly to the technology described above, the process of making a flowerpot from gypsum is carried out, which is diluted with water in a ratio of 2:1. The solution is thoroughly mixed. You need two containers of different sizes. A large container is covered with cling film, and a smaller one is wrapped around the outside.
A 2 cm thick solution is poured into the bottom of the larger vessel, which should set slightly. A smaller container is placed on top. Gypsum mixture is poured into the formed gaps. After 2 hours, the pot can be freed from plastic molds and decorated. nine0003
Hollow cinder blocks are often used to create a flower arrangement for the garden, building elements in the form of a pyramid or tower, as shown in the photo of the pots. You can give the flowerpots originality by coating the surface of the products with paints. A plant pot can be created from an ordinary trash can, which is made of shiny material. Rotating furniture wheels are attached to the bottom of the product for the possibility of its movement.
A new trend in garden design is the creation of gabions. These are structures, the frame of which is made of stainless mesh, and the cavity is filled with pebbles or stones. nine0003
Flower arrangement from a vintage suitcase
A worn-out item easily turns into a stylish and useful one when it falls into the caring hands of a craftsman. We will talk about how to turn a suitcase into a pot in the next master class.
Tools and materials
For work you will need:
- Old suitcase.
- Primer, acrylic paints, brushes and varnish.
- Film.
- Scissors.
- Furniture stapler.
- Expanded clay, earth and plants.
Step-by-step instructions
Getting started:
- We wipe the suitcase with an alcohol solution. If necessary, remove the cover. We cover the surface with primer in two layers, and after drying, paint in any color.
 For a thing to last longer, it should be protected with parquet varnish.
 - To prevent water from spoiling the suitcase, lay its bottom with a thick film. We fix with a furniture stapler along the upper edge. nine0006
- We fill the bottom of the suitcase with expanded clay, earth and plant plants. To make the composition look harmonious, we place higher flowers in the background, and low flowers in the front.
- Plants should be unpretentious and easy to get along with each other.
- A garden in a suitcase is ready!
How to decorate?
Now you can find beautiful pots for indoor plants, but they are often either very ordinary and simple, or vice versa, very elaborate, but at the same time expensive. To make a stylish and original pot better with your own hands, this will allow you to build a designer flowerpot in a single copy. In this case, the pot will look very extraordinary and emphasize the special atmosphere of the room. Covers for pots knitted by hand or sewn from different fabrics will look unusual. When choosing a fabric, it is better to give preference to bright shades. nine0003
You can also choose a plain fabric in beige, thereby emphasizing the beauty of the plant. Knitting lovers can create original clothes for plants from a textured thread.
You can make a real design flowerpot by simply painting clay pots with acrylic paints. Beautiful ceramic fragments can also be used. Use them to decorate a pot in the mosaic technique. Its elements can be colored glass, pebbles, shards of dishes. In mosaic technique, both a small flowerpot and a more bulky design will look good. You can create an original decor using marbling. To do this, use a container of water, several jars of varnish of different shades, as well as a stick. The water temperature should be warm. nine0083 To create a pattern you need:
- pour nail polish into water;
- mix different shades using a stick;
- Immerse the pot in the streaked liquid and wrap the resulting paint around it.
One of the decoration methods is decoupage. To decorate the pot yourself using this technique, should:
- clean and degrease the pot primer;
- paint over it;
- glue the paper cut-outs on the surface; nine0006
- decorate with other additional elements;
- varnish to fix the effect.
Lace and burlap can be used as decor. For decoration use beads, shells, glass pebbles.
Interesting options for floor pots and flower vases with your own hands
An interesting and extraordinary solution would be a floor flower pot made of wood. To work, you need a stump, a log or a thick knot. The wooden blank should be freed from the core. It can be removed both in the transverse and in the longitudinal position of the workpiece. The result is a tall or long pot. The resulting hole is carefully cleaned and polished. nine0003
A hand-made wooden flower pot can be decorated with peeled bark.
It is recommended to emphasize the natural beauty with a layer of varnish.
Good advice! A garden pot made of 5 ceramic tiles glued together will look original and stylish.
A stump or log can be cut into several pieces. The core must be removed from each element. The components are arranged in several rows, creating a multi-tiered composition. For the reliability of the design, all elements are glued together. nine0003
An interesting solution would be a floor pot made from an old plastic container lined with wooden planks. The container must first be treated with an antiseptic. A number of drainage holes are made in the bottom. The entire surface of the container is sheathed with pre-painted wooden planks, which are arranged in a vertical position.
Outdoor flowerpots can be made from old car tires by painting them in different colors and embellishing with any pattern. The products are left in their original design or one of the side surfaces of the tire is cut out in a figured manner. The finished outdoor flower vase is primed and painted with a pattern. nine0003
Good advice! In order for the tire to cut well, it should be treated with machine oil or grease for better glide of the knife blade.
This flowerpot made of tires can be decorated using mosaic technique. To do this, a mesh is applied to the surface of the product, on top of which a thick cement mortar is applied. Mosaic elements are pressed into the mixture. For this purpose, you can use tiles or pebbles.
A flower garden made of glass bottles, which are laid around the circumference of the base in several rows, will look unusual. As an internal base, you can use a tire or a bucket. The walls of the container are coated with a thick cement mortar. The necks of the bottles are pressed into the mixture. nine0003
Interesting options for making hanging flower pots
For plants that do not need frequent watering and ampel varieties, a coconut shell hanging pot is a good option.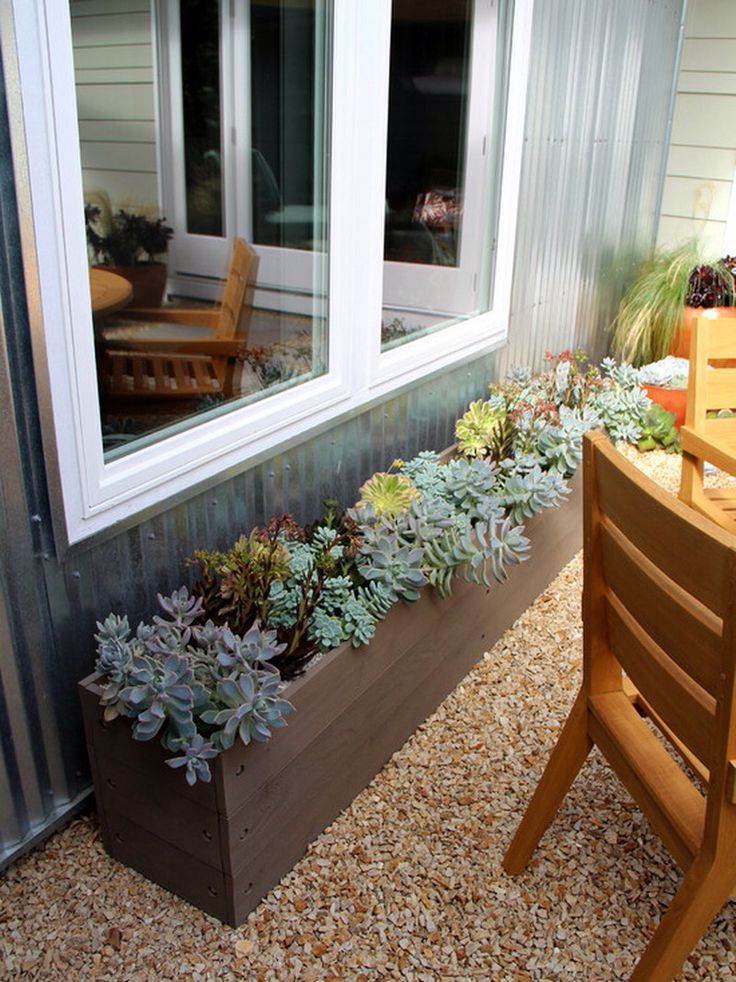 To make it, the nut must be cut in half, removing the pulp from it. Thus, you get two pots. At the bottom of each half, several holes should be made with a drainage drill. For hanging the structure, nests are also made on both sides of the shell. nine0003
Good advice! These flowerpots do not need additional decoration, as they have a pristine exotic look.
A do-it-yourself hanging flowerpot for summer cottages can be woven from thin branches of a vine or threads of artificial rattan. The product may have a rounded, cone-shaped or cylindrical shape. The material is pre-soaked to gain flexibility. The first step is to prepare the bottom of plywood, along the circumference of which holes are made. Thick twigs are inserted vertically into them to create a frame. nine0003
The vine is placed between the twigs of the frame and pressed with an awl, forming the walls of the pot of the required height. The finished product is treated with moisture-proof impregnation and varnished.
Conclusion
Ideas how to decorate a flower pot, the human mind is ready to generate tirelessly. Perhaps you already have a few fun design projects that you can't wait to implement. Do not hold back your impulses - let your home be filled with comfort! nine0003
Photo gallery
Theme keys
1. DIY flower pot photo
2. DIY flower pots
3. DIY pots
4. DIY flower pot
5. DIY flower tray
6. pot for flowers with your own hands
7. how to make flower pots with your own hands
8. original flower pots with your own hands
9. how to make a flower pot with your own hands
10. make a pot
11. flower pots with your own hands
12. DIY flower pot trays
13. DIY flower pot
14. DIY flower pots
15. DIY pots for indoor plants
16. How to make a DIY flower pot
17. DIY flower pots for flowers
18. do-it-yourself flower pot tray
19. do-it-yourself pots from improvised materials
20. do-it-yourself flower pots photo
21. do-it-yourself pot
22. do-it-yourself pot tray
23. DIY flower pots
24. DIY flower pot
25. how to make a flower pot
26. unusual DIY flower pots
27. homemade flower pots
28. homemade flower pot
29. indoor pots DIY for flowers
30. DIY square flower pots
31. DIY flower pot
32. DIY bowl
33. DIY flower pot
34. DIY flower pots
35. beautiful DIY flower pots
36. how to make a flower pot yourself
37. how to make a flower pot
38. DIY wooden flower pots
39. DIY wooden flower pots
40. unusual flower pot do-it-yourself
41. do-it-yourself flower trays
photos of plastic with fastening, hanging with a holder and wooden do-it-yourself, what are the best varieties to plant in a container for the whole summer?
The balcony is used as a place to relax, decorated with flowers and plants. In order for plants to bring joy, it is important not only to care for them, but also to use the correct container for planting.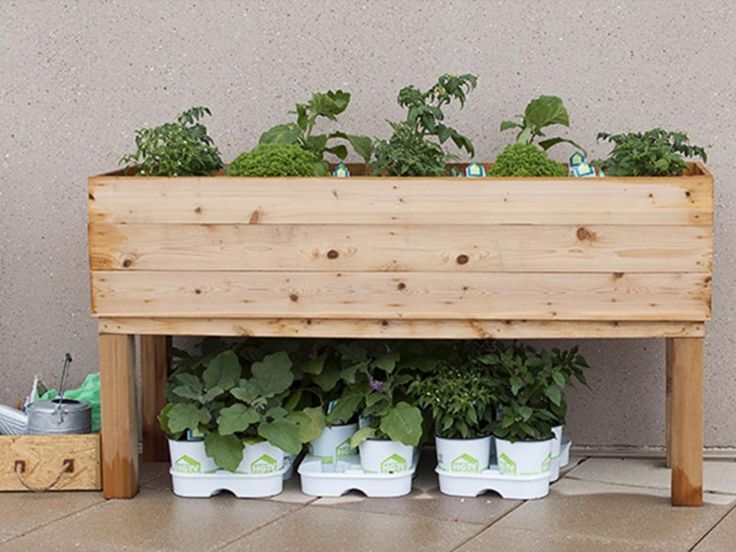 The balcony box is a popular and economical solution. nine0003
Which containers are suitable?
For placement of flowers and plants use:
- floor pots;
- pots;
- boxes or pallets;
- shelves or shelves.
One flower is usually placed in a pot and planter. The advantage of pallets is that you can combine and plant several plants side by side. Now, let's tell you in detail about the balcony boxes.
Optimal tank sizes and requirements
First you need to decide on the size of the box.
Deep containers are used for plants with extensive root systems. The smaller the plant, the smaller the box.
It is also necessary to determine the number of plants that will be in the composition, since the desired length will depend on this. On sale, most often you can buy standard sizes with a length of 60,80 and 100 cm. nine0083 Check for drainage holes with a diameter of at least 10 mm.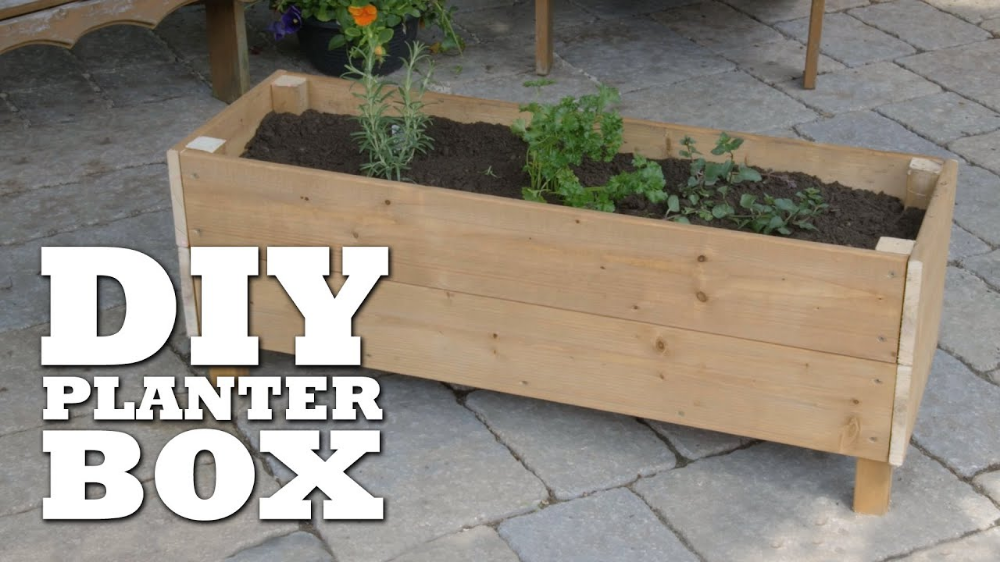 There must be a drip tray under the tank to collect excess water.
Mounting and holder options
Mounting brackets secure containers to walls, railings and balcony railings. The mount can perform not only a supporting function, but also be an element of decor.
How to hang a balcony box on a bracket and other fasteners read here.
Container arrangement
The location and type of construction will depend on the variety and type of the planted plant. Floor boxes are perfect for installation inside a balcony. When installed outside the balcony, mounted balcony containers are used.
Tall plants in large containers placed on the floor in the corners or along the wall.
The arrangement of plants planted together is arranged in such a way that one plant does not shade the other. Light-loving and ampelous (falling) plants are placed in hanging boxes with various fixtures. nine0003
Material
A variety of materials are used in the manufacture of balcony boxes. You can choose for any taste and design.
Plastic hanging railings
Plastic boxes are one of the most popular materials. These containers are available at any gardening store. Plastic containers are distinguished by an extensive range of colors and a variety of appearance with various imitations.
Their light weight makes them ideal for installation on balcony railings. nine0003
Growers are in demand for inexpensive containers with a pallet from Siena and Idea.
Wooden pallets
Wooden boxes are less common due to the property of wood to lose its quality when exposed to water. This type of container is often used on railings and fences using brackets.
Rattan baskets
Wicker baskets are aesthetically pleasing. They are more expensive than others.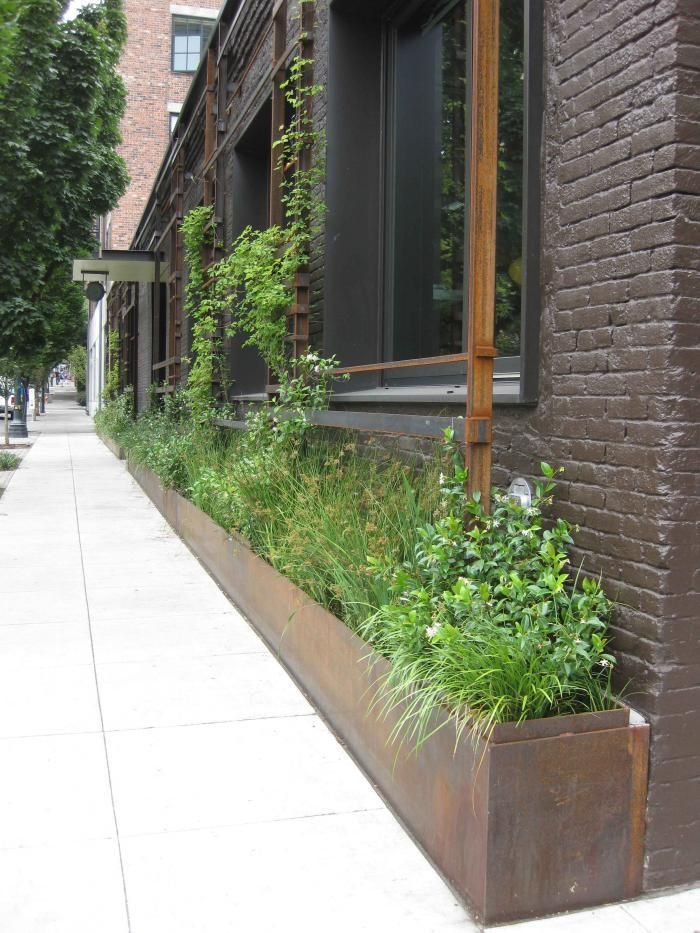 They are mainly used in conjunction with plastic containers, for convenience and beauty. nine0003
Ceramic and earthenware
Ceramic containers are not used as hanging containers. Ceramics is a heavy material. Such containers are placed on the floor.
Clay containers can be installed even on a small loggia. Inside for waterproofing, they can be painted over with water-based paint or pasted over with a film.
Wrought iron and hinged
Wrought iron gratings are usually used as a hinged mount in conjunction with other types of containers. Used for beauty. nine0003
How to make your own hands on photo and video
You can make a balcony box with your own hands. Here are a few ideas:
- The easiest way to make a container is from wooden pallets that hold fruits and vegetables. It remains only to work out the waterproofing.
- Made of metal or metal profiles. It is only necessary to weld the structure in the desired form, and do not forget about drainage.
- In any material and design that suits the look and function: plastic food containers, tins and whatever your imagination allows. It will turn out an unusual and originally decorated box. nine0006
It is easy to make a plant box out of wood. This will require wooden boards, nails, varnish, glue and tools: saw, screwdriver or hammer.
Step-by-step instructions:
- Determine the desired size, and cut out the walls and bottom from the boards.
- If it is planned to make a hanging container, then we additionally cut out long slats that will be installed at the corners of the structure.
- At the ends we drill holes into which the rope is inserted. nine0006
- We use strong glue, nails or screws for fastening. For strength, you can use glue and nails together.
- We make drainage holes at the bottom, and put sand on top.
- We paint the entire structure with a moisture-resistant varnish.
- Optionally paint the box in any color.

How to make a wooden structure in the video:
What are the best varieties to plant for growing all summer?
The choice of plants depends on the type of balcony and its lighting. nine0084 If the loggia is located on the dark side, then it is optimal to plant begonia, fuchsia and other shady crops.
Petunias, marigolds, mint, parsley and any low-growing plant species are best planted on the sunny side. It is also necessary to pay attention to the combination and size of varieties.
What annual and perennial flowers are better to plant on the balcony read here.
Care
The plants are planted in a suitable size container. It must be remembered that flowers such as dahlias and chrysanthemums need freedom. Plant them at a distance from each other. nine0003
At the bottom there must be drainage from expanded clay, shards or crushed stone. Soil is poured over the drainage, stepping back a few centimeters from the edge.