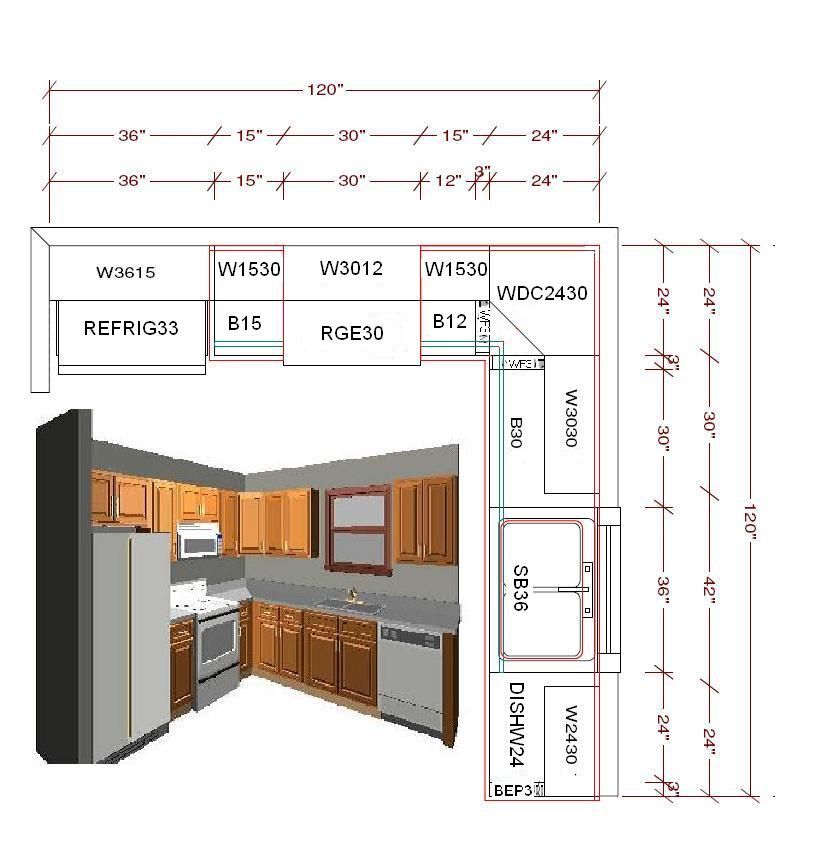
Kitchen diagram layout
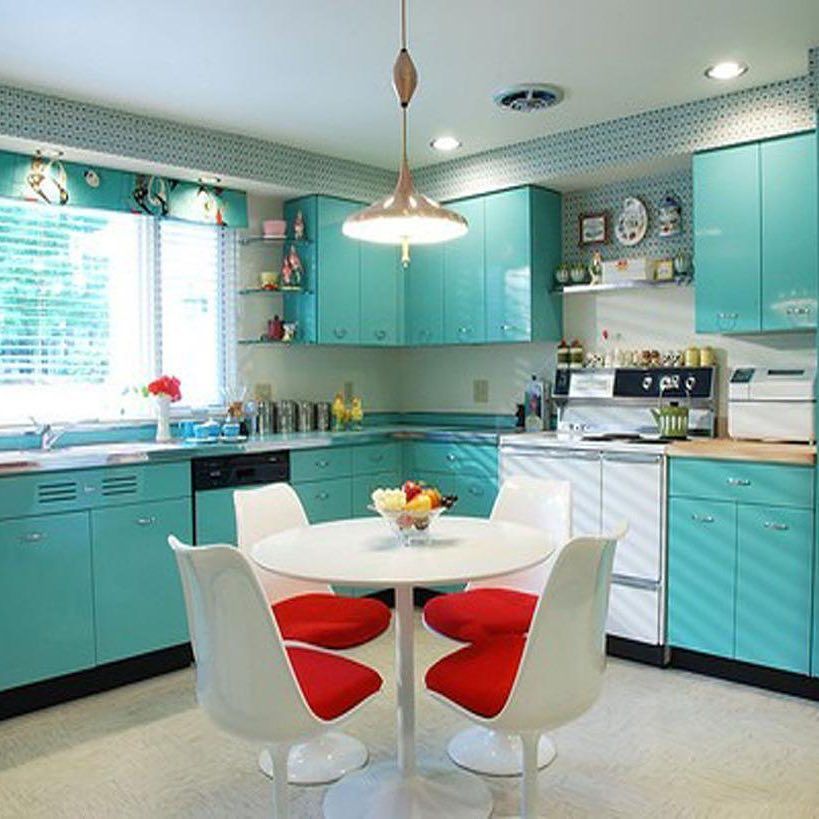
7 Kitchen Layout Ideas That Work
You may have your cabinets, flooring, tile, appliances, and paint all selected. But what makes a kitchen livable has little to do with the way it looks, and everything to do with functionality.
Blog | Kitchen
Today’s post comes from the home improvement experts at Modernize.
If you’re planning a kitchen, there are a few essential kitchen layout ideas you need to keep in mind as you’re designing and planning.
Before you make any big decisions or get carried away with the aesthetic, here are 7 essential kitchen layout ideas you will want to incorporate to make your kitchen design a success:
1. Reduce Traffic
No matter what, the kitchen is probably going to be a high-traffic area of the house. But there are ways you can get around making the kitchen a catch-all for mail and backpacks and coats.
Create a space before you get into the kitchen, like a mudroom, to control the chaos that can come sweeping in every day. Once in the kitchen, make sure the primary pathway through the kitchen is hazard-free and will not be obstructed by the refrigerator or oven door when open.
2. Make the Distance between Main Fixtures Comfortable
When laying out your kitchen it’s important to keep the main tasks in mind – preparing, serving, and cleaning up from meals. You don’t want to put the stove across the room from the sink, or the fridge too far away from the stove because that will complicate whichever task you are working on.
Lay out kitchen fixtures and appliances within comfortable proximity to each other3. Make Sure the Kitchen Island Isn’t too Close or too Far
A kitchen island is where much of the meal preparation happens. If your kitchen layout will include one, consider its location carefully. Make sure that it will not block the area in front of your major appliances, such as wall ovens, dishwashers, and refrigerators.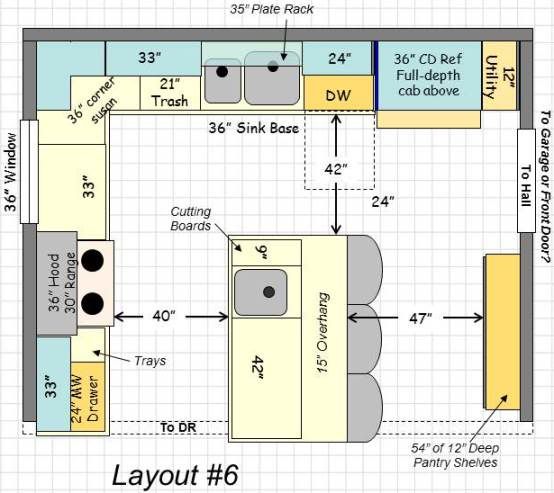
Allow enough space for the appliance door swing plus room to pass when the doors are open. But you also don’t want to place it too far. Make sure your island is located within a comfortable arm’s reach from each of these fixtures.
Keep appliance door swings in mind when placing an island in your kitchen layout4. Place the Sink First
When creating a kitchen layout, many designers place the sink first and then design from there. While this is probably grounded in tradition from the days when people spent a long time scrubbing dishes, it remains a good rule of thumb.
The oven and fridge are vital to preparing meals, but somehow the sink seems to still be the place where we spend the most time. Think about placing the sink where there is a view out a window or into the room. A kitchen island is also a great location for the sink.
Place your sink with a view into the room, out a window, or in a kitchen island for both5. Always Put the Stove on an Exterior Wall
When you’re deciding where to put the stove and oven, remember to put them on an exterior wall rather than an island or interior wall. This will make it easier (and less expensive) to install a proper ventilation system.
6. Keep Vertical Storage in Mind
Instead of focusing all of your energy on creating enough cabinet and drawer storage, put a little of that energy into configuring convenient wall storage.
Storage walls are a great way to incorporate pantry storage, small appliances, baking accessories, extra china, or even a broom closet – in one convenient location. Open shelves, wall hooks, and overhead pot racks are not only convenient – if stocked with the right stuff, they can also add dimension to the aesthetic.
Think Vertical – Combine storage walls, wall hooks, and open shelves for a mix of functional storage7. Create a Floor Plan and Visualize Your Kitchen in 3D
No matter how much designing, measuring, and pinning to your dream kitchen Pinterest boards you do, your completed kitchen can still come as a surprise once the contractors are finished – and not always in a good way.
Save yourself from costly mistakes and unfixable flaws with a kitchen layout tool. RoomSketcher provides an easy-to-use online kitchen planner that you can use to plan your kitchen layout. Draw your kitchen floor plan, add fixtures, finishes, and cabinets, and see them instantly in 3D!
Visualize your kitchen layout ideas in 3D with a kitchen layout toolGet Started on Your Kitchen Design
Create 2D Floor Plans, 3D Floor Plans, and 3D Photos just like these, to share with your family, friends, or contractor for more accurate pricing.
Get Started
Don't forget to share this post!
Recommended Reads
28 ways to configure cabinetry |
(Image credit: Tom Howley )
Looking to remodel and need new kitchen layout ideas? This professional design advice will help you make the most of your kitchen floor space.
Kitchens come in all shapes and sizes, and you can be spoilt for choice with kitchen layouts and formation options when starting out on a project. The key is to take things slowly, and think carefully about how you use and move within the space.
Also consider how you see your family might use the room in the future. It may be all about food prep now. But down the line, it may need to double as place to finish homework, a 'teaching area' where your kids learn to bake, or a sophisticated entertaining spot.
Practicality is key for kitchen ideas when it comes to the best kitchen layout, and the shape you select should be able not only to accommodate your lifestyle, but enhance it. We've got plenty of food for thought, so go ahead and dive into our layout options.
Kitchen layout ideas
Our guide will explore all the key kitchen layout ideas, but first, clue yourself up on the six types of kitchen layouts that will likely form the base of your space...
What are the six types of kitchen layouts?
There are six key kitchen layouts:
- The galley layout
- The L-shaped layout
- The U-shaped layout
- The island layout
- The peninsula layout
- The one-wall kitchen
1.
 Let your habits dictate the layout
(Image credit: Harvey Jones)
'Every aspect of the kitchen, how it works and how it is used is based around the layout,' says Sally Hinks, kitchen designer at Harvey Jones. 'When starting to plan a kitchen, the first thing you must think about is how you're going to be using the space, as this will dictate what you need to include. Is your kitchen purely for cooking or will you be entertaining, too?
'Will the space be used as a working from home spot or will the kids be doing their homework in there? It's also important to look at the existing features of the room. In many cases, doors, thoroughfares and windows set the parameters of the layout out and guide suitable options. Many people like to situate their kitchen to make the most of a lovely view outside or to take center-stage in an open plan space, which can be a useful starting point.'
2. Think: practicality
(Image credit: Benjamin Johnston Design)
'The main thing to keep in mind during the layout planning process is practicality,' says Sally Hinks. 'Think carefully about which parts of the kitchen you're gong to be using the most from a cooking perspective and how easily you can move between them. Use the kitchen triangle method as a guide and focus on the refrigerator, sink and cooker as the core elements when mapping out your space.'
For more guidance, see our exploration that answers the question, where should a refrigerator be placed?
3. Use the galley layout for space efficiency
(Image credit: Future / Paul Raeside)
Galley kitchens are one of the most space-efficient layouts you can choose. They are ideal for keen cooks, and perfect for maximizing storage and work surface space in smaller kitchens. This super-efficient layout is ideal if you are looking for small kitchen ideas that maximize every inch of space.
Allison Lynch, of kitchen design company Roundhouse , says: 'A galley kitchen usually occupies a relatively small space – they are often a walkway between two rooms. An ideal length would be 3. 5 – 5m with space either side of the door opening to allow at least a standard depth countertop.
'Although they tend to be quite small, they are very ergonomic spaces with everything usually within arms' reach – with, ideally, the sink one side and the hob on the other.'
Placing these two important elements centrally within each run of units is the best approach, with the dishwasher on the sink side of the run and the refrigerator on the side of the hob.
4. Share your space with a U-shaped layout
(Image credit: Amanda Evans Interiors)
U-shaped kitchens are an ultra-practical option. They are comprised of countertops on three connecting sides, allowing plenty of room for cooking.
It's one of the most efficient layouts to have in both small and open plan homes alike, and the easiest way to achieve the ergonomic triangle that is so often talked about in kitchen design – where your fridge, cooker and sink are all within easy reach of one another.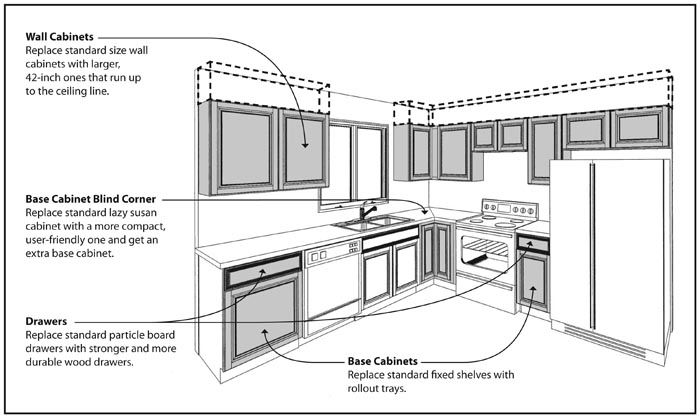
It also easily allows for two cooks in the kitchen at once for a team dinner-making effort.
Allison Lynch says: 'U-shaped kitchen ideas work best in spaces ideally from 3 – 3.5m, but remember that the bigger the space the more crossing the room you have to do.'
Larger kitchens can often accommodate the addition of a central island, too, like in this example by Amanda Evans Interiors . With plenty of room for cabinetry and built-in appliances around the edge, the island provides a casual seating area and additional preparation space.
5. Love your corners with an L-shaped layout
(Image credit: Davide Lovatti)
The most common layout is some sort of L-shape, with at least one straight run. The classic design uses two adjoining walls of a room to allow a continuous flow of worktops and cabinets.
The central area is kept free, so you can enjoy a spacious feel or add an island for extra worktop space and storage.
'L-shaped kitchens are a classic, timeless design,' say the team at Magnet. 'And the open floor space it creates allows the kitchen to be accessible from any angle.'
6. Create distinct zones with an island layout
(Image credit: Davide Lovatti)
Large kitchens and big families can really benefit from utilizing kitchen island ideas to add extra storage and preparation space.
Multi-use spaces are increasingly sought after, and an island can be used to prepare dinner while also keeping an eye on the kids, as well as doubling up as a socialising area, work space, or homework desk.
'The benefit of an island layout is that it is great for zoning in open plan areas, which is what most people opt for today,' says Roundhouse's Allison Lynch. 'It’s a good piece of social furniture and effectively creates two different spaces, one for cooking and one for prep, with one person at the island and the other at the worktop.
'Another big benefit in an open plan space is that an island can be made to look more like a piece of furniture.
'An island allows free movement all the way around, and people can enter the space from different directions. It can feel less monolithic, a much lighter piece of furniture than a peninsula, and with judicious use of plinth lighting it can be made to look like it is floating.'
7. Use a peninsula to disrupt a thoroughfare
(Image credit: Future / Manolo Yllera)
A kitchen island is wonderful, but if it will create a natural passage through the cooking space from one area to another, such as from the hallway through the kitchen into a garden, kitchen peninsula ideas may be a better choice.
'Consider alternatives to a kitchen island, even if you have space,' advises Homes & Gardens' associate editor Busola Evans. 'A peninsula, for instance, can provide many of the benefits of an island without interrupting the cooking workflow.
8. Choose an L-shaped layout for a party kitchen
(Image credit: Marlaina Teich Designs/Patrick Cline)
If your kitchen tends to be the life and soul of the party, choose a layout that will accommodate abundant entertaining.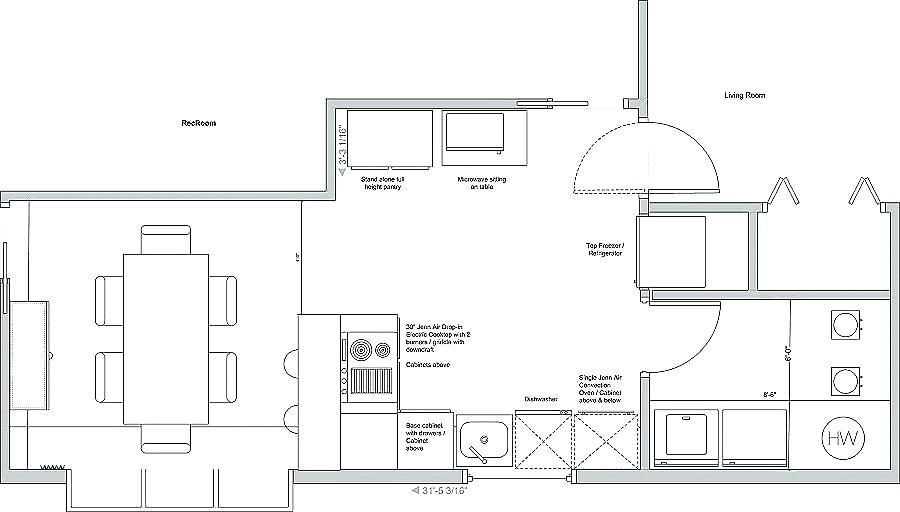 The open nature of an L-shaped kitchen means lots of space for guests to gather in the opposite side of the kitchen to where the units are based.
As demonstrated in this home with interior design by Marlaina Teich , it is also a great choice for kitchen diner ideas, and open plan spaces that merge into a living area. This kitchen boasts a dining area off one side and a living room off another – the L-shaped layout keeps the kitchen neatly tucked in one corner, while the added island provides connection to the other spaces.
9. Consider appliances early in your layout plans
(Image credit: Harvey Jones)
'Another factor that will affect your kitchen layout is the type of appliances and tall cabinetry you want to incorporate,' says kitchen designer Sally Hinks. Tall cabinetry and appliances look strongest standing alone or on the end of a cabinet run, so this can dictate potential layouts during the initial stage.'
10. Make the most of a small space
(Image credit: Harvey Jones)
'When designing small kitchen layouts, choose your appliances wisely,' says kitchen designer Sally Hinks.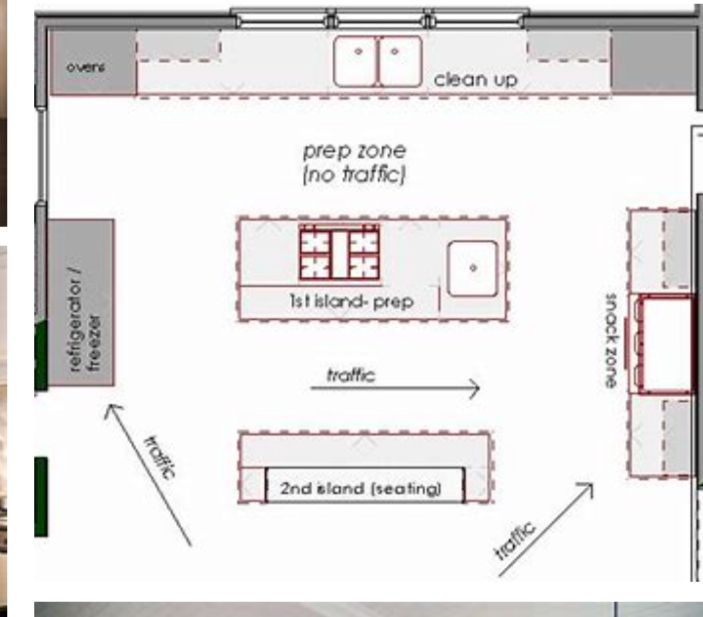 'Any large appliances such as washer dryers that can multi-task are worth considering. Furthermore, integrating appliances wherever possible will open up the space visually and create cleaner lines. Smaller appliances such as coffee makers and microwaves can be housed in cabinets to free up valuable countertop space, keep surfaces clear from bulky devices and create a more minimal aesthetic.'
11. Make the most of natural light in small kitchens
(Image credit: Emily J Followill/Beth Webb Interiors)
Galley kitchen styles may be great for small spaces and ergonomically sound for keen cooks, but they can have a reputation for being a little dark and pokey. To counter this predicament, be sure to make the most of any natural light coming into the space when planning a kitchen.
In this example with interiors by Beth Webb , a window at the short end of the galley has been extended to stretch from floor to ceiling. The window on the right hand side is free from the constraints of upper level cupboards, meaning that light can travel freely into the rest of the kitchen.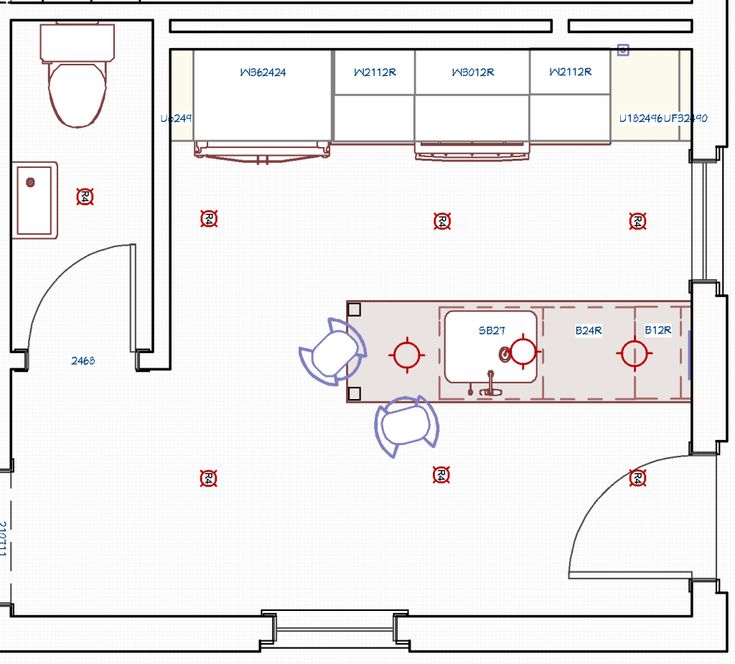
12. Create a ‘Chef’s Table’ experience with a long island
(Image credit: Richard Felix-Ashman Design/Aaron Leitz)
For serious foodies, cooking and serving dinner is the main event, especially when entertaining guests with equally strong culinary inclinations. Upgrade your island’s seating area from a casual breakfast bar to a full-blown dining area, by choosing a larger-than-life island that can accommodate a dinner party.
Bringing guests into the kitchen space can help create a unique ‘Chef’s Table’ experience, as demonstrated in this stunning kitchen in a bar conversion by Richard Felix-Ashman . A large kitchen for entertaining, it also hosts two dining tables for when you want to give a more intimate feeling to a gathering.
13. Bring personality to an open-plan space
(Image credit: Future/Polly Eltes)
'Open-plan kitchens can easily feel disjointed if the different areas aren't carefully linked,' explains kitchen designer Sally Hinks.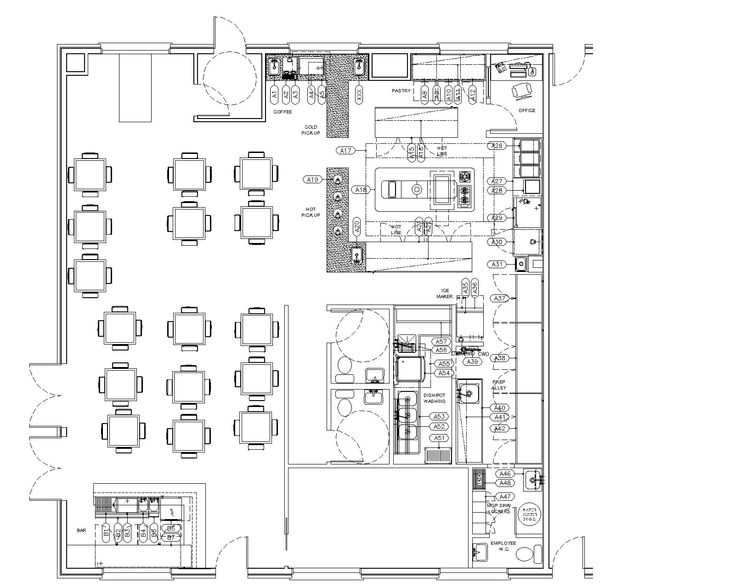 'Kitchen islands and peninsulas are a good choice to bring the kitchen out into the room, while accommodating seating areas within an island is a great way of tying dining areas and kitchen spaces together.'
14. Keep kitchen layouts simple to enhance space
(Image credit: Ginny Macdonald/Sara Tramp)
'Using light kitchen color ideas and mirrored backsplashes will open up spaces,' says Allison Lynch. 'Keep things simple. In galley kitchens in particular, keep tall cupboards for dry food storage and the fridge to the ends of the room, and perhaps limited to one side but not both.
'Too many details will crowd the space – keep to simple clean lines and lose the clutter.'
15. Pick storage that's truly ergonomic
(Image credit: Neptune)
Never underestimate the importance of good kitchen storage ideas. Nerine Vacher, kitchen designer at Neptune Fulham in London, advises: 'Effective storage is one of the simplest ways to create a happy and homely kitchen.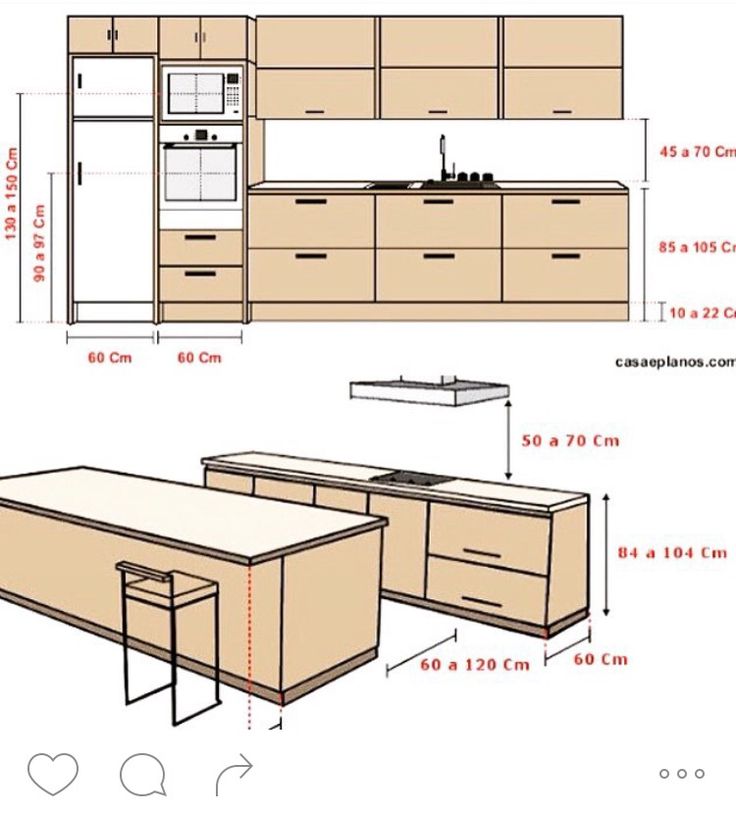
'By including a single piece of furniture, like our Suffolk larder (above), a bi-fold cabinet, or even an island, you can completely transform your kitchen, by creating more surface space and keeping clutter out of sight.'
H&G's Busola Evans adds: 'Ensure your bottom units are drawers rather than cabinets. Deep drawers are a more efficient use of space and give easier access to items at the back.'
16. Consider the second work triangle, too
(Image credit: Rikki Snyder)
'I've moved house seven times – and designed seven new kitchens for myself,' says H&G's Editor in Chief Lucy Searle. 'Plus, I've interviewed countless kitchen designers over the years, both for my kitchen remodels, and professionally.
'In time, I've realised that there's a second kitchen work triangle that no one talks about overtly – but it's really important.
'The second kitchen work triangle is between the kitchen sink, the bin(s) and the dishwasher.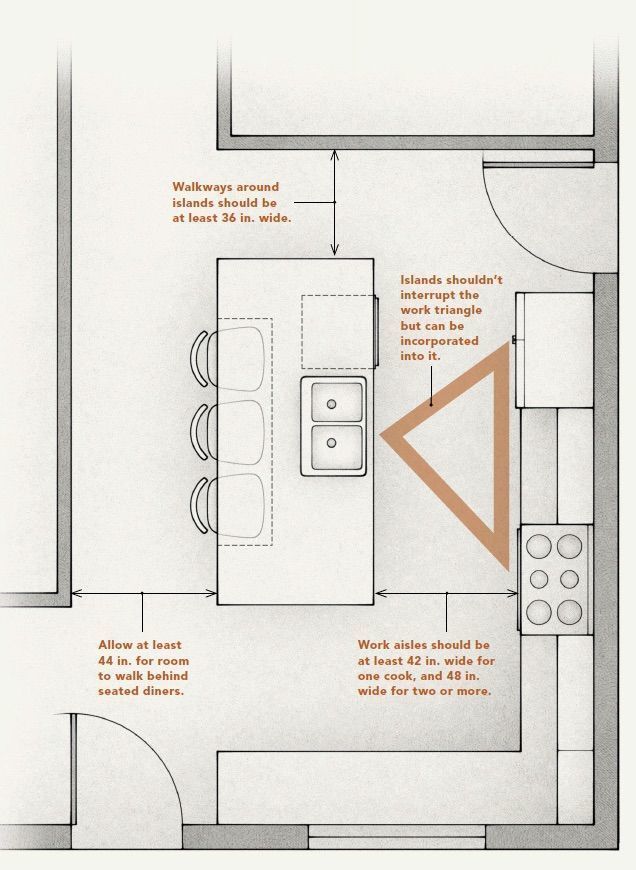 These three elements need to be as close to one another as possible to make tidying up after dinner as easy as possible. You want to scrape plates, rinse them and stack them all in one easy move, without pacing up and down the length of the kitchen.
'If you can ensure that the dining area is towards that end of the kitchen when planning its layout, too, you'll find it makes life even easier.'
17. Work out storage zones
(Image credit: Martin Moore)
When planning your kitchen layout, one key aspect is to consider how you want to use the kitchen and where you want items to be stored.
Naturally, heavy pots and pans should be kept in lower cabinets, and within easy reach of your oven and hob.
Likewise, mugs should never be too far away from your kettle. In this open plan kitchen, the dining table is in the same space as the kitchen area, so the addition of a tall dresser provides storage for crockery and cutlery, to make laying the table quick and easy.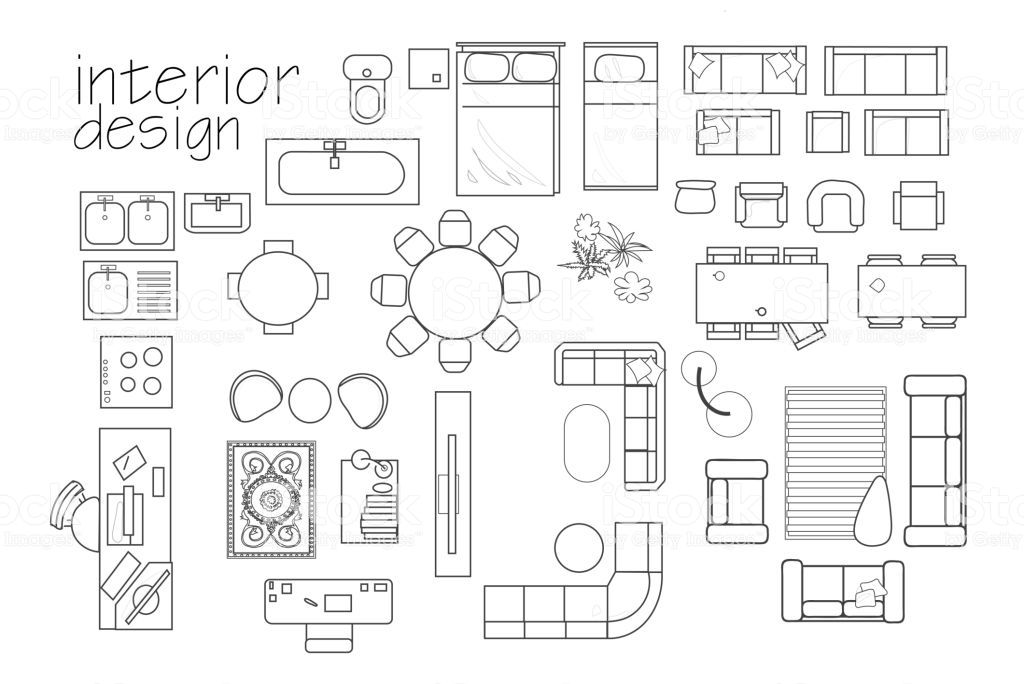
18. Put in a pantry
(Image credit: Sustainable Kitchens)
Larder or pantry ideas separated from the rest of your kitchen can help keep things clear and tidy, as they are an ideal space to keep store cupboard staples and baking equipment.
In this barn conversion project, the ceilings were low and natural light was limited, so a walk-in pantry was designed by Sustainable Kitchens . It has internal windows and under-counter cabinets only, so that it feels bright and connected to the rest of the kitchen. Automatic lighting makes it extra bright inside.
19. Maximize storage and workspace
(Image credit: Burbridge Kitchens)
Most L-shaped kitchens are fitted onto adjacent walls of a room, creating a practical corner design. They provide plenty of work surface as well as storage, though be mindful of where the two runs of cabinetry meet – the addition of pull-out drawers or an internal carousel will help to avoid wasting useful storage space.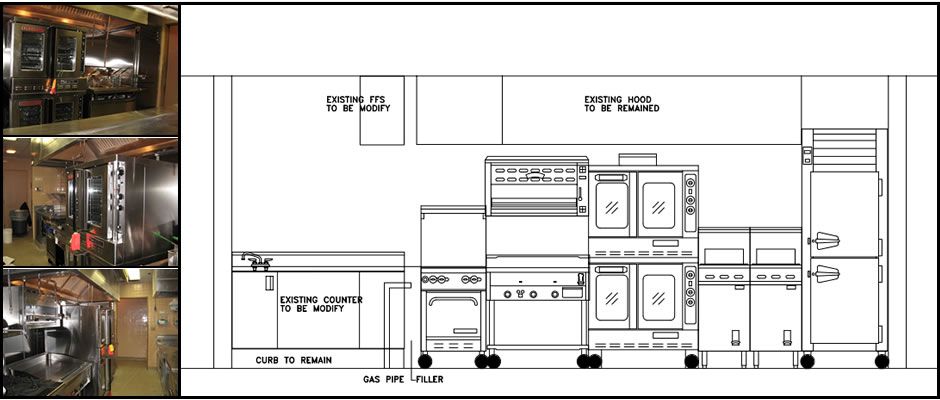
Consider keeping wall cabinets to one side of an L-shaped layout, opting for open shelving on the other so as not to make the room feel overcrowded. If space allows, you could add a dining table.
20. Use your alcoves
(Image credit: Tom Howley)
You are likely to inherit some unusual nooks in older country properties, so taking a flexible approach to your kitchen design may be necessary.
Look for alcoves and recesses that you can build storage into and toss out the idea of a conventional fixed layout. Add single runs of cabinetry wherever they fit best in the space you have to work with, incorporating your appliances in between.
To add to this flexible approach, go for a portable kitchen island or freestanding island design – units on legs open up the amount of floor space on show and can be moved around if needed, too.
21. Build banquette seating
(Image credit: Martin Moore )
Banquette seating ideas mean you can fit more seating into the available space when it is built in to the design of your kitchen.
The fitted, upholstered benches not only provide storage beneath, but are a clever way to hide any unsightly wires or pipework. ‘These are a necessary evil that may have to be boxed in to be concealed,’ says Daniela Condo, designer at Life Kitchens . ‘See if services can be re-routed inside bulkheads, voids or under the plinth of the kitchen.’
22. Enjoy layout flexibility with freestanding furniture
(Image credit: Sebastian Cox X deVOL)
Often found in rustic-style homes, free-standing furniture offers a more flexible approach to kitchen design. It’s a relaxed look, enabling you to add single runs of cabinets around the kitchen to create your ideal layout, incorporating your appliances in between.
This mix-and-match method works particularly well in older, country-style properties where the room may be unusually shaped. Paired with complementary wall-hung cabinets, a run of wooden free-standing cabinets will provide ample storage for small kitchens, as seen in this example by deVOL .
(Image credit: Harvey Jones)
A kitchen-diner layout is ideal for busy family households, where both the cooking and dining zones sit within the same design.
‘When planning a kitchen, take inspiration from the existing features in the room, such as doors, thoroughfares and windows,’ says Sally Hinks, kitchen designer at Harvey Jones. ‘Looking at these elements will help you site the table in the best possible position.’
24. Go with the flow
(Image credit: Naked Kitchens)
‘Always walk through the plan in your mind to ensure it flows well and works efficiently, making sure that you can easily and fully access appliances so there are no pinch points,’ says Jayne Everett, creative director of Naked Kitchens .
‘If you go for an island, make sure there’s enough space around it to pass through and open cabinets,’ she adds. It’s the well-planned, seamless flow around the U-shaped layout and the double-ended island that makes this kitchen design work well.
25. Make the most of a large kitchen
(Image credit: Magnet)
It’s easy to be spoilt for choice when considering kitchen layout ideas for a large area, but don’t overlook one of the most popular layouts, the U-shape, which can be the perfect match for a generously sized kitchen.
To suit the open space, this particular layout is comprised of worktops on three connecting sides to allow for ample room for cooking. This design – by Magnet – is created for high efficiency cooking and accommodates the ‘working triangle’ perfectly, meaning you can easily move between the three key cooking components, sink, oven and refrigerator.
This kitchen layout encourages smooth food preparation, plenty of practical storage space and allows two chefs to be operating at once, making mealtimes a real team effort. It also incorporates a peninsula breakfast bar idea, so visitors aren't excluded from the action.
26. Include an island in a different color
(Image credit: LochAnna Kitchens)
With open plan living proving increasingly popular, islands today come in a range of styles, functions and sizes to suit your space.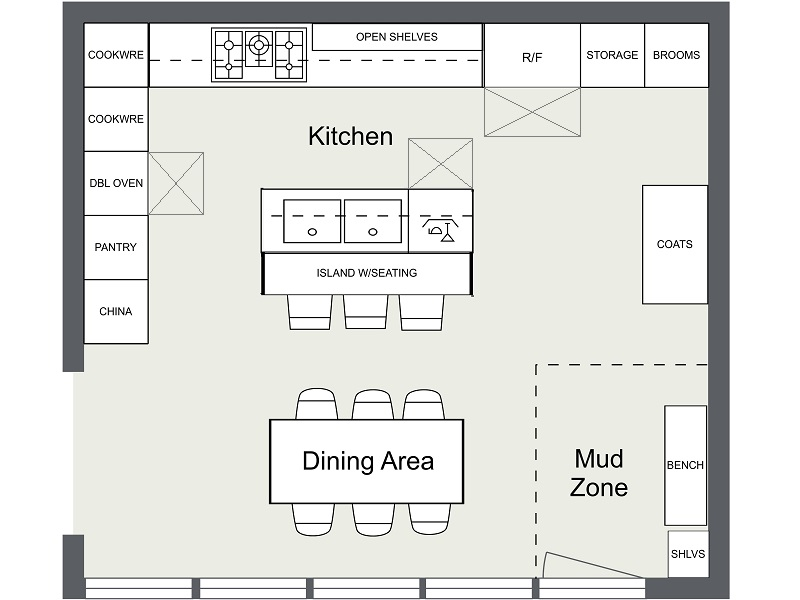 Offering the possibility of extra room for
both cooking and seating, they can help turn a kitchen into the hub of the home.
Offering the possibility of extra room for
both cooking and seating, they can help turn a kitchen into the hub of the home.
To make an island the focal point, choose one in a different color from the rest of your cabinetry, as shown in this traditional kitchen design that combines earthy brown and off-white.
The length of this island allows a variety of different elements to be included, including a sink and ample storage.
27. Create the heart of a family kitchen
(Image credit: Future plc / Darren Chung)
To tie a family kitchen together, the addition of an island can be the final piece to the puzzle. Usually suited to medium-to-large sized kitchen layout ideas, an island can contribute valuable extra storage and worktop space that’s so sought after by large families.
When prepping meals at the island, parents can keep one eye on dinner and one on the kids, too. Then in the evenings it can transform into a dining table or even an office and homework club, offering the family a place to catch up and congregate, like the multi-purpose island in this stylish grey kitchen.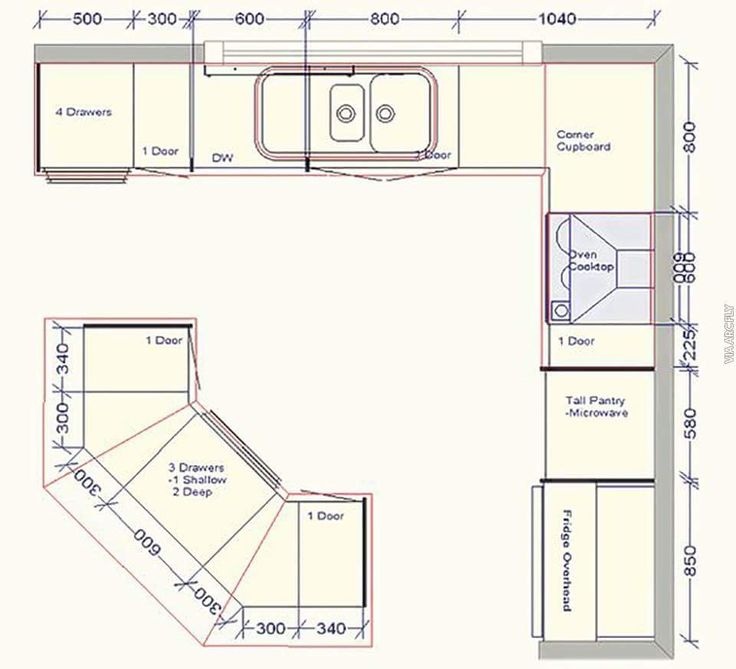
(Image credit: Future)
If your U-shape is more generous, it's worth sticking to the work triangle principle as closely as possible, but ensuring the three important elements are grouped on just two sides of the kitchen, with the third side given over to kitchen storage.
'If your kitchen's third side is an island, like the one above, storing cutlery, plates, china – in fact any items use use for dining – is the best option,' advises Homes and Gardens' Editor in Chief Lucy Searle.
'If you are keen, unflappable cooks who like to entertain regularly, having the hob on that unit with the cookware you need below will also work brilliantly – and be much more sociable.'
To avoid any costly kitchen design mistakes, the first step is to think carefully about how you move within the space and how you see your family using the room in the future – and this is where the well-known kitchen work triangle comes into play.
'The "work triangle" is the common sense principle that a kitchen plan revolves around the location of the sink, cooker and fridge and that the kitchen plan should be based on the most efficient workflow using these elements,' says Adrian Bergman, senior designer at British Standard by Plain English .
'This is, of course true, especially in a busy kitchen, but there can be other considerations such as aesthetics and respect for the architecture of a room, so there are occasions where we might stretch the layout rules to achieve a result that pleases the eye as well as the brain.'
Adrian continues: 'Usually, the size and shape of the room will suggest the best kitchen layout ideas, but often there is a choice and there are pros and cons to each; a single long run, for example, can look smart but means a lot of walking between elements and the fact that guests will be looking at the chef's back while they cook.
'I find that the best approach is to mock up and test any kitchen layout ideas in the actual space using battens and trestles, or with blocks of paper on the floor to represent the cupboards and appliances.'
Ailis started out at British GQ, where a month of work experience turned into 18 months of working on all sorts of projects, writing about everything from motorsport to interiors, and helping to put together the GQ Food & Drink Awards.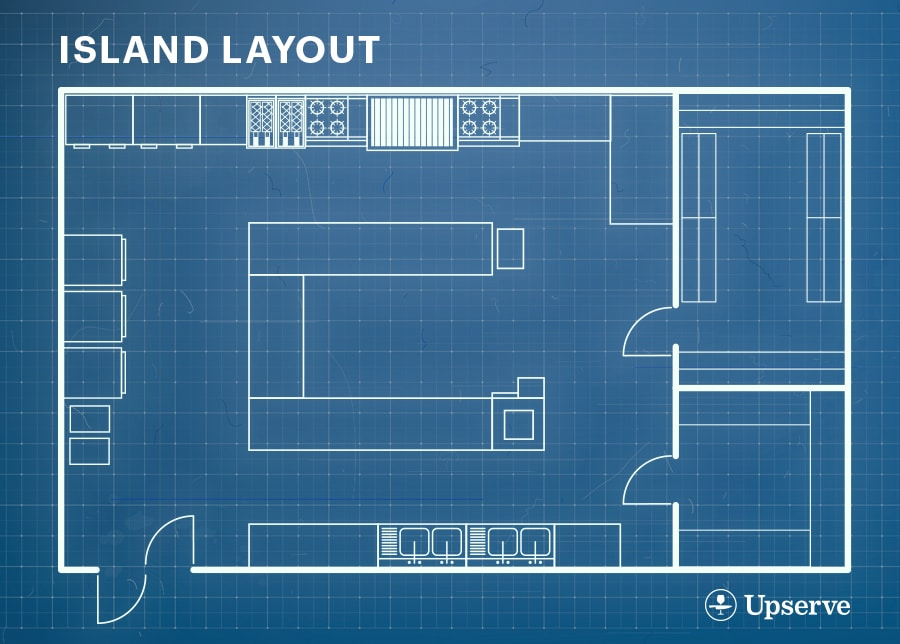 She then spent three years at the London Evening Standard, covering restaurants and bars. After a period of freelancing, writing about food, drink and homes for publications including Conde Nast Traveller, Luxury London and Departures, she started at Homes & Gardens as a Digital Writer, allowing her to fully indulge her love of good interior design. She is now a fully fledged food PR but still writes for Homes & Gardens as a contributing editor.
Smart ergonomics: kitchen layout tips
They begin to design the kitchen “from above” in order to get a really comfortable and functional space as a result. What approaches do designers use to comply with the rules of ergonomics, the "science of convenience"? We have collected in this article the main schemes by which you can "build" your own kitchen - look and try on for your case.
6 handy layouts for kitchen sets
Here are the main schemes for the layout of the kitchen functionality.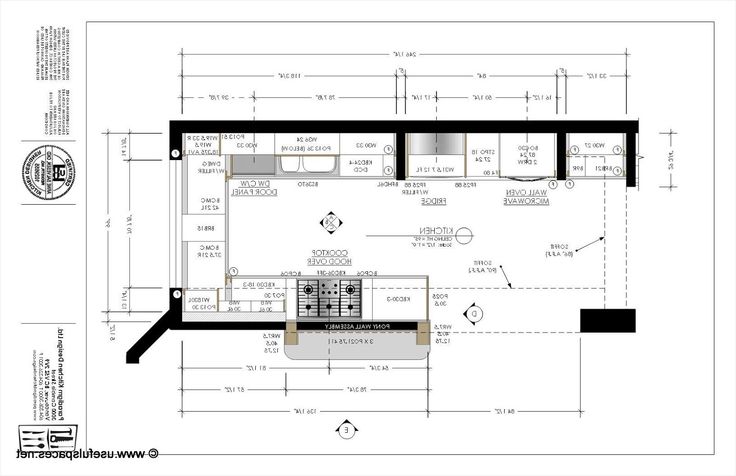
1. Single row - kitchen furniture is lined up with a dining table opposite. The optimal principle for elongated rooms and for super-compact kitchens: if you make cabinets up to the ceiling, the functionality will turn out to be worthy, and the space will not look overloaded.
this kitchen in the studio was deliberately made linear, not angular, so as not to overload the space unnecessarily. The refrigerator and freezer were placed under the countertop and added functionality due to the column. As a result, with a length of 2.6 meters, it was possible to place everything you need 2. U-shaped - kitchen functionality is built in 2 parallel lines, between them there is a jumper in the form of a dining table combined with a window sill. The scheme can be varied - if the window is on the side, then the dining area will be on this line. The option is suitable for compact kitchens: the main thing is that there is a distance of at least 1.2 meters between the main lines (the minimum that will allow you to use cabinets, drawers, and conveniently turn around between furniture).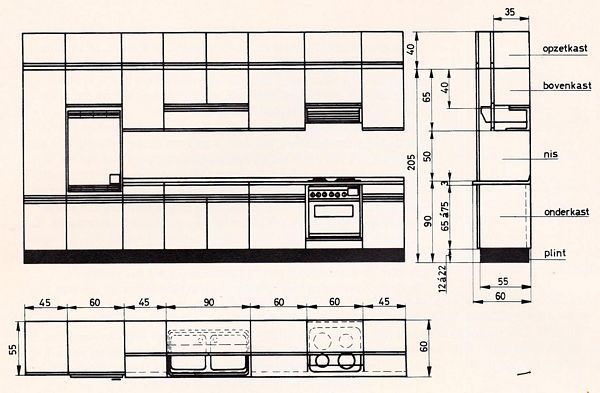
3. Double row - kitchen furniture arranged in 2 parallel lines, without lintel. The option is perfect for those who want to increase the work surface and put the refrigerator separately - then you can design a dining table on the same side. This scheme works great with columns for built-in appliances, and the area with the work surface can be freed from the upper cabinets.
4. C-shaped - kitchen with an enlarged work surface, which ends with a dining or bar table. A favorite scheme for those who often receive guests or work from home: here you can sit with a laptop while watching cooking.
5. L-shaped - the most common scheme, which is implemented in a huge number of variations. For example, a short line can be placed along the wall - and make a column for the equipment there. The kitchen will look elegant and very compact. Another life hack: do not place upper cabinets on the side of the headset. So it will look modern.
on the short side they did not make hanging cabinets - they placed an accent hood and sheathed the wall with panels to match the wood texture.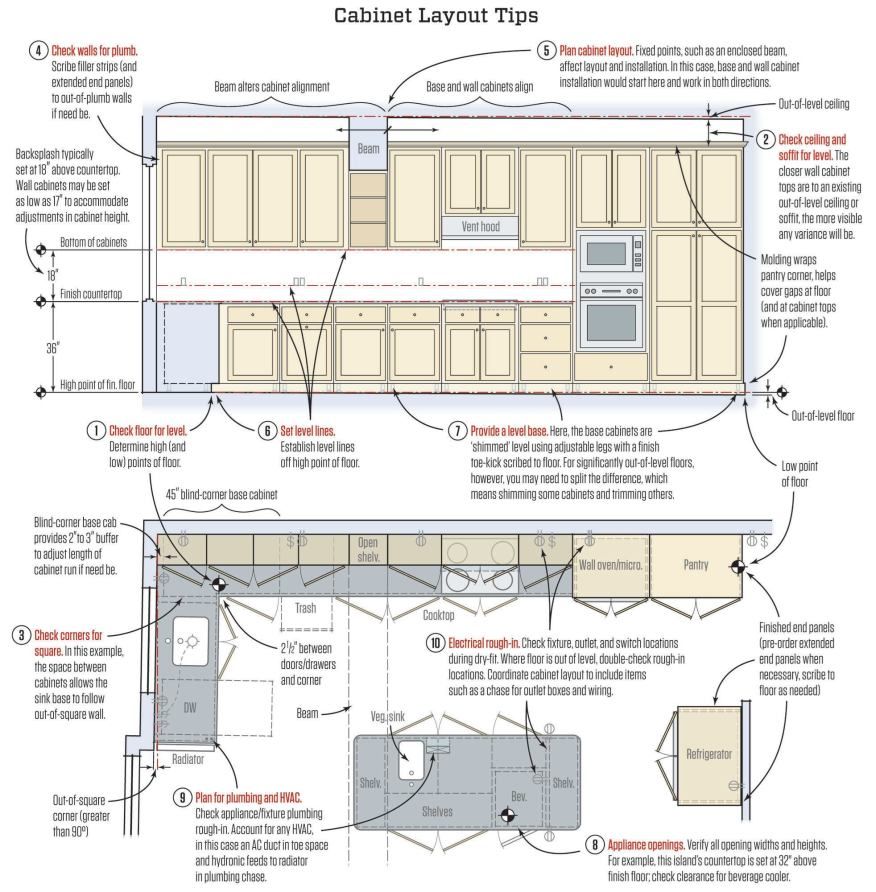 As a result, the kitchen looks advantageous and spectacular.
 6. Kitchen-island — linear kitchen, in which part of the functionality and storage is placed on the island. The optimal scheme for the kitchen-living room and for spacious kitchens from 16 sq.m. Those who often cook not alone, but with the whole family or with guests will especially like it - on the island it is convenient to cut vegetables, knead and roll out dough, etc. If the location of communications allows, a hob and a sink are taken out to the island - they can be accessed from several sides.
Tips and tricks for kitchen layout
The key concept for kitchen ergonomics is the “work triangle”. The term appeared in scientific research in the 1940s at the University of Illinois Architecture. For several years, scientists have been watching how housewives move around the kitchen and found out that:
1. The main points - a refrigerator, a sink, a stove - should be located along 1 line or at the vertices of an equilateral triangle.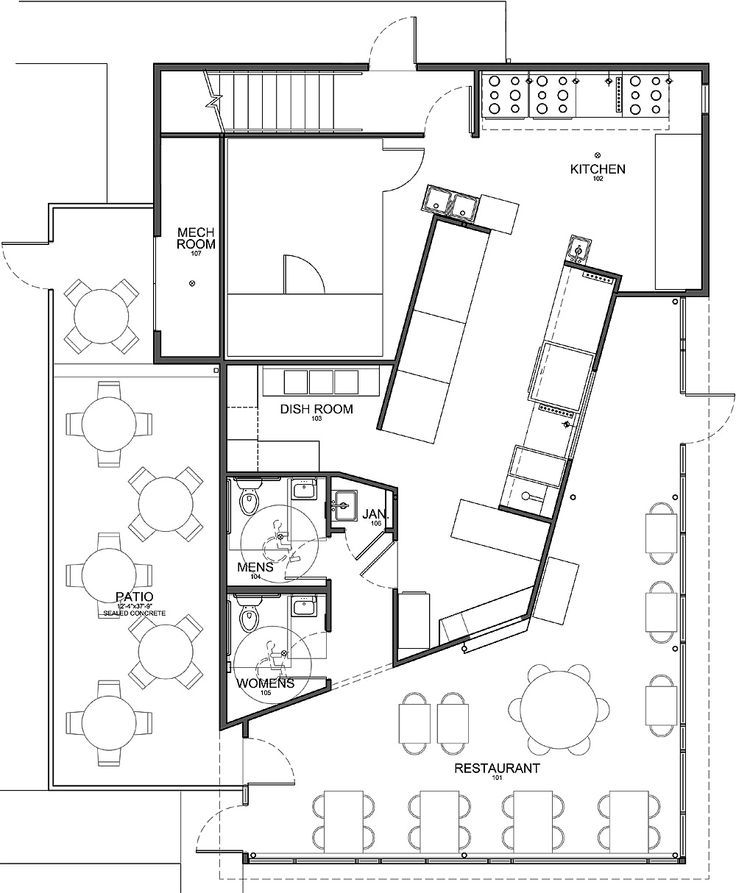 The optimal lengths of the sides are from 1.2 meters to 2.7 meters.
2. The sum of all sides of the triangle must be within 4-8 meters. Otherwise, a person in the kitchen will be very tired, he will have an increased load on the lower back, legs, venous and circulatory system.
a kitchen with an island is a dream of many housewives. But you need to understand that the footage for such a kitchen must be at least 16 square meters in order to comply with the rule of safe distances.3. In compact kitchens, it is often impossible to maintain a distance of 1.2 meters between the refrigerator, stove and sink. In this case, there is a minimum rule: there should be at least 40-60 centimeters between the sink and the stove. This will allow you to put the vegetables on the cutting board, put the pan.
4. Do not clutter up the kitchen: the distance between the furniture should be at least 1.2 meters so that two people can pass and so that you do not constantly bump into corners.
Problem and solution: owners of compact kitchens in Russia have been putting a refrigerator in the corridor and even in the room for a long time. But such a transfer greatly worsens the ergonomics of the space - the hostess has to “wind kilometers” during each cooking, because taking everything you need from the refrigerator right away is a utopian idea.
In fact, in the vast majority of cases in the same Europe (and especially in France) there are very small kitchens - familiar to us 5-6 square meters. And refrigerators are always there according to the rule of the "working triangle" next to the stove and sink.
How to solve the problem of a small kitchen competently?
Answer from a Kitchen Factory designer: “Place a dining table in the living room — and in the kitchen put a small table against the wall (it can even be made folding) or order a pull-out table that hides in the countertop. Most often, families have breakfast separately - everyone has their own schedule.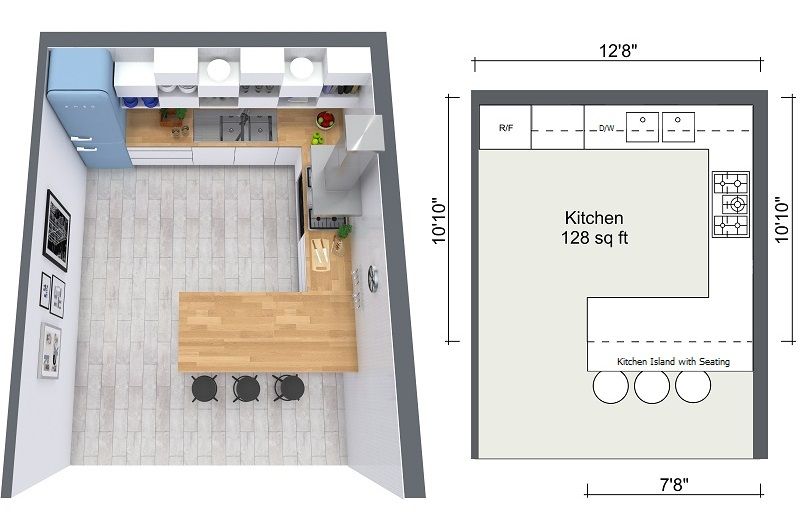 But for dinner, you can gather at a large table in the room (the children will help set and clean the dishes, and you won’t have to run from the refrigerator to the stove all evening).
Diagrams and drawings of the kitchen with dimensions - how to make them yourself
After visiting a furniture store, getting acquainted with the prices and types of products, very often many people decide to make furniture on their own. For this, it is necessary, first of all, to make a drawing of the kitchen with your own hands. High-quality furniture set is very expensive. Moreover, its dimensions do not always correspond to the existing configuration and design of the corner kitchen.
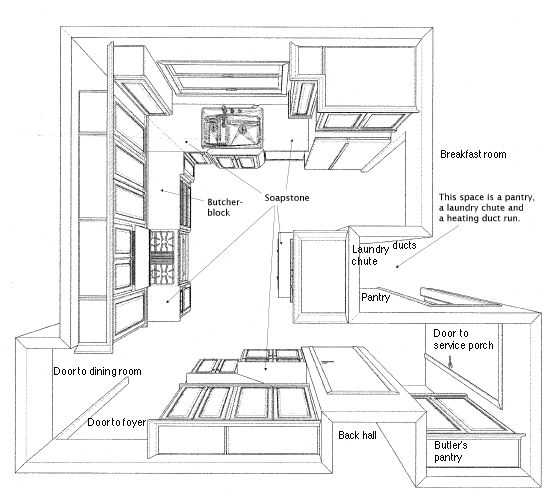
Ready-made drawing of a corner kitchen with a refrigerator
Of course, you can order furniture from the factory, but then the cost will be even higher. Therefore, the best solution to such a problem would be to independently manufacture kitchen furniture.
This option has several advantages:
- the floor plan will be made according to the dimensions of the kitchen;
- maximum use of area;
- original unique design;
- saving money.
Back to index
Contents
- 1 Getting started
- 2 How to draw a kitchen
- 3 How to draw a kitchen
- 3.1 Kitchen design guidelines
- 4 Kitchen design and its pencil drawing
- 5 Computer programs designed to develop a kitchen planning drawing
- 6 household appliances
- 7 installation of the refrigerator
- 8 place of installation of sockets
- 8.1 The designation of the generator on drawings 9006.2 and installation of outlets
- 8.3 Number of outlets
Getting Started
Perhaps this is the most difficult question. Many simply do not know how to get started.
First of all, you need to draw up a scheme of the room, in which to take into account all the nuances of the kitchen. It is necessary to consider the location of household appliances. Where to put the stove, where will the refrigerator be installed? What is the best position for the washing machine?
On the diagram you need to indicate the location of the dining table.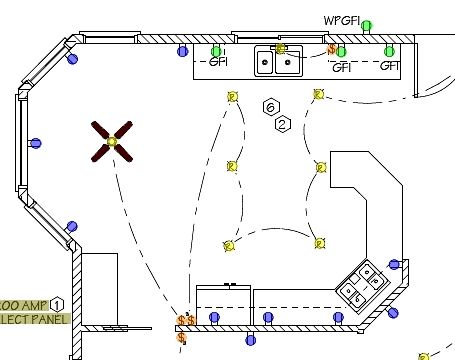 When designing, it will be necessary to resolve the issue with the countertop. Perhaps the window sill will be its continuation. For a corner kitchen, you will need to show the working area on the diagram.
Kitchen layout and drawing
After all these issues are fully resolved, it is necessary to make a kitchen layout. It is desirable that all sizes and arrangement of future furniture be indicated in great detail.
Today there are a lot of computer programs for planning a kitchen, in which you can get a visual, three-dimensional layout of a future corner kitchen. Naturally, during the creation of the scheme, a design project for the future corner kitchen is also being developed.
Drawing variant with the dimensions of the corner kitchen
Only after that the drawing of the furniture set is developed.
Back to the Table of Contents
How to make a drawing of a kitchen
After all the nuances have been taken into account, the design has been developed and the color of the room has been selected, the issue with the location of the corner set has been resolved, it is necessary to take all the measurements and draw the kitchen. To do this, you need to determine what will be included in the kitchen set. For the corner option, you will need a corner sink, cabinet, upper sections and free niches. In such niches, a washing machine, dishwasher, refrigerator or stove can be located.
Assembling a kitchen set can be quite successful, even if you have only the simplest diagram made on a notebook sheet. However, to get a better result, it is better to make an accurate drawing of the kitchen. To do this, you can use the very well-known computer program PRO 100.
Development of the design and drawing of the kitchen in the PRO 100 program
When drawing up the drawing, you must not forget about the gas pipe, mark the location of its tie-in. In addition, it is necessary to indicate where the supply pipes for the exhaust will take place.
The drawing should always have the maximum details, according to which the cutting pattern of the material is drawn up. It cannot be done without having a list of assembly parts corresponding to each furniture module.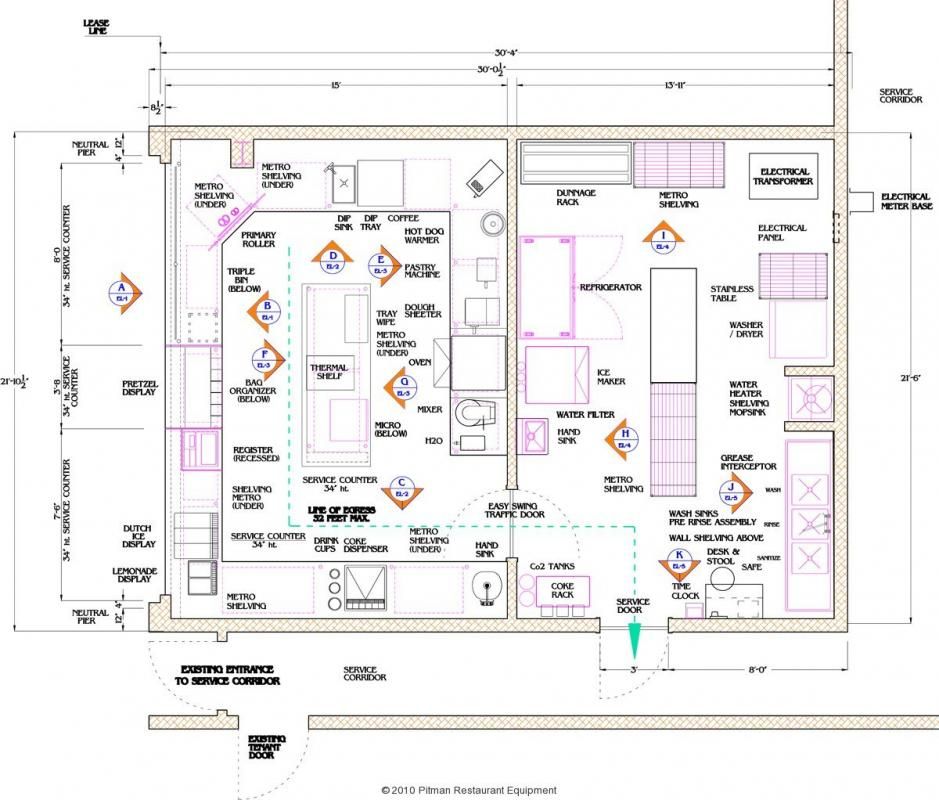
Return to the top
How to draw a kitchen
Every apartment owner has a moment when he needs to re-arrange his home. In the first place is the problem of planning a kitchen with a sofa. The question arises: how to draw a sketch and design of the kitchen in the house?
To make the kitchen comfortable, its project must be developed in advance. You can make a sketch with a simple pencil on a notebook sheet, or you can use a personal computer and draw a kitchen drawing online. Thus, you can take into account the subtleties of the room and give it the greatest functionality.
An example of a drawing of a corner kitchen with all dimensions and designations
Recommendations for designing a kitchen project
It takes several steps to draw a kitchen layout of 12 meters with a pencil. Such phased work will allow the project to take into account the slightest nuances of the kitchen.
The first step is to measure the area of the kitchen. The length of the walls, the size of the openings of doors and windows, as well as the length of the skirting boards are measured. The future arrangement of furniture depends on each of these parameters.
When drawing up a drawing step by step, you must first decide where to put the table, kitchen cabinet, refrigerator, hob, washing machine and dishwasher.
Then, in the next step, a draft scheme is created at the selected scale. All the listed items are shown in it with a pencil. The diagram will most accurately show the location of kitchen appliances relative to the walls.
Back to the top
Kitchen design and its pencil drawing
To draw a project with a pencil, you must first get the true dimensions of the room.
Ready 3D design and kitchen project
The drawing is made in several projections: side view, back view and main view.
The drawing of the interior and design of the kitchen-studio should begin with the development of a plan indicating all dimensions. In addition, various ledges and niches are drawn.
When a drawing of the future kitchen is created, the location of household appliances is necessarily shown, the installation of a furniture set is drawn. This mainly applies to the working area of the kitchen and dining room. In order for the project to be completed, it is necessary to show on the drawing how engineering communications will be laid, where the radiators will be located.
Design and drawing of the kitchen in a special program
The type of future layout depends on the correct location.
When a professional layout is done, the drawings show the main communications, the location of the valves that require free access. Sometimes the installation of household appliances does not allow you to use the wiring done. To solve this problem, flexible hoses are used. To independently draw the interior of a small kitchen of 6 meters, you need to take into account all communications when placing furniture: gas, water, electrical wiring. The installation of furniture should not interfere with their normal operation.
Back to the table of contents
Computer programs designed to develop a kitchen layout drawing
When designing and planning a kitchen of 20 meters, the following is selected: color scheme, style and suitable furniture material. For these purposes, a lot of computer programs have been developed: PRO 100, Aston dizayn, Sweet Home 3, Google Sketchup, Home Plan Pro. All of them have their drawbacks and advantages, which are easy to get acquainted with on the Internet, where their full description is given.
Back to the Table of Contents
Household Appliances
When a stage-by-stage preparation of a kitchen design project takes place, the location of kitchen appliances is shown in pencil. At the same time, it is better to place the washing machine near the sink, as it requires a constant supply of water and drain.
The hob should be away from the refrigerator. A computer program usually places the work area between the stove and the sink.
Kitchen furniture should have drawers, much better than cabinet doors.
Kitchen interior with installed household appliances
After the stage-by-stage formation of the project below, the upper project is being developed.
Built-in hood installed under the cabinet. Wardrobe, can replace the chimney hood. A drying cabinet is often installed above the sink.
Back to the top
Refrigerator installation
The refrigerator must be installed away from the stove and sink. It is adversely affected by the presence of high humidity. It is very important to consider its dimensions.
Back to TOC
Location of outlets
When electrical outlets are properly located in any room, living room or kitchen, it becomes more comfortable. Today, in our apartments there are a lot of very different household appliances, so if you do not plan the installation of sockets in advance, a large number of extension cords will appear in the room.
The kitchen always requires a large supply of electricity, since almost all household appliances are located on its area.
Scheme for installing sockets in the kitchen
Unfortunately, when planning the ergonomic design of a corner kitchen, the development of a plan for installing sockets is ignored.
As a result, there are great difficulties when you want to connect any device. To prevent this from happening, you need to draw up a plan on which to indicate the exact location of the equipment.
Installing kitchen outlets is not limited to just one wall. They can be placed on a work apron or directly on the countertop.
When built-in appliances are used, sockets can be installed behind the walls of the furniture. In this case, the installation height from the floor plane should not exceed 60 cm. In order to have free access to the outlet, special holes are cut in the walls of the kitchen furniture. For safety reasons, sockets for built-in household appliances should be located at a distance of less than one meter from the device.
An extractor hood is considered a stationary appliance, therefore, for it, the installation of an outlet is made above the kitchen furniture by about five centimeters. When sockets are installed, the location of the ventilation corrugated outlet must be taken into account. Access to the electrical network must be free, the corrugated outlet should not interfere with this.
In the case where the hood is built-in, the best location of the outlet is considered to be the inside wall of the cabinet. It is usually mounted next to the side wall so that it is easy to bypass the exhaust pipe.
There are many appliances in the kitchen that are not considered stationary: a mixer, a blender, a kettle, an electric meat grinder, a coffee pot, an air grill, and so on.
To easily switch on these devices, it is enough to mount three free sockets. They must be installed in the most accessible places. The countertop is most suitable for this, sometimes a kitchen apron is used.
Drawing of a corner kitchen with extractor hood and socket locations
To connect lights, sockets are located above the kitchen set. The socket block, which has a retractable design, is also very popular. It is usually installed inside kitchen cabinets.
Electrical sockets, not to be installed:
- above the sink;
- above plate;
- on the walls of cabinets with drawers;
- behind built-in appliances.
Designation of sockets on drawings
There is no special designation of sockets. It is conditional. Usually a schematic representation of the installation of the outlet is made, its grounding is shown. In the diagram, the image of sockets is made in the form of two points.
Placement of sockets on the drawing of the kitchen
It can be the end of the wire, sometimes a square, with the image of two points.
On the diagram, the location of sockets and their image is established by GOST 21.608-84. Plug sockets, according to this document, are divided into several groups:
- open installation;
- closed version;
- sockets with a switch.
Apron and installation of sockets
When a corner kitchen is overhauled, it is very rare to draw up an electrical wiring project. Most people think that it is not worth spending money on such work. However, so that the finish is not subsequently spoiled, it is better to think over the future installation of sockets in advance. That is why it is best to make a detailed sketch of the installation of sockets.
Number of sockets
Calculating the required number of power points is very simple. According to the project, it is known how many appliances the working area will have on the kitchen plan in the house.