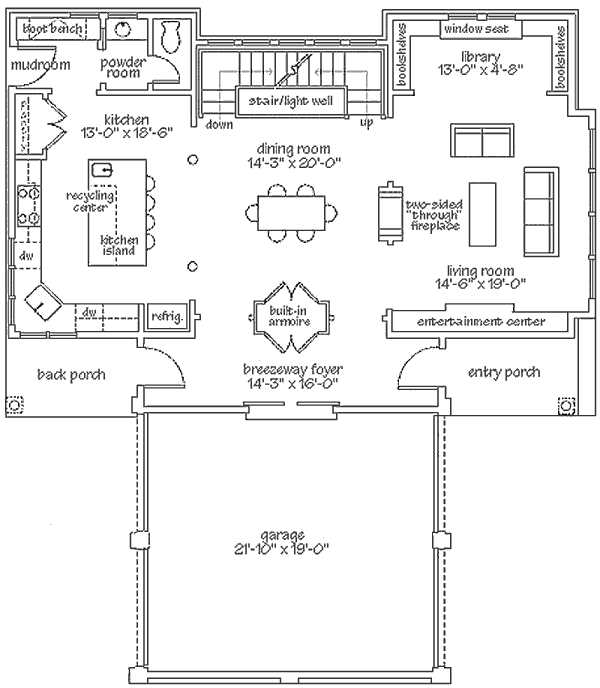
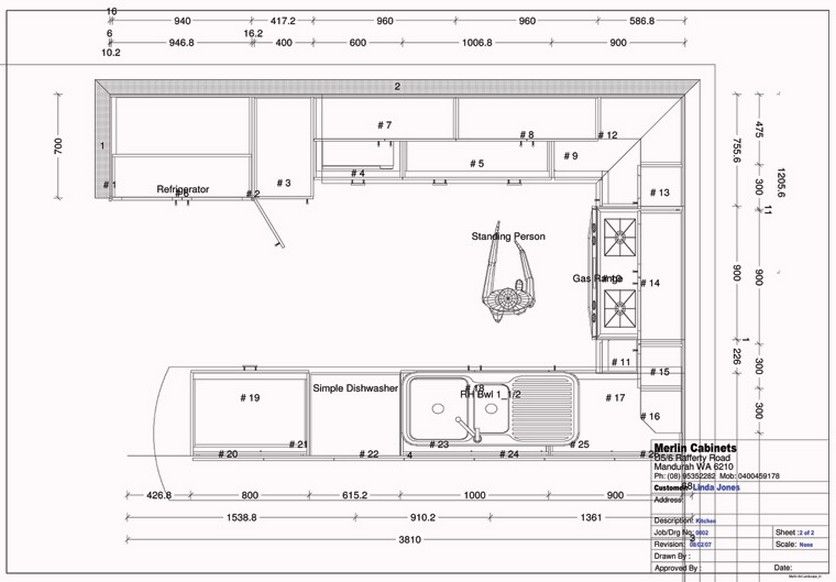
Kitchen center island plans
Build a DIY Kitchen Island ‹ Build Basic
This kitchen island is made from a surprisingly simple frame built around two stock cabinets, and can be sized to fit ANY base cabinets by changing only ONE measurement. When we started our kitchen remodel, this exact island was quoted to cost just over $4,000 (not including the countertop…yikes!). We built it for under $250 using only basic tools (i.e. drill, miter saw, circular saw, etc). Building anything this large may seem daunting, but all the cuts are fairly simple. Believe it or not, the hardest part is mitering the baseboard.
For reference, my frame is built to house two 36-inch-wide by 34½-inch-tall base cabinets, for an overall size of 83¼” x 43″. If you have cabinets of a different width than mine, you’ll only need to adjust the width of the frame by changing one measurement on my cut list—the sides will be built the same. I opted for a 1½ countertop overhang (with a rounded inset detail on the seating side) for a total countertop size of 86¼” x 46″. Please note, I don’t recommend ordering a countertop before the build, as variations in cabinet size and stock lumber can adjust your final dimensions. Instead, I suggest building this frame with the cabinets on hand to double check their fit, and then templating for the countertop once the build is complete.
- Overview
- Tools
- Materials
- Cut List
Cost: $240 (plus base cabinets and countertop)
Time: 2 Work Days (plus paint time)
Difficulty: Moderate. The cuts are fairly easy, but ensuring the assembly remains level and square takes finesse.
Note: This list contains affiliate links
Drill/Driver
Tape Measure
Framing Square
4-Foot Level
Miter Saw
Circular Saw (Or have the plywood cut at the store)
Nail Gun (or Hammer)
Random Orbital Sander (or Sanding Block)
Block Plane
Caulk Gun and Caulk
Click HERE to purchase these plans and get the full materials list, cut list, measurements, drawings, board planning sheet and more!
Click HERE to purchase these plans and get the full materials list, cut list, measurements, drawings, board planning sheet and more!
1.
 Cut the Framing Boards
This island is built to house two 36-inch base cabinets, but can easily be modified by simply adjusting the width of the center wall. Using the Board Planning Sheet, cut the 2×4 boards to create the structural framing for the center and side walls. To ensure the lengths of “like parts” are equal, use the first cut of each group to mark each subsequent cut. For example, I used the first 31½ inch 2×4 stud to mark the cut length of each remaining stud. When complete, set all the studs side-by-side to ensure they are cut to the exact same length. One tall stud could prevent the finished island from sitting level.
2. Mark the Stud Locations
To ensure the studs sit plumb (perfectly vertical) between the horizontal top and bottom 2x4s of each wall’s framing, lay the top and bottom 2x4s together and mark a line at the location of each stud. For example, on the side walls, the doubled-up studs shown in the illustration below will sit 12¼ inches from the front edge–or the “seating side”–of each wall.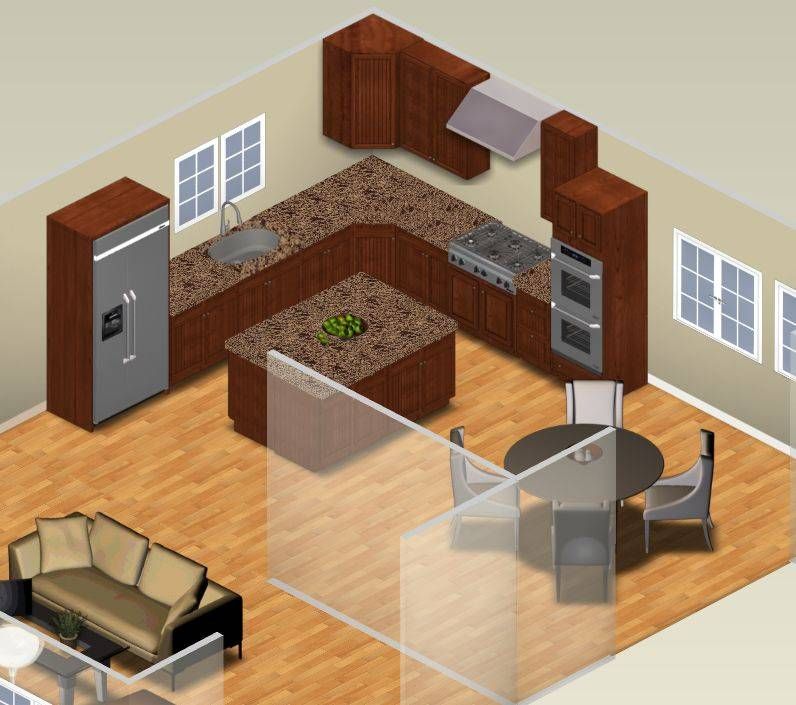 Lining the studs up with these marks will help keep the assembly square.
3. Layout the Side Wall Framing
On a flat surface, lay the parts of one side wall in place. Position the studs between the top and bottom 2x4s. The two outer studs should sit flush with the ends of the top and bottom 2x4s while the doubled-up stud should be positioned using the line marked in step 2.
4. Assemble the Side Wall Framing
Apply glue to the ends of each stud, lay them back in place, and drive two 2½-inch wood screws through the horizontal 2x4s and into the ends of each vertical stud. Repeat to assemble the second wall.
5. Attach the Side Wall Panel
Using the Board Planning Sheet below, cut a piece of plywood to the total height and width of the side wall. Apply a bead of wood glue to the outer edges of the 2×4 framing. Lay the plywood in place and secure it using 1-inch wood screws.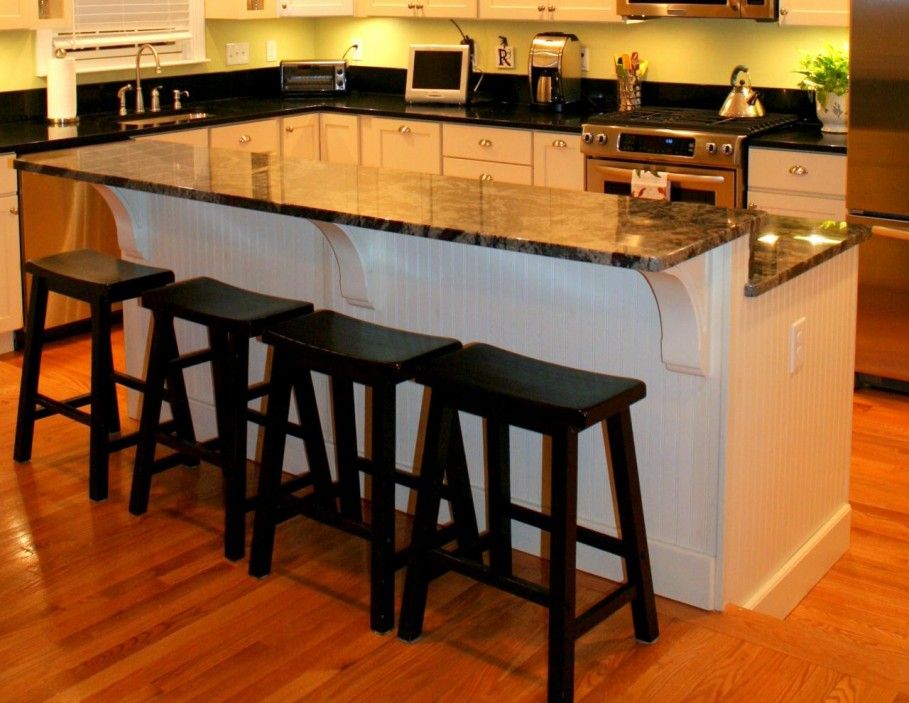 Position the screws around the perimeter of each panel to ensure the stiles and rails will cover them. Repeat this step to cut and attach the second side wall’s panel.
TIP: Get straighter cuts with a circular saw using our simple DIY Cutting Fence Tutorial.
6. Layout the Center Wall Framing
Using the same method described in step 2, mark the center wall’s stud locations on the top and bottom 2x4s. Position the studs between the top and bottom 2x4s on a flat work surface. Using a drill/driver and 2½-inch wood screws, secure each stud in place by sinking two screws through the horizontal 2x4s and into each end of the studs.
7. Install the Crosspieces
Secure a crosspiece in each gap between the studs using 2½-inch wood screws This will help hold the wall square and sturdy. Offset the center crosspieces so the drill/driver can sink through the ends of the board.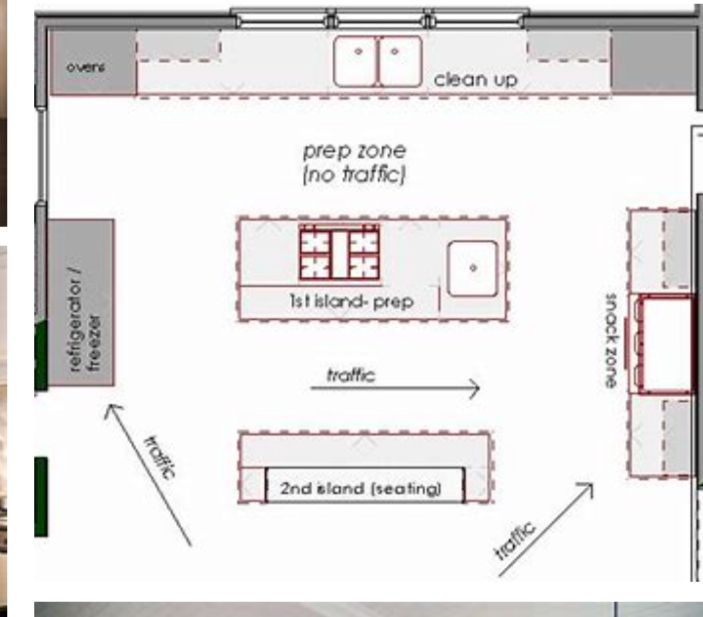
8. Attach the 2×4 Padding and Panel
To create a larger nailer for installing the cabinets, place two 2×4 boards on edge against the back for the center wall, flush with its top and bottom edges. The drawing below shows the center wall from the backside so you can more clearly see the 2×4 padding placement. Cut the center wall’s panel to size and fasten it to the opposite side of the wall using 1-inch finish nails.
9. Cut the 1x Pieces
Cut the vertical 1×6 end caps to the height of the walls. Cut the horizontal 1×5 rails and filler boards to the width of the side wall. Wait to cut the vertical stiles until the rails are installed and you can more accurately measure the distance between them.
10. Attach the Filler Boards
Position a filler board on the panel along the bottom edge of each side wall. Using a nail gun and 1 inch finish nails, attach the board.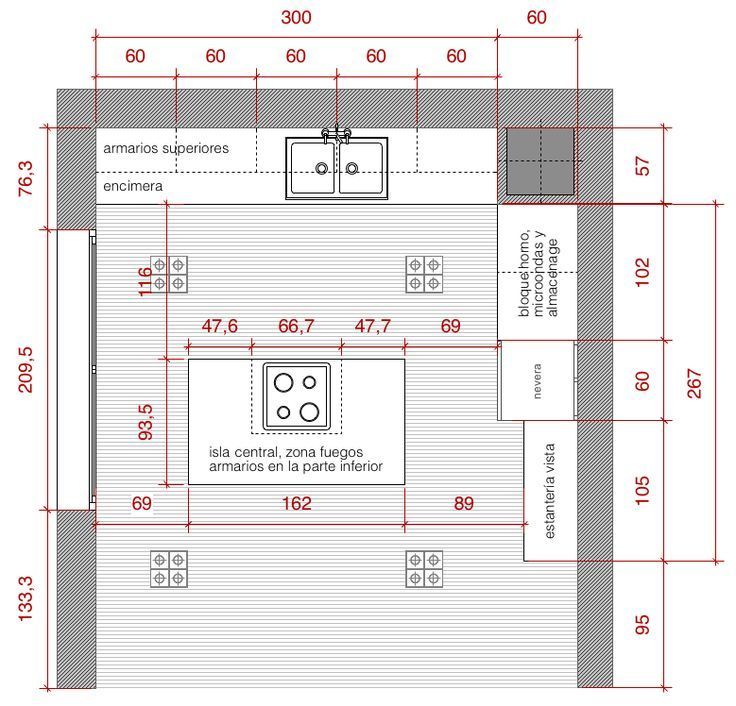
11. Install the End Caps
Position the 1×6 end caps on the front and back edge of each side wall flush with face of the filler board. I used another scrap 1x near the top of the walls to help position each 1×6. Nail the boards in place with 1 inch nails using a nail gun. Since these nail holes will need to be filled, ensure the nails sink below the surface of the wood.
12. Add the Top Rail
Slide the top rail between the end caps and position it flush with the top edge of the side wall. Nail it in place. Repeat on the second side wall.
13. Position and Install the Bottom Rail
Mark the height of the baseboard on the edges of the end caps. Position the lower rail ¼ inch below the height of the baseboard so that the baseboard will slightly overlap the rail, but not so much so that it looks noticeably thinner than the top rail.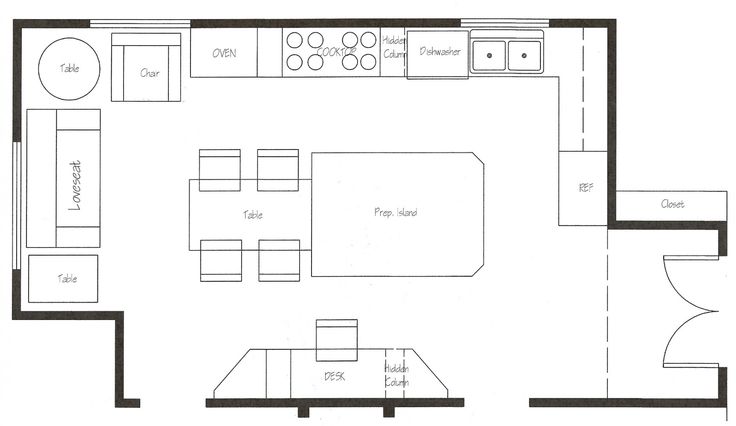 Nail the rail in place and repeat on the other side wall.
14. Size and Insert the Stiles
Measure the distance between the rails, and cut the stiles to size. Don’t be afraid to cut each stile slight longer than your measurement, and then make several cuts until the board fits tightly between the rails. Secure each stile in place tight between the rails and pressed against the edge of the adjacent end cap.
15. Attach the Inside Panel
Using the Board Planning Sheet, cut the inside plywood panels to size. Flip the assembled walls on their face. Be careful not to dent the stiles and rails. Position the panels against the edge of the “stool side” end caps, as shown. Secure the panels by nailing through the plywood and into the edges of the 2×4 framing.
16. Place the Cabinet Filler Board
Cut the cabinet filler board to the height of the wall and place it along the edge of the “cabinet side” end caps. Secure it in place. Repeat on the other side wall.
17. Sand and Smooth the Assembly
Using a block plane trim the edges of the end caps until they sit perfectly flush with the faces of the stiles and rails and the inside panels. Fill all visible nail holes with wood filler. Sand all the parts, especially where two boards butt against each other. The smoother the joints feel, the more likely it is to look like one solid piece once it’s painted. I find this step to be the most crucial for a professional-looking final project.
18. Secure the Baseboard Padding – Stool Side
To further pad the thickness of the island’s footprint, I used an additional board behind the baseboard. This is, of course, optional. To do so, cut 1x material to the width of side walls. We chose to miter the corners since their top edge would be visible. On the stool side, cut a piece to the width of end cap leaving a 45-degree miter on both ends. Wait to cut the piece for the inside panels until the walls are assembled.
19. Secure the Baseboard Padding – Cabinet Side
On the cabinet side, cut the 1x padding with a mitered end–to meet the miter of the pieces along the face of the side wall–and a square cut end to finish where the end cap will meet the cabinet.
20. Dryfit the Base Cabinets
Set the center and side walls upright. Either set the cabinets in place, and then position the walls around them, or stand the walls in place, and then slide the cabinets into the opening. Using a framing square, ensure that the side walls are square to the center wall, and they fit tight to the cabinets. Slide a 4 foot level over the top edges of the walls to ensure everything is level and there are no high spots.
21. Paint the Parts
To mimic the look of the surrounding cabinets, I had the paint store color-match a cabinet door.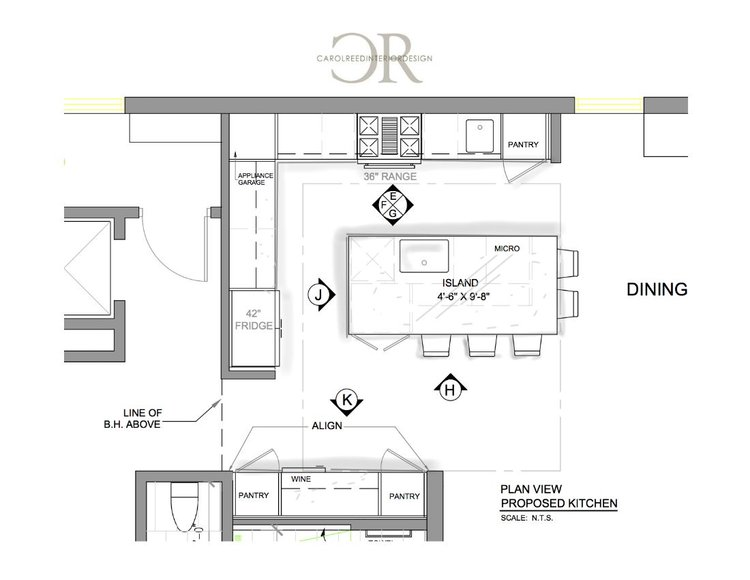 I prepped with a thick, high-adhesion primer and finished with three coats of an enamel paint, which typically has an extra-tough finish. Sand between every coat to smooth brush strokes and drips, and create a long-lasting, professional-looking finish. In addition, prime and paint the baseboard and the additional 1x that will be used to pad out the baseboard along the center wall and inside panels.
22. Level the Center and Side Walls
Once the paint is dry, set all the parts back in place and use a measuring tape, framing square, and 4-foot level to adjust each piece until it sits level, plumb, and square to the remaining parts. Measure between the front end cap of each wall, and then the back end cap of each side wall to ensure the measurements are equal and the walls aren’t twisted. Use shims to make minor adjustments.
23. Assemble the Center and Side Walls
Clamp the parts in place, remove the cabinets, and screw through the center wall’s framing and into the side wall studs on each side. Because we were also redoing our flooring, I screwed through the framing of all three walls and into the floor, but this is not required.
24. Install the Base Cabinets and Toekick
Slide the cabinets into the opening. Level the cabinets to the island walls and each other. Screw through the back wall of the cabinets and into the 2×4 padding. Insert spacer blocks if necessary and screw the cabinets together and to the side walls. Using a nail gun and 1 inch finish nails, secure the cabinets’ toekick against the back of the recessed foot of each cabinet.
25. Caulk the Joints
Using a caulk gun, caulk the joints where the side wall panels meet the center wall panel. Either use white caulk like I did, or clear if your island is painted a color.
26. Attach the Remaining Baseboard Padding
Size the remaining baseboard padding pieces that will fit along the inside panel on each side wall and the center wall.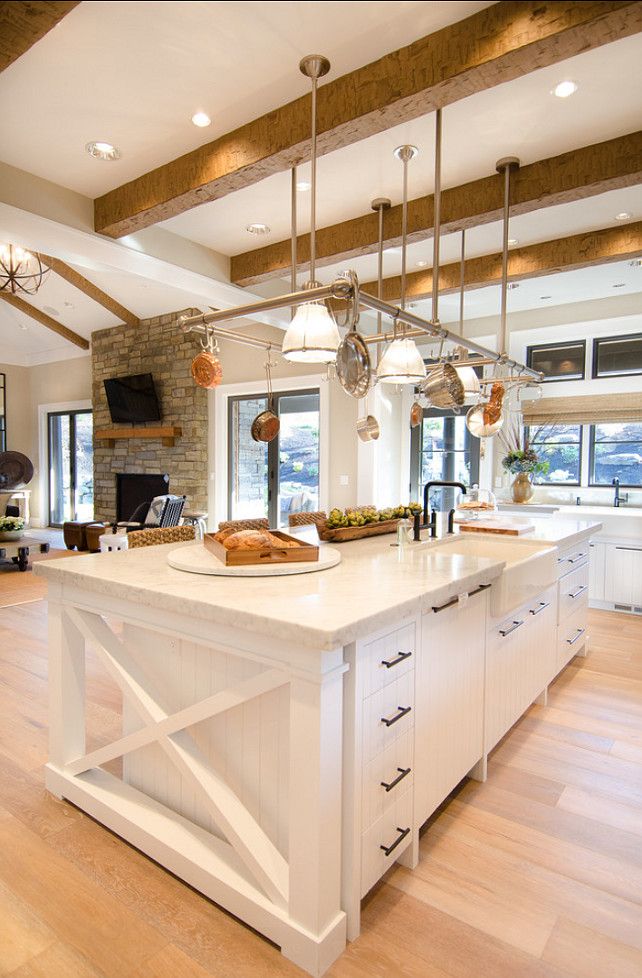 Miter their ends and dryfit them into place. Using a nail gun, attach the remaining baseboard padding using 1 inch finish nail. If possible, nail below the height of the baseboard to avoid visible nail holes once the baseboard is installed.
27. Cut and Install Baseboard
Cut and dryfit the baseboard in the same way as the baseboard padding pieces, mitering their edges.
28. Cut and Install the Baseboard – Side Walls
Secure the baseboard using a nail gun and 1 inch finish nails.
29. Cut and Install the Baseboard – Cabinet Side
Miter both ends of the baseboard pieces that fit along the end caps on the cabinet side of the island.
30. Cut and Install the Baseboard
Miter a piece of baseboard to finish the corner and then slide under the recessed toekick. Depending of the overlay of your cabinets, use a handsaw to notch the top edge of the baseboard so that the cabinet can open without obstruction. Fill the nail holes and joints, and then lightly sand and touchup the baseboard with paint where needed.
MORE BUILDING PLANS
18 Great DIY Plans for Kitchen Islands
DIY Projects for Kitchens of Any Size
By
Stacy Fisher
Stacy Fisher
Stacy is an expert writer for The Spruce covering home DIY projects and crafts. She has over 18 years of journalistic experience, appearing as a DIY expert on the Dr. Oz Show and several radio shows. She has published hundreds of articles and co-authored a book.
Learn more about The Spruce's Editorial Process
Updated on 11/17/22
The Spruce / Michelle Becker
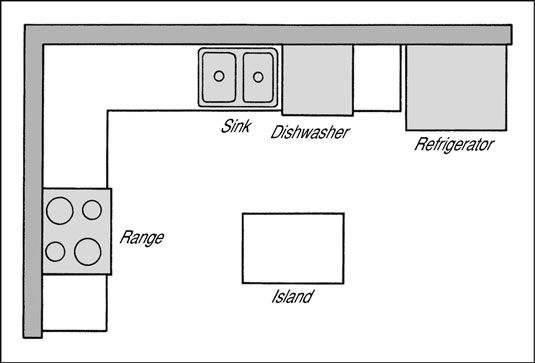
A DIY kitchen island is a great way to add a custom centerpiece to your kitchen and, when done right, can add more value to your home. Extra countertop and storage space are significant benefits, and it doesn't have to be complicated. If you have basic DIY building experience, it is often cheaper to build your own rather than buy a kitchen island. However, if you want to install a sink, dishwasher, or other appliances on your kitchen island, you will need professional help getting your kitchen up to code.
You can find many free DIY kitchen island plans for different features or style elements. Plans include material lists and step-by-step instructions to guide you in building a custom island. For ease, you can make a kitchen island out of stock cabinets as the base and finish it with a countertop.
Size Considerations
The beauty of building a kitchen island yourself is you can modify the plans to adjust the island size, finish, and other aspects, such as accompanying stools or seating. The best size for a kitchen island depends on your available space and needs.
In most cases, an island should meet the minimum of 36 inches tall and 2 x 4 feet in surface space. The galley space or space between the island and cabinets should be at least 42 inches. The average size of the countertop overhang is standard, usually 1 1/2 inches. And, if you plan to add seats, for instance, four stools on one side, plan on having at least 20 to 24 inches of countertop length per stool.
Here are 18 free DIY kitchen island plans to inspire you.
-
01 of 18
Ana White
This huge farmhouse kitchen island from Ana White is loaded with storage. It has two cupboards with shelves, open shelving, and lots of drawer space. You could even use it as an entryway console or for storage elsewhere in your home. The free kitchen island plan includes dimensions, materials, a tools list, a cut list, directions, and photos.
-
02 of 18
Ana White
This rustic but modern kitchen island is also from Ana White.
 It includes two shelves, large drawers, and a wood countertop. It can be stained or painted to match just about any style of kitchen. You also can use hardware to match what you already have in your kitchen.
 -
03 of 18
Shades of Blue Interiors
Make your functional kitchen island dreams come true with this beautiful build from Shades of Blue Interiors. This DIY kitchen island includes open storage plus a pullout bin for a trash can. Besides being useful indoors, this island would also be excellent to use in an outdoor kitchen to ensure there's always a trash can near the cooking space.
-
04 of 18
Cherished Bliss
Cherished Bliss has designed a small but functional kitchen island with two cabinets, four drawers, and a butcher block countertop, which is a wonderful idea if you have a smaller kitchen. The free plan includes a supply list, lumber shopping list, cut list, building directions, diagrams, and photos, including the step-by-step instructions for building the kitchen island frame.
 The DIYer says the instructions are easier than they might seem, although you should pay special attention to getting your drawer measurements exactly right.
 -
05 of 18
Mama Sarahs
Having a small kitchen doesn't necessarily mean you don't have space for an island. This free kitchen island plan from Mama Sarahs builds a functional island that's exactly in proportion with its small kitchen. And it does it for under $50. The island adds a bit more counter and storage space to the kitchen without making things feel tight. Color photos accompany the step-by-step instructions and supply list to make this build a breeze.
-
06 of 18
Designs by Studio C
This free DIY kitchen island plan from Designs by Studio C builds a large island complete with two storage shelves, a push-through drawer, and a double-sided cabinet. If you like the style but are short on space, Designs by Studio C also offers a plan for a smaller version. The large version is 60 inches long by 28 inches wide while the smaller island is 48 inches by 29.
 5 inches. Either way, both islands will add functional and stylish storage and prep space to the kitchen.
 -
07 of 18
Mint Images / Getty ImagesA kitchen cart offers an island's counter and storage space paired with the flexibility of having wheels and being mobile. You can push it against a wall when you don't need it, bring it out by your dining table to use as a buffet while entertaining, and even wheel it outside for extra surface space when you're grilling. It also can serve as a dining spot with some bar stools. Step-by-step instructions, materials, a tools list, user comments, and videos are included in this kitchen cart plan from HGTV.
-
08 of 18
Robert Daly / Getty Images
Here's a plan from Popular Mechanics for a simple kitchen island that's perfect for the beginner woodworker. Drawers, a pullout waste bin, a drop-leaf top, and shelves for storage add lots of function and style to this DIY island. The downloadable plan comes with blueprints, 3D animation, color photos, and step-by-step instructions.
-
09 of 18
Johner Images / Getty Images
Rockler, a woodworking and hardware retailer in Minnesota, offers a free kitchen island plan featuring a thick maple butcher block top that should be ideal for serving, cooling baked goods, or carrying out chopping tasks. Underneath, there’s a spacious drawer for kitchen utensils that are mounted on full-extension drawer slides. Using prefabricated materials will save you a lot of time when building your kitchen island, and it will make the build a lot easier for those who are new to woodworking.
-
10 of 18
James Oliver / Getty ImagesThe Fill has a free plan for building a kitchen island out of base cabinets. If you want a professional-looking island that doesn't take much work, this could be the DIY project for you. The plan takes you through the process of picking a spot in your kitchen for the island, shopping for supplies, connecting the cabinets, fastening the island to the floor, adding power, and applying finishing touches.
-
11 of 18
Little Glass Jar
This DIY kitchen island from Little Glass Jar repurposes an old bookshelf. The DIYer removed the back of the bookshelf, painted it white, and added pieces of plywood to make the sides look like shiplap. A simple stained piece of wood forms the top of the island. This is a kitchen island you can completely customize to your design style, starting with any bookshelf you like as the base. You can even cut down tall bookshelves to the height you need.
-
12 of 18
Classy Clutter
This custom DIY kitchen island from Classy Clutter pieced together three prefabricated or stock cabinet boxes that perfectly fit the available space in the kitchen. The DIYer added trim to make the boxes look like all one piece, as well as beadboard inlays to match the other kitchen cabinets. Finally, the island got a slick coat of deep blue paint to add a pop of color to the kitchen.
-
13 of 18
This DIY kitchen island from Fresh Mommy Blog uses an existing island scored off Craigslist as its jumping-off point.
 The DIYer removed the existing top of the island and then painted it a rich gray. The outdated hardware was swapped for modern gold pulls that match the rest of the kitchen. And rather than breaking the budget on an expensive countertop, the island got a custom concrete top that looks great with the modern design.
 -
14 of 18
This DIY from My Old Country House repurposes an old desk into an island. The desk was the perfect size for the kitchen, and its back was already finished. The DIYer painted the desk, added new hardware that coordinated with the rest of the kitchen, and attached wheels to the desk legs to make the island mobile. The desk also got a formica marble top that matched the rest of the kitchen. Now, it’s functional storage and prep space that looks like it was meant for the kitchen all along.
-
15 of 18
Kreating Homes offers a DIY kitchen island that repurposes cube storage shelves. The DIYer flipped two tall cube shelves on their side and then attached legs to the new bottom to raise the island slightly off the floor.
 Then, they used an old tabletop as the new island top. The large cube shelves provide excellent storage for bulky and oddly shaped kitchen items.
 -
16 of 18
Jen Woodhouse
This DIY kitchen island from Jen Woodhouse was made specifically with coffee in mind. The DIYer adapted another island plan, cutting 8 inches off the length for this island coffee bar. It has just the right amount of surface space to prepare coffee while still being small enough to fit in most kitchens. And the two large shelves below offer ample storage. This island can easily be customized with paint and/or stain to match any kitchen style.
-
17 of 18
Remodelaholic
Remodelaholic shares a DIY that transformed an old secondhand kitchen island into a custom and expensive-looking piece of furniture. The DIYer wanted a rustic look. So after adding a base to raise the island’s height, they attached cedar planks to the island in a design similar to a barn door.
 Then, they stained it in a weathered gray tone and attached a sleek galvanized metal top.
 -
18 of 18
If you have an outdoor kitchen and need some extra food prep space, this build from HomeMade Modern could be the island for you. It uses weatherproofed materials, including cedar lumber and a concrete top, that can withstand the elements. The free DIY kitchen island plan provides tools and supplies lists, a video, and clear step-by-step instructions with photos.
Watch Now: Designer Kitchen Tips
40 design projects with photos
In modern design, centralization is considered good form: furniture is located not only along the walls, but also in the center of the room. In the kitchen, it is not only fashionable, but also convenient: there is a chance to make an additional work surface.
In this article we will talk about kitchens with an island: we will understand its capabilities, see photos in the interior and learn about various design options. Interesting projects and advice from experts will help to equip the room beautifully and functionally. nine0003
What is it?
A kitchen island is a free-standing part of a kitchen. Most often it is placed in the center of the kitchen.
At the same time, this element of furniture can be used in different ways: as a countertop or as a table, place a stove or sink there, turn it into a kind of bar counter ... It all depends on the needs and design project.
The lower part is rarely made hollow: often there are additional drawers for storing kitchen utensils. nine0003
Let's make a reservation right away: it is unrealistic to put it in a small kitchen, since it takes up too much space.
However, in small kitchens, an alternative is usually used - the peninsula. This is a protruding structure, on one side adjacent to the wall or headset.
The islands themselves are of two types:
- stationary, that is, built into the floor;
- and mobile (mobile).
The former are more suitable for a full worktop with a stove and sanitary ware, while the latter are more suitable for those who want to equip an additional countertop.
Planning features
It should be noted that these are more tips than immutable rules. However, if you neglect them, then the island will simply interfere.
If you want to place a sink or hob on it, communications must be carried out in advance. You will also need an island hood (read what it is in this article). It costs more than usual, but it completely solves the problem of unpleasant odors. nine0003
For comfortable movement in the kitchen, indents from walls and furniture to the island should be at least 80 centimeters.
The standard length of the island is from 90 to 120 cm, and the optimal height is about 80-85 cm, like the lower section of the headset.
If you want to use the island as a dining table, make sure that the overhang of the tabletop over the base is at least 30 centimeters.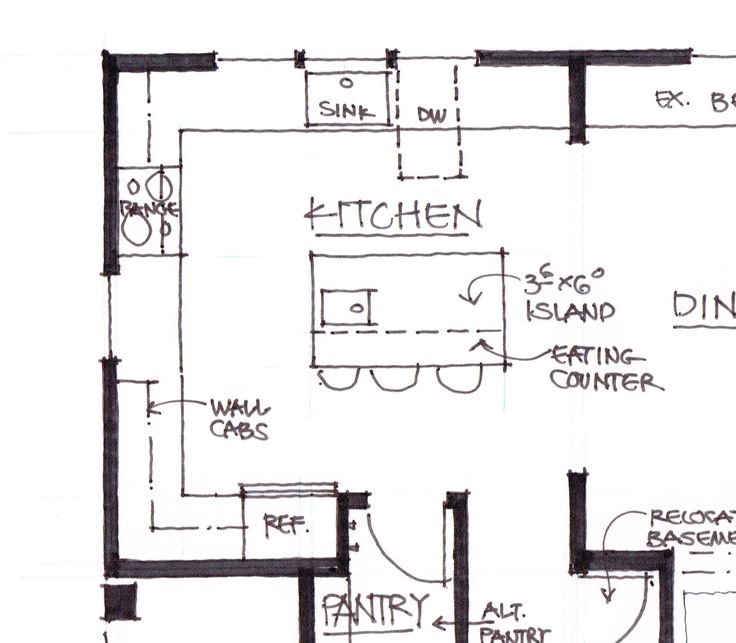 Otherwise, it will be uncomfortable to sit. In addition, make sure that nothing will interfere with the extension of drawers or the opening of doors, if they are provided in the island. nine0003
As for combining it with a bar counter, please note that in this case you will need to make a two-level tabletop. Otherwise, either the stand will be lower than expected, or it will become inconvenient to work on the island.
Tip: When creating a kitchen design project, it is recommended to evaluate the arrangement not only from the top view, but also from the side. So you will understand how comfortable it will be to work and move around the room.
Keep all of this in mind when planning a kitchen with an island. Real projects with photos will be shown below - we are sure they will be useful to you. nine0003
Is the extra surface worth the restrictions? Now we'll see!
Advantages and disadvantages
Like any other piece of furniture, the island has both pluses and minuses.
| For | Against |
|
|
Brief summary: Of course, there are more pluses. Plus, they're all quite heavy. Therefore, if space and finances allow, choose and order the model you like.
Now let's see if there are any restrictions on the area of the room where it will fit.
Island and kitchen area
As mentioned above, this requires a large kitchen. For example:
- Kitchen-living room 20 squares; nine0032
- Combined with a hall, hallway or studio apartment.
However, for a small kitchen, this condition is bypassed if you choose the right configuration: a compact island or a transformer.
Experts advise to choose the option with a pull-out mechanism and a folding top, which can replace a dining table and provide additional work surface. And in the “passive” state, such an island is generally invisible, which frees up a lot of space in the room. nine0003
Let's see photos with different types of designs.
American style
It is believed that this type of kitchen design came from the USA.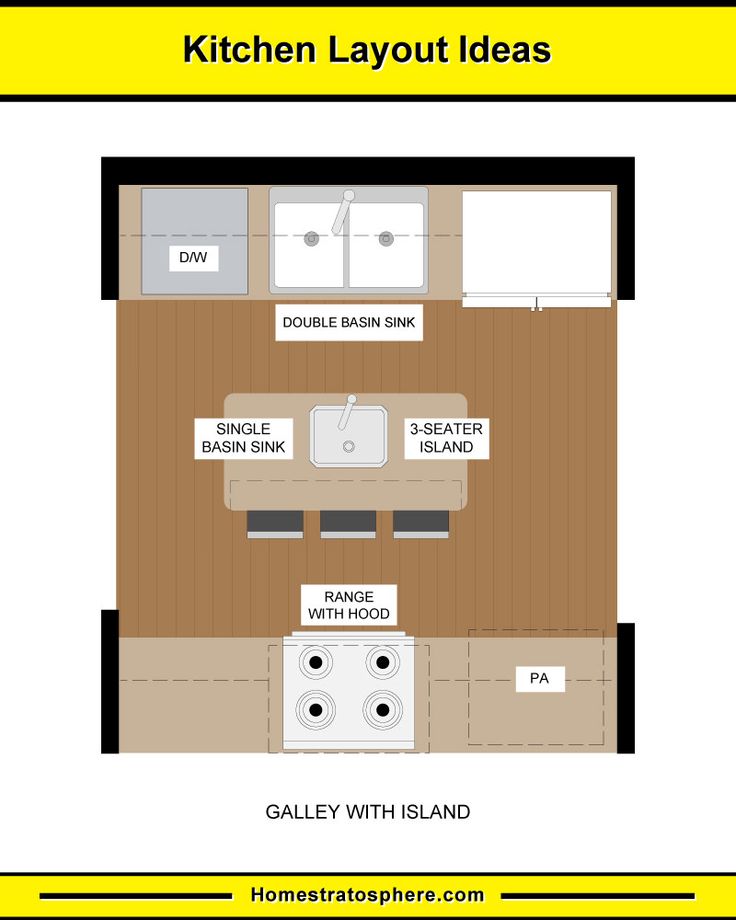
In general, it is characterized by natural materials and the combination of practicality with beauty. Therefore, we recommend decorating the island with light wooden facades and marble countertops. Moreover, furniture from IKEA will not work - Americans appreciate monumentality, so you have to find a really impressive set. nine0003
In the kitchen-living room, it makes sense to delimit the zones with a long island with a prominent bar counter. It is comfortable and looks very unusual. Turn it into a dining table with a raised table top. Due to the size, there is enough space even for a large family.
Please note: According to design standards, it must follow the configuration of the room in shape. That is, square for square and rectangular for elongated.
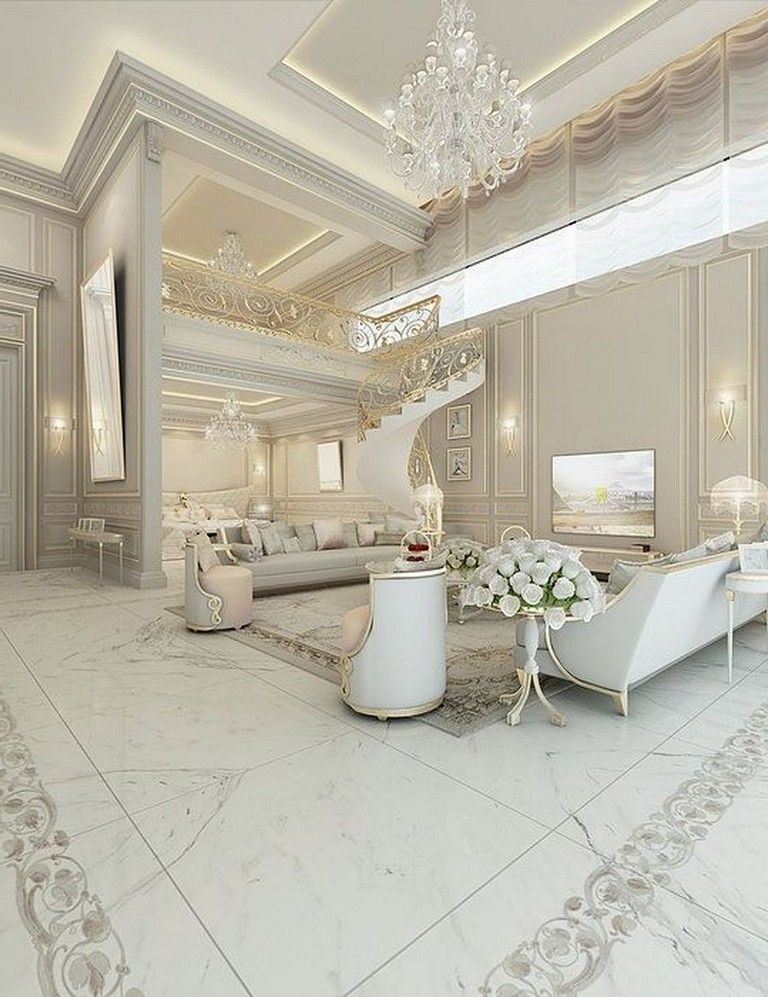
An American classic kitchen with a fixed island is not only fashionable but also practical. Take a look at how the chandelier is framed. It is surrounded by an iron cascade, on which you can hang beautiful crockery and other kitchen utensils. nine0003
The décor is structurally similar to the main set - pay attention to the patina on the facades. But the color scheme is chosen in contrast. This technique makes the room visually more spacious. In this case, the main focus is on the center of the room - black wood is underlined by a white background.
Provence style
You will need to use light, light colors and natural materials. We also advise you to choose furniture that is not too heavy in appearance, without complex textures and decorative curls. nine0003
Let's start with a very unexpected decision. Remember, we wrote about the desired dimensions of the room? Meanwhile, some find a way out even for a small area of 12 sq.m.!
The sink is removed to the miniature island and there is room for a small cutting surface. This allows you to narrow the main headset. True, in this case, you will have to do with a two-burner hob.
The built-in sea-green peninsula also looks beautiful. Such furniture does not clutter up the center, making it possible to equip a full-fledged kitchen-dining room. It is best to use this technique in large rooms with at least two windows - one for each zone. nine0003
Modern idea: This configuration is convenient when you need a dining table and additional storage space at the same time. In addition, it is easy to do it yourself.
Classic style
The island is also suitable for interiors decorated in discreet traditional motifs. Try to make the kitchen in light colors, with white facades and stone countertops. Delicate patina, elegant details look amazing, especially in this scale. nine0003
A little tip: place the shaped chandelier directly above the kitchen island. It will become the main decoration, while providing enough light above the work surface.
In the style of modern classics, the addition of non-standard textures or bright colors is welcome. We offer you this option: an island that plays the role of a dining table on the one hand, and a traditional surface with drawers on the other.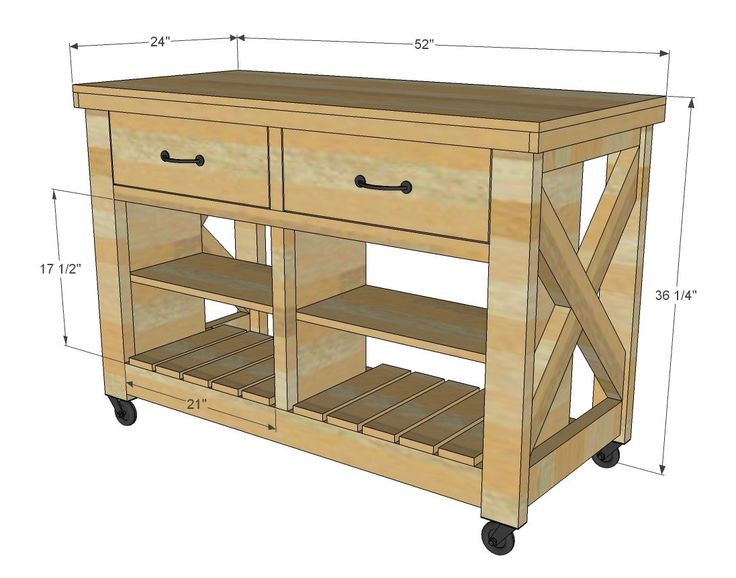 To dilute the white-beige palette will help chairs of an unexpected color - for example, lilac. nine0003
If you decide to remove the wall between the kitchen and the room, it can be a worthy replacement. Place it on the border to emphasize the transition between zones.
A good move - hanging structure with stucco bas-relief. It is not only beautiful, but also practical - hang pots and pans on it. True, for this they must have an appropriate appearance - old dishes are unlikely to decorate the interior.
Scandinavian style
The bright and airy kitchens are ideal for an island. Don't believe? Let's prove it now!
Opt for natural textures such as wood. Pay attention to how multifunctional the small island is made. It combines a sink, a work surface, a dining table and a place to store books and all sorts of little things. This is the perfect solution for a small space.
Think twice before installing an island combined with a breakfast bar. If you place the countertop at the optimum height for the bar, it can be uncomfortable to work on. Therefore, estimate immediately whether you will be able to cook without discomfort. nine0003
It doesn't have to be big. Miniature models also look very stylish. Especially if you add an unexpected element during the design - for example, make legs from rough raw bricks. On a glossy snow-white background, they look interesting and original.
But for a spacious kitchen-living-dining room, a huge island is suitable, which combines several functions. For example, a table and a wide work surface. It is better to make it from natural materials. A wooden table top, for example, is now in vogue. nine0003
Contemporary
We love this look. Minimalism in design emphasizes the beautiful textures of countertops and the whiteness of facades. In a sufficiently large room, every centimeter is involved - rationally, don't you think?
It is better to make a table as simple as possible, but functional._10218_/floorplans/summerlin_pinnacle/marlette1_1800.png) Try to combine several purposes in it - a dining area, storage space, a wide work surface.
Try to combine several purposes in it - a dining area, storage space, a wide work surface.
Classical styles often use rectangular or square. However, you should not be limited to them - round, wavy, zigzag. All this is quite feasible, especially if the area allows. We love this red and white design. It looks very stylish and catchy, becoming the dominant element of the interior. nine0003
Another option is an abstract island design. Smooth lines and elements flowing into each other attract the eye. If you do not want to force the room with furniture, turn it into a full-fledged work surface. A small sink, a modern hob, which at first seems like an unusual countertop decor. Fashionable and modern, right?
The modern design of the kitchen with a 9-square island also definitely deserves attention. A rounded corner set and a tiny island look organic, and the right set of tones makes the room visually more spacious. nine0003
The combined island surface is another trendy trick.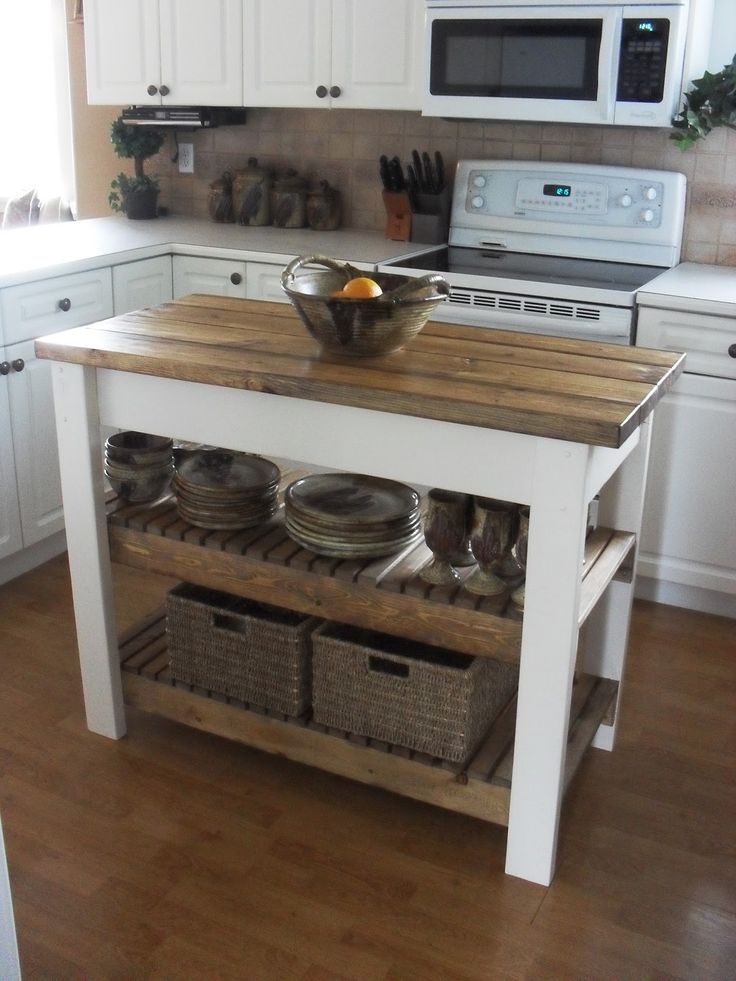 Break it visually into three zones: cooking, work surface and countertop, which will play the role of a dining table. Of course, in a small room you can hardly put such a design. But in a large one, it will be appropriate.
Loft style
The idea of decentralization is typical for a loft, so installing an island is the right and logical move.
If the kitchen is located in the attic, pick it up in width flush with the even part of the ceiling, and install a U-shaped set around the perimeter of the room. It seems to be nothing complicated, but the room immediately seems stylish and modern. Use traditional materials for this style - wood, brick, concrete.
Light island with stove combines the functions of a dining area and a hob. This is convenient, but you need to remember about safety: you still don’t need to cook and have a snack at the table at the same time, there is a risk of getting burned. nine0003
In a white kitchen, we recommend not to overload the interior with an overly complex shape of the kitchen island. It is better to limit yourself to a simple headset, and focus on wall decoration and decorative elements. In a private house, replace one of the partitions with a large window.
Summing up, we note that the kitchen island requires a serious approach. You will have to draw up a design project, think over the arrangement of furniture and carefully select all the elements.
However, if you are not afraid of complexity, and space allows (or if you have an idea how to install it in a small kitchen), then we definitely recommend it for purchase! It is not only beautiful and comfortable, but also very fashionable.
40 kitchen island design ideas
A kitchen island is one of the working modules, which is in no way connected with the kitchen set. A similar solution in kitchen space layout has many advantages: increase in the usable area for cooking, the possibility approach the work area from any side, place a sink or oven with a hob surface, expand the number of places for storing kitchen utensils, etc. The design of the kitchen island is much more diverse than it might seem on the surface. first glance. We will talk about the most interesting solutions in this article. Offers beautiful kitchens with an island and the best design ideas. Enjoy reading! nine0003 Photo from the source: pinterest.ru Countertop Cedar 7093/E Concrete
We select the correct dimensions of the island in the kitchen
Kitchen island and dimensions kitchens are directly dependent on each other. If there is enough space large, you can afford to install a large rectangular island, which will be stretched along the entire kitchen set.
Photo source: elledecor.comTop top Cedar 1110/S White nine0002 To cook on such the kitchen was even more convenient, you can make a sink or stove on the island - this help create a working triangle. Photo source: interierno.comTop top Cedar 9022/S Whitewashed oak In addition, in such on a large island, it is appropriate to create a lot of storage space.
If your house has a kitchen and the dining room are different rooms, the island can become a convenient haven for fast food lovers. nine0003 Photo from the source: behance.net Countertop Cedar 8345/1 Travertin gray
Large kitchen with the island is not only convenient, but also beautiful!
How to make an island in the kitchen if it petite?
This question is asked many. We hasten to please you: a small kitchen with an island is real! However its dimensions, of course, will be more modest than in the first version, and the shape will not rectangular rather than square.
Photo from the source: blog.gnezdo-mall.ruTabletop Cedar 4922K-52 Madura pearl Another relevant solution is the construction on wheels, which are taken out when you need to increase the size of the working surface, and then it will be possible to slide under the countertop of the kitchen set.
Distance between the kitchen and the island
The ergonomics of the kitchen island, the distance from the kitchen to the island are also important questions. In order for you to be comfortable, it is necessary that it be equal, at least one metre. You should also keep this in mind when choosing the width of the island in the kitchen. nine0003 Photo source: myblogdeco.frTop top Cedar 7052/FL* Wotan Oak
Height islands in the kitchen
The height of the kitchen island is quite an individual thing. It all depends from your height. Choose a height so that you don't have to bend down or raise your arms while cooking. Usually the most comfortable tabletop height - 15 cm below the elbow.
Photo source: na-dache.proTabletop Cedar 9968/S Pebbles nine0006 Kitchen island in the interior and its functionsThinking through the plan and kitchen design with an island, remember that the functions that the island can perform there is actually a lot in the kitchen!
1. Kitchen an island with a dining area - it can be a full-fledged a dining area for several people or a place for quick snacks.
2. Bar rack - there are models of kitchen islands with additional raised tables. A couple of bar stools are attached to them - excellent an alternative to the kitchen table when it comes to gatherings with friends or quick snacks. nine0003 Photo source: femmeactuelle.frTop top Cedar 1046/soft Grey-beige Tabletop Cedar 3831/M Douglas light
3. Additional work surface - it provides maximum comfort when cooking, makes it possible to create a working triangle. And in such kitchens will be able to cook at the same time several human.
Photo source: excellence-line.vzug.comTabletop Cedar 1021/Q Black nine0002 4. Additional storage space - if the kitchen is not enough places to store utensils or products, such a decision will become a real salvation! And if the shelves are open, you can organize not just useful places storage, but also stylish. For example, place beautiful services on them, decor, bottles of wine, jars of jams, pickles or bulk products. Photo from the source: homeandinteriors.ruTable top Cedar 910/Br Obsidian brown nine0002 5. Territory to accommodate built-in appliances - click here fit freezer or small refrigerator. Also this is great place to place the oven. Photo from the source: myberghoff.ruTabletop Cedar 3255/M Cocobolo
 6. Kitchen island as a means of zoning - if the layout of the kitchen with an island assumes that the room is one with the living room or dining room, then the island will become an excellent tool for separating the working area and the recreation area.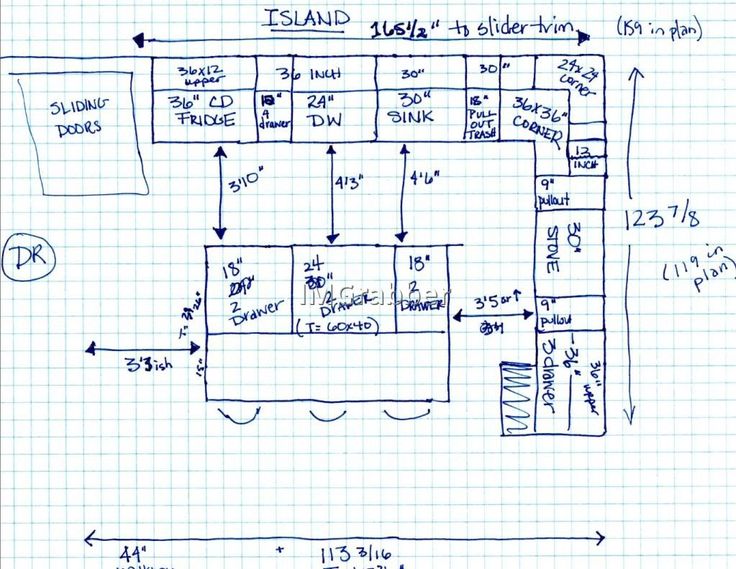 nine0003 Photo from source: admagazine.ruTop top Cedar 9022/S Whitewashed oak
20 kitchen ideas with island in a modern style
A kitchen with an island in a private house or apartment is an interesting decision! We have prepared a lot of ideas for you so that you can implement it. maximum success!
1. Smoothing out the corners
An island without any sharp edges edges, and all corners are smooth will require less distance in order to get around it, which means it allows you to leave more space for the kitchen set. nine0003 Photo from the source: inrosstroy.ruTabletop Cedar 1110/S White Top Cedar 1021/Q Black
2. Spelling
Straight or corner kitchen with L-shaped island are definitely good options. But the letter "P" in this design promises where more storage space and work surface. Bar, cooking area, cabinets with dishes - all this will fit and once again prove that the ergonomics of a kitchen with an island very good! But remember that such a solution requires large spaces for incarnation. nine0003 Photo from the source: pinimg.com Tabletop Cedar 2946/R Galia
3. Ease in everything!
If you think that the island in the kitchen, whose design assumes a closed structure, looks too cumbersome, make shelves open. So the island will seem visually lighter.
Photo from the source: almode.ruTable top Cedar 1110/S White4. Magnet that attracts
Island in the kitchen, photo which is presented below is a vivid example of how this design can become the center of attraction for all household members. Accent will help to emphasize this lighting. nine0003 Photo source: pinterest.ruTable top Cedar 7351/S STROMBOLI GRAY
5. Non-standard hood
island hob, do not forget about the hood. There are interesting design alternatives to standard hoods that look very heavy. For example, a chandelier hood.
Photo from the source: arsenal-bt.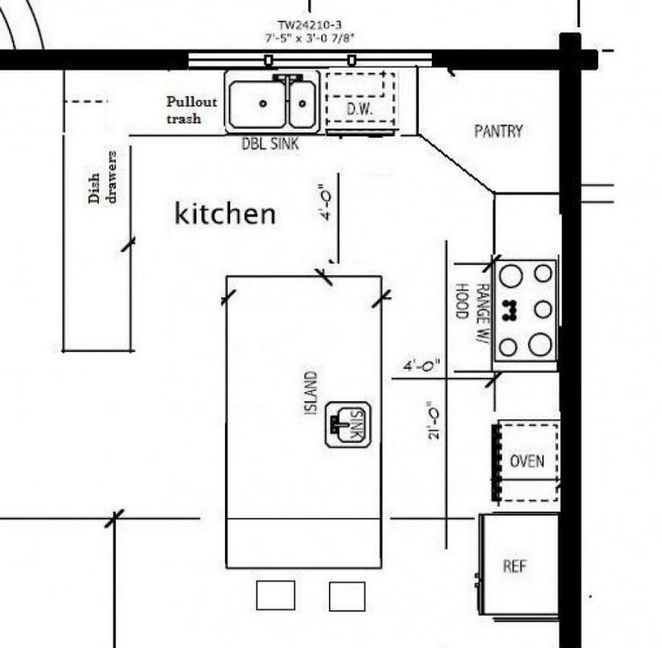 ruTabletop Cedar 111/1 White
 6. Going beyond
Unusual combinations - something that you should not be afraid of, because the design of a kitchen with an island in a modern style is just welcome! As an example of this - a modern kitchen corner is expanding through the use of a long table in the style of the Victorian era or an island that contrasts with the color of the base colors of the interior. Suddenly? Yes! Nice? Undoubtedly!
Photo from the source: shtory-deco.ruTabletop Cedar 314/M Wenge7. Moon in the sky
Shaped kitchen island crescent moon is a very multifunctional piece of furniture. From the outside, this dining area, and from the inside - a work surface.
Photo courtesy of charlesyorke.comToptop Cedar 1110/S White8. Opposites attracted
Modern design models of a kitchen island often suggest contrasts in the materials of its execution. For example, the base can be made of wood, and the countertop - from marble. nine0003 Photo source: marbleplus.caToptop Cedar 8345/1 Travertin gray
9. Prohibition
If you decide equip on the kitchen island both the hob and the sink, be sure provide good insulation so that moisture cannot get on the electrics.
Photo from the source: interior.ruTable top Cedar 1110/S White10. The beauty of marble
Marble is one of the most beautiful materials of the kitchen with an island in a modern style. Photo - explicit proof of that. Just see how it blends in with fruits, flowers, how appropriately highlights the kitchen island in space. nine0003 Photo source: behance.net Countertop Cedar 2347/soft Blanco Marble
11. Original square
Somehow accepted consider that the kitchen island should be exactly rectangular. We hasten to destroy this stereotype. A kitchen set with a square-shaped island also looks very good. Everything will fit on it, and there will also be a place for decor!
This is very correct and practical. After all, if you cook on one level and dine on another, slightly raising the dining area, it will not get water and dirt. Maintaining comfort in the kitchen and cleanliness will be many times easier!
Photo from source: pinterest.ruTable top Cedar 3045/E Betao Top Cedar 2074/FL Chestnut Oak13. Pet Island
In homes where there are dogs or cats, their bowls are often scattered throughout the kitchen. It doesn't look very nice, and it often gets in the way. underfoot - not practical and not ergonomic. Simple yet very elegant the solution is to place the bowls on the shelves of the kitchen island.
14. Kitchen with a window and an island
It is common to think that the interior of a kitchen with an island suggests that the latter is always located in the center of space. But about the importance good natural lighting should also not be forgotten. Therefore if you place this design closer to the window, the island will not be an island from this will stop, and you will get additional convenience. nine0003 Photo from source: mykaleidoscope.ruTabletop Cedar 5021/S Metallic
15. Metal island
Kitchen design with metal island in a private house or apartment - how often do you see such a solution? After all, it is considered that the main the material in this case is wood. However, metal is also appropriate here - this is practical and interesting looking.
Photo from the source: mykaleidoscope. ruTabletop Cedar 811/1 Metallic nine0338 16. Kitchen island as an art object
 Since the island is the central figure in the kitchen, which always remains in sight, it can be turned into a real work of art art! For example, paint in some sudden color, you can even contrast.
Photo from the source: technika-remont.ruTable top Cedar 7351/S STROMBOLI GRAY17. Monolith
Continuing the theme of creating art objects in space suggests considering such an option as a kitchen island in the form of a single piece concrete - something akin to sculpture! nine0003 Photo from source: mebel-v-nsk.ruTabletop Cedar 2238/S Light Breccia
18. Mirror Island
Another non-trivial solution that allows you to create the most weightless design, which seems to dissolve in space.
Photo from the source: verona-kuhni.ruTabletop Cedar 1110/S White19.
 Smooth transition
 When the kitchen island flows from work area to dining area the table is convenient. nine0003 Photo source: salben.kzTabletop Cedar 1110/S White
20. Setting the accents
Even if you have chosen a kitchen project with an island, in which the latter is made in a completely neutral color, to revive the kitchen the interior will be helped by bar stools placed around it. More precisely, their upholstery. Make it bright, interesting, it will turn out very harmoniously!
Photo from the source: cosmorelax.ru Countertop Cedar 3504/XX Gray granite nine0338 21. Great combinationsKitchen island lighting can be different, moreover, than the more combinations you get, the more interesting it will look, and the lighting level will be better, which is especially useful for the cooking process food. After all, it will be much more convenient for you!
Photo from the source: almode.