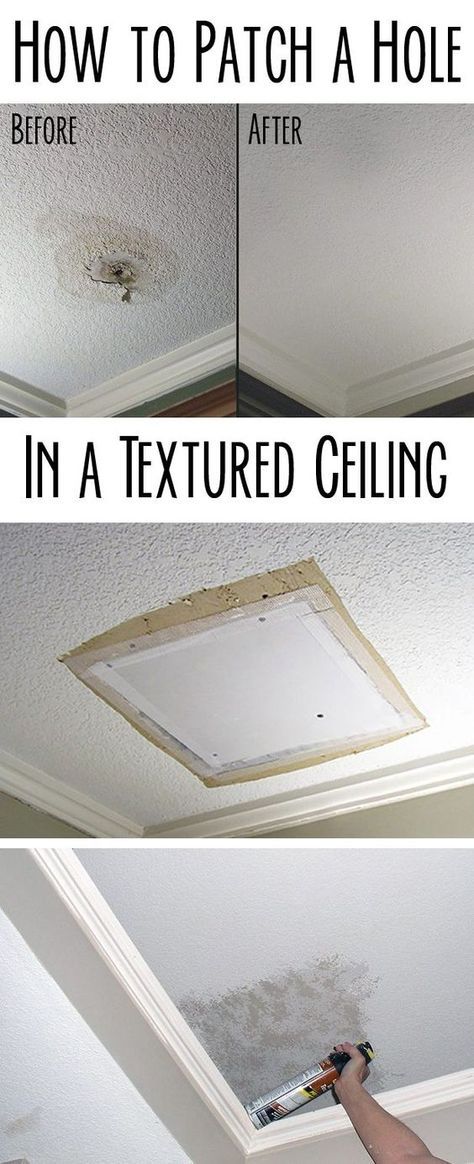
How to scrape ceilings
11 Tips on How to Remove Popcorn Ceiling Faster and Easier
These popcorn ceiling removal tips will help you update your living space while staying safe and clean.
Every editorial product is independently selected, though we may be compensated or receive an affiliate commission if you buy something through our links. Ratings and prices are accurate and items are in stock as of time of publication.
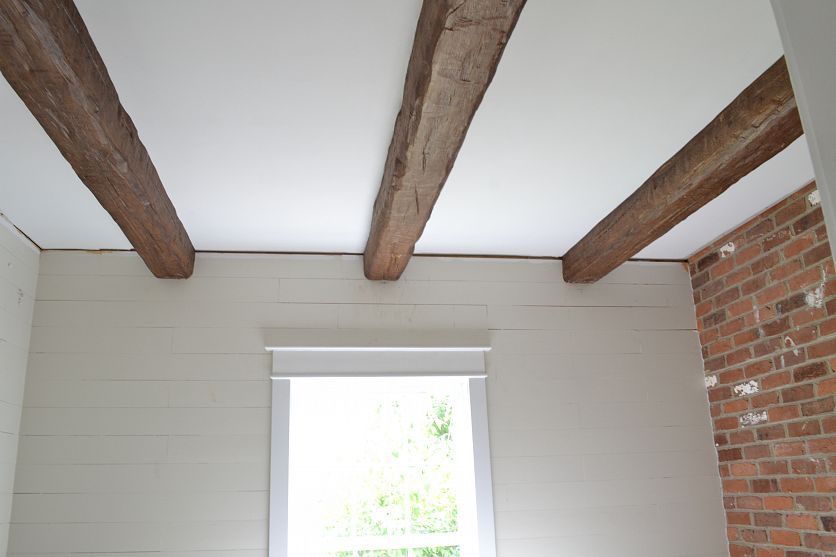
Popcorn ceilings were all the rage back in the ’60s and ’70s. Applying texture to drywall and plaster ceilings was a quick and easy way to hide imperfections with no painting required afterwards. However, its rough texture attracts dust and cobwebs and makes patching cracks and holes a headache.
Removing popcorn texture from a ceiling is a messy chore but worth the effort if the substrate underneath is in sound shape. Here are some tips to take some of the pain out of scraping the popcorn texture off your ceiling.
1 / 12
Family Handyman
Do a Scrape Test
When learning how to remove popcorn ceilings, scrape a small test area first before committing to all the trouble of prepping the room. Try it dry first, then dampen it with water and try again. Some texture comes off easily without water, but in most cases wetting it is most effective. In the event that the water does not soak into the texture and soften it, the ceiling has probably been painted or paint has been added to the texture mix. In that case, wetting the ceiling may not help. You’ll have to decide whether you want to tackle a difficult scraping job or choose another way to hide your popcorn ceiling.
2 / 12
Family Handyman
Test for Asbestos
If you have a popcorn ceiling installed before 1980, it is likely to contain asbestos, which is a known cause of lung cancer. Before removing any popcorn ceiling texture, contact your local health department and ask about getting a sample tested. If the test comes back positive, cover the popcorn with new drywall or tongue-and-groove planks, or hire an asbestos abatement contractor to help with removing the popcorn ceiling.
3 / 12
Family Handyman
Prep for a Big Mess
Cover your floors and walls with plastic drop cloths as you begin the popcorn ceiling removal process. It is not recommended to use canvas drop cloths because water can soak through them. Using plastic drop cloths also makes cleanup easier, since they can be rolled up and thrown in the trash once your project is finished. After the popcorn ceiling texture has been removed, leave the plastic in place to catch any mess you’ll make repairing and sanding it later.
4 / 12
Family Handyman
Get the Furniture Out
If possible, remove all furniture from the room you’ll be working in. As you remove the popcorn ceiling, you will not want furniture to be in your way when moving the ladder. If moving everything out of the room is not possible, arrange it in a cluster and cover it with drop cloths.
5 / 12
Family Handyman
Remove Ceiling Fixtures and Fans
Shut off the breaker to any fixtures and remove them. Leaving lighting and ceiling fans in place may seem easier, but they will only get in your way and get covered with wet popcorn scrapings. Plus, you do not want to accidentally spray water into electrical fixtures.
6 / 12
Family Handyman
Protect Can Lights From Water Spray
For recessed “can” lights, stuff newspaper or rosin paper inside them to ensure that they remain dry when water is sprayed around them.
7 / 12
Family Handyman
Cover Electrical Boxes
Shut off the power to any electrical boxes in the ceiling and cover them with painter’s tape. This will keep the wiring dry when spraying water on the textured ceiling. Overlap the sides of the junction box with tape, and then trim the perimeter with a utility knife, taking care not to nick the wires.
8 / 12
Family Handyman
Wet it With a Pump Sprayer
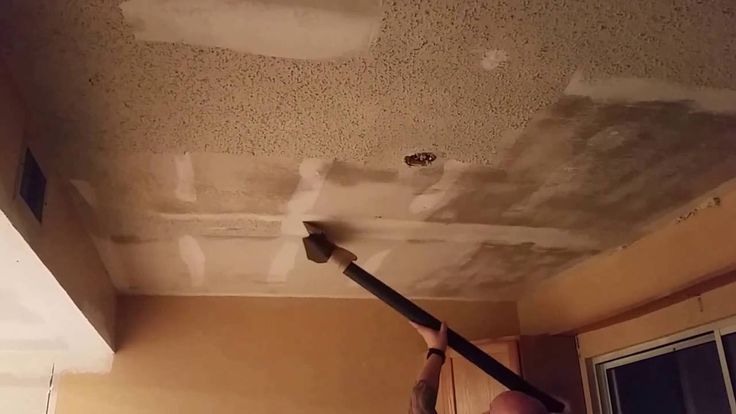
For easier scraping and practically no dust during popcorn ceiling removal, use a garden pump sprayer to mist the ceiling. Let it soak for about 15 minutes before scraping. Give it only a light misting – too much water could damage the drywall or cause the joint tape to loosen. If the texture hasn’t softened after 15 minutes, spray it again and wait another 10 to 15 minutes.
If the texture still hasn’t softened, it might have been painted, or paint might have been mixed into the texture before application. In either case, water won’t easily penetrate it. If the texture is painted, you may be able to dry scrape it first to reveal some of the unpainted texture, and then wet scrape the surface. If the texture contains paint, you may have to dry-scrape the entire ceiling or abandon the project and cover it with drywall or T&G boards.
9 / 12
Family Handyman
Work in Small Sections
Spray and scrape only a small area at a time-about four square feet. If you work on too large an area at once, the popcorn might dry before you have time to scrape it off. If that happens, repeat spraying the area and wait another 10 to 15 minutes before scraping.
10 / 12
Family Handyman
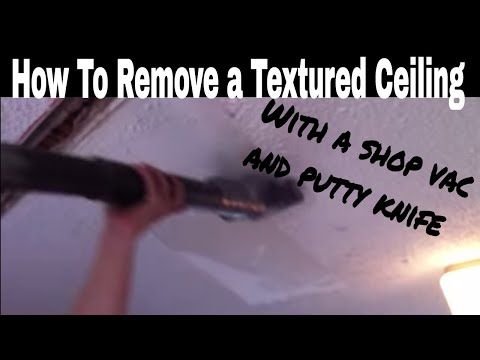
Tame the Mess With a Mud Pan
Use a mud pan—the kind used for joint compound—to catch the wet popcorn before it hits the floor. That way, you’re not tracking it all over the place when you walk and move the ladder around. You may also use the edge of the pan to clean your scraper when it becomes loaded up with wet popcorn.
11 / 12
Family Handyman
Prevent Gouging
Round off the corners of your popcorn scraper—whether it’s a wide putty knife or drywall taping knife—so it won’t gouge the ceiling and leave you with dozens of ceiling wounds to repair. Use a file, a sander or an electric grinder to do this.
12 / 12
Family Handyman
Smooth After Scraping
Scraping alone won’t leave you with a paint-ready ceiling. It’s likely you’ll have some small dings and gouges to fix. At a minimum, you’ll have to sand the ceiling to get it perfectly smooth before painting.
Originally Published: October 17, 2019
How to Remove Popcorn Ceilings in 5 Easy Steps
Is there anything more universally loathed than a popcorn ceiling? If you find yourself staring upward, wondering how to remove popcorn ceilings, you are not alone. Let’s face it: They’re eyesores. They’re also known as acoustic ceilings, stucco ceilings, or, worst of all, cottage cheese ceilings. They were big in the mid- to late 20th century. Builders installed the textured treatment to help absorb sound from above or cover up imperfections in the ceiling. (It also helped skip some steps and save money, since it eliminates the need to paint the finished surface.) But like many trends from the 1970s, the popcorn ceiling has fallen out of favor and many homeowners are removing or covering up the unsightly surface.
If you’re tired of looking up at lumps and bumps and are ready for a makeover, there’s good news. Removing a popcorn ceiling is a fairly easy and affordable DIY project that just requires some time and muscle. Should your ceiling need more TLC than just scraping and painting, there are also options for covering up popcorn ceilings, such as wood paneling, pressed tin tiles, or new drywall. Ready to tackle the home improvement job yourself and learn how to get rid of a popcorn ceiling? We asked contractor Justin Krzyston, president of Stonehurst, how to remove popcorn ceilings safely and easily.
1. Test for Asbestos Before You Begin Popcorn Ceiling RemovalBefore you start, it’s important to make sure that your textured ceilings don’t have asbestos. “Prior to the early 1980s, asbestos was an ingredient that many used in textured popcorn ceilings,” Krzyston says. “The popcorn texture was used to help home builders deal with sound travel, and it was a great fire retardant.” He recommends having the surface tested by a professional, or at the very least purchasing a do-it-yourself test kit from the hardware store and sending the samples to a lab. If you go the DIY test route, make sure to use the appropriate safety gear, such as gloves, a ventilator or dusk mask, and eye protection. “Do some research before diving into a weekend project,” he cautions.
If your ceiling tests positive, you should have a professional licensed in asbestos abatement remove the texture or cover the entire ceiling with paneling or drywall. “If you have asbestos, it is best to leave the ceiling intact, as there is no real danger if it is in good condition,” he says.
2. Gather Your ToolsIf your ceiling is asbestos-free, it’s time to get to work.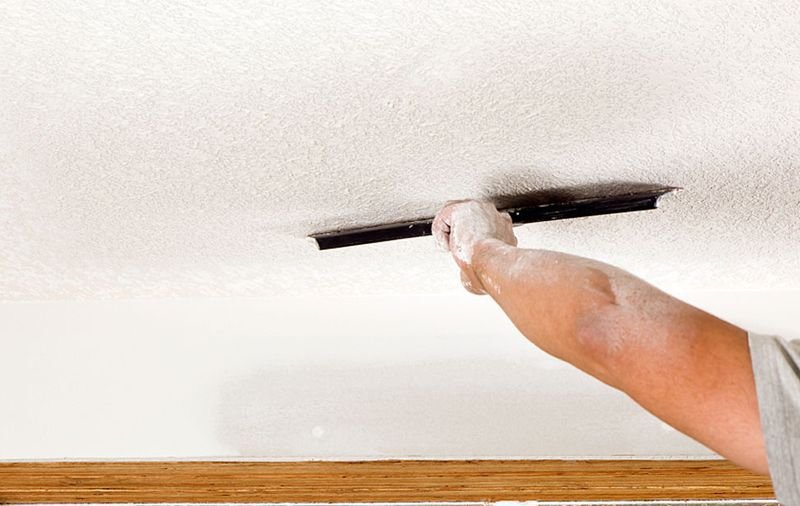 Fortunately, the project doesn’t require any special tools, and you may already have everything you need on hand. The essential popcorn ceiling removal tools include:
- a garden sprayer
- a wide putty knife or drywall taping knife
- drop cloths or plastic sheeting
- painter’s tape
- ladder
- safety goggles
- dust mask
Cover floors and walls with plastic sheeting.
Photo: Spencer Weiner/Los Angeles Times via Getty Images
“Scraping the ceilings is very messy—so have plenty of drop cloths and tarps on hand,” Krzyston says. Remove furniture from the room, and cover floors and walls with plastic sheeting. Attach sheeting to walls with painter’s tape. Taking down ceiling fans or hanging light fixtures will also make the job easier—just be sure to cover electrical boxes with painter’s tape to protect the wires from damage and water. “Turn off your HVAC system and close and cover all vents and electrical outlets with plastic,“ he says. Since this is a job involving water, make sure to turn off the electricity to the room you’re working in.
How to putty the ceiling with your own hands: instructions for beginners
Perfectly smooth ceiling plane is a decoration of any room. It can be painted or wallpapered, tiled or decorated in some other way. It is important that initially the plane is flat. To remove small defects, putty mixture is used. It closes small flaws, leveling the surface. Let's figure out how to apply putty on the ceiling.
All about plastering the ceiling
1. Choice of material
2. Base preparation
3. Puttying
- Starting layer
- Finishing layer
- Peculiarities of puttying drywall
Putty paste is used for work. This is a thick plastic mass designed to level various bases. Blends fall into several categories.
- Base. It can be plaster or cement. Lime, vinyl, polymers are used as additives. nine0014
- Dispersibility. The particle sizes in the mixture vary. They produce coarse, medium and fine dispersion compositions.
- Typ. The material is produced in the form of a powder, then before work it is diluted with water, or in a ready-to-use form.
- Permissible seam thickness.
- Additives. To obtain additional properties, plasticizers, hardening regulators, pigments, etc. are added to the paste.
In addition, there are differences in adhesive strength, viscosity, permissible humidity and temperature during application. Putty is chosen taking into account all these points. To work with the ceiling surface, you will need two different materials:
- Starter. Coarsely dispersed mass, leveling minor differences in height, sealing small defects and cracks. The starting layer should not be higher than 15-25 mm. If you want to remove large differences, the base is plastered.
- Finishing. A finely dispersed mixture used for final leveling. Its layer should not exceed 0.5-3 mm.
Instagram tdmodulstroy
In stores you can find universal materials that are applied as a starting and finishing layer. Their price is slightly lower, so the cost of work will be less. However, their quality is much better if different mixtures are used. nine0003
The agent is applied only on a dry, even surface. Therefore, all the old trim, if present, must be removed. The decoration is removed completely to the floor slab. The most difficult thing to do is if there are several decorative layers.
Sequence of work
- Wet the coating liberally with a sponge or roller.
- After a while, we repeat the processing. The old design should be saturated with water and "limp". nine0014
- We take a spatula and carefully remove the swollen decor in layers.
- Rinse the freed base with clean water.
 Leave to dry.
 - If the first time it is not possible to remove the finish, we moisten it again, repeat all the procedures.
The ceiling tiles are carefully pry off the edge with a spatula and then removed. The wallpaper is soaked with warm soapy water, then removed in strips. If they stick too tightly, moisten again, then scrape off. It is not always possible to wash off the water emulsion. Then it is better to remove it with a grinder. Oil paint is removed with a special remover. For a beginner, this may seem like an unnecessary operation, but otherwise the new design will not hold. After all the old trim is removed, they begin to inspect the base. To do this, it is best to climb the ladder. nine0003
Instagram perfect_house_israel
Height differences are determined using the building level. They should not be more than 25 mm. In this case, you will have to put too much layer of putty mixture, which is not allowed according to the technology. All cracks and cracks are revealed.
Small defects in the form of bulges or dents are clearly visible when illuminated with a flashlight. No matter how many there are, the location of each must be remembered or somehow noted. All identified flaws must be removed. nine0003
How to cover up a crack
- Use a sharp tool to open a crack. That is, we remove the remnants of the old coating from it, expand it to 2-3 mm.
- Use a stiff brush to remove dust and dirt.
- Carefully cover the crack with repair mortar, polyurethane foam, primer.
- Cut off the required amount of sickle tape. This is a reinforcing mesh, produced in the form of strips of different widths. It should completely cover the crack. Glue the tape over the defect. nine0014
Skip this step if you plan to putty the plastered base. It is already aligned and ready for further work. Next, you need to prime the base. The primer will improve the adhesion of materials.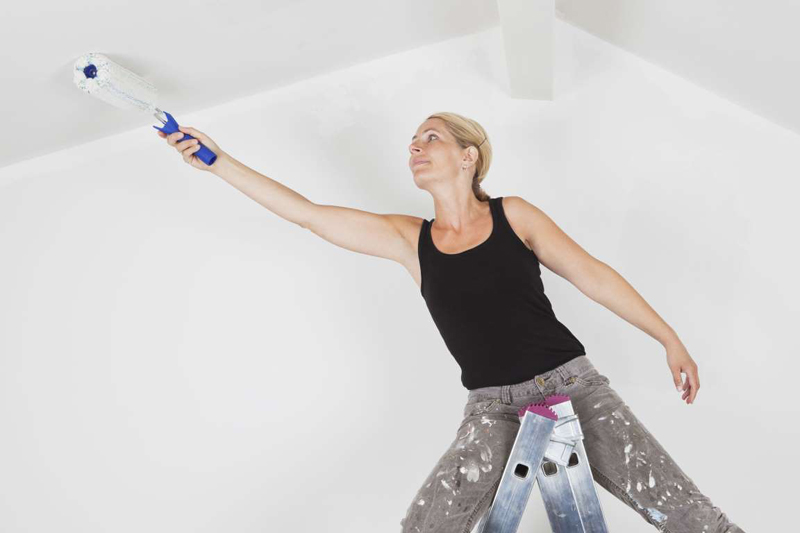 For the best result, the composition is selected according to the type of base. So for concrete, a deep-penetrating preparation is recommended, for gypsum board it improves adhesion as much as possible, etc.
The selected agent is applied to a dry surface. The easiest way to do this is with a roller. In the corners and near the walls, the composition is applied with a brush. The number of layers is recommended by the manufacturer, the information will be on the packaging. If you need to lay more than one layer, the next one is superimposed only after the previous one has completely dried. nine0003
We start by mixing the solution. This is an important point that is not always covered in the recommendations on how to properly putty the ceiling. Whereas the quality of its application depends on the mixing of the composition. The packaging of dry material indicates the proportions in which it is diluted. They must be followed exactly. There will also be a curing time. If the paste dries quickly, such as plaster, the batch for kneading should be small.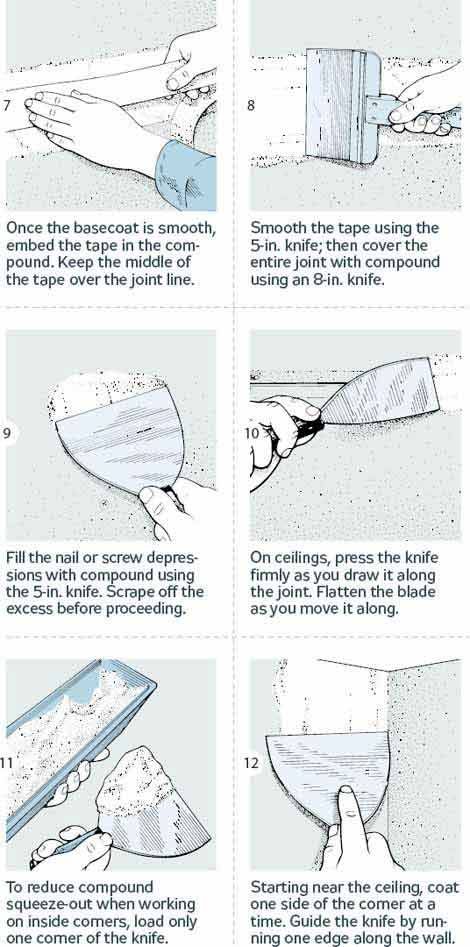
A measured quantity of clean water is poured into a suitable container. Then the powder is poured in small portions there. Each time the mass is well mixed. nine0003
Instagram remont_profi.by
It is difficult to do this manually, it is better to take a construction mixer or a drill with a nozzle. The finished paste has a consistency similar to very thick sour cream. It is left for 12-15 minutes, then mixed again and set to work.
Puttying with starter mix
It is more difficult to apply the compound on a ceiling surface than on a wall. An uncomfortable posture quickly causes fatigue. Therefore, it is advisable to choose goats or other stand that are suitable in height. nine0003
Sequence of work
- We take a wide spatula. Narrow impose a portion of the paste on it, evenly distribute.
- Starting from the corner. We press the tool with the edge to the ceiling at a slight angle, with effort we move it.
 The solution should, as it were, be pressed into the base, evenly distributed over it.
 - Smooth out stripes and small irregularities with a narrow spatula.
- We continue to putty. If recesses come across, carefully close them with two or three layers of mortar. nine0014
- We take a plaster grater, fix an abrasive mesh on it. We begin to rub the puttied surface. We move in a circle, preferably counterclockwise. In the process of mashing, it is desirable to highlight the plane with a flashlight so that the defects are clearly visible.
This is how the starting layer is applied.
Pexels
If it turned out to be insufficient for leveling, the second one is applied in the same way. But only after the first one is completely dry. Then the base is primed for further finishing. nine0003
Puttying with Finishing Compound
The process of applying the putty mass is very similar to that described above, but there are some differences.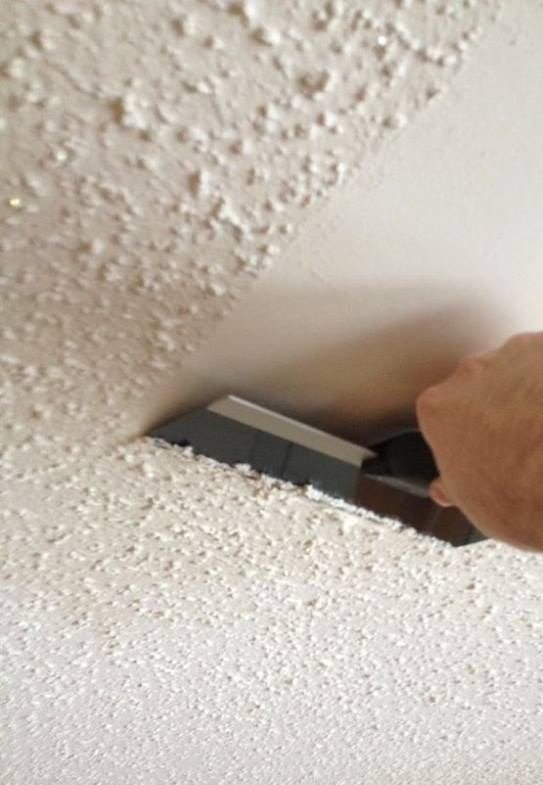 The final layer is the thinnest. You need to work quickly so that the paste does not have time to “grab” at the edges.
Sequence of work
- Using a narrow tool, apply the paste on a wide one, spreading along the edge.
- We start from the same place where we started putting the starting mixture. We press the spatula to the plane at a slight angle, with effort we lead it to the side. nine0014
- With the next movement, remove the excess material. At the same time, we deploy the tool almost perpendicular to the base.
- Apply the finishing compound to the entire surface. Periodically highlight it in different directions to notice defects and remove them.
- Grater with an abrasive mesh we level the putty mortar. It is correct to do this in circular smooth movements.
- Wait until the base is completely dry. We clean it with fine sandpaper. To speed up the process, you can use a grinder. nine0014
Pexels
Ceiling plastered. The next steps depend on how you plan to arrange it. Most often, it is primed under painting with any suitable type of coloring agent or under wallpapering.
How to putty plasterboard ceiling with your own hands
Suspended structures are used to level significant height differences. After they are sheathed with GKL sheets, puttying is required. In this case, only the finishing solution is used, but there are some subtleties. nine0003
Sequence of work
- Preparing the coating for puttying. Sewing the seams. Some sheets are available with a cut edge. If not, you will have to remove it yourself. We take a clerical knife, carefully cut the edge at an angle of 45 °. We remove crumbs and dust with a hard brush.
- Prime the prepared surface. We use a roller for this. We coat hard-to-reach areas with a brush.
- Mix the solution. Before doing this, you need to make sure that it is designed to work with drywall.
 Dilute the powder in strict accordance with the manufacturer's recommendations. nine0014
 - After the primer dries, glue all embroidered seams with sickle. We impose a portion of the solution on the reinforcing tape, literally drown it in the mixture. Level with a spatula, put another layer of paste, level again. We seal the caps of the self-tapping screws with a solution.
- Wait for the agent to harden.
- Puttying the base. We collect a mass with a narrow spatula, put it on a wide one, level it.
- We press the tool to the surface, we force it to the side. Remove excess immediately. So we close the whole base. We check that everything is smooth. nine0014
- Using a grater in a circular motion, we finally level the coating.
- Waiting for it to dry. We clean the plane with fine sandpaper.
It will be difficult for an inexperienced master to accurately putty the ceiling surface. But this does not mean that you should not take on the finishing.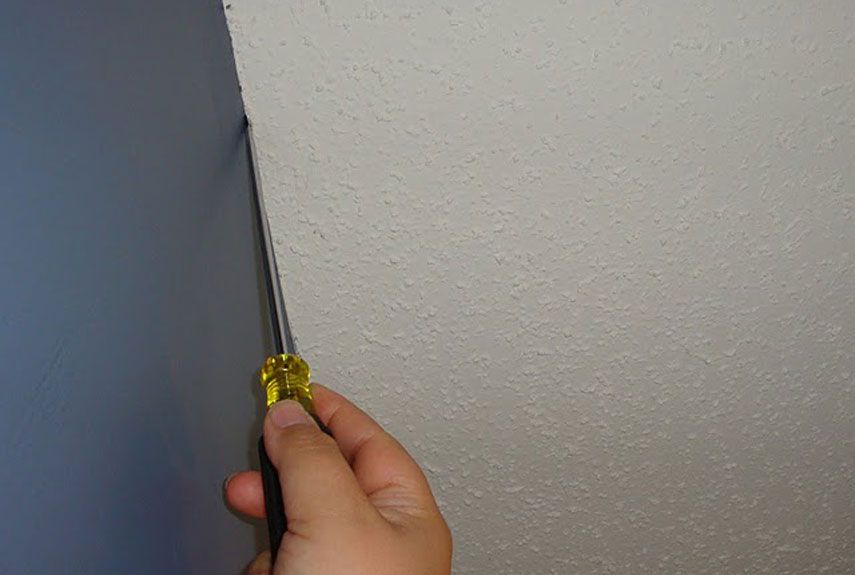 In conclusion, we suggest watching a video on how to putty the ceiling with your own hands: for a beginner and not only.
Prepared by
Inna Yasinovskaya
How to putty the ceiling - how to plaster with your own hands, putty the ceiling for painting, photo and video
How to make the ceiling smooth so that the paint or coating fits well? Before you paint the ceiling or cover it with tiles, you need to cover it with putty. Putty is needed to level surfaces, mask cracks and other imperfections. To properly putty the ceiling, you need to know how to putty, ceiling components for the manufacture of putty.
How to putty the ceiling. Types of putties
Putties that can putty the ceiling, there are several types:
- gypsumelic – with its help remove small irregularities on concrete and other surfaces
- adhesive - surfaces are prepared with such a putty before adhesive painting
- oily - needed for surfaces that will be covered with oil paint nine0014
- plaster
- cement
Depending on how you want to finish or paint the ceiling, choose the type of putty.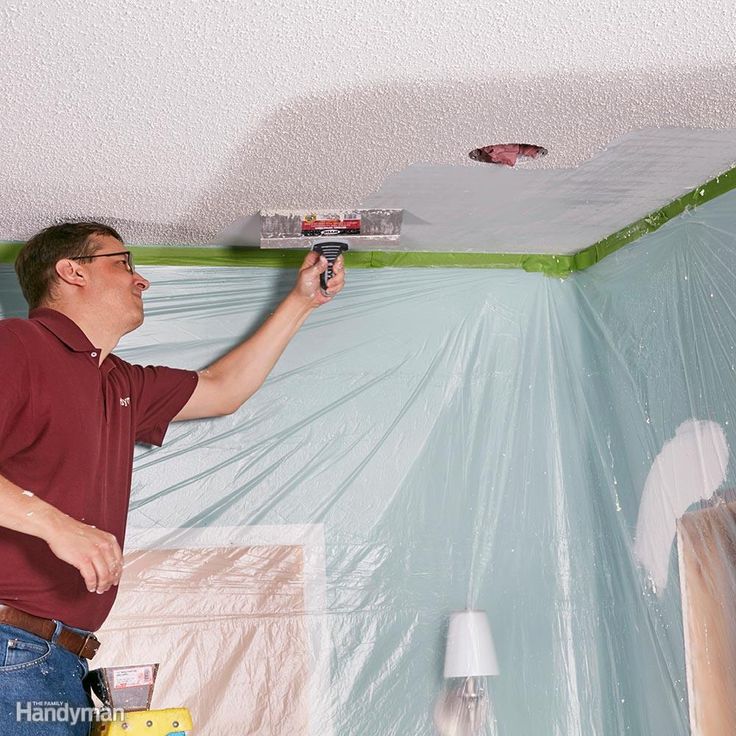 For wet rooms, cement putty is suitable, and in rooms with moderate temperature and humidity, choose gypsum putty. Putties on organic and polymer bonds are also suitable.
Putties are also divided into:
- starting nine0185 - compositions intended for draft layers and sealing large cracks, leveling very uneven surfaces; the shrinkage coefficient of such putties is low
- finishing - are applied after leveling to create a smooth surface on which paint and other material will lie well
For work, you will need both starting and finishing putties.
You can also make your own ceiling plaster. Before puttying, it will be necessary to powder some components for the mixture - chalk, gypsum. nine0003
How to putty the ceiling. How to make putty, ceiling materials
Most often for the preparation of putty at home use:
- a piece of chalk
- gypsum
- wood glue
- animal glue
- laundry soap
- drying oil
- nine0184 varnishes
Prepare gypsum plaster
It is not recommended to cook this putty in large quantities, because it quickly hardens and thus becomes unusable - you can simply use up materials in vain.
First you need to grind chalk into powder - three kilograms is enough. Then you need to ceiling 1 kg of gypsum. Mix powders. Take a container, fill it with a solution of wood glue and carefully pour the powder into the glue. Stir until you get a thick consistency. nine0003
Make your own oil putty
To prepare oil putty, take 2 kilograms of chalk, 1 kg of drying oil, 100 g of desiccant.
First you need to thoroughly grind the chalk, and then pour the powder into a container with drying oil and desiccant.
How to putty the ceiling. Ceiling preparation, primer
Before applying putty to the ceiling, you need to cover it with primer and clean the surface of old coatings and putty layers. For the primer, liquid formulations are used. To apply a primer to the ceiling, it is better to take a roller. A brush works well for this too. nine0003
How to putty the ceiling. Applying the starting layer of putty
To cover the ceiling with putty, you need two, sometimes three, and sometimes more layers. But in no case not one layer - this will not be enough. At the same time, a large number of layers will lead to the appearance of cracks in the putty, and then everything will have to be started all over again.
In one layer, only the starting putty with a coarse structure can be applied. It is best to purchase a ready-made or dry mix on the market. If you have a ready-mix, it must be applied immediately, because the hardened putty loses its properties, and the dry mixture must be diluted before application. To do this, you need plain water without impurities. Pour dry putty into the dishes and add as much water as indicated in the instructions. Having obtained the desired ratio, mix the components until a thick consistency is formed. nine0003
After about forty minutes or an hour, this mixture will begin to set, so do not delay applying the putty and apply it immediately after preparation, and also do not prepare too much composition. Do not try to re-dissolve it, but rather make a new composition so that the ceiling is finished with high quality.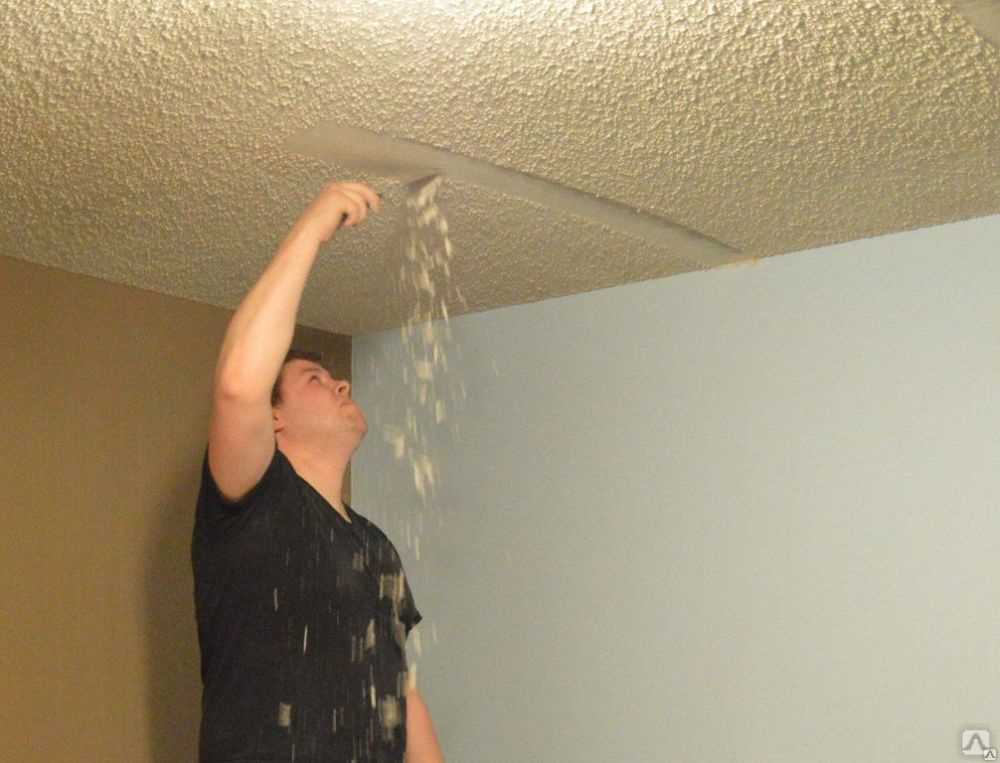
How to putty the ceiling. Applying layers of putty to a concrete ceiling
It is best to start applying putty from the corners or from the wall.
Take a large spatula. Press the spatula to the ceiling and, as it were, stretch it towards you. Keep the same pressure all the time when applying. Try not to make a layer too thick - it is enough if it is less than half a millimeter thick.
How many layers you need depends on the condition of the surface. If it is sufficiently even, one layer of starting putty and one layer of finishing putty will be enough for you. If there are large irregularities on the surface, even several starting layers may be needed. nine0003
If there are cracks on the surface, then it is necessary to putty as follows - treat these cracks, remove dust from there and cover them with a layer of soil. If the cracks are large enough, several coats will be needed. When the primer dries and the cracks are masked, you can start puttying.
When the putty is dry, sand the surface with fine-grained sandpaper to make the surface as smooth as possible. After leveling the surface, apply a new layer of soil - this is necessary for applying paint, wallpapering. nine0003
How to putty plasterboard ceiling
Prime the surface, especially carefully do it at the joints of adjacent sheets. Then process the seams - you need to deepen the seam and chamfer the ends of the sheet at an angle of forty-five degrees. Fill the entire depth of the seam with a starting layer of putty, and then stick a paint grid on top of this and press it into the seam a little. Then apply another layer of putty on top of the mesh. When the putty dries, you need to clean the surface of the seam.
It is necessary to apply putty on drywall in a very thin layer, since the material itself is even. This is done with a finishing putty. As with putty on a concrete surface, sand the drywall surface to a perfectly smooth state with sandpaper.