How to plant and grow potatoes
Growing Potatoes: How to Plant & Harvest Potatoes
7 steps for planting, harvesting and storing potatoes at home By Kevin Lee Jacobs
Photo by: Kevin Lee Jacobs.
Potatoes are generous plants. They are easy to grow and produce abundant harvests. Give them the following and they will accept almost any planting situation:
- Full sun
- Loose, fertile soil
- 1” of water per week
You can grow potatoes in containers, pots, or a special “grow bag”. But in my experience, containers like these require constant attention to watering, and yield smaller harvests than growing in a raised bed.
RELATED: Raised Bed Gardening
I achieve an enormous harvest—enough to feed two for nearly a year—by planting potatoes in two 4'-x-8' raised beds. The tubers are wildly productive in the well-draining, rock-free soil the beds provide, and the vines require deep watering only once each week.
Of all the root vegetables I grow, it is the potatoes that give me the biggest thrill at harvest time. I love to stick my hands in the soil and retrieve the buried bounty, with a yield of eight to ten potatoes for every one that I plant.
However you decide to grow your potatoes, the planting directions are the same.
Photo by: Kevin Lee Jacobs.
Step 1: Choose Seed Potatoes
Start with organic, certified disease-free seed potatoes obtained from a catalog or farm store. (Grocery store potatoes that have been treated with a sprout-retardant are not suitable for planting.) If you buy from a farm store, as I do, try to select tubers which have already sprouted. Otherwise, pre-sprout them by simply laying them out on your kitchen counter. Pre-sprouted potatoes can be harvested a few weeks earlier than their non-sprouted kin.
Photo by: Kevin Lee Jacobs.
Step 2: Separate the Eyes
Only small, golf ball-sized potatoes should be planted whole.
Cut large tubers into pieces. I cut mine so that each segment has two or three "eyes" (the little bumps from which sprouts emerge, as shown in the photo).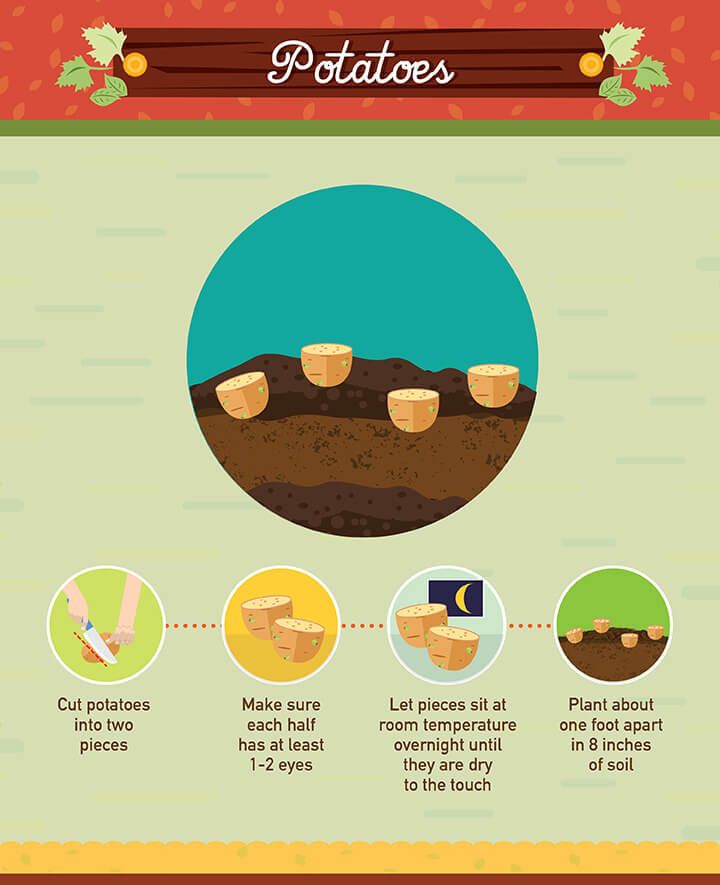 The reason for cutting the potatoes is because the many eyes on a large potato will create a crowded, multi-stemmed plant, with each stem competing for food and moisture, and in the end, bearing only small potatoes.
Photo by: Kevin Lee Jacobs.
Step 3: Cure the Cut Pieces
Next, "cure" the cut pieces. Either set them out in the sun, or place them on a table or counter in a warm (about 70°F), moderately lit room for three to five days. This step permits the cuts to become calloused. Calloused seed potatoes will help prevent rot.
Photo by: Kevin Lee Jacobs.
Step 4: How & When to Plant Potatoes
Plant seed potato segments cut-side down (eyes up) in a 6-inch-deep hole or trench. Space each segment 12-inches apart on all sides.
Between each segment, sprinkle 2 tablespoons of a low-nitrogen, high-phosphorous fertilizer. Then cover both potatoes and fertilizer with 2-inches of soil, and water the soil well.
When do you plant potatoes?
This will vary depending on where you live.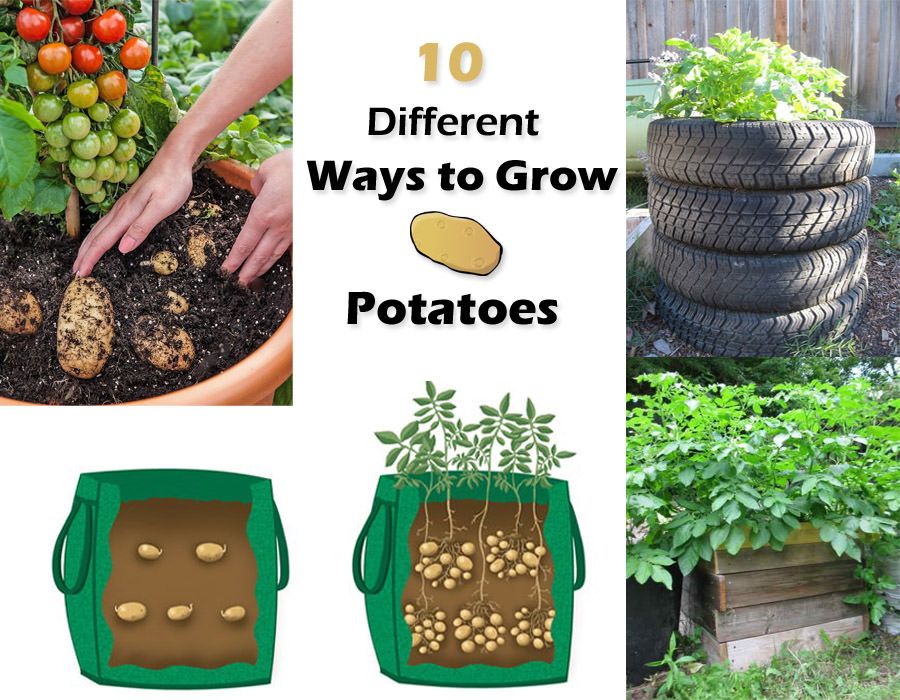 Gardeners in warm climates often plant around Valentine’s Day, while those in cooler areas may get them into the ground near Easter, or early spring. A good rule of thumb is to aim for 3-4 weeks prior to your last frost date.
Photo by: Kevin Lee Jacobs.
Step 5: Hill Around the Stems
Because new potatoes form on lateral stems, or "stolons" above the seed potato, it’s necessary to "hill" the vines. When the green sprouts achieve 8 inches in height, bury all but their top 4 inches with soil, chopped straw, or shredded leaves. Hill again when potato plants grow another 8 inches. The more you hill, the more prolific your harvest is likely to be. I usually hill mine to a height of 18 inches. Stop hilling when the vines flower.
Potato tubers, like vampires, need to live in darkness. In fact, they will turn green if exposed to light. And a green potato can cause sickness if consumed. Therefore it is absolutely essential to keep the tubers covered with soil or mulch.
Photo by: Kevin Lee Jacobs.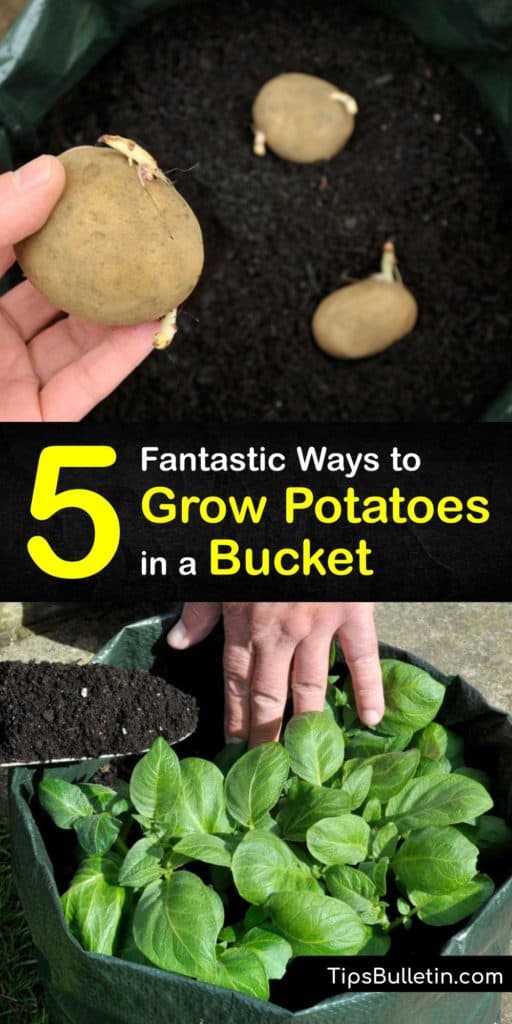
Step 6: How & When to Harvest Potatoes
Two weeks after the vines have flowered, you can, if you wish, reach into the soil or mulch and retrieve a few baby potatoes. Otherwise, wait until the vines die back. Dead vines signal that the tubers have reached maturity. Now reach into the soil with your hands and pull the tubers up.
How long do potatoes take to grow? Small new potatoes can be ready as early as ten weeks. However, full sized potatoes take about 80-100 days to reach maturity.
Photo by: Kevin Lee Jacobs.
Step 7: Store Your Potatoes
Since my potatoes are grown for storage, I leave them in the ground until cool weather arrives. Why? Because potatoes will only store well if they are placed somewhere cold, but not freezing. The closet in my mudroom doesn’t cool off until the outside temperatures plunges to 45° at night. So harvest time for me is usually a sunny day in late October.
After digging the tubers, I let them sit on top of the raised beds for a few hours to dry, as illustrated.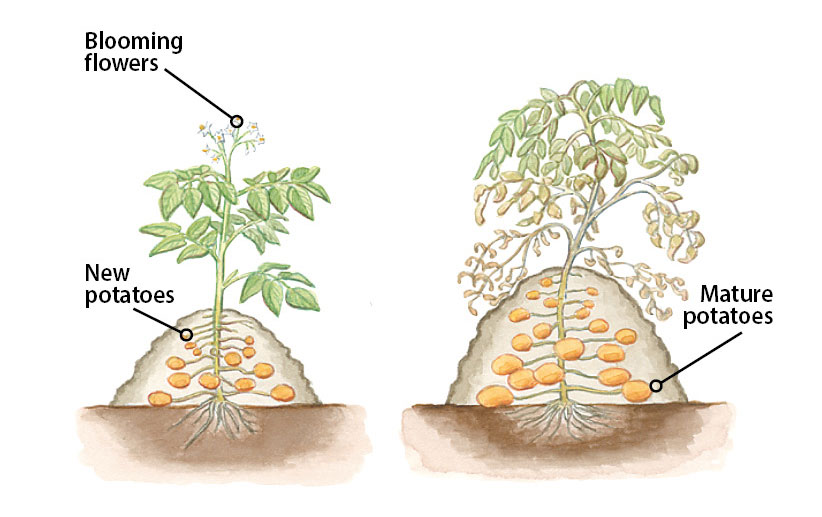 This brief drying-period toughens their skin, and prepares them for storage. Then I gently brush off any loose soil from the tubers, and place them in double thicknesses of paper bags.
More potato growing tips:
- If you don’t want to bother with hilling, plant your potatoes 8-9 inches deep. The downsides are: the potatoes take longer to sprout and your harvest might be smaller.
- Potatoes like slightly acidic soil (5.8-6.5 pH). Add fertilizer or composted manure for best results.
- When growing potatoes in containers, a good soil recipe is 1 part peat moss, 1 part organic potting soil and 1 part cow manure.
- If you want to make the task of weeding easier (and you have the space), plant your potatoes at least two feet apart so that you can weed around them easily.
Preventing Potato Blight
The dreaded fungal disease known as the "potato blight” (Phytophthora infestans) was responsible for the Irish potato famine and can destroy your entire crop, too.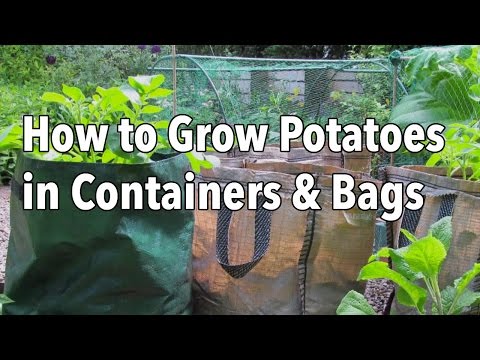 To reduce the chance of infection, never plant potatoes (or tomatoes and other members of the nightshade family, such as eggplants or chili peppers) in the same patch of land without leaving an interval of at least three years. Also, promptly remove any volunteer potatoes that emerge in your garden. The disease overwinters in tubers left behind during the previous year’s harvest.
RELATED READING
How to Start a Vegetable Garden
How to Grow Tomato Plants
Growing Peppers
How to Grow Potatoes — Seed Savers Exchange Blog
Here are a few tips from SSE's gardening crew on how to grow potatoes for a healthy and bountiful harvest.
General Advice
Potatoes always do best in full sun. They are aggressively rooting plants, and we find that they will produce the best crop when planted in a light, loose, well-drained soil. Potatoes prefer a slightly acid soil with a PH of 5.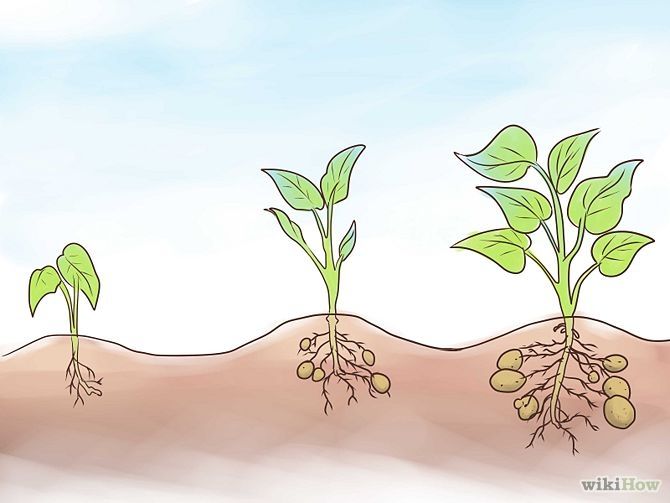 0 to 7.0. Fortunately potatoes are very adaptable and will almost always produce a respectable crop, even when the soil conditions and growing seasons are less than perfect.
Always keep your potato patch weed-free for best results. Potatoes should be rotated in the garden, never being grown in the same spot until there has been a 3-4 year absence of potatoes.
When to Plant Potatoes
Potatoes may be planted as soon as the ground can be worked in the early spring, but keep soil temperatures in mind. Potato plants will not begin to grow until the soil temperature has reached 45 degrees F. The soil should be moist, but not water-logged.
Potatoes can tolerate a light frost, but you should provide some frost protection for the plants if you know that a hard, late season freeze is coming. If you want to extend storage times, and have a long growing season, you can plant a second crop as late as June 15 and harvest the potatoes as late as possible.
Cutting Potatoes Before Planting
A week or two before your planting date, set your seed potatoes in an area where they will be exposed to light and temperatures between 60-70 degrees F.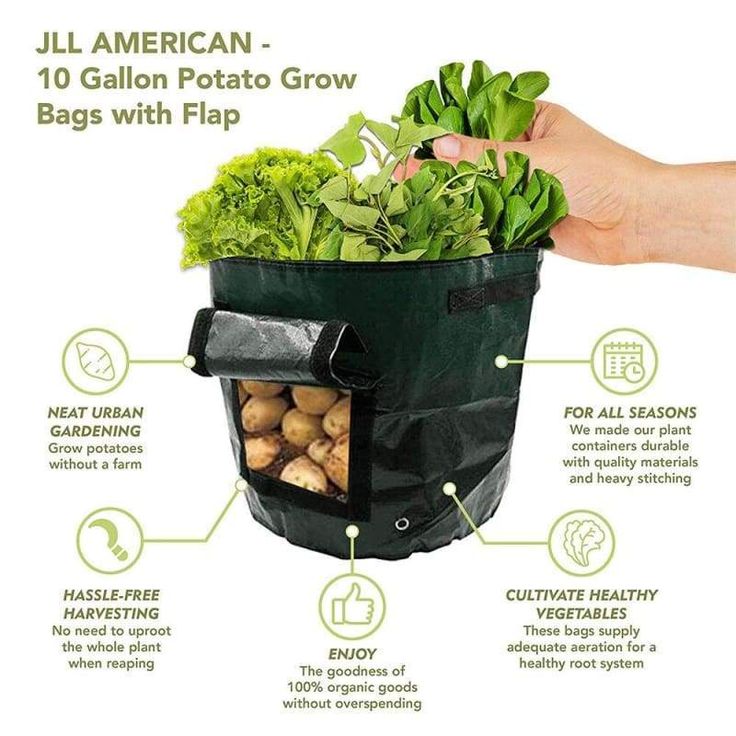 This will begin the sprouting process. A day or two before planting, use a sharp, clean knife to slice the larger seed potatoes into smaller pieces. Each piece should be approximately 2 inches square, and must contain at least 1 or 2 eyes or buds. Plant smaller potatoes whole. A good rule of thumb is to plant potatoes whole if they are smaller in size than a golf ball. In a day or so your seed will form a thick callous over the cuts, which will help prevent rotting.
Planting Potatoes in the Garden
We find that potatoes are best grown in rows. To begin with, dig a trench that is 6-8 inches deep. Plant each piece of potato (cut side down, with the eyes pointing up) every 12-15 inches, with the rows spaced 3 feet apart. If your space is limited or if you would like to grow only baby potatoes, you can decrease the spacing between plants.
To begin with only fill the trench in with 4 inches of soil. Let the plants start to grow and then continue to fill in the trench and even mound the soil around the plants as they continue to grow. Prior to planting, always make sure to cultivate the soil one last time. This will remove any weeds and will loosen the soil and allow the plants to become established more quickly.
How to Water Potatoes
Keep your potato vines well watered throughout the summer, especially during the period when the plants are flowering and immediately following the flowering stage. During this flowering period the plants are creating their tubers and a steady water supply is crucial to good crop outcome. Potatoes do well with 1-2 inches of water or rain per week. When the foliage turns yellow and begins to die back, discontinue watering. This will help start curing the potatoes for harvest time.
When to Harvesting Potatoes
Baby potatoes typically can be harvested 2-3 weeks after the plants have finished flowering. Gently dig around the plants to remove potatoes for fresh eating, being careful not to be too intrusive. Try to remove the biggest new potatoes and leave the smaller ones in place so they can continue to grow.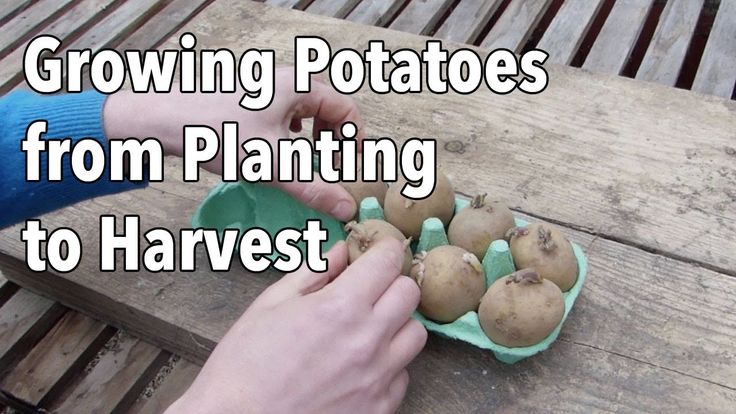 Only take what you need for immediate eating. Homegrown new potatoes are a luxury and should be used the same day that they are dug.
Potatoes that are going to be kept for storage should not be dug until 2-3 weeks after the foliage dies back. Carefully dig potatoes with a sturdy fork and if the weather is dry, allow the potatoes to lay in the field, unwashed, for 2-3 days. This curing step allows the skins to mature and is essential for good storage. If the weather during harvest is wet and rainy, allow the potatoes to cure in a dry protected area like a garage or covered porch.
Storage Conditions
At Seed Savers Exchange. we are able to store potatoes well into the spring in our underground root cellar. Try to find a storage area that is well ventilated, dark, and cool. The ideal temperature is between 35 and 40 degrees F. Keep in mind that some varieties are better keepers than others. Varieties like Red Gold and Rose Gold are best used in the fall, and others like Carola and Russets are exceptional keepers.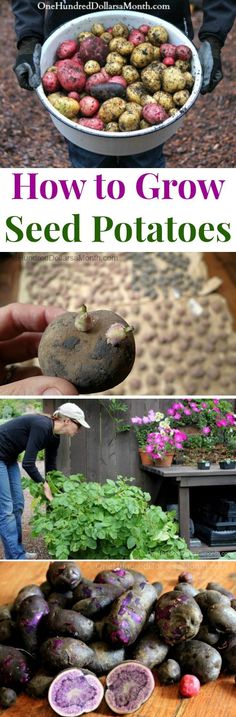
Saving Seed Stock
Home gardeners can save seed for several generations. Save the very best potatoes for planting. You may find that after several years the size begins to decrease; this is typical. Potatoes are very susceptible to viruses. If you are looking for maximum yields it is best to start with fresh, USDA Certified Seed Stock every year.
In collaboration with University of Wisconsin-Madison researchers, SSE is working to eradicate viruses from heritage potatoes in order to safely preserve potato genetic diversity and to offer high quality seed potatoes.
How to plant potatoes: the four most famous ways
In the fifties of the last century, when amateur gardening was just beginning to develop in the country, people occupied almost half of their land for potato fields. And in the villages, collective farmers plowed at least 50 acres per family for potatoes in order to provide themselves with it for a whole year - until the next harvest.
Over the years, the picture has changed dramatically. For many years, potatoes practically disappeared from summer cottages and household plots. However, in recent years, the picture has changed, and interest in tasty crumbly tubers has reappeared. nine0003
Undoubtedly, young potatoes can be bought in any store, but they are literally crammed with all sorts of "chemistry" - fertilizers, plant protection products that accumulate in tubers. Once in our body, they are deposited in the tissues of various organs, gradually destroying them.
And the taste of purchased potatoes is not the same. How much better is your own - sweet, crumbly, grown on natural fertilizers and therefore - very useful.
In recent years, many new varieties of large, tasty and very productive potatoes, resistant to pests and diseases, have been created. nine0003
Growing it is a pleasure. The main thing is to land correctly. In this article we will tell you how to plant potatoes correctly and tell you the most fruitful and interesting varieties.
HOW USEFUL POTATOES
Potato appeared on our continent only three hundred years ago.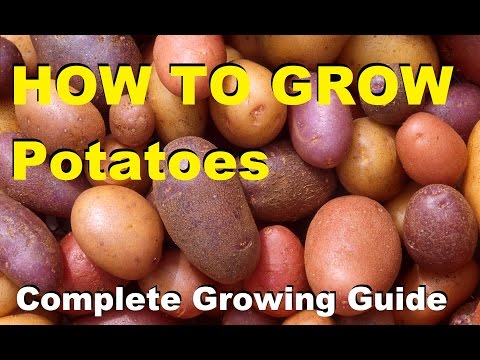 Its homeland is South America, where the culture was grown by local Indian tribes. Edible tubers were brought to their country by Spanish sailors, who liked them.
Very quickly, potatoes with stew and spices became a favorite dish of the Spanish nobility. Then this dish began to be prepared in all taverns and inns. From there, the tubers migrated to the peasant fields. nine0003
Very quickly, the potato spread throughout the territory of almost all countries of Western Europe. It was brought to Russia from Holland by decree of Peter I at the end of the 17th century. The tsar ordered this "overseas vegetable" to be planted throughout Russia and gave it the name "second bread", which was later fully justified.
Today it is difficult to imagine your diet without sweet - boiled or fried potatoes. In addition, it is not only tasty, but also very useful.
Tubers contain vitamins: B1, B2, B3, B5, B6, B9,PP,S,E,K. They contain magnesium, calcium, potassium (570 mg per 100 g of weight!), Phosphorus, iron, zinc, boron, cobalt, folic acid, various complex amino acids, starch, bioflavonoids, fiber.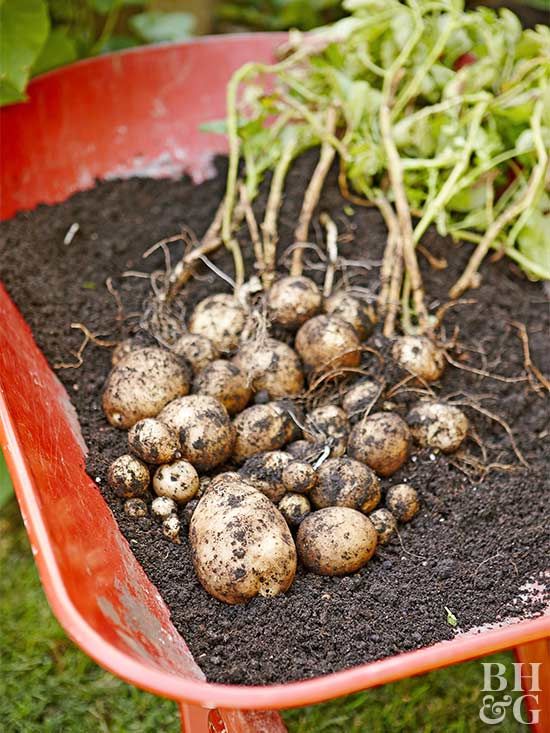
It is young potatoes, freshly dug from the garden, that have the highest nutritional value.
METHODS OF PLANTING POTATOES
The best time for planting potatoes is May 7-10. Previously, the site for planting is well dug up and brought in (per 1 sq. M.): 2 buckets of compost or rotted manure, a bucket of sand, a third of a bucket of ash, 110 g of superphosphate, and 70 g of potassium sulfate. On acidic lands, a glass of dolomite flour is also added. nine0003
Potatoes can be planted in many ways, but the following four are the most common.
Spade landing
This is the best known method.
With a rope stretched over pegs, mark the row (starting from the edge of the field).
One person makes a hole 7-9 cm deep with a shovel, the other puts the tuber into it with the sprouts up.
The first one digs the next hole and covers the planted tuber with earth from it.
The distance between the holes is 30 cm.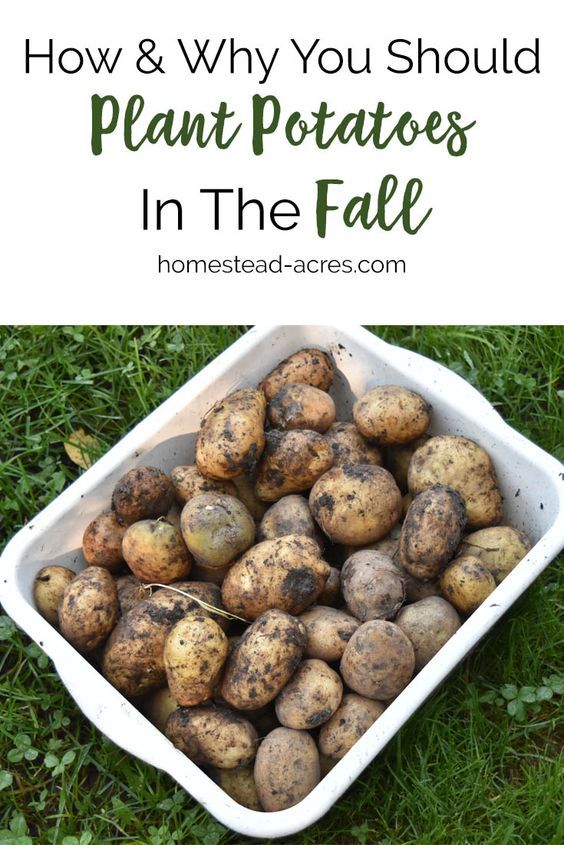 Having finished planting in the first row, the pegs with the cord are transferred to the next one, 75 cm apart from the first one.
The whole field is planted in the same way and the plants are well watered.
Planting in ridges
This method is used on heavy clay soils with close groundwater.
With the help of a walk-behind tractor, ridges are formed on a well-fertilized field.
Distance between ridges - 75 cm, height 20 cm.
Potato tubers are planted in holes located at the top of the ridge at a distance of 30 cm from each other.
Planting in trenches
This method is used on sandy and light sandy loamy soils where water does not linger in the root layer.
In a potato field, trenches are dug 25 cm deep, 90 cm apart. Straw is laid in the trenches in a layer of 15 cm.
Dig holes at a distance of 30 cm and put potato tubers in them. You can add a tablespoon of wood ash to each well.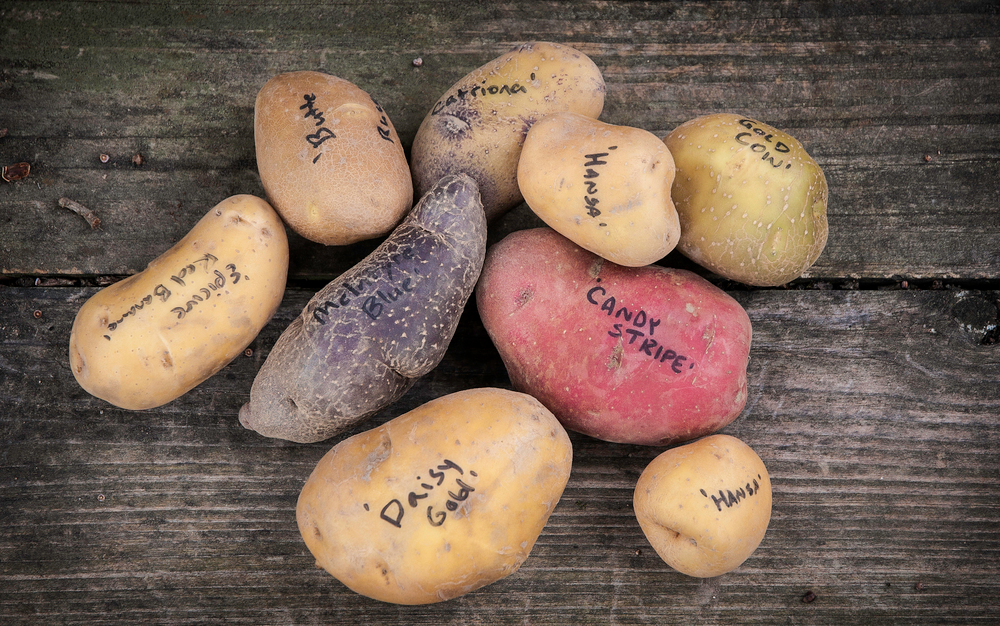 The earth is leveled, and all plantings are well watered. nine0003
Straw planting
This is the oldest method and is often used in villages. In autumn, the potato field is lined with a thick layer of straw or hay (40 cm high). During the winter, the grass overheats, turning into humus.
In the spring, potato tubers are laid on it and again covered with straw or hay with a layer of 20 cm. When sprouts appear, they are not spudded, but hay or straw is laid around each bush so that all the leaves are covered.
In autumn, after maturation, the bushes are simply pulled out of the straw. Potato tubers are not damaged, as when digging with a shovel. In addition, they remain completely clean. nine0003
In the first two methods, potato bushes are spudded twice during the summer so that only the tops of the leaves are visible. When planting in a trench, fertile soil is poured under the bushes.
To get a good harvest, plants need rare but abundant watering so that the ground under the bushes is soaked to a depth of 50 cm.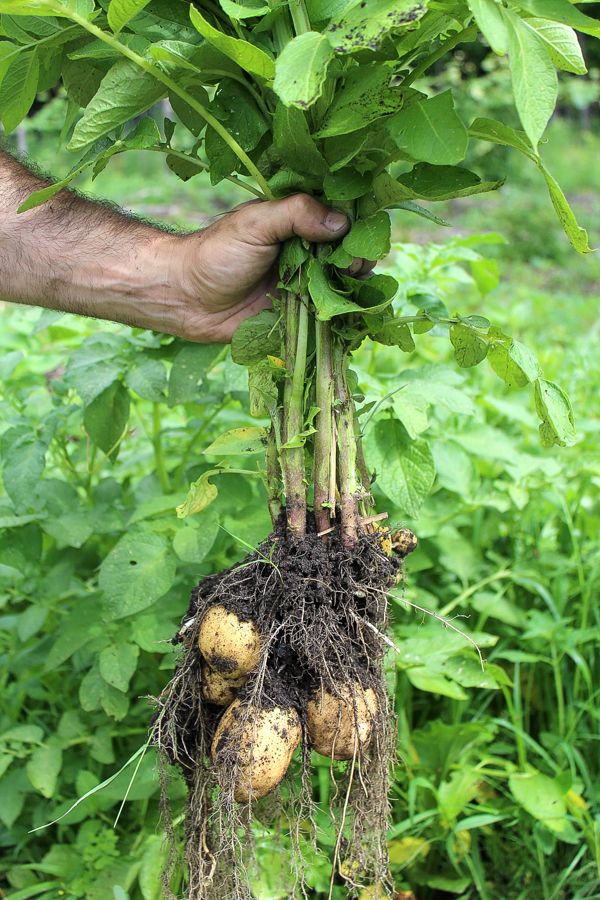
THE BEST VARIETIES FOR PLANTING POTATOES , extremely tasty, resistant to disease. nine0003
We have two varieties, the leaves of which have hard pubescence and therefore are not damaged by the Colorado potato beetle: Early morning and Kamensky .
Very early crop yield varieties: Lux, Red Scarlet, Banba, Zhukovsky early, Nevsky, Bullfinch, Gala, Zorachka, Luck, Rosara, Rodriga, Otrada, Colette, Palace, Romano, Uladar, Manifesto.
Mid-season varieties yield in September: Lad, Skarb, Chudesnik, Jelly, Gornyak, Irbitsky, Zekura, Khozyayushka, Volant. nine0095
All these varieties are very productive and extremely tasty. We hope that you will choose some of them for yourself, and plant them on your site this spring to enjoy sweet, melt-in-your-mouth potatoes in the summer!
When and how to plant potatoes: advice from experts
How to harvest a high yield of potatoes? The cultivation of this culture has its own characteristics, the knowledge of which is indispensable.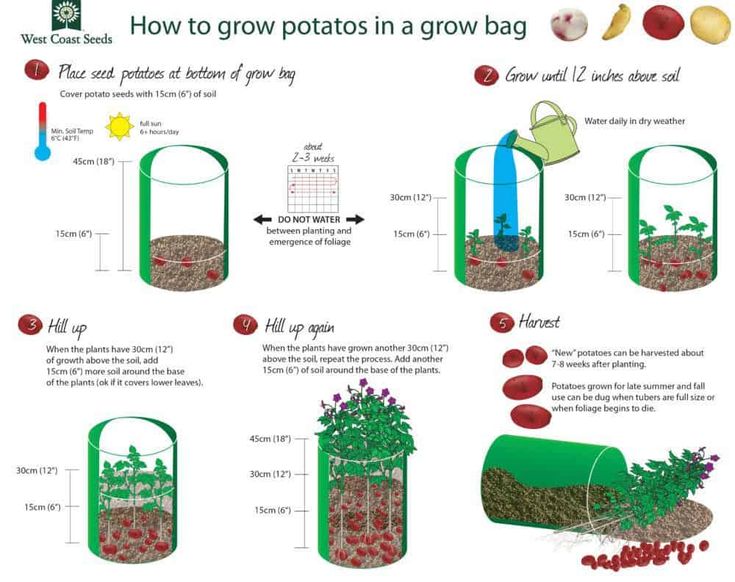 How to plant potatoes correctly, the editors of the site tvtomsk.ru learned in the Agrarian Center of the Tomsk Region. nine0003
Choice of variety
Obtaining high yields of potatoes largely depends on the right variety. Well-known varieties, for example, "blue-eye", of course, are very tasty, but are unstable to almost all types of potato diseases.
Experts note that late varieties have higher yields, but even a very good variety should not be planted for more than 8 or 10 years. It must be replaced by a new one.
The most common varieties of potatoes among the population of the Tomsk region: Nevsky, Zhukovsky early, In memory of Rogachev, Nakra, Rosara, Lina, Fresco, Antonina, Lyubava, Solnechny, Ketsky, Safo, Anniversary, Charm, Tomich, Sante, Ideal, Karatop, Feloks , Adretta, Lugovskoy, Tuleevsky, Udalets, Rozhdestvensky, Zekura. nine0003
Preparing the soil and potatoes for planting
The soil for potatoes for next year is already being prepared at the end of this summer.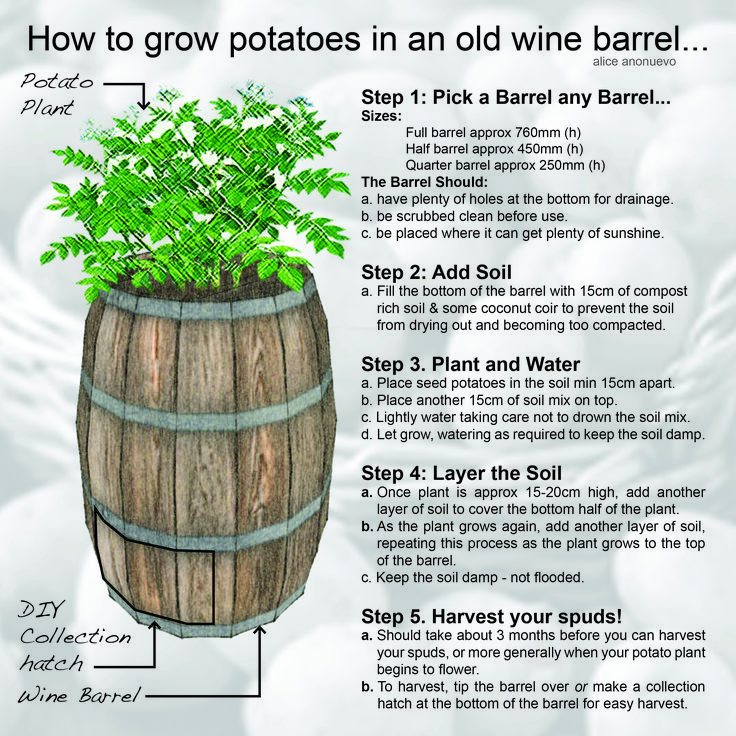 For digging, you can add urea, ammonium nitrate, double granular superphosphate or potassium salt.
Pure tubers must weigh between 55 and 100 grams. It is recommended to warm the tubers to room temperature for 3 days, then spread them out on the windowsill, in low boxes or on the floor near the window, so that the tubers get a little daylight. nine0003
Potatoes can be treated with copper sulphate, Energen, Buton or Agricola Vegeta biostimulants.
If the tubers are thick, strong and short shoots, they can be planted. Large potatoes should be cut with a knife so that at least 2 sprouts are located on the cut parts. Dry them for 2 days, then proceed to planting.
Planting potatoes
Potatoes are best planted after cucumbers, radishes, radishes, beans, green peas and green manure. It should not be placed after tomato and eggplant. nine0003
Potatoes should only be planted when the soil is warm to 8°C. Stick to a planting depth of 9-10 cm. Early varieties should be planted in early May.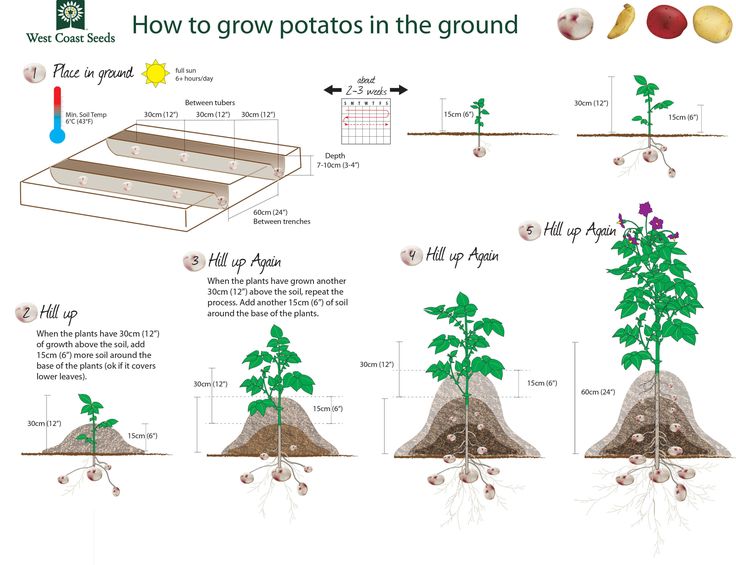 Plant mid-season potatoes in the 10th of May.
Planting methods
1. Smooth method. Plant the vegetable by spreading the potatoes in the furrow. The best potato growth is seen when the distance between the bushes is 65-70 cm and the aisles are wide. Row spacing and hilling should be loosened a week after planting. nine0003
2. Comb method. Cut the ridges with a tractor cultivator or walk-behind tractor. Plant potatoes 8 cm on loamy soils and 11 cm on sandy soils. It should be moderately moist, loose and free of weeds. Potato hilling is carried out when the plant is 15-17 cm in height.
When plants develop slowly, remember to feed them and water them regularly. Weak development can be recognized by the state of the tops. For example, if there is not enough nitrogen, then there will be thin stems and small leaves, and the tops of a light green color. nine0003
End each watering by loosening the soil. When watering, keep the watering can close to the ground. The water temperature must be greater than the soil temperature.
Potato fertilizers
Organic fertilizers are most valuable for potatoes. Not completely rotted manure is valid for 2-4 years. Manure that has decomposed to humus is 4 times more saturated with nitrogen than fresh manure. Therefore, it is better to choose rotten manure for fertilizer. It is also recommended to use slurry with water or humus. Use wood ash for digging, add to top dressing and to holes. nine0003
How to properly store potatoes
Store potatoes in a cool, dry and well ventilated area. During storage, the main thing is not to let the tubers germinate or rot. Potatoes go bad especially in the spring.
Protection against pests and diseases
Diseases and pests of potatoes reduce its yield and quality of tubers. The main fungal diseases of this crop are early rot and late blight. Of the insects, the Colorado potato beetle and wireworms cause the greatest harm. nine0003
Late blight
The most common fungal disease of potatoes. It affects leaves, stems and tubers. On the surface of the tuber, brownish-grayish depressed spots are formed, inside it is painted in a rusty-brown color. The fungus enters the tubers during the harvesting period. The disease spreads in damp, moderately warm weather. To prevent the development of the disease, after harvesting, all affected plant residues are removed from the site and destroyed. When the first signs of disease appear, the plants are sprayed 90% solution of copper oxychloride.
Control of the Colorado potato beetle
One of the methods of pest control in private farms is the cultivation of resistant varieties of potatoes. The Colorado potato beetle affects the following varieties less: Pomegranate, Crystal, Lasunok, Spark, Loshitsky, Temp. Chemical control remains the most effective method of dealing with the beetle. Plants are usually treated when there are more than 15 larvae per plant in the plantings. For the first treatments, it is better to use insecticides such as Commander and Iskra Zolotaya - they provide protection for 20 days.