How to level garden with slope
How To Level A Sloping Garden In 10 Stages
IN THIS GUIDE
- Why level out your garden?
- What you’ll need to level a slope
- How to level a sloping garden
- 1) Make sure you have permission
- 2) Measure the rise and run of the slope
- 3) Water the ground you’ll be digging
- 4) Build the retaining wall
- 5) Pile up soil behind the retaining wall
- 6) Ensure the new lawn is level
- 7) Compact the soil
- 8) Plant a new lawn
- 9) Compact the turf
- 10) Take a moment to appreciate your handy work!
- What materials are used for a retaining wall?
- Levelling a sloping garden: DIY or hire in help?
- How long will it take to level a slope?
- Top tips for levelling a sloping garden
- There you have it…
An uneven lawn with lumps and bumps isn’t ideal for your garden, but you can usually work around it.
Slopes, on the other hand, can interfere with all sorts of garden-based activities.
This guide will cover everything you need to know about levelling a sloping garden including – most importantly – whether you should take on the job yourself, or hire professional landscapers to do it for you.
Here’s what we’ll cover:
- Reasons to level out your garden.
- What you’ll need to level a sloping garden.
- How to actually do the leveling.
- Options for retaining wall materials.
- How to decide whether to do the job yourself or hire in help.
- How long the job might take.
Let’s get started.
Why level out your garden?
Unfortunately, it’s hard to do much with a slope, especially when it’s very steep.
While there are some plants that thrive in a sloping garden – chairs won’t rest level, it will be uncomfortable to sit or lay on the grass, and the incline will interfere with games.
A slope doesn’t mean the space is permanently out of action though.
There are a few ways to level out a garden, and this guide will run you through them.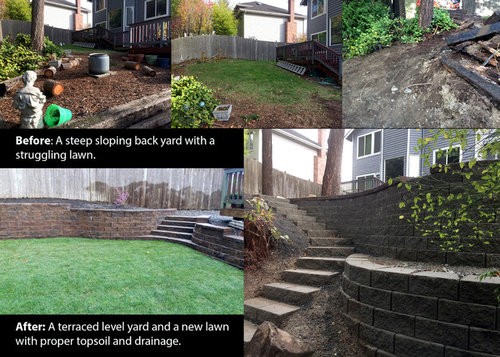
The main reason people look to level a sloping garden is to give themselves a larger workable space.
But because a slope can also lead to problems with flooding and soil erosion, levelling it out is useful for more than just making your garden easier to relax in.
Here are some of the other benefits to levelling out a sloping garden:
- It helps with drainage, and can direct runoff water away from your property.
- A flat lawn is easier to mow.
- A level lawn means that more water can absorb into the soil, meaning it will have more nutrients.
- There is more space to relax on or for kids to play on.
What you’ll need to level a slope
This is a big job, but the list of tools you’ll need isn’t very long.
- A couple of stakes and some string for measuring the rise and run of your current garden.
- A spirit level to check things are flat.
- Water to moisten your soil.
- A shovel to dig with.
- The materials for your retaining wall (covered in a later section).
- A soil compactor to squash everything down.
- Grass seed or turf, for your nice new lawn.
How to level a sloping garden
The process and the guiding logic are the same whether the slope faces away from your house or toward it.
Remember though, that if the slope faces toward your house, you’ll want to leave a walkway between the retaining wall and your house. This allows for access and drainage. [source]
Remember that this is a lot of work in practice, even if it may not look like much on paper.
To level a sloping grade, see this video for a time-lapse demonstration of the entire process:
Or follow each step in the guide below:
1) Make sure you have permission
This is an important first step that’s easily missed.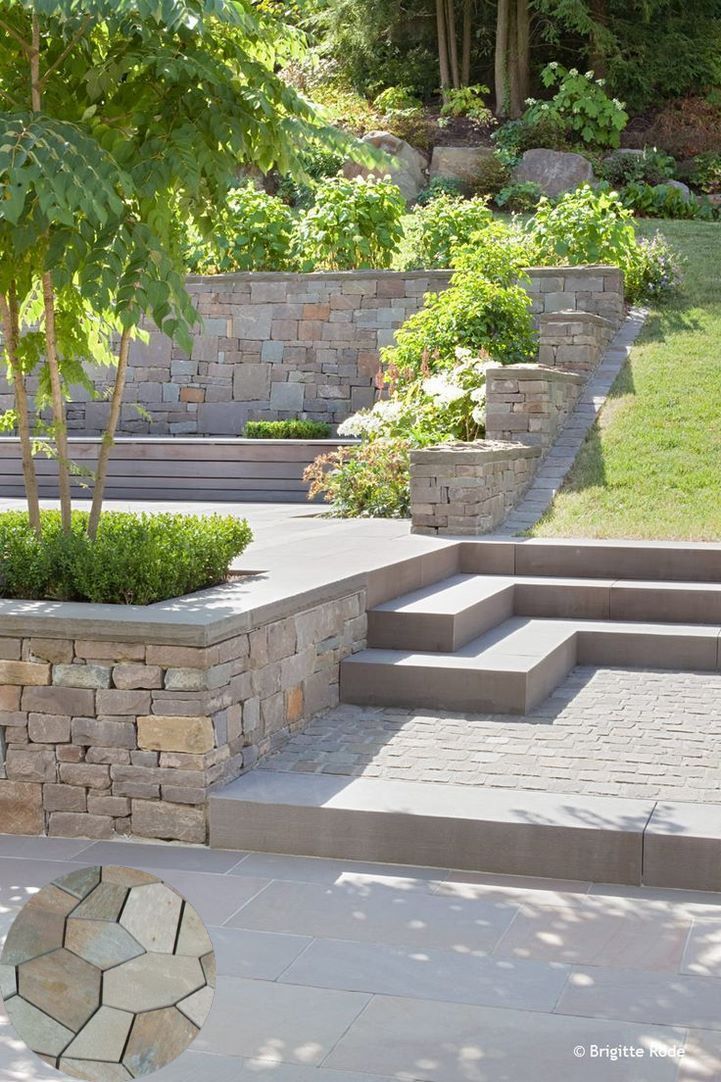
Check with utility companies and your local council to make sure there are no cables under your garden that will be disrupted, and whether the work you are planning requires planning permission. [source]
If it does require planning permission, make sure you have acquired this before starting work!
2) Measure the rise and run of the slope
Image courtesy of WikiHowThis step will let you determine how tall the retaining wall will need to be.
Two stakes are placed, one each at the top and bottom of the slope, and a string tied between them.
The string is called the ‘run’, and its height on the second stake is referred to as the ‘rise’.
On the top stake the string should be at ground level, and it should stretch to meet the other stake.
At this point, place a spirit level on the line to check that it is level.
It’s important to get this right, as your new lawn will follow the line of the run.
With this step, you determine the height needed for your retaining wall, as well as the amount of soil you’ll need to fill the gap behind it.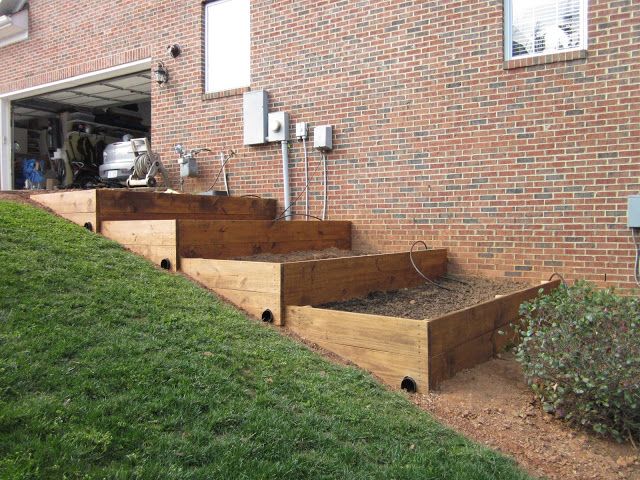
If you think back to high school maths, the rise and run measurements give you two sides of a triangle whose area you can calculate.
Multiplying the area of this triangle by the length of your retaining wall will give you the approximate volume of the space needing to be filled behind the retaining wall.
3) Water the ground you’ll be digging
Aim to do this at least 24 hours before you start digging, as it will make the ground easier to work with.
Be careful not to water too much though: wet soil can be just as tricky to work with as dry.
4) Build the retaining wall
Building a retaining wall can require some heavy liftingA retaining wall is designed to support the newly raised land in your garden, and to prevent your nice new flat lawn from collapsing after rainfall.
The retaining wall holds back the pressure of the soil and, when it rains, the water that soaks into it.
It’s vitally important that the materials used for the wall are strong enough to reduce the risk of it collapsing, but we’ll cover this in the next section.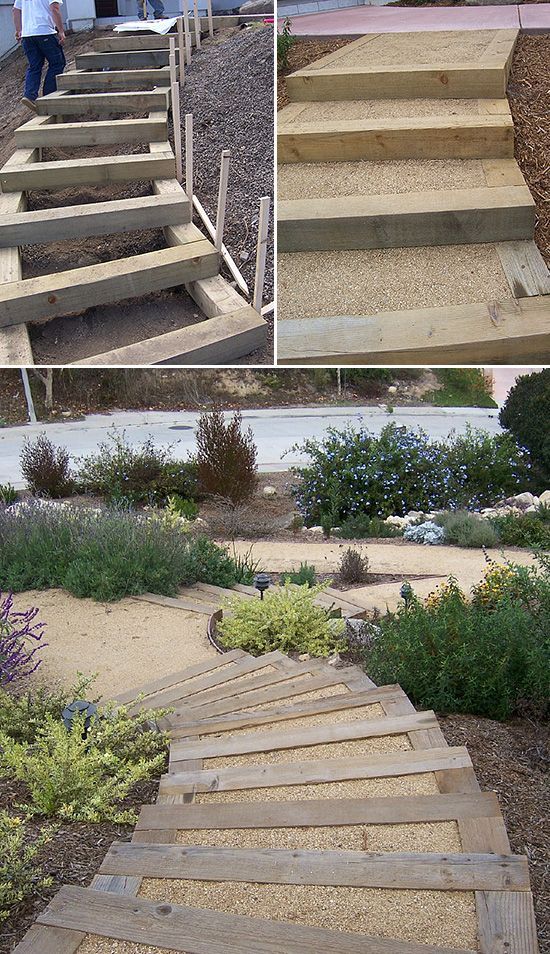
You should aim for a retaining wall no more than two feet tall.
Beyond this point they are exposed to high amounts of pressure that make collapse more likely.
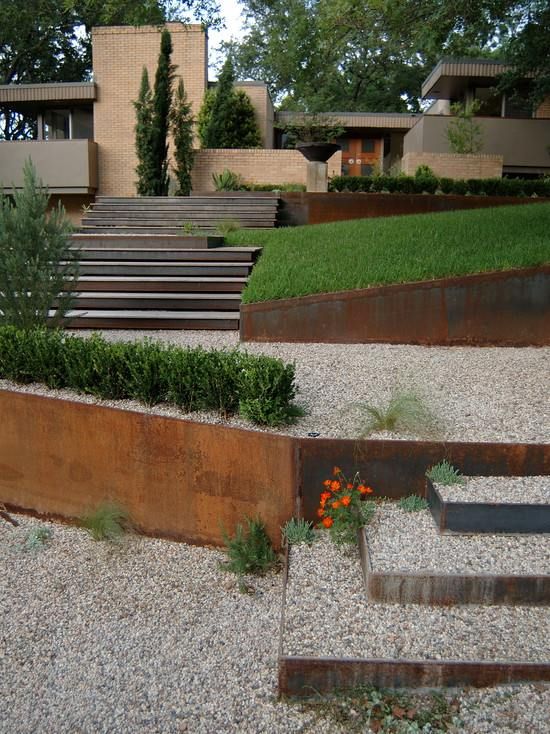
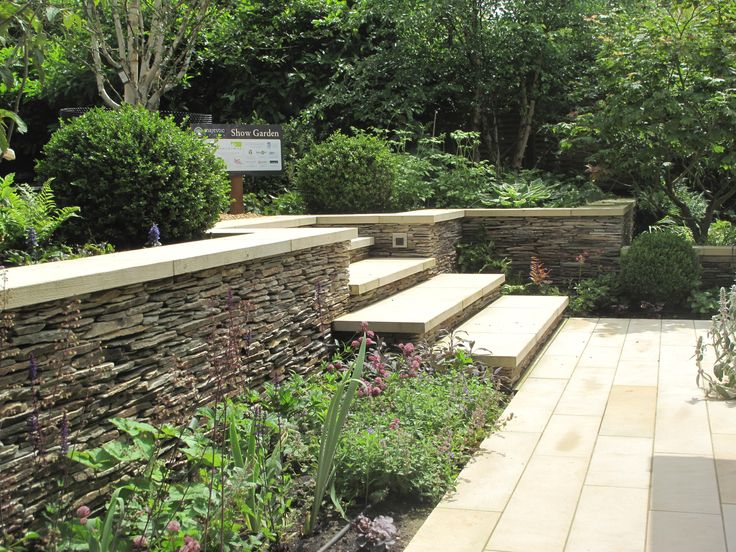
If the rise of your sloped garden is above two feet, consider building a series of terraces instead.
This guide is tailored toward levelling a sloping garden, but the process for installing a series of terraces is similar.
5) Pile up soil behind the retaining wall
Once the retaining wall is erected and stable, pile in soil behind it.
This soil will make up your new, level garden – so it’s important to do this step carefully until level ground is achieved.
If you are just raising a lawn you can order in topsoil to fill the gap behind your retaining wall.
If you are lowering part of the lawn, you can use the soil taken from here to fill the gap behind the retaining wall.
6) Ensure the new lawn is level
Use a spirit level to ensure your lawn is flatBefore you begin compacting the soil, it’s important to check that it is level, and that it is at the correct level.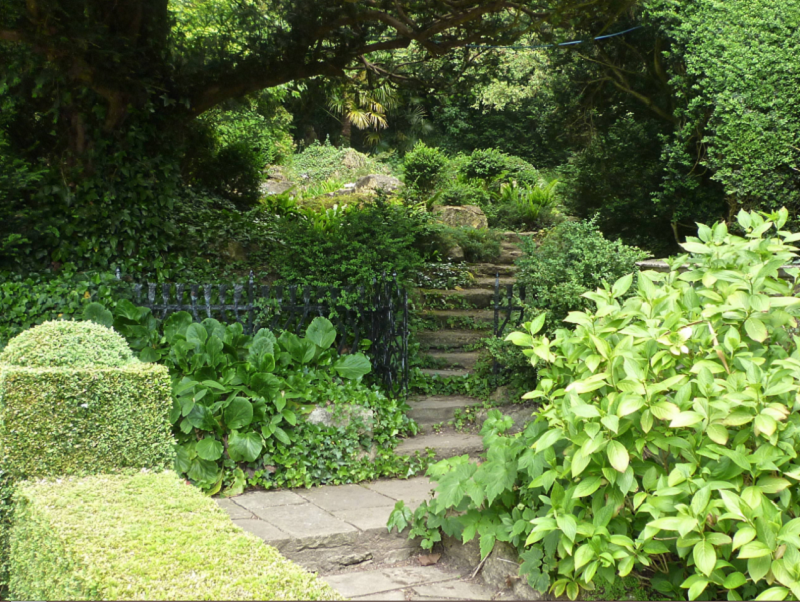
It may be the case that you need to add or even remove some soil before the next step.
Gauging the level by eye is a good start, but the spirit level you used earlier will be your friend here: lay it out on the lawn in a few places to check everything is flat and even.
You can also use the stakes and string method again: put a stake at each corner of your lawn and run the string between them at an even height on each stake.
If your lawn is level, the string will be level too.
At this stage you can add a layer of compost at a uniform thickness on top of your soil, if you want to ensure it will have enough nutrients.
7) Compact the soil
Now the soil is level, compacting it will help to remove any air and cavities.
This step reduces the likelihood of bumps and lumps appearing in your newly levelled garden after the next rainfall.
It also protects the structural integrity of the retaining wall by exposing it to more consistent pressures.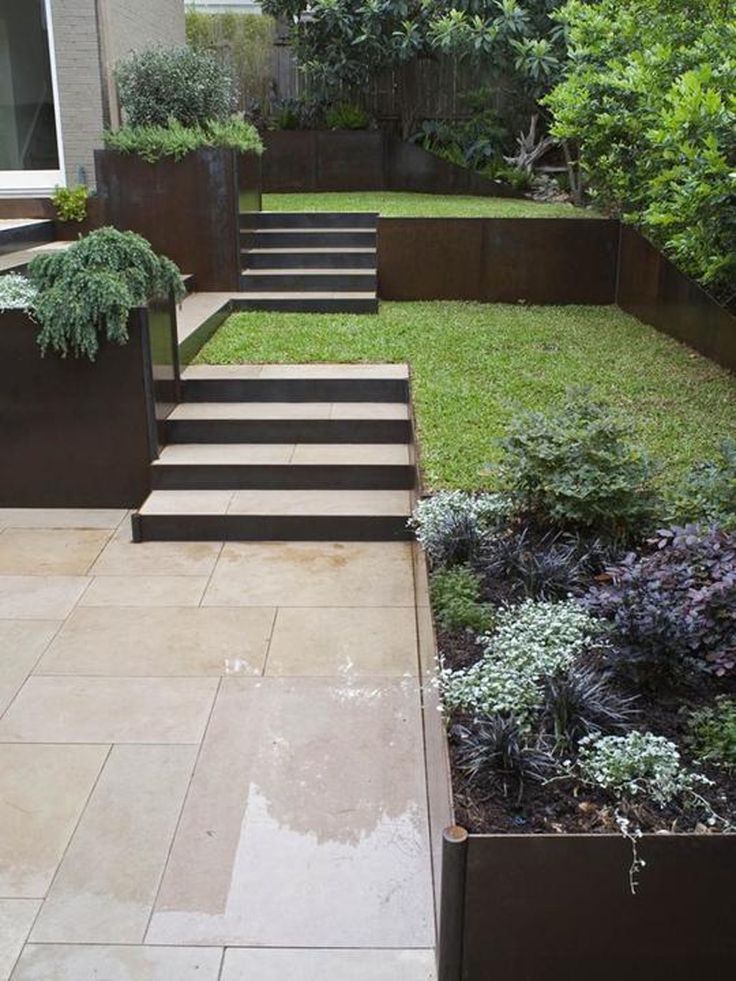
Running a soil compactor back and forth over the soil a few times should do the trick.
8) Plant a new lawn
Now it’s time to plant or place grass on top of the exposed soil.
If you’re growing from seed, scatter the seeds over the soil as per the directions on the seed packet.
If you’re using turf, lay the sheets out flat and as close to each other as possible.
Once they’ve taken root it will be almost impossible to see the lines or gaps between the different pieces.
9) Compact the turf
Get the soil compactor back out (or a lawn roller) and run it over the turf, if that’s the route you went for.
This will help the roots to take more quickly, and will ensure that the grass is good to be walked on.
10) Take a moment to appreciate your handy work!
If you’ve got this far, congratulations. That’s a tough job and you deserve a pat on the back and a sit down.
What materials are used for a retaining wall?
You have a few options, each of which brings its own aesthetic and functional considerations:
- Concrete retaining blocks: these aren’t the cheapest option, but they are purpose-built for the job.
 Many blocks are hollow in the centre, and this space is filled with soil. A plant can be grown to spill over the side of the block, eventually hiding them behind some foliage.
 - Breeze blocks: these are cheaper than purpose-built retaining blocks, but they aren’t hollow, so the surface will always be exposed.
- House bricks are a popular choice that combine material strength with a nice aesthetic. If you use the same bricks as your house, you can achieve a nice design consistency.
- Natural stone: the most expensive, but also very aesthetically pleasing.
- Reclaimed railway sleepers: the only wood that will be strong enough to make a serviceable retaining wall.
- Gabions: these are the wire nets full of stone that you sometimes see buffering steep walls beside motorways (see below).
Dry stone or masonry are generally recommended over wood because of their durability.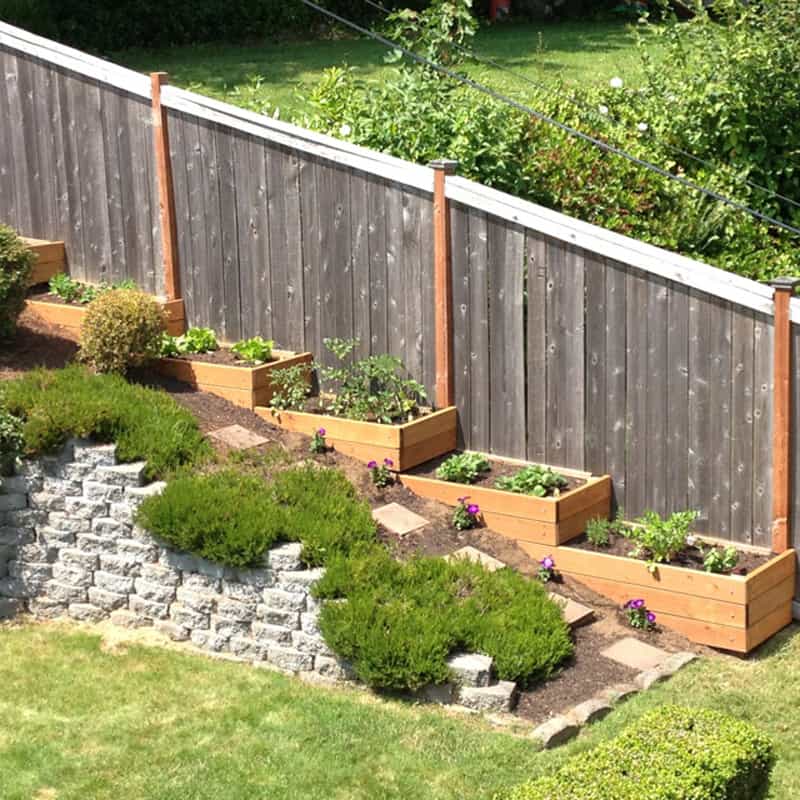
One reader recommended reclaimed wooden sleepers if you consider wood to be a vital aspect of your retaining wall: these are designed to be very strong.
Levelling a sloping garden: DIY or hire in help?
While it is definitely possible to level a sloping garden without professional help, please bear in mind that this is a big job!
Make sure you know what you’re signing up for before the shovel breaks ground.
The most important thing is getting the retaining wall right.
If this stands up and holds back the soil behind it, happy days. If not, you’re looking at potentially timely and expensive repairs.
If you do the job yourself and manage to get a retaining wall built, you need to make sure it is strong enough.
We’ve read horror stories of people building walls that collapse after the first rainfall, and being forced to hire professional help to fix the mess.
If you don’t feel confident with the scale of the job, it may be best to speak with contractors about your options.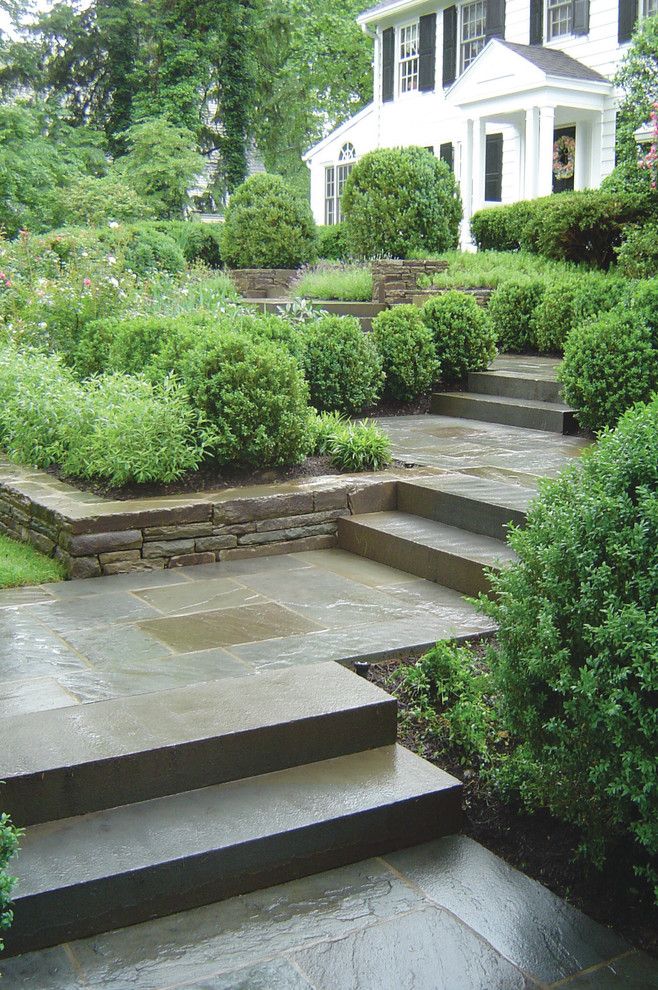
The initial cost could save time, hassle, and even money in the long run.
How long will it take to level a slope?
There’s no easy answer to this, unfortunately. The time it takes will depend on a few factors:
- The size of your garden.
- How many people are helping.
- How steep the slope is.
Don’t expect this to be a quick job though, as we’ve said previously.
Forum posts discussing levelling sloping gardens put an estimate of at least a fortnight for most garden sizes.
Top tips for levelling a sloping garden
If you do the job yourself, try to use soil you dig up to level elsewhere.
Skips are very expensive to rent, and removing soil this way can quickly ramp up the price of the job.
Labour is the main place where you have the opportunity to save money, but remember what we’ve said previously about the scale of this job.
Aim to level your lawn in early spring if possible, to give your new grass the best chance to grow strong over summer.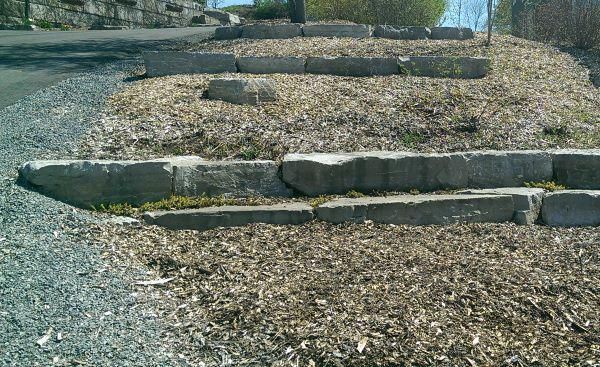
As a general rule, retaining walls are best at no more than two feet high.
Beyond this height the structure risks becoming unstable, as an incredible amount of pressure is put onto the wall by the soil behind.
Make sure you add ‘weep holes’ to the bottom of stone or concrete walls so that water can drain from the soil behind.
It’s absolutely vital that you factor in the weight of water when designing your wall, otherwise it may collapse under the extra pressure caused by rainfall.
There you have it…
Hopefully this guide has given you the information you need to decide whether to level your garden yourself, or whether to hire in help.
And if you’ve opted for the former, you know what you’re up against!
A levelled garden really will be worthwhile in most cases.
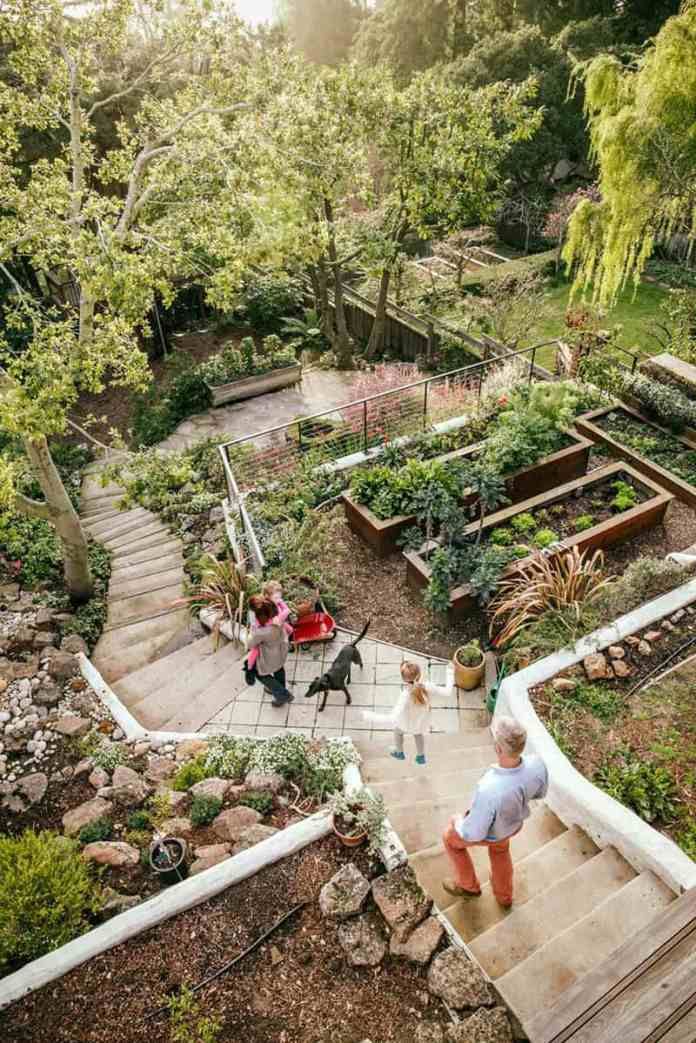
The extra space it opens up can be used for so many things, and the clean, crisp lines help to achieve a nicer garden design.
How to level a yard – fix a bumpy lawn or sloped garden yourself
Real Homes is supported by its audience.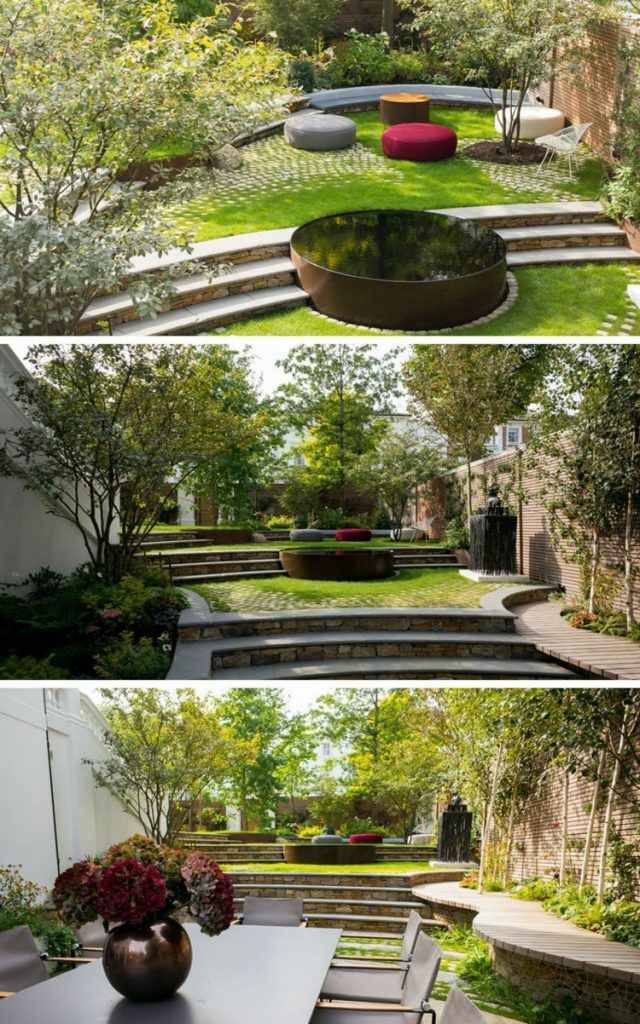 When you purchase through links on our site, we may earn an affiliate commission. Here’s why you can trust us.
(Image credit: Getty Images)
Join our newsletter
Get the best home decor ideas, DIY advice and project inspiration straight to your inbox!
Thank you for signing up to Realhomes. You will receive a verification email shortly.
There was a problem. Please refresh the page and try again.
By submitting your information you agree to the Terms & Conditions and Privacy Policy and are aged 16 or over.Learning how to level a yard is a vital backyard maintenance step whether you’re landscaping the entire space, preparing to lay a patio or deck, or rescuing a bumpy lawn.
Bumpy lawns can be unsightly and make it tricky to mow your lawn, are a trip hazard and can ruin the aesthetics of your garden. A level lawn is also a really important factor for drainage; holes and low areas can collect water which may cause lawn disease.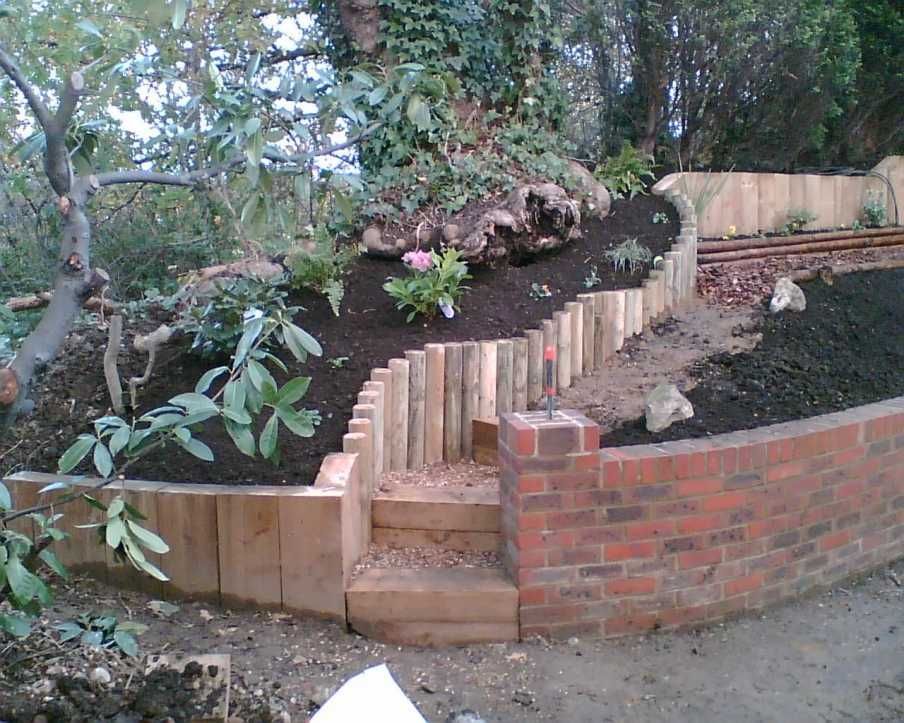
So, before you investigate garden landscaping ideas, follow this step-by-step guide to leveling your bumpy lawn.
How to level a yard: what to consider
The best way to level a garden depends on the garden’s design, and how uneven or sloping the space is. You may just want to get rid of lumps and bumps in the lawn so it looks its best, is suitable for sitting or lying out on and so kids can play on it. A flat lawn is easy to mow, and rain will be absorbed evenly, making the grass healthier.
Alternatively, you may want to construct a patio or deck. If that’s the case, you’ll need to start from a level surface to build your new garden feature.
Of course, your garden may be a sloping one, leaving you with space you can’t easily use. If that’s the case leveling is imperative if you’re to create space for all sorts of garden activities, and to make tending the plot much more straightforward.
If you don't want to do the job yourself, you can outsource it, but find out what the cost to level a yard is first.
How to level a lawn
Topdressing is the easiest and least onerous approach to leveling out lawns with uneven areas, using a thin layer of leveling mix (made up of soil, compost, and sand). You will need:
- Lawnmower
- Trowel
- Rake or dethatcher
- Sand (medium particle size)
- Top soil
- Compost
- Broom
- Hose
- Shovel
- Bucket
- Flat spade or lawn edger
- Grass seed
(Image credit: Kate Sandhu)
1. Mow the lawn
Mow the lawn at the lowest setting with the best lawn mower – remove the majority of excess grass.
(Image credit: Kate Sandhu)
2. Dethatch
Dethatch your lawn with a garden rake or dethatcher. Thatch is a mix of dead and living plant material that forms a layer at the base of grass, the cross-section where it meets the soil.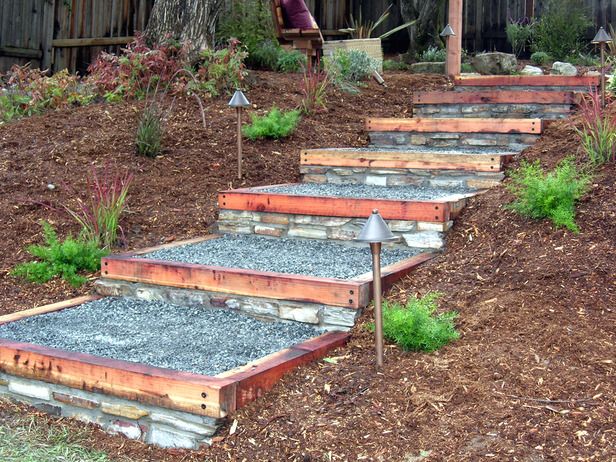 A thin layer can be beneficial to lawn health but too much (often caused by poor soil aeration and drainage) can cause root problems and difficulty mowing. Dethatching can help restore lawn health.
Check your thatch before dethatching by digging up a small wedge of grass and soil with a trowel, anything over a couple of inches needs thatching. Thoroughly rake the grass to remove thatch then clear all debris.
(Image credit: Kate Sandhu)
3. Make a leveling mix
In an old bucket or wheelbarrow, mix up some leveling mix, you can buy this premixed or mix it yourself using 40% fine sand, 40% topsoil, and 20% compost. The sand provides good drainage, and the compost adds nutrients to the soil to promote grass growth.
(Image credit: Kate Sandhu)
4. Apply mixture with a shovel
Apply the mixture on top of the low areas with a shovel taking care not to add more than half an inch because anymore can smother the grass. Rake to spread the mixture out evenly.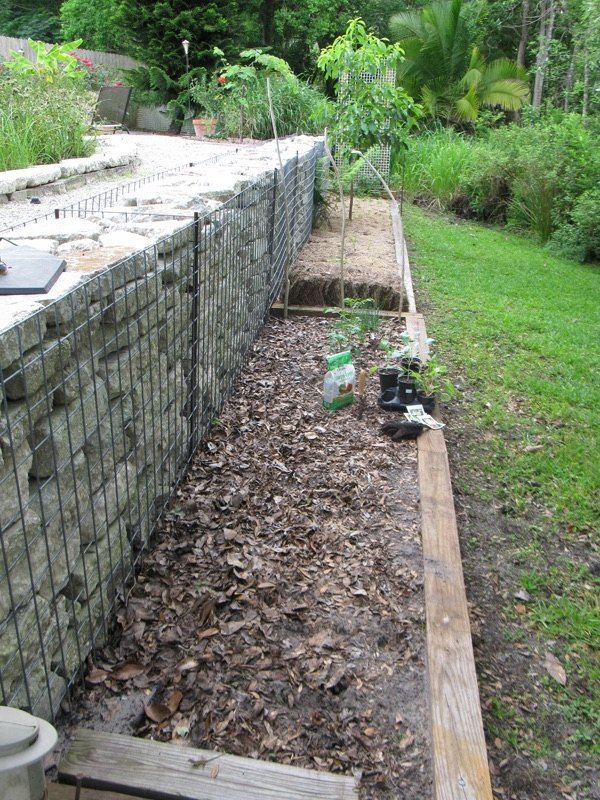
(Image credit: Kate Sandhu)
5. Brush the grass with a broom
Brush the grass back and forth with a broom; this works in the leveling mix down whilst at the same time, lifting the grass blades up to make sure the grass isn’t covered with soil. Water the area lightly, taking care not to overwater as this can wash away the leveling mix. Monitor progress (giving the grass a chance to recover). Repeat if needed
Top tip: You can level out any small bumps (less than 1 inch) by stepping on them; it's best to do this in Spring when the grass is soft.
6. Level out larger areas
To level out larger sunken areas (more than half an inch) you will need a different approach. Mow the lawn and dethatch as outlined above. For any larger patches, you can remove the turf patch by cutting along the sunken area with a flat spade or lawn edger, taking care to protect the roots. Spread a layer of topsoil into the hole, watering slightly as you build it up to the lawn level and then replace the turf patch, pressing the grass back into place with your hand or foot.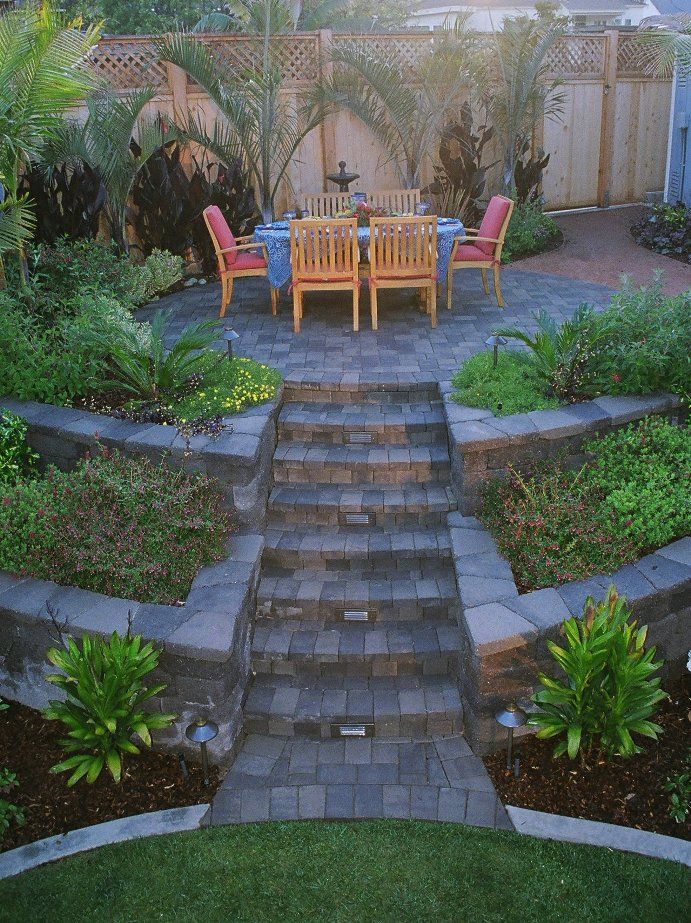
7. Level out bumps and lumps
For lumps, you’ll need to carefully lift the turf, then remove the soil below until the area is level with the rest of the lawn. Lay the turf back down and compact it afterward.
8. Reseed if necessary
For anything bigger than two inches deep you should start again rather than try to salvage the grass. Fill the plot with a good soil mix and lay new grass seed. Leave for two days, then add grass seed and a light layer of topsoil. Water as required.
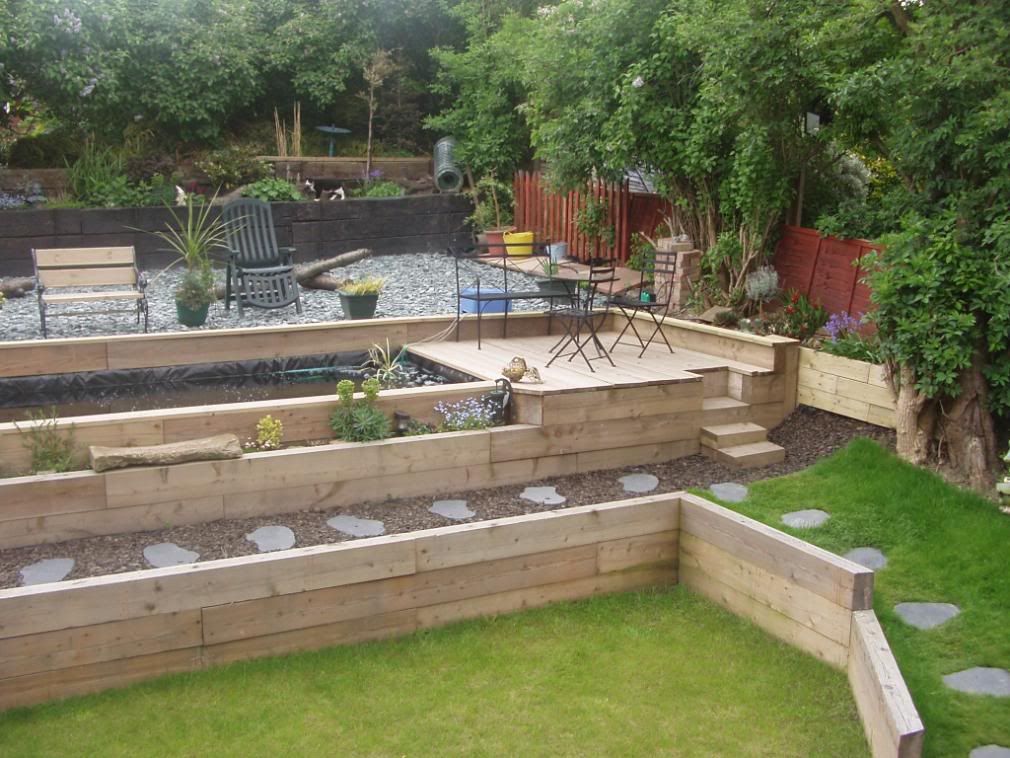
9. Add terraces to a sloped garden
The best way to level a sloping garden is to construct terraces within the garden to create level areas. For gentle slopes, timber retainers can be used to form small, stair-like terraces. In this case, moving the soil around the garden is feasible, and it can be a DIY job.
10. Add retaining walls to steep slopes
For steeper slopes, retaining walls will be required to keep the soil in place, and the soil should then be piled up behind them.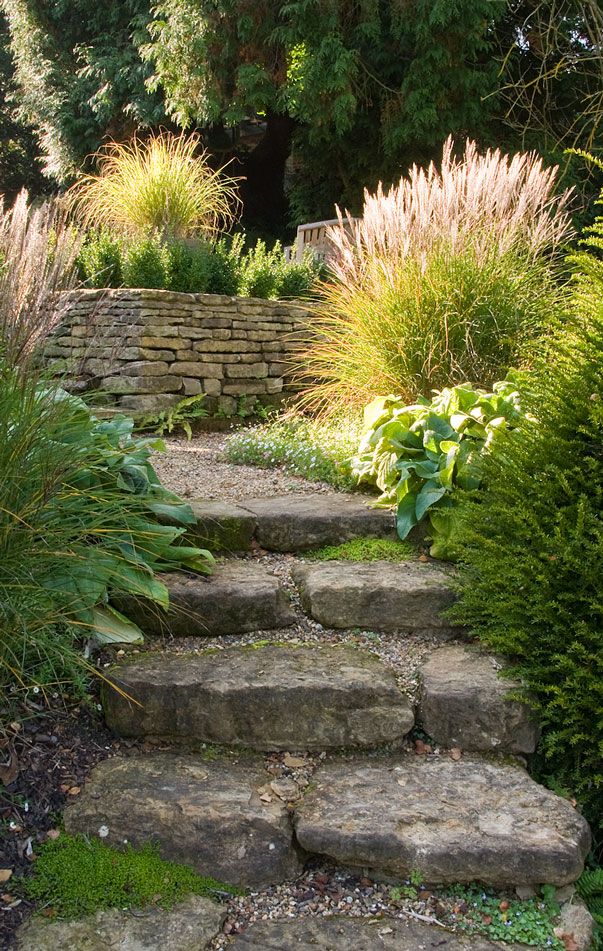 Retaining walls can be attractive features and may be formed with materials such as bricks, stone, sleepers, gabions – wire enclosures filled with stones – and special concrete blocks.
We’d recommend calling in a professional landscaper to do this job as the retaining walls must be strong; you may even require a structural engineer in addition to specifying the design of the wall. If walls are not correctly constructed for your particular plot, they can collapse with damaging and expensive results.
(Image credit: Unsplash/Jan Canty)
How to regrade a yard
If you're thinking of installing a swimming pool, you'll need to regrade your yard first. Before grabbing a shovel, you want to find and mark the location of any underground utility lines. You may think you’re only removing the top layer of grass, but it’s better to be safe before unearthing a power or gas line.
You should also check with your local municipality to see if you need any permits for this job. Blythe Yost, landscape architect and CEO of Tilly , an online landscape design company, says that 'most municipalities have a soil movement permit requirement,' depending on the extent of the job. For example, if you’re changing the grade enough to require a retaining wall, you probably need a permit.
What's the best way to level an uneven yard yourself?
Leveling a bumpy lawn can be tackled at home, the best tip is to do this in spring when the ground is soft. Start with small lumps (less than one inch), using your foot to press them down then fill any small animal holes with garden soil, compressing with your foot and watering; in time the grass should grow back over them. For larger lumps mow your lawn and rake it to remove thatch, mix a topdressing with some sand and garden soil (at a ratio of 40% sand to 60% soil) and fill any lumps, raking even, brushing with a household broom to work it into the soil and watering to finish.
How can I level my yard cheaply?
You can level your yard yourself on a budget, for next to nothing, using a rake, play sand and some soil from your yard. Firstly, level any small bumps (under one inch) with your feet, making sure the ground is moist when you step on them. Any animal holes can be leveled by filling the soil back in with soil from your yard and then topping up with topsoil; if they’re small the existing grass should grow over them, for any larger holes you can sprinkle some grass seed if you have it and water.
For mildly uneven areas that require more work, topdressing is easiest. Once you’ve mowed the lawn, mix together some fine sand with some compost from your yard (at a ratio of 40% sand, 60% soil) and apply it to the low areas evenly. Rake even if you have one and run a household broom over it to work it into the grass, water and monitor progress. Repeat if needed.
Sarah is a freelance journalist and editor writing for websites, national newspapers, and magazines. She’s spent most of her journalistic career specialising in homes – long enough to see fridges become smart, decorating fashions embrace both minimalism and maximalism, and interiors that blur the indoor/outdoor link become a must-have.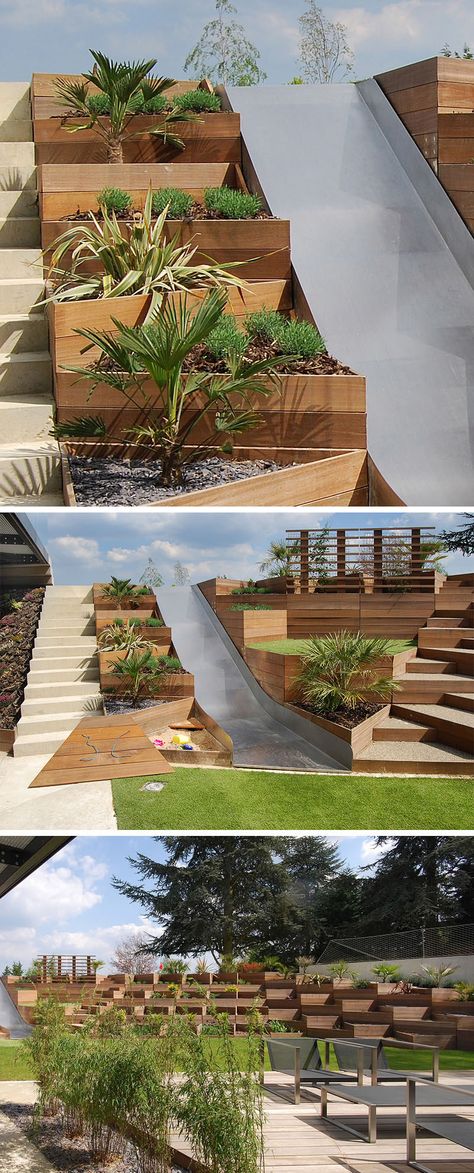 She loves testing the latest home appliances, revealing the trends in furnishings and fittings for every room, and investigating the benefits, costs and practicalities of home improvement. It's no big surprise that she likes to put what she writes about into practice, and is a serial house revamper. For Realhomes.com, Sarah reviews coffee machines and vacuum cleaners, taking them through their paces at home to give us an honest, real life review and comparison of every model.
How to level the plot and strengthen the soil on the slope
It is rare to find a personal plot with a perfectly flat surface. Somewhere there is a stump, somewhere there is a pit, and somewhere there is a slope, so what can you do to accept and adapt, get upset every time, or still try to level the land with your own hands? We offer options on how to make the surface of the earth flat, without the use of heavy "artillery". If there are stumps on the site, then immediately determine for yourself whether they interfere with you.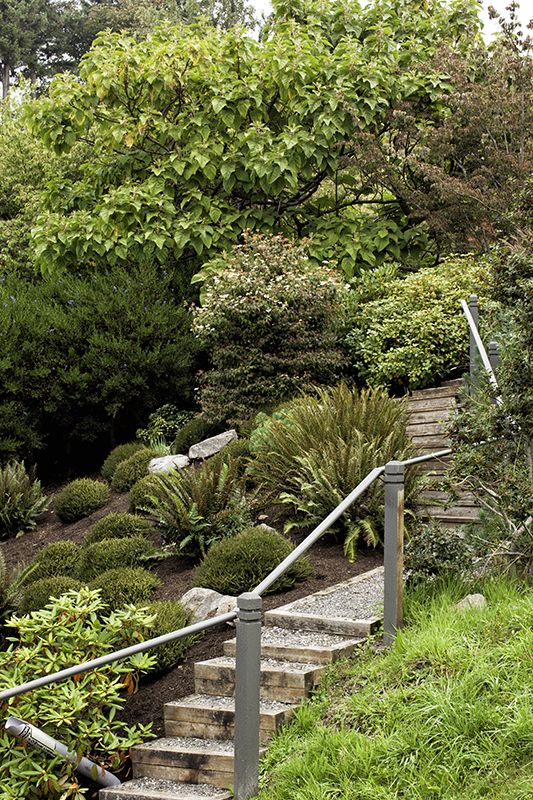 Stumps can be used as garden decor, or they can be removed with a tractor or burned with saltpeter.
If you are concerned about voids in the ground, holes and a slight slope, then it will be enough to remove the top layer of soil, sod with a shovel, fill the voids with earth taken from elevated areas with a pitchfork, level the surface with a rake, throw back the sod and walk again in 1-2 weeks on the surface of the earth with a rake.
If the slope is very small, but which does not allow, for example, to make a beautiful lawn, then it will be faster and less laborious using a steam cultivator. Walk them several times, first in one direction, then in the other direction, thus loosening the soil. Level the surface with a rake and start sowing lawn grass seeds. If you plan to make a flower bed on such a site, then you can create an illusion. Level the surface with a rake and sow flowers of different heights, where tall beauties will grow at a lower level.
If you are leveling a small area with a large slope, then prepare pegs of the required length, set them around the perimeter of the area to be leveled.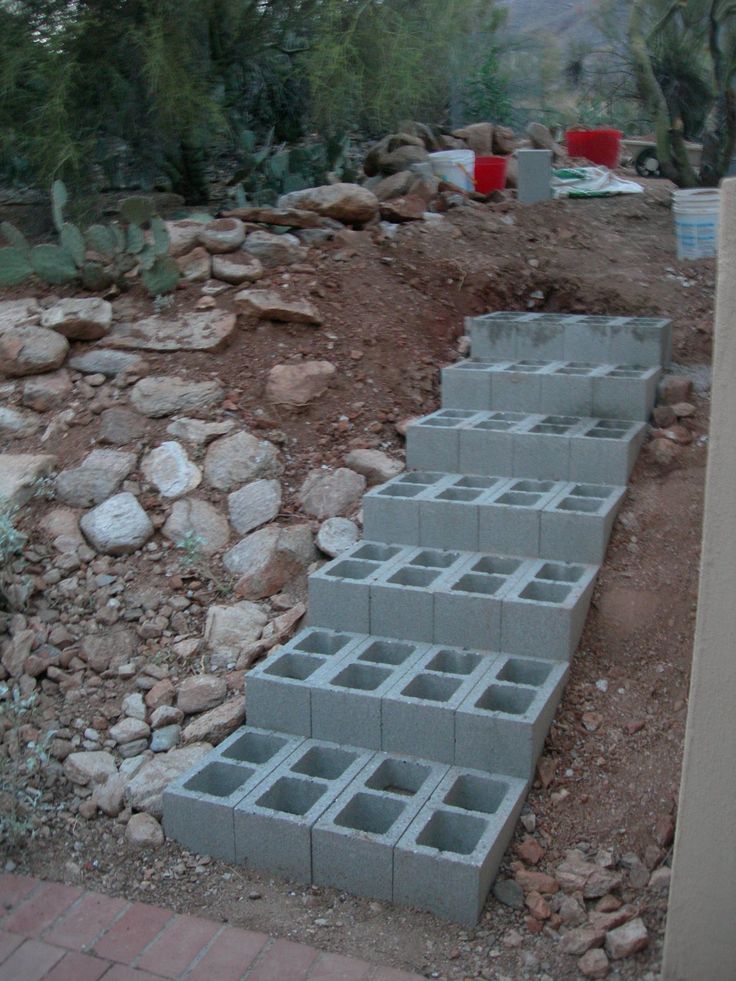 Using the building level on the stakes, make marks to what height you need to pour or remove the earth, pull the thread, fixing it on the marks. Remove the sod, transfer the soil with a shovel, return the sod to its place and level it.
If a large area is in a deplorable state with a slope, then most likely you will have to use a bulldozer. However, before work, collect all debris, stones and remove the sod (fertile soil layer). After leveling the area, return the sod and spread it over the surface with a rake.
It may be necessary to introduce new soil if the ground under the sod is very clayey.
If the garden plot is on a steep slope, even a bulldozer will not help to make the surface even. Terracing is a great way to ennoble the landscape, hide the flaw in the form of a slope and, if desired, make a garden bed. On a steep slope it is quite difficult not only to build something, but also to grow crops, because. from irrigation and rain, the soil will be washed out, exposing the root system of plants, and fertilizers will not be able to linger on a hill.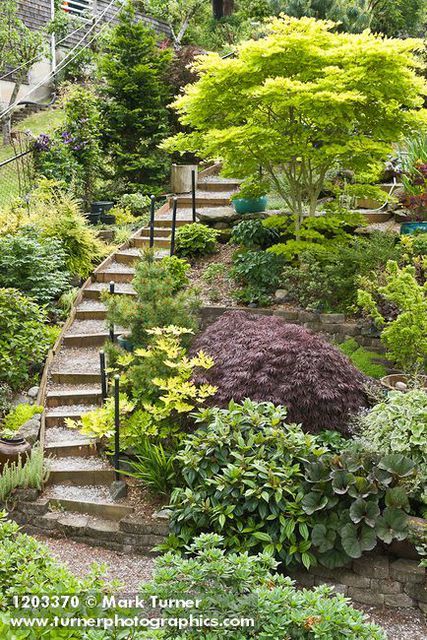 Definitely need to make a drain.
Clear the area of debris, remove topsoil and place stakes horizontally every 1.5 m. Set up verticals according to the shape of the terrain. Do not make the width of the terrace more than 1.5 m, for the convenience of cultivating beds, and so as not to create a lot of soil pressure on the support. Make comfortable steps between terraces using retaining walls at high points.
It is better to strengthen the soil on the slope, especially if it contains sand. If the slope angle of the site is not more than 10º, then planting lawn grass, trees or shrubs with a powerful root system (ivy, barberry, spirea, broom, climbing roses) will be enough to reinforce the soil. But with a steeper slope, it is necessary to strengthen the soil from erosion using special reinforcing structures - a geogrid, a geogrid or an anti-erosion mat, a log. Here are the main materials:
Geogrid is a convenient flexible reinforcing structure that can be used to strengthen soil on slopes both in vertical and horizontal positions.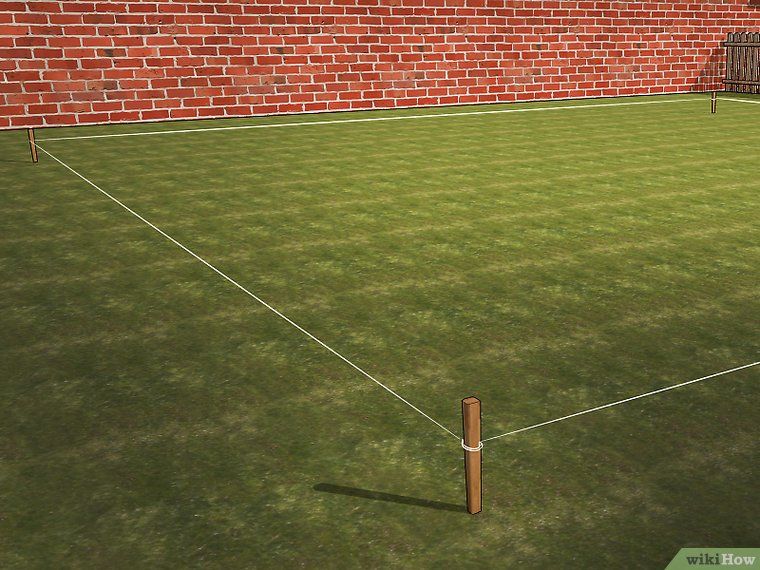 First you need to delimit the site, level and compact the soil on the slope. Lay (preferably, but not necessary) geotextiles, lay the geogrid from top to bottom and secure with anchors or drive in pegs. Fill the cells of the lattice with crushed stone, cover with soil and sow the seeds of lawn grass.
Geomat or anti-erosion mat perfectly strengthens the soil on the slope, if the angle of inclination is 50-70º, and also fixes the root system of young shoots. This material is easy to work with. it is suitable for any slope relief. The geomat is laid with a smooth side to the ground, giving an overlap of 15-20 cm. The edges of the mat are fixed every 50-70 cm with anchors to a depth of 30 cm. Make sure that the material lies tightly and evenly on the ground, without waves. Next, fill the geomat with soil and sow lawn grass.
To strengthen the soil on a slope (angle of inclination up to 60º), large and small stones or logs (boards) can be used. To do this, deepenings are made in the soil and stones are laid very tightly to each other in them, large at the base of the slope, smaller at the edge. If logs or boards are used, they are laid deep and across the slope.
Liked the article? Share it with your friends! (links below)
What if the plot is sloping?
What if the site is sloping? | Articles of the construction company "New House" 06/10/2022 New house
If you got a plot with a slope, or you are just going to purchase such a plot, of course, a number of questions immediately arise. And some may even have doubts about such a site. Excite sewage, heavy rains. What should be the foundation on a site with a slope? Where to plant a garden? How to water? What to consider before building a house on a plot with a slope? How to make a sewer? And much more…
We will help you understand all the nuances and answer all your questions. You will be convinced that a piece of land with a slope and difficult terrain is not a punishment or torment, as some people think, but your individuality, a “highlight”, so to speak, with its proper arrangement. We hope that our article will help you make your dreams come true, and turn all the “minuses” of a land plot with a slope into “pluses”.
So, what if the plot is sloping?
The first thing you ask is how to level a plot with a slope? Is it worth it? After all, you can competently beat the height difference, as well as demonstrate all the beauty and attractiveness of an unusual landscape. And even though the construction on a site with a slope and its arrangement will not be easy, and you will have to face some difficulties, but the final result will please you and give you pleasure after all the work done. The finished site will be the envy of all your friends and acquaintances.
Attaching the house to a plot with a slope.
How to properly position the house on such a site? There are two ways to link a house to a plot with a slope: without changing the landscape, and with changing the existing landscape. A typical project is created based on the fact that the construction will take place on a flat area.
The house, which is being built on a territory with natural conditions, needs to be reworked in the underground and basement parts. Thanks to this, the dwelling will have unique features, and suit the site properly.
Sloped areas are divided into:
-
flat areas with a slope of up to 3%;
-
areas with a small slope up to 8%;
-
plots with an average slope of up to 20%;
-
steep sections with a slope of more than 20%.
Building houses and forming roads leading to a building on a slope is very difficult. Retaining walls, embankments and other structures for strengthening are fixed on slopes where the height difference is 1: 2.
Vertical layout of the site with a slope.
What does the work on equipping the landscape with difficulties include if the land plot is sloping?
It is necessary to organize:
-
the greatest leveling of the relief (if possible), by taking soil on one part of the land plot and pouring it in another part of the plot;
-
storm drains: they can be hidden or left open;
-
correction of minor potholes and tubercles, using the terracing method, and in case of significant differences - the construction of retaining walls;
-
determination of the optimal location of the house, garage, garden, kitchen garden, gazebo, shower and other buildings.
Thanks to these actions, it is possible to clearly and correctly divide the territory into functional zones, as well as design it in a unique and special way.
Drainage system on a site with a slope.
What should be the drainage system on a site with a slope? The device of the drainage system must be given special attention! After all, drainage allows you to adjust the balance of water and provides rapid drainage of the liquid formed and accumulated as a result of significant precipitation and snowmelt.
Melt water and rain create gullies. And the greater the difference in elevation, the more likely the violation of the slope. Even small streams can create impressive ravines and cause landslides.
The formation of runoff begins only after the completion of the main work on the ground and the summing up of communications. In order to competently stretch the drainage system, it is still necessary to have information about the approximate location of the main buildings and green spaces.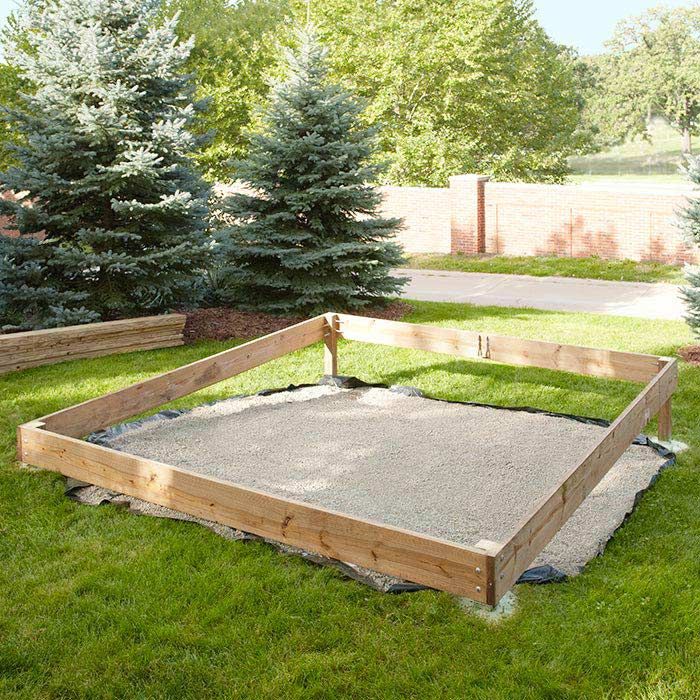
There are two ways of laying a drainage system: open and closed. The main advantage of a closed drainage system is space saving. Due to the fact that the channels are underground, it is possible to equip access roads on the surface.
Ditches are dug along the length of the slope of the entire land plot to the receiving collector. Very effective is the laying of drainage by the "Christmas tree" method, where additional drainage systems are connected to the main line at an acute angle. Using this method, the main trench should be located slightly below the additional channels.
The depth of the trench should be from 0.3 to 1 meter. The slope must be at least 2 millimeters per meter of length. This characteristic is important even on sloping terrain, since part of the system can also pass through a flat area.
Sand, 10 centimeters high, is poured into the bottom of the trench, and it is compacted. A geotextile is laid on top of the sand, with the ends covering the walls of the channel with a small reserve.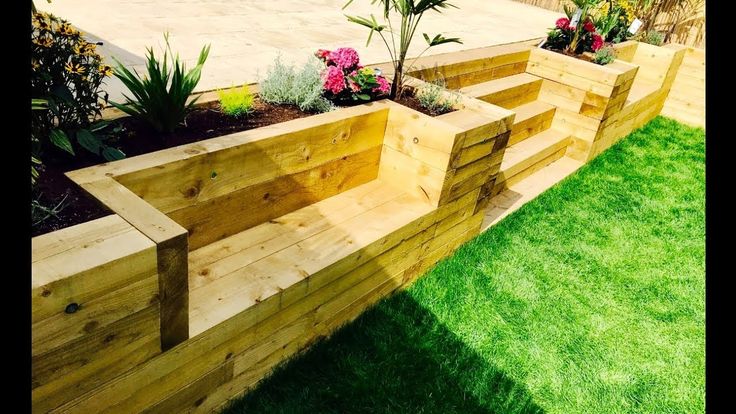 Then rubble is poured with a thickness of 10-20 centimeters.
Perforated pipes made of polymer are laid on a gravel pillow, joined and connected. Next, the pipes are covered with rubble, and the resulting system is covered with geotextile. The finished complex is covered with sand and soil.
Slope site design.
What should be the design on a site with a slope? The arrangement of a complex landscape on a site with a slope is difficult, tricky and looks like a difficult puzzle, it is associated with some features and has its own tricks. But this should not burden you at all or become an obstacle on the way to achieving excellent results. A well-thought-out approach to landscaping your special land plot will plunge you to a unique result and plunge you headlong into the world of extravaganza and bliss.
And the height differences will just give an excellent chance to implement the most decisive, original, immodest and extraordinary ideas. Ordinary flower beds have not been popular for a long time.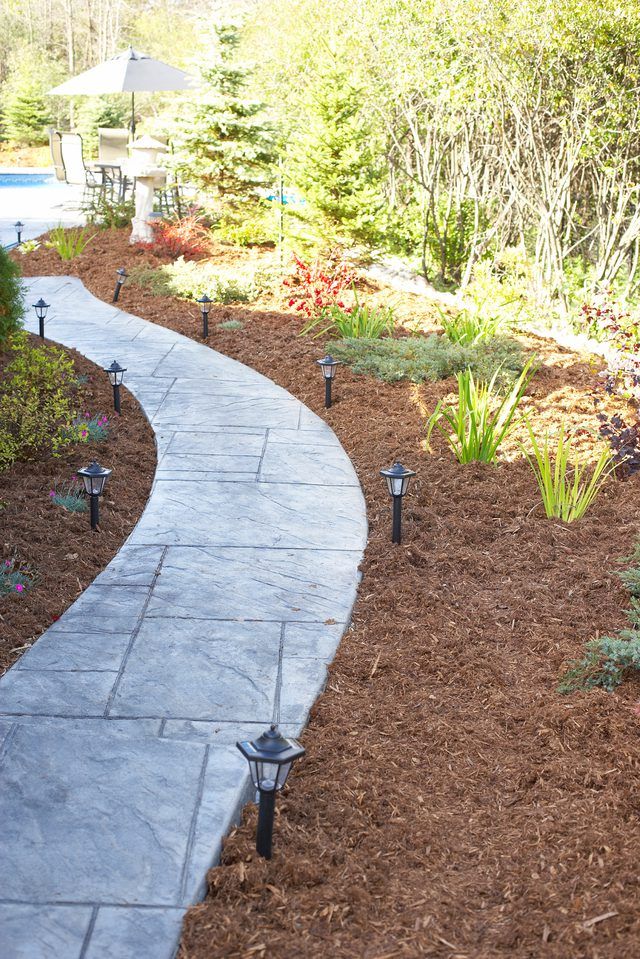 And lovers of ornamental plants increasingly prefer unusual original flower beds. The most famous and used are alpine design and rockeries.
Similar plants are grown on alpine slides and rockeries. The only difference is that the rock garden is mainly a flower garden and a small part of the stones, and the rockery is a rock garden with a small number of flowers.
Alpine slides are the best suited for a piece of land with a slope. The use of rough hewn stones and lots of neat multi-colored flowers will give the site a wonderful, special look. Thanks to this design of the site with a slope, many goals can be achieved:
-
First, you can perform zoning of the site;
-
Secondly, large stones, cobblestones and flowers will serve you in the role of strengthening the slopes, and will also help to retain snow;
-
Thirdly, alpine design will help decorate the entire space in an original way.
When planting green spaces on the site, you need to strictly adhere to special rules: the lower the point, the higher the vegetation should be.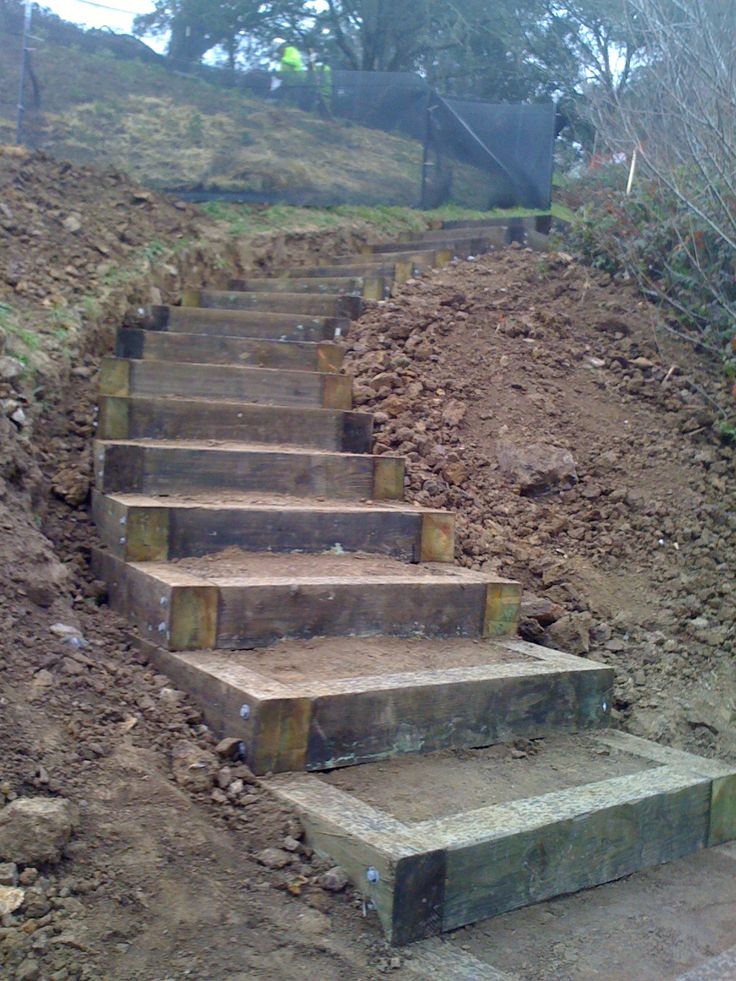 This means that low varieties of plants are planted at the top of the slope, and bushes and trees are planted in the lowlands. Such a plan, the arrangement and planting of green plants can make the relief visually even.
The entire area must be planted. Between fruit trees in unplanted areas, you can plant a lawn or plants that cover the soil with a dense carpet. This includes ivy, chaenomeles, or other climbing plants. In addition to the aesthetic appearance, these plants are able to save the soil from washing it out.
In hilly terrain you will not do without paths and stairs. They need to be made comfortable and very practical, because you will have to move through them more than once a day. Paths are equipped on a more or less flat surface of the site. And in order to visually equalize the difference in heights, paths and paths are made winding.
Steps and ladders are suitable for steep slopes. With significant slopes, railings are mounted on one, or better, on both sides. If there are 10 steps or more, a concrete base is required to ensure stability and prevent the whole staircase from “slipping”.
A good way to arrange a site with a slope is to artificially change the surface of the slopes, the so-called terracing. The size and shape of the terrace areas will depend on their purpose, for a garden, for example, one width is needed, and for gazebos, another.
The division of the site into zones is carried out taking into account how it is located relative to the cardinal points. Here it is necessary to take into account the shading in order to plant shade-loving plants on this part of the earth, or to equip a bench.
When zoning a site with a slope, it is important to remember that the more terraces will be made on the territory, the lower the height of the fortification walls should be. It follows that their construction is a little easier. And all terraces must be equipped with their own drainage system.
Strengthening slopes.
How to strengthen the slopes on an uneven site? How to prevent slipping of the loose mass of rocks? Here it is necessary to strengthen the slopes by implementing all kinds of fortifying structures. The method of strengthening the soil depends on the slope of the terrain.
Method 1. Natural strengthening. For relatively gentle slopes (up to 30 °), creeping plants are used, which form a beautiful cover. Branching roots will serve as a natural frame. Lilac and willow bushes are planted in the lowlands. In the future, branching tree roots will continue to reliably strengthen the soil.
Method 2. Geomaterial. Geotextile or geogrid will give a good result. They creep on the site and sprinkle with soil. Over time, the soil becomes stronger, and does not lead to a modification of the relief. This protection is resistant to negative weather conditions and chemical influences. The service life of geomaterials is up to 50 years.
Method 3. Mound. Strengthening actions can be carried out by embankment.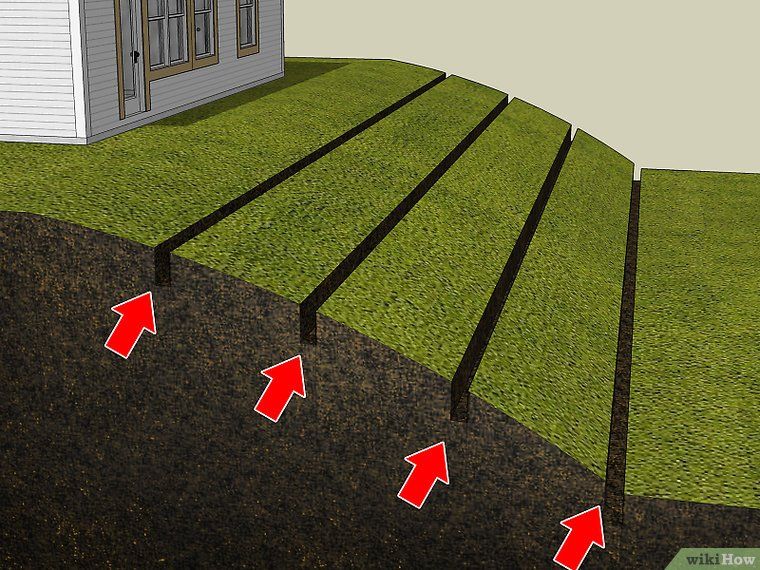 At the same time, it is important to remember that the embankment borrows the useful territory of the site, which means that it must be used in spacious areas. Regular pouring of the embankment will be necessary after a while, as the soil is knocked out at the sole.
Method 4. Retaining walls. Walls made of natural materials (stones, trees) look good and productive. Such a strengthening will protect the slope from decay and divide the space due to terracing. They can be placed on hilly terrain with different elevations.
Low walls (up to 80 cm), which play a more decorative role than the direct obligation to support the walls, are equipped on their own. The construction of a powerful structure capable of eliminating the sliding of soil masses must be entrusted to specialists.
Method 5. Gabions. Such modular structures are often used by landscape designers. Gabions are easily formed, filled with pebbles, rubble, stones. You can lay the ground in the recesses, and by spring, an inconspicuous grid with stones will be covered with greenery. Gabions can be bought or made from wire yourself. Walls made of stones, with breaking through plants, will give the site a noble antique look.
Useful tips when arranging a plot with a slope.
When designing fortifications, the forces affecting overturning and shifts are taken into account. Reliability and durability of the walls is given by the foundation, the thickness and depth of which depends on the height of the supporting wall, its purpose and soil.
The wall support counteracts vertical loads. The presence of a drainage system during the construction of walls is mandatory. It will prevent erosion of the base of the wall by rain and melt water.
Often used material for the construction of walls are stones. Natural or artificially made stones are laid out both on the mortar and without it. With the “dry” method of laying - without mortar, soil is placed in the voids, which is then sown with seeds. So it turns out that the lack of mortar makes the wall not a very reliable structure during frequent rains and during floods.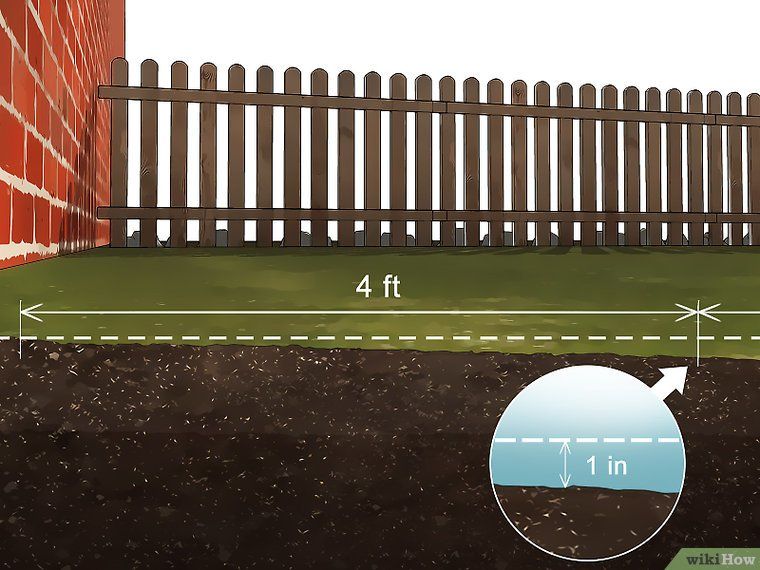
Brick is especially popular. Bricklaying makes it possible to build walls of any type, wavy and other unusual shapes.
Wooden objects succinctly fit into the landscape, but due to their special characteristics, their use as a fortification is not advisable. Of course, treatment with special preparations will extend the life of the wood, but still, this is only a temporary protection. Such a structure requires regular maintenance.
If, when erecting walls made of stone and brick, the height of the structure should not exceed 70 cm, then the use of concrete is allowed for 3 m. Here you can use factory-made concrete slabs or pour the concrete mixture into the finished formwork.
Remember, absolutely the first should be the project of the future home. Do you have a slope? So, you can make a relief, landscape paradise. Some people simply dream of such gifts of nature, measuring their ordinary flat area with steps. And the design of the house should take into account your unique terrain.