How to decorate the top of cabinets
19 Ideas for Decorating the Top of Kitchen Cabinets
By
Shelby Deering
Shelby Deering
Shelby Deering is a lifestyle writer who specializes in decor articles and home tours. She spends her spare time at flea markets and hunting for vintage finds. Shelby is a member of the American Society of Journalists and Authors.
Learn more about The Spruce's Editorial Process
Updated on 12/14/22
The Spruce / Candace Madonna
Decorating the top of kitchen cabinets is an easy way to add some flair to your kitchen while filling in the empty gap between the top of your kitchen cabinets and the ceiling, an often neglected area that can look a little awkward or simply lacking when left bare.
These days many kitchen designers solve this problem by custom building cabinetry all the way up to the ceiling. But if you don't have the luxury of building a custom kitchen from scratch, prefer a less tailored look, are working with existing built-in cabinetry from a rental, or don't have the budget to renovate, there are plenty of ways to fill that dust-collecting kitchen neverland while adding visual interest or extra storage.
Depending on your space, you might choose to line the top of your kitchen cabinets with objects, or to decorate the wall above. Keep in mind that not all kitchen cabinetry comes in a flat pack, and that you can use these tips to style the top of freestanding secondhand, vintage, or antique cabinetry like china cabinets and hutches as well.
Check out these ideas in a range of styles that will help you to maximize every last inch of vertical space in your kitchen.
-
01 of 19
Add Decorative Baskets
Design by Studio Peake
This London kitchen from Studio Peake has tall, seamless built-in cabinetry painted in a serene shade of pale gray that ends a few feet short of the glass roof.
 A row of decorative woven baskets defines the empty space while adding a touch of warmth that complements the organic wood bar stools.
 -
02 of 19
Add Open Shelving
Design by Leanne Ford Interiors / Photo by Max Kim-bee
In this light-flooded kitchen from Leanne Ford Interiors, open shelving is installed above and around a built-in vintage-style china cabinet perched on top of a row of lower cabinetry. The mix of old and new furniture and fittings and natural wood shelving and painted cabinetry gives the kitchen a lived-in, homey DIY feel that isn't trying too hard, making it cozy and welcoming.
-
03 of 19
Hang Some Wallpaper
Design by deVOL Kitchens
To fill the dead space above the cabinetry, deVOL Kitchens hung some nature-themed illustrated kitchen wallpaper that complements the dark green tile backsplash and adds a layer or visual interest without cluttering up the narrow space between the top of the cabinets and the ceiling.
-
04 of 19
Add Bar Storage
A Beautiful Mess
While it's perfectly acceptable to decorate the top of your kitchen cabinets just for show, there's valuable real estate up there that can be used for storing infrequently used items, or things that you don't want the kids to get their hands on. A Beautiful Mess child-proofed the liquor cabinet by storing it on top of the kitchen cabinets, with bottles neatly organized in a row of wire baskets.
-
05 of 19
Add Trailing Vines
Design by deVOL Kitchens
This elegant British kitchen from the U.K.'s deVOL Kitchens is decorated with illustrated wallpaper, shades of green and cream, copper accents, and plants with delicate trailing vines perched atop the closed and glass-front cabinetry that add a natural touch.
-
06 of 19
Balance High Ceilings
Mindy Gayer Design Co.
Mindy Gayer Design Co. layered art and objects on top of the kitchen cabinets in this high-ceilinged lower level Lake Arrowhead kitchen that focuses the eye and makes the space feel cozier.
 The top of similar cabinets in the corner is left bare to keep the space from feeling cluttered.
 -
07 of 19
Layer It Up
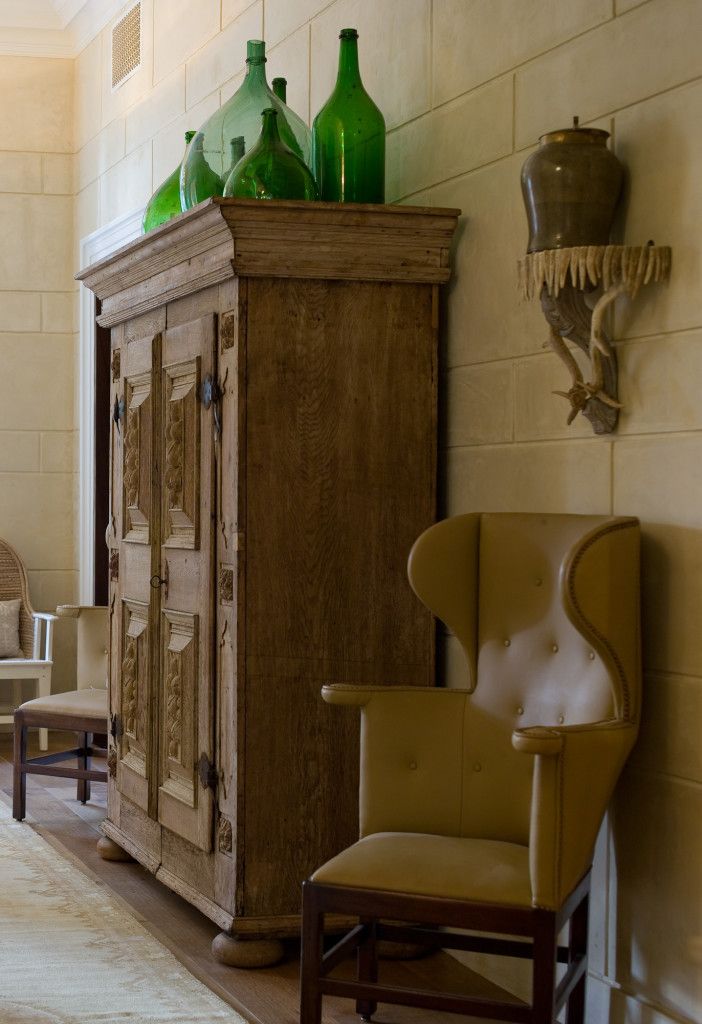
Lobster and Swan
The top of this olive green painted china cabinet in a rustic English DIY kitchen from Lobster and Swan is layered with objects and a tall vase of branches that fills in the empty space above the relatively short cabinet and draws the eye upward.
-
08 of 19
Keep It Casual
Design by deVOL Kitchens
In this timeless English country space from deVOL Kitchens, the top of a free-standing cabinet is styled with a basket and spillover earthenware that is displayed inside and on the open shelving above the sink, creating a casual but coordinated look.
-
09 of 19
Add Baskets
Thistlewood Farms
Thistlewood Farms added a row of matching storage baskets to the top of an open china hutch in her modern farmhouse-style kitchen.
-
10 of 19
Add Plants
Design by Leanne Ford Interiors / Photo by Alexandra Ribar
Kitchen cabinets come in various shapes and sizes.
 In this spacious kitchen from Leanne Ford Interiors, a large curvy antique wooden hutch that stores dishware and cookbooks is topped with a row of bushy Boston ferns that create a lush look and introduces some vibrant greenery into the kitchen.
 -
11 of 19
Add More Cabinets
Design by Leanne Ford Interiors / Photo by Alexandra Ribar
Instead of leaving blank space above the kitchen cabinets, Leanne Ford Interiors added a row of glass-front built-in cabinetry that seamlessly fits the space and can be used to stow non-essential items. The glass fronts add contrast with the larger closed cabinetry below and preserve an airy feel. A sliding library-style ladder attached to the wall allows for easy access.
-
12 of 19
Define Space
Dazey Den
Dazey Den added plants and glassware to the tops of opposite rows of cabinetry in this colorful and kitschy midcentury modern space that help define zones in the semi-open-plan kitchen and dining room.
-
13 of 19
Mix Materials
Design by Leanne Ford Interiors / Photo by Alexandra Ribar
A pair of rustic vintage painted wood cabinets with a charmingly worn patina stacked on a side wall of this kitchen from Leanne Ford Interiors provide extra storage and give the room a sense of history. The top of the cabinet is styled with rustic objects in a mix of materials to give it an effortless feel.
-
14 of 19
Install Open Storage Nooks
Design by Alvin Wayne
Interior designer Alvin Wayne added open stained wood niches above the white kitchen cabinets that serve as display space and storage for those cookbooks that only get trotted out during the holidays.
-
15 of 19
Keep It Practical
Arbor & Co.
In this garage-turned-guest-house from Arbor & Co., an L-shaped kitchen has a mix of upper cabinetry and open shelving to accommodate the small space. The cabinetry top is treated as an extension of the open shelving, housing a pair of simple bowls that makes the corner space look cohesive and keeps everything visible and accessible.

-
16 of 19
Add a Book Nook
Whittney Parkinson Design
Whittney Parkinson Design added a cookbook storage nook in the dead space between a built-in refrigerator and matching kitchen cabinetry that's built up to the ceiling in this neutral-toned 1920s Tudor kitchen renovation.
-
17 of 19
Extend the Backsplash
Design by Laura Brophy Interiors / Photo by Tim Hirschmann
One way to eliminate the problem of filling the empty space above your kitchen cabinetry is to install an eye-catching kitchen backsplash that extends all the way up to the ceiling, like this contemporary kitchen from Laura Brophy Interiors. A blackened wood drop ceiling also helps to fill in the space while providing additional lighting.
-
18 of 19
Bring In Faux Greenery
M. Wilcox Design
Decorating the top of your kitchen cabinets can be challenging from a maintenance standpoint when it comes time to watering and pruning, especially if you don't enjoy climbing up on kitchen stools and ladders to get the job done.
 These days you can find beautiful, realistic looking faux plants that will take care of themselves and look good doing it.
 -
19 of 19
Go Custom
Design by Louis Duncan-He Designs / Photo by Eymeric Wildling
If you're designing a kitchen from scratch, you might want to remove the need to decorate the space above your kitchen cabinets by custom building cabinets that kiss the ceiling instead, like this spacious kitchen from Louis Duncan-He Designs that maximizes every last inch of vertical space.
14 Ideas for Decorating Space Above Kitchen Cabinets
Every item on this page was hand-picked by a House Beautiful editor. We may earn commission on some of the items you choose to buy.
Ain't no cabinet high enough.
By Sienna Livermore
Courtesy of Tessa Neustadt for Emily Henderson Designs
If you've got a gap between your kitchen cabinets and the ceiling, you've likely spent time literally cursing your architect. But good news: There are plenty of ways to make this space totally functional, or at the very least, look cute. The top of your cabinets are no longer going to be the eyesore of your kitchen.
Courtesy of Tessa Neustadt for Emily Henderson Designs
1 of 14
Secret Stash
Use your kitchen cabinet tops as a space to stash things you have no room for elsewhere, like picnic baskets, decorative objects, or extra cutting boards.
See more at Emily Henderson.
Pablo Enriquez via Apartment Therapy
2 of 14
Artsy Fartsy
Gallery walls are cool and all, but we're making "gallery loft" happen. This works especially well if your kitchen, like this one, has an expansive space to fill.
See more at Apartment Therapy.
Sutton Suzuki Architects
3 of 14
Make It Fashion
No closet space? No problem. Store your wicker and rattan bags in your kitchen!
See more at Houzz.
Courtesy of Lark & Linen
4 of 14
Hit A Brick Wall
Add brick (or fake it with brick wallpaper!) above your cabinets for a cool, industrial effect. It'll help balance out a sleek and modern kitchen.
See more at Lark & Linen.
Janae Hardy via A Beautiful Mess
5 of 14
Stacks on Stacks
Gain extra storage space by stacking baskets on top. It'll give you that Joanna Gaines-y, cool farmhouse feel.
See more at A Beautiful Mess.
Design Mom
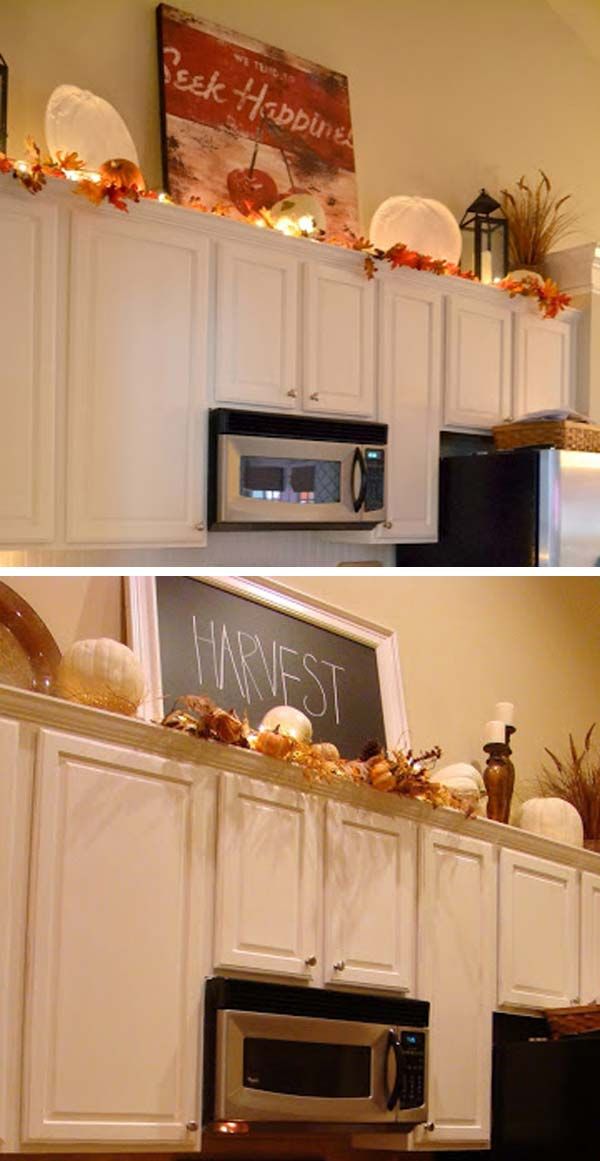
6 of 14
Chalk It Up
The easiest way to make sure you remember that concert you bought tickets to three months in advance: a calendar front-and-center in your kitchen. Chalkboard paint turns the awkward spot into a blank canvas in the best possible way.
See more at Design Mom.
TARA DONNE
7 of 14
Get Cabinet Crazy
Sneak extra storage in by not only installing cabinets up to the ceiling, but also snaking the cupboards around the room and over the sink.
Brandon Barre via Dering Hall
8 of 14
Paint It (Probably Not) Black
Paint the space above your cabinets a color that pops against the color of the cabinetry, the ceiling, and the backsplash for maximum impact.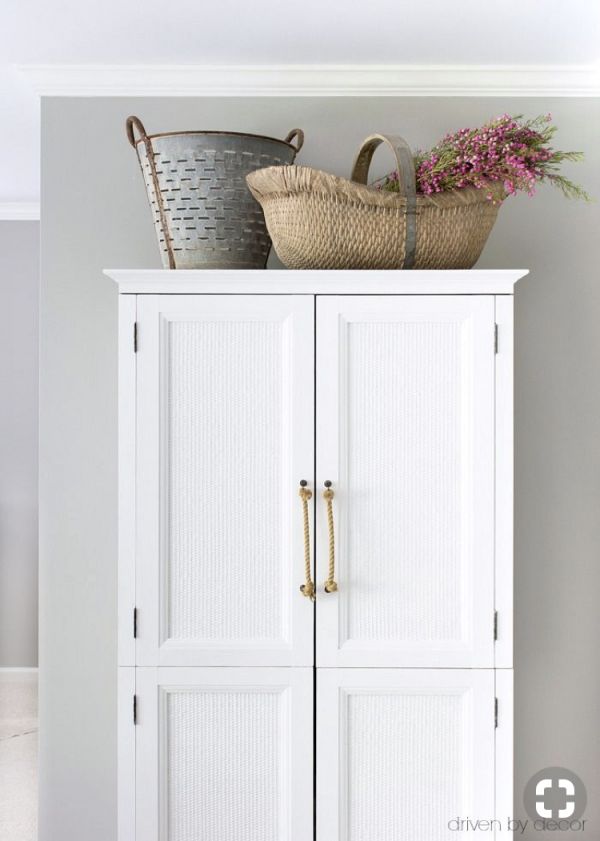
See more at Dering Hall.
Eve Wilson via The Design Files
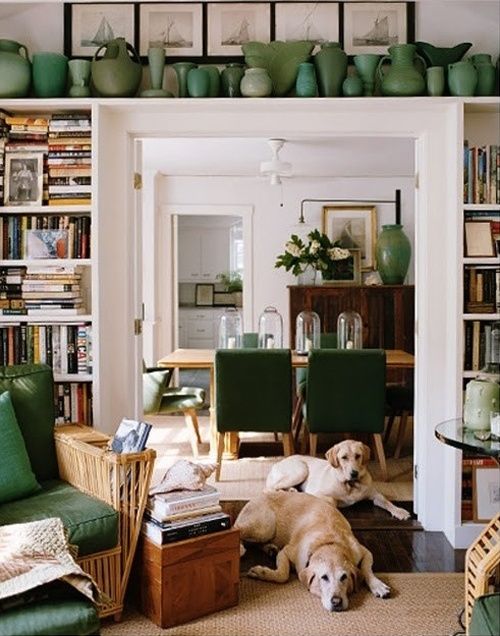
9 of 14
Be A Bookworm
Keep your cookbooks off your living room shelves and store them where you actually need them. Just make sure you have a step ladder handy.
See more at The Design Files.
Design Mom
10 of 14
Twinkle, Twinkle
There's literally no wrong place for twinkle lights. They make even one of the most difficult-to-deal-with spaces look magical.
Get the tutorial at Design Mom.
Courtesy of Matt Harrington for Emily Henderson Designs
11 of 14
Go Wallpaper Wild
Wallpaper both your backsplash and walls if you aren't afraid to go bold. To make it even more fun, give your kitchen a theme (like cats, in this case) to tie your wallpaper together with the rest of the room.
See more at Emily Henderson.
Myquillyn Smith via The Nester
12 of 14
Garland Goals
Warning: This is not for the DIY faint of heart. This gorg paper garland is a legit work of art and will turn a ho-hum kitchen into a statement-making room with a single project.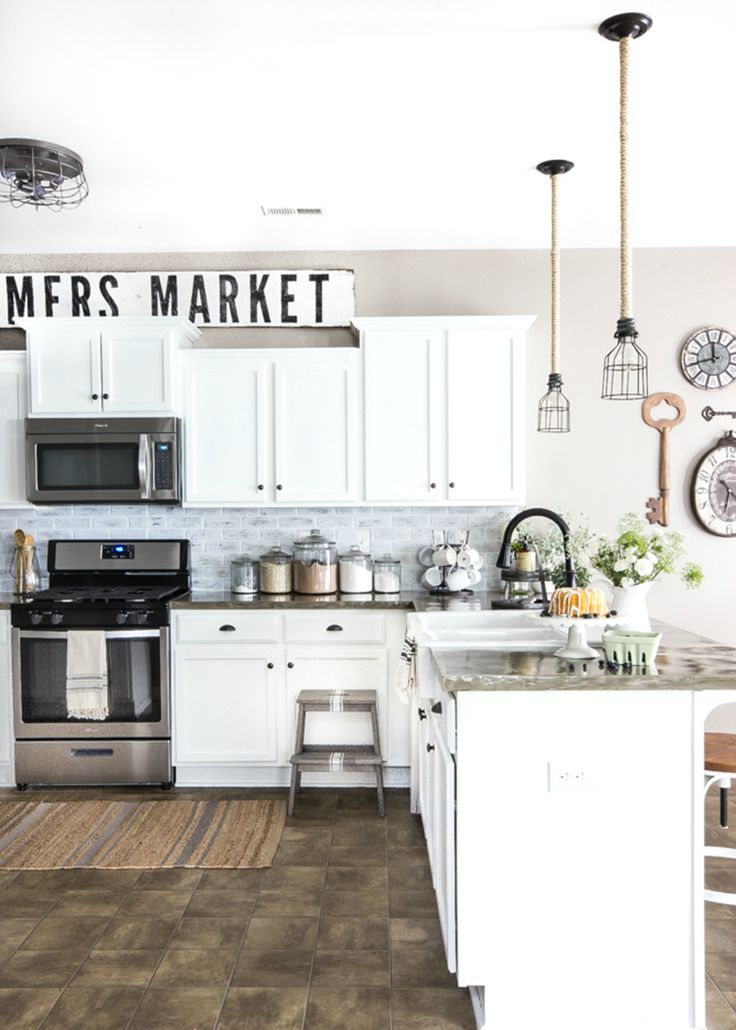
See more at The Nester.
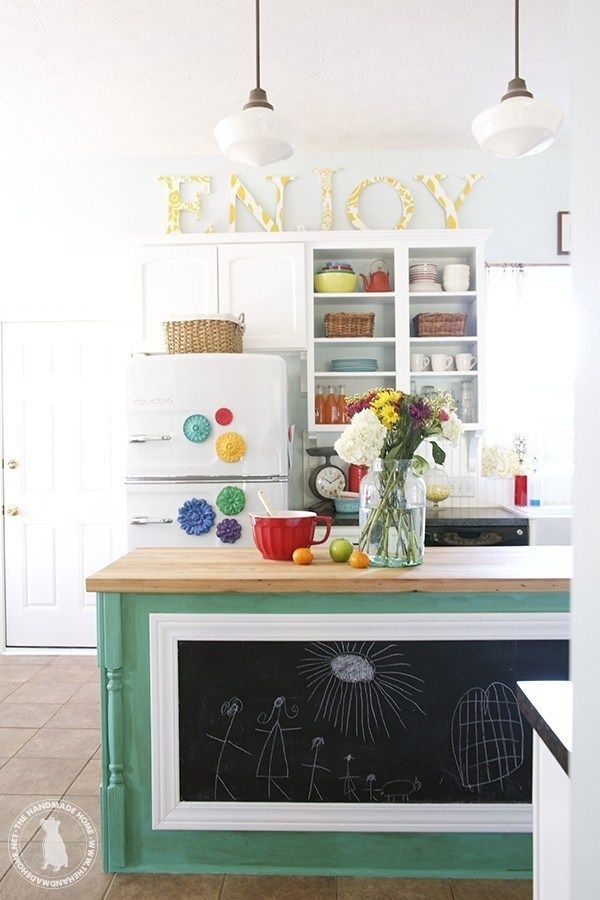
The Handmade Home
13 of 14
Spread The Word
These fabric-topped letters are an easy way to bring in a pop of color and pattern. Switch up your message monthly or seasonally.
See more at The Handmade Home.
Design Sponge
14 of 14
Curtain Call
In an ideal world, the spaces above all kitchen cabinets are windows looking out onto gorgeous, light-filled scenery. In your real world, install a tension rod and fabric you love to create a no-judgement spot to stash junk.
See more at Design Sponge.
4 Dreamy Floral Arrangements to Try This Spring
Sienna Livermore Senior Editor Sienna is a senior editor at Hearst.
Just a photo: 18 ideas for upper cabinets on the corner of the kitchen
We look at solutions for the corner kitchen from completed projects of designers and architects.
—————— —
We remind you: you can ask each designer from our selection a clarifying question or order the development of your project — click on the photo you like, go to the portfolio of the author of the project —————— —
Architectural studio QUADRUM
1. Geometry in volume
The architects played on the geometry of the three tiers of the kitchen: cabinets with wooden facades were placed along only one wall, and the corner joint was hidden in the “niche” of the side part.
Where: Samara
Design: QUADRUM architectural studio
► Other photos of this project
MARION STUDIO
007It can be extended slightly to provide additional storage space in the enlarged part. For example, a rack with open shelves.
Where: Moscow
Design: MARION STUDIO
► More photos of this project
Interested in kitchen design?
Let's select an artist according to your criteria
Design Rocks
3. Without upper cabinets, but with a shelf
Here we used a simple and witty trick when there are no upper cabinets (and their joint), and the design of a narrow shelf "grows" straight from an apron. nine0003
Where: Moscow
Design: Design Rocks
► .
Where: Ufa
Design: Re-PIN
► Other photos of this project
Kristina Artebyakina interior design studio Yuliya
0003 6. Recess between cabinets
Notice how the open shelf extends across the corner.
Where: Moscow
Design: Julia Andrievskaya
► above it they made an open rack for dishes, so as not to go around the whole kitchen in search of a couple of cups. nine0003
Where: Vladivostok
Design: Landik Interior
► on the end module on the aisle. In order not to lose space, they made shelves for the wine collection.
Where: Moscow
Design: Irina Kireeva, dots&points
► More photos of this project
Turchenko Natalia
9. Open shelves
In this black kitchen, the shelves merge with the wall and are almost invisible. Pay attention to how the rhythm of the vertical division of the shelves is knocked down: it is shifted from the corner and does not focus attention on this place.
Location: Moscow
Design: Natalia Turchenko
► Other photos of this project
Gradusova Natalia
10. Diagonal shelves
Non-standard and effective solution for the corner module.
Where: Krasnogorsk
STUPITION: Natalya Gradusova
► ► Through Houzz, you can hire a designer or architect in any city and country. Start looking for a specialist
—————————————
KBG Design
11. Deaf and open
Instead of one of the doors in the upper cabinet, a deaf half was made; open shelves located next to it rest against it.
Where: San Francisco, USA
Design: KBG Design
► increased in height, making parking for a kettle and small household appliances at the bottom. nine0003
Where: Yekaterinburg
Design: Katerina Bulycheva
► . But on the side wall, a blank facade in the corner hides additional shelves for storage.
Where: Kaliningrad
Design: Line Design Studio
► Other photos of this project
Konstantin Malyuta
14. Skip tier
Pay attention to the tiers of upper cabinets along the long wall. They left free space between them and organized open storage.
Where: Moscow
Interior Designers: Pavel and Svetlana Alekseev
Photos: Konstantin Malyuta
► Other photos of this project
thomas | geisel | photographie
15. Game of Cubes
Although this kitchen is linear, the idea of joining the upper cabinets can also solve the problem of corner joints. Instead of cabinets of the same width, the designer used a layout of modules of different sizes.
Where: Dortmund, Germany
Photo: Thomas Geisel Photographi
► I didn’t want a small kitchen with hanging modules. Therefore, we chose a discreet and proportionate solution: tall upper cabinets on one wall and a small open shelf on the other. nine0003
Where: Peterhof
Design: Maria Pilipenko
►
Where: Krasnodar
Design: Ksenia Demina
► Other photos of this project
HANÁK NÁBYTEK
Half height0007
Reduced height modules were installed along the side wall instead of upper cabinets.
Where: Czech Republic
kitchen design : Hanák
► wardrobe is determined by the design of the facade. But it is also important how the upper and side parts of the case are decorated. Cornice, lighting, corner shelves and other elements give the whole product a finished look. How can you arrange the sides of the closet so that it fits better into the interior of the room? Consider all options. nine0003
Contents
- The design of the wardrobe and the appearance of the sidewalls (standing)
- Options for corner shelves and beveled modules
- Shaped stops for sliding systems
- MDF lining, tambour and other ways to visually thicken the sides of the wardrobe Baguette, pilasters and cornices for the classic design of the wardrobe
- Columns with inserts of mirrors, glass and plastic
The design of the wardrobe and the appearance of the sidewalls (standing)
Sliding wardrobe sides are vertical racks from floor to ceiling (or box roof).
We advise you to read how the base of a closet is designed to understand the principle of assembling the lower part of the case.
![]()
Most often, the sides of a sliding wardrobe are made of the same material as the body - laminated chipboard with a thickness of 16.18 or 25 mm.
In built-in and partially built-in constructions, the role of sidewalls is replaced by the walls themselves. In this case, only on the front part they make an “opanelka” framing the compartment doors around the perimeter. nine0003
From the point of view of design, "opanelka" allows the closet to fit more harmoniously into the interior of the room. It covers the moving mechanisms that guide the sliding system. And also all the irregularities of the walls, if they have a place to be.
There are other ways to decorate the sides of the closet, by adding various beveled modules, corner shelves and other decors.
Variants of corner shelves and beveled modules
Sliding wardrobes, as a rule, are made capacious, the depth of the sides of a standard case depth varies within 600-700 mm. To visually make it smaller, use beveled corner shelves and various add-on modules. Which, however, are quite practical and functional. nine0003
There are a lot of design solutions for corner side shelves. They can be made of glass and chipboard, have a rounded and rectangular shape.
For the design of closed modules, both straight and radius facades are used. Most manufacturers of sliding systems also have fittings that help to make hinged facades of the same design and design as sliding doors.
In hallways, the add-on module can be made in the form of an open hanger with shelves, a lower pedestal or a chest of drawers with a mirror. nine0003
For bedrooms, the design of classic wardrobes and side modules with hinged doors can be played up.
Shaped stops for sliding systems
A more high-tech look to the closet will be given by side plates in the form of shaped stops. They are "put on" on the end of the sidewall and visually combine the upper and lower rails into a single system.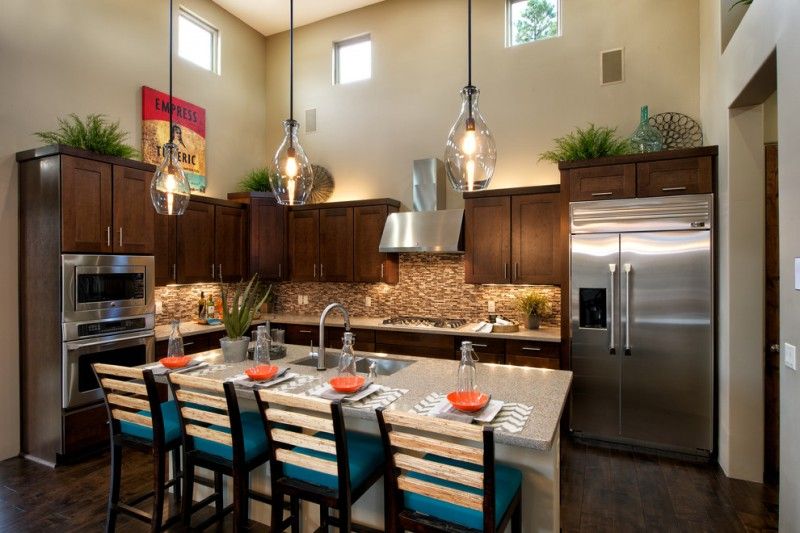
Shaped stops can be streamlined or chopped, with a clear shape. Produced in color with the proposed profile for the assembly of sliding doors. nine0003
MDF lining, tambour and other ways to visually thicken the sides of the wardrobe
The massiveness of the wardrobe is associated with the solidity of furniture design. To achieve the desired effect, resort to different techniques.
In the most common case, the sliding wardrobe is built into an already prepared plasterboard niche.
You can also use MDF lining on the ends of the sides of the wardrobe.
The overlay and mortise profile is used less often, but also solves this problem. nine0003
If thicker sides and canopies are required, 25 mm chipboard can be used to make the outer frame. Or tambourat - a special honeycomb material 50 mm thick.
Baguette, pilasters and cornices for the classic design of the wardrobe
The sides of the wardrobe in the classic style are additionally decorated with special overlays - pilasters, columns and baguettes.