Ground level deck with fire pit
Ground Level Deck With Fire Pit DIY
Ground Level Deck With Fire Pit DIYPhoto: Caia Image / Collection Mix: Subjects / Getty Images
Set your backyard ablaze with fun and relaxation
Get quotes from up to 3 pros!
Enter a zip below and get matched to top-rated pros near you.
Picture this: You walk out onto your deck and gather around your outdoor fire pit with family and friends, bringing a sense of joy and closeness seldom found elsewhere. Fortunately, you can learn how to build a ground-level deck with a fire pit using pressure-treated lumber and a galvanized fire pit ring. Follow this step-by-step guide to constructing a deck that’ll get glowing reviews.
Why Build a Ground Level Deck with a Fire Pit?
A ground-level deck with a firepit offers a comfortable, safe, and beautiful spot to enjoy fires, barbecues, s'mores, and more. The deck can be near your home or in another part of your yard. From lounging in the evening to sharing stories with friends, a DIY ground-level deck with a fire pit is an easy way to boost your outdoor space.
How Much Does It Cost to Build a Deck?
The average cost to build a deck runs about $7,900, but prices range from $1,500 to $21,000, depending on the material and whether you tackle the build yourself. Labor typically accounts for 50% of project costs, so doing it yourself can trim down your budget. The cost of a fire pit costs $850 on average, increasing your total project costs.
How to Prep for Building a Ground-Level Deck with a Fire Pit
Building a deck with a fire pit takes careful planning and the right tools. A quality, long-lasting deck starts with detailed preparation.
Apply for a Permit
To build a fire pit or deck, you almost always need a permit from your local municipality's office or homeowners’ association. There are often restrictions on the size, material, and location of your fire pit, including its distance from your house.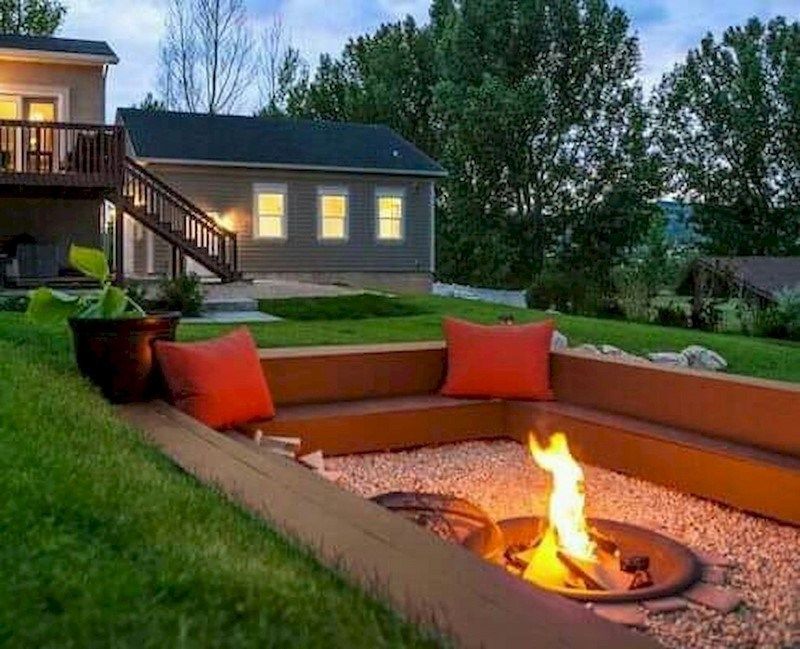
Most fire pits must be at least 15 feet away from your home and 10 feet away from any trees, bushes, property lines, and sheds. You may also need to submit a detailed deck design to your permit board before approval.
Determine Your Deck Type, Size, and Location
There are many types of decks and deck materials. Take time to research the style and type you want and its future location in your yard. Consider the view and the direction of the sun during the times you'd use the deck most. Draw out a plan or two with rough measurements to get a feel of how your deck would fit best on your property.
Plan Your Fire Pit
Photo: Mila Naumova / Adobe Stock
With a customized fire pit, you can create the size, shape, and look you want. Most fire pits measure 36 to 44 inches wide, including the walls, to allow several people to sit by the fire without being too far from each other for conversation.
A fire pit height of 12 to 14 inches from the base of the walls to the ledge is ideal for guests to prop up their feet.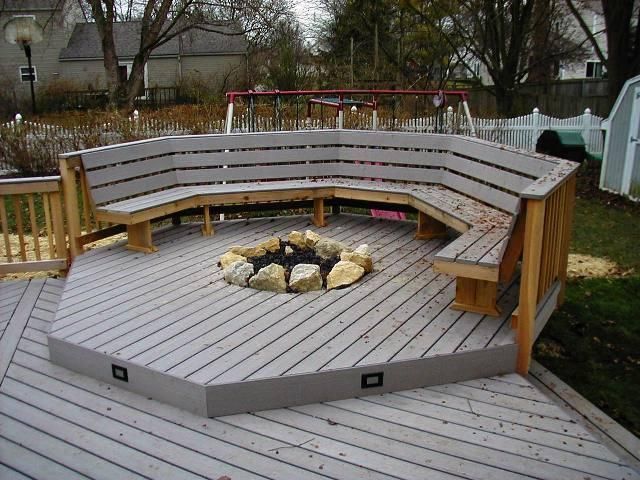 Square or circular fire pits are ideal for building into a deck. One fire pit idea is to buy a fireproof steel insert that provides the outline of your fire pit, surrounded by brick, stone, or rock to encase the pit and protect the deck from heat.
As you plan your fire pit’s location, consider the direction that the wind typically travels. Your seating area shouldn’t be downwind of the firepit and you don’t want smoke blowing into your home's open windows. Consider building a test fire where you plan to have your pit to see how the location and size feels.
Mark Your Utility Lines
Before you dig post holes for your deck, call 811 or your local dig line. A local representative will come out to mark your utility lines so you know where to avoid digging.
Gather Your Tools and Supplies
Having your tools and supplies ready makes for a smoother, faster DIY deck build. Here are the general tools and supplies you’ll need:
Tools
Post hole digger or auger
Reciprocating saw
Circular saw or miter saw
Power screwdriver
Tape measure
Level
Tamper
Shovel
Tape measure
Framing square
Sander with 120-grit sandpaper
Safety gear: hearing and eye protection and dust mask
Chalk line
Caulk gun
Paintbrush
Materials
Structural-grade lumber: posts, rim joists, floor joists, and deck boards
Exterior wood screws
Galvanized structural deck screws
Angle brackets
Joist hangers
Fasteners
Ready-mix concrete
Mason line string
Wood stakes
12-ft pressure-treated 2x6's
12-ft pressure-treated 2x4's
Weed barrier landscape fabric
Landscape block adhesive
Lava rock
Galvanized fire pit ring
Wood preservative
Waterproofing deck stain and sealant
Paint or spray paint
Crushed gravel (optional)
How to Build a Ground Level Deck with a Fire Pit
Photo: BanksPhotos / iStock / Getty Images Plus / Getty Images
Follow these steps to construct a ground-level deck with a fire pit.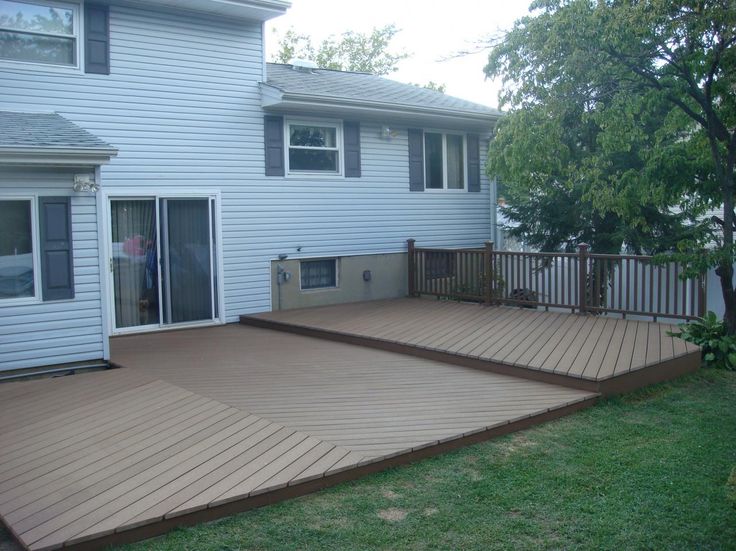 Plan on at least a couple of weekends to complete the project. Because it's a floating deck, you won't need to worry about attaching it to your house's framing or building deck stairs and railings.
1. Outline the Perimeter
Using wood stakes and mason line string, mark the perimeter of your deck. Adjust the markers and strings until they are level. With paint, mark where you’ll put your deck posts, ideally 3 to 6 inches from the inside of your line. When using 4x4 posts, your posts should be 4 to 6 feet apart. When using 6x6 posts, aim for 6 to 8 feet apart.
2. Level the Area
Next, dig out any shrubs or bushes that are in your deck’s area. Make sure the ground is relatively level before beginning your project. If it’s uneven, you’ll need to level your yard in that section before starting your build.
Roll out weed-blocking fabric to prevent grass and greenery from growing under your deck. Overlap each layer by about six inches. Hold down the fabric with bricks or stones until the framing is built.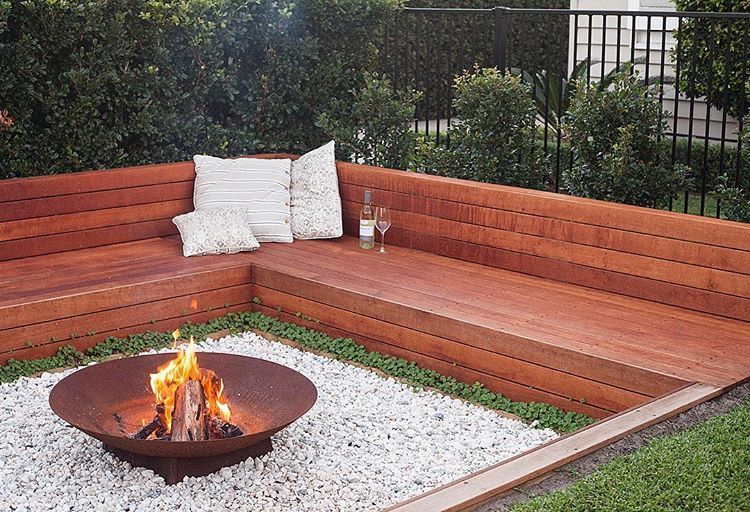 You can lay down gravel on top of the fabric for better drainage under your deck, but it’s not required.
3. Dig Holes and Set Posts
With a post-hole digger or power auger, dig holes for your posts. Depending on the frost line in your area, you may need to dig anywhere from 12 to 48 inches deep. Insert your wood deck posts and ensure all the posts are level with each other using your mason line string and a line level. Mix and pour your concrete around the posts to secure them. Let the concrete cure according to the manufacturer’s instructions.
4. Build and Secure Your Rim Joists
Cut and then line up your pressure-treated 2x6 rim joists (the perimeter joists of your deck). Square the corners at 90-degree angles before screwing them in place with an angle bracket. Screw the joists into your posts, using an angle bracket for stability. Consider screwing each element in partially while you make sure the joists are level, then install the screws fully.
5. Install Floor Joists with a Cut-Out for a Fire Pit
Your floor joists are the crucial part of your deck that will hold up your deck boards, and they should run 12 to 24 inches apart across the entire width of the deck.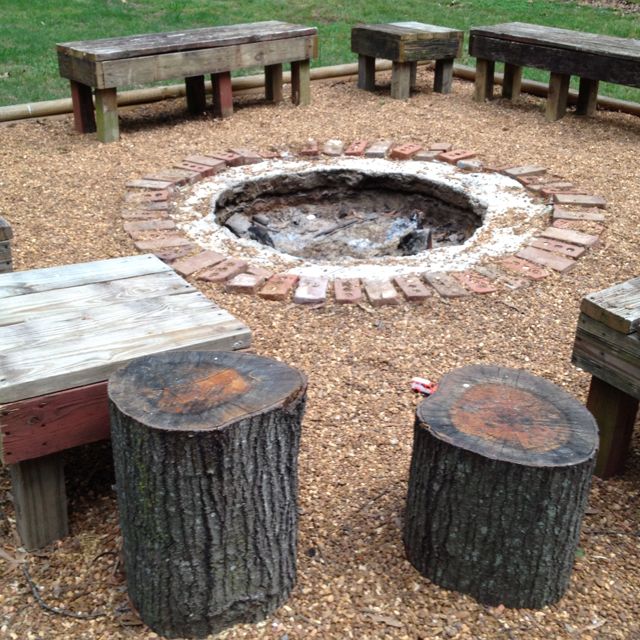 Your floor joists should run opposite your deck boards.
Mark exactly where your fire pit will be, and cut your joists to allow for this space. A square or hexagon cut-out is easiest, even if you have a round fire pit. You can fill in the rest of the framed shape with lava rock for a seamless design.
Place your fire pit ring in the space as you work on cutting and installing the floor joists. Leave enough space for the stones or bricks that will surround the ring (put down a few layers of your wall for guidance as you build). Treat any cut ends around the fire pit with a wood preservative, and consider adding corner braces of 2x6 lumber around your fire pit opening for more stability. Remove your fire pit ring after building the joists around it.
Install the rest of the floor joists across the deck with screws and joist hangers, ensuring that your joists remain level as you install them. Add block joists between your floor joists for extra stability, especially if you’re building a large deck.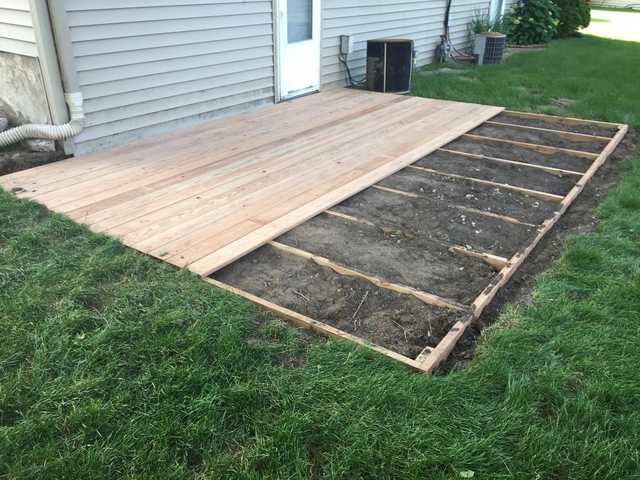
6. Add Lava Rock
Pour your bags of lava rock into the open space you created for your fire pit. This step creates support and a heat-resistant barrier between your fire pit and the deck. Level out the rock before adding the fire pit ring.
7. Insert Your Fire Pit Ring
Place your galvanized fire pit ring in the center of your fire pit cut-out on top of the lava rock, ensuring it’s level. Build two to three layers of your rock, stone, or brick fire pit wall around it. Having the wall there temporarily gives you a guideline as you secure your deck boards.
8. Install the Deck Boards
Place your deck boards crown up, running the opposite of your floor joists. Leave approximately ⅛ inch between boards for drainage. Secure each deck board to the joists with fasteners or deck screws. You can saw off any excess length after you secure your boards.
9. Construct Your Fire Pit Walls
Arrange your stone, brick, or pavers around your firepit to create the wall. Apply landscape block adhesive with a caulk gun to secure them in place.
10. Complete the Finishing Touches
Almost done! With a circular saw, cut off the excess of any deck boards that hang over the edge. Stain and seal your deck to ensure it holds up to weather and UV rays. Allow it to fully cure before adding your furniture, grill, firewood storage, and other fun outdoor accessories.
Tips for Taking Care of a Deck with a Fire Pit
With a beautiful new deck and firepit, you'll want to maintain the space for years of s'mores making ahead.
Here’s how to take care of your deck and fire pit:
Consider adding a spark screen to keep embers from flying on windy days or after you’ve left the fire.
Follow all fire pit safety tips, including putting out fires and hot coals before heading in for the night.
Make sure to always have a hose or fire extinguisher nearby in case of an emergency.
Scoop out the ashes after they’ve completely cooled.
 Wet ashes can cause corrosion, and dry ashes can be messy.
Reseal to maintain your deck every one to three years to ensure it holds up to the elements.
DIY Deck Building vs. Hire a Pro
Photo: Iriana Shiyan / Adobe Stock
Building a deck with a fire pit is a rewarding DIY project that'll make you burn with pride. Every time you roast a marshmallow with friends, you'll be happy you built it. But you need plenty of time, tools, and construction know-how to achieve a sturdy, level deck that's built to last.
If you’d rather not give up several free weekends or you don’t own a circular saw, hire a local deck builder to tackle the project for you. They’ll ensure the deck is level, durable, and meets all building codes. Deck builders charge between $15 and $35 per square foot, on top of materials.
Frequently Asked Questions
Yes, it’s safe to have a fire pit on a deck if you follow building codes and safety precautions.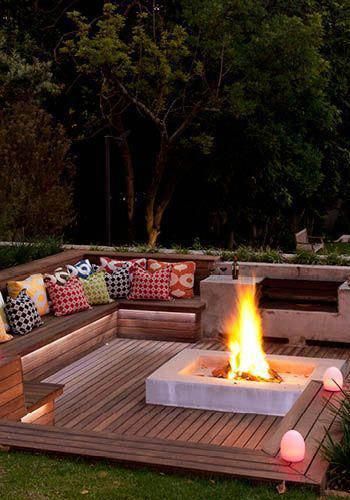 You can build a fire pit into your deck or use a freestanding fire pit as long as you have a heat-resistant barrier between the pit and the deck.
A ground-level deck is a great idea for an outdoor space because it’s easy to access and doesn't require stairs or railings. You can install a ground-level deck near your home or farther away on your property. You can place a ground-level deck around a pool, fire pit, or near a view such as a lake, pond, or area of trees.
Yes, you can build a deck around a fire pit, as long as it is safely enclosed, meets code requirements, and is at least 15 feet away from your home. You’ll want to ensure you have a heat-resistant barrier between the fire pit and your deck to prevent any structural damage and fires. A galvanized ring surrounded by pavers, brick, or stone makes for a beautiful, safe, and sturdy design.
Need professional help with your project?
Get quotes from top-rated pros.
Recommended Articles
How To Install Lattice Under a Deck: Achieve a Polished Look
By Jenna Jonaitis • February 6, 2023
How Much Does It Cost to Build a Cedar Deck? [2023 Data]
By Lawrence Bonk • March 17, 2023
How Much Does Pressure Treated Decking Cost? [2023 Data]
By Allie Ogletree • February 1, 2023
35 Deck Fire Pit Ideas and Designs [With Pictures]
22shares
- Share
- Pin
Nothing takes a deck to the next level like a cozy fire pit.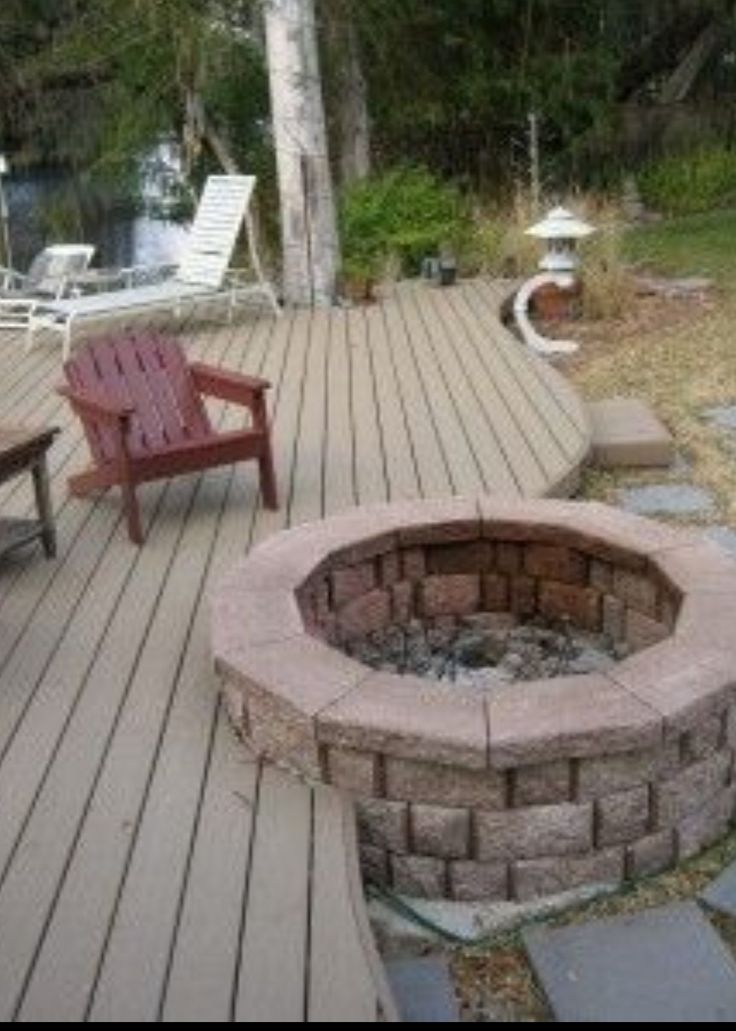 It makes for a perfect outdoor gathering place, allowing you to stay warm as the temperature cools, make amazing fireside snacks, and converse in the glow of a roaring fire.
But what deck fire pit ideas are right for you? Are some decks with fire pits designs better than others?
When it comes to putting a fire pit on a deck, you have a ton of options. If you want to make sure you end up with the right design for your yard, here are some of the best ideas around.
Quick Navigation
- Deck Fire Pit Ideas and Designs
- 1. Curved Deck with Raised Fire Pit
- 2. Stone Gas Fire Pit
- 3. Glass Circular Fire Pit
- 4. Outdoor Living Room with Fire Pit Table
- 5. All Stone Circular Fire Pit
- 6. Stone Slab Fire Pit
- 7. Stepped Fire Pit
- 8. Modern Fire Pit Bench
- 9. Octagon Tile Fire Pit
- 10. Ground-Level Fire Pit
- 11. Sunken Gas Fire Pit
- 12. Southwest-Style Fire Pit
- 13. Steel Fire Pit
- 14.
 Deck with Copper-Toned Fire Pit
 - 15. Modern Concrete Fire Pit
- 16. Simple Dish Fire Pit
- 17. Fountain-Flanking Fire Feature
- 18. Large and Low Fire Dish
- 19. Long and Lean Modern Fire Pit
- 20. Glass and Steel Portable Fire Pit
- 21. Contemporary Fire Pit Table
- 22. Trendy Fire Pit Table
- 23. Built-In Gas Fire Pit
- 24. Rustic Stone Fire Pit
- 25. Hot Tub-Side Fire Pit
- 26. Small Deck Fire Pit Brazier
- 27. Sunken Fire Pit Seating Area
- 28. Curved Minimalist Deck with Fire Pit
- 29. Fire Pit with Deck Surround
- 30. Corner Fire Pit
- 31. Slab Stone Ground-Level Fire Pit
- 32. Minimalist Bowl Fire Pit
- 33. Modern Square Fire Pit
- 34. Mediterranean Deck and Fire Pit
- 35. Stone Slab Fire Pit Table
- Conclusion
Deck Fire Pit Ideas and Designs
1. Curved Deck with Raised Fire Pit
Photo by Paragon Homes
When it comes to decks with fire pits designs, this one is all about gathering together. The fire pit is a beautiful feature, with the metalwork giving it a sense of warmth and weight.
The bench curves around a circular central design on the floor, ensuring that all focus is on the central fire pit. With the pyramid-shaped post caps, space has a slight regal edge, feeling just a bit like a castle wall.
2. Stone Gas Fire Pit
Photo by Decks by Kiefer LLC
This fire pit on wood deck design toes the line between traditional and modern. The floor is laid in a herringbone pattern, adding visual interest. The planters along the side ensure the garden is part of the look.
However, the overall design remains very clean and mainly linear, allowing the space to have a contemporary vibe. While the fire pit is round and made of natural stone, the stacked approach works well with modern or traditional homes.
3. Glass Circular Fire Pit
Photo by Miles Deck Construction
Fire glass is a breathtaking option for an outdoor fire pit design.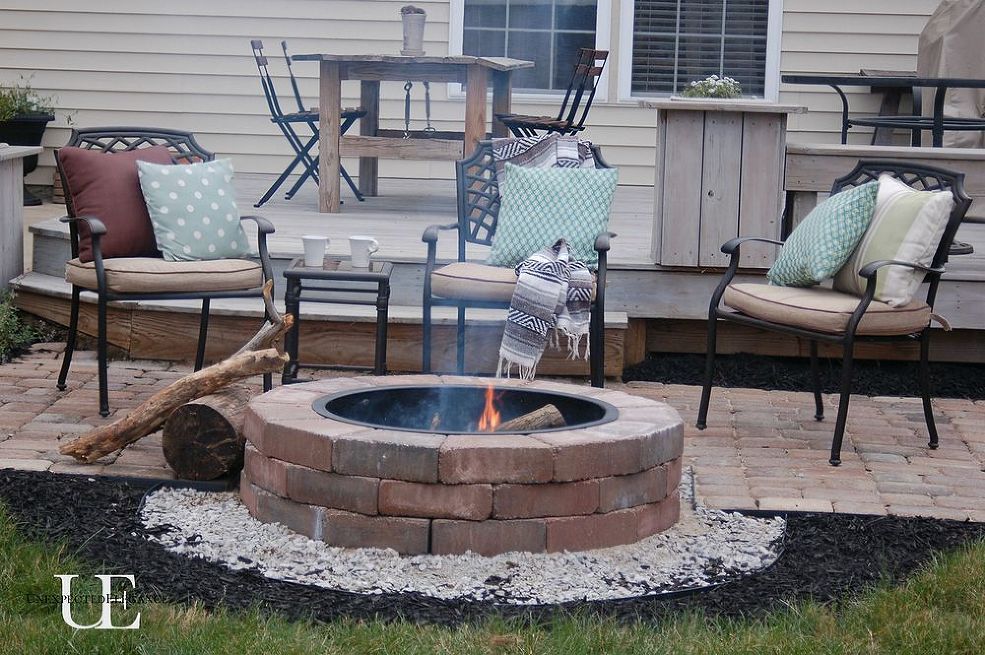 It adds sparkle and shimmer, though keeps the overall look clean and crisp. Plus, it’s a great contrast to the natural stacked stone, making the fire pit visually intriguing without it being overly busy.
The deck design itself also feels incredibly contemporary. The curved lines and two-toned wood create a strong look without being cluttered. The steps and bench essentially frame the fire pit, ensuring it is always the main focus.
4. Outdoor Living Room with Fire Pit Table
Photo by ilumus photography & marketing
If you’re looking for a fire pit for a deck that can double as a usable surface, this design is ideal. It’s more like a piece of furniture, working as a coffee table thanks to the tile surround.
Overall, this design creates an outdoor living room vibe. The benches are strewn with comfy pillows, making it inviting. The same goes for the rug under the fire pit. It softens the space, making it feel even more comfortable.
5.
 All Stone Circular Fire Pit
Photo by Kona Contractors
This fire pit on wood deck design draws the eye to the fire. The deck boards are set in a contemporary chevron-like design, allowing them to function like an arrow.
However, the fire pit is a bit more rustic. It features stones in different sizes, making the look very organic. It feels like the homeowner may have hand-shaped the bricks. Even the tabletop surround is just a bit uneven, ensuring the aesthetic feels modern, yet comfortable.
6. Stone Slab Fire Pit
Photo by Brookside Lumber Company
If you’re looking for a unique fire pit on wood deck design, this is a great option. It looks like rough stone slabs have been hand-stacked to create a space for a cozy fire. While it doesn’t look like it would protect the deck from the blaze, it does.
The deck itself is very modern. The curved bench and contrast wood flooring create a near-circular space. Additionally, the railing is fairly simple, allowing the fire pit to take center stage.
7. Stepped Fire Pit
Photo by Michael F Gallagher, Architect
Built along the edge of the deck, this stepped fire pit provides a substantial amount of warmth to a cozy seating area. There are three levels, each of which can be used to expand the size of the fire.
As far as the aesthetic, this one leans rustic. The stone tiles have rougher edges, making them appear hand-hewn. Couple that with the wood railing and siding, and the country cabin vibe is strong.
8. Modern Fire Pit Bench
Photo by Sticks and Stones Furniture
Part seating area, part fire pit, this fire pit bench is the epitome of modern design. The wood sections are incredibly linear. When combined with the concrete structure, the result is very contemporary.
As a bonus, this design relies on propane. That makes it very easy to control. Plus, you can substitute the darker volcanic-style rock in the fire pit with fire glass, giving you a chance to add some sparkle if you’d like.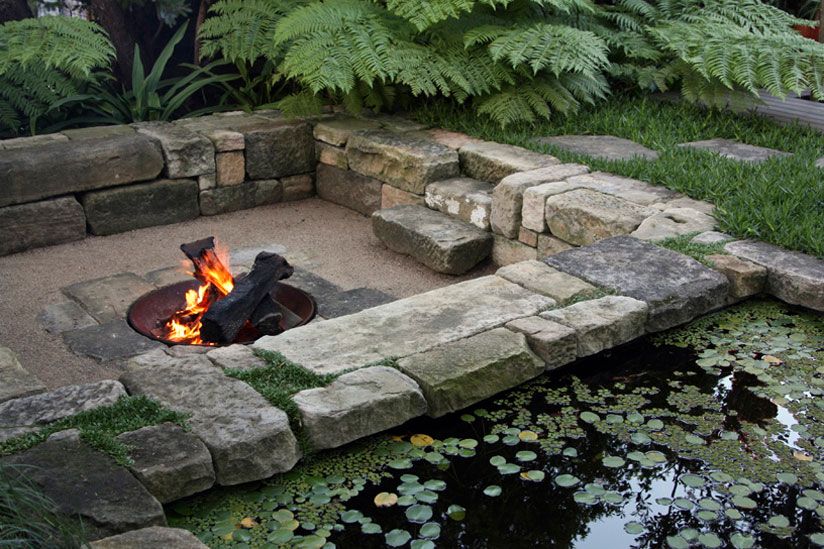
9. Octagon Tile Fire Pit
Photo by Kona Contractors
Another option that encourages people to gather, this octagon fire pit features faux stone tile. That makes the surface durable and easy to care for, making it perfect for heavy use. The small square tiles add visual interest, keeping the fire pit from receding visually.
The octagon shape and tile color and design give this fire pit a traditional vibe. The tiles also create usable surface, which can be ideal for preparing fireside snacks or, when not in use, holding drinks.
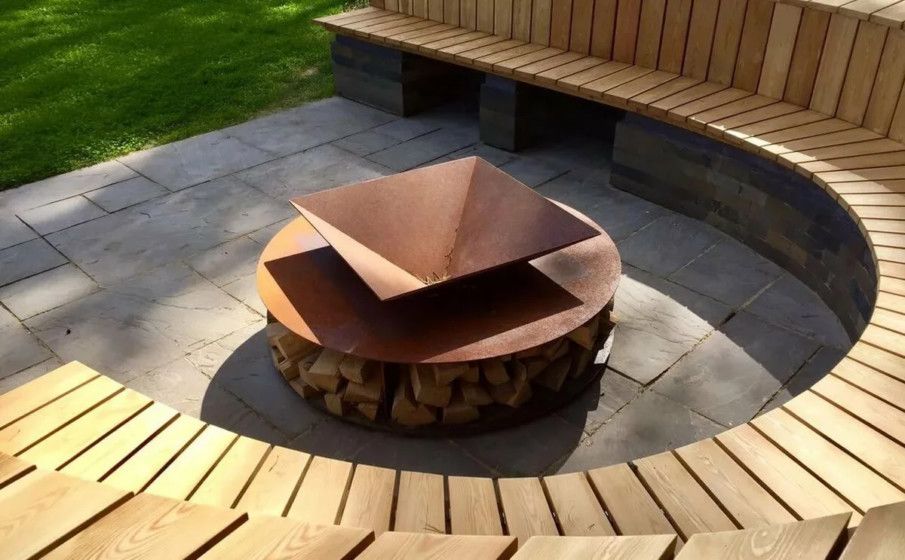
10. Ground-Level Fire Pit
Photo by UNIQUE
This fire pit design uses a different approach. The deck features a cutout that acts as a raised side to the ground-level fire pit. There’s a circular stone surface on the ground, and a curved piece of metal along the deck cutout, enhancing overall safety.
The fire pit itself sits in the middle of the stone circle, ensuring there’s enough space while also allowing the heat from the fire to reach people on the nearby benches.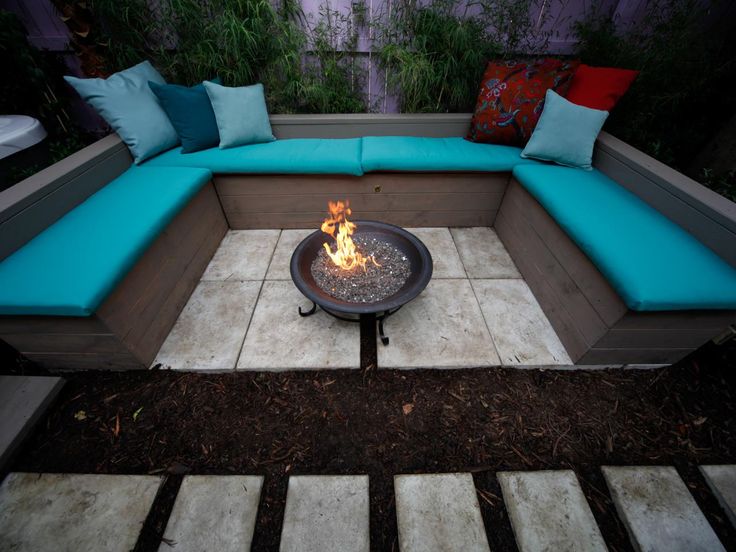
11. Sunken Gas Fire Pit
Photo by AdvantageLumber.com
If you’re looking for a sleek design, consider this one. The firepit is sunken into the deck a bit, allowing it to sit nearly at floor level. The surround has the look of white stone, keeping it clean and crisp. Plus, you’ll find a pop of color thanks to the fire glass.
The fire pit is center stage, but it doesn’t necessarily dominate the space. However, it might not be ideal for households with pets or small children since it’s so low to the ground.
12. Southwest-Style Fire Pit
Photo by Coffman Studio
If you love the look of terra cotta or want a fire pit with a southwest flair, this is the one for you. The fire pit itself resembles a terra cotta dish thanks to the coloring, imbuing extra warmth into the space.
However, the design is also very modern. The lines are clean and crisp, thanks to the rectangular deck and concrete pads. The two frosted glass panels are incredibly contemporary as well, while also adding a bit of privacy.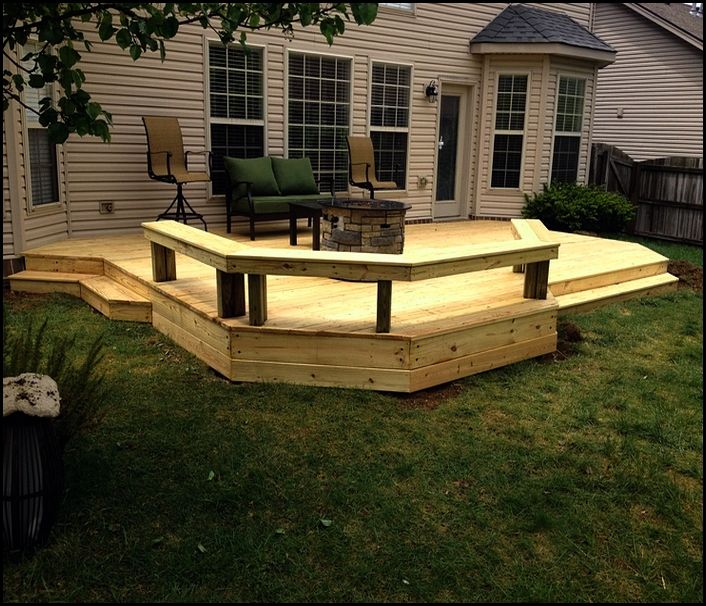
13. Steel Fire Pit
Photo by deckerbullocksir
Wood and metal can be a great combination. With this deck fire pit idea, you get the natural wood decking to imbue warmth in the space. Combine that with the steel fire pit, and the area takes on a hint of a modern industrial vibe.
This fire pit unit is also a bit on the smaller side, making it a good choice for slim decks. It also relies on gas, so you don’t have to worry about keeping firewood around.
14. Deck with Copper-Toned Fire Pit
Photo by JK Architecture Engineering
Hammered copper is a classic look for a fire pit. The warmth of the metal mimics the flames, while the hammered sections ensure that it doesn’t look dirty when left out in the elements.
With this copper-toned fire pit, the look resembles a wood-burning fire. However, it’s gas, which many people favor. Additionally, it works like a piece of furniture. You can move it around with ease and, when a fire isn’t going, use the edges like a tabletop.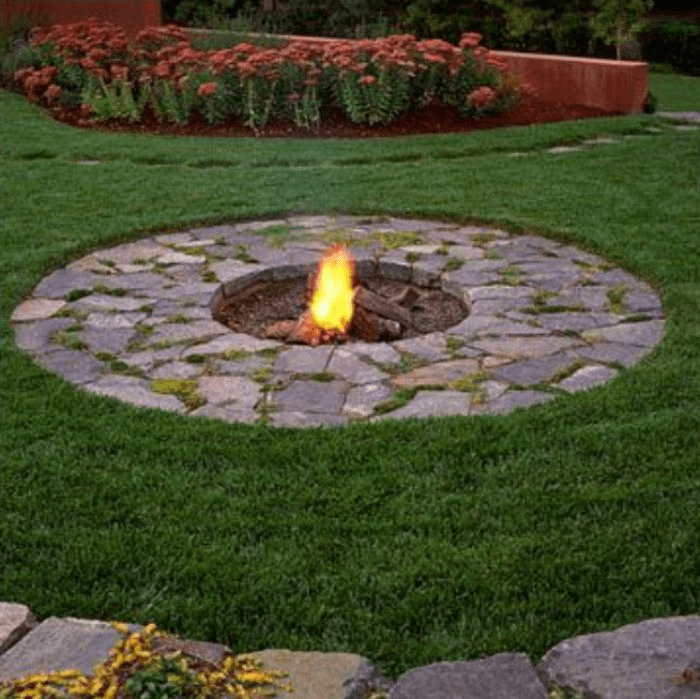
15. Modern Concrete Fire Pit
Photo by Seattle Staged to Sell and Design LLC
Concrete can have a very contemporary vibe. With this fire pit, the modern look goes a step further thanks to the clean lines and simple design and the very neutral color palette.
Curved concrete legs support a central dish, making sure the fire itself is what captures your attention. The bowl has a slightly rusted appearance, creating some interest and preventing it from looking too refined. Plus, the design is incredibly sturdy, resistant to wear and tear as well as toppling.
16. Simple Dish Fire Pit
Photo by Michele Bohbot Design and Architecture
While this fire pit may be labeled contemporary, it’s pretty versatile. The design is a simple dish, featuring an aged copper, brass, or bronze-style hue. That allows it to work with nearly any aesthetic and causes it to blend a bit with the wood decking.
This fire pit for a deck also sits low to the ground.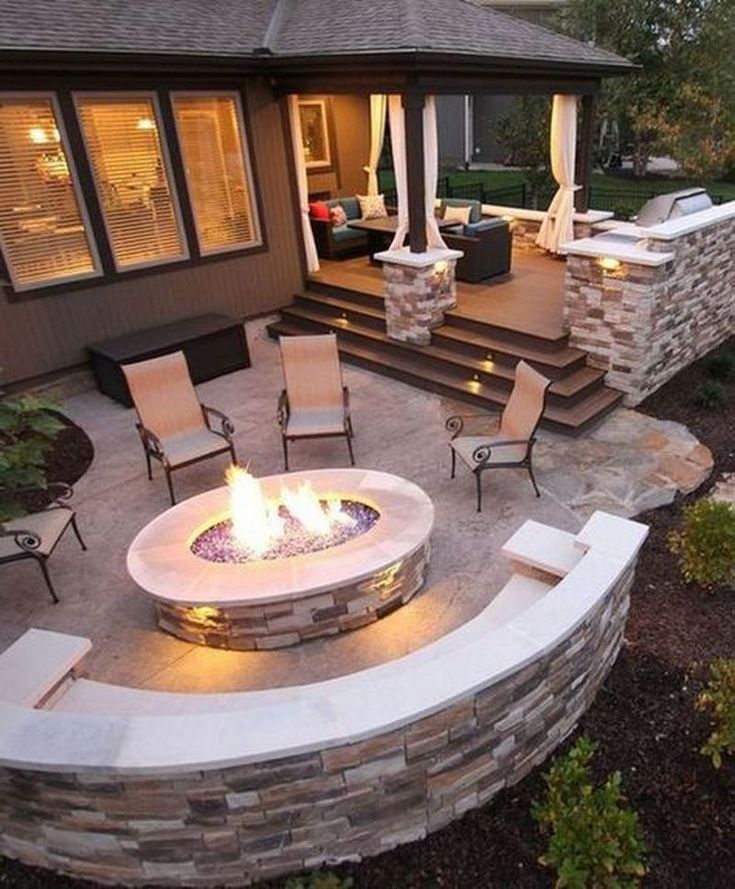 While it is ideal for supporting conversation across it, it does mean it may not be suitable for homes with pets or small children.
17. Fountain-Flanking Fire Feature
Photo by Platinum Landscape & Pools
More of a fire feature than a fire pit, this design features a multi-tier waterfall design flanked by two fire features. It’s meant to serve as a focal point instead of a conversation area, something that many homeowners would prefer.
While the lines are clean and modern, the tile choice gives this fountain-flanking fire feature a traditional bend. However, you could adjust it by going with different tiles, allowing you to coordinate it with any home aesthetic.
18. Large and Low Fire Dish
Photo by Decks by Kiefer LLC
Another flexible option that can work with nearly any design style is this fire pit. It’s a large and low fire dish with a wooden deck, creating a cozy outdoor space.
There’s a long bench on one side with a bit of an Arts and Crafts vibe thanks to the slats.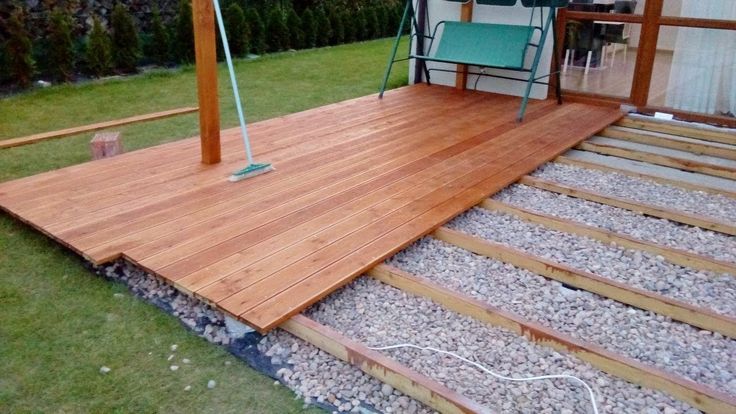 The flooring has a herringbone pattern at the center, drawing the eye from the bench to the pit and beyond.
19. Long and Lean Modern Fire Pit
Photo by Randy Angell Designs
If you’re looking for a slim design, this long and lean fire pit could be a great choice. The light gray and white stone design is very clean and modern, allowing it to work well in a contemporary or minimalist space. However, the stacked stone approach also makes it feel natural, so it could work in a transitional or nature-inspired yard, too.
The blue fire glass mimics the tone of the nearby pool. However, you could go with any other color, including a neutral like black or clear, depending on what’s in your yard.
20. Glass and Steel Portable Fire Pit
Photo by Welcome Home Design Group
If you want a fire pit on your deck but don’t want to commit to something permanent, this is the right option for you. The deck itself is very contemporary, featuring clean lines and strategic lighting for a fresh look.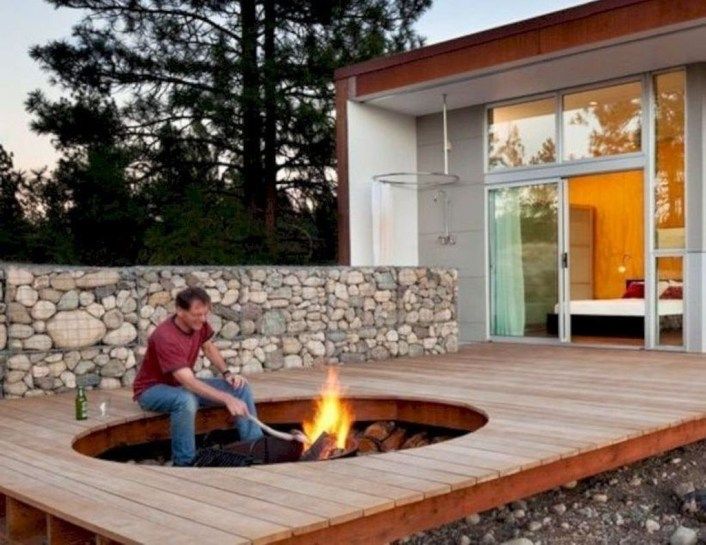
As for the fire pit, it’s a portable unit. The base is polished steel, giving it a great sheen. The top has a glass surround, allowing it to radiate warmth while keeping the flames contained.
21. Contemporary Fire Pit Table
Photo by Harold Leidner Landscape Architects
With this fire pit, you also get a usable table. The flames are limited to a smaller section in the center, allowing you to take advantage of much of the surface space.
The design itself is incredibly modern industrial. It’s a substantial piece with clean lines and hard angles, causing it to dominate the seating area a tad. Plus, it coordinates well with the wood decking and building’s architecture, coordinating and contrasting at the same time.
22. Trendy Fire Pit Table
Photo by DPG Pavers and Design
If you want your fire pit to look like a piece of modern art, this is one of the deck fire pit ideas for you. The wood has a very warm glow, with hints of red and orange.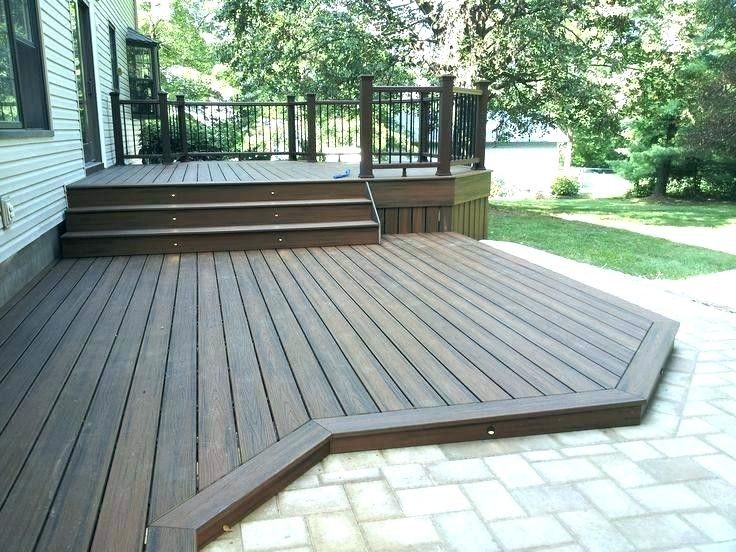 The octagon on the floor draws the eye to the fire pit, ensuring it takes center stage.
The fire pit is a marvel. It features the look of matte steel, allowing it to reflect the flames without being too shiny. The blue fire glass acts as another source of contrast, bringing in cool element to the mix.
23. Built-In Gas Fire Pit
Photo by User
When it comes to decks with fire pits built-in, this contemporary approach is a great option. It creates a clear seating area with room for a large sectional for lounging. The decking itself features clean lines and warm wood hues, making it inviting.
In one corner of the elevated section sits the fire pit. It has a smooth, wide surround that gently reflects the light. The fire pit has fire glass, amplifying the glow and keeping the full look highly modern.
24. Rustic Stone Fire Pit
Photo by Hot Spring Spas
This fire pit and deck design is a great choice for anyone who enjoys a hint of rustic flair.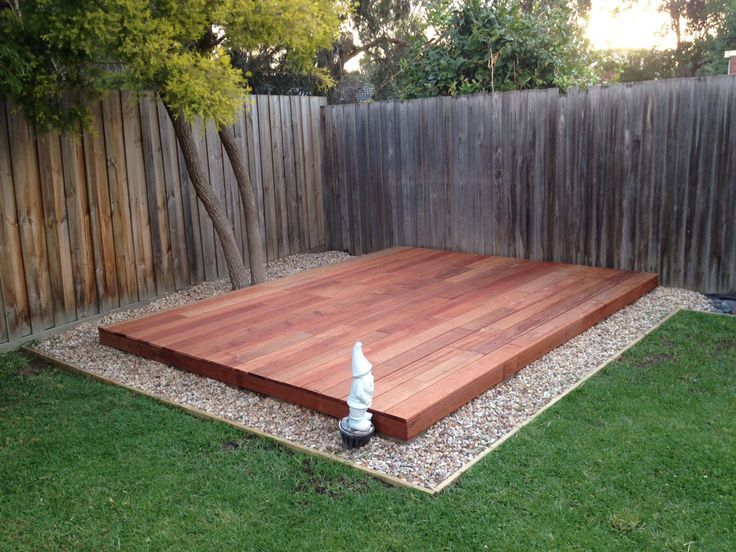 The deck itself is very linear and tonal, causing it to blend in a bit with the natural surroundings.
However, the fire pit, while natural as well, stands out a bit. The stone is in a range of colors, making it interesting. Plus, it’s fairly substantial, making it a feature.
The hot tub surround is meant to mimic the stone. That makes it feel cohesive, even if it isn’t an exact match.
25. Hot Tub-Side Fire Pit
Photo by Anthony Wilder Design/Build, Inc.
While most deck fire pits are positioned near a seating area, this one is a bit different. It allows the glow from the flames to be best enjoyed by those in the hot tub, making it a unique approach to deck design.
As for the fire pit itself, it’s clean and crisp. The body has the look of concrete, giving it a modern edge. The shape is also very contemporary, but its simplicity allows it to work with nearly any style of home.
26. Small Deck Fire Pit Brazier
Photo by Prideaux Design
An option for any homeowner that doesn’t want a permanent fire pit on their deck, this option uses a brazier instead.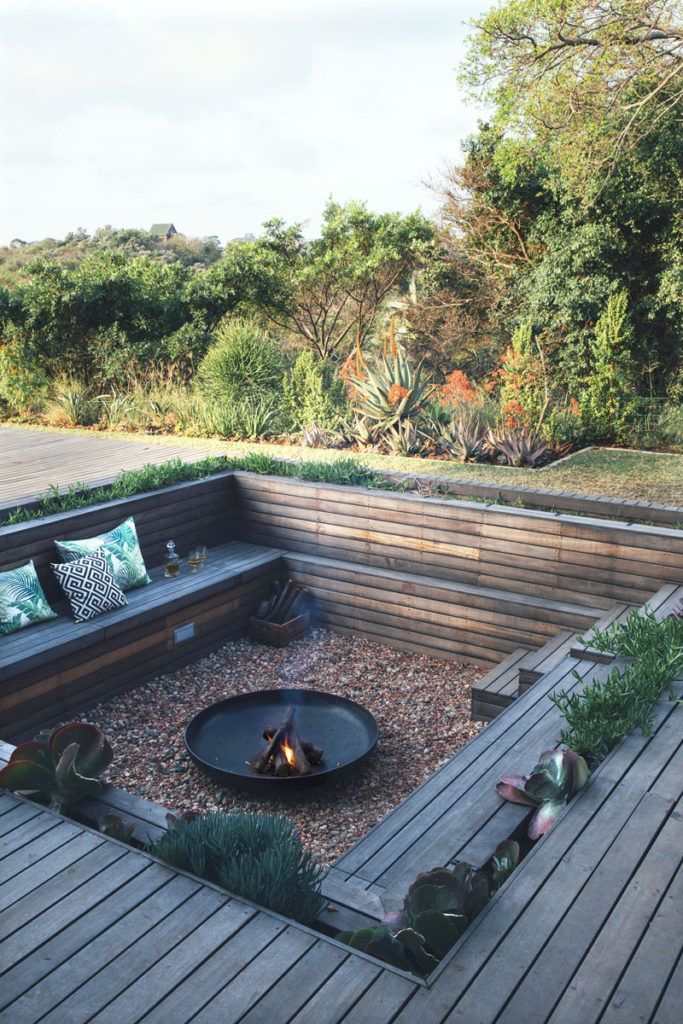 It’s a simple metal structure with a compact chimney that can also work as a rain shield. The dish is generous without being overly large, making it ideal for smaller decks.
The wood deck is comfortable without being overly large. Its design leans contemporary thanks to the minimalist railing and linear floor.
27. Sunken Fire Pit Seating Area
Photo by Alair Homes Nanaimo
This fire pit seating area creates the feel of a multi-level deck, even though the height difference is subtle. A set of steps leads to a sunken seating area, with benches on all four sides.
In the center is a built-in gas fire pit. The main body of the fire pit features the same wood as the deck, allowing it to blend in with the structure. However, the top features the natural stone in shades of gray, ensuring it stands out.
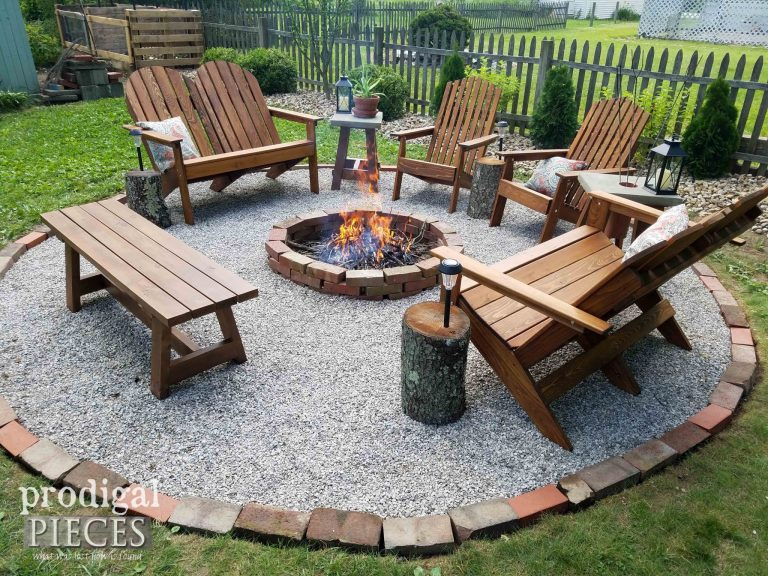
28. Curved Minimalist Deck with Fire Pit
Photo by Residential Decks, Porches, Patios
Another modern yet flexible approach, this ground-level deck features clean lines and simple design.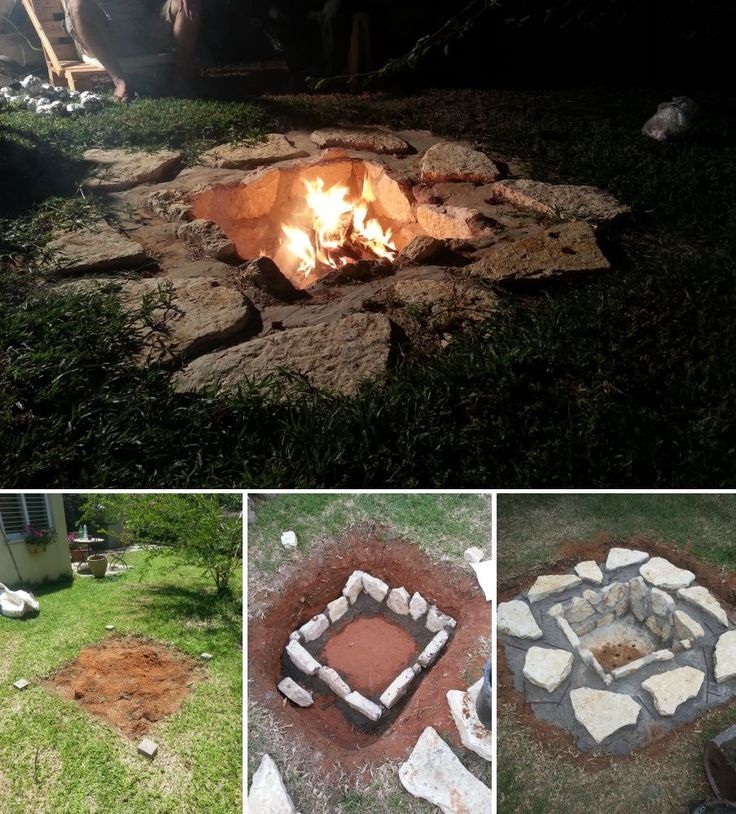 There’s a subtle two-tone approach to the wood surface, allowing darker pieces to frame sections of the deck.
Toward the center of the deck is a curved cutout that frames a stone circle. In the middle of the circle is a wood-burning stone fire pit, a design choice that adds a touch of rustic flair to the overall look.
29. Fire Pit with Deck Surround
Photo by Jake Moss Designs
While this looks like a sunken fire pit, it really isn’t. The copper-toned fire pit is ground-level, surrounded by a bench on all four sides, ensuring ample seating.
Technically, the nearly ground-level deck is surrounding the fire pit, elevating it above the seating space slightly. It allows the gray-toned deck to act as a frame, drawing the eye toward the inviting seating area and warm fire.
30. Corner Fire Pit
Photo by Jeffrey Gordon Smith Landscape Architecture
A mix of concrete and pebbles, this corner fire pit nestles up against a built-in seating area. The longer side features a gentle curve, softening the look and adding visual interest. With the nearby wood elements, the final aesthetic is almost spa-like.
The material choices can feel a bit modern or minimalist. However, they are also very neutral, so they could work with a traditional home.
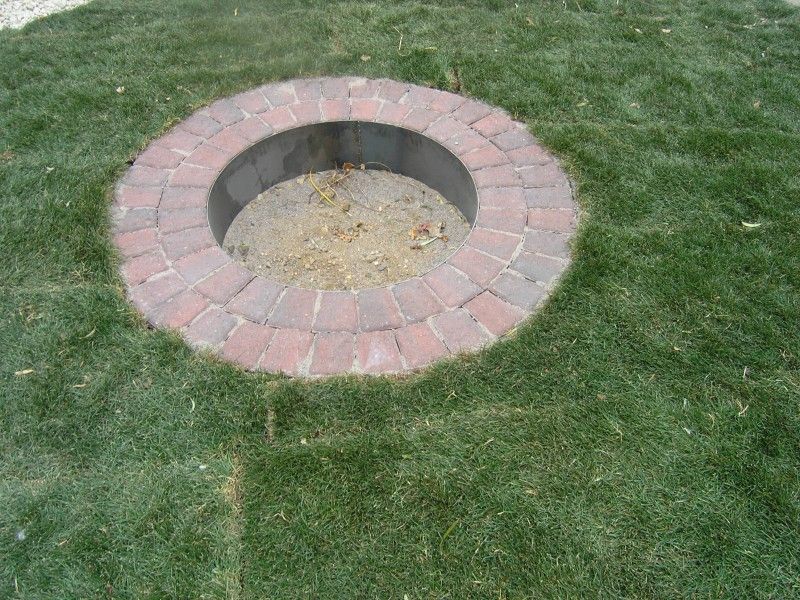
31. Slab Stone Ground-Level Fire Pit
Photo by Molior Construction
With a simple, circular ground-level deck, this fire pit is the focal point. It features the stacked stone in slate colors, giving it a rustic cabin vibe. The tones work well with the natural environment, allowing them to blend without fully fading away.
The deck design offers enough room for seating, making it gathering-friendly. However, it’s also a bit compact, so it can work well with a smaller yard.
32. Minimalist Bowl Fire Pit
Photo by Falken Reynolds Interiors
Another option for anyone looking for a minimalist design, this fire pit is a simple, smooth concrete-style bowl. The color of the dish falls into the greige territory, making it a bit warm and a bit cool simultaneously. That makes it a flexible choice that could work with nearly any palette.
In the middle are simple pebbles. That gives the fire pit a very natural element and softens the overall look.
The decking is a deep, slightly reddish-brown. It imbues warm into space while also receding visually.
33. Modern Square Fire Pit
Photo by Phil Kouffman Builder
This deck and fire pit design almost resembles a sauna. All of the wood has the look of fresh cedar, giving it a spa-like appearance. The fire pit material blends seamlessly, allowing it to almost recede into the deck visually.
As for the fire pit, you have a natural rock on the interior. The glass surround enhances safety and warmth without interrupting the clean, modern look.
For added convenience, the benches have built-in storage. Whether you want to keep outdoor pillows, fireside cooking utensils, or anything else within arm’s reach, it’s possible with this approach.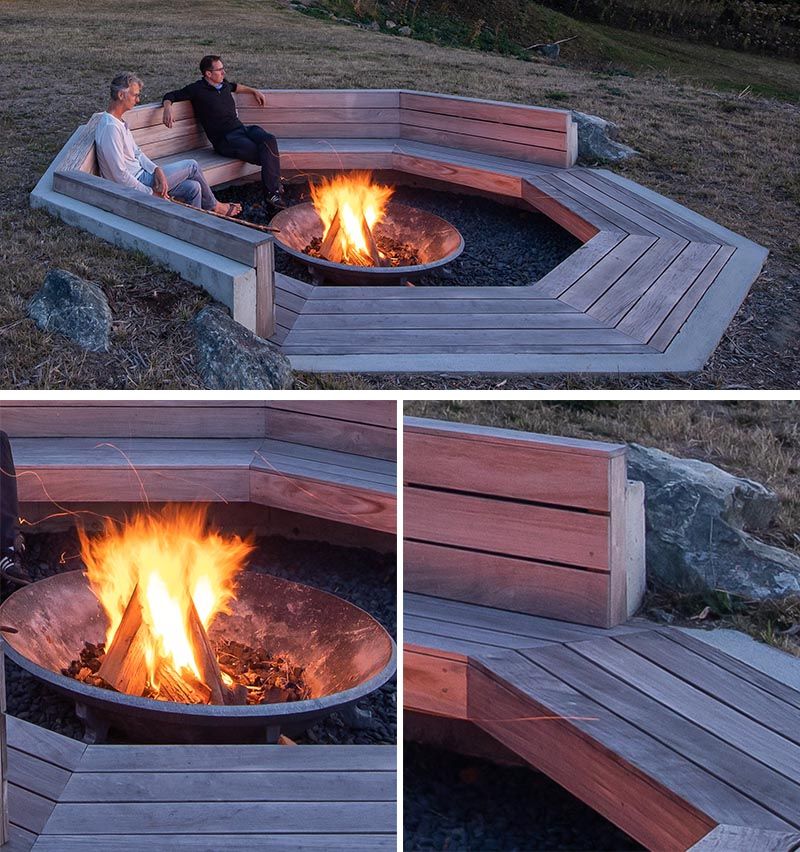
34. Mediterranean Deck and Fire Pit
Photo by Dennis Mayer – Photographer
The warm color palette and roof times give this entire deck a Mediterranean vibe. The wood decking completes the look, while the brown railing provides safety without taking away from the other visual elements.
The included fire pit acts more like furniture. It has a usable tiled surface on the top and interlocking circle design on the side. Since its colors mimic the rest of the space, it adds texture without being overwhelming visually.
35. Stone Slab Fire Pit Table
Photo by Sculpt Gardens Inc.
With this stone slab-topped fire pit table, you get a ton of usable space. The fire pit is limited to a circle that’s positioned slightly to one side. It creates a sense of warmth without dominating the area, making it a feature instead of a strong focal point.
While large, this fire pit table is movable. However, since the surface is a single stone slab, it would be heavy, making repositioning awkward.
If you were looking for amazing deck fire pit ideas, you should now have a ton of outstanding options to explore. Check out each of the designs in the list and see if they would be the perfect approach for your outdoor space.
I hoped you enjoyed learning about each of the decks with fire pits designs above. If you know of any other stellar deck fire pit design ideas or what to discuss your thoughts on any of the ones in the list, take a trip to the comments section below. Also, if a family member or friend is looking for great fire pit options, send them this list. They’re sure to appreciate it.
Eugene Sokol
Eugene has been a DIY enthusiast for most of his life and loves being creative while inspiring creativity in others. He is passionately interested in home improvement, renovation and woodworking.
Kitchen of the Motherland: How were the refrigerators of our ancestors
Fresh number
RG-week
Rodina
thematic applications
Union
Fresh number
02/02/2017 12:43 9000
Ekaterina Zaitseva
Motherland - Federal issue: №8(817)
The ancestors of the modern refrigerator entered the history of world wars and great literature
Do you remember how Eugene Onegin rushes to meet Tatyana for a decisive explanation?
Rushing along the Neva in a sleigh.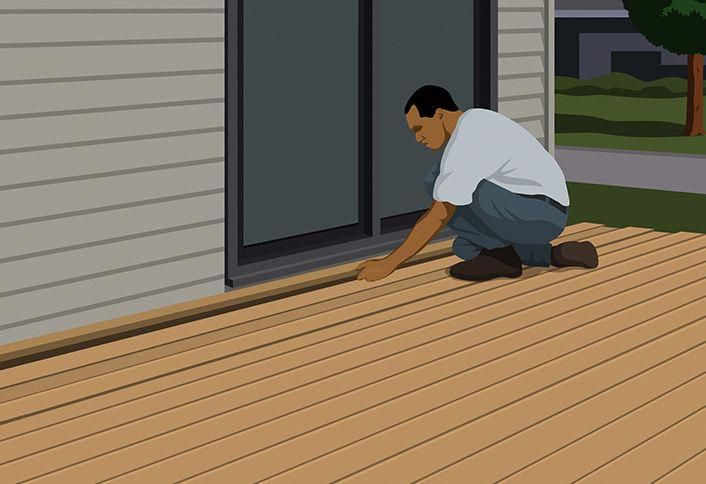
On blue, cut ice
The sun is playing; dirty melting
The streets are full of snow.
"Blue, cut ice" is not a metaphor, but a sign of the times, behind which there is a centuries-old history. After all, before the invention of refrigeration equipment, the ice trade in Russia reached a huge scale. In every more or less wealthy house there were glaciers, in large cities special artels were engaged in the preparation of ice. Craftsmen lowered forged saws with a load suspended at the other end into the hole, sawed ice, pulled blocks out of the water, and hewed them well. As a result, regular parallelepipeds were obtained, they were called "boars".
You can see the process of transportation of blocks in the painting "Riding on the Neva" (1854) by the famous marine painter Alexei Petrovich Bogolyubov. And they completed their journey from the Neva in glacier cellars.
Ice cellar: not a luxury, but a means of freezing
Ice cellars - rooms with ice for storing perishable products.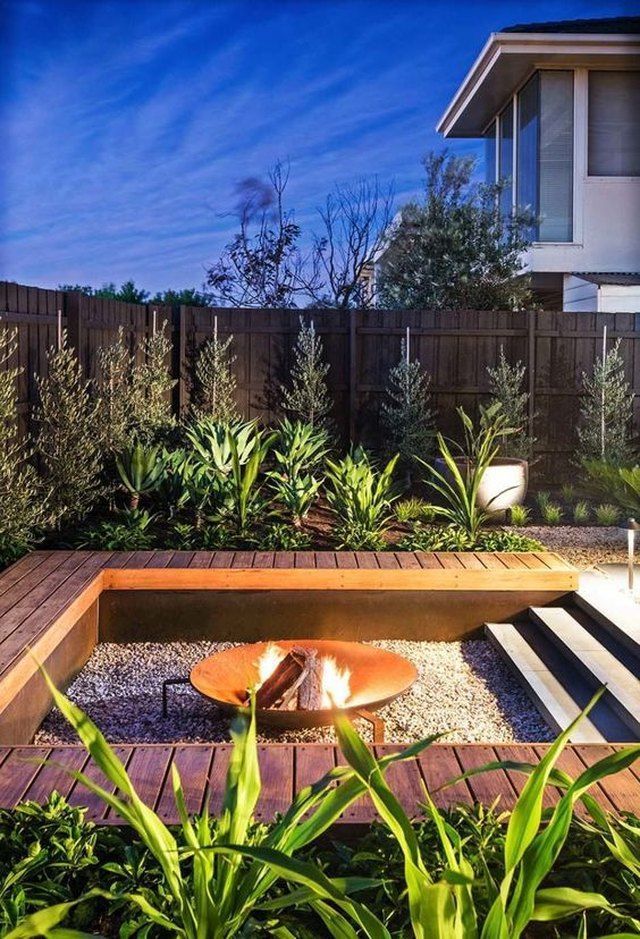 The closest ancestor of the domestic refrigerator could be wholly or partly underground and above ground. And it could be a cabinet with a special compartment for ice - a kitchen glacier. Some expensive models of such cabinets were thermally insulated with porcelain. In 2006, the collection of the "Raznochinny Petersburg" Memorial Museum was replenished with a unique specimen - a kitchen glacier, in which spikelets of wheat were used for thermal insulation. And they are perfectly preserved! A rare item came to the museum from the family of Dr. E.S. Vakhovich, who lived on Zabalkansky ) Avenue. On the lid of the glacier there is a stamp of the San Galli iron foundry, which, by the way, made the main gate of the Winter Palace, the fence of the Tauride Garden and the lattice of the Trinity Bridge. In early 2016, the glacier was restored and took its rightful place among the exhibits " The history of the old house".
Ice was delivered to consumers in special wooden boxes. Inside they were covered with galvanized iron, and in the lower part there was a tube for draining melt water.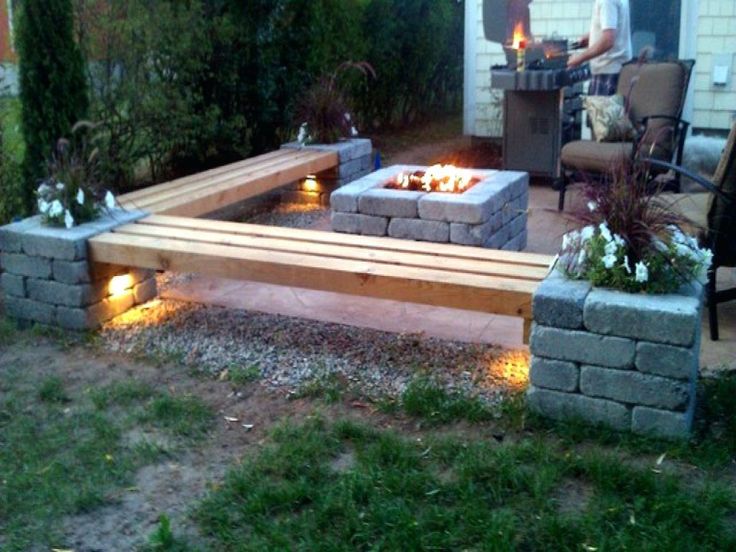 Ice in such a box could fit about 6.5 pounds (more than 100 kg).
Glaciers were a necessary accessory for any household and were widely used until the 70s of the last century. After all, refrigerators that appeared in Moscow at the beginning of the 20th century were an unattainable luxury for our compatriots for a long time.
The site for the construction of the glacier was chosen carefully: ideally, on a hillock, away from groundwater. The walls were sprinkled with earth and covered with turf, which made it possible to protect the ice from premature melting. Some masters for better thermal insulation laid straw between the ice cubes, others preferred snow with finely crushed ice. Construction was carried out in the summer, a large hole was dug under the glacier, ceilings made of stone and wood were placed, an earthen mound was poured over the finished longline building. The ice room was necessarily separated from the one in which the food was stored.
A well-built ice cellar was worth its weight in gold, as it allowed food to be stored from spring to cold.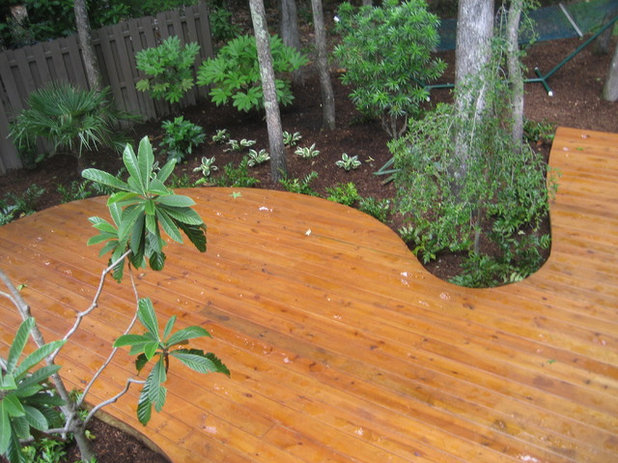
It is curious that many current summer residents prefer glaciers to refrigerators. It is much more spacious and economical, it will perfectly preserve not only jams, pickles and all kinds of seamings, but also a rich harvest, for example, potatoes and apples, until the next summer season.
And, of course, the taste of food stored in the glacier is real!
Menu from Lédnik
on the warm August days "Rodina" offers "cold" lunch that can be prepared only with the help of a refrigerator or lédnik
- fat in Belo-Russian
- Blood
- Refrigerator
- Salted pink salmon
- Strawberry mousse
Belarusian salo - Refrigerator
Ingredients: salo - 1 kg, salt - 500 g, garlic - 5-7 cloves, black pepper - 2 tbsp. l., ground coriander - 1 tbsp. l., cumin - 1-2 tbsp. l.
Recipe: Peel and finely chop the garlic, put in a bowl, add salt, cumin, pepper and coriander to the garlic mass, mix thoroughly.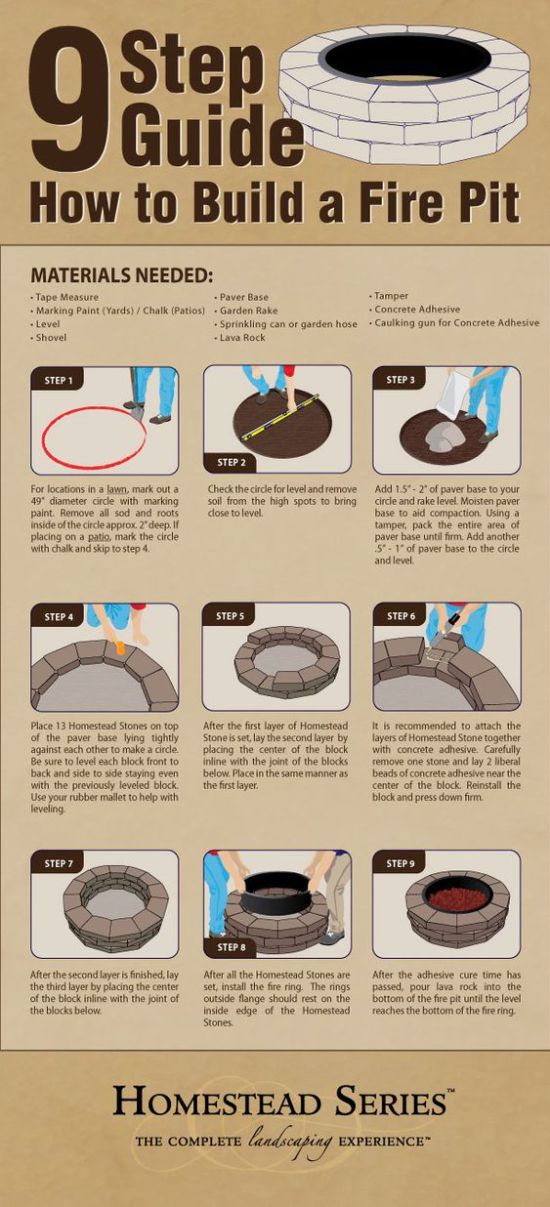 Leave the spice mixture for a few minutes. During this time, prepare the fat. Scrape off all dirt with a knife and cut it into arbitrary pieces. After that, grate the lard with the prepared mixture on all sides and place in a glass or enameled container. Cover the lard with the remaining spice mixture, cover with a flat plate and put something heavy on it. Leave the workpiece for three days at room temperature, and then remove for a day in the refrigerator (glacier).
-
Aspic
Tip: for the transparency of the aspic, always drain the first water, when it boils, boil the meat in it for up to 5 minutes, then rinse the meat with running water to wash off the remains of coagulated protein, and fill with new water. It is necessary to ensure that during the cooking process the water boils weakly, in which case the jelly will turn out to be transparent. In order for the jelly to freeze, you need to choose the right meat: pork legs must be present (the lower part with hooves), the more articular bones in the rest of the meat, the better - use for the jelly also part of the beef shank, pieces of meat, for example, a knuckle with veins and cartilage, skin.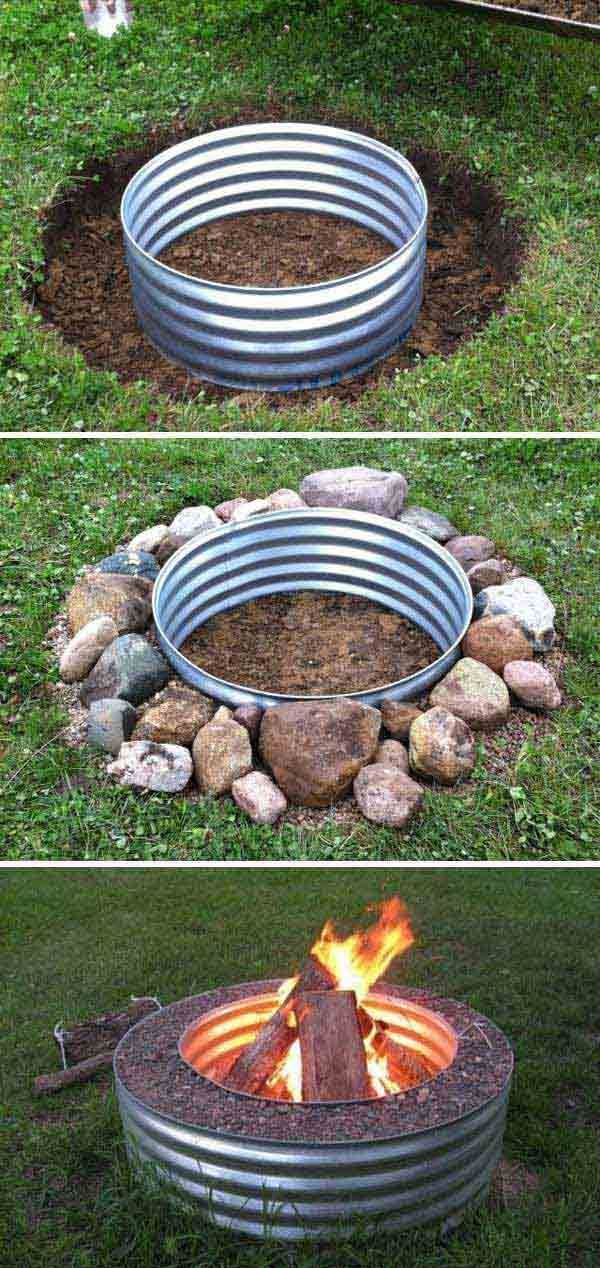 For 700 g of pork legs, you need to take no more than 1.5 kg of other meat parts. You can take different meats or only pork.
Recipe: Cut the legs into 3 parts, cut the rest of the meat so that the pieces are medium. Pour the meat with cold water, the water should cover it completely, and leave for 3 hours or overnight, then drain the water and rinse thoroughly, clean the meat and scrape the legs and skin. Fill a four-liter pot with meat to half, and add water to the top, bring to a boil, boil for 2-3 minutes, drain the water, rinse the meat and pour clean water (it should be 2 cm higher than the level of the meat), bring to a boil again and immediately keep the fire to a minimum. Lightly salt the meat and cook aspic over low heat for 5 hours. Then add onions, carrots to the jelly, add salt to the jelly to taste, boil for 30 minutes, add peas and bay leaf. Remove the meat from the broth with a slotted spoon, strain the broth through a colander, discarding the carrots and onions, remove the meat from the bones, chop it, pass the garlic cloves through a press, mix with the meat. Finely chop the skins and cartilage from the meat and mix with the meat, they give the finished jelly "fortress". Arrange the meat in containers, carefully pour the broth and mix. Allow the jelly to cool first at room temperature, then put it on the middle shelf of the refrigerator or in the glacier, covered with a lid. The jelly should freeze in 4-5 hours.
-
Refrigerator
Ingredients for a three-liter pot: water - 2.5 l, boiled beets - 2 pcs., potatoes - 3 pcs., eggs - 4-5 pcs., fresh cucumbers - 5 pcs. -6 pieces, citric acid - 0.5 tsp, salt, sugar, dill, green onion.
Recipe: Cut potatoes into cubes and boil in salted water until tender, add sugar and citric acid, cool everything. Add grated beets, chopped cucumbers and finely chopped boiled eggs. Chop dill and green onion, add to vegetable broth. Put in the refrigerator (glacier) to infuse.
Ingredients: pink salmon - 1 piece, salt - 2.5 tsp, sugar - 0.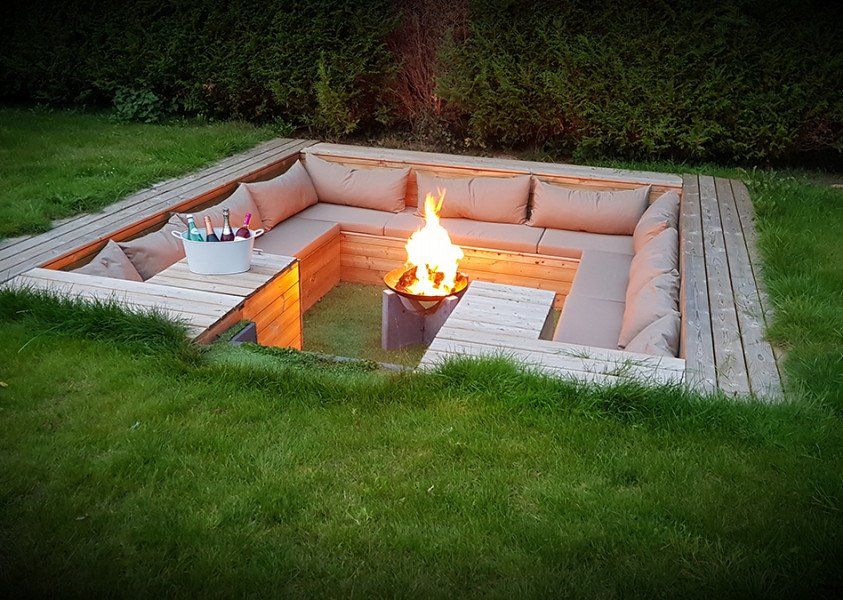 5 tsp, ground black pepper - to taste, sunflower oil - 100 ml, onion - 1-2 PC.
Recipe: Wash pink salmon, cut off head, fins, tail. Cut the carcass in half crosswise. Make an incision along the ridge and cut the fillet from the ridge. Then carefully cut off the skin. After that, cut the salmon fillet into small pieces. In a bowl, mix salt, sugar and ground pepper. Put the first layer of pink salmon in a plastic bowl, sprinkle with the resulting mixture and onion cut into half rings. Put the second layer of fish on top and repeat everything. When all layers are laid out, pour oil, cover with a bowl and put in the refrigerator (glacier) for 4 hours. Ready lightly salted pink salmon can be sprinkled with herbs and served with boiled potatoes.
- Strawberry mousse
Ingredients: strawberries - 250 g, sugar - 0.5 cups, 1 egg white.
Recipe: Grind the berries with sugar into a puree. Whisk the egg white into foam. Next, add protein to the berry puree in small portions.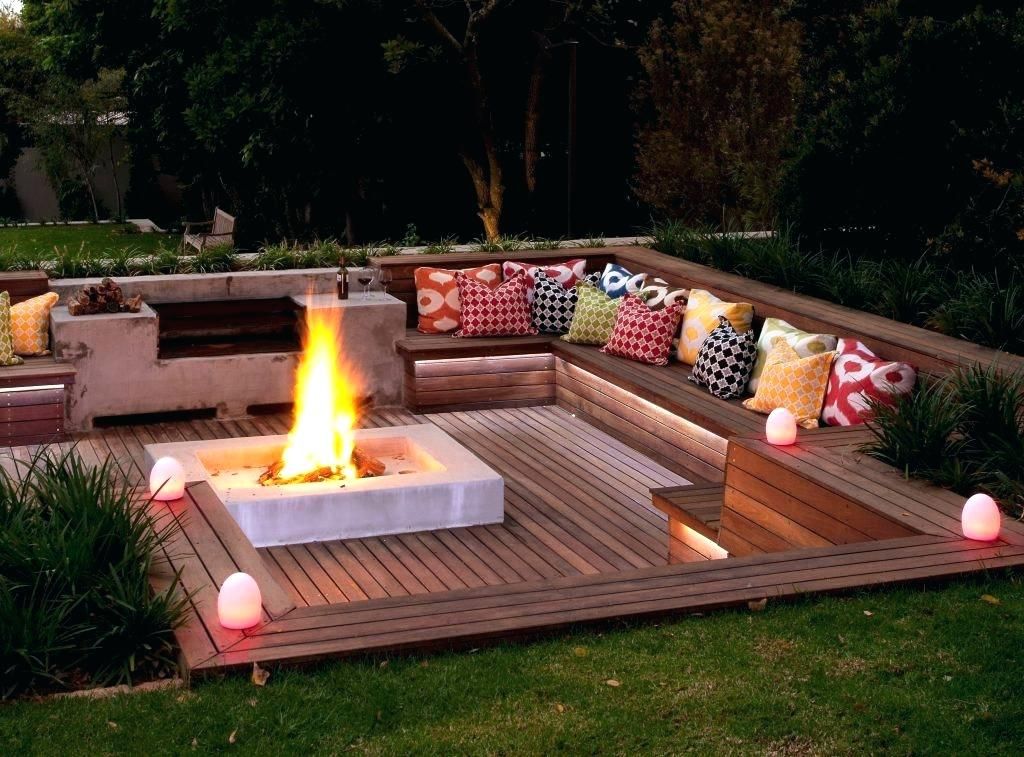 Beat everything well into a fluffy mass, spread out in bowls. Put for 15-20 minutes in the refrigerator (glacier) to cool. Such a dessert can be prepared with any berry.
FIELD KITCHEN
War is war, but lunch is on schedule
The glaciers near the theater of war were absolutely indispensable. After all, the hygienic storage of meat, butter and other perishable products is the most important condition for the operation of hospitals, food stations and sanitary trains. The front ice cabinet was designed for 7-8 pounds (more than 100 kg) of meat, had two storage compartments separated by lattice shelves and one middle compartment for ice.
Such cabinets and boxes for storing ice could be ordered in Moscow at the Sanitary and Technical Department of the All-Russian Union of Cities, created on August 1914 years to assist the government in the war of 1914-1918.
TelegramVKontakte- #Kitchen of the Motherland
Topics of the day:
"I was forgiven for this hooliganism.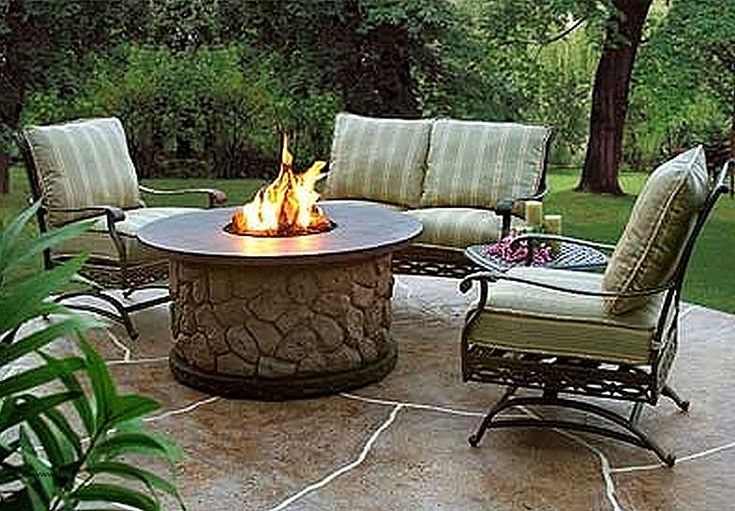 " The story of the hero-pilot Reshetnikov
This article by Vladimir Churov will be published in the May issue of Rodina
"I am turning towards the fighters ..." The country says goodbye to the pilot Vasily Reshetnikov
The Nazis took hostage and shot the children of the partisan commander in response to their refusal to surrender
How pupils of the labor commune headed by Anton Makarenko developed and produced the FED camera
Forerunner of the first battleships - Alternative History
Home » Literature on the history of the fleet
in Favorites in Favorites from Favorites 0
Article by Vladislav Goncharov from the WARSPOT website.
Contents:
A wide range of readers are well aware of the American battleships Monitor and Virginia, the duel of which became a key event in the naval history of the 19th century.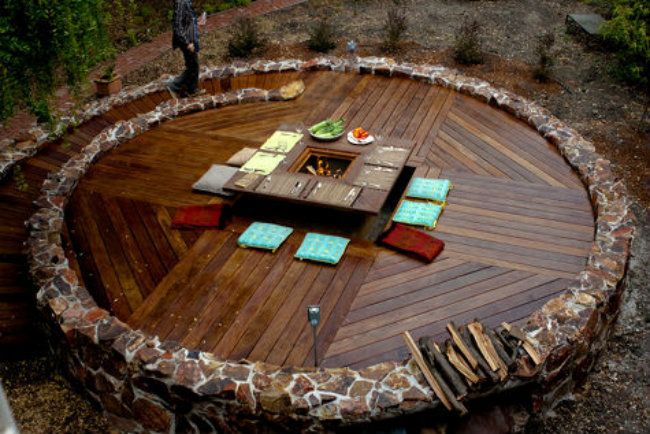 Meanwhile, the construction of the very first American iron armored vessel, now known as the “Stevens Battery”, began as early as 1845. The project of this ship contained a lot of revolutionary ideas and was often reworked, so in the end the battleship was never completed.
Stevens Family Project
This story began in 1841, when, during another aggravation of US-British relations, the United States Congress decided to allocate new funds for the construction of the fleet. On August 13, the sons of Colonel Stevens, Robert and Edwin, proposed to the Naval Department that a steam-powered iron ship be built to defend the sea approaches to New York. As conceived by the inventors, the ship had to embody all the latest advances in technology: it was equipped with heavy bombing guns and a propeller, protected by armor made of iron plates riveted together, and its machines were to be located below the waterline for shelter from enemy fire.
Colonel John Stevens (1749-1838), Revolutionary War veteran and later famous steam locomotive and steamboat designer, was a respected man. His sons also had a reputation for business and honesty: 53-year-old Robert ran the Camden-Amboy Railway and came up with the modern shape of the railroad rail (mushroom-shaped in section), and 46-year-old Edwin was the author of many inventions, including a domed plow, a wagon with vestibule and fire-fighting system. The Stevens have become famous as a family of engineers and inventors for several generations.
Edwin August Stevens. Portrait by Manuel Joaquim de Francia, 1843. National Portrait Gallery of the Smithsonian Institution. npg.si.edu
Already at the end of 1841, President Tyler authorized the construction of the ship, and on February 10 of the following year, Congress signed a contract with the Stevens and allocated money for the construction. The total cost of the ship was estimated at $ 600,000 - a huge amount for those times, but it was assumed that it could be more expensive. According to the contract, the ship should have been built by 1845, before which the builders were paid the entire agreed amount.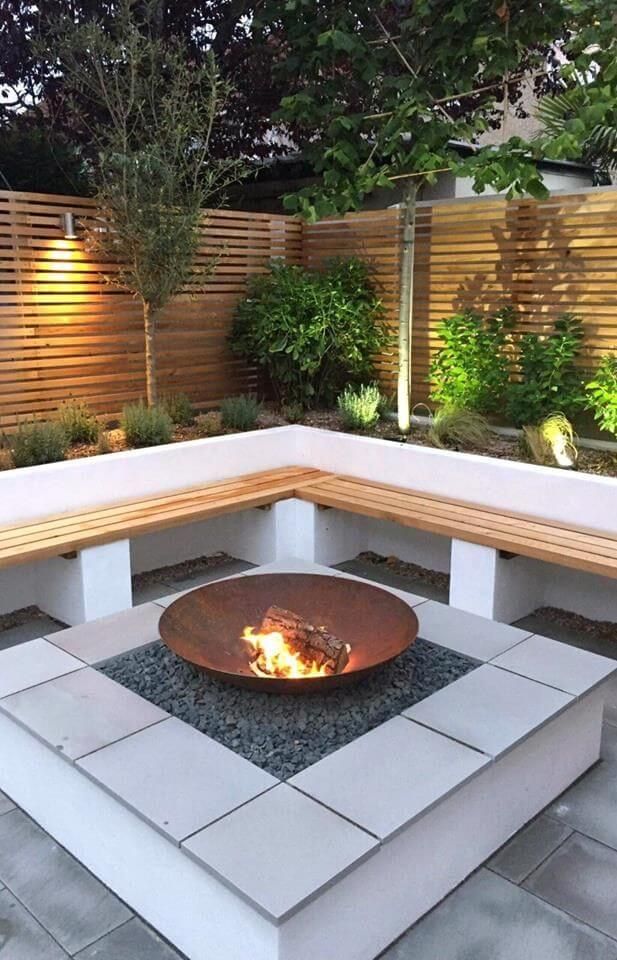
Difficulties began immediately. Edwin Stevens was able to complete the design of the ship only in 1844. The spindle-shaped hull was 76 meters long and 12 meters wide: for wooden ships of that time, this ratio was incredibly large. The height of the hull from the upper deck to the keel was 8.5 m. According to Stevens' calculations, the ship was supposed to have a displacement of about 1500 tons, its main difference from other military ships was armor protection: the upper part of the hull was covered by vertically located 4.5-inch (114 .5 mm) with iron plates. The same vertical armor protected the barbette, open on top, where six 64-pound bombing guns stood.
The Stevens' "floating battery" (the word "battleship" was not yet known at that time) was to be equipped with a 900 hp steam engine. The Stevens believed that with a pointed spindle-shaped hull, such a machine would be able to provide the ship with a huge speed of 18 knots for those times.
View of Hoboken from the ferry.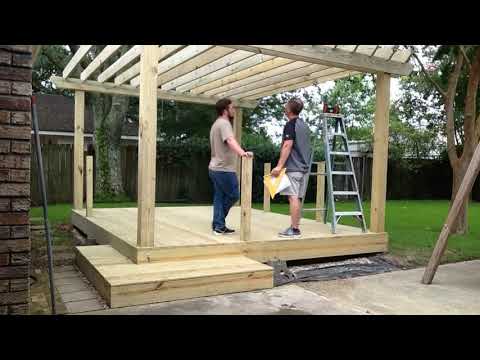 Watercolor by Nicolino Callio, 1838. Gallery of the Metropolitan Museum of Art. Start of construction and first change of project
It was decided to build the "battery" at the Stevens family estate in Hoboken. Here, on the banks of the Potomac River, the construction of a dry dock (sudoyama) began, in which it was supposed to mount the hull. Warehouses and workshops were erected around - to provide the ship with equipment, a full-fledged mechanical plant had to be built.
Immediately it turned out that the pit was filled with groundwater, which must be constantly pumped out. The next problem was John Ericsson's testing of his huge 305 mm Oregon cannon, which weighed 225 pounds and could fly 5 miles. Edwin Stevens decided that 4.5-inch armor would no longer save from such guns, and began to urgently rework the project with increased protection, which inevitably caused an increase in the size and displacement of the battleship.
Stevens Villa in Hoboken, which lasted from 1787 to 1851.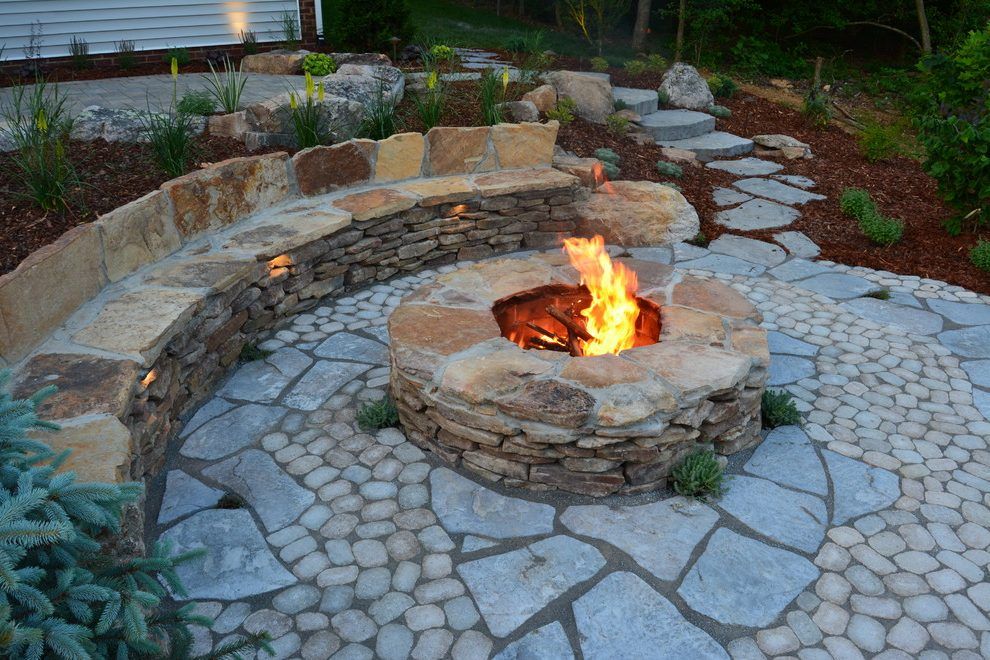 Drawing by William Russell Birch, 1808. US Library of Congress.
Finally, the ship was supposed to become semi-submersible: with the help of special ballast tanks, it sank almost to the very side in order to become the minimum target for enemy artillery. With the then short firing distances using flat fire, the principle of a minimum freeboard was quite justified, and the projects of "water armored" ships subsequently became popular and were developed until the end of the 19th century.
In the meantime, Robert Stevens has gone to Europe for treatment, and the construction of the ship has practically stalled. In 1851, Secretary of the Navy George Bancroft ordered a halt to construction, and Commodore Charles Skinner, head of the Naval Construction Bureau, announced that the hull would be taken apart and sold for scrap to at least partially cover the costs. There was also talk of selling the entire shipyard in Hoboken to cover the costs already incurred.
Construction of a dock for the Stevens battery in Hoboken. librarycollections.stevens.ed
Appeal to Congress, the Stevens managed to cancel the decision to dismantle the ship, and by 1854 Edwin developed a new project. Now the length of the battery was to be 128 m, the width amidships reached 16 m, the draft was 6.5 m, and the displacement was 4683 tons. from the main deck and dropping one foot below the waterline. To increase seaworthiness, there were folding bulwarks.
Active work resumed in January 1854 and continued until September 1855, but then slowed down again. By that time, the ship's hull was almost ready, the manufacture of boilers and mechanisms had begun, but there was not even a question of installing armor and artillery. In April 1856, Robert Stevens died. Meanwhile, the brainchild of the brothers became more and more expensive: in 1859, about 700,000 dollars had already been invested in the ship. By 1861, the Navy had spent about $500,000 on it, and the Stevens family another $228,500.
Battery Stevens at Hoboken in the spring of 1861.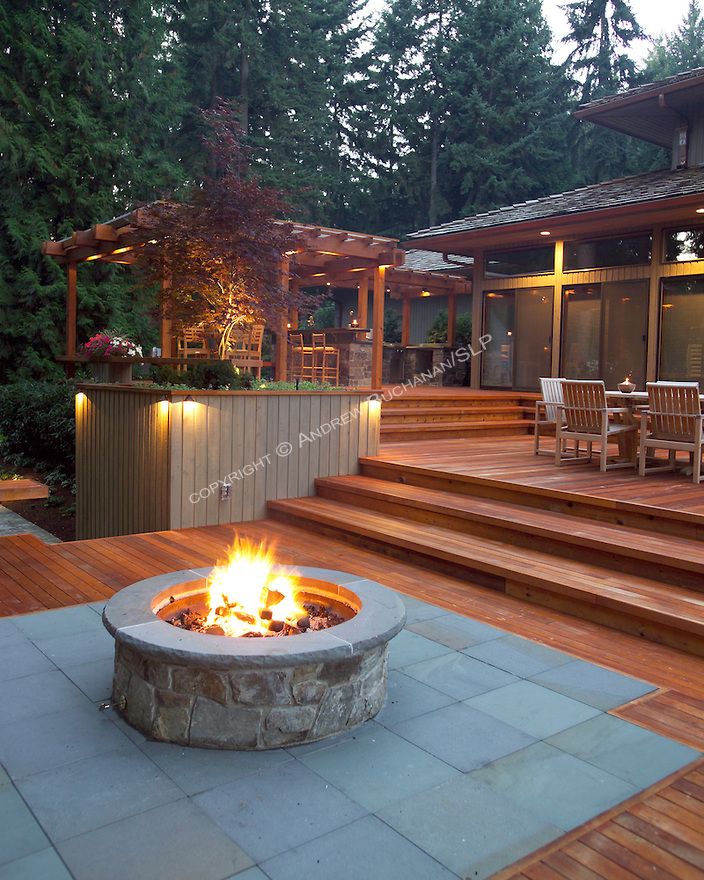 Harper's Weekly May 4, 1861
This is what the Stevens battery looked like in 1861. history.navy.mil
Civil War and the third version of project
With the outbreak of the Civil War, Union authorities' interest in the battleship Stevens grew. In December 1861, the leadership of the federal fleet created a special commission to determine the state of the "battery" and the prospects for its rapid completion. The commission included several naval officers, naval engineer Alban Steamers, and naval consultant Professor Joseph Henry. Captain Siles Stringham became the head of the commission.
It was this commission that gave the first detailed description of the ship's hull, and also for the first time provided a detailed diagram of its new design device, heavily modified by Stevens after the start of the war. Before that, apparently, there were simply no general drawings: the Stevens did not want to declassify the details of their inventions.
The Stevens battery hull had a pointed bow and stern, its length increased to 130 m due to the installation of a ram.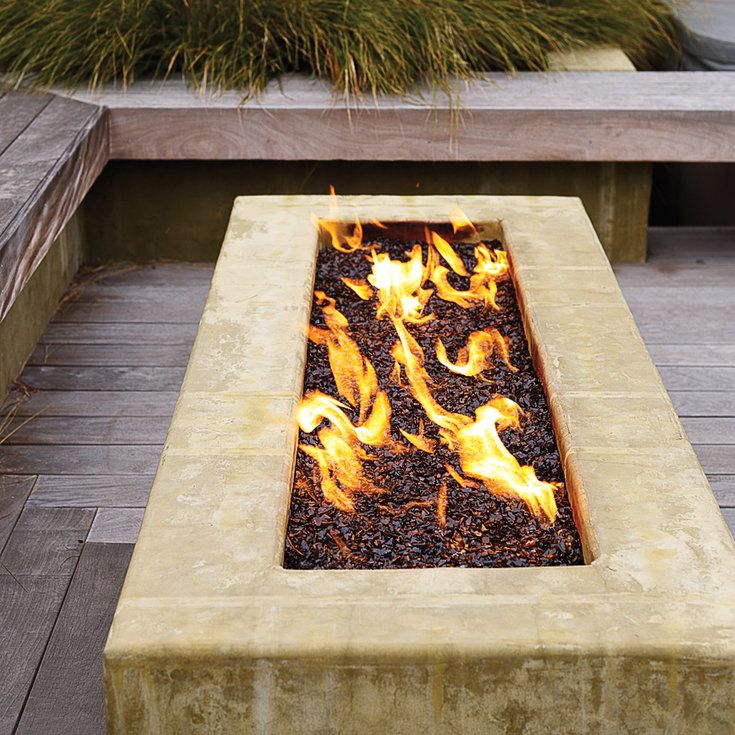 The freeboard was vertical, underwater - sharply sloping outward. At the same time, above the waterline, the reservation was inside the hull and was beveled inward, only the narrow roof of the armored casemate, on which the guns were located, remained flat. Thus, in the waterline area, the ship's armor in the section was an acute angle: the lower part was an inclined 63-mm belt, the upper one was a 171-mm bevel. Forged armor plates were laid on top of a 15-inch (356 mm) wooden lining.
Schematic of the Stevens battery for 1862. Archibald Turnbull. John Stevens. An American record. London & New York, 1928
It must be admitted that the Stevens were really ahead of their time: they anticipated the internal arrangement of the armor, and the side belt with an inclination, and the armored deck, and armored bevels. The latter formed a casemate that covered cars, boilers, cellars and gunners; at the extremities, the armored deck was flat and descended to the level of the waterline.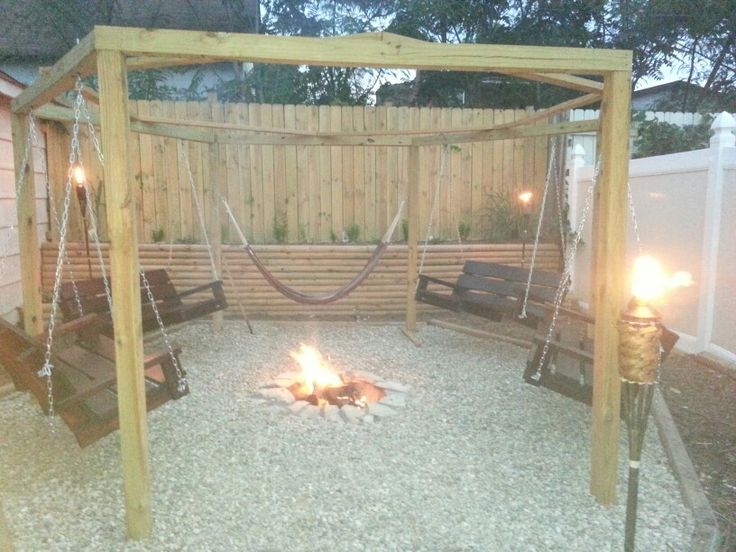
The armament of the battleship was now to consist of two 10-inch (254 mm) Parrot rifled guns on rotary mounts at the ends of the casemate, as well as five 15-inch (381 mm) Dahlgren smoothbore guns in its center. All guns were installed in the diametrical plane in the center of the vessel on top of the armored casemate. The gun crews were under the armor, and the guns had to be controlled by remote steam drives, so that only one gunner for each gun would be placed above the armor. To absorb the recoil of the guns, rubber shock absorbers were provided.
After each shot, the barrel was lowered to a special hole in the deck, the armored flap was opened, water was sprayed into the gun for cooling, and then loading was carried out using a mechanical bathhouse driven by a steam engine. Later, similar deck arrangements were used on the last battleships with rifled muzzle-loading guns, which grew so long that it became impossible to fully retract them for loading into the turret.
Now the ship was equipped with eight steam engines with a total power of 8600 hp, working on two propellers. Steam was produced by ten cylindrical boilers. According to Stevens' calculations, such power should have provided the battleship with a speed of 20 knots. True, with the then voracity of steam engines, even the planned supply of 1000 tons of coal would hardly have been enough for a long time. The interior of the ship was equipped with mechanical ventilation to purify the air and ensure comfortable working conditions for the crew.
However, the impressions of the Stringham Commission were rather negative. Contrary to expectations, the ship was in a low degree of readiness: only the power frame with outer skin was assembled, and there were no decks and bulkheads, not to mention booking. The machines stood in their places, but there were no boilers, shafts and screws still needed to be made.
Schematic of the Stevens battery for 1867 (from the report of the French naval mission).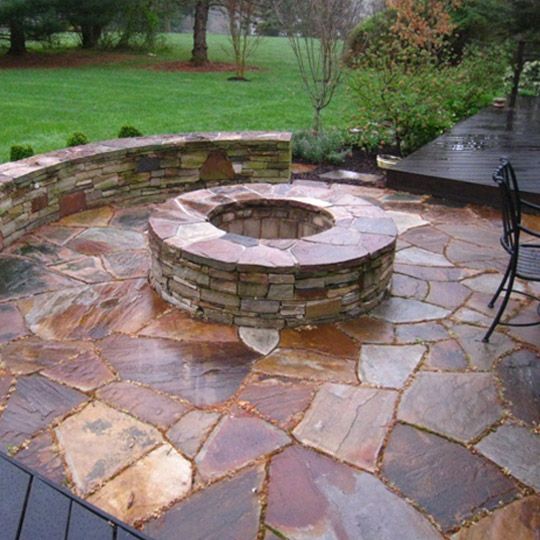 shipmodell.com
As a result, the commission spoke out against the completion of the ship, and its excessive size became the main argument. Now the American fleet had to act not against the English battleships, but against the gunboats and coastal fortifications of the southerners on the rivers and in shallow bays. The high speed of the battleship Stevens made no sense here, but its large draft became a serious drawback. In addition, it took two or even three years to complete the construction of the ship. Only Professor Joseph Henry, who believed that the ship could be used in coastal defense to protect against possible attacks by the British fleet, spoke out for the completion.
Then the Stevens offered to complete the ship at their own expense - on the condition that after accepting it into service, the government would return the amount spent to them. According to the calculations made in 1862 by Edwin Stevens, it was $730,484, including reimbursement of expenses already made.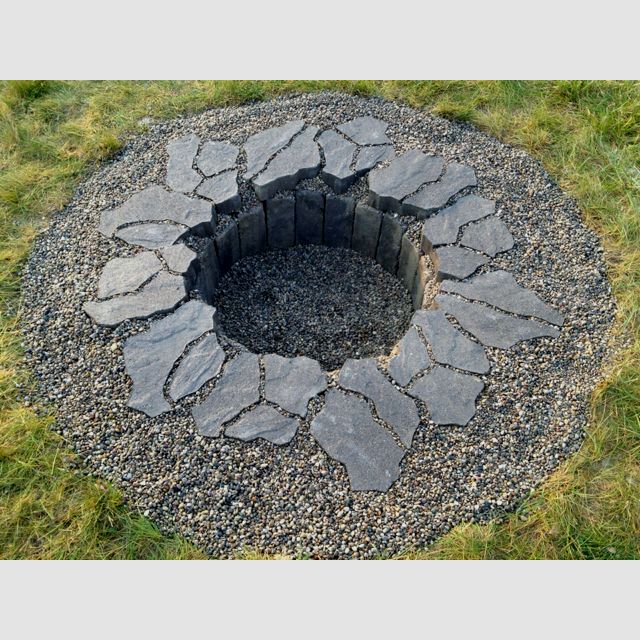 Thus, the total cost of the battleship would be $1,230,000. However, at the beginning of next year it was already about one and a half million dollars. As The New York Times reported April 4, 1863,
"never before in any country has a citizen offered to risk his funds so widely and generously in the interests of his government."
After evaluating this amount, the fleet declared that it did not need such a ship. In addition, the “Monitor” was already built and proved to be excellent, costing much less - $ 275,000.
Current Model: Adventures of the Gunboat Naugatuk
Even at the beginning of the war, Edwin Stevens decided to demonstrate the effectiveness of the principles of his ironclad. To do this, he bought a small iron steamboat Naugatuk built back in 1844 with 200 registered tons (33.5 m long and 6.1 m wide) and converted it in accordance with his ideas. The wheels and the old steam engine were removed and replaced with two inclined engines, powered by a single boiler and driving two propellers - Stevens believed that the alternating operation of the propellers would provide the ship with high maneuverability.
09 - Diagram of Stevens' gunboat, published in Harper's Weekly April 26, 1862
In the center of the hull, just in front of the wheelhouse, was installed the newest 100-pound Parrot rifled muzzle-loading gun, equipped with rubber recoil energy absorbers and protected by a kind of "casemate" of thick logs. The casemate had a height of just under two meters and rose half a meter above the deck. The rest of the ship's protection consisted of a thick iron bulwark that surrounded the deck along the perimeter.
The gun was aimed by turning the entire hull, and loaded when lowered down, in order to expose the crew to the least danger. Here Stevens again anticipated the sinking gun mounts that became fashionable a few years later, as well as the concept of "Rendell gunboats" - small boats armed with a single heavy gun with limited horizontal aiming angles.
Finally, Stevens fitted the ship with ballast tanks located at the bow and stern. With the help of powerful pumps, the ship could increase the draft by 70 cm, submerged in water right up to the deck.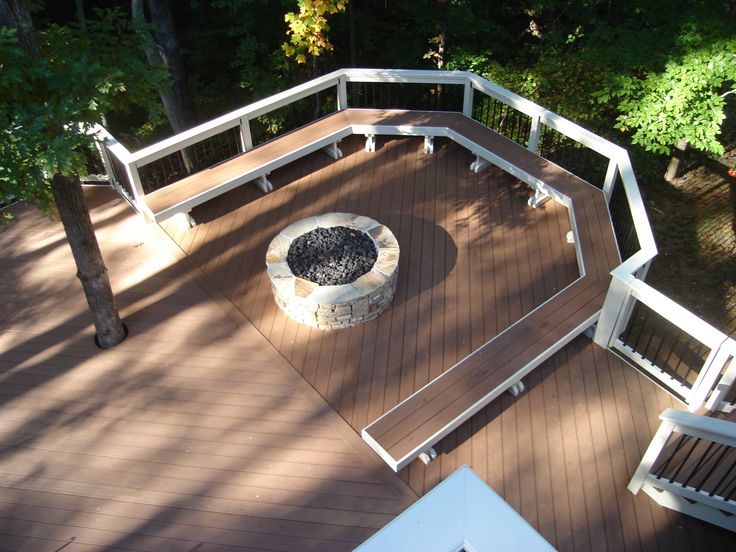 This gave the enemy a minimal target, and at the same time provided better protection for the machines. With a minimum draft of 2.3 m, the steamboat with new machines developed a speed of 10 knots. Later, two 12-pounder howitzers were additionally installed on it.
Without further ado, the inventor named the gunboat by his own name ("EA Stevens"), and then offered it to the fleet free of charge. The sailors refused the gift, citing the untested vessel, but in the end the customs service of the Ministry of Finance agreed to accept it. The gunboat Stevens was used to guard the passage of the Verrazano Narrows leading to New York Harbor. It was commanded by Lieutenant William Shippen, a former employee of the Stevens firm.
In March 1862 the gunboat was sent south and 9April joined the James River squadron in the Hampton roadstead. Two days later, she participated in a short firefight with the Virginia near Crainy Island. On April 29, Lieutenant David Constable was appointed commander of the Stevens.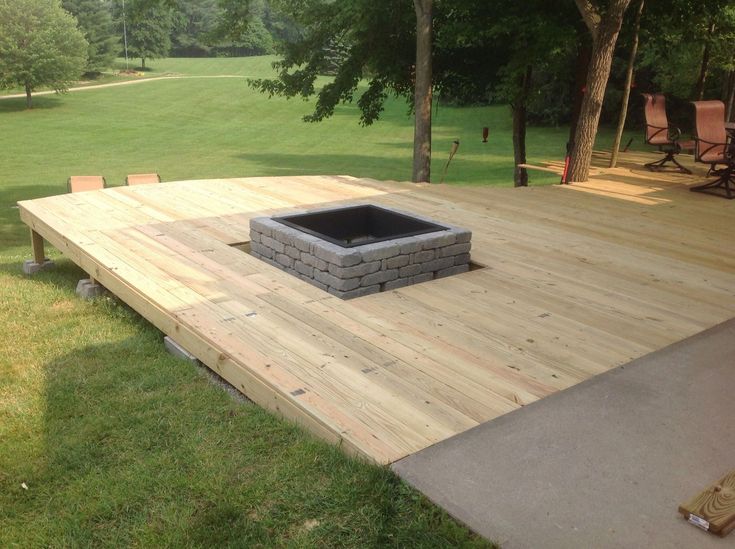
Gunboat Stevens in 1862. history.navy.mil
On May 15, the gunboat took part in the bombardment of Fort Darling, which blocked the way for the Union fleet to Richmond up the James River. The squadron of northerners consisted of the battleships Galena and Monitor, however, the guns of the latter had too low elevation angles and could not fire at the Confederate batteries located on the Drury cliff. Therefore, Stevens was sent to replace the Monitor, whose 100-pounder had an elevation angle of 25 ° and a range of over 6000 m. The gunboat performed well - its bulwark and wooden "casemate" well covered the team from rifle fire. Trouble brought the cannon, which suddenly exploded, damaging the deck and wheelhouse. However, the gunboat continued to fire its 12-pounder howitzers until the heavily damaged Galena was out of action.
The commission, convened the next day at City Point, concluded that the explosion of the gun was due to insufficient strength of the barrel and too severe tests carried out before installing it on the gunboat.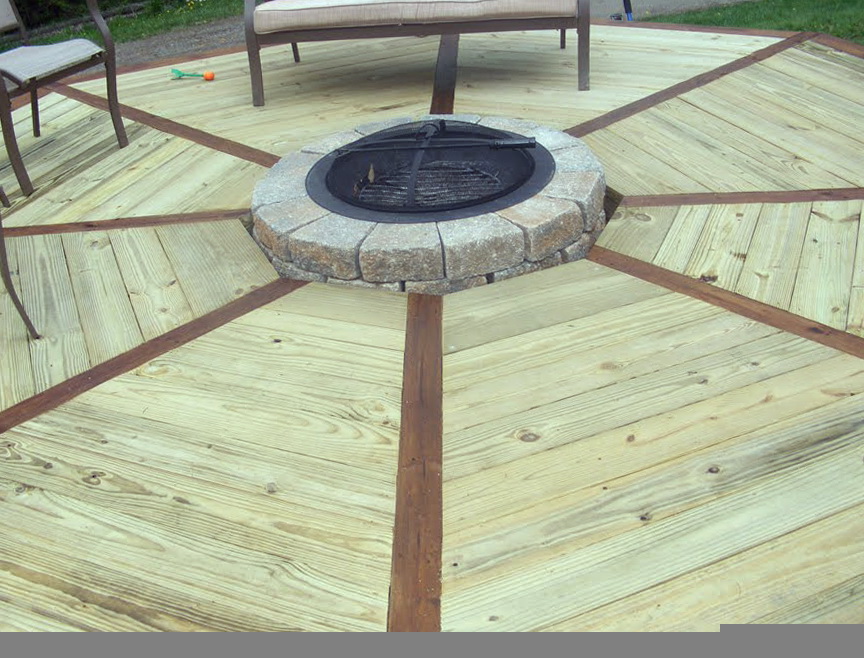 Parrot's large-caliber guns were generally found to be prone to bursting, and it was one of the first such guns.
On May 26, the gunboat left the Hampton raid and went to the Washington Navy Yard for repairs. Lieutenant Constable received a personal commendation from President Lincoln and was promoted to captain.
More gunboat Stevens did not participate in the hostilities - she was used in the protection of the harbor of New York, and on July 29, 1863 was renamed back to Naugatuck. Until 1889, the ship was used by the customs service as a patrol ship, after which it was sold for scrap.
General McClellan Project
Despite the successful actions of the gunboat, Stevens' inventions did not impress either the sailors or Congress, which refused to finance the further construction of the ironclad. On July 17, 1862, he issued an order to stop further work, but agreed to waive the claim for damages and transferred all ownership of the ship to the Stevens family.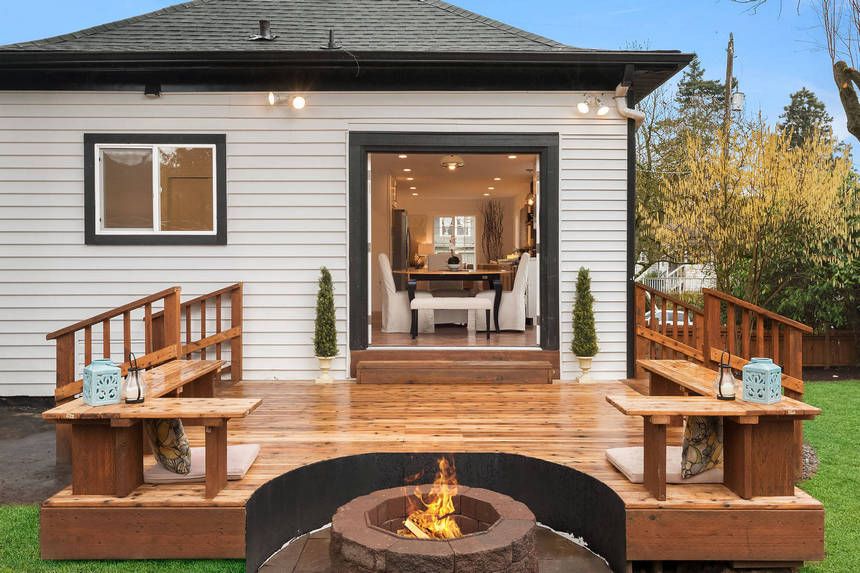 Until the end of the war, the battleship stood in dry dock in Hoboken, all work on it was stopped.
Portrait of Edwin Augustus Stevens with motto of the Stevens Institution, 1874. history.navy.mil
Edwin Stevens died in Paris on August 8, 1868. As an honest man, he bequeathed to the state of New Jersey not only an unfinished battleship, but also a million dollars for its completion. Another $650,000, along with a piece of land adjacent to the Stevens estate in Hoboken, was bequeathed to establish a university dedicated to the "mechanical art." It was opened already in 1870 - now it is the Stevens Institute of Technology, one of the largest technical universities in the United States.
To inspect the ship, the governor of the state assembled a special commission, and the retired general George McClelan, the former commander of the Army of the Potomac, who had just returned from Europe, was appointed to oversee its completion. McClellan was not a very successful commander, but a professional engineer: in 1870 he became chief engineer of the New York Docks Authority, and in 1872, president of the United Atlantic and Great Western Railroad.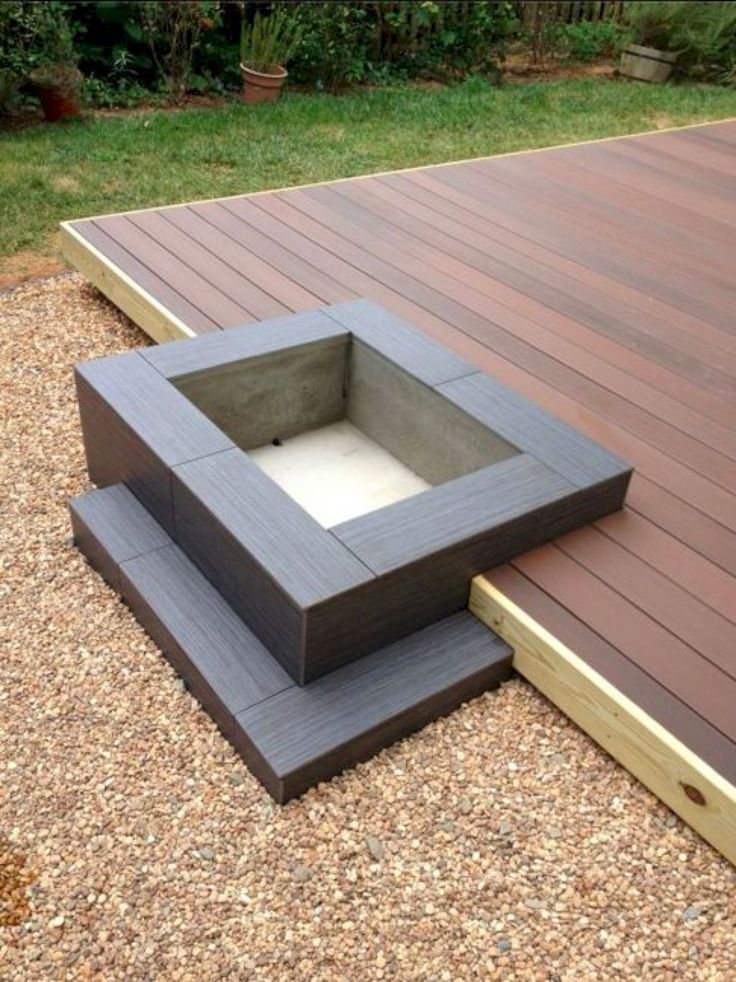
Stevens' battleship according to final design. This engraving was published in Scientific American, August 8, 1874. In fact, the image was based on the ocean monitor "Puritan", launched in 1864, but also never completed
In 1869, McClellan created a project for the completion of the ship. Now it was to become an ocean-going ramming battleship with one twin-gun turret and an advanced unsinkability system (double-skinned and seven transverse bulkheads). The power plant was replaced by ten boilers and two vertical two-cylinder Maudsley and Field steam engines. According to McClellan's calculations, with a total power of 5600 hp. they were supposed to provide the ship with a speed of over 15 knots.
Like the "Monitor", the armor belt was attached to a wooden lining protruding beyond the side, its thickness was 9inches (229 mm). The turret was protected by armor up to a maximum thickness of 18 inches (457 mm) and housed either two 20-inch Dahlgren smoothbore guns or two 12-inch (305 mm) rifled muzzle-loading guns.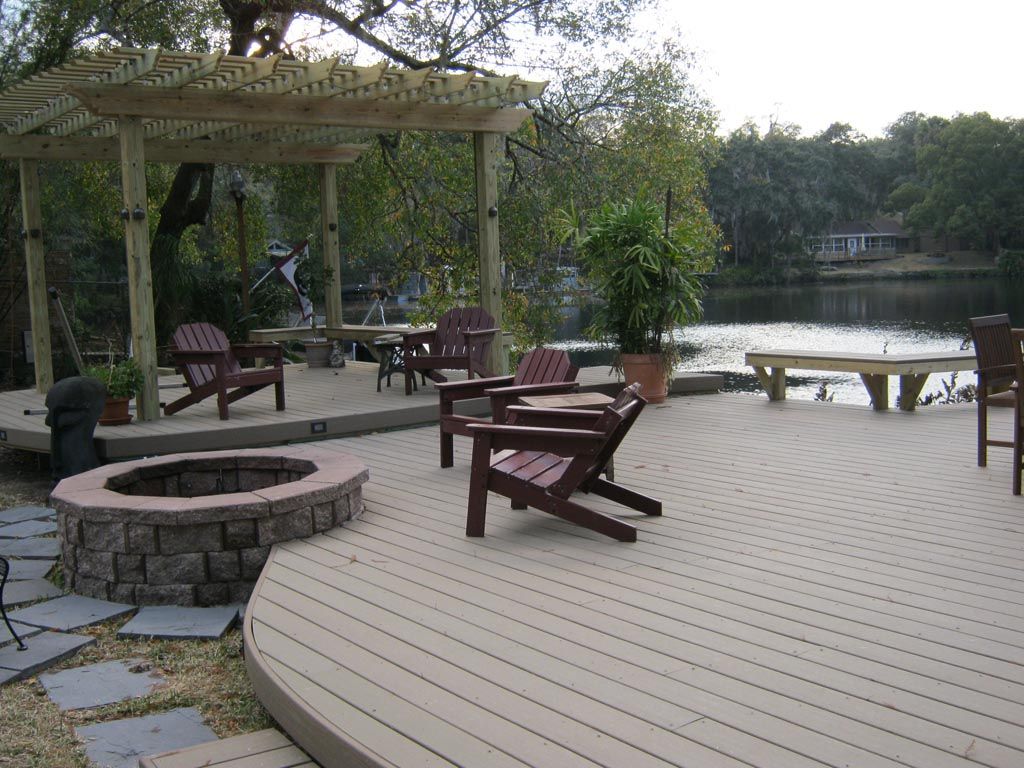
Theoretical drawing and section of the battleship Stevens as of 1874. history.navy.mil
Work began again on the ship, but by 1874 the money ran out again, and it was still far from completion. The hull was finished, the machines and boilers were loaded, but it was necessary to complete their installation, as well as install the rudder and propellers, and seal the bulkheads. Finally, weapons and armor have not yet been mounted on the ship.
Mounting side armor of the battleship Stevens, designed by McClellan. history.navy.mil
According to McClellan, another $450,000 was required for the final completion of the battleship, but there was nowhere to get them - the Stevens' money ran out, the state government absolutely did not need the ship, and the fleet had long lost interest in it. By this time, the construction of the ship had been underway for thirty years and cost $ 2.2 million, of which $ 1.7 million were the personal funds of the Stevens. A significant part of the funds went to the construction of a dock and an industrial town in Hoboken, as well as constant structural alterations and preservation of the hull from the weather.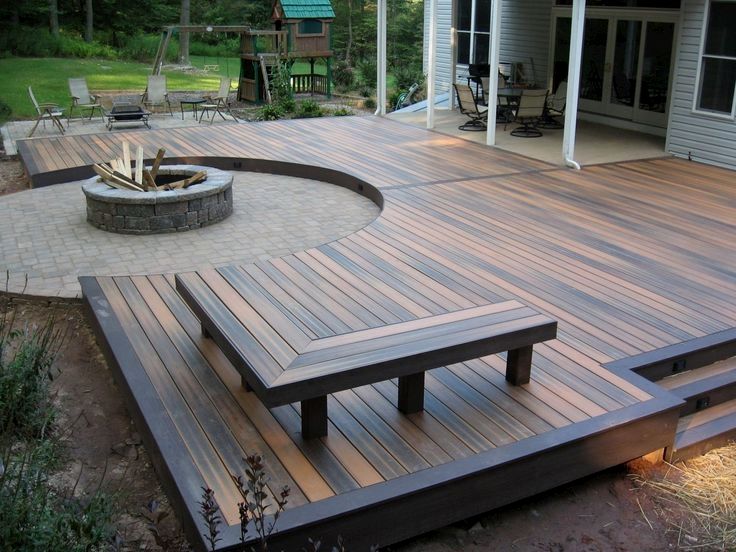
Hoboken shipyard in the early 1870s. history.navy.mil
In 1869-1870, negotiations were underway to sell the unfinished battleship to Prussia, but after the end of the Franco-Prussian War, they stopped. As a result, the ship, which was at least two-thirds ready, was decided to be sold for scrap. This turned out to be a difficult task - in 1874-1875, only machines were dismantled and sold (later they were used as mining equipment). The hull was sold for scrap at a public auction only in 1881, and it turned out to be surprisingly strong - blasting had to be used to cut it.
Stevens battery disassembly. Illustration from Frank Leslie's Illustrated Newspsper, March 5, 1881
Literature
-
-
- Donald L. Canney. The Old Steam Navy. Vol. 2. The Ironclads, 1842-1885. Annapolis: Naval Institute Press, 1993
- Paul H. Silverstone. Civil War Navies 1855-1883. New York: Routledge. 2006
- Morton memorial. A History of the Stevens Institute of Technology.
-