Building a stair stringer
What to Know About Cutting Stair Stringers
For safety and code compliance, the riser height and tread depth must be consistent along the whole stair. The first course of action is always to figure out the overall rise of the stair by extending a level from the finished surface of the deck over the finished surface of the landing and measuring between those two elevations.
Steps for Cutting Stair Stringers
Doing the math
Say the overall rise is 25 inches. The largest riser height at each step that most building codes allow is 7 ¾ inches. Dividing 25 by 7 ¾ and rounding up will determine the number of risers in the stair:
25 ÷ 7.75 = 3.23 = 4 risers
To find the individual riser height, divide the overall rise of 25 by the number of risers:
25 ÷ 4 = 6.25
The other number you need to lay out stringers is the tread depth, also called the run. The minimum allowed by most codes is 10 inches, and that’s a good size to use. Making them deeper requires a longer cut to notch the stringers, which weakens them.
Selecting stringer stock
iStockStringers should always be cut from 2x12s. Notching smaller stock doesn’t leave enough wood to safely carry the loads of a stair.
When ordering stringers, allow about 14 inches of stringer length for each step. Look for straight stock with as few knots as possible. You’ll need at least one stringer for every 16 inches of stair width. If you’re using synthetic decking for the treads, some manufacturers require stringers to be spaced no more than 12 inches apart.
Laying out the stringer
- Lay a straight piece of 2x12 on sawhorses.
- Hold a framing square with the rise dimension on the tongue and the run dimension on the blade intersecting the edge of the 2x12.
- Clamp a scrap of wood to the underside of the of the square to serve as a guide, then mark out the first cut with a pencil. The longer line is the tread cut or run, and the shorter line is the riser.
- Move the square up the stringer, aligning the next tread cut with the top of the riser below, and mark the next tread and riser.
- Continue until you’ve marked out all the tread cuts and riser cuts.
Adjust the Stringer for the Tread Thickness
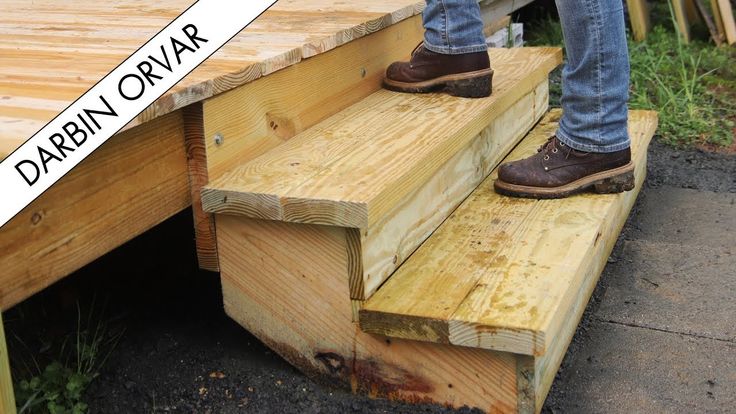
If you were to cut the bottom riser at the full height of 6 ¼ inches, placing the bottom tread would increase the height of that first step by thickness of the that tread. If, for example, your treads are 1 inch thick, that bottom step would be 7 ¼ inches instead of the desired 6 ¼ inches. That’s unsafe, and a code violation.
- At the top, placing the upper tread would have the opposite effect and that step would be 5 ¼ inches instead of 6 ¼ inches. The solution is simple – shorten the bottom riser cut on the stringer by the tread thickness. So, that cut where the stringer meets the bottom landing would be 5 ¼ inches from the tread above, while all the other risers would remain at 6 ¼ inches.
- Lay
- There will always be one less tread than there are risers because the deck itself acts as the top step.
 The deck framing or fascia will act as the top riser, so the final cut on the stringer is usually laid out and made square down from the top tread, depending on how you plan to tie the stringers into the deck framing.
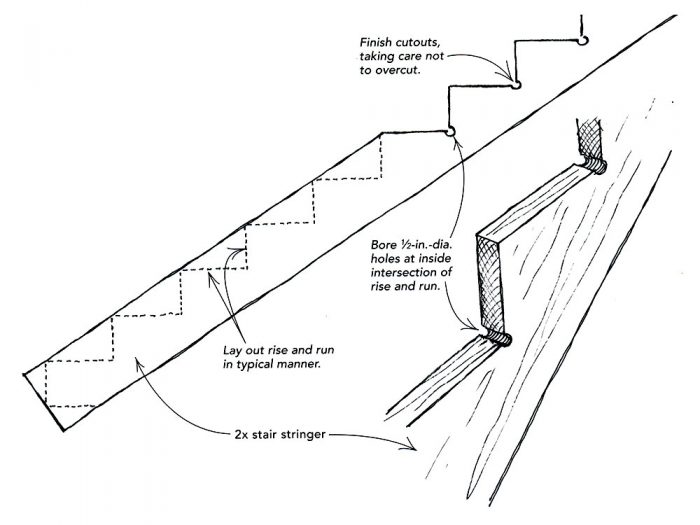
 - With a circular saw, cut out the stringer. Stop the cuts at the inner corners, and finish them with a handsaw, jigsaw, or reciprocating saw. Use this first stringer as a pattern to lay out all the others.
Tools and Materials
- Pressure treated 2x12 for stringers
- Either decking material or pressure treated 2x12 for treads
- Decking material for risers
- Screws for attaching treads and risers
- Stringer connectors such as Simpson LSC Adjustable Stringer Connectors
- Tape measure
- Framing square
- Two small clamps
- Cordless drill
- Pencil
- Circular saw
- Handsaw, jigsaw, or reciprocating saw
How To Cut Stair Stringers
Armed with the unit rise and unit run dimensions, you can make the stair stringers.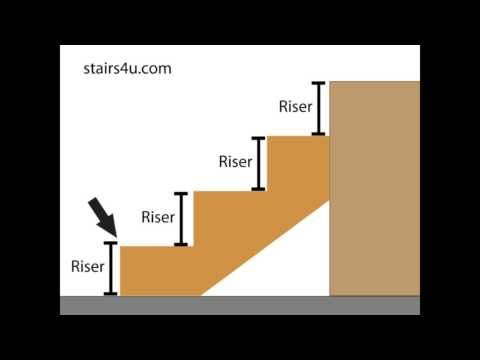 Stringers can be open or closed, as shown in “Types of Stringers.” With closed stringers, the treads and risers fit into slots cut into the inside face of the stringer stock. Closed stringers are usually made from finish-grade lumber and are meant to be left exposed.
Open stringers, sometimes called cut stringers, have triangular-shaped notches cut out of their top edge so that the stringer resembles a dragon’s tail (a common nickname for open stringers). Open stringers, such as those on this project, are made from framing-grade lumber and are not usually left exposed. The side and underside of these stringers will be covered with drywall. Much later on, the temporary treads will be replaced by finished treads and risers.
Make a test stringerThe first step is to make a test stringer, which will confirm that your calculations are correct. If the stringer is accurate, it will become a template for cutting the rest of the stringers. Choose the straightest, best-quality 2×12 stock to use for stringers. A quick diagonal measurement from the top of the stairs to the platform location marked earlier tells you approximately what length stock to cut the stringer from, but start out with a little extra length just in case. As with floor framing, crown the stringer stock and make sure that any bow faces the direction of the tread and riser cutouts.
Stringer Stock
Stair stringers are typically made from 2×12 lumber. That’s because a significant part of the board’s width has to be removed for each tread and riser and a 2×12 has enough lumber left after those cutouts. But the problem with dimensional lumber is that it shrinks over time. Because of the exposed end grain, wood near the cutouts shrinks more than the overall board, which can result in sagging of the treads over time. Some builders use LVL stock for stringers because it is less likely to shrink. But pay attention: LVL stock isn’t always perfectly straight, so check for a crown as you would check a 2×12.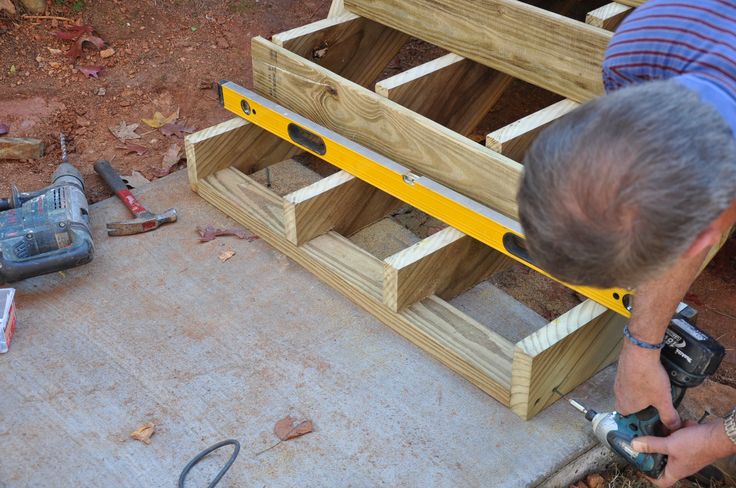
You’ll need a pair of stair gauges for layout. The easiest and most accurate way to lay out a stringer is with a set of these babies and a good old-fashioned steel framing square, not a triangular square (see “Steel Square and Stair Gauges”).
| Stair gauges (these two are brass) can be fastened to a steel framing square at the rise and run dimensions. These handy little tools turn the square into a custom stair-layout template. Steel Square and Stair Gauges When my friend Rob Turnquist first showed me how to make a set of stairs, I was amazed when he dug down into the sawdust at the bottom of his tool belt and pulled out two small hexagon-shaped devices called stair gauges. Each has a slot designed to fit over the edge of a framing square. He slipped the gauges onto the square at the proper rise and run dimensions and tightened the knurled bolts to keep them in place. Stair gauges usually sell for less than $10. |
Set the stringer stock on a pair of sawhorses or a work table with the crown facing toward you. Now tighten a stair gauge at 8⅛ in. on one side of the square to represent the unit rise, and tighten the other gauge at 9 in. on the other leg of the square to represent the unit run. Keep the corner of the framing square flat on the stringer stock, then slide the framing square onto the crowned edge of the board until both gauges touch the edge of the stringer.
Start by laying out the top of the stringer. There are often flaws at the very end of the board that can interfere with the gauges, so place the riser gauge in a bit from the end of the board. Stringers can be confusing, especially to a novice, so make sure you always keep the rise and run on the framing square oriented in the same direction as the progression of your layout. If you stop to check the layout or to count rises or to work from the backside of the stringer, just make sure the square’s orientation hasn’t changed before resuming the layout.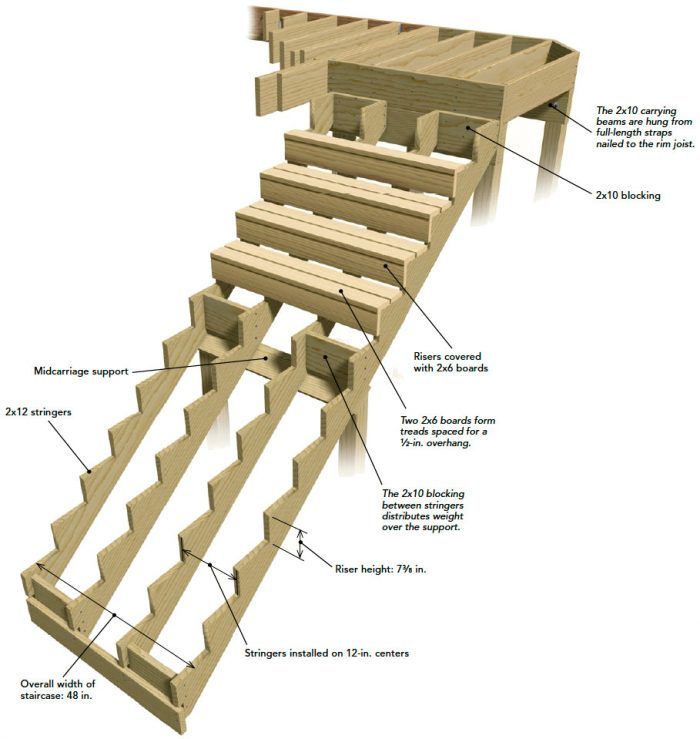
Hold the square in place and mark along its outer edge to indicate the top tread and the associated riser. Remember that there’s no riser at the top of the stringer: The top tread is actually the top of the stringer. Believe me, it’s easy to get confused at this juncture. Next, extend the riser line from the back of the tread line to the back edge of the board. This line is the plumb cut where the top of the stringer attaches to the plywood hanger or cleat. By the way, the simplest way to extend riser or tread lines is to place a second framing square or a straightedge against the square with stair gauges.
After establishing the lines for the first tread at the top of the stringer, slide the framing square down, so that the edge of the riser gauge lines up with the tread line. Now trace the next tread and riser.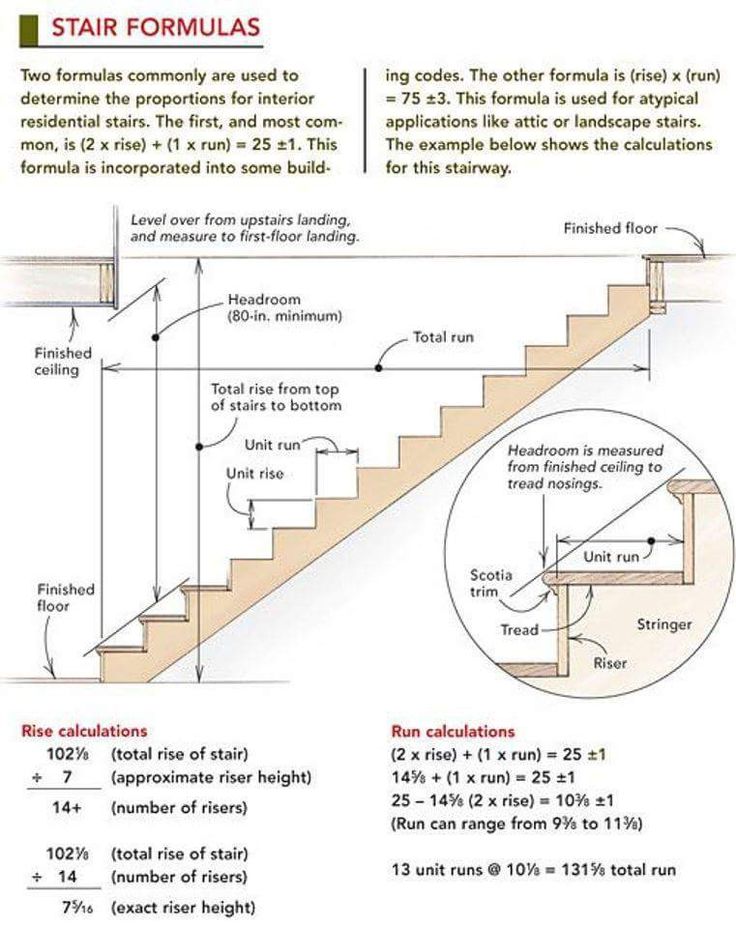 Continue stepping your way down the board until you have the proper number of risers traced out (six, in this case).
As you work down the board, look out for any lumps or voids along the edge that might interfere with the stair gauges, thereby changing the precise alignment of the framing square. (If one of these spots is unavoidable, carefully sight down the milled face of the stair gauge and align it with the edge of the board.) Hold the square down firmly and mark the rise and run on the stringer. At the bottom, extend the tread line below the bottom rise to the back edge of the stock. To make sure the stringers are the right length, I always number the risers and double-check my numbers before cutting them.
| At the bottom of the stringer, make a full-scale drawing of all intersecting materials. | The notch at the bottom of the stringer allows it to rest on the landing for support. |
The 9-in. run of the treads meant that the bottom riser on the stringers for the upper flight would have only 1½ in. of support on the landing, not nearly enough. So at the bottom of those stringers, we made a notch to wrap around the framing of the landing. (On the lower flight, the bottom of the stringers landed fully on the first-floor deck.)
Differences in flooring and tread thicknessOne stair-building factor that confounds carpenters and messes up stairs is dealing with the finished floor thickness and the thickness of the finished treads. This house was pretty easy because the finished floors would be ¾-in.-thick hardwood and the treads would also be ¾-in. stock. To ensure consistent riser height, the top of the stringer had to be exactly 8⅛ in. below the second-floor sheathing, or the height of one riser.
But if the treads had been, say, 1¼ in.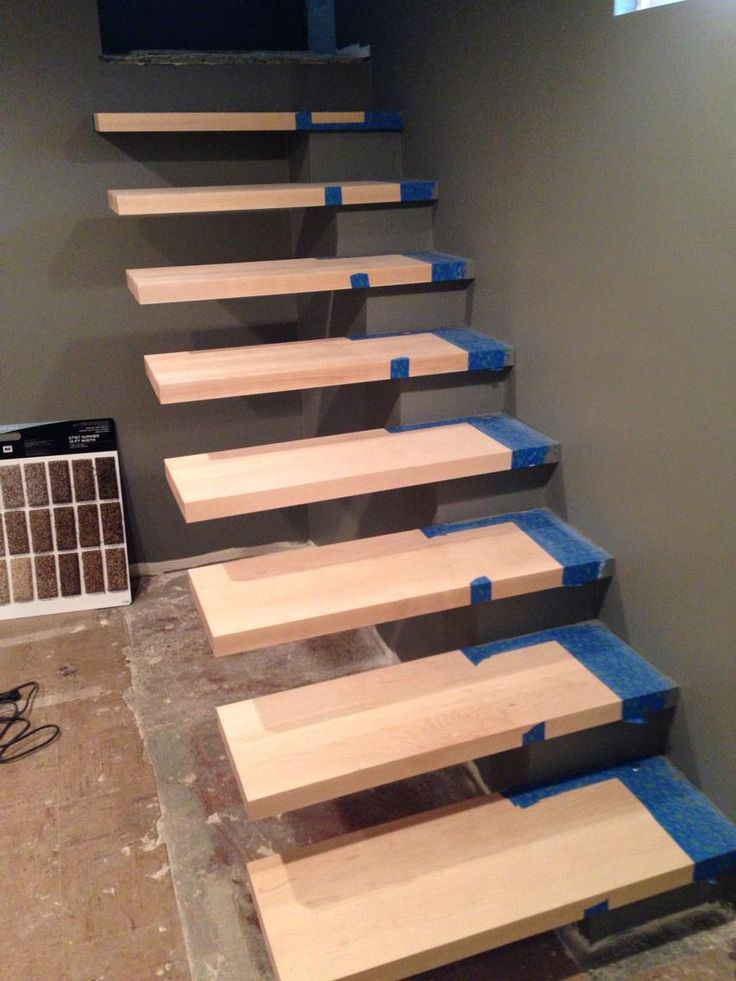 thick, then we’d have to drop the stringer an extra ½ in., or the difference in thickness between the finished floor (¾ in.) and the tread (1¼ in.). To drop a stringer ½ in., cut that amount off the bottom.
In the basement, the bottom flight landed on the concrete floor with no other flooring. In that case, we took ¾ in. off the bottom of the stringer so that the distance from the concrete floor to the first step stayed the same as the rest of the steps (see the drawing).
Basement Stairs DetailWhere the basement stairs land on the concrete floor, the thickness of a finished tread must be subtracted to keep the risers even.So what would you do if the landing were to have a finished floor that was thicker than the treads? Right, you’d drop the height of the landing by the difference in the thicknesses. But in this house, the finished landing floors were the same thickness as the treads, so we set the landing height at exactly seven times the rise, or 56⅞ in. below the second-floor deck. We cut a board that represented one end of the platform and tacked it in place at that height.
Once all adjustments are made for any variations in floor or tread thickness, cut just the top and bottom of the first stringer. This stringer is for testing your layout and landing height. The test stringer for the upper flight had just the plumb cut and tread cut at the top and the notch at the bottom.
Now for the moment of truth. Set the test stringer in place. Have someone hold the top at the right height while you check the fit at the top and bottom. In this case, the bottom of the stringer had to be held ¾ in. above the board representing the platform framing to account for floor sheathing on the landing.
Cut just the top and bottom of the test stringer and set it in place to make sure it fits properly.Set a level on one of the tread lines as a final test.
You’re probably wondering about now why we didn’t just build the platform first and then cut stringers to fit.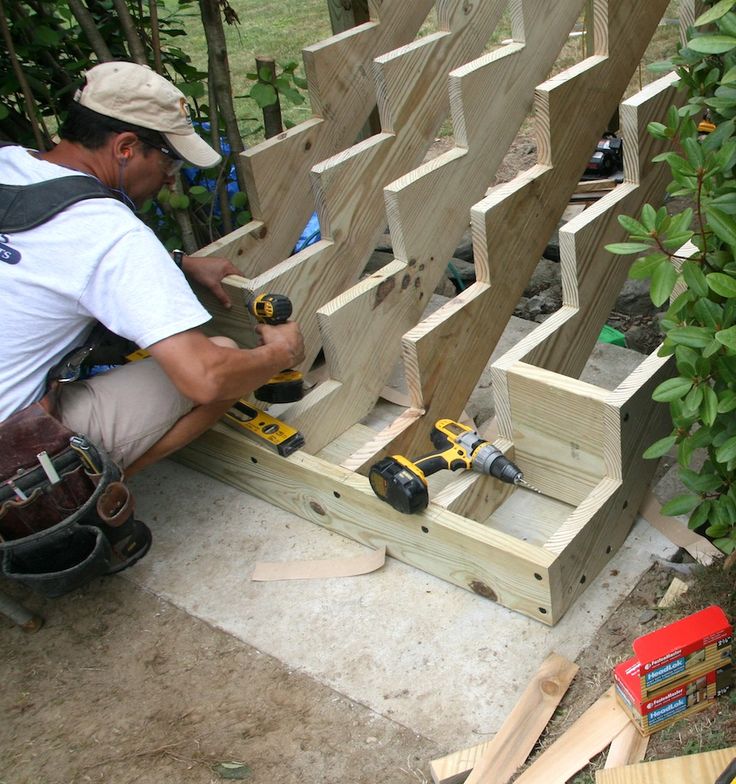 Well, go right ahead and build the platform and then try the test stringer. But when it’s not quite right and the platform needs to be taken out with a reciprocating saw to be lowered ¼ in., I’ll remind you that it’s a lot easier to tweak the height of the platform when it’s represented by a single board nailed to the framing. That’s what the pros do to save themselves time and trouble in the long run.
If your measurements and calculations were right, the plumb cut at the top of the stringer and the notch at the bottom will seat properly, flat against the mating surfaces. Set a torpedo level along one of the tread lines to confirm that the steps made from this stringer will be level.
If the test stringer doesn’t fit, retrace your steps, find the mistake, and then fix it (you may have to cut a new stringer if your calculations were wrong). Take time now to make sure the stringer fits exactly. Correcting the problem later is guaranteed to be a pain.
When you know the stringer will fit, cut along the rise and run layout lines.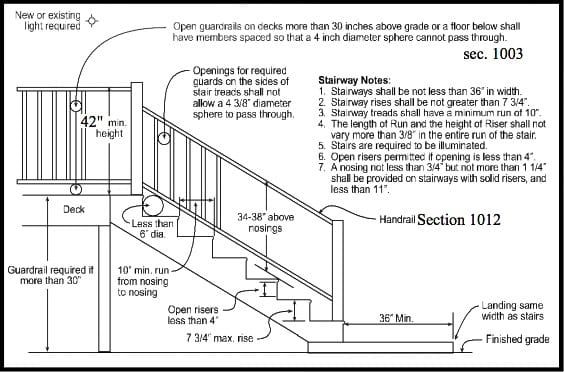 Then go back and finish the cuts with a handsaw.
Use the test stringer as a pattern
After the test stringer has passed its exam, the rest of the treads and risers can be cut out. Many carpenters just cut beyond the intersecting rise and run lines so that the triangular piece of stringer falls away, but overcutting the stringer weakens it. Instead, cut just to the lines and finish the job with a handsaw. The amount of extra work this takes is minimal compared to the benefit it brings.
When all the cutouts are made on the first stringer, you can use it as a pattern for the other stringers in the same flight. Simply align the bottom edge of the pattern on the stringer stock and trace every detail.
Use the first cut stringer as a pattern for laying out the rest of the stringers in a flight.
| How Many Stringers? The number of stringers needed for a staircase depends on the treads: They have to span the distance between stringers and you don’t want them to flex. |
We make do-it-yourself stringers for stairs
If you decide to design your own rise to the floor, you definitely need to know how to make stringers for stairs. If you make everything with your own hands, it is important to know the features of all elements, their types and manufacturing rules.
Features and types of construction
Before you decide to make a kosour for stairs with your own hands, you need to understand in more detail the features of this part. In fact, this is the supporting element of the stairs, which serves as support for the steps.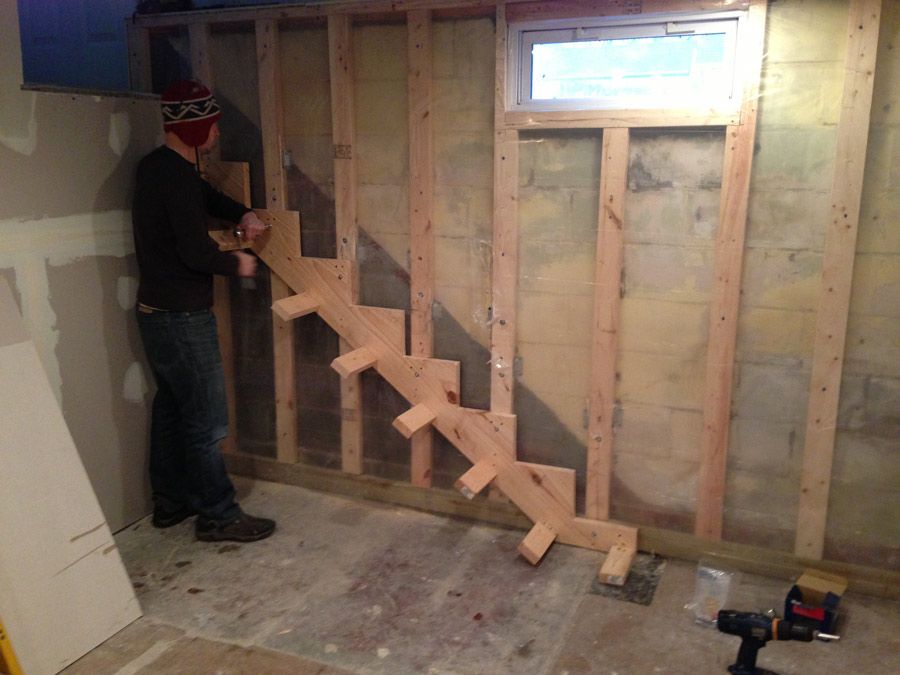 nine0003
Straight stringers are used most often
The type of product largely influences the calculation of materials for stairs on stringers. Stringers can be made of wood, metal, concrete, or a combination of both. The following elements are distinguished by shape:
- straight;
- broken;
- screw.
The simplest option for most stairs is straight. That is what is worth considering in more detail.
Calculation specifics
If you decide to do all the work yourself from start to finish, first of all you need to think about the development of a staircase project. To do this, you need to calculate all the necessary parameters. The calculation of stairs on wooden or metal stringers is made according to almost the same principle.
Calculation data for marking the stringer
Use the Pythagorean theorem to determine the length of the supporting part. In this case, you need to look for the square of the hypotenuse, which, after extracting the root from it, will mean the length of the bar.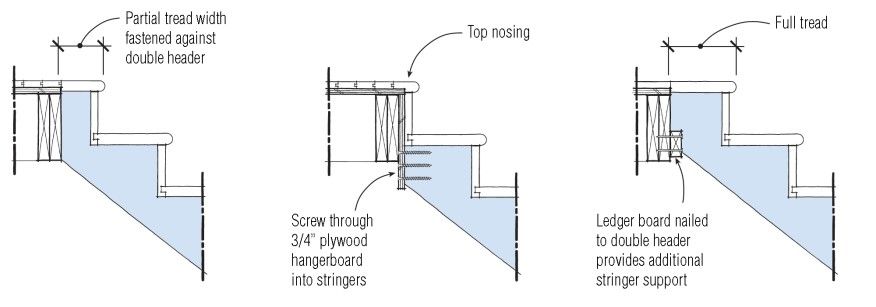 The legs in this situation are the height of the span from the floor of the first floor to the second, as well as the distance from the first step to the platform from above. The angle is determined by the level of inclination of the structure. nine0003
Calculation of the shape of the stringer of the stairs is based on the selected method of fixing steps. If fillies are used, the bar is taken smaller, otherwise you need to add the height of the tread to it. With a staircase width of more than 150 cm, in addition to the side stringers, an additional central one is installed.
Wooden stringer
The most common version of stairs is on wooden stringers. To make them with your own hands will require a minimum of effort.
To make the structure strong and serve you as long as possible, it is better to choose hardwoods, although working with them is a little more difficult and longer.
In the manufacture of stairs made of wood, as a rule, two stringers are used
First you need to calculate the thickness of the board.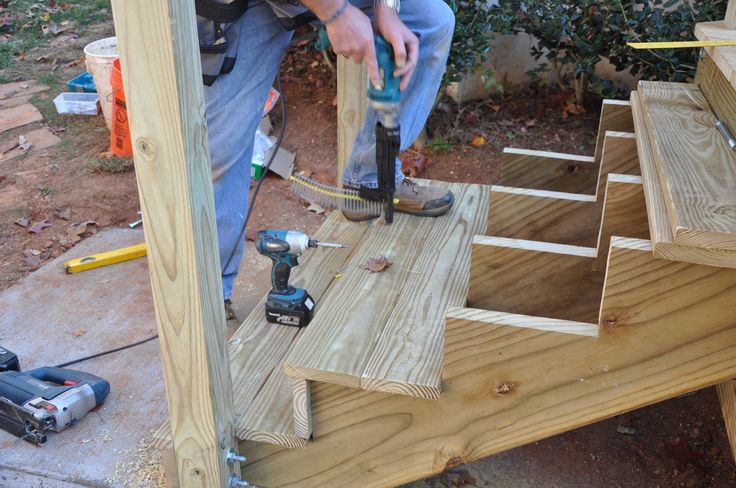 The larger the ladder in height and width, the stronger the support should be, which means that the board needs to be picked up thicker. If the design involves fastening without a filly, the following steps are performed:
- Mark out the cutouts. To do this, you need to use a triangle. One of its sides corresponds to the depth of the tread, and the other to the height of the riser. The hypotenuse of such a right triangle runs along the edge of the beam.
- Using a jigsaw or a circular saw, cut out the excess pieces according to the markings.
- Determine the dimensions of the steps. This largely depends on how they are attached. They can be fixed both close to the edge of the kosour, and go beyond its limits by 2-3 cm.
But if you decide to use fillies, then you don’t need to cut the sidewalls, for this you just use a straight bar made of solid or glued laminated timber. Depending on the height of the riser and the depth of the tread, the filly may look like a triangle or a trapezoid. For the triangular version, it may be necessary to saw out a small section of the beam so that the step goes under the next one a little.
Metal stringer
A more complex, but reliable option is a ladder constructed on a metal stringer with your own hands. To make this option, you will need a metal profile or pipe, it is from these materials that the basis for the stairs is usually made. nine0003
Metal is a very strong material, so one central stringer is often sufficient.
To determine the required amount of materials, you need to make a calculation based on the height and slope of the stairs, as well as the dimensions of the steps and risers. In most cases, one central stringer is sufficient. The metal is able to withstand a huge load, but a lot also depends on the quality of the connection of the parts of the stairs.
The simplest way is to make a stringer from a straight element. For example, take a pipe whose dimensions correspond to the given parameters.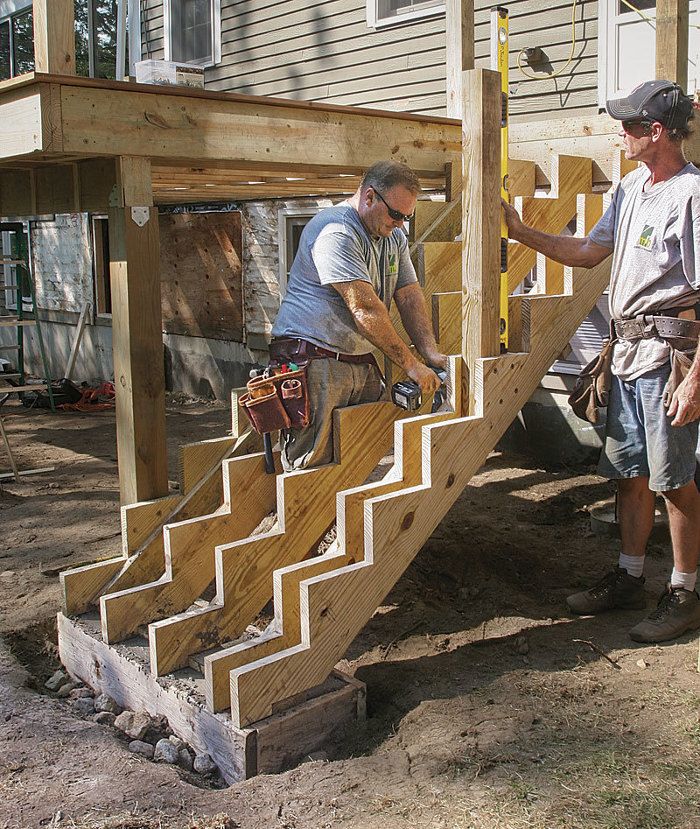 Mark the position of future steps on it and fix the fillies. They are small pieces of pipe or profile with a base plate on top. The ideal connection method is welding. The seams should be strong, but at the same time invisible. Holes are made in the plate, which are necessary for fixing the steps. nine0003
Ways of fastening steps
Depending on what material you decide to make the stringers from, the way of fastening the steps of the stairs also depends. If you chose metal, you need to use fillies. For the steps prepare the base plate. The best option is a sheet of metal cut into the shape of a step. It is welded to the supporting element, and the steps are fixed with bolts.
An exception may be complex stepped structures with a double stringer. Then fillies are optional. nine0003
Various options for fastening steps
If the preliminary calculation showed that it is possible to fit a staircase on wooden stringers in the opening, then it is worth considering several options at once:
- Cut treads adhesive mixture.
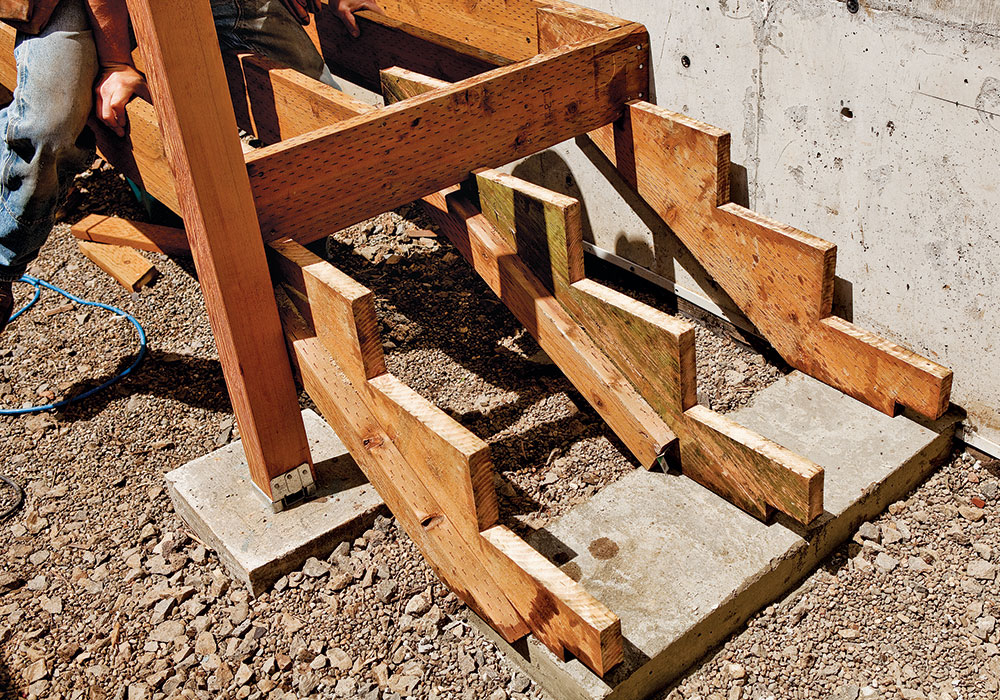
- Wooden filly - additional fragments of stairs are fixed to the beam using dowels, dowels, studs or self-tapping screws. nine0014
- Steel support - steps are fixed on a flat curved support, which, in turn, is fastened with screws.
- Bolza - the back part of the stairs is fixed on the stringers with a metal support leg and dowel.
If you decide to build a ladder yourself, think over several options in advance and choose the most suitable one, based on the materials available and the existing skills.
[niceyoutubelite id=”vkQ3NRO8ixU”]
Do-it-yourself metal stringer for stairs - how to make and install
Contents of the article:
- What is it?
- Classification
- Benefits
- Stringer ladder options
- How to carry out the calculation
- Calculation features
- Stringer made of wood
- Metal stringer
- How to fix steps
- How to calculate stairs
- How to make a wooden stringer
- Manufacture of metal stringers
Designing and erecting stairs is a responsible task.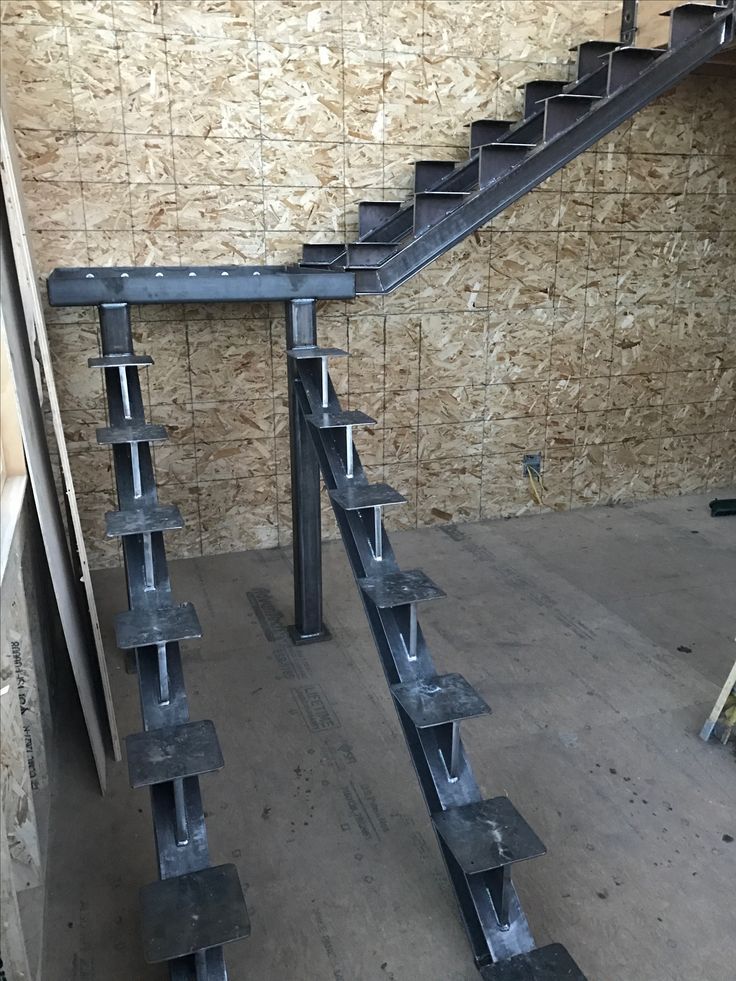 It is extremely important that the finished structure is aesthetically attractive and safe, and fits perfectly into the interior. In this article, we will consider metal stringers for stairs, their own production. We are sure that you will learn a lot of important and interesting things, and after that you will be able to use the acquired knowledge in practice. nine0003
What is it?
The main components of a staircase are elements with a load-bearing function, as well as railings and steps. Kosour is nothing more than a bearing part in the form of a beam with an inclination. It is on it that the steps and fences are kept. With its ends, the product reaches the ceilings between floors, connecting different levels of the building. It is correct to say that this is a load-bearing structural part on which the steps are located. All elements of the system are attached to it. Such designs are quite popular, they are valued for their simplicity and reliability. nine0003
There are several types of stringers:
- straight ;
- broken ;
- involute and screw .
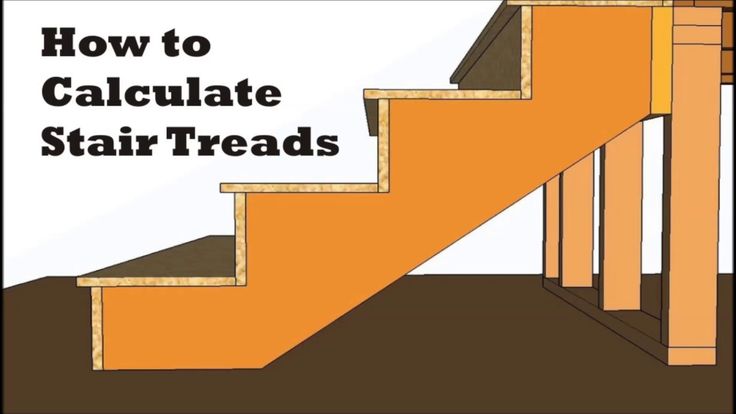
Wood, concrete and metal are selected as the main materials. The stringers themselves can be located in the center or on the sides of the stairs. At the same time, if the width of the latter exceeds 1.2 meters, a mixed fastening on three elements is provided. It is very easy to distinguish structures visually. Unlike the system with a bowstring, in the variant on the stringer, all the supporting elements are located under the steps. Due to this, the design looks light, as if weightless. It does not overload the space, goes well with many interior styles. nine0003
Classification
Below we will take a closer look at what a kosour is, and also what happens depending on the shape and location. This will help reduce the risk of calculation errors.
Stringer can be called an inclined beam, the basis for steps. In addition to wood and metal, concrete can be used for its production. The choice of material is an individual matter, depending on the design and preferences of its future owner.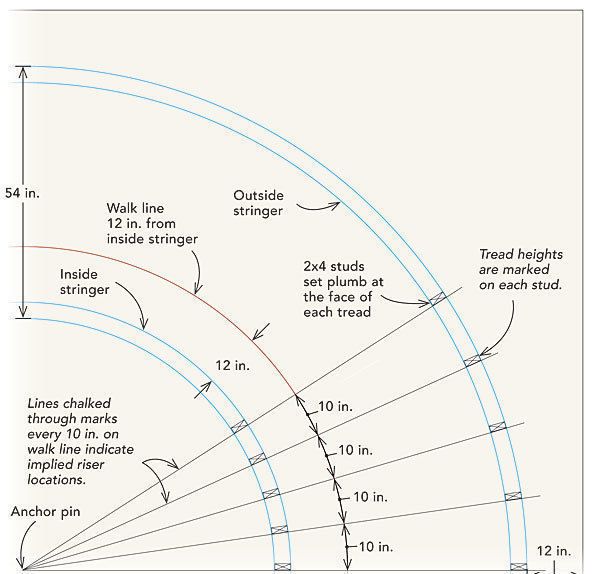
Beam shape varies. The product is straight, broken, and also screw (involute), depending on the type of stairs. The first option is suitable for the production of the base of mid-flight stairs. The second - for stairs that capture several spans, are located at an angle to each other. A screw stringer is needed for the installation of stair structures with rounded marches. nine0003
Stringers are divided into several types. They can be central (one element in the middle of the step), lateral (two elements along the edges of the structure). If the width of the building exceeds one and a half meters, it combines stringers of both types. At the same time, we add that the design with the location of the beam in the center is considered a special product. Its installation will require appropriate permission from the supervisory authorities.
Benefits
Do-it-yourself metal stringer for stairs will definitely make the design more original. Among the advantages of all structures of this type, they note that they do not creak, and their service life is noticeably longer when compared with wooden ones, including oak ones.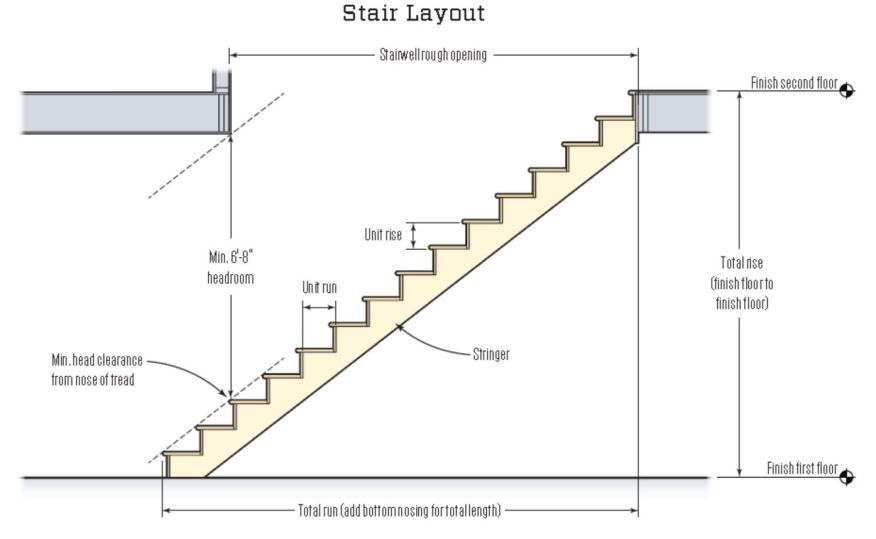 The main thing here is to correctly perform the calculation, build a stringer for a metal staircase that meets the requirements. You can do this yourself, without the help of specialists, but this will require certain efforts and knowledge, including welding skills. nine0003
Stringer stairs
Stringer stairs are divided into several types according to the number of beams. In single versions, there is one stringer located in the middle of the span. Double structures are two support beams that act as the basis for steps. This option is quite common, especially if the structure is wooden. The option on bowstrings is as similar as possible to it, however, here the steps are in specially prepared grooves, between the beams.
Triple constructions are rare, only when steps are longer than 1.2 meters. They have three load-bearing beams, two of which are at the edges, and one in the middle.
Below we will analyze several terms that you may encounter when delving into the process of manufacturing structures on stringers. First of all, we are talking about "combs" - the kosour itself, which is a stepped structure of a certain number of profile parts, which is load-bearing. Another common definition is "filly". It characterizes the small elements that form the support for the steps. nine0003
Another important point concerns the materials for the production of stairs. In most cases, a channel or steel pipe is selected. It is important to remember that both profiles must have a high bearing capacity, especially when it comes to structures with a single base. The assembly of the stairs itself is carried out using electric welding. Here we immediately note that in order to cope with the task on your own, it is extremely important to have the appropriate skill. If it is not, it is better to contact specialists. nine0003
How to calculate
Are you planning to make a metal string for the stairs with your own hands? Pay close attention to your calculations. So you get a design that is convenient for ascent and descent, serving for years and not losing its qualities.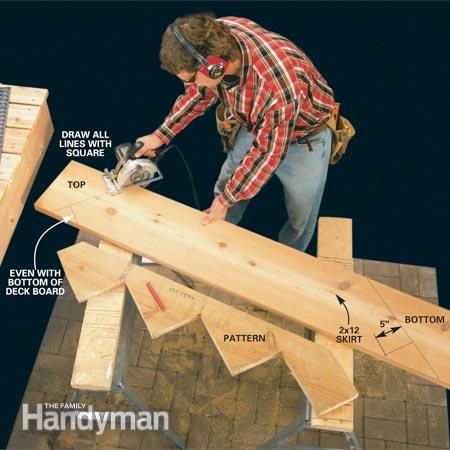
For example, let's take a two-flight construction with a platform between two flights. First, we measure the height to which it will be necessary to climb such a ladder, divide it by two, according to the number of marches. In our example, the height of the march is 144 cm, and the length is 3 meters. What else do you need to know to calculate the stairs? First of all, the width and height of the step, under which it will be easy for a person to go down and up. As a rule, the step height that is comfortable for a person is 150-210 mm, and the width varies from 245 to 330 mm. The smallest width of the landing between two marches is 600 mm. nine0003
Taking into account the data we have, we start the calculation. First of all, we determine the number of steps and the distance between them. To do this, we divide the height of the march by the approximate number of steps (7 or 8): 144 is divided by 8 and we get 18 cm. This indicator can be considered optimal, since it is suitable for comfortable movement of an adult and a child up the stairs.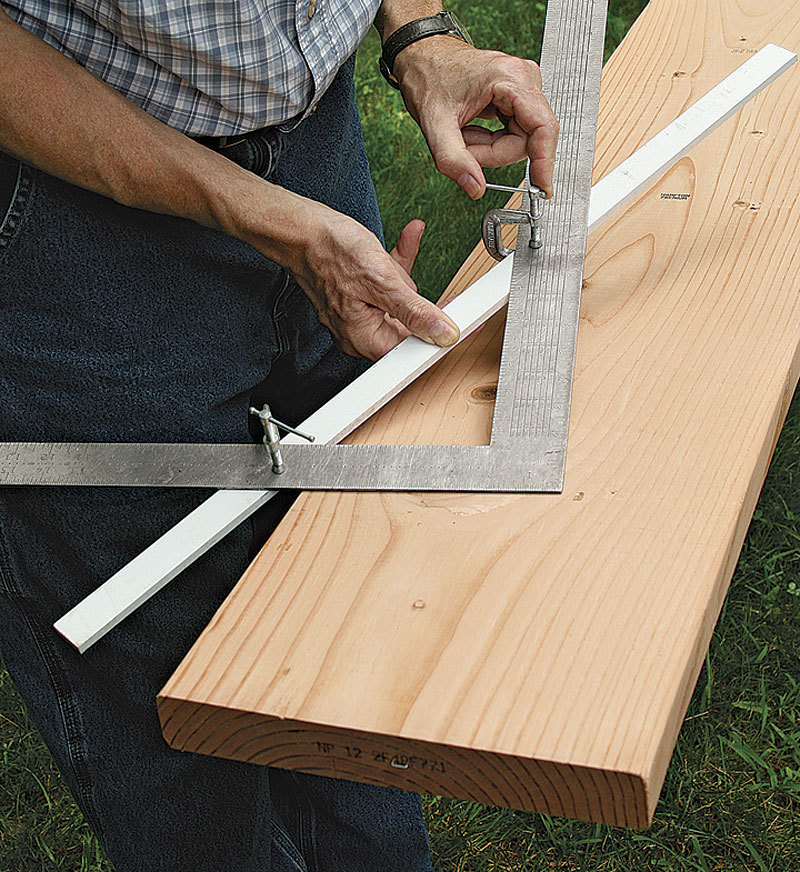
The recommended width of the finished step is 27 cm. This will facilitate the selection of finished steps, since their standard width is 30 cm. And the number 27 is obtained by subtracting the protrusion of the step, “nose”, from 30 cm. However, this condition is not considered mandatory. You can calculate the width of the step, based on personal preferences, and order the steps from the carpenter. nine0003
Features of the calculation
If you decide to do all the work yourself, take the time to develop the project, carefully calculate the parameters of the future design. The Pythagorean theorem will allow you to determine the length of the main part. You will need to calculate the square of the hypotenuse. The root extracted from it will indicate the length of the bar. The legs here will be the height from the bottom to the next floor, as well as the distance from the initial step to the upper platform. The slope of the structure will help determine the angle. nine0003
The shape of the beam depends on the fastening of the steps. If fillies are involved, then you need to take the bar of the smallest size. Otherwise, you will have to add the height of the tread to it. If the structure exceeds 150 cm in width, in addition to the side bases, it will be necessary to install the central elements.
Wooden stringer
Wooden stringer ladders are considered to be one of the most common and easy to manufacture. It takes a little effort to make them. For the base, it is recommended to take hardwood. Working with it is somewhat more difficult, but the finished structure will last much longer compared to elements from other types of wood. nine0003
In the production process, stairs are mainly used with two stringers. The first step is to calculate the thickness of the board. This is due to the fact that the larger the dimensions of the stairs, the stronger the support should be, that is, the thicker the board. If fastening is supposed without a filly, the actions will be as follows:
- Determine the cutout points.
 A triangle will help to cope with the task. One of its sides is compared with the depth of the tread, and the other with the height of the riser. The hypotenuse of the figure falls on the edges of the beam. nine0014
 - Cutting out excess pieces with a circular saw or electric jigsaw. You need to act carefully, in accordance with the markup.
- Setting the dimensions of steps. This parameter affects how steps are fixed. The latter can join closely with the edge of the base or protrude slightly beyond its limits by 2–3 cm.
The situation with fillies is somewhat different. In this case, sawing the sidewalls is not required. All that is needed is a straight plank made of timber, which can be glued or solid. We add that the filly can be triangular or trapezoidal, depending on the tread and its depth, the length of the riser. For the latter type, it may be necessary to remove a small part of the beam so that one step slightly looks under the other. nine0003
Metal stringer
This option is more complex than wood, but reliable.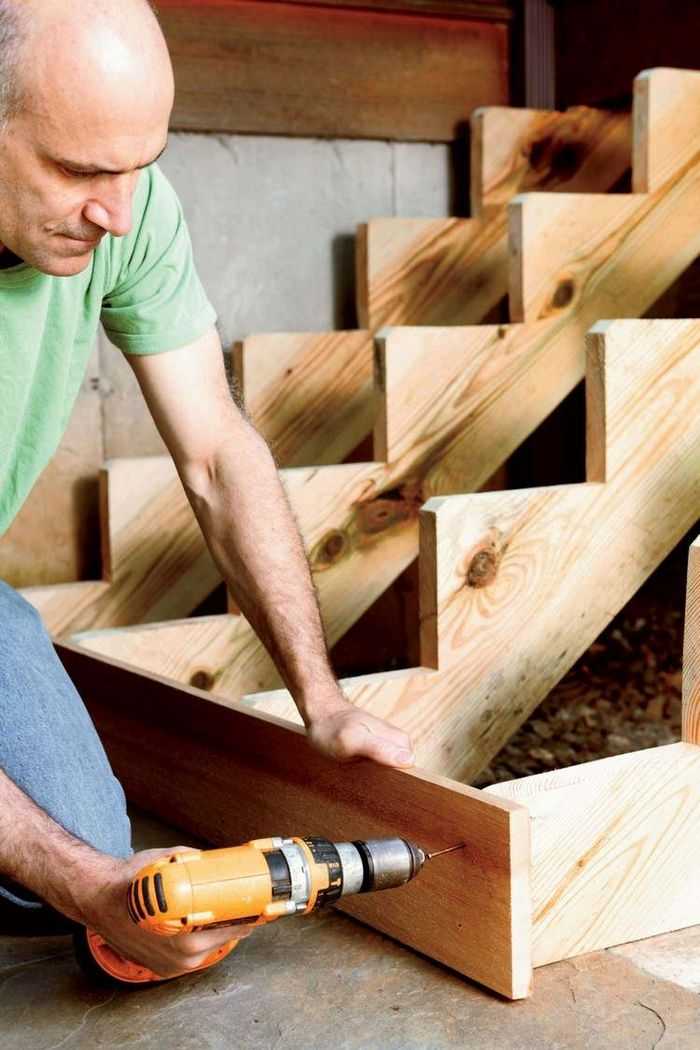 For its implementation, a pipe or profile made from metal raw materials is required. As a rule, these elements are the basis of the future stairs.
Metal is a durable material, so when choosing it, one stringer located in the middle is enough. To calculate how much material is needed, a calculation made taking into account the height and angle of the stairs, as well as the parameters of the risers and their dimensions, will help. nine0003
The most affordable way to produce a stringer is from a direct element. To do this, you need a pipe whose parameters are comparable to the specified parameters. Next - determine how the steps are located and fix the fillies. The latter are small sections of the profile or pipes with a base plate at the top. And yet, welding is considered the most reliable way to connect structural elements. If everything is done correctly, then the seams are strong and at the same time barely visible. nine0003
How to fix steps
How to fix steps? It depends on the materials of the beam.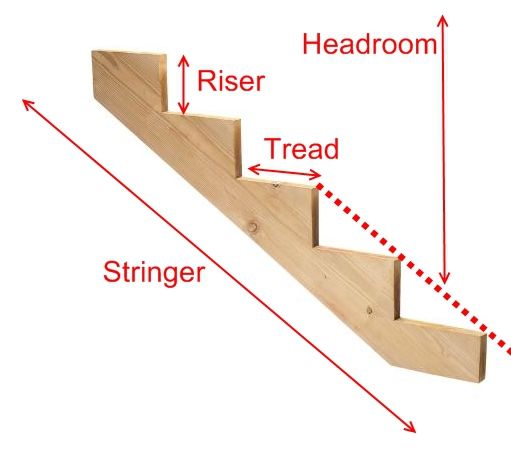 For metal elements, fillies are used. For steps, a base plate must be prepared. The best solution is a metal sheet created in the form of a step. It is attached to the supporting element, and the steps are fixed with bolts. The exception is buildings of increased complexity, with a double stringer. Here fillies can not be used.
Below we will analyze the fastening of steps:
- Bolza . It involves fastening the rear part of the step on the stringers by means of a metal support leg and a dowel.
- Wooden filly . Auxiliary fragments of the structure are attached to the beam with special fixing elements.
- Steel support . The steps stand on a flat, somewhat curved support, fastened with screws.
- Die-cut treads . The elements are fixed on the bases using dowels and glue mixture, as well as using self-tapping screws. nine0014
We recommend that you take into account several options, and then choose the most suitable one, depending on your skills and materials.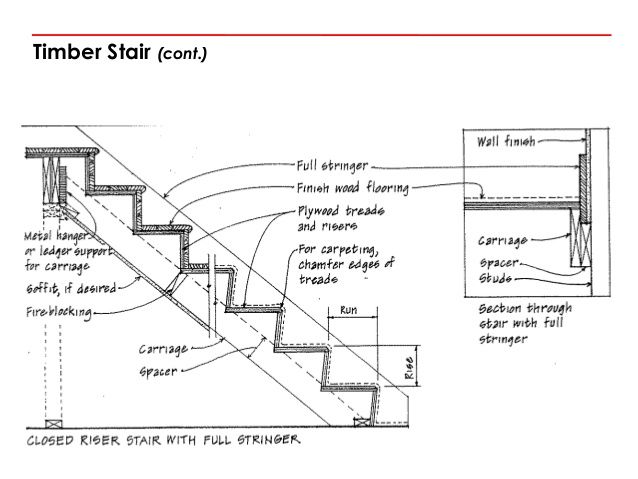
How to calculate the parameters of the stairs
Calculate the dimensions of the stairs on the stringers will help the initial data: height, length, tread depth, etc. To determine the height, measure the distance between the ceilings of adjacent floors. The length is the projection of the stairs onto the floor. The depth of the tread varies, depending on the availability of free space. As a rule, 10-25 cm is considered the best indicator. The height and length of the riser is calculated by measuring at the installation site. nine0003
Below we will analyze the situation using an example. Take a ladder with a height of 2.5 meters and a length of 4 meters. In depth, the step reaches 28 cm. Divide the total length of the stairs by the tread depth indicator and get the number of steps that need to be done. In this example, 14 pieces are obtained. Next, determine the size of the riser. In accordance with generally accepted standards, its height should be 12–22 cm.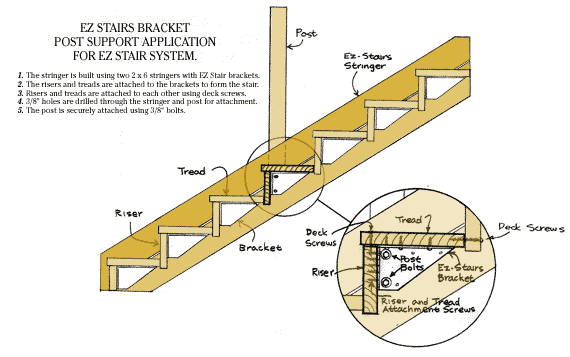 Divide the height of the stairs by the number of steps that have come out and get the height of the riser. Here it is equal to 18 cm, which fits into the requirements. nine0003
Further calculation is carried out according to the Pythagorean theorem. To do this, we present the stairs in the form of a triangle. The kosour acts as the hypotenuse. The length of the beam is determined as a result of simple calculations. The output is 4.7 meters.
How to make a wooden stringer
To complete the work you will need the following materials: two boards, which will become stringers. Their size will be 150x60 mm. You will also need a ruler-corner, a colored pencil, boards for treads 4–5 cm thick, as well as boards for risers 2 cm thick, a circular saw. To increase the service life, the structure is recommended to be made of maple, oak, beech. The quality of raw materials should be given special attention. Previously, the boards will need to be prepared, namely, cut and covered with plaster.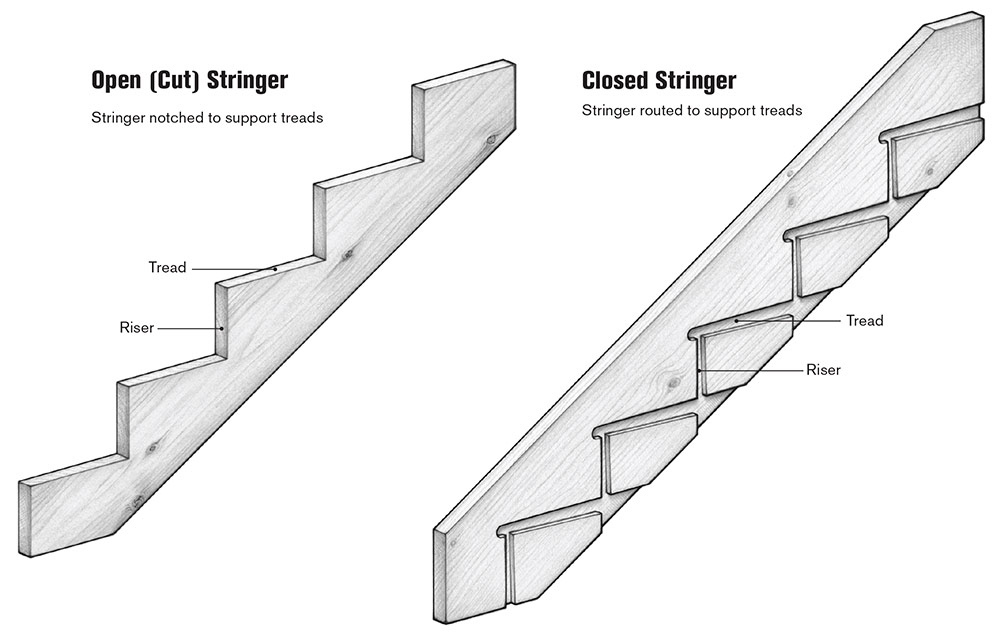 nine0003
Let's analyze two ways to get stringers. The first involves starting work with marking on a wooden board. A ruler-corner will help to perform the work qualitatively. Marks are placed on the ruler, suitable in size to the formed step. The square is applied to the board, over a length of 35-40 cm, we make marks.
In the next step, we work with a circular saw. We cut out all the excess. The edge of the beam, which will take place from below and begin to be fixed on the floor, is cut off, focusing on the places where the steps need to be installed. The other end is removed at an angle, based on the selected mounting method. At the next step, the steps are fixed, which are placed in the cutouts of the triangular stringers. nine0003
The second option involves mounting steps on filly. The latter resemble wedges, similar to a triangle. These auxiliary components are mounted to the beam, fixed with dowels. To strengthen such a fastening, they often make a cutout in the board, suitable for the ledge on the filly.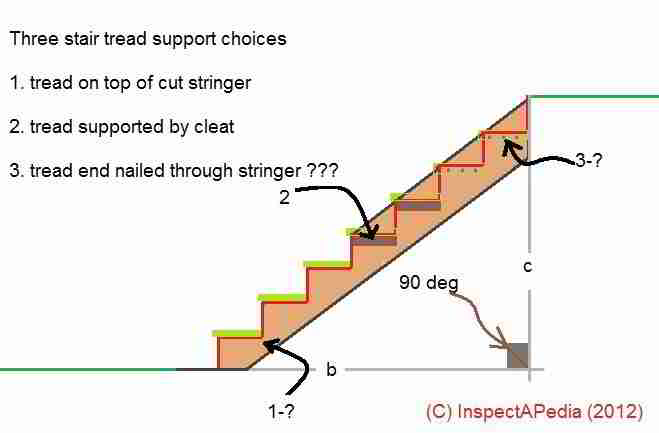 The treads are fixed in place with the help of special fixing elements.
Manufacture of metal stringers
Stairs with metal stringers are no less common than wooden stringers. There are often two types of structures: welded and tape. The former are made from a metal profile, and the latter from sheet metal. Stairs made of steel stringers are considered popular. On the prepared supporting structure, "kerchiefs" are placed, similar to fillies made of wooden raw materials. nine0003
To produce such a part, two profile sections are connected at right angles. The length of the profiles must match the parameters of the steps. The work can be done independently, having knowledge and imagining the finished staircase.
If you want, you can make a metal kosour for stairs without specialists, or you can buy ready-made stairs from the Doors to the House company. We offer several options, we work individually. Departure of the measurer in Moscow within the Moscow Ring Road - free of charge.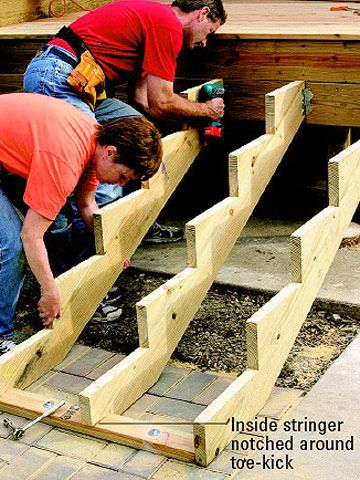
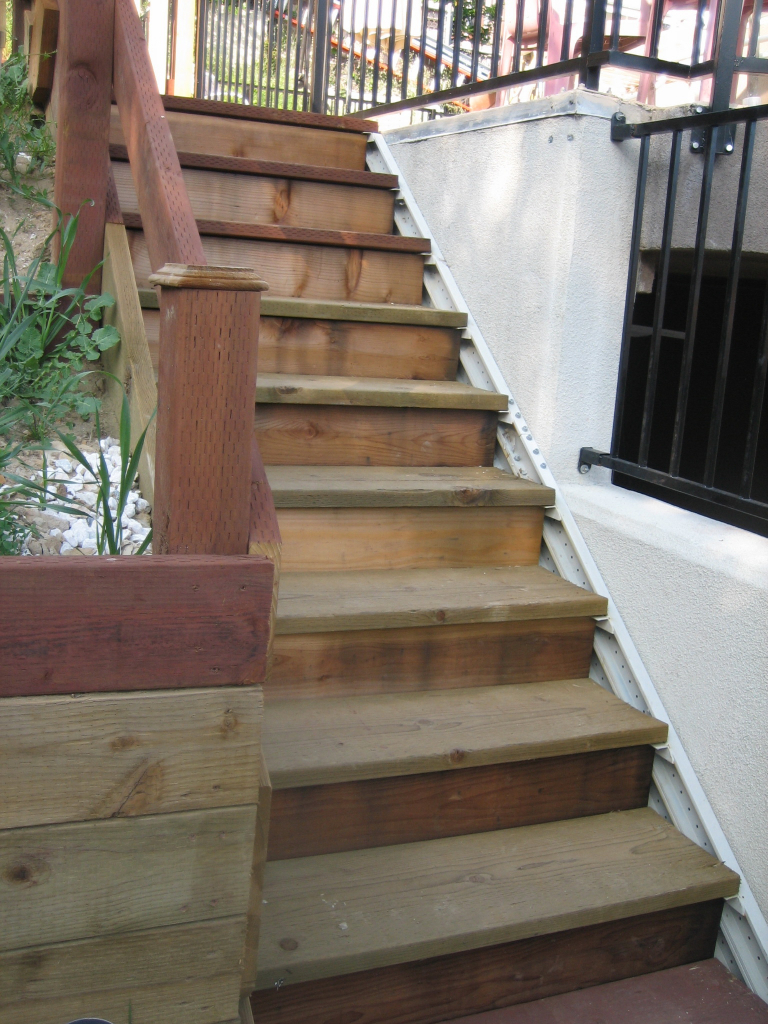
 I worked on a lot of houses where standard-width stairs were fitted with treads made from 2× stock, supported by three stringers: one on each side and one in the middle. (Though I noticed that longer stair runs got a little springy sometimes.) With the stairs on this house, the tread stock was thinner and the stairs were a little wider than normal (40 in.). So we built the stairs using four stringers. The extra one made these stairs really solid.